1
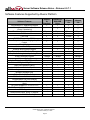
Allworx®
Server Software
Release Notes
(Release 6.9.7.1)
No part of this publication may be reproduced, stored in a retrieval system, or transmitted, in any
form or by any means, electronic, mechanical, photocopy, recording, or otherwise without the prior
written permission of Allworx.
© 2009 Allworx Corp, a wholly owned subsidiary of PAETEC Holding Corp. All rights reserved. Allworx is a
registered trademark of Allworx Corp. All other names may be trademarks or registered trademarks of their
respective owners.
Server Software Release Notes – Release 6.9.7.1
Table of Contents
Introduction ...........................................................................................................................................................2
Who Should Read This Document ...................................................................................................................2
Allworx System Software Compatibility.............................................................................................................2
Important Installation Information .........................................................................................................................3
Software Features Supported by Allworx Platform ...............................................................................................5
New Features in Release 6.9.5/6/7 ......................................................................................................................6
Release 6.9.7.1 Changes .....................................................................................................................................7
Prior Defects Fixed ...........................................................................................................................................7
Known Issues .......................................................................................................................................................8
Third Party Compatibility Issues .........................................................................................................................10
300 Main Street • East Rochester, NY 14445 • Toll Free 1-866-ALLWORX • 585-421-3850 • www.allworx.com
© 2009 Allworx Corp. All Rights Reserved
Revised: February 17, 2009
Page 1
Server Software Release Notes – Release 6.9.7.1
Introduction
This document is an overview of the new features in Allworx® Server software 6.9.7.1, Allworx Phone firmware
1.9.6.1 (9224, 9212) and 1.9.5.7 (9102, 9202,9112), and Allworx Px 6/2 Expander firmware 1.9.5.4
Included in this document are:
•
Important Installation Tips
•
Descriptions of new features available on the Allworx platforms
•
Features that are not available on the Allworx platforms
•
List of fixed defects
•
List of known issues
This document does not describe how to install and use the software. Refer to the Allworx System
Administration Guide, User’s Guide, and Phone Guide for that information.
Who Should Read This Document
These release notes should be read by Allworx VARs and System Administrators.
Allworx System Software Compatibility
Server
Software
6.9.7.1
Phone
Px 6/2 Expander Office Safe
Call
TSP
Firmware1
Firmware1
Assistant2
1.9.6.1 (9212, 9224)
1.9.5.4
5.3.1
2.1.2
1.0.2/2.0.3
1.9.5.7 (9102, 9202, 9112)
1
The Firmware is included in the Server Software. After the server software update is complete, the new firmware will automatically be
downloaded to the devices, the next time they are rebooted.
2
If you are using the Allworx Call Assistant, the Call Assistant software must be upgraded on each user’s PC in order to be compatible
with the server software.
300 Main Street • East Rochester, NY 14445 • Toll Free 1-866-ALLWORX • 585-421-3850 • www.allworx.com
© 2009 Allworx Corp. All Rights Reserved
Revised: February 17, 2009
Page 2
Server Software Release Notes – Release 6.9.7.1
Important Installation Information
1. This release should not be installed while the server is in Safe Mode. Installation should be done in
Normal Mode using the Maintenance > Update screen.
2. Once the update has been activated and the server has finished rebooting, the server must be
rebooted a second time. Use the Maintenance > Restart screen and choose the Normal restart
option.
3. Downgrading to earlier releases causes problems and is not supported. It is very important that you
back up your system using OfficeSafe, prior to performing the upgrade. If a downgrade must be
done, boot the server into Safe Mode and restore the backup. If a backup is not available, boot the
server into Safe Mode, format the drive and install the older software. However when this is done,
configurations will be lost.
4. In release 6.7, the File Server (CIFS) capability of the Allworx 10x server was discontinued. When
servers running release 6.5 or earlier are upgraded to release 6.7 or higher, user files that were stored
on the File Server will no longer be available through Windows file sharing. If you are upgrading and
need to retain these user files, they can be copied to other storage using anonymous ftp to the server
LAN (e.g. ftp://192.168.2.254). The files will be found on the server in user subdirectories:
/users/<username>.
5. There are separate software distributions for each of the Allworx server models. It is very important to
install the software version that is intended for your server.
6. Phone firmware is completely common between the Allworx server products. Phones are inter-operable
between different server models.
7. Allworx phones and port expanders must be rebooted after installation of this server software version to
obtain the new firmware releases.
Note: Allworx phone and port expander firmware cannot be downgraded. Downgrading is prevented by
the system.
8. If an Allworx IP phone displays a Config / Init Error, restore factory defaults within the handset
configuration.
9. For reliable operation in site-to-site Allworx installations (multiple Allworx servers), all of the servers
must be running the same software release. If you upgrade any of the servers in a site-to-site Allworx
installation, upgrade all of the other servers, as soon as possible.
10. Installing an Allworx Px 6/2 Expander on a network with a non-Allworx DHCP server
If the Px is being installed on the same network as the Allworx server and if a device other than the
site’s Allworx server is being used as the network’s DHCP server, the Px may fail to plug and play. If
the DHCP server uses DHCP Option 66, then you must set the TFTP Server IP Address value in the
DHCP server’s database. In the DHCP server’s configuration, set the TFTP Server IP Address to the
LAN IP Address of the Allworx server. If the site’s DHCP server does not support DHCP Option 66 or if
after setting up the DHCP server the Px fails to plug and play, set the Px’s network settings manually
using the procedure below. A few Allworx Px 6/2 Expanders with the earliest version of pre-loaded
software do not properly utilize the DHCP Option 66 information.
300 Main Street • East Rochester, NY 14445 • Toll Free 1-866-ALLWORX • 585-421-3850 • www.allworx.com
© 2009 Allworx Corp. All Rights Reserved
Revised: February 17, 2009
Page 3
Server Software Release Notes – Release 6.9.7.1
In this procedure, you will set up a direct, one-to-one connection between a PC and the Px. You will
boot the Px in Configuration Mode and manually configure its Boot Server IP Address.
A. If the Px has already been powered on, disconnect power.
B. If a cable is plugged into the Network port, disconnect it.
C. Set up the PC’s network interface to obtain an IP address automatically (using DHCP).
D. Apply power to the Px.
E. Wait until the power and port LEDs light solid amber (about 45 seconds). Connect the PC’s
network port to the Px’s Network port with a standard RJ-45 category 5 Ethernet cable.
F. Verify that the PC has an IP address on the 192.168.2.xxx network by typing ipconfig /all in a
command window on the PC.
G. If the PC did not receive the address, it may be necessary to release and renew the PC’s IP
address using the ipconfig command in a command window.
H. Open a web browser on the PC and enter http://192.168.2.254 into the browser’s address field.
The Px’s Configuration screen is displayed.
I.
Navigate to the Boot Server IP Address field. Enter the IP address of the Allworx Server on which
the Px will be installed.
J. Scroll to the New Password field. If it is empty, the Px’s administrator password has not been set.
We recommend you create a site-specific password and enter it into the New Password field. Reenter the password in the Confirm Password field.
K. Click Update. The Px’s Update Result screen is displayed.
L. Click Restart and click OK on the confirmation box.
M. As soon as the Power LED begins flashing, disconnect the Ethernet cable from the Px’s Network
port.
N. When the Power LED lights solid amber, disconnect power.
O. Connect the Px to the site’s network then re-apply power.
The Px’s Power LED will flash green for up to three minutes. When it stops flashing and lights solid
green, installation of the Px on the Allworx server is complete.
300 Main Street • East Rochester, NY 14445 • Toll Free 1-866-ALLWORX • 585-421-3850 • www.allworx.com
© 2009 Allworx Corp. All Rights Reserved
Revised: February 17, 2009
Page 4
Server Software Release Notes – Release 6.9.7.1
Software Features Supported by Allworx Platform
Software Features
Call Assistant PC Application Support
Allworx Communications Center
(Group Calendaring)
Total number of users supported
FXO Ports
FXS Ports
FXO/FXS Support for G.729A
Door Relay Activation and Paging Amplifier
Control
Zoned Paging
Outbound Email Support
External Inbound Email Support
Text to Speech of Email via Phone
3-Way Conferencing hosted by Analog Phone
8-Way Conference Center
Outbound Caller-ID
Native T1 interfaces PRI, RBS, and Data
Choice of 3-Digit or 4-Digit Extensions
Multi-Site Extension Dialing
Call Queue Statistics Report
Call Recording (See Call Assistant 2.1 Quick Reference Guide)
Multiple Language Pack
Follow-Me-Anywhere Calling
Off-Site Access to Outside Lines
Programmable Call Park Handling
Voicemail Notification & Escalation Message
Alerts
TSP Driver Support (See TSP Installation Guide)
Px 6/2 Expander (See Px 6/2 Expander Installation Guide)
DNIS Support
Allworx 9224 Phone, 92/24 Tx Support
Automatic Multi-Site Routing
Allworx
6x
Standard
9
Allworx 6x
With USB
Drive
9
Allworx
10x
Allworx
24x
9
9
9
9
9
60 max
6
2
9
60 max
6
2
9
100 max
9 max
13 max
150 max
3
5
9
9
9
9
9
9
9
9
1 Bridge
9
1 Bridge
9
9
9
9
9
9
9
9
9
9
9
9
9
9
9
9
9
9
9
9
9
9
9
9
9
9
9
9
9
4 Bridges
9
9
9
9
9
9
9
9
9
9
9
9
9
9
9
9
9
9
9
9
9
9
9
9
9
9
9
9
9
9
9
9
9
9
9
9
9
300 Main Street • East Rochester, NY 14445 • Toll Free 1-866-ALLWORX • 585-421-3850 • www.allworx.com
© 2009 Allworx Corp. All Rights Reserved
Revised: February 17, 2009
Page 5
9
9
9
Server Software Release Notes – Release 6.9.7.1
New Features in Release 6.9.5/6/7
Allworx 9224 Phone, Tx 92/24 Expander Support
The Allworx server software has full support for the Allworx 9224 Phone and Tx 92/24 Expanders. Support
includes full plug-and-play installation, default key system and PBX templates, and the ability to configure up to
96 PFKs on one phone.
Phone configuration enhancements include the ability to auto-assign all of the site’s phones to BLF PFKs with
one click. In addition, there is a Reset function that can be used to clear all BLF PFKs, Line Appearance PFKs,
or all PFKs.
The Phone Replace function can be used to replace existing 9112 and 9212 phones with 9224s and viceversa.
Dialed Number Identification System (DNIS) Information Support
When incoming calls are ringing or connected, Allworx phones will display information about the line that the
caller dialed, in addition to the Caller ID information. The third line of the phone LCD will display the Line
Description for non-DID analog lines, SIP Trunks, T1 lines. For DID lines, the system can be configured to
display either the actual number dialed or an Admin-entered name that corresponds to the number that was
dialed.
For Call Assistant and TAPI-enabled applications that support Caller ID, the server can be configured to
display either Caller ID or DNIS but not both.
Analog and other third-party phones will continue to display only Caller ID information.
Redirected DNIS (RDNIS) information can be displayed or used to route incoming calls through DID blocks, if
the T1/PRI trunk provides the information. These options are available in the Digital Line setup screen.
Automatic Multi-Site Routing
In multiple-site installations, phones on one site can use outside lines that are physically attached at other
remote sites. This is accomplished by creating a Custom Service Group that lists the remote site as an outside
line service. If a call uses a dial plan rule that specifies the remote site as its service, the call is directed to the
remote site. The dial plan rules at the remote site select the line that will be used to place the call.
Caution: Remote sites should not be the only method available for external calls to be placed. Loss of Internet
connectivity between the local site and the remote site (at either end) may disable the ability to place calls
including 911 Emergency calls.
300 Main Street • East Rochester, NY 14445 • Toll Free 1-866-ALLWORX • 585-421-3850 • www.allworx.com
© 2009 Allworx Corp. All Rights Reserved
Revised: February 17, 2009
Page 6
Server Software Release Notes – Release 6.9.7.1
Release 6.9.7.1 Changes
Defect
Number
4471
6x
10x
24x
9
9
9
4476
9
9
9
Resolution
Increase the number of available BLF programmable function keys and
parking orbits to accommodate the maximum number allowed on the Allworx
9224 Phone with three Tx 92/24 Telephone Expanders.
Enable logging of Internal Event Codes in the System Events page of the
Web Administrator.
Prior Defects Fixed
Defect
Number
4256
6x
10x
24x
9
9
4083
Resolution
System lockups that infrequently occurred when performing OfficeSafe
backups no longer occur. This change resolves an incompatibility with one
version of the processor chip that was used in some 6x servers. This
incompatibility affects some units with serial numbers greater than
06x000ADD021290, all of which were manufactured after May 1, 2008
Centrex flash now works with T1/RBS
4078
9
9
9
On Px 6/2 Expander FXO ports, lines can now be seized immediately after
hanging up the previous call. No waiting is necessary.
4064
9
9
9
It is now possible to start a PIN code with ‘0’
300 Main Street • East Rochester, NY 14445 • Toll Free 1-866-ALLWORX • 585-421-3850 • www.allworx.com
© 2009 Allworx Corp. All Rights Reserved
Revised: February 17, 2009
Page 7
Server Software Release Notes – Release 6.9.7.1
Known Issues
Defect
Number
4206
6x
10x
24x
9
9
9
9
4188
Problem
Description
When a user’s Presence is set
from within the Admin tool, the
wrong Presence is used.
If a CO DID line definition is
deleted. The FXO port cannot be
used.
4185
9
9
9
The BLF PFK auto-assign button
is disabled if no Outside Lines or
only SIP trunks are defined on the
system.
4181
9
9
9
4168
9
9
9
4166
9
9
9
With RBS Loop-start signaling,
DNIS is not displayed until the
phone is answered
With Automatic Multi-Site Routing,
if a call from a remote site goes to
an extension with a Follow Me
route, the Follow Me call cannot
be placed through an outside line
on the remote site.
With Automatic Multi-Site Routing,
if a call is received from a remote
site, it cannot be transferred back
to an outside line on the remote
site.
3490
9
9
9
3128
9
9
9
The maximum number of Static
Routes that can be handled by
the server is 10.
Firewall rules that map a WAN
port to a private LAN IP address
only works if the Global Port
specified and Local Port specified
are the same.
Fix
Plan
Workaround: Set the user’s Presence
from their phone or on their My Allworx
Manager page.
Will be fixed in a future release
If deleting the DID line cannot be
avoided, call Allworx Customer Support.
Will be fixed in a future release
If only a few BLF PFKs are to be
assigned, assign them manually. If this
is not convenient, temporarily define a
fictitious analog (CO) outside line, then
configure the PFKs. After configuration
is complete, delete the outside line
definition.
Will be fixed in a future release
Will be fixed in a future release
Set up a system extension on the
remote site to dial the Follow Me call.
Route the local extension to dial the
remote site Follow Me extension.
Will be fixed in a future release
Set up a system extension on the
remote site to dial the outside phone
number. Transfer the call to the remote
system extension.
Will be fixed in a future release
Workaround: Do not add more than 10
Static Route entries.
Workaround: When a LAN service is
mapped to the Ethernet WAN interface,
configure the LAN service to run on the
desired public port number so that both
the public and private port numbers are
the same.
300 Main Street • East Rochester, NY 14445 • Toll Free 1-866-ALLWORX • 585-421-3850 • www.allworx.com
© 2009 Allworx Corp. All Rights Reserved
Revised: February 17, 2009
Page 8
Server Software Release Notes – Release 6.9.7.1
3053
9
9
9
Park/Retrieve functionality fails
when only G729a codec is used.
3014
9
9
9
Remote phones that are behind a
firewall do not always hear ‘Music
on Hold’.
Workaround: Set the phone
configuration to include the G711
codec.
Workaround: Map the Remote phone’s
RTP ports through the firewall.
300 Main Street • East Rochester, NY 14445 • Toll Free 1-866-ALLWORX • 585-421-3850 • www.allworx.com
© 2009 Allworx Corp. All Rights Reserved
Revised: February 17, 2009
Page 9
Server Software Release Notes – Release 6.9.7.1
Third Party Compatibility Issues
Remote phones and port expanders behind Linksys® NAT devices stop functioning
The Linksys BEFSR41 series NAT devices (and likely other models) have a bug where they can remap UDP
ports on 20-minute boundaries. This can cause loss of audio during a call or the inability to place or receive
calls. Multiple phones behind the same device will exhibit the problem much quicker than a single device. For
best results, phone ports (e.g. SIP, RTP range, etc) should be set independently for each phone and statically
mapped through the Linksys device. The SonicWall®, Netgear®, D-Link® and Allworx NAT devices have been
tested and do not exhibit this problem.
300 Main Street • East Rochester, NY 14445 • Toll Free 1-866-ALLWORX • 585-421-3850 • www.allworx.com
© 2009 Allworx Corp. All Rights Reserved
Revised: February 17, 2009
Page 10