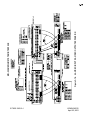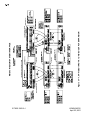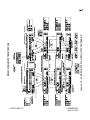
1
MSI-100
MSI-108
MSI-10C
MSI-10F
MSI-200
MSI-208
MSI-20C
MSI-20F
MEDIUM SYSTEM INTERFACE
USER'S MANUAL
Ultrak®, Inc.
4465 Coonpath Road
Carroll, OH 43112
(740) 756-9222•(800) 443-6680•FAX (740) 756-4237
517850-1960-II-J
KEMU040015
April 23, 2001
Issue 2 – July 1997 – added expansion system
Issue 2, Revision A – February 1998 – corrected drawing reference on page 3-19,
darkened drawings on pages 3-11 through 3-18
Issue 2, Revision B – April 1998 – updated manual for Firmware, 517948-1980 and
517949-1980, Rev. B. Firmware changes included COM1 input and joystick priority.
Issue 2, Revision C – September 1998 – added caution in Section 6 for lithium battery
per UL requirements.
Issue 2, Revision D – September 1998 – changed EPROM size from 256 to 512,
changed jumper setting W5
Issue 2, Revision E – April 1999 – updated to Revision D firmware (Joystick/monitor
partitioning, ASCII host interface, DIP switches S1-6 and S1-7 language selection,
changed chassis finish to light gray, added wiring connections for 220-240V power cord.
Issue 2, Revision F - February 4, 2000 - corrected procedure for running a time-initiated
MultiCall one time (enter zeros in the interval fields - do not leave blank).
Issue 2, Revision G - May 11, 2000 - added figure 2-1, updated chassis in figure 3-1-1
to show expansion connectors, revised 220V power cord from bare leads to UK plug
and European plug.
Issue 2, Revision H - June 23, 2000 - added switcher chassis designations to drawings
in Section 3.
Issue 2, Revision I – January 22, 2001 – added enabling/disabling Function Key 1 on
JPD-100P controller to enable/disable alarm MultiCalls, added stopping a MultiCall to
programming MultiCall procedures per Firmware revision E.
Issue 2, Revision J – April 23, 2001 – added host computer command for manual
control in paragraph 4.2.6 and revised the operation and programming for the disable
alarm MultiCalls function (revision F firmware).
©1998-2001 BY ULTRAK®, INC.
ALL RIGHTS RESERVED
PRINTED IN THE UNITED STATES OF AMERICA
ULTRAK®, INCORPORATED
4465 COONPATH ROAD NW
CARROLL, OHIO 43112
(740) 756-9222
(800) 443-6681 TECHNICAL SUPPORT
ALL RIGHTS RESERVED. NO PART OF THIS PUBLICATION MAY BE REPRODUCED BY ANY MEANS WITHOUT WRITTEN
PERMISSION FROM DIAMOND ELECTRONICS, INCORPORATED.
THE INFORMATION IN THIS PUBLICATION IS BELIEVED TO BE ACCURATE IN ALL RESPECTS. HOWEVER, DIAMOND
ELECTRONICS, INCORPORATED CANNOT ASSUME RESPONSIBILITY FOR ANY CONSEQUENCES RESULTING FROM
THE USE THEREOF. THE INFORMATION CONTAINED HEREIN IS SUBJECT TO CHANGE WITHOUT NOTICE. REVISIONS
OR NEW EDITIONS TO THIS PUBLICATION MAY BE ISSUED TO INCORPORATE SUCH CHANGES.
517850-1960-II-J
KEMU040015
April 23, 2001
WARNING
THIS IS A CLASS A PRODUCT. IN A DOMESTIC
ENVIRONMENT, THIS PRODUCT MAY CAUSE RADIO
INTERFERENCE IN WHICH CASE THE USER MAY BE
REQUIRED TO TAKE ADEQUATE MEASURES.
NOTE
This equipment has been tested and found to comply with
the limits for a class A digital device, pursuant to part 15 of
the FCC rules. These limits are designed to provide
reasonable protection against harmful interference when the
equipment is operated in a commercial environment. This
equipment generates, uses, and can radiate radio frequency
energy and, if not installed and used in accordance with the
instruction manual, may cause harmful interference to radio
communications. Operation of this equipment in a
residential area is likely to cause harmful interference in
which case the user will be required to correct the
interference at his own expense.
517850-1960-II-J
KEMU040015
April 23, 2001
DECLARATION OF CONFORMITY
To The European Community Council Directive 89/336/EEC
®
ISSUED BY:
Ultrak , Inc.
4465 Coonpath Road NW
Carroll, OH 43112
USA
Tel: (740) 756-9222
Fax: (740) 756-4237
MANUFACTURER:
Ultrak , Inc.
DATE OF ISSUE:
December 22, 1995
TYPE OF EQUIPMENT:
CCTV and Security Surveillance Equipment
MODEL NUMBER:
Alarm Interface Unit
AIU-100 - may be followed by any number of alphanumeric characters.
Auxiliary Interface Units
AIF-100/CO
Central Control Unit
CCU-100 - may be followed by any number of alphanumeric characters.
CCU-150 – may be followed by any number of alphanumeric characters.
CCU-200 – may be followed by any number of alphanumeric characters.
Joystick Multiplexer
MUX-100 – may be followed by any number of alphanumeric characters
MUX-05 – may be followed by any number of alphanumeric characters
Joystick Controller*
JPD-100, JPD-101, JPD-200 - may be followed by any number of alphanumeric
characters.
Small System Interface*
SSI-100 - may be followed by any number of alphanumeric characters.
Control Output Expander
COE-08, COE-16 - may be followed by any number of alphanumeric characters
Control Receiver
CRX-610/BX, CRX-801AX, CRX-801BX
®
*Standard EN60065 does not apply.
STANDARDS TO WHICH
CONFORMITY IS DECLARED:
EN50081-1 Emissions Standard, and EN50082-1 Immunity Standard.
EN55022 Radiated, Class A, EN55022 Conducted, Class A, IEC-1000-4-2, ESD, IEC1000-4-3, RF Fields, IEC-1000-4-4, Fast Transients/Burst.
EN60065 Safety Requirements for Mains Operated Electronic and Related Apparatus for
Household and Similar General Use
®
Ultrak , Inc. hereby declares that the models specified above conform to the directive and standard as specified.
Donald L. Stephenson
Compliance Engineer
517775-3
517850-1960-II-J
Rev. O
August 25, 1999
KEMU040015
April 23, 2001
IMPORTANT SAFEGUARDS
1.
Read Instructions - All the safety and operating instructions should be read before the unit is
operated.
2.
Retain Instructions - The safety and operating instructions should be retained for future reference.
3.
Heed Warnings - All warnings on the unit and in the operating instructions should be adhered to.
4.
Follow Instructions - All operating and use instructions should be followed.
5.
Cleaning - Unplug the unit from the outlet before cleaning. Do not use liquid cleaners or aerosol
cleaners. Use a damp cloth for cleaning. See cleaning procedures under Maintenance.
6.
Water and Moisture - Do not use this unit near water or in an unprotected outdoor installation, or
any area which is classified as a wet location.
7.
Accessories - Do not place this unit on an unstable stand, tripod, bracket, or mount. The unit may
fall, causing serious injury to a person and serious damage to the unit. Use only with a stand,
tripod, bracket, or mount recommended by the manufacturer, or sold with the product. Any
mounting of the unit should follow the manufacturer’s instructions, and should use a mounting
accessory recommended by the manufacturer.
8.
Power Sources - This unit should be operated only from the type of power source indicated on
the marking label.
9.
Grounding or Polarization – The power supply supplied with this unit may be equipped with a
polarized alternating-current line plug (a plug having one blade wider than the other). This plug
will fit into the power outlet only one way. This is a safety feature. If you are unable to insert the
plug fully into the outlet, try reversing the plug. If the plug should still fail to fit, contact your
electrician to replace your obsolete outlet. Do not defeat the safety purpose of the polarized plug.
Alternately, this unit may be equipped with a 3-wire grounding-type plug, a plug having a third
(grounding) pin. This plug will only fit into a grounding-type power outlet. This is a safety feature.
If you are unable to insert the plug into the outlet, contact your electrician to replace your obsolete
outlet. Do not defeat the safety purpose of the grounding-type plug.
10.
Power-Cord Protection - Power supply cords should be routed so that they are not likely to be
walked on or pinched by items placed upon or against them, paying particular attention to cords
and plugs, convenience receptacles, and the point where they exit from the appliance.
11.
Overloading - Do not overload outlets and extension cords as this can result in a risk of fire or
electric shock.
12.
Object and Liquid Entry - Never push objects of any kind into this unit through openings as they
may touch dangerous voltage points or short-out parts that could result in a fire or electric shock.
Never spill liquid of any kind on the unit.
13.
Servicing - Do not attempt to service this unit yourself as opening or removing covers may
expose you to dangerous voltage or other hazards. Refer all servicing to qualified service
personnel.
14.
Damage Requiring Service - Unplug the unit from the outlet and refer servicing to qualified
service personnel under the following conditions:
a.
b.
c.
When the power-supply cord or plug is damaged.
If liquid has been spilled, or objects have fallen into the unit.
If the unit has been exposed to rain or water.
517850-1960-II-J
KEMU040015
April 23, 2001
d.
e.
f.
If the unit does not operate normally by following the operating instructions. Adjust only
those controls that are covered by the operating instructions as an improper adjustment
of other controls may result in damage and will often require extensive work by a qualified
technician to restore the unit to its normal operation.
If the unit has been dropped or the enclosure has been damaged.
When the unit exhibits a distinct change in performance - this indicates a need for
service.
15.
Replacement Parts - When replacement parts are required, be sure the service technician has
used replacement parts specified by the manufacturer or have the same characteristics as the
original part. Unauthorized substitutions may result in fire, electric shock or other hazards.
16.
Safety Check - Upon completion of any service or repairs to this unit, ask the service technician
to perform safety checks to determine that the unit is in proper operating condition.
17.
Lightning - For added protection of this unit during a lightning storm, or when it is left unattended
and unused for long periods of time, unplug it from the wall outlet and disconnect the cable
system. This will prevent damage to the unit due to lightning and power-line surges.
517850-1960-II-J
KEMU040015
April 23, 2001
SAFETY PRECAUTIONS
CAUTION
RISK OF ELECTRIC
SHOCK, DO NOT OPEN
CAUTION: TO REDUCE THE RISK OF ELECTRICAL SHOCK, DO NOT OPEN
COVERS. NO USER SERVICEABLE PARTS INSIDE. REFER SERVICING TO
QUALIFIED SERVICE PERSONNEL.
This label may appear on the bottom of the unit due to space limitations.
The lightning flash with an arrowhead symbol, within an equilateral
triangle, is intended to alert the user to the presence of uninsulated
“dangerous voltage” within the product’s enclosure that may be of
sufficient magnitude to constitute a risk of electric shock to persons.
The exclamation point within an equilateral triangle is intended to alert
the user to presence of important operating and maintenance
(servicing) instructions in the literature accompanying the appliance.
220-240 Vac, 50 Hz power cords, input and output, must comply with
the latest versions of IEC Publication 227 or IEC Publication 245.
WARNING
TO PREVENT FIRE OR SHOCK HAZARD, DO NOT
EXPOSE THIS UNIT TO RAIN OR MOISTURE.
517850-1960-II-J
KEMU040015
April 23, 2001
HANDLING ELECTROSTATIC-SENSITIVE DEVICES
ATTENTION
OBSERVE PRECAUTIONS
FOR HANDLING
ELECTROSTATIC
SENSITIVE
DEVICES
WARNING
ELECTROSTATIC SENSITIVE DEVICE. USE PROPER
CMOS/MOSFET HANDLING PRECAUTIONS TO AVOID
ELECTROSTATIC DISCHARGE.
NOTE: Grounded wrist straps must be worn and proper
ESD safety precautions observed when handling the
electrostatic-sensitive printed circuit boards.
517850-1960-II-J
KEMU040015
April 23, 2001
DEFINITIONS OF TERMS
The following terms are used often in this manual. Please become familiar with
them before programming and operating the MSI-100 Medium System Interface
Unit.
TERM
DEFINITION
PreShot
A PreShot is a camera/lens position including pan, tilt, zoom, and
focus that is given a number and 16-character name. The number
is used by the operator to send the SmartScan unit to the PreShot
position. Up to 100 (00-99) PreShots can be programmed and
stored in each SmartScan unit. PreShots are programmed using
a KBD-100 Programming Keyboard and a JPD-100 Controller. An
operator sends a SmartScan unit to a PreShot using the JPD-100
Controller or the KBD-100 Keyboard. MultiCalls can also send
cameras to PreShots. When the SmartScan unit is viewing the
PreShot, the title of the PreShot is added to the video signal. If
the SmartScan unit is called up on a monitor, the title appears on
the top of the monitor in a 60 Hz system and on the bottom of the
monitor in a 50 Hz system.
VectorScan
A VectorScan is a video tour that is given a number and a 16character name. It is two or more PreShots (up to 64) from the
same SmartScan unit linked together with specified dwell times.
Up to ten (0-9) VectorScans can be stored in each SmartScan
unit. The number is used by the operator to start the VectorScan.
VectorScans are programmed using the KBD-100 Keyboard and
the JPD-100 Controller. They can be started/stopped by an
operator using the JPD-100 Controller or KBD-100 Keyboard.
VectorScans can also be started in a MultiCall. When a
VectorScan is running in a SmartScan unit, the title of the PreShot
currently being viewed is added to the SmartScan video signal.
517850-1960-II-J
KEMU040015
April 23, 2001
TERM
DEFINITION
Sector ID
Sector IDs are used for labeling specific areas that the SmartScan
unit views. Up to 16 Sector IDs can be programmed and stored in
each SmartScan unit. Sector IDs are programmed using a KBD100 Programming Keyboard and the JPD-100 Controller.
Whenever the dome is under manual control and viewing a
programmed sector, the sector title is added to the SmartScan
video signal. The camera ID display must be enabled for the
Sector ID title to be added to the video signal. If the SmartScan
unit is being viewed on a monitor, the label appears across the top
of the monitor in a 60 Hz system and on the bottom of the monitor
in a 50 Hz system.
MultiCall
A MultiCall can be programmed to perform one or more system
functions at the same time or one function at a time with
programmable dwell times between each function. The system
functions that can be included in a MultiCall are PreShots,
VectorScans, video switching, turning on/off VCRs or other
auxiliary devices, or starting a MultiCall (including itself).
MultiCalls are used to define the system's "automatic" response to
events such as date and time, alarms and JPD-100 Controller
function keys. MultiCalls can be started/stopped "manually" by an
operator at a JPD-100 Controller or KBD-100 Keyboard. Up to
251 (00-250) MultiCalls can be programmed and stored with a
number and a 16-character title in the MSI-100. The number is
used by an operator to start a MultiCall or assign the MultiCall to
alarm inputs, function keys, etc.
517850-1960-II-J
KEMU040015
April 23, 2001
i
TABLE OF CONTENTS
Page
SECTION 1. INTRODUCTION ....................................................................................1-1
1.1
DESCRIPTION...............................................................................................1-1
1.2
FEATURES ....................................................................................................1-1
1.2.1
Optional Features....................................................................................1-3
1.3
SPECIFICATIONS .........................................................................................1-3
1.4
EXPANSION ..................................................................................................1-5
SECTION 2. SETUP....................................................................................................2-1
2.1
DIP SWITCH SETTINGS ...............................................................................2-1
2.1.1
MSI-100 Master and Slave Chassis ........................................................2-1
2.1.2
MSI-100 Slave Chassis Contact Outputs ................................................2-1
2.1.3
MSI-100 Password Default .....................................................................2-2
2.1.4
CATS Expansion Switcher Chassis ........................................................2-2
2.1.5
Joystick Priority .......................................................................................2-3
2.1.6
COM1 Baud Rate....................................................................................2-4
2.1.7
DIP Switch Setting for Language Selection.............................................2-4
2.2
MSI-100 JUMPER SETTINGS .......................................................................2-4
2.3
CATS SWITCHER EXPANSION JUMPER SETTINGS .................................2-5
2.4
CATS EXPANSION CHASSIS RCO-4 RELAY CONTACT OPTION .............2-6
SECTION 3. INSTALLATION .....................................................................................3-1
3.1
MOUNTING....................................................................................................3-1
3.2
POWER SOURCES .......................................................................................3-3
3.3
EQUIPMENT CONNECTIONS ......................................................................3-4
3.3.1
Front Panel Controller ...........................................................................3-18
3.3.2
Master MSI Rear Panel Controller Terminal Block................................3-19
3.3.3
Master or Slave MSI Rear Panel Contact Out Terminal Block ..............3-21
3.3.4
Master MSI Rear Panel Dome Outputs Terminal Block ........................3-21
517850-1960-II-J
KEMU040015
April 23, 2001
ii
3.3.5
Master or Slave MSI Alarm Inputs Terminal Blocks ..............................3-22
3.3.6
Master and Slave Video Connections ...................................................3-23
3.3.7
Master or Slave MSI Video Inputs 1 to 16 and Video Inputs 17 to 32
Header Connectors for Coaxial Ribbon Cable ......................................3-24
3.3.8
COM1 RS-232 Port – Host Computer Input ..........................................3-25
SECTION 4. OPERATION ..........................................................................................4-1
4.1
CONTROLS AND INDICATORS....................................................................4-1
4.2
OPERATING PROCEDURE ..........................................................................4-1
4.2.1
JPD-100/P Joystick Controllers...............................................................4-2
4.2.2
Video Switching.......................................................................................4-8
4.2.3
Alarm Processing ....................................................................................4-9
4.2.4
Auxiliary Control ....................................................................................4-14
4.2.5
Time Initiated MultiCall..........................................................................4-15
4.2.6
RS-232 Port - Host Computer Input ......................................................4-16
SECTION 5. PROGRAMMING....................................................................................5-1
5.1
PROGRAMMING REQUIREMENTS..............................................................5-1
5.2
PROGRAMMING NOTES ..............................................................................5-2
5.3
MSI-100 PROGRAMMING MODE .................................................................5-3
5.4
PROGRAMMING SMARTSCAN UNITS ........................................................5-5
5.4.1
5.5
“Quick” PreShots.....................................................................................5-6
PROGRAMMING THE MSI-100 MEDIUM SYSTEM INTERFACE UNIT .......5-8
5.5.1
Defining MultiCalls ................................................................................5-10
5.5.2
Programming MultiCalls ........................................................................5-11
5.5.2.1 P - PreShot ........................................................................................5-18
5.5.2.2 V - VectorScan ..................................................................................5-22
5.5.2.3 M - MultiCall.......................................................................................5-25
5.5.2.4 C - Video Switcher Call (Call up a camera to a monitor) ...................5-29
5.5.2.5 A - Auxiliary Output Control (such as VCRs) .....................................5-39
5.5.3
Editing an Existing MultiCall ..................................................................5-44
517850-1960-II-J
KEMU040015
April 23, 2001
iii
5.5.4
Deleting a MultiCall ...............................................................................5-48
5.5.5
List Programmed MultiCalls ..................................................................5-51
5.5.6
Run MultiCall.........................................................................................5-52
5.5.7
Stop MultiCalls ......................................................................................5-54
5.5.7.1 JPD-100/P Function Key ...................................................................5-55
5.5.8
Assigning MultiCalls to Alarm Inputs .....................................................5-56
5.5.9
Assigning MultiCalls to JPD-100/P Function Keys ................................5-59
5.5.10
Assigning MultiCalls to Date and Time..................................................5-62
5.5.11
Programming Function Key 1 (JPD-100P Controller) To Disable or
Enable Alarm MultiCalls ........................................................................5-66
5.6
CAMERA CONTROLLER PARTITIONING ..................................................5-68
5.7
CAMERA MONITOR PARTITIONING..........................................................5-71
5.8
JOYSTICK MONITOR PARTITIONING .......................................................5-75
5.9
SETTING THE DATE AND TIME IN THE MSI-100......................................5-79
5.10
PROGRAMMING ALARM MONITORS AND ALARM VCRS .......................5-84
5.11
PROGRAMMING THE ALARM HORN DELAY............................................5-89
5.12
CHANGING PASSWORD ............................................................................5-91
5.13
LOG OUT - END PROGRAMMING..............................................................5-92
5.14
SAMPLE SYSTEM PROGRAMMING ..........................................................5-93
SECTION 6. MAINTENANCE .....................................................................................6-1
6.1
MAINTENANCE PROCEDURES ...................................................................6-1
6.2
EQUIPMENT RETURN ..................................................................................6-2
SECTION 7. TIME DATE CHARACTER GENERATOR OPTION ..............................7-1
7.1
DESCRIPTION...............................................................................................7-1
7.2
PROGRAMMING THE TIME, DATE, AND CHARACTER GENERATOR IN
THE MSI-100 .................................................................................................7-3
7.2.1
Monitor Setup..........................................................................................7-5
7.2.2
Camera Setup .........................................................................................7-9
7.2.3
System Setup........................................................................................7-16
517850-1960-II-J
KEMU040015
April 23, 2001
iv
SECTION 8. LOOPING SWITCHER PANEL OPTION ...............................................8-1
8.1
DESCRIPTION...............................................................................................8-1
APPENDIX A. SYSTEM CONFIGURATION.............................................................. A-1
A.1
GENERAL ..................................................................................................... A-1
A.1.1
Camera Numbers................................................................................... A-1
A.1.2
Monitor Numbers.................................................................................... A-3
A.1.3
Auxiliary On/Off Control ......................................................................... A-3
A.2
PROGRAMMING RECOMMENDATIONS .................................................... A-8
A.3
PROGRAMMING WORKSHEETS ................................................................ A-8
APPENDIX B. QUICK REFERENCE GUIDE............................................................. B-1
INDEX .................................................................................................................. Index-1
LIST OF FIGURES
FIGURE 2-1. MSI-100 CONTROL BOARD, PART NUMBER 517822-1040 ...............2-7
FIGURE 3-1-1. MSI-100 MASTER CHASSIS REAR PANEL EQUIPMENT
CONNECTIONS .................................................................................3-9
FIGURE 3-1-2. 8-VIDEO OUTPUT EXPANSION......................................................3-11
FIGURE 3-1-3. 12-VIDEO OUTPUT EXPANSION....................................................3-12
FIGURE 3-1-4. 16-VIDEO OUTPUT EXPANSION....................................................3-13
FIGURE 3-1-5. 64-VIDEO INPUT EXPANSION........................................................3-14
FIGURE 3-1-6. 64-VIDEO INPUT X 8-VIDEO OUTPUT EXPANSION .....................3-15
FIGURE 3-1-7. 64-VIDEO INPUT X 12-VIDEO OUTPUT EXPANSION ...................3-16
FIGURE 3-1-8. 64-VIDEO INPUT X 16-VIDEO OUTPUT EXPANSION ...................3-17
FIGURE 3-2. MASTER MSI FRONT PANEL EQUIPMENT CONNECTIONS ...........3-18
FIGURE 8-1. LOOPING INPUT PANEL ......................................................................8-1
517850-1960-II-J
KEMU040015
April 23, 2001
v
LIST OF TABLES
TABLE 2-1. CATS EXPANSION DIP SWITCH S1 SETTINGS ...................................2-3
TABLE 3-1. CHASSIS MATRIX...................................................................................3-2
TABLE 3-2. MSI-100 CABLING REQUIREMENTS .....................................................3-5
TABLE 3-3. CATS EXPANSION CABLING REQUIREMENTS ...................................3-7
TABLE 5-1. KBD-100 PROGRAMMING NOTES ........................................................5-2
TABLE 5-2. PROGRAMMING KEYBOARD COMMANDS ......................................5-101
TABLE A-1. FASTSCAN/SMARTSCAN UNIT ADDRESSING ................................... A-2
517850-1960-II-J
KEMU040015
April 23, 2001
vi
This page left blank intentionally.
517850-1960-II-J
KEMU040015
April 23, 2001
1-1
SECTION 1. INTRODUCTION
1.1
DESCRIPTION
The MSI-100 Medium System Interface (MSI) provides advanced system
features for a medium-sized FastScan/SmartScan system. The MSI is available
as a rack mountable or desk top unit. The MSI requires a JPD-100/P Joystick
Controller and a KBD-100 Keyboard for programming and controlling the unit
itself and SmartScan units.
1.2
Model
Part Number
Description
MSI-100/DT
517850-1040
MSI-100/DT/X
517850-3040
MSI-100/R
517850-2040
MSI-100/R/X
517850-4040
Medium System Interface Unit, Desk
Top, 120V
Medium System Interface Unit, Desk
Top, 220V
Medium System Interface Unit, Rack
Mount, 120V
Medium System Interface Unit, Rack
Mount, 220V
FEATURES
The MSI has the following standard hardware features.
1)
32-Input by 4-Output Video Switcher
2)
Four RS-485 control outputs for FastScan/SmartScan assemblies or CRX
Series Control Receivers (up to 32 domes per output; maximum distance
to the last dome in a chain is 4000 feet)
3)
Two inputs for four JPD-100/P Joystick Controllers (one front panel and
three rear panel)
4)
32 normally open alarm contacts
5)
Audible alarm horn (programmable from 0-8 seconds)
517850-1960-II-J
KEMU040015
April 23, 2001
1-2
6)
Two dry contact outputs for auxiliary control (normally open or closed,
jumper selectable)
7)
RS-232 port – host computer input (ASCII characters)
The MSI has the following standard firmware features.
1)
Password Protection for Programming the MSI-100 Unit and SmartScan
Units
2)
Camera/Joystick Control Partitioning
3)
Camera/Monitor Partitioning
4)
Monitor/Joystick Control Partitioning
5)
Joystick Priority
6)
Program and Store 251 (0-250) MultiCalls
a)
Manual MultiCall Control from JPD-100/P Controller or KBD-100
Keyboard
b)
Automatic MultiCall Control by Date and Time and Alarm Input
7)
Alarm Processing (32 alarm inputs)
8)
Disable/Enable alarm MultiCalls
9)
Program SmartScan units
10)
Video Switching (32 input by 4 output)
11)
Host Computer Input (ASCII characters) – video switcher call, send a
SmartScan to a PreShot, start a VectorScan stored in a SmartScan,
Activate an Alarm, Reset an Alarm, run a MultiCall stored in the MSI-100
12)
Expansion
a)
64 video inputs
b)
16 video outputs
c)
64 alarm inputs
d)
8 contact outputs
517850-1960-II-J
KEMU040015
April 23, 2001
1-3
1.2.1
Optional Features
1)
Programmable Time/Date Character Generator (part number 5179501720)
2)
1.3
Looping Video Switcher Connector Panel (part number 517942-1030)
SPECIFICATIONS
Power Requirements:
Selectable
110-120V, 50/60 Hz, 0.16 Amp
220-240V, 50/60 Hz, 0.08 Amp
Communication:
RS-485 Outputs, 9600 Baud
RS-485 Control Inputs, 19.2K Baud
RS-232, 9600 Baud or 19.2K Baud, DIP switch
selectable
Contact Output Rating:
24Vdc @ 1 Amp
120Vac @ .5 Amp (resistive)
Installation:
19” Rack Mountable in accordance with EIA
Standard RS-310 or Desk Top
Connectors:
Front Panel
One RJ-11 6-pin telephone type connector for JPD100/P Joystick Controller
Rear Panel
32 BNC Connectors for Video Input
Four BNC Connectors for Video Output
One BNC Connector for Programming Monitor
One 5-Position Plug In Terminal Block for Joystick
Controller
517850-1960-II-J
KEMU040015
April 23, 2001
1-4
Connectors (Cont):
Rear Panel
One 4-Position Plug In Terminal Block for Contact
Outputs
One 12-Position Plug In Terminal Block for Dome
Outputs (RS-485)
Two 24-Position Plug-In Terminal Blocks for Alarm
Inputs
One IEC-20 Power Input Connector
Four BNC Connectors for Expansion Video Input
Two 34-Pin Header Connectors for Coaxial Ribbon
Cable (terminating plugs installed on standard unit
or used for looping switcher option)
One 9-Pin Sub D Connector (RS-232)
Operating Temperature:
Storage Temperature:
Humidity Limits:
Dimensions:
32°F to 122°F (0° to 50°C)
-40°F to 158°F (-40° to +70°C)
0 to 95% Relative Humidity, Non-Condensing
Rack Mount
5.22” H x 19” W x 10.82“ D
132.6mm H x 482.6mm W x 276.8mm D
Desk Top
5.11” H x 17.09” W x 11.32” D
129.8mm H x 434.1mm W x 287.5mm D
Weight:
Finish:
9.3 Lb (4.2 Kg)
Front & Rear Panel – Light Gray
Chassis - Alodine 1200
517850-1960-II-J
KEMU040015
April 23, 2001
1-5
1.4
EXPANSION
The MSI-100 can be expanded. The following table defines the expansion
options.
Equipment
One MSI-100 Chassis and one
CATS Expansion Chassis
One MSI-100 Chassis and two
CATS Expansion Chassis
One MSI-100 Chassis and three
CATS Expansion Chassis
Two MSI-100 Chassis
Two MSI-100 Chassis and two
CATS Expansion Chassis
Two MSI-100 Chassis and four
CATS Expansion Chassis
Two MSI-100 Chassis and six
CATS Expansion Chassis
*
Expansion
•
•
•
•
•
•
•
•
•
•
•
•
•
•
•
•
•
•
•
•
•
8 Video Outputs (4 standard)
6* Contact Outputs (2 standard)
12 Video Outputs (4 standard)
6* Contact Outputs
16 Video Outputs
6* Contact Outputs
64 Video Inputs (32 standard)
64 Alarm Inputs (32 standard)
4 Contact Outputs (2 standard)
64 Video Inputs (32 standard)
8 Video Outputs (4 standard)
64 Alarm Inputs (32 standard)
4 or 8* Contact Outputs (2 standard)
64 Video Inputs (32 standard)
12 Video Outputs (4 standard)
64 Alarm Inputs (32 standard)
4 or 8* Contact Outputs (2 standard)
64 Video Inputs (32 standard)
16 Video Outputs (4 standard)
64 Alarm Inputs (32 standard)
4 or 8* Contact Outputs (2 standard)
-Requires RCO-4 option installed in CATS Expansion Chassis
517850-1960-II-J
KEMU040015
April 23, 2001
1-6
The expansion MSI-100 systems are terminated video switchers. A looping
system is available by purchasing the required looping video switcher connector
panels, part number 517942-1030. One panel is required for each MSI-100
chassis in the system. See Section 9 of this manual for installation.
517850-1960-II-J
KEMU040015
April 23, 2001
2-1
SECTION 2. SETUP
2.1
2.1.1
DIP SWITCH SETTINGS
MSI-100 Master and Slave Chassis
If there is one MSI chassis in the system, it must be setup as a master unit.
If there are two MSI chassis in the system, one has to be setup as a master
(chassis SW1A) unit and the other as a slave unit (chassis SW1B). The
FastScan and SmartScan units and the JPD-100/P Joystick Controllers are
connected to the master unit. The slave unit provides additional video inputs,
alarm inputs, and contact outputs only. The switches must be in the correct
position on power up of the unit.
2.1.2
S1-1
OFF
MASTER (SW1A)
S1-1
ON
SLAVE (SW1B)
MSI-100 Slave Chassis Contact Outputs
If there are two MSI-100 Chassis, the slave MSI chassis has two contact
outputs. These contact outputs can be defined as contacts 3 and 4 or 7 and
8. If there are no CATS Expansion chassis in the system, the contacts are
set to 3 and 4. Also, if there are two MSI chassis and the CATS Expansion
chassis does not have the RCO-4 option, the contacts are set to 3 and 4. If
there is a CATS Expansion chassis with the RCO-4 option installed, the
contacts are set to 7 and 8. The contact outputs in the RCO-4 CATS option
are 3 through 6.
517850-1960-II-J
KEMU040015
April 23, 2001
2-2
Slave MSI Chassis
2.1.3
SW1-2
ON
Contacts 3 and 4
SW1-2
OFF
Contacts 7 and 8
MSI-100 Password Default
If the programming password is lost, DIP Switch S1, position 8, can be reset
to recover the factory default password, MSI. Perform the following
procedure to reset the default password.
2.1.4
1.
Remove power from the MSI-100 unit.
2.
Remove the chassis cover.
3.
Place DIP Switch S1-8 in the ON position.
4.
Plug the MSI-100 unit into the power source.
5.
The password is set to MSI.
6.
Remove power from the MSI-100.
7.
Set DIP Switch S1-8 to off.
8.
Plug the MSI-100 unit into the power source.
CATS Expansion Switcher Chassis
DIP Switch S1 is set at the factory for each CATS Expansion Switcher
Chassis. DIP Switch S1 defines the video input assignments (camera
group), the video output assignments (monitor group), and to configure the
unit as a master unit or a slave unit.
517850-1960-II-J
KEMU040015
April 23, 2001
2-3
Table 2-1. CATS EXPANSION DIP SWITCH S1 SETTINGS
1
0
1
0
1
2
0
0
1
1
0 = OFF
3
4
0
0
0
0
0
0
0
0
5
6
7
0
1
0
0
0
0
8
0
1
2.1.5
1 = ON
MONITOR GROUP
1-4
5-8
9-12
13-16
CAMERA
GROUP
1-32
33-64
MASTER/
SLAVE
Master
Slave
Joystick Priority
Joystick priority can be enabled or disabled using DIP switch S1-4. If joystick
priority is disabled, all joysticks have the same priority. If joystick priority is
enabled, JPD-100/P Controller addressed #1 has the highest priority,
followed by JPD-100/P Controllers addressed #2 through #4. JPD-100/P
Controller #4 has the lowest priority. Refer to Section 4 of this manual for
operation of priority.
517850-1960-II-J
Joystick Priority
S1-4
Enabled
On
Disabled
Off
KEMU040015
April 23, 2001
2-4
2.1.6
COM1 Baud Rate
The baud rate of COM1 is selectable between 9600 and 19.2K baud using
DIP Switch S1-3.
2.1.7
COM 1 Baud Rate
S1-3
9600
On
19.2K
Off
DIP Switch Setting for Language Selection
DIP Switch S1, positions 6 and 7, are used to select the language for the
programming menus and prompts.
2.2
S1-6
S1-7
English
OFF
OFF
French
ON
OFF
German
OFF
ON
Spanish
ON
ON
MSI-100 JUMPER SETTINGS
The following table defines the jumpers on the printed circuit board.
Jumper
W1
W2
517850-1960-II-J
Function
Contact Output 1 (Master)
Contact Output 3 or 7 (Slave)
Contact Output 2 (Master)
Contact Output 4 or 8 (Slave)
Setting
NC (Normally Closed)
NO (Normally Open)
NC (Normally Closed)
NO (Normally Open)
KEMU040015
April 23, 2001
2-5
2.3
Jumper
W3
W4
W5
W6
W6
W7
Function
Setting
Not Used
Not Used
EPROM Size Select
Enable Battery Backup
Disable Battery Backup
Character Generator Bypass 1
W8
Character Generator Bypass 2
W9
Character Generator Bypass 3
W10
Character Generator Bypass 4
512
In
Out
In, Remove to enable
character generator
In, Remove to enable
character generator
In, Remove to enable
character generator
In, Remove to enable
character generator
CATS SWITCHER EXPANSION JUMPER SETTINGS
Jumpers W20, W21, and W22 are set at the factory in each chassis in a CATS
Video Switcher system. These jumpers are used to terminate the control data
communications.
Switcher Chassis
W20
W21
W22
Slave
IN
IN
IN
Master
IN
IN
*
*Jumper W22 is IN on the last master chassis in a system only.
Example:
64-Input x 12-Output Expanded MSI System
Chassis SW1A (MSI Master) = Video Inputs 1-32 and Video Outputs 1-4
Chassis SW1B (MSI Slave) = Video Inputs 33-64 and Video Outputs 1-4
Chassis SW2A (CATS Master) = Video Inputs 1-32 and Video Outputs 5-8
517850-1960-II-J
KEMU040015
April 23, 2001
2-6
Chassis SW2B (CATS Slave) = Video Inputs 33-64 and Video Outputs 5-8
Chassis SW3A (CATS Master) = Video Inputs 1-32 and Video Outputs 9-12
Chassis SW3B (CATS Slave) = Video Inputs 33-64 and Video Outputs 9-12
2.4
Switcher Chassis
W20
W21
W22
SW1A (MASTER)
IN
IN
OUT
SW1B (SLAVE)
IN
IN
IN
SW2A (MASTER)
IN
IN
OUT
SW2B (SLAVE)
IN
IN
IN
SW3A (MASTER)
IN
IN
IN
SW3B (SLAVE)
IN
IN
IN
CATS EXPANSION CHASSIS RCO-4 RELAY CONTACT OPTION
The RCO-4 option can be installed in the first CATS Expansion Master Chassis
(SW2A) to provide four additional contact outputs (3 – 6). The contact outputs
can be configured as normally open (NO) or normally closed (NC). The factory
settings for the contacts are normally open.
The jumpers to configure the contact outputs are on the relay board, part number
517368-1030.
517850-1960-II-J
Jumper
Contact Output
W1
3
W2
4
W3
5
W4
6
KEMU040015
April 23, 2001
517850-1960-II-J
2-7
KEMU040015
April 23 2001
Figure 2-1. MSI-100 CONTROL BOARD, PART NUMBER 517822-1040
2-8
This page left blank intentionally.
517850-1960-II-J
KEMU040015
April 23, 2001
3-1
SECTION 3. INSTALLATION
3.1
MOUNTING
The MSI unit is manufactured for standard 19-inch rack mounting or in a desk-top
chassis. Each MSI-100 rack mount chassis requires 5.25” of rack space. For
expanded MSI-100 systems having CATS Expansion Switcher rack mount
chassis, each CATS chassis requires 3.06” of rack space. The rack mounting
holes are in accordance with EIA RS-310 standard. The mounting holes are for
#10 mounting screws. The optional looping panel (for rack mount units only)
requires 3.5” of rack space plus an additional 1.75” space for cable and
connectors between chassis.
NOTE
All internal jumpers and DIP switch settings on each
chassis of the MSI-100 system should be made prior to
mounting each chassis. Refer to Section 2 of this
manual.
The jumpers and DIP switches are set at the factory for the standard chassis
documented in this manual. Each chassis is labeled so its setup can be
identified. The monitor output chassis are labeled with consecutive numbers (14). Chassis 1 is monitor group 1 through 4, chassis 2 is monitor group 5-8, etc.
The camera input chassis are labeled with consecutive letters (A-B). Chassis A
is camera inputs 1 to 32 and chassis B is camera inputs 33 to 64.
The MSI-100 chassis labeled SW1A is setup for camera group 1 to 32 and has
monitor outputs 1-4. MSI-100 chassis labeled SW1B is setup for camera group
33 to 64 and monitor outputs 1-4. Setting the MSI chassis up as master or slave
517850-1960-II-J
KEMU040015
April 23, 2001
3-2
defines the camera inputs. The MSI chassis are always monitor output 1-4. The
CATS Expansion chassis labeled SW2A is setup for camera group 1 to 32 and
monitor group 5-8. CATS Expansion chassis labeled SW2B is setup for camera
group 33 to 64 and monitor group 5-8.
Table 3-1. CHASSIS MATRIX
SW
Monitor Outputs
1
1-4
2
5-8
3
9-12
4
13-16
Camera Inputs
A (Master)
B (Slave)
1-32
33-64
SW1A
SW1B
SW2A
SW2B
SW3A
SW3B
SW4A
SW4B
To expand video inputs, add chassis across (maximum of two MSI-100 chassis –
64 inputs).
To expand monitor outputs, add chassis down.
To expand both video inputs and monitor outputs add chassis across and down.
Ex:
1.
MSI-108: A 32-input x 8-output MSI system consists of chassis
SW1A and SW2A. SW1A and SW2A are both master chassis.
2.
MSI-200: A 64-input x 4-output MSI system consists of chassis
SW1A and SW1B. SW1A is the master chassis.
3.
MSI-208: A 64-input x 8-output switcher consists of chassis SW1A,
SW1B, SW2A, and SW2B. SW1A and SW2A are both master
chassis.
517850-1960-II-J
KEMU040015
April 23, 2001
3-3
3.2
POWER SOURCES
Each MSI chassis requires a 110-120Vac or 220-240Vac, 50/60 Hz primary
power source. In systems with CATS Expansion Switcher chassis, each CATS
chassis requires a 110-120Vac or 220-240Vac, 50/60 Hz primary power source.
The required power source is determined by the position of the selector switch. If
the unit is switched to 110V, a .160 Amp fuse is required. If the unit is switched
to 220V, a .08 Amp fuse is required.
CAUTION
Make Sure Each Chassis Is Connected To
The Correct Power Source Defined By The
Voltage Selector Switch Or Equipment
Damage May Occur.
A 110-120V chassis has a power cord with a 3 prong NEMA 5-15P plug. This
plug only fits into a grounding-type power outlet. If the plug does not fit in your
electrical outlet, contact your electrician to replace your outlet. DO NOT
DEFEAT THE SAFETY PURPOSE OF THE GROUNDING-TYPE PLUG.
A 220-240V chassis has a 6-foot power cord with a United Kingdom plug or a
European plug. If the plug does not fit in your electrical outlet, contact your
electrician. The unit should be connected to a grounded power source.
517850-1960-II-J
KEMU040015
April 23, 2001
3-4
3.3
EQUIPMENT CONNECTIONS
On standard MSI systems, all equipment connections are made on the rear panel
of the MSI with the exception of the front panel controller port. The standard
equipment connections are shown for the rear panel in Figure 3-1-1 for the front
panel in Figure 3-2. Table 3-2 defines the cabling requirements for all MSI
equipment connections.
In expanded systems with one MSI chassis (MSI-100 series) and one or more
CATS Expansion Switcher chassis, there are additional video outputs (up to 12)
and 4 additional contact outputs (requires RCO-4 option installed in CATS
expansion chassis). See Figure 3-1-2 and 3-1-3 for equipment connections
between chassis. Table 3-3 defines the cabling requirements for the rear panel
CATS expansion chassis. The CATS front panel connectors are not functional.
In expanded systems with two MSI chassis (MSI-200 series), there is a master
MSI chassis (SW1A) and a slave MSI chassis (SW1B). All equipment
connections to the master chassis (SW1A) are the same as a standard MSI
system. The slave MSI chassis (SW1B) provides an additional 32 video inputs,
32 alarm inputs, and 2 contact outputs. The dome output ports and the joystick
ports are not functional. The front panel joystick port is not functional. The
cabling between chassis is shown in Figures 3-1-4, 3-1-5, 3-1-6, and 3-1-7.
517850-1960-II-J
KEMU040015
April 23, 2001
3-5
Table 3-2. MSI-100 AND MSI-200 SERIES CABLING REQUIREMENTS
Maximum
Connector/
Distance from
Terminal Block
Required Cable
Part Number
MSI
Front Panel
Controller (Master Coiled Cable supplied 849518-0306
10 Feet
Chassis Only)
with Controller
Rear Panel
CNTL (Joysticks) 2-Twisted Pair
849518-0327
4000 Feet
Terminal Block
Shielded RS-422
(Master Chassis
Cable (Carol CO515)
Only)
CNT OUT
26 to 18 AWG Wire
(Contact Outs)
Terminal Block
Dome Outputs
1-Twisted Pair
849518-0334
4000 Feet
Terminal Block
Shielded RS-485
Cable
Alarm Inputs (1 to 26 to 18 AWG Wire
32 or 33 to 64)
BNCs (1-32 or
RG-59U (Belden
849518-0054
1500 Feet
33-64)
8263) Cable
Input Expansion
(4) RG-59U (Belden
849518-0335
BNCs
8263) with BNC
Connectors required
between chassis in
systems with more
than 32 video inputs.
(4) Cable assemblies
are required for each
set of 4 video outputs.
517850-1960-II-J
KEMU040015
April 23, 2001
3-6
Table 3-2. MSI-100 AND MSI-200 SERIES CABLING REQUIREMENTS
Maximum
Connector/
Distance from
Terminal Block
Required Cable
Part Number
MSI
Coaxial Ribbon
Standard Units have
517446-1020
Cable Connectors termination plugs
.......................
...............................
Looping Switcher
849518-0338
Panel Option requires
(2) ribbon coaxial
cables
.......................
...............................
CATS Expansion
849518-0338
Chassis requires (2)
ribbon coaxial cables
between each
chassis.
(2) Termination plugs 517446-1020
required in last unit
unless looping
switcher panel option
is installed.
Input Expansion
6-Pin Connector
COM1
517850-1960-II-J
Does Not Apply to
Standard Units
...............................
Input Expansion
Control Cable
Required in Systems
with two MSI.
...............................
Input Expansion
Control Cable
Required in Systems
with two MSI and two
or more CATS
Expansion Chassis.
RS-232
.......................
.......................
849518-0334
50 Feet
KEMU040015
April 23, 2001
3-7
Table 3-3. CATS EXPANSION CABLING REQUIREMENTS
Connector
Required Cable
Part Number
Input Expansion COMM Input Expansion
Control Cable
Required in Systems
with two MSI and two
or more CATS
Expansion Chassis.
Input Expansion Video
4 Coax Cables
849518-0335
(Master and Slave
between Master Input
Chassis)
Expansion Video
BNCs and Slave
Video Output BNCs.
COMM (Master Chassis Video Switching
Only)
Control Data between
master MSI chassis
and one or more
CATS expansion
chassis.
AUX (Master Chassis
Only) – Requires RCO-4
Option to be functional
517850-1960-II-J
24 AWG Stranded 2Wire
KEMU040015
April 23, 2001
3-8
Table 3-3. CATS EXPANSION CABLING REQUIREMENTS
Connector
Required Cable
Part Number
Coaxial Ribbon Cable
(2) Ribbon coaxial
849518-0338
Connectors
cables between each
MSI chassis and
CATS Expansion
Chassis.
...............................
(2) Ribbon coaxial
cables required
between each set of 4
video output CATS
expansion chassis
...............................
(2) Termination plugs
required in last unit
unless looping
switcher panel option
is installed.
517850-1960-II-J
......................
849518-0338
......................
517446-1020
KEMU040015
April 23, 2001
3-9/3-10
Figure 3-1-1. MSI-100 MASTER CHASSIS REAR PANEL EQUIPMENT CONNECTIONS
517850-1960-II-J
KEMU040015
April 23, 2001
3-11
MSI-108 MEDIUM SYSTEM INTERFACE
Figure 3-1-2. 8-VIDEO OUTPUT EXPANSION
517850-1960-II-J
KEMU040015
April 23, 2001
3-12
MSI-10C MEDIUM SYSTEM INTERFACE
Figure 3-1-3. 12-VIDEO OUTPUT EXPANSION
517850-1960-II-J
KEMU040015
April 23, 2001
3-13
MSI-10F MEDIUM SYSTEM INTERFACE
Figure 3-1-4. 16-VIDEO OUTPUT EXPANSION
517850-1960-II-J
KEMU040015
April 23, 2001
517850-1960-II-J
KEMU040015
April 23, 2001
Figure 3-1-5. 64-VIDEO INPUT EXPANSION
MSI-200 MEDIUM SYSTEM INTERFACE
517850-1960-II-J
KEMU040015
April 23, 2001
Figure 3-1-6. 64-VIDEO INPUT X 8-VIDEO OUTPUT EXPANSION
MSI-208 MEDIUM SYSTEM INTERFACE
517850-1960-II-J
KEMU040015
April 23, 2001
Figure 3-1-7. 64-VIDEO INPUT X 12-VIDEO OUTPUT EXPANSION
MSI-20C MEDIUM SYSTEM INTERFACE
Figure 3-1-8. 64-VIDEO INPUT X 16-VIDEO OUTPUT EXPANSION
MSI-20F MEDIUM SYSTEM INTERFACE
517850-1960-II-J
517850-1960-II-J
517850-1960-II-J
KEMU040015
KEMU040015
KEMU040015
April
23, 2001
April
April 23,
23, 2001
2001
3-18
Figure 3-2. MASTER MSI FRONT PANEL EQUIPMENT CONNECTIONS
3.3.1
Front Panel Controller
The front panel controller connector is for connection to a JPD-100/P
Joystick Controller. A coiled cable is supplied with the joystick controller.
Plug one end of the coiled cable into the controller and the other end into the
MSI. Note: In systems with more than one MSI, the front panel controller
connector on the slave unit (chassis SW1B) is not functional. The JPD100/P Controller must be connected to the master MSI front panel controller
connector.
517850-1960-II-J
KEMU040015
April 23, 2001
3-19
Each joystick must have a unique address. See Figure 3-1-1 for setting the
address. A KBD-100 Keyboard is required in the system to program the MSI
unit and SmartScan units. The KBD-100 keyboard can be plugged into any
of the controllers (front or rear panel); but only one keyboard can be used
in a system.
3.3.2
Master MSI Rear Panel Controller Terminal Block
The rear panel controller terminal block is for connection to up to three JPD100/P Joystick Controllers. A DIA-01 or DIA-01/X Control Interface Adapter
is required for each JPD-100/P Controller. The Control Interface Adapter has
a +5Vdc power supply for powering the controller and the adapter provides
wiring connections between the controller(s) and the MSI. Note: In systems
with more than one MSI chassis, the controller terminal block on the slave
chassis (SW1B) is not functional.
1.
Plug one end of the coiled cable (supplied with the joystick controller)
into the joystick controller and the other end into the phone jack on the
Control Interface Adapter.
2.
The line that connects the MSI-100 to between one and three JPD100/P Controllers may be up to 4000 feet long. It must not have any
branches. The MSI-100 can be located at any point along the line. The
last DIA-01 in the line should be terminated with 120 ohms.
Using
2-twisted-pair-shielded RS-422 cable (part number 849518-0327),
connect one of the control interface adapters to the MSI-100 CNTL
terminal block.
517850-1960-II-J
KEMU040015
April 23, 2001
3-20
DIA-01 or DIA-01/X
Control Interface Adapter
Blue, RXWhite, RX+
Black, TX+
Red, TX-
to
to
to
to
to
Controller (CNTL)
Terminal Block
TXTX+
RX+
RX-
Using 2-twisted-pair-shielded RS-422 cable (part number 849518-0327)
and daisy-chain wiring, connect the remaining DIA-01’s.
DIA-01 or DIA-01/X
Blue, RXWhite, RX+
Black, TX+
Red, TX-
to
to
to
to
to
DIA-01 or DIA-01/X
Blue, RXWhite, RX+
Black, TX+
Red, TX-
NOTE
The receive communications on the last DIA-01 Control
Interface Adapter in the chain must be terminated. If the
MSI-100 is in the middle of the chain, the DIA-01s at both
ends must be terminated. Terminate the receive
communications by connecting a 120 ohm resistor
across terminals, blue (RX-) and white (RX+).
517850-1960-II-J
KEMU040015
April 23, 2001
3-21
3.3.3
Master or Slave MSI Rear Panel Contact Out Terminal Block
There are two contact outputs for connection to auxiliary devices such as a
VCR. The contact outputs can be configured as normally open or normally
closed. Note: In systems with two MSI chassis, the contact outputs on each
chassis are functional. The contact outputs on the master MSI chassis
(SW1A) are contact output 1 and 2. The contact outputs on the slave MSI
chassis (SW1B) are DIP switch selectable between contact output 3 and 4 or
7 and 8. See Section 2 for setup.
The contact output connector is a 4-position plug-in terminal block. Use 26
AWG to 14 AWG wire to connect the auxiliary device to the CNT OUT
terminal block. Terminals 1 (1) and 2 (1) on the terminal block are for contact
output 1 (master) and contact output 3 or 7 (slave). Terminals 3 (2) and 4 (2)
are for contact output 2 (master) and contact output 4 or 8 (slave).
3.3.4
Master MSI Rear Panel Dome Outputs Terminal Block
The DOME OUTPUTS terminal block has 12-positions that provide four RS485 control output ports. A maximum of thirty-two domes can be daisychained together and connected to each RS-485 port. However, the standard
MSI only supports 32 video inputs. A system with two MSI chassis supports
64 video inputs. Note: The DOME OUTPUTS terminal block on the slave
MSI chassis (SW1B) is not functional. The maximum distance from each
RS-485 port to the farthest dome in the chain is 4000 feet.
517850-1960-II-J
KEMU040015
April 23, 2001
3-22
CAUTION
If the FastScan/SmartScan units have RS422 receivers or a combination of RS-422
and RS-485 receivers, only 10 domes can
be daisy-chained together.
DOME OUTPUT
TERMINAL BLOCK
TX+
TXSH
TO
to
to
to
FASTSCAN/SMARTSCAN
J2/P2 CONNECTOR OR
TERMINAL STRIP
Pin 4, Data +
Pin 3, Data Cable Shield (Do Not Connect
Cable Shield to Ground at Dome)
Daisy-Chain Wiring Domes
Dome J2/P2 Connector or
to
DomeJ2/P2 Connector or
Terminal Block
Terminal Block
Pin 4, Data +
to
Pin 4, Data +
Pin 3, Data to
Pin 3, Data The last dome in the chain must be terminated and all intermediate domes
unterminated. Refer to the FastScan/SmartScan Installation Manual for
terminating the dome’s receive communications.
3.3.5
Master or Slave MSI Alarm Inputs Terminal Blocks
Each Alarm Input Terminal Block has 24-positions for 16 alarm inputs. Each
normally open alarm device is connected to two positions (# and COM). On
standard units, the # (number) position defines the alarm number. In
systems with two MSI chassis, the master MSI chassis (SW1A) has alarm
inputs 1 to 32 (the # position defines the alarm number) and the slave MSI
chassis (SW1B) has alarm inputs 33 to 64 (the # position plus 32 defines the
alarm number). The COM position on each terminal block is shared by two
517850-1960-II-J
KEMU040015
April 23, 2001
3-23
alarm devices. Use 26 AWG to 18 AWG (maximum) wire from the normally
open alarm devices to the contact input terminal block.
3.3.6
Master and Slave Video Connections
The standard MSI has 32 video input BNC connectors and four video output
BNC connectors. The MSI has one BNC output connector for the
programming monitor. The programming monitor must be connected to the
master MSI chassis in systems with two MSI units.
For systems with two MSI chassis, there are 32 additional video inputs. The
four video output BNC connectors on the slave chassis are connected to the
four video expansion BNC connectors on the master chassis. Four coax
cable assemblies, part number 849518-0335, are provided for this
connection.
All video connections should be made using a good grade, 75-ohm, RG-59U
video cable (i.e. Belden 8263, Ultrak part number 849518-0054 or
equivalent) with BNC screw-type connectors (Ultrak part number 8423740391). RG-59U video cable is for cable runs less than 1500’.
517850-1960-II-J
KEMU040015
April 23, 2001
3-24
There are factory preassembled RG-59/U cable assemblies with BNC
connectors on both ends. Use the following part numbers for ordering them.
Description
RG-59/U Coax Cable with BNC Connectors
Part Number
Length
500528-3022
Specify
849518-0335
18”
849518-0348
24”
Installed Both Ends
RG-59/U Coax Cable with BNC Connectors
Installed Both Ends
RG-59/U Coax Cable with BNC Connectors
Installed Both Ends
All video runs must be terminated in 75 ohms at the last unit in the run.
Intermediate units must be set to HiZ. If the video run is not terminated, or if
it is double terminated, the resulting picture may be of poor quality. If the run
is not terminated, a brighter picture than desired with possible ghosting may
be displayed. If the run is double terminated, a darker picture than desired
may be displayed.
3.3.7
Master or Slave MSI Video Inputs 1 to 16 and Video Inputs 17 to 32
Header Connectors for Coaxial Ribbon Cable
On standard units, a 75-ohm termination connector plug, part number
517446-1020, is installed in each of these connectors to terminate the video.
Ribbon coaxial cables are used, if the looping switcher option is installed, to
connect the MSI-100 to the header connectors on the looping switcher panel.
See Section 9 of this manual for the looping switcher panel option.
517850-1960-II-J
KEMU040015
April 23, 2001
3-25
On expanded systems, the 75-ohm termination connector plug, part number
517446-1020, is installed in the connectors on the last CATS Expansion
chassis to terminate the video. Ribbon coaxial cables are used between all
intermediate chassis. Ribbon coaxial cables are also used if the looping
switcher option is installed to connect the last chassis in the system to the
header connectors on the looping switcher panel. One looping switcher
panel is required for each MSI chassis in the system. See Section 9 of this
manual for the looping switcher panel option.
3.3.8
COM1 RS-232 Port – Host Computer Input
The RS-232 port is used to interface to a host computer for alarm inputs,
MultiCall control and SmartScan control. The RS-232 port is a 9-pin D type
male connector.
MSI-100
COM1
PIN 2 RX
PIN 3 TX
PIN 5 GND
517850-1960-II-J
KEMU040015
April 23, 2001
3-26
517850-1960-II-J
KEMU040015
April 23, 2001
4-1
SECTION 4. OPERATION
4.1
CONTROLS AND INDICATORS
There are no controls on the MSI-100 chassis. The only indicator on the unit is
the power LED indicator. When the unit is plugged into an AC outlet and power
is supplied to the unit, the power LED lights.
In expanded MSI-100 systems with CATS Expansion Chassis, the only indicator
on the CATS Expansion Chassis is the power LED indicator. When the unit is
plugged into an AC outlet and power is supplied to the unit, the power LED lights.
4.2
OPERATING PROCEDURE
The operation of the unit depends on the type of interconnecting equipment
being used and the programming of the MSI-100 unit by the user. The MSI must
be used with JPD-100/P Joystick Controllers to control the MSI and all other
components connected to the MSI in the system.
In expanded MSI systems with more than one chassis, all the chassis are to be
powered up at the same time or always power up the master MSI chassis last.
The user can program and store up to 251 (0-250) MultiCalls in the MSI. The
MultiCalls can be programmed to carry out one or more of the functions (up to
31) of a FastScan/SmartScan system simultaneously or with dwell times between
each function. The functions of the system that can be programmed in a
MultiCall are PreShots, VectorScans, camera/monitor calls, auxiliary device
control (on/off), start MultiCalls including itself, or stop MultiCalls.
Camera/monitor calls include calling up the video from an alarm input to an alarm
517850-1960-II-J
KEMU040015
April 23, 2001
4-2
monitor and/or calling up the video from an alarm input to an alarm VCR. Alarms
can be automatically acknowledged in a MultiCall.
The MultiCalls can be assigned to alarm inputs, JPD-100/P function (quick) keys,
or activated by date/time. MultiCalls can be manually activated from a JPD100/P Controller or KBD-100 Keyboard. The first twenty-one MultiCalls
(regardless of source) are displayed on the programming monitor as long as they
are running.
4.2.1
JPD-100/P Joystick Controllers
The MSI is controlled manually by an operator using a JPD-100/P Joystick
Controller or KBD-100 Keyboard. JPD-100/P Joystick Controllers have
priority over all other control features (MultiCalls and RS-232 input) except
alarms. Alarm responses are the MSI’s first priority.
The MSI supports control input multiplexing for four JPD-100/P Joystick
Controllers. Each JPD-100/P Controller must have a unique address.
Control Input Multiplexing means having more than one joystick controller in
the system controlling the FastScan/SmartScan assemblies, CRX Series
Control Receivers, Contact Outputs, and the MSI-100 Video Switcher at the
same time. Only one operator can control a FastScan/SmartScan (scan) or
receiver at a time.
517850-1960-II-J
KEMU040015
April 23, 2001
4-3
Joystick Priority
If joystick priority is disabled, when two joysticks request control of the same
receiver, the operator to request control last gets control. If joystick priority is
enabled, the MSI-100 uses the joystick’s priority level to determine which
controller gets control of a device. Refer to Section 2 of this manual for
enabling and disabling joystick priority. When joystick priority is enabled, the
JPD-100/P Controller addressed #1 is given the highest priority, followed by
JPD-100/P Controllers addressed #2, #3, and #4.
If a JPD-100/P is controlling a camera and another JPD-100/P of higher
priority attempts to take control, the JPD-100/P of higher priority takes control
immediately.
If a JPD-100/P has control of a camera and does not physically control the
camera for 10 minutes, it loses control, and any JPD-100/P can control the
camera.
If a JPD-100/P is controlling a camera and a JPD-100/P of lower priority
attempts to take control, the JPD-100/P of higher priority keeps control. The
joystick with lower priority requesting control receives a “Request Denied” on
the joystick LCD display.
If a JPD-100/P has control of a monitor and a JPD-100/P of lower priority or a
MultiCall attempts to switch another camera to that monitor, the switching
command is ignored. The only exception to this, is if an alarm occurs that
uses either a camera or monitor that a JPD-100/P controls. Alarms have
priority over all system functions.
517850-1960-II-J
KEMU040015
April 23, 2001
4-4
Another JPD-100/P controller can call-up a (higher priority) JPD-100/P’s
control camera to another monitor, but cannot control the camera.
Partitioning
Partitioning enables or disables access between devices such as controllers
and cameras, controllers and monitors, or cameras and monitors. Controllerto-camera partitioning defines which cameras can be controlled by each
JPD-100/P Controller. Controller-to-monitor partitioning defines which
monitors can be controlled by each JPD-100/P Controller. Camera-toMonitor partitioning defines which cameras can be switched to which
monitors. See Section 5 of this manual for programming.
The MSI processes control data and video switching as follows:
a.
Camera Control Request
If an operator selects a control camera on a JPD-100/P Controller, the
MSI checks its partitioning tables (camera-to-monitor and camera-tocontroller) and the joystick’s priority level to determine if the camera can
be switched to the controller’s control monitor. The MSI either permits or
denies the request. If the MSI grants permission, the JPD-100/P
Controller has manual control of the requested camera and the
requested camera is switched to the control monitor. If a JPD-100/P
Controller is denied access to a camera, the MSI sends the message
“Request Denied” to the controller. The message appears on the
second line of the controller’s LCD display.
517850-1960-II-J
KEMU040015
April 23, 2001
4-5
If another JPD-100/P Controller in the system has the same control
monitor selected as the JPD-100/P that changed its control camera, the
MSI updates the other JPD-100/P’s display to show the camera change
on the monitor. If the other JPD-100/P is not permitted to control the
camera, the operator is able to view the video from the camera, but is
not able to control the camera displayed on the controller.
b.
Monitor Control Request
If an operator selects a new control monitor on a JPD-100/P Controller,
the MSI checks its partitioning tables (camera-to-monitor and monitor-tocontroller) and the joystick’s priority level to determine if the monitor can
accessed by the controller. The MSI either permits or denies the
request. If the MSI grants permission, the monitor is displayed as the
control monitor on the first line of the JPD-100/P Controller and the
existing control camera is switched to the control monitor. If a JPD100/P Controller is denied access to a monitor or the existing control
camera cannot be switched to the selected monitor, the MSI sends the
message “Request Denied” to the second line of the controller’s LCD
display.
c.
SmartScan Functions (PreShot, VectorScan)
If a PreShot or VectorScan is requested at a JPD-100/P Controller, the
MSI checks its camera partitioning table to see if the controller is allowed
access to the camera and checks the joystick’s priority level. If
permission is granted, the MSI sends the data out the dome output
ports. If permission is denied, the MSI sends the message “Request
517850-1960-II-J
KEMU040015
April 23, 2001
4-6
Denied” to the controller. The message appears on the second line of
the controller’s LCD display.
d.
MultiCalls/Function Keys
The eight function keys on the JPD-100/P Controllers are programmed
by programming a MultiCall in the MSI and assigning the MultiCall to the
function key. If a MultiCall is started from the JPD-100/P Controllers,
either by using the MCALL key or the Function (quick) keys, the MSI
sends the data programmed in the MultiCall out the appropriate port to
process the functions. The first 21 MultiCalls started (regardless of
source) are displayed on the programming monitor.
Function key 1 can be programmed so when it is depressed it disables
or enables all MultiCalls started in response to an alarm. MultiCalls
started from any other source are not affected and continue to run.
Function key 1 toggles between enabled and disabled. Refer to section
5, paragraph 5.5.11 for programming the MSI for this feature. If function
key 1 is programmed to enable or disable alarm MultiCalls, it does not
run the MultiCall assigned to it (if applicable). When alarm MultiCalls are
disabled, the message, “MultiCalls Disabled” is displayed on the top of
the programming monitor.
Programming Monitor
MultiCalls Disabled
MSI Programming
Hit Enter to Start
Alarms:
MultiCalls:
517850-1960-II-J
KEMU040015
April 23, 2001
4-7
If the character generator option is installed in the MSI, the message,
“MD” is outputted on video outputs (1-4) in the upper left hand corner. If
a MultiCall is assigned to an alarm, the most recent active alarm
MultiCall title is displayed on the bottom line of the monitors. If a
MultiCall is not assigned to an alarm, the most recent active alarm
number is displayed on the bottom line of the monitors.
Video Outputs 1-4
MD
Alarm MultiCall Title
or Alarm Number
The MultiCalls can be enabled by pressing function key 1 on any
controller; it does not have to be the controller that disabled alarm. The
monitor displays return-to-normal when alarm MultiCalls are enabled.
e.
Alarms
Alarms are enabled, disabled, and acknowledged at the JPD-100/P
Controller. If an operator disables an alarm, the MSI does not respond
to a change of state for that alarm. If an operator acknowledges an
alarm, the MSI removes the alarm number from the programming
monitor and JPD-100/P Controllers’ LCD display (if only alarm or oldest
alarm in system), and releases the alarm monitor and VCR from alarm
status (if applicable). The alarm input that was acknowledged must
return to its normal state before the MSI responds to it as an alarm
again.
517850-1960-II-J
KEMU040015
April 23, 2001
4-8
4.2.2
Video Switching
The video switcher can be controlled manually by calling up cameras on
monitors from the JPD-100/P Joystick Controllers. Video Switching also
occurs automatically when video switcher calls are programmed in
MultiCalls.
Whenever an operator calls a camera to a monitor, the MSI checks its
partitioning tables (camera-to-monitor, camera-to-controller, monitor-tocontroller) and the joystick’s priority level. If either the partitioning or the
priority check fails, the MSI ignores the switching command and sends a
Request Denied to the controller. If both checks pass, the MSI performs the
video switching command. Refer to the JPD-100/P Controller User’s Manual
for the procedures to call cameras to monitors. If another controller(s)
connected to the MSI has the same control monitor selected, and an
operator switches the camera on the monitor, the MSI updates the other
controller’s display(s) to show the new camera on the monitor. If the other
controller is restricted from controlling the camera, the operator will not be
able to control the camera even though the display shows it as the control
camera.
Automatic video switching occurs when a MultiCall that is programmed to call
a camera to a monitor, an alarm monitor, or an alarm VCR is activated. If a
MultiCall is programmed to call a camera to a monitor and the camera is
restricted from the monitor, the MSI performs the command. If a MultiCall is
programmed to call a camera to a monitor or VCR and the monitor or VCR is
in alarm status, the MSI ignores the command. The MSI updates the
517850-1960-II-J
KEMU040015
April 23, 2001
4-9
controllers’ LCD displays when a camera (other than the one currently
displayed) is switched to the controller’s control monitor. The controller may
not be able to control the camera displayed if the MSI has been programmed
to deny that controller access to that camera.
4.2.3
Alarm Processing
The MSI monitors the normally open alarm contacts and responds to a
change-in-state of these contacts. Alarm processing is the MSI’s first
priority. The response to each alarm is programmed in a MultiCall, stored in
the MSI, and assigned to the alarm. When an alarm occurs, the MSI
processes the MultiCall assigned to the alarm and activates the alarm horn
for the duration (0-8 seconds) programmed. Refer to Section 5 for
programming the alarm horn duration. The first twenty-one alarms are
displayed on the programming monitor until they have been acknowledged.
The oldest alarm in the system is displayed on the second line of the JPD100/P Controller LCD display until it is acknowledged. The first twenty-one
MultiCalls started (regardless of source) are displayed on the programming
monitor as long as they are running.
Disable Alarm MultiCalls
The MSI-100 unit can be programmed to disable and enable MultiCalls
started in response to alarms. This feature does not affect MultiCalls started
from any other source; they will continue to run. When the “disable alarm
MultiCalls” feature is enabled in the MSI-100, function key 1 on any JPD100P controller connected to the MSI, can be pressed to enable and disable
the alarm MultiCalls. Function Key 1 acts as a toggle switch for enabling and
disabling alarm MultiCalls. Function key 1 cannot be used to start a MultiCall
when this feature is enabled. If the MSI has the character generator option
517850-1960-II-J
KEMU040015
April 23, 2001
4-10
installed, the message, “MD” is outputted on video outputs 1-4 when the
alarm MultiCalls are disabled. The message, “MultiCalls Disabled” is also
displayed on the programming monitor when the alarm MultiCalls are
disabled. Note: If the MSI has more than four video outputs, the message is
only outputted on video outputs 1-4. Either the MultiCall title or the alarm
number for the most recent active alarm is also displayed on video outputs 14. If the most recent active alarm is assigned to a MultiCall, the MultiCall title
is displayed on the bottom line of video outputs 1-4. If a MultiCall is not
assigned to the most recent active alarm, the alarm number is displayed on
the bottom line of video outputs 1-4. Any JPD-100P in the system can reenable MultiCalls; it does not have to be the controller that performed the
disable action. There are two modes of operation selectable for how the
MSI handles the MultiCall for the most recent active alarm when MultiCalls
have been disabled then are re-enabled.
If the Enable/Run mode is
selected, the MultiCall for the most recent active alarm runs when MultiCalls
are enabled (after being disabled). If the Enable/No mode is selected, the
MultiCall is not run for the most recent active alarm when MultiCalls are
enabled (after being disabled).
Refer to paragraph 5.5.11 of this manual for setting JPD-100P Function key
1 for disabling and enabling alarm MultiCalls and for selecting the operation
mode when alarm MultiCalls are re-enabled.
517850-1960-II-J
KEMU040015
April 23, 2001
4-11
NOTE
If alarm MultiCalls are disabled, and an alarm occurs that
is automatically acknowledged in its assigned MultiCall,
the alarm will have to be manually reset through the JPD100P Controller in order for the MSI to respond to it when
alarm MultiCalls are enabled. The only exception is if the
alarm is the most recent active alarm and the Enable/Run
mode of operation is selected so the MultiCall runs when
the alarm MultiCalls are enabled.
Alarm Monitors and Alarm VCRs
Video outputs can be defined as alarm monitors and alarm VCRs. See
Section 5 of this manual for programming. The video outputs for the
monitors and VCRs must be in sequential order. The VCRs must be
connected to the contact outputs on the MSI for automatic operation by the
MSI. Contact output 1 on the MSI is assigned to the first defined alarm VCR.
If a second alarm VCR is defined, contact output 2 on the MSI is assigned to
the second alarm VCR. In expanded MSI systems, there can be up to eight
contact outputs depending on the chassis and options installed.
Alarm Monitors
The first alarm called to an alarm monitor is switched to the first defined
alarm monitor, the next alarm called to an alarm monitor is switched to the
next defined alarm monitor. If there are more alarms than alarm monitors,
the MSI sequences the responses to the excess alarms in 2-second frames
on the last defined alarm monitor. When an alarm is acknowledged, the MSI
shifts the alarms so the alarms are displayed on the alarm monitors in order
of occurrence from lowest video output to highest video output. The oldest
alarm sequencing on the last monitor is shifted from the last monitor to the
available monitor. If there is only one defined alarm monitor, all alarms
517850-1960-II-J
KEMU040015
April 23, 2001
4-12
called to alarm monitors, sequence on that monitor. While a monitor is being
used to display alarms, an operator or a MultiCall cannot switch another
camera to the monitor.
The MSI-100 only performs calling cameras to alarm monitors when the
MultiCall is started by an alarm. If a MultiCall is programmed to call video to
an alarm monitor and the MultiCall is started by an operator, a JPD-100/P
function key, or by time and date, the MSI-100 does not perform the call to
the alarm monitor.
For example:
Video outputs 2, 3, and 4 are programmed as alarm monitors. Alarm 3 is
switched to the first alarm monitor (video output 2) and Alarm 5 is switched to
the second alarm monitor (video output 3). Alarms 2, 4, and 6 are
sequencing on the last alarm monitor (video output 4). Alarm 3 is
acknowledged. The MSI moves alarm 5 to the first alarm monitor (video
output 2), moves alarm 2 to the second alarm monitor (video output 3), and
continues sequencing alarms 4 and 6 on the last alarm monitor (video output
4).
Alarm VCR
The first alarm that is called to an alarm VCR is switched to the first alarm
VCR and contact output 1 is energized. The next alarm called to an alarm
VCR is switched to the second alarm VCR and contact output 2 is energized.
If there are more alarms than alarm VCRs, the MSI places the excess alarms
in a queue. When an alarm is acknowledged and a VCR is freed, the MSI
displays the oldest alarm in the queue on the available VCR. The MSI does
517850-1960-II-J
KEMU040015
April 23, 2001
4-13
not shift the video on alarm VCRs. When an alarm VCR becomes available
and there are no alarms in the queue, the MSI sends out data to return the
contact to the state it was in before the alarm occurred. While a VCR is
being used to display alarms, an operator or a MultiCall cannot switch
another camera to the VCR or turn the VCR off.
The MSI-100 only performs calling cameras to alarm VCRs if the MultiCall is
started by an alarm. If a MultiCall is programmed to call video to an alarm
VCR and the MultiCall is started by an operator, a JPD-100/P function key, or
by time and date, the MSI-100 does not perform the call to the alarm monitor.
For example:
Alarm 3 is switched to video output 3 and Alarm 5 is switched to video output
4. Alarm 3 is acknowledged. The MSI leaves alarm 5 on video output 4 and
switches the oldest alarm in the queue to video output 3.
Acknowledging Alarms
The oldest alarm number appears on the second line of the JPD-100/P
Controllers. The first twenty-one alarms appear on the programming
monitor. Alarms can be acknowledged automatically in the MultiCall
assigned to the alarm. The oldest alarm or all alarms can be acknowledged
at the JPD-100/P Controller. If an alarm is acknowledged and it is displayed
on the programming monitor, the MSI removes the alarm number from the
programming monitor and from the JPD-100/P LCD display. The alarm
contact closure must be closed and reopened before the MSI recognizes it
as an alarm again.
517850-1960-II-J
KEMU040015
April 23, 2001
4-14
4.2.4
Auxiliary Control
The standard MSI has two contact outputs that are jumper selectable as
normally open or normally closed. If there are two MSI chassis in the
system, there are four contact outputs. The contact outputs in the master
MSI chassis are 1 and 2. The contact outputs in the slave MSI chassis are
DIP switch (S1-2) selectable between 3 and 4 (ON) or 7 and 8 (OFF).
If CATS Expansion chassis are installed in the system, the RCO-4 option can
be installed in the CATS chassis to provide four more contacts. If the RCO-4
is installed in the system, those contact outputs are 3 through 6. If there are
two MSI chassis and a CATS Expansion chassis with the RCO-4 option, DIP
Switch S1-2 in the slave MSI chassis is set in the OFF position. The slave
MSI contact outputs then become 7 and 8.
The contacts can be activated manually from a JPD-100/P Controller or
automatically when programmed in a MultiCall. The address (control
camera number) used to control the MSI contacts is one. When the MSI gets
a command to control (on or off) an auxiliary output for address one, the MSI
energizes the relay for the contact on the rear panel of the MSI.
When the MSI gets a command to control (on or off) an auxiliary output for
any address other than one, the MSI sends the command and the address
out the RS-485 control output ports. The MSI sees the address (other than
1) for controlling an auxiliary contact output device the same as a camera
address. If a controller is restricted from controlling a camera and an
auxiliary contact output device has the same address, the controller is also
denied control of the contact output device.
517850-1960-II-J
KEMU040015
April 23, 2001
4-15
If an alarm is called to an alarm VCR, the contact output assigned to the
alarm VCR is automatically activated when the video from the alarm is
switched to the alarm VCR. The contact remains activated until the alarm
called to the alarm VCR is acknowledged. When the alarm is acknowledged,
the contact returns to the state it was in before the alarm occurred.
4.2.5
Time Initiated MultiCall
The MSI Unit has an internal clock. The time is set at the factory, but can be
reset in the field to the desired time (see Section 5). The MSI can be
programmed to perform MultiCalls at specific times with specific intervals.
Up to ten time-initiated MultiCalls can be programmed into the MSI Unit.
Note that MultiCalls can activate other MultiCalls. This feature can be used
to perform continuous complex video switcher sequencing and/or full scale
video tours of a facility.
When the clock in the MSI Unit arrives at the date and time, the MSI starts
the MultiCall. The MSI sends the data in the MultiCall to the appropriate
piece of equipment to carry out each function. For example, PreShots and
VectorScans are sent out the dome output ports, and camera/monitor calls
are carried out in the MSI video switcher. Auxiliary control data for
addresses other than 1 are sent out the dome output ports. Auxiliary control
data for address 1 activates the contact outputs resident in the MSI unit.
Refer to Section 5, paragraph 5.5.2 for programming MultiCalls and
paragraph 5.5.10 for assigning MultiCalls to date/time.
517850-1960-II-J
KEMU040015
April 23, 2001
4-16
4.2.6
RS-232 Port - Host Computer Input
The MSI has software to support the following commands from a host
computer.
• Video Switcher Call
• Send A SmartScan Unit to a PreShot
• Run a VectorScan stored in a SmartScan
• Activate an Alarm
When the MSI receives an activate alarm command from the host
computer, the MSI activates the MultiCall assigned to the alarm point.
• Reset an Alarm
When the MSI receives a reset alarm command, the MSI acknowledges
the alarm. A reset command also means the alarm point has returned to
its normal status. The MSI processes the alarms the same as if they
were activated from the contact inputs.
• Run a MultiCall stored in the MSI
• Manually Control a Scan
The communication protocol for the host computer input is 8 data bits, 1 start
bit, 1 stop bit, and 1 even parity bit. Each command consists of a 3- to 5-byte
packet. All data is ASCII characters. Note: Revision B firmware supported
non-ASCII protocol. Reprogramming of your host computer is not required if
the firmware in the MSI-100 is updated. Revision C or later firmware
supports non-ASCII protocol and ASCII protocol.
517850-1960-II-J
KEMU040015
April 23, 2001
4-17
Video Switcher Call
Bit
5 4 3 2 1 0
1 0 0 0 1 1
ASCII “c” (6316)
1
Monitor Number 10’s digit
2
Monitor Number 1’s digit
3
Camera Number 10’s digit
4
Camera Number 1’s digit
Byte 7 6 5 4 3 2 1 0
Bit
Valid Monitor Number = 1-16
Byte
0
7
0
6
1
Byte
0
1
2
3
4
Byte
Valid Camera Number = 1-64
Send a SmartScan to a PreShot
Bit
Byte 7 6 5 4 3 2 1 0
0
0
1 1 1 0 0 0 0
ASCII “p” (7016)
1
PreShot Number 10’s digit
2
PreShot Number 1’s digit
3
Camera Number 10’s digit
4
Camera Number 1’s digit
Byte
7 6 5 4 3 2 1 0
Bit
Valid PreShot Number = 0-99
517850-1960-II-J
Byte
0
1
2
3
4
Byte
KEMU040015
April 23, 2001
4-18
Start a VectorScan Stored in a SmartScan
Byte
0
1
2
3
Byte
Bit
5 4 3 2 1 0
1 1 0 1 1 0
ASCII “v” (7616)
VectorScan Number 1’s digit
Camera Number 10’s digit
Camera Number 1’s digit
7 6 5 4 3 2 1 0
Bit
7
0
6
1
Byte
0
1
2
3
Byte
Valid VectorScan Number = 0-9
Activate an Alarm
Byte
0
1
2
Byte
7
0
7
Bit
5 4 3 2 1
1 0 0 0 0
ASCII “a” (6116)
Alarm Number 10’s digit
Alarm Number 1’s digit
6 5 4 3 2 1
Bit
6
1
0
1
Byte
0
0
1
2
Byte
0
0
Byte
0
0
1
2
Byte
Valid Alarm Number = 1-64
Reset an Alarm
Byte
0
1
2
Byte
517850-1960-II-J
7
0
7
Bit
6 5 4 3 2 1
1 1 1 0 0 1
ASCII “r” (7216)
Alarm Number 10’s digit
Alarm Number 1’s digit
6 5 4 3 2 1
Bit
KEMU040015
April 23, 2001
4-19
Run a MultiCall
Byte
0
1
2
3
Byte
Bit
5 4 3 2 1 0
1 0 1 1 0 1
ASCII “m” (6D16)
MultiCall Number 100’s digit
MultiCall Number 10’s digit
MultiCall Number 1’s digit
7 6 5 4 3 2 1 0
Bit
7
0
6
1
Byte
0
1
2
3
Byte
Valid MultiCall number = 0-250
Manual Control (PTZ)
Byte
0
1
2
3
4
5
6
7
8
9
10
Byte
7
0
7
Bit
6 5 4 3 2 1 0
1 1 0 1 1 1 0
ASCII “n” (6E16)
Camera Number 10’s digit
Camera Number 1’s digit
Pan Speed upper byte
Pan Speed lower byte
Tilt Speed upper byte
Tilt Speed lower byte
Zoom Speed upper byte
Zoom Speed lower byte
Focus control
Iris control
6 5 4 3 2 1 0
Bit
Byte
0
1
2
3
4
5
6
7
8
9
10
Byte
Valid Camera number = 1-64
Pan Speed:
517850-1960-II-J
Left
Stop
Right
0016
8016
FF16
KEMU040015
April 23, 2001
4-20
Tilt Speed:
Zoom Speed:
Up
Stop
Down
0016
8016
FF16
Out
Stop
In
0016
8016
FF16
Lens focus control:
‘0’ = Off
‘1’ = Near
‘2’ = Far
Lens iris control
‘0’ = Off/manual
‘1’ = Open
‘2’ = Close
‘3’ = Auto iris
Note: Ultrak equipment stops motion if no command is received in a fixed
time, so commands need to be updated if continued motion is desired. (JPD
100/P updates every ~100 ms.)
517850-1960-II-J
KEMU040015
April 23, 2001
ON-SCREEN HELP
5-1
SECTION 5. PROGRAMMING
5.1
PROGRAMMING REQUIREMENTS
A JPD-100/P Joystick Controller and a KBD-100 Programming Keyboard are
required to program the MSI-100 Medium System Interface (MSI). The KBD-100
keyboard can be plugged into any of the controllers; but only one keyboard can
be used in the system at a time.
All programming menus for programming the MSI-100 are outputted on the
programming monitor (PRGMR output on the rear panel of the master MSI-100).
The MSI has password protection. An operator has to log on with a valid
password to program the MSI. The factory default password is MSI.
SmartScan, SmartScan Pro, SmartScan Pro II, and SmartScan III units can be
programmed through the MSI-100. An operator must log on with a valid
password to program the SmartScan units.
The MSI-100 is menu
selectable whether “Quick” PreShots stored in the SmartScan units
programmed using the JPD-100/P Controllers require the operator to enter
a password. Refer to the specific SmartScan Operating and Programming
Manual for programming procedures.
517850-1960-II-J
KEMU040015
April 23, 2001
PROGRAMMING NOTES
5-2
5.2
PROGRAMMING NOTES
Table 5-1. KBD-100 PROGRAMMING NOTES
Help
Steps the user back one programming
menu at a time; eventually exits the
programming mode.
Backspace Key
The backspace key deletes the last
character entered (either alphabetic or
numeric).
Gray Insert Key
The insert key inserts a blank line
above the line the cursor is on in a
MultiCall.
Gray Delete Key
The delete key deletes the line the
cursor is on in a MultiCall.
End
Moves the cursor to the end of the line
the cursor is on in a MultiCall.
Exits SmartScan Programming.
Enter
Accepts the text (alpha/numeric) typed
in a field(s).
Home
Moves the cursor to the beginning of
the line the cursor is on in a MultiCall.
Gray Page Up
Moves the cursor up one page in a
programming menu (if applicable).
Gray Page Down
Moves the cursor down one page in a
programming menu (if applicable).
F12
Esc Key
517850-1960-II-J
KEMU040015
April 23, 2001
MSI PROGRAMMING MODE
5-3
5.3
MSI-100 PROGRAMMING MODE
The programming mode must be accessed and a valid password entered to
program the MSI-100 or SmartScan units. Perform the following procedures to
access the programming mode.
PROCEDURE
1.
Connect a monitor to the
Programming Monitor Output
(PRGMR) on the rear panel of
the master MSI (Chassis
SW1A).
NOTE
If a monitor is not available, a coaxial
cable can be connected between the
programming monitor output and a
spare video input. Call the video
input (camera number) up to a video
output (monitor number) on the JPD100/P Controller. Note: the camera
must not be restricted from the
monitor or the controller.
The
programming menus for the MSI can
be viewed on the monitor the camera
number is switched to.
1.
To access the programming
menus, press Enter on the KBD100 keyboard.
MONITOR DISPLAY
MSI Programming
Hit Enter to Start
Alarms:
MultiCalls:
ENTER PASSWORD
PRESS ENTER WHEN DONE
517850-1960-II-J
KEMU040015
April 23, 2001
MSI PROGRAMMING MODE
5-4
PROCEDURE
2.
Enter the programmed password
and press Enter.
If this is the first time the system
is programmed, the password is
MSI.
If you enter an invalid password,
the following message appears:
Invalid, Retry or Esc
3.
MONITOR DISPLAY
Program SmartScan
or Select
→ Program Options
Program MultiCalls
Time/Date Char. Gen.
Alarm Monitors/VCRs
Change Password
Log out-end program
Press Enter to select
To continue, retype the password
and press Enter. To exit, press
Esc.
Choose the desired option by
using the gray up and down arrow
keys on the KBD-100 keyboard
until the arrow is pointing to the
desired option. Select the option
by pressing the Enter key on the
KBD-100 keyboard or program
SmartScan units as outlined in
paragraph 5.4.
517850-1960-II-J
KEMU040015
April 23, 2001
PROGRAMMING SMARTSCAN UNITS
5-5
5.4
PROGRAMMING SMARTSCAN UNITS
SmartScan units can be programmed through the MSI-100. The KBD-100
keyboard must be plugged into the rear panel of one of the JPD-100/P
Controllers. Only one KBD-100 keyboard can be used in the system at a time.
Refer to the applicable SmartScan Operating and Programming Manual for
programming procedures. When a SmartScan is being programmed, the
following display is on the programming monitor.
Programming SmartScan
Press END to quit
Alarms:
MultiCalls:
When you are done programming SmartScans, press the gray End key to end
programming. The programming monitor returns to the main programming
menu.
517850-1960-II-J
KEMU040015
April 23, 2001
PROGRAMMING SMARTSCAN UNITS
5-6
5.4.1
“Quick” PreShots
An operator can program “Quick” PreShots using only the JPD-100/P
Controller. An operator can set the MSI-100 so “Quick” PreShots can be
programmed without entering a password.
PROCEDURE
1. Press the Enter key to access
the programming mode and
enter a valid password.
MONITOR DISPLAY
Program SmartScan
Or Select
→ Program Options
Program MultiCalls
Time/Date Char. Gen.
Alarm Monitors/VCRs
Change Password
Log out-end program
Press Enter to Select
2. Use the gray up and down
arrow keys to move the arrow
indicator to Program Options
and press Enter.
517850-1960-II-J
PROGRAM OPTIONS FOR:
A ALARM INPUT
J JPD-100 QUICK KEY
T TIME INITIATED MCALL
C CAM/JPD PARTITIONING
M CAM/MON PARTITIONING
P JPD/MON PARTITIONING
D AUDIBLE ALARM: n SEC
Q QUICK PS PASSWORD YES
L ALARM MC ENABLED
KEMU040015
April 23, 2001
PROGRAMMING SMARTSCAN UNITS
5-7
PROCEDURE
MONITOR DISPLAY
3. Press Q to toggle between Yes
and No.
Yes means a password is
required to program Quick
PreShots.
No means a password is not
required to program Quick
Preshots.
517850-1960-II-J
KEMU040015
April 23, 2001
PROGRAMMING THE MSI
5-8
5.5
PROGRAMMING THE MSI-100 MEDIUM SYSTEM INTERFACE UNIT
A JPD-100/P Joystick Controller and a KBD-100 Keyboard are required to
program the MSI-100 Medium System Interface Unit. The keyboard is plugged
into the JPD-100/P Controller. A monitor must be connected to the programming
monitor output on the master MSI (chassis SW1A) rear panel to view the
programming menus.
NOTE
If a monitor is not available, a coaxial cable can
be connected between the programming
monitor output and a spare video input. Call
up the video input (camera number) on one of
the switched video outputs (monitor number).
The programming menus can be viewed on the
monitor the video input is called to.
The MSI has battery backup so all programming is protected if the system loses
power. The MSI has a jumper, W6, on the printed circuit board inside the
chassis. Jumper W6 must be installed to enable the battery backup and is
removed to disable battery backup. To ensure the backup is enabled, perform
the following steps.
1.
2.
3.
Program a single step MultiCall and save it.
Turn off the master MSI.
Turn on the master MSI.
517850-1960-II-J
KEMU040015
April 23, 2001
PROGRAMMING THE MSI
5-9
4.
If the MultiCall is present, battery back up is enabled. If the MultiCall is not
present, the jumper may not be installed. Perform the following steps to
install jumper W6.
a.
b.
c.
d.
e.
f.
517850-1960-II-J
Remove power from the master MSI.
Remove the chassis cover.
Install jumper W6.
Replace the chassis cover.
Turn on the MSI.
Perform steps 1 through 4 again.
KEMU040015
April 23, 2001
DEFINING MULTICALLS
5-10
5.5.1
Defining MultiCalls
MultiCalls are used to define the MSI’s response to events such as date and
time, alarms, JPD-100/P Controller function keys, or started manually on
operator command. Up to 251 (00-250) MultiCalls can be programmed and
stored in the MSI. The MultiCall number is used by the operator to run the
MultiCall or assign the MultiCall to an alarm or JPD-100/P function key, etc.
A MultiCall can be programmed to perform one or more system functions at
the same time or one step at a time with programmable dwell times between
each function. The system functions that can be included in a MultiCall are:
PreShots, VectorScans, MultiCalls (including itself), Video Switching, and
Auxiliary Output Control (turning on/off VCRs, etc.).
The MSI-100 can store 251 MultiCalls. Each MultiCall can have 31 steps. If
more than 31 steps are required, program multiple MultiCalls and link them
together. Program the first MultiCall to run the second MultiCall. Program
the second MultiCall to run the third MultiCall, etc.
After a MultiCall is programmed and stored in the MSI-100, it can be
assigned to any of the alarm inputs, JPD-100/P function keys, or date and
time. MultiCalls can be run by an operator using the MCALL key on the JPD100/P Controller or the F4 function key on the KBD-100 Keyboard (if the
keyboard is plugged into the JPD-100/P).
517850-1960-II-J
KEMU040015
April 23, 2001
PROGRAMMING MULTICALLS
5-11
5.5.2
Programming MultiCalls
To program a MultiCall, perform the following steps.
NOTE
All commands are entered using the KBD-100
keyboard.
STEP
1.
Press the Enter key to
access the programming
mode and enter a valid
password. See paragraph
5.3
MONITOR DISPLAY
Program SmartScan
or Select
→ Program Options
Program MultiCalls
Time/Date Char. Gen.
Alarm Monitors/VCRs
Change Password
Log out-end program
Press Enter to select
2.
Use the gray up and down
arrow keys to move the
arrow indicator to Program
MultiCalls and press Enter.
517850-1960-II-J
Enter Multicall number
PRESS ENTER WHEN DONE
KEMU040015
April 23, 2001
PROGRAMMING MULTICALLS
5-12
STEP
3.
MONITOR DISPLAY
Enter the desired MultiCall
number (00-250) to
MULTICALL nnn
MCnnn
program.
↑...............
4.
Enter the title of the
MultiCall (up to 16
characters) or press Enter to
accept the default or a
previously programmed title.
517850-1960-II-J
FUN
00
01
02
03
04
05
06
07
NUM
.
.
.
.
.
.
.
.
CAM
MISC
DWELL
..
....
..
..
....
..
..
....
..
..
....
..
..
....
..
..
....
..
..
....
..
..
....
..
MULTICALL nnn
ENTER FUNCTION
P,V,M,C, or A
KEMU040015
April 23, 2001
PROGRAMMING MULTICALLS
5-13
STEP
5.
MONITOR DISPLAY
Enter the desired functions
in the order you want the
MultiCall to perform them.
If all the functions are to be
performed
simultaneously,
the order they are entered
does not matter.
517850-1960-II-J
KEMU040015
April 23, 2001
PROGRAMMING MULTICALLS
5-14
STEP
MONITOR DISPLAY
The letters of the functions
that are programmable are
listed at the bottom of the
screen.
Function Descriptions:
P - PreShot
V - VectorScan
M - MultiCall
C - Call (call a camera to a
monitor, an alarm monitor,
an
alarm
VCR,
or
automatically acknowledge
an alarm )
A - Auxiliary
Output
Control
On/Off (such as VCRs)
See paragraphs 5.5.3.1 through
5.5.3.5 for the steps required to
program each type of function.
517850-1960-II-J
KEMU040015
April 23, 2001
PROGRAMMING MULTICALLS
5-15
STEP
MONITOR DISPLAY
NOTE
When a function is
selected,
there
are
messages on the bottom
of the screen to prompt
the programmer for the
next required field entry.
Enter data in the fields by typing
the desired information.
The
cursor moves to the next field. If
the cursor does not move to the
next field, use the gray right arrow
key to move it to the next field.
For example, Enter P in the
FUN field means type the letter
P in the column headed FUN.
Enter a transit time in the MISC
field means type a number from
0.0 to 9.9 in the column headed
MISC.
517850-1960-II-J
KEMU040015
April 23, 2001
PROGRAMMING MULTICALLS
5-16
STEP
6.
MONITOR DISPLAY
When done entering
functions, press ENTER in
an empty FUN field or press
Esc.
Press D to Delete, E to Edit, S or Esc to Save
7.
Press S to Save the MultiCall
or D to Delete the MultiCall
entirely. If you want to add
functions between existing
steps, change any of the
existing functions, or change
any of the fields for a
function, press E to Edit.
517850-1960-II-J
KEMU040015
April 23, 2001
PROGRAMMING MULTICALLS
5-17
STEP
MONITOR DISPLAY
If E to Edit was selected, use
the gray arrow keys to move
to the desired field on the
screen.
To go to the
beginning of a line, press the
gray Home key. To go to the
end of a line, press the gray
End key. To insert a function
between steps, use the gray
Insert key to insert a line
above the line the cursor is
on. To delete a function,
position the cursor on the
line you want to delete and
press the gray Delete key.
The following paragraphs describe the steps to program each function
programmable in a MultiCall. Steps 1 through 3 above must be done before
programming a function.
517850-1960-II-J
KEMU040015
April 23, 2001
PROGRAMMING MULTICALLS
5-18
5.5.2.1
P - PreShot
To program the MultiCall to perform a PreShot, perform the following
steps. The monitor display shown in step 3 of paragraph 5.5.2 must be
displayed on the monitor. However, it does not have to be entered
beside line “00” if there are other functions programmed in the MultiCall.
NOTE
If the cursor does not automatically move to
the next field after entering data in a field,
press the gray right arrow key to move to the
next field.
STEP
1.
MONITOR DISPLAY
Enter P in the FUN field.
FUN NUM CAM
00
01
02
03
04
05
06
07
P
.
.
.
.
.
.
.
..
..
..
..
..
..
..
..
..
..
..
..
..
..
..
..
MISC
DWELL
....
....
....
....
....
....
....
....
..
..
..
..
..
..
..
..
MULTICALL nnn
PRESHOT
ENTER PRESHOT NUMBER
517850-1960-II-J
KEMU040015
April 23, 2001
PROGRAMMING MULTICALLS
5-19
P - PreShot
STEP
2.
MONITOR DISPLAY
Enter the desired PreShot
Number (00-99) in the NUM
field.
pp = PreShot Number
00
01
02
03
04
05
06
07
FUN
P
.
.
.
.
.
.
.
NUM
pp
..
..
..
..
..
..
..
CAM
..
..
..
..
..
..
..
..
MISC
....
....
....
....
....
....
....
....
DWELL
..
..
..
..
..
..
..
..
MULTICALL nnn
PRESHOT
ENTER CAMERA NUMBER
3.
Enter the Camera Number
where the PreShot is stored
in the CAM field.
nn = Camera Number
517850-1960-II-J
FUN NUM CAM
00
01
02
03
04
05
06
07
P
.
.
.
.
.
.
.
MISC
DWELL
nn
....
..
....
..
..
..
....
..
..
....
..
..
....
..
..
....
..
..
....
..
..
....
..
MULTICALL nnn
PRESHOT
ENTER TRANSIT TIME
pp
..
..
..
..
..
..
..
KEMU040015
April 23, 2001
PROGRAMMING MULTICALLS
5-20
P - PreShot
STEP
4.
MONITOR DISPLAY
Enter a transit time (0.0-9.9
seconds) in the MISC field.
t.t = transit time
The transit time is the
amount of time you want the
camera to take to move from
FUN NUM CAM
00
01
02
03
04
05
06
07
P
.
.
.
.
.
.
.
MISC
DWELL
nn
t.t
..
..
....
..
..
....
..
..
....
..
..
....
..
..
....
..
..
....
..
..
....
..
MULTICALL nnn
PRESHOT
ENTER DWELL TIME
pp
..
..
..
..
..
..
..
its present location to the
PreShot position. The MSI
sends the transit time out to
the SmartScan unit.
517850-1960-II-J
KEMU040015
April 23, 2001
PROGRAMMING MULTICALLS
5-21
P - PreShot
STEP
5.
MONITOR DISPLAY
Enter a dwell time (00-99
seconds) in the DWELL
field.
dd = dwell time
Dwell time is the amount of time
you want the MSI to wait before it
performs the next step in the
MultiCall. A “00” dwell time tells
the MSI to perform the functions at
the same time. A “15” second
dwell time means that the MSI will
wait 15 seconds before performing
the next step in the MultiCall.
Note: The transit time for a
PreShot and the dwell time start
at the same time.
6.
FUN NUM CAM
00
01
02
03
04
05
06
07
P
.
.
.
.
.
.
.
MISC
pp
nn
t.t
..
..
....
..
..
....
..
..
....
..
..
....
..
..
....
..
..
....
..
..
....
MULTICALL nnn
ENTER FUNCTION
P,V,M,C, or A
DWELL
dd
..
..
..
..
..
..
..
Enter another function or
press Enter to end
programming. If you
pressed Enter, Press S to
save programming.
517850-1960-II-J
KEMU040015
April 23, 2001
PROGRAMMING MULTICALLS
5-22
5.5.2.2
V - VectorScan
To program the MultiCall to perform a VectorScan, perform the following
steps. The monitor display shown in step 3 of paragraph 5.5.2 must be
displayed on the monitor. However, it does not have to be entered
beside line “00” if there are other functions programmed in the MultiCall.
NOTE
If the cursor does not automatically move to
the next field after entering data in a field,
press the gray right arrow key to move to the
next field.
STEP
1.
MONITOR DISPLAY
Enter a V in the FUN field.
FUN NUM CAM
00
01
02
03
04
05
06
07
517850-1960-II-J
MISC
DWELL
..
....
..
....
..
..
..
....
..
..
....
..
..
....
..
..
....
..
..
....
..
..
....
..
MULTICALL nnn
VECTORSCAN
ENTER VECTORSCAN NUMBER
V
.
.
.
.
.
.
.
..
..
..
..
..
..
..
..
KEMU040015
April 23, 2001
PROGRAMMING MULTICALLS
5-23
V - VectorScan
STEP
2.
MONITOR DISPLAY
Enter the VectorScan
Number (0-9) in the NUM
field.
v = VectorScan number
3.
FUN NUM CAM
00
01
02
03
04
05
06
07
DWELL
v
..
....
..
..
..
....
..
..
..
....
..
..
..
....
..
..
..
....
..
..
..
....
..
..
..
....
..
..
..
....
..
MULTICALL nnn
VECTORSCAN
ENTER CAMERA NUMBER
In the CAM field, enter the
Camera Number where the
VectorScan is stored.
nn= Camera Number
Note: An entry is not made
in the MISC field.
517850-1960-II-J
V
.
.
.
.
.
.
.
MISC
FUN NUM CAM
00
01
02
03
04
05
06
07
V
.
.
.
.
.
.
.
MISC
nn
....
..
....
..
....
..
....
..
....
..
....
..
....
..
....
MULTICALL nnn
VECTORSCAN
ENTER DWELL TIME
v
..
..
..
..
..
..
..
DWELL
..
..
..
..
..
..
..
..
KEMU040015
April 23, 2001
PROGRAMMING MULTICALLS
5-24
V - VectorScan
STEP
4.
MONITOR DISPLAY
Enter a Dwell Time (00-99
seconds) in the DWELL
field.
dd = dwell time
Dwell time is the amount of time
you want the MSI to wait before it
performs the next step in the
MultiCall. A "00" dwell time tells
the MSI to perform the functions at
the same time. A "15" second
dwell time means that the MSI will
wait 15 seconds before performing
the next step in the MultiCall.
5.
FUN NUM CAM
00
01
02
03
04
05
06
07
V
.
.
.
.
.
.
.
v
..
..
..
..
..
..
..
MISC
nn
..
....
..
....
..
....
..
....
..
....
..
....
..
....
MULTICALL nnn
ENTER FUNCTION
P,V,M,C, or A
DWELL
dd
..
..
..
..
..
..
..
Enter another function or
press Enter to end
programming. If you
pressed Enter, press S to
save programming.
517850-1960-II-J
KEMU040015
April 23, 2001
PROGRAMMING MULTICALLS
5-25
5.5.2.3
M - MultiCall
To program the MultiCall to start a MultiCall (including itself) or to stop a
MultiCall, perform the following steps. The monitor display shown in step 3
of paragraph 5.5.2 must be displayed on the monitor. However, it does not
have to be entered beside line “00” if there are other functions programmed
in the MultiCall.
NOTE
If the cursor does not automatically move to
the next field after entering data in a field,
press the right gray arrow key to move to the
next field.
STEP
1.
MONITOR DISPLAY
Enter M in the FUN field.
00
01
02
03
04
05
06
07
517850-1960-II-J
FUN
M
.
.
.
.
.
.
.
NUM CAM MISC DWELL
..
..
....
..
..
..
....
..
..
..
....
..
..
..
....
..
..
..
....
..
..
..
....
..
..
..
....
..
..
..
....
..
MULTICALL nnn
MULTICALL
ENTER MULTICALL NUMBER
KEMU040015
April 23, 2001
PROGRAMMING MULTICALLS
5-26
M - MultiCall
STEP
2.
Enter the MultiCall Number
(0-250) in the NUM field.
mmm = MultiCall number
Note: Entries are not made
in the CAM field.
3.
4.
Enter 1 (start) or 0 (stop)
in the MISC field.
Enter a dwell time (00-99
seconds) in the DWELL
field.
dd = dwell time
Dwell time is the amount of
time you want the MSI to
wait before it performs the
next step in the MultiCall. A
"00" dwell time tells the MSI
to perform the functions at
the same time. A "15"
second dwell time means
that the MSI will wait 15
seconds before performing
the next step in the MultiCall.
517850-1960-II-J
MONITOR DISPLAY
00
01
02
03
04
05
06
07
FUN
M
.
.
.
.
.
.
.
NUM CAM MISC DWELL
mmm ..
....
..
..
..
....
..
..
..
....
..
..
..
....
..
..
..
....
..
..
..
....
..
..
..
....
..
..
..
....
..
MULTICALL nnn
MULTICALL
ENTER DWELL TIME
FUN
M
.
.
.
.
.
.
.
NUM CAM
00
01
02
03
04
05
06
07
mmm
..
..
..
..
..
..
..
..
..
..
..
..
..
..
MISC
1
....
....
....
....
....
....
....
DWELL
dd
..
..
..
..
..
..
..
MULTICALL nnn
ENTER FUNCTION
P,V,M,C, or A
KEMU040015
April 23, 2001
PROGRAMMING MULTICALLS
5-27
M - MultiCall
STEP
MONITOR DISPLAY
One MultiCall can start
another MultiCall. If a
MultiCall calls itself, it will
repeat until halted by an
operator. If the MultiCall
calls itself, that step should
be the last entry in a
MultiCall.
If a MultiCall is run
pressing a function key
the JPD-100/P, pressing
function key again stops
MultiCall.
by
on
the
the
STOP ALL MULTICALLS
To stop all MultiCall files
currently running regardless
of origin, a JPD-100/P
joystick controller must be
used.
Press MCALL
controller.
on
the
Press 3 to STOP ALL.
517850-1960-II-J
KEMU040015
April 23, 2001
PROGRAMMING MULTICALLS
5-28
M - MultiCall
STEP
5.
517850-1960-II-J
MONITOR DISPLAY
NOTE
If a MultiCall contains a
VectorScan, and the
operator halts the MultiCall
while the VectorScan is
running, the MSI stops
processing the MultiCall, but
the VectorScan continues to
run until the SmartScan unit
is returned to manual
operation. The VectorScan
does not stop because the
VectorScan executes in the
SmartScan unit and not in
the MSI. To stop the
VectorScan, the operator
must manually control the
SmartScan or send the
SmartScan to a Preshot.
Enter another function or
press Enter to end
programming. If you
pressed Enter, press S to
save programming.
KEMU040015
April 23, 2001
PROGRAMMING MULTICALLS
5-29
5.5.2.4
C - Video Switcher Call (Call up a camera to a monitor)
The Video Switcher Call has four functions:
1.
Call a camera to a monitor
2.
3.
4.
Call a camera to an alarm monitor (AM)
Call a camera to an alarm VCR (AR)
Automatically Acknowledge an Alarm (AA)
CALL A CAMERA TO A MONITOR
To program the MultiCall to switch a camera to a monitor, perform
the following steps. The monitor display shown in step 3 of
paragraph 5.5.2 must be displayed on the monitor. However, it does
not have to be entered beside line “00” if there are other functions
programmed in the MultiCall.
517850-1960-II-J
KEMU040015
April 23, 2001
PROGRAMMING MULTICALLS
5-30
NOTE
If the cursor does not automatically move to
the next field after entering data in a field,
press the right gray arrow key to move to the
next field.
STEP
1.
MONITOR DISPLAY
Enter C in the FUN field.
00
01
02
03
04
05
06
07
FUN
C
.
.
.
.
.
.
.
NUM
..
..
..
..
..
..
..
..
CAM
..
..
..
..
..
..
..
..
MISC
....
....
....
....
....
....
....
....
DWELL
..
..
..
..
..
..
..
..
MULTICALL nnn
VIDEO SWITCHER CALL
ENTER MON NUM, AA, AM, AR
2.
Enter the monitor number
(1-4) in the NUM field.
mm = monitor number
00
01
02
03
04
05
06
07
FUN
C
.
.
.
.
.
.
.
NUM
mm
..
..
..
..
..
..
..
CAM
..
..
..
..
..
..
..
..
MISC
....
....
....
....
....
....
....
....
DWELL
..
..
..
..
..
..
..
..
MULTICALL nnn
VIDEO SWITCHER CALL
ENTER CAMERA NUMBER
517850-1960-II-J
KEMU040015
April 23, 2001
PROGRAMMING MULTICALLS
5-31
C - Video Switcher Call
STEP
3.
Enter the camera number
(1-32) in the CAM field.
cc = camera number
Note: An entry is not made
in the MISC field.
4.
00
01
02
03
04
05
06
07
Enter a dwell time (00-99
seconds) in the DWELL
field.
dd = dwell time
Dwell time is the amount of
time you want the MSI to
wait before it performs the
next step in the MultiCall. A
"00" dwell time tells the MSI
to perform the functions at
the same time. A "15"
second dwell time means
that the MSI will wait 15
seconds before performing
the next step in the MultiCall.
517850-1960-II-J
MONITOR DISPLAY
FUN
C
.
.
.
.
.
.
.
NUM CAM MISC DWELL
mm cc
....
..
..
..
....
..
..
..
....
..
..
..
....
..
..
..
....
..
..
..
....
..
..
..
....
..
..
..
....
..
MULTICALL nnn
VIDEO SWITCHER CALL
ENTER DWELL TIME
FUN NUM CAM
00
01
02
03
04
05
06
07
C
.
.
.
.
.
.
.
mm
..
..
..
..
..
..
..
MISC
cc
..
....
..
....
..
....
..
....
..
....
..
....
..
....
MULTICALL nnn
ENTER FUNCTION
P,V,M,C, or A
DWELL
dd
..
..
..
..
..
..
..
KEMU040015
April 23, 2001
PROGRAMMING MULTICALLS
5-32
C - Video Switcher Call
5.
STEP
Enter another function or
press Enter to end
programming. If you
pressed Enter, press S to
save programming.
MONITOR DISPLAY
CALL A CAMERA TO AN ALARM MONITOR (AM) OR ALARM VCR (AR)
If the MultiCall is to be assigned to an alarm, the video from the camera
in alarm can be called to an alarm monitor (AM) and/or an alarm VCR
(AR). See paragraph 4.2.3 for the operation of alarm monitors and alarm
VCRs. To call the camera up to both an alarm monitor and an alarm
VCR, you must enter them as two steps in the MultiCall. If a MultiCall is
not started by an alarm; for example, started manually at JPD-100/P, the
calls to the alarm monitor and alarm record are not performed.
517850-1960-II-J
KEMU040015
April 23, 2001
PROGRAMMING MULTICALLS
5-33
C - Video Switcher Call (Alarm Monitor or Alarm VCR)
To call a camera to an Alarm Monitor or Alarm VCR, perform the
following steps. The monitor display shown in step 3 of paragraph 5.5.2
must be displayed on the monitor.
C - Video Switcher Call (Alarm Monitor or Alarm VCR)
STEP
1.
MONITOR DISPLAY
Enter C in the FUN field.
00
01
02
03
04
05
06
07
FUN
C
.
.
.
.
.
.
.
NUM
...
..
..
..
..
..
..
..
CAM
..
..
..
..
..
..
..
..
MISC
..
....
....
....
....
....
....
....
DWELL
..
..
..
..
..
..
..
..
MULTICALL nnn
VIDEO SWITCHER CALL
ENTER MON NUM, AA, AM, AR
517850-1960-II-J
KEMU040015
April 23, 2001
PROGRAMMING MULTICALLS
5-34
STEP
2.
3.
Enter AM in the NUM field to
call the camera to an Alarm
Monitor or AR in the NUM
field to call the camera to an
Alarm VCR.
Enter the camera number
for the alarm video in the
CAM field.
cc = camera number
Note: An entry is not made
in the MISC field.
517850-1960-II-J
MONITOR DISPLAY
FUN NUM CAM
00
01
02
03
04
05
06
07
C
.
.
.
.
.
.
.
C
.
.
.
.
.
.
.
DWELL
..
..
..
....
..
..
..
....
..
..
....
..
..
....
..
..
....
..
..
....
..
..
....
..
MULTICALL nnn
VIDEO SWITCHER CALL
ENTER CAMERA NUMBER
AM
..
..
..
..
..
..
..
FUN NUM CAM
00
01
02
03
04
05
06
07
MISC
MISC
DWELL
cc
..
..
..
....
..
..
....
..
..
....
..
..
....
..
..
....
..
..
....
..
..
....
..
MULTICALL nnn
VIDEO SWITCHER CALL
ENTER DWELL TIME
AM
..
..
..
..
..
..
..
KEMU040015
April 23, 2001
PROGRAMMING MULTICALLS
5-35
C - Video Switcher Call (Alarm Monitor or Alarm VCR)
STEP
4.
MONITOR DISPLAY
Enter a dwell time in the
DWELL field.
dd = dwell time
Dwell time is the amount of time
you want the MSI to wait before it
performs the next step in the
MultiCall. A "00" dwell time tells
the MSI to perform the functions at
the same time. A "15" second
dwell time means that the MSI
waits 15 seconds before
performing the next step in the
MultiCall.
FUN NUM CAM
00
01
02
03
04
05
06
07
C
.
.
.
.
.
.
.
MISC
DWELL
AM
..
..
..
..
..
..
..
cc
dd
..
....
..
..
....
..
..
....
..
..
....
..
..
....
..
..
....
..
..
....
..
MULTICALL nnn
ENTER FUNCTION
P,V,M,C, or A
If an alarm is to be automatically
acknowledged (AA), the dwell time
for the Alarm Record (AR) or
Alarm Monitor (AM) (whichever
occurs last) should reflect the
amount of time the user wishes to
monitor or record the alarm site
before acknowledging the alarm.
The alarm acknowledge function
can occur anywhere in the
MultiCall after the alarm monitor
and alarm record functions.
Usually it is the last function
programmed. For example, a
PreShot or a VectorScan may
occur prior to acknowledging the
alarm.
517850-1960-II-J
KEMU040015
April 23, 2001
PROGRAMMING MULTICALLS
5-36
C - Video Switcher Call (Alarm Monitor or Alarm VCR)
5.
STEP
Enter another function or
press Enter to end
programming. If you
pressed Enter, press S to
save programming.
MONITOR DISPLAY
AUTOMATICALLY ACKNOWLEDGE AN ALARM
If you want the MultiCall to automatically acknowledge the alarm,
perform the following steps. The monitor display shown in step 3 of
paragraph 5.5.2 must be displayed on the monitor. However, it does
not have to be entered beside line “00” if there are other functions
programmed in the MultiCall.
517850-1960-II-J
KEMU040015
April 23, 2001
PROGRAMMING MULTICALLS
5-37
C - Video Switcher Call (Automatically Acknowledge an Alarm)
STEP
1.
MONITOR DISPLAY
Enter C in the FUN field.
FUN NUM CAM
00
01
02
03
04
05
06
07
2.
DWELL
..
....
..
....
..
..
..
....
..
..
....
..
..
....
..
..
....
..
..
....
..
..
....
..
MULTICALL nnn
VIDEO SWITCHER CALL
ENTER MON NUM, AA, AM, AR
C
.
.
.
.
.
.
.
..
..
..
..
..
..
..
..
Enter AA in the NUM
column.
FUN NUM CAM
00
01
02
03
04
05
06
07
517850-1960-II-J
MISC
C
.
.
.
.
.
.
.
MISC
DWELL
..
....
..
....
..
..
..
....
..
..
....
..
..
....
..
..
....
..
..
....
..
..
....
..
MULTICALL nnn
VIDEO SWITCHER CALL
ENTER DWELL TIME
AA
..
..
..
..
..
..
..
KEMU040015
April 23, 2001
PROGRAMMING MULTICALLS
5-38
C - Video Switcher Call (Automatically Acknowledge an Alarm)
STEP
3.
Enter a dwell time in the
DWELL field.
dd = dwell time
Dwell time is the amount of time
you want the MSI to wait before it
performs the next step in the
MultiCall. A "00" dwell time tells
the MSI to perform the functions at
the same time. A "15" second
dwell time means that the MSI
waits 15 seconds before
performing the next step in the
MultiCall. Usually the AA function
is the last step in the MultiCall.
4.
517850-1960-II-J
MONITOR DISPLAY
FUN NUM CAM
00
01
02
03
04
05
06
07
C
.
.
.
.
.
.
.
AA
..
..
..
..
..
..
..
MISC
..
....
..
....
..
....
..
....
..
....
..
....
..
....
MULTICALL nnn
ENTER FUNCTION
P,V,M,C, or A
DWELL
dd
..
..
..
..
..
..
..
Enter another function or
press Enter to end
programming. If you
pressed Enter, press S to
save programming.
KEMU040015
April 23, 2001
PROGRAMMING MULTICALLS
5-39
5.5.2.5
A - Auxiliary Output Control (such as VCRs)
The auxiliary output control function is used to turn on or off auxiliary
devices such as VCRs. The auxiliary devices must be connected to a
unit that contains contact outputs for this purpose. The AIF-100/CO has
eight auxiliary outputs, the CRX-800 Series Control Receivers have six
auxiliary outputs and CRX-500 Series Control Receivers have two
auxiliary outputs. The standard MSI-100 has two relays to control an
auxiliary device. In expanded MSI-100 systems, there can be up to eight
relays to control auxiliary devices. The programmer must know the
address of the contact output device (AIF-100/CO, CRX-800, or CRX500) and the number of the contact output the auxiliary device is
connected to. The addresses of the AIF-100/CO, CRX-500, and CRX800 units are DIP switch selectable like the FastScan/SmartScan units.
The MSI reserves address one (1) for controlling the relays in the MSI
system. All other contact output devices must be addressed two (2) or
higher.
To program the MultiCall to turn an auxiliary device on or off, perform the
following steps. The monitor display shown in step 3 of paragraph 5.5.2
must be displayed on the monitor. However, it does not have to be
entered beside line “00” if there are other functions programmed in the
MultiCall.
517850-1960-II-J
KEMU040015
April 23, 2001
PROGRAMMING MULTICALLS
5-40
A- Auxiliary Output Control
STEP
1.
MONITOR DISPLAY
Enter A in the FUN field.
FUN NUM CAM
00
01
02
03
04
05
06
07
2.
Enter the auxiliary number
in the NUM field.
n = contact number
The auxiliary number is the
physical contact output on
the unit the auxiliary device
is connected to.
517850-1960-II-J
DWELL
..
....
..
....
..
..
..
....
..
..
....
..
..
....
..
..
....
..
..
....
..
..
....
..
MULTICALL nnn
AUXILIARY OUTPUT CONTROL
ENTER AUXILIARY NUMBER
A
.
.
.
.
.
.
.
..
..
..
..
..
..
..
..
FUN NUM CAM
00
01
02
03
04
05
06
07
MISC
MISC
DWELL
..
....
..
....
..
..
..
....
..
..
....
..
..
....
..
..
....
..
..
....
..
..
....
..
MULTICALL nnn
AUXILIARY OUTPUT CONTROL
ENTER CAMERA NUMBER
A
.
.
.
.
.
.
.
n
..
..
..
..
..
..
..
KEMU040015
April 23, 2001
PROGRAMMING MULTICALLS
5-41
A - Auxiliary Output Control
3.
STEP
In the CAM field, enter the
address (1-99) of the AIF100/CO, the CRX-800
Series Receiver, CRX-500
Series Receiver or MSI. The
address for the MSI contacts
is always one (1).
cc = contact output address
517850-1960-II-J
MONITOR DISPLAY
FUN NUM CAM
00
01
02
03
04
05
06
07
MISC
DWELL
cc
....
..
..
....
..
..
....
..
..
....
..
..
....
..
..
....
..
..
....
..
..
....
..
MULTICALL nnn
AUXILIARY OUTPUT CONTROL
ENTER - 1>ON, or 0>OFF
A
.
.
.
.
.
.
.
n
..
..
..
..
..
..
..
KEMU040015
April 23, 2001
PROGRAMMING MULTICALLS
5-42
A - Auxiliary Output Control
STEP
4.
Enter 1=On or 0=Off in the
MISC field.
1 turns the contact on: if a
normally open contact, on closes
the contact; if a normally closed
contact, on opens the contact.
5.
FUN NUM CAM
00
01
02
03
04
05
06
07
Enter a dwell time (0-99
seconds) in the DWELL
field.
dd = dwell time
Dwell time is the amount of time
you want the MSI to wait before it
performs the next step in the
MultiCall. A "00" dwell time tells
the MSI to perform the functions at
the same time. A "15" second
dwell time means that the MSI will
wait 15 seconds before performing
the next step in the MultiCall.
517850-1960-II-J
MONITOR DISPLAY
DWELL
cc
1
..
..
....
..
..
....
..
..
....
..
..
....
..
..
....
..
..
....
..
..
....
..
MULTICALL nnn
AUXILIARY OUTPUT CONTROL
ENTER DWELL TIME
A
.
.
.
.
.
.
.
n
..
..
..
..
..
..
..
FUN NUM CAM
00
01
02
03
04
05
06
07
MISC
A
.
.
.
.
.
.
.
n
..
..
..
..
..
..
..
MISC
cc
1
..
....
..
....
..
....
..
....
..
....
..
....
..
....
MULTICALL nnn
ENTER FUNCTION
P,V,M,C, or A
DWELL
dd
..
..
..
..
..
..
..
KEMU040015
April 23, 2001
PROGRAMMING MULTICALLS
5-43
A - Auxiliary Control
6.
517850-1960-II-J
STEP
Enter another function or
press Enter to end
programming. If you
pressed Enter, press S to
save programming.
MONITOR DISPLAY
KEMU040015
April 23, 2001
EDIT MULTICALLS
5-44
5.5.3
Editing an Existing MultiCall
To edit an existing MultiCall, perform the following procedure.
STEP
1.
MONITOR DISPLAY
Press Enter on the
keyboard to access the
programming mode and
enter a valid password.
Program SmartScan
or Select
→ Program Options
Program MultiCalls
Time/Date Char. Gen.
Alarm Monitors/VCRs
Change Password
Log out-end program
Press Enter to select
2.
Use the gray up and down
arrow keys to move the
arrow indicator to Program
MultiCalls and press Enter.
517850-1960-II-J
Enter Multicall number
PRESS ENTER WHEN DONE
KEMU040015
April 23, 2001
EDIT MULTICALLS
5-45
STEP
3.
Enter the MultiCall Number
MONITOR DISPLAY
(EXAMPLE)
to be edited and press
Enter.
MC nnn
↑. ..............
The cursor is positioned on
the first character of the
MultiCall title.
517850-1960-II-J
KEMU040015
April 23, 2001
EDIT MULTICALLS
5-46
STEP
4.
Edit the title of the MultiCall
and press Enter or press
Enter to accept the present
title.
The first eight functions of
the file appear on the
screen.
To view more of the file, use
the gray up and down arrow
keys or the gray Page Up
and Page Down keys to
move up and down in the
listing.
517850-1960-II-J
MONITOR DISPLAY
00
01
02
03
04
05
06
07
FUN
C
C
C
C
C
C
NUM
1
1
1
1
1
1
CAM
1
2
3
4
5
6
MISC
DWELL
15
15
15
15
15
15
MULTICALL nnn
ENTER FUNCTION
P,V,M,C,or A
KEMU040015
April 23, 2001
EDIT MULTICALLS
5-47
STEP
5.
6.
MONITOR DISPLAY
Use the gray arrow keys to
move around the screen and
edit the fields as required.
To go to the beginning of a
line, press the gray Home
key. To go to the end of a
line, press the gray End key.
Use the gray Insert key to
insert a line above the line
the cursor is on. Use the
gray Delete key to delete a
line.
After all changes have been
made, press Esc or press
Enter in an empty FUN
field.
MULTICALL nn
Press D to Delete, E to Edit, S or Esc to Save
7.
517850-1960-II-J
Press S or Esc to save the
MultiCall with the new
changes, press D to delete
the entire MultiCall, or press
E to continue editing the
MultiCall.
KEMU040015
April 23, 2001
DELETING MULTICALLS
5-48
5.5.4
Deleting a MultiCall
To delete the programming for a MultiCall entirely, perform the following
steps.
STEP
1.
MONITOR DISPLAY
Press Enter to access the
programming mode and
enter a valid password.
Program SmartScan
or Select
→ Program Options
Program MultiCalls
Time/Date Char. Gen.
Alarm Monitors/VCRs
Change Password
Log out-end program
Press Enter to select
2.
Use the gray up and down
arrow keys to move the
Enter Multicall number
arrow indicator to Program
MultiCalls and press Enter.
517850-1960-II-J
PRESS ENTER WHEN DONE
KEMU040015
April 23, 2001
DELETING MULTICALLS
5-49
STEP
3.
Enter the MultiCall Number
MONITOR DISPLAY
(EXAMPLE)
to be deleted.
The cursor is positioned on
Sequence Monitor 1
↑...............
the title of the MultiCall.
517850-1960-II-J
KEMU040015
April 23, 2001
DELETING MULTICALLS
5-50
STEP
4.
MONITOR DISPLAY
Press Enter to accept the
present title.
The first eight functions of
the file appear on the
screen.
00
01
02
03
04
05
06
07
FUN
C
C
C
C
C
C
.
.
MULTICALL nnn
NUM CAM MISC
1
1
1
2
1
3
1
4
1
5
1
6
..
...
....
..
...
....
DWELL
15
15
15
15
15
15
..
..
MULTICALL nnn
ENTER FUNCTION
P,V,M,C,A (VIDEO SWITCHER CALL)
5.
Press Esc or Move the
cursor to an empty FUN
MULTICALL nnn
field and Press Enter .
Press D to Delete, E to Edit, S or Esc to Save
6.
Press D to delete the
MultiCall.
517850-1960-II-J
KEMU040015
April 23, 2001
LIST MULTICALLS
5-51
5.5.5
List Programmed MultiCalls
STEP
1.
Press F11.
MONITOR DISPLAY
EXAMPLE
MULTICALL LIST
1 - MultiCall 1
2 - MultiCall 2
3 - MultiCall 3
2.
3.
517850-1960-II-J
Press F11 to see the next
page of MultiCalls (if
applicable).
Repeat step 2 continue
paging through the MultiCall
listing or press Esc when
done viewing the list.
KEMU040015
April 23, 2001
RUN MULTICALLS
5-52
5.5.6
Run MultiCall
A.
KBD-100 Keyboard
To run a MultiCall from the KBD-100 keyboard, perform the following
steps.
STEP
1.
MONITOR DISPLAY
Press function key F4.
RUN MULTICALL
Enter Multicall number
PRESS ENTER WHEN DONE
2.
3.
Enter the MultiCall number
(0-250).
Press Enter.
The MSI sends out the data
to run the steps in the
MultiCall. The MultiCall
number (up to 21 current) is
displayed on the
programming monitor as long
as it is running.
517850-1960-II-J
KEMU040015
April 23, 2001
RUN MULTICALLS
5-53
B.
JPD-100/P Controller
To run a MultiCall from the JPD-100/P, use the following procedures.
All keystrokes are done on the JPD-100/P keypads.
STEP
1.
Type the MultiCall Number
(0-250)
JPD-100/P DISPLAY
CNTL - CAM n
mmm
MON n
mmm = MultiCall Number
2.
3.
Press MCALL.
1>Start
3>Stop
4>Continue
6>Hold
Press 1.
CNTL - CAM n MON n
START MULTICALL
517850-1960-II-J
KEMU040015
April 23, 2001
STOP MULTICALLS
5-54
5.5.7
Stop MultiCalls
To stop all MultiCalls currently running, a JPD-100/P joystick controller must
be used.
STEP
1.
Type the MultiCall Number
(0-250)
JPD-100/P DISPLAY
CNTL - CAM n
Mmm
MON n
mmm = MultiCall Number
2.
3.
Press MCALL.
1>Start
3>Stop
4>Continue
6>Hold
Press 3.
CNTL - CAM n MON n
START MULTICALL
517850-1960-II-J
KEMU040015
April 23, 2001
STOP MULTICALLS
5-55
5.5.7.1
JPD-100/P Function Key
To stop a MultiCall started from a JPD-100/P Function Key, press the
Function Key again.
NOTE
If the MSI has processed all the steps in the
MultiCall, pressing the function key restarts the
MultiCall.
517850-1960-II-J
KEMU040015
April 23, 2001
ASSIGNING MULTICALLS TO ALARM INPUTS
5-56
5.5.8
Assigning MultiCalls to Alarm Inputs
The MSI can be programmed to assign MultiCalls to the alarm inputs. When
the alarm occurs, the MSI starts the MultiCall assigned to the alarm.
Perform the following steps to assign MultiCalls to alarms. Note: You must
access the MSI programming mode and enter a valid password. See
paragraph 5.3.
STEP
1.
MONITOR DISPLAY
Use the gray up and down
arrow keys to move the
arrow indicator to Program
Options and press Enter.
517850-1960-II-J
PROGRAM OPTIONS TO:
A ALARM INPUT
J JPD-100 QUICK KEY
T TIME INITIATED MCALL
C CAM/JPD PARTITIONING
M CAM/MON PARTITIONING
P JPD/MON PARTITIONING
D AUDIBLE ALARM: n SEC
Q QUICK PS PASSWORD YES/NO
L ALARM MC ENABLED
KEMU040015
April 23, 2001
ASSIGNING MULTICALLS TO ALARM INPUTS
5-57
2.
STEP
Press A for Alarm Inputs.
MONITOR DISPLAY
ALARM-MULTICALL ASSIGN
1- •••
12- •••
23- •••
2- •••
13- •••
24- •••
3- •••
14- •••
25- •••
4- •••
15- •••
26- •••
5- •••
16- •••
27- •••
6- •••
17- •••
28- •••
7- •••
18- •••
29- •••
8- •••
19- •••
30- •••
9- •••
20- •••
31- •••
10-•••
21- •••
32- •••
11-•••
22- •••
3.
517850-1960-II-J
Use the gray arrow keys
and the page up and down
keys to move around in the
table to locate the desired
alarm number. Enter the
MultiCall number to be
assigned to the alarm in the
MC column (to the right of
the alarm number).
KEMU040015
April 23, 2001
ASSIGNING MULTICALLS TO ALARM INPUTS
5-58
4.
STEP
Continue assigning
MultiCalls to alarms.
MONITOR DISPLAY
To delete MultiCalls from
alarms, press the space bar
until the MultiCall number is
erased.
5.
517850-1960-II-J
When
done
assigning
MultiCalls to alarms press
ESC to save programming
and exit programming.
KEMU040015
April 23, 2001
ASSIGNING MULTICALLS TO JPD-100/P FUNCTION KEYS
5-59
5.5.9
Assigning MultiCalls to JPD-100/P Function Keys
The MSI can be programmed to assign MultiCalls to JPD-100/P Function
Keys. When the function key is pressed, the MSI starts the MultiCall
assigned to the key. When the function key is pressed again, the MSI stops
processing the MultiCall assigned to the key.
To assign MultiCalls to JPD-100/P function keys, perform the following steps.
Note: You must access the programming mode and enter a valid
password. See paragraph 5.3 above.
STEP
1.
MONITOR DISPLAY
Use the gray up and down
arrow keys to move the
PROGRAM OPTIONS FOR:
arrow indicator to Program
A ALARM INPUT
Options and press Enter.
J JPD-100 QUICK KEY
T TIME INITIATED MCALL
C CAM/JPD PARTITIONING
M CAM/MON PARTITIONING
P JPD/MON PARTITIONING
D AUDIBLE ALARM: n SEC
Q QUICK PS PASSWORD YES
L ALARM MC ENABLED
517850-1960-II-J
KEMU040015
April 23, 2001
ASSIGNING MULTICALLS TO JPD-100/P FUNCTION KEYS
5-60
STEP
2.
3.
MONITOR DISPLAY
Press J on the KBD-100
Keyboard for JPD-100/P
Quick Key
Enter the address of the
JPD-100/P to be
programmed
The controller address is
jumper selectable between 1
and 8. The MSI accepts
addresses 1 through 4.
Each JPD-100/P contains 8
function keys (quick
switches).
517850-1960-II-J
Enter JPD Number
JPD KEY - ASSIGN MULTICALL
JPD NUMBER n
1-
•••
2-
•••
3-
•••
4-
•••
5-
•••
6-
•••
7-
•••
8-
•••
KEMU040015
April 23, 2001
ASSIGNING MULTICALLS TO JPD-100/P FUNCTION KEYS
5-61
STEP
4.
5.
MONITOR DISPLAY
Use the gray arrow keys to
move around in the table to
assign a MultiCall to the
desired function key.
To unassign (remove) a
MultiCall from a function key,
press the space bar until the
MultiCall number is erased.
Press Esc when done.
PROGRAM OPTIONS TO:
A ALARM INPUT
J JPD-100 QUICK KEY
T TIME INITIATED MCALL
C CAM/JPD PARTITIONING
M CAM/MON PARTITIONING
P JPD/MON PARTITIONING
D AUDIBLE ALARM: n SEC
Q QUICK PS PASSWORD YES
L ALARM MC ENABLED
6.
Select another menu option
or press Esc to exit.
517850-1960-II-J
KEMU040015
April 23, 2001
ASSIGNING MULTICALLS TO DATE AND TIME
5-62
5.5.10
Assigning MultiCalls to Date and Time
A MultiCall can be assigned to Date and Time. When the clock in the MSI
reaches the programmed time, the MSI starts the MultiCall. The MSI can be
programmed to repeat the same MultiCall at specific intervals. Up to ten
MultiCalls can be assigned to date and time. The same MultiCall can be
assigned to more than one date and time.
To assign MultiCalls to date and time, perform the following steps. Note:
You must access the programming mode and enter a valid password.
See paragraph 5.3 above.
STEP
1.
MONITOR DISPLAY
Use the gray up and down
arrow keys to move the
PROGRAM OPTIONS TO:
arrow indicator to Program
A ALARM INPUT
J JPD-100 QUICK KEY
T TIME INITIATED MCALL
C CAM/JPD PARTITIONING
M CAM/MON PARTITIONING
P JPD/MON PARTITIONING
D AUDIBLE ALARM: n SEC
Q QUICK PS PASSWORD YES
L ALARM MC ENABLED
Options and press Enter.
517850-1960-II-J
KEMU040015
April 23, 2001
ASSIGNING MULTICALLS TO DATE/TIIME
5-63
2.
STEP
Press T for time initiated
MultiCall.
COLUMN
DEFINITION
MC MultiCall # (0-250)
Start Date
Month/Day (MM/DD)
MM = 1-12
DD = 1-31
Time 24 Hour Clock (HH/MM)
HH = Hours = 0-23
MM = Minutes =0-59
Interval Day How many days from the
start date of MultiCall (099 days)
Time How many
hours/minutes from the
start time of MultiCall
(HH = 0-23, MM = 0-59)
MONITOR DISPLAY
MC
•••
•••
•••
•••
•••
•••
•••
•••
•••
•••
Start
Date-Time
../..-..:..
../..-..:..
../..-..:..
../..-..:..
../..-..:..
../..-..:..
../..-..:..
../..-..:..
../..-..:..
../..-..:..
Interval
Day-Time
..-..:..
..-..:..
..-..:..
..-..:..
..-..:..
..-..:..
..-..:..
..-..:..
..-..:..
..-..:..
To program a MultiCall to run
once at a specific time, enter
zeros in the interval fields. If a
MultiCall is programmed to only
run one time, after it has been
started and run, the MSI
automatically deletes that
MultiCall from the listing.
517850-1960-II-J
KEMU040015
April 23, 2001
ASSIGNING MULTICALLS TO DATE AND TIME
5-64
STEP
EXAMPLE 1
To run MultiCall #5 on 12/23 of
the current year at 3:00 PM and
then every 3 days plus 4 hours,
enter the following data.
MC
05
Start
Date-Time
12/23-15:00
MONITOR DISPLAY
Interval
Day-Time
03-04:00
After the MultiCall is run on 12/23
at 3:00 PM, the MSI updates the
start time to reflect the next time
the MultiCall is run.
MC
05
Start
Date-Time
12/26-19:00
Interval
Day-Time
03-04:00
December 26th is three days after
December 23rd. The 19th hour is
four hours after the 15th hour.
517850-1960-II-J
KEMU040015
April 23, 2001
ASSIGNING MULTICALLS TO DATE/TIIME
5-65
EXAMPLE 2
To run MultiCall #2 every day at
5:00 starting on 6/15 of the
current year, enter the following
data.
Start
Date-Time
06/15-5:00
MC
02
Interval
Day-Time
01-00:00
After the MultiCall is run on 06/15
at 5:00 PM, the MSI updates the
start time to reflect the next time
the MultiCall is run.
Start
Date-Time
06/16-5:00
MC
02
Interval
Day-Time
01-00:00
June 16 is one day after June 15
and the time does not change.
3.
Press Esc when done.
517850-1960-II-J
KEMU040015
April 23, 2001
PROGRAMMING FUNCTION KEY 1 ON JPD-100P
TO ENABLE/DISABLE ALARM MULTICALLS
5-66
5.5.11
Programming Function Key 1 (JPD-100P Controller) To Disable or
Enable Alarm MultiCalls
Function Key 1 on the JPD-100P Controllers can be programmed to disable
or enable MultiCalls started in response to an alarm. If function key 1 is
enabled to perform this function, it does not start the MultiCall assigned to it.
Note: You must access the programming mode and enter a valid
password. See paragraph 5.3 above.
STEP
1.
MONITOR DISPLAY
Use the gray up and down
arrow keys to move the
PROGRAM OPTIONS TO:
arrow indicator to Program
A ALARM INPUT
J JPD-100 QUICK KEY
T TIME INITIATED MCALL
C CAM/JPD PARTITIONING
M CAM/MON PARTITIONING
P JPD/MON PARTITIONING
D AUDIBLE ALARM: n SEC
Q QUICK PS PASSWORD YES
L ALARM MC ENABLED
Options and press Enter.
517850-1960-II-J
KEMU040015
April 23, 2001
PROGRAMMING FUNCTION KEY 1 ON JPD-100P
TO ENABLE/DISABLE ALARM MULTICALLS
5-67
STEP
MONITOR DISPLAY
2. Press L to toggle between
Enabled/No, Enabled/Run,
and Disabled.
Enabled/No and
Enabled/Run means
Function Key 1 is
programmed to enable and
disable MultiCalls started
by alarms. Note: Refer to
paragraph 4.2.3, Disable
Alarm MultiCalls, for a
description of the
Enabled/No and
Enabled/Run modes of
operation.
Disabled means Function
Key 1 is programmed for
standard operation. When
depressed, the MultiCall
assigned to the function
key is started.
517850-1960-II-J
KEMU040015
April 23, 2001
CAMERA CONTROLLER PARTITIONING
5-68
5.6
CAMERA CONTROLLER PARTITIONING
The MSI-100 can be programmed to define the cameras a JPD-100/P Joystick
Controller can address. The MSI is shipped with all controllers having the ability
to address all cameras.
Perform the following steps to define the cameras for a JPD-100/P Controller.
Note: You must access the programming mode and enter a valid
password. See paragraph 5.3 above.
STEP
1.
MONITOR DISPLAY
Use the gray up and down
arrow keys to move the
PROGRAM OPTIONS FOR:
arrow indicator to Program
A ALARMS
Options and press Enter.
J JPD-100/P JPD QUICK KEY
T TIME INITIATED MCALL
C CAM/JPD PARTITIONING
M CAM/MON PARTITIONING
P JPD/MON PARTITIONING
D AUDIBLE ALARM: n SEC
Q QUICK PS PASSWORD YES/NO
L ALARM MC ENABLED
517850-1960-II-J
KEMU040015
April 23, 2001
CAMERA CONTROLLER PARTITIONING
5-69
STEP
2.
Press C for camera
partitioning.
3.
MONITOR DISPLAY
To deny a controller camera
CAMERA/CONTROL PARTITION
CAM
CONTROLLER
CAM
1
2
3 4
1
Y
Y
Y Y
1
2
Y
Y
Y Y
2
3
Y
Y
Y Y
3
4
Y
Y
Y Y
4
5
Y
Y
Y Y
5
6
Y
Y
Y Y
6
7
Y
Y
Y Y
7
8
Y
Y
Y Y
8
Press Esc to Exit
EXAMPLE
access and control
capability, use the gray
arrow keys to move to the
location across from the
camera and down from the
controller, then type an N
over the Y.
If the camera is not
displayed, use the gray
arrow keys or the page up
and page down keys to scroll
through the camera
numbers.
517850-1960-II-J
CAMERA/CONTROL PARTITION
CAM
CONTROLLER
CAM
1
2
3 4
1
Y
Y
Y Y
1
2
Y
Y
Y Y
2
3
Y
Y
Y Y
3
4
Y
Y
Y Y
4
5
Y
Y
N Y
5
6
Y
Y
Y Y
6
7
Y
Y
Y Y
7
8
Y
Y
Y Y
8
Press Esc to Exit
In the above display Controller #3
cannot address camera 5.
KEMU040015
April 23, 2001
CAMERA CONTROLLER PARTITIONING
5-70
STEP
4.
When done programming,
press Esc.
5.
MONITOR DISPLAY
PROGRAM OPTIONS FOR:
A ALARMS
J JPD-100/P JPD QUICK KEY
T TIME INITIATED MCALL
C CAM/JPD PARTITIONING
M CAM/MON PARTITIONING
P JDP/MON PARTITIONING
D AUDIBLE ALARM: n SEC
Q QUICK PS PASSWORD YES/NO
L ALARM MC ENABLED
Select another menu option
or press Esc to exit the
Program Options Menu.
517850-1960-II-J
KEMU040015
April 23, 2001
CAMERA MONITOR PARTITIONING
5-71
5.7
CAMERA MONITOR PARTITIONING
The MSI-100 can be programmed to restrict an operator and the MSI from
switching specific cameras to specific monitors. The MSI default is all cameras
can be switched to all monitors.
Perform the following steps to restrict cameras from monitors. Note: You must
access the programming mode and enter a valid password. See paragraph
5.3 above.
STEP
1.
MONITOR DISPLAY
Use the gray up and down
arrow keys to move the
PROGRAM OPTIONS FOR:
arrow indicator to Program
A ALARMS
Options and press Enter.
J JPD-100/P JPD QUICK KEY
T TIME INITIATED MCALL
C CAM/JPD PARTITIONING
M CAM/MON PARTITIONING
J JPD/MON PARTITIONING
D AUDIBLE ALARM: n SEC
Q QUICK PS PASSWORD YES/NO
L ALARM MC ENABLED
517850-1960-II-J
KEMU040015
April 23, 2001
CAMERA MONITOR PARTITIONING
5-72
STEP
2.
MONITOR DISPLAY
Press M for monitor
partitioning.
517850-1960-II-J
CAMERA/MONITOR PARTITION
CAM
MONITOR
CAM
1
2
3 4
1
Y
Y
Y Y
1
2
Y
Y
Y Y
2
3
Y
Y
Y Y
3
4
Y
Y
Y Y
4
5
Y
Y
Y Y
5
6
Y
Y
Y Y
6
7
Y
Y
Y Y
7
8
Y
Y
Y Y
8
Press Esc to Exit
KEMU040015
April 23, 2001
CAMERA MONITOR PARTITIONING
5-73
STEP
3.
To restrict a camera from a
MONITOR DISPLAY
EXAMPLE
monitor, use the gray arrow
keys to move to the location
across from the camera and
down from the monitor, then
type an N over the Y.
If the camera (1-64) or
monitor (1-16) is not
CAMERA/MONITOR PARTITION
CAM
MONITOR
CAM
1
2
3 4
1
Y
Y
Y Y
1
2
Y
Y
Y Y
2
3
Y
Y
Y Y
3
4
Y
Y
Y Y
4
5
Y
Y
N Y
5
6
Y
Y
Y Y
6
7
Y
Y
Y Y
7
8
Y
Y
Y Y
8
Press Esc to Exit
displayed, use the gray
arrow keys and the page up
and page down keys to scroll In the above display Camera #5 is
through the menu.
4.
restricted from monitor 3.
When done programming,
press Esc.
PROGRAM OPTIONS FOR:
A ALARMS
J JPD-100/P JPD QUICK KEY
T TIME INITIATED MCALL
C CAM/JPD PARTITIONING
M CAM/MON PARTITIONING
J JPD/MON PARTITIONING
D AUDIBLE ALARM: n SEC
Q QUICK PS PASSWORD YES/NO
L ALARM MC ENABLED
517850-1960-II-J
KEMU040015
April 23, 2001
CAMERA MONITOR PARTITIONING
5-74
STEP
5.
MONITOR DISPLAY
Select another menu option
or press Esc to exit the
Program Options Menu.
517850-1960-II-J
KEMU040015
April 23, 2001
JOYSTICK MONITOR PARTITIONING
5-75
5.8
JOYSTICK MONITOR PARTITIONING
The MSI-100 can be programmed to define the monitors a JPD-100/P Joystick
Controller can address. The MSI default is all controllers have access to all
monitors.
Perform the following steps to restrict monitors from controllers. Note: You
must access the programming mode and enter a valid password. See
paragraph 5.3 above.
STEP
1.
MONITOR DISPLAY
Use the gray up and down
arrow keys to move the
PROGRAM OPTIONS FOR:
arrow indicator to Program
A ALARMS
Options and press Enter.
J JPD-100/P JPD QUICK KEY
T TIME INITIATED MCALL
C CAM/JPD PARTITIONING
M CAM/MON PARTITIONING
J JPD/MON PARTITIONING
D AUDIBLE ALARM: n SEC
Q QUICK PS PASSWORD YES/NO
L ALARM MC ENABLED
517850-1960-II-J
KEMU040015
April 23, 2001
JOYSTICK MONITOR PARTITIONING
5-76
STEP
2.
MONITOR DISPLAY
Press J for joystick monitor
partitioning.
517850-1960-II-J
CAMERA/MONITOR PARTITION
MON
CONTROLLER MON
1
2
3 4
1
Y
Y
Y Y
1
2
Y
Y
Y Y
2
3
Y
Y
Y Y
3
4
Y
Y
Y Y
4
5
Y
Y
Y Y
5
6
Y
Y
Y Y
6
7
Y
Y
Y Y
7
8
Y
Y
Y Y
8
Press Esc to Exit
KEMU040015
April 23, 2001
JOYSTICK MONITOR PARTITIONING
5-77
STEP
3.
To restrict a monitor from a
MONITOR DISPLAY
EXAMPLE
controller, use the gray
arrow keys to move to the
location across from the
monitor and down from the
controller, then type an N
over the Y.
If the monitor (1-16) is not
CAMERA/MONITOR PARTITION
MON
CONTROLLER MON
1
2
3 4
1
Y
Y
Y Y
1
2
Y
Y
Y Y
2
3
Y
Y
Y Y
3
4
Y
Y
Y Y
4
5
Y
Y
N Y
5
6
Y
Y
Y Y
6
7
Y
Y
Y Y
7
8
Y
Y
Y Y
8
Press Esc to Exit
displayed, use the gray
arrow keys and the page up
and page down keys to scroll In the above display monitor #5 is
through the menu.
4.
restricted from controller 3.
When done programming,
press Esc.
PROGRAM OPTIONS FOR:
A ALARMS
J JPD-100/P JPD QUICK KEY
T TIME INITIATED MCALL
C CAM/JPD PARTITIONING
M CAM/MON PARTITIONING
J JPD/MON PARTITIONING
D AUDIBLE ALARM: n SEC
Q QUICK PS PASSWORD YES/NO
L ALARM MC ENABLED
517850-1960-II-J
KEMU040015
April 23, 2001
JOYSTICK MONITOR PARTITIONING
5-78
STEP
5.
MONITOR DISPLAY
Select another menu option
or press Esc to exit the
Program Options Menu.
517850-1960-II-J
KEMU040015
April 23, 2001
SETTING THE TIME AND DATE
5-79
5.9
SETTING THE DATE AND TIME IN THE MSI-100
The date and time are set at the factory. The date and time are used by the MSI100 to start time activated MultiCalls. Perform the following steps to set or
change the date and time.
STEP
1.
MONITOR DISPLAY
Press Enter on the KBD-100
keyboard to access the
programming mode and enter a
valid password.
Program SmartScan
or Select
→ Program Options
Program MultiCalls
Time/Date Char. Gen.
Alarm Monitors/VCRs
Change Password
Log out - end program
Press Enter to Select
2.
Move the arrow indicator to
Time/Date Char. Gen. and press
Enter.
517850-1960-II-J
Enter 0 to Program All
or
Enter monitor NO. -
KEMU040015
April 23, 2001
SETTING THE TIME AND DATE
5-80
STEP
3.
MONITOR DISPLAY
Type 0 and press Enter to
program all.
→ Monitor Setup
Camera Setup
System Setup
Exit
Press ENTER to select
4.
Use the gray up and down arrow
keys to move the arrow indicator
to System Setup and press
Enter.
The current time and date are
SYSTEM SETUP
→ Set Time ...................16:52:59
Time Format ................ 24/HR
Set Date................10-DEC-96
Date Format..........DD:MM:YY
Options
Intensity
Exit
displayed on the menu.
Press Enter to Select
5.
To change the time, move the
arrow indicator to Set Time and
MMM:DD:YY
HH:MM:SS
Press Enter.
Time setup menu
-HH:MM:SS••-••-••
517850-1960-II-J
KEMU040015
April 23, 2001
SETTING THE TIME AND DATE
5-81
STEP
6.
MONITOR DISPLAY
Enter the time in
hours/minutes/seconds using a
24-hour format. The clock is set
upon entering the seconds. The
system setup menu display
shows the new time. If the time
SYSTEM SETUP
→ Set Time ...................16:52:59
Time Format ................ 24/HR
Set Date................10-DEC-96
Date Format..........DD:MM:YY
Options
Intensity
Exit
format is set to 12/HR, the
character generator converts the
Press Enter to Select
24/HR format you entered into
12/HR format with an AM or PM
designator.
Note: to leave the time setup
menu without entering a time,
press Esc.
7.
To change the time format, move
the arrow to Time Format and
press Enter until 24/HR or
12/HR appears. The time format
changes in the Set Time field to
display the format selected.
517850-1960-II-J
KEMU040015
April 23, 2001
SETTING THE TIME AND DATE
5-82
STEP
8.
MONITOR DISPLAY
To change the date, move the
arrow to Set Date in the System
MMM:DD:YY
HH:MM:SS
Setup Menu and press Enter.
Date Setup Menu
-YY:MM:DD••-••-••
9.
Enter the correct date (year,
month, day) and press Enter.
The programmed date appears
on the System Setup display in
the Set Date Field in the format
SYSTEM SETUP
→ Set Time ...................16:52:59
Time Format ................ 24/HR
Set Date................10-DEC-96
Date Format..........DD:MM:YY
Options
Intensity
Exit
shown in the Date Format Field.
Press Enter to Select
Note: to leave the date setup
menu without entering a date,
press the Esc key.
517850-1960-II-J
KEMU040015
April 23, 2001
SETTING THE TIME AND DATE
5-83
STEP
MONITOR DISPLAY
10. To change the date format, move
the arrow to Date Format in the
System Setup Menu and press
Enter until the desired format
appears.
There are two date formats:
a. Day/Month/Year
(DD:MM:YY)
b. Month/Day/Year
(MM:DD:YY)
The date is displayed in the menu
in the format selected.
517850-1960-II-J
KEMU040015
April 23, 2001
PROGRAMMING ALARM MONITORS AND ALARM VCRS
5-84
5.10
PROGRAMMING ALARM MONITORS AND ALARM VCRS
The MSI can be programmed to setup monitors as alarm monitors (AM) and
VCRs as alarm VCRs (AR). The alarm VCRs are setup to use the contact
outputs on the MSI. See paragraph 4.2.3 in Section 4 of this manual for the
operating procedures for the alarm monitors and alarm VCRs.
Perform the following steps to define alarm monitors and alarm VCRs.
NOTE
If there are active alarms, you cannot program
Alarm Monitors and Alarm VCRs.
STEP
1.
MONITOR DISPLAY
Press Enter on the KBD-100
keyboard and enter a valid
password to enter the
programming mode.
Program SmartScan
or Select
→ Program Options
Program MultiCalls
Time/Date Char. Gen.
Alarm Monitors/VCRs
Change Password
Log out - end program
Press Enter to select
517850-1960-II-J
KEMU040015
April 23, 2001
PROGRAMMING ALARM MONITORS AND VCRS
5-85
STEP
2.
MONITOR DISPLAY
Use the gray up and down arrow
keys to move the arrow indicator
to Alarm Monitors/VCRs and
press Enter.
On the standard MSI unit, you
can define all four video outputs
as alarm monitors. If the MSI has
expanded video outputs, you can
define up to sixteen video outputs
as alarm monitors. Alarm monitor
video outputs must be in
sequential order. The system
does not accept incorrect entries.
ALARM SETUP
ALARM MONITORS
FIRST ••
LAST ••
ALARM VCR VIDEO OUTPUTS
FIRST ••
LAST ••
ALARM VCR CNTRL OUTPUTS
FIRST ••
LAST ••
On the standard MSI unit, you
can define two alarm VCRs. If
there are two MSI chassis and/or
a CATS Expansion Chassis with
the RCO-4 option, you can define
up to eight alarm VCRs. The
alarm VCR video outputs must be
in sequential order. The system
does not accept incorrect entries.
The Alarm VCR Control Outputs
are set by the MSI. Contact
output 1 on the MSI is assigned to
the first VCR Video Output,
Contact output 2 on the MSI is
assigned to the next VCR Video
Output.
517850-1960-II-J
KEMU040015
April 23, 2001
PROGRAMMING ALARM MONITORS AND ALARM VCRS
5-86
STEP
3.
MONITOR DISPLAY
Enter the first video output and
the last video output on the MSI
for the alarm monitors.
If you enter 1 for the first video
output and 3 for the last number,
ALARM SETUP
ALARM MONITORS
FIRST - 1
LAST -3
video outputs 1, 2, and 3 are
setup as alarm monitors. The first
ALARM VCR VIDEO OUTPUTS
FIRST - ••
LAST - ••
two alarms called to alarm
monitors are displayed on
monitors 1 and 2, respectively.
ALARM VCR CNTRL OUTPUTS
FIRST - ••
LAST - ••
All remaining alarms called to
alarm monitors are sequenced in
2-second frames on monitor 3.
517850-1960-II-J
KEMU040015
April 23, 2001
PROGRAMMING ALARM MONITORS AND VCRS
5-87
STEP
4.
MONITOR DISPLAY
Enter the first video output and
the last video output on the MSI
for the alarm VCRs.
If you enter 4 for the first number
and 4 for the last number, video
ALARM SETUP
ALARM MONITORS
FIRST - 1
LAST - 3
output 4 is setup as the alarm
VCR.
ALARM VCR VIDEO OUTPUTS
FIRST - 4
LAST - 4
The MSI automatically assigns
ALARM VCR CNTRL OUTPUTS
FIRST - 1
LAST - 1
the first and last alarm VCR
control outputs. In this case,
contact output 1 is assigned to
the alarm VCR (video output 4).
5.
Press Enter when done.
ALARM SETUP
ALARM MONITORS
FIRST - 1
LAST - 3
ALARM VCR VIDEO OUTPUTS
FIRST - 4
LAST - 4
ALARM VCR CNTRL OUTPUTS
FIRST - 1
LAST - 1
ENTER OR ESC TO ACCEPT
PRESS E TO EDIT
517850-1960-II-J
KEMU040015
April 23, 2001
PROGRAMMING ALARM MONITORS AND ALARM VCRS
5-88
STEP
6.
MONITOR DISPLAY
Press Enter or Esc to Save and
exit programming alarm monitors
and VCRs. Press E to change
before saving.
517850-1960-II-J
KEMU040015
April 23, 2001
ALARM HORN DELAY
5-89
5.11
PROGRAMMING THE ALARM HORN DELAY
When an alarm occurs, the alarm horn sounds for the alarm delay duration
programmed.
STEP
1.
MONITOR DISPLAY
Press Enter on the KBD-100
keyboard and enter a valid
password to enter the
programming mode.
Program SmartScan
or Select
→ Program Options
Program MultiCalls
Time/Date Char. Gen.
Alarm Monitors/VCRs
Change Password
Log out - end program
Press Enter to select
2.
Select Program Options.
PROGRAM OPTIONS FOR:
A ALARMS
J JPD-100/P JPD QUICK KEY
T TIME INITIATED MCALL
C CAM/JPD PARTITIONING
M CAM/MON PARTITIONING
D AUDIBLE ALARM: n SEC
P QUICK PS PASSWORD YES/NO
L ALARM MC ENABLED
517850-1960-II-J
KEMU040015
April 23, 2001
ALARM HORN DELAY
5-90
STEP
3.
4.
MONITOR DISPLAY
Press D until the desired seconds
(0-8) is displayed.
Press Esc to exit the Program
Options Menu.
517850-1960-II-J
KEMU040015
April 23, 2001
CHANGING PASSWORD
5-91
5.12
CHANGING PASSWORD
The factory programmed password is MSI. The password can be changed to
any alphanumeric consecutive characters (up to 10). If you forget the password,
you must power down the unit, set DIP Switch S1-8 on the printed circuit board
inside the unit to ON and power up the unit. This procedure returns the
password to MSI. Then power down the unit again, set DIP switch S1-8 to off
and power up the unit.
To change the password, you must access the programming mode with a
valid password. Perform the following steps to change the password.
STEP
1.
MONITOR DISPLAY
Select Change Password and
press Enter.
2.
Type the new password and
press Enter. The password is
displayed as X’s.
3.
Retype the new password for
verification.
517850-1960-II-J
KEMU040015
April 23, 2001
END PROGRAMMING
5-92
5.13
LOG OUT - END PROGRAMMING
When you have completed programming the MSI unit and all SmartScan units,
log out of (exit) the programming mode. After you have exited programming, you
can disconnect the monitor from the programming output if you desire. However,
if you want to change any programming, you must reconnect the programming
output to a monitor or a spare video input to view the programming menus.
STEP
1.
MONITOR DISPLAY
Select Log Out - End Program
and press Enter; or simply
press the Esc key.
MSI Programming
Hit the Enter Key
2.
You are now out of the
programming mode. To
program the MSI or the
SmartScan units, you must
reaccess the programming
mode.
517850-1960-II-J
KEMU040015
April 23, 2001
SAMPLE PROGRAMMING
5-93
5.14
SAMPLE SYSTEM PROGRAMMING
The following examples provide some typical situations and the methods used for
programming the system's responses.
All of the examples require an MSI-100 Unit, a KBD-100 Keyboard, and a JPD100/P Controller. The KBD-100 keyboard is plugged into the rear panel of the
JPD-100/P.
A. Jewelry Store with One Entrance/Exit
Scenario:
The store manager wants to view all customers entering/exiting
the store on a monitor in his office and tape the video for 10
seconds as well.
When a person passes through the entrance, a sensor sends an alarm to the
system. The alarm is assigned to a MultiCall that sends a SmartScan unit
mounted in the ceiling near the entrance to view the entrance, calls the video
from the SmartScan unit up on the monitor and VCR in his office, and
records the video for 10 seconds. After taping the entrance for 10 seconds,
the system automatically acknowledges the alarm. When the alarm record
(AR) function is used, acknowledging the alarm returns the contact output
(VCR) to its state before the MultiCall was started. The MultiCall does not
need a line to turn the contact output (VCR) off.
Perform the following steps to program the system to respond as described
above.
517850-1960-II-J
KEMU040015
April 23, 2001
SAMPLE PROGRAMMING
5-94
1.
Outline your system.
SmartScan Unit (Ceiling Entrance) = Camera #2.
Monitor in Office = Video Output (Monitor) #1
Alarm (Entrance) = Alarm Input #4
VCR in Office = Video Output #3 and Auxiliary Output #1 on MSI-100
2.
Program PreShot 1 on Camera #2 to view the entrance door.
a.
Call up Camera 2 on Monitor 1 on the programming JPD-100/P
Controller.
b.
2
CNT
(Control Camera 2)
1
MON
CNT
(Control Monitor 1)
Move the joystick (pan, tilt, zoom) so camera #2 is viewing the
desired location at the front entrance and adjust the focus.
c.
Access the MSI programming mode (press the Enter key) and logon with a valid password (MSI).
d.
Press Shift F5 on the KBD-100 keyboard.
e.
Type 1 for the PreShot Number and press Enter.
f.
Type the title of the PreShot (up to 16 characters)
Entrance Door
Press Enter
3.
g.
Press S to save the present view on the monitor and the title.
h.
Press Esc to exit programming PreShots.
i.
Press End to end programming SmartScans
Program the alarm monitor and alarm VCR.
517850-1960-II-J
KEMU040015
April 23, 2001
SAMPLE PROGRAMMING
5-95
a.
b.
c.
Select Alarm Monitors/VCRs and press Enter.
Enter 1 for first alarm monitor and 1 for last alarm monitor.
Enter 3 for the first alarm VCR and 3 for the last VCR.
The alarm setup display should be:
ALARM SETUP
ALARM MONITORS
FIRST 01
LAST 01
ALARM VCR VIDEO OUTPUTS
FIRST 03
LAST 03
ALARM VCR CNTRL OUTPUTS
FIRST 01
LAST 01
4.
Program MultiCall 1 for alarm 4. Simultaneously call up camera 2 to the
alarm monitor and VCR, and send camera 2 to PreShot 1. After 10
seconds, acknowledge the alarm.
a.
b.
c.
517850-1960-II-J
Select Programming MultiCalls
Type 1 for the MultiCall number and press Enter.
Type the title for the MultiCall (up to 16 characters) and press
Enter.
KEMU040015
April 23, 2001
SAMPLE PROGRAMMING
5-96
d.
Enter the following functions in the MultiCall.
00
01
02
03
04
05
06
07
FUN
NUM
CAM
C
C
P
C
.
.
.
.
AM
AR
1
AA
..
..
..
..
2
2
2
MISC
0.0
...
....
....
...
....
...
....
...
MULTICALL 001
ENTER FUNCTION
P,V,M,C, or A
DWELL
00
00
10
00
..
..
..
..
MultiCall Line Definitions:
Line 00 calls Camera 2 to an alarm monitor.
Line 01 calls Camera 2 to the alarm VCR and turns the VCR
on.
Line 02 calls PreShot 1 in Camera #2, then wait 10 seconds
before performing the next line.
Line 03 acknowledges the alarm assigned to MultiCall 1 and
turns the VCR off.
e.
f.
g.
517850-1960-II-J
Position the cursor in the FUN field in row 04 and press Enter
Press S or Esc to Save the MultiCall.
Press Esc to exit programming MultiCalls
KEMU040015
April 23, 2001
SAMPLE PROGRAMMING
5-97
5.
Assign MultiCall 1 to alarm #4.
a.
b.
c.
d.
e.
Select Program Options
Press A
Locate alarm 4 and type 1 in the MC column.
Press Esc.
Press Esc to exit Program Options
B. Warehouse with Delivery Truck Gate
Scenario:
The warehouse has a truck entrance for delivery trucks. When
a truck pulls up to the gate a sensor triggers an alarm to send a
SmartScan camera to view the gate, call the video up on a
monitor and VCR on the receiving supervisor's desk, and turn
on the VCR to tape the view for 15 seconds, then acknowledge
the alarm.
Perform the following steps to program the system to respond as required
above.
1.
Outline your system.
Receiving Dock Camera = Camera #6
Monitor on Supervisor's Desk = Video Output (Monitor) #2
VCR = Video Output #3 and Auxiliary Contact Output #1 on AIF-100/CO
addressed 2
Alarm = Contact Input 5
517850-1960-II-J
KEMU040015
April 23, 2001
SAMPLE PROGRAMMING
5-98
2.
Program PreShot 4 on Camera 6 to view the receiving dock.
a.
b.
c.
d.
e.
f.
g.
h.
i.
3.
Call up camera 6 on monitor 2 on the programming JPD-100/P.
6 ENT
2 MON CNT
Move the joystick (pan, tilt, zoom) so camera #6 is viewing the
desired location at the truck entrance and adjust the focus.
Accessing the programming mode and entering a valid password.
Press Shift F5 on the KBD-100 keyboard.
Type 4 for the PreShot number and press Enter.
Type the title of the PreShot (up to 16 characters)
Truck Gate
Press Enter
Press S to save the present view on the monitor and the title.
Press Esc to end programming PreShots.
Press End to exit programming SmartScans
Program MultiCall 7 for alarm 5. Send camera 6 to PreShot 4, call
camera 6 to monitor 2, turn on the VCR, wait 15 seconds, turn off the
VCR, and acknowledge the alarm.
a.
b.
c.
517850-1960-II-J
Select Program MultiCall from the Programming Menu.
Type 7 for the MultiCall number and press Enter.
Type the MultiCall title (up to 16 characters) and press Enter.
KEMU040015
April 23, 2001
SAMPLE PROGRAMMING
5-99
d.
Enter the following functions in the MultiCall.
00
01
02
03
04
05
06
07
FUN
C
C
A
P
A
C
.
.
NUM
2
3
1
4
1
AA
..
..
CAM
6
6
2
6
2
MISC
1
0.0
0
...
...
....
....
DWELL
00
00
00
15
00
00
..
..
MULTICALL 007
ENTER FUNCTION
P,V,M,C, or A
Line Definitions:
00 = Call Camera Six to Video Output 2 (Monitor) 2
01 = Call Camera Six to Video Output (VCR) #3
02 = Turn on Auxiliary Contact Output 1
03 = Send Camera Six to PreShot 4, then wait 15 seconds.
04 = Turn off Auxiliary Contact Output 1
05 = Acknowledge Alarm assigned to MultiCall 7.
Lines 00 through 03 are performed simultaneously. After 15
seconds, lines 04 and 05 are performed simultaneously.
e.
f.
g.
517850-1960-II-J
Position in FUN field of row 06 and press Enter.
Press S or Esc to Save the MultiCall.
Press Esc to end programming MultiCalls.
KEMU040015
April 23, 2001
SAMPLE PROGRAMMING
5-100
4.
Assign MultiCall 7 to Alarm #5.
a.
b.
c.
d.
e.
517850-1960-II-J
Select Program Options in the Programming Menu.
Press A for Alarm Inputs.
Locate alarm 5 and type 7 in the MC column next to NUM 5.
Press Esc.
Press Esc to end programming alarms
KEMU040015
April 23, 2001
5-101
Table 5-2. PROGRAMMING KEYBOARD COMMANDS
Command
Definition
F1
"GO TO" PreShot
F2
Run VectorScan Once
F3
Run VectorScan Continuously
F4
Run MultiCall
F5
List PreShots - Press F5 again to display the next page of the listing.
'Shift' F5*
Program PreShot
F6
List VectorScans - Press F6 again to display the next page of the
listing.
'Shift' F6*
Program VectorScans
F7
List VectorScan Contents - Press F7 again to display the next page of
the listing.
F8
List Sectors - Press F8 again to display the next page of the listing
'Shift' F8*
Program Sector IDs
F9
Initialize SmartScan Unit’s Position (Find Home)
F11
List MultiCalls
F12
Help
'Esc'
The 'Esc' key causes the SmartScan unit to back up one step in the
programming sequence and eventually returns the SmartScan unit to
manual control.
*Must access MSI programming with valid password
517850-1960-II-J
KEMU040015
April 23, 2001
6-1
SECTION 6. MAINTENANCE
6.1
MAINTENANCE PROCEDURES
a.
Preventive Maintenance
Use of preventive maintenance allows detection and correction of minor
faults before they become serious enough to cause equipment failure. As
a result, major repairs can be avoided, and the equipment can be
maintained in an operable condition with a minimum of maintenance.
Every 3 months, perform the following.
1.
Inspect all interface connecting cabling for deterioration or other
damage.
2.
Clean the front panel with a soft cloth using any mild commercial
cleaner.
b.
Troubleshooting
If problems occur at the initial installation phase, verify the installation
procedures and DIP switch and jumper settings are as outlined in Section
2. Because this unit is just one part of an overall system, it may be
necessary to verify that the other equipment types have been installed and
are operating correctly before assuming the problem exists at the MSI-100
Unit.
517850-1960-II-J
KEMU040015
April 23, 2001
6-2
If problems still exist after verifying correct installation and the problem
has been isolated to the MSI-100, then it must be removed for servicing.
THE MSI-100 HAS NO USER-SERVICEABLE PARTS. REFER
SERVICING TO QUALIFIED PERSONNEL ONLY.
c.
Battery Replacement
The MSI-100 unit has a lithium battery located on the control board, part
number 517822-1040. The life expectancy of the battery is 10 years. If
necessary, replace the battery with a Matsushita Electric Battery, Part
Number BR2325. This battery is available through Ultrak, part number
840301-0028 or Panasonic, part number BR2325-1HB. Use of another
battery may present a Risk of Fire or Explosion.
CAUTION
Battery May Explode If Mistreated. Do Not
Recharge, Disassemble Or Dispose Of In
Fire.
6.2
EQUIPMENT RETURN
Any equipment returned to Ultrak for warranty or service repair must have a prior
written Authorization to Return Material (ARM) form completed for its repair.
Contact:
517850-1960-II-J
KEMU040015
April 23, 2001
6-3
Ultrak, Inc.
Service Department
4465 Coonpath Road
Carroll, Ohio 43112
(740) 756-9222
Toll Free (USA) 1-800-443-6681
517850-1960-II-J
KEMU040015
April 23, 2001
7-1
SECTION 7. TIME DATE CHARACTER GENERATOR OPTION
7.1
DESCRIPTION
The time date character generator is a factory installed option. The character
generator option provides a character generator for each video output. The
character generators can be programmed globally or individually for each video
output. Through the use of the character generators, the MSI can be
programmed to output camera IDs, the time, and the date on the video outputs.
Positioning of the displays and enabling or disabling the displays can be setup
globally for all video outputs or each video output can be setup individually.
A camera ID can be programmed for each video input. The positioning of the
camera ID and enabling or disabling the camera ID on the monitor can be
programmed to override the programming for camera ID for the monitor setup.
Time
The time can be enabled or disabled globally for all video outputs or enabled or
disabled for individual video outputs. If the time is enabled for a video output, it
can be positioned anywhere on the screen depending on the programming. The
time can be displayed on a 12-hour clock with AM or PM designations or on a 24hour clock.
517850-1960-II-J
KEMU040015
April 23, 2001
7-2
Date
The date can be enabled or disabled globally for all video outputs or enabled or
disabled for individual video outputs. If the date is enabled for a video output, it
can be positioned anywhere on the screen. The date can be displayed as
Month/Day/Year or Day/Month/Year.
Camera ID
A camera ID can be programmed for each video input. The default camera ID is
CAM-001 for video input 1, CAM-025 for video input 25, CAM-032 for video input
32, etc. The camera ID can be enabled or disabled for all video outputs or
enabled or disabled for individual video outputs. If the camera ID is enabled for
the video outputs, it can be displayed anywhere on the screen.
The camera ID for an individual video input can also be enabled, disabled, or the
monitor setup (default) can be used. If a camera ID is enabled for an individual
video input, the monitor setup is overridden, and the position programmed for the
individual camera ID is used. If the camera ID for an individual camera is
disabled, the monitor setup is overridden and the camera ID is disabled on all
monitors for that camera.
517850-1960-II-J
KEMU040015
April 23, 2001
7-3
NOTE
The SmartScan units output a camera ID on
the video signal. This camera ID is created by
the SmartScan by the DIP switch setting for the
camera address. This display can be enabled
or disabled at the JPD-100/P Controller. Refer
to the JPD-100/P Controller User’s Manual for
enabling or disabling the SmartScan generated
camera ID.
7.2
PROGRAMMING THE TIME, DATE, AND CHARACTER GENERATOR IN THE
MSI-100
The time, date, and camera IDs (up to 24 characters) are programmable in the
MSI. There are three progammable categories for the character generator.
1.
Monitor Setup
The positions of the Camera ID, date, and time displays on the video
outputs are programmed using the Monitor Setup Menu. The Camera ID,
date, and time displays can be enabled or disabled using the Monitor SetUp menu. The monitors can be programmed globally or individually, if
other than factory default settings are desired. Camera IDs and the time
and date displays are enabled when shipped.
2.
Camera Setup
The Camera IDs are programmed using the Camera Setup Menu. A
position can be programmed for each Camera ID that overrides the
517850-1960-II-J
KEMU040015
April 23, 2001
7-4
position selected for Camera ID in the Monitor Setup Menu. All Camera
IDs can be programmed without leaving the Camera Setup Menu. The
factory default setting for each camera is CAM-nn. nn is the video input
number the camera is connected to on the switcher. The camera ID
display is enabled and the position of the camera ID is in the monitor
default position when shipped.
3.
System Setup
The time, time format, date, and date format are programmed using the
System Setup Menu. These settings are global settings for all video
signals.
The intensity (brightness) of the characters generated can be set using the
System Setup Menu. The intensity can be adjusted globally for all
monitors or individually for each monitor.
517850-1960-II-J
KEMU040015
April 23, 2001
7-5
7.2.1
Monitor Setup
To change the default display positions for the monitors or to enable or
disable a display, perform the following steps. Note: you must access the
MSI programming mode and enter a valid password.
STEP
1.
Use the gray up and down
arrow keys to move the arrow
indicator to Time/Date Char.
Gen. and press Enter.
MONITOR DISPLAY
ENTER 0 to Program All
or
Enter monitor NO. -
2.
Type in 0 to program all
monitors globally or type the
monitor number to program
and press Enter.
→ -Monitor Setup
-Camera Setup
-System Setup
-Exit
Press ENTER to select
517850-1960-II-J
KEMU040015
April 23, 2001
7-6
STEP
3.
MONITOR DISPLAY
Use the gray up and down
arrow keys to move the arrow
indicator to Monitor Setup and
press Enter.
SETUP FOR MONITOR -nn
CAMERA ID.
→ -Display......................... EN
-Position.................... 01,01
DATE
-Display......................... EN
-Position.................... 02,01
TIME
-Display......................... EN
-Position.................... 03,01
-EXIT
Press ENTER to select
4.
Move the arrow to Display
under CAMERA ID. EN
enables the Camera ID
display on the monitor being
programmed. DIS disables
the Camera ID display on the
monitor being programmed.
To change the selection,
press the Enter key until the
desired selection is displayed.
517850-1960-II-J
KEMU040015
April 23, 2001
7-7
STEP
5.
MONITOR DISPLAY
Move the arrow to Position
under Camera ID. The
current position is shown on
the menu.
Example:
Camera ID
-Display ...................EN
-Position ..............03;02
The first number (03) refers to
the number of spaces from
the left of the screen and the
second number (02) refers to
the number of lines down from
the top of the screen.
6.
To change the current
position, press ENTER.
A dot matrix screen
(representing character
positions) is displayed on the
monitor. The current date,
time, and camera ID are
displayed at their
programmed positions on the
monitor. The Camera ID
position is blinking on the
monitor.
517850-1960-II-J
••CAM-017•••••••••••••••
••10-DEC-93•••••••••••••
••16:27:35••••••••••••••
•••• •••••••••••••• ••••••
••••••• •••••••••••••• •••
•• ••••••••••••••••••• •••
••• •••••••••••••••••• •••
•••••• •••••••••• ••••••••
•• ••••••••••••• ••••••••
•• •••••••••••• ••••••••••
••••• •••••••••••••••• •••
••• •••••••••••••• •••••••
KEMU040015
April 23, 2001
7-8
STEP
7.
MONITOR DISPLAY
Use the gray arrow keys to
move the Camera ID display
to where you want it to be
positioned on the monitor.
8.
Press Enter to save the new
position. The display returns
to the MONITOR SETUP
MENU.
SETUP FOR MONITOR -nn
CAMERA ID.
→ -Display.............................. EN
-Position......................... 03,03
DATE
-Display.............................. EN
-Position......................... 03,03
TIME
-Display.............................. EN
-Position......................... 03,03
-EXIT
Press ENTER to select
9.
Repeat steps 4 through 8 to
enable/disable and change
the display positions for DATE
and TIME as desired.
10.
To end programming and
save the programming for a
monitor, move the arrow to
EXIT and press Enter or
press Esc.
517850-1960-II-J
→ -Monitor Setup
-Camera Setup
-System Setup
-Exit
Press ENTER to select
KEMU040015
April 23, 2001
7-9
STEP
11.
MONITOR DISPLAY
At this point, you have several
options:
a.
b.
c.
7.2.2
Program the camera IDs
by selecting Camera
Setup.
Select System Setup to
program the date, time,
and character
brightness.
End programming by
selecting Exit or pressing
Esc.
Camera Setup
The Camera ID for each video input is programmable. The position of the
camera ID is programmable and overrides the position programmed for
Camera ID in the Monitor Setup.
Perform the following procedure to program Camera IDs. Note: you must
be in the programming mode and have logged on with a valid
password.
517850-1960-II-J
KEMU040015
April 23, 2001
7-10
1.
2.
STEP
Using the gray up and down
MONITOR DISPLAY
arrow keys, move the arrow
Enter 0 to Program All
indicator to Time/Date Char.
or
Gen. And press Enter.
Enter monitor NO. -
Enter 0 and press Enter to
program the camera IDs.
→ - Monitor Setup
- Camera Setup
- System Setup
- Exit
517850-1960-II-J
KEMU040015
April 23, 2001
7-11
3.
STEP
Move the arrow indicator to
MONITOR DISPLAY
Camera Setup and press
CAMERA SETUP
Enter.
All programming done from
this menu is saved for the
camera number displayed. In
the display shown, all
programming will be saved for
Camera 001.
→ -Display Mode............. EN
-Set Position ........... 03,03
-Edit Camera ID
-Camera Number ....... 001
-EXIT
Press ENTER to select
The Camera ID for all
cameras can be programmed
without leaving this menu by
entering the camera number
to be programmed, entering
the desired information in all
the options; then changing
the camera number to the
next camera and
programming the desired
information in all the options,
until all Camera IDs are
programmed.
517850-1960-II-J
KEMU040015
April 23, 2001
7-12
4.
STEP
Enter the camera number to
MONITOR DISPLAY
be programmed by moving
the arrow to Camera Number
Enter Camera Number - 000
and press Enter.
Use ENTER to Accept
5.
Type the camera number and
press Enter. The screen
returns to the Camera Setup
Menu. The camera number
entered is displayed in the
Camera Number field.
CAMERA SETUP
→ -Display Mode ........... EN
-Set Position.......... 03,03
-Edit Camera ID
-Camera Number ..... nnn
-EXIT
Press ENTER to select
nnn = camera number entered.
517850-1960-II-J
KEMU040015
April 23, 2001
7-13
6.
STEP
Program the Camera ID.
MONITOR DISPLAY
Move the arrow to Edit
Camera ID and press Enter.
CAM-nnn••••••••••••••••••
↑• • • • • ••••••••••••••••••
The first row of dots is where
the camera identification
appears as you type the
characters. The second row
has an arrow to show you
where the character you type
is entered. Use the gray
arrow keys to move the
cursor to the desired location
to enter characters. The
cursor is helpful when editing
an existing camera
identification.
7.
Type the camera ID and
press Enter.
CAMERA SETUP
in the Camera Setup Menu
→ -Display Mode ........... EN
-Set Position.......... 03,03
-Edit Camera ID
-Camera Number ..... nnn
-EXIT
unless you change the
Press ENTER to select
The Camera ID is saved for
the camera number shown
camera number first.
517850-1960-II-J
KEMU040015
April 23, 2001
7-14
8.
STEP
Select the Display Mode of
the Camera ID. There are
three display modes for the
camera identification. Press
ENTER until the desired
mode is displayed.
a.
b.
517850-1960-II-J
MONITOR DISPLAY
The DEFAULT mode
displays the camera
identification in the
position programmed for
Camera ID in the Monitor
Setup Menu. When the
camera is switched to a
monitor, the Camera ID
is displayed in the
position programmed for
Camera ID on that
monitor.
The EN mode overrides
the Camera ID position
programmed for the
monitor in the Monitor
Setup Menu. The
Camera ID for each
monitor can be
individually positioned on
the monitors. When the
camera is switched to a
monitor, the camera
identification is displayed
in the position
programmed for the
camera number in the
Camera Setup Menu.
KEMU040015
April 23, 2001
7-15
9.
STEP
c. The DIS mode disables
the camera ID display for
the camera number
shown in the current
menu. The DIS mode in
this menu overrides the
EN mode in the Monitor
Setup Menu. When this
camera is switched to a
monitor, the Camera ID
is not displayed.
If the EN display mode is
selected, program the
position of the Camera ID for
the camera number shown on
the Camera Setup Menu.
The current position is
displayed.
To change the current
location, move the arrow to
Position and press Enter.
The current date, time, and
camera ID are displayed at
their programmed positions
on the monitors.
10.
517850-1960-II-J
MONITOR DISPLAY
•CAM-nnn••••••••••••••••
•10-DEC-95••••••••••••••
•16:50:36••••••••••••••••
•••••••••• •••••••••• ••••
•••••••••• •••••••••• ••••
•••••••••• •••••••••• ••••
•••••••••• •••••••••• ••••
•••••••••• •••••••••• ••••
•••••••••• •••••••••• ••••
•••••••••• •••••••••• ••••
•••••••••• •••••••••• ••••
•••••••••• •••••••••• ••••
Use the gray arrow keys to
move the camera ID display
to where you want the display
to be positioned on the
monitor.
KEMU040015
April 23, 2001
7-16
11.
STEP
Press Enter to save the new
position.
MONITOR DISPLAY
CAMERA SETUP
→ -Display Mode ........... EN
-Set Position.......... 03,03
-Edit Camera ID
-Camera Number ..... nnn
-EXIT
Press ENTER to select
12.
13.
Repeat steps 4 through 11 to
program another Camera ID.
When done programming
Camera IDs, select EXIT in
the Camera Setup Menu and
press Enter or press Esc.
→
-Monitor Setup
-Camera Setup
-System Setup
-Exit
Press ENTER to select
14.
7.2.3
Make another programming
selection or end programming
by selecting Exit or pressing
Esc.
System Setup
The time and time format, the date and date format, and the brightness
(intensity) of the generated characters are programmed using the System
Setup Menu. The time and date are programmed globally for all monitors.
517850-1960-II-J
KEMU040015
April 23, 2001
7-17
The intensity of the characters can be programmed globally or for a specific
monitor. If the intensity of the characters are programmed from monitor 0,
the intensity is adjusted globally for all monitors. If a specific monitor is
selected, the intensity is adjusted for only that monitor.
Perform the following steps to set the time and date, to select the time and
date format, and to adjust the character intensity. Note: you must be in the
programming mode and have logged on with a valid password.
1.
2.
STEP
Use the gray up and down
arrow keys to move the arrow
indicator to Time/Date Char.
Gen.
Enter 0 to program all monitors
or enter a specific monitor
number (1-4) to program the
intensity of the characters for
only that monitor.
MONITOR DISPLAY
Enter 0 for All
or
Enter Monitor No. -
→ -Monitor Setup
-Camera Setup
-System Setup
-Exit
Press ENTER to select
517850-1960-II-J
KEMU040015
April 23, 2001
7-18
3.
STEP
Move the arrow indicator to
System Setup and press
Enter.
The current time, time format,
date and date format are
displayed. The time updates as
you view the menu.
To change any of the settings,
perform the following steps as
desired.
MONITOR DISPLAY
SYSTEM SETUP
→ -Set Time
16:52:59
-Time Format..................... 24/HR
-Set Date .......................10-DEC-95
-Date Format .................DD:MM:YY
-Options
-Intensity
-EXIT
Press Enter to select
Note: The options menu is
not used at this time.
4.
To change the time, move the
arrow to Set Time and Press
Enter.
MMM:DD:YY
HH:MM:SS
Time setup menu
-HH:MM:SS---•• - •• - ••
517850-1960-II-J
KEMU040015
April 23, 2001
7-19
5.
STEP
Enter the time in
hours/minutes/seconds using a
24-hour format. The clock is
set upon entering the seconds.
The system setup menu display
shows the new time. If the time
format is set to 12/HR, the
character generator converts
the 24/HR format you entered
into 12/HR format.
MONITOR DISPLAY
SYSTEM SETUP
→ -Set Time....................... 16:52:59
-Time Format..................... 24/HR
-Set Date ................... 10-DEC-95
-Date Format ............. DD:MM:YY
-Options
-Intensity
-EXIT
Press Enter to select
Note
6.
7.
To leave the time setup menu
without entering a time, press
Esc.
To change the time format,
move the arrow to Time Format
in the System Setup menu and
press Enter until 24/HR or
12/HR appears. The time
format changes in the Set Time
field to display the format
selected.
To change the date, move the
arrow to Set Date in the System
Setup Menu and press Enter.
MMM:DD:YY
HH:MM:SS
Date Setup Menu
-YY:MM:DD---•• - •• - ••
517850-1960-II-J
KEMU040015
April 23, 2001
7-20
8.
STEP
Enter the correct date (year,
month, day) and press Enter.
The programmed date appears
on the System Setup display in
the Set Date Field in the format
shown in the Date Format Field.
Note
To leave the date setup menu
without entering a date, press
the Esc key.
9.
MONITOR DISPLAY
MMM:DD:YY
HH:MM:SS
SYSTEM SETUP
→ -Set Time ....................16:52:59
-Time Format ................. 24/HR
-Set Date.................10-DEC-95
-Date Format...........DD:MM:YY
-Options
-Intensity
-EXIT
Press Enter to select
To change the date format,
move the arrow to Date Format
in the System Setup Menu and
press Enter until the desired
format appears.
There are two date formats:
a. Day/Month/Year
(DD:MM:YY)
b. Month/Day/Year
(MM:DD:YY)
The date is displayed in the
format selected.
517850-1960-II-J
KEMU040015
April 23, 2001
7-21
STEP
10. To change the Intensity of the
generated characters, move the
arrow to Intensity and press
Enter.
Note: Does not change
characters on programming
monitor; only video outputs.
MONITOR DISPLAY
MMM:DD:YY
HH:MM:SS
Brightness
Increase - ↑ Decrease - ↓
Use Esc to exit
11. Press the gray up arrow key on
the keyboard to increase the
intensity (whitens the
characters). Press the gray
down arrow key on the
keyboard to decrease the
intensity (darken the
characters). The display
changes to show the brightness
as it is changed.
12. After the desired brightness is
achieved, press the Esc key to
leave the intensity adjustment
menu.
SYSTEM SETUP
→ -Set Time...........................16:52:59
-Time Format........................ 24/HR
-Set Date .......................10-DEC-95
-Date Format .................DD:MM:YY
-Options
-Intensity
-EXIT
Press Enter to select
517850-1960-II-J
KEMU040015
April 23, 2001
7-22
STEP
13. Move the arrow to EXIT and
press ENTER or press Esc.
The display returns to the
Time/Date Char. Gen. menu.
MONITOR DISPLAY
→
-Monitor Setup
-Camera Setup
-System Setup
-Exit
Press ENTER to select
14. Choose another setup menu or
select Exit (or press Esc) to exit
the Time/Date Char. Gen
programming menu.
517850-1960-II-J
KEMU040015
April 23, 2001
8-1
SECTION 8. LOOPING SWITCHER PANEL OPTION
8.1
DESCRIPTION
The looping switcher panel option (part number 517942-1030) has 32 BNC
connectors for looping the video from the 32 video inputs on the MSI-100 to
another video device (i.e. a monitor or VCR). If expanded systems where there
are two MSI chassis in the system, two looping panels are required. If CATS
expansion chassis are installed, the looping panel is connected to the last
expansion chassis in the system. Two ribbon coaxial cables are provided with
each panel for connection between the panel and the MSI-100 coaxial header
connectors. A 1-3/4” space is required between the MSI-100 chassis and the
looping panel for cable and connectors. Each video run must be terminated in
75-ohm at the last device in the run.
Figure 8-1. LOOPING INPUT PANEL
517850-1960-II-J
KEMU040015
April 23, 2001
A-1
APPENDIX A. SYSTEM CONFIGURATION
A.1
GENERAL
Prior to programming the MSI-100, identify all pieces of equipment and their
addresses in your specific system.
Refer to the following paragraphs for assistance in identifying equipment
addresses.
A.1.1
Camera Numbers
The MSI-100 has 32 video inputs. Each FastScan/SmartScan unit should be
addressed the same as the video input it is connected to.
The camera number for the SmartScan III units is set using rotary switches
SW1 through SW3.
Switch
Digit
SW1
Hundreds
SW2
Tens
SW3
Ones
The camera number for the FastScan/SmartScan Units is set up using an 8position DIP switch on the unit's Digital Receiver Board. Table A-1 identifies
the settings for FastScan/SmartScan camera addresses 1 through 32.
517850-1960-II-J
KEMU040015
April 23, 2001
A-2
Table A-1. FASTSCAN/SMARTSCAN UNIT ADDRESSING
ON = 0
CAMERA
NUMBER
1
2
3
4
5
6
7
8
9
10
11
12
13
14
15
16
17
18
19
20
21
22
23
24
25
26
27
28
29
30
31
32
517850-1960-II-J
OFF = 1
8
0
0
0
0
0
0
0
0
0
0
0
0
0
0
0
0
0
0
0
0
0
0
0
0
0
0
0
0
0
0
0
0
7
0
0
0
0
0
0
0
0
0
0
0
0
0
0
0
0
0
0
0
0
0
0
0
0
0
0
0
0
0
0
0
0
SWITCH POSITION
6
5
4
3
0
0
0
0
0
0
0
0
0
0
0
0
0
0
0
0
0
0
0
1
0
0
0
1
0
0
0
1
0
0
0
1
0
0
1
0
0
0
1
0
0
0
1
0
0
0
1
0
0
0
1
1
0
0
1
1
0
0
1
1
0
0
1
1
0
1
0
0
0
1
0
0
0
1
0
0
0
1
0
0
0
1
0
1
0
1
0
1
0
1
0
1
0
1
0
1
0
1
1
0
0
1
1
0
0
1
1
0
0
1
1
0
0
1
1
1
0
1
1
1
0
1
1
1
0
1
1
1
2
0
0
1
1
0
0
1
1
0
0
1
1
0
0
1
1
0
0
1
1
0
0
1
1
0
0
1
1
0
0
1
1
1
0
1
0
1
0
1
0
1
0
1
0
1
0
1
0
1
0
1
0
1
0
1
0
1
0
1
0
1
0
1
0
1
KEMU040015
April 23, 2001
A-3
A.1.2
Monitor Numbers
The MSI-100 has four video outputs. The monitor numbers are identified by
the video output channel (1, 2, 3, or 4) on the switcher.
A.1.3
Auxiliary On/Off Control
The On/Off Control of the auxiliary devices is identified by the Contact Output
Number the auxiliary device is connected to on the MSI.
MSI Master Chassis
MSI Slave Chassis*
CATS Expansion Chassis
RCO-4 Option
AUX 1
AUX 2
AUX 1
AUX 2
AUX 1
AUX 2
AUX 3
AUX 4
Contact Output 1
Contact Output 2
Contact Output 3 or 7
Contact Output 4 or 8
Contact Output 3
Contact Output 4
Contact Output 5
Contact Output 6
*Refer to Section 2, paragraph 2.1.2 for DIP switch setting for slave auxiliary contacts.
NOTE
Camera address 1 is reserved by the MSI-100
to identify the contact outputs in the MSI-100
system for control.
517850-1960-II-J
KEMU040015
April 23, 2001
A-4
System Components
To simplify the system for programming, the camera address should be the same as the
video input number.
CAMERAS
Camera Types
SmartScan = SS
FastScan = FS
Conventional P&T = PT
Fixed Camera = FX
Camera No.
1
Type
Location/Function
2
3
4
5
6
7
8
9
10
11
12
13
14
15
16
17
18
19
517850-1960-II-J
KEMU040015
April 23, 2001
A-5
Camera No.
20
Type
Location/Function
21
22
23
24
25
26
27
28
29
30
31
32
MSI-100 CONTACT OUTPUTS
(Auxiliary Devices)
Contact
Output
1
2
3
4
5
6
7
8
CAM NO.
1
1
1
1
1
1
1
1
517850-1960-II-J
NO/NC
Control/Function
KEMU040015
April 23, 2001
A-6
CRX-800 SERIES CONTACT OUTPUTS
(Auxiliary Devices)
Contact
Output
1
2
3
4
5
6
CAM NO.* NO/NC
Control Function
*The camera number for all six contact outputs should be the same for each CRX-800
unit.
CONTACT INPUTS (ALARMS)
Alarm
Number
1
Location
MultiCall # and Desired System Response
2
3
4
5
6
7
8
9
10
11
12
517850-1960-II-J
KEMU040015
April 23, 2001
A-7
Alarm
Number
13
Location
MultiCall # and Desired System Response
14
15
16
17
18
19
20
21
22
23
24
25
26
27
28
29
30
31
32
517850-1960-II-J
KEMU040015
April 23, 2001
A-8
A.2
PROGRAMMING RECOMMENDATIONS
The following steps are recommended to organize the programming efforts of the
SmartScan System.
1.
Identify and program all desired PreShot locations for each SmartScan
Unit and maintain a log.
2.
Identify and program all desired VectorScans for each SmartScan unit and
maintain a log.
3.
Identify and Program all Sector ID's for each SmartScan unit and maintain
a log.
4.
Identify all alarm inputs and outline the desired system response to each
alarm.
A.3
5.
Identify the contents of MultiCalls for JPD-100/P function keys.
6.
Identify the contents of each MultiCall using the MultiCall worksheet.
PROGRAMMING WORKSHEETS
The following worksheets are included to organize the programming efforts for
the Medium System Interface
Sector Programming Log
Preshot Programming Log
VectorScan Programming Log
Alarm Log
MultiCall Log
MultiCall Worksheet
Camera-Controller Partitioning Worksheet
Camera-Monitor Partitioning Worksheet
Monitor-Controller Partitioning Worksheet
517850-1960-II-J
KEMU040015
April 23, 2001
A-9
SECTOR PROGRAMMING LOG
Page 1 of 2
This form is used to program Sector ID’s. A review of the area or the drawings covering
these areas should be done prior to the preparation of this form.
Sixteen sectors (0-15) can be programmed for each SmartScan unit. Sector names can
be sixteen characters long.
CAMERA NUMBER ______
SECTOR
NAME
COVERAGE
0
1
2
3
4
5
517850-1960-II-J
KEMU040015
April 23, 2001
A-10
SECTOR PROGRAMMING LOG (cont)
Page 2 of 2
CAMERA NUMBER ______
SECTOR
NAME
COVERAGE
6
7
8
9
10
11
12
13
14
15
517850-1960-II-J
KEMU040015
April 23, 2001
A-11
PRESHOT PROGRAMMING LOG
Page 1 of ___
This form is used to program PreShots in the SmartScan units. One form or series of
forms can be used for each camera. PreShots are determined by required alarm
coverage, quick keys, and frequently viewed scenes.
One hundred PreShots (0-99) can be programmed for each SmartScan unit. PreShot
names can be 16 characters long.
CAMERA NUMBER _____
PreShot #
0
1
2
3
4
5
6
7
8
9
10
11
12
13
14
15
16
17
18
517850-1960-II-J
Name
Coverage
KEMU040015
April 23, 2001
A-12
PRESHOT PROGRAMMING LOG
Page ___ of ___
CAMERA NUMBER _____
PreShot #
Name
517850-1960-II-J
Coverage
KEMU040015
April 23, 2001
A-13
VECTORSCAN PROGRAMMING LOG
Page ___ of ___
This form is for programming VectorScans in SmartScan units. A form or series of
forms can be used for each camera.
Ten VectorScans (0-9) can be programmed for each SmartScan unit. VectorScan
names can be 16 characters long. Each VectorScan can have up to 64 PreShots with
transit times and dwell times.
CAMERA NUMBER _____
VECTORSCAN NUMBER ________
DESCRIPTION _______________________________________________________
PreShot #
517850-1960-II-J
Transit Time
Dwell Time
Coverage
KEMU040015
April 23, 2001
A-14
VECTORSCAN PROGRAMMING LOG
Page ___ of ___
CAMERA NUMBER _____
VECTORSCAN NUMBER ________
DESCRIPTION ________________________________________________________
PreShot #
517850-1960-II-J
Transit Time
Coverage
KEMU040015
April 23, 2001
A-15
ALARM LOG
Page ___ of ___
This form is for assigning MultiCalls to alarm inputs and describing the system functions
in the MultiCall. There can be up to sixty-four alarm inputs (1-64).
Alarm #
1
MultiCall #
Description of MultiCall
2
3
4
5
6
7
8
9
10
11
12
13
14
517850-1960-II-J
KEMU040015
April 23, 2001
A-16
Alarm #
MultiCall #
517850-1960-II-J
Description of MultiCall
KEMU040015
April 23, 2001
A-17
MULTICALL LOG
Page ___ of ___
There can be up to 251 MultiCalls (0-250). MultiCalls can be assigned to Alarm Inputs,
JPD-100/P Function (Quick) Keys, and Time/Date. A MultiCall can be run manually by
an operator at the JPD-100/P Controller or KBD-100 Keyboard.
MultiCall #
0
Assigned To
Description
1
2
3
4
5
6
7
517850-1960-II-J
KEMU040015
April 23, 2001
A-18
MULTICALL LOG
Page ___ of ___
MultiCall #
Assigned To
517850-1960-II-J
Description
KEMU040015
April 23, 2001
A-19
MULTICALL WORKSHEET
MultiCall # _____
Description _________________________________________________________
Assigned to ________________________________________________________
(May have more than one assignment)
The following table shows the required data and the range of data for each MultiCall
function.
FUN
NUM
CAM
MISC
DWELL
P=PreShot
0-99
1-64
0.0-9.9 seconds
00-99 seconds
V=VectorScan
0-9
1-64
M=MultiCall
0-250
C=Call
Mon #
1-64
00-99 seconds
AM
1-64
00-99 seconds
AR
1-64
00-99 seconds
00-99 seconds
00-99 seconds
AA
A=Auxiliary
1-8
00-99 seconds
1-99
1=ON,0=OFF
00-99 seconds
Use the following worksheet to design MultiCalls. Each MultiCall can have up to 31
steps. Note: If more steps are required, program two (or more) MultiCalls and have the
first MultiCall call the other MultiCall(s).
517850-1960-II-J
KEMU040015
April 23, 2001
A-20
MULTICALL _______
FUN
NUM
CAM
MISC
DWELL
00
01
02
03
04
05
06
07
08
09
10
11
12
13
14
15
16
17
18
19
20
21
22
23
24
25
26
27
28
29
30
517850-1960-II-J
KEMU040015
April 23, 2001
A-21
CAMERA CONTROLLER PARTITIONING WORKSHEET
Y = ACCESS PERMITTED
N = ACCESS DENIED
CAM
1
2
3
4
5
6
7
8
9
10
11
12
13
14
15
16
17
18
19
20
21
22
23
24
25
26
27
28
29
30
31
32
CAM
517850-1960-II-J
1
CONTROLLER
2
3
4
CAM
1
2
3
4
5
6
7
8
9
10
11
12
13
14
15
16
17
18
19
20
21
22
23
24
25
26
27
28
29
30
31
32
CAM
KEMU040015
April 23, 2001
A-22
CAMERA CONTROLLER PARTITIONING WORKSHEET
Y = ACCESS PERMITTED
CAM
CAM
517850-1960-II-J
1
N = ACCESS DENIED
CONTROLLER
2
3
4
CAM
CAM
KEMU040015
April 23, 2001
A-23
CAMERA MONITOR PARTITIONING WORKSHEET
Y = ACCESS PERMITTED
CAM
1
2
3
4
5
6
7
8
9
10
11
12
13
14
15
16
17
18
19
20
21
22
23
24
25
26
27
28
29
30
31
32
CAM
517850-1960-II-J
1
MONITOR
2
3
N = ACCESS DENIED
4
CAM
1
2
3
4
5
6
7
8
9
10
11
12
13
14
15
16
17
18
19
20
21
22
23
24
25
26
27
28
29
30
31
32
CAM
KEMU040015
April 23, 2001
A-24
CAMERA MONITOR PARTITIONING WORKSHEET
Y = ACCESS PERMITTED
N = ACCESS DENIED
MONITOR
CAM
1
2
3
4
5
6
7
8
9
10
11
12
13
14
15
16
17
18
19
20
21
22
23
24
25
26
27
28
29
30
31
32
CAM
517850-1960-II-J
CAM
1
2
3
4
5
6
7
8
9
10
11
12
13
14
15
16
17
18
19
20
21
22
23
24
25
26
27
28
29
30
31
32
CAM
KEMU040015
April 23, 2001
A-25
MONITOR CONTROLLER PARTITIONING WORKSHEET
Y = ACCESS PERMITTED
MON
1
2
3
4
5
6
7
8
9
10
11
12
13
14
15
16
MON
517850-1960-II-J
1
N = ACCESS DENIED
CONTROLLER
2
3
4
MON
1
2
3
4
5
6
7
8
9
10
11
12
13
14
15
16
MON
KEMU040015
April 23, 2001
B-1
APPENDIX B. QUICK REFERENCE GUIDE
All programming menus for the MSI-100 are outputted on the programming monitor
(PRGMR output on rear panel of MSI-100). All programming menus for a SmartScan
unit are added to the SmartScan video signal and are viewed on the control monitor the
SmartScan is switched to. To program the MSI-100 or a SmartScan unit, the
programming mode on the MSI must be accessed and a valid password entered.
MSI Programming
Hit Enter to Start
1.
PROCEDURE
To access the programming menus, press Enter on
the KBD-100 keyboard.
MONITOR DISPLAY
ENTER PASSWORD
PRESS ENTER WHEN DONE
2.
Enter the programmed password (MSI) and press
Enter.
Program SmartScan
or Select
→ Program Options
Program MultiCalls
Time/Date Char. Gen.
Alarm Monitors/VCRs
Change Password
Log out-end program
Press Enter to select
3.
Choose the desired option by using the gray up and
down arrow keys on the KBD-100 keyboard until the
arrow is pointing to the desired option. Select the
option by pressing the Enter key on the KBD-100
keyboard.
517850-1960-II-J
KEMU040015
April 23, 2001
B-2
QUICK PRESHOT PASSWORD OPTION
FUNCTION
Quick PreShot Password
PROCEDURE
Pregram Options>Q (toggles between yes and no)
Yes - Log on with a password when programming “Quick”
PreShots
No - Password not required to program “Quick“PreShots
PROGRAMMING MULTICALLS
FUNCTION
Program MultiCall (Numbered 0-250)
DEFINITION
File stored in MSI-100 containing one or
PROCEDURE
(All keystrokes are separated by >)
Program MultiCall > Enter> MultiCall #>
more functions of a
Enter> Type data in fields for up to 31
FastScan/SmartScan system that are
Functions> Enter> S (Save)
performed at the same time or one
function at a time with programmable
Functions:
dwell times between each function.
P = PreShot
MultiCalls can be assigned to:
V = VectorScan
Alarm Inputs
M = MultiCall
JPD-100 Function Keys
C = Video Switcher Call, Call Camera to Alarm
Monitor (video outputs 1 and 2), Call
Started by Date and Time
Camera to Alarm VCR (video outputs 3
and 4), Automatically Acknowledge Alarm
A = Auxiliary Output Control
P = PreShot
FUN
NUM
CAM
MISC
DWELL
P
0-99
1-64
0-9.9
00-99
MISC
V = VectorScan
FUN
NUM
CAM
V
0-9
1-64
DWELL
00-99
M = MultiCall
FUN
NUM
M
0-250
CAM
MISC
DWELL
1>Start 00-99
0>Stop
C = Video Switcher Call
FUN
NUM
CAM
C
1-16
1-64
MISC
DWELL
00-99
C = Call Camera to Alarm Monitor
517850-1960-II-J
FUN
NUM
CAM
C
AM
1-64
MISC
DWELL
00-99
KEMU040015
April 23, 2001
B-3
FUNCTION
DEFINITION
Program MultiCall (cont)
PROCEDURE
(All keystrokes are separated by >)
C = Call Camera to Alarm VCR
FUN
NUM
CAM
C
AR
1-64
MISC
DWELL
00-99
C = Automatically Acknowledge Alarm
FUN
NUM
CAM
C
AA
1-64
MISC
DWELL
00-99
A = Auxiliary Output Control
FUN
NUM
CAM
MISC
DWELL
A
AUX#
1-99*
1 (ON)
00-99
0 (OFF)
*The auxiliaries in MSI are CAM 1.
EDITING MULTICALLS
FUNCTION
Edit Existing MultiCalls
DEFINITION
Edit a MultiCall stored in the MSI-100.
PROCEDURE
(All keystrokes are separated by >)
Program MultiCalls> Enter> MultiCall #> Enter
The first 8 functions appear on the screen.
Use gray up, down, left, and right arrow keys
or gray Page Up and Page Down keys to
move up and down in listing. Edit the fields as
desired.
Home Key = beginning of line cursor is on
End Key = end of line cursor is on
When editing is done, press Enter>E (Edit) or
S (Save) or D* (Delete)
*Deletes entire MultiCall file
517850-1960-II-J
KEMU040015
April 23, 2001
B-4
PROGRAMMING ALARMS
FUNCTION
Alarm Inputs
DEFINITION
The MSI monitors 64 alarm contacts.
When an alarm contact changes state,
the MSI-100 starts the MultiCall
assigned to the alarm.
1.
2.
3.
4.
5.
6.
PROCEDURE
(All keystrokes are separated by >)
Program MultiCall for each alarm.
Note: A MultiCall can be assigned to
more than one alarm.
Assign MultiCall to Alarm Input:
Program Options> Enter> A> Use gray
arrow keys to move around in the alarm
table.
Enter MultiCall # to right of alarm #
Press Enter to save programming
Press Esc to exit assigning MultiCalls
to alarms.
Choose another option or press Esc to
exit the Program Options Menu.
PROGRAMMING JPD-100 FUNCTION KEYS
FUNCTION
JPD-100 Function Keys
DEFINITION
Four JPD-100s (address is jumper
selectable 1-8). When the function key
on a JPD-100 is pressed, the MSI-100
starts the MultiCall assigned to the
function key*.
1.
2.
Program Options > Enter> J> JPD# (1-4)>
Enter> Use arrow keys to move to the
desired function key #> Type MultiCall # in
MC column to right of function key #>
Enter
The MSI only recognizes addresses 1-4.
*Function key 1 can be programmed to
enable/disable alarm MultiCalls. Refer to
paragraph 5.5.11. If function key 1 is
programmed in the MSI to perform this
action, it does not start the assigned
MultiCall.
PROCEDURE
(All keystrokes are separated by >)
Program MultiCall for each key.
Assign MultiCall to Function Key:
3.
4.
Press Esc to end programming function
keys.
Program another JPD or press Esc to exit
Program Options Menu.
ASSIGNING MULTICALLS TO DATE AND TIME
FUNCTION
Time and Date Initiated
MultiCall (Up to 10)
DEFINITION
The MSI-100 can be programmed to start
a MultiCall on a specific date and specific
time programmed by the operator.
MultiCalls can be programmed to run at
specific intervals after the first start time.
The MSI updates the listing to show the
next time the MultiCall runs.
1.
2.
Assign the MultiCall to Time and Date:
Program Options >Enter> T> MultiCall#>
Start Date (MM/DD)>Start Time (24-Hr
Clock)>Interval* (# days-#hours/minutes)
3.
4.
517850-1960-II-J
PROCEDURE
(All keystrokes are separated by >)
Program the MultiCall.
* If a 00-00/00 interval time is
programmed the MSI-100 runs the
MultiCall once and removes it from the list.
When done assigning MultiCalls to time
and date, press Esc.
Choose another option or press Esc to exit
the Program Options Menu.
KEMU040015
April 23, 2001
B-5
CAMERA CONTROLLER PARTITIONING
FUNCTION
DEFINITION
Camera Controller Partitioning
The MSI-100 can be programmed to lock
out a camera from a controller. The
controller cannot control the camera or
call the camera up on a monitor.
1.
2.
3.
PROCEDURE
(All keystrokes are separated by >)
Program Options> Enter> C> Use page up
and page down keys to find desired
camera; use arrow keys to move to
location across from camera and down
from the controller> Enter Y or N to define
partitioning.
Y = Access Permitted
N = Access Denied
When done programming, press Esc.
Choose another option or press Esc to exit
the Program Options Menu
CAMERA MONITOR PARTITIONING
FUNCTION
Camera Monitor Partitioning
DEFINITION
The MSI-100 can be programmed to
restrict a camera from a monitor.
1.
2.
3.
PROCEDURE
(All keystrokes are separated by >)
Program Options> Enter> M> Use page
up and page down keys to find desired
camera; use arrow keys to move to
location across from camera and down
from the monitor> Enter Y or N to
define partitioning.
Y = Access Permitted
N = Access Denied
When done programming, press Esc.
Choose another option or press Esc to
exit the Program Options Menu
MONITOR CONTROLLER PARTITIONING
FUNCTION
DEFINITION
Monitor Controller Partitioning
The MSI-100 can be programmed to lock
out a monitor from a controller. The
controller cannot call up the monitor.
1.
2.
3.
517850-1960-II-J
PROCEDURE
(All keystrokes are separated by >)
Program Options> Enter> P> Use page up
and page down keys to find desired
camera; use arrow keys to move to
location across from camera and down
from the controller> Enter Y or N to define
partitioning.
Y = Access Permitted
N = Access Denied
When done programming, press Esc.
Choose another option or press Esc to exit
the Program Options Menu
KEMU040015
April 23, 2001
B-6
MONITOR SETUP (OPTIONAL)
FUNCTION
Enable/Disable Camera ID
Position Camera ID
Enable/Disable Date
DEFINITION
The camera ID display can be enabled or
disabled. If the camera ID is enabled, it
is displayed on the monitor unless the
camera ID is disabled for the camera at
the Camera Setup Menu. The Camera
Setup Menu overrides the Monitor Setup
Menu.
The camera ID can be positioned on the
monitor. The camera ID is positioned on
the monitor as programmed unless the
camera ID posiiton is programmed at the
Camera Setup Menu. The Camera
Setup Menu overrides the Monitor Setup
Menu.
The date display can be enabled or
disabled.
1.
2.
1.
2.
1.
2.
Position Date
The date can be positioned on the
monitor.
1.
2.
Enable/Disable Time
The time display can be enabled or
disabled on the video signal.
1.
2.
Position Time
The time can be positioned on the
monitor.
1.
2.
PROCEDURE
(All keystrokes are separated by >)
Time/Date Char. Gen.> Enter> 0 (global
for all monitors) or Monitor #>Enter>
Monitor Setup> Enter> Camera ID
Display> Enter (toggles between enable
(EN) and disable (DIS).
Choose another option or press Esc to exit
the Monitor Setup Menu.
Time/Date Char. Gen.> Enter> 0 (global
for all monitors) or Monitor #>
Enter>Monitor Setup> Enter> Camera ID
Position> Enter> Use the gray arrow keys
to move the Camera ID display> Enter.
Choose another option or press Esc to exit
the Monitor Setup Menu.
Time/Date Char. Gen.> Enter> 0 (global
for all monitors) or Monitor #> Enter>
Monitor Setup> Enter> Date Display>
Enter (toggles between enable (EN) and
disable (DIS).
Choose another option or press Esc to exit
the Monitor Setup Menu.
Time/Date Char. Gen.> Enter> 0 (global
for all monitors) or Monitor #> Enter>
Monitor Setup>Enter> Date Position>
Enter> Use the gray arrow keys to move
the Date display> Enter.
Choose another option or press Esc to exit
the Monitor Setup Menu.
Time/Date Char. Gen.> Enter>0 (global for
all monitors) or Monitor #> Enter> Monitor
Setup> Enter. Date Display> Enter
(toggles between enable (EN) and disable
(DIS).
Choose another option or press Esc to exit
the Monitor Setup Menu.
Time/Date Char. Gen.> Enter> 0 (global
for all monitors) or Monitor #>
Enter>Monitor Setup> Enter> Time
Position> Enter> Use the gray arrow keys
to move the Date display> Enter.
Choose another option or press Esc to exit
the Monitor Setup Menu.
PROGRAMMING CAMERA IDs (OPTIONAL)
FUNCTION
Program Camera ID
517850-1960-II-J
DEFINITION
A unique title can be programmed for
each video input. The default is CAM001 for video input one, CAM-021 for
video input 21, CAM-032 for video input
32, etc. Camera ID display can be
enabled, disabled, or the default (Monitor
setup) can be selected. The camera ID
position can be programmed. These
settings override the Monitor Setup
Menu.
PROCEDURE
(All keystrokes are separated by >)
Time/Date Char. Gen.> Enter> Type 0 to program
all or type a specific monitor #> Enter> Camera
Setup> Enter> Camera Number> Enter> Edit
Camera ID> Enter> Type camera title (24
characters)> Enter> Display mode> Enter (toggles
between EN, DIS, Default> Set position> Enter>
Use gray arrow keys to move display> Enter>
Program another camera number or press Esc to
exit the Camera Setup Menu.
KEMU040015
April 23, 2001
B-7
MONITOR CHARACTER BRIGHTNESS (OPTIONAL)
FUNCTION
Character Brightness
DEFINITION
The brightness of the characters (time,
date, and camera ID) added to the video
signal can be adjusted.
1.
2.
PROCEDURE
(All keystrokes are separated by >)
Time/Date Char. Gen.> Enter> 0 (global
for all monitors) or Monitor #> Enter>
System Setup> Intensity> > Use gray up
and down arrow keys to adjust intensity>
Esc.
Choose another option or press Esc to exit
the System Setup Menu.
SET TIME AND DATE
FUNCTION
Set Time
Select Time Format
DEFINITION
Sets the clock in the MSI-100. The time
is used for time and date initiated
MultiCalls and for adding the time to the
video signal. Set the time using a 24hour format.
1.
The time can be displayed on a 12-hour
format with AM and PM designations or
on a 24-hour basis.
1.
2.
2.
Set Date
Sets the date in the MSI-100. The date is
used for time and date initiated MultiCalls
and for adding the date to the video
signal.
1.
2.
Select Date Format
The date can be displayed as
Day/Month/Year or Month/Day/Year.
1.
2.
PROCEDURE
(All keystrokes are separated by >)
Time/Date Char. Gen.> Enter> Type 0 to
Program All or a specific monitor #>
Enter> System Setup> Enter> Set Time>
Enter> HH> MM> SS> Enter.
Choose another option or press Esc to exit
the System Setup Menu.
Time/Date Char. Gen.> Enter> Type 0 to
Program All or a specific monitor #>
Enter> System Setup> Enter> Time
Format> Enter (toggles between 24 hour
and 12 hour format).
Choose another option or press Esc to exit
the System Setup Menu.
Time/Date Char. Gen.> Enter> Type 0 to
Program All or a specific monitor #>
Enter> System Setup> Enter> Set Date>
Enter> YY> MM> DD> Enter.
Choose another option or press Esc to exit
the System Setup Menu.
Time/Date Char. Gen.> Enter> 0> System
Setup> Enter> Date Format> Enter
(toggles between 24 hour and 12 hour
format).
Choose another option or press Esc to exit
the System Setup Menu.
ALARM HORN DURATION
FUNCTION
Program Duration of Alarm
Horn
517850-1960-II-J
DEFINITION
When an alarm occurs, an audible
horn sounds. The duration of the horn
is programmable from 0-8 seconds.
1.
2.
PROCEDURE
(All keystrokes are separated by >)
Program Options>Enter>D
(D toggles between 0,1,2,3,4,5,6,7,8)
When set, choose another option or
press Esc to exit the Program Options
Menu.
KEMU040015
April 23, 2001
B-8
EXIT PROGRAMMING
FUNCTION
DEFINITION
Exit Programming
PROCEDURE
(All keystrokes are separated by >)
Pressing the Esc key on the KBD-100 keyboard
moves the programmer back one menu at a time
eventually ending programming.
When the monitor displays the message:
Hit Enter to Start
you are out of the programming mode.
JPD-100/P CONTROLLER AND MSI-100 MEDIUM SYSTEM INTERFACE
FASTSCAN®/SMARTSCAN® MANUAL CONTROL
FUNCTION
PROCEDURE
(Keystrokes are separated by >)
Select Control Camera
Select Control Monitor
Select 2nd Camera
Select 2nd Monitor
Call 2nd Camera to 2nd Monitor
Control 2nd Camera & Monitor
Clear 2nd Camera & Monitor
Manual/Auto Iris (option)
Camera #> CNTL
Monitor #> MON> CNTL
Camera #> CAM
Monitor #> MON
ENTER
CNTL
Press CLEAR until display disappears
IRIS>1 (auto) or 2 (manual)
SMARTSCAN CONTROL
FUNCTION
Manual Control
Find Home
Go to PreShot (2nd Camera Selected or Control
Camera if 2nd Camera Not Selected)
List PreShots
Start VectorScan (2nd Camera Selected or Control
Camera if 2nd Camera Not Selected.)
List VectorScans
List VectorScan Contents
List Sector ID’s
517850-1960-II-J
PROCEDURE
(Keystrokes are separated by >)
Move large joystick in any direction or
OPT> 1
OPT> 2
PreShot #> PSHOT
OPT> 5> 1
Press 1 to view next page, press 2 when done viewing list.
VectorScan #> VSCAN
OPT> 5> 3> 1 (to view next page) or 2 (done)
OPT> 5> 4> VectorScan #> Enter> 1 (Up 1 line), 2 (Down 1 line), or 3
(Exit)
OPT> 5> 2> 1 (view next page) or 2 (done)
KEMU040015
April 23, 2001
B-9
AUXILIARY CONTROL
FUNCTION
PROCEDURE
(Keystrokes are separated by >)
Control Camera must be 1.
Auxiliary #> AUX
or
AUX> Auxiliary #> 1 (ON) or 3 (OFF)
Auxiliaries in MSI-100
ALARM CONTROL
FUNCTION
DEFINITION
Enable Alarm(s)
Enable one alarm or all alarms
Disable Alarm(s)
Disable one alarm or all alarms
Acknowledge Alarm(s)
Acknowledge oldest alarm or all
alarms
PROCEDURE
(Keystrokes are separated by >)
Alarm #> ALARM> 1> 1 (enable alarm called up) or 3
(enable all alarms)
Alarm #> ALARM> 2> 1 (disable alarm called up) or 3
(disable all alarms)
Alarm #> ALARM> 3> 1 (acknowledge oldest alarm) or 3
(acknowledge all alarms)
or
ALARM>1 (Acknowledge Oldest Alarm)
or 3 (Acknowledge All Alarms)
MULTICALL CONTROL
FUNCTION
Run1 a MultiCall
Halt1 All MultiCalls
1
DEFINITION
Start a MultiCall that is stored in the
MSI-100
Stops all the MultiCalls that are
running in the system regardless of
where they were started from.
PROCEDURE
(Keystrokes are separated by >)
MultiCall #> MCALL
MCALL> 3
Note: If a VectorScan was started as part of a MultiCall,
the VectorScan continues to run, after the MultiCall has
been halted, until manual control is taken of the SmartScan
unit where the VectorScan is stored.
If the Function Keys on the JPD-100 are assigned to MultiCalls, pressing the Function Key starts the MultiCall assigned to that
key. Pressing the function key again, stops that MultiCall.
517850-1960-II-J
KEMU040015
April 23, 2001
B-10
SMARTSCAN PROGRAMMING
(JPD-100/P Controller and KBD-100 Keyboard)
Note: You must access the MSI Programming Mode and enter a valid passwrod to program
SmartScan Units. The MSI can be set so the operator does not need a password to program
“quick” PreShots.
FUNCTION
DEFINITION
Esc
Exit Programming
Program Standard
PreShot (Control Camera)
Camera view including pan & tilt
position and zoom & focus lens
settings with operator entered title.
Camera view including pan & tilt
position and zoom & focus lens
settings with system default title
Program “Quick” PreShot
Delete PreShot
Replace PreShot
List PreShots
Program VectorScan
Edit VectorScan
Delete VectorScan
List VectorScans
List VectorScan Contents
Program Sector ID
Edit Sector ID Title
Replace Sector ID
Delete Sector ID
List Sector ID’s
517850-1960-II-J
Video Tour - two or more PreShots
(up to 64) linked together in series.
Add a PreShot or delete a PreShot
Cannot edit VectorScan from this
screen.
Label for specific area camera views.
Label only appears during manual
control of camera.
PROCEDURE
(Keystrokes are separated by >)
The “Esc” key causes the unit to back up one step in the
programming mode and eventually returns the dome to
manual control.
Select Pan & Tilt Position, Focus and Zoom Setting> Shift
F5> PreShot #> ENTER> Title> ENTER> S
This procedure is done using only the JPD-100/P
Controller.
Select Pan & Tilt Position, Focus and Zoom Setting>
PRGM> PreShot #> ENTER
Shift F5> PreShot #> ENTER> ENTER> D> Esc
See Program PreShot
F5> F5 (next page)
Shift F6> VectorScan #> ENTER> Title> ENTER> PreShot
#> Time> Dwell> PreShot #> Time> Dwell> ..... PreShot #>
Time> Dwell> Enter> S (press right arrow key to move to
next column)
Shift F6> VectorScan #> ENTER> Edit Title> ENTER> E>
Use up, down, left, right arrow keys to move to field
requiring change> Insert (Insert PreShot) or Delete (Delete
PreShot line cursor is on)> ENTER> S
Shift F6> VectorScan #> ENTER> ENTER> D
F6> F6 (next page)
F7> VectorScan #> ENTER
Shift F8> Sector #> ENTER> Title> Enter> S> Move to
lower left corner of sector> Enter> Move to upper right
corner of sector> Enter.
Shift F8> Sector #> Enter> E> Title.
See Program Sector ID
Shift F8> Sector #> D
F8
KEMU040015
April 23, 2001
Index-1
INDEX
Alarm
Connectors
Programming log, A-15
Front panel, 1-3
Alarm contact inputs, 4-8
Rear panel, 1-3
Alarm horn
Contact outputs
Operation, 4-8
CRX Series Receivers, A-6
Programming, 5-89
Installation, 3-21
Alarm inputs, A-6
MSI-100, A-5
Alarm Inputs
Operation, 4-12
JPD-100/P Controller, 4-12
Alarm Monitors
Controls and indicators, 4-1
Date and Time
Operation, 4-10
Assigning MultiCalls, 5-62
Programming, 5-84
Setting, 5-79
Alarm VCR
Operation, 4-11
Programming, 5-84
Alarms
DIP Switch
Camera number, A-1
DIP Switch Settings, 2-1
End Programming, 5-92
Assigning MultiCalls, 5-56
Equipment Return, 6-2
Auto-Acknowledge, 5-36
Installation, 3-4
Disable MultiCalls, 4-9
Alarm Inputs, 3-22
Auxiliary outputs, A-3
Contact outputs, 3-21
Battery backup, 5-8
Front panel, 3-18
Cabling requirements, 3-4
JPD-100/P Controller, 3-18, 3-19
Video, 3-23
Mounting, 3-1
Camera number, A-1, A-4
RS-485 Outputs, 3-21
Camera Setup, 7-3, 7-9
Video BNC Connectors, 3-23
COM1
Baud Rate, 2-4
Communications, 1-3
517850-1960-II-J
JPD-100 Function Keys
Assigning MultiCalls, 5-59
JPD-100/P Controller, 1-1, 4-2, 5-1
KEMU040015
April 23, 2001
Index-2
Partitioning, 4-4
Run, 5-52
Priority, 4-3
Stop, 5-54
Video Switching, 4-7
VectorScan, 5-22
Jumper Settings, 2-4
KBD-100 Keyboard, 1-1
Commands, 5-101
Video Switching, 5-29
Operation, 4-1
Character generator, 7-1
Looping switcher, 8-1
Contact outputs, 4-12
Maintenance
Quick Guide, B-8
Preventive, 6-1
Partitioning
Monitor number, A-3
Camera/Controller, 5-68
Monitor Setup, 7-3, 7-5
Camera/Monitor, 5-71
MultiCall
Monitor/Controller, 5-75
Programming log, A-17
Password, 5-1, 5-3
Time-Initiated, 4-13
Changing, 5-91
Worksheet, A-19
Default, 2-2
MultiCalls
Alarm Auto-Acknowledge, 5-36
Factory programmed, 5-91
Quick PreShots, 5-6
Alarm Monitor or Alarm VCR, 5-32
Power requirements, 1-3
Assigning to Alarms, 5-56
PreShot
Assigning to Date and Time, 5-62
Assigning to JPD-100 Function Keys,
5-59
Programming Log, A-11
PRGMR, 5-1
Programming
Auxiliary Control, 5-39
Battery-backup, 5-8
Deleting, 5-48
Character Generator, 7-3
Editing, 5-44
End, 5-92
Run, 5-53
Keyboard Commands, 5-101
Stop, 5-55
MSI-100, 5-8
MultiCall, 5-25
MultiCalls, 5-10
PreShot, 5-18
Quick Guide, B-1
Programming, 5-11
Recommendations, A-8
517850-1960-II-J
KEMU040015
April 23, 2001
Index-3
Sample, 5-93
Programming, 5-5
SmartScan, 5-5
Specifications, 1-3
Worksheets, A-8
System Setup, 7-4, 7-16
Programming mode, 5-3
Troubleshooting, 6-1
Quick PreShots
VectorScans
Password, 5-6
Sector IDs
Programming log, A-13
Video switcher, 4-7
Programming Log, A-9
Video Switcher
Shipping Information, 6-2
Looping, 9-1
SmartScan
517850-1960-II-J
Warranty, Consult Factory, 6-2
KEMU040015
April 23, 2001
517850-1960-II-J
KEMU040015
April 23, 2001