1
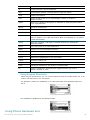
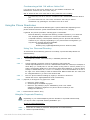
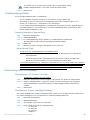
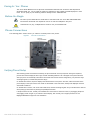
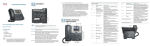
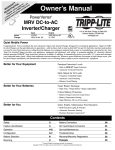
USER GUIDE
Cisco Small Business Pro
SPA 500 Series IP Phones
Models 504G, 508G, and 509G
Provided by
!
Understanding Your Phoneʼs Lines and Buttons
Use the following graphic and table to identify the parts of your phone.
Phone Components
Figure 1
Phone Components
The photo above shows the Cisco SPA 509G to illustrate the Cisco Small Business Pro IP
Phone features. Other models differ.
Numbered objects in the photo are explained in the following table.
#
Phone Feature
Description
1
Handset
Pick up to place or answer a call.
2
Message Waiting
Indicator
Displays solid red when you have a new voice mail message.
Flashes red during an incoming call.
3
LCD Screen
Displays date and time, phone station name, line extensions,
and softkey options.
4
Line keys
Indicates phone line status.
When lit:
Green: Line is idle.
Red (steady): Line is active or in use. Red
(blinking): Line is on hold.
Orange: Line is unregistered (cannot be used).
These keys can also be programmed by your phone system
administrator to perform functions such as speed dial, call
pickup, or monitoring an extension.
5
Softkey buttons
"#$%!&'()$!*+%!,(#-+!./0&1!./2&!34)!./5&!!
Press a softkey button to perform the action shown on the label
on the LCD screen above.
!
!
!
6!
!
6
Navigation button
Press an arrow key to scroll left, right, up, or down through items
shown on the LCD screen.
7
Messages button
Press to access voice mail (must be set up by your phone
system administrator).
8
Hold button
Press to place a call on hold.
9
Setup button
Press to access a menu to configure features and
preferences (such as your directory and speed dials), access
your call history, and set up functions (such as call forwarding).
10
Mute button
Press to mute or unmute the phone. When phone is muted,
the button glows red. A flashing mute button indicates the
network connection cannot be found.
11
Volume button
Press + to increase the volume and - to lower the volume of the
handset, headset, speaker (when the handset is off the phone, or
ringer volume (when the handset is on the phone).
12
Headset button
Push to turn the headset on or off. When the headset is on, the
button glows green.
13
Speaker button
Push to turn the speaker on or off. When the speaker is on, the
button glows green.
14
Keypad
Use to dial phone numbers, enter letters, and choose menu
items.
Softkey Buttons
The softkey buttons on your phone display may vary depending on your phone model
and the phone system setup. Press the Right Arrow or Left Arrow keys on the navigation
button to view additional softkey buttons.
Below is a partial listing of softkey buttons that may be available on your phone. You may not
have all of these softkey buttons on your phone, and you may have additional buttons that
are not listed here. For example, your phone administrator may also provide custom softkey
buttons on your phone, such as buttons that provide a speed dial to a company number,
or that access a specialized program that runs on your phone. Contact your phone
administrator for more information.
Button
Function
<< or >>
Move left or right through an entry without deleting characters.
activ
Activates screen saver mode.
add
Add an entry.
bXfer
Performs a blind call transfer (transferring a call without speaking to the party to
whom you are transferring the call.)
cancel
Cancels any changes you have made (press before ok or save).
cfwd
Forwards all calls coming to your phone to a specified number.
-cfwd
Clears call forwarding.
conf
Initiates a conference call.
confLx
Conferences active lines on the phone together.
delChr
Deletes the last number or letter.
delete
Deletes an entire item (for example, a number from the Call History list).
"#$%!&'()$!*+%!,(#-+!./0&1!./2&!34)!./5&!!
!
!
!
7!
!
dial
Dials a number.
dir
Provides access to phone directories.
dnd
Do Not Disturb; prevents incoming calls from ringing your phone.
-dnd
Clears Do Not Disturb.
edit
Opens an item so that you can edit numbers or letters, or enable or
disable a feature.
grPick
Allows you to answer a call ringing on an extension by discovering the number
of the ringing extension.
ignore
Ignores an incoming call.
lcr
Dials the Last Call Received.
miss
Shows the Missed Calls list.
park
Puts a call on hold at a designated “park” number. The call is parked on the line
until you unpark it or the caller disconnects. Must be configured by your phone
system administrator.
pickup
Allows you to answer a call ringing on another extension by entering the
extension number.
phold
Puts a call on hold on an active shared line.
redial
Displays a list of recently dialed numbers.
resume
Resumes a call that is on hold.
save
Saves your changes.
select
Selects the highlighted item on the LCD screen.
unpark
Resumes a parked call.
xfer
Performs a call transfer.
xferLx
Transfers an active line on the phone to a called number.
y/n
Enters a submenu and when pressed, toggles between Yes or No to
enable or disable an option.
Using Keypad Shortcuts
When using the phone menus, you can use the keypad to enter the number shown next to the
menu or sub-menu item on the LCD screen.
For example, to obtain your IP address on the Cisco SPA 504G, press the Setup button and
dial 9.
The IP address is displayed on the Network screen.
Using Phone Hardware and
"#$%!&'()$!*+%!,(#-+!./0&1!./2&!34)!./5&!!
!
!
!
0!
!
Accessories
Using the Speakerphone
To use the speakerphone, press the Speaker button (the handset can be either on or off hook).
Switching Between the Handset/Speakerphone During a Call
The handset can be on the hook when using the speakerphone. If switching from the handset to the
speakerphone, make sure the speakerphone light is illuminated before placing the handset back on the
hook.
Sending Audio to the Phone Speaker
Choosing this option sends audio to the speaker when the handset is lifte d .
STEP
1
Press the Setup button.
STEP
2
Select Preferences.
STEP
3
Choose Send Audio to Speaker > edit.
STEP
4
Press y/n to enable or disable the feature.
STEP
5
Press ok.
STEP
6
Press save.
Choosing Your Preferred Audio Device
This option designates the speakerphone as the preferred audio device when the handset is not
used. To choose your preferred audio device:
STEP
1
Press the Setup button.
STEP
2
Select Preferences.
STEP
3
Choose Preferred Audio Device and press edit.
STEP
4
Press option to view your choices. When the option you want is displayed,
press ok.
STEP
5
Press save.
Adjusting Call Volume and Muting
Adjusting Call Volume
To adjust the volume of the handset or speaker, lift the handset or press the Speaker
button. Press + on the Volume button to increase the volume, or press - to decrease the
volume. Press Save.
Adjusting the Ringer Volume
To adjust the ringer volume, press the Volume button when the handset is on the phone
and the speaker button is off. Press Save.
Using Mute
To mute the phone microphone, speaker, or headset microphone, press the Mute button on
the phone. The button glows red. Press the Mute button again to unmute.
If no audio device is on, pressing the Mute key has no effect. When switching from the
speakerphone to the handset, mute is turned off automatically.
"#$%!&'()$!*+%!,(#-+!./0&1!./2&!34)!./5&!!
!
!
!
.!
!
Placing or Answering a Call
You may have to dial a number or numbers to reach an outside line. Ask your phone
Administrator.
NOTE
To place or answer a call, do one of these:
•
•
•
•
Pick up the receiver.
Press the Speaker button.
Press the Headset button.
Press a green line button (to place a call) or a red flashing line button (to answer a call).
If you are on a call and another call comes in, press the flashing red line button or press
the Hold button to place the call on hold and answer the incoming call.
To return to the first call, press the line button for the call or select it using the Up or Down
navigation button and press the Resume softkey
Using Dial Assistance
If dial assistance is enabled, when placing calls, youʼll see a list of matching recently
dialed or received phone numbers on the screen after you begin dialing.
If you want to choose one of these numbers:
STEP 1
STEP
Use the navigation button to scroll down and highlight a phone number
on the LCD screen.
2 Press dial to complete the call.
Putting a Call on Hold
To put a call on hold, press the Hold button. A series of beeps or music on hold plays for the
caller to indicate that the call is on hold. Only one call can be active at a time. Pressing the
Hold button places the active call on hold.
Resuming a Call
To resume the call, press the flashing red line button for the call.
Ending a Call
To end a call:
•
If you are using the handset, hang up.
•
If you are using the speakerphone, press the Speaker button.
Transferring Calls
You can perform the following types of transfers:
•
Attended Transfer—You call the person to whom you are transferring the call and either:
transfer the call while the phone is ringing.
wait for the person to answer before transferring the call.
Blind Transfer—You transfer the call without speaking to the other party to which you are
transferring the call.
•
Performing an Attended Transfer
STEP 1
STEP
During an active call, press xfer. The call is placed on hold and a new line is opened
to dial the number.
2 Either:
•
Enter the number to which you want to transfer the call, then press dial or wait a
few seconds.
•
Press dir and either choose a number from the personal directory or select the
Corporate Directory, then press dial.
"#$%!&'()$!*+%!,(#-+!./0&1!./2&!34)!./5&!!
!
!
!
8!
!
If you hang up before the second call rings, the transfer fails and the first call is
disconnected. If you misdial, use the delChar, clear, or cancel key to make your
changes before the call is transferred.
STEP
3 Press xfer after the phone begins to ring, or at any time after the phone is
answered.
Performing an Unattended (Blind) Transfer
STEP 1
STEP
During an active call, press the bXfer softkey.
2 Enter the number to which you want to transfer the call and press dial. The call is
transferred with no further action required on your part.
Transferring a Held Call to an Active Call
If you have a call on hold and an active call, you can transfer one of these calls to the other
call, connecting the two callers. (This differs from a conference call because you no
longer remain part of the call after the transfer.)
With an active call and one or more calls on hold, press the xferLx softkey.
•
If you have only one call on hold, the call is transferred to the active party and you
are disconnected.
•
If you have more than one call on hold, choose the held call you want to transfer
by pressing the line button of the call on hold.
Redialing
To redial the last number called, press the redial softkey twice. To redial another number:
STEP 1
STEP
Press the redial softkey and select the desired number.
2 (Optional) Press edit to select a number and modify it (for example, to add an area code).
When youʼre done, press ok.
STEP
3 Lift the handset or press dial to automatically dial the selected number.
Viewing and Returning Missed Calls
The LCD screen on your IP phone notifies you if a call came in that was unanswered.
To return a missed call:
•
•
If the LCD screen shows a missed call, press the lcr softkey to return the last missed
call. Press the miss softkey to view a list of missed calls, select a call, and press dial.
If the LCD screen does not show a missed call, you can return a call from the Missed Call
list:
a. Press the Setup button.
b. Select Call History.
c. Select Missed Calls.
d. Choose the call you want to return and press dial.
If the call was from a long distance number, you may have to edit the call before returning it. Press the edit
NOTE softkey to edit the call and use the softkey buttons and keypad to edit the number.
To view a list of all missed calls:
•
If the LCD screen shows a missed call, press the miss softkey to view a list of missed
calls.
•
If the LCD screen does not show a missed call:
a. Press the Setup button.
b. Select Call History.
c. Select Missed Calls.
"#$%!&'()$!*+%!,(#-+!./0&1!./2&!34)!./5&!!
!
!
!
9!
!
Turning the Missed Calls Shortcut On and Off
This option removes the lcr and miss softkeys that appear on the IP phone screen when you miss a
call.
To access this option:
STEP 1
Press the Setup button.
STEP
2 Select Preferences.
STEP
3 Choose Miss Call Shortcut and press edit.
STEP
4 Press y/n to enable or disable the feature.
STEP
5 Press ok.
STEP
6 Press save.
Forwarding Calls
You can forward all calls, forward calls when the phone is busy or forward calls when there is no
answer.
Forwarding All Calls
Using the cfwd sofkey:
STEP 1
Press the cfwd softkey.
STEP
2 Enter a number to which to forward all calls; for example, your voice mailbox, another
extension, or an outside line. If forwarding calls to an outside line, be sure to use any
access and area codes required.
STEP
3 Press dial. The LCD screen displays Calls Forwarded.
Using the star code:
Press *72 and enter the number to which to forward all calls.
Using the Setup button:
STEP 1
Press the Setup button and select Call Forward > CFWD All Number.
STEP
2 Press edit.
STEP
3 Enter a number to which to forward all calls; for example, your voice mailbox, another
extension, or an outside line. If forwarding calls to an outside line, be sure to use any
access and area codes required.
STEP
4 Press ok.
STEP
5 Press save.
Stopping Call Forwarding
To stop forwarding calls, press the -cfwd softkey.
You can also stop call forwarding by pressing the Setup button and selecting Call Forward > edit.
Press clear, then press ok. Press save. Using star codes:
•
Enter *73 to deactivate call forwarding.
Setting Do Not Disturb
Use the Do Not Disturb feature to prevent incoming calls from ringing your phone. If you have voice
mail configured, incoming callers immediately reach voice mail. If voice mail is not configured,
callers hear a busy signal or message.
Activating Do Not Disturb
Using the dnd softkey:
To activate Do Not Disturb, press the dnd softkey. The LCD screen indicates that Do Not Disturb is
turned on for your phone.
Using the Setup button:
"#$%!&'()$!*+%!,(#-+!./0&1!./2&!34)!./5&!!
!
!
!
2!
!
You can also access Do Not Disturb by performing the following steps:
STEP 1
Press the Setup button and select Preferences > Do Not Disturb.
STEP
2 Press the edit softkey.
STEP
3 Press y/n to choose y, then press ok.
STEP
4 Press save.
Deactivating Do Not Disturb
Using the -dnd softkey:
To deactivate Do Not Disturb, press the -dnd softkey.
Using the Setup button:
You can also deactivate Do Not Disturb by pressing the Setup button and selecting
Preferences > Do Not Disturb.
Parking a Call
You can “park” a call on a designated line so that another person in your company can pick up the call.
The call is active until it is “unparked” or the caller hangs up.
To park a call:
STEP 1
While on an active call, press the park softkey.
STEP
2 Enter a number to identify the park line and press dial. The “park line number ” does not
correspond with an actual phone extension number, and you can pick any easilyremembered number (for example, 100). The call is then parked on that line, and the caller
hears “on hold” music or messages.
STEP
3 You or another person must then “unpark” the call.
To unpark a call, you can either use the unpark softkey (if you know the park line number), or view a list
of parked calls and unpark it from the list.
To unpark if you know the park line number:
STEP 1
Press the unpark softkey.
STEP
2 Enter the number of the park line (for example, the number that was
entered in Step 2 of “parking a call.”)
STEP
3 Press dial. The call is picked up on your phone.
To view a list of parked calls (and unpark from the list):
STEP 1
Press the Setup button.
STEP
2 Select Call Park Status.
STEP
3 Choose the parked call you want to retrieve and press unpark.
Placing a Three-Way Conference Call
You can perform conference calls by:
•
•
calling both numbers and pressing the conf softkey
conferencing an active and held call using the confLX softkey
To initiate a conference call:
STEP 1
Press the conf softkey during an active call. The first call is placed on hold, a second
line is opened, and you hear a dial tone.
STEP
2 Dial the second personʼs telephone number.
STEP
3 Press the conf softkey again. All three parties are connected in the conference call.
When you hang up, the other two parties are disconnected.
"#$%!&'()$!*+%!,(#-+!./0&1!./2&!34)!./5&!!
!
!
!
5!
!
Conferencing a Held Call with an Active Call
If you have a call on hold and an active call, you can create a conference call
between the active call, the call on hold, and you.
With an active call and one or more calls on hold, press the confLx softkey.
•
•
If you have only one call on hold, the conference call is created between the three of
you.
If you have more than one call on hold, choose the held call you want to
conference in by pressing the line button of the call on hold.
Using the Phone Directories
Your IP phones provide several different types of phone directories, depending on the
phone model and what the system administrator has set up for the company.
In general, the phones provide the following types of directories:
•
•
Personal Directory—The personal directory provides a place for you to store and
view frequently dialed numbers. You can also dial numbers from the directory.
Corporate Directory—The corporate directory lists the phones and extension
numbers in your company. Depending on your phone network configuration, you
may have the following directories available:
Corporate Directory (LVS)
Directory using Lightweight Directory Access Protocol (LDAP)
Using Your Personal Directory
To access the Phone Directory, press the dir softkey, or press the Setup button and
select Directory.
To add a new entry to the directory:
STEP 1
In the Directory screen, when New Entry is selected, press the add
softkey.
STEP
2
Use the keypad to enter the name of the directory entry. Press the
number key multiple times to move to a different letter under that number. (For example, to
enter “Mary,” you would press 6 and then pause (for M); press 2 and then pause (for A),
press 7 three times rapidly (for R), then press 9 three times rapidly (for Y). Use the delChr
softkey to delete letters, the <<< and >>> softkeys to move one character to the left or
the right, or the clear softkey to clear the entire name. When finished with the name, use
the navigation button to go down to the Number field.
STEP
3
Enter the phone number, including any digits you must dial to access an
outside line and the appropriate area code, if necessary.
STEP
4 (Optional) To change the ring type for the caller:
a. Press the option softkey.
b. Scroll through the available ring types.
c. Press the play softkey to play the selected ring tone or the select
softkey to assign that ringtone to the person whose number you are
adding to the directory.
STEP
5 Press save to save the entry.
Using the Corporate Directory
Depending on your Internet Telephony Service Provider or corporate network setup,
NOTE you may not have a corporate directory available to you.
To use the corporate directory:
STEP
1
Press the dir softkey, or press the Setup button and select Directory.
STEP
2
Select Corporate Directory.
"#$%!&'()$!*+%!,(#-+!./0&1!./2&!34)!./5&!!
!
!
!
:/!
!
STEP
Choose and entry and press the dial softkey. Press cancel to exit.
3
To use the Lightweight Directory Access Protocol (LDAP) directory:
STEP
1
Press the dir softkey, or press the Setup button and select Directories.
STEP
2
Scroll to the LDAP Directory Name and press Select.
The name of the LDAP directory is configured by the phone administrator and can differ.
NOTE
STEP
3 Enter information in the fields and press search.
STEP
4 In the results, press Dial to dial the contact, or choose one of the other
options.
Using the Call History Lists
Viewing the Call History Lists
To view the Call History lists:
STEP 1
Press the Setup button.
STEP
2 Select Call History.
STEP
3 Select the Call History list you want to view. Available Call History lists are:
• Redial List—Shows the last 60 numbers dialed from your phone.
• Answered Calls—Shows the caller ID of the last 60 answered calls.
• Missed Calls—Shows the last 60 missed calls.
Calling from the Call History Lists
To dial a number from one of the Call History lists:
STEP 1
STEP
Choose the call.
2 Press dial.
If the call was from a long distance number, you may have to edit the call before dialing it.
Press the Edit softkey to edit the call and use the softkey buttons and keypad to edit the
number.
Deleting a Number from the Call History Lists
STEP
1
In the Redial, Answered Calls, or Missed Calls list, choose the call.
STEP
2
Press delete.
STEP
3
Press OK.
Saving a Call History List Number to Your Directory
STEP 1
In the Redial, Answered Calls, or Missed Calls list, choose the call.
STEP
2 Use the navigation button to scroll to the right to access more
softkey button options, and press save.
STEP
3 Edit the information (if desired) and press save again. The entry is
added to your directory.
Accessing Voicemail
To access voicemail, press the Messages button on your phone. Your system administrator should
configure your phone with the correct voicemail number so that pressing the Messages button
automatically dials your voicemail system.
STEP 1
Press the Setup button.
STEP
2 Scroll to Voice Mail and press select.
STEP
3 Enter the number to dial for voicemail.
"#$%!&'()$!*+%!,(#-+!./0&1!./2&!34)!./5&!!
!
!
!
::!
!
To clear the field of a previous entry, press clear. To enter letters, press
the Right navigation button to scroll, then press the alpha softkey
STEP
4 Press save.
Creating Speed Dials
You can configure different types of speed dials:
•
You can assigned unused line buttons on your phone to act as a speed dial.
•
Depending on how your extensions are configured and how many line buttons are on your
phone, you can have up to 7 speed dials on the line buttons.
•
You can create speed dials assigned to a number, that, when pressed on the keypad, dials the
number assigned to it. You can have up to 8 of these speed dials. Each speed dial can be a
phone number, IP address or URL.
Creating Numerical Speed Dials
STEP 1
Press the Setup button.
STEP
2 Select Speed Dial.
STEP
3 For a new speed dial, scroll to select an unused speed dial (marked with
Not Assigned). To edit a previously existing speed dial, select it.
STEP
4 Press edit.
STEP
5 Enter the number to assign to the speed dial and press ok.
Using Speed Dials
To call one of your configured speed dial numbers, either:
•
Open a phone line and press the number on the phone keypad for the speed dial,
then press Dial.
•
Press the Setup button, select Speed Dial, choose the number, and press Dial.
•
Press the unused line button you have configured for a speed dial.
Your system administrator may configure your phone so that you can monitor other user ʼs phones
from your phone. If this feature is configured, some line buttons on your phone are assigned to
display the status of another userʼs phone. For example, if your line 4 is configured to display
Bobʼs phone line, the LED color shows you the status of his phone line
Customizing Your LCD Screen
Changing the LCD Screen Contrast
To adjust the contrast of the LCD screen:
STEP 1
Press the Setup button, scroll to highlight LCD Contrast, and press the select button.
STEP
2 Use the navigation button to adjust the screen contrast. Pressing the Left navigation
button decreases the contrast. Pressing the Right navigation button increases the
contrast.
STEP
3 Press save.
Changing the Screen Backlight Settings
The screen backlight turns off after a specified period of time. You can change this time period so that
the screen backlight is on for a longer period, or keep the backlight always on.
STEP 1
Press the Setup button.
STEP
2 Select Preferences.
STEP
3 Choose Back Light Timer and press edit.
STEP
4 Press
•
•
•
•
Option to choose the desired setting:
10 seconds
20 seconds
30 seconds
always on
"#$%!&'()$!*+%!,(#-+!./0&1!./2&!34)!./5&!!
!
!
!
:6!
!
STEP 5 Press ok.
STEP 6 Press save.
Configuring the Phone Screen Saver
To configure your screen saver:
STEP 1
STEP
Press the Setup button.
2 Select Screen Saver Mode.
To enable your screen saver:
STEP 1
In Screen Saver Mode, Choose Enable Screen Saver and press edit.
STEP
2 Press y/n to choose yes.
STEP
3 Press ok.
STEP
4 Press save.
To specify the amount of time before the screen saver turns on if your phone is idle:
STEP 1
In Screen Saver Mode, choose Screen Saver Wait Time and press edit.
STEP
2 Enter the time, in seconds, to wait before the screen saver starts.
STEP
3 Press ok.
STEP
4 Press save.
To change your screen saver picture:
STEP 1
STEP
In Screen Saver Mode, choose Screen Saver Icon and press edit.
2 Press option multiple times to display the choices available until the one
you want is displayed. Options are:
•
•
•
•
•
Background Picture—Displays your phoneʼs background picture.
Station Time—Overlays the phoneʼs station ID and time onto the
picture.
Lock—Overlays a lock graphic onto the picture.
Phone—Overlays a phone graphic onto the picture.
Date/Time—Overlays the date and time onto the picture.
STEP
3 Press ok.
STEP
4 Press save.
Turning on the Screen Saver
To immediately turn on your phoneʼs screen saver:
STEP 1
STEP
Press the Setup button.
2 Scroll to Screen Saver Mode and press activ. (The screen saver must be
enabled in order to immediately activate it.)
Using Ring Tones
Each extension of your phone can have a different ring tone. You can also create your own ring tones.
Changing Your Ring Tone
To change a ring tone:
STEP 1
Press the Setup button.
STEP
2 Select Ring Tone.
STEP
3 Choose the extension for which to choose a ring tone and press change.
STEP
4 Scroll through the ring tones and press play to play the highlighted ringtone. Press select to
choose the highlighted ringtone for that extension.
"#$%!&'()$!*+%!,(#-+!./0&1!./2&!34)!./5&!!
!
!
!
:7!
!
Caring for Your Phone
The Cisco Small Business Pro IP phones are electronic devices that should not be exposed to
excessive heat, sun, cold or water. To clean the equipment, use a slightly moistened paper or cloth
towel. Do not spray or pour cleaning solution directly onto the hardware unit.
Before You Begin
The RJ-11 port marked “AUX” is reserved for connection with the Cisco SPA 500S Attendant
NOTE
!
Console that works with the IP phones. It is not for use as a telephone line port.
CAUTION: Do not plug a telephone line cord into the port marked “AUX.”
CAUTION
Phone Connections
The following photo shows where you need to connect parts of the phone.
Figure 1
Phone Connections
Verifying Phone Startup
After receiving power and network connectivity, the phone executes a boot-up sequence. During this sequence,
phones with screens display the Cisco logo and then “Initializing Network”. All of the lights on the phone will flash.
After your phone is successfully connected to the network and receives a basic configuration, your phone line keys
should glow green (on models with phone line keys).
On models with screens, the phone displays the standard menu for the phone. The date, name and number of the
phone display on the top line of the LCD screen. At the bottom of the LCD screen, softkeys are displayed over their
associated soft buttons.
On models with no screen, such as the Cisco SPA 501G, the lines should glow green and you should hear a dial tone
when picking up the handset or pressing the speakerphone button.
If the phone does not start, confirm your installation and connections. If these are correct, try unplugging the phone
and plugging it back in again. If you still donʼt see the display, then contact your IT support personnel or call
Megagate Broadband support for more assistance.
"#$%!&'()$!*+%!,(#-+!./0&1!./2&!34)!./5&!!
!
!
!
:0!
!
Problems with Your Phone?
The First step in trouble shooting phone issues is to check each part of the phone and make sure that each part of
the phone is plugged into the correct port. Check the following:
Ethernet cord connection at the phone and at the wall.
Power cord connection at the phone and the wall. (Some phones use power over Ethernet, so this may not
apply)
•
•
If all the connections are correct, follow steps for Restarting your Cisco Phone.
STEP 1
Press the Setup button.
STEP
2 Scroll to Device Administration and press Select.
STEP
3 Scroll to Restart and press Select.
If you are still having problems with your phone please contact your IT support personnel or call Megagate
Broadband support for more assistance.
Support Hours: Monday – Friday 8 a.m. to 7 p.m.
Saturday 10 a.m. to 4 p.m.
601.450.5000 or 1.866.342.4283
Advanced Procedures for Technical Support Personnel
!
These menus are used to configure and troubleshoot your phone and the phone network.
You should not change these settings or perform these actions unless directed to do so by your
phone administrator.
!
If you choose factory reset, you will return the phone to the original factory settings and will erase all
current settings, including the directory and call logs. It is also possible that your phone extension will
change.
Rebooting Your Phone
This setting is to configure and troubleshoot the network. You should not change these
settings unless directed to by your phone administrator as this can negatively affect your
phoneʼs function.
To reboot your phone:
STEP 1
Press the Setup button.
STEP
2 Scroll to Reboot and press select.
STEP
3 Press ok.
"#$%!&'()$!*+%!,(#-+!./0&1!./2&!34)!./5&!!
!
!
!
:.!