1
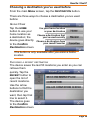
ARE YOU READY FOR A WORLD WITHOUT WRONG TURNS?
User’s Guide
TRAX350 GPS
Navigation Device
Contents
What Do I Do First?.............. 4
Make sure everything is OK........ 4
TRAX350 GPS navigation device....4
Windshield mount..........................4
Included accessories......................5
Plug it in...................................... 5
Choose your default language..... 6
Set your time zone...................... 6
Enter your home location............ 7
The payoff.....................................10
Get acquainted with the Map
screen....................................... 10
What do those icons mean?.........11
Battery status icon.......................11
Zooming in and out.......................12
Changing the map view................13
Changing the volume....................14
Re-centering the map...................14
Getting more information.......... 15
How Do I Put It in My Car?16
Safety considerations............... 16
Attaching the windshield
mount....................................... 17
Choosing a destination you’ve
used before............................... 29
Going Home..................................29
Choosing a recent destination......29
Choosing a favorite location.........30
Confirming your destination..........30
Choosing a destination from
the map (the mark button)....... 31
Using the destination................ 32
View Map.....................................32
Save as Favorite and Save as
Home............................................33
Plotting a route to the
destination................................ 33
Reading the Route screen.............34
Changing the route view...............35
Testing the route...........................36
Getting more route information37
Reading the Maneuver List
screen...........................................37
Reading the Route Info screen.....38
What Else Can I Do with
Routes?............................... 40
Mounting on a flat surface........ 20
Avoiding roads on the route...... 40
Adding waypoints .................... 41
Editing or deleting waypoints.... 43
Changing the route method
options...................................... 45
How Do I Use It?................ 22
What Options Do I Have?... 47
Entering a new destination........ 22
Map..............................................47
Guidance......................................47
System.........................................48
User Data......................................48
Adjusting the windshield mount...18
Mounting on the windshield...... 19
Removing the windshield mount...19
Entering an address or
intersection...................................23
Selecting a Point of Interest (POI)26
Page Customizing the Map screen.... 49
Changing the default map view
(Map Orientation) ......................49
Changing the Map Display Color50
Showing the Breadcrumb Trail...51
Changing the POI icon Display....51
Customizing guidance during
routes........................................ 52
Turning off the Voice Prompts &
alert tones....................................53
Activating Auto-Zoom.................53
Activating Speed Alert...............53
Customizing general options..... 54
Changing the screen’s
Brightness..................................55
Changing how distance is
displayed (Unit Setup).................55
Changing the Volume..................55
Changing the Language..............55
Turning off the Sounds................56
Editing favorite locations........... 56
Understanding the zoom
options...................................... 58
I Have a Question............... 61
How long should the battery
last?.......................................... 61
How do I update or add maps? 61
What if I need to update the
software?.................................. 61
How do I find the software
version?........................................61
Tightening the bracket joint..........65
Why is it that...? ...................... 66
The POI icons disappear from
the map?.......................................66
The screen is blurry and hard
to read..........................................66
I can’t find a location on the map..66
Some buttons are grayed out.......66
What Else Do I Need to
Know?................................ 67
One-year limited warranty........ 67
NAVTEQ Data End-user
License Agreement................... 68
Terms and Conditions...................69
Notice of Use................................71
Manual information................... 72
Copyright and trademark
information...................................72
Regulatory information.............. 72
US regulatory compliance.............72
Canadian regulatory compliance...73
Important vehicle and product
safety information..................... 73
Drive safely!.................................73
Electrical safety warnings.............74
Lithium-Ion battery cautions.........74
Recycling and disposal
information...................................74
Index and glossary.................... 75
Why can’t I get a GPS signal
lock?......................................... 62
Reading the GPS Status screen...63
How can I keep the device still?65
Page What Do I Do First?
Make sure everything is OK
If anything listed here is missing or damaged, call Customer
Service (see back cover for contact information).
Power button
Notch for windshield
mount bracket.
TRAX350 GPS
navigation device
► Press the power
button to turn off the
screen; the device
stays on and can still
give directions.
► Press the power
button in and hold
it for three seconds
to turn the device
completely off.
USB port for
software and
map updates
Power
connection
Windshield mount
► Some states have laws
against putting
things on your
car’s windshield.
If you don’t
know the laws
for your state,
contact the
office that
controls drivers’
licences.
Suction
cup
Adjustment
lock
Suction
latch
Suction cup
pull tab
Bracket
top
Bracket
bottom
► If you do put the device on your windshield, don’t forget
to lock it up or take it with you when you leave your car.
Page What Do I Do First?
Included accessories
DC (car)
adapter
Adhesive
anchor
disk
USB
cable
Plug it in
► Connect the power adapter to the
power connector on the lower right side
of the device.
► Plug the other end into your car’s
cigarette lighter (or any standard
12 V DC outlet).
► Only use the power adapter that came
with your device. Any other adapter
might damage the device.
► Whenever it senses power
coming in, the device turns
itself on and charges the
battery.
► As soon as the power stops
(for example, when you unplug the adapter or turn off
your car), the device automatically shuts down. If you
want it to stay on, tap anywhere on the screen during the
Shutting down message.
► You can turn the device on or off anytime you want: just
push the power button on top of the device (hold the
button for three seconds to turn the device off).
Page What Do I Do First?
Choose your default language
The first time you
turn on the device,
it asks you which
language you want
to use for menus
and voice prompts. Choose from US English (eng), Spanish
(esp), or Canadian French (fra). (You can change the
language anytime you want from the Settings menu; See
page 55.)
Set your time zone
1) From the main menu screen, select
2) Select
.
to open the System Settings screen:
3) In the time zone
field, use the +
and – buttons
to select your
local time zone.
The available
time zones are
Atlantic (Atlantic
Standard Time),
Eastern (Eastern
Standard Time,
Central (Central Standard Time), Mountain (Mountain
Standard Time), Pacific (Pacific Standard Time), Alaska
(Alaska Standard Time), Hawaii (Hawaii-Aleutian
Standard Time). The default time zone is Central.
4) In the daylight saving field, select yes if your area
uses daylight savings time. Select no if your area never
uses daylight savings time.
Page What Do I Do First?
5) Tap the
button to go to the second screen.
6) In the time format field, choose 12 hr to use twelvehour (am/pm) time or 24 hr to use twenty-four-hour
(military) time.
7) Tap the
Tap the
button to go back to the Menu screen.
button to go back to the Map screen.
Enter your home location
Next, enter the address you want to use as your “home”
location, that is, the place you travel to and from the most.
(This step isn’t actually required, so you can skip it if you
want. But the home feature is so useful that you’ll be glad
you entered it!)
1) From the main menu, choose
.
2) From the Destination screen, you can choose how you
want to enter your home location.
► To enter a complete address, choose
.
► To enter an intersection of two streets, choose
.
3) The device shows you the
default state. Tap the button
to select that state, or to pick
a different state, tap
change state.
► On the Select State screen,
scroll down until you find the state you want to use. You
can choose from all fifty US states, Puerto Rico, the US
Virgin Islands, and the District of Columbia.
Page What Do I Do First?
4) Use the alphabet keypad to enter the name of the city (or
unincorporated area) where your home location is.
Go back to
the previous
screen
The number of cities
in the database that
match your entry.
Go to the
Map screen
Letters that don’t match
a name in the database
are grayed out
Go to the
volume
settings
Tap OK when
you’re done
Go to
the Menu
screen
Back
space
Switch to
the number
or symbol
keypad (not
available
unless a city
name in the
database
contains a
symbol or
numeral)
► Don’t worry about typos or misspellings! As you type, the
device grays out any letters that don’t match a record in
the map database. For example, if you type D, you only
see letters that come after D on the list of city names.
► If any city names on the list include a symbol
(punctuation, letter with accents, etc.), the sym button will
be active. Tap the sym button to switch the keypad from
letters to symbols.
► If any city names include a number, the 123 button will
be active. Tap the 123 button to switch from letters to
numbers.
Page What Do I Do First?
► To switch back to letters, tap the abc button.
► Tap the ok button when you are finished.
5) When you tap ok (or if there are 5 or fewer city names
that start with the letters you typed), the device goes to
the Select City Name screen. Just tap the name of the
city you want.
6) Enter the street name using the same process you used
to enter the city name. When the device shows the
Select Street Name screen, tap the name of the street
you want.
Enter numbered streets as numerals plus
abbreviation (1ST, 2ND, 3RD, etc.) instead of
spelling out the word (First, Second, Third, etc.).
7) Enter the address number (if you are entering an
address) or the second street name (if you are entering
an intersection). Use the same process you used to enter
the city and the street name.
8) After you enter the address
or cross street, the device
shows the Confirm
Destination screen.
► Tap the
button if you
need to go back to the entry
screens and make changes.
► If the information is correct,
tap the options button.
9) On the Options screen, choose
.
Page What Do I Do First?
10) Enter any name you want for your home location (the
default name is HOME).
11) Tap the ok button when you finish. The device confirms
that it saved your new home location, and you’re done.
The payoff
That probably seemed like a lot of work, but here’s why you
did it: In the top left corner of the menu screen, there’s a
home icon. Tap that icon, and the device plots a route from
wherever you are right now to your home location.
Get acquainted with the Map screen
The Map screen is the one you’re probably use most often,
so you should take a few minutes to get familiar with it:
Tap on the
map itself
to recenter
the map
screen and
see more
options.
Car icon
(you are
here)
POI
icons
Volume
icon
Battery
status
icon
Compass
icon
Page 10
Name of
the road
you’re on
Zoom
icon
Current
Miles
time
travelled
(Trip Computer icons)
Go to the
Menu
screen
What Do I Do First?
If the device doesn’t have a lock on your location, the
car icon will be gray.
► Tap the menu button to open the main Menu screen.
What do those icons mean?
Icon
Name
What it shows
Tap it to...
The current map
the map
Compass view, which way Change
view
is north
Bring up the
zoom bar and
change the
zoom level
Get more
POI
The location and information
address,
(Point of type of various (name,
phone number)
Interest) POI
on a specific
POI
Change the
the
Volume Whether
or mute
audio is muted volume
the audio
Open the Trip
Trip
Miles driven and Computer
Computer current time
screen to see
more details
Zoom
,
, etc.
,
,
The current
zoom level and
scale
Battery status icon
The battery status icon shows how much charge is left in
the battery. Anytime there is a power input, the icon shows
“charging”:
Battery
Status:
Low
Medium
High
Full
Charging
Icon:
Page 11
What Do I Do First?
Zooming in and out
There are 12 different zoom levels, ranging from 125 feet to
100 miles in the English system measurements or 50 meters
to 200 kilometers in the metric system.
► The zoom icon shows the map scale and the current
zoom level. The map scale unit is approximately ⅜ inch
or 1 centimeter.
► Tap the zoom icon to bring up the zoom bar.
Zoom out
English
system
(mile)
100 mi
50 mi
25 mi
10 mi
5 mi
2 mi
1 mi
½ mi
1000 ft
500 ft
250 ft
125 ft
Map
scale
(approx.
3/8 in or
1 cm)
Current
zoom
level
Use for
viewing:
Metric
system
(km)
200 km
100 km
GREATER 50 km
METRO
20 km
AREA
10 km
4 km
CITY
2 km
1 km
400 m
STREET
200 m
(POI icons
are visible) 100 m
50 m
STATE/
REGION
Zoom in
► Tap the
+ or – icons to change the zoom level one step
at a time.
► Tap anywhere on the bar to skip directly to that zoom
level.
Page 12
What Do I Do First?
Changing the map view
Tap the compass icon to cycle through the three map views:
North up view (2D):
North is always at the
top of the screen, and
the car icon rotates to
point in the direction
you’re going. The
compass icon’s needle
(the red half) always
points straight up.
Heading up view (2D):
(default) The direction
you are currently going
is always at the top of
the screen. The car
icon points up, and the
map rotates as you
change direction. The
compass icon’s needle
rotates to point north.
Three-dimensional
(3D) view:
The map and all icons
are shown in three
dimensions, so your
current heading is
forward or away from
you. The map and the
compass icon rotate
the same way as in the
2D heading up view.
Page 13
What Do I Do First?
You can set any of the three map views as the
default view. (See page 49 for Map screen options.)
Changing the volume
Tap the volume icon to go to the Volume screen.
► Tap the + button to
increase the volume or
the – button to decrease
the volume.
► Tap on to mute the audio
completely.
► Tap ok when you’re done.
Re-centering the map
Tap anywhere inside the map area to center the map on that
location. This also gives you some additional options:
Go to the
previous
screen
Go to
the Map
screen
The map centers
Name of the on the location you
spot marked by tapped and marks
the crosshairs it with crosshairs.
Mark this location
(as home, favorite,
destination, etc.)
Page 14
Plot a route to
this location
What Do I Do First?
► Tap the mark button to open the Mark menu and set the
current location as a destination, an origin, a favorite, etc.
► Tap the go button to plot a route to the current location.
► Tap
to return to the map screen.
► Tap
to go back to the previous screen.
Getting more information
This was enough information to get you started. If you want
to know more about the device and how to use it, see these
sections:
To find out more about:
Entering destinations
Re-using a previous destination
What the MARK button is for
Saving places to the favorites list
Editing the favorites list
Creating a route
Seeing a list of directions
Adding waypoints to a route
Fixing a problem
See the section called:
Entering a new destination (p 22)
Choosing a recent destination (p
29)
Choosing a destination from the
map (p 31)
Save as favorite (p 33)
Editing favorite locations (p 56)
Plotting a route to the destination
(p 33)
Reading the Maneuver List
screen (p 37)
Adding waypoints (P 41)
I have a question... (P 61)
Page 15
How Do I Put It in My Car?
Safety considerations
► Don’t install any device where it will block your view
(including your mirrors!) while you’re driving.
► Keep your attention on the road! Don’t try to operate
or focus on any device while you’re driving. If you have
to concentrate on a device, pull off the road for a few
minutes.
► Some states have rules about what kind of devices you
can affix to your car’s windshield and where exactly you
can put them. If you’re not sure if there are any applicable
laws in your state, contact the state agency that issues
drivers’ licences.
► It’s a good idea to take valuable items with you when you
leave you car—that includes GPS devices. If you can’t
take the device with you, lock it in the glove compartment
or hide it somewhere. And don’t forget to take down the
windshield mount: you don’t want to remind any potential
thieves that you might have some valuable mobile
electronics in the car.
Don’t leave the device in direct sunlight for a long
period of time or where the temperature could go above
140º F (60º C).
Page 16
How Do I Put It in My Car?
Attaching the windshield mount
1
Insert the bracket hooks
into the notches on the
bottom of the device.
2
Rotate the
bracket
head up...
3
...and snap
the top
hook into
the notch
on top of
the device.
Page 17
How Do I Put It in My Car?
Adjusting the windshield mount
Lift the adjustment
lock to move the
suction cup and
bracket
The bracket
pivots in all
directions
► The adjustment lock keeps both the bracket and the
suction cup locked into place. Lift the adjustment lock to
change the position of the device.
► The suction cup joint pivots front to back, and the bracket
joint pivots up, down, right and left, any just about angle
in between.
► Angle the suction cup and the bracket where you want
them, then push the adjustment lock back down to lock
the windshield mount into position.
► If the bracket still moves too easily after you push the
adjustment lock down, tighten the bracket joint (see page
65).
Page 18
How Do I Put It in My Car?
Mounting on the windshield
Make sure the device does not block your view of the
road or your mirrors.
Once you decide where you want the device, hold the
suction cup in that position, then adjust the mount so you
have the best view of the device.
1) Press the suction cup flat against the windshield.
2) Push the suction lock
up (towards the suction
cup) until it snaps into
place.
3) Gently pull on the
mount to make sure it is
secure.
If you have trouble getting
the suction cup to stick:
► Clean the spot with an
ammonia-free cleanser.
► Dry the spot completely
Flip the suction
latch up to lock
the windshield
mount into place.
(use a lint-free cloth, if possible).
► Make sure the spot is smooth and flat (suction cups won’t
stick well on a curved or textured surface).
Removing the windshield mount
When you release the suction latch, make sure
you’re holding or somehow supporting the device.
Lift the suction latch and use the plastic pull tab to pull the
suction cup off of the glass.
Page 19
How Do I Put It in My Car?
Mounting on a flat surface
If you want to put the device somewhere other than your
windshield (or anywhere the suction cup won’t stick), you can
use the anchor disk. Once you glue the anchor disk down,
the windshield mount installs inside the disk just like it does
on glass.
When you’re deciding where to put the anchor disk, here are
some things to keep in mind:
► The surface should be as flat as possible. If the disk
is upside down or at a sharp angle, it might not hold the
device’s weight.
► The surface should be as smooth as possible. If the
surface texture is too rough, the glue may not stick as
well.
► The anchor disk will stick permanently on most
surfaces. If you try to remove the disk, you might
damage the surface.
► Don’t peel off the protective sheet until you’re ready to
install the disk. Once you expose the glue, you can’t stop
easily.
1) When you decide where you want to mount the disk, hold
the suction cup in that spot and set the angle and position
of the bracket (just like you would for mounting on your
windshield).
2) Clean the spot to remove any wax, grease, protecterants,
etc.
3) Carefully peel the protective sheet
from the bottom of the anchor disk to
expose the glue.
Page 20
How Do I Put It in My Car?
4) Hold the disk exactly above the spot where you want
to glue it down. (Remember, the glue is designed to be
permanent!)
5) Press the disk firmly against the surface. Push down
along the edges, too, so that every part of the disk makes
good contact with the surface.
6) Before you install the windshield mount, gently tug on the
disk to make sure it’s secure.
7) Remove the clear plastic sheet
from the top of the anchor disk.
8) Press the suction cup flat
against the anchor disk, then
push the suction latch down
(towards the suction cup) to lock
it into place.
Flip the latch
down towards
the suction cup
Page 21
How Do I Use It?
Most of the functions of the GPS navigation device can be
summarized in two steps:
1) Enter a destination.
2) Decide what you want to do with it (see the map, plot
a route to it, save it as a favorite, save it as your home
location, etc.).
Everything starts with your destination. Once you know
where you want to go, you have a whole range of options on
how to get there.
Entering a new destination
From the main Menu screen, tap the destination button.
This opens the Destination screen.
There are three basic ways to enter a new destination:
Enter a complete address
as your destination
Enter the intersection of two
streets as your destination
Select your destination from
the pre-programmed POI list
Page 22
How Do I Use It?
Entering an address or intersection
If you followed the instructions for Entering Your
Home Location starting on page 7, the process is
the same.
1) The device shows you the last-used region of the map. If
this is not the region you want, choose change region;
The device opens the Select Region screen.
Use the up and down buttons to find the region you
want to use, and tap the region name.
The US maps contain 53 regions: all 50 states,
Puerto Rico, the US Virgin Islands, and the District of
Columbia.
2) As soon as you select a region, the device goes to the
Input City Name screen.
► Use the letter
keypad to
enter the name
of the city or
unincorporated
area
where your
destination is.
► If you need to
delete a letter,
tap the
backspace
button (
).
► The number of cities on the list appears beside the
backspace button.
Page 23
How Do I Use It?
► As you type, the
device grays out
any letters that
don’t match a
record in the map
database. For
example, if you
type FO, the
device grays out
all the letters
except for those
that come after Fo on the list of city names.
► If any city names on the list include a symbol
(punctuation,
letter with
accents, etc.),
the sym button
will be active.
Tap the sym
button to switch
the keypad
from letters to
symbols.
► If any city
names include
a number, the
123 button
will be active.
Tap the 123
button to switch
from letters to
numbers.
► To switch back to letters, tap the abc button.
Page 24
How Do I Use It?
3) When only 5 (or fewer) city names start with the letters
you typed, the device goes to the Select City Name
screen. Just tap the name of the city you want.
4) Enter the street name using the same procedure you
used to enter the city name.
Enter numbered streets as numerals plus
abbreviation (1ST, 2ND, 3RD, etc.) instead of
spelling out the word (First, Second, Third, etc.).
5) When the device shows the Select Street Name screen,
tap the name of the street you want.
6) If you are entering an address, the device prompts you to
enter the address number.
If you are entering an intersection, the device prompts
you to enter the second street name.
Enter the address or second street name using the same
procedure you used to enter the city name and the street
name.
7) After you enter the
address or second
street name, the
device shows the
Confirm Destination
screen.
► Tap the
button if
you need to go back
to the entry screens
and make any
changes.
► If the information is correct, tap the go button to plot a
route to this destination using the default options.
Page 25
How Do I Use It?
► Tap the demo route button to see a test run of the
route.
► Tap the options button to see what else you can do with
this destination.
Selecting a Point of Interest (POI)
1) From the Destination screen, tap the
button.
2) Select the region you want to search in.
3) The device opens
the Select Category
screen. The main
screen shows the
most common
categories. To see all
POI categories, tap
the more button at
the bottom of the
screen.
4) Use the arrow buttons
to find the category
that best describes
what you’re looking
for.
► The up and down
buttons (single
arrows) scroll
through the list one
item at a time.
► The page up and page down buttons (double arrows)
skip to the next screen. Press and hold the page up and
page down buttons to scroll through the list quickly.
Page 26
How Do I Use It?
5) When you select the category, the device goes to the
Search Method screen. Choose the most convenient
method:
► near here:
The device
shows the
list of POI
items that
matched
your search
options,
sorted by
distance,
with the
closest item
to the center
of the map
listed first.
Enter the name of a
POI item, then sort
items by distance
Sort POI items by
distance from the
map center
(closest items first)
Enter a city name,
then sort POI items by
distance from that city
Sort POI items by
distance from the
destination
(only available
during a route)
► near destination: The device shows the POI
list sorted by distance, with the closest item to your
destination listed first.
near destination is available only when there
is an active route. (See page 34 for information on
routing.)
► near city: Enter the name of the city you want to search
near. The device displays the POI list, sorted by distance,
with the closest items to the selected city listed first.
► by poi name: Enter the name (or partial name) of a
POI item (enter as much as you want and tap ok). Then
choose near city, near here, or near destination.
The device displays any POI items that start with the
letters you entered, sorted by distance.
Page 27
How Do I Use It?
6) On the Select POI
Name screen (the
POI list), use the
arrow buttons to
find the POI you
want. The POI at
the top of the
screen is
expanded to show
more information.
7) When you choose
the POI, the
device goes to the
Confirm
Destination
screen.
► Tap the
button
if you need to go
back and make
changes.
► If the information
is correct, tap
the go button to plot a route to this destination using the
default options.
► Tap the demo route button to see a test run of the
route.
► Tap the options button to see what else you can do with
this destination.
Page 28
How Do I Use It?
Choosing a destination you’ve used before
From the main Menu screen, tap the destination button.
There are three ways to choose a destination you’ve used
before:
Going Home
Tap the home
Use your home location
as your destination
button to use your
home location as
Choose a destination that
you’ve used recently
a destination; the
device goes directly Choose a destination from
your saved favorites
to the Confirm
Destination screen.
This button is only available after you enter a home
location.
Choosing a recent destination
The device saves the last 50 locations you enter so you can
retrieve them
quickly. Tap the
recent button to
open the list of
recent locations.
Use the arrow
buttons to find the
destination you
want, then tap that
line to select it.
The device goes
to the Confirm
Destination screen.
Page 29
How Do I Use It?
Choosing a favorite location
You can save up to
50 locations to your
favorites list, so you
can use them over
and over again (like
using speed dial on
your phone). Tap the
favorites button to
open your favorites
list.
Use the arrow buttons
to find the location you want, then tap that line to select it.
The device goes to the Confirm Destination screen.
This button is only available after you save at least
one favorite location.
Confirming your destination
When you choose your destination, the device goes to the
Confirm Destination screen:
► Tap the go
button to plot
a route to this
destination
using the
default options.
► Tap the demo
route button
to see a test
run of the
route.
Page 30
How Do I Use It?
► Tap the options button to see what else you can do with
this destination.
► If the destination is not correct, tap the
back and choose another destination.
button to go
Choosing a destination from the map (the mark button)
When you tap
anywhere inside the
map area, it centers
the map on that
location and brings up
the mark button.
Tap the mark
button to open the
Mark menu. The
Mark menu has the
same basic options
as the Destination
Options screen.
Save this location as your new home location (see
page 33).
FAVORITE
Save this location to your list of favorites (see page 33).
Select this location as a destination. The device goes to
DESTINATION
the Confirm Destination screen (see page 30).
Set this location as a Waypoint on a route (see page
WAYPOINT
41).
Move the car icon and center the map on this location.
ORIGIN
(This option is not available when the device has a
GPS signal lock.)
HOME
Page 31
How Do I Use It?
Using the destination
Once you enter a destination, you have several options for
how to use that location:
See this location on the map.
Save this location to your list of
favorites.
Save this location as your new home
location.
Move the car icon and center the map
on this location (not available when the
device has a valid GPS signal lock).
View Map
The device centers the
map on the location
and marks it with
crosshairs. (This
screen is the same
one you see when you
tap on the map to
recenter it.)
► Tap the go button
to plot a route to
this location.
► Tap the mark button to set the current location as a
destination, an origin, a favorite, etc.
► Tap the menu button to open the main Menu screen.
► Tap
Page 32
to go back to the previous screen.
How Do I Use It?
Save as Favorite and Save as Home
If you tap save as
favorite or save as
home, the device goes to
the Input Name screen,
which has the same
alphabet keypad as the
Input City Name screen.
Enter a name for this
location.
► The name can be up to 30 characters, and it can use
spaces, punctuation, accents, etc.
► If the location already had a name (for example, if it is
a POI or if you had already saved a home location), the
existing name is already filled in. Tap ok to accept the
existing name, or use the backspace key to erase it.
► Tap ok when you’re finished. The device saves the
location and goes back to the Options screen.
Once the name is saved, you can go back and
change it. See page 56.
Plotting a route to the destination
When you enter a
destination and come to the
Confirm Destination
screen, tap thego button.
Page 33
How Do I Use It?
The device uses the default route options to calculate a route
from your current location to the destination. This may take
a few seconds, depending on how complicated the route is
(how far the destination is, how many turns there are, etc.).
While it’s calculating the route, the device shows a
horizontal progress bar at the bottom of the screen.
Wait until the device finishes calculating the route
before you try to do anything else.
Reading the Route screen
The direction
you should go
Name of
street or turn
End the
route
Details on
your next
turn or
maneuver
How
far it is
The route is
marked in
green.
Miles left
Time left
Name of the
Go to the
to go
to go
street you are
currently on Go to the Trip Computer screen Menu screen
► The street you should be driving on is marked in green.
► The zoom, volume, compass, and trip computer
Page 34
How Do I Use It?
icons work the exact same way as they do on the Map
screen.
► Tap the cancel route button to stop the route
completely and go back to the Map screen. Don’t worry:
the device saves the destination information in the
Recent Destinations list, so you can get it later.
► When you get within 1000
feet of the next maneuver,
the count-down bar
appears. Every 100 feet, a
block disappears from the
bottom of the bar. This
gives you an easy way to
watch for your next
maneuver.
Changing the route view
Tap the green arrow showing your next maneuver (in the
upper left corner) to cycle through the three route views: the
regular view (on the previous page), the split-screen view,
and the full-screen view.
► The split screen
view divides
the screen
between the
map and the
next maneuver
area. The split
screen view
also shows a
long-distance
countdown bar
when the next
Street where the
next maneuver is
The direction
you need to go
Long range
countdown
bar (more
than 1000
feet away)
Distance to your
next maneuver
Name of the
current street
Page 35
How Do I Use It?
maneuver is further than 1000 feet away. At 1000 feet, it
switches to the thousand-foot countdown bar.
► The full screen
view replaces
the map with
arrows that
show the next
three
maneuvers.
This view also
uses the long
Direction of the
next maneuver
distance countdown bar in
addition to the
thousand-foot countdown bar.
Direction
of the third
Direction maneuver
of the
second
maneuver
Testing the route
The device can show you a full test run of the route,
including all
instructions and
voice prompts.
From the Confirm
Destination
screen, tap the
demo route
button at the bottom of the screen.
The device runs through the entire route at an accelerated
rate. When it reaches the destination, it loops back and starts
again.
To stop the test run, tap the stop demo button (
Page 36
).
How Do I Use It?
Getting more route information
From any route view, you can tap the screen for more
information and options without stopping the route:
Tap on or above the next maneuver
title bar to see the complete list of
Tap the next maneuvers for this route.
maneuver
arrow to
change the
route view
Tap anywhere inside
the map area to
pause the route and
see more options.
► Tap the next maneuver arrow to change the route view
(see page 35).
► Tap on or above the bar that shows the name of the next
maneuver to go to the Maneuver List screen.
► Tap anywhere else inside the screen area to recenter the
map and see more options, just like on the Map screen.
(Tapping on the map just pauses the route: it does not
end or cancel it.)
Reading the Maneuver List screen
The Maneuver List screen is a complete list of directions for
the route. It shows every maneuver you will need to make,
the name of the street you need to turn on, the direction you
need to go, and the distance from the previous maneuver.
Page 37
How Do I Use It?
► Use the up and
down (single
arrow) buttons to
scroll through the
list one maneuver
at a time.
► Use the page up
and page down
(double arrow)
buttons to skip to
the next screen.
► Tap the
button to go to the route view screen.
► Tap the
button to go to the main Menu screen.
► Tap the
button to go back to the previous screen.
► Tap on an individual maneuver line to see a map of that
maneuver’s location. This map includes the mark button
(which opens the Mark menu) and the route button
(which opens the Route Info screen).
Reading the Route Info screen
The Route Info
screen shows the
destination, total
driving distance, and
estimated drive time.
► Tap the
maneuver list
button to go to the
Maneuver List
screen (see page
37).
Page 38
How Do I Use It?
► To change the default options for the route, tap the
route method button. This takes you to the Route
Method screen (see page 45 for detailed information on
the route method options).
► Tap the delete route button to end the route (this
works the same as the cancel route button).
► Tap the
button to go back to the route view screen.
► Tap the
button to go to the main Menu screen.
► Tap the
button to go to back to the previous screen.
► To recalculate the route without using specific roads, tap
the avoid roads button (see page 40).
You can also get to the Route Info screen by tapping
the info button on the main Menu screen and then
tapping the route info button.
Page 39
What Else Can I Do with Routes?
Once you have plotted a route, you can make a lot of
changes to it. You can
► Avoid individual roads along the route (because of traffic,
construction, or whatever).
► Add intermediate stops or waypoints to the route.
► Change the way the device calculates the route.
Avoiding roads on the route
At any point in a route, if you prefer not to use particular
roads, you can tell the device to re-plot the route without
those roads.
From the Route
Info screen, tap
the avoid roads
button.This opens
the Avoid Roads
screen, which
shows all the
roads and turns
you have left to go
in the route.
► Use the up and down (single arrow) buttons to scroll
through the list one maneuver at a time.
► Use the page up and page down (double arrow)
buttons to skip to the next screen.
► To avoid a particular road, tap on the maneuver line. The
device highlights that maneuver and changes the color of
the X icon.
► If you select the wrong line or change your mind about
Page 40
What Else Can I Do with Routes?
avoiding that road, that’s OK: if you tap one of the
highlighted lines, the device clears that selection and will
no longer avoid that road.
► When you have selected all the roads you want to avoid,
tap the recalculate button at the bottom of the screen.
The device re-plots the route without using the roads you
selected.
Until you tap the recalculate button, the device
will use the route as originally plotted: the route still
includes the roads you selected on the Avoid Roads
screen.
Before you recalculate the route, you can go back to any of
the other screens to get more information:
► Tap the
button to go to the route view screen.
► Tap the
button to go to the main Menu screen.
► Tap the
button to go to the previous screen.
When you leave the Avoid Roads screen, the device
remembers which roads you selected; it can save these
selections until you recalculate or delete the route.
Adding waypoints
Once you have a route plotted, you can add waypoints, that
is, any place where you want to stop along the way:
1) Plot the route to your final destination, then tap anywhere
on the route view screen.
2) Tap the menu button to go to the main Menu screen.
3) On the main Menu screen, tap the destination button.
Page 41
What Else Can I Do with Routes?
4) Find the location you want to set as a waypoint. Follow
the same steps you normally use to set a destination until
you get to the Confirm Destination screen.
5) On the Confirm
Destination screen, tap
the options button. The
Options screen now has
one more button available:
the set as waypoint
button.
6) Tap the set as
waypoint button.
The device goes to
the Waypoint
screen, which shows
the waypoint along
with your destination.
7) If you want to add
more waypoints, go
back to the main
Menu screen and enter the next destination. (When
you leave the Waypoint screen, the device saves your
waypoints until you delete the route.)
8) When you are finished adding waypoints, tap the
recalculate button.
The device re-plots the route, starting from your current
location and going to the waypoint. Then it plots the route
from the waypoint to the final destination.
Until you tap the recalculate button, the device
will use the route as originally plotted, without any
waypoints.
Page 42
What Else Can I Do with Routes?
Editing or deleting waypoints
You can edit or delete waypoints from the Edit Waypoints
screen. There are two different ways to get there:
► When you enter a waypoint, tap the edit button on the
bottom of Waypoint screen.
► Tap anywhere on the route
view screen, then tap the
route button to go to the
Route Info screen. The
Route Info screen now
has one more button
available: the edit
waypoints button.
The Edit Waypoints screen shows all the waypoints in the
order you will drive
to them. The
device plots a
route from your
current location to
the first waypoint
at the top of the
list. Then it plots a
route from that
waypoint to the
next one on the
list, and so on.
► Use the up and down arrows to select a specific
waypoint.
► Tap the delete button to delete the selected waypoint.
If you delete the destination, the last waypoint on the list
automatically becomes the destination.
Page 43
What Else Can I Do with Routes?
► Use the move up button to move the selected waypoint
before the one above it. For example, if you want to go to
Waypoint C before Waypoint A, use the move up button
to move Waypoint C to the top of the list, above Waypoint
A.
► Use the move down button to move the selected
waypoint after the one below it. For example, if you want
to go to Waypoint A after Waypoint B, use the move down
button to move Waypoint A to the bottom of the list, after
Waypoint B.
► When you’re finished editing the waypoints, tap the
recalculate button.
The device re-plots the route, starting from your current
location and going to the first waypoint on the list. Then it
plots the route from there to the next waypoint on the list,
and so on through the list of waypoints. Finally, it plots the
route from the last waypoint to the final destination.
Until you tap the recalculate button, the device
will use the route as originally plotted, without the
edited waypoints.
Page 44
What Else Can I Do with Routes?
Changing the route method options
You have several different options for exactly how the
device plots a route. You’ve already seen how you can
avoid individual roads on a specific route (see page 40
if you missed it). You can also control the route method,
which is the “background” choices the device makes when it
calculates a route.
Use highways
as much as
possible
Use surface
streets or local
roads as much
as possible
Choose
one
Use the shortest
possible route
Tap either
RECALCULATE
button when
you’re
finished.
Select the things you want to avoid.
(You can select all of them, if you want.)
Page 45
What Else Can I Do with Routes?
There are two different ways to get to the Route Method
screen:
1
From the Confirm
Destination screen, tap
the OPTIONS button.
On the Options
screen, tap the
ROUTE METHOD
button.
2
On the Route Info
screen, tap the
ROUTE METHOD
button.
Page 46
What Options Do I Have?
The table below lists all the available menu items, the choice
available for each one, and which option is set by default.
See the page number(s) beside each menu item for detailed
information.
Menu Item
Use it to…
Map
Map
Change how the map appears
orientation on the display.
Map display
color
Breadcrumb
trail
Change the colors used on the
map
Leave markers on the map as
you drive.
Choose which point of interest
POI display icons you want to see on the
map screen
Guidance
Voice
prompts
Turn off the spoken instructions
and alert tones during a route
Automatically recalculate the
Auto
route if you miss a turn or leave
reroute
the planned route
Have the route view zoom in
and change to split screen view
Auto zoom
as you drive or approach your
next maneuver
Trigger an alarm if you exceed
Speed alert the speed limit recorded for the
current road
Available options See
(default in italics) page
N-up (North up)
H-up (heading up) 49
3D
Day, Night, Auto
50
On
Off
51
Edit
Off
51
On
Off
53
On
Off
N/A
On
Off
53
On
Off
53
Page 47
What Options Do I Have?
Menu Item
Use it to…
Available options See
(default in italics) page
System
Change how bright the screen
15 levels
backlight appears
(default: 15)
Set the device to your local time
North American
Time zone zone. (Other NA time zones:
time zones
Altantic, Eastern, Mountain,
(default: Central)
Pacific, Alaska and Hawaii)
Have the device automatically
Daylight
Yes
adjust 1 hour forward for
saving
No
daylight savings time
Change the map units from
mile
Unit setup
feet/ miles to meters/kilometers
km
Change the starting volume
15 levels
Volume
of the touch tones and voice
(default: 12)
prompts
EN (English)
Change the language of the
Language
FR (French)
display and the voice prompts
ES (Spanish)
Change from 12- to 24 hour
Time format
12 hour, 24 hour
time format.
Sounds
Turn off the screen touch tones
On, Off
Brightness
Edit your list of favorite
User Data locations.
Page 48
(No favorite
locations saved)
55
6
6
55
55
55
N/A
56
56
What Options Do I Have?
Customizing the Map screen
The following pages give details and examples of all the
options available for the Map screen.
From the Menu
screen, tap the
SETTINGS button.
On the Settings
screen, tap the
MAP button.
Tap the BACK
icon when
you’re
finished.
Changing the default map view (Map Orientation)
You can change the map orientation at any time by tapping
the compass icon in the lower left corner. If you prefer a
particular map view, set that view as the default here.
Page 49
What Options Do I Have?
North up:
North stays at the top of the
screen, and the car icon
rotates to point in the
direction you’re going.
Heading up:
The direction you are
currently going is always at
the top of the screen. The
car icon points up, and the
map rotates as you change
direction.
Three-dimensional (3D):
The map and all icons are
shown in three dimensions,
so your current heading is
“forward” or “away from
you.” The map rotates as
you change direction.
Changing the Map Display Color
The map display color
automatically adjusts
as the time changes
from day to night. If
you want the map to
remain one single
color all the time,
choose the Day or
Night color scheme
here. Leave this option at Auto if you want the map to
continue changing the color.
Page 50
What Options Do I Have?
Showing the Breadcrumb Trail
As you drive, the device can leave a trail of markers or
“breadcrumbs” so you can
retrace your route. This is
useful if you are off-road or in
an area where roads have
changed since the latest map
update. Set the breadcrumb
trail to On if you want the
device to leave the breadcrumb markers while you drive.
Changing the POI icon Display
You can choose which POI icons the device shows on the
Map screen. The following icons display by default:
► airports
► amusement parks
► ATMs/banks
► auto dealerships
► auto service/
maintenance
► bookstores
► bus stations
► cinemas
► coffee shops
► colleges/
universities
► department stores
► gas stations
► hospitals
► parks/recreation
► sports complexes
► tourist attractions
1) Under POI Display, choose Edit. This opens the Edit POI
Icon Display screen.
2) Tap on any POI
categories that
you want to
see on the Map
screen. When
you select a
category, the line
is highlighted, and
the check mark
beside it turns
green.
Page 51
What Options Do I Have?
3) If you change your mind about a POI icon, just tap the
line again; the check mark turns back to gray, and the
icons won’t show on the Map screen anymore.
Customizing guidance during routes
See the following pages for details and examples of the
options you have for the guidance the device gives you
during a route.
From the Menu
screen, tap the
SETTINGS button.
On the Settings
screen, tap the
GUIDANCE button.
Tap the BACK
icon when
you’re
finished.
Page 52
What Options Do I Have?
Turning off the Voice Prompts & alert tones
As you approach the next maneuver, the device sounds an
alert tone and announces the instructions for that maneuver.
To turn off both the voice prompts and alert tones, set Voice
Prompts to Off.
Activating Auto-Zoom
When you get close to the next maneuver, the device can
zoom in and change to the split-screen view. After the
maneuver, the device sets the screen back to the way it was.
If you want the device to zoom in as you approach the next
maneuver, set Auto Zoom to On.
Auto zoom also works while you’re driving. If you turn
on Auto Zoom, the device will zoom out as your speed
increases so you can see further ahead when you’re driving
faster. The baseline for auto zoom while you’re driving is
whatever zoom level you set (500 ft is the default).
When you’re driving...
15 mph or slower
16-45 mph
46-65 mph
66 mph or faster
The map will...
stay at the level you set it to
zoom out one level
zoom out two levels
zoom out two levels
Activating Speed Alert
The information in the map database includes the posted
speed limit of each road. Because the device knows how
fast you’re going, it can trigger an alarm if you go over the
recorded speed limit for that road. Turn Speed Alert on if you
want the device to alert you that you might be going too fast.
Speed alert cannot alert you if you are driving on a
roads that is not named in the map database.
Page 53
What Options Do I Have?
Be aware of speed limit signs even when the speed
alert feature is on. Posted speed limits may have
changed since the data was recorded.
Customizing general options
There are two screens for system or general settings. Tap
the arrow icons to switch to the next page.
From the Menu
screen, tap the
SETTINGS button.
On the Settings
screen, tap the
SYSTEM button.
Tap either
BACK icon
when you’re
finished.
Page 54
What Options Do I Have?
Changing the screen’s Brightness
The screen has 15 different brightness levels; choose the
level that is easiest for you to see. Tap the + icon to make
the screen brighter or the - icon to make the screen less
bright. As you tap the icons, the screen adjusts immediately.
If you want to increase the battery life, decrease the
screen brightness by a few levels.
Changing how distance is displayed (Unit Setup)
Choose mile if you want the device to show distances in
feet and miles; choose km if you want the device to show
distances in meters and kilometers.
Changing the Volume
The speaker has 15 volume levels. The system settings will
change the starting or default volume level.
+ icon to make the speaker louder.
Tap the - icon to make it softer.
► tap the
►
You can change the volume any time by tapping the
icon on the Map screen.
Changing the Language
When you turn on the device for the first time, it asks you to
choose the default language for the display and the voice
instructions.
To switch to a different language, choose en for English, fr
for French (Française), or es for Spanish (Español).
Page 55
What Options Do I Have?
Turning off the Sounds
The device usually beeps when you tap an option or a
button on the screen. If you want to turn off these beeps, set
Sounds to Off.
Turning off the sounds on the Settings screen
doesn’t turn off the voice directions or reminder tones
that you hear during a route. See the Guidance
Settings screen for those tones (page 52).
Editing favorite locations
After you save a favorite location, you can come back and
edit the name, add a phone number, or use a different icon.
1) From the main menu screen, select settings and then
user data. This opens the Edit Favorites screen.
2) Use the arrow
buttons to find the
location you want
to edit.
► The up and
down buttons
(the single arrows)
scroll through the
list one item at a
time.
► The page up and page down buttons (double arrows)
skip to the next screen.
► To erase every location stored on your favorites list,
tap the delete all button. (The device asks you for
confirmation before it erases your favorites list.)
Page 56
What Options Do I Have?
3) When you select a favorite from the list, the device goes
to the Edit Favorite screen.
Go back to the
previous screen
Edit the
Go to the
name of this Map screen
location
Delete this
location
from the
favorites
list
Change
the icon
See this
location
on the
map
Go to Volume Edit the phone
number of this
settings
location
Go to the main
Menu screen
► Tap the delete button to delete this location from your
favorites list.
► Tap the icon button to select a new icon for this location.
The device uses the icon you select on the map screen.
► Tap the map button to see this location on the map.
4) Tap the edit name button to change the name of this
location or the edit phone number button to change
the phone number.
Page 57
What Options Do I Have?
.
5) From either screen, tap ok when you’re finished.
This only changes the name or phone number used
on the favorites list; if this location is also on the POI
list, editing the name here will not change it on the
POI list.
Understanding the zoom options
There are 12 different zoom levels, ranging from 1 centimeter
= 125 feet to 1 centimeter = 100 miles. Here is some useful
information about the zoom levels and what they show.
► At 125 feet, the device displays and names all the streets
that are currently within the map area:
Page 58
What Options Do I Have?
► Between 250 and 1000 feet, the device shows most of
the smaller streets but only names the larger ones:
► Starting at one-half mile, the device no longer shows POI
icons. It shows your home location and favorites at all
zoom levels:
► Starting at two miles, the device shows only state and
federal highways along with geographical features:
Page 59
What Options Do I Have?
► At 100 miles the device shows only interstate highways,
state lines, and large geographical features (coastlines,
bays, etc.):
Page 60
I Have a Question
How long should the battery last?
With normal use, the battery charge should last about 2
hours. To help increase the battery life:
► Store the device at room temperature. Never store the
device in temperatures below -4°F (-20°C) or above
+140°F (+60°C).
► Don’t store the device in any area where it might get wet
or where high humidity can condense into water.
► Don’t leave the device in direct sunlight for long periods
of time.
► To avoid risk of fire or damage, only use power adapters
made for this device (see www.uniden.com for
accessory adapters).
How do I update or add maps?
Updated maps and additional maps are available for
additional cost through www.uniden.com. Instructions on
how to update the maps or add new maps are available at
the website.
What if I need to update the software?
You can download any necessary software updates other
than maps through www.uniden.com. Instructions on how
to update the software is included with the download file.
Be sure to read the instructions before updating the
software!
How do I find the software version?
Before you update the software, you need to know the
version of the software your device currently uses. From the
Page 61
I Have a Question
Menu screen, tap the info button and then the system
info button. This opens the System Info screen, which tells
you the software version and the database edition.
Why can’t I get a GPS signal lock?
The most common cause of signal lock issues is external
radio interference or signal blockage: if your cell phone or
AM/FM radio are having trouble with reception, your GPS
device might have trouble getting a clear signal also. Some
common things that can interfere with or block satellite
signals are
► Radio broadcast towers or signal repeaters
► Localized radio signals (like at an airport)
► High frequency power lines
► Tunnels, large bridges or overpasses, parking garages,
etc.
► Tall buildings or canyon walls
► Dense overhead tree cover
Another common cause is window tinting. No, really. Some
window tints have such a high metallic content that they can
interfere with radio signals and increase the amount of time
it takes for the device to get an initial lock. If your windows
are tinted, try stepping outside the car or holding your device
near an open window.
Page 62
I Have a Question
Reading the GPS Status screen
The GPS Status screen gives details about the satellite
signals. To open the GPS Status screen, go to the Menu
screen and tap the
button in the bottom right corner.
The number of satellites your device can see
(total squares in the lower window)
The number of satellites your device can track
(green squares in the lower window)
The number of satellites your device has locked onto
(green bars in the upper window)
Signal
strength
of tracked
satellites
How accurate
your position is
Your current position
in latitude, longitude,
and altitude
Shows whether the
device locked onto
at least four satellites
and can calculate
your altitude.
Your
current
speed
Page 63
I Have a Question
Some helpful things to know about the GPS Status screen:
► There are a total of 27 GPS satellites in orbit, arranged
so that at least 4 satellites can be seen from every point
on the planet at all times. These satellites broadcast radio
signals that allow GPS devices to find them. Atmospheric
conditions and radiation can affect the signal strength on
the satellite’s end just as the local environment can affect
the signal strength on the recevier’s end.
► Satellites in view are above the horizon and have the
potential to be tracked. When the device receives a valid,
continuing signal from a satellite, it marks that satellite as
tracked. When the device synchronizes with the satellite
and locks onto its position in the sky, it marks that
satellite as active.
► The device must lock onto at least three satellites to
estimate your latitude and longitude. If it locks onto four
satellites, it can also calculate your altitude. Generally,
the device must lock onto four satellite signals to
calculate your position accurately.
► The GPS Status screen also shows the accuracy of
your position. An accuracy of 10 feet means that the
calculated position is within a 10 foot radius of your actual
position.
► Once the device locks onto the satellites, it can usually
maintain the lock even if the signal strength goes down.
Also, if the device locked onto the satellite signals within
the past 30 minutes or so, it can often get a new lock very
quickly.
Page 64
I Have a Question
How can I keep the device still?
If the whole mount shifts out of position, the suction cup
probably isn’t getting a good grip on the windshield. Try
removing the mount from the windshield and re-installing
it. See page 19 for hints on getting the suction cup to stick
better.
If the device shifts out of position even though the suction
cup itself stays in place, try tightening the bracket joint.
Tightening the bracket joint
1) Remove the mount from your windshield.
2
Twist the
adjustment
lock clockwise
a few turns to
tighten the
bracket joint.
1
Lift the
adjustment
lock.
2) Lift the adjustment lock, and twist the lock handle
clockwise two, maybe three turns.
3) Flip the adjustment lock back down and see if the bracket
still moves. If it does, repeat step 2.
4) If the adjustment lock won’t go back down, the bracket
joint is too tight. Twist the adjustment lock one or two
turns counter-clockwise and try to flip it down again.
Page 65
I Have a Question
Why is it that...?
The POI icons disappear from the map?
The device does not display POI icons when the map scale
greater than 1000 feet. If you can’t see the POI icons on the
map, try zooming in to 1000 feet or closer. If you still can’t
see the POI icons you want, go the Map Settings screen
and make sure those icons are set to display on the map
(see page 51).
If Auto Zoom is turned on, the map might zoom out
past 1000 feet and hide the POI icons automatically.
The screen is blurry and hard to read
Dirt and oils from your fingers can stay on the touchscreen.
Periodically clean the touch screen with a lint free cloth
dampened with water only. If the screen remains dirty,
try a mild soap solution or a cleaning spray designed for
electronics.
Do not use ammonia on the screen, and never
immerse the device in water.
I can’t find a location on the map
Newer addresses may not have existed when the map
software was created. Check www.uniden.com for the
latest maps.
Some buttons are grayed out
If a button’s function is not available for some reason the
button will be grayed out. You’ll see this on the Destination
screen (where the favorites button is grayed out if you
haven’t saved any favorites) and the input screens (where
letters that don’t match a record in the map database will be
grayed out so you don’t misspell anything).
Page 66
What Else Do I Need to Know?
One-year limited warranty
Important: Evidence of original purchase is required
for warranty service.
WARRANTOR: UNIDEN AMERICA CORPORATION (“Uniden”)
ELEMENTS OF WARRANTY: Uniden warrants, for one year, to the
original retail owner, this Uniden Product to be free from defects in
materials and craftsmanship with only the limitations or exclusions set out
below.
WARRANTY DURATION: This warranty to the original user shall
terminate and be of no further effect 12 months after the date of original
retail sale. The warranty is invalid if the Product is
(A) damaged or not maintained as reasonable or necessary,
(B) modified, altered, or used as part of any conversion kits,
subassemblies, or any configurations not sold by Uniden,
(C) improperly installed,
(D) serviced or repaired by someone other than an authorized Uniden
service center for a defect or malfunction covered by this warranty,
(E) used in any conjunction with equipment or parts or as part of any
system not manufactured by Uniden, or
(F) installed or programmed by anyone other than as detailed by the
owner’s manual for this product.
STATEMENT OF REMEDY: In the event that the product does not
conform to this warranty at any time while this warranty is in effect,
warrantor will either, at its option, repair or replace the defective device
and return it to you without charge for parts, service, or any other cost
(except shipping and handling) incurred by warrantor or its representatives
in connection with the performance of this warranty. Warrantor, at its
option, may replace the device with a new or refurbished device.
THE LIMITED WARRANTY SET FORTH ABOVE IS THE SOLE AND
ENTIRE WARRANTY PERTAINING TO THE PRODUCT AND IS IN LIEU
Page 67
What Else Do I Need to Know?
OF AND EXCLUDES ALL OTHER WARRANTIES OF ANY NATURE
WHATSOEVER, WHETHER EXPRESS, IMPLIED OR ARISING BY
OPERATION OF LAW, INCLUDING, BUT NOT LIMITED TO ANY
IMPLIED WARRANTIES OF MERCHANTABILITY OR FITNESS FOR A
PARTICULAR PURPOSE. THIS WARRANTY DOES NOT COVER OR
PROVIDE FOR THE REIMBURSEMENT OR PAYMENT OF INCIDENTAL
OR CONSEQUENTIAL DAMAGES. Some states do not allow this
exclusion or limitation of incidental or consequential damages so the
above limitation or exclusion may not apply to you.
NOTE: THERE ARE NO USER SERVICABLE PARTS IN THIS
PRODUCT. ANY ATTEMPT TO DISSASEMBLE THE PRODUCT WILL
VOID YOUR WARRANTY.
LEGAL REMEDIES: This warranty gives you specific legal rights, and you
may also have other rights which vary from state to state. This warranty is
void outside the United States of America and Canada.
PROCEDURE FOR OBTAINING PERFORMANCE OF WARRANTY:
If, after following the instructions in the owner’s manual you are certain
that the Product is defective, pack the Product carefully (preferably in its
original packaging). The Product should include all parts and accessories
originally packaged with the Product. Include evidence of original
purchase and a note describing the defect that has caused you to return
it. The Product should be shipped freight prepaid, by traceable means, to
warrantor at:
Uniden America Service
4700 Amon Carter Blvd.
Fort Worth, TX 76155
NAVTEQ Data End-user License Agreement
The data (“Data”) is provided for your personal, internal use only and not
for resale. It is protected by copyright, and is subject to the following terms
and conditions which are agreed to by you, on the one hand, and Uniden
America Corp. (“UNIDEN”) and its licensors (including their licensors
and suppliers) on the other hand. You agree, and are hereby required, to
cease using and return the Data to Uniden America Corporation if you fail
to comply with the terms and conditions of this End-User License.
Page 68
What Else Do I Need to Know?
© 2008 NAVTEQ All rights reserved.
The Data for areas of Canada includes information taken with permission
from Canadian authorities, including: © Her Majesty the Queen in Right
of Canada, © Queen’s Printer for Ontario, © Canada Post Corporation,
GeoBase®
NAVTEQ holds a non-exclusive license from the United States Postal
Service® to publish and sell ZIP+4® information. ©United States Postal
Service® 200X. Prices are not established, controlled or approved by the
United States Postal Service®. The following trademarks and registrations
are owned by the USPS: United States Postal Service, USPS, and ZIP+4.
Terms and Conditions
PERSONAL USE ONLY. You agree to use this Data together with
Uniden’s TRAX series GPS navigation devices for the solely personal,
non-commercial purposes for which you were licensed, and not for service
bureau, time-sharing or other similar purposes. Accordingly, but subject
to the restrictions set forth in the following paragraphs, you may copy this
Data only as necessary for your personal use to (i) view it, and (ii) save
it, provided that you do not remove any copyright notices that appear and
do not modify the Data in any way. You agree not to otherwise reproduce,
copy, modify, decompile, disassemble or reverse engineer any portion of
this Data, and may not transfer or distribute it in any form, for any purpose,
except to the extent permitted by mandatory laws. Multi-disc sets may only
be transferred or sold as a complete set as provided by UNIDEN and not
as a subset thereof.
RESTRICTIONS. Except where you have been specifically licensed to do
so by UNIDEN, and without limiting the preceding paragraph, you may
not (a) use this Data with any products, systems, or applications installed
or otherwise connected to or in communication with vehicles, capable of
vehicle navigation, positioning, dispatch, real time route guidance, fleet
management or similar applications; or (b) with or in communication with
any positioning devices or any mobile or wireless-connected electronic
or computer devices, including without limitation cellular phones, palmtop
and handheld computers, pagers, and personal digital assistants or PDAs.
Page 69
What Else Do I Need to Know?
WARNING. The Data may contain inaccurate or incomplete information
due to the passage of time, changing circumstances, sources used and
the nature of collecting comprehensive geographic data, any of which may
lead to incorrect results.
NO WARRANTY. This Data is provided to you “as is,” and you agree to
use it at your own risk. UNIDEN and its licensors (and their licensors and
suppliers) make no guarantees, representations or warranties of any kind,
express or implied, arising by law or otherwise, including but not limited to,
content, quality, accuracy, completeness, effectiveness, reliability, fitness
for a particular purpose, usefulness, use or results to be obtained from this
Data, or that the Data or server will be uninterrupted or error-free.
DISCLAIMER OF WARRANTY: UNIDEN AND ITS LICENSORS
(INCLUDING THEIR LICENSORS AND SUPPLIERS) DISCLAIM ANY
WARRANTIES, EXPRESS OR IMPLIED, OF QUALITY, PERFORMANCE,
MERCHANTABILITY, FITNESS FOR A PARTICULAR PURPOSE OR
NON-INFRINGEMENT. Some States, Territories and Countries do not
allow certain warranty exclusions, so to that extent the above exclusion
may not apply to you.
DISCLAIMER OF LIABILITY: UNIDEN AND ITS LICENSORS
(INCLUDING THEIR LICENSORS AND SUPPLIERS) SHALL NOT
BE LIABLE TO YOU: IN RESPECT OF ANY CLAIM, DEMAND OR
ACTION, IRRESPECTIVE OF THE NATURE OF THE CAUSE OF THE
CLAIM, DEMAND OR ACTION ALLEGING ANY LOSS, INJURY OR
DAMAGES, DIRECT OR INDIRECT, WHICH MAY RESULT FROM THE
USE OR POSSESSION OF THE INFORMATION; OR FOR ANY LOSS
OF PROFIT, REVENUE, CONTRACTS OR SAVINGS, OR ANY OTHER
DIRECT, INDIRECT, INCIDENTAL, SPECIAL OR CONSEQUENTIAL
DAMAGES ARISING OUT OF YOUR USE OF OR INABILITY TO USE
THIS INFORMATION, ANY DEFECT IN THE INFORMATION, OR THE
BREACH OF THESE TERMS OR CONDITIONS, WHETHER IN AN
ACTION IN CONTRACT OR TORT OR BASED ON A WARRANTY,
EVEN IF [CLIENT] OR ITS LICENSORS HAVE BEEN ADVISED OF
THE POSSIBILITY OF SUCH DAMAGES. Some States, Territories and
Countries do not allow certain liability exclusions or damages limitations,
so to that extent the above may not apply to you.
Page 70
What Else Do I Need to Know?
EXPORT CONTROL. You agree not to export from anywhere any part
of the Data provided to you or any direct product thereof except in
compliance with, and with all licenses and approvals required under,
applicable export laws, rules and regulations.
ENTIRE AGREEMENT. These terms and conditions constitute the
entire agreement between UNIDEN (and its licensors, including their
licensors and suppliers) and you pertaining to the subject matter hereof,
and supersedes in their entirety any and all written or oral agreements
previously existing between us with respect to such subject matter.
GOVERNING LAW. The above terms and conditions shall be governed
by the laws of the State of Illinois without giving effect to (i) its conflict of
laws provisions, or (ii) the United Nations Convention for Contracts for
the International Sale of Goods, which is explicitly excluded. You agree
to submit to the jurisdiction of the State of Illinois for any and all disputes,
claims and actions arising from or in connection with the Data provided to
you hereunder.
GOVERNMENT END USERS. If the Data is being acquired by or on
behalf of the United States government or any other entity seeking or
applying rights similar to those customarily claimed by the United States
government, the Data is a “commercial item” as that term is defined at 48
C.F.R. (“FAR”) 2.101, is licensed in accordance with the End-User Terms
under which this Data was provided, and each copy of the Data delivered
or otherwise furnished shall be marked and embedded as appropriate with
the following “Notice of Use,” and shall be treated in accordance with such
Notice:
Notice of Use
► Contractor (Manufacturer/ Supplier) Name: NAVTEQ
► Contractor (Manufacturer/Supplier) Address: 425 West Randolph
Street, Chicago, Illinois 60606
► This Data is a commercial item as defined in FAR 2.101 and is subject
to the End-User Terms under which this Data was provided.
► © 2008 NAVTEQ – All rights reserved.
If the Contracting Officer, federal government agency, or any federal
official refuses to use the legend provided herein, the Contracting Officer,
Page 71
What Else Do I Need to Know?
federal government agency, or any federal official must notify NAVTEQ
prior to seeking additional or alternative rights in the Data.
Please direct any questions regarding this license to
Uniden America Corporation
4700 Amon Carter Blvd.
Fort Worth, TX 76155
Manual information
► All images in this manual are used for demonstration purposes; the
images in manual might be different from your actual device, but the
operation is the same.
► This documentation reflects the most up-to-date information available
at the time of production. The product, documentation, map database,
and navigation software are subject to change without notice.
► Any updates to this manual will be posted at www.uniden.com and
can be downloaded at no charge.
Copyright and trademark information
► This manual is copyrighted by Uniden America Corporation, Ft. Worth,
TX.
► Navigation software and screen design is copyrighted by Space
Machine, Inc., Sunnyvale, CA.
► All logos and trademarks used in the software or in the documentation
are copyrighted by their respective owners.
Regulatory information
US regulatory compliance
FCC PART 15.105(b)
Note: This equipment has been tested and found to comply with the limits
for a Class B digital device, pursuant to part 15 of the FCC Rules. These
limits are designed to provide reasonable protection against harmful
interference in a residential installation. This equipment generates, uses
and can radiate radio frequency energy and, if not installed and used in
accordance with the instructions, may cause harmful interference to radio
communications. However, there is no guarantee that interference will
Page 72
What Else Do I Need to Know?
not occur in a particular installation. If this equipment does cause harmful
interference to radio or television reception, which can be determined by
turning the equipment off and on, the user is encouraged to try to correct
the interference by one or more of the following measures:
► Reorient or relocate the receiving antenna.
► Increase the separation between the equipment and receiver.
► Connect the equipment into an outlet on a circuit different from that to
which the receiver is connected.
► Consult the dealer or an experienced radio/TV technician for help.
FCC Part 15.19(a)(3)
This device complies with part 15 of the FCC Rules. Operation is subject
to the following two conditions: (1) This device may not cause harmful
interference, and (2) this device must accept any interference received,
including interference that may cause undesired operation.
FCC PART 15.21
Changes or modifications to this product not expressly approved by
Uniden, or operation of this product in any way other than as detailed by
the owner’s manual, could void your authority to operate this product.
Canadian regulatory compliance
ICES003, PARA 6.2
This Class B digital apparatus complies with Canadian ICES-003. Cet
appareil numerique de la classe B est conforme a la norme NMB-003 du
Canada.
Important vehicle and product safety information
Drive safely!
► Do not install any device where it might block your driving veiw or
mirrors.
► Do not attempt to operate any device while you are driving a vehicle.
► Remain alert to actual road conditions; obey all local traffic laws and
posted signs.
► Do not use this product for any purpose where a failure of the product
could lead to harm to any person or property.
Page 73
What Else Do I Need to Know?
Electrical safety warnings
Warning! Risk of fire or electric shock: read and
follow all instructions carefully!
► THIS DEVICE IS NOT WATERPROOF. Do not immerse the device in
water or expose it to moisture.
► Only use the power adapter that came with your device; use of any
other power adapter might damage the device or create a shock or fire
hazard.
► Do not use any power adapter if the cord appears damaged, if either
connector seems loose, or if any internal wires are visible.
► If you need a replacement adapter, contact Uniden Customer Service
(see back page for contact information).
Lithium-Ion battery cautions
This product contains a rechargeable Lithium-Ion battery.
► The battery is not user-servicable. Do not attempt to remove the
battery from the device or open the battery cell.
► In case of exposure to the cell contents, wash the affected area
thoroughly, and seek medical attention.
► Do not expose the battery to temperatures in excess of 140º F (60º C)
or leave the battery in direct sunlight for an extended period of time.
► Lithium Ion batteries may explode if exposed to extreme heat or fire.
► Lithium Ion batteries must be recycled or disposed of properly.
Recycling and disposal information
► Do not dispose of electronic components (particularly batteries and
LCD displays) in your municipal trash collection.
► Consult your local waste management authority or a recycling
organization like Earth911 to find a recycling facility in your area.
► If you are unable to locate proper recycling facilities in your area,
please return the product to Uniden for recycling.
Page 74
What Else Do I Need to Know?
Index and glossary
Term
Definition
Breadcrumb A trail created by leaving markers along the path you
trail
are traveling
The latitude and longitude reference for a specific
Coordinates
location
The Global Positioning Satellites used by GPS
GPS
receivers to calculate your location
Heading
The direction you are currently going.
The angle of the map (no matter what direction you
Orientation
are going)
Point of Interest. One of approximately 2 million
POI
pre-programmed address in the device, divided into
categories
A calculated list of roads, maneuvers, and
Route
instructions that tell you how to drive from your
current location to your destination.
A stopping point or side trip along the way to your
Waypoint
destination.
The location saved in the device as “Home” (it does
Home
not have to be your actual residence)
The instructions and voice prompts the device gives
Guidance
you during a route
How far north or south a specific location is from the
Latitude
equator
How far east or west a specific location is from the
Longitude Prime Meridian (which runs through Greenwich,
England)
See
pages
51
63
62
49
49
26, 51
34, 37
41
7, 33
52
(N/A)
(N/A)
Page 75
HAVE A QUESTION? NEED A PART?
Our Customer Service Specialists
are ready to help!
During regular business hours*
call 1-800-620-7531
or get answers 24/7 at
www.uniden.com.
*Central Time
USZZ01209ZZ (0)
Printed in China.