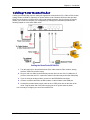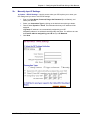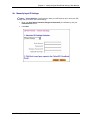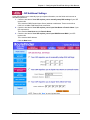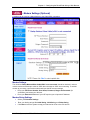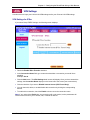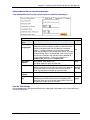
1
SOHO Internet Security Appliance
RF560VPN
User Guide
User Guide
RouteFinder SOHO Internet Security Appliance
RF560VPN
PN S000302A Revision A
Copyright © 2003
This publication may not be reproduced, in whole or in part, without prior expressed written permission
from Multi-Tech Systems, Inc. All rights reserved.
Multi-Tech Systems, Inc. makes no representations or warranties with respect to the contents hereof
and specifically disclaims any implied warranties of merchantability or fitness for any particular
purpose. Furthermore, Multi-Tech Systems, Inc. reserves the right to revise this publication and to
make changes from time to time in the content hereof without obligation of Multi-Tech Systems, Inc. to
notify any person or organization of such revisions or changes.
Revision
A
Date
Description
08/18/03
Initial release.
Trademarks
The Multi-Tech logo is a trademark of Multi-Tech System, Inc. Windows is a trademark of
Microsoft. All other trademarks are owned by their respective companies.
World Headquarters
Multi-Tech Systems, Inc.
2205 Woodale Drive
Mounds View, Minnesota 55112
(763) 785-3500 or (800) 328-9717
Fax (763) 785-9874
Internet Address: http://www.multitech.com
Contents
Chapter 1 – Introduction and Description .............................................................................. 5
Key Features ...................................................................................................................... 5
RouteFinder Documentation ............................................................................................... 7
RF560VPN Front Panel ...................................................................................................... 8
RF560VPN Back Panel....................................................................................................... 9
Chapter 2 – Installation...........................................................................................................10
Safety Warnings ................................................................................................................10
System Requirements .......................................................................................................10
Unpacking Your RouteFinder.............................................................................................10
Cabling Your RouteFinder .................................................................................................11
Chapter 3 – Configuring the PC .............................................................................................12
Chapter 4 – Navigating the Screens ......................................................................................19
Chapter 5 – Configuring the RouteFinder Using a Web Browser ........................................20
About the Browser Interface...............................................................................................20
Setup Wizard .....................................................................................................................22
Chapter 6 – Managing the RouteFinder Using a Web Browser............................................39
Device Information.............................................................................................................39
Device Status ....................................................................................................................40
Advanced Settings.............................................................................................................42
System Tools.....................................................................................................................52
Chapter 7 – Troubleshooting .................................................................................................60
Chapter 8 – Frequently Asked Questions .............................................................................63
Appendix A – Specifications ..................................................................................................66
Appendix B – Installing TCP/IP ..............................................................................................67
Appendix C – Tools for Your RF560VPN ...............................................................................69
PING..................................................................................................................................69
WINIPCFG and IPCONFIG................................................................................................69
TRACERT..........................................................................................................................69
Appendix D – Warranty and Repairs .....................................................................................70
Appendix E – Regulatory Compliance Information ..............................................................72
FCC Part 15 Regulation.....................................................................................................72
EMC, Safety, and R&TTE Directive Compliance................................................................73
Other Approvals.................................................................................................................73
Appendix F – Technical Support............................................................................................74
Glossary ..................................................................................................................................76
Index ........................................................................................................................................81
Chapter 1 – Introduction and Description
Chapter 1 – Introduction and
Description
Welcome to the world of Internet security. Your Multi-Tech SOHO RouteFinder VPN Internet security
appliance, Model RF560VPN, is ideal for the small branch office or telecommuter who needs secure
access to the corporate LAN.
In addition to providing a WAN Ethernet port for DSL or cable broadband Internet access, it also offers
both client-to-LAN and LAN-to-LAN connectivity based on the IPSec protocol. The SOHO RouteFinder
supports up to 10 IPSec tunnels and provides 3DES encryption with 1.5 Mbps throughput.
The RF560VPN is a cost-effective, easy-to-manage solution that is ideal for small- to medium-sized
businesses through the use of Network Address Translation (NAT). Since NAT provides for the
sharing of a single connection, you save the cost of multiple Internet accounts. See the Glossary for
more about NAT.
Key Features
·
One WAN Ethernet port connects to a DSL or cable modem for shared Internet access.
·
Supports up to 10 IPSec VPN tunnels for secure LAN-to-LAN and Client-to-LAN access over the
Internet.
·
3DES encryption throughput of 1.5 Mbps.
·
Built-in 4-port 10/100M bps switch.
·
Built-in firewall and DHCP services with Network Address Translation (NAT).
·
Protects your LAN against Denial of Service (DoS) attacks.
·
Internet access controls provide client and site filtering.
·
Asynchronous port for automatic dial-backup.
·
Network monitoring allows the network administrator to view all incoming and outgoing packets,
status of connections, and specific connection events via a Syslog server.
·
Configuration and management using any Web browser.
·
Works with H.323 Voice over IP products including Multi-Tech MultiVOIP gateways or Microsoft
NetMeeting.
·
PPPoE support.
·
Supports Windows Plug and Play
·
Flash memory allows easy firmware upgrades.
·
IP address mapping/port forwarding.
·
Two-year warranty.
Multi-Tech Systems, Inc. RF560VPN User Guide
5
Chapter 1 – Introduction and Description
·
Secure VPN Connections. The SOHO RouteFinder VPN uses the IPSec industry standard
protocol, data encryption, and the Internet to provide high-performance, secure VPN connections.
·
For LAN-to-LAN connectivity, the RouteFinder utilizes the IPSec protocol to provide up to 10
tunnels with strong 168-bit 3DES encryption using IKE and PSK key management. In addition, it
provides very high performance with 1.5 Mbps with 3 DES encryption throughput.
·
For Client-to-LAN connectivity, Multi-Tech provides optional IPSec client software allowing
traveling employees and telecommuters secure access to the company’s internal network.
·
Network Security Protection. Protects a network from invalid access.
·
Prevention of DoS (Denial of Service) – Prevents the consequences of the Denial of Service,
such as network traffic congestion or ping of death.
·
Hacker Attack Logging – Supports general hacker attack pattern monitoring and logging.
·
Filtering – Prevents unauthorized packets from entering or leaving the local network.
·
Connects up to 253 Users to the Internet with Broadband Speed. With the SOHO
RouteFinder VPN, up to 253 users are connected to the Internet with only one IP account.
·
LAN Segmentation. For added LAN security, the RouteFinder can be used to segment the LAN
by connecting the corporate servers to one RouteFinder Ethernet port and the Internet Servers to
the other Ethernet port. This configuration puts the corporate servers behind a firewall and the
Internet servers outside the firewall. To continue to provide Internet access, connect a modem or
ISDN terminal adapter to the RouteFinder’s asynchronous port.
·
Can Be Configured as a DHCP Server. The SOHO RouteFinder VPN can be configured as a
DHCP server to handle request for Internet services and route to and from the ISP. Server and
Client features include:
DHCP Server – Automatically assigns IP information to the network users.
DHCP Client – Automatically gets IP information from the ISP DHCP server.
PPPoE Client – Supports PPPoE client function to connect to the remote PPPoE server.
Idle Time – Lets you set a specified idle-time before automatically disconnecting.
Dial-on-Demand – Eliminates the need for dial-up; automatically logs to your ISP.
The RouteFinder RF560VPN
Multi-Tech Systems, Inc. RF560VPN User Guide
6
Chapter 1 – Introduction and Description
RouteFinder Documentation
The Quick Start Guide
The Quick Start Guide is a shorter version of this User Guide. It is included in printed form with your
RF560VPN. Both guides are intended to be used by systems administrators and network managers.
They provide the necessary information for a qualified person to unpack, cable, and configure the
device for proper operation.
This User Guide
The User Guide can be installed from the CD by clicking Install Manuals on the Installation screen or
downloading the file from our Web site at: http://www.multitech.com
Save or Print the User Guide
Once the User Guide is displayed on screen using Adobe Acrobat Reader, you can save the .pdf file
to your system or print a copy.
Setup Examples and Other Helpful Documents
There are five reference documents to help you setup and use your RF560VPN.
These reference guides are located on the CD that accompanies your RouteFinder and also on
the Multi-Tech Web site.
Description of the Setup Examples
1. Setup Examples for the RF560VPN.
The four examples show:
· A LAN-to-LAN VPN configuration between two RF560VPNs. One at Site A and one at Site
B. Both RouteFinders use static IP address at their WAN port gateways.
· A LAN-to-LAN VPN configuration between an RF560VPNs at Site A that uses a static IP
through its WAN port and an RF560VPN at Site B that uses a dynamic IP address through
its WAN port.
· A LAN-to-LAN VPN configuration between an RF560VPN at Site A that uses a static IP
address at the WAN port and an RF560VPN at Site B that uses dynamic IP addressing
through a modem connected to the serial port.
· A Client-to-LAN configuration between an RF560VPN at Site A and an SSH IPSec Client.
Each example includes a diagram, a summary chart of input values, an address table you can use
to keep track of your values, and explanations of the Web interface screens.
2. RF560VPN Using a NAT Box with an IPSec Pass-Through.
The two example show:
· SSH Sentinel IPSec client behind a NAT box doing IPSec Pass-Through to an RF560VPN.
· An RF560VPN behind a NAT box doing IPSec Pass-Through to another RF560VPN.
3. RF560VPN File Sharing across VPN.
4. Configuring IPSec Tunneling in Windows XP or 2000 and Connecting to an RF560VPN.
5.
Advanced Settings - five examples.
6. FQDN and DDNS Examples.
Multi-Tech Systems, Inc. RF560VPN User Guide
7
Chapter 1 – Introduction and Description
RF560VPN Front Panel
RF560VPN Light Panel
LEDs
Description
Link ACT
Lights when the LAN client is correctly connected to the Ethernet port. Blinks
when there is activity on the Ethernet port.
100/10
Lights when the LAN client is connected at 100MB.
Off when the LAN client is connected at 10MB.
FDX COL
Lights when the LAN client is connected as full duplex.
Off when the LAN client is connected as half duplex. Blinks when there are
collisions on the network.
Serial Data
Blinks when the Serial async port is receiving or transmitting data.
Serial DCD
Lights when the Serial async port is properly connected to a remote site.
WAN 100
Lights when a successful connection to the 100BaseT WAN is established.
Off when connected to the 10BaseT.
WAN Link /
ACT
Lights when the LAN port has a valid Ethernet connection. Blinks when it is
receiving or transmitting data.
Status
Blinks when it is starting, saving the configuration, or performing a firmware
update. Normally, it should be off.
Power
Lights when power is being supplied to the router.
Multi-Tech Systems, Inc. RF560VPN User Guide
8
Chapter 1 – Introduction and Description
RF560VPN Back Panel
RF560VPN Back Panel
12VDC Power
The power port connects the AC power adapter.
10/100 BT WAN
(10/100BaseT)
The WAN port connects the xDSL modem or cable modem.
Serial
The Serial port connects a standard modem (optional).
Reset
The Reset button resets the router to factory defaults. Press and hold the Reset
button until the Status LED of the RF560VPN blinks, and then release it. Do not
press this button unless you want to restore all settings to the factory defaults.
Ports 1 - 4
There are 4 LAN ports. You can connect network devices such as PCs, FTP
servers, printers, or other devices you want to put on your network.
Multi-Tech Systems, Inc. RF560VPN User Guide
9
Chapter 2 – Installation
Chapter 2 – Installation
Safety Warnings
1. Never install telephone wiring during a lightning storm.
2. Never install telephone jacks in a wet location unless the jack is specifically designed for wet
locations.
3. This product is to be used with UL and cUL listed computers.
4. Never touch uninsulated telephone wires or terminals unless the telephone line has been
disconnected at the network interface.
5. Avoid using a telephone during an electrical storm. There may be a remote risk of electrical
shock from lightening.
6. Do not use the telephone to report a gas leak in the vicinity of the leak.
7. To reduce the risk of fire, use only No. 26 AWG or larger Telecommunications line cord.
System Requirements
·
Microsoft I.E 5.5 or later version or Netscape Navigator 7.0 or later version
·
One computer with an installed 10Mbps, 100Mbps or 10/100Mbps Ethernet card
·
One Modem or ISDN TA (if a dialup backup connection is needed)
·
One RJ-45 xDSL/Cable Internet connection
·
TCP/IP protocol installed
·
UTP network Cable with a RJ-45 connection
Unpacking Your RouteFinder
The RF560VPN shipping box contains the following items:
·
The RouteFinder RF560VPN
·
One RF560VPN System CD
·
Power Supply
· A Quick Start Guide
If any of the items is missing or damaged, please contact Multi-Tech Systems.
Multi-Tech Systems, Inc. RF560VPN User Guide
10
Chapter 2 – Installation
Cabling Your RouteFinder
Cabling your RouteFinder requires making the appropriate connections to PCs, Cable or DSL modem,
analog modem or ISDN TA (optional), AC power and the router. Because this device also provides
DHCP server functions, remote access, routing and firewall protection, after your device is properly
cabled, you will need to complete your configuration by following the instructions provided in the
following chapter or in the Quick Start Guide.
Cabling the RouteFinder RF560VPN
1. Turn the power off on all network devices (PCs, cable modems, DSL modems, analog
modems, ISDN TAs, and the router).
2. Plug one end of a cable into the Ethernet port and other into one of the 4 LAN ports. (If
you have more than one PC, connect the others in the same way to the other LAN ports).
3. If you are using an analog modem, connect it to the RF560VPN’s serial port.
4. Connect a network cable from the DSL modem or cable modem to the WAN port.
5. Connect the provided power supply cable to the 12 VDC power port on the back of the
router. Plug the other end of the power supply into an AC power outlet as shown.
You are ready to configure your router and network PCs.
Multi-Tech Systems, Inc. RF560VPN User Guide
11
Chapter 3 – Configuring the PC
Chapter 3 – Configuring the PC
You must establish TCP/IP communication on each PC (make sure a Network Card or Adapter has
been installed into each PC).
If Your Operating System Is Windows 98/Me:
Note: The following procedures are based on Windows 98. Procedures may differ slightly in Windows
Me. For Windows 98, check to see that you have installed the Windows 98 patch dated August 1998.
1. Click Start | Settings | Control Panel.
2. Double-click the Network icon.
3. On the Configuration tab, select the TCP/IP protocol line associated with your network
card/adapter.
4. If the TCP/IP protocol line associated with your network card/adapter is listed, proceed to Step
5. If not listed, see Appendix B for installation directions.
5. Then click the Properties button.
Multi-Tech Systems, Inc. RF560VPN User Guide
12
Chapter 3 – Configuring the PC
6. The TCP/IP Properties window displays. Click the IP Address tab to set your workstation’s IP
Address.
7. In the IP Address dialog box, choose one of the following:
·
To set a Dynamic IP Address, check Obtain an IP Address Automatically. Dynamic
Addresses are used in the Example Reference Guide in Example 2 – Site B and
Example 3 – Site B.
·
To set a Fixed IP Address, check Specify an IP address. Fixed Addresses are used in
the Example Reference Guide in all the examples, except the two mentioned above. For
our example, set the address to 192.168.2.x.
8. Click OK.
9. You have completed the client settings. Click OK to close out of the Network Control Panel.
10. Windows will ask you to restart the PC. Click the Yes button.
Note: Repeat these steps for each PC on your network.
Multi-Tech Systems, Inc. RF560VPN User Guide
13
Chapter 3 – Configuring the PC
If Your Operating System Is Windows NT:
1.
Click Start | Settings | Control Panel.
2.
Double-click the Network icon.
3.
The Network dialog box displays. Click the Protocols tab. Select the TCP/IP protocol line
associated with your network card/adapter. If TCP/IP is not listed, see Appendix B for
installation directions.
Multi-Tech Systems, Inc. RF560VPN User Guide
14
Chapter 3 – Configuring the PC
4.
Click the Bindings tab.
The Bindings dialog box displays.
In the Show Bindings for drop-down list box, select all adapters. A list of all adapters
displays on the lower part of the screen.
Double-click the entry for your Ethernet card adapter. This expands the list. Verify that TCP/IP
Protocol is included in the list below your adapter name.
5.
TCP/IP and your adapter are now setup.
Multi-Tech Systems, Inc. RF560VPN User Guide
15
Chapter 3 – Configuring the PC
6.
Next, select the Protocol tab to set your workstation’s IP Address.
7.
Click the Properties button and choose one of the following:
·
To obtain an IP Address automatically, check the Obtain an IP Address Automatically
checkbox.
· To specify a Fixed IP Address, check the Specify an IP Address checkbox.
8. Click OK.
9.
10.
Close out of the Control Panel.
Repeat these steps for each PC on your network.
Multi-Tech Systems, Inc. RF560VPN User Guide
16
Chapter 3 – Configuring the PC
If Your Operating System Is Windows 2000/XP
1.
Click Start | Settings | Control Panel. Double-click the Network and Dial-Up Connections
icon.
2.
The Network and Dial-Up Connections screen displays. Right-click the Local Area
Connection icon and choose Properties.
Multi-Tech Systems, Inc. RF560VPN User Guide
17
Chapter 3 – Configuring the PC
3. The Local Area Connection Properties dialog box displays.
·
Select Internet Protocol [TCP/IP]. Once the protocol is selected, the name of your
adapter card should display in the Connect using box.
·
Click the Properties button.
4. The Internet Protocol (TCP/IP) Properties dialog box displays. Set your workstation’s IP
Address.
·
To set a Dynamic IP Address, check Obtain an IP Address Automatically.
·
To set a Fixed IP Address, check Specify an IP address. Fixed Addresses are used in all
the examples, except the two mentioned above. For our example, set the address to
192.168.2.x.
5. Click OK.
6. Close out of the Control Panel.
7. Repeat these steps for each PC on your network.
Multi-Tech Systems, Inc. RF560VPN User Guide
18
Chapter 4 – Navigating the Screens
Chapter 4 – Navigating the
Screens
Buttons on the Main Menu
When you select a function by clicking the button at the top of the screen, the button will change from
red to blue denoting that this is now the active screen.
Buttons on the Function Screens
·
Buttons at the Top of the Screen: These are the main function buttons. They allow you to move
from one function to another: Device Information, Device Status, Setup Wizard, Advanced
Settings, System Tools, and Help.
·
Buttons on Side of the Screen: These are submenus under some of the main functions. When
you select one of these buttons, it will turn from red to blue denoting that this is now the active
selection.
·
Links: Click on Main Menu to return to the Main Menu. Click on Logout to exit the program.
Multi-Tech Systems, Inc. RF560VPN User Guide
19
Chapter 5 – Configuring the RouteFinder Using a Web Browser
Chapter 5 – Configuring the
RouteFinder Using a Web
Browser
Now that the cabling is completed and each PC on the network is configured to accept the IP
addresses that the RouteFinder will provide, you are ready to configure your Router.
About the Browser Interface
Initial configuration is required in order for you to begin operation. The browser-based interface eases
VPN configuration and management.
About IPSec
The VPN functionality is based on the IPSec protocol and uses 168-bit Triple DES (3DES) encryption
to ensure that your information remains private.
Start the RF560VPN Configuration
1. Connect your workstation.
Be sure your workstation is connected to one of the RF560VPN’s LAN ports.
2. Apply power.
Apply power to the RF560VPN RouteFinder and allow the LEDs to stabilize on the unit.
3. Set the workstation IP address.
The directions for setting your workstation IP address are covered in Chapter 3.
4. Open a Web browser.
· At the Web browser’s address line, type the RF560VPN IP address: http://192.168.2.1. This is
the default address of your RouteFinder.
· Press Enter.
Note: Make sure your PC’s address is on the same network as the router’s address. WINIPCONFIG
and IPCONFIG are tools for finding out a PC’s IP configuration: the default gateway and the MAC
address. In Windows 98/Me, type WINIPCONFIG. In Windows 2000/NT, type IPCONFIG.
Multi-Tech Systems, Inc. RF560VPN User Guide
20
Chapter 5 – Configuring the RouteFinder Using a Web Browser
5. The Password dialog box displays. Type your network password.
·
Type admin (admin is the default user name) in the user name box. Leave the password box
empty.
· Click OK. The Setup Wizard screen displays.
Note: To change your password, select Advanced Settings, and then choose Administrative
Settings. See Chapter 6.
6. The Main Menu displays.
On the Main Menu, click the Setup Wizard
Multi-Tech Systems, Inc. RF560VPN User Guide
button.
21
Chapter 5 – Configuring the RouteFinder Using a Web Browser
Setup Wizard
When the Setup Wizard screen displays, the Setup Wizard button will turn blue to
indicate that the screen is active.
The following screen is the first Setup Wizard screen. From here you will follow a step-by-step
process that lets you input all of the basic settings to configure your RF560VPN.
– Time Zone Selection
Select the time zone, and then click the Next button to continue. You can also click the buttons on the
left side of the screen. These buttons are useful when you want to change the information on
individual screens or to choose your own setup order.
Multi-Tech Systems, Inc. RF560VPN User Guide
22
Chapter 5 – Configuring the RouteFinder Using a Web Browser
– Device IP Settings
On this screen, enter the internal LAN IP address that you want to assign to the LAN port of the
RF560VPN. This is not the IP address from your ISP – it is the local internal LAN IP address.
·
Device IP Address: The default IP address of your RF560VPN: 192.168.2.1.
·
Device IP Subnet Mask: The subnet mask can usually be left at its default of 255.255.255.0.
·
Click the Next button.
Multi-Tech Systems, Inc. RF560VPN User Guide
23
Chapter 5 – Configuring the RouteFinder Using a Web Browser
– ISP Settings
On this screen you can select to have the program automatically get your IP settings from your ISP
DHCP server or you can choose one of four options for manually inputting your IP settings.
1.
From the drop down list box, select the type of settings you will be entering. The default screen is
Static IP Settings.
2a. Static IP Settings
Use this screen when your ISP requires you to enter your ISP settings and you want to use static
IP settings. Enter the IP assigned by your ISP, your IP Subnet Mask, and your ISP Gateway
Address.
Multi-Tech Systems, Inc. RF560VPN User Guide
24
Chapter 5 – Configuring the RouteFinder Using a Web Browser
2b. Manually Input IP Settings:
st
1 Option – Connect to Cable ISP Option – Use this screen to have the program retrieve your
IP settings from the ISP DHCP server and to see a description of each option.
·
Select Connect to Cable ISP and click Next.
Multi-Tech Systems, Inc. RF560VPN User Guide
25
Chapter 5 – Configuring the RouteFinder Using a Web Browser
2b.
Manually Input IP Settings:
nd
2 Option – PPPoE Settings – Use this screen when your ISP requires you to enter your
ISP settings and you want to use PPPoE settings.
·
Enter your User Name, Password, Retype the Password (for verification), and
select your idle time.
·
Select your Connection Type by clicking on the desired connection type button.
·
Choose either Dynamic or Fixed. This will determine how you IP address will be
assigned.
A Dynamic IP address is one automatically assigned by your ISP.
A Fixed IP address is an address that always stays the same. You will have to enter
the Fixed IP address assigned by your ISP and your IP Netmask.
·
Click Next.
Multi-Tech Systems, Inc. RF560VPN User Guide
26
Chapter 5 – Configuring the RouteFinder Using a Web Browser
2b. Manually Input IP Settings:
rd
3 Option – PPTP Settings – Use this screen when your ISP requires you to enter your ISP
settings and you want to use PPTP settings.
·
Enter your User Name, Password, Retype the Password (for verification), select your
idle time, enter your PPTP Client IP address, PPTP Server IP address, and your
Connection ID or Name.
·
Select your Connection Type by clicking on the desired connection type button.
·
Choose either Dynamic or Fixed. This will determine how you IP address will be
assigned.
·
A Dynamic IP address is one automatically assigned by your ISP.
·
A Fixed IP address is an address that always stays the same. You will have to enter the
Fixed IP address assigned by your ISP and your IP Netmask.
·
Click Next.
Multi-Tech Systems, Inc. RF560VPN User Guide
27
Chapter 5 – Configuring the RouteFinder Using a Web Browser
2b. Manually Input IP Settings:
th
4 Option – Telstra Settings – Use this screen when your ISP requires you to enter your ISP
settings and you want to use Telstra settings.
·
Enter your User Name, Password, Retype the Password (for verification), and your
Default Domain name.
·
Click Next.
Multi-Tech Systems, Inc. RF560VPN User Guide
28
Chapter 5 – Configuring the RouteFinder Using a Web Browser
– ISP Additional Settings
If your ISP requires you to manually input your system information, use the fields on this screen to
fulfill that requirement.
1. Check the box labeled Your ISP requires you to manually setup DNS settings if your ISP
requires this.
Then enter the DNS (Domain Name Server) address or addresses. These can be left as
0.0.0.0 for a LAN-to-LAN RouteFinder connection.
2. Check the box labeled Your ISP requires you to input Host Name or Domain Name if your
ISP requires this.
Then enter the Host Name and the Domain Name.
3. Check the box labeled Your ISP requires you to input WAN Ethernet MAC if your ISP
requires this.
Then enter the MAC address.
Click the Next button.
Multi-Tech Systems, Inc. RF560VPN User Guide
29
Chapter 5 – Configuring the RouteFinder Using a Web Browser
– Modem Settings (Optional)
A modem can be used as a dialup backup to the Cable/xDSL connection.
Modem Settings
The checkbox Dialup Modem When Cable/xDSL is not connected should be checked in order to
use the modem as a backup to cable or xDSL when the cable or xDSL are not working. To add the
modem to your setup, connect the modem and input the ISP account settings.
·
Enter your ISP Phone Number, User Name, Password, Retype the Password (for
verification), and select your idle time.
·
Enter your External IP Address if your ISP requires you to input the IP Address.
Modem String Settings
·
Select your Baudrate Settings.
·
Enter your dialing strings: Pre-Initial String, Initial String, and Dialup String.
·
Click Next to have the system accept your data and to move to the next screen.
Multi-Tech Systems, Inc. RF560VPN User Guide
30
Chapter 5 – Configuring the RouteFinder Using a Web Browser
– VPN Settings
Use this screen to input your LAN-to-LAN VPN settings and/or your Client-to-LAN VPN settings.
VPN Settings for IPSec
If you select Setup IPSEC Settings, the following screen displays:
· Check the Enable IPSec Function checkbox.
· In the Connection Name field, type a name that describes a connection you would like to
establish.
Example: Site A.
· Click the Add button. The VPN Settings detail screen will display. Once you have entered the
settings, the Connection Name displays on the lower half of the screen (see screen above).
· Click the checkbox if you want to Disable Internet Access (VPN Tunnel Only).
· You can then edit, delete, or enable/disable this connection by clicking the corresponding
buttons.
· To enable this connection, check the Enable column next to the connection name.
Note: If you uncheck the Enable box, the connection will not be active, but the parameters will
remain on the screen for you to enable, edit, or delete as desired.
Multi-Tech Systems, Inc. RF560VPN User Guide
31
Chapter 5 – Configuring the RouteFinder Using a Web Browser
–
Enter the VPN IPSec Connection Settings
VPN Setting Name
Description
Example
Connection Name
The Connection Name entered on the previous screen
displays here
Accept the default Disable UID (when this is selected, Local
and Remote IPSEC Identifier are not active). Enable UID is
an option for compatibility purposes only (other IPSEC VPN
gateways might require you to input a Local and Remote
IPSec Identifier).
When enabled, will automatically renegotiate VPN if a tunnel
is temporarily interrupted.
Site A
Enable/Disable UID
Enable Keep Alive
Multi-Tech Systems, Inc. RF560VPN User Guide
Disable
Enabled
32
Chapter 5 – Configuring the RouteFinder Using a Web Browser
VPN Setting Name
Description
Example
Enable NetBIOS
Broadcast
Remote Site
When enabled, will allow Microsoft File and Printer sharing to
communicate information about computers on the network.
Enabled
Remote IP Network
Remote IP Netmask
Remote Gateway
IP/FQDN
Network Interface
Choose whether the remote site will be used by a single user
or a LAN.
Enter Remote IP Network address (LAN) for Site B.
Enter Remote IP Netmask address for Site B.
Enter Remote Gateway IP address (WAN) for Site B.
Select a Network Interface from the drop-down list box. Other
options are Auto and Async.
192.168.10.0
255.255.255.0
204.26.122.3
WAN
ETHERNET
Main Mode
Main Mode and Aggressive are part of the Internet Key
Exchange (IKE), a protocol for performing automated key
management for IPSec. Aggressive is similar but includes a
Key Group.
About IKE: The RF560VPN can be used with a wide range
of other IKE compliant VPN devices. IKE creates two types of
Security Associations to allow for encrypted traffic.
Once configuration is completed on the firewall to create a
VPN connection, the IKE process automatically negotiates
with the remote VPN device to establish the parameters for
individual Security Associations.
Main Mode provides for increased security during Phase-1
by encrypting the initial IKE traffic at the expense
performance. Aggressive Mode is used in cases where the
initial traffic cannot be encrypted, as is the case for dynamic
IP VPN clients or when performance is an important factor.
Manual Mode is used when the remote VPN device does not
support the IKE standard for key management. Manual Mode
requires more administration effort while providing for lower
overall VPN security, since the same keys are used until the
administrator manually changes them.
Main Mode: Select Main Mode (the default) to set how
inbound packets will be filtered. Main Mode primarily
encompasses router key exchange and the negotiation of
security policy. Selecting Main Mode activates the remaining
input settings on this screen.
Enter the Required Information for Main Mode, the Secure Association Default:
Check the Enabled button.
Enable
Perfect Forward
Secure
3DES
Encryption Protocol Select 3DES.
Enter the PreShared Key name. You can enter an
102t3t4f
PreShared Key
alphanumeric name, but it must match the security code
for the RouteFinder at site B.
Enter the amount of time that tells the router to
28800 sec
Key Life
renegotiate the Key
= 8 hours
Enter the amount of time that tells the router to
3600 sec
IKE Life Time
renegotiate the IKE security association.
= 60 min
Secure Association
Save the VPN Settings
Click the Save button. Your defined connections are displayed at the bottom of this screen where you
can edit or delete them.
Multi-Tech Systems, Inc. RF560VPN User Guide
33
Chapter 5 – Configuring the RouteFinder Using a Web Browser
Optional Aggressive Secure Association Selection
If you selected Aggressive for the Secure Association, the following fields display:
Enter the Required Information for Aggressive, an Optional Secure Association
Selection:
VPN Setting Name
Description
Example
Perfect Forward
Secure
Encryption
Protocol
Check the Enabled button.
Enabled
Select 3DES. Other options are:
Null, DES, AES-128, AES-192, AES-256
Accept the Diffie-Hellman Group 1 default. The
alternate is Diffie-Hellman Group 2.
Enter a PreShared Key name. You can enter an
alphanumeric name. It must match the security code
for the RFVPN at Site B.
Enter the amount of time that tells the router to
renegotiate the Key
Enter the amount of time that tells the Router to
renegotiate the IKE security association.
3DES
Key Group
PreShared Key
Key Life
IKE Life Time
Multi-Tech Systems, Inc. RF560VPN User Guide
Group 1
102t3t4f
28800 sec
= 8 hours
3600 sec
= 60 min
34
Chapter 5 – Configuring the RouteFinder Using a Web Browser
Optional Manual Secure Association Selection
If you Selected Manual for the Secure Association, the following fields display:
Enter the Required Information for Manual Secure Association:
VPN Setting
Name
Description
Example
Incoming SPI
Outgoing SPI
The SPI is a unique hexadecimal identifier in the SA that
allows the receiving computer to select the SA under which a
packet will be processed. The SPI (Security Parameters
Index) is a number needed by the manual keying code.
Enter any hexadecimal value (3-digit hex number). A number
between 0x100 - 0xfff is recommended. If there is more than
one manual connection, then the SPI must be different for
each manual connection – in this case, one for the
Incoming SPI and one for the Outgoing SPI.
Select 3DES. Other options are:
Null, DES, AES-128, AES-192, AES-256
Enter a secret, unique hexadecimal value that will be used to
identify a computer on one side of the firewall to a computer
on the other side. Each one must use the same number.
Enter any hexadecimal number up to 24 characters.
Select MD5. The alternate choice is SHA-1.
51c
Encryption
Protocol
Encryption Key
Authentication
Protocol
Authentication
Key
Enter a secret, unique value that will be used to identify a
computer on one side of the firewall to a computer on the
other side. Each one must use the same number. Enter any
hexadecimal number up to 16 characters.
10d
3DES
12344lkje
trew5556
6677788
MD5
99990000t
tttgggg
Save the VPN Settings
Click the Save button. Your defined connections are displayed at the bottom of this screen where you
can edit or delete them.
Multi-Tech Systems, Inc. RF560VPN User Guide
35
Chapter 5 – Configuring the RouteFinder Using a Web Browser
– VPN
PPTP Connection Settings
If you prefer to use PPTP Settings instead of IPSec, click the PPTP Settings button on the left side of
the screen. The following screen displays:
VPN Setting Name
Description
Example
Enable PPTP Function
PPTP IP Pool
Check the box to enable the PPTP function.
Enter a range of IP addresses.
Enable
190 - 200
Multi-Tech Systems, Inc. RF560VPN User Guide
36
Chapter 5 – Configuring the RouteFinder Using a Web Browser
VPN Setting Name
Description
Example
NetBIOS Enable
When enabled, will allow Microsoft File and Printer sharing
to communicate information about computers on the
network.
DNS Server – Enter the address of the DNS Server to be
used.
WINS Server – Enter the address of WINS Server to be
used.
Select the User Authentication method to be used. Options
are PAP, CHAP, and MS-CHAP
Select the Encryption Strength. Options are 128 bit or
None.
Check the Use RADIUS Authentication button to enable
RADIUS. Then the following information:
RADIUS Port – Select the port number. Options are
1645, 1646, 1812, and 1813
RADIUS Server IP Address – Enter the RADIUS Server
IP Address.
Secret – Enter a secret password.
Secret Confirm – Retype the secret password for
verification.
Check this radio button to have your local client list used by
the program instead of using RADIUS Authentication.
When you click the New button, a screen for adding client
information displays.
Enabled
User Authentication
Encryption Strength
Use RADIUS
Authentication
Use Local Client List
New Button
MS-CHAP
128 bit
1812
192.168.2.100
Save the VPN Settings
Click the Next button to save your settings.
This concludes the basic configuration of your SOHO RouteFinder. It is a good idea to
save the settings at this time by clicking the Save and Restart button.
See Chapter 6 in the User Guide for Advanced Settings.
Multi-Tech Systems, Inc. RF560VPN User Guide
37
Chapter 5 – Configuring the RouteFinder Using a Web Browser
– Save and Restart
After you have finished entering and/or editing the information on the previous screens, click the Save
and Restart button on the left-hand side of the screen. This will save all of the preceding settings and
restart the device. After the restart, the device will function according to the saved settings.
During the save and restart process, system messages will let you know that you have successfully
configured the settings for the device and saved the settings. You will see a status bar across the
bottom of your browser showing the progress of the startup process.
Multi-Tech Systems, Inc. RF560VPN User Guide
38
Chapter 6 – Managing the RouteFinder Using a Web Browser
Chapter 6 – Managing the
RouteFinder Using a Web
Browser
Once the RF560VPN has been configured using the Setup Wizard, the other menu options can be
used for managing your router. They allow you to perform the following functions:
Find information about your current settings.
Find information about your current connection status.
Set Advanced Setup features.
Use Tools for managing the system.
Device Information
Click the Device Information button. The Device Information screen displays. It
shows the current setting of the RF560VPN.
·
·
·
·
·
Device Name – The host name of the VPN gateway.
IP Address – The IP address of the VPN gateway.
Private LAN Mac Address – The Mac address of the VPN gateway LAN Ethernet port. This
address cannot be changed; it is assigned by Multi-Tech.
Public WAN (Cable/xDSL) Mac Address – The Mac Address of the VPN gateway WAN
Ethernet port. This address cannot be changed; it is assigned by Multi-Tech.
Firmware – The current firmware’s version number and its release date.
Multi-Tech Systems, Inc. RF560VPN User Guide
39
Chapter 6 – Managing the RouteFinder Using a Web Browser
Device Status
Click the Device Status button. The Device Status screen displays.
Use the Device Status screen to view the status of the current connections. This screen shows the
status of the Cable/xDSL modem, the Modem Dialup, and the Device IP addresses. You can view the
status of other items by clicking the buttons on left side of the screen.
Device Status Screen (Information Displayed on Left Side of Screen)
·
·
·
·
WAN Ethernet – This test describes the current connection status of the Cable/xDSL Modem. For
example, when Cable/xDSL is connected, the screen displays a message Cable/xDSL: Active.
Release and Renew Buttons - Click the Release button to terminate the WAN connection. Click
the Renew button to establish the WAN connection.
Modem Dialup – A modem can be used as a dialup backup for the Cable/xDSL modem. If the
modem is the current connection, a message displays: Modem: Active. Otherwise, a message
Not Active displays.
Hang Up and Dial Up Buttons – Click the Hang Up button to force the modem to break its
connection. Click the Dial Up button to force the modem to dial out.
Multi-Tech Systems, Inc. RF560VPN User Guide
40
Chapter 6 – Managing the RouteFinder Using a Web Browser
·
VPN Status Button – Click this button to view the status of the IPSec and PPTP connections.
·
DHCP Log Button – Click this button to view the current DHCP client information. The information
is displayed on the screen as illustrated on the Device Status screen above.
·
VPN Log Button – Click this button to view the current VPN activity. You will see a screen similar
to this one.
·
Update DDNS (Dynamic Domain Name Servers) Button – Use this option only when you
receive a notification from your ISP provider saying that the account will be removed if an update
is not performed. If you receive such a notification from your ISP provider, click the Update DDNS
button. When you click this button, you will first receive the following warning. To continue, click
the Yes button.
Multi-Tech Systems, Inc. RF560VPN User Guide
41
Chapter 6 – Managing the RouteFinder Using a Web Browser
Advanced Settings
Click the Advanced Settings button. The DHCP Server Settings screen displays first.
Use the Advanced Settings screens to establish DHCP server settings, virtual server settings, a
static routing table, dynamic settings, modem string settings, and administrative settings.
– DHCP Server Settings
·
·
·
·
·
The DHCP server is enabled by default. If you would like to disable it, uncheck the Enable DHCP
Server Functions box.
IP Address Pool Range - The IP address pool contains the range of the IP addresses that will
automatically be assigned to the clients of your network. The default setting is 192.168.2.2 to
192.168.2.100.
WINS Server Address - Enter the Primary and the Secondary WINS Server addresses.
IP Address Reservation - You can use the IP address reservation option to give particular
computers on your network the same static IP address every time the computer is turned on.
Add Button - Click the Add button to save the reserved MAC Address and the reserved IP
Address. These addresses will then display on the lower part of this screen. They can then be
edited or deleted.
Multi-Tech Systems, Inc. RF560VPN User Guide
42
Chapter 6 – Managing the RouteFinder Using a Web Browser
– Virtual Server Settings
To access this screen, click the Virtual Server Settings button on the left side of the screen.
·
Port Range Mapping: When established, Virtual Server Settings allow clients on the Internet to
access your LAN via the Internet.
▪
▪
The Internal IP Address is the LAN.
The External IP Address is your WAN IP. If this address is dynamically assigned, then
enter all zeroes.
You can use the IP mapping function to access an FTP server or Telnet server, etc. on your LAN
via your ISP Internet connection. Port numbers include:
FTP
Telnet
SMTP
DNS
TFTP
HTTP
POP3
News
SNMP
SNMP-trap
·
Port Redirection: If you want to route the Internet through the RF560VPN onto a port other than
the port 80h, which is the usual port, follow the example below. This example is reassigning the
port to 81h:
▪
▪
·
20,21
23
25
53
69
80
110
144
161
162
Assign port 80h to the external IP
Assign port 81h to the internal IP
Click the Submit button when finished.
Multi-Tech Systems, Inc. RF560VPN User Guide
43
Chapter 6 – Managing the RouteFinder Using a Web Browser
– Routing Settings
To access this screen, click the Routing Settings button on the left side of the screen. Routing is the
process of moving a packet of data from source to destination. Use this screen to create a routing
table that stores routing information so that your network device knows where to redirect the IP
packets on the proper network.
·
Static Routing
Enter the details for each routing table entry. Click the Add button after each entry.
▪
Destination IP Address: the address of the remote network to which you want to assign
a static route.
▪
▪
Subnet Mask: the Subnet Mask of your network IP address.
Gateway IP Address: the IP address of the interface used to link to the remote network.
The entry displays in the lower half of the screen. To change an entry, click the Delete (Del)
button, and then re-enter the information.
·
Dynamic Routing
Dynamic Routing is a routing protocol that adjusts automatically to the changes in the network
topology or traffic.
▪
·
Click the drop-down list buttons for the Send and Receive settings desired.
Send – Choose the protocol you want to use to transmit the network data. The
recommended setting is Disable.
Receive – Choose the protocol you want the RF560VPN to receive network data. The
recommended setting is Disable.
Click the Submit button to accept these settings.
Multi-Tech Systems, Inc. RF560VPN User Guide
44
Chapter 6 – Managing the RouteFinder Using a Web Browser
– Filter Settings
LAN Filter Settings
To access this screen, click the Filter Settings button on the left side of the Advanced Settings
screen.
The LAN Filter Settings function allows the network administrator to define whether local users have
the permission to access the Internet.
1. Check the LAN Side Filter Enabled box to begin a list of users and permissions.
2. Select the LAN side filter: Block or Pass.
3. Select the client filter settings: Block or Pass.
4. Select the protocol to be used from the Protocol drop-down list box.
5. Enter the client IP Address Range and Destination Port Range.
6. Click the Add button. The entry displays on the lower part of the screen.
7. Continue adding table entries. When complete, click the Submit button.
Example - To prevent the local users in IP address range 101 to 200 from accessing port 80 (HTTP),
set up the following parameters:
LAN Side Filter Enabled: Enabled
Protocol: TCP
Default LAN Side Filter: Pass
IP Address Range: 101 - 200
Filter: Block
Destination Port Range: 80 - 80 (HTTP)
Multi-Tech Systems, Inc. RF560VPN User Guide
45
Chapter 6 – Managing the RouteFinder Using a Web Browser
– WAN Filter Settings
To access this screen, click the Filter Settings button on the left side of the Advanced Settings
screen. Then click the WAN Filter Settings button on the left side of the screen. The WAN Filter
Settings screen displays.
The WAN Filter Settings function allows the network administrator to define whether remote/outside
users have the permission to access the local network. To activate, check the WAN Side Filter
Enabled box. Then define the policy.
1.
2.
3.
4.
5.
6.
7.
Check the WAN Side Filter Enabled box to begin a list of users and permissions.
Select the WAN side filter: Block or Pass.
Select the client filter settings: Block or Pass.
Select the protocol to be used from the Protocol drop-down list box.
Enter the client IP Address Range and Destination Port Range.
Click the Add button. The entry displays on the lower part of the screen.
Continue adding table entries. When complete, click the Submit button (not shown on this
screen capture).
Multi-Tech Systems, Inc. RF560VPN User Guide
46
Chapter 6 – Managing the RouteFinder Using a Web Browser
– Administrative Settings
To access this screen, click the Administrative Settings button on the left side of the Advanced
Settings screen. Use this screen to change your RF560VPN password, set the HTTP port number,
set remote user configuration, and establish system log settings.
· Password Settings
To set a new password, type a new one in the New Password box and re-type it for verification in
the Retype Password box. If you do not want to change any other item on this screen, click the
Submit button to accept the password change.
Important: Use a safe password. Your first name spelled backwards is not a sufficiently safe
password. A password such as xfT35$4 is better.
Caution: It is important to remember your password. If for any reason you lose or forget your
password, you can press the small reset button on the back of the RF560VPN. However, if you do
this, all configurations will be reset, including the password. You will have to reconfigure all of
your RF560VPN settings, but the password is reset to admin.
If you are sure you want to reset all the configurations, hold the reset button until the serial LEDs
of the RF560VPN blink, and then release the reset button. This reset action will re-initialize the
settings.
· System Administration
The System Administration function gives remote users the ability to configure and administrate
the RF560VPN through the Internet. The default IP address of the remote administration host is
0.0.0.0. This address means that any remote user can access and manage the RF560VPN.
▪
▪
HTTP Port Number: The default value is 80.
▪
IP Address: Type the RF560VPN WAN IP address into the browser of the specific PC on
the network.
http://192.168.100.1:1023
http://<WAN IP Address>: <Port Number>
Important: Once the HTTP port number (NOT Port 80) is changed and the users of the
LAN terminal want to configure the RF560VPN, the users have to type the LAN IP
address with the port number: 192.168.2.3:1023
▪
Ping: If you want to allow a remote user to PING the device, check the corresponding
box. See information about PING in the Appendix.
Allow Remote User to Configure the Device Check Box: To give remote users the
ability to configure and administrate the RF560VPN, you have to check this box.
·
System Log
·
Miscellaneous
·
System Parameters
·
TCP Session
·
UPnP
If you want to enable the system log function, check the corresponding box and enter the Log
Server IP Address. This log provides you with a list of all system messages (for example, users
that accesses the Internet).
If you want to enable a Detail Debug IPSec Log, check the corresponding box. This option exists
to help you in case there is a problem with the VPN connection.
Check the Force to reconnect PPoE box to force the reconnection of PPPoE if packets cannot
Send/Receive from the PPPoE connection. This ensures that the PPPoE connection is always
there.
Check the Enable Keep Alive Ping box if you desire Ping to be kept alive. Enter the address that
should be pinged and enter the time in seconds that pinging should occur.
Check the Enable TCP MTU Adjust Function box to enable this function. Enter an MTU setting.
This option is to be used with specific applications that require adjusting the packet size.
Enter the amount of time in minutes allowed before a Telnet/SSH or TCP session will timeout.
Check the Enable UPnP Function box to enable this function.
Multi-Tech Systems, Inc. RF560VPN User Guide
47
Chapter 6 – Managing the RouteFinder Using a Web Browser
Multi-Tech Systems, Inc. RF560VPN User Guide
48
Chapter 6 – Managing the RouteFinder Using a Web Browser
– Dynamic DNS Settings
DNS (Domain Name Service) is the “middleman” who translates domain names such as
multitech.com or yahoo.com into numbers (and, occasionally, the other way around).
The Dynamic DNS service allows you to alias a dynamic IP address to a static host name such as
youname.dyndns.org or any other name in one of many domains offered by the service.
You must sign up with a DNS service provider in order to use this option.
To set up dynamic DNS, check Use a dynamic DNS service. All fields are required to be filled in.
·
Update Server – Enter the name of your organization with the new DNS indicator:
members.dyndns.org, members.orgdns.org
·
Host Name – Enter the name of the DNS provider: dyndns.org, orgdns.org
·
Domain Name – Enter the name of your domain: org, com
·
User Name and Password – Enter the user’s name and password that is to be translated into
the user’s new DNS name.
·
Use Wildcards – Wildcards are special characters (for example, *) you can use to represent
one or more characters. They act like shortcuts when entering information.
Multi-Tech Systems, Inc. RF560VPN User Guide
49
Chapter 6 – Managing the RouteFinder Using a Web Browser
– URL Filter Settings
Enabled URL Filter Settings can prevent users from accessing certain Internet sites.
· To enable this option, check Enable URL Filter Functions.
· Enter the name of the Internet address in the Filter String box.
· Click the Add button.
The URL address then displays in the box in the middle of the screen. Once the URL appears
here, you can delete one or all entries.
Multi-Tech Systems, Inc. RF560VPN User Guide
50
Chapter 6 – Managing the RouteFinder Using a Web Browser
– Email Alert
Email alerts will be sent to the system administrator when users have tried to access URLs that
have been filtered (see the screen on the previous page).
·
To enable this option, check Turn Email Notification On.
·
Enter the name of your outgoing mail server.
·
Enter the email address of the person who receives this alert.
· Indicate how often you would like the alert to be sent.
Click the Submit button (not shown on this screen capture).
Multi-Tech Systems, Inc. RF560VPN User Guide
51
Chapter 6 – Managing the RouteFinder Using a Web Browser
System Tools
Click the Systems Tools
displays first.
button on the Main Menu. The Intruder Detection Log
The System Tools functions allow you to view the Intruder Detection Log, the Routing Table, and a
System Diagnosis screen. You can also choose to save your settings, load the RF560VPN default
settings, upgrade firmware, and restart the device.
– Intruder Detection Log
The event messages of the Intruder Detection Log show the possible hacker attacks that have
occurred on your Internet gateway. Up to 32 hacker attacks may be logged in this manner.
Multi-Tech Systems, Inc. RF560VPN User Guide
52
Chapter 6 – Managing the RouteFinder Using a Web Browser
– Display Routing Table
To access this screen, click the Display Routing Table button from the System Tools screen. The
Display Routing Table screen displays.
This table shows the current routing configuration that you setup on the Routing Table screen.
To exit this screen, select another button on the left side of the screen.
Multi-Tech Systems, Inc. RF560VPN User Guide
53
Chapter 6 – Managing the RouteFinder Using a Web Browser
– System Diagnostics
Click the System Diagnostics button from the System Tools screen to display (the screen is pictured
on the next page).
This screen displays even when one component is not functioning properly. This is the screen you can
turn to for troubleshooting your system.
When selected, the System Diagnostics function performs a check-up on your RF560VPN to make
sure that everything is functioning properly.
To exit, select another option from the button at the left of the screen.
Multi-Tech Systems, Inc. RF560VPN User Guide
54
Chapter 6 – Managing the RouteFinder Using a Web Browser
Multi-Tech Systems, Inc. RF560VPN User Guide
55
Chapter 6 – Managing the RouteFinder Using a Web Browser
– Save Settings to a File
Use this screen to save your configuration settings to a file. This will provide a backup of your
settings in case, for some reason, you have to reset your RF560VPN.
1. Click the Save File button.
2. Then click Save This File to Disk in the browsing wizard.
Multi-Tech Systems, Inc. RF560VPN User Guide
56
Chapter 6 – Managing the RouteFinder Using a Web Browser
– Load Default Settings
To access this screen, click the Load Settings button from the System Tools screen. The Load
Default Settings screen displays.
▪
▪
Use this screen to load the original RF560VPN factory defaults.
Click the Start button to load the default settings.
– Load Settings from a File
1. To load settings from a file, click the Load Settings from File button under Load Settings. The
screen displays.
2. Select the browse button to locate the file.
3. When the file is located, click the Start button.
Multi-Tech Systems, Inc. RF560VPN User Guide
57
Chapter 6 – Managing the RouteFinder Using a Web Browser
– Upgrade Firmware
To access this screen, click the Upgrade Firmware button from the System Tools screen. The
Upgrade Firmware screen displays.
The Upgrade Firmware option allows you to upgrade the newest firmware to your RF560VPN.
How will I be notified of new router firmware upgrades?
All Multi-Tech firmware upgrades are posted on the Multi-Tech Web site at www.multitech.com, where
they can be downloaded for free.
Your Router does NOT need the latest firmware upgrade if your Internet connection is already
successful, as firmware upgrades will not increase your connection speed or enhance your Router’s
performance.
1. Use the browse button to locate the file.
2. Click the Start button.
3. To exit this screen, select another option or return to the Main Menu.
Multi-Tech Systems, Inc. RF560VPN User Guide
58
Chapter 6 – Managing the RouteFinder Using a Web Browser
– Restart Device
To access this screen, click the Restart Device button from the System Tools screen. The Restart
Device screen displays.
Click on the Start button to save the current settings and restart the device.
Multi-Tech Systems, Inc. RF560VPN User Guide
59
Chapter 7 – Troubleshooting
Chapter 7 – Troubleshooting
This chapter provides a list of common problems encountered while installing, configuring or
administering the RF560VPN. In the event you are unable to resolve your problem, refer to the
Service, Warranty and Technical Support chapter of this User Guide for information about contacting
our Technical Support representatives.
System Diagnostics as a Troubleshooting Tool
The System Diagnostics function performs a check-up on the SOHO RouteFinder VPN to make sure
that it is functioning properly.
To display this screen, launch your Web browser, enter the RF560VPN’s IP address
(http://192.168.2.1) in the browser’s address box. Then click the System Tools button and then the
System Diagnostics button.
You might want to print this page before you call Technical Support.
Problem #1
Other computers can connect to the network device, but my computer can’t.
Whenever I click on Internet Explorer or Netscape, I see the Windows Dial-up utility popping up on my
screen asking for my phone number and password to dial-up my ISP.
· Remove the TCP/IP dial-up adapter from all computers that will be using your RouteFinder to
access the Internet. TCP/IP dial-up adapter is not needed to use the RF560VPN to connect to
the Internet.
1. To remove the Dial-up Adapter, click Start | Settings | Control Panel.
2. Double-click the Network icon.
3. Click the Dial-up Adapter and click Remove. Restart the computer and try again.
· Ensure you have a correct IP address. From a DOS window in Windows 95/98, type
WINIPCFG. From Windows NT, type IPCONFIG. If the address field is listed as 0.0.0.0, the
computer does not have an IP address and you must ensure the automatic DHCP configuration
has been correctly set up for this computer.
·
Ensure that the Web browser is properly configured to connect to the Internet via the LAN.
Multi-Tech Systems, Inc. RF560VPN User Guide
60
Chapter 7 – Troubleshooting
Problem #2
The RouteFinder is connected to the Cable/DSL, but has problems accessing the Internet.
·
·
·
•
·
•
•
Ensure the workstation has TCP/IP properly configured.
Attempt to ping the IP address of the RF560VPN.
Use Web browser interface to see if the WAN Ethernet port has successfully acquired a
dynamic IP address from the ISP, or if the static IP address is valid.
Use WINIPCFG (Windows 95/98) or IPCONFIG (Windows NT/ 2000) to check to see if the
computer’s IP settings are correct.
Ensure the DNS settings are correct.
Ensure the Gateway IP address is the device’s LAN Ethernet IP address (Server IP address).
Ensure the IP address netmask is correct.
Problem #3
I configured my RouteFinder but I can’t get it to communicate with my modem.
• Check your initialization string. If you are using an ISDN TA and your ISDN TA was not
listed as a choice in Setup Wizard, refer to the ISDN TA section in the User Guide for the
appropriate initialization string.
Problem #4
My RouteFinder dials-up a connection but can’t seem to communicate with the ISP.
· Verify that your baud rate is not set too high for your modem or ISDN TA. The maximum
baud rate that your modem or ISDN claims it can achieve may not be attainable due to poor
line or connection quality. Use the RouteFinder Web browser management interface to set
the baud rate to a lower rate and retry the connection.
· If your connection still doesn’t work, contact your ISP.
Problem #5
Sometimes when I try to use the Internet or get my mail, the application can’t connect to the Internet
immediately.
• The most common reason for this is not due to a problem or error. If you are the first person
to make a connection to the Internet through the RF560VPN, there will be a delay when the
Dial-On-Demand function automatically makes the connection and logs on to your ISP.
Subsequent users will be able to use the connection you’ve established without a delay.
• If the scenario described above does not fit your situation, use RouteFinder Web browser
management interface to view all events that are taking place between the modem and your
ISP as you attempt to make a connection (e.g., a busy signal).
Multi-Tech Systems, Inc. RF560VPN User Guide
61
Chapter 7 – Troubleshooting
Problem #6
After installing my RF560VPN, my modem connection seems to be slower.
• The RouteFinder device should have no effect on the modem speed. However, if more than
one client is using the same modem through the RouteFinder, the speed will be reduced.
• Run RouteFinder Web browser management interface to view the number of concurrent
client connections to your ISP.
Problem #7
While the Serial async port is in use, my RF560VPN keeps dialing a connection to the Internet, but no
one is using the Internet.
• The RF560VPN will only dial the connection if there is a request from one of the computers
on the LAN for an IP address on the Internet. Keep in mind that certain applications can be
configured to request information from the Internet. For example, Microsoft Outlook can be
set up to “check for new mail every x minutes”. If this feature is enabled, Outlook will send a
request for your Internet POP3 server which will cause your RF560VPN to dial-up your ISP.
To determine which computer on your network is processing a request for an Internet
connection, use the RouteFinder Web browser management interface. The event messages
will provide information about which computer is causing the RF560VPN to dial and which
service (port #) the computer is requesting.
Problem #8
The Please set the Device IP screen displays while configuring the RF560VPN.
• The system detects that the RouteFinder’s LAN Ethernet IP address is not in the same
subnet as the PC’s. Use RouteFinder Web browser management interface to set the
RouteFinder’s IP address to the same network as your PC’s.
Problem #9
A message appears indicating the input IP address is either not valid on your network or is in conflict
with another IP address.
• The system has detected the IP address of the RF560VPN you are configuring is in conflict
with another device. Power off the conflicting device and configure the RF560VPN using a
different Ethernet LAN IP address.
Multi-Tech Systems, Inc. RF560VPN User Guide
62
Chapter 8 – Frequently Asked Questions
Chapter 8 – Frequently Asked
Questions
Where is the xDSL/Cable Router installed on the network?
In a typical environment, the Router is installed between the Cable/DSL Modem and the LAN. Plug the
Cable/DSL Router into the Cable/DSL Modem’s Ethernet port.
Does the Router support IPX or AppleTalk?
No. TCP/IP is the only protocol standard for the Internet and has become the global standard for
communications. IPX, a NetWare communications protocol used only to route messages from one
node to another, and AppleTalk, a communications protocol used on Apple and Macintosh networks,
can be used from LAN to LAN connections, but those protocols cannot connect from WAN to LAN.
Does the WAN connection of the xDSL/Cable Router support 100Mbps Ethernet?
Because of the speed limitations of broadband Internet connections, the Cable/DSL Router’s current
hardware design supports 10Mb Ethernet on its WAN port. It does, of course, support 100Mbps over
in the auto-sensing Fast Ethernet 10/100 switch on the LAN side of the router.
What Is Network Address Translation and How Is It Used?
Network Address Translation (NAT) translates multiple IP addresses on the private LAN to one public
address that is sent out to the Internet. This adds a level of security since the address of a PC
connected to the private LAN is never transmitted on the Internet. Furthermore, NAT allows the
Cable/DSL Router to be used with low cost Internet accounts, such as DSL or cable modems, where
only one TCP/IP address is provided by the ISP. The user may have many private addresses behind
this single address provided by the ISP.
Does the xDSL/Cable Router support any operating system other than Windows 95, Windows
98, Windows 2000, or Windows NT?
Yes, but Multi-Tech does not, at this time, provide technical support for setup, configuration or
troubleshooting of any non-Windows operating systems.
Does the Router pass PPTP packets or actively route PPTP sessions?
The Router lets PPTP packets pass through.
What is the maximum number of users supported by the Router?
The Router supports up to 253 users.
Is the Router cross-platform compatible?
Any platform that supports Ethernet & TCP/IP is compatible with the router.
Multi-Tech Systems, Inc. RF560VPN User Guide
63
Chapter 8 – Frequently Asked Questions
Will the Router function in a Mac environment?
Yes, as long as you have a browser to configure the router.
Will the Router allow you to use your own public IPs and Domain, or do you have to use the IPs
provided by the router?
The router mode allows for customization of your public IPs and Domain.
Can multiple gamers on the LAN get on one game server and play simultaneously with just one
public IP address?
It depends on which network game or what kind of game server it is. For example, Unreal Games
support multi-login with one public IP.
Does the Router replace a modem? That is, is there a cable or DSL modem in the router?
No. The Router must work in conjunction with a cable or DSL modem.
Which modems are compatible with the router?
The Router is compatible with any cable modem or DSL modem that supports Ethernet.
What are the advanced features of the Router?
They include asynchronous port dial-up backup, VPN pass through, hacker attack logging, and Virtual
server. See Chapter 1 for a complete list.
What is the maximum number of VPN sessions allowed by the router?
Five.
How do I access the Router’s setup pages with a Mac?
The router’s setup pages are accessible to the Mac through a browser. Use the default address
192.168.2.1.
Can I choose whether to use UDP or TCP on the Router’s ports?
No, the Router does not have this feature. UDP and TCP are both automatically activated at the same
time when the Router’s service ports are specified to be opened.
Does Multi-Tech provide syslog support?
Yes.
How can I check whether I have static or DHCP (dynamic) IP addresses?
Consult your ISP to confirm this data.
Does the Router support PPP over Ethernet (PPPoE)?
Yes, the router does support PPPoE.
Multi-Tech Systems, Inc. RF560VPN User Guide
64
Chapter 8 – Frequently Asked Questions
Why does the Router not obtain the IP address assigned by my ISP?
• Make sure that your cable or DSL modem is connected properly.
• Try resetting your cable or DSL modem by powering the modem off and on.
• If you are using dynamic IP addressing, make sure that your cable or DSL modem is DHCPcapable.
• Some ISPs require a MAC address to be registered with them.
If all else fails in the installation, what can I do?
•
•
•
•
Reset your cable modem or DSL modem by powering the unit off and on.
Obtain the latest release of firmware on the RF560VPN at www.multitech.com.
Reset the Router’s factory default by holding down the reset button until the lights start blinking.
Flash the firmware again to the Router to ensure that it was successfully written to the unit.
How will I be notified of new router firmware upgrades?
All Multi-Tech firmware upgrades are posted on the Multi-Tech Web site at www.multitech.com, where
they can be downloaded for free.
Your Router does NOT need the latest firmware upgrade if your Internet connection is already
successful, as firmware upgrades will not increase your connection speed or enhance your Router’s
performance.
Does the Router support IPsec?
The RF560VPN supports IPsec endpoint/gateway.
What type of firewall is the router equipped with?
The Router uses NAT.
I am not able to get my e-mails or my ISP Web page (e.g., http://www.isp.com/). What can I do?
Contact the ISP to get the full URL, or you can do the following:
1. Connect one of the computers directly to the cable modem or DSL modem.
2. Open a command prompt and ping the ISP web server or mail server name given. For example,
at the command prompt, type in ping www and press Enter. You should be able to get an IP
address when it responds.
3. After you get the IP address, enter the IP address on the mail server option.
Multi-Tech Systems, Inc. RF560VPN User Guide
65
Appendix A – Specifications
Appendix A – Specifications
Processor
50 MHz 32-bit RISC CPU
Memory
RAM: 16MB
Flash ROM: 1MB
LAN Ports
Number of Ports: 4
Interface: 10BaseT/100BaseTX
Standards: 802.3
WAN Ports
Number of Ports: 2
10BaseT/100Base TX & RS232
Protocols
Security: PAP/CHAP, NAT Firewall
Network: TCP/IP, DHCP (Client/Server), PPPoE, PPP
Filtering: Protocol, port number, IP address
Routing: Static, RIP1
VPN: IPSec, PPTP pass through
VPN
Protocol: IPSec with IKE key management
PPTP option supports up to 10 clients
3DES Encryption: 168-bit; 1.5M bps throughput
Number of Tunnels: 10
Firewall
Port and IP Filtering, Denial of Service Protection (DoS), Network Address
Translation (NAT), and Virtual Server
Management
Local and Remote Management, Logging, Web-Based HTTP & Syslog
Dimensions
201 x 151 x 44 mm (L x W x H); 7.1” x 4.9” x 1.4”
Weight
380g
13 oz
Temperature
Temperature Range: 32 –120 F (0–50 C)
Humidity: 25–85% non-condensing
Power
Requirements
External AC Adapter
Input: 100 ~240V, 0.6A 50-60- Hz
Output: 12V DC
Approvals
FCC Part 15 (Class B), CE Mark, UL1950, and EN60950
Warranty
2 years
o
Multi-Tech Systems, Inc. RF560VPN User Guide
o
o
66
Appendix B – Installing TCP/IP
Appendix B – Installing TCP/IP
Windows 98/Me
1. Click Start | Settings | Control Panel, and then double-click the Network icon. In the
Network dialog box, Configuration tab, click the Add button.
2. Select Protocol and click Add.
3. The Select Network Protocol dialog box displays. In the Manufacturers box, select
Microsoft and then select TCP/IP in the Network Protocols box.
4. Click OK and you will be returned to the Network dialog box.
Click OK to close out of the Network dialog box.
5. Allow your system to reboot.
Multi-Tech Systems, Inc. RF560VPN User Guide
67
Appendix B – Installing TCP/IP
Windows NT
1. Click Start | Settings | Control Panel, and then double-click the Network icon. In the
Network dialog box, click the Protocols tab, and click the Add button.
(This screen shows TCP/IP already installed)
2. The Select Network Protocol screen displays. Select TCP/IP and follow the on-screen
instructions to complete installation.
3. Allow your system to reboot.
Windows 2000/XP
TCP/IP is automatically installed in Windows 2000 and Windows XP.
Multi-Tech Systems, Inc. RF560VPN User Guide
68
Appendix C – Tools for Your RF560VPN
Appendix C – Tools for Your
RF560VPN
PING
Ping is an acronym for Packet Internet Groper. The PING utility is used as a diagnostic tool to
determine if a communication path exists between two devices on the network. The utility sends a
packet to the specified address and then waits for a reply. PING is used primarily to troubleshoot
Internet connections, but it can be used to test the connection between any devices using the TCP/IP
protocol.
If you PING an IP address, the PING utility will send four packets and stop.
If you add a -t to the end of the command, the PING utility will send packets continuously.
WINIPCFG and IPCONFIG
These tools find a computer’s IP configuration, MAC address, and default gateway.
WINIPCFG (for Windows 95/98)
1. Select Start | Run and type WINIPCFG.
2. The IP address, default gateway (the RF560VPN IP address), and the MAC (adapter
address) display.
IPCONFIG (for Window NT/2000)
1. From a DOS Prompt, type IPCONFIG and press Enter.
2. The IP address, default gateway (the RF560VPN address), and the MAC (adapter address)
display.
TRACERT
TRACERT is an extensive PING utility that allows you to trace the route of an IP address. The utility
reports the number of router hops, the time for each hop, and any failed attempts to cross a hop. The
information that is provided by this utility assists you to locate the specific site of a failed PING. You
can run TRACERT at the DOS prompt (e.g., c:\tracert www.yahoo.com). The utility will provide
information about the route and number of hops required to reach the destination IP address
associated with the network address or URL.
Multi-Tech Systems, Inc. RF560VPN User Guide
69
Appendix D – Warranty and Repairs
Appendix D – Warranty and
Repairs
This chapter covers with the terms of your RouteFinder’s warranty and repair policies.
Warranty
Multi-Tech Systems, Inc., (hereafter “MTS”) warrants that its products will be free from defects in material or
workmanship for a period of two, five, or ten years (depending on model) from date of purchase, or if proof of
purchase is not provided, two, five, or ten years (depending on model) from date of shipment.
MTS MAKES NO OTHER WARRANTY, EXPRESS OR IMPLIED, AND ALL IMPLIED WARRANTIES OF
MERCHANTABILITY AND FITNESS FOR A PARTICULAR PURPOSE ARE HEREBY DISCLAIMED.
This warranty does not apply to any products which have been damaged by lightning storms, water, or power
surges or which have been neglected, altered, abused, used for a purpose other than the one for which they were
manufactured, repaired by Customer or any party without MTS’s written authorization, or used in any manner
inconsistent with MTS’s instructions.
MTS’s entire obligation under this warranty shall be limited (at MTS’s option) to repair or replacement of any
products which prove to be defective within the warranty period or, at MTS’s option, issuance of a refund of the
purchase price. Defective products must be returned by Customer to MTS’s factory – transportation prepaid.
MTS WILL NOT BE LIABLE FOR CONSEQUENTIAL DAMAGES, AND UNDER NO CIRCUMSTANCES WILL
ITS LIABILITY EXCEED THE PRICE FOR DEFECTIVE PRODUCTS.
Repair Procedures for U.S. and Canadian Customers
In the event that service is required, products may be shipped, freight prepaid, to our Mounds View, Minnesota
factory:
Multi-Tech Systems, Inc.
2205 Woodale Drive
Mounds View, MN 55112
Attn: Repairs, Serial # ____________
A Returned Materials Authorization (RMA) is not required. Return shipping charges (surface) will be paid by MTS.
Please include, inside the shipping box, a description of the problem, a return shipping address (must have street
address, not P.O. Box), your telephone number, and if the product is out of warranty, a check or purchase order
for repair charges.
For out of warranty repair charges, go to www.multitech.com/documents/warranties
Extended two-year overnight replacement service agreements are available for selected products. Please call
MTS at (888) 288-5470, extension 5308 or visit our web site at
http://www.multitech.com/programs/orc/ for details on rates and coverages.
Please direct your questions regarding technical matters, product configuration, verification that the product is
defective, etc., to our Technical Support department at (800) 972-2439 or email [email protected]. Please
direct your questions regarding repair expediting, receiving, shipping, billing, etc., to our Repair Accounting
department at (800) 328-9717 or (763) 717-5631, or email [email protected].
Repairs for damages caused by lightning storms, water, power surges, incorrect installation, physical abuse, or
user-caused damages are billed on a time-plus-materials basis.
Multi-Tech Systems, Inc. RF560VPN User Guide
70
Appendix D – Warranty and Repairs
Repair Procedures for International Customers (Outside U.S.A. and
Canada)
Your original point of purchase Reseller may offer the quickest and most economical repair option for your MultiTech product. You may also contact any Multi-Tech sales office for information about the nearest distributor or
other repair service for your Multi-Tech product.
http://www.multitech.com/COMPANY/offices/DEFAULT.ASP
In the event that factory service is required, products may be shipped, freight prepaid to our Mounds View,
Minnesota factory. Recommended international shipment methods are via Federal Express, UPS or DHL courier
services, or by airmail parcel post; shipments made by any other method will be refused. A Returned Materials
Authorization (RMA) is required for products shipped from outside the U.S.A. and Canada. Please contact us for
return authorization and shipping instructions on any International shipments to the U.S.A. Please include, inside
the shipping box, a description of the problem, a return shipping address (must have street address, not P.O.
Box), your telephone number, and if the product is out of warranty, a check drawn on a U.S. bank or your
company’s purchase order for repair charges. Repaired units shall be shipped freight collect, unless other
arrangements are made in advance.
Please direct your questions regarding technical matters, product configuration, verification that the product is
defective, etc., to our Technical Support Department nearest you or email [email protected]. When calling
the U.S., please direct your questions regarding repair expediting, receiving, shipping, billing, etc., to our Repair
Accounting department at
+(763) 717-5631 in the U.S.A., or email [email protected].
Repairs for damages caused by lightning storms, water, power surges, incorrect installation, physical abuse, or
user-caused damages are billed on a time-plus-materials basis.
Repair Procedures for International Distributors
Procedures for International Distributors of Multi-Tech products are on the distributor web site.
http://www.multitech.com/PARTNERS/login/
Copyright ã Multi-Tech Systems, Inc. 2001
10-Sep-01
Multi-Tech Systems, Inc. RF560VPN User Guide
71
Appendix E – Regulatory Compliance
Appendix E – Regulatory
Compliance Information
FCC Part 15 Regulation
This equipment has been tested and found to comply with the limits for a Class B digital device,
pursuant to Part 15 of the FCC rules. These limits are designed to provide reasonable protection
against harmful interference in a residential installation. This equipment generates, uses, and can
radiate radio frequency energy, and if not installed and used in accordance with the instructions, may
cause harmful interference to radio communications. However, there is no guarantee that interference
will not occur in a particular installation. If this equipment does cause harmful interference to radio or
television reception, which can be determined by turning the equipment off and on, the user is
encouraged to try to correct the interference by one or more of the following measures:
· Reorient or relocate the receiving antenna.
·
Increase the separation between the equipment and receiver.
·
·
Plug the equipment into an outlet on a circuit different from that to which the receiver is connected.
Consult the dealer or an experienced radio/TV technician for help.
This device complies with Part 15 of the FCC rules. Operation of this device is subject to the following conditions:
(1) This device may not cause harmful interference, and (2) this device must accept any interference that may
cause undesired operation.
WARNING – Changes or modifications to this unit not expressly approved by the party responsible for
compliance could void the user’s authority to operate the equipment.
Industry Canada
This Class B digital apparatus meets all requirements of the Canadian Interference-Causing Equipment
Regulations.
Cet appareil numérique de la classe B respecte toutes les exigences du Reglement Canadien sur le matériel
brouilleur.
Multi-Tech Systems, Inc. RF560VPN User Guide
72
Appendix E – Regulatory Compliance
EMC, Safety, and R&TTE Directive Compliance
The CE mark is affixed to this Multi-Tech product to confirm compliance with the following
European Community Directives:
Council Directive 89 / 336 / EEC of 3 May 1989 on the approximation of the laws of Member
States relating to electromagnetic compatibility.
and
Council Directive 73 /23 / EEC of 9 February 1973 on the harmonization of the laws of Member
States relating to electrical equipment designed for use within certain voltage limits:
and
Council Directive 1999 / 5 / EC of March 1999 on radio equipment and telecommunications
terminal equipment and the mutual recognition of their conformity.
Other Approvals
UL1950
EN60950
Multi-Tech Systems, Inc. RF560VPN User Guide
73
Appendix F – Technical Support
Appendix F – Technical Support
The Technical Support section offers information about on-line registration as well as phone numbers
for contacting our Technical Support group. Also included is information about accessing our Internet
site, and information about ordering accessories for your RouteFinder.
Multi-Tech provides free technical support for as long as your product remains in service. Before
calling Technical Support, please read through the Troubleshooting chapter of this User Guide. Also,
ensure you have completed the Recording RouteFinder Information section below.
To contact our Technical Support group, use one of the following contact options, keeping in mind that
phone calls are handled with first priority:
Contacting Technical Support
Country
France
India
U.K.
Rest of World
Using Email
[email protected]
[email protected]
[email protected]
[email protected]
By Phone
+(33) 1-64 61 09 81
+(91) 124-340778
+(44) 118 959 7774
800-972-2439 (U.S. & Canada)
or +763-785-3500
Recording RouteFinder Information
Before placing a call to our Technical Support staff, record the following information about your MultiTech RouteFinder.
Model no.: ________________________________________________________________
Serial no.: ________________________________________________________________
Firmware version: _________________________________________________________
Software version: _________________________________________________________
Note the status of your RouteFinder in the space provided before calling tech support. Make certain to
include screen messages, diagnostic test results, problems with a specific application, etc.
Multi-Tech Systems, Inc. RF560VPN User Guide
74
Appendix F – Technical Support
On-line Warranty Registration
If you have access to the World Wide Web, you can register your Multi-Tech product online at the
following URL:
http://www.multitech.com/register
Contacting Multi-Tech by Internet
Multi-Tech System, Inc. maintains a Web and an FTP site at:
http://www.multitech.com
ftp://ftp.multitech.com
Ordering Accessories
SupplyNet, Inc. can provide you with replacement transformers, cables and connectors for select
Multi-Tech products. You can place an order with SupplyNet via mail, phone, fax or the Internet at:
Mail:
SupplyNet, Inc.
614 Corporate Way
Valley Cottage, NY 10989
Phone:
(800) 826-0279
Fax:
(914) 267-2420
Email:
[email protected]
http://www.thesupplynet.com
Internet:
Multi-Tech Systems, Inc. RF560VPN User Guide
75
Glossary
Glossary
A
Authentication
The process of determining the identity of a user attempting to access a system and the process
of verifying that a particular name really belongs to a particular entity.
Asynchronous
A method of transmitting data which allows characters to be sent at irregular intervals.
B
Baud Rate
Baud Rate refers to the number of bits per second (Bps) that are transmitted between your
network device and modem or ISDN TA.
Blocked Cipher
Cipher that encrypts data in blocks of a fixed size: DES, IDEA, and SKIPJACK are block ciphers.
C
Client
A computing entity in a network that seeks service from other entities on the network. Client
software generally resides on personal workstations and is used to contact network servers to
retrieve information and perform other actives.
D
Data Encryption Standard (DES)
Block cipher that is widely used in commercial systems. It is a Federal standard so it is deemed
acceptable by many financial institutions.
Data Key
Crypto key that encrypts data as opposed to a key that encrypts other keys. Also called a session
key.
DHCP (Dynamic Host Configuration Protocol)
A protocol that was made to lessen the administrative burden of having to manually configure
TCP/IP Hosts on a network. DHCP makes it possible for every computer on a network to extract
its IP information from a DHCP server instead of having to be manually configured on each
network computer. The DHCP server built-in to your RouteFinder allows every computer on your
network to automatically extract IP information from the RouteFinder.
Why is it called Dynamic?
Each time a network client turns on their computer your RouteFinder DHCP server will
automatically give them an IP address from the IP address pool configured in the DHCP
Configuration dialog box in RouteFinder Web browser management interface. It is called Dynamic
because the address that is issued could be different each time a computer connects to the
network.
DNS (DomainNameSystem)
A DNS Server can be thought of as the computer at your ISP whose job is to take all the URLs
that you type into your web browser and translate them to their corresponding IP address. To use
this the DNS translator, you need to know the IP address of your ISP’s DNS Server.
Domain Name
The textual name assigned to a host on the Internet. The Domain Name Service (DNS) protocol
translates between domain names and numerical IP addresses.
Multi-Tech Systems, Inc. RF560VPN User Guide
76
Glossary
Dynamic Routing
Routing is the process of selecting the correct path for a message. Dynamic routing adjust
automatically to changes in network topologies or traffic. It automatically accomplishes load
balancing and optimizes performance of the network “on the fly.”
E
Encryption
In general use, the transformation of data into a form unreadable by anyone without a secret
decryption key. Its purpose is to ensure privacy by keeping the information hidden from anyone for
whom it is not intended.
Ethernet
A LAN (Local Area Network) protocol developed by Xerox and DEC. It is a very commonly used
type of LAN.
F
Filtering
An operating parameter used in LAN bridges and routers that when set will cause these devices to
block the transfer of packets from one LAN to another.
Firewall
A system designed to prevent unauthorized access to or from a private network. Firewalls are
typically installed to give users access to the Internet while protecting their Internal Information.
Your RouteFinder uses a firewall technology known as NAT (see NAT). Each message entering
or leaving the intranet passes through the firewall. The firewall examines each message and
blocks those that do not meet the specified security criteria.
Firmware
Software that has been has been permanently or semi-permanently written to the RouteFinder’s
memory. Your RouteFinder supports flash ROM which means you can upgrade the firmware in
your network device very easily by downloading a copy of the new firmware from the Multi-Tech
Web site and using the RouteFinder Web browser management Firmware function.
FTP (File Transfer Protocol)
A protocol which allows a user on one host to access, and transfer files to and from another host
over a network.
G
Gateway
An entrance and exit into a communications network.
I
IKE
Internet Key Exchange – a procedure by which the value of a key is shared between two or more
parties.
IP (Internet Protocol)
The Internet Protocol is the network layer for the TCP/IP Protocol Suite. It is a connectionless,
best-effort packet switching protocol.
IPSec
A collection of IP security measures that comprise an optional tunneling protocol for IPv6. IPSec
supports authentication through an “authentication header” which is used to verify the validity of
the originating address in the header of every packet of every packet stream.
Intranet
An Intranet is the use of Internet technologies within a company. Intranets are private networks
that exist only within organizations, while the Internet is a global network open to all.
IP Addresses
A computer on the Internet is identified by an IP Address. A computer’s IP address is like a
Multi-Tech Systems, Inc. RF560VPN User Guide
77
Glossary
telephone number. It identifies one address or in this case one computing device. Every computer
or device on the network must have a different IP address.
An IP address consists of four groups of numbers called octets, which are separated by periods.
For example, 213 .0.0.1 is an IP address. An IP address consists of a network portion and a
host portion. The network portion identifies the subnet that the computer belongs to. The host
portion identifies the particular computer or node on that network.
IP addresses can either be dynamic (temporary) or static (permanent or fixed). A dynamic IP
address is a temporary IP address that is assigned to you by a server (usually a DHCP server)
when the computer is powered on. A static IP address is a permanent IP address that is set up on
each individual computer. When your RouteFinder dials-up your ISP, your ISP can give it a fixed
or dynamic IP address. Likewise, when you power on your computer, the RF560VPN can give
your computer a dynamic or fixed IP address.
ISDN TA
(Integrated Services Digital Network Terminal Adapter) ISDN is a high speed digital telephone
connection involving the digitization of the telephone network using existing wiring. An ISDN
Terminal Adapter can be thought of as an ISDN Modem.
ISP (Internet Service Provider)
An organization that provides Internet services. An ISP is the company that provides the
connection from your computer to the Internet. An ISP can offer a range of services, such as dialup accounts, e-mail, web hosting or News.
L
LAN (Local Area Network)
A data network intended to serve an area of only a few square kilometers or less. This often
means a small private network in companies.
M
ML-PPP (Also called MP or MPPP)
Stands for Multilink Point to Point Protocol and is an advancement of the PPP protocol that allows
for the bridging or bundling of two ISDN or analog channels for faster connections.
MAC Address
The hardware address of a Device connected to a shared media. To find out the MAC address of
your computer please see Troubleshooting.
N
NAT Technology
NAT is short for Network Address Translation. NAT is an Internet standard that enables a localarea network to use one set of IP addresses for internal traffic and a second set of IP addresses
for external traffic. The RF500S provides the necessary IP address translations. NAT is
sometimes referred to as “IP Address Masquerading”. This technology provides a type of firewall
by hiding the internal IP addresses.
How does it work?
Every IP address on the Internet is a Registered or legal IP address. Therefore, no two IP
addresses on the Internet are the same. For you to use your network device to access the Internet
you need a registered IP address from your ISP (Internet Service Provider). Using a registered IP
address on your Intranet or LAN is not necessary. When clients on your network start surfing the
Internet, your RouteFinder will receive all the requests for information. The RouteFinder will dialup your ISP and your ISP will give your RouteFinder a registered legal IP address. Your
RouteFinder uses this IP address to request information saying, “send all information back to me
at this IP address”. In essence it appears as though all your clients requests are coming from that
one IP address (hence the name IP masquerading). When all the information comes back through
the RouteFinder, it sorts the data using an Address Translation Table and returns the data to the
computer on your network that requested it.
If someone on the Internet tries to access your network, the firewall function of the RouteFinder
stops the request. The device will not reverse translate network addresses unless you have
specifically allowed this feature using the Virtual Server function (IP Mapping).
Multi-Tech Systems, Inc. RF560VPN User Guide
78
Glossary
NetworkAddress
The network portion of an IP address. For a class A network, the network address is the first byte
of the IP address. For a class B network, the network address is the first two bytes of the IP
address. For a class C network, the network address is the first three bytes of the IP address. In
each case, the remainder is the host address. In the Internet, assigned network addresses are
globally unique.
P
Packet
A packet is a piece of a message transmitted over a packet-switching network. A packet contains
the destination address of the message as well as the data. In IP networks, packets are often
called datagrams.
PING
A program that tests whether a particular network destination on the Internet is online (that is,
working) by bouncing a “signal” off a specified IP destination address.
Port Number
The term port can mean the connector on your computer or it can be thought of as a server
number. Every service that travels over phone lines and modems has a standard port number. For
example, the World Wide Web service uses the standard port number, 80 and the standard Telnet
port is 23.
Port numbers are controlled and assigned by the IANA (Internet Assigned Numbers Authority).
Most computers have a table in their systems containing a list of ports that have been assigned to
specific services. You can also find lists of standard port numbers on the World Wide Web.
PPPoE
Point-to-point protocol over the Ethernet. It is a means of connecting from your premises to your
Internet Service Provider. Its main advantage is that it determines the need for the ISP to manage
the allocation of IP addresses.
PPTP
Point-to-Point Tunneling Protocol – An IP tunneling protocol designed to encapsulate the LAN
protocols IPX and Apple Talk within IP for transmission across the Internet and other IP-based
networks.
Private Key
Key used in public key crypto that belongs to an individual entity and must be kept secret.
Protocol
A formal description of message formats and the rules two computers must follow to exchange
those messages. You can think of protocols like languages. If two computers or devices aren’t
speaking the same language to each other, they won’t be able to communicate.
PPP (Point -to- Point Protocol)
PPP enables dial-up connections to the Internet and is the method that your network device
connects to the Internet. PPP is more stable than the older SLIP protocol and provides error
checking features.
R
Router
A device which forwards traffic between networks. If you request information from a location on
your network or the Internet, the router will route the request to the appropriate destination. The
router’s job is to listen for requests for IP addresses that are not part of your LAN and then route
them to the appropriate network which may either be the Internet or another sub-network on your
LAN.
Multi-Tech Systems, Inc. RF560VPN User Guide
79
Glossary
S
Server
A provider of resources (e.g., file servers and name servers). For example, your RouteFinder
provides Internet access and is, therefore, an Internet Access Server.
Static Routing
Involves the selection of a route for data traffic on the basis of routing options preset by the network
administrator.
Subnet
A portion of a network that shares a common address component. On TCP/IP networks, subnets are
all devices whose IP Addresses have the same prefix. For example, all devices with IP addresses
starting with 213.0.0 are part of the same subnet.
SubnetMask /IPAddressMask
Subnet mask is what is used to determine what subnet an IP address belongs to. Subnetting
enables the network administrator to further divide the host part of the address into two or more
subnets.
T
TCP/IP (Transmission Control Protocol/Internet Protocol)
A suite of communication protocols used to connect hosts on the Internet. Every computer that
wants to communicate with another computer on the Internet must use the TCP/IP protocol to
transmit and route data packets. The format of an IP address is a 32-bit numeric address written
as four octets separated by periods. Each number can be zero to 255. Within an isolated network,
you can assign IP addresses at random as long as each one is unique. However, connecting a
private network to the Internet requires using registered IP addresses to avoid duplication.
The four groups of numbers (octets) are used to identify a particular network and host on that
network. The InterNIC assigns Internet addresses as Class A, Class B, or Class C. Class A
supports 16 million hosts on each of 127 networks. Class B supports 65,000 hosts on each of
16,000 networks. Class C supports 254 hosts on each of 2 million networks. Due to the large
increase in access to the Internet, new classless schemes are gradually replacing the system
based on classes.
Triple DES (3DES)
Cipher that applies the DES cipher three times with either two or three different DES keys.
Tunneling
As an Internet term, tunneling means to provide a secure temporary path over the Internet or other
IP-based network in a VPN (Virtual Private Network) scenario. In this context, tunneling is the
process of encapsulating an encrypted data packet in an IP packet for secure transmission across
an inherently insecure IP network, such as the Internet.
U
UDP (User Datagram Protocol)
An Internet Standard transport layer protocol. It is a connectionless protocol that adds a level of
reliability and multiplexing to IP.
V
Virtual Private Network
A private network built atop a public network. Hosts within the private network use encryption to
talk to other hosts; the encryption excludes hosts from outside the private network even if they are
on the public network.
W
WAN (Wide Area Network)
A network that connects host computers and sites across a wide geographical area.
Multi-Tech Systems, Inc. RF560VPN User Guide
80
Index
Index
A
Administrative Settings, 47
Advanced Settings, 42
Approvals, 66
Asynchronous, 76
Authentication, 76
B
Back Panel, 9
Baud Rate, 76
Blocked Cipher, 76
buttons, screen, 19
C
Cable/xDSL ISP Settings, 24
Cabling Your RouteFinder, 11
Client, 76
Configuring in Windows 2000/XP, 17
Configuring the PC, 12
Contacting Technical Support, 74
continuous PING, 69
D
Data Encryption Standard (DES), 76
Data Key, 76
Detail Debug IPSec Log, 47
Device Information, 39
Device IP Settings, 23
Device Status, 40
DHCP, 76
DHCP Log Button, 41
DHCP Server Settings, 42
Dimensions, 66
DNS, 76
Domain Name, 76
DomainNameSystem, 76
DoS, 6
Dynamic DNS Settings, 49
Dynamic Host Configuration Protocol, 76
Dynamic Routing, 77
E
E-Mail Alert, 51
EMC, Safety, and R&TTE Directive
Compliance, 73
Encryption, 77
Ethernet, 77
Multi-Tech Systems, Inc. RF560VPN User Guide
F
FCC Part 15 Regulation, 72
File Transfer Protocol, 77
Filtering, 6, 77
Firewall, 77
Firewall Features, 66
Firmware, 58, 77
firmware upgrade notification, 58
Frequently Asked Questions, 63
FTP, 77
G
Gateway, 77
Glossary, 76
H
Hacker Attack Logging, 6
I
IKE, 77
Installing TCP/IP, 67
Internet Protocol, 77
Intranet, 77
Intruder Detection Log, 52
IP, 77
IP Addresses, 77
IPCONFIG, 69
IPSec, 77
ISDN TA, 78
ISP (Internet Service Provider), 78
K
Key Features, 5
L
LAN (Local Area Network), 78
LAN Filter Settings, 45
LAN Ports, 66
LAN Segmentation, 6
LED Panel, 8
Load Default Settings, 57
Load Settings from a File, 57
M
MAC address, 78
Management Features, 66
Memory, 66
ML-PPP, 78
81
Index
Modem Settings, 30
MP or MPPP, 78
MTU setting, 47
N
NAT Technology, 78
navigating, 19
Network Address, 79
Network Security Protection, 6
O
Open a Web browser, 20
Ordering Accessories, 75
P
Packet, 79
password, 21
Password, New, 47
PING, 69, 79
Port Number, 79
Power 5VDC, 9
Power Requirements, 66
PPP (Point -to- Point Protocol), 79
PPPoE, 79
PPTP, 79
Prevention of DoS, 6
Private Key, 79
Processor, 66
Protocol, 79
Protocols, 66
R
Registering Your Product, 75
Related Documentation, 7
repair, 70
Reset, 9
Reset Device, 59
Router, 79
Routing Table, 53
S
Safety Warnings, 10
Save and Restart, 38
Save Settings to a File, 56
Secure VPN Connections, 6
Server, 80
Multi-Tech Systems, Inc. RF560VPN User Guide
Setup Examples, 7
Specifications, 66
Static Routing, 44, 80
Subnet, 80
SubnetMask, 80
System Administration, 47
System Diagnosis, 54
System Log, 47
System Requirements, 10
System Tools, 52
T
TCP/IP, 80
Technical Support, 74
Temperature, 66
TRACERT, 69
Triple DES (3DES), 80
Troubleshooting, 60
Tunneling, 80
U
UDP (User Datagram Protocol), 80
Unpacking Your RouteFinder, 10
Upgrade Firmware, 58
URL Filter Settings, 50
Using a Web Browser, 20
V
Virtual Private Network, 80
Virtual Server Settings, 43
VPN Features, 66
VPN Settings, 31
VPN Status, 41
W
WAN (Wide Area Network), 80
WAN Filter Settings, 46
WAN Ports, 66
warranty, 70
Warranty, 66
Web Browser
Time Zone Selection, 22
Weight, 66
Windows 98/Me, 12
WINIPCFG, 69
82