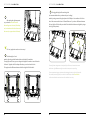
1
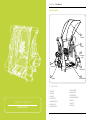
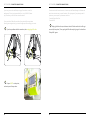
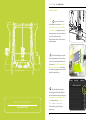
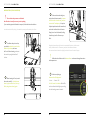
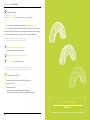
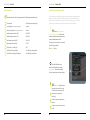
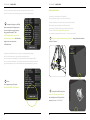
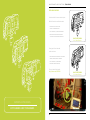
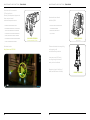
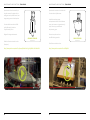
PERSONAL FABRICATOR
VERSION 2.0
USER MANUAL
TABLE OF
CONTENT
VOXELIZER
THE ZMORPH
40
TOOLHEAD FEATURES
42
CLEANING THE NOZZLE
51
NOZZLE REMOVAL
53
MACHINE OVERVIEW
6
LUBRICATION
54
CHAMBER
8
EXCHANGE AND REPLACEMENT OF TOOLHEAD
54
PANEL OVERVIEW
9
EXCHANGING THE TOOLHEADS
55
MAKING THE PLASTIC PRINT STICK TO THE PRINTBED
58
10
CNC-MILLING
PRINTER CONNECTION
THE CNC-MILLING FEATURE
61
USB CONNECTIVITY
11
THE FILE FORMAT: LOADING DFX
61
LAN CONNECTIVITY
13
SETTING WORKING PARAMETERS
62
PREPARING THE DREMEL TOOL
63
CALIBRATION
TESTING THE AXIS
17
BED CALIBRATION
20
EXTRUDER TEST
24
PLASTICS STUCK
27
UPGRADES
SOFTWARE UPGRADES
64
TROUBLESHOOTING AND ADJUSTMENTS
FIRST PRINT
YOUR FIRST PRINT
28
SOFTWARE
G-CODE AND PRINTING
4
GET STARTED
37
SAFETY
ACCESSORIES
WORKING WITH VOXELS
TOOLHEADS
OVERVIEW
35
MAINTENANCE AND FUNCTION
G-CODES IN VOXELIZER SOFTWARE
BASICS
TROUBLESHOOTING
65
FAQ
68
ADVANCED SERVICING AND MACHINE HACKING
74
CONFIG FILE
74
DESIGN YOUR OWN TOOLHEADS
76
GENERATING GCODES
31
SPECIFICATIONS
77
PREPARING GCODES
33
WARRANTY
81
SETTING G-CODES
34
CONTACT
82
OVERVIEW / THE ZMORPH
OVERVIEW / THE ZMORPH
SAFETY
!
!
Before using the machine, You need to read the instructions carefully.
Improper use of the device might cause fire, electric shock or damage
!
!
!
!
!
!
4
Make sure You work in a well ventilated environment.
If fumes make You feel unwell, switch the machine off and allow fresh air in.
to the mechanical and electronic parts.
!
The machine might emit fumes.
!
!
!
This machine is not a toy. Small children and pet animals
should not be allowed to interfere with it.
The machine is designed to operate indoors
and should not be exposed to rain or extreme humidity.
The machine shall not be covered during operation.
The machine must be supervised at all times.
ZMorph extruders and toolheads should be used only
with materials they were designed for.
Other use is prohibited and will void warranty.
Device should be used away from water.
!
!
All flammable substances and materials should be kept away
during machine operation.
Before using the machine, You should make sure it is not damaged.
!
!
In such case stop using it and contact manufacturer.
Power supply should be grounded.
If there is no such option, do not use the machine.
The person using the machine should always have clean and dry hands.
5
The machine must be positioned on flat surface.
During operation, the machine will produce high temperatures.
The user should not touch any elements marked with "hot surface" sticker.
After finishing working, the machine should be stored in a dry and clean area.
Filaments for 3D printing should be stored in clean and dry place.
The use of dirty filaments might cause nozzle blockage.
OVERVIEW / THE ZMORPH
MACHINE OVERVIEW
1
Chamber
2
Extruder
3
Navigation
panel
7
4
X Axis motor
Reset button
5
8
Z Endstop
Glass heated bed
LIST OF ZMORPH PARTS
ZMORPH 3D PRINTER
FIRST STEPS
•
•
•
•
•
•
•
7
EXTRUDER
X AXIS BELT
Y AXIS BELT
RESET BUTTON
MEMORY CARD SLOT
POWER SOCKET
CHAMBER COVERS
•
•
•
•
•
•
•
STEPPER MOTOR
POWER SUPPLY
FILAMENT DRIVE
Z AXIS THREADED ROD
ENDSTOP X
ENDSTOP Y
ENDSTOP Z
OVERVIEW / THE ZMORPH
OVERVIEW / THE ZMORPH
CHAMBER
PANEL OVERVIEW
The Zmorph have has two covers that creates a closed heat chamber. This enables the machine
to print in ABS, which otherwhise would crack and warp due to uneven temperature.
The covers adds extra safety when the machine is running,
which is excellent for school environments and exhibitions.
Fumes and noise are also reduced.
1
When you work around the machine you might want to keep the covers open.
There is one option to insert a hex key into the cover mounts opening.
This will ensure that the cover is open as long as the hex key remains.
1
RESET
3
2
UP
PLAY/PAUSE
4
OK
5
DOWN
8
9
OVERVIEW / THE ZMORPH
GET STARTED / PRINTER CONNECTION
ACCESSORIES
USB CONNECTIVITY
1
2
3
Driver and software installation instructions for Windows.
From March 2014 ZMorph personal fabricators don’t require drivers. The new firmware supports
USB communication (as HID device) and internal SD drive natively, without any necessary files.
ZMorph personal fabricator
4
100 ml of ABS juice
Screwdriver and HEX keys set
1
5
Just plug USB cable,
and wait until all devices are discovered
by your system.
SD card with config files
10
Spool stand
2
It is recommended to open
3
After automatic installation
Device Manager (if using Windows),
a new disk drive should be discovered,
and monitor installation there.
where all configuration and firmware-
You should see ‘ZMorph HID’ and ‘ZMorph
related files are stored. The disk can
MSD’ appear during the process.
also store g-codes for printing.
11
GET STARTED / PRINTER CONNECTION
GET STARTED / PRINTER CONNECTION
LAN CONNECTIVITY
You can also connect to the machine using Telnet protocol or HTTP.
To use it, follow these steps:
!
4
1
Important: please copy
all contents of the SD card drive as soon
as you can (backup).
Connect the machine
to a router in your network using the
cable provided. If your network has
DHCP active (most networks do),
ZMorph will get it’s IP address and
display it on front panel.
5
After that, you can connect
to the machine using Voxelizer,
which can be downloaded from:
http://voxelizer.com/
2
Type this address to
Voxelizer. Click ‘Connect’.
Voila !
6
In Voxelizer, select connection
method as HID.
3
Machine number should be discovered
and displayed, after selecting it,
click ‘Connect’.
If your network doesn’t use DHCP
(unlikely), or you want it to have static IP
address, edit config file on SD card, and
change network settings (at the end).
12
13
GET STARTED / PRINTER CONNECTION
GET STARTED / PRINTER CONNECTION
If you want, you can drive the ZMorph using any Telnet client, or even (!) a
web browser. To do so, just type machine’s IP as: http://192.168.1.5 (example). This allows you to drive it also via mobile devices.
To make sure that HID connection works, it’s best to open the Device Manager in Windows and
check that no other drivers ‘occupies’ the device. This only happens if you previously used 3d
printers on your computer. If you see names similar to:
- Smoothie Virtual Serial Port
- Smoothie DFU
If you want to drive ZMorph from outside of your network (for example when
traveling / returning home etc), you have to configure port forwarding in your router.
4
If you have problems with the connection, then unplug/plug USB cable.
?
Simply right click on them, and choose ‘uninstall’. Make sure that driver files get
removed (tick an option). Then, unplug the USB-cable and plug it again. You should see
‘ZMorph HID’ appear.
5
Or press RESET on the printer,
wait and repeat all steps above.
14
15
GET STARTED / CALIBRATION
TESTING THE AXIS
!
1
Important : Before you
start testing the axis, make sure that
endstop for Z axis is in correct position
(approximately). It might have moved
during transport. It must be positioned
in a way, that allows contact
with the tactile switch, when in lowest
possible position.
2
If there is something wrong with
the homing procedure (if the endstops
are too low, or rotated/moved because
of transport) press RESET immediately
or disconnect the machine. Otherwise
the toolhead might go too low and collide with the print surface.
3
After checking the endstops
and making sure that nothing blocks
the axis mechanisms (belts, pulleys etc)
click the button marked with X in Voxe-
ZMORPH 3D PRINTER
lizer Or alternatively, use panel:
CALIBRATION
The toolhead carriage should go
OK >> Custom >> Home X Axis
left and stop.
17
GET STARTED / CALIBRATION
?
GET STARTED / CALIBRATION
If there is anything unusual during this step, reset the machine and try again.
6
After successful testing of X, Y
and Z endstops, you can click A button
4
(ALL) or select:
Similarly, to home Y axis, click Y
button in Voxelizer, or use panel:
Prepare >> Home All Axis
on the panel.
Custom >> Home Y
5
To home the Z axis, click the Z button (or use the panel) and watch the entire
horizontal axis go down. To make sure that tactile switch works, press it with finger
few times - the motors should now stop.
!
18
If it doesn’t happen, contact ZMorph support team at:
[email protected]
19
GET STARTED / CALIBRATION
GET STARTED / CALIBRATION
WORKING TABLE (BED CALIBRATION)
!
3
The machine always comes as calibrated.
No calibration is usually necessary to start printing.
If the nozzle touches the glass,
and pushes it down too much, it means
that it’s too low. In such case, you have
If your machine got miscalibrated in transport, follow the instructions below.
to move the Z endstop up. It is a piece
In order to work with 3d printing, it is essential to properly calibrate the print surface.
under the tactile switch and X motor.
of plastic positioned on left smooth rod,
Simply turn it anti-clockwise (looking
from the top) and it will move up a
little.
1
To calibrate the print surface,
you should position the nozzle in the
middle of print bed, and home
the Z axis. Before homing, make sure
Regulating the endstop might have to be repeated a few times, until the nozzle
barely touches the bed. It is commonly accepted, that distance between
the nozzle and the bed should be slightly less that thickness of a sheet of paper.
!
the nozzle tip and glass bed itself
is clean.
Calibration should be run with a hot machine - as elements change dimensions
with temperature.
4
2
When homing the Z axis, watch
the nozzle carefully - it should come
down to glass surface level, rise up a
To heat everything up
choose on the ZMorph panel:
Custom >> Preheat ABS
Or click ‘heater’ in Voxelizer. White LEDs
little, and go down slowly again.
on the toolhead should light up, marking
20
21
that the heating process is started.
GET STARTED / CALIBRATION
GET STARTED / CALIBRATION
B
Changing the height of the working table
(not recommended unless you know what you’re doing)
5
After setting the right temperature, you should move the nozzle to
the working areas 4 corners (black square) and make sure that the clearance is
made by turning screws in the glass plate with a Philips nr. 2 screwdriver. A half rotation of the screw results in about 0.35mm difference. If you have a difference between
left, and right half of the table you should first check the table corner heights by using a
ruler (right side picture).
the same (as a paper sheets thickness).
If it’s not, regulation can be run in two ways:
A
Re-balancing the X-axis
made by adjusting vertical threaded rods on the side of the machine.
Turning only one of them, you can change the height of the nozzle at one of the ends
of the axis. Together with Z-endstop calibration, you can level entire X-axis.
This regulates the difference between the left and right half of the table.
Generally, these changes are not required by the first use, as the machine comes
calibrated - slight differences might occur due to transport or unpacking.
If you are experiencing any problems with balancing the table or X axis of the machine, consider purchasing the clip-on add-on for the ZMorph called Touch Probe.
It will make calibration much easier and is available in our shop.
22
23
GET STARTED / CALIBRATION
GET STARTED / CALIBRATION
EXTRUDER TEST
4
If you have no filament loaded, you should feed it in, as shown in the video:
Before you start printing, the extruder needs to be tested.
1
https://www.youtube.com/watch?v=zZigNKNwppI
To do that, move the nozzle up
by 20mm. In the panel you should go to:
OK >> Jog >> Move 10mm >> Z axis
(press two times for 20mm).
2
And heat it to 250°C - if using
ABS, or 210 - if using PLA.
3
After temperature stabilises,
press extrude (E button in Voxelizer)
few times.
In panel you should go to:
Prepare >> Extrude >> Extrude
24
25
GET STARTED / CALIBRATION
GET STARTED / FIRST PRINT
PLASTIC STUCK
5
!
The speed and length of test
extrusions is defined underneath the
E and R buttons in Voxelizer.
E and R refer to Extrude and Reverse.
Extrude pushes filament out of the
nozzle, Reverse moves it back.
Important: The extruder comes calibrated, and is always tested before the ma-
chine is shipped. If you don’t get proper extrusion, play with temperatures first
- this is usually the primary cause of uneven flow.
If the plastic doesn’t move, despite motor movement, you need to check the following:
Both values (amount and speed) relate
1
to both buttons.
Temperature of the nozzle.
Must be hot - 250°C for ABS or 200-210°C for PLA.
2
Filament pusher (toothed brass pulley).
It should be rotating together with the motor shaft. If motor shaft rotates, but
the pulley stays static, tighten 3 small screws in pulley’s body. You can do that
6
using small hex key (provided in the toolset).
When performing test extrusion,
grab the filament with your fingers
3
(carefully) and make sure it moves
Check the pressure of the bearing that touches the filament.
If it’s not strong enough, filament will be slipping, and the pulley will carve it,
together with the wheel. Do not place
causing a jam. If it’s too tight, filament will change dimensions (might become
your fingers next to moving parts,
ellipsoidal due to high pressure) and might have problem with entering
especially pulleys.
extrusion head.
To regulate the pressure of the bearing, loosen or tighten two upper screws
in the filament drive. If there are any problems with the filament flow,
· remove it completely (use Reverse button)
· cut 10-20cm
· feed it back again (Extrude button).
Rule of thumb is, to tighten it until you can’t turn the bearing with your finger.
If you can (and it slides on the filament), it’s too loose.
26
27
GET STARTED / FIRST PRINT
GET STARTED / FIRST PRINT
YOUR FIRST PRINT
To test the printer, you should:
1
3
Apply a sticky substance to the heated bed ( „ABS juice” in case of
ABS plastic, or paper glue in case of PLA. You can also use Kapton tape or pure glass),
as shown in the video:
Heat the nozzle to:
· 250°C - if using ABS
· or 210 - if using PLA.
https://vimeo.com/80748630
4
Heat the bed to:
· 100°C for ABS
· 60 for PLA.
2
Home all axis (first X, then Y and Z).
5
28
29
Extrude some filament.
GET STARTED / FIRST PRINT
6
In Panel menu choose:
OK >> PLAY >> SD >> TEST
and select one of test files (for example testriangle.g) and press OK
!
Important: It is essential to pay attention how the first print layer sticks
to the bed. If the nozzle is positioned too high, the print won’t have any good contact
and heat up well. This will result in curling the edges and deformations during higher
layers. If nozzle height is not even for entire table area, check the calibration.
If the nozzle is too low (touches the glass during first layer)
- filament will jam due to nozzle blockage. If this happens:
7
Re-position the Z-endstop, and home Z axis
(check the clearance with sheet of paper).
8
9
Retract the filament entirely out of the extruder.
Cut 10-20mm off, and load it back again.
After printing the triangle you can see how well it sticks to the table
- this will give good information about table flatness and calibration.
If the print does not stick well:
Make sure that table is fully covered with ABS juice or glue
Make sure it’s hot
Slow down the print
You can do it by pressing DOWN button during printing
(100% means normal speed, anything less is proportionally slower)
VOXELIZER SOFTWARE
GCODES
30
SOFTWARE / BASICS
SOFTWARE / BASICS
GENERATING GCODES
PREPARING GCODES
To turn a 3D model into something that can be easily printed, the models geometry needs to
be saved into STL file format. Most CAD programs supports STL export. You can also download
print ready projects as STL files from the internet:
(for example www.thingiverse.com or other online repositories).
The print preparation process can be
illustrated with the diagram below:
1
Next, check the geometry. To correctly print a STL-file it has to be:
Creation of a 3D GEOMETRY
and saving as STL-format model.
WATERTIGHT - meaning that there are no holes, and object
reports it’s volume properly
CORRECT DIMENSIONS - fitting the printbed
ONE SHELL PER OBJECT - No intersecting shells/meshes!
You can check the geometry using the NetFabb software, available at
http://www.netfabb.com/download.php (free).
Many meshes get slightly corrupted during STL-export: triangles might intersect, have open edges etc. NetFabb helps to spot these problems and repairs them
automatically, so it is recommended to check every file before printing.
2
2
VOXELIZATION - conversion from
mesh based STL-model to volumetricpixel data.
If you can’t fix the problem with NetFabb, you have to remodel the object in your
3
native CAD software.
Generating horizontal slices
of the object, and plastic extrusion
General recommendations:
Objects have to be WATERTIGHT and CLOSED - they have to have volume
paths as G-CODES, instructions for
machine to move in space and deposit
plastic.
Should NOT INTERSECT – if there are multiple objects, they must be added
(using boolean operations ) so there is only one object at the end
4
Inclination of external walls should NOT EXCEED 45-50°C
If inclination exceeds this angle, support material should be used
32
Printing stage. Re-creating the
object by extruding horizontal slices.
33
SOFTWARE / BASICS
SOFTWARE / VOXELIZER
SETTING GCODES
G-CODES IN VOXELIZER SOFTWARE
Recommendations for G-code generation for ZMorph personal fabricator:
To start working you should first load your model, which you will prepare for print.
Voxelizer is able to import files in STL-format, which is the most used 3D model
format. You can download plenty of STL-files on the internet, or you can use CADsoftware of your preference, most CAD-programs support STL-file export.
Print speed: 50-60mm/s (normal quality)
Layer height when using 0.4mm nozzle: 0.25mm
First layer height when using 0.4mm nozzle: 0.3mm
Nozzle temperature for ABS: 240-260°C
your STL-file is correct: it should not
Nozzle temperature for PLA: 200-210°C
contain multiple intersecting meshes,
Bed temperature for ABS: 100-110°C
or incomplete/broken shells.
Bed temperature for PLA: 60-70°C
Infill ratio: 0.4, infill type: 40%
Infill ratio for large objects:
0.1, infill type: honeycomb
Infill ratio for strong solid objects: 0.6, infill type: rectilinear
!
1
Always make sure that
To make sure your meshes are correct,
use STL fixing software,
like Netfabb (free).
2
Load the file from menu
on the top of Voxelizer or simply
drag and drop file to the window.
You can import more than one object.
3
The mouse will allow you to navigate over the 3D scene.
To rotate your view press left mouse key in empty area and drag.
To move view use right mouse button.
To zoom your scene use mouse scroll.
34
35
SOFTWARE / VOXELIZER
4
When you have imported your
STL model you have access to tools like
scale and rotation.
To make these modifications
click on the object you would like to
SOFTWARE / VOXELIZER
WORKING WITH VOXELS
The Voxelizer software allows you to work with an innovative technique: VOXELIZATION.
Nowadays most programs use 3D objects represented as surfaces forming closed
volume. Voxelizer interprets models as voxels - similarly to atoms, representing it as
finite number of blocks in space. This method offers many new possibilities and its closer to reality. After voxels creation software automaticaly switches to voxel view.
manipulate and use sliders in mesh
transformations window.
You can also move your objects
through the printing area which is re-
1
For an easy start, you can use PRESETS for various extruder configurations.
Most common ones are 1.75mm extruder, and 3.0mm extruder. Simply select one that
suits your hardware setup, and click 'generate gcode' button. If you want to tinker with
the settings, read further points below.
presented by a light grey color. To move
the object left click the object and drag
it to a new place.
If you would like to create a new
scene just press clear scene button.
If you want to position objects
automatically use 'auto align' button.
5
When finished adjusting objects
?
press VOXELIZE.
•
•
•
•
36
Below you can find most important settings you should pay attention to:
LAYER HEIGHT - setting lower layer height will give better quality but print will take more time
INFILL RATIO - density of internal infill - standard as 0.5 (50%)
PERIMETER COUNT - number of perimeters for external shell of the object
FILAMENT DIAMETER - usually 3.0 or 1.75
37
SOFTWARE / VOXELIZER
SOFTWARE / VOXELIZER
3D printer creates objects by placing layers starting from bottom to top of the
model. For this reason every overhanging model part needs support material.
GCODE AND PRINTING
In last step you’ve created your first gcode file.
Now you only have to plug in your printer and start print.
2
In support settings you will find
settins connected with support parts.
You can resign from support unchecking „generate support” field.
There are many ways to connect printer to your personal computer.
Basic method: you will propably use is USB connection.
If you are user of ZMorph printer and you have newest firmware.
(If unsure - check: http://zmorph3d.com/firmware/)
you only need to plug the machine to your PC - no drivers are required.
In field „support angle” you can set
1
minimum angle of surface which needs
support. You can see preview
Plug in your printer and connect using HID mode - simply choose this method,
and click „Connect”.
in 3d model view.
To generate commands for printer it’s important to set appropriate head speeds. If you don’t know what to set you should use standard values.
You can now be a bit overwhelmed by number of possibilities and settings but don’t
worry, it only looks complicated. Try printing first few objects using standard values, once
you get more experience, you can start tweaking them and experimenting on your own.
3
Great!
You’ve prepared your first print.
Now click GENERATE GCODE button.
2
If using LAN or WIFI connection
choose 'Telnet' and type IP address
that is displayed on LCD panel of the
machine (example : 192.168.1.10 )
38
39
SOFTWARE / VOXELIZER
SOFTWARE / VOXELIZER
Before starting print it is important to prepare printer.
There are four most important parameters, you shouldn’t forget:
B
Click "SD PRINT" to use algo-
Head homing
rithm which automatically buffers
Heating extruder (250°C for ABS plastic/ 200-210°C for PLA)
file on SD card and starts print with
Heating bed (100°C for ABS plastic/ 60°C for PLA)
preview (you can unplug the printer
Beds sticky surface (can be covered with ABS juice, special glue, kapton or paper
afterwards).
masking tape, or other perforated/special surfaces)
Then use one of three printing methods:
A
!
Click "PRINT" to begin your print. Instructions will be sent to printer during
printing so you shouldn't unplug your printer from computer.
C
Note : This option is only available when connecting via HID mode
Copy file by yourself onto internal SD disk drive and use panel to start print
(you can unplug the cable). Don’t use spaces in names (!)
40
41
MAINTENANCE AND FUNCTION / TOOLHEADS
EXTRUDERS FEATURES
A classic extruder for mono material prints.
Made of aluminium and stainless steel.
• VERY PRECISE SINCE IT EXTRUDES THINNER
FILAMENT THUS HAVING MORE CONTROL
• ABLE TO EXTRUDE ABS, PLA, NYLON AND OTHER MATERIALS
• A BRASS FILAMENT DRIVE (TOOTHED PULLEY) ENSURES THAT FILAMENT IS GRIPPED SECURELY AND DOES NOT SLIP
PLASTIC EXTRUDER
for 1,75mm filament
Same type of classic extruder
as the one above.
• 3MM EXTRUDERS ARE BETTER AT MATERIALS SUCH AS NINJAFLEX, LAYWOOD, LAYCERAMICS, BRONZEFILL AND SIMILAR.
• ABLE TO EXTRUDE ABS, PLA, NYLON AND MORE
• BRASS FILAMENT DRIVE (TOOTHED PULLEY)
3.0 mm in action (time lapse):
http://vimeo.com/99782904
PLASTIC EXTRUDER
for 3.00mm filament
ZMORPH EXTRUDERS
EXTRUDERS AND TOOLHEADS
43
MAINTENANCE AND FUNCTION / TOOLHEADS
MAINTENANCE AND FUNCTION / TOOLHEADS
Plastic extruder for two materials
(1.75mm) application.
Driven by two independent stepper motor
drivers, uses two heated
nozzles and temperature sensors.
Experimental laser toolhead.
Available Q4 2014.
• ALLOWS MULTICOLOR AND MULTIMATERIAL PRINTS
• SUITABLE FOR CREATING ARCHETECTURAL MODELS
• ALLOW DISSOLVING SUPPORT MATERIAL, PVA IN WATER AND ABS • ENGRAVING IN METAL, WOOD OR PLASTIC
IN ACETONE. THIS ALLOWS COMPLEX PRINTING GEOMETRIES
• 1,5 WATT STRENGTH
• THE DUAL EXTRUDER IS FULLY SUPPORTED BY OUR VOXELIZER SOFTWARE, WHICH ENSURES AUTOMATIC PATH GENERATOIN
AND OPTIMISATION.FULLY SUPPORTED BY VOXELIZER SOFTWARE,
AUTOMATIC PATH GENERATION AND OPTIMISATION
IN THIN PLYWOOD OR CARDBOARD
DUAL HEAD EXTRUDER
LASER TOOLHEAD
for two materials 1,75mm
(experimental)
•
Dual head in action:
http://vimeo.com/99771398
The dremel toolhead allows easy milling
and engraving in soft
and medium-density materials.
It can serve as small CNC machine, cutting through thin sheets of
wood, plastic and cardboard.
Alternatively it can do 3d milling of
reliefs (see relief feature in Voxelizer).
44
45
DREMEL TOOLHEAD
MAINTENANCE AND FUNCTION / TOOLHEADS
MAINTENANCE AND FUNCTION / TOOLHEADS
Experimental toolhead created for printing with ceramics. Equipped with planetary gears and a powerful motor, uses
large pushing power to drive the piston.
Experimental chocolate and cake extruder.
Can extrude semi-liquid masses.
Used for decorative purposes
and experimental builds. Utilizes Moineau
pump, also known as a 'progressive cavity
pump', driven by a powerful motor
with planetary gears.
Can extrude thick mass that solidifies
quickly afterwards. Nozzle size
is approximately 1.5mm.
Designed for large scale elements.
CERAMICS EXTRUDER
Watch the Ceramics extruder in action
(time lapse):
Does not use a piston and can
be refilled during operation.
(experimental)
CHOCO EXTRUDER
(experimental)
Watch Choco extruder in action:
https://www.youtube.com/watch?v=jkeuwwjRSwc&list=UUyyeCKyWMN-zZsrSrbNaHDA
https://www.youtube.com/watch?v=ivKElpB5k-8
46
47
MAINTENANCE AND FUNCTION / TOOLHEADS
MAINTENANCE AND FUNCTION / TOOLHEADS
Connect your camera to Voxelizer
and create amazing time lapses
of your 3D-prints.
An experimental toolhead,
designed to host a variety
of add-ons. Can work as 5d milling
machine, or 5D extruder. Allows the use
of custom-designed add-ons (tips).
THE SET INCLUDES:
• MINI-FIT PLUG FOR CONNECTING THE CABLES
TO THE MACHINE (USING RIGHT EXTRUDER SOCKET)
• MODULE WITH MINI-JACK PLUG AND 24V CONTACT SWITCH,
THAT WILL INFORM CAMERA ABOUT SHUTTER RELEASE
• THE SET DOES NOT INCLUDE SLIDING RAIL
5 AXIS MILLING TOOLHEAD
WITH CAMERA (ON THE PICTURE ABOVE)
• YOU CAN ALSO ADD THE 'M150'-COMMAND TO YOUR
PHOTO CAMERA TRIGGER
G-CODE TO ACTIVATE THE CAMERA FUNCTION
Watch video below:
https://www.youtube.com/watch?v=tSFiK9q_Ers&list=UUyyeCKyWMN-zZsrSrbNaHDA
An addition to the camera trigger
that allows even more professional
use of the photo camera trigger.
Voxalizer generates G-Code to slide
the camera during your 3D print.
This is a separate add-on from
the camera trigger itself.
TIME LAPSE RAIL
This tool checks the calibration of the working table.dfv
All our machines comes calibrated to 0.1mm, this is an option if you
want even greater precision.
TOUCH PROBE
48
49
MAINTENANCE AND FUNCTION / TOOLHEADS
CLEANING THE NOZZLE
There are situations when your extruder nozzle will get blocked.
This happens either when a foreign object enters your nozzle or if you
have the wrong temperature settings for your filament.
A
If a foreign object enters the nozzle with the filament a blockage may occur.
You can try to unblock it by inserting and removing a 0.4mm drill to the nozzle (0.3mm
drill for the 0.3mm nozzle) when heated and trying extrusion. Usually when repeating
this several times, nozzle can be cleaned.
2
If this does not help, You need to
unscrew the nozzle (be careful not to
damage the thermistor and aluminium
heating block) and clean it from inside.
In case of PLA, just heat it up with hot
air or flame (be careful), and insert a
ZMORPH 3D PRINTER
drill bit (2mm) to remove the plastic.
SERVICING
51
MAINTENANCE AND FUNCTION / TOOLHEADS
3
If you experience a blockage while using ABS, just place the nozzle in acetone
for one night, then clean it carefully.
4
5
MAINTENANCE AND FUNCTION / TOOLHEADS
NOZZLE REMOVAL
The nozzle of the extruder has to be removed in two cases:
Check if you can see through the nozzle. If not - repeat the above steps.
A
Re-insert the nozzle back to the heating block
If it needs to be cleaned
B
(when it is blocked).
(it’s easier to screw it in when it's heated).
When you want to change it
to different size.
In both cases, the procedure is the same.
B
1
Wrong material/temperature:
If you have PLA filament in the extruder but ABS temperature (250°C) turned on
2
for more than 10 minutes the PLA will get burnt and stuck.
Start with heating the nozzle to about 200°C.
Switch off the machine (disconnect host software, USB cable
and swich off the power).
3
1
If this happens you will have to
unmount the nozzle from the extruder.
When removing the nozzle be careful
and turn gently. If heating block turns at the same time, you need to secure it with
another key or pliers - but be very careful not to damage the thermistor. High temperature allows less friction while turning, which helps.
that you do not damage the thermistor
that registers temperature.
2
Clean the flow chamber with a
4
Sometimes your filament will transport dirt or dust into the feeder. In this case you might experience that the filament is extruded but can not be retracted. You can try cleaning the area
with a sturdy brush or blow the dust away. If this does not help please contact your reseller.
diameter or you might damage the
nozzle.
Use the drill with your hands and
never with a machine, or you risk damaging the nozzle.
52
If the nozzle is blocked, follow the instructions described
in previous section.
drill. Be gentle and do not use a larger
!
With the nozzle still hot, grab the nozzle with an appropriate key (10mm size)
53
MAINTENANCE AND FUNCTION / TOOLHEADS
MAINTENANCE AND FUNCTION / TOOLHEADS
LUBRICATION
EXCHANGING THE TOOLHEADS
It is not recommended to use oil to lubricate smooth rods - sliding bearings
don’t require anything to run. Only if you’re experiencing high friction, it is acceptable - but needs to be cleaned from time to time, due to high temperatures inside.
ZMorph is a multifunctional tool, and can host equipment such as
However - It might be helpful to lubricate Z axis trapezoidal screws.
•
•
•
•
MILLING TOOL (DREMEL)
CHOCOLATE EXTRUDER
CAKE EXTRUDER
CERAMICS EXTRUDER
!
If you experience high friction on Y axis (linear rails for heated bed),
they should be cleaned with water and soap.
EXCHANGE AND REPLACEMENT OF EXTRUDER
EXTRUDERS
DREMELS
OTHER EXPERIMENTAL MODULES
(LIKE LASERS)
1
Exchange is done by unscrewing one mounting screw in front, and unplugging
mounting cable.
TURN OFF the power using the switch at the back of the machine.
1
RELEASE CURRENT TOOLHEAD
Unscrew the nut with the provided hex
key.
The USB cable might remain plugged
(display will be active), but motors and
heaters will be shut down, so electronics stays safe.
2
REMOVE THE TOOLHEAD
Gently remove the toolhead and lift.
!
54
• LASER MODULE
• DUAL-HEAD EXTRUDER (MULTI-MATERIAL)
• 5 AXIS MILLING TOOLHEAD
Important: Before disconnecting the toolhead plug, make sure to
ZMorph allows exchange of different toolheads and accessories:
•
•
•
:
plugs on left and right for connecting different extruders
Important:To unplug the extruder/toolhead ALWAYS switch off the power.
If you do not - you’re risking damaging your electronics.
55
MAINTENANCE AND FUNCTION / TOOLHEADS
3
CHOOSE A NEW TOOLHEAD
And put it in place.
MAINTENANCE AND FUNCTION / TOOLHEADS
If you exchange extruder to another device that measures temperature
(is equipped with thermistor), make sure to verify BETA values of this thermistor.
They are specified on the device, or in it's documentation. If unsure - ask us.
If beta is different, you have to change it in config file, and restart the machine. Otherwise - the readout might vary and create unwanted effects, such as overheating the plastic.
To change extruder temperature settings:
1
2
Open config file with notepad.
Change:
temperature_control.hotend.beta
XXX
(Where XXX is the value)
4
SECURE THE TOOLHEAD
To change extruder callibration:
1
By screwing the nut with provided hex
key.
2
!
Open config file with notepad.
Change:
If You are using regular extruder insert the plug to left socket.
(Where YYY is the value)
If you’re using dual extruder, or 5-axis toolhead, insert plugs in left and right sockets.
EXAMPLES:
Turn the power on after making sure that plugs are positioned correctly.
In case of plastic extruders, also connect small 4-pin plugs powering lights
extruder.hotend.steps_per_mm
and cooling fan.
steps_per_mm
For 175 extruder
steps_per_mm
For 3.00 extruder
56
100
57
400
YYY
MAINTENANCE AND FUNCTION / TOOLHEADS
MAINTENANCE AND FUNCTION / TOOLHEADS
MAKING PLASTIC STICK TO PRINTBED
Heating the bed has been used for a long time and is well known. In case of
ZMorph personal fabricator, bed works also as a HEATER for the CHAMBER.
Heating the bed to 100°C and keeping the chamber closed increases
internal air temperature to about 50°C, which has positive effect to ABS
plastic. Protective atmosphere prevents cracks between layers, curling up the edges, saves energy and keeps the smells inside.
To keep the print hold firmly to the table while printing, we can use measure described below:
A
Heating the bed table - especially important for ABS plastic. Usual temperature
is 100-120°C. With higher temperatures plastic sticks better, and deforms less during
!
printing (especially for large objects).
B Applying layer of dissolved ABS plastic (ABS juice). Watch the video:
https://vimeo.com/80748630
Important: It is essential to pay attention to how first print layer sticks to the
bed. If the nozzle is too high, the print won’t have good contact and won’t heat up well.
This will result in curling the edges and deformations during higher layers. If nozzle
height is not even for entire table area, check the calibration.
If the nozzle is too low (touches the glass during first layer)
- filament will jam due to nozzle blockage. If this happens:
1
Re-adjust Z-endstop, and home Z axis
(check the clearance with sheet of paper).
2
3
C
Applying layer of Kapton tape on the bed (must be used without any other
substances - just the tape). Works with ABS.
D
Applying layer of paper masking tape, and wiping it with alcohol.
Works very well for PLA.
E
Applying layer of paper glue (Pritt Stick for example). When dried, holds the print
nicely, and allows easy removal afterwards. Should be used with heated bed (60°C)
and cooled down for removing.
58
59
Remove the plastic entirely.
Cut 10-20cm off, and load it back again.
MAINTENANCE AND FUNCTION / TOOLHEADS
4
You can print with PLA just on pure glass (cleaned with acetone),
MAINTENANCE AND FUNCTION / CNC MILLING
THE CNC MILLING FEATURE (AND DXF FILE IMPORT IN VOXELIZER SOFTWARE)
more information here:
https://vimeo.com/17064268
1
Before you start we recommend to
download newest release from our website: http://voxelizer.com/download/
!
Important: Voxelizer imports only lines and polylines composed of lines on
"geometry" layer. All other objects, and objects on other layers will be ignored. Moreover, drawing which you want to use have to be inside printer working area. To make the
preparation of DXF file easy we have made template wherein we marked printer bed,
where you should place your objects.
FILE FORMAT: LOADING DXF
1
To import DXF file choose "Open DXF File" option from "File" menu [1] on the top
of Voxelizer window.
You can view your drawing on grey area which represents printer working area [2]
1
2
It is recommended to use this example first. It contains sample geometry,
and indication of work area - as well as simple instructions.
60
61
MAINTENANCE AND FUNCTION / CNC MILLING
MAINTENANCE AND FUNCTION / CNC MILLING
SETTINGS WORKING PARAMETERS
After loading DXF file "milling tool" window will apear. You can also open it from
Normally printer is calibrated to use plastic extruder.
If you want to use other device you should keep in mind that its end probably will be
at different height creating the possibility of collision with bed.
1
"Toolbars" menu. There you will set machine working parameters:
PREPARING THE DREMEL TOOL
!
1
Be careful!
To install device move head to central area of machine, and increase it’s height to provide enough space. Mount the device to the head and place material on bed.
2
Then lower the tool carefully using buttons in "printer head set" window. Button
"-1" decrease head height by 1 milimeter, button "-.1" by 0.1 milimeter.
Buttons "+1" and "+.1" increase head hight.
3
When head will touches the material read it's Z position and set it (or slightly lo-
wer value. If you want to perform deeper milling) in "milling tool" window in "set work
base Z" text field.
Set travel Z
This value is used when printer moves head to new place without doing any job.
It should be enough high to avoid printer and material collision.
Set work base Z
This is the height on which printer head will work.
Set work speed
Speed for work (milling) moves, should be significantly slower.
You can also use two buttons on the bottom of window: "go to travel Z"
and "go to work Z" which immediately move head.
62
63
UPGRADES / SOFTWARE UPGRADES
SOFTWARE UPGRADES
ZMorph uses SunBeam electronics. It is inspired by Smoothie electronics
(it’s compatible) and works on open-source firmware Smoothieware.
To find out more about its capabilities check http://smoothieware.org
!
1
2
Make sure you backup all the files (especially config and firmware.cur).
To upgrade firmware to newest version, get firmware.bin from Download
section at www.zmorph3d.com and copy it to internal SD card.
3
Then restart the machine (reset) and wait 30-40 seconds (don’t switch off the
power!). After this machine will reboot with new firmware.
!
Important: Don’t remove SD card from the slot - it is designed to be permanent
part of electronics. After removing, machine won’t work.
ZMORPH 3D PRINTER
QUESTIONS AND ANSWERS
64
MAINTENANCE AND FUNCTION / TROUBLESHOOTING AND ADJUSTMENTS
TROUBLESHOOTING
Symptom: no connection with the machine.
Reason: dropped USB connection due to electromagnetic noise
MAINTENANCE AND FUNCTION / TROUBLESHOOTING AND ADJUSTMENTS
Symptom: uneven layer height, cracks between layers.
Reason: uneven layer height, cracks between layers.
Solution: make sure that spool rotates freely.
Solution: insert/remove USB cable. Voxelizer should reconnect automatically.
If it doesn’t , run the program again and repeat the steps.
Symptom: layers are shifted, machine loses position from time to time.
If this doesn’t help, reset the machine.
Reason: friction on one or two axis is too strong, or speeds are too high.
Solution: find cause of high friction.
Symptom: plastic doesn’t flow,
even though extruder pulley is rotating normally.
Reason: blocked nozzle, temperature too low, nozzle blocked by glass table
(pushed against it), or extrusion speed too high.
Solution: removing the filament, cutting 10-20cm off, feeding it back in.
Fixing one of the reasons stated above (cleaning the nozzle,
increasing the temperature, lowering extrusion speed
or increasing the gap between glass and nozzle).
Symptom: print is brittle, layers don’t stick together.
Plastic doesn’t flow evenly.
Reason: partially blocked nozzle or temperature too low.
Solution: cleaning the nozzle or increasing the temperature.
Usually smooth rails are covered in sticky substances that prevent it from moving
freely. Clean them with soap and water,
Slow down travel speed, lower accelerations,
increase motor power to 1.6 or 1.7 in config file.
Symptom: layers are shifted, machine loses position from time to time,
blobs of plastic occur during print.
Reason: extruder toothed pulley might be too loose,
Solution: tighten M2 screws in brass pulley (filament drive).
Increase Z lift value (to 0.3 - 0.5 mm),
nozzle then gets lifted every time it travels,
so it doesn’t collide with blobs of plastic.
Symptom: plastic blocks in extruder from time to time.
Reason: uneven diameter of the filament (above 3.1mm).
To verify, measure filament in several places.
Solution: changing the material to one from different source.
66
retractions don’t work properly.
67
MAINTENANCE AND FUNCTION / TROUBLESHOOTING AND ADJUSTMENTS
MAINTENANCE AND FUNCTION / TROUBLESHOOTING AND ADJUSTMENTS
?
FAQ
?
What is ZMorph?
to use. It marks its uniqueness innovative interchangeable toolheads.
?
Is a license of Voxelizer software limited in time ?
What is 3D printing?
?
What material can I use to print?
fabricator is designed to be user friendly, easy to setup and straightforward
?
3D printing is a process for producing three-dimensional, digitally designed
objects. Printing is done by applying successive layers in a predetermined shape.
such as architecture, fashion, design. The possibilities are endless.
?
?
?
What are the G-codes ?
basis of the trajectory of the head. You can use Voxelizer or other popular pro
Drivers and Voxelizer software
On our website you can find: blue, green , red, black and yellow filament.
Which operating systems do you support ?
?
Extruders and additional tools
ZMorph comes with special dedicated software package called Voxelizer.
Windows Vista, Windows 7, Windows 8 , and Linux and OSX soon.
We offer extruders for plastics, for cakes and chocolate and extruders
for ceramics. Other Tools: Dremel holder, laser module (experimental)
It's revolutionary way of handling STL geometry lies in the core of our new
and 5-axis milling. New toolheads are being added monthly.
aproach - where entire model is treated as volumetric whole, instead of just
boundary representation. It is represented by voxels (like atoms in the universe).
Software supports .stl and .dxf files.
68
What colors of filament are available in ZMoprh’s?
?
grams: Slic3r, Kisslicer, Cura.
?
It's consumable for 3D printers ( in technology ABS, PLA , PVA )
http://shop.zmorph3d.com/index.php/pl/kategorietop/filament
G-code - sequences of heads movements in a 3D printer , saved to a plain text
(Slicer) . Slicer is a very useful tool for carving 3D models and generating on the
What is a filament ?
- like traditional ink for printers.
Run Voxelizer Software on your computer, it allows you to generate a G-code
file. To generate such a file , you need to convert a STL file by the program
ABS, PLA, PVA, Nylon, rubber, laywood,
cake, chocolate and metal engravering.
How to start 3D printing?
version of the object, which is used by our printer.
There is no limit on the use of software Voxelizer. The update is also free.
brickwood, Stick Filament, ceramics,
3D printing can be used both at home and in various industries
?
You can download Voxelizer Software from the download link located
on our website http://voxelizer.com/
Zmorph is a device designed to materialize physical objects using digital
fabrition techniques, such as 3D printing or CNC milling. ZMorph 3D personal
Where can I download Voxelizer?
69
MAINTENANCE AND FUNCTION / TROUBLESHOOTING AND ADJUSTMENTS
MAINTENANCE AND FUNCTION / TROUBLESHOOTING AND ADJUSTMENTS
?
Can I print a few models on one platform and print them together?
will be exchanged and shipped back as soon as possible.
Yes. You can multiple one object or put a few different objects for one print.
Warranty covers 1 year from date of delivery and can be extended.
?
What is the SLA ?
?
warranty period, user can send faulty module to ZMorph headquaters, where it
It is the oldest method of incrementally building models.
?
Selective laser sintering used in the field of 3D printing. The accuracy of the pro
?
Find the cause of increased friction.
Turn off the machine and gently move the axes X and Y.
It might be necessary to clean the smooth rods or X axis or Y-axis rails.
Up to 4 weeks from the date of receipt of money on account.
You can also slowdown the speed (in the settings of the gcodes Advance payment of 100 % of the purchase price.
generator) or change acceleration values in the configuration file.
What is the approximate price of 3D printing ?
The prices depend on element you want to print,
Warranty
Warranty covers following components :
∙
standard plastic extruder module with heated nozzle, stepper motor
∙
heated bed module, with kapton heater, temperature sensor,
plug and cables.
∙
?
What is in a jar?
100 ml solution of ABS dissolved in acetone.
Often calles 'ABS juice' makes prints stick to the table.
?
?
I would like to be a reseller of ZMorph, is it possible?
Of course , please contact sales at: [email protected]
What determines the quality of the prints ?
Method for generating gcodes ( height of the layer , the amount of plastic)
electronics module, with onboard - SD card, connectors and fuses
for heaters and motor inputs.
and nozzle size . You can also replace the nozzle print on different size,
∙
which significantly improves the quality, but increases the time of printing.
mechanical parts of X, Y and Z axis, as well as stepper motors.
In case of technical fault caused by material wear or improper assembly, if still in
70
Increased friction, what should I do?
Delivery time
with planetary gears, temperature sensor and cartridge heater.
PLA - 100mm/s
What is the SLS ?
precision and amount of plastic used
?
ABS - 75mm/s
Higher speed can have a negative effect on print quality.
totype is 0.1 mm or less. Both SLA and SLS are much more expensive than FDM.
?
?
What is the MAX print speed?
?
71
Is there a daily / monthly / annual limit of prints?
No there isn't .
MAINTENANCE AND FUNCTION / TROUBLESHOOTING AND ADJUSTMENTS
?
What is a recommended temperature of print?
Recommended temperature (heads):
245-255°C (ABS)
200-210°C (PLA)
Recommended temperature (table):
100-120°C (ABS)
?
?
You have to provide a 3D model to Voxelizer, which is then converted to gcode.
Do I need a special training if I want to use ZMorph personal fabricator?
ZMorph was designed to be as easy and intuitive as possible.
135°C (NYLON)
watch video tutorials, and try for yourself. If you have further questions,
drop us a line, or visit us for free training, we're happy to help.
What elements are most often broken?
Depending on quality of the plastic, users might experience nozzle clogging
What are the differences between the old and the new version (2.0) ?
?
Can Voxelizer download files from AutoCAD?
?
Which program allows me control the density of the grid
Lighter construction, larger working area (expandable to 300x235mm),
lightweight translucent cover and many minor adjustments helping
to manufacture objects more intuitively.
Model - dremel 3000 , collar - 44mm .
Output voltage at extruder.
?
Is the printer assembled and ready to work right away?
?
and fill out the model in the middle?
How many meters is in 1 kg spool ?
1.75mm ~ 400m
3mm ~ 300m
?
24V
We are sending assembled printer. You start your work from installing
Files from AutoCAD can be exported to stl. - Voxelizer can read this format.
Voxelizer , check out: www.voxelizer.com
Dremel type recommended for mounting.
?
Where can I find STL files?
You can obtain the STL files by exporting the model from almost any program
for 3D design . Also, Internet provides a lot of free models in this format.
?
the software, and can run test prints right after that.
72
Do you supported 123D type programs?
However, it requires certain amount of skill. Start with reading the manual,
(table height).
?
?
60 - 70°C (PLA)
in the extruder. After transport, machine might require slight recalibration
?
MAINTENANCE AND FUNCTION / TROUBLESHOOTING AND ADJUSTMENTS
73
Can I extend the warranty?
You can do it at any time for one year from the date of delivery of the machine.
MAINTENANCE AND FUNCTION / TROUBLESHOOTING AND ADJUSTMENTS
MAINTENANCE AND FUNCTION / TROUBLESHOOTING AND ADJUSTMENTS
2
ADVANCED SERVICING AND MACHINE HACKING
ZMorph has many capabilities to extend boundaries of modern digital fabrication.
To truly be a part of this revolution, you can take advantage of software and hardware openness and use your technical skills to improve your ZMorph experience.
Each entry needs three lines:
status (enable=true/false), name (text field), and G-Code command In the last one, multiple commands can be separated by | symbol.
It’s also important to give each entry separate descriptor (this
doesn’t matter to the user, but it matters to the firmware).
CONFIG FILE
For example
SD card delivered with your ZMorph contains small text file named ‘config’
(no extension, just name). You can find more information on it’s meaning here:
http://zmorph3d.com/electronics-config-file/
1
How to access and create custom menu entry
When you press OK button on the panel, and choose ‘Prepare/Custom’ entry, you
true
So if you want to create an entry that will position the toolhead in the middle, add:
It contains information about axis scaling (steps per mm), axis directions, maximum permissible speeds and accelerations, temperature settings, and custom menu entries.
?
custom_menu.myDescriptor1.enable
custom_menu.moveToMiddle.enable
custom_menu.moveToMiddle.name
Center_Toolhead
custom_menu.moveToMiddle.command
true
G1_X117_Y125
will see multiple commands that relate to preparing the printer to work. Most of them
are defined in config, and can (!) be redefined.
Last line uses G-Code command. If you don’t know what G-Codes mean, refer to:
Typical entry looks as follows:
custom_menu.preheatP.enable
true
custom_menu.preheatP.name
Preheat_PLA
custom_menu.preheatP.command
M104_S210|M140_S60
74
http://reprap.org/wiki/G-code
75
MAINTENANCE AND FUNCTION / TROUBLESHOOTING AND ADJUSTMENTS
MAINTENANCE AND FUNCTION / SPECIFICATIONS
DESIGN YOUR OWN TOOLHEADS
SPECIFICATIONS
If you’re experienced enough to create and build your own toolhead,
please read information here:
http://zmorph3d.com/toolheads/
250x2`35x165mm,
working area
expandable to 300x235x165mm
with special table
If you want to design your own toolhead, check specifications of the mount and wiring at:
www.zmorph3d.com
You can download CAD files, technical drawings and working examples.
recommended layer height
0.3mm-0.05mm (ABS)
0.3-0.01mm (PLA)
For your disposal you will have:
60mm/s (ABS @ 0.3)
Two stepper motor drivers, able to drive up to 2A per motor
75mm/s (PLA @ 0.3)
(typically NEMA17, but you can also try bigger motors)
Higher speeds might be used
Two high-power 24V outputs (typically used for heaters)
recommended print speed
Three smaller-power 24V outputs (typically used for fans, lighting etc)
For perimeters, we recommend
Two sensor inputs (typically used for thermistors)
10-20% slower speed
for better quality
recommended temperature
245-255°C (ABS)
for plastic extruder
200-210°C (PLA)
recommended bed
temperature
76
with lower layer heights
77
100-110°C (ABS)
60-70°C (PLA)
135°C (NYLON)
number of axis
5
electronics
Sunbeam 2.0 (rev. A, rev. B or rev. C)
firmware
Smoothieware
MAINTENANCE AND FUNCTION / SPECIFICATIONS
MAINTENANCE AND FUNCTION / SPECIFICATIONS
Voxelizer
Any other open-source
recommended host software
host software might be used,
detachable, modular, parameters:
such as YARRH, Repetier,
Pronterface etc.
X and Y – 500mm/s
Maximum axis speeds
Z – 5mm/s
heating: 40W heater
extruder 4mm/s (extrusion)
and 40mm/s (retractions)
watercut aluminium 6mm
frame construction
cnc-cut policarbonate 6mm
extruder
thermistor: 100K NTC
ABS printed parts
other elements
3mm laser cut
nozzle size: 0.4mm, exchangeable
and computer-bent aluminium
hardened glass 5mm,
heated bed
lighting (heated bed, X AXIS bracket,
dimensions 250x235mm
heater’s indicators): white LED
150W heater, max 150°C
78
79
MAINTENANCE AND FUNCTION / SPECIFICATIONS
WARRANTY
WARRANTY
ZMorph personal fabricator is designed to be modular, and easy to service. In case of technical
difficulty with any of the parts, it can be easily removed and shipped to us for maintenance.
X axis: smooth rods 10mm + IGLIDUR bearings
Warranty covers following components: • STANDARD PLASTIC EXTRUDER MODULE WITH HEATED NOZZLE,
STEPPER MOTOR WITH PLANETARY GEARS,
TEMPERATURE SENSOR AND CARTRIDGE HEATER
Y axis: T-liner drive + sliding
bearings
• HEATED BED MODULE WITH KAPTON HEATER,
TEMPERATURE SENSOR, PLUG AND CABLES
• ELECTRONICS MODULE Z WITH ONBOARD - SD CARD
CONNECTORS AND FUSES FOR HEATERS AND MOTOR INPUTS
• MECHANICAL PARTS OF X, Y AND Z AXIS,
AS WELL AS STEPPER MOTORS
other elements
Z axis: 10mm smooth rods + ball
bearings
communication: USB cable with
In case of technical fault caused by material wear or improper assembly, if still in warranty period, user can send faulty module to ZMorph headquaters, where it will be exchanged and shipped back as soon as possible.
Warranty covers 1 year from date of delivery and can be extended.
ferrite filters, or CAT-5 ethernet cable for LAN connectivity
For any further questions about warranty please contact us at: [email protected]
power input: 110/220V (automatic
For general info contact us at: [email protected]
selection)
available toolheads: cnc milling
(Dremel mount), cake/chocolate
extruder, ceramics extruder (experimental), laser module (experimental) - check full offer on our website
80
81
CONTINUE YOUR JOURNEY
FIND YOUR OWN PATH
IN PERSONAL FABRICATION!
First of all:
Register in our community webpage www.designfutures.club
to get access to other people's ideas and get inspired.
To be up to date with Voxelizer:
Just download and subscribe it www.voxelizer.com
You will be receiving information about the new version of Voxelizer
and its amazing modern possibilities.
To be up to date with Zmorph Team & New Staff/Toolheads:
Just subscribe on our website www.zmorph3d.com
(you can do that at the down of the main page).
Good luck from the Zmorph Team, Morpher.
When you start to feel alone and actually you do not know what to do.
Contact us!
[email protected]