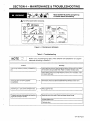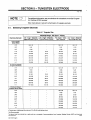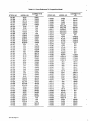
1
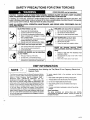
Millerfi
January
Form:
1994
Effective With
Style
OM-1563B
No. KB-8
OWNERS
MANUAL
~' F'~~
MTL-1 7 Torches
Air-Cooled Torches For GTAW
Rated At 150
Amperes
.020 Thru 1/8 in
100%
Welding
Duty Cycle Using Argon Shielding Gas
(0.5 Thru 3.2 mm) Tungsten Size Capacity
Includes 12-1/2 Or 25 ft
(3.8
or
7.6
m) Cable
Remote Contactor And Current Control Available
Tungsten
r.
Electrode And Some Torch Parts Needed
Read and follow these instructions and all
blocks carefully.
safety
Have
7/93
ST-120 869
~
only trained and qualified persons
install, operate,
cover
Give this manual to the operator.
or
.
For
service this unit.
help,
Call your distributor if you do not understand
or:
the directions.
Appleton,
'
1993 MILLER Electric
Mig. co.
call your distributor
MILLER Electric Mfg. Co., P.O. Box 1079,
WI 54912
414-734-9821
PRINTED IN USA
:I~I
TRUE BLU ETM LIMITED WARRANTY
MILLERS
Effective
(Equipment
with
a
January
serial number
This Limited warranty suoersedes all previous MILLER warranties and
LIMITED WARRANTY
MIp Co
Sub~ect
to the terms and conditions
Wisconsin
Appleton
warrants
to its
is
1.1992
that
newer)
Remote Controls
new
Accessory
MILLER equipment sold alter the ehectine dale Cl this limited warranty is tree Cl de
feels ir m,rteriLtl rd wnrknrannhip at the time it is shipped by MILLER THIS WAR.
Kits
Replacement Parts
IS b\PPESSLX IN LIEU OF ALL OTHER WARRANTIFS
PANTS
EXPRESS OR
INCLUDING THE WARRANTIES OP MERCHANTAITILITY AND FIT.
lED
l,tpI
or
exclusive with ire other gualantees Or warlantres expressed or implied
below. MILLER Electric
original retail osrchaser
of KC
preface
MILLERS f-ire Blue
Limited Warranty snaIl not apply to
NESS
by MILLER
items tsrnrshed
Within the warrants aerinds listed below
ranted
parts
comooirents that laI
oi
stIllER must be notified
which
me
in
MILLER will
due to such defects
ypair
in
or
material
or
on
or
cosered
are
by
ssch as engines
or
the manufacturers warranty, it
Consumable components. ssch
2
as
contact tips,
cutting noodles,
contactors
and relaes or p~rt~ that fail due to normal wear
MILLER un.~fI honor wariants claims
event ar such
a
equipment
ahni the edsioment
veil
Pt-tv
ears
warranted eQuipment listed below
on
Inure withn the warranty time
start on the ante that the
t
Vnii5
was
periods
All
warranty
time
in
Eaumpment that has been moditied by any party other than MtLLER or equip.
menl that nas been improperly installed
improperly operated Pr misused
3
the
periods
delisered to the original retail purchaser
based upon industry standards. or equipment which has npt had reasonable
or
arid necessary maintenance, or edsrpment which has been used tot oseratron
outside o~ the nqecrticatrons ICr the eqsrpmenr
the distributor
is sent to
Lapor
ARE INTENDED FOR PURCHASE AND USE BYCOMMEP.
MIILEP POOUCTS
CISL t4DUSTRIAL
2 -a-s
T-arvtrrrrvr
Sn
Power Sources
Pn1,riyr
owei
Ac Cutto
In
Sources
the njent o~
ynaS on
writing
Avtcrnat~c and Automatic Wire Pneders
MILLER
W
goods
FT
D
~
n
On~nratcrs
,,nlrtiin
..ni
n ,~,,,-,
.~:n
ef,ltnct
vec,rrotnis
cv
apprspria(e
Inn esclvsm:e
21 replacement,
repair
or
cases.
13) the reasonable
sernrce station, or
nmedies
where authorized
or
.0
of repair or replace
cost
tat payment of
credit for ne pur
or
less reasorrabledepreciation based soon actual asel upon return of the
ye ~O B
ice
acmlil,
0
Pactory
an
at
MILLERS oplion ot epair or replacement
Appleton Wisconsin or P0 B at a MILLER asthonoed ser.
Pu MILLER Thnrelorn no comcnnsat.on Tr rnmmpsrse
cntn-mmind
costs of any ~ind will be sllnwed
i,lnspOrtatmcn
F
00
N
Al csstomer a risk and espense
will
enema -Vr--iIlactmirvt
v
in
Ill
autaorized MILLER
chase price
Pris ano LAPOr
cOAINED AND EXEEPiENCED
warranty claim covered by this warranty
a
tILLER S option
at
ment at an
r -rain
AND ERSONS
USES
AND MAINTENANCE OF WELDING EQUIPMENT
THy ICE
.iint LrtOrtr
ii
Pacr,,r
3
but manslactsred by others
These items
lailure. at
the warranty claim procedures to be
tollowelt
one
accessories
any
wprbmansnio
writing within thirty 130) days ol such defect
MILLER will pronide instructions
trade
replace any war
E.,~yrtT PEAMIOTED Wi
0LV
cuE PE.IEDIES
500i,iDEC FOCI,
APE c,y SOI,E AND EXCLUSIVE REMEDIES
IN NO EVENT SALL MILLER BE
DIRECT INDIRECT SPECIAL, INCIDENTAL OR CONSEQUENTIAL
DAMAGPS
INCLUDING LOSS OP PRDFITI WHETHER BASED ON CON
TPACT TORT OR ANY OTHER LEGAL THEORY
LIABLE OP
t,rcrcr fli
C,snc
., on
AN0
S cot
~~~ES
.TARPANTr
cANT.
0~AA,.
E,IED
~QP
ILO
NOT 000VIDED HEPEIN AND
ANV
IMPLIED
APOPESENTATION A5 TO EOPOAMANCE
PREACH
CF
COtITPACT
OpT
OP
ANN
NAP.
AND ANS
OTHER
LEGAL
WHICH BUT FOB THIS ROVISION
THEC1Pr
MIGHT ARISE Es IMPLICATION
CUSTOM OP TRADE OR COURSE OP DEALING. IN
CLUDING ANY IMPLIED WARRANTY OP MERCHANTABILITY OR PITNESS
cv e.ons
OPERATION OP LAW
Load Banks
SOY Transcrrrers
FOR PARTICULAR PURPOSE WITH RESPECT TO ANY AND ALL EQUIPMENT
FURNISHED BY MILLER IS EXCLUDED AND DISCLAIMED BY MILLER
Runnino Gear Trailers
F.e.c flommns
NOTE
meId
c.ptions
are covereo
onn
Months
5
90
S
Days
year
nhichever
is
Somn statna
unoen True Blue
viarranty perod of the product they
are
installed
in
or
or
the remaining
for
a
minimum
lasts
or
n
ne U
S
A
AP nor allow limitations cI bow lone
the exclusion CI incidental
ol
greater I
indirect, special
or
implied
an
warranty
consequential damages. so
Thi5 warranty provides spe
the aPove limitation or exclusion
may not apply
cific
may be available. Out may vary 1rpm stale to state
tngal
rights, and other
rights
to
you
Batteries
.
Parts and Labor
In
Canada. legislation
or
remedies other than as stated herein, and to the extent that
waived
taIG OvnhiTIG Torches
asnr,t
Cuimro
in some
prosinces prqsrdes
Warranty provides specilrc legal rights
Torches
-5r
or certain
additional warrantIes
the limitations and exclusions set oat abose may not
and other
rights may
they may
apply This
not be
Lrmrted
be anarlable. but may
l-sm province to ptosmece
I
RECEIVING-HANDLING
unpacking equipment, check carton for any damage that may haMe occurred during shipment. File any claims for
delivering carrier Assistance for filing or settling claims may be obtained from distributor and/or equipment
Before
loss
with the
or
damage
manufacturers
Transportation Department.
When
requesting
Use the
or
folloWing
information about this
equipment, always provide Model Designation
spaces to record Model
Designation
and Serial
or
Style
and Serial or
Style
Number.
Number of your unit. The Information
is
tocafed
on
the
rating
label
nameplate
Model
__________
Serial
or
Style
No.
Date of Purchase
miller 9i93
SAFETY PRECAUTIONS FOR GTAW TORCHES
WARNING
a
GTAW WELDING
can
be hazardous.
PROTECT YOURSELF AND OTHERS FROM POSSIBLE SERIOUS INJURY OR DEATH. KEEP CHILDREN
AWAY. PACEMAKER WEARERS KEEP AWAY UNTIL CONSULTING YOUR DOCTOR.
In welding, as in most jobs, exposure to certain hazards occurs. Welding is safe when precautions are taken. The
safety information given below is only a summary of the more complete safety information found in the welding
power source Owners Manual. Read and follow all safety precautions.
HAVE ALL
INSTALLATION, OPERATION, MAINTENANCE, AND REPAIR WORK PERFORMED ONLY BY
QUALIFIED PEOPLE
______________________________
ELECTRIC SHOCK
1.
Always
can
kill.
dry insulating gloves.
yourself from work and ground.
Insulate
3.
Do not touch live electrode
Repair
torch
5.
replace
or
or
Turn oft
Keep
electrical parts.
damaged,
or
near
2.
Do not weld
on
3.
Watch for fire;
welding power
all
ARC RAYS
covers
can
or
A
source
torch
before
closed containers.
keep extinguisher nearby.
HOT SURFACES
burn skin.
can
changing
parts.
securely in
and handle
explosion.
or
flammable material.
cracked
cable insulation.
tungsten electrode
6.
worn,
or
fire
can cause
Do not weld
1.
wear
2.
4.
WELDING
1.
Allow torch to cool before
2.
Do not touch hot metal.
3.
Protect hot metal from contact by others.
touching.
burn eyes and skin.
1.
Wear
2.
Wear correct eye and
3.
Cover
welding helmet
with correct shade of filter.
NOISE
can
damage hearing; SOME
APPLICATIONS, SUCH AS PULSING, are
body protection.
exposed skin.
noisy.
FUMES AND GASES
can
be hazardous
Check for noise level limits exceeding those
specified by OSHA.
1.
to your health.
1.
Keep your head
2.
Ventilate
3.
Read Material
Use
2.
out of the fumes.
breathing
Safety Data Sheets (MSDSs)
approved
high.
ear
plugs
ear
or
muffs if noise
level is
device.
area, or use
Warn others
3.
and
nearby
about nos~e
hazard.
manufacturers instructions for material used.
EMF INFORMATiON
NOTE
~H
Considerations About
Magnetic
We/ding
And The Effects Of Low
following is a quotation from the General Conclusions Section
Congress, Office of Technology Assessment, Biological
Effects of Power Frequency Electric & Magnetic Fields
Background Paper, OTA-BP-E-53 (Washington, DC: U.S.
there is now a very
Government Printing Office, May 1989):.
large volume of scientific findings based on experiments at the
cellular level and from studies with animals and people which clearly
The
To
of the U.S.
procedures:
.
avoid
potential
risks.
And
magnetic
Keep
2.
Arrange cables
3.
Do not coil
fields
cables close
in
the
workplace,
together by twisting
or
use
taping
to one side and away from the
the
following
them.
operator.
.
frequency magnetic fields can interact with, and
produce changes in, biological systems. While most of this work is
of very high quality, the results are complex. Current scientific
understanding does not yet allow us to interpret the evidence in a
single coherent framework. Even more frustrating, it does not yet
allow us to draw definite conclusions about questions of possible
risk or to offer clear science-based advice on
reduce
1.
4.
establish that low
or
Frequency Electric
Fields
strategies to minimize
or
Keep welding
drape cables
around the
power
source
clamp
to
body.
and cables
as
far away as
practical.
5.
Connect work
workpiece
as
close to the weld
as
possible.
About Pacemakers;
The above procedures are among those also normally
recommended for pacemaker wearers. Consult your doctor for
complete information.
modlo,1 4/93
5t6 7/93
TABLE OF CONTENTS
SECTION 1
-
SAFETY INFORMATION
.
1
SECTION 2- SPECIFICATIONS
2-1.
Duty Cycle
2
SECTION 3- INSTALLATION & OPERATION
3-1.
3-2.
3-3.
Required Torch Parts And
Adjusting Flex-Lok Head
Connecting Torch
Torch
Assembly
3
4
SECTION 4- MAINTENANCE & TROUBLESHOOTING
SECTION 5
5-1.
5-2.
Figure
Figure
5
TUNGSTEN ELECTRODE
Selecting Tungsten Electrode
Preparing Tungsten
SECTION 6
2
6
7
PARTS LIST
6-1.
Complete
Torch
8
Assembly
6-2. Consumable Parts
Table 6-1. Cross Reference to
9
Competitive
Model
10
OM-15636
1/94
SECTION 1
SAFETY INFORMATION
-
modl.t 2.93
Read all
safety messages throughout
Obey
safety messages
all
Learn the
to avoid
this manual.
injury.
and CAUTION.
meaning of WARNING
2
1
\~
2
WARNING means possible death
or serious injury can happen.
a CAUTION
3
_______
L~
ELECTRIC SHOCK
can
kill.
Disconnect
installing
or
input
power
servicing.
_______
MOVING PARTS
+1
Do not touch live electrical parts.
injure. I
CAUTION
Keep
all panels and covers closed
I
means possible minor
injury or equipment damage can
happen.
when
operating.
I
3
Statement Of Hazard And
Result
4
Safety
5
Hazard
Keep
beforejj_
Safety Alert Symbol
Signal Word
1
2
\
~
away trom
can
moving parts.
/
5
a
WARNING
Symbol (If Available)
Safety Banner
6
READ SAFETY BLOCKS at start of
SectIon 3-1 before proceeding.
6
Instructions To Avoid
Hazard
Read safety blocks for each sym
bol shown.
NOTE
7
H
~
NOTE
Turn Off switch when using
high frequency.
Special
ation
Figure
1-1.
Safety
instructions for best oper
not related to
safety.
Information
SECTION 2- SPECIFICATIONS
Table 2-1.
Welding
Torch
Specification
Model
Description
Description
MT: Miller Torch; L: Flex Lok; 17: 150 Ampere
25: 25 ft (7.6 m) Cable; 1: One-Piece Cable
Example:
MTL-17-12
Miller
Rating;
V: Gas Valve 12:12-1/2
ft(3.8 m) Cable;
Torch; Flex Lok; 150 Ampere Rating; 12-1/2 ft (3.8 m); One-Piece
Cable
Ampere Rating
DCEN, ACHF
Cooling
At 100%
Duty Cycle
Method
150
Air
Amperes Using Argon
Cooling
Tungsten Size Capacity
.020 Thru 1/8 in
Options
See Rear Cover
And Accessories
Gas
(0.5 Thru 3.2 mm)
12-1/2 ft (3.8 m)
Cable
25 ft (7.6
Cable
m)
12-1/2 ft (3.8 m)
Cable With Gas
25 ft (7.6 m) Cable
With Gas Valve~
Valve
Total
Weight
Net: 25
Ship:
.
Torch
Body
Dimensions And
Weight
Ib(1.1 kg);
(1.4 kg)
3 lb
8 in (203 mm);
Handle Diameter: 3/4 in
Net: 4.5
Ship:
5.6
oz
(160 g)
Net: 2.5
Ship:
lb(1.1 kg);
(1.4 kg)
3 lb
Length: 8-3/4
Length:
Weight:
lb(2 kg);
kg)
5 lb (2.3
(19 mm)
in
Net: 5
Ship:
lb(2.3 kg);
(2.3 kg)
5 lb
(222 mm);
Handle Diameter: 7/8 in (23 mm);
Weight:
7.5
oz
(210 g)
OM-1563
Page
1
Duty Cycle
2-1.
CAUTIONS
a
WELDING LONGER THAN RATED DUTY CYCLE
Do not weld at rated load
longer
can
damage torch and void warranty.
than shown below.
wfwarn8.1~ 8/93
100% D uty
0
Cycle
At 150
Amperes Using Argo n Gas
Definition
-
10
Duty Cycle is percentage of 10
minutes that torch
rated load without
can
weld at
overheating.
Minutes
Continuous
Figure
2-1.
Welding
sb1.5~ 8/93
Duty Cycle
SECTION 3- INSTALLATION & OPERATION
3-1.
Required Torch Parts
Required Torch Parts
And Torch
Assembly
Obtain the
Section 6):
4
1
following parts (see
Tungsten Electrode (See
Section 5)
3
2
Cup
3
Collet
4
Standard Collet
5
Reverse Collet
Body
Reverse collet improves electrical
contact of tungsten electrode.
6
Power Cable Adapter
Assembling
Assembling
Torch Parts
Torch
Body
7
Flex-Lok Head
8
Heat Shield
9
Backcap (Short Backcap
Shown)
10
0-Ring
7
10
3
Installing Tungsten
OR
To
adjust tungsten position,
backcap.
~-
-~
5
loosen
Keep connections tight. Replace
heat shield, backcap, and
cup,
0-rings
f cracked.
Installing Tungsten
Loosen
Tighten
-~
ST-800 486
Figure
OM-1563
Page
2
3-1.
Required
Torch Parts And Torch
Assembly
3-2.
Adjusting
Flex-Lok Head
CAUTION
TOOLS
Do not
damage
torch.
hand tools to
adjust
can
use
torch flex-bk head.
1
Head
2
Head
Adjusting
Stem
Hold stem and turn head one lull turn.
Turn head and stem to desired
angle.
~1~
Hold stem and turn head until
Figure
3-2.
tight.
Adjusting Flex-Lok
ST-~42 083.A
Head
OM-1563
Page
3
3-3.
Connecting
Torch
~ ~ ~
READ SAFETY BLOCKS at beginning
of manual before proceeding.
4jj~1 ~
BUILDUP OF SHIELDING GAS
0
Shut off
shielding
gas
supply
can
when not in
harm health
or
kill.
use.
warnl.1 9/91
If applicable. install
high-frequency
Turn Off welding power source, and
disconnect input power before in
unit,
stalling
torch.
Obtain the
Torch With Gas Valve
1
following
hose:
Gas Hose With 5/8-18
Hand
Right-
Fittings
Connections:
2
Regulator/Flowmeter
3
Gas
4
Welding Power Source
5
Gas Valve
6
Torch Cable
7
Power Cable
Cylinder
Adapter
Connect hose and cable to adapter
before connecting adapter to weld
output terminal.
8
Work
Clamp
Connect work clamp to clean, paintfree location on workpiece. as close
to weld area as
possible.
Use wire brush
Operating
joint
to
area.
Torch Gas Valve:
Valve controls gas
flow. Preflow aids
low and
sandpaper
or
clean metal at weld
preflow and post
arc starting. Pre
postflow prevent
from
forming
(oxidizing).
a
electrode
black
surface
Open
valve just before welding.
Turn valve clockwise 1/4 turn to
open, and counterclockwise 1/4 turn
to close.
________
Torch Without Gas Valve
After welding, leave valve open
about 10 seconds for every 100
amperes of weld current. Close
valve when
postflow
is finished.
3
Tools Needed:
~
5/8, 7/8 in
8
sT-BOO 487
Figure
OM-1563
Page
4
3-3.
Connecting
Torch
MAINTENANCE & TROUBLESHOOTING
SECTION 4
V~
~.
4..
Turn Off all power before
READSAF ETYBLOCKSatbeginning
of manual before proceeding.
~
~
maintaining.
~~Replace
Cracked
Parts
3-1, 3-3
Torch
Torch Cable
Gas Hose
Figure
1
Troubleshooting
Before using
electrode
troubleshooting table,
according to Section 5.
check selection and
Trouble
Lack of
high frequency~ difficulty
preparation of tungsten
Remedy
in
establishing
~
arc.
Check cables and torch for cracks or bad connections. Be sure that torch cables
are not close to any grounded metal. Repair or replace necessary parts.
Check
and
Torch gas valve not
.
4-1. Maintenance Schedule
Table 4-1.
N OTE
Body
working properly
-~
welding
power source
high frequency control.
and if necessary. check
adjust spark gaps.
Have
Factory Authorized Service Station/Service Distributor check
valve.
(if applicable).
Wandering
arc
poor control of direction of
Tungsten electrode oxidizing and
bright after conclusion of weld.
not
arc.
remaining
~
-..j
Reduce gas flow rate.
-~
Shield weld
Increase
zone
postflow
from drafts. Check and tighten all gas
fittings.
time.
Check gas valve.
OM-1563
Page
5
SECTION 5- TUNGSTEN ELECTRODE
mod2. I 3/93
NOTE ~
Foradditional information,
Arc
I
Welding (GTAW)
Wear clean
5-1.
gloves
to
see your distributor fora
handbook on the Gas
Tungsten
process.
prevent contamination of tungsten electrode.
Selecting Tungsten Electrode
Table 5-1.
Tungsten
Size
Amperage Range. Gas Type,
Electrode Diameter
DC
Argon Electrode
Negative/Straight Polarity
DC
Argon Electrode
Positive/Reverse Polarity
Polarity
-
AC
Argon Using
High Frequency
AC
Argon
Wave Using
Balanced
High Freq.
Pure
Tungsten
(Green Band)
-
.010,
Up
.020
.
to 15
5-20
Uptol5
UptolO
5-20
10-20
.040
15-80
10-60
20-30
1/16
70-150
10-20
50-100
30-80
3/32
125-225
15-30
100-160
60-130
1/8
225-360
25-40
150-210
100-180
5/32
360450
4055
200275
160:240
3/16
450-720
55-80
250-350
190-300
80-125
325-450
250-400
.
1/4
2% Thorium
720-950
Alloyed
Tungsten (Red Band)
010
Up
to
.
25
.020
15-40
.040
25-85
1/16
50-160
.
.
Up
to 20
15-35
Up
to 15
5-20
*
20-80
20-60
10-20
50-150
60-120
3/32
135-235
15-30
130-250
100-180
1/8
250-400
25-40
225-360
160-250
5/32
400-500
40-55
300-450
200-320
3/16
500-750
55-80
400-500
290-390
1/4
750-1000
80-125
600-800
340-525
Upto2O
Uptol5
Zirconium
Alloyed
Tungsten (Brown Band)
.010
.020
15-35
5-20
.040
20-80
20-60
1/16
50-150
60-120
3/32
130-250
100-180
1/8
225-360
160-250
5/32
300-450
200-320
400-550
290-390
600-800
340-525
3/16
.
1/4
Typical argon shielding gas flow
rates are 15 to 35 cfh
(cubic feet per hour),
Not Recommended.
The
figures listed
manufacturers.
OM-1563
Page
6
are
intended
as a
guide
and
are a
composite of
recommendations from American
Welding Society (AWS)
and electrode
S-0009
5-2.
Preparing Tungsten
P
1
Tungsten
2
Balled End
Electrode
Ball end of tungsten before welding
by applying either an ac amperage
slightly higher than what is recom
mended for a given electrode diam
eter (see Table 5.1), or a dc elec
trode positive amperage.
1iI~IIE
1-1/2 Times
Electrode Diameter
2
Ref. S-0161
Figure
a
5-1.
Preparing Tungsten
For AC Or DC Electrode Positive
(DCEP) Welding
CAUTION
FLYING SPARKS AND HOT METAL
can cause
injury
and start fires.
Shape tungsten electrode only on grinder with proper guards in a sate location wearing proper face.
Keep flammables
hand, arid
body protection.
away.
wam2.1 9/91
1
Tungsten
2
Tapered
2
Electrode
End
Grind end of tungsten on fine grit,
hard abrasive wheel before weld.
ing. Do notuse wheel for other jobs
or
H
tungsten can become contami
causing lower weld quaIity~
nated
2-1/2 Times
Electrode Diameter
Ret S0161
1
1
Stable Arc
2
FIat
Diameter of this flat determines
amperage
capacity.
3
Grinding
4
Straight Ground
Wheel
V
4
Ideal
Tungsten
P reparation
Stable Arc
Ref. S0162
1
2
Arc Wander
2
Point
3
Grinding
4
Radial Ground
Wheel
3
4
Wrong Tungsten Preparation
Figure
5-2.
Preparing Tungsten
Wandering Arc
For DC Electrode
Ref. S-0162
Negative (DCEN) Welding
OM-1563
Page
7
SECTION 6- PARTS LIST
Fig
6-2
11
4
16
17
Fig
Fig
18
6-2
6-22
6
20
Figure
Model
No.
Stock
Item
No.
No.
1
2
3
118 526
.
5
.
.
.
116256.
.
.
.
.119 914
-.
-.
.119 915
-.
.
5
-
5
.
6
.
..
.
.116260....
7
FL3L
3GHS
.
.
.
9
.
9
.
..
...
3GHSLD
..
116203... 01-0009
116259..
.
-
300R
.
-
300S
116 258.... 300M
.116 257....
300L
.
12.
13.
14
-
15.
.
.
..
.
.
.
-.
...
...
..
116219... 01-0012
11
.
.
116 218... 01-0007
18.
.118510
19.
.116276
20
21
.
..
.
-.
.
22.
.
.
..
.
.
-
120721
120720
.
-
8
1
1
1
1
(consisting of)
0-RING
0-RING
VALVED HANDLE, models w/valve (consisting of)
SCREW, non-conductive
HANDLE ADAPTER, models w/valve (consisting of)
0-RING
FLEX LOC TORCH BODY, (consisting of)
0-RING
HANDLE
1
..
1
..
2
1
1
1
1
..
-.
2
-
.
POWER CABLE ADAPTER
HI-FLEX POWER CABLE, 12-1/2ft (consisting of)
HI-FLEX POWER CABLE, 25ft (consisting of)
RH NUT
RING NUT
OPTIONAL
Page
1
1
BE SURE TO PROVIDE MODEL AND STYLE NUMBER WHEN ORDERING REPLACEMENT PARTS.
OM-1563
1
..
1 5PCA...
1512PCHF
116272.. 1525PCHF
116 271
1
.
.
116 207
13. ..116217... 01-0002
20
..
116216.... FLHV
..
..
..
1
1
COLLET, (see Fig 6-2)
BACKCAP, short (consisting of)
BACKCAP, medium (consisting of)
BACKCAP, long (consisting of)
FLEX LOC TORCH BODY, w/valve
116220... 01-0013
17. ..116217... 01-0002
16
Complete Torch Assembly
0-RING
116 208
.116217... 01-0002
-
Quantity
HEAT SHIELD, small dia gas lens
HEAT SHIELD, large dia gas lens
HEAD ADJUSTMENT STEM, (consisting of)
0-RING
10. .116260.... 300R
11
6-1.
867
Assembly
HEAT SHIELD, std
8
9
Torch
TUNGSTEN, electrode (consult your welding supply distributor)
CUP, (see Fig 6-2)
COLLET BODY, (see Fig 6-2)
3 SERIES HEAD, (consisting of)
300HS
..
Complete
Description
Figure
4
6-1.
SB120
1
1
1
1
1
2
2
S-0768
USAGE
Revrse Col ei 7C-X
Short Col el 4C-X
RECOMND
INDCATE
AREAS
SHADE
Standr Col et 3C-X
SELCTOR
PARTS
Revrse Col et 7C-X
ENDS
FRONT Ler yth
CONSUMABLE STANDR
Body
1 6259 LenyIh
30 HS Shrekt No
1 9 14
3GHS SIseki No
LENGTH Standi Col et 3CBX Use Heal Stock Standr Gas 3GL-X Use Heat Stock
0
adpter.
cable
torch). power
a
complet require
to
d
also
required cable
Cup
Gas
compsite
and Rex
Body high
Cot et with
(Note: Torches
Lens
Parts
~3GL-X
Consumable
1 9 15
Diar elr Lens
Shield No
LargeGas
Use Neat Stock
6-2.
Figure
Table 6-1. Cross Reference To
Competitive
Model
COMPETITIVE
STOCK NO.
NO.
MODEL NO.
116367
3020
116368
3C40
3C418
7C20
116371
116 379
.
.
.
10N22
10N23
10N24
3C332
116 370
10N25
.
N/A
116 380
7C40
N/A
116381
70116
N/A
119 934
3AG6
54N16
119935
54N15
119 936
3AG7
3AG8
119937
3AG11
54N19
119 902
3GLL332
45V64
119 903
3GLL418
995795
3AG8LD
57N74
53N88
116382
7C332
N/A
116383
7C418
N/A
119913
3AG1OLD
3AG12LD
116 373
4020
116 374
4C40
3CB20
10N29
54N14
119911
119912
116 361
COMPETITIVE
NO.
MODEL NO.
10N21
.
3C116
116369
STOCK NO.
116 362
3CB40
10N30
116363
3CB116
10N31
116375
40116
116376
4C332
53N87
N/A
.
.
.
.
.
.
.
.
10N23S
10N24S
..
.
10N25S
..
..
116364
3CB332
10N32
116365
3CB418
3C3
10N28
116377
N/A
116 379
4C418
7C20
116 380
7C40
116381
7C116
.
.
116 347
304
116 348
1 05Z43
10N22S
.
.
.
..
116349
3C5
105Z42
116 350
306
1 05Z44
116 382
70332
.
.
7C418
.
.
..
.
.
..
.
.
.
.
N/A
N/A
N/A
N/A
105Z45
116 352
307
308
116383
08N78
116 355
4CB20
116353
3C10
08N79
116356
4CB40
17CB20
116354
3C12
08N80
116357
4CB116
17CB20
116343
3C4L
12N03
116358
4CB332
17CB20
116344
3C5L
105Z60
116359
4CB41 8
17CB20
116345
3C6L
12N02
116337
204
13N14
116346
3C7L
105Z61
116338
205
13N15
116330
3A4
10N50
116339
2C6
13N16
116331
3A5
10N49
116340
207
13N17
116332
3A6
10N48
116341
2C8
1 3N 18
3A7
10N47
116342
2010
13N19
3A8
10N46
116326
2C3L
796F70
10N45
116327
2C4L
796F71
2C5L
796F72
116351
116333
116334
-
.
116335
3A10
N/A
N/A
116336
3A12
10N44
116328
119926
3GL20
45V29
116329
2C6L
796F73
119927
3GL40
45V24
116310
2A4
13N08
119928
3GL116
45V25
116311
2A5
13N09
119929
3GL332
45V26
116312
2A6
13N10
119930
3GL418
45V27
116313
2A7
13N11
119917
3CG4
54N35
116314
2A8
1 3N 12
119918
3CG5
3CG6
54N34
116315
2A10
1 3N 13
119 919
54N33
119 905
4GL20
N/A
119 920
3CG7
54N32
119 906
4GL40
N/A
119 921
3CG8
54N31
119 907
4GL116
N/A
119 922
3CG11
54N35
119 908
4GL332
N/A
119923
3CG12
N/A
119909
4GL418
N/A
119924
30G14
N/A
119893
2AG4
53N58
119925
3CG16
N/A
119894
2AG5
53N59
119 932
3AG4
54N18
119 895
2AG6
53N60
119933
3AG5
54N17
119896
2AG7
53N61
OM-1563
Page
10
.
OPTIONS AND ACCESSORIES
For TOTAL TIG
one
system, select
each of the
following
items:
FUSE BLOCK ASSEMBLY
For
use
GAS REGULATORS
with watercooled
With 580 CGA inlet connector
torches. Five fuse links included
Welding
power
source
Up
TIG torch
to 260
Amps
260 to 550
TIG kit (see hG kits listed below)
Coolant system (it using water
cooled
torch)
Remote control
Note: The other items necessary to weld
are power source primary cable.
shielding gas,
and filler metal.
(#116 163)
(#116164)
Amps
Protects torch from
overheating
and
damage if water is not
circulating or if torch is run
considerably higher than its
capacity.
of 5
(#127 661)
regulator/flowmeter has outlet
pressure preset at 25 PSIG; the
maximum inlet is 3000 PSIG and
SCFH gas
has 540
AF1
delivery.
50
(#127 662)
This flowgauge regulator has
adjustable gas delivery of 825
rated
Note: Additional fuse links available in
packages
HRF2425
This
SCFH with argon gas.
(#116 559).
TIG ACCESSORY KITS
(TAK)
CABLE EXTENSION BOX
KIT FOR MT17
and MTL17
For
TORCHES
SERIES AIRCOOLED
ft.
(3.8 m) length
(#129 590)
25 ft. (7.6 m) length
(#129 589)
121/2
kit
(TH K-2)
Consumable accessory kit
one backcap and
(TAK1)
(.040, 1/16,
and 3/32
in.) of collets, collet bodies, cups,
and 2% thoriated tungsten
Regulator/flowmeter (HRF2425)
Ground cable with clamp. 121/2
ft. (3.8 m) or 25 ft. (7.6 m)
to match TIG torch length
Note: Power cable
lengths
(Nonfused)
Allows hose and cable
assembly
to
body, alumina cup, and 2%
thoriated tungsten pieces.
TAK1
TIG TORCH CABLE
COVERS
Reinforced plastic cable
be extended from the power
source. Available with or without
made of tear and flame resistant
fuse protection. All components
material. A
are
protected by
nonconductive
a
strong,
and 25 ft.
Note: Hose and cables from power
source to CEB box are not supplied. Use
large diameter
heavy welding
performance.
extension hoses and
cable for
RMCH14
optimum
and RLCH14
CONTACTOR SWITCHES
a
builtin
switch
for remote contactor control of
POWER CABLE ADAPTERS
Miller solidstate
(Required on torches with one-piece.
high-flex cable assembly and all
sources.
covers
large and small cover is
length to fit 121/2 ft.
(3.8 and 7.6 m) torches.
available in
enclosure.
Torch handle with
CC12S
(#126 150)
(3.8 m) torches. Fits
Miller TIG Torch models 80 Amps
through 250 Amps.
For 121/2
ft.
(#126 151)
For 25 ft. (7.6 m) torches. Fits
Miller TIG Torch models 80 Amps
through
250
Amps.
REMOTE CONTROLS
AMTV REMOTE CONTACTOR
TIG power
Includes 25 ft.
(7.6 m)
control cord with 14pin plug.
AND CURRENT CONTROL
(#152 608)
Linear motion control fastens to
torches.)
RMCH14S
Adapter
105Z57
Stock No.
(#116 276)
(Momentary)
hG torch handle
(Locking)
straps. The AMTV is a practical
alternative to a foot control.
(#129 336)
RLCH14S
(#129 335)
Includes 28 ft.
with
INTERNATIONAL TIG TORCH
CONNECTOR KIT
TIG HOSE HOOK-UP KITS
(THK)
Amp Torch
150 Amp Torch
200 Amp Torch
250/350 Amp Torch
(#135
(#135
(#135
(#135
492)
493)
494)
495)
(Watercooled)
(#128 065)
THK2
(Aircooled)
(#128 066)
Provides the necessary hoses and
hardware to connect either air or
torches
TIG
watercooled
torches into power
sources
Internationalstyle
connectors.
with
source
a
power
and, if applicable, water
coolant system.
control cord
14pin plug.
RCC REMOTE CONTACTOR
(14pin plug)
(#151 086)
RCC5 (5pin plug)
onepiece
torches to
(8.5 m)
two Velcro
RCC14
For direct connection of
watercooled
using
AND CURRENT CONTROL
THK1
80
or
(#129 585)
0.40, 1/16, and 3/32 in. for MT17
CC25S
adapter 105Z57
(#116 276) must be ordered for torches
with onepiece composite cable.
water-cooled
backcap and three
following: collet, collet
one
each of the
(#120 797)
CEB 260FA
(#116 161)
(Fused up to 260 Amps)
CEB 550FA
(#116 162)
(260 to 550 Amps)
Hose & hardware hookup
sizes
Kits include
with watercooled
torches
CEB
Kit includes:
three
use
(#157 365)
motion
fingertip control
using two
Velcro straps. Includes 28 ft. (8.5
m) control cord.
Rotary
fastens to TIG torch
1192
Miller.
January
Form:
1994
Effective With
Style
OM-1563B
No. KB-B
OWNERS
MANUAL
1
~=l~ ''~7
~1fJ~ ~r' ~
MTL-1 7 Torches
Air-Cooled Torches For GTAW
Rated At 150
Amperes
.020 Thru 1/8 in
100%
Welding
Duty Cycle Using Argon Shielding
Gas
(05 Thru 3.2 mm) Tungsten Size Capacity
Includes 12-1/2 Or 25 ft
(3.8
or
7.6
m) Cable
Remote Contactor And Current Control Available
Tungsten Electrode And Some Torch
U
~/J>
~
~
~
7/93
-
safety
blocks
Have
only trained and qualified persons
carefully.
install, operate,
~
cover
Read and follow these instructions and all
ST 120 869
or
Parts Needed
j~
service this unit.
Call your thstributor if you do not understand
the directions.
'
?~i1~
1993 MILLER Electric MIg. c~.
I
Give this manual to the operator.
U
For help, call your distributor
or:
MILLER Electric
Appleton,
WI 54912
P.O. Box 1079,
414-734-9821
Mfg. Co.,
PRINTED IN USA
u-f
:1~.
TRUE BLUETM LIMITED WARRANTY
MILLERS
Effective
(Equipment
with
a
This umited warranty supersedes alt previous MtLLER
LIMITED WARRANTr
Co
Mtg
Subtect
to the terms and conditions betow
Wisconsin, warrants to its
Appleton
warranties and is erctusiue witn
newer)
or
other guarantees
to
MILLER Electric
retail purchaser that
original
January 1. 1992
preface of KC
serial number
warranties esoressed or implied
or
Remote Controls
new
Accessory Kits
MILLER eqiroment sold atter the effective date of this limited warranty is free of de
wcrkmairnhio at the tine it is shipped be MILLER THIS WAR
errs in matnv~rl id
Replacement Pans
IS EXPRESSLY IN LIEU OF ALL OTHER WARRANTIES EXPRESS OR
iMPlIED INCLUDING THE WARRANTIES OF MERCHANTAbILITY AND FIT.
PANTy
MILLER S Tue B1ue
Limited Warranty snaIl not apply to
NESS
by MILLER
Items turnrshed
Lrciteie the warranty oennds listed hetow
ranted parts
comoorrents that fail due to such defects
or
httIlER must be notified
weice
MILLER will
writing
ie
yr
material
or
on
trade
war
or
Consumable components, suck
2
and relays
MILLER untIl honor warranty claims
dl Such
start on the date
one
warranted equipment listed below
on
t,rilurrr within the warranty time
.1
nat
ne
equipment
was
delivered to the
in
original
retail purchaser.
arid necessary
.irts
maintenance
A
Power Sources
Piti1ier
Senrm.Autornasc and Automatic Wire Feeders
writing by I.tILLER
or
eouipmeni whion has not had reasonable
or
equipment which has been used for operation
LISERS AND OERSONS TRAINED ND
cc
ill
in
appropriate oases,
ment at an authorized
Robots
.rrts
i,Vnid.nn Generators
v.__ .,-,,~
NOTE
~
IN
MILLER
13) the reasonable
service station
cost
of repair
dl payment slot credit
or
or
or
replace
tEe pur
goods at customers risk and espense MILLER S option 5i reoair or replacement
will be ~O P
Pactory at Appleton uaisopesin or ED B at a MILLER authorized ser
and Laos
Di.~ir
5 ERIENCED
lens reasonable deoreciatron based upon actual uoel upon returns1 the
chase Orion
vice
iiciu~rtnlv
,v.i,intvtt
flu
ru
eiroiiie
,tciutu
.iuiic,5~.
is
ThE
TCi
E-
O~ MILLER
onlnrrniied
costs
-onsoortatisn
olnu-
ENT PEPMITTED Pt
Therefore
no
zsmpensar,on
5r reinrsvrse
wit on allowed
no
LAW
THE PE-tED1ES 000ViDE:
APE TFW SOLE AND EXCLUSiVE AErrEDIES
.EAEIN
iN NO EVENT SHALL MILLER BE
LIABLE FOR DIRECT INDIRECT SPECIAL. INCIDENTAL CR CONSEDUENTIAL
INClUDING LOSS OF PROFITi
WHETHER BASED ON CON
DAMAGES
Dr-on Guns
TRACT
PANT
riders
TORT OP ANY OTHEO LEGAL THEORY
0500000 uJAPOANT/
AN
Scot
contactors
of a waranty claim covered by this warranty
the exclusive nmeoies
t.tILLER S oction Ill repair or 21 replacement, or where authorized in
snaii
F-u,.
cutting nozzles.
In inn erect
Pi,ruir~,i Arc Cuitiirq Power Sources
2 r.-rrs
contact tips
as
THE iieE AND MAINTENANCE OF VJELD1NO ECUIPMENT
Lacer
hut
ranv,oivr
3
it
uPE INTENDEDEOR PURCHuSE ANDUSE BY COMME
r3lLLEo OODUCTS
3 i,ir
or
warranty
.1 Vi..iic Labor
CiVL tLDUSTRIAL
-,
such as engines
specifications for the equipment
outside of the
5 -er
others
pans that fail due to normal wear
or
dused upon industry stanoards
or
after the equipment is sent to the distributor
year
by
the manufacturers
Equipment that san been modified by any party other than MtLLER or equip
ment that has seen imoroperlu installed
improperly operated or misused
3
the
All warranty time peridds
periods
by
are covereo
failure at
the warranty claim procedures to be
i0 lIars no
event
but manufactured
These items
accessories
any
workmanship
thirty 130) days of such defect
within
MILLER wIl provide resfructions
ne
replace any
-epttir tr
BREuCH
0,00
fllEOPr
i~iHICH
NOT OOVIDED
HEREIN AND ANY iMPLIED,jAR.
QR APA0ESEtITATION 43 TO OE500Ri$ANCE
OrUVAAN
RE3EEtir
OF
CONTPACT
TORT
QP
ANY
AND ANY
OTHER
LEGAL
RUT POP THIS PROVISION
MIGHT ARISE BY IMPLICATION.
CuSTOM OF TRADE OR COURSE OF DEALING, IN
OPERATION OF LAW
CLUDING ANY tMPLIED WARRANTY OF MERCHANTABILITY OR FtTNESS
FOR PARTICULAR PURPOSE, WITH RESPECT TO ANY AND ALL EDUIPMENT
FURNISHED BY MtLLER IS EXCLUDED AND DISCLAIMED BY MILLER
Load Banks
SOX Transforrrers
Rvnrrirrc Oear.Tiiiters
Pure Oitns
Some stares
~
Field cotisos
NOTE
warrants perod
sure
S
E Months
B
90
year
are coueeo
under
of the product thny
are
True hive
installed
in
or
or
Isv remaininq
or a minimum
lasts
n
the U S A
our sot allow limilativirs of hpw
the exclusion of incidental, indirect, special
the tissue limitation or esolusrsn may not
whichever is greater I
citic leqal rights, and other
rights
apply
to
or
you
long
an
implied warranty
consequential
damages.
so
This warranty provides spe
may be available, but may vary from state to state
Batteries
Canada. legislation
In
Days
or
of
in
some prournoen
provides for oentamn additional warranties
remedies steer than as stated herein, and to the eutent that
they may not be
the limitations and esclusmons set out above may sot apply This Limited
and
other rights may be available. Put may
Warrairty piouides uoeoifio legal rights
or
Pans and Labor
waived
MID Guns TlO Torches
Riasma Cutrorc Torches
vay
rum
province to province
4>
.1
t
RECEIVING-HANDLING
unpacking equipment, check carton for any damage that may have occurred during shipment. File any claims for loss or damage
delivering carrier. Assistance for filing or settling clatms may be obtained from distributor and/or equipment manufacturers
Transportation Department.
Before
with the
When
requestIng information about this equipment, always provide Model Designation and Serial
Use the
OT
following
spaces to record Model
Designation
and Serial
or
Style
or
Style
Number.
Number ol your unit The information is located
on
the
rating
label
nameplate
Model
__________
Serial
or
Style
No.
Date of Purchase
miller 9193
SAFETY PRECAUTIONS FOR GTAW TORCHES
I
WARNING~.~
a
GTAW WELDING
can
be hazardous.
PROTECT YOURSELF AND OTHERS FROM POSSIBLE SERIOUS INJURY OR DEATH. KEEP CHILDREN
AWAY. PACEMAKER WEARERS KEEP AWAY UNTIL CONSULTING YOUR DOCTOR.
In welding, as in most jobs, exposure to certain hazards occurs. Welding is safe when precautions are taken. The
safety information given below is only a summary of the more complete safety information found in the welding
power source Owners Manual. Read and follow all safety precautions.
HAVE ALL INSTALLATION, OPERATION, MAINTENANCE, AND REPAIR WORK PERFORMED ONLY BY
QUALIFIED PEOPLE.
_____
ELECTRIC SHOCK
1.
can
WELDING
kill.
dry insulating gloves.
Insulate yourself from work and ground.
Do not touch live electrode
Always
Repair
________
Do not weld
near
2.
Do not weld
on
3.
Watch for fire;
1.
wear
replace
or
worn,
or
electrical parts.
damaged,
or
fire
can cause
explosion.
or
flammable material.
closed containers.
keep extinguisher nearby.
cracked
torch or cable insulation.
HOT SURFACES
A
burn skin.
can
Turn off
welding power source before changing
tungsten electrode or torch parts.
Keep all covers and handle securely in place.
ARC RAYS
Wear
can
welding
1.
Allow torch to cool before
2.
Do not touch hot metal.
3.
Protect hot metal from contact by
helmet with correct shade of filter.
NOISE
can
damage hearing; SOME
APPLICATIONS, SUCH AS PULSING, are
body protection.
Cover exposed skin.
noisy.
FUMES AND GASES
can
be hazardous
1.
Check for noise level limits
specified by OSHA.
2.
Use
to your health.
your head out of the fumes.
Ventilate
area, or use
Read Material
manufacturers
others:
burn eyes and skin.
Wear correct eye and
Keep
touching.
breathing
Safety Data Sheets (MSDSs)
approved
level is
device.
plugs
or ear
those
muffs if noise
high.
Warn others nearby about
3.
and
ear
exceeding
noise
hazard.
instructions for material used.
EMF INFORMATION
NOTE ~
I
Considerations About We Iding And The Effects Of Low
Magnetic Fields
Frequency
Electric And
.
The
To reduce
of the U.S.
following is a quotation from the General Conclusions Section
Congress, Office of Technology Assessment, Biological
Effects of Power Frequency Electric & Magnetic Fields
Background Paper, OTA-BP-E-53 (Washington, DC: U.S.
Government Printing Office, May 1989):.
there is now a very
large volume of scientific findings based on experiments at the
cellular level and from studies with animals and people which clearly
establish that low frequency magnetic fields can interact with, and
produce changes in, biological systems. While most of this work is
of very high quality, the results are complex. Current scientific
understanding does not yet allow us to interpret the evidence in a
single coherent framework. Even more frustrating, it does not yet
allow us to~draw definite conclusions about questions of possible
risk or to offer clear science-based advice on strategies to minimize
or avoid potential risks.
procedures:
.
1.
Keep
magnetic fields
cables close
cables to
2.
Arrange
3.
Do not coil
4.
Keep welding
in
the
workplace,
together by twisting
one
or
use
taping
the
following
them.
side and away from the operator.
.
or
drape cables
around the
power
source
clamp
to
body.
and cables
as
far away
as
practical.
5.
Connect work
workpiece
as
close to the weld
as
possible.
About Pacemakers:
The
above procedures are among those also normally
recommended for pacemaker wearers. Consult your doctor for
complete information.
modlO 1 4/93
sr6 7/93
TABLE OF CONTENTS
SECTION 1
SAFETY INFORMATION
SECTION 2
SPECIFICATIONS
2-1.
1
2
DutyCycle
SECTION 3-INSTALLATION & OPERATION
3-1.
3-2.
3-3.
Required Torch Parts And Torch Assembly
Adjusting Flex-Lok Head
Connecting Torch
SECTION 4- MAINTENANCE & TROUBLESHOOTING
SECTION 5
5-1.
5-2.
2
3
4
5
TUNGSTEN ELECTRODE
6
Selecting Tungsten Electrode
Preparing Tungsten
7
SECTION 6- PARTS LIST
Figure
Figure
6-1.
Complete
Torch
8
Assembly
9
6-2. Consumable Parts
Table 6-1. Cross Reference to
Competitive
Model
10
OM-!5638
Tf94
SECTION 1
SAFETY INFORMATION
-
modi.l a93
Read all
safety messages throughout
Obey
safety messages
all
to avoid
meaning of WARNING
Learn the
this manual.
injury.
and CAUTION.
2
\
1
L~~\~
Safety Alert Symbol
Signal Word
1
2
2
1
~LE~+RIC
SHOCK
can
kiIl.~
S
Installing
or
Input
power
servicing.
~
beforejj
Keep away
S
Keep
all
serious
or
MOVING PARTS
Do not touch live electrical parts
Disconnect
WARNING
a CAUTION
from
can
panels
CAUTION
injure. I
I
moving parts.
means
injury
injury or
happen.
and covers closed
when operating.
happen.
possible minor
equipment damage can
means
3
Statement Of Hazard And
Result
4
Safety
/
5
possible death
can
Instructions To Avoid
Hazard
Hazard
Symbol (If Available)
Safety Banner
5
a
6
READ SAFETY BLOCKS at start of
Section 3-1 before proceeding.
WARNING
6
Read
safety
blocks for each sym
bol shown.
NOTE
7
H
~
NOTE
Turn Off switch when
using high frequency.
Special
instructions for best oper
ation
Figure
1-1.
Safety
not related to
safety.
Information
SECTION 2- SPECIFICATIONS
Table 2-1.
Welding
Torch
Specification
Model
Description
MT: Miller Torch; L; Flex Lok; 17: 150 Ampere Rating; V: Gas Valve 12: 12-1/2 ft(3.8 m)Cable;
25: 25 ft (7.6 m) Cable; 1: One-Piece Cable
Example: MTL-17-12 Miller Torch; Flex Lok; 150 Ampere Rating; 12-1/2 ft (3.8 m): One-Piece
Cable
Description
Ampere Rating At 100% Duty Cycle
OCEN, ACHF
150
Cooling
Air
Method
Amperes Using Argon Gas
Cooling
Tungsten Size Capacity
.020 Thru 1/8 in
Options
See Rear Cover
And Accessories
12-1/2 ft
(0.5 Thru 3.2 mm)
(3.8 m)
25 ft
Cable
Total
Torch
Weight
Body
Dimensions And
Weight
Net: 2.5 lb
Net: 4.5 lb
Ship:
Ship:
3 lb
(1.1 kg),
(1.4 kg)
8 in (203 mm);
Handle Diameter: 3/4 in
5 lb
Length:
Weight:
5.6
oz
(7.6 m)
Cable
(160 g)
(2kg);
(2.3 kg)
12-1/2 ft (3.8 m)
Cable With Gas
Valve
(1.1 kg);
(1.4 kg)
(7.6 m) Cable
With Gas Valve
25 ft
Net: 2.5 lb
Net: 5 lb
Ship:
Ship:
3 lb
8-3/4 in (222 mm);
Handle Diameter: 7/8 in (23
(2.3 kg);
(2.3 kg)
5 lb
Length:
(19 mm)
Weight: 7.5
oz
mm);
(210 g)
OM-1563
Page
1
2-1.
Duty Cycle
CAUTION
;~
WELDING LONGER THAN RATED DUTY CYCLE
Do not weld at rated load
longer
can
damage
torch and void
warranty.
than shown below.
wiwarne.r 8/93
100%
Duty Cycle At 150 Amperes Using Argon Gas
Definition
10
Duty Cycle
percentageof
is
minutes that torch
rated load without
can
10
weld at
overheating.
Continuous
Figure
2-1.
Welding
sb1 5
8/93
Duty Cycle
SECTION 3- INSTALLATION & OPERATION
3-1.
Required
Required
Torch Parts And Torch
Assembly
Obtain the
Torch Parts
following parts (see
Section 6):
3
1
Tungsten Electrode (See
Section 5)
2
Cup
3
Collet
4
Standard Collet
5
Reverse Collet
Body
Reverse collet improves electrical
contact of tungsten electr.ode.
Power Cable
6
Assembling
Assembling
Torch Parts
Adapter
Torch
Body
7
Flex-Lok Head
8
Heat Shield
9
Backcap (Short Backcap
Shown)
10
0-Ring
7
10
3
Installing Tungsten
<
OR
~
To
adjust tungsten position,
backcap.
Keep
cup,
connections
heat
0-rings
shield,
loosen
tight. Replace
backcap, and
if cracked.
Installing Tungsten
Loosen
Tighten
-~
ST800
Figure
OM-1563
Page
2
3-1.
Required
Torch Parts And Torch
Assembly
486
3-2.
Adjusting
Flex-Lok Head
a
TOOLS
Do not
can
use
CAUTION_____
damage torch.
hand tools to
adjust
torch flex-bk head.
Hold stem and turn head
one
1
Head
2
Head
Adjusting
Stem
full turn.
I
Turn head and stem to desired
angle.
I
Hold stem and turn head until
Figure
3-2.
Adjusting
tight.
ST.142 083A
Flex-Lok Head
OM-1563
Page
3
3-3.
Connecting
Torch
l.~\ 4//~~~
BUILDUP OF SHIELDING GAS
S
Shut off
shielding
gas
supply
can
when not in
harm health
READ SAFETY BLOCKS at
or
beginning
kill.
use.
warnll 9/91
1~
If applicable, install
high-frequency
Turn Off welding power source, and
disconnect input power before in
unit.
stalling
torch.
Obtain the
Torch With Gas Valve
1
following
hose:
Gas Hose With 5/8-18
Hand Fittings
Right-
Connections:
2
Regulator/Flowmeter
3
Gas
4
Welding
5
Gas Valve
6
Torch Cable
7
Power Cable
Cylinder
Power Source
Adapter
Connect hose and cable to adapter
before connecting adapter to weld
output terminal.
8
Work
Clamp
Connect work clamp to clean, paintfree location on workpiece. as close
to weld area as
possible.
Use wire brush
or
clean metal at weld
Operating
to
Torch Gas Valve:
Valve controls gas
flow. Preftow aids
flow and
sandpaper
loint area.
pref low and postarc starting. Pre
posttlow prevent
from
forming
(oxidizing).
a
electrode
black
surface
Open valve iust before welding.
Turn valve clockwise 1/4 turn to
open, and counterclockwise 1/4 turn
to close.
8
After
welding,
about
Torch Without Gas Valve
10
leave
valve
open
seconds for every 100
of weld current. Close
amperes
valve when
postf low is finished.
3
Tools Needed:
~
5/8, 7/8 in
ST-BOO 487
Figure
OM-1563
Page
4
3-3.
Connecting
Torch
MAINTENANCE & TROUBLESHOOTING
SECTION 4
k~-~
~
~.:
Turn Off all power before
READ SAF ETY BLOCKS at beginning
of manual before proceeding.
maintaining.
Torch Cable
Figure
4-1. Maintenance Schedule
Table 4-1.
NOTE
Troubleshooting
Before using troubleshooting fable, check select ion and
electrode according to Section 5.
~_.
Trouble
Lack of
high frequency~ difficulty
of
tungsten
Remedy
in
establishin~
-
Check cables and torch for cracks
are not
arc.
CloSe to any
grounded
or
bad connections. Be
metal.
Repair
Check
and
Torch gas valve not
preparation
working property
welding power source high frequency
adjust spark gaps.
Have
or
sure
that torch cables
replace necessary parts.
control, and if necessary. check
Factory Authorized Service Station/Service Distributor
check valve.
(if applicable).
Wandering
arc
poor control of direction of
Tungsten electrode oxidizing and
bright after conctusion of weld.
not
arc.
remaining
Reduce gas flow rate.
Shield weld
Increase
zone
from drafts. Check and
tighten
all gas
fittings.
postftow time.
Check gas valve.
OM1563
Page
5
TUNGSTEN ELECTRODE
SECTION 5
mod2.1 3/93
NOTE ~
Foradditional in formation,
Arc
Welding (GTAW)
Wear clean
5-1.
gloves
to
see
yourdistributorfora handbook on the Gas Tungsten
process.
prevent contamination of tungsten electrode.
Selecting Tungsten Electrode
Table 5-1.
Tungsten
Size
Amperage Range
Electrode Diameter
DC
Argon Electrode
Negative/Straight Polarity
-
Gas
DC
Argon Electrode
Positive/Reverse Polarity
Type.
-
Polarity
AC
Argon Using
High Frequency
AC
Argon
Wave Using
Balanced
High Freq.
Pure
Tungsten
(Green Band)
.010
UptolS
.020
5-20
.
Uptol5
UptolO
5-20
10-20
10-60
20-30
.040
15-80
1/16
70-150
10-20
50-100
30-80
3/32
125-225
15-30
100-160
60-130
.
1/8
225-360
25-40
150-210
100-180
5/32
360-450
40-55
200-275
160-240
3/16
450-720
55-80
250-350
190-300
1/4
720-950
80-125
325-450
250-400
2% Thorium Alloyed
Tungsten (Red Band)
.
.010
Upto2S
Upto2O
Uptol5
.020
15-40
15-35
5-20
.040
25-85
*
1/16
50-160
10-20
20-80
20-60
50-150
60-120
3/32
135-235
15-30
130-250
100-180
1/8
250-400
25-40
225-360
160-250
5/32
400-500
40-55
300-450
200-320
3/16
500-750
55-80
400-500
290-390
1/4
750-1000
80-125
600-800
340-525
.
Upto2O
Uptol5
Zirconium
Alloyed
Tungsten (Brown Band)
.010
.020
15-35
5-20
.040
20-80
20-60
1/16
50-150
60-120
3/32
130-250
100-180
225-360
160-250
300-450
200-320
400-550
290-390
600-800
340-525
1/8
.
5/32
.
3/16
1/4
Typical argon shielding gas flow
rates are 15 to 35 cfh
(cubic feet per hour).
Not Recommended.
The figures listed
manufacturers,
OM-1563
Page
6
are
intended
as a
guide
and
are a
composite of
recommendations from American
Welding Society (AWS)
and electrode
S -0009
5-2.
Preparing Tungsten
Tungsten
2
Balled End
Ball end of tungsten before welding
by applying either an ac amperage
slightly higher than what is recom
1-1/2 Times
Ele ctrode Diameter
____________________
Electrode
1
mendedforagivenelectrodediam
eter
(see Table 5-1), or a
positive amperage.
dc elec
trode
2
Ret. S-0161
Figure
5-1.
Preparing Tungsten
For AC Or DC Electrode Positive
(DCEP) Welding
CAUTION
a
FLYING SPARKS AND HOT METAL
Shape tungsten
Keep
electrode
only
on
grinder
with
and start fires.
can cause
injury
properguards
in a safe location
wearing proper face, hand, and body protection.
flammables away.
w~rn2.I 9/91
1
Tungsten
2
Tapered
2
\
/
Electrode
End
Grind end of tungsten on fine grit,
hard abrasive wheel before weld
ing. Do not use wheel for other jobs
or
tungsten
nated
become contami
lower weld quality.
can
causing
2-1/2 Times
Electrode Diameter
Ret. S0161
1
1
Stable Arc
2
Flat
Diameter of this flat determines
4~
amperage capacity.
~
SI
Ideal
3
Grinding
Wheel
4
Straight
Ground
Stable Arc
Tungsten Preparation
2
Ret. S-0162
1
Arc Wander
2
Point
3
Grinding
4
Radial Ground
Wheel
3
4
Wrong Tungsten Preparation
Figure
5-2.
Wandering
Preparing Tungsten
Arc
For DC Electrode
Ret. S.0162
Negative (DCEN) Welding
OM-1563
Page
7
SECTION 6- PARTS LIST
Fig
6-2
4
16
J27
3.
Fig6-2
18
/
F-i
6
20
Figure
Stock
Item
No.
Model
No.
No.
1
2
3
.
5
5
5
6
7
.
.
.
.
118 526
.
116 256.
.
.119 914.
.
.119 915
.
116203.
.
..
.
.116260.
.
.
.
FL3L
.
3GHS
...
.
.
.
.
.
300HS
.
...
3GHSLD
..
01-0009
..
..
.
..
116 259.
.
116 258.
...
.
300S
.
...
.
9
9
.
.
10.
11
.
...
300L
.116260.
...
300R
.116 257
.
.
.
12.
.
.
13. ..116217.
.
15
16
.
.
..
116 216
116 218
..
116 220
..
17.
.
..
...
.01-0012
.01-0002
...
.
..
01-0007
..
01-0013
..
01-0002
.
.
..
.
..
.
.
116 207
13. .116217. .01-0002
..
18. .118510
19.
20.
20
21
.
.
22.
.116 276.
..
..
116 271
.
.
..
116272.
.
1 5PCA...
1512PCHF
1525PCHF
.
.
1
1
1
1
1
1
0-RING
FLEX LOC TORCH BODY, w/valve (consisting of)
0-RING
0-RING
VALVED HANDLE, models w/valve (consisting of)
..
Quantity
CompleteTorch Assembly
COLLET, (see Fig 6-2)
BACKCAP, short (consisting of)
BACKCAP, medium (consisting of)
BACKCAP, long (consisting of)
..
FLHV
.
.116217.
11
...
116 208
116219.
..
14.
300M
6-1.
1
1
1
1
1
1
2
1
SCREW, non-conductive
HANDLE ADAPTER, models w/valve (consisting of)
1
0-RING
FLEX LOC TORCH BODY,
0-RING
HANDLE
1
1
..
(consisting of)
..
POWER CABLE ADAPTER
HI-FLEX POWER CABLE, 12-1/2ft (consisting of)
HI-FLEX POWER CABLE, 25tt (consisting of)
1
2
1
1
1
1
120721
RH NUT
2
120720
RINGNUT
2
.
.
. OPTIONAL
BE SURE TO PROVIDE MODEL AND STYLE NUMBER WHEN ORDERING REPLACEMENT PARTS.
OM-1563
Page
8
B67
Assembly
0-RING
8
9
Torch
TUNGSTEN, electrode (consult your welding supply distributor)
CUP, (see Fig 6-2)
COLLET BODY, (see Fig 6-2)
3 SERIES HEAD, (consisting of)
HEAT SHIELD, std
HEAT SHIELD, small dia gas lens
HEAT SHIELD, large dia gas lens
HEAD ADJUSTMENT STEM, (consisting of)
300R
...
Complete
Description
Figure
4
6-1.
SB120
S-0768
USAGE
Duty Using
When
RECOMND
Body
Contiu s Cotle/ t
25%
INDCATE
By
Reduce RatingShort
AREAS
SHADE
Standr Coliet 3C-X
SELCTOR
PARTS
Rev rse Colte 7C-X
Consumable
ENDS
FRONT Ler yrli
CONSUMABLE STANDR
Body
30 1-IS Shreld
1 6256 Ler grh
1 9 14
3GHS Shield No
Diametr Lens 3GHSLO Sheld 1915
3GLX
LENGTH Standr Col et 3CBX Use Heat SiockNo Standr Gas 3GL-X Use Heal Stock LargeGas
I
adpter.
cable
torch). power
a
complet require
to
also
required cable
Cup
Gas
Parts
compsite
and Rex
Body high
Colte with
(Note: Torches
Lens
6-2.
NO
Use Heat Stock
Figure
Table 6-1. Cross Reference To
STOCK NO.
MODEL NO.
COMPETITIVE
NO.
116367
3020
10N21
116 368
10N22
10N24
116 379
3C40
3C116
3C332
3C418
7C20
116380
7C40
N/A
116381
7C116
N/A
116369
116370
116371
70332
116 382
7C418
116 383
3CB20
116361
10N23
10N25
N/A
Competitive
STOCK NO.
Model
MODEL NO.
COMPETITIVE
NO.
119 934
3AG6
54N16
119935
3AG7
54N15
119936
3AG8
54N14
119937
3AG11
54N19
119 902
3GLL332
45V64
119903
3GLL418
995795
119911
3AG8LD
57N74
119 912
3AG1OLD
53N88
N/A
119 913
3AG12LD
53N87
10N29
116373
4C20
N/A
116 374
4C40
1 0N22S
N/A
116 362
3CB40
1 0N30
116363
3CB116
10N31
116375
40116
10N23S
10N32
116 376
4C332
10N24S
10N28
116377
4C418
10N25S
N/A
116 379
7020
N/A
1 05Z43
116 380
7040
N/A
105Z42
116381
7C116
N/A
105Z44
116382
70332
N/A
105Z45
116383
70418
N/A
40B20
N/A
3CB332
116 364
3CB418
303
116365
116 347
3C4
116 348
3C5
116349
306
116350
3C7
116351.
116 352
308
08N78
116 355
116353
3010
08N79
116356
4CB40
17CB20
4CB116
17CB20
116354
3012
08N80
116357
116343
3C4L
12N03
116358
406332
17CB20
116344
3C5L
105Z60
116359
4CB418
17CB20
116345
3C6L
12N02
116337
204
13N14
116346
3C7L
105Z61
116338
2C5
13N15
116330
3A4
10N50
116339
2C6
13N16
116331
3A5
10N49
116340
2C7
13N17
116332
3A6
10N48
116341
208
13N18
116333
3A7
10N47
116342
116 334
3A8
10N46
116.326
2010
2C3L
796F70
116335
3A10
10N45
116327
2C4L
796F71
2C5L
796F72
..
13N19
116336
3A12
10N44
116328
119926
3GL20
45V29
116329~
2C6L
796F73
45V24
116310
2A4
13N08
2A5
13N09
13N10
3GL40
119927
119928
3GL116
45V25
116311
119929
3GL332
45V26
116312
2A6
119930
3GL418
45V27
116313
2A7
13N11
119917
3CG4
54N35
116314
2A8
13N12
119918
3CG5
54N34
116315
2A10
13N13
119 919
3CG6
54N33
119 905
4GL20
N/A
119 920
3CG7
54N32
119 906
4GL40
N/A
119 921
3CG8
54N31
119 907
4GL116
N/A
119 922
30G11
54N35
119 908
4GL332
N/A
119923
N/A
119909
4GL418
N/A
119 924
3CG12
3CG14
N/A
119 893
2AG4
53N58
119 925
3CG16
N/A
119 894
2AG5
53N59
119 932
3AG4
54N18
119 895
2AG6
53N60
119 933
3AG5
54N17
119 896
2AG7
53N61
OM-1563
Page
10
OPTIONS AND ACCESSORIES
For TOTAL TlG~ system, select
each of the following items:
one
FUSE BLOCK ASSEMBLY
For
use
GAS REGULATORS
with watercooled
With 580 CGA inlet connector
torches. Five fuse links included
Welding
power
TIG torch
source
Up
to 260
Amps
260 to 550
TIG kit (see TIC kits listed below)
Coolant system (if using water
cooled torch)
Remote control
Note: The other items necessary to weld
are power source primary cable.
shielding gas,
and filler metal.
(#116 163)
(#116 164)
Amps
Protects torch from
overheating
damage if water is not
circulating or if torch is run
considerably higher than its
capacity.
and
of 5
(#127 661)
regulator/flowmeter has outlet
pressure preset at 25 PSIG; the
maximum inlet is 3000 PSIG and
SCFH gas
has 540
AF150
rated
delivery.
(#127 662)
This
flowgauge regulator has
adjustable gas delivery of 825
SCFH with argon gas.
Note: Additional fuse links available in
packages
HRF2425
This
(#116 559).
hG ACCESSORY KITS
and MTL17
KIT FOR MT17
SERIES AIRCOOLED
TORCHES
121/2 ft. (3.8 m) length
(#129 590)
25 ft. (7.6 m) length
(#129 589)
(TAK)
For use with watercooled
torches
each of the
CEB
(Fused up
kit
hookup
(THK-2)
backcap and
(TAK1)
one
three
(.040, 1/16, and 3/32
in.) of collets, collet bodies, cups,
tungsten
Regulator/flowmeter (HRF2425)
and 2% thoriated
Ground cable with clamp, 121/2
ft. (3.8 m) or 25 ft. (7.6 m) lengths
Note: Power cable
Amps)
body, alumina cup, and 2%
thoriated tungsten pieces.
TAK1
(#129 585)
(#116 162)
Amps)
Allows hose and cable
assembly
to
TIG TORCH CABLE
COVERS
Reinforced plastic cable
material. A
are
available in
protection. All components
protected by a strong,
nonconductive
and 25 ft.
enclosure.
Note: Hose and cables from power
source to CEB box are not supplied. Use
extension hoses and
cable for
optimum
length
large and small cover is
length to fit 121/2 ft.
(3.8 and 7.6 m) torches.
CC12S
(#126 150)
(3.8 m) torches. Fits
Miller TIG Torch models 80 Amps
through 250 Amps.
For 121/2
ft.
CC25S
adapter 105Z57
(#116 276) must be ordered for torches
with onepiece composite, cable.
RMCH14
and RLCH14
CONTACTOR SWITCHES
Torch handle with
a
builtin
switch
covers
made of tear and flame resistant
fuse
large diameter
heavy welding
performance.
one backcap and three
following: collet, collet
0.40, 1/16, and 3/32 in. for MT17
be extended from the power
source. Available with or without
Consumable accessory kit
to match TIG torch
(#116 161)
to 260
to 550
Kits include
(#120 797)
CEB 550FA
(260
Hose & hardware
(Nonfused)
CEB 260FA
Kit includes:
sizes
CABLE EXTENSION BOX
(#126 151)
For 25 ft. (7.6 m) torches. Fits
Miller TIG Torch models 80 Amps
through
250 Amps.
REMOTE CONTROLS
for remote contactor control of
POWER CABLE ADAPTERS
(Required on torches with one-piece.
high-flex cable assembly and all
water-cooled torches.)
Adapter
105Z57
Stock No.
(#116 276)
TIG power
Includes 25 ft. (7.6 m)
control cord with 14pin plug.
Miller solidstate
AMTV REMOTE CONTACTOR
AND CURRENT CONTROL
sources.
(#152 608)
Linear motion control fastens to
RMCH14S
(Momentary)
(#129 336)
RLCH14S
TIC torch handle
(Locking)
alternative to
(#129 335)
with
CONNECTOR KIT
80
Amp Torch
Amp Torch
200 Amp Torch
250/350 Amp Torch
For direct connection of
torches
or
TIG HOSE HOOKUP
KITS (THK)
watercooled
(#135
(#135
(#135
(#135
492)
493)
494)
495)
onepiece
TIC
torches into power
sources
with
Internationalstyle
connectors.
(Watercooled)
(#128 065)
THK2
(Aircooled)
(#128 066)
source
a
power
and, if applicable, water
coolant system.
two Velcro
practical
foot control.
(8.5 m)
14pin plug.
control cord
RCC REMOTE CONTACTOR
RCC14
Provides the necessary hoses and
hardware to connect either air or
water-cooled torches to
a
AND CURRENT CONTROL
THK1
150
a
Includes 28 ft.
-
INTER NATIONAL TIG TORCH
using
straps. The AMTV is
(14pin plug)
(#151 086)
RCC5 (5pin plug)
(#157 365)
Rotary motion fingertip control
fastens to TIG torch using two
Velcro straps. Includes 28 ft. (8.5
m) control cord.
1192