1
MANUAL
DEL OPERADOR
®
19.2 VOLT PAreNT
SPRAYER TOOL
HERRAMIENTA
ROCIADORA
DE PINTURA DE 19,2 V
Model No.
315.SS630
N0mero de modelo
31 5.SS630
WARNING:
To reduce the risk
of injury, the user must read and
understand the operator's manuaU
before using this product.
BATTERIES AND CHARGERS
SOLD SEPARATELY
ADVERTENCJA:
Para reducir eU
nesgo de Uesiones, eUusuano debe Ueer
y comprender eUmanuaU deUoperador
antes de usar este producto.
LAS BATI=RIAS Y LOS CARGADORES
SE VENDEN POR SEPARADO
Customer Help Line: 1-800-932-3188
TeU6fonode atenci6n aUconsumidor: 1-800-932-3188
Sears Brands
Management,
3333 Beverly
Rd., Hoffman
Estates,
IL 60179 USA
Visit the Craftsman _ web page: www.sears.com/craftsman
Visite el sitio web de Craftsman'S>:
www.sears.com/craftsman
987000-915
8-5-11 (REV:04)
Save this
manual
Guarde
este manual
for future
para futuras
reference
consumta
Garant[a
........................................................................
2
Warranty.......................................................................
2
introduction
..................................................................
2
Introducci6n
..................................................................
2
importantSafetyinstructions
.......................................
3
Instrucciones
desegundadimportantes
......................
3
SpecificSafetyRuUes
.................................................
4-5
RegUas
desegundadespecificas
...............................
4-5
S[mboUos
.......................................................................
6
SymboUs
........................................................................
6
Features
........................................................................
7
Caracteristicas
..............................................................
7
Armado.........................................................................
7
AssembUy
......................................................................
7
Funcionamiento
.........................................................
8-9
Operation
...................................................................
8-9
Maintenance
...............................................................
10
Mantenimiento
............................................................
10
Troubleshooting
..........................................................
11
Correcci6n
de probUemas
...........................................
11
IHustrated
PartsList....................................................
12
Figuranumeras(ilustraciones)
.....................................
iqi
FigureNumbers(HUustrations)
.....................................
iqi
Pedidosdepiezas/ Servicio .................... p_g. posterior
PartsOrdering/Service
..................................
BackPage
CRAFTSMAN ® ONE YEAR LiMiTED WARRANTY
FOR ONE YEAR from the date of purchase, this product is warranted against any defects in material or workmanship.
With proof of purchase, defective product will be replaced free of charge.
For warranty
coverage detaiJs to obtain free replacement,
visit the web site: www, craftsman,com
This warranty does not cover the atomizer valves, the cleaning brush or the lubricant, which are expendable parts that
can wear out from normal use within the warranty period.
This warranty is void if this product is ever used while providing commercial
services or if rented to another person.
This warranty gives you specific legal rights, and you may also have other rights which vary from state to state.
Sears Brands Management
GARANTiA
Corporation,
Hoffman
LIMmTADA DE CRAFTSMAN
Estates, mL60179
POR UN ANO
Este producto tiene garant[a por cualquier defecto en material o mano de obra DURANTE UN ArgO desde la fecha de
compra. Los productos defectuosos se remplazar_n sin cargo si presenta un comprobante de pago.
Si desea conocer los detalles de la cobertura
sitio Web: www.craftsman.com
de la garantia
para conseguir
reparaciones
o recambios,
visite el
Esta garantia no cubre la v_lvulas atomizadoras, la cepillo para limpiar o la lubricante, que es una pieza fungible que
puede desgastarse por el uso normal durante el periodo de garant[a.
La garantia pierde validez si este producto se utiliza mientras se prestan servicios comerciales o si se alquila a otra
persona.
Esta garant[a le otorga derechos legales especificos y tambi6n puede gozar de otros derechos que varian segOn el
estado.
Sears Brands Management
Corporation,
Hoffman
Estates, mL60179
This product has many features for making its use more pleasant and enjoyable. Safety, performance,
have been given top priority in the design of this product making it easy to maintain and operate.
and dependability
Esta producto ofrece numerosas caracteristicas para hacer mas agradable y placentero su uso. En el diseSo de este
producto se ha conferido prioridad a la seguridad, el desempeSo y la fiabilidad, por Io cual se facilita su manejo y
mantenimiento.
2
_
WARNING:SAVETHESEINSTRUCTmONS.
To
reducethe risksoffireor expbsion,eUectric
shock,
andtheinjuryto persons,readandunderstand
aH
instructionsincludedinthis manualBefamiUiar
with
the controUs
andtheproperusageofthe equipment.
WARNING:
Do not aim the nozzle at, or spray any person or
animal.
Keep hands and other body parts away from the
discharge. For example, do not try to stop leaks
with any part of the body.
READ ALL mNSTRUCTmONS
Always use the spray tip. Do not spray without
tip in place.
KNOW YOUR POWER TOOL. Read the operator's
manuaU carefully. Learn the machine's appUications and
Uimitations as well as the specific potentiaUhazards reUated
to this tooL
WAF{NING:
Only use a spray tip specified
To reduce the risk of fire or expbsion:
High pressure spray is able to inject toxins into the
body and cause serious bodily injury. In the event
that injection occurs, seek medical attention immediately.
Paint or solvent flowing through the equipment is
able to result in static electricity. Static electricity
creates a risk of fire or explosion in the presence of
paint or solvent fumes.
Check parts for signs of damage.
aged parts.
haloge-
Know how to stop the unit quickly. Be thoroughly
familiar with the controls.
Verify that all connections
ing this unit.
Do not smoke in the spray area.
Do not operate light switches, engines, or similar
spark-producing
products in the spray area.
For household
WARNING:
Know the contents of the paints and solvents being
sprayed. Read all Material Safety Data Sheets
(MSDS) and container labels provided with the
paints and solvents. Follow the paint and solvent
manufacturer's safety instructions.
equipment
Replace any dam-
This system is capable of producing 2500 psi. Only
use replacement parts or accessories that are specified by the manufacturer and that are rated a minimum of 2500 psi.
Keep spray area well ventilated. Keep a good supply
of fresh air moving through the area. Keep pump
assembly in a welPventilated area.
Fire extinguisher
working.
by the manufacturer.
Do not leave the unit energized while unattended.
When the unit is not in use, turn off the unit in
accordance with the manufacturer's
instructions.
For units intended for use with only water-based or
mineral spirit-type materials with a minimum flash
point of 140°F (60°C), do not spray or clean with
liquids having a flash point less than 140°F (60°C).
Keep area clean and free of paint or solvent containers, rags, and other flammable materials.
spray
Use caution when cleaning and changing spray tips.
in the case where the spray tip clogs while spraying,
follow the manufacturer's instructions for turning off
the unit before removing the spray tip to clean.
Do not spray fiammabUe or combustibUe matedaUs
near an open flame or sources of ignition such as
cigarettes, motors, and electrical equipment.
Do not use a paint or a solvent containing
nated hydrocarbons.
To reduce the risk of skin injection:
shall be present and
3 - English
are secure before operat-
use only.
To reduce the risk of injury:
Do not operate or spray near children.
away from equipment at all times.
Keep children
Do not overreach or stand on an unstable support.
Keep effective footing and balance at all times.
Stay alert and watch what you are doing.
Do not operate the unit when fatigued
influence of drugs or alcohol.
or under the
Keepguardsin placeandinworkingorder.Never
operatethetooUwithanyguardor coverremoved.
MakesureaHguardsareoperatingpropertybefore
eachuse.
Toreducethe risk of injury,keepchildrenandvisitors
away.Allvisitorsshouldwearsafetyglassesandbe
keptasafedistancefromworkarea.
Keepthe areaof operationc_earof all persons,
particularly
smallchildren,andpets.
Useright took Don'tforcetoolor attachment
to doa
job it wasnotdesignedfor.Don'tuseit fora purpose
notintended.
Donot operatethe equipmentwhilebarefoot
or whenwearingsandalsor similarlightweight
footwear.Wearprotective
footwearthatwillprotect
yourfeetandimproveyourfootingonslippery
surfaces.
Exercisecautionto avoidsJippingor falling.
Alwaysweareyeprotectionwith sidesHe_ds
markedto compJywith ANSiZ87.1.Followingthis
rulewillreducetheriskof seriouspersonalinjury.
UseonJyrecommendedaccessories.Theuseof
improperaccessories
maycauseriskofinjury.
FoJlowthe maintenanceinstructionsspecifiedin
this manual.
Checkdamagedparts.Beforefurtheruseofthe
tool, a guardor otherpartthatis damaged
should
becarefullycheckedto determine
thatitwill operate
properlyandperformits intendedfunction.Checkfor
alignmentofmovingparts,bindingof movingparts,
breakage
of parts,mounting,andanyotherconditions
thatmayaffectitsoperation.
A guardor otherpartthat
is damagedmustbeproperlyrepairedor replacedby
anauthorized
servicecenterto avoidriskof personal
injury.
NeverleavetooJrunningunattended.Turnpower
off. Don'tleavetooluntilit comesto a completestop.
BethoroughlyfamiJiarwith controls.Knowhowto
stopthe productandbleedpressurequickly.
Keeptool dry,dean, andfreefrom oil andgrease.
Alwaysusea cleanclothwhencleaning.Neveruse
brakefluids,gasoline,petroleum-based
products,or
anysolventsto cleantool.
Donot usetool if switchdoesnot turn it off. Have
defectiveswitchesreplacedby anauthorized
service
center.
Beforec_eaning,
repairing,or inspecting,shutoffthe
motorandmakecertainallmovingpartshavestopped.
Avoiddangerousenvironment.Don'tuseindampor
wetlocationsor exposeto rain.Keepworkareawelllit.
Neverdirecta paintstreamtowardpeopJeor pets,
or anyeJectricaldevice.
Neverstartthe machineif icehasformedin anypart
oftheequipment.
WARNING:Highpressurespraycanbe dangerous
if subjectto misuse.Thespraymustnotbedirected
at persons,animals,electricaldevices,or themachine
itself.
Keepawayfromhot parts.
Checkbolts andnuts forlooseness
beforeeachuse.
Alooseboltor nutmaycauseseriousmotorproblems.
Beforestoring,allowthe productto cook
Storein a cooJ,weH-ventiJated
area,safelyaway
fromsparkand/orflame-producing
equipment.
WhenservicinguseonJyidenticalreplacement
parts.Useof anyotherpartsmaycreatea hazardor
causeproductdamage.
Neverusethe sprayerwithouta spraytip installed.
Aninjectioninjurycan leadto possibleamputation.
Seea physicianimmediately.
Neverput yourhandin front of the spraytip whenin
use.Gloveswill notalwaysprovideprotectionagainst
aninjectioninjury.
Wearclothingto keeppaintoff skin andhair,
alongwith a maskor respiratorduringuse.Paints,
solvents,andothermaterialscanbeharmfulif inhaled
or iftheycomeintocontactwiththe body.
AJwaysshut the unit off, removethe battery pack,
andreJeasepressurebeforeservicing,cleaningthe
tip or guard,changingthe tip, or leavingunattended.
Plasticcancausesparks.Neverhangplasticto
enclosea sprayarea.Donotuseplasticdropcloths
whensprayingflammable
materials.
Donot sprayoutdoorsonwindydays.
Donot attemptto dean or unclogthe spraytip with
yourfinger.
A batteryoperatedtooJwith integralbatteriesor a
separatebatterypackmustbe rechargedonlywith
the specifiedchargerfor the battery.Achargerthat
maybesuitableforonetypeof batterymaycreatea
riskoffirewhenusedwithanotherbattery.
Usebatteryoperatedtool onlywith specifically
designatedbatterypack.Useof anyotherbatteries
maycreatea riskoffire.
Usebatteryonlywith chargerlisted.Forusewith
19.2Vnickel-cadmiumand19.2VJithiumoion
battery
packs,seetool/appliance/battery
pacWcharger
correlation
supplement
988000-272.
4 - English
Disconnectbatterypackfromtool beforemaking
any adjustments, changing accessories, or storing
the tool. Such preventive safety measures reduce the
risk of starting the tooU accidentally.
When battery pack is not in use, keep it away from
other metal objects mike:paper dips, coins, keys,
nails, screws, or other small metal objects that can
make a connection from one terminal to another.
Shorting the battery terminaUs together may cause
sparks, burns, or a fire.
Battery tools do not have to be plugged into an
electrical outlet; therefore, they are always in
operating condition. Be aware of possibJe hazards
when not using your battery tool or when changing
accessories.
Following this rule will reduce the risk of
electric shock, fire, or serious personal injury.
Do not place battery tools or their batteries near
fire or heat. This will reduce the risk of explosion and
possibly injury.
Do not crush, drop or damage battery pack. Do
not use a battery pack or charger that has been
dropped or received a sharp bJow. A damaged
battery is subject to explosion. Properly dispose of a
dropped or damaged battery immediately.
CALIFORNIA
_
WARNING:
PROPOSITION
Batteries can explode in the presence of a source
of ignition, such as a pilot light. To reduce the risk of
serious personal injury, never use any cordless product
in the presence of open flame. An exploded battery
can propel debris and chemicals, if exposed, flush with
water immediately.
Do not charge battery tooJ in a damp or wet
mocation. Following this rule will reduce the risk of
electric shock.
For best results, your battery tool should be charged
in a location where the temperature is more than
50°F but less than 100°R Do not store outside or in
vehicles.
Under extreme usage or temperature conditions,
battery aeakage may occur, ff liquid comes in
contact with your skin, wash immediately with soap
and water, mfliquid gets into your eyes, flush them
with dean water for at least 10 minutes, then seek
immediate medical attention. Following this rule will
reduce the risk of serious personal injury.
Never leave a tool unattended
installed.
with the battery
Save these instructions.
Refer to them frequently and
use them to instruct other users. If you loan someone
this tool, loan them these instructions also.
65
This product, and the paints designed to be applied with this product, may contain chemicals,
including lead, known to the State of California to cause cancer, birth defects, or other reproductive
hands after handling.
harm. Wash
Some examples of these chemicals are:
o lead from lead-based paints,
crystalline silica from bricks and cement and other masonry products, and
arsenic and chromium from chemically-treated
lumber.
Your risk from these exposures varies, depending on how often you do this type of work. To reduce your exposure
to these chemicals: work in a well ventilated area, and work with approved safety equipment, such as those dust
masks that are specially designed to filter out microscopic particles.
5 = English
ThefollowingsignaU
wordsandmeanings
areintendedto expUain
the UeveUs
of riskassociatedwiththis product.
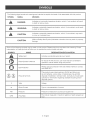
SYMBOL SmGNAL
MEANmNG
indicatesanimminentlyhazardous
situation,which,if notavoided,will resuUt
in deathorseriousinjury.
WARNING:
indicatesa potentiallyhazardous
situation,which,if notavoided,couUd
resuUt
in deathorseriousinjury.
CAUTmON:
indicatesa potentiallyhazardous
situation,which,if notavoided,mayresult
in minor or moderate injury.
(Without Safety Alert Symbol) Indicates a situation that may result in property
damage.
CAUTION:
Some of the following symbols may be used on this product. Please study them and learn their meaning. Proper
interpretation of these symbols will allow you to operate the product better and safer.
SYMBOL
V
PSI
GPH
NAME
DESIGNATION/EXPLANATION
Safety Alert
indicates a potential personal injury hazard.
Read Operator's Manual
To reduce the risk of injury, user must read and understand
operator's manual before using this product.
Eye Protection
Always use eye protection with side shields marked to comply
with ANSI Z87.1.
Recycle Symbols
This product uses nickel-cadmium (Ni-Cd) and lithium-ion
(Li-ion) batteries. Local, state, or federal laws may prohibit
disposal of batteries in ordinary trash. Consult your local waste
authority for information regarding available recycling and/or
disposal options.
Volts
Voltage
Direct Current
Type or a characteristic
Pressure
Pressure is measured in pounds per square inch
Flow Rate
Flow rate is measured in maximum gallons of paint sprayed per
hour
6 - English
of current
PRODUCT
SPECIFICATmONS
Container Size ...................................................................................................................................................................
Motor ....................................................................................................................................................................
KNOW YOUR
PAINT SPRAYER
mNNOVATiVL= MOTOR
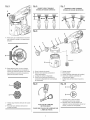
See Figure 1, page L
The safe use of this product requires an understanding
of the information on the product and in this operator's
manual as well as a knowledge of the project you are
attempting. Before use of this product, familiarize yourself
with aHH
operating features and safety ruHes.
C3 ENERGY
iNDiCATOR
WINDOW
DESIGN
The innovative motor design means less vibration and
noise when using your sprayer.
QUICK-LOCK
CONTAINER
The quick-Hock feature aHHowseasy instaHHationand
removal of the paint container.
SPRAY
The C3 energy indicator wdndow located on the side of the
handle will light when a Craftsman! 9.2 V compact lithiumion battery pack (315.113710) is installed and has charge.
1 qt.
19.2 Volt DC
TraPS
The two spray tips provided allow you to choose between
different spray patterns - vertical, horizontal, and round.
NOTE: Feature wiHHnot Hight with Craftsman 19.2 V nickeHcadmium battery packs.
UNPACKING
_
This product has been shipped completely assembled.
Carefully remove the product and any accessories from
the box. Make sure that all items listed in the packing
list are included.
_
WARNING:
Do not use this product if it is not
completely assembled or if any parts appear to be
missing or damaged. Use of a product that is not
properly and completely assembled could result in
serious personal injury.
inspect the product carefuHHyto make sure no breakage
or damage occurred during shipping.
Do not discard the packing material until you have
carefully inspected and satisfactorily operated the
product.
if any parts are damaged or missing, pHease caHH
1-800-932-3188 for assistance.
PACKING
LIST
Paint Sprayer with Quick-Lock Container and Wide Fan Tip
Replacement Atomizer Valve
Brush CHeaner
Lubricant
Round Tip
Operator's Manual
7 - EngHish
WARNING:
if any parts are damaged or missing do
not operate this product untiHthe parts are repHaced.
Use of this product with damaged or missing parts
could result in serious personal injury.
WARNING:
Do not attempt to modify this product
or create accessories not recommended for use with
this product. Any such alteration or modification is
misuse and could result in a hazardous condition
leading to possible serious personal injury.
WARNING:
To prevent accidental starting that
could cause serious personal injury, always remove
the battery pack from the product when assembling
parts.
WARNING:DonotallowfamiUiadty
withproducts
to makeyoucareUess.
Remember
thata careUess
fractionof a secondissufficientto inflictserious
injury.
WARNING:AUways
weareyeprotectionwithside
shbUds
markedto compUy
withANSiZ87.1.FaiUure
to dosocouUd
resuUt
influidsenteringyoureyes
resuUting
inpossibUe
seriousinjury.
To remove:
Depress the latches on both sides of the battery pack
to release the battery pack and remove it from the tool.
_
WARNING:
Battery tools are always in operating
condition. Therefore, switch should always be locked
when not in use or carrying at your side.
_1_ WARNING:
Risk of fire or explosion. Spray area
must be welPventilated and away from sparks or
flames.
WARNING:Donotuseanyattachments
or
accessories
notrecommended
bythemanufacturer
ofthisproduct.Theuseof attachments
or
accessories
notrecommended
canresuUt
inserious
personaU
injury.
APPLICATmONS
FiLLiNG
SPRAYER
WiTH
PAiNT/STAIN
See Figure 3 =4, page L
Remove and discard any skin that has formed on top of
the paint or stain, then thoroughly mix the material in its
original container before beginning.
NOTE: Older containers of stain and paint may need to be
strained before use.
You may use this product for the purposes Uistedbebw:
interior and exterior painting and staining of decks,
outdoor furniture, fences, and walls
Remove the battery pack from the sprayer.
This product will accept Craftsman _>19.2 V lithium-ion
battery packs and Craftsman _>19.2 V nickePcadmium
battery packs.
Remove the quick-lock container by twisting counterclockwise so that the arrow on the container lines up
with the "unlock" symbol on the lid.
For complete charging instructions, refer to the Operator's
Manual for the battery packs and chargers listed in the
Specific Safety instructions.
Fill the container with paint or stain as desired. Do not
fill above the max fill mark on the container.
8ATTI=RY
Reinstall the container on the sprayer and twist
clockwise so that the arrow on the container lines up
with the "lock" symbol on the lid.
PROT_=CTmON FI=ATURI=S
Craftsman _ 19.2 V lithium-ion battery packs are designed
with features that protect the lithiumqon cells and
maximize battery life.
SELECTING
BATTERY
Use the round tip for latex paints, oil-based paints,
and stains. This tip sprays in a round pattern.
PACK
Use the wide fan tip for latex paints. This tip
sprays in a wide pattern that can be adjusted from
horizontal to vertical.
See Figure 2, page L
_
WARNING:
SPRAY Trap
See Figure 5, page iL
if the tool stops during use, release the trigger to reset
and resume operation. _fthe tool still does not work, the
battery needs to be recharged.
TO mNSTALL / REMOVE
THE PROPER
Always remove battery pack from
your tool when you are assembling parts, making
adjustments, cleaning, or when not in use. Removing
battery pack will prevent accidental starting that
could cause serious personal injury.
To switch tips:
To install:
Place the battery pack in the tool. Align the raised rib
on the battery pack with groove in the battery port.
Make sure the latches on each side of the battery pack
snap in place and that the battery pack is secured in
the tool before beginning operation.
8 - English
Remove the battery pack from the sprayer.
Remove the installed tip by turning it counter-clockwise.
Install the desired tip and rotate clockwise to tighten
securely.
NOTE: The tip should be tightened securely by hand. A
too loose or overtightened tip may cause the sprayer to
leak or be damaged.
Tochangedirectionoffan tip:
Slightlyloosenthefantip by rotatingcounter-clockwise
1/4turn.
Rotatetheadjustingarm1/4turninthedirection
neededto switchthedirectionofthetip spray.
Whileholdingtheadjustingarminposition,rotatethe
widefantip clockwiseuntilsecurelytightened.
_
Depress the trigger to begin the spray off the material you want to paint. Operate the sprayer in straight
horizontal or vertical strokes across the surface
being painted, then release the trigger off the material to end the stroke.
NOTE: For spray quality consistency when using
thinner paints, it may be necessary to keep the trigger depressed between strokes.
When finished, remove the battery pack, return any
unused paint or stain to its original container, and
thoroughly clean the sprayer.
WARNING:Toreducethe riskof injection,donot
pointsprayeratanypartofthebodyor person.
in caseofskininjection,seekmedicalattention
immediately.
Donotusewithoutspraytip in place.
OPERATING
CAUllON:
It is important to thoroughly clean the
sprayer after each use or when changing colors.
Allowing paint or stain to remain in an idle tool for an
extended period can cause its moving pieces to seize up.
THE SPRAYER
See Figures 6 - 9, page iL
Place a line of lubricant on the piston. To gain access to
the piston, follow the instructions in Cleaning the Sprayer
for Storage in the Maintenance section of this manual.
_
Fill the quickqock container with no more than 1 quart
of desired paint or stain.
NOTE: After every 4 refills of the quickqock container,
add a line of lubricant to the piston. See Cleaning the
Sprayer for Storage for instructions on disassembling
the sprayer to gain access to the piston.
Do not clean with any flammable liquids
such as paint stripper, paint remover, brush cleaner,
mineral spirits, lacquer thinner, turpentine, acetone,
gasoline, kerosene, etc.
Ensure surface to be painted is free of dust, dirt, and
grease.
Mask or cover any areas not intended to be painted or
stained. Be aware of wind that may cause your paint
or stain to spray into areas not desired. Always use
drop cloths or other cover to protect areas that are not
intended to be painted or stained.
WAF{NING:
CLEANING
THE SPRAYER
AFTER
USE
The solution used to clean the sprayer is determined
by the type of material that has been sprayed. For
anything other than latex material, follow the material
manufacturer's directions for appropriate clean-up.
To clean the sprayer for short term storage:
Select the proper spray tip for desired spray pattern.
Remove the battery pack from the sprayer.
if you haven't already done so, remove the paint
container and return any unused paint or stain to its
original container.
Fill the paint container with lukewarm water (following
the use of latex products) or any non-flammable paint
thinner (following the use of oiPbased products).
Install the battery pack in the sprayer.
Pull the switch trigger to spray paint. Release the
switch trigger to stop paint spray.
Practice spraying on a piece of scrap material to test
your spray pattern and to prime the pump before
beginning. If you do not get a preferred spray pattern
with an even amount of paint or stain throughout,
paint may be thinned as desired. Refer to the
Troubleshooting
section later in this manual.
NOTE: The pump must be primed after every paint
change and at first use after storing. Spray paint at a
scrap surface for at least 20 seconds to prime.
To create an even coating over the entire surface:
o Move your arm at a steady rate of speed and make
sure to move your entire arm, not just your wrist.
Keep the sprayer an even distance from the area
being sprayed, which should be between 18 to 20
inches from the tip of the sprayer to the surface
being sprayed.
9 - English
Reinstall the paint container.
Install the battery pack in the sprayer.
Spray the solution onto a piece of cardboard or other scrap
material. Continue spraying until all the solution is used.
Remove the battery pack from the sprayer.
Place a line of lubricant on the piston. To gain access to
the piston, follow the instructions in Cleaning the Sprayer
for Storage in the Maintenance section of this manual.
Use a damp cloth to wipe the exterior of the sprayer.
The unit is now ready to put away.
WARNING:Whenservicing,useonlyidentical
replacement
parts.Useofanyotherpartsmay
createa hazardorcauseproductdamage.
Pull the piston and spring off the pump housing.
WARNING:Alwaysweareyeprotectionwithside
shieldsmarkedto complywithANSIZ87.1.Failure
to dosocouldresultinfluidsenteringyoureyes
resultinginpossibleseriousinjury.
NOTE: Make sure to scrub thoroughly inside the pump
housing opening so that no paint or stain material is left
behind.
MAINTENANCE
Using the cleaning brush provided and the solution
determined by the last type of paint or stain sprayed,
clean all of the above parts thoroughly.
PROCEDURES
Clean the vent hob in the pump housing using a
straightened paper clip.
To reassembJe:
NOTE: Always remove the battery pack from the unit
before attempting a service operation.
Place a line of lubricant on the piston.
Avoid using solvents when cleaning plastic parts. Most
plastics are susceptible to damage from various types of
commercial solvents and may be damaged by their use.
Use clean cloths to remove dirt, dust, oil, grease, etc.
insert the piston and spring assembly inside the back
of the pump housing.
_
WARNING:
Slide the spring back onto the piston.
Replace the pump housing assembly/container
the sprayer.
Replace the locking nut on the motor housing by
pushing in while rotating clockwise to secure.
Do not at any time let brake fluids,
gasoline, penetrating oils, etc., come in contact with
plastic parts. Chemicals can damage, weaken, or
destroy plastic which may result in serious personal
injury.
CLEANING
THE SPRAYER
lid onto
insert the atomizer valve assembly into the pump
housing front opening.
Replace the spray tip and rotate clockwise to secure.
Reinstall the suction tube and filter.
FOR STORAGE
Reinstall the paint container.
See Figure 8, page iL
The sprayer is now ready to be stored.
When you've finished your project and are ready to
store the sprayer, a thorough cleaning and Uubfication is
recommended.
Remove the battery pack from the sprayer.
Remove the paint container.
if you haven't aUready done so, return any unused paint
or stain to its originaU container.
Fill the paint container with Uukewarm water (following
the use of Uatexproducts) or any non-fiammabUe paint
thinner (following the use of oiPbased products).
REPLACING
ATOMIZER
VALVE ASSEMBLY
See Figure 10, page ft.
The atomizer valve causes the paint or stain material to
spin as it comes out of the sprayer. After 7 to 10 gallons of
paint or stain, the atomizer valve may no longer produce a
good spray pattern and may need to be replaced.
To repJace:
Remove the battery pack from the sprayer.
Rotate the spray tip counterclockwise
and remove.
Reinstall the paint container.
install the new atomizer valve assembly
install the battery pack in the sprayer.
Replace the spray tip and rotate clockwise to secure.
Spray the solution onto a piece of cardboard or other
scrap material. Continue spraying until all the solution
is used.
BATTERY PACK RPMOVAL AND
PREPARATION
FOR RECYCLING
Remove the battery pack from the sprayer.
_
Remove the paint container.
Remove the suction tube and filter.
Remove the installed spray tip by turning it
counterclockwise.
Remove the atomizer valve assembly.
Remove the locking nut by turning it counterclockwise.
Slide the pump housing assembly/container
off the sprayer.
lid forward
10 - English
WARNING:
Upon removal, cover the battery
pack's terminals with heavy-duty adhesive tape.
Do not attempt to destroy or disassemble battery
pack or remove any of its components. Lithium-ion
and nickePcadmium batteries must be recycled
or disposed of properly. Also, never touch both
terminals with metal objects and/or body parts as
short circuit may result. Keep away from children.
Failure to comply with these warnings could result in
fire and/or serious injury.
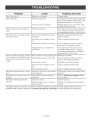
CAUSE
Motordoesnotrun.
Motoroverheats.
POSSIBLE
SOLUTmON
Battery is not charged.
Charge battery.
Piston has seized up.
ThoroughUy cUeanthe sprayer using longterm storage cleaning instructions in the
Maintenance section of this manual.
Continuous spray operation.
Release trigger at the end of each pass
to allow the motor to cool.
Motorhasa Uowhumbut doesnot
spray.
Piston has seized up.
Thoroughly clean the sprayer using longterm storage cleaning instructions
in
the Maintenance section of this manual.
Motorseemsto berunningproperty
butdoesn'tspray.
Suction tube and fluter are Uooseor
Reinstall or replace suction tube and
filter as needed.
damaged.
Atomizer vaUveis cUogged or worn
out.
Clean or replace atomizer valve.
MateriaU being sprayed is too thick.
Follow material manufacturer's directions and thin material as needed.
PUugged spray tip or intake fluter;
worn piston.
Thoroughly clean the sprayer and, if
necessary, replace piston*, using storage cleaning instructions in the Maintenance section of this manual.
SprayedmateriaU
isspitting,gUobbingPaint container voUume is getting Uow.
upor unabUe
to geta preferredspray MateriaU being sprayed is too thick.
patternwithanevenamountofpaint
or stain
Refill paint container.
Follow material manufacturer's directions to thin material as needed.
Suction tube is Uoose.
Reinstall suction tube securely.
Atomizer vaUveis cUogged or worn
out.
Clean or replace atomizer valve.
Worn spray tip or piston.
Clean or replace spray tip or piston*.
Paint/stain spray overspray is excessive.
Spray tip is too far from the surface
being sprayed,
Hold sprayer closer to the surface being
sprayed.
Paint/stain runs or sags on the work
surface,
Proper paint methods not being
observed,
Refer to Operating
in this manual.
Paint/stain is leaking behind the
Spray tip is loose.
Tighten spray tip.
spray tip.
Atomizer valve is worn or not positioned properly,
Replace or reposition atomizer valve as
needed.
the Sprayer earlier
* Although unlikely, a worn piston is possible. A replacement piston can be purchased by cafling customer service at
1-800-932-3188. Follow the instructions in Cleaning the Sprayer for Storage to access the piston for replacemenL
11 - English
CRAFTSMAN
I
PAINT SPRAYER
- MODEL
NUMBER
315.SS630
J
The modem
number
wiHHbe found
on a HabeH
attached
to the or
motor
the model
number
in aHH
correspondence
regarding
your
paint sprayer
whenhousing.
orderingAlways
repair mention
parts.
SEE BACK
PAGE FOR PARTS ORDERING
|
iNSTRUCTiONS
9
8
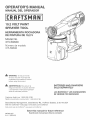
7
12
PARTS
Key
No.
Part
Number
LiST
Description
Qty,
1
940114264
2
940207025
Logo LabeH ......................................................................................................
Data LabeH.......................................................................................................
1
1
3
303233002
Piston AssembHy ..............................................................................................
1
4
692331001
Spring ..............................................................................................................
1
5
303221001
Pump Housing AssembHy ................................................................................
1
6
519459001
Locking Nut .....................................................................................................
1
7
303265001
Atomizer Valve AssembHy ................................................................................
1
8
303262002
Round Tip ........................................................................................................
1
9
303260002
Wide Fan Tip ...................................................................................................
1
10
303263001
11
303836001
CHeaning Brush ................................................................................................
Suction Tube and FiHter ...................................................................................
1
1
12
521206001
Quick-Lock
1
987000915
Operator's
Container .....................................................................................
Manual (960931508)
12 =EngHish
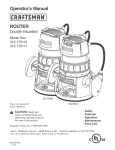
B
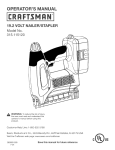
B
A o Batterypack (paquetede baterias)
Bo Depresslatchesto releasebattery pack (para
soltar, el paquetede bateriasoptima los
pestillos)
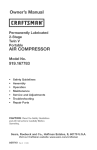
A o1 qt. quickolockcontainer [contenedor de
aseguramiento r@ido de 0,9464 1(1 cto.)]
B oWidefan tip [punta ancha en abanico]
C o1 in. round fan tip [punta redonda en abanico
de 25,4 mm (1 pulg.)]
D oLubricant bottle (botellade lubricant@
E oSwitch trigger (gatillo del interruptor)
F oCleaningbrush (cepillo para limpiar)
GoReplacementatomizer valve assembly
(reemplazo del conjunto de la valvula
atomizadora)
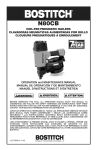
A oLock (asegurar)
B oUnlock (desasegurar)
A oMax fill line (linea de Ilenadomaxim@
B - 1/2 quart fill line (linea de Ilenadode 1/2
cuarto)
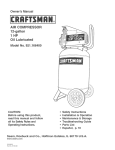
A
CORRECTSPRAYTECHN)QUE
(TECN(CADE ROC(ADO(;OF{RECTA)
(NCORRECTSPRAYTECHNIQUE
(TECN(CADE ROC(ADO(NCORRECTA)
i ii ili! ! iii i,iiiiiiii'i
iii iii iiiiiiii,i, iiiii i
_mm(
A - Rotatespray tip counterclockwise to loosen
(gire la punta de rociado a la izquierdapara
aflojarla)
B- Rotateadjusting arm 1/4 turn to change
direction of paint spray from horizontal to
vertical (gire el brazo de a)uste1/4 de vuelta
para cambiar la direccion de rociado de la
pintura de horizontala vertical)
C - Vertical spray direction (direccion de rociado
vertical)
D° Horizontal spray direction (direccion de
rociado horizontal)
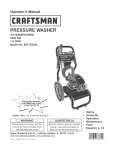
A oSpray tip (punta de rociado)
BoAtomizer valve assembly (conjunto de
valvula atomizadora)
C o Locking nut (tuerca de seguridad)
D° Pump housing assembly/container lid
(conjunto de alojamiento de la bomba/tapa
del contenedor)
PLACEUNE OF LUBR(CANT
ON P(STONSHAFT
PLACERUNEPELL(CULEBE LUBR)F(ANTSUR
L'ARBREDE P)STON)
EoSpring (resorte)
F o Piston (pist6n)
GoSprayer housing (alojamiento del rociador)
H° Quick-lock container (contenedor de
aseguramiento rapido)
I ° Suction tube and filter (tubo de succion y
filtro)
A ° Atomizer valve is good (la %lvula
atomizadora est_ en buen estado)
B- Atomizer valve is bad and needsto be
replaced(la v_lvula atomizadora est_ en mal
estado y necesitaset reemplazada)
,_
ADVERTENCIA:
ADVERTENCIA:
GUARDE ESTAS
mNSTRUCCmONES° Para reducir el nesgo de
incendio o explosiSn, descanga el6ctdca, y la
lesiones a personas, lea y comprenda todas
instrucciones incluidas en este manual. Familiar[cese
con todos los controles y la forma correcta de utilizar
la equipo.
LEA TODAS
LAS mNSTRUCCIONES
operador. Aprenda sus usos y limitaciones, as[ como
los posibles peligros espec[ficos de esta herramienta.
Para reducir el nesgo de estallido o
[] No rode materiales infiamables ni combustibles
cerca de llamas abiertas o fuentes de igniciOn,
como cigarrillos, motores y equipos el6ctricos.
[] No rode ni limpie con I[quidos que tengan un punto
de inflamaciOn menor a 60 °C (! 40 °F) las unidades
diseSadas para ser utilizadas s61o con materiales a
base de agua o de un tipo de alcohol mineral con un
punto de inflamaci6n m[nimo de 60 °C (!40°F).
[] La pintura o el solvente que fiuyen a trav6s del
equipo pueden generar electricidad est_tica. La
electricidad est_tica produce un riesgo de incendio
o explosi6n en presencia de emanaciones de
pintura o de solvente.
[] No use una pintura o un solvente
hidrocarburos halogenados.
que contenga
[] Mantenga el _rea de rociado bien ventilada.
Mantenga una buena circulaciOn de aire fresco en el
_rea. Mantenga el conjunto de la bomba en un _rea
bien ventilada.
[] No fume en el _rea donde se _rea de rociado.
[] No utilice interruptores de luz, motores o productos
similares que produzcan chispas en el _rea donde
se Area de rociado.
[] Mantenga el _rea limpia y sin contenedores de
pintura o solvente, trapos y otros materiales
inflamables.
de incendios
que
a
[] Mantenga las manos y demos partes del cuerpo
lejos de la descarga. Por ejemplo, no intente
detener fugas con ninguna parte del cuerpo.
[] Utilice siempre la punta de rociado.
punta de rociado en su lugar.
No rode sin la
[] Tenga precauciOn al limpiar y cambiar las puntas de
rociado. En el caso en que la punta de rociado se
obstruya durante el rociado, siga las instrucciones
del fabricante para apagar la unidad y aliviar la
presiOn antes de retirar la punta de rociado para
limpiada.
[] No deje la unidad sin supervisi6n cuando
est_ activada. Cuando la unidad no est_ en
funcionamiento,
ap_guela segOn las instrucciones
del fabricante.
[] El rociado a alta presiOn puede inyectar toxinas en
el cuerpo y provocar lesiones corporales graves. En
el caso en que se produzca la inyecci6n, busque
atenci6n m6dica de inmediato.
[] Inspeccione que las mangueras y las piezas no
muestren seSales de da5o. Reemplace cualquier
manguera o pieza da5ada.
[] Este sistema es capaz de producir 17 236,89 kPa
(2 500 psi). Utilice solamente piezas o accesorios
de repuesto especificados por el fabricante y que
tengan una capacidad nominal de 17 236,89 kPa
(2 500 psi), como m[nimo.
[] Sepa c6mo detener la unidad r_pidamente.
Familiar[cese completamente
con los controles.
[] Antes de hacer funcionar la unidad, verifique
todas las conexiones scan seguras.
[] Para uso dom6stico
que
Onicamente.
ADVERTENCIA:
Para reducir el riesgo de lesiones:
[] No utilice la unidad ni rode cerca de los ni5os.
Mantenga alejados
momento.
[] Conozca el contenido de las pinturas y los solventes
que se roc[an. Lea todas las hojas de datos sobre la
seguridad de materiales (MSDS) y las etiquetas de
los contendores que se proveen con las pinturas y
los solventes. Siga las instrucciones de seguridad
del fabricante de la pintura y el solvente.
[] Tenga a mano un extinguidor
funcione.
[] No apunte la boquilla ni rode en direcci6n
personas ni animales.
[] Utilice Onicamente una punta de rociado
especificada por el fabricante.
FAMmLmARiCESE CON SU HERRAMmENTA
ELECTRmCA. Lea cuidadosamente el manual del
ADVERTENCIA:
explosi6n:
Para reducir el riesgo de inyecci6n:
a los ni5os del equipo en todo
[] No se estire demasiado ni se pare sobre un soporte
inestable. Mantenga los pies bien asentados y el
equilibrio en todo momento.
[] Permanezca
haciendo.
alerta y preste atenci6n a Io que est6
[] No use la unidad si est_ cansado o se encuentra
bajo los efectos de alguna droga odel alcohol.
3 = EspaSol
[] Mantengalasproteccionesen su lugaryen buenas
condiciones
detrabajo.NuncautiUice
Uaherramienta
conningunadeUasprotecciones
o cubiertasquitadas.
AsegOrese
dequetodasUas
protecciones
est6n
funcionando
deformacorrectaantesdeutiUizar
Ua
unidad.
[] Parareducirel riesgode lesiones,mantenga
a
aUejados
a nidosy demascircunstantes.
TodosUos
presentesdebenHevar
puestosanteojosdesegundad
y permanecer
a unadistanciaseguradeU_reade
trabajo.
[] Mantengaalejadasdelareadetrabajoa todaslas
personas,particuUarmente
a Uosnidosdecortaedad,
ytambi6na Uasmascotas.
[] Usenaherramientaadecuadaa la tarea.NofuerceUa
herramienta
ni ningOnaccesorioa efectuartareaspara
lasquenoest_nhechos.NolauseparapropOsitos
no
indicadosenlasinstrucciones.
[] Noaccioneel equipocuandoest_descalzoo al
Hevarpuestassandaliaso calzadolivianosimilar.
Usecalzadodeseguridadqueleprotejasuspiesy
mejoresu posturaensuperficiesresbaladizas.
[] Tengasumaprecauci6nparaevitarresbaJarse
o
caero
[] Siemprepongaseproteccionocularconla marca
de cumpHmiento
de _anormaANSm
Z87°1°Conel
cumplimiento
deestareglase reduceel riesgode
lesionescorporales
serias.
[] Uti_ices6_oaccesoriosrecomendados.Elempleode
accesoriosinadecuados
puedepresentarriesgosde
lesiones.
[] Siga1asinstruccionesde la mantenimiento
especificadasen estemanual
[] mnspeccione
laspiezasdaSadas°
Antesdeseguir
utilizandolaherramienta,
esnecesario
inspeccionar
cuidadosamente
todaprotecci6no piezadadadapara
determinar
si funcionar_
correctamente
y desempedar_
lafunciOna la queest_destinada.
Verifiquela
alineaciOn
delaspartesmOviles,
quenohaya
atoramiento
de lasmismas,quenohayapiezasrotas,
el montajedelaspiezasy cualquierotracondici6nque
pudieraafectarsufuncionamiento.
Todaprotecci6no
piezaqueest6dadadadeberepararse
apropiadamente
o reemplazarse
enuncentrodeservicioautorizado.
[] Nuncadejedesatendidaningunaherramientaen
funcionamiento°
Apaguela herramienta.Nose
alejede laherramienta
hastanovedacompletamente
detenida.
[] FamiHadcese
comp_etamente
con los contro_es.
Aprendaa detenerlam_quinay a liberarr_pidamente
la presiOn.
[] Mantengala herramientaseca,Jimpiay mibre
de
aceitey grasa.Siempreutiliceunpanolimpioparala
limpiezade launidad.Nuncautilicefluidosparafrenos,
gasolina,productosa basedepetr61eo
nisolventes
paralimpiarlaherramienta.
[] Noutitice_aherramientasi el interruptorno apaga.
Uevetodointerruptordefectuosoa uncentrode
servicioautorizado
paraqueIoreparen.
[] Antesde limpiar,repararo inspeccionarla maquina,
apagueel motory cerci6rese
dequesehayandetenido
todaslaspartesenmovimiento.
[] Evitetenet unentornode trabajopeHgroso.No
utiliceherramientas
el6ctricasenlugareshOmedos
o mojadosni lasexpongaa laIluvia.Mantengabien
iluminadael_readetrabajo.
[] Nuncadirija unchorrodeaguaendireccion
depersonaso animales,ni haciadispositivos
electricoso
[] Nuncapongaen marchala maquinasi se ha
formadohieloencualquierpartedelequipo.
ADVERTENCIA:Los chorros
de alta presion
pueden set peligrosos si se utiJizan indebidamente°
Nunca dirija el chorro a personas, animales,
dispositivos el6ctricos ni a la m_quina misma.
[] Evite eJcontacto
con las partes caHentes de la unidad.
[] Antes de cada uso, inspeccione _os pernos y _as
tuercas para verificar que est_n apretados. Una tuerca
o perno sueltos pueden causar problemas graves en el
motor.
[] Antes de guardar deje que se enfde e_ producto°
[] Guarde _a unidad en un _ugar frio y bien ventilado,
a una distancia segura de todo equipo generador de
chispas o llamas.
[] A] dar servicio a _a unidad, s6_o utiHce piezas de
repuesto id_nticas° El empleo de piezas diferentes
puede causar un peligro o da5ar el producto.
[] Nunca utHice e_ rociador
insta_ada.
sin _a punta de rociado
[] Una _esi6n pot inyecci6n puede ocasionar
una
posib_e amputaci6n°
Consulte a un m_dico de
inmediato.
[] Nunca co_oque _a mano de,ante de _a punta de
rociado cuando use _a unidad. Los guantes no
siempre brindan protecci6n contra lesiones por
inyecci6n.
[] Cuando utHice _a unidad, use ropa que no
permita que _a pintura entre en contacto con
la pie_ ni e_ cabeHo, junto con una mascara o
un respirador.
Las pinturas, los solventes y otros
materiales pueden ser da5inos si se inhalan o si
entran en contacto con el cuerpo.
[] Siempre apague _a unidad, quite e_ paquete de
baterias, y _ibere presi6n antes de dar servicio
a _a unidad, limpiar _a punta o la proteccion,
cambiar _a punta o dejar desatendida
_a unidad.
[] El p]astico puede provocar chispas. Nunca utHice
p_astico para cercar un area de rociado. No
use protecciones de pl_stico al rociar materiales
infiamables.
4 E Espadol
No rocie en e×terioresen dias ventosos°
No intente limpiar ni destaparmapunta de
rociado con el dedo°
[] No coloque herramientas de baterias ni las baterias
mismas cerca del fuego o deJ caloro De esta manera
se reduce el riesgo de explosiones y de lesiones.
[] No aplaste, deje caer o dafie _a bateria. Nunca
utilice una bateda o cargador que se ha caido,
aplastado, recibido un go_pe contundente o ha side
dafiado(a} de alguna manera. Las bater[as da5adas
pueden sufrir explosiones. Deseche de inmediato toda
bater[a que haya sufrido una ca[da o cualquier da5o.
Toda herramienta de batedas, ya sea de batedas
integradas o de paquete de batedas separado,
debe recargarse Qnicamente con el cargador
especificado
para 1as batedaso Un cargador que
puede ser adecuado para un tipo de baterias puede
significar un riesgo de incendio si se empUea con otro
tipo de bater[as.
[] Utilice _as herramientas de batedas s6_o con el
paquete de batedas especfficamente
indicado° El
empleo de bater[as diferentes puede presentar un
riesgo de incendio.
[] Las baterias pueden e×plotar en presencia de una
fuente de inflamacion, come una luz guia. Para
reducir el riesgo de lesiones corporales serias, nunca
use un producto inal_mbrico en presencia de llamas
expuestas. La explosi6n de una bater[a puede lanzar
fragmentos y compuestos qu[micos. Si ha quedado
expuesto a la explosion de una bater[a, I_vese de
inmediato con agua.
[] Cargue 1as batedas solamente con eJ cargador
indicado. Para utilizar con paquetes de batedas de
n_quel-cadmio de 19,2 V o de iones de _itio de 19,2
V, consulte el folleto de la herramientaiaparatoipaquete
de bater[asicargador complementario 988000-272.
[] No cargue herramientas de baterias en lugares
mojados o humedos. Con el cumplimiento de esta
regla se reduce el riesgo de una descarga el6ctrica.
[] Desconecte el paquete de batedas de la
herramienta o ponga el interrupter en la posicion
de aseguramiento
o apagado antes de efectuar
ajustes, de cambiar accesorios o de guardar la
herramienta. Con tales medidas preventivas de
seguridad se reduce el riesgo de poner en marcha
accidentalmente la herramienta.
[] Para obtener resu_tados 6ptimos, debe cargar
la herramienta de baterias en un ]ugar deride _a
temperatura est_ entre 5O°F y 100°F. No guarde
la herramienta a _a intemperie ni en e_ interior de
vehiculos.
[] En condiciones e×tremas de use o temperatura las
batedas pueden emanar _iquido. Si el liquido Itega a
tocar_e la piel, lavese de inmediato con agua y jab6n°
Si le entra liquido en los ojos, laveselos con agua
limpia per Io menos 10 minutes, y despu_s busque
de inmediato atencion m_dica. Con el cumplimiento
de esta regla se reduce el riesgo de lesiones corporales
senas.
[] Cuando no este usando e_ paquete de batedas,
mantengalo aJejado de todo objeto metalico come:
dips, monedas, Haves, ctavos, torniHos y otros
objetos metalicos pequefios que puedan establecer
conexi6n entre ambas terminales. Establecer una
conexiOn directa entre las dos terminales puede causar
chispas, quemaduras o incendios.
[] Las herramientas de bater_as no se necesitan
conectar a una toma de corriente; per Io tanto,
siempre estan en condiciones de funcionamiento°
Este consciente de ruesposibtes peligros cuando no
este usando la herramienta de batedas o cuando
este cambiando los accesorios de la misma. Con el
[] Nunca deje desatendida
la bateda insta_ada.
ninguna herramienta
con
[] Guarde estas instrucciones.
ConsOltelas
frecuentemente y util[celas para instruir a otros
usuarios. Si presta a alguien esta herramienta, facil[tele
tambi_n las instrucciones.
cumplimiento de esta regla se reduce el riesgo de una
descarga el6ctrica, incendio o lesi6n corporal seria.
CALIFORNIA
- PROPUESTA
DE LEY N0_.
65
ADVERTENC_A:
Este producto, y las pinturas dise5aron ser aplicados con este producto, pueden contener los
productos qu[micos, incluyendo el plomo,reconocidas per el estado de California come causantes de c_ncer,
defectos cong_nitos y otras afecciones del aparato reproductor. Lbvese tas manes despu#s de utilazar el
aparate.
Algunos ejemplos de estas sustancias qu[micas son:
o plomo de las pinturas a base de plomo,
silicio cristalino de los ladrillos, del cemento y de otros productos de mamposter[a, y
ars_nico y creme de la madera qu[micamente tratada.
El riesgo de la exposici6n a estos compuestos var[a, seg0n la frecuencia con que se realice este tipo de trabajo.
Para reducir la exposiciOn personal a este tipo de compuestos: trabaje en _reas bien ventiladas, y con equipo
de seguridad aprobado, tal come las caretas para el polvo especialmente dise5adas para filtrar part[culas
microsc6picas.
5 - Espa_ol
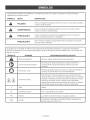
LassiguientespaUabras
desedaUizaci6n
y sussignificados
tieneneUobjetodeexpUicar
UosniveUes
defiesgo
reUacionados
conesteproducto.
SiMBOLO
SENAL
SIGNIFmCADO
PELJGRO:
Indica una situaci6n peUigrosa inminente, UacuaU,si no se evita, causar_ Ua
muerte o Uesiones serias.
Indica una situaciOn peUigrosa posibUe, UacuaU,si no se evita, podr[a
causar Uamuerte o Uesiones serias.
Indica una situaci6n potenciaUmente peUigrosa la cual, si no se evita,
puede causar lesiones leves o moderadas.
PRECAUCm6N:
(Sin el s[mbolo de alerta de seguridad) Indica una situaci6n que puede
producir dados materiales.
Es posible que se empleen en este producto algunos de los siguientes s[mbolos. Le suplicamos estudiarlos y
aprender su significado. Una correcta interpretaci6n de estos s[mbolos le permitir_ utilizar mejor y de manera m_s
segura el producto.
SiMBOLO
NOMBRE
DENOMINACK)
N/EXPLICACK)N
Alerta de seguridad
Indica un peligro posible de lesiones personales.
Lea el manual del operador
Para reducir el riesgo de lesiones, el usuario debe leer y
comprender el manual del operador antes de usar este
producto.
Protecci6n ocular
Siempre p6ngase protecci6n ocular con protecci6n lateral con
la marca de cumplimiento de la norma ANSI Z87.1.
Symboles reciclar
Este producto contiene bater[as de n[quel-cadmio (Ni-Cd) o
iones de litio (Li-ion). Es posible que algunas leyes municipales,
estatales o federales proh[ban desechar las bater[as de n[quelcadmio en la basura normal. Consulte a las autoridades
reguladoras de desechos para obtener informaci6n en relaci6n
con las alternativas de reciclado y desecho disponibles.
V
Volts
Voltaje
Corriente continua
Tipo o caracter[stica
PSI
Presi6n
La presi6n se mide en libras per pulgada cuadrada
GPH
Caudal
El caudal se mide seg0n la cantidad maxima de galones de
pintura que se roc[a per hera
6 - Espadol
de corriente
_=SPI=CIFiCACiONI=S
DI=L PRODUCTO
Tamafio del contenedor ..................................................................................................................................
Motor .............................................................................................................................................................
CONOZCA
SU ROCIADOR
DE PINTURA
NOVEDOSO
Vea /a figura 1, pbgina L
0,9464 I (! cto.)
19,2 V, corr. cont
DJSi=NO DI=L MOTOR
El novedoso dise_o del motor implica menos vibraci6n y
ruido al usar su rociador.
Para usar este producto con la debida segundad se debe
comprender la informaciSn indicada en la herramienta
misma yen este manual, y se debe comprender tambi6n
el trabajo que intenta realizar. Antes de usar este
producto, familiar[cese con todas las caracter[sticas de
funcionamiento y normas de segundad del mismo.
La caracteristica de aseguramiento r_pido permite instalar
y eliminar f_cilmente el contenedor de pintura.
VISOR D_=L INDICADOR
PUNTAS
DE I=Nt=RGIA 03
El visor del indicador de energ[a C3 ubicado al costado
del mango se enciende luego de instalar y cargar un
compacto paquete de bater[a Craftsman de iones de litio
de !9,2 V (315.113710).
CONT_=NEDOR
RAPIDO
DE ASEGURAMIENTO
DE ROCiADO
Las dos puntas de rociado suministradas le permiten
elegir entre patrones de rociado diferentes: vertical,
horizontal, y circular
NOTA: Esta IAmpara no se encender_ con paquetes de
bater[as de n[queFcadmio Craftsman de 19,2 V.
DESEMPAQUETADO
Embarcamos este producto completamente
armado.
Extraiga cuidadosamente de la caja la producto y los
accesorios. AsegOrese de que est6n presentes todos
los art[culos enumerados en la lista de empaquetado.
_
ADVER'TENCIA:
No use este producto si no est_
totalmente ensamblado o si alguna pieza falta o est_
da_ada. Si utiliza un producto que no se encuentra
ensamblado de forma correcta y completa, puede
sufrir lesiones graves.
Inspeccione cuidadosamente la producto para
asegurarse de que no haya sufrido ninguna rotura o
dado durante el transporte.
No deseche el material de empaquetado hasta que
haya inspeccionado cuidadosamente la producto y la
haya utilizado satisfactoriamente.
Si hay piezas dadadas o faltantes, le suplicamos llamar
a 1-800-932-3188, donde le brindaremos asistencia.
USTA
DE EMPAQUETADO
Rociador de pintura con contenedor
r_pido y punta ancha en abanico
de aseguramiento
V_lvula atomizadora de repuesto
Limpiador para brochas
Lubricante
Punta redonda
Manual del operador
7- Espadol
ADVERTENCIA,
Si falta o est_ dadada
alguna pieza, no utilice este producto sin haber
reemplazado la pieza. Usar este producto con partes
da_adas o faltantes puede causar lesiones serias al
operador.
ADVERTENCIA;
No intente modificar este
producto ni hacer accesorios no recomendados
para la misma. Cualquier alteraciOn o modificaci6n
constituye maltrato el cual puede causar una
condiciSn pe@rosa, y como consecuencia posibles
lesiones corporales serias.
ADVERTENCIA;
Para evitar un arranque accidental
que podr[a causar lesiones corporales serias,
siempre desmonte de la producto el paquete de
bater[as al montade piezas a aqu611a.
ADVERTENCmA:
No permita que su faminadzaci6n con
este producto nevuenva descuidado. Tenga presente
que un descuido de un instante es suficiente para
causar una nesi6n grave.
Para el desmontaje:
[]
Opnma los pestillos a ambos lados para soltar y extraer el
paquete de baterias.
_
ADVERTENCmA:
de baterias
siempre est_n en condiciones de funcionamiento.
Pot
Io tanto, siempre debe estar asegurado el interruptor
cuando no est6 us_ndose o el operador Io Ileve per un
lade.
ADVERTENCIA:
Siempre p6ngase protecci6n ocunar
con protecci6n nateran con na marca de cumpnimiento
de na norma ANSI Z87.1. La inobservancia de esta
advertencia podria ocasionar na entrada de fiuidos en
sus ojos y provocar nesiones graves.
_
ADVERTENCmA:
No utinice ningOn aditamento o
accesorio no recomendado
pot enfabricante de esta
herramienta° Enempneo de aditamentos o accesorios no
recomendados
podria causar nesiones serias.
Las herramientas
ADVERTENCmA:
Riesgo de incendio
o explosi6n.
_rea de rociado debe estar bien ventilada
chispas o llamas.
LLENADO
DEL ROCIADOR
El
y lejos de
CON PmNTURA/TINTE
Vea /a figuras 3 y 4, pbgina L
uSOS
Este producto
abajo:
[]
Retire y deseche cualquier capa que se haya formado en
la superficie de la pintura o del tinte, luego mezcle bien el
material en su contenedor original antes de comenzar a
pintar.
puede empnearse para en fines enumerado
Pinturas y barnices para intedores y exteriores para
terrazas, muebles de extedores, cercas y paredes
Este producto acepta baterias de iones de %0 Craftsman _
de 19,2 V y de niqueFcadmio
de 19,2 V.
Para ver las instrucciones
de carga completas, consulte
el manual del operador de los paquetes de baterias y
cargadores enumerados en las Reglas de Seguridad
Especificas.
CARACTERiSTICAS
BATERiAS
DE PROTECCKSN
Y MONTAR
Quite el paquete
[]
Retire el contenedor de aseguramiento
r_pido gir_ndolo a
la izquierda de tal manera que la fiecha del contenedor se
alinee con el simbolo "desasegurar"
de la tapa°
[]
Llene el contenedor con pintura o tinte segOn se desee°
No llene por encima de la marca de llenado maximo del
contenedor.
[]
Vuelva a instalar el contenedor en el rociador y girela a
la derecha de tal manera que la fiecha del contenedor se
alinee con el simbolo "asegurar" en la tapa°
SELECCI6N
Si la herramienta se detiene durante el use, suelte el gatillo
para reiniciarla y reanude el funcionamiento.
Si aun asi no
funciona, se debe recargar la bateria.
EL PAQUETE
ADVERTENCIA:
Retire siempre
el paquete
DE LA PUNTA
DE ROCIADO
Vea /a figura 5, pbgina ft.
Utilice una punta de ventilador redonda para
materiales como pinturas I_tex y come pinturas
y manchas al aceite. Esta redonda tiene un
patr6n de rociado redondo°
DE
Utilice una punta ancha en abanico de ancho
para materiales come pinturas I_tex. Esta
redonda ancha en abanico tiene un patr6n
de rociado ancho que puede ajustarse de
horizontal a vertical.
de
baterias de la herramienta antes de instalar las piezas,
realizar ajustes° limpiada o cuando no la utilice° Retirar
el paquete de baterias evitar_ que la unidad se accione
accidentalmente
y provoque lesiones graves.
Para cambiar
Para conectar:
[]
de baterias del rociador.
ADECUADA
Vea /a figura 2, pbgina L
_
de
[]
DE LAS
Las baterias de iones de %0 Craftsman _ 19,2 V est_n
disedadas con caracteristicas
que protegen las celdas de
iones de litio y maximizan la duraci6n de las baterias.
PARA DESMONTAR
BATERiAS
NOT,&: Es posible que se deba filtrar los contenedores
tinte y pintura mAs antiguos antes de usar el rociador.
Coloque el paquete de baterias en la producto, alineando
la costilla realzada del paquete de baterias con el
recept_culo para baterias de la herramienta.
[] AsegOrese de que los pestillos situados en ambos lados
del paquete de baterias entren completamente
en su lugar
con un chasquido y de que el paquete quede bien fijo en
la herramienta antes de empezar a utilizar la herramienta°
las puntas:
[]
Quite el paquete
[]
Retire la punta instalada
[]
tnstale la punta deseada,
firmemente.
8 = Espadol
de baterias del rociador.
gir_ndola
a la izquierda.
girela a la derecha
y apri6tela
NOTA: La punta debe apretarse firmemente con la mano°
Una punta demasiado floja o demasiado apretada puede
provocar que el rociador presente fugas o da_os.
Para cambiar
la direccJ6n de la punta ancha en abanico:
t
Afloje ligeramente la punta ancha en abanico girandola a la
izquierda I/4 de vuelta.
t
Gire el brazo de ajuste 1/4 de vuelta hacia la direcci6n
necesada para cambiar la direcci6n del rociado de la punta.
t
AI sostener el brazo de ajuste en su posici6n, gire la punta
ancha en abanico a la derecha hasta que quede firmemente
apretada.
_,
ADVERTENCIA:
Para reducir el riesgo de inyecci6n,
no apunte el rociador a ninguna parte del cuerpo ni a
otra persona. En el caso de inyecci6n en la piel, busque
atenci6n medica de inmediato. No utilice la unidad sin la
punta de rociado en su lugar.
FUNCIONAMIENTO
Mantenga el rociador a una misma distancia del Area que
se esta rociando, que debe set de entre 457,2 mm
(18 pulg.) y 508 mm (20 pulg.) desde la punta del rociador
hasta la superficie que se esta rociando.
Optima el gatillo para comenzar a rociar el matedal que
desea pintar Utilice el rociador en recorridos rectos
horizontales o verticales sobre la superficie que se
esta pintando, luego, suelte el gatillo para detener la
pulvedzacidn.
NOTA: Para obtener una calidad consistente de
pulverizaci6n cuando se trabaja con pinturas decapantes,
puede set necesario mantener el gatillo opdmido entre
cada recorrido.
t
DEL ROCIADOR
PRECAUCI6N:
Es importante limpiar bien el rociador
despues de cada use o al cambiar de color. Dejar que la
pintura o el tinte permanezcan en una herramienta sin use
durante un perfodo prolongado puede provocar que sus
piezas mdviles se agarroten.
Vea la fl_Turas6 a 9, pagina iL
t
Coloque una linea de lubdcante en el pist6n. Para
tenet acceso al pist6n, siga las instrucciones en C6mo
limpiar el rociador para aJmacenamiento
de la secci6n
Mantenimiento de este manual.
t
AsegL_rese de que la superficie que se pintara no tenga
polvo, suciedad ni grasa.
t
Tape o cubra cualquier Area que no deba set pintada o
tetiida. Este atento al viento que pueda provocar que la
pintura o el tinte se roc[en en Areas no deseadas. Utilice
siempre protecciones u otras cubiertas para proteger las
Areas que no deban pintarse o tetiirse.
t
Llene el contenedor de aseguramiento rapido con no mas de
I cuarto de la pintura o el tinte deseados.
_
LIMPIEZA
No limpie con liquidos inflamables
DEL ROCIADOR
DESPUES
DE
UTILIZARLO
La soluci6n que se utiliza para limpiar el rociador se determina
segOn el tipo de material que se ha rociado. Para cualquier otto
material que no sea latex, siga las instrucciones del fabdcante
del material para una limpieza adecuada.
Seleccione la punta de rociado adecuada para el patr6n de
rociado deseado.
t
Instale el paquete de baterfas del rociador.
t
Tire del gatillo del interruptor para rociar pintura. Suelte el
gatillo del interrupter para detener el rociado de pintura.
t
Practique rociando sobre un pedazo de material de desecho
para probar su patr6n de rociado y para cebar la bomba
antes de comenzar. Si no Iogra un patrdn de rociado de su
preferencia con una cantidad uniforme de pintura o tintura en
toda la aplicaci6n, se puede diluir la pintura segL_nse desee.
Consulte la secci6n Correcci6n de probtemas que aparece
mas adelante, en este manual.
NOTA: La bomba debe cebarse despues de cada cambio
de pintura y la pdmera vez que la utilice despues de haber
estado guardada. Rode pintura en una superficie de desecho
durante, al menos, 20 segundos para cebar la bomba.
t
ADVERTENCJA:
como decapante para pinturas, quitapinturas, limpiador
para brochas, destilados de petr61eo, diluyente de laca,
trementina, acetona, gasolina, querosene, etc.
NOTA: Despues de volver a Ilenar el contenedor de
aseguramiento rapido 4 veces, agregue una linea de
lubricante al pist6n. Vea la secci6n Limpieza del rociador
para guardarJo para obtener instrucciones sobre c6mo
desarmar el rociador para tenet acceso al pist6n.
t
Cuando termine, quite el paquete de bater[as, vuelva a
colocar la pintura o el tinte que no haya utilizado en su
contenedor original, y limpie bien el rociador.
Para Hmpiar et rociador
per_odo:
a fin de guardarlo
durante
un breve
t
Quite el paquete de bater[as del rociador.
t
t
Si alan no Io ha hecho, retire el contenedor de pintura y
vuelva a colocar toda la pintura o el tinte que no haya
utilizado en su contenedor original.
Llene el contenedor de pintura con agua jabonosa templada
(despues de usar productos de latex) o cualquier diluyente
de pintura no infiamable (siguiendo las instrucciones de los
productos al aceite).
t
Vuelva a colocar el contenedor
t
Instale el paquete de bater[as del rociador.
t
Rode la soluci6n sobre un pedazo de cart6n u otto material
de desecho. Siga rociando hasta que se haya utilizado toda
la soluci6n.
t
t
Quite el paquete de baterfas del rociador.
Coloque una linea de lubdcante en el pist6n. Para tenet
acceso al pist6n, siga las instrucciones en C6mo Limpiar
Ei Rociador Para AImacenamiento
de la secci6n
Mantenimiento de este manual.
t
Utilice un patio h0medo para limpiar la parte exterior del
rociador. Ahora, la unidad esta lista para guardar.
Para producir una capa pareja sobre toda la superficie:
Mueva el brazo a una velocidad constante y asegOrese de
mover todo el braze, no solo la mutieca.
9-Espa5ol
de pintura.
_
AOVERTENClA:
AI dar servicio a la unidad, soto utilice
piezas de repuesto identicas. El empteo de piezas
diferentes puede causar un petigro o daSar et producto.
_
AOVERTENClA:
Siempre p6ngase protecci6n
•
Tire del pist6n y desprenda el alojamiento
•
Con el cepilto para timpiar suministrado y una soluci6n
acorde con el Ottimo tipo de pintura o tinte que roci6, timpie
profundamente todas tas piezas mencionadas arriba.
NOTA: AsegOrese de restregar bien dentro de la abertura det
alojamiento de la bomba de tal manera que no queden restos
de materiales de pintura o tinte.
ocular
con protecci6n lateral con la marca de cumplimiento de la
norma ANSi Z87.1. La inobservancia de esta advertencia
podria ocasionar la entrada de fluidos en sus ojos y
provocar lesiones graves.
de la bomba.
•
Limpie el orificio de ventilaci6n del alojamiento
con un clip para papel enderezado.
Para volver a armar la unidad:
de la bomba
•
Coloque una lfnea de lubricante en el pist6n.
•
Deslice el resorte hacia atr_.s sobre el pist6n.
NOTA: Siempre quite el paquete de baterfas de la unidad antes
de realizar et servicio de la unidad.
•
Introduzca el pist6n y el conjunto del resorte en la parte
posterior det alojamiento de la bomba.
Evite el empleo de solventes al limpiar piezas de pt&stico. La
mayoria de los pl&sticos son susceptibtes a diferentes tipos de
solventes comerciales y pueden resultar da5ados. Utilice pa5os
limpios para etiminar la suciedad, et polvo, et aceite, la grasa, etc.
•
Vuelva a colocar el conjunto del alojamiento
tapa del contenedor dentro del rociador.
•
Vuelva a colocar la tuerca de seguridad en el alojamiento
del motor empuj&ndola hacia adentro mientras la gira a la
derecha para asegurarla.
_
•
Introduzca el conjunto de la v&lvula atomizadora en ta
abertura detantera del alojamiento de la bomba.
•
Vuelva a colocar la punta de rociado y gire a la derecha para
asegurarla.
•
Vuelva a colocar el tubo de succi6n y el filtro.
•
Vuelva a colocar el contenedor de pintura.
•
Ahora, et rociador est,. listo para guardar.
PROCEDIMIENTOS
DE MANTENIMIENTO
ADVERTENCIA:
No permita en ningOn momento que
ftuidos para frenos, gasotina, aceites penetrantes, etc.,
Ileguen a tocar tas piezas de plb.stico. Las sustancias
quimicas pueden da5ar, debilitar o destruir el pl&stico, Io
cual a su vez puede producir lesiones corporales serias.
COMO
LIMPIAR
EL ROCIADOR
PARA
ALMACENAMIENTO
Vea /a figura 8, pagina iL
Una vez que haya terminado su proyecto y este tisto para
guardar el rociador, se recomienda realizarle una buena limpieza
y lubricaci6n.
•
Quite el paquete de bater(as del rociador.
•
Retire el contenedor de pintura.
•
Si aOn no 1o ha hecho, vuelva a colocar toda la pintura o
el tinte que no haya utilizado en su contenedor original.
•
Llene el contenedor de pintura con agua jabonosa templada
(despues de usar productos de I&tex) o cualquier diluyente
de pintura no inftamabte (siguiendo las instrucciones de los
productos al aceite).
•
•
Vuelva a colocar el contenedor
Enchufe el rociador.
de pintura.
•
Rode la sotuci6n sobre un pedazo de cart6n u otro material
de desecho. Siga rociando hasta que se haya utilizado toda
la soluci6n.
•
Quite el paquete de bater(as del rociador.
•
Retire el contenedor de pintura.
•
Retire el tubo de succi6n y el fittro y depositelos a un tado.
•
Retire la punta de rociado instalada gir_.ndola a la izquierda y
depositela a un lado.
•
Retire el conjunto de la vb.tvula atomizadora
lado.
•
Retire la tuerca de seguridad gir&ndola a la izquierda.
•
Deslice el conjunto de alojamiento
contenedor fuera det rociador.
REEMPLAZO
DEL CONJUNTO
ATOMIZADORA
de la bomba/la
DE V.&.LVULA
Vea la figura 10, pagina ii.
La vb.lvula atomizadora provoca que el material de pintura o tinte
gire cuando sale del rociador. Despues de entre 26,5 (7 gal.)
y 37,85 I (10 gal.) de pintura o tinte, es posible que la v_.lvula
atomizadora deje de realizar un buen patron de rociado y sea
necesario reemptazarla.
Para reemplazar
el conjunto:
•
Quite el paquete de baterias det rociador.
•
Gire la punta de rociado a ta izquierda y retfreta.
•
Instale el conjunto de vatvula atomizadora nuevo.
•
Vuelva a colocar la punta de rociado y gire a la derecha para
asegurarta.
REMOCION Y PREPARACION DEL PAQUETE DE
BATER|AS PARA EL RECICLADO
_)b
y deposfteta a un
de la bomba/la tapa det
10= Espa_o)
ADVERTENCIA:
At retirar el paquete de bater(as, cubra
las terminales del mismo con cinta adhesiva reforzada.
No intente destruir o desarmar el paquete de baterias, ni
de desmontar ninguno de sus componentes. Las baterias
deben recictarse o desecharse debidamente. Asimismo,
nunca toque ambas terminales con objetos metalicos
y partes del cuerpo, ya que puede producirse un corto
circuito. Mantengase fuera del alcance de los ni_os.
La inobservancia de estas advertencias puede causar
incendios y lesiones corporales serias.
PROBLEMA
CAUSA
POSlBLE
SOLUCiON
Enmotor no funciona.
La bateria
Enmotor se recafienta.
Enpist6n est_ agarrotado.
Limpie bien el rociador seg0n las
instrucciones
de fimpieza para guardado
durante un largo periodo que figuran en la
secci6n Mantenimiento de este manual.
Operaci6n
Suelte el gatiflo al terminar cada pasada
para dejar que el motor se enfrie.
no est_ cargada.
Cargue
de rociado continua.
la bateria.
Enmotor tiene un zumbido bajo, pero
no rocia.
Enpist6n est_ agarrotado.
Limpie bien el rociador segOn las
instrucciones
de fimpieza para guardado
durante un largo periodo que figuran en la
secci6n Mantenimiento de este manual.
Enmotor parece estar funcionando
adecuadamente
pero no rocia.
Entubo de succi6n
floios o dafiados.
Vuelva a instalar o reemplace el tubo de
succi6n y el ffltro, seg0n sea necesario.
yen filtro est_n
La v_lvula atomizadora
o desgastada.
est_ obstruida
El material que se est_ rociando
demasiado espeso.
El matedal rociado salpica, forma
gnobos o no se puede nograr un patr6n
de rociado de su preferencia con una
cantidad uniforme de pintura o tintura.
es
Siga las instrucciones
del fabricante del
material para diluir el material, segOn sea
neoesadoo
Limpie bien el rociador y, de set
necesado, reemplace el pist6n*, siguiendo
las instrucciones
de fimpieza para guardar
la unidad que figuran en la secci6n
Mantenimiento
de este manual.
El volumen del contenedor
est_ bajando.
Vuelva a Ilenar el contenedor
de pintura
El material que se est_ rociando
demasiado espeso.
es
de pintura.
Siga las instrucciones
del fabricante del
material para diluir el material, segOn sea
neoesario.
Vuelva a instalar el tubo de succi6n
firmemente.
est_ fioio.
La v_lvula atomizadora
de pintura/tinte
la v_lvula
La punta de rociado o el filtro de
entrada est_n tapados; pist6n
desgastado.
El tubo de succi6n
Ensobrerociado
exoesivo.
es
Limpie o reemplace
atomizadora.
est_ obstruida
Limpie o reemplace
atomizadora.
la v_lvula
o desgastada.
La punta de rociado o el pist6n est_n
desgastados.
Limpie o reemplace
el pist6n*.
la punta de rociado
La punta de rociado esta demasiado
lejos de la superficie que se est_
rociando.
Sostenga
superficie
el rociador m_s cerca de la
que esta rociando.
Consulte
rociador
manual.
la secci6n Funcionamiento
del
que figura anteriormente en este
La pinturaien tinte se corre o se
desprende de nasuperficie de trabajo.
No se estb.n siguiendo
pintura adecuados.
Hay fugas de pintura/tinte
punta de rociado.
La punta de rociado est_ fioja.
Apriete
La v_lvula atomizadora est_
desgastada o no est_ colocada
adecuadamente.
Vuelva a colocar o a ubicar la valvula
atomizadora, seg0n sea necesario.
detr_s de na
los m6todos
de
la punta de rociado.
* Aunque sea poco probable, puede tratarse de un pistdn desgastado. Se puede comprar un pistdn de repuesto flamando
vicio al c/iente al 1-800-932-3188. Siga /as instrucciones
de/a seccidn C6mo Limpiar El Rociador Para Almacenamiento
tener acceso al pistdn y reemplazarlo.
11-Espafiol
o
a/serpara
Your Home
iiiiiiiiiiiiiiiiiiiiiiii_?
_
iiiiiiiii@
iiiiiiiiiiiiiiiiiiiii
iiiiiiiiiiiiiiiiiiiii
iiiiiiiiiiiiiiiiiiiii
iiiiiiiiiiiiiiiiiiiii
iiiiiiiiiiiiiiiiiiiii
iiiiiiiiiiiiiiiiiiiii
iiiiiiiiiiiiiiiiiiiii
ww..mooogomyhomo.oom
iiiiiiiiiiiiiiiiiiiii
iiiiiiiiiiiiiiiiiiiii
iiiiiiiiiiiiiiiiiiiii
For repair-in your home - of allmajorbrand appliances,
iiiiiiiiiiiiiiiiiiiii
iiiiiiiiiiiiiiiiiiiii lawn and garden equipment, or heatingand coolingsystems,
iiiiiiiiiiiiiiiiiiiii
no matter who made it, no matter who sold it!
iiiiiiiiiiiiiiiiiiiii
iiiiiiiiiiiiiiiiiiiii
plaoe p ot
ts,
oo sso i s
iiiiiiiiiiiiiiiiiiiii
iiiiiiiiiiiiiiiiiiiii
owner's manuals that you need to do-it-yourseF,
iiiiiiiiiiiiiiiiiiiii
iiiiiiiiiiiiiiiiiiiii
For Sears professional installation of home appliances
iiiiiiiiiiiiiiiiiiiii
iiiiiiiiiiiiiiiiiiiii
and items like garage door openers and water heaters,
iiiiiiiiiiiiiiiiiiiii
iiiiiiiiiiiiiiiiiiiii
1-8 00.,4.,MY-H O M E® (1moo-469-466s)
iiiiiiiiiiiiiiiiiiiii
iiiiiiiiiiiiiiiiiiiii
Call anytime, day or night (U.S.A. and Canada)
iiiiiiiiiiiB
www,searsocom
www,searsoca
iiiiiiiiiiiiiiiiiiiiii
iiiiiiiiiiiiiiiiiiiiii
iiiiiiiiiiiiiiiiiiiiii
Our Home
iiiiiiiiiiiiiiiiiiiiii
iiiiiiiiiiiiiiiiiiiiii
For repair of carry-in items like vacuums, lawn equipment,
iiiiiiiiiiiiiiiiiiiiii
iiiiiiiiiiiiiiiiiiiiii and electronics, call anytime for the location of your nearest
iiiiiiiiiiiiiiiiiiiiii
iiiiiiiiiiiiiiiiiiiiii
Sears Parts & Repair Service Center
iiiiiiiiiiiiiiiiiiiiii
iiiiiiiiiiiiiiiiiiiiii
1-800-488-1222 (U.S.A.)
1,,800-469-4663 (Canada)
iiiiiiiiiiiiiiiiiiiiii
iiiiiiiiiiiiiiiiiiiiii
iiiiiiiiiiiiiiiiiiiiii
iiiiiiiiiiiiiiiiiiiiii
To purchase a protection agreement on a product serviced by Sears:
iiiiiiiiiiiiiiiiiiiiii
iiiiiiiiiiiiiiiiiiiiii 1,,800-827-6655 (U.S.A.)
1-800-361 °6665 (Canada)
iiiiiiiiiiiiiiiiiiiiii
iiiiiiiiiiiiiiiiiiiiii
iiiiiiiiiiiiiiiiiiiiii
Parapedirse_vicio
de_epa_ac_6n AuCanada
peo_
service
enf_an_ais:
anag
iiiiiiiiiiiiiiiiiiiiii
a domicilio,
y para ordenar piezas:
ioSO0oLEoFOYEERMc
t -8 8 8 oS U -H O GA R ®
® Registered
® Marca
MC Marque
Trademark
Registrada
/
TM
Trademark
/ SMService
t TM Marca de F&brica
de commerce
t MD Marque
/ sM Marca
d6pos_e
(1o800o533o6937)
Mark of Sears
de Servicio
de Sears
Brands,
Brands,
de Sears
LLC
LLC
Brands,
LLC
® Sears
Brands,
LLC
iiiiiiiiiiiiiiiiiii
iiiiiiiiiiiiiiiiiii
iiiiiiiiii
iiiiiiiiii