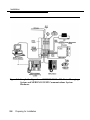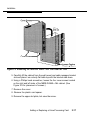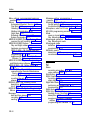
1
AT&T 585-320-141
Issue 1
AT&T
MERLIN MAIL™
Voice Messaging System
Multi-Lingual Version
®
for MERLIN LEGEND Communications System
Installation, System Programming
and Maintenance
System
Parameters
Schedule
Port
Allocation
Update
System Date
and Time
All Ports
Automated
Attendant
All Ports
Call Answer
Split
Allocation
Weekly
Business
Schedule
Delayed
Answer
On All
Ports
On Automated
Attendant
Ports
On Call
Answering
Ports
No
Delayed
Answer
Open
Closed
Open or
Closed for
Today
Fax
Extension
Operator
Extension
General
Mailbox
Owner
System
Administrator
Mailbox
Maximum
Digit
Length
System
Language
Bilingual
Monolingual
English
French
Spanish
English
French
Spanish
Temporarily
Closed
Voice Mail
Service
Enter System
Administrator
Password +
Enter System
Administrator
Extension +
Administration
Main Menu
Automated
Attendant
Mailboxes
Day
Menu
Play a Mailbox
Configuration
Play
the
Menu
Modify
the
Menu
Play
the
Menu
Modify
the
Menu
Create
a
Mailbox
Night
Menu
Delete a
Mailbox
Submenus
Play
the
Menu
Create
the
Menu
Play the
Announcement
Record an
Announcement
Deactivate
Touch-Tone
Gate
Activate
Touch-Tone
Gate
Modify
the
Menu
Delete the
Menu
Modify
a
Mailbox
Announcements
Touch-Tone
Gate
Delete an
Announcement
Modify
Name
Modify
Class of
Service
Initialize
Password
Change
Language
Group
Lists
Systems
Greetings
Scan
Group Lists
Voice
Mail
Greeting
Create a
Group List
Attendant
Greeting
Day
Greeting
Modify or
Review a
Group List
Add
Entry
Delete a
Group List
Delete
Entry
Night
Greeting
Copyright © 1993
All Rights Reserved
Printed in U.S.A.
AT&T 585-320-141
Issue 1
July 1993
Notice
Every effort was made to ensure that the information in this book was complete and
accurate at the time of printing. However, information is subject to change.
Federal Communications Commission (FCC) Interference Notice
This equipment has been tested and found to comply with the limits of a Class A digital
device, pursuant to Part 15 of FCC rules. These limits are designed to provide reasonable
protection against harmful interference when the equipment is operated in a commercial
environment. This equipment generates, uses, and can radiate radio frequency energy
and, if not installed and used in accordance with the instruction manual, may cause
harmful interference to radio communications. Operation of this equipment in a residential
area is likely to cause harmful interference in which case the user will be required to
correct the interference at his or her own expense.
Canadian Department of Communications (DOC) Interference
Information
This digital apparatus does not exceed the Class A limits for radio noise emissions set out
in the radio interference regulations of the Canadian Department of Communications.
Le Présent Appareil Numérique n’émet pas de bruits radioelectriques depassant les
limites applicable aux appareils numériques de la class A prescrites dans le reglement
sur le brouillage radioelectrique edicté par le ministère des Communications du Canada.
Security
As a customer of new telecommunications equipment, you should be aware of the
significant and growing problem of theft of long distance services by third parties, known
commonly as “toll fraud.” It is particularly important that you understand and take
appropriate steps to deal with this crime because under applicable tariffs, you will be
responsible for payment of associated toll charges. AT&T can not be responsible for such
charges and will not make any allowance or give any credit resulting from toll fraud.
Toll fraud can occur despite the preventative efforts of network providers and equipment
manufacturers. Toll fraud is a potential risk for every customer with telecommunications
equipment having one or more of the following features: (1) remote access, (2) automated
attendant, (3) voice mail, (4) remote administration and maintenance, and (5) call
forwarding (remote). This is not a product or design defect, but a risk associated with
equipment having one or more of the features described above. If your new
telecommunications equipment possesses any of these features, please consult the
relevant portion of your documentation for further details and specific procedures to
reduce the risk of toll fraud or contact your AT&T dealer for further details.
Trademarks
MERLIN LEGEND, MERLIN MAIL, and MLX-20L are trademarks of AT&T.
Warranty
AT&T provides a limited warranty to this product. Refer to the “Limited Use Software
License Agreement” card provided with your package.
Ordering Information
The order number for this book is 585-320-141. To order additional books, call
1-800-432-6600 in the U.S. and 1-800-255-1242 in Canada. In other countries, call
1-317-322-6646 or fax 1-317-322-6699. For more information on how to order this and
other system reference materials, see “About This Guide.”
Support Telephone Numbers
AT&T provides a toll-free customer helpline 24 hours a day. In the U.S., call the AT&T
Helpline at 1-800-628-2888 or your AT&T Authorized Dealer if you need assistance when
installing, programming, or using your system. For assistance outside the U.S., contact
your local AT&T authorized representative.
FCC Notification and Repair Information
This equipment is registered-with the Federal Communications Commission (FCC) in
accordance with Part 68 of its rules. In compliance with those rules, you are advised of the
following:
Means of Conection: Connection to the telephone network shall be through a standard
network interface jack USOC RJ11C. These USOCs must be ordered from your Telephone
Company. This equipment may not be used with party lines or coin telephone lines.
Notification to the Telephone Companies: Before connecting this equipment, you or your
equipment supplier must notify your local telephone company’s business office of the
following:
■
The telephone numbers you will be using with this equipment.
■
The appropriate registration number and ringer equivalence number (REN) which
can be found on the back or bottom of the control unit.
You must also notify your local telephone company if and when this equipment is
permanently disconnected from the line(s).
Repair Instructions: If you experience trouble because your equipment is malfunctioning,
the FCC requires that the equipment not be used and that it be disconnected from the
network until the problem has been corrected. Repairs to this equipment can be made
only by the manufacturers, their authorized agents, or by others who may be authorized by
the FCC. [In the event repairs are needed on this equipment, please contact the AT&T
National Service Assistance Center (NSAC) at 1-800-628-2888 or your authorized AT&T
dealer.]
Rights of the Local Telephone Company: If this equipment causes harm to the telephone
network, the local telephone company may discontinue your service temporarily. If
possible; they will notify you in advance. But if advance notice is not practical, you will be
notified as soon as possible. You will also be informed of your right to file a complaint with
the FCC.
Your local telephone company may make changes in its facilities, equipment, operations,
or procedures that affect the proper functioning of this equipment. If they do, you will be
notified in advance to give you an opportunity to maintain uninterrupted telephone service.
Interference Information Notice: FCC Rules require that you be notified of the following:
■
This equipment generates, uses, and can radiate radio frequency energy and, if
not installed and used in accordance with the instructions in this manual, may
cause interference to radio communications.
■
This equipment has been tested and found to comply with the limits for a Class A
computing device pursuant to Subpart J of Part 15 of FCC Rules, which are
designed to provide reasonable protection against such interference when the
equipment is operated in a commercial environment.
■
Operating this equipment in a residential area is likely to cause interference, in
which case the user, at his or her own expense, will be required to do whatever
is necessary to correct the interference.
Contents
About This Guide
vii
■ Terms
viii
and Conventions
■ Related
1
Guides
Introduction
viii
1-1
■
System Services and Features
Monolingual or Bilingual Operation
Automated Attendant Service
Voice Mail Service
Call Answer Service
1-1
1-4
1-5
1-16
1-20
■
MERLIN MAIL—ML System Configurations
1-21
■
Installation and Programming Responsibilities
1-22
■
Subscribers’ Responsibilities
System Administrator
System Operator
General Mailbox Owner
1-22
1-23
1-24
1-25
■
Helpful Hints
1-25
■
Planning Forms
1-26
i
Contents
2
3
Installation
■
Preparing for Installation
Parts Checklist
MERLIN LEGEND Hardware Requirements
Preparing the Site
2-1
2-2
2-2
2-5
■
Installing the MERLIN MAIL—ML Unit
Mounting the MERLIN MAIL—ML Unit
Connecting the Unit to the MERLIN LEGEND System
Connecting the Remote Maintenance Device to the Unit
2-6
2-7
2-10
2-13
■
Adding or Replacing a Voice-Processing Card
2-16
MERLIN MAIL—ML System Programming
3-1
■
MERLIN MAIL—ML Forms
3-3
■
Before Beginning MERLIN MAIL—ML Programming
Using the MLX-20L for MERLIN LEGEND Programming
Using SPM for MERLIN LEGEND Programming
Accessing the MERLIN MAIL—ML System
Preparing the MERLIN LEGEND System for
MERLIN MAIL—ML Programming
3-4
3-5
3-6
3-8
Programming MERLIN MAIL—ML System Parameters
Specifying Port Allocation
Confirming No Delayed Answer
Identifying Fax Extensions
3-11
3-12
3-13
3-15
■
ii
2-1
3-9
Contents
Specifying Maximum Number of Digits in an Extension
Specifying Languages
3-16
3-17
Programming Voice Mailboxes
Creating Mailboxes
Creating the Delayed Call Handling Group
Coverage Mailbox
Creating the Night Service Call Handling Only
Group Coverage Mailbox
3-19
3-20
■
Changing Factory-Set Mailboxes
Assigning the System Administrator Mailbox
Changing the System Administrator’s Password
Assigning the System Operator Extension
Assigning a General Mailbox Owner
3-28
3-30
3-31
3-32
3-33
■
Programming the Schedule
Setting the Date and Time
Setting the Weekly Business Schedule
3-35
3-36
3-38
■
Setting the Touch-Tone Gate
Touch-Tone Gate Setting in Monolingual Mode
Touch-Tone Gate Setting in Bilingual Mode
3-44
3-45
3-47
■
Recording System Greetings
Recording the Day and Night Greetings
Recording a Voice Mail Greeting
3-47
3-48
3-51
■
Programming the Automated Attendant Menus
Selector Codes and Selector Code Actions
Automated Attendant Service Programming Sequence
Creating Announcements
Creating Submenus
3-54
3-55
3-60
3-60
3-63
■
3-26
3-28
iii
Contents
Creating the Day/Night Main Menus
■
4
iv
Creating Group Lists
MERLIN LEGEND System Programming
3-67
3-72
4-1
■
MERLIN LEGEND Planning Forms
4-2
■
Optional Group-Assigned Features
Hunt Type
Transfer Return Interval
VMS Transfer Return Interval
4-3
4-3
4-4
4-5
■
Call Answer Service
Programming Group Coverage
Creating the Group Coverage Delay Interval
Redirecting Calls Sent to Unassigned Extensions
4-7
4-8
4-9
4-10
■
Call Handling Methods
MERLIN LEGEND Planning Forms
Immediate Call Handling
Fax Call Handling
Delayed Call Handling
Night Service Call Handling Only
4-12
4-14
4-14
4-20
4-24
4-30
■
Setting Up the RMD
4-33
■
Optional System Features
Message-Waiting Receiver
Confirming the Touch-Tone Duration
Confirming the Touch-Tone Interval
Programming Labels
4-33
4-33
4-35
4-36
4-37
Contents
5
6
Post-Implementation
5-1
■
Programming Optional Features
Programming a MERLIN MAIL—ML Auto Dial Button
Programming a Delete Message Button
Programming a Message Return Call Button
Programming a Coverage VMS Off Button
Programming a Coverage Inside Button
5-1
5-2
5-3
5-4
5-6
5-7
■
Performing Acceptance Tests
Automated Attendant Service
Checking Call Answer Service (Extension Coverage)
Checking Call Answer Service (Line Coverage)
Voice Mail Service
5-8
5-8
5-12
5-13
5-13
Troubleshooting
6-1
A
MERLIN MAIL—ML Factory Settings
A-1
B
MERLIN LEGEND Release 1.x
Installation Supplement
B-1
v
Contents
GL G l o s s a r y
GL-1
IN I n d e x
IN-1
vi
About This Guide
This guide provides information and instructions for installing and
programming the MERLIN MAIL™ Voice Messaging System—Multi-Lingual
Version. It is intended for technicians who install, maintain, and repair
communications systems as well as the implementers who program the
system features.
The installation and system programming instructions in this guide are
presented in the order in which they should be performed.
In addition to instructions, this guide contains the following information:
■
Listing of MERLIN MAIL—ML system factory settings in
Appendix A
■
Supplemental programming instructions in Appendix B for
installing the MERLIN MAIL—ML system with MERLIN LEGEND®
Communications System Releases 1.0, 1.1, and 1.2i
■
Glossary of terms
■
Index
■
Detachable form on which to provide feedback on this guide to
AT&T
vii
About This Guide
Terms and Conventions
The following conventions are used throughout this guide:
Subscriber means a registered MERLIN MAIL—ML Voice Mail
Service user.
Telephone dialpad buttons are shown as rounded boxes enclosing
the digit, letter, or character they represent, such as [1] for the
button containing the number "1".
[#] means press the pound button. The pound button is frequently
used as a termination character, enabling the system to detect the
end of an extension or password you have entered.
[*] means press the star button.
The prompts or responses provided by the MERLIN MAIL—ML
system are shown in italics:
This is a system prompt or response.
Factory-settings, or defaults, are identified by ◆ .
Related Guides
The following guides are available to help you set up, use, and maintain the
MERLIN MAIL Voice Messaging System-Multi-Lingual Version when it is
installed with MERLIN LEGEND Communications System Releases 1.0, 1.1,
1.2i, and 2.0. The guides that are supplied with the MERLIN MAIL—ML
system are marked with an asterisk.
You can order any of the guides listed in the following table from the AT&T
Customer Information Center. Phone numbers are listed on the inside front
cover of this guide.
viii
Related Guides
About This Guide
Guide Title
Order Number
MERLIN MAIL Voice Messaging
System-Multi-Lingual Version
Planning Guide and Forms
585-322-541
Installation, System Programming and
Maintenance
585-320-141
System Administration*
585-322-742
User’s Quick Reference*
585-322-741
MERLIN LEGEND Release 1.0
System Programming
555-610-111
PBX System Planning
555-610-113
PBX System Planning Forms
555-610-117
Key System Planning
555-610-112
Key System Planning Forms
555-610-116
MERLIN LEGEND Release 1.1
Release 1.1 Notes
555-610-119
MERLIN LEGEND Release 1.2i
Release 1.2i Notes
555-611-119
MERLIN LEGEND Release 2.0
System Programming
555-620-111
System Planning
555-620-112
System Planning Forms
555-620-113
MERLIN LEGEND Release 2.1
Release 2.1 Notes
555-620-003
* Supplied with the MERLIN MAIL—ML system.
Related Guides ix
Overview
1
System Services and Features
MERLIN MAIL Voice Messaging System—Multi-Lingual Version, hereafter
called the MERLIN MAIL—ML system, works with the MERLIN LEGEND
Communications System to automate the call handling, call answering, and
voice messaging needs of your company. To meet these needs, the MERLIN
MAIL—ML system offers three services:
■
Automated Attendant Service
■
Call Answer Service
■
Voice Mail Service
Automated Attendant Service provides the MERLIN MAIL—ML system’s call
handling features. Automated Attendant Service can be setup to answer calls
and present callers with menus of selectable options, such as transferring to
specific extensions or playing pre-recorded announcements. Automated
Attendant Service can also automatically route calls, accept fax calls, answer
calls based on a programmed business schedule, and provide customized
after-hours service.
Call Answer Service provides the MERLIN MAIL—ML system’s call coverage
features. Call Answer Service automatically answers calls when the subscriber
(user of the MERLIN MAIL—ML system) is either on another call or away from
the phone. Call Answer Service lets the caller leave a message for a
subscriber or transfer to another extension.
System Services and Features 1-1
Overview
Voice Mail Service provides the MERLIN MAIL—ML system’s voice
messaging features. Voice Mail Service lets subscribers send voice mail
messages to other subscribers and listen to messages left in their mailboxes
by subscribers and external callers.
All services provided by the MERLIN MAIL—ML system can be implemented
in a single language (monolingual mode) or two languages (bilingual mode). If
set up for bilingual mode, the MERLIN MAIL—ML system lets callers select
the language in which they want to hear prompts, menus, and
announcements. The MERLIN MAIL—ML system can operate in English,
French, or Spanish. In bilingual mode, English must be one of the language
choices.
A detailed description of the MERLIN MAIL—ML system’s services and
features follows. Figure 1-1 shows the main features associated with each
service.
1-2 System Services and Features
Overview
MERLIN MAIL—ML
Voice Messaging System
Monolingual/Bilingual Mode
Automated Attendant Service
Voice Mail Service
Call Answer Service
Prompts caller to make a choice
from a menu of options, then
routes the call to the selected
destination.
Allows subscribers to:
■ Send Messages
■ Listen to Messages
■ Forward Messages
■ Delete Messages
■ Reply to Messages
■ Record Personal Greeting
■ Change Password.
■ Administer Outcalling
Prompts caller to leave a
message or transfer to another
extension when the called party
does not answer.
In bilingual mode, callers hear
prompts in the primary system
language. Callers can choose
to hear prompts in the alternate
language.
In bilingual mode, after logging
in, subscribers hear prompts in
the language administered for
their voice mailbox.
Immediate
Call Handling
MERLIN MAIL—ML
system answers
external calls day
and night Callers
receive Automated
Attendant Service.
The System Operator
answers overflow
calls.
Delayed
Call Handling
The System Operator
answers external
calls. Overflow calls
go to Automated
Attendant Service
day and night.
Night Only
Call Handling
The Automated
Attendant Service
answers calls only
after normal business
hours and transfers
them to selected
extensions.
In bilingual mode, callers hear
personal greeting in the
language administered for the
voice mailbox. Callers can
choose to hear prompts in the
alternate language.
Extention Coverage
Line Coverage
Picksup unanswered
calls ringing at SA or
ICOM buttons and
accepts messages
left by caller
Pick up unanswered
Calls ringing on a line
button and accept
message left by caller,
(the call can be
ringing at more than
one extention.)
Figure 1-1. Overview of MERLIN MAIL—ML System Services and Features
System Services and Features 1-3
Overview
Monolingual or Bilingual Operation
You choose to operate the MERLIN MAIL—ML system in monolingual or
bilingual mode. In monolingual mode, you select the single language in which
MERLIN MAIL—ML system prompts, menus, and announcements are played.
In bilingual mode, you select both a primary system language and a
secondary system language. The primary system language is the default
language for which system prompts, menus, and announcements are played.
The secondary system language is the alternate language which callers can
choose to play prompts, menus, and announcements.
Whether you choose to operate in a monolingual or bilingual mode depends
on the needs of your callers and subscribers (voice mail users).
The MERLIN MAIL—ML system offers you the choice of three languages:
■ For
monolingual mode, one of the following languages:
— English
— French
— Spanish
■ For
bilingual mode, one of the following primary/secondary system
language combinations:
Primary Language
Secondary Language
English
French
English
Spanish
French
English
Spanish
English
NOTE:
In bilingual mode, English must be one of the languages.
1-4 System Services and Features
Overview
Automated Attendant Service
The MERLIN MAIL—ML system’s Automated Attendant Service consists of a
greeting and one or more menus, providing callers with a number of options
that allow them to quickly access an extension, a department, or information
by pressing a single dialpad button. This service provides several major
benefits, both to the callers and to the company:
■
System greetings, announcements, and menus can be recorded
and played in one language (monolingual mode) or two languages
(bilingual mode).
■
In bilingual mode, callers can select their language preference for
system greetings, prompts, announcements, and menus.
■
Different greetings, menus, and announcements can be recorded to
play during the day and night.
■
For example, during the day you may want to tell callers to stay on
the line for assistance by an operator. At night, when there maybe
no operator, you may want to tell callers to stay on the line to leave
a message in the General Mailbox.
■
Calls are efficiently routed to the correct party.
■
Incoming fax calls from machines that produce industry-standard
fax (CNG) tones, are recognized and automatically routed to the fax
extension.
■
Callers using rotary phones or needing assistance, are
automatically transferred to the system operator or General Mailbox,
or disconnected, based on your company’s preference.
■
If the party the caller wants does not answer or the phone is busy,
the caller is prompted to leave a message.
■
If callers do not know the extension needed, they can access a
directory of subscribers or be transferred automatically to an
operator.
System Services and Features 1-5
Overview
■
Announcements of frequently requested information (such as
directions or business hours) can be included as menu options,
thereby freeing an employee’s time for other tasks.
Examples of Automated Attendant Service
The following examples show how you can set up Automated Attendant
Service for monolingual and bilingual modes. The examples illustrate how a
caller can quickly reach the extension he or she wants.
Monolingual Mode Example—English as the Only Language. The following
example consists of a greeting followed by a menu of options to reach
particular extensions.
Automated Attendant Service Prompts Caller Response
Thank you for calling the XYZ Company. If
you are calling from a touch-tone phone,
press [1] now.
For sales, press [1]
For customer service, press [2].
If you know the extension of the person you
are calling, press [8] and dial the extension
now.
For a directory of employees listed by last
name, press [*] [A] .
Or stay on the line for assistance.
1-6 System Services and Features
Caller presses [1] to indicate
the call is from a touch-tone
phone.
Caller presses dialpad
buttons in response to the
prompts, or waits for the
system operator to answer
the call.
Overview
Bilingual Mode Example — French Speaking Caller and French as the
Primary Language. The following example shows what a French speaking
caller would hear if French was set up as the primary system language and
English was set up as the secondary system language. As part of the initial
greeting set up by the customer, the caller hears an English prompt to press
[*] [1] to select English. By ignoring the English prompt to press [*] [1] , the
caller "selects" the primary system language automatically.
Automated Attendant Service Prompts Caller Response
Merci davoir appeler la compagnie XYZ.
For English, press [*] [1] now.
Si vous connaissez le numéo de poste de
la personne avec qui vous désirez parler
composez le maintenant.
Pour le département des ventes appuyez
sur le [1] .
Pour le service appuyez sur Ie [2] .
Pour le répertoire de postes composez
[*] [2]
Sinon rester en ligne.
Caller ignores the English
prompt to press [*] [1] —
prompts are now played in
French.
Caller presses dialpad
buttons in response to the
prompts.
System Services and Features 1-7
Overview
Bilingual Mode Example—Spanish Speaking Caller and EngIish as the
Primary Language. The following example shows what a Spanish speaking
caller would hear if English was setup as the primary system language and
Spanish was set up as the secondary system language. As part of the initial
greeting set up by the customer, the caller hears a Spanish prompt to press
[*] [1] to select Spanish. By pressing [*] [1] in response to this prompt, the
caller selects the secondary system language. All remaining prompts, menus,
and announcements play in Spanish.
Automated Attendant Service Prompts Caller Response
Thank you for calling the XYZ Company.
Para escuchar en español, marque Ios
[*] [1] ahora.
Caller presses [*] [1] —
prompts are now played in
Spanish.
Gracias por Ilamar a la compañia XYZ.
Para el department de ventas, marque
el [1].
Para servicio de los clientes, marque el [2] .
Si sabe la extensión de la persona a quien
llama, marque el [8] y la extensión ahora.
Para el directorio de empleados Iistado por
apellido marque [*] [2] .
O espere en la Iínea para la operadora.
1-8 System Services and Features
Caller presses dialpad
buttons in response to the
prompts, or waits for the
system operator to answer
the call.
Overview
Bilingual Mode Multilevel Menu Example—English Speaking Caller and
English as the Primary Language. The following example shows what an
English speaking caller would hear after reaching an Automated Attendant
Service that includes submenus and pre-recorded announcements:
Automated Attendant Service Prompts Caller Response
You have reached the City Zoo.
Para escuchar en español, marque Ios
Caller ignores the Spanish
[*] [1] ahora.
prompt to press [*] [1] —
prompts are played in English.
For admission charges, press [1]
For special events, press [2]
For group sales, press [3]
For travel directions, press [4]
If you know the extension of the person you
are calling, press [8] and dial that person’s
extension.
Or stay on the line for operator assistance.
Caller presses [4] to get
directions — the directions
submenu plays.
If you are coming by subway, press [1]
If you are coming by bus, press [2]
If you are coming by car, press [3]
Caller presses dialpad
buttons in response to the
prompts.
After the caller selects the mode of transportation from the submenu, the next
menu level might ask the caller to enter the direction he or she is coming from
and would then play an announcement containing the requested directions.
This multilevel menu approach is useful for many businesses and agencies,
such as banks, insurance agencies, post offices, and department stores. For
example, Automated Attendant Service could be used in the banking
business. A multilevel menu allows clients to select recordings of specific
information they need, such as current loan, mortgage, or savings account
interest rates; speak directly to a loan officer or account manager; or wait for
an available customer service representative.
System Services and Features 1-9
Overview
The menu allows bank employees to handle banking transactions instead of
being tied up reciting repetitive information. In a business like this, the
Automated Attendant Service should always be programmed to allow the
caller to stay on the line or enter an extension to reach an employee.
RECOMMENDATION:
Callers may get confused if presented with more than 3 levels of menus
or more than 5 options on a menu. Although the MERLIN MAIL—ML
system lets you create up to 99 menus and up to 9 options on each
menu, it is recommended that you limit the number of menu levels to 3
and the number of options on each menu to 5. Also, remind callers from
each menu that they can get assistance by dialing 0 (zero).
Call Handling Methods
Automated Attendant Service can be set to handle calls in one of the following
ways:
■
Immediate Call Handling, which also allows Fax Call Handling
■
Delayed Call Handling
■
Night Only Call Handling, which also allows Fax Call Handling with
MERLIN LEGEND Release 2.0 and later releases.
1-10 System Services
and Features
-..
Overview
Immediate Call Handling
With Immediate Call Handling, Automated Attendant Service answers all
incoming calls, both day and night. If the MERLIN MAIL—ML system is busy
and does not answer the call, additional calls (called overflow calls) will ring at
the system operator’s phone, as shown in Figure 1-2.
Figure 1-2. MERLIN MAIL—ML System as Immediate Call Handler
Immediate Call Handling plays either your company’s day greeting and
menus or the night greeting and menus, based on the time of the call and the
schedule set up. If you want most callers to be handled by the Automated
Attendant Service, use Immediate Call Handling.
System Services and Features
1-11
Overview
Delayed Call Handling
With Delayed Call Handling, external calls ring immediately at the MERLIN
LEGEND system operator’s console, both day and night. If the system
operator does not answer, calls automatically go to Automated Attendant
Service, as shown in Figure 1-3.
Figure 1-3. MERLIN MAIL—ML System as Delayed Call Handler
With Delayed Call Handling, like Immediate Call Handling, Automated
Attendant Service plays either your company’s day greeting and menus or the
night greeting and menus, based on the time of the call and the schedule set
up.
1-12 System Services
and Features
. .
Overview
If you want most calls handled by the system operator, use Delayed Call
Handling. If the system operator is busy or does not answer, the calls are
handled by the MERLIN MAIL—ML system.
Night Only Call Handling
With Night Only Call Handling, the Automated Attendant Service answers
external calls only when the MERLIN LEGEND system is in Night Service. To
use Night Only Call Handling, you must use MERLIN LEGEND Night Service.
During the day, calls ring at the system operator’s console. With Night Only
Call Handling, the Automated Attendant Service plays your company’s night
greeting, menus, and announcements when the MERLIN LEGEND system is
in Night Service. The day greeting, menus, and announcements are not
played.
If you want callers to receive the Automated Attendant Service only when your
business is closed, use Night Only Call Handling.
Fax Call Handling
Automated Attendant Service can be setup to recognize incoming fax calls
from machines that produce industry-standard fax (CNG) tones and transfer
the calls to a designated fax extension. The sending fax machine must send
industry-standard fax (CNG) tones for the Automated Attendant Service to
recognize the call automatically as a fax call. With Fax Call Handling, your
company may not need a separate telephone line for its fax machine—callers
can dial the same number for voice and fax calls.
Fax Call Handling can be combined with Immediate Call Handling. In
addition, Fax Call Handling can be combined with Night Only Call Handling
for MERLIN LEGEND Release 2.0 or later releases. Fax Call Handling cannot
be combined with Delayed Call Handling because the sending machine will
stop sending the fax (CNG) tone and hang up after 35 seconds.
System Services and Features
1-13
Overview
Automated Attendant Service Scheduling
You can set up Automated Attendant Service to provide different greetings,
menus, and announcements for calls received when your company is open for
business and when it is closed. For calls received during scheduled business
hours, Automated Attendant Service plays the day greeting, menus, and
announcements; for calls received after scheduled business hours,
Automated Attendant Service plays the night greeting, menus, and
announcements.
The Automated Attendant Service uses the Night Service schedule from your
MERLIN LEGEND system, or a separate schedule you setup for the MERLIN
MAIL—ML system, to determine whether your company is open or closed at
the time of a call.
RECOMMENDATION:
Use the MERLIN LEGEND Night Service feature to administer the
schedule and set every day to closed on the MERLIN MAIL—ML
business schedule. In this way, the MERLIN LEGEND system controls
the MERLIN MAIL—ML schedule.
It is not recommended to use the MERLIN MAIL—ML business schedule
to enter your company’s normal hours of operation if you also use the
MERLIN LEGEND Night Service feature. When you use both, the
schedules can contain different information and there can be undesired
interactions between the schedules.
When the MERLIN LEGEND system begins or ends Night Service, it
sends a command to the MERLIN MAIL—ML system causing the
MERLIN MAIL—ML system to go into night or day mode. The commands
sent by the MERLIN LEGEND system will override the business schedule
set on the MERLIN MAIL—ML system.
For example, if the MERLIN MAIL—ML business schedule is
programmed to be in day mode from 8 a.m. to 6 p.m., but the MERLIN
LEGEND begins Night Service at 4 p.m., then the MERLIN MAIL—ML
system will prematurely go into night mode at 4 p.m. instead of at 6 p.m.
1-14 System Services and Features
Overview
Administering the Schedule Using
MERLIN LEGEND Night Service
The MERLIN LEGEND system notifies the MERLIN MAIL—ML system when
MERLIN LEGEND Night Service begins and ends. When the MERLIN
MAIL—ML system is notified that Night Service is on, the Automated
Attendant Service plays the night greeting, menus, and announcements.
When the MERLIN MAIL—ML system is notified that Night Service is off, the
Automated Attendant Service plays the day greeting, menus, and
announcements.
There are three ways that the MERLIN MAIL—ML system can be notified when
MERLIN LEGEND Night Service begins and ends:
■
Night Service with Time Set — On the MERLIN LEGEND system,
you set up a schedule that specifies when Night Service begins and
ends. The MERLIN LEGEND system notifies the MERLIN MAIL—ML
system automatically whenever the MERLIN LEGEND system goes
into or out of Night Service.
■
Night Service with Group Assignment — The MERLIN LEGEND
system notifies the MERLIN MAIL—ML system that Night Service is
on when all system operator positions have Night Service activated.
The MERLIN LEGEND system notifies the MERLIN MAIL — ML
system that Night Service is off when one system operator position
has deactivated Night Service.
■
Night Service with Outward Restriction — The MERLIN LEGEND
system notifies the MERLIN MAIL—ML system when Night Service
goes on and off when one operator activates or deactivates Night
Service.
NOTE:
If you use Night Only Call Handling, the Automated Attendant Service is
only available when the MERLIN LEGEND Night Service feature is on.
For more information on the MERLIN LEGEND Night Service feature, see your
MERLIN LEGEND documentation.
System Services and Features
1-15
Overview
Administering the Schedule Using the
MERLIN MAIL—ML Business Schedule
The MERLIN MAIL—ML business schedule can be used to enter your
company’s hours of operation and any temporary changes to the schedule.
Use the MERLIN MAIL— ML business schedule to enter your normal hours of
operation only if you are not using the MERLIN LEGEND Night Service feature.
You must use the MERLIN MAIL—ML business schedule to enter temporary
changes to the schedule. You can enter special hours for a day up to a week
in advance. You can also set the current day to open or closed.
Voice Mail Service
The MERLIN MAIL—ML system’s Voice Mail Service (also called Voice Mail)
lets subscribers:
■
Listen to messages from non-subscribers and other subscribers.
■
Record their own personal greetings and names.
■
Forward a received message to one or more subscribers, with
additional comments, if desired.
■
Assign their own passwords, which they can change to ensure that
messages are kept confidential.
■
Create a message and send it to one or more subscribers.
■
In bilingual mode, listen to Voice Mail Service prompts in the
language they prefer.
■
Designate a telephone number or pager/beeper that is notified
when a new message arrives in the subscriber’s mailbox.
1-16 Voice Mail Service
Overview
Addressing Voice Mail
Voice Mail provides the following methods of addressing (sending) voice mail
messages to subscriber mailbox:
■
Subscriber extension number (voice mailbox number)
■
Voice mailbox name (directory listing)
■
Pre-designated group of subscribers (Group List)
■
Broadcast message to all subscribers (system administrator only)
Addressing Voice Mail by Extension Number
If the sender knows the recipient’s extension number (voice mailbox number),
a voice mail message can be addressed by entering the recipient’s extension
number and [#] . Voice Mail ensures that the mail is addressed correctly by
playing back the subscriber’s name after the extension number is entered.
The sender can then delete the extension if it is not correct.
Once all the recipients’ extension numbers have been entered, the sender
enters [*] [#] to send the message.
Addressing Voice Mail by Voice Mailbox Name
Subscribers who want to send a voice mail message may not always know the
extension number of the message recipient. The MERLIN MAIL—ML system
lets these subscribers address voice mail messages by accessing the
directory of subscribers’ voice mailbox names and selecting the message
recipient(s) from the directory. The directory can be organized by first or last
name.
The directory is accessed by pressing [*] [A] (numeric equivalent, [*] [2] ) after
hearing the system prompt to enter the extension number. The message
recipient is then selected by entering the first four letters of the recipient’s
name. If only a single name matches the letters entered, Voice Mail Service
addresses the message to the corresponding subscriber. If more than one
name matches the letters entered, Voice Mail plays the corresponding
subscriber names in groups of five and prompts the sender to select the
correct name.
Voice Mail Service
1-17
Overview
Addressing Voice Mail to a Group List
There are times when a subscriber wants to send the same voice mail
message to more than one subscriber. Rather than dialing each subscriber’s
extension to address a message, Voice Mail Service lets the system
administrator set up a Group List (list of voice mailbox numbers) that
subscribers can use to address messages to more than one subscriber by
entering the appropriate Group List number.
This feature is useful in many different situations as shown in the following
examples:
■
A sales manager can send a single message to a group of
salespeople who are often traveling and hard to reach by telephone.
■
A faculty department chairperson can send a message to
department members, not all of whom are on campus on the same
day.
■
A hospital or plant administrator can send a message to a group of
employees working on different shifts.
Addressing Voice Mail to All Subscribers (Broadcast Message)
Sometimes information needs to be sent to all MERLIN MAIL—ML
subscribers. The system administrator can use the Voice Mail Service
Broadcast Message feature to send a message to all subscribers at one time
instead of addressing the message by entering all extension numbers or
creating a group list containing all subscribers.
NOTE:
Broadcast messages are delivered immediately to subscribers’ voice
mailboxes, however, message waiting indicators are not lit until 3 a.m.
for these messages. Also, subscribers do not receive Outcalling
notification for broadcast messages. If you want Outcalling notification
or if you want the message-waiting indicators to light immediately,
address the message using Group List numbers, extension numbers, or
mailbox names, instead of using the Broadcast feature.
1-18 Voice Mail Service
Overview
Outcalling
The MERLIN MAIL—ML system’s Outcalling feature can dial a designated
telephone number or pager/beeper and notify a subscriber that a new
message has arrived in the subscriber’s voice mailbox.
Outcalling is particularly useful because it immediately calls the
subscriber-designated car phone, pager/beeper service, or telephone, and
tells him or her that there is a new message in the mailbox. Subscribers who
use Outcalling know that they will get their messages whether they are at their
desk, on the road, or at an alternate work location.
If the designated Outcalling number is a telephone number, when a
subscriber gets a new message, MERLIN MAIL—ML dials the Outcalling
number and delivers the following message:
"This is MERLIN MAIL. You have a new message. To access your new
message, enter extension and [#] . To avoid further notification about this
message, press [*] [#] "
For pager/beeper calls, MERLIN MAIL — ML does not play this message.
The MERLIN MAIL—ML system dials the designated outcalling number up to
5 times, once every 30 minutes until the subscriber logs in or cancels
Outcalling for that message by pressing [*] [#] during the Outcalling message
call. If the subscriber does not log in or cancel Outcalling for that message
within 5 dialing attempts, the MERLIN MAIL—ML system waits until a new
message is left for the subscriber before outcalling again.
Using a touch-tone phone, subscribers with the Outcalling feature can retrieve
their messages, change their Outcalling number, and turn Outcalling on or off
as necessary.
To setup Outcalling, the following parameters must be set:
■
The system administrator must assign a Class of Service (COS) to
the subscriber’s mailbox that permits Outcalling. To avoid toll
abuse, strictly control mailboxes that have Outcalling privileges.
Voice Mail Service
1-19
Overview
■
The subscriber must turn Outcalling “on.”
■
The subscriber must specify an Outcalling number. For a
pager/beeper, a call-back number can be programmed as part of
the Outcalling number.
NOTE:
Before you use Outcalling, its is strongly recommended that you read
“Security of Your System — Preventing Toll Fraud” in your MERLIN
LEGEND documentation.
Call Answer Service
The MERLIN MAIL—ML system’s Call Answer Service allows callers to leave
messages or transfer to another extension when the extension called is busy
or does not answer. When a message is left, Call Answer Service deposits the
message in the subscriber’s voice mailbox, then lights the message-waiting
indicator on the subscriber’s phone. If the subscriber has Outcalling turned
on, the MERLIN MAIL—ML system will also place a call to the specified
Outcalling number.
In addition to acting as an answering machine, Call Answer Service enables
callers to perform any of the following actions:
■
Press [0] (zero) for the system operator.
■
Transfer to another extension by dialing [*] [T] (or [*] [8] ) before or
after leaving a message.
■
Review and edit messages before depositing them in the
voice mailbox.
■
Leave messages in the General Mailbox if the subscriber’s voice
mailbox is full.
1-20 Call Answer Service
Overview
■
If the MERLIN MAIL—ML system has been setup for bilingual
operation, callers hear the subscriber’s personal greeting in the
language administered for the voice mailbox. Callers can choose to
hear the personal greeting and all other prompts in the alternate
(secondary) language by pressing [*] [1]
Guest Mailboxes
You can set up Guest Mailboxes so that Voice Mail users who do not have
their own extension, such as temporary workers, contract workers, and
consultants, can receive messages from subscribers and non-subscribers.
MERLIN MAIL—ML System
Configurations
The MERLIN MAIL—ML system is available in two configurations: the two-port
configuration uses a single voice processing card and the four-port
configuration uses two voice processing cards. The ports of a voice
processing card connect to a Basic Telephone (012) Module in the MERLIN
LEGEND system. Each MERLIN MAIL—ML port can support multiple services:
Automated Attendant Service, Call Answer Service, and Voice Mail Service.
Either MERLIN MAIL—ML configuration can store approximately four hours of
messages.
The MERLIN MAIL—ML system can be upgraded from a two-port system to a
four-port system. Contact your AT&T representative or authorized dealer for
more information.
A separate Remote Maintenance Device (RMD) is included with the MERLIN
MAIL—ML unit. This device is used for remote maintenance and diagnostic
services by AT&T or authorized service personnel. The RMD is connected to a
port on a Basic Telephone (012) Module.
MERLIN MAIL—ML System Configurations 1-21
Overview
Installation and Programming
Responsibilities
One or more people will be responsible for these tasks:
■
Installing and wiring the MERLIN MAIL—ML unit.
■
Programming the MERLIN MAIL—ML unit to provide the services
specified by the customer.
■
Programming MERLIN LEGEND parameters that integrate the
operation of the MERLIN MAIL—ML and MERLIN LEGEND systems.
Collect the completed planning worksheets from the MERLIN LEGEND system
manager and from the MERLIN MAIL—ML system administrator before
installing and programming the MERLIN MAIL—ML system. (In many
companies, both functions are performed by the same person. )
Subscribers’ Responsibilities
Before programming the MERLIN MAIL—ML system, subscribers should be
designated to serve in the following support roles:
■
System administrator
■
System operator
■
General Mailbox owner
1-22 Subscribers’ Responsibilities
Overview
System Administrator
The system administrator is responsible for making these routine changes to
the system:
■
Maintaining voice mailboxes
Besides adding and deleting voice mailboxes, the system
administrator is responsible for resetting voice mailbox
passwords if subscribers forget them, changing subscribers’
mailbox language, and changing the mailbox’s Class of Service
which determines Outcalling permissions, call transfer
permissions, message length, and storage space.
■
Changing greetings, menus, and announcements
Changes in personnel, your company’s operations, or your
company’s services may require changes to Automated
Attendant Service greetings, menus, and announcements.
■
Maintaining the business schedule
Holidays and temporary company closings or openings must be
entered to ensure the proper Automated Attendant greetings and
menus are played during these times.
■
Maintaining Group Lists for use by subscribers
The system administrator can create, update, or delete a Group
List. The system administrator is also responsible for informing
subscribers of any changes to Group Lists.
■
Maintaining system parameters
Changes in personnel or telephone configuration may require
changes to some of the system parameters, such as the fax
extension, system operator extension, or system administrator’s
mailbox.
■
Broadcast messages to all subscribers
The system administrator is the only subscriber able to use the
Broadcast feature to send messages.
Subscribers’ Responsibilities
1-23
Overview
■
Resolving problems with the MERLIN MAIL— ML system
If users experience problems with the MERLIN MAIL—ML
system, they can send a message reporting the problem to the
Trouble Mailbox. The system administrator is responsible for
responding to the messages left in the Trouble Mailbox.
When a message is sent to the Trouble Mailbox, the
message-waiting indicator lights on the MERLIN MAIL—ML
system administrator’s telephone.
System Operator
The person designated as the system operator has primary responsibility for
answering calls in the following situations:
■
If Delayed Call Handling is used, the system operator is expected to
handle all calls. The MERLIN MAIL—ML system serves as
a backup to the system operator.
■
If Immediate Call Handling is used, the system operator handles
calls when the MERLIN MAIL—ML system is busy and cannot
answer the call.
■
The system operator answers calls if the Automated Attendant
Service is setup to transfer calls to the system operator when a
caller presses [0] (zero) or does not press any dialpad buttons.
■
The system operator answers if Call Answer Service is setup to
transfer calls to the system operator when a caller presses [0]
(zero).
1-24 Subscribers’ Responsibilities
Overview
General Mailbox Owner
Messages are sent to the General Mailbox in the following situations:
■
Messages can not be delivered to a subscriber’s voice mailbox
because the subscriber’s voice mailbox is full.
■
Automated Attendant Service is setup to transfer calls to the
General Mailbox when a caller presses [0] (zero) or does not press
any dialpad buttons.
■
Automated Attendant Service attempts to transfer a call to a busy
extension that does not have a voice mailbox.
The person designated as the General Mailbox owner forwards the messages
from the General Mailbox to the intended recipient. The recipient must be a
voice mail subscriber. If a message is left in the General Mailbox for a person
who is not a subscriber, the General Mailbox owner will need to deliver the
message to the person in some other way.
A copy of the instructions for forwarding General Mailbox messages should
be given to the person designated as the General Mailbox owner. These
instructions are included at the back of this guide.
Helpful Hints
After you become familiar with the MERLIN MAIL—ML system, the following
hints and shortcuts can save you time:
■
The MERLIN MAIL—ML system can be programmed from any
touch-tone phone.
■
You never need to wait for a greeting or a prompt to play before
dialing the next step. To save time in the instructions, you can dial
ahead (go to the next step) before a menu or system response
completes playing. You must, however, perform each step in the
instructions.
Helpful Hints
1-25
Overview
■
Press [*] [7] at any point during system programming always
brings you back to the System Administration Main Menu. Press
[*] [7] again to return you to the Voice Mail Activity Menu.
■
Enter [*] [#] to return to the previous menu.
■
Enter [*] [4] to repeat the current menu, prompt, or instruction.
■
Press [*] [*] [9] to exit the system. (You can also hang up.)
■
Use the handset to record messages, greetings, names, menus,
and announcements. The speakerphone is not recommended for
making recordings.
■
If you are using a speakerphone, turn off your speakerphone’s
microphone when programming the system.
■
When calling the MERLIN MAIL—ML system from your own MERLIN
LEGEND system extension, you do not have to enter your extension
number during Iogin. Simply enter [#] when the following prompt
plays:
"Please enter extension and [#] sign."
■
Though you can set your mailbox for no password checking, to
maintain a more secure telephone system and reduce the possibility
of toll fraud, it is strongly recommended that neither the system
administrator nor other subscribers eliminate MERLIN MAIL—ML
passwords.
Planning Forms
Before you attempt to program the MERLIN LEGEND or MERLIN MAIL—ML
systems, make sure you get the completed planning forms from the MERLIN
LEGEND system manager and the MERLIN MAIL—ML system administrator.
This guide’s instructions identify the required forms when you need them.
1-26 Planning Forms
Installation
2
This chapter details what you need to install the MERLIN MAIL— ML system
unit and provides instructions for installing and connecting the MERLIN
MAIL—ML system to the MERLIN LEGEND system.
Preparing for Installation
Read through this chapter before you perform the installation instructions it
contains.
Verify that you have all the required MERLIN MAIL—ML and MERLIN LEGEND
components, and that your installation site meets the environmental
requirements, before you begin installation.
Preparing for Installation 2-1
Installation
Parts Checklist
The AT&T MERLIN MAIL Voice Messaging System—Multi-Lingual Version
shipment should contain the following parts:
[ ✓ ] MERLIN MAIL—ML cabinet
[ ✓ ] Wall mount and cable manager bracket
NOTE:
The cabinet and bracket are together referred to as the
MERLIN MAIL—ML unit.
[ ✓ ] For a single voice-processing card configuration:
— two 8-foot modular D4BU telephone cords (2 pair, T/R connection)
[ ✓ ] For a dual voice-processing card configuration:
— four 8-foot modular D4BU telephone cords (2 pair, T/R connection)
[ ✓ ] Power cord (6-foot, 3-prong, male/female ends)
[ ✓ ] Modem cable
[ ✓ ] Remote Maintenance Device (shipped in a separate box) and
1 modular telephone cord
MERLIN LEGEND Hardware
Requirements
The following MERLIN LEGEND equipment is required to install the MERLIN
MAIL—ML system:
[ ✓ ] MERLIN LEGEND Processor Module
[ ✓ ] Basic Telephone (012) Module, model 517C13 or later (models
517A13 and 517B13 can not be used)
[ ✓ ] Appropriate Ring Generator for 012 module model 517C13, 517D13,
517E13, or 517F13
2-2 Preparing for Installation
Installation
The ring generator should be installed in the power supply module of the
carrier, either basic or expansion, containing the 012 module to which the
MERLIN MAIL—ML system ports are connected.
NOTE::
For 012 module model 517G13, the ring generator is built-in. A separate
ring generator is not needed in the power supply module.
The following chart lists the number of devices that can be supported at the
same time by a 012 module, model 517F13 or earlier, when MERLIN
MAIL—ML is installed:
MERLIN MAIL—ML
Configuration
Fax
RMD
2 port
1
1
3
4 port
1
1
2
Single Line Sets
The 012 module, model 517G13, can have its 12 ports used as MERLIN
MAIL—ML ports, faxes, or single line sets, if a sufficient number of touch-tone
receivers are available in the system. The limiting factor is the touch-tone
receiver needs of all devices connected to the 012 module as well as the
number of devices that can be supported to ring simultaneously.
Preparing for Installation 2-3
Installation
Figure 2-1. Sample Configuration of MERLIN MAIL—ML Voice Messaging
System and MERLIN LEGEND Communications System
Hardware
2-4
Preparing for Installation
Installation
Preparing the Site
The MERLIN MAIL—ML unit should be wall-mounted adjacent to the MERLIN
LEGEND processor, on the same wood mounting surface if possible. The
MERLIN MAIL—ML unit should be connected to the same branch circuit as
the MERLIN LEGEND processor.
WARNING:
If there is not sufficient room on the existing wood mounting surface,
either secure anew surface (apiece of plywood) or use wall studs to
install the MERLIN MAIL—ML unit. This ensures permanent mounting
and will prevent wall damage.
If the MERLIN LEGEND processor is connected to an uninterruptible power
supply (UPS) or surge protector, it is recommended that the MERLIN
MAIL—ML unit be connected to the same UPS or surge protector.
To help ensure trouble-free operation, maintain the following environmental
conditions:
■
Dust-free area (preferably in an office environment)
■
Relative humidity < 90%
■
No exposure to any liquids (avoid areas near drinking fountains,
coffee makers, and so on).
■
Temperature range recommendation: 60°F to 80°F (15.5°C to 26.6°C)
Preparing for Installation 2-5
Installation
Installing the MERLIN
MAIL—ML Unit
Installation of the MERLIN MAIL—ML unit (Figure 2-2) involves the following
phases:
■
Mounting the unit on the wall near the MERLIN LEGEND processor in
close proximity to the power supply to which the MERLIN LEGEND
processor is connected.
■
Connecting the unit to the MERLIN LEGEND system.
■
Connecting the Remote Maintenance Device to the unit.
■
Verifying the installation connections.
Before you begin, be sure the installation site has been prepared properly.
Figure 2-2. MERLIN MAIL — ML Unit
2-6
Installing the MERLIN MAIL—ML Unit
Installation
Mounting the MERLIN MAIL—ML Unit
Refer to Figures 2-3 and 2-4 as you follow the instructions for mounting the
MERLIN MAIL—ML unit below:
1. Remove the wall mount and cable manager bracket from the shipment
package.
2. Position this bracket so that the slot is upward and use the bracket as a
template to mark the four points on the plywood surface or wall studs
where the wall-mounting screws will be inserted.
WARNING:
Be sure to install the wall-mounting screws in wall studs or in a
piece of plywood to ensure permanent mounting and to prevent
wall damage.
3. Secure the wall mount and cable manager bracket as shown in
Figure 2-3.
For mounting on plywood, use the four #8 X 3/4-inch pan-head sheet
metal screws provided (or their equivalent). For mounting to wall studs
through drywall, use four #8 x 1 1/4-inch (or longer) pan-head sheet
metal screws.
4. From the rear panel of the MERLIN MAIL—ML cabinet, remove the #6-32
hex-head screw from the mounting hole on the lower right. (See Figure
2-4 for position of screw.)
Installing the MERLIN MAIL—ML Unit 2-7
Installation
Figure 2-3. Mounting the MERLIN MAIL—ML Unit
5. Position the cabinet securely on the wall mount and cable manager bracket
slot, placing the cabinet’s bracket lip over the slot on the wall mount, as
shown in Figure 2-4.
2-8
Installing the MERLIN MAIL—ML Unit
Installation
Figure 2-4. Mounting the MERLIN MAIL—ML Unit
6. Tighten the captive retaining screw in the mounting hole on the
cabinet’s rear panel to secure the MERLIN MAIL—ML cabinet to the
wall mount and cable manager bracket.
Installing the MERLIN MAIL—ML Unit
.
2-9
Installation
Connecting the Unit to the MERLIN
LEGEND System
Refer to Figures 2-5 and 2-6 as you follow the instructions below to connect
the MERLIN MAIL—ML unit:
1. Route the 8-foot modular telephone cords through the slots on the wall
mount and cable manager bracket, located on the right side of the
MAIL—ML unit, to the MERLIN LEGEND processor module
(see Figure 2-5).
Figure 2-5. Threading Cords through the MERLIN MAIL—ML Wall
Mount and Cable Manager Bracket
2-10 Installing the MERLIN MAIL—ML Unit
Installation
2.
Connect the two (for a two-port) or four (for a four-port) modular
telephone cords into the appropriate ports (jacks) on the MERLIN
MAIL—ML system. The MERLIN MAIL—ML ports are numbered 1
through 4 (see Figure 2-6).
3.
Connect the other end of the modular telephone cords into telephone
jacks on the MERLIN LEGEND Basic Telephone (012) Module. Refer to
MERLIN LEGEND System Form 2a: System Numbering—Station Jacks
for proper jack assignments.
4.
Set the 115/230V switch to the appropriate voltage.
5.
Plug the power cord provided into the unit’s AC Power In socket.
6.
Plug the MERLIN MAIL—ML unit into a grounded AC electrical source,
preferably on the same branch circuit as the MERLIN LEGEND System.
7.
Switch the unit on. (The on/off switch is located in the center of the rear
panel.)
Installing the MERLIN MAIL—ML Unit
2-11
Installation
Figure 2-6. The MERLIN MAIL—ML Unit (Rear Panel)
2-12 Installing the MERLIN MAIL—ML Unit
Installation
Connecting the Remote Maintenance
Device to-the Unit
Refer to Figures 2-6, 2-7, and 2-8 as you follow the instructions below to
connect the Remote Maintenance Device:
NOTE:
Skip step 1 for RMD Mk Ill.
1.
The Remote Maintenance Device comes preset from the factory.
Confirm that the switches, located on the bottom of the modem, are set
as follows:
NOTE:
If you reset the switches, you must switch the Remote
Maintenance Device off and back on again before the new
settings take effect.
2. Use the modem cable provided to connect the RS-232-C port on the
Remote Maintenance Device to the COM1 port on the MERLIN
MAIL—ML unit. For the location of the RS-232-C port, refer to Figure
2-7 (RMD) or Figure 2-8 (RMD Mk Ill). For the location of the COM1
port on the MERLIN MAIL—ML unit, see Figure 2-6.
Installing the MERLIN MAIL—ML Unit
2-13
Installation
Figure 2-7. MERLIN MAIL—ML Remote Maintenance Device
2-14 Installing the MERLIN MAIL—ML Unit
Installation
Figure 2-8. MERLIN MAIL—ML Remote Maintenance Device MK III
3. Use a modular line cord to connect the remote maintenance device’s
telephone line port to the Basic Telephone (012) Module jack. Refer to
MERLIN LEGEND Form 2a: System Numbering—Station Jacks for jack
number.
4. Attach the power cord to the Remote Maintenance Device.
5. Plug the power cord into a grounded AC electrical source.
6. Switch the Remote Maintenance Device on.
7. Write the Basic Telephone Module jack number (extension number) on a label
and affix the label to the MERLIN MAIL—ML unit.
Installing the MERLIN MAIL—ML Unit
2-15
Installation
Adding or Replacing a
Voice-Processing Card
Customers with a two-port configuration may want to upgrade to a four-port
configuration to support a greater volume of calls or subscribers. To upgrade
from two to four ports, you need to add a voice-processing card.
CAUTION:
Only a qualified installer should open the MERLIN MAIL—ML unit, and
add or replace voice-processing cards.
WARNING:
Attach a grounded wrist-strap to the bare skin of your body before
handling any components sensitive to electrostatic discharge. The wrist
strap should be connected to the ground through a one meg ohm
resistor (usually built into the grounding cord).
1. Switch the MERLIN MAIL—ML unit off. (The on/off switch is located in the
center of the rear panel. See Figure 2-6.)
2 . Unplug the power cord.
WARNING:
The MERLIN MAIL—ML unit must be unplugged before
removing the cover. Hazardous voltage is inside. Failure to
comply could cause electric shock.
3. Disconnect all modular telephone cords and the modem cable from the
MERLIN MAIL—ML unit.
4. Loosen the captive retaining screw securing the cabinet to the wall
mount and cable manager bracket as shown in Figure 2-9.
2-16 Adding or Replacing a Voice-Processing Card
Installation
Figure 2-9. Removing the MERLIN MAIL—ML Unit from the Wall
5. Carefully lift the cabinet from the wall mount and cable manager bracket
slot and place it on a sturdy flat table top with the bracket side down.
6. Using a Phillips head screwdriver, loosen the four cover screws located
on the right and left sides of the MERLIN MAIL—ML cabinet. (See
Figure 2-9 for placement of screws.)
7. Remove the cover.
8. Remove the plastic card spacer.
9. Remove the upper slot plate, but save the screw.
Adding or Replacing a Voice-Processing Card
2-17
Installation
Figure 2-10. Removing the Slot Plate and Plastic Card Spacer
10. Verify that the following DIP-switch settings are set on the voiceprocessing card(s) being installed (see Figure 2-11).
Figure 2-11. Voice-Processing Card DIP-Switch Settings
2-18 Adding or Replacing a Voice-Processing Card
Installation
11.
Install the voice-processing card into the appropriate slot of the MERLIN
MAIL—ML cabinet, making sure the pins on the back of the voiceprocessing card are firmly connected into the slots. Card 1 goes in Slot
1 and Card 2 goes in Slot 2.
Figure 2-12. Installing the Voice-Processing Card
12. Insert and tighten the screw.
13. Re-install the plastic card spacer.
14. Replace the cover.
15. Tighten the four cover screws.
16. Lift the cabinet and securely position it on the wall mount and cable
manager bracket slot.
Adding or Replacing a Voice-Processing Card
2-19
Installation
17.
Tighten the captive retaining screw on the wall mount and cable
manager bracket into the mounting hole on the lower right side of the
cabinet.
18.
Plug in the modular telephone cords from the MERLIN MAIL—ML ports
to the correct MERLIN LEGEND jacks. Be sure to connect the cords
from lowest-numbered port to lowest-numbered jack and
highest-numbered port to highest-numbered jack. Refer to MERLIN
LEGEND System Form 2a: System Numbering—Station Jacks for jack
assignments.
19.
Reconnect the modem cable to the COM1 port.
20.
Plug in the MERLIN MAIL—ML unit power cord.
21.
Switch the MERLIN MAIL—ML unit power on.
22.
If the unit has been previously programmed, perform the Acceptance
Tests in Chapter 5.
2-20 Adding or Replacing a Voice-Processing Card
MERLIN MAIL — ML
System Programming
3
In this chapter, you will program the MERLIN MAIL—ML system.
Program the MERLIN MAIL—ML features in the order in which they are
presented in this chapter. The MERLIN MAIL—ML system requires certain
programming information (for example, language selection) before it can be
programmed for other features (such as voice mailbox assignments).
Figure 3-1 illustrates the programming menus available from the
Administration Main Menu.
You will be using the system administrator’s extension and password to
program these features. Although the MERLIN MAIL—ML system provides a
default (factory-set) administrator extension and password, you should
change them at some point during the system programming. Note that you
must create a mailbox for the new system administrator before changing the
system administrator’s extension to that mailbox. After you change the system
administrator’s extension and password, be sure to use the new values
whenever you log on to the MERLIN MAIL—ML system.
Refer to Appendix A for a complete list of MERLIN MAIL—ML factory settings.
You should confirm a factory setting, as instructed in procedures, even if you
are not changing the parameter.
3-1
MERLIN MAIL—ML System Programming
Figure 3-1. MERLIN MAIL—ML System Programming Menus
.
3-2
MERLIN MAIL—ML System Programming
MERLIN MAIL—ML Forms
The following MERLIN MAIL—ML planning forms contain information you will
need to program the MERLIN MAIL—ML system. These forms should be kept
with the System Administration guide.
■
Form A: System Parameters
■
Form B: Voice Mailbox Assignments
■
Form C: Automated Attendant Service Greeting
■
Form D: Voice Mail Greeting
■
Form E: Automated Attendant Service Day Main Menu
■
Form F: Automated Attendant Service Night Main Menu
■
Form G: Automated Attendant Service Submenus
■
Form H: Automated Attendant Service Announcements
■
Form I: Group Lists
MERLIN MAIL—ML Forms 3-3
MERLIN MAIL—ML System Programming
Before Beginning MERLIN
MAIL—ML Programming
Before beginning MERLIN MAIL—ML programming, you should have the
following forms:
■
Completed MERLIN MAIL—ML planning forms
■
Updated MERLIN LEGEND planning forms
Instructions for completing the MERLIN LEGEND and MERLIN MAIL—ML
forms are provided in the MERLIN MAIL—ML Planning Guide and Forms.
Once you have completed the MERLIN LEGEND and MERLIN MAIL—ML
forms, you are ready to begin programming the system.
You can use either of the following to program the MERLIN LEGEND system:
■
MLX-20L™ telephone identified as the system programming
console
■
Personal computer (PC) with the MERLIN LEGEND System
Programming and Maintenance (SPM) software
Use centralized telephone programming to program features for individual
extensions from the MLX-20L telephone or SPM console.
3-4 Before Beginning MERLIN MAIL—ML Programming
MERLIN MAIL—ML System Programming
Using the MLX-20L for
MERLIN LEGEND Programming
The MLX-20L telephone provides a seven-line display and 14 buttons located
to the left and right of the display. The top two buttons on each side of the
display are Iabelled and have fixed functions as described below:
Button
Action
[Home]
Returns to normal call-handling mode after you finish the
programming steps.
[Menu]
Displays the System Programming Main Menu.
[More]
Displays more menu options when there are more options
than will fit in the seven-line display. A “>” displays next to
the [More] button when there are additional menu options.
[Inspct]
View (inspect) programmed buttons on a telephone or
system features which have been programmed.
The remaining five buttons on each side of the display are used to select
menu options. Select the menu option by pressing the button located next to
the displayed menu option.
When programming on the MLX-20L console, you may need to write over the
previously entered choices. Use the backspace key to move the cursor to the
left to write over characters or press [Drop] to erase the whole entry.
Figure 3-2 shows the MLX-20L display and button arrangement. See the
MERLIN LEGEND System Programming guide for additional information on
using the MLX-20L telephone to program the system.
Before Beginning MERLIN MAIL—ML Programming 3-5
MERLIN MAIL—ML System Programming
Using SPM for MERLIN LEGEND
Programming
The MERLIN LEGEND System Programming and Maintenance (SPM) software
lets you use a personal computer to program the MERLIN LEGEND system.
SPM simulates the MLX-20L by displaying a representation of the MLX-20L
display and buttons on the computer’s monitor screen. Instead of pressing a
button next to the displayed menu option as you would with the MLX-20L, you
press the computer keyboard key corresponding to the one displayed next to
the menu option.
Figure 3-2 shows the MLX-20L and SPM display and button configurations.
MLX-20L Display and Buttons
[HOME]
[MENU]
[ ]
[ ]
[ ]
[ ]
[ ]
MENU Mode: Select Feature
Press HOME to exit
Directory
Messages
Posted Msg Sys Pro
Alarm Clock Maintenance
Timer
Ext Program
SPM Screen and Key Equivalents
[MORE]
[INSP]
[ ]
[ ]
[ ]
[ ]
[ ]
Home
End
F1
F2
F3
F4
F5
MENU Mode: Select Feature
Press HOME to exit
Directory
Messages
Posted Msg Sys Pro
Alarm Clock Maintenance
Timer
Ext Program
Figure 3-2. MLX-20L Programming Console and SPM Screen Display
3-6 Before Beginning MERLIN MAIL—ML Programming
PgUp
PgDn
F6
F7
F8
F9
F10
MERLIN MAIL—ML System Programming
The following chart shows the relationship between the buttons displayed on
the SPM screen and the MLX-20L button equivalents:
Label
Home
Key
Action
[Home]
Exit from SPM and return to the DOS
prompt after you finish the programming
steps.
[Menu]
Displays the System Programming Main
Menu.
PgUp
[More]
Displays more menu options when there
are more options than will fit in the
seven-line display. A “>” displays next to
the [More] button label when there are
additional menu options.
PgDn
[Inspct]
End
View (inspect) programmed buttons on a
telephone or system features which have
been programmed.
When programming using SPM on the personal computer, you will need to
write over the previously set choices. Use the [F4] key to move the cursor to
the left to write over characters. If you are using SPM Release 2.09 or later,
you can also use the [Backspace] key to move the cursor to the left and erase
characters.
See the MERLIN LEGEND System Programming guide for additional
information on using SPM to program the system.
Before Beginning MERLIN MAIL—ML Programming 3-7
MERLIN MAIL—ML System Programming
Accessing the MERLIN MAIL—ML System
You must first log into the MERLIN MAIL—ML system before you can perform
any MERLIN MAIL—ML system programming tasks.
To log into the MERLIN MAIL—ML system:
1.
Enter MERMAIL (the MERLIN MAIL—ML Calling Group extension).
The MERLIN MAIL—ML greeting plays.
2. Enter the system administrator’s EXTENSION followed by [#]
The Password prompt plays.
NOTE:
Until you change it, the system administrator’s extension is
[9] [9] [9] [7]
3.
Enter the system administrator’s PASSWORD followed by [#]
The system administrator’s name plays; then the Voice Mail Activity Menu
plays.
NOTE:
Until you change it, the system administrator’s password is
[1] [2] [3] [4] . To help maintain system security, it is strongly
recommended that after installation, you change the system
administrator’s password. See “Changing the System Administrator’s
Password” later in this chapter
3-8 Before Beginning MERLIN MAIL—ML Programming
MERLIN MAIL—ML System Programming
Preparing the MERLIN LEGEND System
for MERLIN MAIL—ML Programming
This procedure must be completed before programming the MERLIN
MAIL—ML system.
Perform the following MERLIN LEGEND system programming to create the
MERLIN MAIL—ML Calling Group and assign its group members (MERLIN
MAIL—ML ports).
■
Use MERLIN LEGEND Form 6e to determine the extensions of the
members of the MERLIN MAIL—ML Calling Group.
MLX-20L
PC
[Menu]
Sys Program
Exit
[S] [P] [M]
[Enter]
[any key]
[F1]
[F5]
2. Select Extensions.
Extensions
[F6]
3. Display next page of menu.
[More]
4. Select Group Calling.
Grp Calling
[F4]
5. Select Members.
Members
[F9]
6. Enter extension number of
the MERLIN MAIL—ML
Calling Group.
[nnn]
Enter
[nnn]
[F10]
7. Enter the members of the
MERLIN MAIL—ML Calling
Group in ascending order.
Repeat this step for each
MERLIN MAIL—ML port.
[nnn]
Enter
[nnn]
[F10]
Step Instruction
1.
Enter programming mode.
[PgUp]
Before Beginning MERLIN MAIL—ML Programming
3-9
MERLIN MAIL—ML System Programming
8. To return to Extensions
menu.
Exit
[F5]
9. Display next page of menu.
[More]
[PgUp]
10. Select Group Calling.
Grp Calling
11. Display next page of menu.
[More]
12. Select Group Type.
Group Type
13. Enter extension of the
MERLIN MAIL—ML Calling
Group.
[nnn]
Enter
[nnn]
[F10]
14. Select Integrated VMI.
Integ. VMI
Enter
15. To return to System
Programming menu.
Exit
[F3]
[F10]
[F5]
3-10 Before Beginning MERLIN MAIL—ML Programming
[F4]
[PgUp]
[F1]
MERLIN MAIL—ML System Programming
Programming MERLIN
MAIL—ML System Parameters
The MERLIN MAIL —ML System Parameters must be programmed regardless
of the services being used. Figure 3-3 shows these parameters.
Figure 3-3. MERLIN MAIL—ML System Parameters Programming Menus
Programming MERLIN MAIL—ML System Parameters
3-11
MERLIN MAIL—ML System Programming
Specifying Port Allocation
Specify which service is assigned for external calls to the MERLIN MAIL—ML
ports. The MERLIN MAIL—ML ports may be assigned Automated Attendant
Service or Call Answer Service, or on a 4-port system, the MERLIN MAIL—ML
ports can be split between the two services.
■
The factory setting allocates all ports to Automated Attendant
Service. This makes the ports available for all services.
■
Guidelines for port allocation:
— If you do not want to use Automated Attendant Service but you
want direct Voice Mail Service access on external lines, set all
ports to Call Answer Service.
— For 4-port systems, a split allocation—that is, 2 ports Automated
Attendant Service (AA) and 2 ports Call Answer Service
(CA)—should be used only when you need to provide
Automated Attendant Service for calls on some lines and direct
Voice Mail access for calls on other lines. Special installation
steps are required when both services are used. Call your AT&T
representative or authorized dealer for more information on
using both services.
■
MERLIN MAIL—ML Form A: System Parameters identifies the
planned port allocation.
To program the port allocation, follow the instructions below:
1. Log into the MERLIN MAIL—ML system as the system administrator.
The system administrator’s name plays; then the Voice Mail Activity Menu
plays.
2. [9] to program the MERLIN MAIL — ML system.
The System Administration Menu plays.
3-12 Programming MERLIN MAIL—ML System Parameters
MERLIN MAIL—ML System Programming
3. [1] for System Parameters.
The System Parameters Menu plays.
4. [2] to specify port allocations.
The current port allocation plays, followed by the Port Allocation Menu.
5. Select one of the following options:
— [1] to allocate all ports to Automated Attendant Service
(AA—factory setting).
— [2] to allocate all ports to Call Answer Service (CA — use only
when your business does not want Automated Attendant
Service but wants outside callers to access Voice Mail Service
directly.)
— [3] to split allocation (2 ports AA, 2 ports CA).
The system plays the new port allocation, followed by the System
Parameters Menu.
Confirming No Delayed Answer
With No Delayed Answer (Immediate Answer), MERLIN MAIL—ML ports will
answer calls immediately (after one ring). With Delayed Answer, MERLIN
MAIL—ML ports will answer calls after four rings.
■
The factory setting is No Delayed Answer on all ports (Immediate
Answer ).
■
It is recommended that you do not change the factory setting.
■
MERLIN MAIL—ML Form A: System Parameters identifies the
planned setting.
Programming MERLIN MAIL—ML System Parameters
3-13
MERLIN MAIL—ML System Programming
To confirm No Delayed Answer, follow the instructions below:
1. Log in to the MERLIN MAIL—ML system as the system administrator.
The system administrator’s name plays; then the Voice Mail Activity Menu
plays.
2. [9] to program the MERLIN MAIL — ML system.
The System Administration Menu plays.
3. [1] for System Parameters.
The System Parameters Menu plays.
4. [3] to administer the Delayed Answer setting.
The system plays back the current Delayed Answer setting, followed by the
Delayed Answer Administration Menu.
5. Choose one:
— If the setting is correct, press [*] [#] to return to the System
Parameters Menu. This procedure is complete.
— If the setting is incorrect, go to Step 6.
6. Select one of the following options:
— [1] to set all ports to Delayed Answer.
— [2] to set Automated Attendant Service ports to Delayed
Answer.
— [3] to set Call Answer Service ports to Delayed Answer.
— [4] to set all ports to No Delayed Answer (Immediate Answer).
The system plays back the new Delayed Answer setting, followed by the
System Parameters Menu.
3-14 Programming MERLIN MAIL—ML System Parameters
MERLIN MAIL—ML System Programming
Identifying Fax Extensions
Program the fax or fax calling group extension where the Automated
Attendant Service will transfer fax calls.
■
MERLIN MAIL—ML Form A: System Parameters identifies the
planned fax extension.
■
If the MERLIN MAIL—ML system has been set up for monolingual
operation, the Touch-Tone Gate is set “On” automatically when
you program the MERLIN MAIL—ML system to receive fax
messages. This enables fax calls to be immediately detected and
sent to the fax extension or extension of the fax calling group.
To program the fax extension, follow the instructions below:
1. Log in to the MERLIN MAIL—ML system as the system administrator.
The system administrator’s name plays; then the Voice Mail Activity Menu
plays.
2. [9] to program the system.
The System Administration Menu plays.
3. [1] for System Parameters,
The System Parameters Menu plays.
4. [4] to change the fax extension.
The current fax extension plays, followed by a prompt to enter the fax
extension number.
5. Enter the fax extension followed by [#]
The fax extension number plays, along with the message “The Touch-Tone
Gate is on” if the MERLIN MAIL—ML system is set up for monolingual
operation. The system then plays the System Parameters Menu.
Programming MERLIN MAIL—ML System Parameters
3-15
MERLIN MAIL—ML System Programming
Specifying Maximum Number of Digits
in an Extension
Specify the maximum number of digits (2, 3, or 4) in an extension or calling
group so that Automated Attendant Service will begin to transfer calls when
the number of digits entered by the caller equals the maximum length.
■
The MERLIN MAIL—ML factory setting is 2 digits.
■
MERLIN MAIL—ML Form A: System Parameters identifies the
maximum digits in an extension.
To specify the maximum number of digits in an extension, follow the
instructions below:
1. Log into the MERLIN MAIL— ML system as the system administrator.
The system administrator’s name plays; then the Voice Mail Activity Menu
plays.
2. [9] to program the MERLIN MAIL—ML system.
The System Administration Menu plays.
3. [1] for System Parameters.
The System Parameters Menu plays.
4. [8] to specify the maximum length of an extension.
The current extension length plays.
5. Enter the number of digits (2, 3, or 4).
The new maximum number of digits plays back, followed by the System
Parameters Menu.
3-16 Programming MERLIN MAIL—ML System Parameters
MERLIN MAIL—ML System Programming
Specifying Languages
Before you can create subscriber voice mailboxes, you must specify whether
the MERLIN MAIL—ML system is to operate in monolingual or bilingual mode.
Once the mode has been selected, the system language(s) must be specified
as well.
NOTE:
The MERLIN MAIL—ML system retains recordings initially set up for
bilingual operation if you later decide to change to monolingual
operation. This allows recovery of prompts, menus, and announcements
for both languages if you choose to return to bilingual operation.
■
The factory setting is monolingual mode with English as the
system language.
■
MERLIN MAIL—ML Form A: System Parameters identifies the
language mode and language(s) supported.
To specify the language, follow the instructions below:
1. Log in to the MERLIN MAIL—ML system as the system administrator.
The system administrator’s name plays; then the Voice Mail Activity Menu
plays.
2. [9] to program the MERLIN MAIL—ML system.
The System Administration Menu plays.
3. [1] for System Parameters.
The System Parameters Menu plays.
4. [9] to program the system language.
The system tells you the current mode, then prompts you to select
monolingual or bilingual mode.
Programming MERLIN MAIL—ML System Parameters
3-17
MERLIN MAIL—ML System Programming
5. Select one of the following options:
— [1] to setup for monolingual operation.
— [2] to setup for bilingual operation.
The system plays the Language Selection Menu and prompts you to select
the system language (monolingual mode) or primary language (bilingual
mode).
6. Select one of the following languages:
— [1] to select English
— [2] to select French
— [3] to select Spanish
If the MERLIN MAIL—ML system is set up for monolingual operation, the
system plays back the mode and language selected. Go to Step 8.
If you setup MERLIN MAIL—ML for bilingual operation, the system prompts
you to enter the secondary system language.
7. (Bilingual Operation Only) Repeat Step 6 to select the secondary
system language.
The system plays back the mode and languages selected.
8. Choose one:
— [*] [#] to confirm your selection.
This procedure is complete. The system plays the System Parameters
Menu.
— [1] to re-enter the language selection.
Go back to Step 6.
3-18 Programming MERLIN MAIL—ML System Parameters
MERLIN MAIL—ML System Programming
Programming Voice Mailboxes
The system administrator can program voice mailboxes for any extension on
the MERLIN LEGEND system. The following options are available when
creating voice mailboxes:
■
Message storage limit—0, 5, 10, or 60 minutes
■
Transfer Type—how the MERLIN MAIL—ML system processes a
call transfer to the mailbox.
■
Outcalling—whether or not the MERLIN MAIL—ML system is
permitted to call a subscriber-designated telephone number and
inform the subscriber that new messages have been received.
These voice mailbox options are designated by the Class of Service (COS).
The Class of Service (COS) key (shown in “Creating Mailboxes ”, the next
topic) lists all 16 available option combinations.
If you have setup the MERLIN MAIL—ML system for bilingual operation, you
also specify whether system prompts for the subscriber are played using the
primary or secondary system language. Callers can switch to the alternate
language by pressing [*] [1]
Voice mailboxes must be created before programming the remaining MERLIN
MAIL—ML features. See Figure 3-4 for an overview of the MERLIN MAIL—ML
menus used to program mailboxes. (To modify or delete Mailboxes, refer to
the MERLIN MAIL—ML System Administration guide. )
Programming Voice Mailboxes
3-19
MERLIN MAIL—ML System Programming
Figure 3-4. Mailbox Administration Programming Menus
Creating Mailboxes
Program voice mailboxes so that subscribers can access MERLIN MAIL—ML
Voice Mail Service.
■
MERLIN MAIL—ML Form B: Voice Mailbox Assignments lists the
subscribers who will receive a voice mailbox, their corresponding
extension, Class of Service, language selection, and directory
name.
■
A total of 100 voice mailboxes can be created, but to avoid
trafficking problems, a maximum of 40 is recommended for 4-port
systems and 20 for 2-port systems.
■
If you want to change the system administrator’s mailbox from the
factory setting to a subscriber’s voice mailbox, first create the
system administrator’s new mailbox then program a new system
administrator extension and password.
3-20 Programming Voice Mailboxes
MERLIN MAIL—ML System Programming
To program voice mailboxes, follow the instructions below:
1. Log in to the MERLIN MAIL—ML system as the system administrator.
The system administrator’s name plays; then the Voice Mail Activity Menu
plays.
2.
[9] to program the system.
The System Administration Menu plays.
3.
[4] for Mailbox programming.
The Mailbox Administration Menu plays.
4.
[4] to create a new mailbox.
The system prompts you to enter the mailbox number.
5.
Enter the mailbox number followed by [#]
The system prompts you to enter the Class of Service (COS).
6.
Enter the Class of Service, followed by [#]
If necessary, review the information in the Class of Service Key that
follows. This key defines the characteristics for each Class of Service.
The system default is 1.
Programming Voice Mailboxes
3-21
MERLIN MAIL—ML System Programming
.
Class of Service (COS) Key
Class Mins Transfer Type Outcalling Coverage Service
2
3
4
5
6
*7
8
9
10
11
12
13
*14
**15
***16
5
10
60
5
10
60
60
5
10
60
5
10
60
60
o
60
Unsupervised
Unsupervised
Unsupervised
Supervised
Supervised
Supervised
No Transfer
Unsupervised
Unsupervised
Unsupervised
Supervised
Supervised
Supervised
No Transfer
Unsupervised
No Transfer
No
No
No
No
No
No
No
Yes
Yes
Yes
Yes
Yes
Yes
Yes
No
No
Call Answer
Call Answer
Call Answer
Call Answer
Call Answer
Call Answer
Call Answer
Call Answer
Call Answer
Call Answer
Call Answer
Call Answer
Call Answer
Call Answer
Automated Attendant
Call Answer
* Classes 7 and 14 are used for Guest Mailboxes that do not
have an associated extension.
** Class 15 is used with Delayed Call Handling. Class 15 is
also used with Night Only Call Handling for MERLIN LEGEND
releases 1.0, 1.1, and 1.2i. Voice mailboxes with Class of
Service 15 are used to provide Automated Attendant Service.
*** Class 16 is for special mailboxes, used for purposes such as
order taking, message drop, or Dictaphone. The General
Mailbox should be assigned Class 16.
3-22 Programming Voice Mailboxes
MERLIN MAIL—ML System Programming
Definitions for Class of Service Key:
Mins (Minutes)—total number of minutes available for storing messages
in the mailbox. For an individual message, the maximum message
length is 2 minutes for Classes of Service 1-14; for Class of Service 16,
it is 15 minutes.
Transfer Type— method of transfer to be used for this Class of Service.
Outcalling—whether Outcalling is permitted; this feature calls a
designated phone number or beeper/pager number when a message
is placed in a subscriber’s mailbox.
Coverage Service—type of coverage that this Class of Service supports.
If the MERLIN MAIL—ML system is set for monolingual operation, you are
prompted to enter the mailbox name. Skip to Step 9.
If the MERLIN MAIL—ML system is set for bilingual operation, the system
prompts you to select this subscriber’s mailbox language. Go to Step 7.
7. Enter one of the following options:
— [1] to select the primary language as the mailbox language.
— [2] to select the secondary language as the mailbox language.
— [#] to review the current language.
— [*] [#] to quit use the primary language as the mailbox
language. Skip to Step 9.
8. Choose one:
— [*] [#] to approve the language selected. Go to Step 9.
— [1] to re-enter the language selected. Go back to Step 7.
9. Substituting number codes for letters, as shown in the Letter Key that
follows, use the dialpad to enter the mailbox name (up to four letters)
followed by [#]
Programming Voice Mailboxes
3-23
MERLIN MAIL—ML System Programming
Enter the mailbox name as you want it to be listed in the
directory—usually the first four letters of the first or last name. Use
the same method to assign all mailbox names.
Letter Key
A
B
C
D
E
F
G
H
I
J
K
L
M
N
=
=
=
=
=
=
=
=
=
=
=
=
=
=
21
22
23
31
32
33
41
42
43
51
52
53
61
62
Ñ
=
O
P
Q
R
S
T
U
V
W
X
Y
Z
=
=
=
=
=
=
=
=
=
=
=
=
64
63
71
74
72
73
81
82
83
91
92
93
94
NOTE:
The letter Ñ can be entered if the system administrator’s mailbox
language is Spanish. The letters Q and Z may not appear on your
telephone dialpad and are assigned the values 74 and 94,
respectively. Use the values in the Letter Key to enter mailbox
names regardless of letter positions on your telephones’ dialpad
numbers.
The system echos the mailbox name letters, followed by a prompt to
confirm them.
10. Select one of the following options:
— [9] for "Yes" to confirm the name.
The mailbox name is saved and the system prompts you to record the
subscriber’s name at the tone.
— [6] for “No” to cancel the mailbox name. Go back to Step 9.
3-24 Programming Voice Mailboxes
MERLIN MAIL—ML System Programming
11. Record the mailbox name, then press [1]
The system plays back the subscriber’s name, then prompts you to
confirm it.
RECOMMENDATION:
For better clarity, it is recommended that you use the handset
instead of a speakerphone when recording the subscriber’s name.
12. Enter one of the following options or go to Step 13:
— [2] [3] to play back the name recording.
— [2] [1] to re-record the name. Go back to Step 11.
— [*] [D] (or [*] [3] ) to delete the name recording. (The mailbox
number will be used for the mailbox name. )
13. [*] [#] to approve the subscriber’s name recording.
The system prompts you to enter a mailbox number and [#] sign.
14. Choose one:
— Repeat Steps 5 through 13 to add another voice mailbox.
— [*] [#] to return to the Mailbox Administration Menu.
Programming Voice Mailboxes
3-25
MERLIN MAIL—ML System Programming
Creating the Delayed Call Handling Group
Coverage Mailbox
If you are using Delayed Call Handling, you must program an extension to
handle calls not answered by the system operator.
This extension must be an unused multiline station port and it must be the
principal user of the lines to be handled in the Delayed Call Handling mode.
Assign a mailbox with Class of Service 15 to the Delayed Call Handling
extension (phantom station).
■
MERLIN MAIL—ML Form B: Voice Mail Assignments identifies the
planned Delayed Call Handling extension.
■
Set the MERLIN MAIL—ML Class of Service for the mailbox to 15.
To program the Delayed Call Handling mailbox, follow the instructions below:
1.
Log in to the MERLIN MAIL—ML system as the system administrator.
The system administrator’s name plays; then the Voice Mail Activity Menu
plays.
2 . [9] to program the system.
The System Administration Menu plays.
3. [4] for Mailbox programming.
The Mailbox Administration Menu plays.
4. [4] to create a new mailbox.
The system prompts you to enter the mailbox number.
5. Enter the extension to be used for Delayed Call Handling, followed by [#]
The system prompts you to enter the Class of Service (COS).
3-26 Programming Voice Mailboxes
MERLIN MAIL—ML System Programming
6. Enter [1] [5] followed by [#] as the Class of Service assigned to this
mailbox.
If the MERLIN MAIL—ML system is set for monolingual operation, the
system prompts you to enter the mailbox name. Skip to Step 9.
If the MERLIN MAIL—ML system is set for bilingual operation, the system
prompts you to select the mailbox language. Go to Step 7.
7. Enter [1] to select the primary system language as the Delayed
Call Handling mailbox language.
The system plays the language selected, followed by a prompt to approve
the selection.
8. Choose one:
— [*] [#] to approve the language selected. Go to Step 9.
— [1] to re-enter the language selected. Go back to Step 7.
9. Use dialpad to enter the mailbox name. To name this mailbox DLAY,
enter [3][1] [5][3] [2][1] [9][3] [#] To enter a different mailbox name,
substitute number codes for letters, as shown in the Letter Key shown
in the previous procedure. Use the dialpad to enter the mailbox name
(up to four letters) followed by [#]
The system echoes the mailbox name letters, followed by a prompt to
confirm them.
10. Select one:
— [9] for “Yes” to confirm the name.
The mailbox name is saved and the system prompts you to record the
subscriber’s name at the tone.
— [6] for "No' to cancel the mailbox name. Go back to Step 9.
11. Record the mailbox name, then press [1]
The system plays back the subscriber’s name, then prompts you to
confirm it.
Programming Voice Mailboxes
3-27
MERLIN MAIL—ML System Programming
RECOMMENDATION:
For better clarity, it is recommended that you use the handset
instead of a speakerphone when recording the subscriber’s name,
12. Enter one of the following options or go to Step 13:
— [2] [3] to play back the name recording.
— [2] [1] to re-record the name. Go back to Step 11.
— [*] [D] (or [*] [3] ) to delete the name recording. (The mailbox
number will be used for the mailbox name.)
13. [*] [#] to approve the subscriber’s name recording.
The system prompts you to enter a mailbox number and [#] sign.
14. Choose one:
— Repeat Steps 5 through 13 to add another voice mailbox.
— [*] [#] to return to the Mailbox Administration Menu.
Creating the Night Only Call Handling
Group Coverage Mailbox
If you are using Night Only Call Handling with MERLIN LEGEND
Communication System Release 1.0, 1.1, or 1.2i, create a mailbox for the
Night Only Call Handling extension. For details, refer to Appendix B, “MERLIN
LEGEND Release 1.x Installation Supplement.”
Changing Factory-Set Mailboxes
Although it is not necessary to do so, you may want to change the factory
settings for the following MERLIN MAIL—ML voice mailboxes:
■
System administrator
■
System operator
■
General Mailbox owner
3-28 Changing Factory-Set Mailboxes
MERLIN MAIL—ML System Programming
These factory settings can be changed using the System Parameters
programming menus show in Figure 3-5.
Figure 3-5. System Parameters Administration Programming Menus
Changing Factory-Set Mailboxes
3-29
MERLIN MAIL—ML System Programming
Assigning the System Administrator Mailbox
CAUTION
To prevent unauthorized programming of the MERLIN MAIL—ML
system, the system administrator’s mailbox and password should be
changed.
■
MERLIN MAIL—ML Form A: System Parameters identifies the
planned system administrator extension.
■
The factory setting for the system administrator’s mailbox is 9997,
with password 1234.
■
MERLIN MAIL—ML Form B: Voice Mailbox Assignments identifies
all planned voice mailboxes in the system.
■
To change the factory setting for the system administrator’s
mailbox, you must create a new mailbox before you change the
assignment (see “Creating Mailboxes” earlier in this chapter).
■
■
If your system is set up for bilingual mode, change the mailbox
language for the system administrator’s mailbox if it is not
correct. After you change it, disconnect and log in again to hear
the prompts in the newly chosen language.
If the system administrator changes the password and forgets it,
or a new system administrator does not know the password set
by his or her predecessor, your AT&T representative or
authorized dealer can reset the password after obtaining proper
authorization from the customer.
To assign the system administrator mailbox, follow the instructions below:
1.
Log in to the MERLIN MAIL—ML system as the system administrator.
The system administrator’s name plays; then the Voice Mail Activity Menu
plays.
2. [9] to program the system.
The System Administration Menu plays.
3-30 Changing Factory-Set Mailboxes
MERLIN MAIL—ML System Programming
3. [1] for System Parameters.
The System Parameters Menu plays.
4. [7] to change the system administrator’s voice mailbox.
The current system administrator’s voice mailbox number plays, followed by
a prompt to enter the system administrator’s extension number.
5. Enter the new system administrator’s extension number followed by [#]
The new voice mailbox number plays, followed by the System Parameters
Menu.
Changing the System
Administrator’s Password
It is recommended that you change the system administrator’s password after
the MERLIN MAIL—ML system installation is complete.
To change the system administrator’s password, follow the instructions below:
1.
Log in to the MERLIN MAIL—ML system as the system administrator.
The system administrator’s name plays; then the Voice Mail Activity Menu
plays.
2. [5] to program your new password.
The prompt asks you to enter your new password.
3. Enter the new password (up to four digits) followed by [#]
The prompt asks you to re-enter your new password.
4. Enter the new password followed by [#]
The system plays a message confirming that the password has been
changed.
Changing Factory-Set Mailboxes
3-31
MERLIN MAIL—ML System Programming
Assigning the System Operator Extension
When the Dial 0/Timeout Action is set to “transfer to system operator,” calls
are answered at the system operator’s extension.
■
The factory setting is 768.
■
Update the system operator’s extension on MERLIN MAIL—ML
Form A: System Parameters.
In most dial plans 768 is an invalid extension. Leave the setting at 768 or set it
to another invalid extension, if you want Dial 0/Timeout calls directed to the
first operator console on the MERLIN LEGEND system. External calls
transferred by the MERLIN MAIL—ML system to the system operator’s Direct
Line Console (DLC) ring on a line button (in Key mode), not on an intercom
button; in Hybrid/PBX mode, calls ring on a line button. If the system operator
has a Queued Call Console, calls ring on a Call button.
If you want Dial 0/Timeout calls directed to an extension other than the first
operator console on the MERLIN LEGEND system, enter that extension as the
system operator’s extension.
To change the system operator’s extension, follow the instructions below:
1. Log in to the MERLIN MAIL—ML system as the system administrator.
The system administrator’s name plays; then the Voice Mail Activity Menu
plays.
2. [9] to program the system.
The System Administration Menu plays.
3. [1] for System Parameters.
The System Parameters Menu plays.
4 . [5] to change the system operator's extension.
The current system operator’s extension plays, followed by a prompt to enter
the system operator’s extension number.
3-32 Changing Factory-Set Mailboxes
MERLIN MAIL—ML System Programming
5. Enter the new system operator’s extension number followed by [#]
The new system operator’s extension number plays, followed by the System
Parameters Menu.
Assigning a General Mailbox Owner
You can change the General Mailbox owner factory settings.
■
These are the factory settings for the General Mailbox:
— General Mailbox owner: 10
— Mailbox number: 9999
— Password: 1234
■
The General Mailbox owner extension can be changed to any
extension. It is not necessary for the owner to also have a
subscriber mailbox. The mailbox number 9999 cannot be
changed. To change the password, log on as the General
Mailbox owner and press [6] to change the password.
■
MERLIN—ML Form A: System Parameters identifies the
planned General Mailbox owner extension.
To assign the General Mailbox owner extension, follow the instructions below:
1. Log into the MERLIN MAIL—ML system as the system administrator.
The system administrator’s name plays; then the Voice Mail Activity Menu
plays.
2. [9] to program the system.
The System Administration Menu plays.
3. [1] for System Parameters.
The System Parameters Menu plays.
Changing Factory-Set Mailboxes
3-33
MERLIN MAIL—ML System Programming
4. [6] to change the owner of the General Mailbox.
The current General Mailbox owner’s extension plays, followed by a prompt
to enter the General Mailbox owner’s number.
5. Enter the new General Mailbox owner’s extension number followed
by [ # ]
The General Mailbox owner’s extension number plays, followed by the
System Parameters Menu.
3-34 Changing Factory-Set Mailboxes
MERLIN MAIL—ML System Programming
Programming the Schedule
Automated Attendant Service provides both day and night operation so that
callers hear the appropriate greeting and menu options whenever they call.
The MERLIN MAIL—ML system switches to day or night operation
automatically by comparing the time of day to the MERLIN LEGEND system
Night Service settings or to the MERLIN MAIL—ML business schedule. It also
stamps each message with the date and time of recording.
Figure 3-6 illustrates the options available when programming the schedule.
Figure 3-6. Schedule Administration Programming Menus
Programming the Schedule
3-35
MERLIN MAIL—ML System Programming
Setting the Date and Time
Synchronize the date and time settings on the MERLIN MAIL—ML system to
the MERLIN LEGEND system.
To program the MERLIN MAIL—ML system date and time, follow the
instructions below:
1. Log into the MERLIN MAIL—ML system as the system administrator.
The system administrator’s name plays; then the Voice Mail Activity Menu
plays.
2. [9] to program the system.
The System Administration Menu plays.
3. [2] for the Schedule.
The Schedule Administration Menu plays.
4. [1] to update the date and time.
The current date plays, then the system prompts you to enter the date, and
time.
NOTE:
You can skip the date and change only the time by pressing [#] when
the date is requested.
3-36 Programming the Schedule
MERLIN MAIL—ML System Programming
5. Enter the date in one of the following formats:
— If the system administrator’s mailbox language is English,
mmddyy (month day year).
— If the system administrator’s mailbox language is French or
Spanish, ddmmyy (day month year),
where:
mm
dd
yy
= month, 01–12
= day, 01-31
= year, 00-99
The system plays back the date and asks you to confirm it by
pressing [*] [#] or re-enter it by pressing [1]
6. Choose one of the following options:
— [*] [#] to confirm the date.
The system plays the current time and prompts you to enter the time.
— [1] to re-enter the date. Go back to Step 5.
7. Enter the time in hhmm format (hour minute).
— 24-hour format: 0000-2359
— 12-hour format: 0100-1259
— [#] to keep the current time.
NOTE:
If French is the system administrator’s mailbox language, you must use
the 24-hour format.
Programming the Schedule
3-37
MERLIN MAIL—ML System Programming
If the system administrator’s mailbox language is English or Spanish and
the number you enter is 0100–1259, the system prompts you to enter
one of the following settings as well:
— [1] for A.M.
— [2] for P.M.
The system plays back the time and asks you to confirm it by
pressing [*] [#] or re-enter it by pressing [1]
8.
Choose an option:
— [*] [#] to confirm the time setting.
— [1] to re-enter the time. Go back to Step 7.
The Schedule Administration Menu plays.
Setting the Weekly Business Schedule
The business schedule tells Automated Attendant Service which days your
company is open and the time it opens and closes. The Automated Attendant
Service uses this information to determine when to switch from Day mode to
Night mode, and which greeting to present—the Day Greeting or the Night
Greeting.
■
It is recommended that you do not change the business schedule
from the MERLIN MAIL—ML system factory setting “Closed All
Day. ” The MERLIN MAIL—ML business schedule is set to
“Closed All Day” so that its schedule opens and closes whenever
the MERLIN LEGEND system begins or ends Night Service.
■
MERLIN MAIL—ML Form A: System Parameters specifies the
weekly business schedule start and stop times. The factory
setting allows the MERLIN LEGEND system to control the
MERLIN MAIL—ML business schedule regardless of whether you
are using. If you administer a business schedule on the MERLIN
MAIL—ML system, there is the possibility that the MERLIN
MAIL—ML system and the MERLIN LEGEND system schedules
may lose synchronization.
3-38 Programming the Schedule
MERLIN MAIL—ML System Programming
To program the Weekly Business Schedule, follow the instructions below:
1. Log into the MERLIN MAIL—ML system as the system administrator.
The system administrator’s name plays; then the Voice Mail Activity Menu
plays.
2. [9] to program the system.
The System Administration Menu plays.
3. [2] for the Schedule.
The Schedule Administration Menu plays.
4. [2] to program the Weekly Business Schedule.
The system prompts you to enter the day.
5. Choose the appropriate day:
— [1] for Sunday
— [2] for Monday
— [3] for Tuesday
— [4] for Wednesday
— [5] for Thursday
— [6] for Friday
— [7] for Saturday
— [9] for all days
— [*] [#] to save any changes made and return to the Schedule
Administration Menu.
If you choose a day, the system prompts you to enter the mode of operation.
Programming the Schedule
3-39
MERLIN MAIL—ML System Programming
6. Choose one:
— [1] for “Open.” Skip to Step 13.
— [2] for “Closed.” Go back to Step 5 if there are additional days in
the schedule to be programmed; otherwise, skip to Step 16.
NOTE:
If you are programming the schedule for consecutive
days, press [#] to select the next day in the sequence.
— [3] for temporarily closed on the day selected. Go to Step 7.
The Closure Greeting Menu plays.
NOTE:
If you specify a temporary closing for today, the system
prompts you to confirm it. Press [9] for “Yes” or [6] for “No”.
— [*] [#] to quit.
Go back to Step 5.
7. Choose one of the following greetings:
— [1] to use the regular closed greeting (that is, the Automated
Attendant Service Night Greeting).
The system confirms that the business will be temporarily closed for the
chosen day(s) then prompts you to choose a day for programming.
Go back to Step 5.
— [2] to use a Temporary Closure Greeting.
The system plays the Temporary Closure Greeting Menu.
3-40 Programming the Schedule
MERLIN MAIL—ML System Programming
8. Choose one:
— [1] to record a Temporary Closure greeting.
The system prompts you to record at the tone. Go to Step 9.
— [0] to listen to the current greeting.
The system plays the greeting, then plays the Temporary Closure
Greeting Menu.
— [2] to use the system default Temporary Closure greeting.
The system confirms that the system default greeting will be used, then
plays the Closure Greeting Menu. Press [*] [#] to quit.
The system prompts you to choose a day for programming. Go back to
Step 5.
– [*] [#] to quit.
The system states the changes made and prompts you to choose a
day for programming. Go back to Step 5.
9. Record the greeting.
— The greeting is limited to 10 seconds—make the greeting as
brief as possible.
— In bilingual mode, you must record greetings in both the
primary and secondary Iangauges within 10 seconds.
10. [1] after recording the greeting.
The system plays the Message Editing Menu.
Programming the Schedule
3-41
MERLIN MAIL—ML System Programming
11. Select an option:
— [2] [3] to Play back the new greeting.
— [2] [1] to re-record the new greeting. Go to Step 9.
— [*] [D] (or [*] [3] to delete the new greeting and use the
previous greeting.
The message "Deleted" plays then the Temporary Closure Greeting
Menu plays.
12. [*] [#] to approve the greeting.
The message "Approved. This new greeting will be used" plays. Then, the
Temporary Closure Greeting Menu plays. Go back to Step 8.
13. Enter the opening time in hhmm format (hours minutes).
— 24-hour format: 0000-2359
— 12-hour format: 0100-1259
The system plays back the time entered.
NOTE:
If French is the system administrator’s mailbox language, you
must use the 24-hour format.
If you enter 0000–1259, enter one of the following settings in response
to the prompt:
— [1] for A.M.
— [2] for P.M.
The system prompts you to enter the closing time.
3-42 Programrning the Schedule
MERLIN MAIL—ML System Programming
14. Enter the closing time in hhmm format.
— 24-hour format: 0000-2359
— 12-hour format: 0100-1259
The system plays back the time entered. .
If you enter 0100-1259, enter one of the following settings in response
to the prompt:
— [1] for A.M.
— [2] for P.M.
The system prompts you to select another day.
15. To program the schedule for the next consecutive day, press [#] or enter
the appropriate number for the day, then go back to Step 6. If you are
finished making changes, go to Step 16.
16. When you finish making schedule changes, press [*] [#] to approve the
schedule and return to the Schedule Administration Menu.
Programming the Schedule
3-43
MERLIN MAIL—ML System Programming
Setting the Touch-Tone Gate
The Touch-Tone Gate is used in Automated Attendant Service. It serves
different purposes depending upon whether the MERLIN MAIL—ML system is
set up for monolingual or bilingual operation.
Figure 3-7 illustrates the Touch-Tone Gate programming option on the
Automated Attendant Service menu.
Figure 3-7. Automated Attendant Service Programming Menus
3-44 Setting the Touch-Tone Gate
MERLIN MAIL—ML System Programming
Touch-Tone Gate Setting in
Monolingual Mode
In the monolingual mode, the Touch-Tone Gate determines whether the caller
is calling from a touch-tone phone or a rotary phone.
When the Touch-Tone Gate is “On,” the Automated Attendant Service
Greeting must prompt the caller to press [1] to indicate that the call is from a
touch-tone phone. If the caller presses [1] , the Automated Attendant Service
Main Menu is played to the caller. If the caller does not press [1] within four
seconds (eight seconds if Fax Call Handling is activated), the call is
processed as determined by the Dial 0/Timeout Action setting for the menu.
Setting the Touch-Tone Gate to “On” ensures that the callers from rotary
phones receive service quickly. When the Touch-Tone Gate is “Off,” rotary
callers must wait for the Automated Attendant Greeting to play once and the
Automated Attendant Main Menu to play before callers are transferred to the
system operator or the General Mailbox.
You should set the Touch-Tone Gate to “On” if you expect most of your callers
to be calling from rotary phones.
NOTE:
If you designate a fax extension, the Touch-Tone Gate is set to “On”
automatically and cannot be turned off.
Setting the Touch-Tone Gate
3-45
MERLIN MAIL—ML System Programming
Programming the Touch-Tone Gate
To program for monolingual operation, refer to the Touch-Tone Gate setting on
MERLIN MAIL—ML Form C: Automated Attendant Service Greeting, and
follow the instructions below:
1 . Log into the MERLIN MAIL—ML system as the system administrator.
The system administrator’s name plays; then the Voice Mail Activity Menu
plays.
2.
[9] to program the system.
The System Administration Menu plays.
3.
[3] for Automated Attendant Service.
The Automated Attendant Service Administration Menu plays.
4.
[5] to change the Touch-Tone Gate setting.
The current Touch-Tone gate setting plays.
5.
Choose an option:
— [9] to set the Touch-Tone Gate to “On.”
— [6] to set the Touch-Tone Gate to “Off.”
The Touch-Tone Gate setting plays followed by the Automated Attendant
Service Administration Menu.
3-46 Setting the Touch-Tone Gate
MERLIN MAIL—ML System Programming
Touch-Tone Gate Setting in Bilingual Mode
In the bilingual mode, the Touch-Tone Gate determines the language in which
menus and prompts are played to the caller.
When the MERLIN MAIL—ML system is setup for bilingual operation, the
Automated Attendant Service Greeting must prompt the caller to press [*] [1]
to hear system prompts, menus, and announcements in the secondary
language. If the caller does not press [*] [1] within four seconds (8 seconds if
Fax Call Handling is activated), the system plays all system prompts, menus,
and announcements in the primary language.
The Touch-Tone Gate is automatically set to “On” and cannot be turned “Off”
when the MERLIN MAIL—ML system is set up for bilingual operation.
Recording System Greetings
The MERLIN MAIL — ML Automated Attendant Service immediately plays a
greeting when it first answers a call. Depending on the time of day, a caller
hears either the Day or Night Greeting, followed by an announcement or an
option menu.
The Voice Mail Greeting plays when a subscriber calls the Voice Mail Service.
Figure 3-8 illustrates the menus for recording the Automated Attendant
Service greetings and the Voice Mail Greeting.
Recording System Greetings
3-47
MERLIN MAIL—ML System Programming
Figure 3-8. Greeting Administration Programming Menus
Recording the Day and Night Greetings
The MERLIN MAIL—ML’s Automated Attendant Service plays a greeting to
every caller that phones your company: a Day Greeting for calls received
during scheduled business hours and a Night Greeting for calls received after
scheduled business hours or when the company is closed. If you plan to use
Automated Attendant Service, you need to create the Day and Night greetings.
■
MERLIN MAIL—ML Form C: Automated Attendant Service
Greeting provides the planned scripts for the Day and Night
Greetings.
■
For better sound quality, use the handset instead of the speakerphone when recording greetings.
3-48 Recording System Greetings
MERLIN MAIL—ML System Programming
■
Remember to tell callers using touch-tone phones to press [1] if
you will be enabling the Touch-Tone Gate and are setting up for
monolingual operation. (See “Setting the Touch-Tone Gate”
earlier in this chapter. )
■
Remember to tell callers to press [*] [1] if you will be setting up
the MERLIN MAIL—ML system for bilingual operation. (See
“Setting the Touch-Tone Gate” earlier in this chapter.)
To create the Automated Attendant Service Day or Night greeting, follow the
instructions below:
1.
Log in to the MERLIN MAIL—ML system as the system administrator.
The system administrator’s name plays; then the Voice Mail Activity Menu
plays.
2. [9] to program the system.
The System Administration Menu plays.
3. [7] for System Greeting.
The System Greeting Choice Menu plays.
4. [3] for the Automated Attendant Service Greeting.
The system prompts you to select either the Day or Night greeting.
5. Select one of the following options:
— [1] for Day Greeting.
— [2] for Night Greeting.
— [*] [#] to quit.
The System Greeting Close Menu plays.
6. [1] to record the Day or Night greeting.
The system prompts you to record at the tone.
Recording System Greetings
3-49
MERLIN MAIL—ML System Programming
7. Record the Day or Night greeting.
— The greeting is limited to 10 seconds—make the greeting as
brief as possible.
— In monolingual mode, if the Touch-Tone Gate is “On,” the
greeting must tell callers to press [1] if they are calling from a
touch-tone phone.
— In bilingual mode, the greeting must tell callers in the alternate
language to press [*][1] to select the alternate system
language.
8. [1] after recording the greeting.
The system plays the Greeting Editing Menu.
9. Enter one of the following options or go to Step 10:
— [2][3] to listen to the greeting.
— [2][1] to re-record the greeting.
— [*][D] (or [*][3] ) to delete the new greeting and use the
previous greeting.
10. [*] [#] to approve the greeting.
The Automated Attendant Greeting Administration Menu plays.
3-50 Recording System Greetings
MERLIN MAIL—ML System Programming
Recording a Voice Mail Greeting
The Voice Mail Greeting plays when a subscriber calls the Voice Mail Service.
The MERLIN MAIL—ML system comes with a factory-set Voice Mail
Greeting— although you can change the greeting, it is recommended that you
leave it at the factory setting.
■
The factory-set greeting is “Welcome to MERLIN MAIL. Please
press extension and pound sign. "
■
MERLIN MAIL—ML Form D: Voice Mail Greeting provides the
planned Voice Mail Greeting script.
■
For better sound quality, use the handset instead of the speakerphone when recording greetings.
To record a Voice Mail Greeting, follow the instructions below:
1.
Log in to the MERLIN MAIL —ML system as the system administrator.
The system administrator’s name plays; then the Voice Mail Activity Menu
plays.
2. [9] to administer the system.
The System Administration Menu plays.
3. [7] for System Greeting.
The System Greeting Choice Menu plays.
4. [1] for Voice Mail greeting.
The system prompts you to record the greeting, then the Voice Mail Greeting
Menu plays.
Recording System Greetings
3-51
MERLIN MAIL—ML System Programming
5. Select one of the following options:
— [1] to record a greeting.
The system prompts you to record at the tone. Go to Step 6.
— [0] to listen to the greeting.
— [2] to use the system default greeting.
The message “System default greeting will be used” plays.
If the MERLIN MAIL—ML system is set up for monolingual operation,
the System Greeting Choice Menu plays.
If the MERLIN MAIL—ML system is set up for bilingual operation, the
system prompts you to record the greeting in the secondary language.
Skip to Step 9.
— [*][#] to use the current greeting.
The message “The current greeting will be used.” plays.
If the MERLIN MAIL—ML is setup for monolingual operation, the
System Greeting Choice Menu plays. This procedure is completed.
If the MERLIN MAIL—ML is set up for bilingual operation, the system
prompts you to record the greeting in the secondary
\ language. Skip to
Step 9.
6. Record the Voice Mail Greeting, then press [1]
NOTE:
Remember to include instructions for the caller to enter an
extension number followed by [#]
The system plays the Message Editing Menu.
7. Enter one of the following options or go to Step 8:
— [2][3] to play back the greeting.
— [2][1] to re-record the greeting.
— [*][D] (or [*][3] ) to delete the new greeting and use the
previous greeting.
3-52 Recording System Greetings
MERLIN MAIL—ML System Programming
8. [*][#] to approve the greeting.
If the MERLIN MAIL—ML system is set up for monolingual operation, the
system plays the Voice Mail Greeting Menu. Skip to Step 10.
If the MERLIN MAIL—ML system is set up for bilingual operation, the system
prompts you to record the greeting in the secondary language. Go to Step 9.
9. (Bilingual Operation Only) Repeat Steps 5 through 8 for the secondary
system language.
The system plays the Voice Mail Greeting Menu.
10. [*][#] to return to the System Greeting Choice Menu.
Recording System Greetings
3-53
MERLIN MAIL—ML System Programming
Programming the Automated
Attendant Menus
When the Automated Attendant Service answers a call, the caller hears the
Automated Attendant Service Greeting followed by a main menu. There are
two main menus:
■
Day Menu that plays after the Day Greeting when your business
is open,
■
Night Menu that plays after the Night Greeting when your
business is closed.
Figure 3-9 shows the Automated Attendant Service programming menus used
to program the Day and Night Menus, submenus, and announcements.
Figure 3-9. Automated Attendant Service Programming Menus
3-54 Programming the Automated Attendant Menus
MERLIN MAIL—ML System Programming
Selector Codes and Selector Code Actions
The main menus consist of a recorded script listing menu options and the
corresponding digit (Selector Code) the caller presses to select each option.
When the caller enters a Selector Code on the phone’s dialpad to select a
menu option, the Automated Attendant Service performs the action
designated for that option:
■
Transfer to a frequently called department or extension.
■
Play a pre-recorded announcement containing frequently
requested information.
■
Play a submenu listing additional options.
For example, a caller to the Travel Agency would hear the following greeting:
Automated Attendant Service Prompts Caller Response
Thank you for calling Travel Agency.
if you are calling from a touch-tone phone,
press [1] now.
For cruises, press [1]
For corporate travel, press [2]
For personal travel, press [3]
For discounted trip information, press [4]
If you know the extension of the person you
are calling, press [8] and dial that person’s
extension.
Or stay on the line for assistance.
The caller presses [1] The
Automated Attendant Service
plays ANY Travel Agency’s
main menu.
Caller presses dialpad
buttons in response to the
prompts or waits for
assistance.
Programming the Automated Attendant Menus
3-55
MERLIN MAIL—ML System Programming
Automated Attendant Service uses Selector Code Actions to determine the
action performed when the caller presses the Selector Code. Each Selector
Code (1–9) specified in a menu must be assigned one of the following five
Selector Code Actions:
■
Action 1—Selector Code Transfer
Automated Attendant Service transfers calls to a specific
extension or Calling Group assigned to a Selector Code.
For example, at the Travel Agency, when callers press [2] , they
are connected to extension 11, the corporate travel agent’s
extension.
■
Action 2—Play an Existing Submenu
Automated Attendant Service plays a submenu listing additional
options, from which callers choose another Selector Code.
For example, at the Travel Agency, when callers press [1] at the
main menu to select cruises, they hear the following submenu
listing the types of cruises:
Automated Attendant Service Prompts Caller Response
Caller presses [1] for
information on cruises. The
Automated Attendant Service
plays the “cruises” submenu.
For Caribbean cruises, press [1]
For Hawaiian cruises, press [2]
For Alaskan cruises, press [3]
Caller presses [1] for
information on Caribbean
cruises and hears the
submenu.
For Grand Cayman, press [1]
For Jamaica, press [2]
For Bahamas, press [3]
Caller presses [1] , [2] , or [3]
for information on a particular
cruise.
3-56 Programming the Automated Attendant Menus
MERLIN MAIL—ML System Programming
NOTE:
Submenus must be programmed before the main menu from
which they are accessed.
■
Action 3—Play an Existing Announcement
Automated Attendant Service plays a pre-recorded
announcement. Use this Selector Code Action when information
that callers need can be provided in a two-minute recording.
For example, the Travel Agency offers special discounted trips
each month. Callers who are interested in discounted trips press
[4] at the main menu to hear the following announcement
providing destinations, departure dates, and prices:
Automated Attendant Service Prompts Caller Response
Caller presses [4] for
information on discounted
trips. Automated Attendant
Service plays the following
announcement:
The Travel Agency is p/eased to offer the
following discounted trips in November:
Spend a week in Mexico City for $1599. Price
includes round-trip airfare, transfers, rental
car, and seven nights in a luxurious hotel.
Departure dates are November 12th and 15th
only.
Cruise the Hawaiian Islands for $1299. Arrive
in Honolulu on November 3rd, spend a day on
Oahu touring Pearl Harbor and Diamond
Head, then board the ship on November 4th
for stops at Maui, Lanai, and the big island,
Hawaii. Take the island tours included in this
package, or feel free to explore each island
on your own.
•
•
•
Programming the Automated Attendant Menus
3-57
MERLIN MAIL—ML System Programming
Automated Attendant Service Prompts Caller Response
This trip includes shipboard meals, tours, and
transfers. This trip does not include
airfare—speak to your travel agent for prices
on roundtrip airfare to Honolulu.
Dial [0] now if you need assistance.
NOTE:
Announcements must be created before the main menu or
submenus from which they are accessed.
■
Action 4—Prompted Transfer
Automated Attendant Service requires callers to enter a Selector
Code before they dial an individual extension number. Use this
Selector Code Action when the first digit of extensions is identical
to one or more Selector Codes offered in a menu.
For example, the Travel Agency has twenty agents, with
extension numbers ranging from 11 to 31. If a caller attempts to
dial extension 31 from the main menu, the caller is connected to
the Personal Travel Agent as soon as the caller enters [3] . To
avoid this, the travel agency assigned Selector Code Action 4,
Prompted Transfer, to Selector Code 8 and the script asks callers
to press [8] before dialing an extension number.
■
Action 5—Direct Extension Transfer
Automated Attendant Service lets callers dial individual
extensions or calling groups directly from the menu when
corresponding Selector Codes are reserved for direct extension
dialing. To use this Selector Code Action, assign Selector Codes
that are identical to the first digit of the extension number.
3-58 Programming the Automated Attendant Menus
MERLIN MAIL—ML System Programming
For example, if the extensions at the Travel Agency range from 11 to
31, and the agency wanted callers to be able to transfer directly to
any extension from the Automated Attendant Service main menu, the
Travel Agency would change its main menu so that callers would
hear the following:
Automated Attendant Service Prompts Caller Response
If you know the extension of the person you
are calling, dial that person’s extension now.
For cruises, press [4]
For corporate travel, press [5]
For personal travel, press [6]
For discounted trip information, press [7]
Or stay on the line for assistance.
Caller presses dialpad
buttons to select a menu
option.
In the previous example, note that Selector Codes 4 through 7 were used for
menu options so that 1, 2, and 3 could be reserved for direct dialing of
extensions.
Programming the Automated Attendant Menus
3-59
MERLIN MAIL—ML System Programming
Automated Attendant Service
Programming Sequence
Automated Attendant Service submenus and announcements must be
programmed before the higher-level menu options that selects them.
Therefore, record all announcements first. Then create the submenus, starting
with the lowest-level submenu and continuing up the submenu levels so that
the Main Menu is the last created. To help you program Automated Attendant
Service menus and announcements, reorganize the completed MERLIN
MAIL—ML forms in the following order:
■
MERLIN MAIL—ML Form H: Automated Attendant Service
Announcements
■
MERLIN MAIL—ML Form G: Automated Attendant Service
Submenus
■
MERLIN MAIL—ML Form F: Automated Attendant Service Night
Main Menu
■
MERLIN MAIL—ML Form E: Automated Attendant Service Day
Main Menu
Creating Announcements
To program Selector Code Action 3—play an existing announcement in a
submenu or Main Menu, you must create the announcement and assign an
announcement number (1–99) to it.
■
MERLIN MAIL—ML Form H: Automated Attendant Service
Announcements provides the planned announcement scripts.
■
Up to 99 announcements can be recorded.
■
Announcements can be up to 2 minutes in length.
■
Create announcements before programming the corresponding
Selector Code in a Main Menu or submenu.
3-60 Programming the Automated Attendant Menus
MERLIN MAIL—ML System Programming
To create an announcement, follow the instructions below:
1. Log in to the MERLIN MAIL—ML system as the system administrator.
The system administrator’s name plays; then the Voice Mail Activity Menu
plays.
2. [9] to program the system.
The System Administration Menu plays.
3. [3] for Automated Attendant Service.
The Automated Attendant Service Administration Menu plays.
4. [4] to program an announcement.
The Announcement Administration Menu plays.
5. [7] to record an announcement.
The system prompts you to enter the announcement number.
6. Enter the announcement number (1–99) followed by [#]
The system tells you if the announcement already exists and prompts “DO
you want to record?”
7. Select one of the following options:
— [9] for "Yes" to confirm that you want to record the
announcement.
The system prompts you to record at the tone or press [#] to use the
current announcement, if it already exists.
— [6] for "No" to cancel the recording.
The Announcement Administration Menu plays.
— [2] to play the announcement if it already exists.
The system plays the announcement, then prompts you to confirm that
you want to re-record the announcement.
Programming the Automated Attendant Menus
3-61
MERLIN MAIL—ML System Programming
8. Choose one:
— [#] to use the current announcement.
The system plays the message “Existing announcement will be used”.
In monolingual operation, the Announcement Administration Menu
plays.
In bilingual operation, the system prompts you to record the
announcement script in the secondary language.
— Record the announcement (up to 2 minutes), then press [1]
The system plays the Message Editing Menu.
9. Choose an option or go to Step 10:
— [2][3] to play back the announcement.
— [2][1] to re-record the announcement.
— [*][D] (or [*][3] ) to delete the announcement and use the one
previously recorded.
If there is no previously recorded announcement, the system plays the
message. "No announcement created" then the Announce
Administration Menu plays.
If the MERLIN MAIL—ML system was setup for bilingual operation, the
system prompts you to record the announcement script in the
secondary language. Go to Step 11.
3-62 Programming the Automated Attendant Menus
MERLIN MAIL—ML System Programming
10. [*][#] to approve the new announcement.
The message "Approved” plays.
If the MERLIN MAIL—ML system was setup for monolingual operation,
the Announcement Administration Menu plays. This procedure is
complete.
If the MERLIN MAIL—ML system was setup for bilingual operation, the
system prompts you to record the announcement script in the
secondary system language at the tone. Go to Step 11.
11. (Bilingual Operation Only) Repeat steps 8 through 10 to record the
announcement script in the secondary system language.
The Announcement Administration Menu plays.
Creating Submenus
If you want to program more than nine menu options in a Main Menu, you will
need to program one or more submenus to provide the additional options to
callers.
■
MERLIN MAIL—ML Form G: Automated Attendant Service
Submenus provides the following information for each planned
submenu:
— Submenu number
— Selector Code and Selector Code Action
— Submenu script
■
You can create up to 99 submenus, but more than three menu
levels tend to confuse callers.
■
Each submenu can contain up to nine options, but more than five
options tend to confuse callers.
■
If you are creating more than one submenu, create the
lowest-level submenu first.
Programming the Automated Attendant Menus
3-63
MERLIN MAIL—ML System Programming
To create a submenu, follow the instructions below:
1.
Log into the MERLIN MAIL—ML system as the system administrator.
The system administrator’s name plays; then the Voice Mail Activity Menu
plays.
2. [9] to program the system.
The System Administration Menu plays.
3. [3] for Automated Attendant Service.
The Automated Attendant Service Administration Menu plays.
4. [3] to program a submenu.
The Submenu Administration Menu plays.
5. [4] to create a submenu.
The system prompts you to enter a submenu number and [#]
6. Enter the submenu number followed by [#]
The system prompts you to enter a Selector Code.
7. Enter a Selector Code ( [1] through [9] ).
3-64 Programming the Automated Attendant Menus
MERLIN MAIL—ML System Programming
8. Select one of the following options:
To
Enter the Following
Assign Selector Code Action 1,
Selector Code Transfer, to this
Selector Code
[1] then enter the extension
number and [#] in response to the
prompt.
Assign Selector Code Action 2,
Play Submenu, to this Selector
Code
[2] then enter a submenu number
and [#] in response to the prompt.
Assign Selector Code Action 3,
Play Announcement, to this
Selector Code
[3] then enter the announcement
number and [#] in response to the
prompt.
Assign Selector Code Action 4,
Prompted Transfer, to this
Selector Code
[4]
Assign Selector Code Action 5,
Direct Extension Transfer, to this
Selector Code
[5]
Delete this Selector Code
[*][D] (or [*][3] ) then when
prompted, enter [9] to confirm the
deletion or [6] to cancel the
deletion.
The system prompts you to enter a Selector Code.
9. Repeat Steps 7 and 8 for each Selector Code to be added to this submenu.
10. [*][#] once all the Selector Codes have been added to this submenu.
The system prompts you to record the submenu script at the tone.
Programming the Automated Attendant Menus
3-65
MERLIN MAIL—ML System Programming
11.
Record the new submenu script (up to two minutes).
12.
[1] after recording.
The Message Editing Menu plays.
13. Enter one of the following selections or go to Step 14:
— [2][3] to play back the new submenu script.
— [2][1] to re-record the new submenu script. Go back to Step 12.
— [*][D] (or [*][3] ) to delete the new submenu script. Re-record
the new submenu script.
14. [*][#] to approve the submenu script,
The message “Approved” plays.
If the MERLIN MAIL—ML system was setup for monolingual operation,
the Submenu Administration Menu plays. This procedure is complete.
If the MERLIN MAIL—ML system was setup for bilingual operation, the
system prompts you to record the submenu script in the secondary
system language. Go to Step 15.
15. (Bilingual Operation Only) Repeat Steps 11 through 14 to record the
script for the secondary system language.
The Submenu Administration Menu plays.
3-66 Programming the Automated Attendant Menus
MERLIN MAIL—ML System Programming
Creating the Day/Night Main Menus
The Automated Attendant Service Day and Night Menus are the top level
menus from which callers can transfer to an extension or department, play a
submenu, or play an announcement. Because they are the top level menus,
program the Day and Night Main Menus after you have programmed the
announcements and submenus they offer as menu options.
■
Create the Day Main Menu using MERLIN MAIL—ML Form E:
Automated Attendant Service Day Main Menu.
■
Create the Night Main. Menu using MERLIN MAIL—ML Form G:
Automated Attendant Service Night Main Menu.
NOTE:
Submenus and announcements must be created before the Main
Menus. Refer to the preceding instructions for “Creating
Submenus” and “Creating Announcements.”
■
Even if the Night Main Menu is identical to the Day Main Menu,
you must create them both.
■
If either menu is not being used, follow Steps 1 through 9 to
delete Selector Codes 1 through 4 for that menu. These codes
are factory-set to transfer calls directly to extensions.
To create the Day and Night Day Menus, follow the instructions below:
1. Log into the MERLIN MAIL—ML system as the system administrator.
The system administrator’s name plays; then the Voice Mail Activity Menu
plays.
2. [9] to program the system.
The System Administration Menu plays.
3. [3] for Automated Attendant Service.
The Automated Attendant Service Administration Menu plays.
Programming the Automated. Attendant Menus
3-67
MERLIN MAIL—ML System Programming
4. Enter one of the following choices:
— [1] to select the Day Menu.
— [2] to select the Night Menu.
The Menu Administration Menu plays.
5. [6] to modify the Main Menu.
The system prompts you to enter a Selector Code.
6. Enter a Selector Code ( [1] through [9] ).
If the Selector Code is already assigned, the system plays the Selector Code
definition and a prompt asking you to confirm the requested modification.
Go to Step 7.
If the Selector Code is not already assigned, the Selector Code Menu plays.
Skip to Step 8.
7. Enter one of the following choices:
— [9] for “Yes” to confirm that you want to modify it.
The Selector Code Modification Menu plays. Go to Step 8.
— [6] for “No” to cancel the modification.
The system prompts you to enter a Selector Code. Go back to Step 6.
3-68 Programming the Automated Attendant Menus
MERLIN MAIL—ML System Programming
8. Select one of the following options:
To
Enter the Following
Assign Selector Code Action 1,
Selector Code Transfer, to this
Selector Code
[1] then enter the extension
number and [#] in response to the
prompt.
Assign Selector Code Action 2,
Play Submenu, to this Selector
Code
[2] then enter a submenu number
and [#] in response to the prompt.
Assign Selector Code Action 3,
Play Announcement, to this
Selector Code
[3] then enter the announcement
number and [#] in response to the
prompt.
Assign Selector Code Action 4,
Prompted Transfer, to this
Selector Code
[4]
Assign Selector Code Action 5,
Direct Extension Transfer, to this
Selector Code
[5]
Delete this Selector Code
[*][D] (or [*][3] ) then when
prompted, enter [9] to confirm the
deletion or [6] to cancel the
deletion,
The system prompts you to enter a Selector Code.
Programming the Automated. Attendant Menus
3-69
MERLIN MAIL—ML System Programming
9. Repeat Steps 6 through 8 for each Selector Code to be modified in this
menu.
10. [*][#] when finished making the Selector Code changes for this menu.
The current Timeout Action plays, followed by the Timeout Action Menu.
11. Choose the Dial O/Timeout Action that defines what happens to a call
when there is no touch-tone response from the caller or the caller
presses 0 (zero):
—
—
—
—
[0] for transfer to the system operator.
[1] to record a message in the General Mailbox.
[2] for disconnect.
[*][#] to quit.
The system plays back the selected Dial 0/Timeout Action. The system then
prompts you to record the main menu script at the tone.
12. Choose one:
— [#] to use the existing script.
The message "The existing menu prompt will be used" plays.
If the MERLIN MAIL—ML system was setup for monolingual operation,
the Menu Administration Menu plays. This procedure is complete.
If the MERLIN MAIL—ML system was setup for bilingual operation, the
system prompts you to record the main menu script in the secondary
system language.
— Record the main menu script (up to two minutes).
NOTE:
If you have changed a Selector Code that requires a
change to the menu script, you must re-record the entire
script. If the Selector Code changes have no affect on the
menu script, you can use the existing script.
3-70 Programming the Automated Attendant Menus
MERLIN MAIL—ML System Programming
13. [1] after recording editing.
The Message Editing Menu plays.
14. Enter one of the following options or go to Step 15:
— [2][3] to play back the new main menu script.
– [2][1] to re-record the new main menu script.
— [*][D] (or [*][3] ) to delete the new main menu script and use
the one previously recorded.
If the MERLIN MAIL—ML system was setup for monolingual operation,
the Menu Administration Menu plays. This procedure is complete.
If the MERLIN MAIL—ML system was setup for bilingual operation, the
system prompts you to record the main menu script in the secondary
language. Go to Step 16.
15. [*][#] to approve the new main menu script.
The message "Approved" plays.
If the MERLIN MAIL—ML system was setup for monolingual operation,
the Menu Administration Menu plays. This procedure is complete.
If the MERLIN MAIL—ML system was setup for bilingual operation, the
system prompts you to record the main menu script in the secondary
system langauge.
16. (Bilingual Operation Only) Repeat Steps 12 through 15 to record the
script for the secondary system language.
Programming the Automated. Attendant Menus
3-71
MERLIN MAIL—ML System Programming
Creating Group Lists
Group Lists enable a single voice mail message to be sent to many
subscribers atone time, without dialing each extension.
A Group List consists of extensions assigned to a single group. That group of
extensions is assigned a Group List number. When a subscriber sends a
message to a Group List number instead of an extension number, the
message is sent to all of the voice mailboxes contained in the Group List.
Figure 3-10 shows the Group List programming options used to create and
maintain Group Lists.
Figure 3-10. Group List Programming Menu Options
3-72 Creating Group Lists
MERLIN MAIL—ML System Programming
Subscribers can be members of several different Group Lists.
■
Up to 99 Group Lists can be created.
■
Up to 99 subscribers can be assigned to each Group List
■
MERLIN MAIL—ML Form 1: Group Lists provides the subscribers
assigned to each planned Group List.
To create a new group list, follow the instructions below:
1. Log into the MERLIN MAIL—ML system as the system administrator.
The system administrator’s name plays; then the Voice Mail Activity Menu
plays.
2. [9] to program the system.
The System Administration Menu plays.
3. [5] for Group Lists.
The Group List Administration Menu plays.
4. [4] to create a Group List.
The system prompts you to enter the new Group List number.
5. Enter the new Group List number (1–99) followed by [#]
The system prompts you to enter an extension number.
6. Enter a subscriber’s extension number followed by [#]
The system plays the mailbox name of the subscriber for the extension
number entered, then prompts you to enter the next extension number.
NOTE:
To delete the last mailbox entered, press [*][D] (or [*][3] ). The
system will confirm the deletion and prompt you to enter the next
extension.
Creating Group Lists
3-73
MERLIN MAIL—ML System Programming
7 . Repeat Step 6 for each extension to be added to the Group List.
8 . [*][#] to save the Group List and return to the Group List Administration
Menu.
3-74 Creating Group Lists
MERLIN LEGEND
System Programming
4
This chapter provides instructions for programming the MERLIN LEGEND
system settings. You can program the MERLIN LEGEND system settings from
a MERLIN LEGEND MLX-20L™ Programming Console or you can use System
Programming Maintenance (SPM) software on a personal computer. For
further details on MERLIN LEGEND programming, refer to the MERLIN
LEGEND System Programming Guide.
The charts in the following descriptions show the task to be performed in the
left-most column and the buttons to press or menu items to select in the
remaining two columns. If you are using the console, follow the instructions in
the MLX-20L column; if you are using SPM, follow the instructions in the PC
column. An instruction such as [S][P][M] means to press the “S” key, then the
“P” key, and then the “M” key. An instruction such as [Alt] + [P] means to press
the “ALT” key, and while holding it down, press the “P” key.
NOTE:
If you have SPM Release 2.09 or a later release, you can use [Enter] or
[F10] whenever [F10] is noted in Chapters 4 and 5. In addition, you can
use the arrow keys to highlight items on menus and the [Backspace] key or
[F4] to erase characters. See the MERLIN LEGEND System Programming
Guide for additional information on SPM.
4-1
MERLIN LEGEND System Programming
MERLIN LEGEND
Planning Forms
Before programming the MERLIN LEGEND system, be sure that you have the
following planning forms completed:
■
Form 2a: System Numbering —Station Jacks
Indicates the jacks on the MERLIN LEGEND system that are
connected to the MERLIN MAIL—ML ports.
■
Form 2c: System Numbering —Trunk Jacks
Defines jack and trunk types on the system; indicates type of
disconnect (reliable or unreliable) for loop-start lines.
■
Forms 4b and 4d: Multiline Telephones (Analog and Digital)
Defines the Delayed Call Handling extension.
■
Form 4f: Tip/Ring Equipment Defines
MERLIN LEGEND ports used for fax machines and the RMD.
■
Forms 4b, 4d, 5a, 5b, or 5d:
Define the extensions to be used for fax machine
message-waiting indication.
■
Form 6d: Group Coverage
Defines Group Coverage extensions (senders) and the assigned
Calling Group (designated receiver).
■
Form 6e: Group Calling
Indicates extensions for any Calling Groups and specifies
Delayed Call Handling and Overflow Coverage.
■
Form 6f: System Features
Specifies the Transfer Return Time and the Transfer Redirect
Extension.
■
Form 7a: Night Service-Group Assignment
Identifies the MERLIN MAIL—ML Calling Group as the Night
Service coverage receiver.
4-2 MERLIN LEGEND Planning Forms
MERLIN LEGEND System Programming
■
Form 7b: Night Service—Outward Restriction
Indicates extensions on the Exclusion List.
■
Form 7c: Night Service—Time Set (optional)
Indicates when the MERLIN LEGEND system begins and ends
Night Service.
These forms should be kept with the MERLIN MAIL—ML System
Administration guide.
Group-Assigned Features
The following features must be programmed:
■
Hunt Type
■
Transfer Return Time
■
VMS Transfer Return Time
Before completing any of these procedures, you must create the Calling
Group for the MERLIN MAIL—ML ports. For this procedure, see “Preparing
MERLIN LEGEND for MERLIN MAIL—ML Programming” in Chapter 3.
Hunt Type
The Hunt Type defines the method used by the MERLIN MAIL—ML Calling
Group to search for the next available extension. Program a linear hunt pattern
so that the system will search in the same order in which you have assigned
members to the the group.
■
Use MERLIN LEGEND Form 6e to identify the hunt pattern.
■
The factory setting is circular hunting pattern.
Group-Assigned Features 4-3
MERLIN LEGEND System Programming
MLX-20L
PC
1 . Enter programming mode.
[Menu]
2. Select Extensions.
Sys Program
Exit
Extensions
[S][P][M]
[Enter]
[any key]
[F1]
[F5]
3. Display next page of menu.
[More]
[PgUp]
4. Select Group Calling.
Grp Calling
[F4]
5. Select Hunt Type.
Hunt Type
[F1]
6. Enter extension number of
the MERLIN MAIL — ML
Calling Group.
[nnn]
Enter
[nnn]
[F10]
7. Specify linear hunt type.
Linear
Enter
8. To return to previous menu
Exit
[F2]
[F10]
[F5]
Step Instruction
[F6]
Transfer Return Time
The Transfer Return Time is the number of rings that occur before a
transferred call returns to the extension from which it was transferred.
If all stations are covered only by the MERLIN MAIL—ML system, the Transfer
Return Time should be set to a value greater than the Coverage Delay. If any
station has personal coverage and group coverage by the MERLIN MAIL—ML
system, set the Transfer Return Time to a value greater than the sum of the
Coverage Delay and Delay Ring intervals.
■
Use MERLIN LEGEND Form 6f to identify the Transfer Return
Interval.
■
The factory setting is 4 rings.
4-4 Group-Assigned Features
MERLIN LEGEND System Programming
Step Instruction
1.
Enter programming mode.
MLX-20L
PC
[Menu]
[S][P][M]
[Enter]
[any key]
[F1]
[F5]
2. Select Options.
Sys Program
Exit
Options
3. Select Transfer.
Transfer
4. Select Transfer Return Time.
Return Time
[F1]
[F1]
5. To erase current number of
rings.
[Drop]
[Alt] + [P]
6. Enter number of rings before
calls are transferred to
originator.
[n]
Enter
[n]
[F10]
7. Return to previous menu.
Exit
[F5]
[F7]
VMS Transfer Return Interval
The VMS Transfer Return Interval defines the number of rings that occur
before a call transferred by the MERLIN MAIL—ML system is redirected to a
designated extension. Calls can be redirected to the QCC queue (hybrid/PBX
mode only), another extension, or a calling group. For more detail, see
“Redirecting Calls Sent to Unassigned Extensions” later in this chapter.
Group-Assigned Features 4-5
MERLIN LEGEND System Programming
RECOMMENDATION:
Set the VMS Transfer Return Interval equal to the Transfer Return Interval.
If all stations are covered only by the MERLIN MAIL—ML system, the
VMS Transfer Return Interval should be set to a value greater than the
Coverage Delay. If any station has personal coverage and group
coverage by the MERLIN MAIL—ML system, set the VMS Transfer
Return Interval to a value greater than the sum of the Coverage Delay
and Delay Ring intervals.
■
The VMS Transfer Return Interval does not appear on a MERLIN
LEGEND Form.
■
The factory setting is 4 rings.
MLX-20L
PC
1 . Enter programming mode.
[Menu]
2. Select Auxiliary Equipment.
Sys Program
Exit
AuxEquip
[S][P][M]
[Enter]
[any key]
[F1]
[F5]
[F9]
3. Select Voice Messaging
System/Automated
Attendant.
VMS/AA
[F6]
4. Select Transfer Return.
TransferRtn
[F1]
5. Erase current number of rings.
[Drop]
[Alt] + [P]
6. Enter number of rings before
calls are returned from
transfer.
[n]
Enter
[n]
[F10]
7. To return to previous menu.
Exit
[F5]
Step Instruction
4-6 Group-Assigned Features
MERLIN LEGEND System Programming
Call Answer Service
Program the MERLIN LEGEND system to transfer unanswered calls to the
MERLIN MAIL—ML system by assigning Group Coverage to the extensions
you want to have covered. Then select the MERLIN MAIL—ML Calling Group
as the Group Coverage receiver.
Any number of extensions can be assigned to a Coverage Group.
Unanswered calls to extensions in the Coverage Group (senders) are
redirected to MERLIN MAIL—ML ports in the MERLIN MAIL—ML Calling
Group (receivers). The MERLIN LEGEND system sends the call with a code
identifying the call as a coverage call.
Figure 4-1. Call Answer Service
Call Answer Service 4-7
MERLIN LEGEND System Programming
Programming Group Coverage
Create a Coverage Group for the extensions covered by the MERLIN
MAIL—ML system’s Call Answer Service.
■
Use MERLIN LEGEND Form 6d to identify extensions included in
the Coverage Group, and to identify the extension for the MERLIN
MAIL—ML Calling Group.
MLX-20L
PC
1. Enter programming mode.
[Menu]
2. Select Extensions.
Sys Program
Exit
Extensions
[S][P][M]
[Enter]
[any key]
[F1]
[F5]
[F6]
3. Display next page of menu.
[More]
[PgUp]
4. Select Group Coverage.
Group Cover
[F3]
5. Enter the Group Number.
(The group number can be
1-30.)
[nn]
Enter
[nn]
[F10]
6. Enter Extensions.
(Repeat step for each
extension to be included
in the coverage group. )
[nnn]
Enter
[nnn]
[F10]
7. Return to Extensions Menu.
Exit
Exit
8. Select Group Calling.
Grp Calling
[F4]
9. Select Group Coverage.
Grp Coverage
[F3]
[nnn]
Enter
[nnn]
[F10]
Step Instruction
10. Enter the extension number of
the MERLIN MAIL—ML
Calling Group.
4-8 Call Answer Service
MERLIN LEGEND System Programming
11.
Enter the coverage group
number.
12. Return to the previous menu.
[nn]
Enter
[nn]
[F10]
Exit
[F5]
Creating the Group Coverage Delay Interval
Assign the number of rings (1–9) that occur before a call is sent to Group
Coverage receivers.
■
Use MERLIN LEGEND Form 6d to identify the Coverage Delay
Interval.
■
The factory setting for Coverage Delay is 3 rings.
If you change the Group Coverage Delay interval, it maybe necessary to
change the Transfer Return Time and VMS Transfer Return Intervals. For
details, refer to “Transfer Return Time” and “VMS Transfer Return Interval”
earlier in this chapter.
If any station has personal coverage and coverage by MERLIN MAIL — ML, the
Transfer Return and VMS Transfer Return Intervals must be greater than the
sum of the Coverage Delay and Delay Ring intervals.
MLX-20L
PC
[More]
2. Select Options.
Sys Program
Exit
Options
[S][P][M]
[Enter]
[any key]
[F1]
[F5]
[F7]
3. Display next page of menu.
[More]
[PgUp]
4. Select Group Coverage Delay
Interval.
Cover Delay
Step Instruction
1.
Enter programming mode.
[F6]
Call Answer Service 4-9
MERLIN LEGEND System Programming
5. To erase current number of
rings.
[Drop]
[Alt] + [P]
6. Enter number of rings for
Group Coverage delay.
[n]
Enter
[n]
[F10]
7. Return to system
programming menu.
Exit
[F5]
Redirecting Calls Sent to
Unassigned Extensions
Designate an extension where the following types of calls can be transferred:
■
Calls which are transferred by MERLIN MAIL—ML to extensions
where there is no answer and no coverage.
■
Calls to unassigned numbers
Calls can be redirected to a QCC (hybrid/PBX only), a Calling Group
extension, or another extension.
■
Use MERLIN LEGEND Form 6f to identify the Transfer Redirect
extension, QCC, or Calling Group number for unassigned calls.
Step Instruction
1.
Enter programming mode.
MLX-20L
[Menu]
Sys Program
Exit
PC
[S][P][M]
[Enter]
[any key]
2. Select Options.
Options
[F5]
[F7]
3. Display next page of menu.
[More]
[PgUp]
4. Select Unassigned Extension.
Unassigned
4-10 Call Answer Service
[F1]
MERLIN LEGEND System Programming
5.
To transfer unassigned calls
to-the QCC Queue, an
extension, or a Calling
Group, select QCC Queue,
Extension, or Group Calling.
QCC Queue
or
Extension
or
Grp Calling
then [Enter]
[F1]
or
[F2]
or
[F3]
then [F10]
6. To erase the current setting.
[Drop]
[Alt] + [P]
7.
To enter phone extension or
Calling Group to which you
want calls redirected.
[nnn]
Enter
[nnn]
[F10]
8.
Return to previous menu.
Exit
[F5]
Call Answer Service
4-11
MERLIN LEGEND System Programming
Call Handling Methods
The MERLIN MAIL—ML Automated Attendant Service provides four call
handling methods that allow external calls to be answered by Automated
Attendant Service or by the system operator:
■
Immediate Call Handling
■
Fax Call Handling
■
Delayed Call Handling
■
Night Only Call Handling
The following sections describe each call handling method and the
programming steps required for each method.
NOTE:
Fax Call Handling can be combined with Immediate Call Handling. Fax
Call Handling can also be combined with Night Only Call Handling for
MERLIN LEGEND Release 2.0 and later releases. Fax Call Handling
cannot be combined with Delayed Call Handling.
Figure 4-2 outlines the programming steps required for each call handling
method.
4-12 Call Handling Methods
MERLIN LEGEND System Programming
*Can be combined with immediate Call Handling and MERLIN LEGEND Release 1.0 and later. Can also be
combined with Night Only Call Handling and MERLIN LEGEND Release 2.0 and later. Fax Call Handling
cannot be combined with Delayed call handling.
Figure 4-2. Programming MERLIN LEGEND Call Handling Methods
Call Handling Methods
4-13
MERLIN LEGEND System Programming
MERLIN LEGEND Planning Forms
The following MERLIN LEGEND planning forms contain information you will
need to program the call handling methods.
■
Form 2a: System Numbering — Station Jacks
■
Form 6d: Group Coverage
■
Form 6e: Group Calling
Immediate Call Handling
With Immediate Call Handling, the MERLIN MAIL—ML Automated Attendant
Service answers all incoming calls (see Figure 4-3). The caller hears the
Automated Attendant Service greeting and Main Menu, makes a selection
from the menu, and either gets transferred to a department or extension, hears
an announcement, or hears another menu listing additional options.
When the number of incoming calls to the MERLIN MAIL—ML system is large,
overflow calls are sent to the system operator, who provides assistance or
transfers the call. After business hours, the caller hears the Night Greeting
and Night Main Menu.
When Fax Call Handling is programmed, Automated Attendant Service
recognizes the fax CNG tone and directs the fax call to a fax machine.
4-14 Call Handling Methods
MERLIN LEGEND System Programming
Figure 4-3. Immediate Call Handling
Call Handling Methods
4-15
MERLIN LEGEND System Programming
Setting Delayed Ring
Delayed Ring is the number of rings (2-6) that the MERLIN MAIL—ML system
has to answer a call before it rings at the system operator’s extension. Use
this procedure if the system operator has a Direct Line Console (DLC).
■
Use MERLIN LEGEND Form 2a to identify the system operator’s
extension.
■
The factory setting is 2 rings.
Step Instruction
1. Enter programming mode.
MLX-20L
[Menu]
PC
[S][P][M]
Sys Program
Exit
[Enter]
[any key]
[F1]
[F5]
2. Display next page of menu.
[More]
[PgUp]
3. Select Centralized Telephone
Programming.
Cntr-Prg
4. For MERLIN LEGEND Release
2.x, select Program
Extension.
Program Ext.
[F1]
[nnn]
Enter
[nnn]
[F1O]
[F4]
For prior releases, skip this
step.
5. Enter the extension you want
to program.
6. Start Centralized Programming. Start
7. Select Line/Feature Button.
4-16 Call Handling Methods
Press button on
console.
[F10]
[Shift] or [Alt]
and function
key
MERLIN LEGEND System Programming
8. Set all lines at the extension to
Delayed Ring.
Set individual lines at the
extension to Delayed Ring
9. Return to previous menu.
[*][3][4][6]
[*][3][4][6]
[*][3][6]
[*][3][6]
Sys Program
[F5]
Providing Overflow Coverage
(Hybrid/PBX Only)
Use this procedure if the system operator has a Queued Call Console (QCC)
and the MERLIN MAIL—ML Calling Group should receive overflow calls from
the system operator’s extension. The MERLIN MAIL—ML Calling Group will
receive calls when the number of calls waiting in the queue is equal to or
greater than the programmed overflow coverage threshold.
■ Use
MERLIN LEGEND Form 6e to identify the overflow coverage
threshold.
Step Instruction
MLX-20L
PC
[Menu]
Sys Program
Exit
[S][P][M]
[Enter]
[any key]
[F1]
[F5]
2. Select Extensions.
Extensions
[F6]
3. Display next page of menu.
[More]
[PgUp]
4. Select Group Calling.
Grp Calling
[F4]
5. Select Group Calling Overflow
Coverage.
Overflow
[F8]
6. Enter extension number of
Group Calling.
[nnn]
Enter
[nnn]
[F10]
1 . Enter programming mode.
Call Handling Methods
4-17
MERLIN LEGEND System Programming
7. Enter Calling Group or QCC
Listed Directory Number.
[nn]
Enter
[nn]
[F10]
8. To erase current number of
calls.
[Drop]
[Alt] + [P]
9. Enter number of calls (1-99) in
queue before calls are sent
to Calling Group or QCC.
[nn]
Enter
[nn]
[F10]
Exit
[F5]
10. To return to previous menu.
Setting No Ring for Other Extensions
Set “No Ring” to lines assigned to Automated Attendant Service that also
appear at other telephones and to the MERLIN MAIL—ML ports.
■
Use MERLIN MAIL—ML Form 2c to identify which lines are set to
No Ring.
■
The factory setting is for lines to ring.
■
Use MERLIN LEGEND Centralized Telephone Programming to
set the lines to No Ring.
■
Use this procedure for a MERLIN LEGEND Key System only. Do
not use these instructions for a MERLIN LEGEND hybrid/PBX
System.
Step Instruction
1. Enter programming mode.
MLX-20L
PC
[Menu]
[S][P][M]
[Enter]
[any key]
[F1]
[F5]
[PgUp]
Sys Program
Exit
2. Display next page of menu.
4-18 Call Handling Methods
[More]
MERLIN LEGEND System Programming
3. Select Centralized Telephone
Programming.
Cntr-Prg
[F4]
4. For MERLIN LEGEND Release
2.x, select Program
Extension.
Program Ext
[F1]
5. Enter the extension you want
to program.
[nnn]
Enter
[nnn]
[F10]
6. Select Line/Feature Button.
Press button on
console.
[Shift] or [Alt]
and function
key, then [F10]
7. Set all lines at an extension
to No Ring.
[*][3][4][5]
[*][3][4][5]
8. Return to previous menu.
Exit
For prior releases, skip this
step.
[F5]
Assigning Trunks/Pools to the MERLIN
MAIL—ML Calling Group
Assign the trunks/pools to the MERLIN MAIL—ML Calling Group so that
incoming calls are directed to the MERLIN MAIL—ML system.
■
Be sure that the MERLIN MAIL—ML system parameters are set
before assigning trunks/pools. For details, see Chapter 3,
“MERLIN MAIL—ML System Programming”.
■
Use MERLIN LEGEND Form 6e to identify the lines assigned
to the MERLIN MAIL—ML Calling Group.
Call Handling Methods
4-19
MERLIN LEGEND System Programming
Step Instruction
MLX-20L
PC
1 . Enter programming mode.
[Menu]
2. Select Extensions.
Sys Program
Exit
Extensions
[S][P][M]
[Enter]
[any key]
[F1]
[F5]
[F6]
3. Display next page of menu.
[More]
[PgUp]
4. Select Group Calling.
Grp Calling
[F4]
5. Select Line/Pool Assignment.
Line/Pool
[F10]
6. Enter extension number of
the MERLIN MAIL—ML
Calling Group.
[nnn]
Enter
[nnn]
[F10]
7. Enter trunk/pool numbers.
[nnn]
Enter
[nnn]
[F10]
8. Return to previous menu.
Exit
[F5]
Fax Call Handling
Identify the station jacks that connect to fax machines. Also identify the
extension that will display a message-waiting indication when a fax is
received.
If more than one fax machine extension is specified on MERLIN LEGEND
Form 2a, you must create a Fax Calling Group. This allows the MERLIN
MAIL—ML system to transfer fax calls immediately to an available fax
machine assigned to the Fax Calling Group.
Fax Call Handling can be combined with Immediate Call Handling. Fax Call
Handling can also be combined the MERLIN LEGEND Release 2.0 and later
releases. Fax Call Handling cannot be combined with Delayed Call Handling.
4-20 Call Handling
. . . . . Methods
MERLIN LEGEND System Programming
Administering Fax Ports
Up to four extension’s message-waiting indicators can be programmed to
light when fax calls have been received.
■
Use MERLIN LEGEND Form 2a: System Numbering to determine
the Fax station jack number.
■
Use MERLIN LEGEND Forms Series 4: Multiline Telephones; and
Series 5: DLC/QCC Consoles to determine extension of
message-waiting indication.
■
Use MERLIN LEGEND Form 4f: Tip/Ring Equipment to determine
station jack for fax machine.
Step Instruction
1. Enter programming mode.
MLX-20L
[Menu]
PC
2. Select Auxiliary Equipment.
AuxEquip
[S][P][M]
[Enter]
[any key]
[F1]
[F5]
[F9]
3. Select Fax.
Fax
[F3]
4. Select Extension.
Extension
[F1]
5. Enter station jack number
where fax machine is
connected.
[nn]
Enter
[nn]
[F10]
6. To return to Fax menu.
Exit
[F5]
7. To assign an extension to
receive message-waiting
indication.
Msg Waiting
[F2]
Sys Program
Call Handling Methods
4-21
MERLIN LEGEND System Programming
8.
Identify the fax machine port
number sending the
indication.
[nn]
Enter
[nn]
[F10]
9.
Enter extension number of
phone you want to assign
as the fax message-waiting
receiver.
[nn]
Enter
[nn]
[F10]
Exit
[F5]
Repeat for up to four
extensions.
10. Return to previous menu.
Creating a Fax Calling Group
If there is more than one fax machine, use this procedure to assign fax
machines to a Calling Group.
■
Use MERLIN LEGEND Form 2a: System Numbering to determine
the fax extension.
■
Use MERLIN LEGEND Form 6e: Group Calling to determine
the available Calling Group Numbers.
Step Instruction
MLX-20L
PC
[Menu]
Sys Program
Exit
[S][P][M]
[Enter]
[any key]
[F1]
[F5]
2. Select Extensions.
Extensions
[F6]
3. Display next page of menu.
[More]
4. Select Group Calling
Grp Calling
[PgUp]
[F4]
1 . Enter programming mode.
4-22 Call Handling Methods
MERLIN LEGEND System Programming
5. Select Members.
Members
[F9]
6. Enter extension number of
Group.
[nnn]
Enter
[nnn]
[F10]
7. Enter Group Members
(extension of Fax Machine).
Repeat this step for each “
fax machine.
[nnn]
Enter
[nnn]
[F10]
8. Exit.
Exit
[F5]
9. Display next page of menu.
[More]
[PgUp]
[F1]
10. Select Group Type.
Group Type
11. Enter Extension number of
[nnn]
Enter
12. Select Auto Login.
Auto Login
Enter
[nnn]
[F10]
[F1]
[F10]
13. Return to previous menu.
Exit
[F5]
Calling Group.
Call Handling Methods
4-23
MERLIN LEGEND System Programming
Delayed Call Handling
With Delayed Call Handling, incoming calls ring at the system operator. The
operator provides assistance or transfers the call. When calls are not
answered by the system operator, the MERLIN MAIL—ML system answers the
call. The caller hears the Automated Attendant Service greeting and menu
and gets transferred to the called party. After business hours, the call hears
the Night Greeting and Night Main Menu.
To accomplish Delayed Call Handling, calls ring at the system operator’s
phone and at the Delayed Call Handling extension (phantom station). See
Figure 4-4.
If the system operator does not answer a call, the Delayed Call Handling
extension’s coverage sends the call to the MERLIN MAIL—ML Calling Group.
The Delayed Call Handling extension’s voice mailbox has a Class of Service
15 and plays the Automated Attendant Service greetings and menus. The
caller hears the Automated Attendant Service greetings menus and gets
transferred to the called party.
The Delayed Call Handling extension must bean unused, multiline station port
that has appearances for all lines that appear at the system operator’s
extension. The station port for the Delayed Call Handling extension must be
the principal user of these lines.
4-24 Call Handling Methods
MERLIN LEGEND System Programming
Figure 4-4. Delayed Call Handling
Call Handling Methods
4-25
MERLIN LEGEND System Programming
Assigning the Delayed Call Handling
Extension to a Coverage Group
When setting up the MERLIN MAIL—ML system for Delayed Call Handling,
— an
unused multiline station port covered by the MERLIN MAIL—ML Calling Group
is assigned as the Delayed Call Handling extension.
■
Use MERLIN LEGEND Form 6d to identify the Delayed Call
Handling extension.
MLX-20L
PC
1 . Enter programming mode.
[Menu]
2. Select Extensions.
Sys Program
Exit
Extensions
[S][P][M]
[Enter]
[any key]
[F1]
[F5]
3. Display next page of menu.
[More]
[PgUp]
4. Select Group Coverage.
Group Cover
[F3]
5. Enter the Group Number.
(The group number can be
1-30.)
[nn]
Enter
[nn]
[F10]
6. Enter the Delayed Call
Handling Extension.
[nnn]
Enter
[nnn]
[F10]
7. Return to Extensions Menu.
Exit
[F5]
8. Select Group Calling.
Grp Calling
[F4]
9. Select Group Coverage.
Grp Coverage
[F3]
[nnn]
[F10]
Step Instruction
10. Enter the extension number
of the Calling Group.
4-26 Call Handling Methods
[nnn]
Enter
[F6]
MERLIN LEGEND System Programming
11.
Enter the coverage group
number.
[nn]
Enter
12.
Return to the previous menu.
Exit
[nn]
[F10]
[F5]
Assigning Lines/Line Pools to the Delayed
Call Handling Extension
Lines and line pools that are to be covered by the Delayed Call Handling
extension must be programmed to ring at the extension.
Step Instruction
1. Enter programming mode.
MLX-20L
PC
[Menu]
[S][P][M]
[Enter]
[any key]
[F1]
[F5]
Sys Program
Exit
2. Select Extensions.
Extensions
[F6]
3. Select lines and trunks.
LinesTrunks
[F1]
4. Enter the Delayed Call
Handling extension number.
[nnn]
Enter
[nnn]
[F10]
5. For a single line/trunk, select
entry mode.
Entry Mode
[F6]
6. Enter line/trunk number.
[nnn]
Enter
7. If next number is sequential,
select Next, then repeat
Steps 3-6.
Next
[nnn]
[F10]
[F9]
If next number is not
sequential, repeat Steps
4-6 to add more lines.
Call Handling Methods
4-27
MERLIN LEGEND System Programming
8. Return to the previous menu.
Exit
[F5]
Assigning the Delayed Call Handling
Extension as the Principal User
To make The Delayed Call Handling extension the principal user, enter
programming mode and select “Line Trunks”. Go to the second screen of
the Line and Trunks menu and select “Principal User”. For more detail,
refer to the MERLIN LEGEND System Programming Guide.
Setting Immediate Ring for System Operator
Set the system operator’s extension and the Delayed Call Handling extension
to Immediate Ring so that incoming calls ring at both extensions.
■
Use MERLIN LEGEND Form 2a to determine the system
operator’s extension and the Delayed Call Handling extension
■
Immediate Ring is the MERLIN LEGEND factory setting.
■
Use MERLIN LEGEND Centralized Telephone Programming to
set the extensions for Immediate Ring.
Step Instruction
MLX-20L
PC
[Menu]
Sys Program
Exit
[S][P][M]
[Enter]
[any key]
[F1]
[F5]
2. Display next page of menu.
[More]
[PgUp]
3. Select Centralized Telephone
Programming.
Cntr-Prg
[F4]
1.
Enter programming mode.
4-28 Call Handling Methods
MERLIN LEGEND System Programming
4. For MERLIN LEGEND Release
2.xr, select Program
Extension.
Program Ext
[F1]
5. Enter the extension you want
to program.
[nnn]
[nnn]
[F10]
6. Start centralized telephone
programming.
Start
[F10]
7. Select Line/Feature Button.
Press button on
console
[Shift] or [Alt]
and function
key
then [F10]
8. Select Immediate Ring
Feature for 1 line.
[*][3][7]
[*][3][7]
[*][3][4][7]
[*][3][4][7]
Exit
[F5]
For prior releases, skip this
step.
Select Immediate Ring
Feature for all lines.
9. Return to previous menu.
Setting No Ring for Other Extensions
Set lines covered by the Automated Attendant Service that appear at other
telephones and the MERLIN MAIL—ML ports to No Ring. Calls ring at the
system operator’s extension and the Delayed Call Handling extension.
■
Use MERLIN LEGEND Form 2a to determine which lines are set
to No Ring.
■
Use MERLIN LEGEND Centralized Telephone Programming to
set lines to No Ring.
Call Handling Methods
4-29
MERLIN LEGEND System Programming
Step Instruction
1.
Enter programming mode.
MLX-20L
PC
[Menu]
2. Display next page of menu.
[More]
[S][P][M]
[Enter]
[any key]
[F1]
[F5]
[PgUp]
3. Select Centralized Telephone
Programming.
Cntr-Prg
[F4]
4. Enter the extension you want
to program.
[nnn]
Enter
[nnn]
[F10]
5. Start centralized telephone
programming.
Start
[F10]
6. Select Line/Feature Button.
Press button on
console.
7. Select No Ring Feature.
[*][3][5]
[Shift] or [Alt]
and function
key, then [F10]
[*][3][5]
[*][3][4][5]
[*][3][4][5]
Sys Prog
[F5]
Sys Program
Exit
Select No Ring Feature for
all lines.
8. Return to previous menu.
Night Only Call Handling
If Night Only Call Handling is programmed, the Automated Attendant Service
answers calls only when the MERLIN LEGEND system is in Night Service. For
Night Only Call Handling, make sure the MERLIN MAIL—ML business
schedule is set to “Closed all Day”. For more details, refer to “Setting the
Weekly Business Schedule” in Chapter 3.
4-30 Call Handling Methods
MERLIN LEGEND System Programming
Programming a Night Service
Coverage Receiver
To program Night Only Call Handling, you program the MERLIN MAIL—ML
Calling Group as the Night Service coverage receiver. Night Service calls will
be sent to the MERLIN MAIL—ML system, and Automated Attendant Service
will answer the call.
NOTE:
Use these procedures for MERLIN LEGEND Release 2.0 or later. For
previous releases, see Appendix B.
If you want calls to ring at other extensions for Night Service, assign cover
buttons for the Night Service receiver at those extensions. See the MERLIN
LEGEND System Programming Guide.
■
Use MERLIN LEGEND Form 7a: Group Assignment to determine
the Night Service operator extension and the extension number
for the MERLIN MAIL—ML Calling Group.
Step Instruction
MLX-20L
PC
[Menu]
Sys Program
Exit
[S][P][M]
[Enter]
[any key]
[F1]
[F5]
2. Select Night Service.
NightSrvce
[F10]
3. Select Group Assign.
GroupAssign
[F1]
4. Select Calling Group.
Calling Grp
[F2]
5. Enter the Night Service
operator extension.
[nn]
Enter
[nn]
[F10]
1 . Enter programming mode.
Call Handling Methods
4-31
MERLIN LEGEND System Programming
6. Enter the extension number of
the MERLIN MAIL—ML
Calling Group.
[nnn]
Enter
[nnn]
[F10]
7. Return to previous menu.
Exit
[F5]
Creating the Exclusion List
The Exclusion List contains extensions that are exempt from Night Service
password requirements. Add all MERLIN MAIL—ML ports to the Exclusion List.
■
Use MERLIN LEGEND Form 7b to determine the extensions
on the Exclusion List.
Step Instruction
MLX-20L
PC
[Menu]
Sys Program
[S][P][M]
[Enter]
[any key]
[F1]
2. Select Night Service.
NightSrvce
[F10]
3. Select Exclusion List.
ExcludeList
4. To assign the MERLIN
MAIL—ML system to the
exclusion list, enter the
MERLIN MAIL—ML port
extensions.
[nnn]
Enter
[nnn]
[F10]
5. Return to previous menu.
Exit
[F5]
1.
Enter programming mode.
4-32 Call Handling Methods
[F4]
MERLIN LEGEND System Programming
Setting Up the RMD
Follow these procedures to setup the RMD:
1. (Key mode only) Remove all lines from the RMD. To do this, enter
programming mode, Select “Extensions”, then “Line Trunks”
and follow the prompts. For Hybrid/PBX mode, skip this step.
2. Restrict the RMD from making outside calls. To do this, enter
programming mode, select "Extensions" then “Restriction”
and follow the prompts. For Restriction Type, choose “Outward
Restrict”.
For more details on these procedures, refer to the MERLIN LEGEND System
Programming Guide.
Optional System Features
The following features are available for your convenience, but are not required
for the operation of the MERLIN MAIL—ML system.
Message-Waiting Receiver
It is useful to designate an extension as a message-waiting receiver when
calls are transferred to a Calling Group. The message-indicator lights on the
designated extension whenever a caller leaves a message for the Calling
Group.
■
Use MERLIN LEGEND Form 6e to identify the Message-Waiting
Receiver extension number.
■
Only one telephone can be designated as the Message-Waiting
Receiver.
■
More than one Calling Group can have the same
Message-Waiting Receiver if the Message-Waiting Receiver is a
display set.
Optional System Features
4-33
MERLIN LEGEND System Programming
MLX-20L
PC
1. Enter programming mode.
[Menu]
2. Select Extensions.
Sys Program
Exit
Extensions
[S][P][M]
[Enter]
[any key]
[ F 1 ]
[F5]
[F6]
3. Display next page of menu.
[More]
[PgUp]
4. Select Group Calling.
Grp Calling
[F4]
5. Select Message Waiting
Receiver.
Message
[F4]
6. Enter extension number of
Calling Group.
[nnn]
Enter
[nnn]
[F10]
7. Enter extension number of
telephone you want to
assign as Message Waiting
Receiver.
[nnn]
Enter
[nnn]
[F10]
8. To return to previous menu.
Exit
[F5]
Step Instruction
4-34 Optional System Features
MERLIN LEGEND System Programming
Confirming the Touch-Tone Duration
The Touch-Tone Duration defines the duration of touch-tone signals sent
between the MERLI N LEGEND and MERLIN MAIL—ML systems.
■
Verify the Touch-Tone Interval factory setting of 100 miIliseconds
(ms).
Step Instruction
MLX-20L
PC
1 . Enter programming mode.
[Menu]
2. Select Auxiliary Equipment.
Sys Program
Exit
AuxEquip
[S][P][M]
[Enter]
[any key]
[F1]
[F5]
[F9]
3. Select VMS/AA.
VMS/AA
[F6]
4. Select Touch Tone Duration.
TT Duration
[F2]
5. Verify factory setting of 100
milliseconds.
If the setting is not correct,
erase the current setting.
[Drop]
[Alt] + [P]
To change the setting, type
the number of milliseconds.
[nnn]
Enter
[nnn]
[F10]
6. To return to previous menu,
Exit
[F5]
Optional System Features
4-35
MERLIN LEGEND System Programming
Confirming the Touch-Tone Interval
The Touch-Tone Interval defines the interval between touch-tone signals sent
between the MERLIN LEGEND and MERLIN MAIL—ML systems.
■
Verify that the Touch-Tone Interval stays at the factory setting of
100 milliseconds.
Step Instruction
MLX-20L
PC
1 . Enter programming mode.
[Menu]
2. Select Auxiliary Equipment.
Sys Program
Exit
AuxEquip
[S][P][M]
[Enter]
[any key]
[F1]
[F5]
[F9]
3. Select VMS/AA.
VMS/AA
[F6]
4. Select Touch-Tone Interval.
TT Interval
[F3]
5. Verify factory settingof100
milliseconds.
If the setting is not correct,
erase the current setting.
[Drop]
[Alt] + [P]
To change the setting, type
the number of milliseconds.
[nnn]
Enter
[nnn]
[F10]
Exit
[F5]
6. Return to previous menu.
4-36 Optional System Features
MERLIN LEGEND System Programming
Programming Labels
These instructions show you how to identify your Group Calling and
MAIL—ML ports so that the names appear on your console display.
■
Use MERLIN LEGEND Form 2a: System Numbering—Station
Jacks to identify labels.
Step Instruction
1 . Enter programming mode.
MLX-20L
PC
[Menu]
2. Display next page of menu.
[More]
[S][P][M]
[Enter]
[any key]
[F1]
[F5]
[PgUp]
3. Select Labeling.
Labeling
[F1]
4. Select Group Calling.
Grp Calling
[F4]
5. Enter MERLIN MAIL — ML
Calling Group extension.
[nnn]
Enter
[nnn]
[F10]
6. Enter label name to identify the
Group Calling.
MERMAIL
Enter
MERMAIL
[F10]
7. Return to previous menu.
Exit
[F5]
8. Select Directory.
Directory
[F1]
9. Select Extension.
Extension
[F2]
10. Enter extension number for the
MERLIN MAIL — ML port.
[nnn]
Enter
[nnn]
[F10]
11. Enter MERMAIL for the
MERLIN MAIL — ML port.
MERMAIL
MERMAIL
Sys Program
Exit
Optional System Features
4-37
MERLIN LEGEND System Programming
12. Save your entry.
Repeat Steps 10 to 12 for
each MERLIN MAIL—ML
port.
Enter
13. Return to previous menu.
Exit
4-38 Optional System Features
[F6]
[F7]
5
Post-Implementation
Once you have completed programming the MERLIN LEGEND system
operating features, you may want to program optional features that make the
system easier to use. Then, after all programming is finished, perform the
Acceptance Tests to verify system operation.
Programming Optional Features
The following optional features can be programmed into the MERLIN LEGEND
system to help automate system operation for subscribers:
■
Auto Dial Button—when pressed, directly dials into Voice Mail.
■
Delete Message Button—when pressed, turns off the messagewaiting indicator and deletes the display message “MERMAIL”
that appears after a subscriber presses the Message button in
response to the lighted message-waiting indicator.
■
Return Call Button—when pressed, dials the Voice Mail
extension, enabling a subscriber to retrieve messages when
notified by the “MERMAIL” phone display.
Programming Optional Features 5-1
Post-Implementation
■
Coverage VMS Off—prevents the MERLIN MAIL—ML system
from handling unanswered calls from external callers.
■
Coverage Inside Off—prevents the MERLIN MAIL—ML system
from handling unanswered calls from internal callers.
Programming a MERLIN MAIL—ML
Auto Dial Button
To provide one-touch dialing into Voice Mail, program an Auto Dial button for
all subscribers either at the subscribers’ telephones or through MERLIN
LEGEND Centralized Telephone Programming (shown below).
MLX-20L
PC
[Menu]
Sys Program
Exit
[S][P][M]
[Enter]
[any key]
[F1]
[F5]
2. Display next page of menu.
[More]
[PgUp]
3. Select Centralized Telephone
Cntr-Prg
[F4]
4. For MERLIN LEGEND Release
Program Ext
[F1]
5. Enter the extension you want
to program.
[nnn]
Enter
[nnn]
[F10]
6. Start centralized telephone
programming.
Start
[F10]
Step Instruction
1. Enter programming mode.
For prior releases, skip this
step.
5-2 Programming Optional Features
Post-lmplementation
7. Select Line/Feature Button.
Press button on
console.
[Shift] or [Alt]
and function
key, then [F10]
8. Select Auto Dial Inside
Feature.
[*][2][2]
[*][2][2]
9. Enter the extension for the
MERLIN MAIL—ML Calling
Group.
[nnn]
Enter
[nnn]
[F10]
Sys Program
[F5]
10. Return to previous menu.
Programming a Delete Message Button
When a subscriber with a display phone receives a message from the
MERLIN MAIL—ML system, the message-waiting indicator lights and the label
“MERMAIL” appears on the display after the subscriber presses the Message
button. The Delete Message feature turns off the message-waiting indicator
and deletes the label “MERMAIL” that appears on the display. The Delete
Message feature does not delete voice mail messages.
NOTE:
To program an MLX display set, use the menu on the set.
This feature can be programmed at the subscribers’ ATL display set or
through MERLIN LEGEND Centralized Telephone Programming (shown
below).
Step Instruction
1.
Enter programming mode.
2. Display next page of menu.
MLX-20L
PC
[Menu]
Sys Program
Exit
[S][P][M]
[Enter]
[any key]
[F1]
[F5]
[More]
[PgUp]
Programming Optional Features 5-3
Post-lmplementation
3. Select Centralized Telephone
Programming.
Cntr-Prg
[F4]
4. For SPM Release 2.09 and later,
select Program Extension.
Program Ext
[F1]
5. Enter the extension you want
to program.
[nnn]
Enter
[nnn]
[F10]
6. Start centralized telephone
programming.
Start
[F10]
7. Select Line/Feature Button.
Press button on
console.
[Shift] or [Alt] and
function key,
then [F10]
8. Select Message Delete Feature.
[*][2]6]
[*][2][6]
9. Return to previous menu.
Sys Program
[F5]
For prior releases, skip this
step.
Programming a Message Return Call Button
When a subscriber with a display phone receives a message from the
MERLIN MAIL—ML system, the message-waiting indicator lights and the label
“MERMAIL” appears on the display after the subscriber presses the Message
button.
Program a Message Return Call button to enable a subscriber to quickly
access the MERLIN MAIL—ML system to retrieve messages. When the Return
Message button is pressed, it automatically dials the MERLIN MAIL—ML
system.
This feature can be programmed at the subscribers’ ATL display set or
through MERLIN LEGEND Centralized Telephone Programming.
5-4 Programming Optional Features
Post-lmplementation
NOTE:
To program an MLX display set, use the menu on the set.
MLX-20L
PC
[Menu]
Sys Program
[S][P][M]
[Enter]
[any key]
[F1]
2. Display next page of menu.
[More]
[PgUp]
3. Select Centralized Telephone
Programming.
Cntr-Prg
[F4]
4. For SPM Release 2.09 and later,
select Program Extension.
Program Ext
[F1]
Step Instruction
1. Enter programming mode.
For prior releases, skip this
step.
5. Enter the extension you want
to program.
[nnn]
Enter
[nnn]
[F10]
6. Start centralized telephone
programming.
Start
[F10]
7. Select Line/Feature Button.
Press button on
console.
[Shift] or [Alt]
and function
key, then [F10]
8. Select Message Return Call
Feature.
[*][2][7]
[*][2][7]
9. Return to previous menu.
Sys Program
[F5]
Programming Optional Features 5-5
Post-implementation
Programming a Coverage VMS Off Button
For MERLIN LEGEND Release 2.0 or later, subscribers can program a
Coverage VMS Off button to prevent unanswered external calls from being
handled by the MERLIN MAIL—ML system.
This feature can be programmed at the subscribers’ telephones or through
MERLIN LEGEND Centralized Telephone Programming (shown below).
MLX-20L
PC
[Menu]
Sys Program
Exit
[S][P][M]
[Enter]
[any key]
[F1]
[F5]
2. Display next page of menu.
[More]
[PgUp]
3. Select Centralized Telephone
Programming.
Cntr-Prg
[F4]
4. Select Program Extension.
Program Ext
[F1]
5. Enter the extension you want
to program.
[nnn]
Enter
[nnn]
[F10]
6. Start centralized telephone
programming.
Start
[F10]
7. Select Line/Feature Button.
Press button on
console.
[Shift] or [Alt] and
function key,
then [F10]
8. Select Coverage VMS Off
Feature.
[*][4][6]
[*][4][6]
9. Return to previous menu.
Sys Program
Step Instruction
1 . Enter programming mode.
5-6
Programming Optional Features
[F5]
Post-Implementation
Programming a Coverage Inside Button
A Coverage Inside button prevents or allows coverage of inside calls. With
Coverage Inside Off, only outside calls are covered. With Coverage Inside On,
inside and outside calls are covered.
This feature can be programmed at the subscribers’ telephones or through
MERLIN LEGEND Centralized Telephone Programming (as shown below).
Step Instruction
1 . Enter programming mode.
MLX-20L
PC
[Menu]
[S][P][M]
[Enter]
[any key]
[F1]
[F5]
Sys Program
Exit
2. Display next page of menu.
[More]
[PgUp]
3. Select Centralized Telephone
Programming.
Cntr-Prg
[F4]
4. For SPM Release 2.09 and later,
select Program Extension.
Program Ext
[F1]
5. Enter the extension you want
to program.
[nnn]
Enter
6. Start centralized telephone
programming.
Start
[nnn]
[F10]
[F10]
7. Select Line/Feature Button.
Press button on
console.
[Shift] or [Alt]
and function
key, then [F10]
8. Select Coverage Inside
Feature.
[*][*][4][8]
[*][*][4][8]
For prior releases, skip this
step.
Programming Optional Features 5-7
Post-Implementation
9. Return to previous menu.
Sys Program
[F5]
Performing Acceptance Tests
After you finish programming the MERLIN MAIL—ML system, perform the
following applicable tests to verify proper operation of each service. If you
have any difficulty with any of the acceptance tests, contact your AT&T
representative or authorized dealer.
Automated Attendant Service
If the Automated Attendant Service is set up, perform the following applicable
tests.
Immediate Call Handling
1.
Call in on a line answered by Automated Attendant Service.
2.
Listen for the Automated Attendant Service Greeting. You should hear it
answer after approximately one ring.
3.
Repeat this test for each line answered by Automated Attendant Service.
Delayed Call Handling
1.
Call in on a line assigned to Automated Attendant Service. (Ask the
primary call handler not to answer the call.)
2.
After approximately four rings, listen for the Automated Attendant Service
Greeting.
3.
Repeat this test for each line assigned to the Automated Attendant.
5-8 Performing Acceptance Tests
Post-Implementation
Day Main Menu
1. Call in on a line programmed for Automated Attendant Service.
2. During or after the greeting, respond to the Touch-Tone Gate, if necessary.
3. Choose a Selector Code offered on the Main Menu.
4. Ensure that the transfer to the appropriate extension, playing of a
submenu, or playing of an announcement is performed.
5. Repeat this test for each Selector Code offered on the Main Menu.
Night Main Menu
See “Night Service Programming” later in this chapter.
Unsupervised Transfer without MERLIN
MAIL — ML Coverage
1.
Place an internal call to the MERLIN MAIL—ML system.
2.
Do not answer the call.
3.
When the MERLIN MAIL—ML system answers, press [*][T] (or [*][8] )
and dial a mailbox number that has unsupervised transfer (Class of
Service 1-3 or 8-10).
4.
One of the following responses should occur:
— If the telephone has an alternate telephone covering its calls,
the call should ring at the alternate telephone.
— If the telephone does not have coverage, the call should be
sent to the system operator (or to the designated Transfer
Redirect Extension).
5.
Perform this test for each extension that has Unsupervised Transfer
assigned without MERLIN MAIL—ML coverage.
Performing Acceptance Tests 5-9
Post-lmplementation
Unsupervised Transfer with
MERLIN MAIL—ML Coverage
1. Place an internal call to the MERLIN MAIL—ML system.
2. Do not answer the call.
3. When the MERLIN MAIL—ML system answers, press [*][T] (or [*][8] ) and
dial a mailbox number that has unsupervised transfer (Class of Service .
1-3 or 8-10).
4. One or both of the following responses should occur:
— If the telephone has an alternate telephone covering its calls,
the call should also ring at the alternate telephone.
— If the call is not answered, the call should be directed to the
MERLIN MAIL—ML system.
5. Perform this test for each extension that has Unsupervised Transfer assigned
and MERLIN MAIL—ML coverage.
Fax Call Handling
1. Send a fax in on one of the incoming lines assigned to Automated
Attendant Service.
2. Make sure that the fax is received by the fax machine.
3. If a fax message-waiting indicator has been programmed, check that
it is lit.
5-10 Performing Acceptance Tests
Post-lmplementation
Night Service Programming
Verify with the MERLIN LEGEND system manager that the Night Service you
have programmed operates properly using one of the methods described
below:
■
If Night Service with time set has been administered, the system
will automatically go into Night Service at the scheduled time.
■
If you are using Night buttons to enable Night Service, turn Night
Service on.
■
If you have more than one system operator, press the Night
button on each system operator’s console to enable Night
Service. If all Night buttons are not pressed, the system will play
the Automated Attendant Day Greeting and Day Main menu
instead of the Night Greeting and Night Main menu.
■
If you are using Night buttons and passwords to enable Night
Service, press the Night button on one console and enter the
password to enable Night Service.
NOTE:
If you are using Night Only Call Handling, you may want to make the
Night Greeting and Night Main menu identical to the Day Greeting and
Day Main menu to ensure that the correct Automated Attendant Service
greetings and menus play, even if an operator does not press the Night
button.
To verify the Night Main Menu:
1. Perform the appropriate step for your Night Service:
— Night Service with Time Set: program the current time on
MERLIN LEGEND to two minutes before the time set for night
mode to go into effect, then wait three minutes for the system to
go into Night Service mode.
— Night Service button: press the button on the attendant’s
console.
Performing Acceptance Tests
5-11
Post-Implementation
— Night Service button on more than one attendant: press the
Night Service button at every console.
— Night Service button with password: press the Night Service
button on one console and enter the password.
2.
Place a call on an incoming line answered by the Automated Attendant
Service.
3.
Listen for the Night Greeting followed by the Night Main Menu.
4.
Choose a Selector Code from the Night Main Menu.
5.
Ensure that the transfer to the appropriate extension, playing of a
submenu, or playing of an announcement is performed.
6.
Repeat this test for each Selector Code on the Night Main Menu.
7.
Reset the system time to the current setting.
Checking Call Answer Service
(Extension Coverage)
1.
Call an extension that is a sender in a Coverage Group covered by the
MERLIN MAIL—ML Calling Group.
2.
Do not answer the called extension.
3.
When the Call Answer Service answers, you should hear the subscriber’s
personaI message or the Call Answer Service greeting with the
subscriber’s name or extension number.
4.
(Bilingual Operation Only) Verify that the greeting played is in the appropriate
language.
5.
(Bilingual Operation Only) Press [*][1] and verify that you hear the personal
or default greeting in the secondary system language.
5-12 Performing Acceptance Tests
Post-lmplementation
Checking Call Answer Service
(Line Coverage)
1 . Place an outside call to a line that should receive MERLIN MAIL—ML
Call Answer Service.
— For lines without a principal user, the call should receive the
coverage of the extension with the lowest logical ID in the
Calling Group.
— For lines with a principal user, the call should receive the
coverage of the principal user.’
2 . Do not answer the call.
3 . When the Call Answer Service answers, you should hear the subscriber’s
personal message or the Call Answer Service greeting with the
subscriber’s name or extension number.
4 . (Bilingual Operation Only) Press [*][1] and verify that the Call Answer Service
greeting is played in the appropriate language.
Voice Mail Service
Place an internal call to the Voice Mail Service. You should hear the Voice Mail
Greeting. If the MERLIN MAIL—ML system has been setup for bilingual
operation, you should hear the Voice Mail Greeting in the primary and the
secondary system languages.
Performing Acceptance Tests
5-13
Troubleshooting
PROBLEM:
6
Touch-tones were entered but not detected by the MERLIN
MAIL—ML system.
Possible Cause
The line is too "noisy”.
Corrective Action
The system may not be able to
interpret touch-tones while a prompt
plays because of the noise. Wait until
the prompt finishes before entering
the touch-tones.
If you are using a speakerphone, turn
off the microphone.
PROBLEM:
A call transferred by the system appears on both the intercom
button and a phone’s line button.
Possible Cause
When the system transfers a call to a
phone that has a line appearance for
the line the call is on, the call rings at
the intercom button but also flashes
on the line button.
Corrective Action
Use the intercom button to answer the
call.
Troubleshooting 6-1
Troubleshooting
PROBLEM:
No one is on the line when you first answer a call transferred by
the system.
Possible Cause
If the system is using Supervised
Transfer, it waits for you to answer the
call before it connects the caller to
you. Thus, there is a momentary delay
between the time you pick up the call
and when the caller is actually
connected. Under these
circumstances, the system waits to
hear your voice before connecting the
call.
The system has transfered the call to
a non-subscriber.
PROBLEM:
Corrective Action
When you answer a call, wait a
moment after the two beeps, then
speak again. The caller should be
connected.
Use Unsupervised Transfer together
with group coverage by the MERLIN
MAIL—ML system. Unsupervised
Transfer will connect the call
immediately. If there is no answer,
group coverage will send the call to
the MERLIN MAIL—ML system’s Call
Answer Service.
None. It is normal operation for a short
delay to occur when the system
transfers a call to a non-subscriber.
Part of the greeting gets cut off.
Possible Cause
Corrective Action
You may have begun recording the
greeting too early.
Speak after the beep ends.
A touch-tone was pressed while
recording the greeting.
Re-record the greeting.
6-2 Troubleshooting
Troubleshooting
PROBLEM;
System terminates recording of name, greeting, or message
before user finishes.
Possible Cause
Corrective Action
The recording may exceed the time
limit set for it.
Be sure the recording does not
exceed the time limit, then re-record it.
The speaker’s voice sounded like a
touch-tone digit.
Re-record the message.
PROBLEM:
Message-waiting indicator will not turn on or off.
Possible Cause
Corrective Action
It takes about 30 seconds for the
system to turn the indicator on or off. If
there is heavy call traffic, it may take
slightly longer.
Wait a minute or two.
The message-waiting indicator
remains lighted until all messages are
removed from the voice mailbox,
unless you turn it off.
Remove messages from the voice
mailbox.
The message-waiting indicator may
be indicating that there is a message
in the Trouble Mailbox or the General
Mailbox, or that an operator message
or a fax has arrived.
If you are the system administrator,
check the Trouble Mailbox and delete
all messages. If you are the General
Mailbox owner, check the General
Mailbox and delete all messages. If
you are the fax message receiver,
check to see if a fax has arrived and if
so, turn off your message-waiting
indicator. Also, check with the
operator to see if you have a message.
Troubleshooting 6-3
Troubleshooting
PROBLEM:
*-
Messages cannot be left in a subscriber’s voice mailbox.
Possible Cause
The voice mailbox is full.
Corrective Action
Old messages must be deleted
regularly from voice mailboxes.
NOTE:
When an individual’s voice mailbox is
full, new messages to that subscriber
are deposited in the General Mailbox
along with a recording identifying the
name and extension of the called
party.
Voice mailbox may be too small.
6-4 Troubleshooting
Mailbox sizes range from 5 to 60
minutes. If subscribers frequently hear
the “Mailbox Nearly Full” message,
you may want to change the Class of
Service to increase the storage size of
their voice mailboxes.
Troubleshooting
PROBLEM:
Calls are not being transferred properly.
Possible Cause
The Automated Attendant Service
may not be administered properly.
Corrective Action
Make sure the menu script matches
the programmed Selector Codes.
If the problem involves the system
operator, be sure the proper
extension has been designated for
that person.
On the MERLIN MAIL—ML system,
check the setting for system
operator’s extension.
On the MERLIN LEGEND system,
check the setting for “Unassigned”
under “Options.”
PROBLEM:
Callers hear ringing, but the system does not answer.
Possible Cause
Corrective Action
This is normal when all the the system None.
ports are busy.
The connections of the modular cords
to the MERLIN MAIL—ML system unit
may be loose.
Check the modular cords on the unit
to make sure they are securely
connected. Call the MERLIN
MAIL—ML system port directly to see
if the call is answered. If it is not
answered, the connection may be
broken and you may need to
reconnect or replace the modular
cords.
Troubleshooting 6-5
Troubleshooting
PROBLEM:
The system does not answer immediately.
Possible Cause
Corrective Action
The system may be administered
for Delayed Answer.
Check the settings on the MERLIN
MAIL—ML system.
The Intercom buttons (Key Mode) or
System Access buttons
(Hybrid/PBX mode) on the MERLIN
MAIL—ML ports may have been set
to Delayed Ring or No Ring.
Check the settings via MERLIN
LEGEND system programming.
The connections of the modular cords
to the MERLIN MAIL—ML system unit
may be loose.
Check the modular cords on the unit
to make sure they are securely
connected.
PROBLEM:
Busy signal received when calling into Voice Mail.
Possible Cause
All ports are in use or maintenance is
being performed on the MERLIN
MAIL—ML system unit.
PROBLEM:
Corrective Action
Try again later.
Subscriber unable to log into Voice Mail.
Possible Cause
Corrective Action
Password may be incorrect.
Check to see that the password is correct
Someone else is already logged in to
that mailbox.
Only one person can log into a
mailbox at a time. Change the
mailbox password to prevent
unauthorized use.
6-6 Troubleshooting
MERLIN MAIL—ML
Factory Settings
A
MERLIN MAIL — ML Factory Settings
MERLIN MAIL—ML Parameters
Factory Settings
System Parameters
Port Allocation
All ports AA
No Delayed Answer/Delayed Answer
No Delayed Answer
Number of Rings for No Delayed Answer 1
Number of Rings for Delayed Answer
4
Fax Extension
None
System Operator’s Extension
768
General Mailbox Owner
10
System Administrator’s Mailbox
9997
Maximum Digit Length
2
Language Mode
Monolingual
System Language
English
Schedule
Business Schedule
Closed All Day
Changeable
Yes
Yes
No
No
Yes
Yes
Yes
Yes
Yes
Yes
Yes
Yes
MERLIN MAIL—ML Factory Settings A-1
Appendix A
MERLIN MAIL—ML
MERLIN MAIL—ML Parameters
Automated Attendant Service
Menu Prompts
Announcements
Announcement Numbers
Submenu Numbers
Day Dial 0/Timeout Action
Factory Settings
Factory Settings
Night Dial 0/Timeout Action
Touch-Tone Gate: Monolingual mode
Touch-Tone Gate: Bilingual mode
Mailboxes
Name Recording
Personal Greetings
System Administrator’s Mailbox
Trouble Mailbox
General Mailbox
General Mailbox Owner
Message length
Changeable
2 minutes maximum
2 minutes maximum
1-99
1-99
Transfer to
System Operator
Transfer to General
Mailbox
On
On
No
No
No
No
Yes
4 seconds maximum
2 minutes maximum
9997
COS 7
No
No
Yes
Yes
9998
COS 7
9999
COS 16
Extension 10
1 second-2 minutes
maximum for COS
1-14
No
Yes
No
Yes
Yes
No
Yes
Yes*
No
1 second-15 minutes
for COS 16 only
Group Lists
Group List IDs
1-99
No
—
* If a fax extension is administered, the Touch-Tone Gate cannot be changed.
A-2 MERLIN MAIL—ML Factory Settings
Appendix A
MERLIN MAIL—ML Factory Settings
Changeable
Factory Settings
MERLIN MAIL—ML Parameters
System Greetings
No
2 minutes maximum
Voice Mail Greeting
10 seconds maximum No
Automated Attendant Service Greetings
MERLIN MAIL—ML Factory Settings
A-3
MERLIN LEGEND
Release 1.x Installation
Supplement
B
If you are installing the MERLIN MAIL—ML system for a MERLIN LEGEND
Communications System release prior to 2.0 (Releases 1.0, 1.1, or 1.2,
collectively referred to as “Release 1.x”), additional installation instructions are
provided in this appendix for setting up Night Only Call Handling.
Programming Night Only Call
Handling
To program Night Only Call Handling, you must first assign an unused,
multiline station port as the Night Only Call Handling extension (Night Service
Receiver) to receive incoming calls. Place the Night Service Receiver in a
Coverage Group and program the MERLIN MAIL—ML Calling Group as the
coverage receiver. Night Service calls will be sent to the MERLIN MAIL—ML
system by the coverage of the Night Service Receiver. The Night Service
Receiver’s voice mailbox is assigned Class of Service 15 and provides
Automated Attendant Service. Callers hear the Automated Attendant Service’s
Night greeting and menu.
Figure B-1 shows how Night Only Call Handling is done for MERLIN LEGEND
Release 1.x.
Programming Night Only Call Handling B-1
Appendix B
Figure B-1. Night Only Call Handling for MERLIN LEGEND Release 1.x
Programming a Night Service Receiver
Assign an unused multiline station port as the Night Service Receiver and set
all lines to No Ring. This should be the only Night Service Receiver.
If you want calls to ring at other extensions for Night Service, assign cover
buttons for the Night Service Receiver at those extensions. See the MERLIN
LEGEND System Programming Guide.
■
R e f e r to MERLIN LEGEND Form 2a: System Numbering and
MERLIN LEGEND Form 7a: Group Assignment to identify the
Night Only Call Handling extension.
NOTE:
The Night Service Receiver must not be a Direct-Line
Console (DLC).
B-2
Programming Night Only Call Handling
Appendix B
MLX-20L
PC
1. Enter programming mode.
[Menu]
2. Select Night Service.
Sys Program
Exit
NightSrvce
[S][P][M]
[Enter]
[any key]
[F1]
[F5]
[F10]
3. Select Group Assign.
GroupAssign
[F1]
4. Select Extensions.
Extensions
[F2]
5. Enter the Night Only Call
Handling extension.
[nn]
Enter
[nn]
[F10]
6. Return to System Programming
menu.
Exit
Exit
[F5]
[F5]
7. Display next page of menu.
[More]
[PgUp]
8. Select Centralized Telephone
Programming.
Cntr-Prg
Step Instruction
[F4]
9. Start Centralized Programming. Start
[F10]
10. Enter the Night Service Call
Handling extension.
[nnn]
Enter
[nnn]
[F10]
11.
Press button on
console.
12. Set all lines at the extension to
No Ring.
[*][3][4][5]
[Shift] or [Alt]
and function
key, then [F10]
[*][3][4][5]
13. Return to previous menu.
Exit
[F5]
Enter the Line/Feature Button.
Programming Night Only Call Handling B-3
Appendix B
Creating Night Service Group Coverage
Program a coverage group for the Night Only Call Handling extension, then
select the MERLIN MAIL—ML Calling Group as the Group Coverage receiver.
■
Refer to MERLIN LEGEND Form 2a: System Numbering to identify
the MERLIN MAIL—ML Calling Group number.
MLX-20L
PC
[Menu]
Sys Program
Exit
[S][P][M]
[Enter]
[any key]
[F1]
[F5]
2. Select Extensions.
Extensions
[F6]
3. Display next page of menu.
[More]
[PgUp]
4. Select Group Coverage.
Group Cover
[F3]
5. Enter the Group Number.
(The group number can be
1-30.)
[nn]
Enter
[nnn]
[F10]
6. Enter the Night Only Call
Handling extension.
[nnn]
Enter
[nnn]
[F10]
7. Return to Extensions Menu.
Exit
[F5]
8. Select Group Calling.
Grp Calling
[F4]
9. Select Group Coverage.
Grp Coverage
[F3]
[nnn]
Enter
[nnn]
[F10]
Step Instruction
1.
Enter programming mode.
10. Enter the extension number of
the MERLIN MAIL—ML
Calling Group.
B-4
Programming Night Only Call Handling
Appendix B
11.
Enter the coverage group
number of the Night Service
Call Handling Extension.
12. Return to previous menu.
[nn]
Enter
Exit
[nn]
[FIO]
[F5]
Making the Night Only Call Handling
Extension the Principal User
To make the Night Only Call Handling extension the principal user, enter
programming mode and select “LineTrunks.” Go to the second screen off
the Lines and Trunk menu and select “Principal User.” For more details,
refer to the MERLIN LEGEND System Documentation.
Programming the MERLIN
MAIL—ML Night Only
Coverage Mailbox
If you are installing the MERLIN MAIL—ML system with MERLIN LEGEND
Communications System Release 1.0, 1.1, or 1.2i, and you are using Night
Only Call Handling, you must program an unused multiline station port to
receive calls not answered by the system operator.
The Night Only Call Handling Group Coverage extension must have a Class of
Service 15 so that coverage calls for this mailbox receive Automated
Attendant Service. Create a mailbox for the extension and program it for Class
of Service 15.
■
MERLIN MAIL—ML Form B: Voice Mailbox Assignments identifies
the Night Only Call Handling Group Coverage extension.
■
Set the MERLIN MAIL—ML Class of Service for the mailbox to 15.
Programming the MERLIN MAIL—ML Night Only Coverage Mailbox B-5
Appendix B
To program the Night Only Call Handling mailbox, follow the instructions
below:
1. Log into the MERLIN MAIL — ML system as the system administrator.
The system administrator’s name play; then the Voice Mail Activity Menu
plays.
2. [9] to program the system.
The System Administration Menu plays.
3. [4] for Mailbox programming.
The Mailbox Administration Menu plays.
4. [4] to create a new mailbox.
The system prompts you to enter the mailbox number.
5. Enter the extension number of the unassigned multiline telephone to be
used for Night Only Call Handling, followed by [#] ).
The system prompts you to enter the Class of Service (COS).
6. Enter [1][5] followed by [#] as the Class of Service assigned to this
mailbox.
— If the MERLIN MAIL—ML system is set for monolingual
operation, you are prompted to enter the mailbox name. Skip to
Step 9.
— If the MERLIN MAIL—ML system is set for bilingual operation,
the system prompts you to select the mailbox administration
language preference. Go to Step 7.
7. Enter [1] to select the primary system language as the Night
Only Call Handling mailbox language.
The system plays the language selected, followed by a prompt to approve
the selection.
8. Choose one:
— [*][#] to approve the language selected. Go to Step 9.
B-6 Programming the MERLIN MAIL—ML Night Only Coverage Mailbox
Appendix B
— [1] to cancel the language selected. Go back to Step 7.
9. Substituting number codes for letters, as shown in the Letter Key that
follows, use the dialpad to enter the mailbox name (up to four letters)
followed by [#] . To enter the mailbox name “NIGH,” enter
[6][2][4][3][4][1][4][2][#]
The system echoes the mailbox name letters, followed by a prompt to
confirm them.
A
B
C
D
E
F
G
H
I
J
K
L
M
N
=
=
=
=
=
=
=
=
=
=
=
=
=
=
21
22
23
31
32
33
41
42
43
51
52
53
61
62
Letter Key
Ñ
O
P
Q
R
S
T
U
V
W
X
Y
Z
=
=
=
=
=
=
=
=
=
=
=
=
=
64
63
71
74
72
73
81
82
83
91
92
93
94
NOTE:
The letter Ñ can be entered if the system administrator’s mailbox
language is Spanish. The letters Q and Z may not appear on your
telephone dialpad and are assigned the values 74 and 94, respectively.
Use the values in the Letter Key to enter Mailbox Names regardless of
letter positions on your telephones’ dialpad numbers.
Programming the MERLIN MAIL—ML Night Only Coverage Mailbox B-7
Appendix B
10. Enter one of the following options:
— [9] for “Yes” to confirm the name.
The mailbox name is saved and the system prompts you to record the
subscriber’s name at the tone.
— [6] for “No” to cancel the mailbox name. Go back to Step 9.
11.
Record the mailbox name and press [1]
The system plays back the mailbox name, then prompts you to confirm it.
RECOMMENDATION:
For better clarity, it is recommended that you use the handset when
recording the subscriber’s name.
12. Enter one of the following options or go to Step 13:
— [2][1] to re-record the name.
— [2][3] to play back the name recording.
— [*][D] (or [*][3] ) to delete the name recording.
13. [*][#] to approve the mailbox name recording.
The system prompts you to enter a mailbox number.
14. Choose one:
— Repeat Steps 5 through 13 to add another voice mailbox.
— [*][#] to return to the Mailbox Administration Menu.
B-8 Programming the MERLIN MAIL—ML Night Only Coverage Mailbox
Glossary
A
.
Announcement
An informative message that provides frequently requested information. It is
pre-recorded by the system administrator and plays to callers who select it from the
Automated Attendant Service Main Menu or a submenu.
Automated Attendant
See Automated Attendant Service.
Automated Attendant Service
The system component that automatically answers and directs incoming calls to the
desired extensions or plays an announcement selected by the caller.
B
Bilingual Mode
MERLIN MAIL—ML system operation that allows callers and subscribers to select one
of two languages in which system prompts, menus, and announcements are played.
Bilingual language combinations are English/French, French/English, English/Spanish,
and Spanish/English. See also Primary System Language and Seconday System
Language.
Broadcast
A feature that lets the system administrator send a message to all Voice Mail
subscribers at the same time without having to address it to each extension.
Business Schedule
The days and hours that a business is open or closed. This programmable option can
be used to determine when the Automated Attendant Service Day or Night greetings
and menus play.
C
Call Answer Service
The system feature that allows callers to leave a message or to transfer to another
extension when their calls are not answered by the called party.
GL-1
Glossary
Calling Group
A group of extensions that perform a similar function. A Calling Group can be
administered to provide Group Coverage for one or more Coverage Groups. See also
Group Calling, Coverage, and Coverage Group.
Class of Service (COS)
This parameter defines the characteristics of a voice mailbox. Identifies the total
mailbox storage space (0, 5, 10, or 60 minutes), maximum message length (2 or 15
minutes), the type of transfer (Unsupervised, Supervised, or No Transfer), and the
Outcalling permission (permitted or not permitted).
CNG
In the data communications environment, a fax calling tone that indicates that a fax
machine is ready to transmit.
COS
See Class of Service.
Coverage
This feature designates an alternate answering position when the extension called is
busy or does not answer. It is programmed by the MERLIN LEGEND system manager.
Coverage Group
A group of extensions that is programmed to be covered by the same Group Coverage
receiver(s). Individual extensions or a Calling Group (such as the MERLIN MAIL—ML
Calling Group) can be a Group Coverage receiver.
D
Day Greeting
The Automated Attendant Service Greeting that plays during the hours that a company
is open for business. See also Night Greeting.
Delayed Answer
The MERLIN MAIL—ML feature that allows MERLIN MAIL—ML ports to answer a call
after a delay of four rings. See also Immediate Answer.
Dial Plan
The extension assignments for all equipment (voice or data) connected to the
communications system. Also called Numbering Plan.
GL-2
GIossary
Dial 0/Timeout Action
Automated Attendant Service feature in both monolingual and bilingual mode that
determines how a call is processed when a caller dials O (zero) or when a caller does
not make a selection from the main menu. Calls can be transferred to the system
operator, connected to the General Mailbox, or can be disconnected. This option is
programmed separately for day and night operation by the system administrator.
In monolingual mode with the Touch-Tone Gate “On,” this feature determines how a
call is processed if the caller does not respond to the Touch-Tone Gate within 4
seconds after the Automated Attendant Greeting finishes playing (8 seconds if Fax Call
Handling is used). In Call Answer Service, this option determines what happens when
a caller presses 0 (zero). See also Touch-Tone Gate.
E
Exclusion List
When the MERLIN LEGEND Night Service with Outward Restriction feature is used, the
subscribers who can make external calls without entering a password when Night
Service is activated. Subscribers who are not on this list must enter a password to
make external calls when Night Service is activated.
Extension
Number that identifies a phone or other voice or data equipment connected to the
system. Extension numbers can be 1-to-4 digits.
F
Factory Settings
The settings that are in effect when the MERLIN LEGEND Communications System or
the MERLIN MAIL Voice Messaging System—Multi-Lingual Version is shipped.
Sometimes these settings are referred to as “default settings.”
Fax Message-Waiting Receiver
The extension designated to receive message-waiting indications for calls directed to
the fax extension or Fax Calling Group. See also Message-Waiting Receiver.
Fax Tones
See CNG.
GL-3
Glossary
G
General Mailbox
A voice mailbox (mailbox 9999) where callers can leave messages when a
subscriber’s mailbox is full, if they are dialing from a rotary phone, or do not know the
extension of the person they would like to contact. See also General Mailbox Owner.
General Mailbox Owner
The individual responsible for transferring messages from the General Mailbox to the
appropriate person. The message-waiting indicator on the General Mailbox owner’s
phone lights whenever a message is placed in the General Mailbox.
Greeting
Initial message that plays to callers. See also Day Greeting, Night Greeting, Personal
Greeting, Temporary Closure Greeting, and Voice Mail Greeting.
Group Calling
A feature that directs calls to a group of people assigned to handle the same type of
call. A single extension number is assigned to the group and is used by internal and
external callers to reach the group. See also Calling Group
Group Coverage
Extensions that are grouped together so that they get coverage by the designated
group coverage receiver(s). The MERLIN MAIL—ML Calling Group can be designated
as a coverage receiver for one or more coverage groups.
Group Coverage Delay Interval
The number of times a call will ring at an extension without personal coverage but
covered by a Calling Group before the call is sent to an assigned Calling Group (group
coverage receiver). If any personal coverage (primary or secondary) is available, the
Delay Ring Interval parameter value is added to this ring delay parameter value for a
total ring delay value.
Group List
A list of subscribers programmed into the MERLIN MAIL—ML system and assigned a
number (1-99) so that subscribers can record a single message and send it to
everyone on the list at the same time simply by using the Group List number. The
system administrator maintains Group Lists.
GL-4
GIossary
Guest Mailbox
A voice mailbox assigned to visitors, guests, or employees who need to receive
messages but do not have a phone assigned to them. Callers using any of the MERLIN
MAIL—ML services can leave messages in a guest mailbox, however the system
operator cannot transfer calls to a guest mailbox. If you want the system operator to
transfer calls to a guest mailbox, setup a phantom station for the subscriber. See also
No Transfer.
H
Hunt Pattern
The search pattern used by the Group Calling feature to find the next available
extension for answering a call. The MERLIN MAIL—ML Calling Group should be
administered for a linear hunt pattern. If this search pattern is specified, the first
member is selected. If the first port is not available, the next port is selected. The
search continues in a linear manner until an available port is found.
I
Immediate Answer
The MERLIN MAIL—ML feature that allows MERLIN MAIL—ML ports to answer a call
after one ring. Immediate Answer (No Delayed Answer) is the factory setting. Contrast
with Delayed Answer.
K
Key System
A telephone system for telephones that use intercom buttons for placing and receiving
internal calls and where each line appears on its own button.
M
Mailbox
See Voice Mailbox.
GL-5
Glossary
Main Menu
A list of options presented to the caller from which the caller selects an option by
entering the corresponding Selector Code. Based on predefine associations between
menu options and Selector Codes, Automated Attendant Service routes the call to a
specific extension, submenu, or an announcement. The system administrator can
program Day and Night Main Menus for Automated Attendant Service that play when
your business is open or closed. See also Selector Code.
Main Menu Script
The list of options that plays after the Day or Night Greeting. It describes to callers what
is available on the Main Menu and can provide a list of Selector Codes that callers can
enter to get to the extension, submenu, or announcement they want.
Message-Waiting Receiver
An extension designated to receive message-waiting indications for calls directed to a
Calling Group. See also Fax Message-Waiting Receiver.
Monolingual Mode
MERLIN MAIL—ML system operation in which a single language is used for system
prompts, menus, and announcements. The available languages are English, French,
and Spanish. Contrast with Bilingual Mode.
N
Night Greeting
The Automated Attendant Service greeting that plays during the hours that a company
is closed.
Night Service
MERLIN LEGEND feature that causes calls to ring at specially assigned stations in
addition to where calls would normally ring.
No Transfer
A MERLIN MAIL—ML transfer type that is normally used for the mailboxes of visitors,
guests, or employees who need to receive messages but do not have a phone
assigned to them. Messages can be left in voice mailboxes assigned this transfer type
by: selecting an Automated Attendant Service menu option that transfers to the voice
mailbox, pressing [*][T] (or [*][8] ) and entering the mailbox number from any MERLIN
MAIL—ML service, or by addressing a message to the voice mailbox from within Voice
Mail Service. See also Supervised Transfer, Unsupervised Transfer, and Guest Mailbox.
GL-6
GIossary
Numbering Plan
See Dial Plan.
O
Outcalling
A MERLIN MAIL—ML system feature that calls an outside or inside number, or
pager/beeper, to inform a subscriber when a new message has arrived in his or her
mailbox. Subscribers administer their own Outcalling number and can turn Outcalling
On or Off as required. This feature is only available if a subscriber’s voice mailbox has
a Class of Service that permits its use. A subscriber can specify a telephone number or
beeper/pager number for Outcalling.
Overflow Coverage
The method of designating a secondary Group Calling or the Queued Call Console
(hybrid/PBX only) to receive calls when the number of calls waiting in the queue for the
primary Calling Group is equal to or greater than the programmed Overflow Coverage
Threshold. See also Overflow Coverage Threshold.
Overflow Coverage Threshold
The programmable number of calls that can wait in the queue for a Calling Group
before calls are sent to another Calling Group by the Overflow Coverage feature. See
also Overflow Coverage.
P
Personal Greeting
A greeting recorded by a subscriber that callers hear when they are transferred to a
subscriber’s mailbox.
Port Allocation
The process of assigning MERLIN MAIL—ML services to each port.
Primary System Language
In bilingual mode, the default language used for playing system prompts, menus, and
announcements to callers. Contrast with Secondary System Language.
GL-7
Glossary
R
Return Time Interval
See Transfer Return Interval.
RMD
Remote Maintenance Device. A device used by AT&T or an authorized dealer to call
the system and perform maintenance and diagnostic services on the MERLIN
MAIL—ML unit from a remote location.
S
Secondary System Language
In bilingual mode, the alternate language that callers can choose to play system
prompts, menus, and announcements. Contrast with Primary System Language.
Selector Code
A one-digit number (1–9) representing a menu option that callers select from a Main
Menu or from a submenu to transfer them to an extension, play a submenu, or play an
announcement. Selector codes can also be reserved for direct dialing of individual
extension numbers. See also Selector Code Action.
Selector Code Action
The type of action taken when a caller enters a Selector Code. The possible actions
are: transfer calls to a predetermined extension, play a submenu, play an
announcement, prompt to transfer to an extension, or direct (unprompted) transfer to
an extension using a selector code as the first digit of the extension. See also Selector
Code.
Submenu
A lower-level menu selected from a Main Menu or from another submenu that presents
additional options that a caller can select by entering the corresponding Selector
Code. Based on predefine associations between Selector Codes and Selector Code
Actions, Automated Attendant Service routes the call to an extension, submenu, or an
announcement.
Submenu Script
The list of options that play after callers select a submenu from a Main Menu or from
another submenu. The script offers the list of options available on the submenu and
gives the Selector Codes for callers to dial to reach the extension, submenu, or
announcement they want.
GL-8
GIossary
Subscriber
A person whose extension is registered with the MERLIN MAIL—ML system. Every
subscriber has a voice mailbox. The voice mailbox number is usually the same as the
subscriber’s extension number.
Supervised Transfer
The transfer type in which the MERLIN MAIL—ML system monitors a call to see if it is
answered. The MERLIN MAIL—ML system returns to the caller if it detects a busy
signal or the call remains unanswered after four rings. In such cases, callers are given
two options: leave a message or choose another extension. Supervised Transfer
should be used only when a phone does not have coverage assigned to it. See also
Unsupervised Transfer and No Transfer.
System Administrator
The person who updates and changes the MERLIN MAIL—ML system to meet the
company’s requirements. The system administrator is a registered Voice Mail
subscriber and is also responsible for the Trouble Mailbox.
System Operator
The person to whom calls are transferred when: the Dial 0/Timeout Action is set to
“Transfer to System Operator” and callers press [0] ; or callers do not make a selection
from the Automated Attendant Service Main Menu; or callers do not respond to the
Touch-Tone Gate (monolingual mode only).
System Parameters
Programmable settings that allow the MERLIN LEGEND Communications System and
the MERLIN MAIL—ML system to be customized according to business needs. Prior to
installation, each system is programmed with factory-set system parameters.
System Language
In monolingual mode, the language in which the prompts, announcements, and
submenus are played. See also Primary System Language and Secondary System
Language.
T
Temporary Closure Greeting
A special greeting that can be recorded to play to callers when a company closes for a
holiday or unexpectedly because of inclement weather, emergency, or other reasons.
GL-9
Glossary
Touch-Tone Duration
The length (specified in milliseconds) of the touch-tone codes sent between a
communications system and a voice messaging system.
Touch-Tone Gate
In monolingual mode, a programmable feature that determines quickly whether a caller
is dialing from a rotary phone. In monolingual mode, when the Touch-Tone Gate is set
to “On,” callers must dial a digit before the Main Menu plays. If a digit is dialed,
MERLIN MAIL—ML plays the Main Menu. If a digit is not dialed, the call is handled as
specified by the Dial 0/Timeout Action. If the Touch-Tone Gate is set to “Of f,” callers
who are calling from a rotary phone must listen to the entire Main Menu before their
calls are transferred to the Dial 0/Timeout Action specified.
In bilingual operation, the Touch-Tone Gate is automatically set to “On” and is used to
allow callers to select the alternate language by dialing [*][1]
Touch-Tone Interval
The interval (specified in milliseconds) between touch-tone codes sent between a
communications system and a voice messaging system.
Transfer Redirect Extension
The extension number to which calls are redirected if the calls have been transferred
to busy and unavailable extensions that do not have coverage. The default extension is
the first operator’s extension. This extension can also be a Queued Call Console
(QCC), another extension, or the extension of the MERLIN MAIL—ML Calling Group.
The Transfer Redirect extension is programmed by the MERLIN LEGEND System
Manager.
Transfer Return Interval
The number of times a transferred call will ring at the transfer destination before it
returns to the transfer originator. See also VMS Transfer Return Interval.
Transfer Type
Type of transfer that is administered for a subscriber’s voice mailbox. A voice mailbox
can be administered for Supervised Transfer, Unsupervised Transfer, or No Transfer.
Trouble Mailbox
Storage space reserved for subscribers to report any problems they may experience
with the MERLIN MAIL—ML system so that the system administrator can correct them.
To report a problem, a subscriber logs in to Voice Mail, records a message, and
addresses it to 9998. Whenever a message is left in the Trouble Mailbox, the system
administrator’s message-waiting indicator lights.
GL-10
GIossary
U
Unsupervised Transfer
The transfer type in which the MERLIN MAIL—ML system transfers a call without
waiting to see if the extension requested is busy or is not answered. This reduces the
time the MERLIN MAIL—ML system port is tied upon a call and is the recommended
type of transfer. See also Supervised Transfer and No Transfer.
V
VMS Transfer Return Interval
The number of times a call transferred by the MERLIN MAIL—ML system to extensions
without coverage will ring before the call is redirected to the Transfer Redirect
Extension. See also Transfer Redirect Extension.
Voice Mail Greeting
The greeting that plays to subscribers who call Voice Mail for messages.
Voice Mail Service
Allows subscribers to send messages to other subscribers, retrieve their own
messages, record their own greetings, and create their own passwords.
Voice Mailbox
,
Storage space assigned to MERLIN MAIL—ML subscribers where messages can be
left for the subscriber. Voice mailboxes are identified by voice mailbox numbers, which
are the usually the same as the subscriber’s extension number. The General Mailbox
and the Trouble Mailbox have their own mailbox numbers.
GL-11
Index
(pound button), defined, viii
(star button), defined, viii
A
Acceptance Tests, performing, 5-8
Addressing Voice Mail, methods of, 1-17
Announcement
creating, 3-60
programming requirements, 3-60
Auto Dial button
defined, 5-1
programming, 5-2
Automated Attendant Service
description, 1-1, 1-5
programming greetings, 3-48
programming menus, 3-67
sample scripts, 1-6
scheduling, 1-14
B
Basic Telephone Module (012), 1-21, 2-2,
2-3
Beeper, 1-19
Bilingual mode
definition, 1-4
programming, 3-17
Broadcast Message
description, 1-18
limitation to System Administrator, 1-23
Business Schedule
description, 1-14, 1-16, 3-36
Button
Auto Dial, 5-1
Coverage inside Off, 5-2
Coverage VMS Off, 5-2
Delete Message, 5-1
Night, 5-1
Return Call, 5-1
C
Call Answer Service
description, 1-1, 1-20
Guest Mailbox feature, 1-21
performing acceptance test, 5-12 - 5-13
programming, 4-7
Call Handling Methods
Delayed, 1-12
Fax, 1-13
Immediate, 1-11
Iist of, 1-10
Night Only, 1-13
programming, 4-12
Calling Group
programming for fax, 3-15, 4-22
programming for MERLIN MAIL—ML
Calling Group, 3-9
Class of Service
defined, 3-19
key, 3-22
Closed mode of operation, 3-38
COS
See Class of Service
IN-1
Index
Coverage Inside button
defined, 5-1
programming, 5-7
Coverage VMS Off button
defined, 5-1
programming, 5-6
Coverage Service, 3-23
D
Date and Time, setting, 3-36
Day Greeting, 3-48
played, 3-47
recording, 3-49
Day Main Menu
performing acceptance test, 5-8
programming, 3-67
Day Mode, 3-38
Delayed Answer, programming, 3-13
Delayed Call Handling
description, 1-12
Group Coverage mailbox, 3-26
programming, 4-24
Delayed Ring, setting, 4-16
Delete Message button
description, 5-1
programming, 5-3
Dial 0/Timeout Action
time limit in bilingual mode, 3-47
time limit in monolingual mode, 3-45
DIP switch settings
Remote Maintenance Device, 2-13
voice-processing card, 2-16
Direct extension dialing, 3-58
Directory of subscribers
accessing, 1-18
description, 1-5
mailbox name ordering, 3-24
IN-2
E
English language, 1-4
Environmental requirements, 2-5
Exclusion List, creating, 4-32
Extension
assigning General Mailbox owner, 3-33
changing system operator, 3-32
programming for fax, 3-15
programming maximum digits, 3-16
programming Night Only Call
Handling, B-5
See also Voice mailbox
F
Factory settings, list of, A-1
Fax Call Handling
description, 1-13
performing acceptance test, 5-10
programming, 4-20
Fax Calling Group, creating, 4-20
Fax Extension
programming, 3-15
routing calls to automatically, 1-5
French language, 1-4
G
General Mailbox
Class of Service, 3-22
message-waiting indicator, 6-3
messages, 1-25
Index
General Mailbox owner
assigning, 3-33
messages for, 6-3
responsibility, 1-25
Greeting
Day, 3-48
Night, 3-48
troubleshooting cut-off, 6-2
Voice Mail, 3-51
Greeting Administration Menus, 3-48
Group Coverage
Delayed Call Handling mailbox, 3-26
programming, 4-8
Night Only Call Handling mailbox, B-5
Night Service, B-4
Group Coverage Delay Interval,
programming, 4-9
Group List
description, 1-19, 3-72
creating, 3-73
maximum number of extensions, 3-73
Guest Mailbox
description, 1-21
Class of Service, 3-22
H
Handset, using to record messages, 1-26
Hardware requirements
MERLIN LEGEND, 2-2
MERLIN MAIL—ML, 2-2
Hunt Type, 4-3
I
Immediate Call Handling
description, 1-11
programming, 4-14
Immediate Ring
setting for system operator, 4-28
Installation
connecting the MERLIN MAIL—ML
unit, 2-10
connecting the Remote Maintenance
Device, 2-13
mounting the MERLIN MAIL—ML unit,
2-7
L
Labels, programming, 4-37
Language
programming, 3-17
selected by caller, 3-47
selecting mailbox prompt, 3-23
Language, available combinations, 1-4
Letter Key, 3-24, B-7
Line noises, troubleshooting, 6-1
Linear Hunt Type, programming, 4-3
Logging in, 3-8
M
Mailbox
name, 3-23, B-7
See also Voice Mailbox
Mailbox Administration Menus, 3-20
Mailbox, Trouble, 1-24
IN-3
Index
Menu options, recommended maximum
number 1-10
Menus
Automated Attendant Service, 3-54
Day Main, 3-67
Greeting Administration, 3-48
Mailbox Administration, 3-20
Night Main, 3-67
Schedule Administration, 3-35
System Parameters, 3-11
MERLIN LEGEND Planning Forms, 4-2
required for call handling, 4-14
MERLIN LEGEND System
Day and Night modes, 1-14
hardware requirements, 2-2
MERLIN MAIL—ML System use with,
1-1
programming, 4-1 — 4-38
supplemental installation steps for
Release 1.x, B-1
MERLIN LEGEND System Programming
and Maintenance software, 3-6
MERLIN MAIL—ML Calling Group, 3-9,
4-3, 6-3
MERLIN MAIL—ML installation
connecting the Remote Maintenance
Device, 2-13
connecting the unit, 2-10
mounting the unit, 2-7
phases, 2-6
MERLIN MAIL—ML Planning Forms
description, 1-26
list of, 3-3
MERLIN MAIL—ML System Programming
Menus, 3-2
Message
date and time stamp, 3-35
recording, 1-26
sending, 1-17
IN-4
Message-waiting, programming a
receiver, 4-31
Message-waiting indicator
fax call waiting, 4-20
troubleshooting delay in activation, 6-3
Microphone, when not to use, 1-26
MLX-20L programming console, 3-5
Mode
open or closed, 3-38
See Monolingual and Bilingual
Monolingual operation
See Monolingual mode
Monolingual mode
definition, 1-4
programming, 3-17
Multilevel menus
description, 1-10
recommended maximum levels, 1-10
N
Name
recording subscriber, 3-25, B-8
voice mailbox, 3-23, B-7
Night Button, 5-11
Night Greeting
recording, 3-48
when played, 3-48
Night Main Menu, 3-54
performing acceptance test, 5-11
programming, 3-67
Night mode, 3-38
Night Only Call Handling
creating Group Coverage, B-4
description, 1-15
programming Group Coverage
mailbox, B-5
programming with Release 1.x, B-1
Index
programming with Release 2.x, 4-30
verifying programming, 5-11
Night Service Receiver, programming, B-2
No Ring for Other Extensions, setting,
1-18, 4-29
No Transfer, specified by Class of
service, 3-22
O
Open mode of operation, 3-38
Opening time, 3-40
Otional Station Features, programming,
5-1 – 5-8
Otional System Features, programming,
4-33 – 4-38
Outcalling
description, 1-19
permission specified by Class of
Service, 3-22
Overflow calls, 1-11
Overflow Coverage, programming, 4-17
P
Pager, 1-16, 1-19
Parts checklist, 2-2
Personal Greeting, 1-16
Phone, rotary, 1-15
arming Forms
MERLIN LEGEND, 4-2
MERLIN MAIL—ML, 1-26, 3-3
required for call handling, 4-14
Port Allocation, programming, 3-12
Pound button (#), defined, viii
Primary system language
description, 1-4
See also Bilingual mode
Principal User
Delayed Call Handling extension, 4-24,
4-28
Night Only Call Handling extension, B-5
testing line coverage, 5-13
Processor Module, 2-2
Programming
announcements, 3-60
Automated Attendant Service Menus,
3-54
changing System Operator extension,
3-30
Date and Time, 3-36
Delayed Answer, 3-13
Delayed Call Handling mailbox, 3-26
General Mailbox owner, 3-33
language selection, 3-17
Main Menu Selector Codes, 3-69
Main Menus, 3-67
MERLIN MAIL—ML System
Parameters, 3-11 – 3-18
Night Only Call Handling coverage
mailbox, B-5
Port Allocation, 3-12
Specifying Maximum Digits in an
Extension, 3-16
submenu Selector Codes, 3-65
submenus, 3-63
System Greetings, 3-47 – 3-53
Touch-Tone Gate, 3-44 – 3-47
Voice Mail Greeting, 3-49
Weekly Business Schedule, 3-35
IN-5
Index
R
Recording, troubleshooting problems, 6-3
Redirect Calls, 4-10
Remote Maintenance Device
installing, 2-13
description, 1-21
MERLIN LEGEND programming for,
4-33
Requirements, environmental, 2-5
Responsibilities, 1-22
See also System administrator, System
operator, and General Mailbox owner
Return Call button
defined, 5-1
programming, 5-4
Ring generator connection, 2-2
Ringing problems, troubleshooting, 6-5
RMD
See Remote Maintenance Device
Rotary phone, 1-15
S
Schedule
programming, 3-35 – 3-43
programming consecutive days, 3-40
Schedule Administration Menus, 3-35
Secondary system prompt language
description, 1-4
See also Bilingual mode
Selector code, description, 3-55
Selector Code Action
Direct Extension Transfer (Action 5),
3-58
Play an Existing Announcement
(Action 3), 3-57
Play an Existing Submenu (Action 2),
3-56
IN-6
Prompted Transfer (Action 4), 3-58
Selector Code Transfer (Action 1), 3-56
Services
Automated Attendant, 1-5
Call Answer, 1-20
description, 1-1
Voice Mail, 1-16
Shortcuts, 1-25
Site preparation, 2-5
Spanish language, 1-4
Speakerphone, when using, 1-26
SPM
See MERLIN LEGEND System
Programming and Maintenance
software
Star button (*), defined, viii
Submenu
programming, 3-64
recommended number of levels, 3-63
recommended number of options, 3-63
Subscriber
definition, viii, 1-1
name, 3-25, B-8
specifying mailbox language, 3-23
Subscriber directory
See Directory of subscribers
Supervised Transfer
specified by Class of Service, 3-22
Surge protector, 2-5
System Administrator
changing extension and password, 3-1
changing password, 3-31
messages for, 6-3
responsibilities, 1-23
System Greetings
recording, 3-47 – 3-53
System operator
changing extension, 3-30
responsibility, 1-24
Index
setting Delayed Ring, 4-16
setting for lmmediate Ring, 4-28
System Parameters Menu, 3-11
System Programming Menus
MERLIN MAIL—ML, 3-2
T
Terms used in guide, viii
Time
closing, 3-43
opening, 3-42
Timeout
See Dial 0/Timeout Action
Touch-Tone Duration, 4-33, 4-35
Touch-Tone Gate
activated by fax extension, 3-15
affect on rotary phone callers, 3-45
description, 3-44
forced On in bilingual mode, 3-47
programming, 3-46
Touch-Tone Interval, confirming, 4-36
Touch-tones, troubleshooting missed, 6-1
Transfer
problems, 6-2, 6-5
types, 3-23
Transfer Redirect Extension, 4-10
Transfer Return Time
dependency on Group Coverage
Delay Interval and Delay Ring, 4-9
programming, 4-4
Trouble Mailbox
description, 1-24
message-waiting indicator, 1-24, 6-3
Troubleshooting, 6-1
U
Unassigned Extensions, redirecting calls
to, 4-10
Uninterruptible power supply, 2-5
Unsupervised Transfer
performing acceptance test, 5-9 – 5-10
specified by Class of Service, 3-22
UPS
See Uninterruptible power supply
User
See Subscriber
User, voice mail
See Subscriber
V
VMI Calling Group
assigning trunks/pools to, 4-19
See also MERLIN MAIL—ML Calling
Group
VMS Transfer Return Interval
dependency on Group Coverage
Delay Interval and Delay Ring, 4-6
setting, 4-5
Voice Mail
See Voice Mail Service
Voice Mail addressing methods
Broadcast, 1-18
extension number, 1-17
Group List, 1-18
voice mailbox name, 1-17
Voice Mail Service
description, 1-2, 1-16
performing acceptance test, 5-13
troubleshooting busy signal, 6-5
troubleshooting Iogin difficulty, 6-6
troubleshooting no answer, 6-5
IN-7
Index
Voice Mail Service Greeting
factory setting, 3-51
recording, 3-51
Voice mailbox
creating, 3-20
full, 6-4
message storage limit, 3-23
message-waiting indicator, 1-20
name, 3-23, B-7
recommended maximum number, 3-20
selecting mailbox language, 3-23
storage size, 6-4
Voice mailbox number
description, 1-17, 1-18
programming, 3-21
Voice-processing card
adding or replacing, 2-16
DIP-switch settings, 2-18
modular telephone cord requirements,
2-2
W
Weekly Business Schedule,
programming, 3-35
IN-8
AT&T 585-320-141
Graphics © AT&T 1988