1
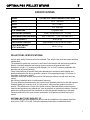
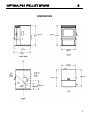
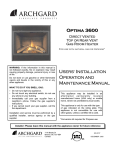
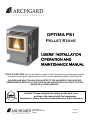
OPTIMA PS1
Pellet Stove
Users’ Installation
Operation and
Maintenance Manual
PRIOR TO FIRST FIRE: Remove all labels from glass. Clean fingerprints from plated surfaces with a
non-abrasive liquid glass cleanser and soft cloth to prevent permanent staining. (See Page 28)
CHILDREN AND ADULTS SHOULD BE ALERTED TO THE HAZARDS OF HIGH SURFACE
TEMPERATURES, ESPECIALLY THE STOVE GLASS, AND SHOULD STAY AWAY TO AVOID
BURNS OR CLOTHING IGNITION.
Installer: Please complete the details on the back cover
and leave this manual with the homeowner.
Homeowner: Please keep these instructions for future reference.
7116 Beatty Dr
Mission, BC V2V 6B4
Canada
200-0242
MAY 2007
OPTIMA PS1 PELLET STOVE
2
Congratulations on choosing a state-of-the-art
Archgard Hearth Product!
The hand crafted Optima PS1 has been designed to
provide you with comfort, security and economy for
many years of trouble-free enjoyment.
It has been our experience that the overall enjoyment
of your new appliance will be greatly enhanced by
becoming familiar with its installation, operation and
maintenance. Prior to installation, we ask that you
take a few moments to read this manual.
We wish you and your family many years of
enjoyment in the warmth and comfort of this hearth
appliance.
Thank you for choosing Archgard
Industries!
2
OPTIMA PS1 PELLET STOVE
3
TABLE OF CONTENTS
Important Safety Notes
4
Rating Plate Label
6
Specifications
7
Dimensions
8
INSTALLATION METHODS
Important Installation Notes
9
Residential & Mobile Home Installation
10
Combustion Air Supply
11
Venting
12-16
OPERATING INSTRUCTIONS
Operating Safety Precautions
18
Start-Up Check List
19
Filling the Hopper
20
Control Functions
21-23
Start-Up and Shut-Down Instructions
Fine Tuning Stove
Thermostat
24
25-26
26
MAINTENANCE
Cleaning Door Glass
Ash Disposal
27
27-28
Miscellaneous Maintenance
29
Electrical Circuit Diagram
30
Component Locations
31
Troubleshooting
32-34
ACCESSORY / PARTS REPLACEMENT
Accessory & Replacement Parts List
Archgard Warranty
35
36-37
Warranty Registration Card
38
Notes
39
Installation Information
40
3
OPTIMA PS1 PELLET STOVE
4
IMPORTANT SAFETY NOTES
•
•
•
•
•
•
•
•
•
•
•
•
•
•
•
•
•
•
•
When installing your stove, particular attention should be paid to fire
protection. If this room heater is not properly installed, a house fire may result.
To reduce the risk of fire, follow the installation instructions. Contact local
building, fire officials or authority having jurisdiction about restrictions,
installation inspection and permit requirements in your area.
CAUTION: Never use gasoline, gasoline-type lantern fuel, kerosene, charcoal
lighter fluid, or similar liquids to start or “freshen up” a fire in this heater. Keep
all such liquids well away from the heater while it is in use.
DO NOT BURN GARBAGE OR FLAMMABLE FLUIDS SUCH AS GASOLINE,
NAPHTHA OR ENGINE OIL.
Do not store any fuel closer than 2 feet from your unit. Do not place wood,
paper, furniture, drapes or other combustibles near the appliance.
RISK OF FIRE! Do not operate with stove door open.
WARNING! Never draw outside combustion air from a wall, floor or ceiling
cavity or from any enclosed space such as an attic or garage, carport or under
a mobile home.
Check your chimney system thoroughly when installing into an existing metal
or masonry chimney. Seek professional advice if in doubt about its condition.
Comply with all minimum clearances to combustibles as shown in this manual
for this appliance.
HOT WHILE IN OPERATION! Keep children, pets, clothing and furniture away.
Contact can cause skin burns.
All fuel burning appliances consume oxygen during operation. It is important
that you supply a source of fresh air to your unit while burning. A slightly
opened window is sufficient for this purpose. If you also have a fireplace in your
home, a downdraft may be created causing a draft down your chimney. Provide
adequate ventilation. This does not apply if the stove is installed with outside
combustion air connection.
The controls of your unit or the air supply passages should not be altered to
increase firing for any reason.
Do not permit soot or ash build-up in the venting system. Check and clean
venting system at regular intervals.
Cool ashes should be disposed of carefully, using a metal container.
Do not connect to any air distribution duct or system.
Do not connect this unit to a chimney flue already serving another appliance.
This appliance must be connected to a vent and terminate to the outside of the
building envelope. Never vent to another room or inside a building.
Do not operate if the gasket on the door is missing or damaged.
Do not operate with broken glass.
For further information refer to NFPA 211 (USA) or CAN/CSA-B365 (Canada).
4
OPTIMA PS1 PELLET STOVE
5
YOUNG CHILDREN SHOULD BE CAREFULLY SUPERVISED WHEN
THEY ARE IN THE SAME ROOM AS THE STOVE.
SAFETY NOTE: If this stove is not properly installed, a house fire may result. For your
safety, follow the installation instructions, vent manufacturer’s instructions, contact local
building, fire officials, or authority having jurisdiction about restrictions and installation
inspection requirements in your area.
The authority having jurisdiction should be consulted before installation to determine
the need to obtain a permit.
WHEN LOCATING YOUR STOVE: Consider safety, convenience, traffic flow, and the
fact that the stove will need a chimney and chimney connector. It is a good idea to plan
your installation on paper, using exact measurements for clearances and floor
protection, before actually beginning the installation.
These installation instructions describe the installation and operation of the OPTIMA
PS1 pellet stove. This stove meets the U.S. Environmental Protection Agency’s
emission standards. The Optima PS1 is listed by Warnock Hersey Test Laboratories,
Inc. to ASTM E1509-04. The Optima PS1 is approved for mobile home installation ( in
the US and Canada) when not installed in a sleeping room and when an outside
combustion air inlet is provided. The structural integrity of the mobile home floor,
ceiling, and walls must be maintained. The stove must be properly grounded to the
frame of the mobile home. See instructions for connecting the stove to get outside
combustion air.
SAFETY LABEL
A copy of the label that accompanies each Archgard Optima PS1 pellet stove is printed
on the next page for your convenience.
NOTE: Archgard units are constantly being improved. If there is a conflict between the
label on the unit and the one printed here, the label on the unit is the correct one. The
safety label is located on the underside of the hopper lid.
5
OPTIMA PS1 PELLET STOVE
6
LISTED ROOM HEATER, PELLET FUEL-BURNING TYPE.
ALSO SUITABLE FOR MOBILE HOME INSTALLATION.
DO NOT REMOVE THIS LABEL
SERIAL NUMBER / NUMÉRO DE SÉRIE:
MODEL: OPTIMA PS1 FREE STANDING STOVE
TESTED TO: ASTM E1509-04
FRONT
FOR USE WITH SUITABLE PELLETIZED FUEL ONLY. See instruction manual on the specifications of fuels. USE OF OTHER FUELS MAY
DAMAGE THE HEATER AND CREATE A HAZARDOUS CONDITION. DO NOT OBSTRUCT THE COMBUSTION AIR OPENING. RISK OF
SMOKE AND FLAME SPILLAGE, OPERATE ONLY WITH ASH CLEAN-OUT SLIDER AND ASH DRAW IN PLACE; AND THE DOOR
FULLY CLOSED. KEEP FURNISHINGS AND OTHER COMBUSTIBLE MATERIALS AWAY FROM STOVE. DANGER, RISK OF
ELECTRICAL SHOCK, DISCONNECT POWER BEFORE SERVICING STOVE. MOBILE HOME INSTALLATION REQUIRE OUTSIDE
COMBUSTION AIR, PROPER ELECTICAL GROUNDING AND PROPER FASTENING OF STOVE TO THE FLOOR. DO NOT INSTALL IN
SLEEPING ROOM. THE STRUCTUAL INTEGRITY OF THE MANUFACTURED HOME FLOOR, WALLS AND CEILING/ROOF MUST BE
MAINTAINED. See manual for instructions. Inspect and clean stove and vent system regularly, see instruction manual for servicing
instructions. Replace glass only with 5mm ceramic glass. Optional Multi-fuel burn pot kit Part # PS1-MF. See manual for other stove options.
ARCHGARD INDUSTRIES LTD.
MISSION, BC ~ CANADA
Made in Canada
OCT
SEP
JAN
2008
6”
2007
6”
SIDE
6”
SIDE
Any combustible flooring or floor covering beneath the appliance and / or within the area extending
153mm / 6” horizontally beyond the appliance on any side equipped with a door, and beyond the appliance
on the other sides, shall be protected by a continuous, durable, non-combustible pad that will provide
ember protection. Refer to Canadian CSA B365 and USA NFPA 211 Installation Codes for details. It is
recommended that floor protection extends beneath the vent pipe.
2006
FLOOR PROTECTION
Manufactured by:
AUG
MAY
APR
D
FEB
C
E
D
MAR
C
DATE OF MANFACTURE:
A
BACKWALL
SIDEWALL
B
ADJACENT WALL
SIDEWALL
SIDEWALL
BACKWALL
JUL
MINIMUM CLEARANCES TO COMBUSTIBLE MATERIALS
RESIDENTIAL & MOBILE HOME INSTALLATION
ALCOVE INSTALLATION
SIDEWALL
A - 229 mm / 9”
SIDEWALL
D - 229 mm / 9”
BACKWALL
B - 76 mm / 3”
BACKWALL
E - 76 mm / 3”
CORNER
C - 26 mm / 1”
MINIMUM ALCOVE CEILING HEIGHT : 1220 mm / 48”
MAXIMUM ALCOVE DEPTH : 915 mm / 36” , Minimum 381 mm /
15” clearance from stove top to ceiling.
JUN
PREVENT HOUSE FIRES:
INSTALL ONLY IN ACCORDANCE WITH THE MANUFACTURER’S INSTALLATION AND OPERATING INSTRUCTIONS. CONTACT LOCAL
BUILDING OR FIRE OFFICIALS ABOUT RESTRICTIONS AND INSTALLATION INSPECTION IN YOUR AREA. USE ONLY LISTED TYPE L,
TYPE PL VENT OR OTHER LISTED VENT SYSTEMS SUITABLE FOR PELLET FUEL BURNING STOVE. STRICTLY FOLLOW VENT
MANUFACTURER’S CLEARENCES AND INSTALLATION INSTRUCTIONS. DO NOT CONNECT THIS UNIT TO A CHIMNEY SERVING
ANOTHER APPLIANCE. DO NOT INSTALL A FLUE DAMPER IN THE EXHAUST VENTING SYSTEM OF THIS UNIT. DO NOT CONNECT
THIS UNIT TO A CHIMNEY FLUE SERVING ANOTHER APPLIANCE.
NOV
DEC
MAXIMUM INPUT RATING: 42,000BTU/HR (APPROXIMATELY 5LB/HR OF WOOD PELLETS OR 6LB/HR OF SHELLED CORN)
ELECTICAL RATING: 120VAC, 60HZ, LESS THAN 5A.
THIS APPLIANCE IS SUITABLE FOR MOBILE HOME INSTALLATION IN US & CANADA. SEE MANUAL FOR INSTALLATION
INSTRUCTIONS.
UNITED STATES ENVIROMENTAL PROTECTION AGENCY
CERTIFIED TO COMPLY WITH PARTICULATE EMMISION STANDARDS
CAUTION
• HOT WHILE IN OPERATION.
• DO NOT TOUCH, KEEP CHILDREN, CLOTHING AND FURNITURE AWAY.
• CONTACT MAY CAUSE SKIN BURNS. READ NAMEPLATE AND INSTRUCTIONS.
6
OPTIMA PS1 PELLET STOVE
7
SPECIFICATIONS
MODEL
OPTIMA PS1 FREESTANDING Pellet Stove
WIDTH
23.75” (603 mm )
DEPTH
28” (711 mm)
HEIGHT
32.5” (826 mm)
E.P.A. EMISSIONS
0.9 grams / hour
12,000 - 42,000 Btu/hr (3.5 - 12.3 kW)
INPUT RATING (APPROX)
APPROXIMATE HEATING AREA
800 - 1,500 FEET2 (74.3 - 139.4 METRE2)
HOPPER CAPACITY
DURATION ON LOW FIRE
STOVE BODY WEIGHT
WITH PACKAGING
95 lb (43 kg)
Approximately 60 Hours with full hopper
250 lb (113 kg)
PELLET FUEL SPECIFICATIONS:
Use the best quality Premium pellet fuel available. This will give the most heat output with less
maintenance.
The standard for pellet fuel is set out by the Pellet Fuels Institute with the following qualities:
Density: consistent hardness and energy content (minimum 40 pounds/cubic foot)
Dimensions: length (1 ½” maximum) and diameter (1/4” to 5/16”) to assure predictable fuel
amounts and to prevent jamming
Fines: limited amount of sawdust from pellet breakdown to avoid dust while loading and
problems with pellet flow during operation (amount of fines passing through 1/8” screen no
more than .5 percent by weight)
Chlorides: limited salt content (no more than 300 parts per million) to avoid stove and vent
rusting
Ash content: important factor in maintenance frequency
The only difference that determines the Premium and Standard pellet fuel is their ash content.
Standard grade fuel is usually up to 3% ash content, while premium grade is less than 1
percent. This difference is a result of the pellet contents. Standard pellets are derived from
materials that produce more residual ash, such as tree bark or agricultural residues. Premium
pellets are usually produced from hardwood or softwood sawdust containing no tree bark.
Premium pellet fuel is the most common and makes up 95 percent of pellets sold on the
market.
OPTIONAL MULTI-FUEL BURN POT KIT
This pellet stove can burn shelled corn as fuel with the installation of the optional multi-fuel
burn pot kit, PART #: PS1-MF. Follow the operating instructions included with the kit.
7
OPTIMA PS1 PELLET STOVE
8
DIMENSIONS
(820mm)
(820mm)
(661mm)
(597mm)
(712mm)
(597mm)
(77mm)
(51mm)
(712mm)
(661mm)
(369mm)
(90mm)
(267mm)
8
OPTIMA PS1 PELLET STOVE
9
INSTALLATION INSTRUCTIONS
IMPORTANT INSTALLATION NOTES:
•
•
•
•
•
•
Please read this entire manual before you install and use your new Optima
PS1 Pellet stove. Failure to follow instructions may result in property
damage, bodily injury or even death. Be aware that local codes and
regulations may override some items in this manual. Check with your local
authority having jurisdiction.
Select a location for your Archgard Optima PS1 pellet stove. Double check
the clearances on the label and set the stove in place.
Check that the intended location of the vent does not interfere with trusses,
joists or rafters before proceeding further.
Check that the intended location of the vent termination is located in a
suitable location. See the diagram of allowable vent terminal location.
Make sure there is a nearby suitable grounded receptacle to supply 120VAC,
60HZ and at least 5A of electrical power needed to operate the stove.
Obtain any necessary permits for the installation of the stove.
9
OPTIMA PS1 PELLET STOVE
10
RESIDENTIAL & MOBILE HOME INSTALLATION
MINMUM CLEARANCES TO COMBUSTIBLE MATERIALS
SIDEWALL
BACKWALL
CORNER
A - 229 mm / 9”
B - 76 mm / 3”
C - 26 mm / 1”
MAXIMUM ALCOVE DEPTH: 915 mm / 36” with minimum back wall clearance or front of
stove door recessed a maximum of 178mm / 7” into alcove.
MINIMUM ALCOVE CEILING HEIGHT:1220 mm / 48” OR MINIMUM 381 mm / 15”
CLEARANCE FROM TOP OF STOVE TO CEILING.
CLEARANCE TO VENT PIPE MUST ALSO BE OBSERVED. PLEASE SEE VENT
MANUFACTURES’ INSTRUCTIONS FOR VENT PIPE CLEANRANCE TO COMBUSTIBLES.
NOTE—Even though the pellet stove is safe to install to the minimum clearances listed
above, additional clearances should be considered for the ease of fueling, operating
and maintenance.
(26mm)
(76mm)
(76mm)
(76mm)
(229mm)
(229mm)
(26mm)
(51mm)
(51mm)
(153mm)
(153mm)
(813mm)
(153mm)
The floor pad (ember pad) must be of noncombustible material and must extend 6" (153mm)
in front of the door opening and 6" (153mm) to the
sides and rear of the unit.
If the listed stove clearance is less than the
required floor pad, use the stove listing. Contact
your local Authority Having Jurisdiction and/or the
CSA B365 in Canada or NFPA 211 in USA for
more details.
Hearth pad should also extend beneath the
horizontal or vertical vent.
(902mm)
10
OPTIMA PS1 PELLET STOVE
11
COMBUSTION AIR SUPPLY
Fresh outside air is not required for normal residential installation. The stove consumes oxygen
during operation. It is important that you supply a source of fresh air to your stove while
burning. A slightly opened window is sufficient for this purpose. If you also have a fireplace in
your home, a downdraft may be created causing a draft down your chimney. Provide adequate
ventilation in the room.
Outside combustion air is a requirement for mobile home installation. It is also highly
recommended for tightly insulated homes and a good feature for normal installations.
A metallic 2” diameter rigid or flexible pipe should be securely connected to the air intake
connector at the back of the stove. The fresh air may be taken from outside of the house
through a hole in an adjacent wall or from the floor of houses with ventilated craw space. Be
sure not to damage the structural integrity of the house The pipe and penetrations should be
properly sealed and weather-proofed. The intake pipe should be properly terminated with a
cap or elbow to shield the inlet from the weather. The termination openings should be
protected by a rodent screen. Keep the pipe length as short as possible for optimal
performance. For best performance, keep 2” diameter intake pipe length under 10 feet. If
longer runs are required, use an adapter to connect to 3” diameter intake pipe.
Outside air can also be obtain by installing a listed direct-vent system for pellet stoves. Follow
the vent manufacturer’s instructions.
Never draw outside combustion air from a wall, floor or ceiling cavity or from any enclosed
space such as an attic, garage, carport or under a mobile home.
11
OPTIMA PS1 PELLET STOVE
12
VENTING
Use only listed type L, PL or other suitable listed vents for pellet fuel burning
stoves. Install venting system according to the vent manufacturer’s instructions.
Strictly follow the vent manufacturer's clearances and use the proper vent
components when passing the vent through walls and ceilings. A suitable vent
termination should also be used. The performance of your pellet stove can also
be hindered by improper venting system. It is recommended that your pellet
stove be installed by a professional installer who is certified to install pellet
stoves. An improper installed and vented pellet stove can be a fire and health
hazard.
CAUTION: At no time can unlabelled parts, or substitute parts made for another venting
system be used.
Maintain the structural and vapor barrier integrity of the house when cutting holes in the walls,
ceiling and roof to suit the venting system and do any necessary framing as required by the
vent manufacturer.
NOTE: Interior vents shall be enclosed where they extend through closets, storage areas,
occupied spaces, or anyplace where the surface of the vent could be contacted by persons or
combustible materials.
The stove has a 3” diameter flue connector. Vent systems with pipes either 3” diameter or 4”
diameter (with a step up adapter) maybe used. The use of 4” diameter vent pipe system is
preferred with longer and more restrictive vent runs.
For best performance from the pellet stove, it is recommended that the total horizontal vent
runs is kept to a maximum of 10 feet. Use a maximum of two 90 elbows or equivalent and one
tee. Limit total vertical vent run to a maximum of 35 feet. This pellet stove is equipped with an
exhaust slider restrictor just upstream of the exhaust blower. The installer can use this to
balance the flow of exhaust on high draft vent configurations. This is a one time adjustment to
be done only by the installer. Loosen the 1/4” hex screw securing the slider. Push the slider in
to restrict the exhaust flow. Adjust till the stove burns properly on high and tighten the screw to
secure the slider.
The venting system of a pellet stove is pressurized. Make sure all pipe joints and connections
are air-tight to prevent the leakage of flue gas and ash. Follow the vent manufacturer’s
instructions to seal the vent system. Otherwise, apply a continuous bead of 500F (260C) high
temperature silicone sealant at the joints and securely fasten with no less than 3 sheetmetal
screws per joint or connection.
In seismically active areas, Archgard recommends that your stove be secured to the floor by
using 3” long, ¼” lag bolts in the bolt down holes on the pedestal. This is mandatory with
mobile home installations.
Do not connect this stove to a chimney serving another appliance.
Do not connect your stove to an air distribution duct.
12
*
*
*
*
*
3 feet (91 cm) within a
height 15 feet (4.5 m)
above the
meter/regulator assembly
C= Clearance to permanently
closed window
D= Vertical clearance to
ventilated soffit located
above the terminal within a
horizontal distance of 2 feet
(61 cm) from the center line
of the terminal
E= Clearance to unventilated soffit
F= Clearance to outside corner
G= Clearance to inside corner
H= Clearance to each side of
center line extended above
meter/regulator assembly
3 feet (91 cm)
12 inches (30 cm)
B= Clearance to window or
door that may be opened
L= Clearance to service
regulator vent outlet
12 inches (30 cm)
A= Clearance above grade,
veranda, porch, deck, or
balcony
12 inches (30 cm) ++
7 feet (2.13 m) +
3 feet (91 cm) above if
within 10 feet (3 m)
horizontally
9 inches (23 cm)
(*) Clearances shall be in accordance with local installation codes.
(++) Permitted only if veranda, porch, deck, or balcony is fully open on a minimum of two
sides beneath the floor.
(+) A vent shall not terminate directly above a side walk or paved driveway that is located
between two single family dwellings and serves both dwellings
M= Clearance under veranda,
porch, deck, or balcony
L= Clearance above paved
sidewalk or paved driveway
located on public property
K= Clearance to a mechanical
air supply inlet
J= Clearance to non-mechanical air
supply inlet to building or the
combustion air inlet of any other
appliance
OPTIMA PS1 PELLET STOVE
13
TYPICAL EXHAUST TERMINATION LOCATIONS
(CHECK FOR ACCORDANCE WITH LOCAL INSTALLATION CODES)
13
OPTIMA PS1 PELLET STOVE
14
TYPICAL VENTING CONFIGURATIONS:
HORIZONTAL VENTING
NOTE: Horizontal venting with vertical offset is preferred. The additional vertical vent rise will
improve venting performance and provide natural draft to evacuate smoke from the stove in
case of power failure.
14
OPTIMA PS1 PELLET STOVE
15
VERTICAL VENTING
15
OPTIMA PS1 PELLET STOVE
16
VENTING INTO FIREPLACE OR CHIMNEY
Make sure the chimney top is properly sealed to prevent the intrusion of weather with suitable
flashings, collars and sealants.
Outside air maybe obtained by running an intake vent pipe up along side the exhaust and properly
terminated at the top to prevent the inlet of rain or exhaust gases. Outside air may also be taken from
a suitable duct passing through the ash clean-out opening.
Similar installations are applicable to factory build fireplaces and chimneys.
Check with local code for any installation restrictions.
16
OPTIMA PS1 PELLET STOVE
17
ADDITIONAL MOBILE HOME INSTALLATION REQUIREMENTS:
In addition to standard installation instructions, the following requirements are mandatory for
installation in a mobile home.
• The stove must be permanently bolted to the floor of the mobile home using screws. Once
you have properly marked the position of your stove and the floor protection as outlined in
the installation instructions, secure it to the floor using two lag bolts 1/4" x 3" through the
two holes in the pedestal base just inside, near the front of the two side access panels.
• The stove must have a permanent outside air source for combustion as outlined in the
installation instructions.
• The stove must be electrically grounded to the steel chassis of the mobile home. Use a #8
ground wire with approved termination and star washer.
• The stove must be installed with a listed pellet stove venting system, roof thimble, spark
arrestor and roof flashing kit suitable for use in mobile homes.
• The vent shall extend at least 3 ft. (914mm) above the part of the roof through which it
passes. The top of the vent should project at least 2ft. (610mm) above the highest
elevation of any part of the mobile home within 10 ft. (3048mm) of the vent. Top sections
of chimney must be removable to allow maximum clearance of 13.5 ft. (411cm) from
ground level for transportation purposes.
CAUTION: THE STRUCTURAL INTEGRITY OF THE MOBILE HOME ROOF, FLOOR,
WALLS AND CEILING MUST BE MAINTAINED. Also maintain the integrity of
the vapor barrier at the location where the chimney or other component
penetrates the exterior of the structure.
WARNING: DO NOT INSTALL THE STOVE IN A SLEEPING ROOM OF A MOBILE HOME.
Never draw outside combustion air from a wall, floor or ceiling cavity or
from any enclosed space such as a garage, carport or under a mobile home.
Check any other local building code as other local codes may apply.
17
OPTIMA PS1 PELLET STOVE
18
OPERATING SAFETY PRECAUTIONS
•
•
•
•
•
•
•
•
•
•
•
Hot while in operation. Contact may cause skin burns. Keep
children, pets, clothing and furniture away.
Use only pelletized fuel recommended by the manufacturer. See
pellet fuel specifications.
Only service and maintain the stove when it not operating and
cool to the touch. Electrical power to the stove must be
disconnected for any servicing that require the open of the side or
back service panels.
Do not use any flammable liquids, such as gasoline, kerosene,
lighter fluid or other similar liquids to start or freshen up the fire.
Keep all such liquids well away from the stove while it is in use. If
manually starting the pellet stove, use only suitable solid or gel
fire starter products designed specifically for starting pellet
stoves.
Provide adequate fresh air to room for pellet stove installed
without outside combustion air.
Relocate any smoke detectors that maybe false triggered by the
normal operation of the stove.
Keep a suitable fire extinguisher within easy reach. As with any
fuel burning appliance, there is always a potential fire hazard.
Keep stove door tightly close during operation.
Keep area around stove free of debris, lint and any objects that
might be a potential fire hazards. Do not store pellet fuel next to
the stove. Keep it at least 3 feet away.
Keep stove grill and air openings free of lint and any obstructions
to maintain optimal efficiency.
Unplug the stove when it is not going to be used for an extended
period of time.
18
OPTIMA PS1 PELLET STOVE
19
OPERATING INSTRUCTIONS
Check List Before Starting Your Pellet Stove:
• Check that the pellet stove is properly plugged into a 3-prong grounded 115VAC
electrical receptacle. Make sure there is electrical power to the stove.
• Check around the pellet stove for any potential safety hazards.
• Check that the pellet stove is connected to a proper venting system to exhaust the
stove’s combustion gases outdoors. Check that the vent cap is not damaged or
obstructed. Also check for any potential fire hazards around the vent cap.
• Make sure there is adequate supply of pellet fuel in the hopper and that the pellet fuel
is in good condition and suitable for burning in this pellet stove.
• Make sure the burn pot is seated properly and empty of ash or clinkers. Check to make
sure all the air holes of the burn pot are unobstructed and clear out any obstructions.
• Close and latch the door securely. The stove will not operate with the door open.
• Close the hopper lid. The fuel feed auger will stop if the hopper lid is opened.
NOTE: It is normal for the stove to emit some odor and smoke with the first few initial
operations. This is due the curing of the paint and ‘burning-off’ of manufacturing oils.
For the first few operations, keep the heat setting low to medium to reduce emissions
and keep the room well ventilated by open windows.
Opening the stove door:
Rotate the handle clockwise towards the front of the door
until the handle is about the 9 O’clock position and swing
the door to the left.
Closing the stove door:
Keep the handle horizontal about the 9 O’clock position.
Swing the door to the right and push the door firmly
against the stove. Rotate the handle to the 6 O’clock position to lock.
Install the burn pot by tucking the top of the burn port under the pellet drop chute. Line
up the burn pot with the holder and drop the burn pot in. Make sure the burn pot is
squarely seated in its holder.
SIDE VIEW OF
BURN POT
19
OPTIMA PS1 PELLET STOVE
20
FILLING THE HOPPER WITH PELLET FUEL:
Open the hopper lid by placing your fingers in the recessed handle on the hopper lid and lifting
up. Lift the lid until the prop rod catches and keeps the lid up.
Fill the hopper only with dry quality pellet fuel as noted in the fuel specification at the front of
the manual.
Check and remove any foreign objects or debris mixed in with the pellet fuel that could jam up
the fuel feed auger.
Be careful not to spill any fuel on the stove top and adjoining gaps. Spilling pellet fuel on the
floor can also pose a slipping hazard.
To close the hopper lid, support the hopper lid with the left hand while using the right hand to
pull the prop rod forward to release it from the catch. CAUTION: Be sure to support the
hopper lid to prevent possible pinching of the fingers while releasing the lid prop rod.
WARNING: This stove is equipped with a fuel feel auger interlock switch,
which will stop the fuel feed to the stove with the hopper lid opened. Re-fuel
as quickly as possible. The stove will not operate with the hopper lid open.
Do not overfill the hopper so that the hopper lid will not close flush. When refilling the
hopper while the stove is operating, please do so as quickly as possible to minimize the
interruption of the fuel feed. The stove will shut down if the hopper lid remains open for
more than 5 minute. It is also likely that the flames in the burn pot will go out before the
time limit, especially on lower heat settings.
Do not allow the hopper run completely empty if possible. Once emptied, the auger feed
system will takes a long time to reload with pellets before starting to drop pellets into
the burn pot. If this happen, use the FUEL FEED button on the control panel to speed up
the process. Two or three restart cycle of the stove will be required before fuel will start
dropping into the burn pot.
20
OPTIMA PS1 PELLET STOVE
21
CONTROLS FUNCTIONS:
21
OPTIMA PS1 PELLET STOVE
22
THERMOSTAT / MANUAL Switch:
Selects the pellet stove operating mode. Slide the switch to MANUAL (the far right position) to
operate in user manually selectable heat level and controls. If you have a thermostat attached
and wish to have the pellet stove controlled by the device, slide the switch to HIGH/LOW (the
middle position) to operate the pellet stove in a modulating heat mode, where the thermostat
will control the heat output of the pellet stove, alternate between the lowest heat level and the
higher heat level pre-selected by the user. The ON/OFF setting (the far left position) is similar
to the previous mode, except that the stove will alternate between shutdown (stove turn
completely off) and restart to user selected heat level setting when commanded by the
thermostat. When using the thermostat, the HIGH/LOW mode is recommended. This setting
provides a more even heat output for better comfort and will extend the life of the ignition
system components. In addition, the constant visual of the flames in the stove will serve as
warning for people and pets to keep away from the stove during operations, rather then being
startled by spontaneous start-up of the stove. After switching modes, the stove should be
turned OFF and ON to reset the controls to operate in the new mode setting.
A SPST wall switch or remote control with passive on and off contact may also be used in
place of the thermostat for remote operation of the pellet stove.
ON/OFF Button:
Used to turn the stove ON and OFF.
If the stove is cold during start-up, to turn the pellet stove on, press and release the ON/OFF
button. The green light above the ON/OFF button will flash to indicate start-up cycle has
started. Fuel pellets will start to feed into the burn pot. The electric ignition system will be
automatically activated. Flames in the burn pot will appear in 3 to 7 minutes. Once the flame is
well established, the start-up cycle will end. This takes about 10 minutes. At this point, the user
will be able to make heat level adjustments in the manual mode, or the stove will carry on being
controlled by the thermostat.
If the stove is warm at restart, the ON/OFF button must be pressed down and held for two
seconds or more, until the light above the ON/OFF button is lit. The start-up cycle for the pellet
stove will be initiated. The pellet stove will be able to be adjusted in the Manual after 10
minutes or carry on being controlled by the thermostat. If you are starting a new stove or refilled
a completely empty hopper, see FUEL FEED button function below.
HEAT OUTPUT Button:
When the button is pressed, it will increase the heat output one heat level. Keep pressing the
button will cycle the heat level from 1 to 5 and back again. The convection fan speed will also
change according to the heat level. When the ON/OFF light is flashing during the start-up cycle,
the heat output button will cycle the heat level, but the stove will not respond to adjustments.
When the ON/OFF light is solid, indicating the start-up cycle has ended (about 10 minutes),
then the stove will respond, and only in manual mode. If it is a warm start-up, the ON/OFF light
will not flash indicating a start-up cycle. The stove will respond to heat adjustments only after
10 minutes from start-up.
22
OPTIMA PS1 PELLET STOVE
23
FAN HIGH Button:
Use this button to override the automatic fan speed control and turn the convection fan on high.
The smart control on this pellet stove will vary the fan speed in accordance with heat level
setting. It is best to let the controller adjust the speed of the fan for best efficiency and
minimized fan noise.
FUEL FEED Button:
This button manually activates the fuel feed auger. Press and hold this button will turn on the
auger to feed pellets into the burn pot.
When first using the pellet stove, or when you completely empty the hopper of pellets and
restarting after reloading the hopper, you can load the auger faster by pressing and holding this
button until you see pellets dropping into the burn pot. This button will turn off after one minute
and must be released and pressed again if you want to continue to manually activate the fuel
feed auger.
LOW ADJUST Button:
This button is used to change the fuel feed rates on the heat level 1 for various quality pellet
fuels. This button is used to keep the flames from extinguishing on heat level 1.
Push and release the LOW ADJUST button until the heat level 1 and 4 lights appear. This will
slightly increase the fuel feed rate on heat level 1. Push and release the button until the heat
level 1 and 3 lights appear, this will reduce the fuel feed rate on heat level 1. Use this setting
only if the operator has determined that the flames will stay on at this fuel feed rate. To return
to the default setting, push and release the button until just the heat level 1 light is on, this is a
general setting and will likely work with most types of fuels.
23
OPTIMA PS1 PELLET STOVE
24
START-UP INSTRUCTIONS
When first operating the pellet stove, switch it to the MANUAL mode, so you can have full
control of the pellet stove’s control functions and familiarize yourself with how the pellet stove
works. During initial start-up, pellet fuel needs to fill the auger feed system before starting to
drop pellets into the burn pot. The FUEL FEED button on the control panel can be used to
speed up this process. Multiple restarts maybe required to get the pellets dropping into the burn
pot.
Start-up a cold stove:
Press and release the ON/OFF button. The green light above the ON/OFF button will flash to
indicate that the start-up cycle has started. The light above the FUEL FEED button will turn on
intermittently, indicating the activation of the auger, which feeds fuel pellets into the burn pot.
The electric igniter is activated. The igniter will takes time to heat up before igniting the pellets
in the burn pot. This can takes as little as 3 minutes or up to 7 minutes. If no flames or a good
strong fire appear before 10 minutes, the stove will shut down. Press the ON/OFF button again
to restart the stove..
As a safety feature, if the flames do not start up fast enough to trip the Proof of Fire
switch, the stove will shut down. This may also happen when starting the stove in
extreme cold temperatures. Simply press the ON/OFF button again to restart the stove
and keep the flames going in the burn pot.
If the stove will not start repeatedly, please check the TROUBLE SHOOTING section at the
back of the manual and correct any problems.
Once the flame is well established, and 10 minutes have passed, the start-up cycle will end. At
this time, if the stove is in the manual mode, the stove will return to the last heat level setting
and the user may make heat level adjustments; or if the stove is in the THERMOSTAT HIGH/
LOW modes, the heat output of the stove will vary in accordance with the commands from the
thermostat. Make sure the thermostat is set high enough on the THERMOSTAT ON/OFF
mode, otherwise the stove will shut down.
Start-up a warm stove:
If the stove is warm at restart, the ON/OFF button must be pressed down and held for two
seconds or more, until the ON/OFF light is lit.
Start up sequence is the same as cold start above.
SHUTDOWN INSTRUCTIONS
Turn off the stove by pressing the ON/OFF button. The stove will enter a shutdown cycle where
the pellets fuel will stop feeding to allow the flames in the burn pot to burn itself out.
The exhaust blower and convection fan will continue to operate to evacuate the exhaust and to
cool down the stove. Once the flames are out and the stove is sufficiently cooled down, the
convection fan and exhaust blower will turn off automatically.
In the THERMOSTAT ON/OFF mode, turning the thermostat all the way down can also be
used to turn off the stove.
DO NOT turn off the stove by disconnecting electrical power to the stove. This
will cause the stove to miss the proper shutdown cycle, causing the release of
smoke into the house and overheating of the stove.
24
OPTIMA PS1 PELLET STOVE
25
FINE TUNING THE BURNING OF PELLET FUEL
Combustion Air Shutter:
The combustion air to the burn pot is controlled by the round knob on the right side of the
pellet stove, below the control panel. It is connected to an air shutter inside the stove. To
increase combustion air, push the knob in. To reduce combustion air, pull the knob out.
If the fuel pellets are consumed too fast, giving very brisk bright flames with flame height
fluctuating significantly, the combustion air to the burn pot can be reduced by pulling the
control knob and rod out. Care should be used to not to reduce the burn pot combustion air
too much as to cause a poor, lazy burn that will soot up the door glass.
The air shutter can also be used to slow down the burn rate of pellet fuel on low to prevent
flames in the burn pot from going out. Remember that there is the LOW ADJUST button on
the control panel to make adjustments to the fuel feed on lowest heat level. See LOW
ADJUST button description.
In most cases, the stove operate best with the air shutter wide open, with the rod pushed all
the way in.
PULL OUT TO REDUCE
COMBUSTION AIR
Make sure the burn pot is properly seated:
If the burn pot is not properly seated into its holder, combustion air will flow around the burn
pot instead of into the burn pot. This will cause poor combustion, which eventually overfills the
burn pot with unburned pellets and extinguish the flames.
Improper seating of the burn pot will also cause fuel pellets to not fall into the burn pot and/or
bounce outside of the burn pot.
SIDE VIEW OF
BURN POT
Keep the Burn Pot Clean:
When burning low quality pellet fuel or after long periods of burning, excess ash accumulates
in the burn pot and obstructs the combustion air holes. This is evident by lazy orange flames
that soot up the door glass frequently. Scrape out the ash build up in the burn pot and poke out
any obstructions to the air hole. Keeping the burn pot clean will allow the pellet stove to
operate at its maximum efficiency and lower the overall frequency of maintenance.
25
OPTIMA PS1 PELLET STOVE
26
FINE TUNING THE BURNING OF PELLET FUEL (Cont…)
Fuel Quality:
Although there are standards for pellet fuel, fuel quality still varies greatly and will cause
significant changes in burn rate and flame characteristics.
Smaller, shorter pellets will feed a lot quicker than larger, longer pellets. The burning of small
short pellets may cause the stove to overfire. The stove may not be able to burn fast feeding
small short pellets efficiently at the maximum heat setting, causing tall smoky flames and the
glass to soot up very quickly. The operator will have to turn the heat level down to a burn this
kind of pellet. On the other hand, large long pellets may feed too slow so as to cause the flame
to go out on the minimum heat setting. In this case, the operator can use the LOW ADJUST
button to increase the feed rate on minimum.
Various brands and types of pellets will burn differently. It is best to use high quality premium
pellets for ease of use and less maintenance. If only low grade pellets are available,
understand their limitations and familiarize yourself with the stove settings that will burn these
pellets most effectively.
WARNING: Do not overfire the stove. Use the heat settings controls to keep flame height
just below the top of the firebox interior. The flames should be bright and clean.
Do not operate the stove if the flames are dark and sooty, or if the burn pot overfills with
pellets. Turn the stove off and troubleshoot and problems.
Note: Alternating the burning of the stove on high and low will slow down the
accumulation of flyash in the burn pot; therefore reducing the frequency of pot cleaning.
MANUAL START-UP
In case of igniter failure, the pellet stove can be started manually. Use a suitable pellet stove
starter. The dry wax impregnated wood shavings type starters work the best and safer for
storage. Clean the burn pot. Fill it half full with equal parts of fire starter with pellets. Mix well
the starter with the pellets. Close the door and press the ON/OFF button on the control panel.
Wait 20 seconds for the controller to initiate and check all sensors. Open the door and light the
mixture in the burn pot with a match or lighter. Wait about 10 to 20 seconds for the flames to
establish a bit. Close and securely latch the door. The flames in the burn pot should grow and
establish. The stove should operate as normal. However, only operate the stove in the manual
or thermostat HIGH/LOW modes; the stove is not capable of restarting in the thermostat ON/
OFF mode due to the failed igniter.
THERMOSTAT
Use contact thermostats, remote control or remote switch only. The pellet stove generates a
low voltage (5VDC) to use on the thermostat circuit. Do not use any thermostat that supply
power to the circuit.
CAUTION: DISCONNECT POWER TO THE PELLET STOVE BEFORE MAKING ANY
THERMOSTAT CONNECTIONS. CONTROL BOARD MAYBE DAMAGED BY SHORTING
OF THE THERMOSTAT WIRES TO THE STOVE CHASSIS.
The connectors for the thermostat wire is located at the back of the stove on the right hand
side. Use a Philips screw driver to remove the two screws holding the cover plate. Run the
thermostat wires through the grommet on the cover plate. Loosen the screws to the terminal
block and connect the stripped ends of the thermostat wires to the terminals. Replace the cover
plate.
26
OPTIMA PS1 PELLET STOVE
27
MAINTENANCE
•
•
•
REGULAR MAINTENANCE MUST BE CONDUCTED FOR SAFE AND EFFICIENT
OPERATION OF THE STOVE.
CONDUCT MAINTENANCE ON A COLD STOVE ONLY. TURN OFF THE STOVE AND
ALLOW SUFFICIENT TIME FOR IT TO COOL.
DISCONNECT POWER TO THE STOVE IF MAINTENANCE REQUIRES THE OPENING
OF SERVICE PANEL(S).
CLEANING DOOR GLASS:
Keep all objects away from the door and glass during stove operation. Only clean the
door glass with the stove shut down and the glass cool to the touch.
Use a soft lint free cloth to wipe the exterior of the glass and trims.
Use a damp paper towel or newspaper to clean the interior of the glass. To remove more
stubborn residues and stains, dip a damp paper towel in some fine ash from the firebox and
gentle rub them off. Your stove dealer also carry glass cleaners for tough cleaning jobs.
If the door glass dirty up quickly with heavy dark sooty film, this is an indication that the stove is
not operating properly. Adjustment of combustion air and/or clean the burn pot. A light white or
tan residue on the glass that can be easily wiped off is normal and an indication that the stove
is operating optimally.
ASH DISPOSAL:
Soot and Flyash: Formation and Need for Removal—The products of combustion
will contain small particles of flyash. The flyash will collect in the exhaust venting
system and restrict the flow of the flue gases. Incomplete combustion, such as occurs
during startup, shutdown, or incorrect operation of the room heater will lead to some
soot formation which will collect in the exhaust venting system. The exhaust venting
system should be inspected at least once every year to determine if cleaning is
necessary.
Every 60 to 120 hours of operation:
Open the door to get access to inside of the firebox. Take out the burn pot and scraped out the
ashes or clinkers inside the burn pot and poke out any obstructions in the air holes.
Grasp the ash clean-out slider and pull it out about two inches. Use a small hand brush and
sweep the firebox ashes and ashes under the burn pot into the opening uncovered by the
slider. The ashes will fall into the ash drawer below. Poor quality pellets with high ash content
will require frequent ash cleaning and disposal.
Empty the ash drawer when it reached about 3/4 full to minimize chance of ash spillage. This
may need to be done every third of fourth ash sweeping of the firebox (180 to 480 hours of
operation). Grasp the front lip of the ash drawer and pull it out carefully. Properly dispose of
the ashes.
CAUTION: Ashes can start fires. Never dispose of ashes in a combustible container.
Remove ashes only when stove and ashes are cold.
If the ashes are to be disposed of by burial in soil or otherwise locally dispersed, they should
be retained in the closed container until they are thoroughly cooled. Do not place other waste
materials in the ash container.
CAUTION: For safe and proper operation of the stove, the ash clean-out slider must be
pushed all the way in, ash drawer in place and the door securely latched.
27
OPTIMA PS1 PELLET STOVE
28
WITH THE DOOR
OPENED
ASH CLEAN-OUT
SLIDER
ASH DRAWER
Every ton of pellet fuel burned or 6 months:
Disconnect power to the stove before conducting the following maintenance.
Open the left side service panel. This can be done by using a Phillips screw driver and removing two
screws. Remove a screw on the side of the hopper, near the top front corner of the side panel; and
remove a screw at the front of the panel near the bottom. The side panel can also be detached by
swinging it out and lifting it up and away from the back, with the hopper lid down.
You will also need a 1/4” and a 3/8” hex nut driver. Remove the two screws holding the firebox trim
panel to the side of the firebox. Remove the two bolts and the clean-out cover on the side of the
firebox. Loosen the six 1/4” hex screws holding the exhaust blower motor mounting plate. Rotate the
mounting plate anti-clockwise and carefully remove the motor assembly. Place it down on the floor.
Use a shop vacuum equipped with a fine dust filter, a specialty steel canister vacuum designed for
removing ashes is preferred. Place the vacuum duct into the firebox clean-out opening and vacuum
out all the ash accumulations. Vacuum out the ash accumulations in the exhaust blower housing and
exhaust ducts. If the vent pipe is equipped with an ash clean-out tee, this is a good time to disconnect
it and clean it also. Use a vacuum brush and gently brush off all ash accumulations stuck to the
exhaust blower fan blades. Be careful not to bend the blades.
Properly replace all parts in the reverse order of disassembly.
Also vacuum out any lint of debris accumulations in and around the stove.
FIREBOX TRIM SCREWS
VENT CEAN-OUT TEE
FIREBOX CLEAN-OUT
COVER BOLTS
EXHAUST BLOWER
(LOOSEN 6 SCREWS)
SIDE SERVICE PANEL
SCREWS
28
OPTIMA PS1 PELLET STOVE
29
MISCELLANEOUS MAINTENANCE:
DOOR GLASS BREAKAGE
See your dealer for the exact replacement of door assembly. The owner should not attempt to
replace the special high temperature ceramic glass. A precision air wash system is also built
into the door assembly. If the door gasket is damaged, it can be replaced by your dealer with
exact factory replacement parts.
PAINT
You may touch up the Archgard Optima PS1 with STOVE BRIGHT 316-0100 Black high
temperature paint. The correct paint is available from your dealer. When you paint the stove,
remove the gold items (i.e., door), mask the control panel, control knobs, handles and cover
the area surrounding the stove from over spray. Follow the directions outlined on the spray
can. DO NOT attempt to paint while the stove is still warm. Keep the spray can away from any
source of heat or open flame. Ensure that there is adequate ventilation in the room from the
time you start painting until the paint is dry.
GOLD PLATED TRIMS
If you have gold doors trims, grills or other optional accessories, you will be happy to know
that they will not tarnish, however they are not scratch resistant. They require a totally abrasive
free cleaner. Use only mild soap and warm water or denatured alcohol to clean the gold when
the surface is cool. The use of any household cleaner, such as Windex, abrasive cleaners, or
any form of acid, may permanently etch or remove some of the gold plating. Before every fire,
be absolutely sure to wipe off all fingerprints from the gold plating. Acid from debris or even
your fingerprints may permanently etch the gold plating and void the warranty.
29
OPTIMA PS1 PELLET STOVE
30
DANGER: RISK OF ELECTRICAL SHOCK. DISCONNECT POWER
BEFORE SERVICING STOVE.
CAUTION: MOVING PARTS MAY CAUSE INJURY. HOT PARTS, DO NOT
OPERATE STOVE WITH SIDE OR BACK SERVICE PANELS
REMOVED OR OPENED.
ARCHGARD OPTIMA PS1 PELLET STOVE ELECTICAL CIRCUIT DIAGRAM
30
OPTIMA PS1 PELLET STOVE
31
COMPONENT LOCATIONS
RIGHT SIDE WITH
SERVICE PANEL REMOVED
HOPPER LID SWITCH
OVER TEMPERATURE
SWITCH
ELECTRONIC CONTROLLER
(MOUNTED ON SERVICE PANEL)
THERMOSTAT CONNECTION
ELECTRIC IGNITER
FEED AUGER MOTOR
AIR PRESSURE SWITCH
CONVECTION FAN
LEFT SIDE WITH
SERVICE PANEL REMOVED
PELLET FUEL HOPPER
BURN POT
PROOF OF FIRE
SWITCH
EXHAUST BLOWER
EXHAUST SLIDER
RESTRICTOR
31
OPTIMA PS1 PELLET STOVE
32
TROUBLESHOOTING
PROBLEM
Stove Will Not Start.
CAUSE
1. No electrical power.
Make sure the stove is plug in to a 120VAC
electrical outlet. Check outlet for electrical
power and the correct voltage.
The ON/OFF light should light when the ON/
OFF button is pressed and held for 2
seconds.
2. No pellet feed.
Make sure the hopper is filled with pellet fuel
as per specifications in the manual.
Keep the hopper lid closed to activate fuel
feed auger.
Securely latched the door. An open door will
trip the air pressure switch and disengage the
fuel feed auger.
If it is the first time starting the stove or the
hopper has run completely empty, the pellet
fuel feed system takes a long period of time
to load and start feeding fuel into the burn
pot. Two or three repeated start up maybe
required.
Check to see if FUEL FEED light on the
control light is flashing intermittently to
indicate activation of the fuel feed auger.
Listen for a faint intermittent hum of an
operating feed auger motor.
Make sure the hopper lid is
closed flat so as to contact
the auger interlock switch.
Make sure the door is closed
and securely latched.
CURE
If it is the initial start up or
the hopper has run
completely empty. Two or
three start-ups and the use
of the FUEL FEED button is
required.
The stove control panel will
return a flashing #2 light if it
encounters a hopper lid ajar
or a tripped air pressure
switch related problem.
3. Excessive negative pressure Balance pressure in the room by opening a
in the room.
window. Check for flashing #2 light.
4. Block vent system.
Check vent system for blockage. Check the
clean-out Tee for ash build-up. Check vent
cap. Check for flashing #2 light.
5. Clogged combustion air inlet Check for blockage in the air intake
or inlet pipe.
connector and duct.. Check for flashing #2
light.
6. Clogged exhaust blower or
exhaust passages.
Conduct ash removal maintenance in the
stove. Check for flashing #2 light.
7. Defective exhaust blower.
Check for operation of the exhaust blower.
Listen for hum next to the exhaust connector.
Check for flashing #2 light.
8. Defective air pressure
switch.
Check for blockage of tubing connected to
the Air pressure switch. Check of operation of
the switch. Check for flashing #2 light.
32
OPTIMA PS1 PELLET STOVE
PROBLEM
Stove Will Not Start.
(Cont…)
Stove won’t respond to
changes to the heat level.
Pellet feeds into the burn
pot but will not start. Burn
pot fills with pellets and
then shuts down.
CAUSE
33
CURE
9. Tripped or defective
Press the red manual reset button on the switch.
over temperature switch. Check for proper operation of the switch and its
connections. Also check to see if the convection
blower is working properly.
10. Defective control
board.
Check connections. Check to see if the on-board
fuse is blown. It is a mini 5A fast blow fuse. Before
replacing the fuse, check for the cause of the
blown fuse. It could be a short-out wire or
defective electrical components.
1. Stove is still in start-up
cycle.
Wait for at least 10 minutes. The stove well also
have to heat up sufficiently to turn on the Proof of
fire switch.
Even if you are starting a warm stove, you still
have to wait at least 10 minutes for the start-up
cycle to end. A good indicator of the stove has
passed the start-up cycle is by the feel of high
convection air flow on high heat setting.
2. The stove controller is
set to Thermostat and it
is not requesting heat.
Switch controller to Manual or adjust the
thermostat to request heat
3. The Proof of fire switch
is defective.
Check for proper operation of the Proof of fire
switch.
If the flames are going strong and yet the stove
shuts down after 15 minutes of operation with the
#3 light flashing is a good indication of a defective
switch.
1. Burn pot is clogged.
Clean out burn pot of ash and clinkers. Poke out
any block air holes.
2. Burn pot is not installed
or seated properly
Hot air from the igniter can not reach the pellet in
the burn pot to start ignition. Install and seat burn
pot properly.
3. Auto start electric igniter Remove the burn pot and check to see if the
is burned out.
electric igniter is glowing red inside the igniter
tube.
If the igniter is defective, the stove can still be
started manually. Put some pellet mixed with
pellet stove starter in the burn pot and light it
with match or lighter. Let the flames
established. Press the ON/OFF button on the
control panel to start the stove.
4. Air inlet to the igniter
tube is blocked.
If igniter is glowing and the burn pot is seated
properly, disconnect electrical power to the stove
and open the service panel to check for any
obstruction to the air inlet holes on the igniter
tube.
33
OPTIMA PS1 PELLET STOVE
PROBLEM
CAUSE
34
CURE
Glass is Dirty
1. Need more combustion air.
Push combustion air control knob in.
(A light white/tan accumulation is
normal)
2. Burn pot is clogged
Clean out burn pot and poke out
clogged air holes.
3. Poor fuel
Change to dry clean fuel. Use higher
quality premium pellet fuel.
4. Clogged venting system.
Check for blockage in the venting
system. Check vent cap and ash
clean-out Tee.
5. Clogged combustion air inlet or Check for blockage in the air intake
inlet pipe.
connector and duct..
6. Excessive negative pressure in Balance pressure in the room by
the room.
opening a window.
Flame Goes Out on Low or
Won't Burn Overnight On Low.
The Heat Level #3 light will flash
on the control panel to indicate
that the Proof of Fire sensor has
tripped.
7. Clogged exhaust blower or
exhaust passages.
Conduct ash removal maintenance.
8. Defective exhaust blower.
Check for proper voltage to the stove.
If the blower runs very slow, replace
blower.
1. Burn pot is clogged.
Clean out burn pot and poke out
clogged air holes.
2. Not high enough pellet fuel
feed rate.
Use the LOW ADJUST button to
increase fuel feed on heat setting 1.
Select heat setting #1. Press the LOW
ADJUST button until both heat setting
1 and 4 light is lit.
3. Poor fuel
Change to dry clean fuel. Use higher
quality premium pellet fuel. Increase
fuel feed rate on low by using the
LOW ADJUST button as above.
4. Combustion air set too high
Gradually restrict combustion air by
pulling the control knob out.
34
OPTIMA PS1 PELLET STOVE
35
PARTS LIST FOR OPTIMA PS1
NUMBER
PART NO.
PS1-FS
DESCRIPTION
FREESTANDING OPTIMA PS1 PELLET STOVE STANDARD (ALL OTHER OPTIONAL COMPONENTS MUST BE ADDED SEPARATELY)
OPTIONAL ITEMS
1
PS1-BRPL
DECORATIVE BRICK LINER
2
PS1-GDDF
DOOR FRAME (GOLD PLATED)
3
PS1-BNDF
DOOR FRAME ( NICKEL PLATED)
4
PS1-GDGR
GRILLS (GOLD PLATED)
5
PS1-BNGR
GRILLS (NICKEL PLATED)
6
PS1-GTBT
GRANITE TOP RETAINER KIT (BLACK)
7
PS1-GTKG
GRANITE TOP RETAINER KIT (GOLD PLATED TRIMS)
8
PS1-GTNT
GRANITE TOP RETAINER KIT (NICKEL PLATED TRIMS)
8
PS1-TTTK
TILE TRAY TOP KIT
10
PS1-MFBP
MULT-FUEL BURN POT KIT
REPLACEMENT ITEMS
1
314-0015
DOOR GASKET 3/4” DIA. GRAPHITE ROPE GASKET
2
PS1-DOOR
DOOR ASSEMBLY
2
300-0145
DOOR HANDLE
4
300-0146
COMBUSTION AIR ADJUST KNOB
5
305-0052
ELECTRIC IGNITER
6
PS1-POT
BURN POT (STANDARD)
7
305-0048
PROOF OF FIRE SWITCH
8
305-0049
OVER TEMPERATURE SWITCH
9
305-0047
AIR PRESSURE SWITCH
10
305-0045
HOPPER LID SWITCH
11
305-0053
EXHAUST BLOWER
12
305-0043
CONVECTION BLOWER
13
305-0046
FUEL FEED AUGER MOTOR
14
305-0050
ELECTRONIC CONTROL BOARD
15
PS1-MFBP
MULTI-FUEL BURN POT
16
PS1-MFRA
MULTI-FUEL BURN POT RAKE
17
PS1-MFCA
MULTI-FUEL BURN POT CAM ROD ASSEMBLY
18
PS1-MFMO
MULTI-FUEL MOTOR
35
OPTIMA PS1 PELLET STOVE
36
ARCHGARD LIMITED WARRANTY
This Limited Warranty is made by ARCHGARD INDUSTRIES LTD., hereinafter referred to as “Archgard”. Archgard warrants to the
original purchaser of an Archgard Wood burning fireplace (s) that the product will be free of defects in materials and workmanship under
normal use and service, for a “lifetime”.
INCLUSIONS: “LIFETIME LIMITED WARRANTY”
❖ Firebox and firebox liners against splitting or cracking.
❖ Ceramic Glass against thermal breakage.
❖ All plated trims and accessories against defective manufacturing
❖ NOTE: Discoloration and some minor movement of certain parts are normal and are not a defect and therefore, not covered under
warranty.
The above will be covered “parts & subsidized labor” to the original purchaser for FIVE years and “parts” only thereafter from original
date of purchase.
Special Finishes—One year on brushed nickel louvers and doors. You can expect some changes in color as the product “ages” with
constant heating and cooling. Archgard warranties the product for any manufacturing defects on the original product. However, the
manufacturers warranty does not cover changing colors and marks, ie: finder prints etc applied after the purchase of the product. Damage
from the ise of abrasive cleaners is not covered by warranty
INCLUSIONS: “ONE YEAR LIMITED WARRANTY”
❖ All electrical components, such as electronic controller, control panel, blowers, fans, auger motors, wiring and snap discs.
❖ Burn pot, auger feed components and multi-fuel burn pot ash disposal components.
The above will be covered “parts & subsidized labor” to the original purchaser for ONE year from date of purchase.
EXCLUSIONS: “1 YEAR AND 5 YEAR LIMITED WARRANTY”
❖ Archgard does not offer warranty on damages to fireplace mantel (s), trims or tiles.
❖ Travel time or mileage to original purchasers residence. Archgard suggests that you pre-arrange travel expenses with your Authorized
Archgard Dealer.
❖ Door Latch Hardware, paint, gaskets or trim.
❖ This warranty does not cover installation and operational related problems such as over-firing, use of unsuitable fuel, lack of
maintenance, user abuse, downdrafts or spillage caused by environmental conditions, nearby trees, buildings, hill tops, mountains,
inadequate venting or ventilation, excessive offsets, negative air pressures caused by mechanical systems such as furnaces, fans, clothes
dryers, etc.
WHAT TO DO IN THE EVENT OF A PROBLEM:
❖ Thoroughly read your manual.
❖ If you cannot solve the problem, contact your Archgard Dealer or representative.
❖ When calling for help please have the following information:
Model of your Stove Serial Number Place of Purchase
Date of Purchase Problem Description
❖ NOTE: Warranty may be void if work is carried out by an unqualified person (s). Only original Archgard parts may be used. Please
consult your Archgard dealer or representative if in doubt about a replacement part (s).
OBTAINING WARRANTY SERVICE:
To obtain warranty service, the original purchaser shall return the defective part (s) to the original authorized Archgard selling dealer
transportation prepaid, along with the serial number of the appliance and proof of purchase. Any defective part, in our
judgment, will be repaired or replaced at Archgard’s discretion. The dealer must obtain approval from Archgard before any
repairs are made.
* Subsidy according to job scale as predetermined by Archgard Industries Ltd.
36
OPTIMA PS1 PELLET STOVE
37
LIMITED WARRANTY CONT’D
WARRANTY LIMITATION:
THIS LIMITED WARRANTY IS MADE IN LIEU OF ALL OTHER WARRANTIES, EXPRESSED OR IMPLIED AS TO QUALITY,
MERCHANTABILITY OR FITNESS FOR PARTICULAR PURPOSE.
Archgard is not liable for freight or labor on any appliance replaced in the field. Any part or parts of this unit which in our judgment show
evidence of such defects will be repaired or replaced at Archgard’s option, through an accredited dealer or Agent provided that the defective part
be returned to the dealer or agent Transportation Prepaid, if requested. The appliance is only warranted for the use as intended by the
installation and operating instruction and local building codes. The warranty will not cover damage due to accident, misuse, abuse, alteration,
improper installation or “Acts Of God”, “Act of Terrorism” or Shipping.
Installation and environmental problems are not the responsibility of the manufacturer and therefore are not covered under the terms of this
warranty.
Performance problems due to operator error will not be covered by this warranty policy.
Products made or provided by other manufacturers and used on conjunction with the operation of the appliance without prior authorization form
Archgard Industries may nullify your warranty on this product
This limited warranty is void unless the appliance is installed by a qualified installer, in accordance with the instructions furnished with the
appliance. Some Provinces or States do not allow limitations on how long an implied warranty lasts, so the above limitation may not apply to the
original purchaser. Any damage resulting from defects in this product, is limited to the replacement of the defective part (s) and does not include
incidental and consequential exposures sustained in connection with the product. This includes facing (s), mantle (s), cabinet (s), tile (s) or any
other finishes resulting from removal of the appliance. This warranty is limited to residential use only and gives the consumer specific rights.
These rights may vary from State to State or Province to Province.
37
POSTAGE
CUT ALONG LINE
WARRANTY REGISTRATION
ARCHGARD INDUSTRIES LTD.
7116 BEATTY DRIVE
MISSION, B.C. CANADA
V2V 6B4
CUT ALONG LINE
FOLD DOWN AT LINE
FOLD DOWN AT LINE & TAPE CLOSED
Model # :
OPTIMA PS1
Date Installed:
/
mm
/
dd
Address:
Name:
City:
CUT ALONG LINE
Serial #:
State/Prov:
ZIP:
Phone: ( _____ )
State/Prov:
ZIP:
Phone: ( _____ )
State/Prov:
ZIP:
Phone: ( _____ )
Dealer's Name & Address:
City:
Installer's Name & Address:
City:
Why did you choose this product?
Thank you for purchasing our product and filling out this warranty card.
yyyy
Archgard Industries Ltd.
7116 Beatty Drive
Mission, B.C. V2V 6B4
Canada
Website: www.archgard.com
Archgard fireplace products are designed with reliability and simplicity in mind.
In addition, our internal Quality Assurance Team carefully inspects each unit thoroughly before it leaves our door. Archgard is pleased to extend this Limited Lifetime Warranty to the original purchaser of an Archgard Product.
See page 36 for details.
We recommend you record the following information:
Fireplace Model Number:
Date of Installation:
Dealer’s Name & Address:
Dealer’s Phone Number:
OPTIMA PS1
Serial Number: