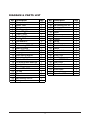
1
10-Pc.
Multi-Purpose
Angle Ginder Set
OWNER'S MANUAL
WARNING:
Read carefully and understand all INSTRUCTIONS before
operating. Failure to follow the safety rules and other basic
safety precautions may result in serious personal injury.
Item # 1433781
Thank you very much for choosing a Wel-Bilt TM product! For future reference,
please complete the owner's record below:
Model: _______________
Purchase Date: _______________
Save the receipt, warranty and these instructions. It is important that you read
the entire manual to become familiar with this product before you begin using it.
This machine is designed for certain applications only. The distributor cannot
be responsible for issues arising from modification. We strongly recommend
this machine is not modified and/or used for any application other than that for
which it was designed. If you have any questions relative to a particular application,
DO NOT use the machine until you have first contacted the distributor to
determine if it can or should be performed on the product.
For technical questions please call 1-800-222-5381.
INTENDED USE
This Angle Grinder Set is designed for grinding metal and removing rust by
fitting specific accessories to the unit.
TECHNICAL SPECIFICATIONS
Description
Specifications
Disc Diameter:
Disc Bore Diameter :
Spindle Thread:
No Load Speed:
Input Power:
4 1/2 in.
7/8 in.
5/8 in.
x 11
11,000 RPM
500 Watt
1
GENERAL SAFETY RULES
WARNING! Read and understand all instructions. Failure to follow all instructions listed
below may result in electric shock, fire and/or serious injury.
WARNING! The warnings, cautions, and instructions discussed in this instruction
manual cannot cover all possible conditions or situations that could occur. It must
be understood by the operator that common sense and caution are factors which
cannot be built into this product, but must be supplied by the operator.
SAVE THESE INSTRUCTIONS
WORK AREA
• Keep work area clean, free of clutter and well lit. Cluttered and dark work areas can
cause accidents.
• Do not use your tool where there is a risk of causing a fire or an explosion; e.g. in
the presence of flammable liquids, gasses, or dust. Power tools create sparks, which may
ignite the dust or fumes.
• Keep children and bystanders away while operating a power tool. Distractions can
cause you to lose control, so visitors should remain at a safe distance from the work area.
• Be aware of all power lines, electrical circuits, water pipes and other mechanical
hazards in your work area, particularly those hazards below the work surface hidden from
the operator's view that may be unintentionally contacted and may cause personal harm or
property damage.
• Be alert of your surroundings. Using power tools in confined work areas may put you
dangerously close to cutting tools and rotating parts.
ELECTRICAL SAFETY
WARNING! Always check to ensure the power supply corresponds to the voltage on the
rating plate.
• Do not abuse the cord. Never carry a portable tool by its power cord, or yank tool or
extension cords from the receptacle. Keep power and extension cords away from heat, oil,
sharp edges or moving parts. Replace damaged cords immediately. Damaged cords may
cause a fire and increase the risk of electric shock.
• Grounded tools must be plugged into an outlet properly installed and grounded in
accordance with all codes and ordinances. Never remove the grounding prong or modify
the plug in any way. Do not use any adapter plugs. Check with a qualified electrician if you
are in doubt as to whether the outlet is properly grounded.
• Double insulated tools are equipped with a polarized plug (one blade is wider than the
other). This plug will fit in a polarized outlet only one way. If the plug does not fit fully in the
outlet, reverse the plug. If it still doesn't fit, contact a qualified electrician to install a
polarized outlet. Do not change the plug in any way.
• Avoid body contact with grounded surfaces such as pipes, radiators, ranges, and
efrigerators. There is an increase risk of electric shock if your body is grounded.
• When operating a power tool outside, use an outdoor extension cord marked “W-A” or
“W.” These cords are rated for outdoor use and reduce the risk of electric shock.
2
• Extension Cord Use:
A. Use only 'Listed' extension cords. If used outdoors, they must be marked “For
Outdoor Use.” Those cords having 3-prong grounding type plugs and mating
receptacles are to be used with grounded tools.
B. Replace damaged or worn cords immediately.
C. Check the name plate rating of your tool. Use of improper size or gauge of extension
cord may cause unsafe or inefficient operation of your tool. Be sure your extension
cord is rated to allow sufficient current flow to the motor. For the proper wire gauge
for your tool, see chart.
CHART FOR MINIMUM WIRE SIZE OF EXTENSION CORD:
If in doubt, use larger cord. Be sure to check voltage requirements of the tool to your
incoming power source.
• Do not expose power tools to rain or wet conditions. Water entering a power tool will
increase the risk of electric shock.
• Do not let your fingers touch the terminals of plug when installing to or removing from
the outlet.
• Ground fault circuit interrupters. If work area is not equipped with a permanently
installed Ground Fault Circuit Interrupter outlet (GFCI), use a plug-in GFCI between power
tool or extension cord and power receptacle.
PERSONAL SAFETY
• Stay alert, watch what you are doing and use common sense when operating a power
tool. Do not use a power tool while you are tired or under the influence of drugs, alcohol or
medication. A moment of inattention while operating power tools may result in serious
personal injury.
• Dress properly. Do not wear loose clothing, dangling objects, or jewelry. Keep your hair,
clothing and gloves away from moving parts. Loose clothes, jewelry or long hair can be
caught in moving parts. Air vents often cover moving parts and should be avoided.
• Use safety apparel and equipment. Use safety goggles or safety glasses with side
shields which comply with current national standards, or when needed, a face shield. Use
as dust mask in dusty work conditions. This applies to all persons in the work area. Also
use non-skid safety shoes, hardhat, gloves, dust collection systems, and hearing
protection when appropriate.
• Avoid accidental starting. Do not carry the power tool with your finger on the switch.
Ensure the switch is in the off position before plugging tool into power outlet. In the event
of a power failure, while a tool is being used, turn the switch off to prevent surprise starting
when power is restored.
• Do not overreach. Keep proper footing and balance at all times.
3
• Remove adjusting keys or wrenches before connecting to the power supply or turning
on the tool. A wrench or key that is left attached to a rotating part of the tool may result in
personal injury.
• Always inspect the grinder before use and have any damage repaired by an authorized
service agent.
• Make sure the disc is not contacting the workpiece before the switch is turned on.
• Keep the guard in place.
• Use only discs having a maximum operating speed at least as high as 10,000 RPM. When
using depressed center discs, be sure to use only fiberglass reinforced discs.
• Check the disc carefully for cracks or damage before operation. Replace cracked or damaged discs immediately.
• Be careful not to damage the spindle or either of the disc flanges. Damage to these parts
could result in disc breakage.
• Hold the tool firmly.
• Before using the tool on an actual workpiece, let it run for a while. Watch for vibration or
wobbling that could indicate poor installation of the disc or a poorly balanced disc.
• Use only discs designed for each specified function and purpose. Do not use cutting discs
for grinding or metal wheels on masonry.
• Watch out for flying sparks. Hold the tool at an angle of approximately 15˚- 30˚ to the workpiece surface.
• It should never be necessary to force the tool. If rotational speed drops abnormally the
pressure should be released immediately. Little more than the weight of the tool should be
applied. Forcing and excessive pressure can cause dangerous disc breakage or damage
to the tool.
TOOL USE AND CARE
• Do not force the tool. Tools do a better and safer job when used in the manner for which
they are designed. Plan your work, and use the correct tool for the job.
• Never use a tool with a malfunctioning switch. Any power tool that cannot be controlled
with the switch is dangerous and must be repaired by an authorized service representative
before using.
• Disconnect power from tool and place the switch in the locked or off position before
servicing, adjusting, installing accessories or attachments, or storing. Such preventive
safety measures reduce the risk of starting the power tool accidentally.
• Secure work with clamps or a vise instead of your hand to hold work when practical. This
safety precaution allows for proper tool operation using both hands.
• Store idle tools. When tools are not is use, store them in a dry, secure place out of the
reach of children. Inspect tools for good working condition prior to storage and before re-use.
• Use only accessories that are recommended by the manufacturer for your model.
Accessories that may be suitable for one tool may create a risk of injury when used on
another tool.
• Keep guards in place and in working order.
• Never leave tool running unattended.
4
ASSEMBLY
Be sure to disconnect the angle grinder from the power supply before attaching or removing
the disc or attachment. Make sure that a grinding or cutting disc is mounted with the label on
top or facing the angle grinder.
If you are fitting any other kind of attachment, refer to attachment fitting instructions. Incorrect
attachments can cause the motor to burn out, generally damaging the tool or causing injury.
Attaching and removing the grinding disc provided.
• Inspect the disc before fitting and during use to ensure it is not deformed or cracked.
• Ensure that the guard is fitted and at an angle which ensures it is between you and the
grinding disc. The guard is there to protect you from dislodging objects at the workpiece
and from accidental contact with the disc, of your hand, fingers or other parts of yourself.
• Do not fit or use a grinding disc for cutting applications. For cutting, use a cutting disc and
ask your hardware retailer for advice regarding the type of material you wish to cut.
Grinding discs are used for grinding metal only.
• The grinding disc provided is not solid. It is made from grit which is bonded together with
reinforcement and adhesives. It is always possible that a part of the disc can dislodge and
fly away from the tool at high speed. This is why you must wear the appropriate safety
equipment (glasses, gloves and protective clothing) described herein and follow all safety
instructions also described herein.
• Do not use any kind of attachment (discs or otherwise) that has a diameter of greater
than 4-1/2 in.
• Remove the outside retaining flange by hand if loose. If tight, depress the spindle lock
button at the top of the gear box housing, rotate the spindle to locate the lock position.
Once the spindle is locked and cannot be rotated, use the wrench supplied to loosen the
retaining flange.
• Remove the grinding disc from its envelope.
• Holding the angle grinder with the spindle facing upwards, ensure the nonthreaded flange
is on the spindle and located correctly. The two machined flat sections on one side of the
nonthreaded flange must face the angle grinder and locate in the appropriate position on
the spindle.
• Insert the grinding disc onto the angle grinder spindle with the disc label facing the angle
grinder. The hole in the disc should be located onto the spindle. Ensure that the hole in the
disc locates and fits firmly into the ring section of the nonthreaded flange.
• Screw the threaded flange onto the spindle with the protruding ring section facing the
angle grinder. This ring section must locate with the hole in the grinding disc.
• Tighten the threaded flange by locking the spindle and tighten with the spanner provided.
• Removal of the disc is conducted in reverse order to the above.
• Regularly check that the disc retaining flange has not loosened during use.
NOTE: When fitting a cutting disc, the ring section on both flanges should face away from the disc.
5
Guard Replacement
See Figure 1.
After extended use, the guard may
become worn and need adjustment or
to be replaced. Or if you drop the
angle grinder and damage the guard,
it may be necessary to replace it.
To replace the guard:
1. Unplug the angle grinder.
2. Depress spindle lock button and
rotate clamp nut with provided
wrench until spindle locks.
3. Using the wrench provided, loosen
and remove nut, grinding wheel
and disc flange from spindle.
Note: To prevent damage to the spindle
or spindle lock, always allow motor to
come to a complete stop before
engaging spindle lock.
4. Using a screwdriver, loosen the
clamp screw.
5. Remove the guard.
6. Place the new guard on the
shoulder of the bearing cap.
7. Rotate guard to the correct position.
8. Tighten clamp screw securely.
Brush Replacement
See Figure 2.
This product has externally accessible
brush assemblies that should be
periodically checked for wear.
1. Unplug the angle grinder.
2. With a flat head screwdriver,
remove the brush caps. The brush
assembly is spring loaded and will
pop out when you remove the
brush cap.
3. Remove the brush assembly
(brush and spring). Check the
brushes first. You need to replace the brush if the length of the carbon remains less than
1/4in. Do not replace one side without replacing the other.
6
4. Hold the brush cap with the carbon brush and slightly insert into the brush tube. Make
sure curvature of brush matches curvature of motor and that brush moves freely in
brush tube.
5. Replace brush cap and tighten securely. Do not overtighten.
MAINTENANCE
WARNING: Make sure this tool is disconnected from its power source before attempting
any maintenance, cleaning, or inspection.
• Maintain your tools. It is recommended that the general condition of any tool be examined before it is used. Keep your tools in good repair by adopting a program of conscientious repair and maintenance in accordance with the recommended procedures found in
this manual. If any abnormal vibrations or noise occurs, turn the tool off immediately and
have the problem corrected before further use. Have necessary repairs made by qualified
service personnel.
• Keep cutting tools sharp and clean. Properly maintained cutting tools with sharp cutting
edges are less likely to bind and are easier to control. Keep handles dry, clean, and free
from oil and grease.
• Cleaning. Use only soap and a damp cloth to clean your tools. Many household cleaners
are harmful to plastics and other insulation. Never let liquid get inside a tool.
1. When not in use the grinder should be stored in a dry, frostfree location not within the
reach of children.
2. Keep ventilation slots of the grinder clean at all times and prevent any foreign matter
from entering.
3. If the enclosure of the grinder requires cleaning do not use solvents but a moist soft cloth
4. Regularly check the carbon brushes. Brushes should be replaced before they wear out.
Both brushes should be replaced at the same time.
7
TROUBLE SHOOTING GUIDE
Be sure to follow safety rules and instructions
PROBLEM
Unit will not operate
Unusual sound or runs
slowly
POSSIBLE CAUSE
REMEDY
No supply
Check that supply is available at
power outlet
Switch is faulty
Service agent repair
Motor components
Service agent repair
open or short circuited
Mechanical obstruction
Service agent repair
Motor is overloaded by
unnecessary force
Reduce force applied to tool
Armature has shorted
sections
Service agent repair
Motor runs but disc will Gear shaft or woodruff key
not
is broken
Heavy sparking occurs
inside
Motor enclosure gets
hot
Service agent repair
Disc flange nut not tight
Ensure flange is tight
Armature short circuited or
open circuited
Service agent repair
Surface of commutator not
clean
Service agent repair
Working load too heavy
Reduce force applied to tool
Tool improperly assembled Service agent repair
Low supply voltage
Ensure supply voltage is correct
and if extension cord is used that
it is of adequate rating and fully
unreeled
Gear enclosure gets too Lack of grease in gear box
hot
Service agent maintenance
Grease is contaminated by Service agent maintenance
dirt or foreign matter
WARNING!: The information above is provided to assist the owner to determine action
required to ensure optimum performance of the tool. Do not tamper with the tool. If a
problem is encountered which is not resolved by the above remedies take the unit to an
authorized service agent.
8
DIAGRAM & PARTS LIST
No.
1
2
3
4
5
6
7
8
9
10
11
12
13
14
15
16
17
18
19
20
21
22
23
25
26
27
Description
Clamp nut
Wheel disc
Flange
Wheel guard
Screw M5 20
Output shaft
Screw M4 12
Key 3 10
Flat washer 4
Gear case cover
Ball bearing6200-2Z
Bearing clamp
Screw ST4.2X10
Large gear
Wave spring washer
Retaining ring10
Side handle
Oil-impergnated bearings
Lock pin
Pin spring
Screw ST4.2X20
Pin cap
Gear case
Pinion
Ball bearing 608-2Z
O-ring
Qty.
1
1
1
1
1
1
4
2
4
1
1
1
3
1
1
1
1
1
1
1
4
1
1
1
1
1
No.
29
30
31
32
33
34
35
36
37
38
40
43
44
45
46
48
49
50
51
52
53
54
55
9
Description
Armature
Ball bearing 607-2Z
Bearing cover
Windfield
Stator
Stator case
Pusher rod
Pusher
Spring
Cord clamp
Terminal block
Switch
Brush holder
Brush
Brush cap
Cord & plug
Screw ST4.2X16
Rear cover
Cord protector
Spanner
Brand lable
Name plate
Square nut M5
Qty.
1
1
1
1
1
1
1
1
1
1
1
1
2
2
2
1
4
1
1
1
1
1
1
1
2
3
4
55
5
6
8
7
9
10
11
12
13
14
15
16
18
17
19
21
20
22
23
25
26
27
8
29
30
31
52
32
33
53
34
43
36
38
49
35
48
37
54
44
45
46
40
50
49
51
WARNING
Some dust created by power sanding, sawing, grinding, drilling,and other construction activities contains
chemicals known to the State of California to cause cancer, birth defects or other reproductive harm.
Some examples of these chemicals are:
• lead from lead-based paints,
• crystalline silica from bricks and cement and other masonry products, and
• arsenic and chromium from chemically-treated lumber.
Your risk from these exposures varies, depending on how often you do this type of work. To reduce your
exposure to these chemicals: work in a well ventilated area, and work with approved safety equipment,
such as those dust masks that are specially designed to filter out microscopic particles.