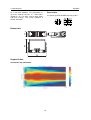
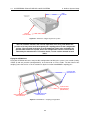
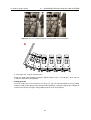
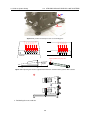
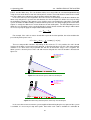
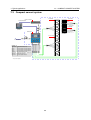
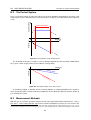
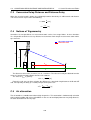
1
5SER-ANUAL SOUNDPROELGROUPCOM AXIOM SERIES USER MANUAL Version 2.0 February 27, 2008 c 2006-2008 Proel SpA Copyright Text and images by Daniele Ponteggia, Supervised by Remo Orsoni, Mario Di Cola, Rinaldo Grifoni cooperated for text and images in chapter 5, Cover art by Cinzia Calcagnoli. Version 2.0 - February 27, 2008 All contents of this manual are for the purpose of information and reference only; specifications and aspects of each product are subject to change at any time. Proel SpA is not responsible for any possible error in the contents of this manual. All rights (translation, reproduction, electronic memorization, total or partial adaptation by any means) are reserved. Names and brands quoted throughout the manual are generally deposited or registered by the respective manufacturers. Contents 1 Introduction 1.1 The sound out front! . . . . . . . . . . . . . . . . . . 1.1.1 Vertical Array Systems . . . . . . . . . . . . . 1.1.2 AXIOM Vertical Array Systems . . . . . . . . 1.1.3 Typical applications of AXIOM Vertical Arrays 1.2 Technological Solutions . . . . . . . . . . . . . . . . 1.2.1 Components . . . . . . . . . . . . . . . . . . 1.2.2 Technological Solutions . . . . . . . . . . . . . . . . . . . . . . . . . . . . . . . . . . . . . . . . . . . . . . . . . . . . . . . . . . . . . . . . . . . . . . . . . . . . . . . . . . . . . . . . . . . . . . . . . . . . . . . . . . . . . . . . . . . . . . . . . . . . . . . . . . . . . . . . . . . . . . . . . . . . . . . . . . . . . . . 1 1 1 3 3 6 6 7 2 Specifications 2.1 AX3210P . . 2.2 AX1118SP . 2.3 EDGE121SP 2.4 AX2265P . . 2.5 AX1115SP . 2.6 DSO26 . . . 2.7 LAC . . . . . . . . . . . . . . . . . . . . . . . . . . . . . . . . . . . . . . . . . . . . . . . . . . . . . . . . . . . . . . . . . . . . . . . . . . . . . . . . . . . . . . . . . . . . . . . . . . . . . . . . . . . . . . . . . . . . . . . . . . . . . . . . . . . . . . . . . . . . . . . . . . . . . . . . 9 10 13 16 18 21 23 25 3 Accessories 3.1 Accessories for flown or stacked installation . . . . . 3.2 Accessories for transportation and care of the systems 3.3 Amplifier racks, cabling . . . . . . . . . . . . . . . . . 3.4 Suspension towers and engines . . . . . . . . . . . . . . . . . . . . . . . . . . . . . . . . . . . . . . . . . . . . . . . . . . . . . . . . . . . . . . . . . . . . . . . . . . . . . . . . . . . . . . . . . . . . 27 27 28 28 28 4 Sound design with AXIOM 4.1 The sound reinforcement issue . . . . . 4.2 Design instruments . . . . . . . . . . . . 4.2.1 LAC . . . . . . . . . . . . . . . . 4.2.2 EASE . . . . . . . . . . . . . . . 4.3 Flown or stacked arrays . . . . . . . . . 4.4 The curvature of the array . . . . . . . . 4.5 System Processing . . . . . . . . . . . . 4.5.1 AX3210P System Processing . . 4.6 The low range . . . . . . . . . . . . . . . 4.6.1 Arrangement of subs . . . . . . . 4.6.2 Temporal Alignment . . . . . . . 4.7 Notes on the power of the amplification . . . . . . . . . . . . . . . . . . . . . . . . . . . . . . . . . . . . . . . . . . . . . . . . . . . . . . . . . . . . . . . . . . . . . . . . . . . . . . . . . . . . . . . . . . . . . . . . . . . . . . . . . . . . . . . . . . . . . . . . . . . . . . . . . . . . . . . . . . . . . . . . . . . . . . . . . . . . . . . . . . . . . . . . . . . . . . . . . . . . . . . . . . . . . . . . . . . . . . . . . . . . . . . . . . . . . . . . . . . . . . . . . . . . . . . . . . . . . . . . 31 31 32 32 35 35 36 36 37 37 38 39 39 5 Guide to System Setup 5.1 Suspending AX3210P and AX1118SP Systems . . . . . . . . . . . . . . . . . . . . . . . . 5.1.1 The suspension of AX3210P systems with KPTAX3210 flying bar . . . . . . . . . . 5.1.2 Flying an array of AX3210P and AX1118SP using flying bar KPTAX3210 . . . . . 5.1.3 Flying an array of AX3210P and AX1118SP systems using flying bar KPTAX3210S 5.2 Stacking AX3210P and AX1118SP systems . . . . . . . . . . . . . . . . . . . . . . . . . . 5.2.1 Stacking AX3210P systems on flying bar KPTAX3210 . . . . . . . . . . . . . . . . 41 41 41 53 54 55 55 . . . . . . . . . . . . . . . . . . . . . . . . . . . . . . . . . . . . . . . . . . . . . . . . . . . . . . . . . . . . . . . . . . . . . . . . . . . . . . . . . . . . . . . . . . . . . . . . . . . . . . . . . . . . . . . . . . . . . . . . . . . . . . . . . . . . . . . . . . . . . . . iii . . . . . . . . . . . . . . . . . . . . . . . . . . . . . . . . . . . . . . . . . . . . . . . . . . . . . . . . . . . . . . . . . . . . . . . . . . . . . . . . . . . . . . . . . . . . . . . . . . . . . . . . . . . CONTENTS 5.3 5.4 5.5 5.6 5.7 5.8 CONTENTS 5.2.2 Stacking arrays of AX3210P and AX1118SP systems combined on flying bar KPTAX3210 . . . . . . . . . . . . . . . . . . . . . . . . . . . . . . . . . . . . . . . . . Suspending AX2265P and AX1115SP Systems . . . . . . . . . . . . . . . . . . . . . . . . 5.3.1 The suspension of AX2265P systems with KPTAX2265 flying bar . . . . . . . . . . 5.3.2 Flying an array of AX2265P and AX1115SP using flying bar KPTAX2265 . . . . . Stacking AX2265P and AX1115SP systems . . . . . . . . . . . . . . . . . . . . . . . . . . 5.4.1 Stacking AX2265P systems on flying bar KPTAX2265 . . . . . . . . . . . . . . . . 5.4.2 Stacking arrays of AX2265P and AX1115SP systems combined on flying bar KPTAX2265 . . . . . . . . . . . . . . . . . . . . . . . . . . . . . . . . . . . . . . . . . Notes on safety . . . . . . . . . . . . . . . . . . . . . . . . . . . . . . . . . . . . . . . . . . 5.5.1 Inspection and maintenance . . . . . . . . . . . . . . . . . . . . . . . . . . . . . . Responsibility . . . . . . . . . . . . . . . . . . . . . . . . . . . . . . . . . . . . . . . . . . . What you need to do . . . . . . . . . . . . . . . . . . . . . . . . . . . . . . . . . . . . . . . What you need to avoid . . . . . . . . . . . . . . . . . . . . . . . . . . . . . . . . . . . . . 6 Operating guide 6.1 Necessary tools . . . . . . . . . . . . . . . . . . . . . . 6.1.1 A PC with Windows Operating System . . . . . . 6.1.2 Cable testing . . . . . . . . . . . . . . . . . . . . 6.1.3 Test Signal generator . . . . . . . . . . . . . . . 6.1.4 Real time analyzer and transfer function analyzer 6.1.5 Measurement tools for distance and angle . . . . 6.2 Components testing . . . . . . . . . . . . . . . . . . . . 6.3 System Design . . . . . . . . . . . . . . . . . . . . . . . 6.4 Installation of the system . . . . . . . . . . . . . . . . . 6.4.1 Power up procedure . . . . . . . . . . . . . . . . 6.4.2 Adjustment . . . . . . . . . . . . . . . . . . . . . 6.5 During the show . . . . . . . . . . . . . . . . . . . . . . 6.5.1 Level adjustment . . . . . . . . . . . . . . . . . . 6.5.2 Equalization adjustment . . . . . . . . . . . . . . 60 62 62 69 71 73 73 75 75 75 76 76 . . . . . . . . . . . . . . 77 77 77 77 78 78 78 78 79 79 79 80 84 84 85 7 Typical applications 7.1 Medium concert system 1 . . . . . . . . . . . . . . . . . . . . . . . . . . . . . . . . . . . . 7.2 Medium concert system 2 . . . . . . . . . . . . . . . . . . . . . . . . . . . . . . . . . . . . 87 87 88 A Vertical Array theory A.1 The Lobing Phenomenon . . . . . . . . . . . . . . . . . . . . . . . . . . . . . . . . . . . . A.2 Wave Fronts and Source Curvature . . . . . . . . . . . . . . . . . . . . . . . . . . . . . . . 89 89 90 B Notes on system measurement B.1 Time-Frequency Relationship . . . . . . . B.2 The Perfect System . . . . . . . . . . . . B.3 Measurement Methods . . . . . . . . . . B.3.1 Wrapped Phase . . . . . . . . . . B.4 Environmental Reflections . . . . . . . . . B.5 Selection of a measurement microphone . B.6 Mono or Stereo Measurement? . . . . . . 93 93 94 94 95 95 96 96 . . . . . . . . . . . . . . . . . . . . . . . . . . . . . . . . . . . . . . . . . . . . . . . . . . . . . . . . . . . . . . . . . . . . . . . . . . . . . . . . . . . . . . . . . . . . . . . . . . . . . . . . . . . . . . . . . . . . . . . . . . . . . . . . . . . . . . . . . . . . . . . . . . . . . . . . . . . . . . . . . . . . . . . . . . . . . . . . . . . . . . . . . . . . . . . . . . . . . . . . . . . . . . . . . . . . . . . . . . . . . . . . . . . . . . . . . . . . . . . . . . . . . . . . . . . . . . . . . . . . . . . . . . . . . . . . . . . . . . . . . . . . . . . . . . . . . . . . . . . . . . . . . . . . . . . . . . . . . . . . . . . . . . . . . . . . . . . . . . . . . . . . . . . . . . . . . . . . . . . . . . . . . . . . . . . . . . . . . . . . . . . . . . . . . . . . . . . . . . . . . . . . . . . . . . . . . . . . . . . . C Useful Formulae and Tables C.1 Calculation of the speed of sound . . . . . . . . C.2 Calculation of wavelength . . . . . . . . . . . . C.3 Conversion Delay-Distance and Distance-Delay C.4 Notions of Trigonometry . . . . . . . . . . . . . C.5 Air attenuation . . . . . . . . . . . . . . . . . . . . . . . . . . . . . . . . . . . . . . . . . . . . . . . . . . . . . . . . . . . . . . . . . . . . . . . . . . . . . . . . . . . . . . . . . . . . . . . . . . . . . . . . . . . . . . . . . . . . . . . . . . . . . . . . . . . . . 99 . 99 . 99 . 100 . 100 . 100 iv . . . . . . . . . . . . . . . . . . . . . 1. Introduction 1.1 The sound out front! The AXIOM project was born when a careful analysis of the professional market revealed that one of its most urgent requests was for highly versatile and scalable products. Following the advances made with the development of the EDGE modular array project, Proel’s Research and Development Group has created several vertical array solutions that will satisfy the most demanding clientele in the widest range of applications. The products of the AXIOM Series are the result of the many years of experience and research the PROEL has put into professional sound reinforcement, striving always to obtain excellent performance, proudly made in Italy. 1.1.1 Vertical Array Systems In recent years, sound reinforcement with vertical array systems has known a huge success, which, though undoubtedly highly deserved, has been pushed by aggressive marketing campaigns that have oversimplified the way they physically function, and rhetoricized certain themes which are not fully understood by many professional users. This has happened to such an extent that much imprecise information has been diffused and a air of confusion has been created around these types of systems1 . From the outset, we need to debunk two myths associated with vertical array systems2 : the first being that they are always the best solution for any sound reinforcement need; and the second is that it is possible to generate cylindrical waves (and that “real line arrays” are the only device that can do it). Vertical array systems have clearly proven their value with an audio performance that overshadows the so-called traditional systems, the only ones available in the past. This is possible thanks to a new approach to sound reinforcement in very large spaces (with high sound pressure levels) that brought a revolution to the design of professional sound systems. The associated technological research on single components and advanced design and simulation techniques has also had a positive effect on sound systems without vertical array3 . We went from an approach that aimed at optimising the design of each single element that had to be multiplied to form an array, to a more structured approach that conceives an array as one single sound source which then can be coherently divided into smaller parts. Before vertical array systems gained their success, several attempts at finding a solution for the so-called “array-ability” were made. The results were rather frustrating, though, as the problem is highly complex when studied in two dimensions. What gave great impulse to the professional audio industry was the brilliant solution of trying to simplify the problem, thinking of simple vertical arrays. The results of such an intuition are before everyone’s eyes (and can reach everyone’s ears): sound coverage has never been so uniform and sound quality has never been so high. Nonetheless we need to remark that downward scalability in these systems is not completely painless, as they are conceived and designed as parts of a system with specific 1 A very good reading on the subject is a series of articles by Mario Di Cola, Line Array Theory Revisited: Analisi critica delle tecniche per il Line Array, published by Sound&Lite Magazine (issues from 48 to 54, 2004-2005) 2 Here we speak of Vertical Arrays rather than Line Arrays, as these systems are never a line, they have finite dimensions, and, very often, in order to obtain a wider angular dispersion on the vertical axis, they take a curvilinear shape. Therefore the definition Vertical Array is more correct 3 Like concert systems Proel EDGE212P that, designed to work combined as traditional arrays, typically lined up side by side horizontally, are sometimes staked vertically. 1 1.1. THE SOUND OUT FRONT! 1. Introduction (a) (b) (c) Figure 1.1: Different designing approaches: (a) classic, (b) two-dimension array-ability, (c) vertical axle only arrayability. dimensions. Furthermore, while directivity can be shaped with a certain degree of freedom on a vertical line, on a horizontal line the directivity features of each element can be limiting4 . In the attempt to divulge to most people in the audio industry the operational principle of a vertical array system, complex concepts were very often banalized so much that false notions started circulating, and some have gone as far as stating that vertical array systems can generate cylindrical wave fronts, with great profit in terms of sound propagation5 . Curiously enough, such inaccurate notions spread rapidly and took root in the mind of many technicians in the field. We now need to state clearly that a sound source of finite dimensions, such as an array, cannot generate a cylindrical wave front6 . The operational principles of a vertical array of sound sources are basically two: for the medium-lower end of the audio spectrum we use the interference of a set of sources that are naturally not very directive in order to obtain a controlled directivity for the whole array; for the upper portion of the audio spectrum we use very directive sources in order to obtain minimal interference among them when combined in an array. At a low range a vertical array employs the phenomenon of interference in a constructive way, using the main emission lobe which originates naturally because of the combination of sound sources. When frequencies grow higher, though, secondary lobes appear and their energy content gets higher and higher, therefore interference can no longer be used to obtain directivity. See the appendices at the end of this manual for a more detailed description of the combination of sources in vertical array. As for the higher portion of the frequency range, through the years we have seen several types of cylindrical wave moulding devices which should allow the transformation of the emission of a driver into a portion of a cylindrical wave, that is if seen in section of a flat wave, and some have gone as far as stating that in order to obtain a real line array you must employ such a device. What it should do is 4 However, directivity on the horizontal axis depends on the number of elements in use. we know, the emission of a single point source diminishes by 6 dB for every doubling of distance, while a cylindrical source diminishes by 3dB. 6 Meyer Sound. Line Arrays: Theory, Fact and Myth. Meyer Sound Laboratories Inc., 2002. 5 As 2 1. Introduction 1.1. THE SOUND OUT FRONT! (a) (b) Figure 1.2: Vertical Array coverage, 16 modules @ 2kHz: (a) perfectly straight array, (b) progressive curvilinear array. extend the frequency range at which the interference between the sources can be controlled, even when their frequencies reach the highest levels. Those assumptions raise great doubts, first of all because, beyond a certain frequency, the emission of a driver membrane is no longer flat7 ; secondly because those devices are based on geometrical acoustic assumptions which are valid only when the wave length is very short if compared to that originating from the geometry of the reflecting surfaces, that is at frequencies for which the source (the driver membrane) is already above the frequency break-up point, which means out of control, trying to re-phase a wave that was originally already out of phase. Furthermore, a perfectly cylindrical emission from each module of the array is to be desired only when the array is mounted perfectly straight. If we were to analyse the emission according to the vertical axis of a perfectly straight array, we would immediately remark that its practical applications would be rather limited, as in most cases the array needs to cover a deep audience area which is below the centre of the array itself, rather than project a sound beam the furthest away possible (figure 1.2). In 99.9% of cases vertical arrays are mounted in a curve in order to obtain a wider vertical dispersion. The wave front curvature cannot and should not be useless: in practical applications that require a curved array it is logical to have curved wave fronts. Obviously, cylindrical wave fronts, or flat wave fronts if seen in section, are the best solution when the array has to be mounted straight. In most practical applications with a curved array, if the emission of each single element is flat, it creates energy vacuums in the polar response, resulting in an unstable vertical coverage (figure 1.3). 1.1.2 AXIOM Vertical Array Systems During the Axiom Systems planning phase we ran a statistical analysis on curvatures that are actually employed for vertical arrays and we found out that, on average, the angle between the elements varies from 5◦ to 8◦ . The brilliant performance of vertical array systems as compared to a traditional array solution comes from the correct control of interference between several sound sources and not from the supposed creation of a cylindrical wave front. For the higher portion of the spectrum, the AXIOM Systems directivity control is due to unusual conic waveguides emitting on diffraction and horn slots which minimize distortion and losses, keep energy at the highest range and obtain the desired directivity pattern with a minimal vertical dispersion and very wide horizontal dispersion. In order to increase horizontal angular dispersion in the medium-lower range, every model features a purpose-designed diffraction device– A.C.I.D. (Acoustical Coverage Improvement Device) – which guarantees the correct distribution of energy in space. 1.1.3 Typical applications of AXIOM Vertical Arrays Thanks to their scalability and ease of mounting, vertical array systems are the ideal solution for a great deal of live events and installations, both outdoors and indoors. Nonetheless, we need to critically analyse the downward scalability of such systems, when a small number of elements complicates set up 7 Above a certain frequency the membrane of the driver no longer behaves as a piston. 3 1.1. THE SOUND OUT FRONT! 1. Introduction (a) (b) (c) (d) Figure 1.3: Vertical coverage stability comparison: (a) plan radiation sound system on straight array, (b) plan radiation sound system on curvilinear array, (c) curvilinear radiation sound system on straight array, (d) curvilinear radiation sound system on curvilinear array. Figure 1.4: AX3210P array with overhead AX1118SP subs, a typical employment of vocal sound reinforcement in an indoor arena. 4 1.1. THE SOUND OUT FRONT! #"$"%&''& #()*+, ! '& & " ! "&#"" '""" .&$/( , ! '& #-- 1. Introduction ! .&$/0$ Figure 1.5: Comparison between typical applications of AXIOM AX3210P and EDGE212P. and effectiveness of the system so much that it would be preferable to use so-called traditional systems in certain applications. In a wide range of applications either the so-called traditional systems such as modular arrays of the EDGE Series by Proel, or vertical array systems are a valid sound reinforcement solution. When choosing the best one you need to consider that, as a rule, vertical array systems have limited downward scalability due to angular coverage and directivity control, while traditional array systems do not, but they do have upward scalability problems due to their mounting characteristics and do not control vertical directivity as well as vertical arrays. Many variables are therefore involved and that is why, in order to provide the best solution for the widest range of applications, the AXIOM Series by Proel features several different models. The employment of single or double vertical array elements, as they were not designed nor optimized for such applications, yields a performance that is certainly inferior to that resulting from traditional systems, which in fact are designed to work singularly. Furthermore, take into account that the dimension of the array itself strongly conditions its directivity in the medium-lower range. The employment of AXIOM Vertical Array Systems is advised when using at least 6 elements, keeping in mind that there are limitations when operating only with very few elements. As few as only 4 elements could be employed in specific applications, such as in theatres or in small indoor venues, but a detailed knowledge of the system is required in order to avoid limitations due to low vertical coverage and its consequent instability. AXIOM Vertical Array versatility is particularly useful in sound reinforcement situations that require an angular dispersion which would be very difficult to obtain with traditional systems, or which could be obtained but only facing great instability due to uncontrolled interference in the system emission. Also, as they are easy and quick to mount, vertical array systems are ideal solutions when touring, 5 1.2. TECHNOLOGICAL SOLUTIONS 1. Introduction as, at equivalent power capability, their mounting complexity is remarkably reduced. 1.2 Technological Solutions The choice of AXIOM Systems project specifications was made considering the actual needs of our customers, the final users. Analysing such needs and combining the results with our professional experience in this field we laid the basis for our project of building functional versatile vertical array systems. We overlooked no detail. We privileged the choice of components that assured quality and reliability. Every product was extensively tested before its actual industrial production. Each system set up was studied both in labs and in the field, on stage during important national and international events. 1.2.1 Components We accepted no compromise in the choice of components, woofers and custom drivers: we wanted high performance when handling power and excellent audio features, nothing less. AX3210P Systems feature a double-membrane, coaxial driver that, if compared with traditional single membrane drivers, offers better muffling at the highest frequencies, resulting in an exceptionally soft sonority for a professional component with such a high output. The two membranes in the driver are piloted through a purpose-designed, passive filter. The coaxial driver is mounted on a wave guide with a CAD profile which allows the correct wave front curvature and the correct directivity with respect to the vertical axis, minimizing distortion effects and vibration. (a) (b) Figure 1.6: AX3210P components: (a) internal detail of coaxial driver; (b) wave guide mechanical plan detail. The compression driver features a neodymium magnet, a 1” throat and is equipped with a special titanium membrane which enables it to work well even at 1.3 kHz despite its small size. The wave guide, entirely built aluminium die-cast, allow to minimize losses whilst mantaining a very high efficiency of the driver, in particular at the higher extreme of the audio band. All woofers adopted for AXIOM Systems have been especially designed according to state-of-the-art technology for moving coil transducers. ISV (Interleaved Sandwich Voice) Coil; a coil wound around its bearing both inside and outside allows better dissipation of heat and, consequently, power compression reduction. SDR/DDR (Single and Double Demodulating Rings); demodulating rings minimize modulation effects due to inductance and, as a result, harmonic and inter-modulation distortion are reduced through the entire frequency spectrum reproduced. DSS (Double Silicon Spider); a double spider improves excursion control and temporal stability of the component features. 6 1. Introduction 1.2. TECHNOLOGICAL SOLUTIONS Figure 1.7: AX2265P driver on wave guide 1.2.2 Technological Solutions When designing the AXIOM Series we went for top functionality, ignoring not even the slightest detail. The result is a mechanical system that is extremely easy to use and safe with an audio performance that is guaranteed in any situation. Integrated Suspension System The AXIOM Series Suspension System is fully integrated, with no need for external components, except the fly bar. Our solution is simple and effective and requires neither connecting bars nor external pins, which are always easy to lose and difficult to carry around. AX3210P Systems can be assembled and wired on the ground directly on their transportation casterboards. Security is guaranteed by calculated design and extensive load tests. Angular Dispersion Control System In order to optimize angular coverage at mid-low range frequencies according to the horizontal axis, the AXIOM Series Systems employ an innovative technology, A.C.I.D. (Acoustical Coverage Improvement Device), a series of diffraction devices that optimize the system’s horizontal coverage and avoid the natural shrinkage of the beamwidth when frequencies produced by mid-low range frequency devices increase. Preset for Amplification All passive systems of the AXIOM Series are designed so that in the future they could become amplified systems thanks to the Amp-Ready Technology. Each passive loudspeaker features a metal plate closing a compartment that is completely separate from the acoustical enclosure. That compartment will house the amplification module. All systems will be active simply by replacing the metal plate with a new one containing the amplification module. 7 1.2. TECHNOLOGICAL SOLUTIONS 1. Introduction Figure 1.8: Amp-Ready back mechanics LAC Simulation Software In order to support the AXIOM Series Systems during the design phase and for daily use we developed a simulation software based on high resolution measurements of every element in the series and on advanced mathematical models. 8 2. Specifications All technical data reported here are the results of a series of tests run at Proel Labs in an anechoic chamber and in free field using state-of-the-art measurement methods. The measurements that resulted from such tests are the basis for the dedicated LAC simulation software and for the EASE commercial simulation software models. All updated models are available free of charge on our web site: sound.proelgroup.com. 9 AX3210P 2. Specifications AX3210P • VeCAM Module for high power curvilinear vertical arrays • Acoustic Coverage Improvement Device (A.C.I.D. Technology) • Integrated suspension and transportation systems • Amp Ready format Description Data Sheet Model AX3210P is a 3-way, full-range biamplifiable module for vertical arrays designed for live concerts or for permanent installations. It features two 10” woofers with ISV (Interleaved Sandwich Voice) coil, SDR (Single Demodulation Ring) and DDS (Double Silicon Spider). Its 2-way, coaxial compression driver features a neodymium magnet and a 2” throat. It mounts a 4” annular membrane for the reproduction of mid-range frequencies and a 2” membrane for high frequencies. The average angular horizontal coverage is 110◦ (-6 dB), while the vertical dispersion depends on the composition of the array. Every single element, and particularly the high-frequency wave guide, has been studied to combine at its best with the rest of the system, especially when marked curvatures are needed. The precise directivity control in the high range reduces destructive interference to a minimum. The wave guide, completely manufactured using a special toughened and damped material, minimizes transfer losses while maintaining the efficiency of the driver, especially at band extremes. Model AX3210P is designed (AMP READY Format) for the installation of onboard amplifier/digital processor units currently under development. The suspension and transportation system is completely integrated with the exception of its basic element, flying bar KPTAX3210. This bar can suspend up to 24 AX3210P elements with a security factor of 7:1. System System Type Frequency Response Coverage Angle H. (-6 dB) Coverage Angle V. (-6 dB) Directivity Index (DI) Maximum Peak Output Signal Processing Transducers Mid Frequency Device Nominal Impedance Power Rating Sensitivity High Frequency Device Nominal Impedance Power Rating Sensitivity Mechanical Data Construction Flying System Dimensions (WxHxD) Weight Weight With Skate AX3210P 3-way full-range vertical array element - bi-amp 75 Hz - 20 kHz 110◦ average depending on array size depending on array size 131 dB @ 1 m Proel DSO26 Lake Contour Pro 26 2 x 10” neodymium woofer - 3” voice coil 8Ω 800 W AES 1600 W program 99 dB SPL (2.83 V, 1 m) 2” coaxial compression driver - horn loaded 16 Ω 150 W AES 300 W program 110 dB SPL (4 V, 1 m) trapezoidal (12◦ ) 15 mm birch plywood internally reinforced with paint finish built in suspension system 79.6 x 32.1 x 66.5 cm 51.5 kg - 113.5 lb 57.5 kg - 126.7 lb Engineering specifications The system should be a two-way passive enclosure, with a frequency response from 75 Hz to 20 kHz and a horizontal coverage of 110◦ . The system should have a 4” driver with a coaxial diaphragm and a 2” throat fit with a wave guide, power handling of 150 W AES and an impedance of 16 Ohms. The system should also have two 10” low frequency loudspeakers with a 3” voice coil. The system should provide a suspension 10 2. Specifications AX3210P Connectors mechanism for curvilinear vertical arrays, allowing the adjustment of the angle between each of the elements. The enclosures must be made of 15 mm birch plywood. The trapezoidal angle of the cabinets must be 12◦ . Dimensions should be: 32.1 cm high, 79.6 cm wide (front) and 66.5 cm deep. The system should be a PROEL AX3210P. 2 x Neutrik Speakon NL4MP, linked in parallel. 2- 1+ 2+ 1+ 1- LF+ 1- LF- 2+ MF/HF+ 2- MF/HF- Dimensions Graphical data Attenuation map (horizontal): Polar Coverage Map − Attenuation [dB] 0 160 140 120 −5 100 80 angle [degrees] 60 −10 40 20 −15 0 −20 −40 −20 −60 −80 −100 −25 −120 −140 −160 1k 20k frequency [Hz] 11 −30 AX3210P 2. Specifications Polar diagrams (horizontal): 0° 30° 0° −30° 30° −12 30° −12 60° −60° −60° 60° −60° −36 90° 200Hz 250Hz 315Hz 400Hz −90° −36 90° −120° 120° −90° −150° 500Hz 630Hz 800Hz 1kHz 90° −120° 120° 150° −180° −90° −150° 150° −150° −180° 0° 0° −30° 30° −12 −30° −12 60° −60° 60° −60° −36 −36 90° −90° 3.15kHz 4kHz 5kHz 6.3kHz 90° −120° 120° 150° 1.25kHz 1.6kHz 2kHz 2.5kHz −120° 120° −180° 30° −30° −12 60° −36 150° 0° −30° −90° −120° 120° −150° 150° −180° 8kHz 10kHz 12.5kHz 16kHz −150° −180° Vertical Axis Coverage The vertical axis coverage depends on the configuration of the array, and coverage measurements of specific array configurations will be published soon. Here you will find a few SPL maps designed with a LAC simulation software based on high resolution measurements of an AX3210P single element. 12 2. Specifications AX1118SP AX1118SP • 18” neodymium woofer with ISV, DDR and DSS • Exponential vents • Integrated suspension and transportation systems • Amp Ready Format Description The AX1118SP is a direct radiation bass-reflex suspended subwoofer. AX1118SP complements AX3210P whenever extended bass frequency reproduction is required in the creation of a suspended array (model EDGE121SP from the EDGE Professional Series can also be used as ground stack subwoofer). The 18” woofer features a 5.5” ISV voice coil and an optimized neodymium magnet structure to ensure continuous excursion control. The double demodulation ring DDR and double silicon spider (DSS) guarantees a controlled excursion and very low distortion levels. In order to improve the efficiency, acoustic compression, maximum output level and distortion reduction, the AX1118SP ports feature an innovative profile. Sharp discontinuity at the end of traditional ports causes turbulence which then affects the overall performance. Proel’s Touring R&D Department have designed a port with a streamlined profile which drastically reduces the generation of noise inside the port. Suspension and transportation mechanics are integrated and compatible with the AX3210P unit, thus allowing the creation of completely suspended systems with excellent performance even at the most extended bass range. Thanks to the power handling and the mechanical strength of the driver together with the careful acoustical design, the AX1118SP subwoofer is capable of producing 3 dB more acoustical output than any other 18” direct radiating subwoofer. The AX1118SP has been designed in an AMP READY Format allowing the eventual future installation of on-board amplifier/digital processor unit. Data Sheet System System Type Frequency Response Maximum Peak Output Signal Processing Crossover Frequency Input Power Rating Sensitivity Nominal Impedance Transducer Low Frequency Device Mechanical Data Construction Flying System Dimensions (WxHxD) Weight Weight With Skate AX1118SP direct radiation bass-reflex subwoofer 32 Hz - 80 Hz 133 dB @ 1 m Proel DSO26 Lake Contour Pro 26 from 80 Hz to 160 Hz 1500 W AES, 3000 W program 98 dB SPL ( 2.83 V @ 1 m ) 8Ω 18” neodymium woofer - 5.5” voice coil 15 mm birch plywood internally reinforced with paint finish built in suspension system 79.6 x 48 x 66.5 cm 59 kg - 130 lb 67 kg - 147.7 lb Engineering specifications The system should be a passive subwoofer with a frequency response from 32 Hz to 80 Hz. The system should have an 18” direct radiation bassreflex woofer with exponential vents. The woofer should have an impedance of 8 ohms and a 5.5” coil. The cabinet should be made out of internally reinforced 15 mm birch plywood. The system should be equipped with an integrated lifting gear allowing the assembly of AX1118SP and AX3210P columns. The cabinet front should be rectangular, and it should be 48 cm high, 79.6 cm wide and 66.5 cm deep. The system should be Proel AX1118SP. 13 AX1118SP 2. Specifications Connectors 2 x Neutrik Speakon NL4MP linked in parallel. 2- 1+ 2+ 1- 1+ IN+ 1- IN- 2+ 2- Dimensions 14 2. Specifications AX1118SP Graphical data Frequency response1 : 10 0 SPL [dB] −10 −20 −30 −40 20 100 1k 10k 20k Frequency [Hz] Impedance: 100 90 80 Impedance [ohm] 70 60 50 40 30 20 10 0 10 100 1k Frequency [Hz] 1 Measured with 2.83 V @ 1m. with ground plane procedure in free field. 15 10k 20k EDGE121SP 2. Specifications EDGE121SP • Direct Radiation Low-Frequency Enclosure • 21” Woofer with 4” ISV voice coil, DSS, DDR • Easy to transport Description 21” direct radiation subwoofer EDGE121SP can complete the bass response operating from 30 to 80 Hz, with an impressive excursion control and great power handling. It can operate at 800 W continuous (AES) and can handle peaks of 6 dB higher (3200 W) without problems or damage. Thanks to its Double Silicon Spider, to its Double Demodulating Ring and to the over-damped box in which it is housed, EDGE121SP can provide a large amount of well-controlled, defined energy at low frequencies. Engineering specifications Data Sheet System System Type Frequency Response Maximum Peak Output Signal Processing Crossover Frequency Input Power Rating Sensitivity Nominal Impedance Transducer Low Frequency Device Mechanical Data Construction Dimensions (WxHxD) Weight The system should be a passive subwoofer, with a frequency response from 32 Hz to 80 Hz. The loudspeaker of the system should be a 21”, 8ohm woofer with a 4” voice coil, in a directradiating configuration and bass reflex loaded. The cabinet should be a parallelepiped built with 18/24 mm, internally-reinforced birch plywood and should be 76.5 cm high, 58.4 cm wide and 81 cm deep. The system should be Proel EDGE121SP. EDGE121SP direct radiation bass-reflex subwoofer 32 Hz - 80 Hz 130 dB @ 1 m Proel DSO26 Lake Contour Pro 26 from 80 Hz to 160 Hz 800 W AES, 1600 W program 98 dB SPL ( 2.83 V @ 1 m ) 8Ω 21” woofer - 4” voice coil Connectors 18/24 mm birch plywood internally reinforced with paint finish 58.4 x 76.5 x 81.0 cm 63.5 kg - 140 lb 2 x Neutrik Speakon NL4MP linked in parallel. 2- 16 1+ 2+ 1- 1+ IN+ 1- IN- 2+ 2- 2. Specifications EDGE121SP Dimensions Graphical data Frequency response2 : Impedance: 100 Impedance [ohm] 80 60 40 20 0 12.5 2 Measured 31.5 63 125 250 500 Frequency [Hz] 1k with 2.83 V @ 1m. with ground plane procedure in free field. 17 2k 4k 8k 16k AX2265P 2. Specifications AX2265P • VeCAM Module for high power curvilinear vertical arrays • Acoustic Coverage Improvement Device (A.C.I.D. Technology) • Integrated suspension system • Amp Ready format Description Data Sheet Model AX2265P is a compact module for underdimensioned Vertical Arrays that will surprise you with its quality and high pressure. AX2265P is a 2-way bi-amplifiable system designed for live concerts and permanent installations. It features two mid-low 6.5” loudspeakers with neodymium magnet, aluminium coil and single demodulating ring. The compression driver features a neodymium magnet, a 1” throat and is equipped with a special titanium membrane which enables it to work well even at 1.3 kHz despite its small size. The average nominal angular dispersion is 110◦ (-6 dB) on the horizontal level, whereas the vertical dispersion depends on the composition of the array. Each single element, and particularly the high range wave guide, has been studied to combine at its best with the rest of the system, especially when the array has a high curvature. Precise directivity control in the high range lowers destructive interference phenomena to their minimum. Entirely made of pressure die cast aluminium, the wave guide minimises transfer loss whilst maintaining the efficiency of the driver, especially at band extremes. Model AX2265P has been designed (AMP READY Format) for the installation of onboard amplifier/digital processor units. The suspension and transportation system is completely integrated with the exception of the flying bar KPTAX2265. This bar can suspend up to 24 AX2265P elements with a security factor of 7:1. System System Type Frequency Response Nominal Impedance Continous Power Peak Power Coverage Angle H. (-6 dB) Coverage Angle V. (-6 dB) Directivity Index (DI) Maximum Peak Output Signal Processing Transducers Mid Frequency Device Sensitivity High Frequency Device Sensitivity Mechanical Data Construction Flying System Dimensions (WxHxD) Weight AX2265P 2-way full-range vertical array element bi-amp 125 Hz - 18 kHz 8 Ω + 16 Ω 500 W + 80 W AES 1000 W + 160 W 110◦ average depending on array size depending on array size 129 dB @ 1 m Proel DSO26 Lake Contour Pro 26 2 x 6.5” woofer - 2” voice coil 99 dB SPL (2.83 V, 1 m) 1” compression driver horn loaded 110 dB SPL (4 V, 1 m) trapezoidal (12◦ ) 15 mm birch plywood internally reinforced with paint finish built in suspension system 58.5 x 19 x 46 cm 18.5 kg - 40.8 lb Engineering specifications The system should be a two-way passive enclosure, with a frequency response from 125 Hz to 18 kHz and a horizontal coverage of 110◦ . The system should have a 4” driver with a coaxial diaphragm and a 2” throat fit with a wave guide, power handling of 150 W AES and an impedance of 16 Ohms. The system should also have two 10” low frequency loudspeakers with a 3” voice coil. The system should provide a suspension mechanism for curvilinear vertical arrays, allowing the adjustment of the angle between each of the elements. The enclosures must be made 18 2. Specifications AX2265P Connectors of 15 mm birch plywood. The trapezoidal angle of the cabinets must be 12◦ . Dimensions should be: 32.1 cm high, 79.6 cm wide (front) and 66.5 cm deep. The system should be a PROEL AX3210P. 2 x Neutrik Speakon NL4MP, linked in parallel. Dimensions Graphical data Attenuation map (horizontal): 19 AX2265P 2. Specifications Polar diagrams (horizontal): 0° 30° 0° −30° 30° −12 30° −12 60° −60° −60° 60° −60° −36 90° −90° 120° 200 Hz 250 Hz 315 Hz 400 Hz −36 90° −120° −90° 120° −150° 500 Hz 630 Hz 800 Hz 1 kHz 90° −120° 150° −180° −90° 120° −150° −150° −180° 0° 0° −30° 30° −12 −30° −12 60° −60° 60° −60° −36 −36 90° −90° 120° 3.15kHz 4 kHz 5 kHz 6.3 kHz 90° −120° 150° −120° 150° −180° 30° −30° −12 60° −36 150° 0° −30° −90° 120° −150° −120° 150° −180° −150° −180° 20 8 kHz 10 kHz 12.5kHz 16 kHz 1.25kHz 1.6 kHz 2 kHz 2.5 kHz 2. Specifications AX1115SP AX1115SP • 15” neodymium woofer with ISV, DDR and DSS • Exponential vents • Integrated suspension system • Amp Ready Format Description Model AX1115SP is a compact direct radiation bass-reflex subwoofer. AX1115SP can be suspended and complements AX2265P units both for suspended and stacked arrays, yielding coherent bass frequency reproduction, thus creating a 3-way system with a remarkable performance-dimension ratio. Its 15” woofer features a neodymium magnet and an ISV coil, along with a super-reinforced cone with a rubber suspension, which guarantee great excursions without any damage. The woofer also mounts a die cast basket with double ventilation, Double Demodulating Rings, and a Double Silicon Spider to ensure continuous excursion control and very low distortion levels. In order to improve its performance as for efficiency, acoustic compression, maximum output level and distortion reduction, model AX1115SP features ports with a streamlined profile. Suspension and transportation mechanics are integrated and compatible with the AX2265P unit, thus allowing the creation of completely suspended systems with excellent performance even at the most extended bass range. Model AX1115SP is preset (AMP READY Format) for the installation of on-board amplifier/digital processor units. Data Sheet System System Type Frequency Response Maximum Peak Output Signal Processing Crossover Frequency Input Power Rating Sensitivity Nominal Impedance Transducer Low Frequency Device Mechanical Data Construction Flying System Dimensions (WxHxD) Weight AX1118SP direct radiation bass-reflex subwoofer 40 Hz - 160 Hz 130 dB @ 1 m Proel DSO26 Lake Contour Pro 26 from 80 Hz to 160 Hz 1000 W AES, 2000 W program 97 dB SPL ( 2.83 V @ 1 m ) 8Ω 15” neodymium woofer - 4” voice coil 15 mm birch plywood internally reinforced with paint finish built in suspension system 58.5 x 55 x 54 cm 43 kg - 94.8 lb Engineering specifications The system should be a passive subwoofer with a frequency response from 40 Hz to 160 Hz. The system should have an 15” direct radiation bassreflex woofer with exponential vents. The woofer should have an impedance of 8 ohms and a 4” coil. The cabinet should be made out of internally reinforced 15 mm birch plywood. The system should be equipped with an integrated lifting gear allowing the assembly of AX1115SP and AX2265P columns. The cabinet front should be rectangular, and it should be 55 cm high, 58.5 cm wide and 54 cm deep. The system should be Proel AX1115SP. 21 AX1115SP 2. Specifications Connectors 2 x Neutrik Speakon NL4MP linked in parallel. 2- 1+ 2+ 1- 1+ IN+ 1- IN- 2+ 2- Dimensions 22 2. Specifications DSO26 DSO26 Descrizione Digital System Optimizer DSO26 is a digital processor with high audio quality thanks to the double precision signal elaboration offering a dynamic range greater than 110dB. DSO26 provides 2 inputs and 6 outputs3 and it is designed to operate in the following modes: 2x3-way, 4+2way, 5+1-way – with a mono sum output available – or 6-way. There are 30 bands of parametric equalization available, each of them allowing a gain from +15 to –30dB in a range from 20Hz to 20kHz, with a Q that can be adjusted from 0.4 to 128. All parameters feature fine adjustment with 1/36 octave frequency steps and gain increase at 0.1dB steps and 100 Q settings. Each parametric section can be set as a shelving filter. All outputs are provided with a high performance limiter, with attack, release and threshold control parameters. Every output features variable high-pass and low-pass filters of 12, 18 or 24 dB per octave of Butterworth, Bessel or Linkwitz-Riley type. Independent control of each filter allows the creation of asymmetrical crossover bands. Delay lines of up to 650ms can be set independently on every output, with fine adjustment by 2.6µsec minimum steps. DSO26 includes presets for Proel Systems and will let you memorize personal settings. Its software can be updated through its RS232 port. The LCD shows all parameter information. The headroom of both channels can be monitored with the LED bars. Interface software for Windows 9x/Me/2000/XP, updated presets and the processor manual (which we strongly recommend reading) are available on our web site: sound.proelgroup.com. 3 AES-EBU Engineering specifications The digital processor should have 2 inputs and 6 outputs. Operative modes should allow the system to work as 2x3-way, 4+2-way, 5+1-way or 6-way with a mono sub out possibility. There should be 5 parametric equalization sections for each output. Every input/output should have: up to 650 ms delays in 2.6µs steps, a limiter with attack, release and threshold controls. The input signal level should be displayed on LED bars and the parameters should be displayed on a backlit LCD. The digital processor should at least feature the following specifications: frequency response: 0.5dB 20Hz-20kHz; dynamics: 110dB20Hz-20kHz, un-weighted; parametric filters: a total of 30 digital sections, with +15dB to -30dB gain in 0.1dB intervals; central frequencies: 20Hz-20kHz, in 1/36 octave steps, filter Q from 0.4 to 128. Inputs and outputs should be coupled through electronically balanced XLR connectors. The processor should be a 1 19” rack unit with supply voltage variable from 90VAC to 240VAC 50/60Hz. The digital processor should be a Proel DSO26. digital inputs and outputs are available on request. 23 DSO26 2. Specifications Data Sheet Inputs Impedance CMRR Outputs Source Imp Min. Load Max. Level Frequency Resp. Dynamic Range Distorsion Max Delay Min Step Size Gain Inputs Gain Outputs Parametric EQ Gain Freq. Range Filter Q / BW Shelving sections High and lowpass filters Responses Limiters Threshold Attack time Release time Display Input meter Output meter Connectors Inputs Outputs External Power Consumption Weight Size 2 electronically balanced > 10k Ω > 65dB 50Hz - 10kHz 6 electronically balanced < 60 Ω 600 Ω +20dBm into 600 Ω ±0.5dB 20Hz-20kHz >110dB 20Hz-20k unweighted < .02%@1kHz,+18dBm 650 ms 2.6 µs +6dB to -40dB in 0.1dB steps +15dB to -40dB in 0.1dB steps and mute 5 Sections per output +15dB to -30dB, 0.1dB steps 20Hz - 20kHz, 1/36 octave steps. (368 positions) 0.4-128 / 2.5-0.008 Low freq. 20Hz - 1kHz High freq. 1kHz - 20kHz Shelf gain ± 15dB in passi da 0.1dB Filters 1 of each per output. Freq. Range HPF 10Hz - 16kHz 1/36 octave steps. Freq. Range LPF 35Hz - 22kHz 1/36 octave steps. Bessel/Butterworth 12-18-24dB/Oct. Linkwitz-Riley 24dB/Oct. 1 of each per output +22dBu to -10dBu 0.3 to 90 ms 2/4/8/16/32 x Attack time 2x20 character backlit LCD 2 x 3 point 6 x 3 point 3 pin female XLR 3 pin male XLR 9 pin DEE (RS232) 3 pin IEC, 60 to 250V ± 15% @ 50/60Hz < 20 watts 3.5kg. Net (4.8kg. Shipping) 1.75”(1U) x 19” x 11.8” (44 x 482 x 300mm) excluding connectors 24 2. Specifications LAC LAC Description The software is designed to be a quick and easy instrument for the best configuration of the system whether it is used by the most expert sound designer – who can use the array shading and singularly set the delay for each element – or by a beginner – who could profit from the auto-configure mode which will automatically optimize the curvature of the array. Images can be exported of the coverage map and detailed mechanical reports of the system configuration can be printed. The Proel LAC (Line Array Configurator) software allows accurate simulation of the mechanical and acoustic behaviour of the AXIOM Series Vertical Arrays. The simulation algorithm is based on high resolution measurements of each module, and the results have been verified on measurements taken on real arrays. Using the Vertical View visualization you can set dimensions and structure of your location, the array configuration (loudspeaker models and quantity, angles and related levels of each loudspeaker) and all parameters needed for the simulation. Cluster Configuration 1 1 Boxes Number 12 Array Selected Angle -7,3° Array Actual Angle -7,3° Cluster Bottom Z 10,96 m Flying-Bar X 0m Flying-Bar Z 14,6 m Center Of Gravity (X;Z)[m] -0,4; 12,76 Array Weight 600 Kg Rigging Mode 1 Reverse Mode No Weight On Central Hook 600 Kg Weight On Each Lateral Hook 0 Kg 2 3 4 5 6 7 8 9 10 11 12 13 14 15 16 17 18 19 20 2 3 4 5 6 7 8 9 10 11 12 1 2 3 4 5 6 7 8 9 13 14 15 16 17 18 19 20 21 22 23 24 10 # Box Name Relat. Angle Abs Angle Delay Box Level 1 AX3210P 0° -7,3° 0 µs 0 dB 2 AX3210P 1° -6,3° 0 µs 0 dB 3 AX3210P 2° -4,3° 0 µs 0 dB 4 AX3210P 3° -1,3° 0 µs 0 dB 5 AX3210P 4° 2,7° 0 µs 0 dB 6 AX3210P 4,5° 7,2° 0 µs 0 dB 7 AX3210P 6° 13,2° 0 µs 0 dB 8 AX3210P 7° 20,2° 0 µs 0 dB 9 AX3210P 8° 28,2° 0 µs 0 dB 10 AX3210P 8° 36,2° 0 µs 0 dB 11 AX3210P 9° 45,2° 0 µs 0 dB 12 AX3210P 10° 55,2° 0 µs 0 dB 11 12 13 14 15 16 17 18 19 20 Min X: -1,31m(Z: 11,55m) Max X: 0,12m(Z: 13,23m) 1,43m Max Z: 14,6m(X: 0m) 0° AX3210P 1° AX3210P 2° AX3210P In the Mechanical View window you can verify the flying bar connecting position and manually configure the suspension points according to the maximum load allowed by the support structure available. AX3210P 3° AX3210P 4° AX3210P 3,64m 4,5° AX3210P 6° AX3210P AX3210P 7° AX3210P 8° AX3210P AX3210P 8° 9° 10° Min Z: 10,96m(X: -0,98m) The software runs exclusively on Windows XP/2000/98 systems and, together with the user’s manual, is provided free of charge in combination with AXIOM Systems. 25 3. Accessories The AXIOM Series features a complete line of accessories for the system’s installation and care. 3.1 Accessories for flown or stacked installation The fundamental element for flown or stacked installation of AX3210P and AX1118SP systems is fly bar KPTAX3210S, which optional feet, 95AXMPDN, allow installation in a stacked configuration. A compact version of fly bar KPTAX3210S is also available. You will find more information on its features and on load limits in chapter 5. (a) (b) Figure 3.1: Fly bars: 3.1a KPTAX3210 fly bar with 95AXMPDN feet, 3.1b KPTAX3210S compact version. For an easy and safe installation of AX2265P and AX1115SP the KPTAX2265 flying bar is available. Thanks to its feet it can be used also in stacked configuration. Figure 3.2: Fly bars: KPTAX2265 fly bar. 27 3.2. ACCESSORIES FOR TRANSPORTATION AND CARE OF THE SYSTEMS 3.2 3. Accessories Accessories for transportation and care of the systems Available caster-boards for transportation are: AXSKATE for AX3210P and AXSKATES18 for AX1118SP. Available for model AX3210P, there is also cover 93COVAX310 and soft cover COVERAX3210. There are also transport cases: CP038D04 for four AX2265P, CP038C04 for two AX1115SP. 3.3 Amplifier racks, cabling For the AXIOM Systems we market pre-wired amplifier racks, transportation solutions and dedicated multi-polar cabling for power and signal distribution. Please check chapter 7 for various system configurations examples. 3.4 Suspension towers and engines The Proel Trussing Catalogue features towers and motors to lift all AXIOM Series Systems quickly and safely. Figure 3.3: PLFTMQD30 9.5m tower with 600 kg capacity. 28 3. Accessories 3.4. SUSPENSION TOWERS AND ENGINES (a) (b) Figure 3.4: Transportation accessories: 3.4a AX3210P on AXSKATE caster-board and 93COVAX310 cover, 3.4b AX1118SP on AXSKATES18 caster-board. (a) (b) (c) Figure 3.5: Transportation accessories: 3.5a CP038D04 case for 4 x AX2265P, 3.5b AX2265P on case (open), 3.5c CP038A04 case for 2 x AX3210P. 29 4. Sound design with AXIOM Vertical array systems offer a series of advantages when compared to traditional systems, and we discussed them extensively in the introduction to this manual. Nonetheless, because of the high quantity of sources employed, vertical array systems present a natural complexity which needs to be dealt with correctly. A careful acoustic and mechanical design when configuring the installation will help face such complexity painlessly. You need to spend time considering the sound reinforcement needs and the installation limits when designing your array. This phase should never be omitted1 as it allows the evaluation of all possibilities for the installation of the array, with regard to shape and dimensions. Thanks also to the LAC simulation software for AXIOM Array Systems, design time is minimal and guarantees correct acoustical and mechanical installation, ensuring performance and safety. 4.1 The sound reinforcement issue The combination of all steps undertaken to design a sound reinforcement system for a specific event can be defined sound design. Generally the aim is the creation of the most uniform coverage possible with a certain pressure level over the entire audience area.2 . When the area that needs to be covered is limited and the sound pressure level required is not particularly high, the simplest solution is the use of a single speaker enclosure, or of a couple of enclosures if you were to prefer a stereophonic image. When you need provide sound coverage of large areas or to reach high pressure levels, or both, you are forced to use speakers with a certain angular dispersion diagram or speakers which can supply a certain power. It does not take long before you reach the physical limit beyond which single speakers featuring such power and dispersion cannot be created, and this is the case in common situations of professional sound reinforcement of certain dimensions. The only available solution is the use of several speaker enclosures. Thus is born the problem of how to reach the specified coverage and sound pressure objectives. In fact, because of the inevitable time gap between the signals reaching a hypothetical audience, when you combine the effect of two or more sources you have to face interference between their output. Among all the possibilities available for the combination of several sound sources, we can single out two categories of approach to sound reinforcement: centralized systems and distributed systems. With a centralized system you employ a single source (actually, a combination of sources) to cover all the area that needs to be reached, whereas with the distributed approach you employ a series of sources positioned in different spots. These two approaches can be combined to satisfy specific needs.3 . With 1 Only when the conditions for installation are exactly the same, or close, the repetition of one installation design can be taken into consideration. 2 We had better speak of audience areas, as they could be spatially distant, and of a certain trend for the frequency response, as certain music genres need a marked emphasis in the lowest portion of the spectrum, while others require a flat response, or, as for voice reinforcement systems, the band that needs to be reproduced is limited. 3 An example of a combination of both approaches is the classic concert set up with one or more delay line systems to cover a very wide area. 31 4.2. DESIGN INSTRUMENTS 4. Sound design with AXIOM vertical array systems we use the centralized approach to sound reinforcement, and the modality which allows the creation of a single, large source has already been treated in detail when we discussed array-ability. One of the great advantages of vertical array systems is the possibility to mould the angular coverage on the vertical axis of the sound source with a certain degree of freedom, varying the curvature of the array and the number of units employed in the array. Scalability faces a downward limit imposed by directivity control and by timbre balance, and an upward limit determined by weight and by the dimensions of the array. The possible solutions between these two limits are many; therefore the system can be adapted to a great variety of situations. 4.2 Design instruments Once you have all information available on the coverage area (such as dimensions of the audience areas, positions and capacity of the coupling points) you can use those data for a better design. At this point, it is fundamental to make use of a series of software tools that permit experimentation with computer simulations. The employment of simulation software and the installation designer’s ability are what it takes to define the performance of a vertical array quickly and precisely. 4.2.1 LAC The LAC simulation software is a fundamental instrument in the design of an AXIOM array system. The software allows an intuitive and simple simulation of a vertical array while taking every mechanical constraint into account. The LAC was designed to be a useful tool for vertical array systems. It allows operation on the vertical section of the area where the array will be arranged, rather than on a threedimensional space. This is not a limit as the design of the array coverage depends on the vertical axis only4 ; furthermore, the two-dimensional vision drastically reduces time spent working with the simulation software. The simulation accuracy is guaranteed by the calculation algorithm which is based on real high resolution measurements of each enclosure. Furthermore, because of its nature as a work tool, the LAC takes into consideration only the direct sound coming from the array and disregards any possible reflection coming from the environment. The LAC software features two main windows, the Vertical View and the Mechanical View, that need to be used in sequence when inserting all data referring to the venue where the AXIOM vertical array system will be used. At the start, the Vertical View window pops up automatically (figure 4.1), as the working procedure requires the insertion of all data referring to the location (dimensions and structure) in a module called Audience, then of all data about the array (model and number of speakers, relative angles between speakers) in modules named Array Mounting and Array Configuration, finally the insertion of all simulation parameters in the module named Simulate. After completion of the above mentioned operations, in Mechanical View (figure 4.2) you can verify the coupling position of the flying bar and, eventually, you can manually configure the suspension points according to the load capacity allowed by the available suspension structure. There are two ways to select the windows: clicking on definitions in the main menu or clicking directly in the area named Cluster Preview. This allows rapidity while choosing the best configuration for the system. The Miscellaneous module contains a series of information related to the general layout of the system, to the overall centre of mass and to the total weight of the array you’ve created. While positioning each speaker, the observation of where each single element points to may be of help in arranging them so that the sound energy radiating from the whole array can be duly directed. While configuring the array you can set the position of the suspension point, the angle of the flying bar, the number of elements composing the array and each speaker’s relative angle. The Autoconfig. button allows the program to suggest a good starting point for the arrangement of each element’s relative angle. The result is not the best configuration possible, but only a good starting point. Manual changes always need to be made to relative angles, but the suggested configuration is always composed of an 4 This statement is not absolutely true, as the dispersion on the horizontal axis is not completely independent, but it is an acceptable assumption when approximating and finding the best setting for the array. 32 4. Sound design with AXIOM 4.2. DESIGN INSTRUMENTS Figure 4.1: LAC Vertical View window increasing angle sequence. Whatever the changes made, the sequence should follow an increasing pattern. This allows the greatest uniformity of vertical dispersion, and the distance SPL graph will fully confirm it, at any frequency. The Advanced button leads to another window where you can set some more parameters (power level and delay of each single element) which by default have been set to zero. A skilled operator should be the one setting the delay between each element, but level shading is a procedure which employment we advise in many installations, as it limits remarkably the differences in level between the areas closest to the system and those further away from it. As it is possible to tell the software about such variations, it will allow the simulation of their effects. 5 . Once the structure of the location and of the whole array has been determined, a simulation can calculate how the direct sound range emanated by the whole array is distributed. This acoustic simulation is carried out one frequency at a time and the frequency has to be chosen among the ISO frequencies available in the proper pull-down menu. The distribution of the direct range is represented by a colour map. This map will disappear from the screen every time a parameter that can influence the simulation’s result is inserted. In this case the distribution simulation has to be recalculated. Obviously, the calculation is not completely punctual, but in a neighbourhood of the frequency you can select. The pull-down menus in the Simulate module allow the choice of the simulation frequency and of the average that needs to be applied. Parameter Map Res indicates the dimension of the area module on which the colour map is calculated. If you were to partition the whole vertical view surface in a certain number of squares, Map Res would indicate the dimension of the side of each square: it can vary between 0.1 (10 cm) and 5 (5 m). Parameter Source Res indicates which resolution is employed to partition the source (the whole array)6 . If those parameters are modified for accuracy, calculation time will be lengthened. Finally, parameter BW Accuracy allows the choice of how many points within the frequency neighbourhood are to be used for the calculation. Thus, for any of the band widths admitted for calculation (1/3, 1/6, 1/12, 1/24 of an octave) the accuracy values can be Low, Medium or High, which 5 The attenuation of the lower part of the array is a rather common practice, but it is not completely painless, as the length of the array gets shorter and consequently the directivity control in the lower-mid range decreases. 6 For example, a figure of 0.02 indicates that the array has been vertically divided into 2 cm-high pieces. If we were only interested in the simulation results referring to the low range, we could use Source Res figures as high as 0.1 (10 cm), thus increasing the simulation speed remarkably. 33 4.2. DESIGN INSTRUMENTS 4. Sound design with AXIOM Figure 4.2: LAC Mechanical View window is like calculating respectively for 3, 5 or 7 points within the chosen band segment. Once all the simulation parameters have been set, the calculation motor can be started by pressing the Start button in the Simulate module. The feed bar will show the calculation phases and at the end the direct range map for the configuration chosen will come up. Below the colour map there is a graph showing the distribution of the acoustic pressure generated by the array, which corresponds to the position of the cross pointer on the broken line. The broken line ideally represents the position of the spectators’ heads, sitting or standing according to the selection made in the Audience module. The same query can be made for all the defined audience areas. The graph showing acoustic pressure related to frequency is always automatically shown, and it is continuously updated any time a parameter is modified. Calculation accuracy for this graph can be set using the preferences menu. The frequency of the calculation is set by the same command which sets the frequency of the direct range map calculation. This pull-down menu is connected with the scroll-down button on the mouse: you can change the frequency by highlighting the menu. This system allows the quick scrolling of all frequencies in order to have an immediate picture of the situation. Once the most satisfying configuration has been found, you can switch to the Mechanical View window. On the left of this window you will see a lateral view of the Line Array with the indications of the suspended system weight and of the total dimensions of the array. Had you selected any feature that is not mechanically compatible with the system you have chosen, it will be highlighted with a red flashing line, indicating the type of incompatibility which occurred. Even when the mechanical configuration indicated by the LAC is compatible, before you suspend any AXIOM System you need to verify that all the load limits are satisfied; for further details read through chapter 5 carefully. On the right of the Mechanical View window you will see the vertical array flying bar and all relative numbered perforations. The red line indicates the position of the systems centre of mass, and the highlighted holes represent the best hoisting position suggested by the software in order to respect the angles chosen in the Vertical View window. You can manually set the number of motors you need to use to hoist the system as well as the coupling points, in order to respect any eventual constraint. For each 34 4. Sound design with AXIOM 4.3. FLOWN OR STACKED ARRAYS configuration, the load on each motor is automatically recalculated. The LAC software does not take into account the power cable weight, and the position of the array, once mounted, could be different from the simulated one7 . From the Mechanical view window, if you click on the left box, you can switch immediately to the Vertical View window, and the different pointer symbol indicates you’ve switched area. Obviously, when you switch from automatic to manual configuration you determine the movement of the array and the sound pressure map will have to be recalculated in relation to the new inclination of the system. The software allows you to save all settings for the array configuration and for the location. For further details about the software, please refer to the software operating manual. 4.2.2 EASE The functions featured by the LAC simulation software are what you need for every typical live application; when you deal with indoor installations, such as in theatres or sports arenas, knowledge of total sound range distribution, that is direct range plus reflected range distribution, can be useful. Several software systems allowing the simulation of acoustic sources and their interaction with a threedimensional location are available on the market. The package usually chosen by professionals is the EASE (Enhanced Acoustical Simulator for Engineers) by ADA Acoustic Design Ahnert; all Proel speakers feature models for EASE 4.18 , and they can be downloaded free of charge from our website: sound.proelgroup.com. 4.3 Flown or stacked arrays All AXIOM systems can be either flown or ground stacked. Descriptions of all mounting procedures are in chapter 5. The best mounting option – suspended or stacked – is related to the kind of sound reinforcement you need to create and to any mounting constraints you might face. In most common applications, a flown array is the best choice, as it allows a more uniform coverage of the audience area. We could say that any time the audience area lies at a uniform level below an available hoisting point and stretches out for a certain length, then a flown array is the best choice, as it allows a better sound pressure distribution over the whole area. (a) (b) Figure 4.3: Comparison of 6 AX3210P composing: (a) a flown array, (b) a stacked array (not advised). In case of typical outdoor events, we do not advise stacking the equipment on stage. Figure 4.3 shows a comparison of the SPL level map for both situations: the configuration with a flown array has a more uniform distribution, whereas the stacked configuration creates a very narrow central emission lobe which is not very well suited to the audience area. Nonetheless, there are complex situations in which stacking the equipment is the best solution, e.g. in theatres or arenas where the audience area is vertically dispersed. There are also situations in which suspension is just not possible: in those cases the system must be stacked and its setup needs to be as thorough as possible in order to achieve the most uniform coverage possible. 7 We verified experimentally that if you move one hole down toward the front part of the bar for coupling points (that is -1 in the numeration of the holes of KPTAX3210 flying bar) in most situations you will be able to compensate the cable weight. 8 The models for the AXIOM Series are under development as we write. 35 4.4. THE CURVATURE OF THE ARRAY 4.4 4. Sound design with AXIOM The curvature of the array Directivity on the vertical axis of an array of sources depends on the shape of the array. We know that perfectly straight arrays create a very narrow central lobe, which is a problem in most typical sound reinforcement applications. The solution which proved to be the most effective for typical sound reinforcement applications is the employment of arrays with a progressive curvature9 . AXIOM Systems are optimized for progressive array use (figure 4.4 shows the different kinds of arrays) Figure 4.4: Different Vertical Array typologies When designing sound reinforcement with an AXIOM system we advise imposing a progressive curvature to the array, which is using a sequence of progressively increasing angles. This way the sound range will gain maximum stability, resulting in a greater uniformity of coverage and in easier system equalization. 4.5 System Processing The AXIOM Series Systems do not feature passive filters and, to work, they need an external processor to take care of crossover filtering, temporal alignment and protection of all devices. Proel provides DSO26 digital processor which comes with all the presets for the AXIOM line. All updates for Proel Presets can be downloaded from our website: sound.proelgroup.com10 . Presets created for the AXIOM Systems have been designed for top performance. The optimization of vertical array systems through digital processing is based on data obtained through measurements of the polar response throughout space and on their elaboration through purpose-designed mathematical models. Presets provided with the AXIOM series allow the correct operation of the system, provide the best starting point for setup of temporal alignment, gain adjustment and, eventually, system equalization. The creation of customized presets to correct the system response is impossible without having access to the equipment and to the knowledge that provide specific measurements and allow the elaboration of such data. For this reason, in order to obtain the best sound quality possible and to avoid involuntary mistakes, processor Proel DSO26 grants access only to parameters related to gain trim and to the delay of some pass band outputs, which, together with equalization, are the only ones needed for setting up the system. The use of presets provided by Proel guarantees the correct and safe operation of the system. 9 A very thorough article on this subject is: Ureda, Analysis of Loudspeaker Line Arrays, JAES, Vol. 52, No. 5, May 2004. It analyses linear arrays, j-shaped arrays and progressive (or spiral) arrays. 10 Presets for DSO26 are compatible with processor XTA226. Presets with linear phase filters to be used with Lake Contour Pro 26 are also available. 36 4. Sound design with AXIOM 4.5. SYSTEM PROCESSING Figure 4.5: EDGE121SP+AX3210P preset structure 4.5.1 AX3210P System Processing AX3210P are three-way systems with a passive filter that feeds the two coaxial membranes of the high frequency driver. AX3210P systems are processed as two-way: MID-L and HIGH. Available presets allow the combination of AX3210P satellite with EDGE121SP subwoofer from the EDGE Series or AX1118SP subwoofer (suitable for suspension) from the AXIOM Series. Two different types of presets are available: UP and DOWN. UP is suited for all long range configurations, while DOWN is better for down-fill situations or whenever the range is shorter. Both presets can be used simultaneously in the upper or lower part of the array in case of separated processing of those sections. With the presets the operator can trim the gain of SUB, MID-L and HIGH and adjust the delay of HIGH, while the delay of MID-L is automatically linked, as shown in figure 4.5. When we deal with arrays with extreme curvatures that need to cover areas that are very close together, we can resort to the attenuation (bass roll-off) of the system in the lower part of the array. This technique can be employed only if the operator is aware that it shortens the virtual length of the array and the directivity can not be controlled at low frequencies. Generally, the response of an element for vertical arrays has the kind of tendency shown in figure 4.6, with a certain degree of emphasis on high frequencies. This happens because as frequency increases, the “active” portion of the array seen by the hypothetical audience gets smaller and smaller. Figure 4.7 shows this reduction which adds to the fact that, as the frequencies increase, the sources become gradually more and more directive. Thus, while at low frequencies the spectator represented by P hears the combination of several sources of the array, at high frequencies he hears only the contribution of a single source. This explains why the trend of the response of each single element is strongly emphasized at high frequencies, and why, with the increase of the array, there is a natural equalization. The AXIOM Series presets are optimized for the use of 6-8 systems per column; whenever a higher or smaller number is employed, the timber balance needs to be reset through the TRIM control for the MID-L pass band11 . 4.5.2 AX2265P System Processing AX2265P are two-way systems: MID-L and HIGH. Available presets allow the combination of AX2265P satellite with AX1115SP subwoofer (suitable for suspension) from the AXIOM Series. Everything else is the same as reported in the previous section. 11 We already discussed phenomena of directivity control connected to the length of the array. 37 4.6. THE LOW RANGE 4. Sound design with AXIOM Figure 4.6: Typical frequency response for vertical arrays (a) (b) Figure 4.7: Simplified pattern of the combination mechanism for the elements of the array: (a) low frequencies (b) high frequencies. 4.6 The low range AXIOM Vertical Array Systems do not feature a an extended range and, with the exception of certain applications requiring only the reproduction of the vocal range, need additional subwoofer units for the reproduction of the whole spectrum. An AX3210P System needs either subwoofer unit AX1118SP (which can be flown) or the earthbound subwoofer EDGE121SP from the EDGE Series. The quantity of subwoofers you need depends on the number of satellites and on the kind of music that has to be reproduced; some kinds of music programs require a remarkable emphasis on the lower part of the spectrum. If the system is not correctly dimensioned, no equalization will provide the acoustic energy needed. 4.6.1 Arrangement of subs Typically, subwoofers are arranged under the array towers in a L+R configuration. In a hypothetical semi-free field, this configuration leads to an interference that provokes a central emission lobe and two secondary lateral lobes12 . Between the lobes there will be areas of cancellation that in certain situations could be rather intense and create instability and equalization difficulties. There are several solutions to homogenize the lower frequency diffusion; some of them require separate processing and a physical displacement of the subwoofers that is not always possible due to 12 For a certain frequency range which is function of the distance between positions L and R. 38 4. Sound design with AXIOM 4.7. NOTES ON THE POWER OF THE AMPLIFICATION Figure 4.8: Simulation of emission produced by 12 EDGE121SP subs set in 2 groups of 6 and positioned L+R. Figure 4.9: Simulation of emission produced by 12 EDGE121SP subs set in 4 groups of 3 and distributed across the stage front. practical problems of space. Practical experience has taught us that the subdivision of all subwoofers in different groups in front of the stage provides a better distribution and reduces phenomena of interference, without having to insert separate processing and without placement constraints. The use of suspended subs, as in the case of satellites, allows a better distribution of the sound pressure level on the whole audience area. The subs can be placed on a separate array or combined with the satellites in a single array. When the subs are flown in a separate array they should be placed behind the satellite array, whenever possible, so to take advantage of the directivity control that this arrangement creates. Instead, when you have arrays of satellites and subs, you should mount the subs in the upper part of the array, or in symmetrical order in the upper and in the lower part of the array, which will once again create a certain directivity diagram due to the distance between the sub sources, with all of the advantages and disadvantages of this phenomenon. 4.6.2 Temporal Alignment Every time you mount the equipment, you need to verify the processor setting of the delay time. Presets are provided with mechanic alignment, that is aligned to suit the situation in which a satellite is placed directly on top of a sub. The detailed description of the alignment operation is in chapter 6. 4.7 Notes on the power of the amplification The AXIOM Systems technical specifications carry two different values for the speakers power handling: AES and program. According to the AES standard13 , tests run on the components require a two-hour stressing of a filtered pink noise signal with a pass band of a decade and with a crest factor (average 13 AES2-1984 (r2003): AES Recommended Practice – Specification of loudspeaker components used in professional audio and sound reinforcement 39 4.7. NOTES ON THE POWER OF THE AMPLIFICATION 4. Sound design with AXIOM value and peak value ratio) of 6 dB. For common applications which require both a high power and a high reliability level, it is advisable to use power amplifiers with an output rating equivalent to the AES power rating of the enclosures. This ensures that the enclosures will operate within their thermal limit specification. For applications where the user desires to take advantage of the full applicable power of the enclosures, it is possible to use amplification with output power ratings equal to the programme output rating of the enclosures. In this configuration, the full capacity of the system to handle transient power is utilised, however it will be necessary to constantly monitor and regulate the system very carefully in order to avoid overloading the speakers. The limiter protection of the processor is always active, however, and will prevent signals from arriving to the enclosures which have a long duration and power in excess of the handling spec of speakers, as long as the voltage gain of the amplifiers used is 32dB. For effective protection of the transducer components, it is necessary to use amplification with a voltage gain of 32dB. For effective protection of the transducer components, it is necessary to use amplification with a voltage gain of 32dB, but it remains necessary to respect the physical limits of the loudspeakers. In addition to power handling considerations tied to the thermal limits, it is necessary to avoid that the loudspeakers be subjected to signals which could cause them to exceed their mechanical limits or their applicable frequency limits. In practice, it is possible to damage a loudspeaker with a power well below its AES applicable power rating if it is required to reproduce a distorted signal at a low frequency that causes a cone excursion beyond the physically consented limit. 40 5. Guide to System Setup This chapter of the manual is devoted to the mounting procedures necessary to fly or stack the AXIOM Series Curvilinear Vertical Array Systems. The AXIOM Systems are built to allow the suspension of arrays with variable shape and dimensions thanks to a suspension mechanism designed to be functional, flexible and safe. The loudspeakers are linked together in a column using a series of couplers integrated in the frame of each enclosure. The same suspension mechanism allows stacking AX3210P, AX1118SP, AX2265P and AX1115SP by simply inverting the elements1 . DO NOT ATTEMPT TO SUSPEND ANY AXIOM SYSTEM BEFORE HAVING READ THIS MANUAL THOROUGHLY. Check our website (sound.proelgroup.com) periodically to verify the eventual publication of updates or appendices. All specifications and information provided refer to the date this manual was revised (see inside cover). AXIOM models AX3210P, AX1118SP, AX2265P and AX1115SP feature a suspension system integrated into their frames. The only element that needs to be added is the flying bar, KPTAX32102 for the models AX3210P and AX1118SP, KPTAX2265 for the models AX2265P and AX1115SP. The AX3210P, AX1118SP, AX2265P and AX1115SP integral suspension system features two coupling cams in the front of the speaker and two slotted bars in the back. Figure 5.1 shows an AX3210P element: coupling cams and slotted bars are highlighted red. Coupling cams in the front do not require any adjustment, whereas the slotted bars in the back are inserted in a U-shaped frame which features a series of numbered holes. Sliding the slotted bar in the U-shaped frame of the next loudspeaker and inserting a 94AXMSP1 coupling pin in one of the numbered holes, it is possible to adjust the relative angle between two adjacent loudspeakers in the array column. The AX2265P is similar, please check the section describing arrays of AX2265P. 5.1 5.1.1 Suspending AX3210P and AX1118SP Systems The suspension of AX3210P systems with KPTAX3210 flying bar As stated before, the only accessory necessary for the suspension of a series of AX3210P enclosures in an array is the KPTAX3210 flying bar. In this manual, the load capacity of the coupling point – or points – which will suspend the array are understood to be mechanically verified to support the array with a safety factor allowed by current regulations. KPTAX3210 flying bar can suspend up to 24 AX3210P systems with a safety factor of 7:1. Choosing the array configuration Because of the great variety of possible configurations, AXIOM systems are provided with a software (LAC) which allows the simulation of the array configuration, therefore calculating the barycentre and the anchoring points. 1 The procedures needed to stack the system are slightly less fluid than those necessary to suspend it. short frame version of the flying bar (KPTAX3210S) is also available. It is best suited for fixed installations and can suspend up to 8 AX3210P systems. 2A 41 5.1. SUSPENDING AX3210P AND AX1118SP SYSTEMS 5. Guide to System Setup Figure 5.1: AX3210P - integral suspension system The LAC software simulates the acoustic operation of the array, and defines the position of its barycentre and consequently the coupling points for the configuration chosen. The structural resistance of each component needs to be verified by the operator who installs the system, unless the configuration chosen is one of those advised by the manufacturer. For further details, see the section devoted to load limits. Flying bar KPTAX3210 Flying bar KPTAX3210 features two possible configurations for lifting the systems, one anterior (configuration A) and one posterior (configuration B), also referred to as reverse mode. The bar features four coupling cams that can be set in the lateral bars by the insertion of 94AXMSP1 coupling pins. Figure 5.2: KPTAX3210 – Coupling configurations 42 5. Guide to System Setup 5.1. SUSPENDING AX3210P AND AX1118SP SYSTEMS Mounting operation sequence According to the correct mounting procedure, the creation of the array has to be started on the ground, with AX3210P systems on their caster boards, and then lifted. All front coupling operations and most of the wiring can be done on the ground. This allows the quick and easy assembly of the array, without having to worry about taking away the caster boards in this phase. The coupling of all rear cams needs to be carried out during the ascent, as the natural conformation of the array will ease this phase. • Enclosure front coupling on the ground The operation of coupling the front part of the enclosures is quite simple: get the speakers on their caster boards close together and release the pins holding the cams, then rotate the cams into their housing on the next speaker and fasten them into their new position with the pins. Now you can proceed iteratively with the following steps necessary to mount the array. 1. Enclosure arrangement 2. Disengagement of pins and extraction of front cams 3. Introduction of front cams into the frames of the successive enclosure and securing coupling pins 4. The front part of the train is now completely coupled Make sure all front cams are correctly inserted in their housing and safely held in place by the 94AXSMP1 pins3 . When you start assembling an array on the ground make sure the surface is sufficiently flat so that the caster boards will be able to roll evenly. When you have to work on grass or gravel, cover the ground with wood boards to create a sufficiently hard surface. • Coupling the array with the flying bar The case reported here is the attachment of the flying bar according to the configuration defined as A.4 . 3 Because of their length, the 94AXSMP1 pins could stick out even if they are correctly mounted. but the procedures it requires are definitely more complex as, normally, the array cannot be left on the ground, but it needs to be partially lifted. 4 Eventual coupling according to the B configuration (reverse mode) is not discussed, 43 5.1. SUSPENDING AX3210P AND AX1118SP SYSTEMS 5. Guide to System Setup Figure 5.3: Array prepared on a uneven ground In the A configuration, the attachment of the flying bar is rather easy: move KPTAX3210 flying bar vertically close to the top enclosure on the array, then use the cams on the flying bar to couple it to the front of the enclosure. The posterior bars need to be fastened to the coupling housings in the rear of the flying bar, in the seats created by the L-folded plates welded to the crossbars. To obtain a correct assembly, the relative angle between the flying bar and the first enclosure of the array has to equal 0◦ : to do so insert 94AXSMP1 pins through the second hole from the top in the flying bar and through the hole of the bar. Please note that, in the back of the array, the pin stays on the enclosure, whereas in the front the pin is used on the enclosure immediately below. 5. Pins are disengaged and cams are extracted from KPTAX3210 flying bar 44 5. Guide to System Setup 5.1. SUSPENDING AX3210P AND AX1118SP SYSTEMS Figure 5.4: Correct coupling point between the hole in the posterior bars and the flying bar. 6. The flying bar is coupled with the enclosure and fixed with pins • Coupling the flying bar with the lifting device The flying bar and the lifting device are coupled through the insertion of 22 mm shackles in the numbered holes on the bar itself. The indication of the correct hole to use will be provided by the LAC simulation software. You can use from one to three flying points according to the availability of the lifting devices and to their load capacity. Please note that, in case of wind, the solution with multiple flying points is to be preferred to improve the array stability. In this phase you can connect the elements of the array to their cables. We advise discharging the weight of the cables on the flying point by tying them with a textile fibre rope, instead of letting them hang freely: this way the position of the array will be much more similar to the simulation produced by the LAC software5 . • Lifting phase starts Now you can start lifting the array. Through this phase you need to pay close attention not to let the cables enter the space between one enclosure and the other, as their compression could cut them. 5 In the experimental phase we verified that the effect produced by the cable weight can be compensated by using a different hole for the coupling with the flying bar, subtracting one hole from the value suggested by the software. 45 5.1. SUSPENDING AX3210P AND AX1118SP SYSTEMS 5. Guide to System Setup Figure 5.5: Array coupled in the front and ready (on the left) and power wiring (on the right). During the lifting phase check continuously to make sure that the space between each loudspeaker and the next is free and that the lifting is smooth. If jams were to occur or if cables were to enter the space between the enclosures, do not try to free them during compression or lifting. Never try to operate in the space between the loudspeakers while they are being hoisted. Once the first loudspeakers of the array are under compression you can disengage the slotted bar from its U-shaped frame and insert it in the U-shaped frame of the next loudspeaker. 7. Slotted bars are inserted in the U-shaped frame At this point you can set the relative angle between the enclosures by inserting 94AXSMP1 pins through the numbered holes on the U-shaped frame or in the slotted bar itself. To couple the bar you can either use the hole at its end or the slot. If you use the slot, the numbers next to the holes correspond to the relative angle; instead, if you use the hole, you need to subtract 1.5 degrees from the numeric value indicated next to the hole used on the U-shaped frame. 46 5. Guide to System Setup 5.1. SUSPENDING AX3210P AND AX1118SP SYSTEMS Figure 5.6: Pins are inserted through the U-shaped profile and the slotted bar 8. The angles are set by inserting the pins Figure 5.7 shows some mounting examples with the angle set at 0◦ , 10◦ and 10.5◦ . Next, you see a table for all possible configurations. • Lifting proceeds Once the angle of the first enclosures has been set, you can continue lifting the array, putting another section under compression and proceeding iteratively, setting the angle of the subsequent enclosure one by one using the corresponding hole in the U-shaped frame. 47 5. Guide to System Setup 5.1. SUSPENDING AX3210P AND AX1118SP SYSTEMS Figure 5.7: The relative angle between AX3210 enclosures is set 48 5. Guide to System Setup 5.1. SUSPENDING AX3210P AND AX1118SP SYSTEMS 9. The array is lifted further 10. The array is completely set At the end of these operations the last element of the array still lies on the ground and the array is ready to be lifted. 49 5.1. SUSPENDING AX3210P AND AX1118SP SYSTEMS 5. Guide to System Setup Figure 5.8: Caster boards are disengaged and stacked. • The array is lifted off the ground In this phase the array has to be eased in its natural movement by holding the handles on the last enclosure of the array to avoid a sharp forward shifting toward the natural vertical centre provided by the lifting point. We advise operating on the vertical lifting point as much as possible in order to keep the array from shifting forward. During the lifting phase, and particularly when there is only one caster board left on the ground, do not stop the ascent, or you will damage the only caster board supporting the weight of the whole array. 11. Caster boards are disengaged 50 5. Guide to System Setup 5.1. SUSPENDING AX3210P AND AX1118SP SYSTEMS As the array is being lifted, you can take away the caster boards. To disengage the boards press and turn the catch pins. This operation is rather simple and it does not require more than one operator. 12. The array is completely off the ground • Arranging the position of the array At this point the array can be lifted to the desired height and fastened with ropes to avoid its rotation or oscillation due to the wind, especially when you are using only one flying point. Once the array has been positioned correctly, the flying device has to be checked to assure safety according to all current local and national regulations. Sequence of disassembly operations Disassembly operations are exactly the same described for assembling the array, you need only to reverse their sequence. Load limits Load limits have been determined during the design phase by calculations executed through modelling of the finished elements then validated by empirical load tests. Flying bar KPTAX3210 can hold up to 24 AX3210P systems. Figure 5.9 shows some configurations that have been verified; please contact Proel’s Technical Office if you need to verify any other configuration. 51 5.1. SUSPENDING AX3210P AND AX1118SP SYSTEMS 5. Guide to System Setup ) ! % $ & ' ( )*+) -.!" % $ " #$ #$ %#$ $ & ' ( &%, ) ! % $ & ' ( % $ & )*+) -.!" $ " #$ #$ #$ #$ % %#$ $ & & ' '%, ) ! % $ & ' ( % $ & )*+) -.!" % " #$ #$ #$ #$ % %#$ $ $ & & '%, ) ! % $ & ' ( % $ & )*+) -.!" " #$ #$ #$ #$ #$ #$ #$ % % %#$ '%, -.!" ) ! " #$ #$ % $ & #$ #$ ' #$ ( #$ #$ % #$ $ #$ & % ' & ( ' ( % )*+) %, -.!" ) ! " #$ % $ & ' ( % $ & #$ ' #$ ( #$ % % & & % & )*+) %, Figure 5.9: Verified configurations of arrays made with AX3210P and flying bar KPTAX3210. 52 5. Guide to System Setup 5.1.2 5.1. SUSPENDING AX3210P AND AX1118SP SYSTEMS Flying an array of AX3210P and AX1118SP using flying bar KPTAX3210 Flying bar KPTAX3210 allows the suspension of systems composed by AX3210P and AX1118SP6 . Array configuration choice We discussed the advisability of systems composed with suspended subwoofers in the preceding chapter. The LAC software will simulate the acoustic behaviour of the system, define its barycentre and determine the mechanical configuration of the system. Sequence of assembly operations The sequence of the assembly operations is exactly the same as described for arrays composed only of AX3210P. The only exception is the angle setting which is different when you have to couple AX3210P systems with AX1118SP. AX1118SP systems feature a U-shaped frame like the one mounted on AX3210P systems, which has a slotted bar for coupling purposes. The angle between AX1118SP systems cannot be different from 0◦ because of the parallelepiped shape of the enclosure; you can however adjust the angle between AX3210P and AX1118SP without exceeding 6◦ - this limitation is also due to the shape of the enclosure. For the adjustment of the intermediate angles, that is of the half degrees, use the same rule described earlier – couple the hole in the bar with one of those on the U-shaped frame subtracting 1.5◦ from the value shown on the side of each hole. Sequence of disassembly operations Disassembly operations of mixed systems follow the same principle used for the disassembly of arrays composed of only AX3210P systems. Load limits Load limits have been determined during the design phase by calculations executed through modelling of the finished elements then validated by empirical load tests. The following table indicates the maximum quantity of enclosures that can be safely suspended: AX3210P 24 22 20 18 16 14 12 10 8 6 4 2 0 AX1118SP 0 1 2 3 4 5 6 7 8 9 10 11 12 Figure 5.10 shows some configurations that have been verified; please contact Proel’s Technical Office if you need to verify any other configuration. 6 And obviously of arrays composed only of AX1118SP systems. 53 5.1. SUSPENDING AX3210P AND AX1118SP SYSTEMS )* %+ ! " # ,! $ ,! ,! ! " # ! ! $ " " %&'% #( 5. Guide to System Setup )* %+ ! " # ! $ " # %&'% #( Figure 5.10: Verified configurations of arrays composed of AX3210P and AX1118SP systems with flying bar KPTAX3210. 5.1.3 Flying an array of AX3210P and AX1118SP systems using flying bar KPTAX3210S Compact flying bar KPTAX3210S is advisable for permanent installations or for arrays of suspended subwoofers. Because of its limited mounting possibilities, we certainly do not advise using the compact version of the flying bar while on tour. Choosing the configuration of the array The configuration can be simulated by LAC, taking its limitations into due account. Thus, even if the software does not explicitly indicate the use of flying bar KPTAX3210S, it can nonetheless verify the possibility of using it. Flying bar KPTAX3210S Flying bar KPTAX3210S is the compact version of KPTAX3210, and they share the same load limits. Flying bar KPTAX3210S allows only one mounting option (the reverse mode is not an option) and the number of suspension points is lower (the first 12 suspension points on KPTAX3210). The bar features two coupling cams for the front coupling with the first suspended enclosure; they can be put into the lateral bars by insertion of 94AXMSP1 pins. Sequence of assembly and disassembly operations Assembly and disassembly operations are the same described for flying bar KPTAX3210. Load limits Load limits are analogous to those referring to flying bar KPTAX3210. Figure 5.12 shows some configurations that have been verified; if you need to verify any other configuration please contact Proel’s 54 5. Guide to System Setup 5.2. STACKING AX3210P AND AX1118SP SYSTEMS Figure 5.11: KPTAX3210S – Coupling configuration Technical Office. 5.2 Stacking AX3210P and AX1118SP systems Stacked AXIOM Systems arrays can be created either using an AX1118P SUB directly on the ground as a base or employing flying bar KPTAX3210 adding its feet (95AXMPDN). The coupling procedure of the enclosures is the same followed for a suspended array, with the only difference that the array is mounted upside down. Incorrect use of the array stacking system can cause serious injury to persons and damage to property. Sound system stack rigging should be done on even, uniform, and compact surfaces. Before sound system mounting, please carefully verify the support surface capability. 5.2.1 Stacking AX3210P systems on flying bar KPTAX3210 Choosing the array configuration The array configuration is limited by the fact that, when stacked, the systems can only maintain partial angles because only the hole on the slotted bar, and not the slot, can be used to couple them7 . Flying bar KPTAX3210 used as stacking base Flying bar KPTAX3210 with its feet 95AXMPDN can be used to stand AXIOM System Stacked Arrays safely. As opposed to its conventional use, the bar needs to be mounted upside down on the ground and perfectly balanced by adjusting the height of its feet. Always verify that the bearing surface is stable and compacted. 7 When designing the system, simplicity and practicality in mounting the suspended version prevailed, and we introduced a slotted bar to diminish the compression stress during the ascent and descent of the system 55 5.2. STACKING AX3210P AND AX1118SP SYSTEMS 5. Guide to System Setup '( #) ! " #$%# & '( #) ! ! * " " #$%# & '( #) " " ! * ! " + " #$%# !"& '( #) " " " " ! * " + ! " #$%# ! & Figure 5.12: Verified configurations of arrays composed of AX3210P and AX1118SP systems with compact flying bar KPTAX3210S 56 5. Guide to System Setup 5.2. STACKING AX3210P AND AX1118SP SYSTEMS Figure 5.13: KPTAX3210 – positioned on the ground Sequence of mounting operations • Positioning flying bar KPTAX3210 on the ground Mount feet 95AXMPDN on top of the flying bar (on the same side where the suspension shackle is), then put the bar down on the ground in the position where you will stack the array and adjust the feet so to lie the bar perfectly horizontal. Obviously, the ground needs to be absolutely stable and compacted. 1. Adjusting feet height At this point mark the position of the bar on the ground and lift it up vertically. • Coupling the first speaker enclosure with KPTAX3210 The first loudspeaker of the array is coupled to the bar following the same procedure described for the suspension of the array, that is the bar is coupled to the enclosure still mounted on its caster board. Couple the front cams of the flying bar to the front lateral bars on the enclosure and fasten them with the pin. Couple the back slotted bar to the flying bar inserting the pin in the hole of the slotted bar and in the coupling frame of bar KPTAX3210. The coupling frame features four holes corresponding to four different angles between the first enclosure and the flying bar, therefore you can select the angle of the first enclosure among the following values: -2◦ ; -1◦ ; 0◦ and 1◦ (see figure 5.14). 57 5.2. STACKING AX3210P AND AX1118SP SYSTEMS 5. Guide to System Setup Figure 5.14: KPTAX3210 – adjusting the angle of the first enclosure 2. Coupling the bar with the first enclosure of the stacked array • Positioning the first portion of the array on the ground Once the first enclosure has been coupled to the flying bar, with a rotation you can lie this portion of the array back on the ground in the position you had marked. To avoid backward shifting of the array you have to use two 94AXMSPI pins and insert them in the proper housings on the lateral crossbar of the flying bar (see figure 5.15). • Coupling the next enclosures You can stack another enclosure on the array lifting it up and placing it upside down on top of the array. Now you can couple its front cams to the frame of the enclosure underneath and secure them with the pins. Then lift the back part of the enclosure and set the relative angle using the hole in the slotted bars on the back and the hole in the U-shaped frame of the enclosure underneath, and secure their position with a pin (figure 5.16 shows the possible mounting angles). 58 5. Guide to System Setup 5.2. STACKING AX3210P AND AX1118SP SYSTEMS Figure 5.15: position of lateral pins used as anti-shifting pins ! Figure 5.16: Adjusting the relative angle between AX3210P and AX1118SP systems when stacked 3. Positioning the next enclosure 59 5.2. STACKING AX3210P AND AX1118SP SYSTEMS 5. Guide to System Setup 4. Front coupling 5. Setting the angle with the back slotted bar Verify that the angle has been set correctly on both slotted bars of the enclosure. You can now proceed iteratively to complete the assembly of the whole stacked array. • Removing the caster boards Once you have completed the array you can remove the caster boards and put them away. Sequence of disassembly operations Disassembly works the same way assembly does, simply inverting the order of the operations. Load limits With this configuration you can stack up to eight AX3210P. 5.2.2 Stacking arrays of AX3210P and AX1118SP systems combined on flying bar KPTAX3210 Flying bar KPTAX3210 can also be set on the ground to stack arrays of AX3210P and AX1118SP systems combined. In this case you can only mount the subwoofers (AX1118SP) under the loudspeakers (AX3210P), as the angle between the subwoofer/s and the flying bar (therefore the ground) cannot be changed. Always verify that the surface bearing the array is stable and compacted. 60 5. Guide to System Setup 5.2. STACKING AX3210P AND AX1118SP SYSTEMS Sequence of mounting operations • Positioning flying bar KPTAX3210 on the ground Mount feet 95AXMPDN on top of the flying bar (on the same side where the suspension shackle is), then put the bar down on the ground in the position where you will stack the array and adjust the feet so to lie the bar perfectly horizontal. Obviously, the ground needs to be absolutely stable and compacted. At this point mark the position of the bar on the ground and lift it up vertically. • Coupling the first subwoofer enclosure with KPTAX3210 The first subwoofer enclosure of the array is coupled to the bar following the same procedure described for the suspension of the array, that is the bar is coupled to the enclosure still mounted on its caster board. Couple the front cams of the flying bar to the front bars on the enclosure and fasten them with the pin. Couple the back slotted bar to the flying bar inserting the pin in the hole of the slotted bar and in the coupling frame of bar KPTAX3210. The coupling frame features four holes corresponding to four different angles between the first enclosure and the flying bar. The subwoofer AX1118SP has to be at a 0◦ angle, therefore you need to use the hole corresponding to 0◦ (see figure 5.14). • Positioning the first portion of the array on the ground Once the first enclosure has been coupled to the flying bar, with a rotation you can lie this portion of the array back on the ground in the position you had marked. To avoid backward shifting of the array you have to use two 94AXMSPI pins and insert them in the proper housings on the lateral crossbar of the flying bar. • Coupling next subwoofers AX1118SP You can stack another AX1118SP subwoofer on the array lifting it up and placing it upside down on top of the array. Now you can couple its front cams to the frame of the enclosure underneath, then the hole in the slotted bars on the back and the hole corresponding to 0◦ in the U-shaped frame of the enclosure underneath, and insert the pin to secure their position. Make sure you have set the correct angle for both back slotted bars on the enclosure. You can now proceed iteratively and stack all AX1118SP systems. • Coupling next loudspeakers AX3210P You can stack the next enclosure of an AX3210P loudspeaker on the array lifting it up and placing it upside down on top of the array. Now you can couple its front cams to the frame of the enclosure underneath and insert the pins to block them. Then lift the back part of the enclosure and set the relative angle using the hole in the slotted bars on the back and the hole in the U-shaped frame of the enclosure underneath, and insert the pin to block their position (figure 5.16 shows the possible mounting angles). Make sure you have set the correct angle for both back slotted bars on the enclosure. You can now proceed iteratively until the completion of the array. • Removing the caster boards Once the array has been completely stacked you can remove the caster boards and put them away. Sequence of disassembly operations Disassembly works the same way assembly does, simply inverting the order of the operations. 61 5.3. SUSPENDING AX2265P AND AX1115SP SYSTEMS 5. Guide to System Setup Load limits Flying bar KPTAX3210 can stack up to eight systems. The following chart shows all the possible combinations: AX3210P 8 6 4 2 0 5.3 AX1118SP 0 1 2 3 4 Suspending AX2265P and AX1115SP Systems AXIOM models AX2265P and AX1115SP feature a suspension system integrated into their frames features two coupling cams in the front of the speaker and two slotted bars in the back. The loudspeakers are linked together in a column using a series of couplers integrated in the frame of each enclosure. The same suspension mechanism allows stacking AX2265P and AX1115SP by simply inverting the elements8 . Figure 5.17: AX2265 - integral suspension system 5.3.1 The suspension of AX2265P systems with KPTAX2265 flying bar As stated before, the only accessory necessary for the suspension of a series of AX2265P enclosures in an array is the KPTAX2265 flying bar. In this manual, the load capacity of the coupling point – or points – which will suspend the array are understood to be mechanically verified to support the array with a safety factor allowed by current regulations. KPTAX2265 flying bar can suspend up to 24 AX2265P systems with a safety factor of 7:1. 8 The procedures needed to stack the system are slightly less fluid than those necessary to suspend it. 62 5. Guide to System Setup 5.3. SUSPENDING AX2265P AND AX1115SP SYSTEMS Choosing the array configuration Because of the great variety of possible configurations, AXIOM systems are provided with a software (LAC) which allows the simulation of the array configuration, therefore calculating the centre of mass and the anchoring points. The LAC software simulates the acoustic operation of the array, and defines the position of its barycentre and consequently the coupling points for the configuration chosen. The structural resistance of each component needs to be verified by the operator who installs the system, unless the configuration chosen is one of those advised by the manufacturer. For further details, see the section devoted to load limits. Flying bar KPTAX265 Flying bar KPTAX2265 features two possible configurations for lifting the systems, one anterior (configuration A) and one posterior (configuration B), also referred to as reverse mode. Figure 5.18: KPTAX2265 – Coupling configurations Mounting operation sequence According to the correct mounting procedure, the creation of the array has to be started on the ground, with AX2265P systems on their case boards (case code CP038D04 for 4 AX2265P systems), and then lifted. All front coupling operations and most of the wiring can be done on the ground. This allows the quick and easy assembly of the array, without having to worry about taking away the case boards in this phase. The coupling of all rear cams needs to be carried out during the ascent, as the natural conformation of the array will ease this phase. 63 5.3. SUSPENDING AX2265P AND AX1115SP SYSTEMS 5. Guide to System Setup • Enclosure front coupling on the ground The operation of coupling the front part of the enclosures is quite simple: get the speakers on their case boards close together and release the pins holding the cams, then slide the cams into their housing on the next speaker and fasten them into their new position with the pins. Now you can proceed iteratively with the following steps necessary to mount the array. 1. Enclosure arrangement on the CP038D04 case boards 2. Disengagement of pins and extraction of front cams 3. Introduction of front cams into the frames of the successive enclosure and securing coupling pins Make sure all front cams are correctly inserted in their housing and safely held in place by the pins9 . When you start assembling an array on the ground make sure the surface is sufficiently flat so that the caster on the case boards will be able to roll evenly. When you have to work on grass or gravel, cover the ground with wood boards to create a sufficiently hard surface.. • Coupling the array with the flying bar The case reported here is the attachment of the flying bar according to the configuration defined as A10 . In the A configuration, the attachment of the flying bar is rather easy: move KPTAX2265 flying bar vertically close to the top enclosure on the array, then use the cams on the enclosure to couple it to the flying bar. To obtain a correct assembly, the relative angle between the flying bar and the first enclosure of the array has to equal 0◦ : to set-up this configuration, insert the pins in the plate with the indicated angles. 9 Because of their length, the 94AXSMP1 pins could stick out even if they are correctly mounted. but the procedures it requires are definitely more complex as, normally, the array cannot be left on the ground, but it needs to be partially lifted. 10 Eventual coupling according to the B configuration (reverse mode) is not discussed, 64 5. Guide to System Setup 5.3. SUSPENDING AX2265P AND AX1115SP SYSTEMS Figure 5.19: AX2265 array ready for wiring Figure 5.20: AX2265P array coupled in the front and power wired ready to lift 65 5.3. SUSPENDING AX2265P AND AX1115SP SYSTEMS 5. Guide to System Setup 4. The flying bar is coupled with the enclosure and fixed with pins 5. Set the angle between the flying bar and the first enclosure • Coupling the flying bar with the lifting device The flying bar and the lifting device are coupled through the insertion of 16 mm shackles in the numbered holes on the bar itself. The indication of the correct hole to use will be provided by the LAC simulation software. You can use from one to two flying points according to the availability of the lifting devices and to their load capacity. Please note that, in case of wind, the solution with multiple flying points is to be preferred to improve the array stability. In this phase you can connect the elements of the array to their cables. We advise discharging the weight of the cables on the flying point by tying them with a textile fibre rope, instead of letting them hang freely: this way the position of the array will be much more similar to the simulation produced by the LAC software11 . • Lifting phase starts Now you can start lifting the array. Through this phase you need to pay close attention not to let the cables enter the space between one enclosure and the other, as their compression could cut them. 11 In the experimental phase we verified that the effect produced by the cable weight can be compensated by using a different hole for the coupling with the flying bar, subtracting one hole from the value suggested by the software. 66 5. Guide to System Setup 5.3. SUSPENDING AX2265P AND AX1115SP SYSTEMS During the lifting phase check continuously to make sure that the space between each loudspeaker and the next is free and that the lifting is smooth. If jams were to occur or if cables were to enter the space between the enclosures, do not try to free them during compression or lifting. Never try to operate in the space between the loudspeakers while they are being hoisted. Once the first loudspeakers of the array are under compression you can disengage the slotted bar from its frame and insert it in the frame of the next loudspeaker. 6. Slotted bars are inserted in the frame At this point you can set the relative angle between the enclosures by inserting the pins through the numbered holes on the frame or in the slotted bar itself. To couple the bar you can either use the hole at its end or the slot. If you use the slot the relative angle are print in the side plate. 7. The angles are set by inserting the pins • Lifting proceeds Once the angle of the first enclosures has been set, you can continue lifting the array, putting another section under compression and proceeding iteratively, setting the angle of the subsequent enclosure one by one using the corresponding hole in the frame. 67 5.3. SUSPENDING AX2265P AND AX1115SP SYSTEMS 5. Guide to System Setup Figure 5.21: AX2265P array is lifted off the ground 8. The array is lifted further 9. The array is completely set At the end of these operations the last element of the array still lies on the ground and the array is ready to be lifted. • The array is lifted off the ground In this phase the array has to be eased in its natural movement by holding the handles on the last enclosure of the array to avoid a sharp forward shifting toward the natural vertical centre provided by the lifting point. We advise operating on the vertical lifting point as much as possible in order to keep the array from shifting forward. During the lifting phase, and particularly when there is only one case board left on the ground, do not stop the ascent, or you will damage the only case board supporting the weight of the whole array. As the array is being lifted, you can take away the case boards. 68 5. Guide to System Setup 5.3. SUSPENDING AX2265P AND AX1115SP SYSTEMS 10. The array is completely off the ground • Arranging the position of the array At this point the array can be lifted to the desired height and fastened with ropes to avoid its rotation or oscillation due to the wind, especially when you are using only one flying point. Once the array has been positioned correctly, the flying device has to be checked to assure safety according to all current local and national regulations. Sequence of disassembly operations Disassembly operations are exactly the same described for assembling the array, you need only to reverse their sequence. Load limits ILoad limits have been determined during the design phase by calculations executed through Finite Element Modeling then validated by empirical load tests. Flying bar KPTAX2265 can hold up to 24 AX2265P systems. Figure 5.22 shows some configurations that have been verified; please contact Proel’s Technical Office if you need to verify any other configuration.. 5.3.2 Flying an array of AX2265P and AX1115SP using flying bar KPTAX2265 Flying bar KPTAX2265 allows the suspension of systems composed by AX2265P and AX1115SP12 . Array configuration choice We discussed the advisability of systems composed with suspended subwoofers in the preceding chapter. The LAC software will simulate the acoustic behaviour of the system, define its barycentre and determine the mechanical configuration of the system. 12 And obviously of arrays composed only of AX1115SP systems. 69 5.3. SUSPENDING AX2265P AND AX1115SP SYSTEMS 5. Guide to System Setup ) !" % & ' ( )*+) -."# ( # $ %$ &$ ' ( %, ) !" % & ' ( % & )*+) -."# # $ $ $ % %$ & &$ ' ' %, ) !" % & ' ( % & )*+) -."# % # $ $ $ % %$ & &$ ' ' %, ) !" % & ' ( % & )*+) -."# # $ $ $ $ $ $ % % %$ & & &$ %, -."# ) !" # $ % $ & $ ' $ $ ( $ $ % & $ $ % ' & ( ' ( % & )*+) &, -."# ) ( !" # $ % & % ' % % ( % % % % % % & % % % ' %$ %$ ( %$ & & % & )*+) &, Figure 5.22: Verified configurations of arrays made with AX2265P and flying bar KPTAX2265. 70 5. Guide to System Setup 5.4. STACKING AX2265P AND AX1115SP SYSTEMS Sequence of assembly operations The sequence of the assembly operations is exactly the same as described for arrays composed only of AX2265P. The only exception is the angle setting which is different when you have to couple AX2265P systems with AX1115SP. AX1115SP systems feature a frame like the one mounted on AX2265P systems, which has a slotted bar for coupling purposes. The angle between AX1115SP systems cannot be different from 0◦ because of the parallelepiped shape of the enclosure; you can however adjust the angle between AX2265P and AX1115SP without exceeding 6◦ - this limitation is also due to the shape of the enclosure. For the adjustment of the intermediate angles you use the slot the relative angle printed in the side plate. Sequence of disassembly operations Disassembly operations of mixed systems follow the same principle used for the disassembly of arrays composed of only AX2265P systems. Load limits Load limits have been determined during the design phase by calculations executed through Finite Element Modeling then validated by empirical load tests. The following table indicates the maximum quantity of enclosures that can be safely suspended: AX2265P 24 22 20 18 16 14 12 10 8 6 4 2 0 AX1115SP 0 1 2 3 4 5 6 7 8 9 10 11 12 Figure 5.23 shows some configurations that have been verified; please contact Proel’s Technical Office if you need to verify any other configuration. 5.4 Stacking AX2265P and AX1115SP systems Stacked AXIOM Systems arrays can be created either using an KPTAX2265 with its rubber feet. The coupling procedure of the enclosures is the same followed for a suspended array, with the only difference that the array is mounted upside down.. Incorrect use of the array stacking system can cause serious injury to persons and damage to property. Sound system stack rigging should be done on even, uniform, and compact surfaces. Before sound system mounting, please carefully verify the support surface capability. 71 5.4. STACKING AX2265P AND AX1115SP SYSTEMS )* %+ $ ! " # , $ , , ! ! ! " # $ %&'% #( 5. Guide to System Setup )* %+ ! ! " # $ " # ! %&'% ( )* %+ ! " ! # ! $ ! %&'% #( Figure 5.23: Verified configurations of arrays composed of AX2265P and AX1115SP systems with flying bar KPTAX2265. 72 5. Guide to System Setup 5.4.1 5.4. STACKING AX2265P AND AX1115SP SYSTEMS Stacking AX2265P systems on flying bar KPTAX2265 Choosing the array configuration The array configuration is limited by the fact that, when stacked, the systems can only maintain partial angles because only the hole on the slotted bar, and not the slot, can be used to couple them13 . Flying bar KPTAX2265 used as stacking base Flying bar KPTAX2265 with its rubber feet can be used to stand AXIOM System Stacked Arrays safely. As opposed to its conventional use, the bar needs to be mounted upside down on the ground and perfectly balanced by adjusting the height of its feet. Always verify that the bearing surface is stable and compacted. Sequence of mounting operations • Positioning flying bar KPTAX2265 on the ground put the bar down on the ground in the position where you will stack the array and adjust the feet so to lie the bar perfectly horizontal. Obviously, the ground needs to be absolutely stable and compacted.v • Coupling the first speaker enclosure with KPTAX2265 The first loudspeaker of the array is coupled to the bar following the same procedure described for the suspension of the array. Couple the front cams of the flying bar to the front lateral bars on the enclosure and fasten them with the pin. Couple the back slotted bar to the flying bar inserting the pin in the hole of the slotted bar and in the coupling frame of bar KPTAX2265. • Coupling the next enclosures You can stack another enclosure on the array lifting it up and placing it upside down on top of the array. Now you can couple its front cams to the frame of the enclosure underneath and secure them with the pins. Then lift the back part of the enclosure and set the relative angle using the hole in the slotted bars on the back and the hole in the frame of the enclosure underneath, and secure their position with a pin. Verify that the angle has been set correctly on both slotted bars of the enclosure. You can now proceed iteratively to complete the assembly of the whole stacked array. Sequence of disassembly operations Disassembly works the same way assembly does, simply inverting the order of the operations. Load limits With this configuration you can stack up to eight AX2265P. 5.4.2 Stacking arrays of AX2265P and AX1115SP systems combined on flying bar KPTAX2265 Flying bar KPTAX2265 can also be set on the ground to stack arrays of AX2265P and AX1115SP systems combined. In this case you can only mount the subwoofers (AX1115SP) under the loudspeakers (AX2265P), as the angle between the subwoofer/s and the flying bar (therefore the ground) cannot be changed. Always verify that the surface bearing the array is stable and compacted. 13 When designing the system, simplicity and practicality in mounting the suspended version prevailed, and we introduced a slotted bar to diminish the compression stress during the ascent and descent of the system. 73 5.4. STACKING AX2265P AND AX1115SP SYSTEMS 5. Guide to System Setup Sequence of mounting operations • Positioning flying bar KPTAX2265 on the ground put the bar down on the ground in the position where you will stack the array and adjust the feet so to lie the bar perfectly horizontal. Obviously, the ground needs to be absolutely stable and compacted. • Coupling the first speaker enclosure with KPTAX2265 The first loudspeaker of the array is coupled to the bar following the same procedure described for the suspension of the array. Couple the front cams of the flying bar to the front lateral bars on the enclosure and fasten them with the pin. Couple the back slotted bar to the flying bar inserting the pin in the hole of the slotted bar and in the coupling frame of bar KPTAX2265. The angle between AX1115SP systems cannot be different from 0◦ so you must use only the 0◦ hole (see the side plate). • Coupling the next AX1115SP enclosures You can stack another enclosure on the array lifting it up and placing it upside down on top of the array. Now you can couple its front cams to the frame of the enclosure underneath and secure them with the pins. Then set the 0◦ angle using the hole in the slotted bars on the back and the hole in the frame of the enclosure underneath, and secure their position with a pin. Verify that the angle has been set correctly on both slotted bars of the enclosure. You can now proceed iteratively to complete the assembly of all the AX1115SP. • Coupling the next AX2265P enclosures You can stack another AX2265P enclosure on the array lifting it up and placing it upside down on top of the array. Now you can couple its front cams to the frame of the enclosure underneath and secure them with the pins. Then lift the back part of the enclosure and set the relative angle using the hole in the slotted bars on the back and the hole in the frame of the enclosure underneath, and secure their position with a pin. Verify that the angle has been set correctly on both slotted bars of the enclosure. You can now proceed iteratively to complete the assembly of the whole stacked array. Sequence of disassembly operations Disassembly works the same way assembly does, simply inverting the order of the operations. Load limits Flying bar KPTAX3210 can stack up to eight systems. The following chart shows all the possible combinations: AX2265P 8 6 4 2 0 AX1115SP 0 1 2 3 4 74 5. Guide to System Setup 5.5 5.5. NOTES ON SAFETY Notes on safety Although this manual contains a lot of useful information for the suspension of vertical array systems, it is not enough to cover the subject in all its complexity: it is therefore necessary to rely on qualified and expert operators when you need to mount a vertical array. The user/installer will have the responsibility of verifying all load limits and procedures constraints related to the suspension of the array. We took great care in choosing the materials and manufacturing our systems in order to provide a high safety level. Incorrect use of the suspension system of the array can cause serious injury to persons and damage to property. Proel’s products have been designed and tested to exclude any critical breakage in a normal use cycle including periodical mechanical inspections. All system parts have safety margins suited to the kind of use envisioned by the specifications provided by this manual. The configurations suggested throughout the manual have been verified by calculator modelling and by operative tests. Proel advises to take all local, national and federal laws into account when suspending acoustic enclosures. Always verify that pins 94AXMSP1 have been correctly inserted before you try and lift any AXIOM system array off the ground. 5.5.1 Inspection and maintenance Every time any AXIOM system has to be suspended, a thorough inspection of all materials used, including the overhead structure that will hold it, should be carried out, so to rule out any possibility of aging, deformation, corrosion or break. With a frequency of use equal to twenty times per month in the respect of all instructions and limitations indicated in this manual provided by Proel SpA, the expected life span of Flying Bar KPTAX3210 (and of Flying Bar KPTAX3210S) should be five years. Yet, qualified operators indicated by Proel itself should carry out an annual inspection to verify the general state of repair of the structure and eventually arrange for maintenance, and especially should ascertain the integrity of the welded joints. Inspections should proceed with the following order: • Identification of the suspension device, • control of the conditions of all components and devices, in reference to damage, consumption, corrosion or any other problem, • test functionality of mechanism, • test of welded joints and evaluation of any prospective crack, • test of all connecting pins and couplings and evaluation of any possible deformation, consumption or crack. If the inspection were to reveal any anomaly or defect of the components, all faulty parts will have to be replaced with Proel original spare parts. 5.6 Responsibility All efforts made to design the components and optimize practicality of use do not change the fact that only expert qualified operators should work the suspension system after having read this manual carefully. Proel recommends abiding to every national, federal and local law when suspending AXIOM system arrays. 75 5.7. WHAT YOU NEED TO DO 5. Guide to System Setup Therefore, it is the user’s responsibility to make sure that the suspension system features meet all criteria required by local laws and regulations. Nonetheless, it is the user’s responsibility to make sure that the system is mounted right, according to its load limits and to all indications reported here. The product must be installed only by qualified operators without exceeding the load limits and in the respect of all indications given by this guide. All NON-PROEL parts employed are the responsibility of a third party. Technical specifications can change at any time without notice, and it is the user’s responsibility to verify that the system is suspended according to all information provided by this manual and its updates. Suspension systems KPTAX3210 and KPTAX3210S and all related accessories are suited only for Proel’s AX3210P and AX1118SP systems and cannot be used for different models or for products of a different brand. Proel declines all responsibility for damages to people or things due to lack of maintenance, tampering, improper use or installation not in accordance with safety laws. The same reasons determine the loss of all warranty terms. 5.7 What you need to do • Inspect the suspending material before every use • Respect all local and national current safety laws for installations • Suspend the system using coupling points provided by this manual or by the LAC software • Employ only qualified operators who are familiar with this manual and make one available for each of them • Make sure all blocking devices are correctly inserted in their housings • Make sure the capacity of all suspension points and devices is higher than the weight of the load that needs to be suspended 5.8 What you need to avoid • Do not suspend anything before having read this manual thoroughly • Do not hire non-qualified operators • Do not exceed the load limits • Do not use non-original spare parts • Do not use damaged or worn-out materials • Do not employ a lifting speed faster than 4m/min 76 6. Operating guide In this chapter we will describe the series of practical operations needed for the use of the AXIOM Systems. We will not discuss the mounting, to which we devoted chapter 5. This chapter could be used as a step-by-step guide that can lead you through mounting choices and execution, verification of correct mounting, equalization and setting and finally disassembly and storage of the system. You will also find information on care and preservation of the AXIOM systems . 6.1 Necessary tools In order to work correctly and safely, and to get the most out of your system, you should have at least a minimum of necessary tools. 6.1.1 A PC with Windows Operating System The LAC software simulation tool, freely distributed to all AXIOM system owners, requires the use of a computer with a Windows operating system1 . A laptop is the most convenient for use in the field, especially if it is also equipped with a measurement software such as SmaartLive2 . 6.1.2 Cable testing The performance of complex audio systems depends on the performance and quality of each single part. It is well noted that a high percentage of problems and malfunctions in large systems are due to connection defects or errors. In array systems, where the number of enclosures (and therefore connections) is high, the probability of this type of problem is even higher. The periodic use of a cable tester to verify the correct functionality of every connecting cable used is one of the most efficient and cost-effective ways to assure optimum performance of the system. Figure 6.1: Proel cable tester PLTESTCB 1 See the LAC software manual to find out which versions of the operating system it supports. 2 http://www.siasoft.com/ 77 6.2. COMPONENTS TESTING 6.1.3 6. Operating guide Test Signal generator When verifying the operativeness of the system and its equalization, it is essential to have a signal generator that can at least generate pink noise. If measurement software is used, this function is usually included, but an inexpensive alternative is to have a CD with pre-recorded pink noise. 6.1.4 Real time analyzer and transfer function analyzer For time alignment and system setup, it is advisable to use instrumentation for the measurement of the audio output of the system. Very often, system equalization is adjusted with the use of a Real-Time analyzer. However, the information supplied by this type of instrument is incomplete and insufficient for the proper setup of a complex system such as a vertical array, and is quite useless in the phase alignment of such a system. It is necessary to use a measurement tool that provides monitoring of the system with respect to frequency and phase.3 . Among professionals in the field, the software SmaartLive4 is a proven and accepted standard that is quite functional and cost-effective for the setup and alignment of professional systems. 6.1.5 Measurement tools for distance and angle For time alignment, but also simply for the correct mounting of the system, it is necessary to have on hand proper tools for measuring distance and angle. A laser range-finder is very useful for rapid and precise measurement of distances, but such tools have their limits, especially in the open and in full daylight. When an optical instrument is not available or not usable, a tape-measure roll is a valid and essential tool. Very often trigonometry is of great help, and can help you determine the measurement of unknown distances with given information from other easily measured distances. Please refer to the appendix of this manual for a quick review of trigonometric functions which are useful for system alignment. For the verification of the correct pointing of the system, it is useful to have some sort of inclinometer to fix to the flying bar and correct any difference in angle to that simulated in the LAC software and ascertain the changes in coverage. We also remind you of the importance of always having a bubblelevel or, better, a laser level. 6.2 Components testing A periodic procedure that should be followed when the system is not in use, is the verification of the condition and functionality of every element in the system. It is particularly important to inspect the suspension system for any defect or crack. In the case of malfunction, it is possible to verify the state of the electro-acoustic components in the system. The simplest tests to carry out are measurements of frequency response and impedance. It is not within the scope of this manual to go into detail about the execution of these measurements, but both are possible with the SmaartLive software application or with dedicated electro-acoustic measurement equipment such as CLIOwin5 . Periodic measurement of the system between uses permits not only the verification of its correct operation6 , but also the physical examination of its state of wear in order to perform any preventive maintenance that proves necessary. For further information on techniques and methods of measurement and analysis, it is possible to contact PROEL technical support at sound.proelgroup.com. 3A description of the meaning of frequency and phase monitoring is provided in appendix. manual does not advise one measurement system rather than another. SmaartLive was chosen as it is widely used. The appendix lists a series of alternative options available on the market. 5 http://www.cliowin.com/ 6 And also a memorization of the measurements, so to have a record. 4 This 78 6. Operating guide 6.3 6.3. SYSTEM DESIGN System Design Every time that the system is to be installed, it is necessary to simulate it with the LAC software application. In chapter 4, we have covered this subject in detail, and it is to be emphasized here that the design and simulation of the installation is part of the setup procedure and should never be omitted. From the LAC software it is possible to print a summary and design of the mechanical configuration of the system for distribution to the personnel responsible for rigging the system. 6.4 Installation of the system Installation of the system is covered in exhaustive detail in the preceding chapter. Always assure that the system is installed with maximum attention to and priority on safety. 6.4.1 Power up procedure Once the system is physically in place and mechanically stable, you can proceed with the connection of the power amplification. To verify the correct operation of the system, and correct wiring a very simple procedure can be followed: 1. Power up the amplifiers with output volume completely at the minimum7 and all processor outputs in MUTE. 2. Apply pink noise generation at the input. 3. Starting from one side, for example Left, take off the Mute from the HIGH output on the processor. 4. Raise the volume on one amplifier at a time to verify that each is coupled to the correct output and that it is operative. This verification can be effected by ear and with instrumentation. After each amplifier is verified, its volume should then be returned to zero. 5. Repeat step 4 for each amplifier connected to the HIGH output. 6. Once terminated the verification of the amplification of the HIGH output, return the output to MUTE on the processor. 7. Repeat steps 3, 4 and 5 for every filtered output of the Left side.8 . 8. Repeat steps 3, 4, 5 and 6 for every filtered output of the Right side. Once the correct connection and operation of system has been ascertained, you can proceed with raising the volume on all of the amplifiers. Upon completion of this procedure, one can be assured that the system is perfectly functional, as long as the following conditions are also met: • Each cable has been tested and verified with a tester, • All power amplifier racks have been correctly wired at the warehouse (or, if new, by the supplier)9 ) • Each electro acoustic system has been measured and tested at the warehouse (or, if new, by the supplier)10 ) 7 If the volume/gain control is available, otherwise proceed with a moderate level for pink noise. correct procedure starts at HIGH pass band output to the SUB output. In fact, if any wiring is wrong, sending the HIGH pass band signal to a speaker intended for MID-L does not cause any damage, whereas sending a signal meant for the LOW pass band to a component intended for HIGH or MID is likely to damage it. 9 All racks provided by Proel with AXIOM Systems are verified prior to shipping. 10 All Proel AXIOM Systems are accurately verified and measured at the end of the production line according to state-of-the-art quality control techniques. 8 The 79 6.4. INSTALLATION OF THE SYSTEM 6.4.2 6. Operating guide Adjustment Once the system has been installed and its correct operation has been confirmed, proceed to the regulation of the SUB output. SUB delay The presets supplied by Proel with the AXIOM system foresee the mechanical alignment of the satellites with the subwoofer systems. Therefore the system is correctly aligned when one satellite is physically above one sub enclosure; the situation shown in figure 6.2. Figure 6.2: System in a physically superimposed configuration, reference for the alignment of the various output pass bands in the preset. In this configuration, the delay necessary for the alignment of the various output pass bands is already preset by the processor. Figure 6.3 illustrates a situation in which the system is geometrically aligned, that is if there is no difference in the path of Sub and Satellite11 . Figure 6.3: System in a configuration with identical paths for Sub and Satellite, with alignment of the various pass bands preset by the processor. In the great majority of practical applications, it will not be possible to position the Subs in order to have an identical acoustical path to that of the flown array. In these cases some electronic correction of the alignment will be necessary, with additional delay applied to that of the preset for the Sub signal or for the MID-L/HIGH pass bands12 . In order to determine the delay to set in the processor, it is necessary to measure the distance between point P, where the system is pointed, and the position of the Sub and the distance between 11 Obviously this is true for a single point: the system is aligned with only one point in the audience, not with the whole audience. As the distance between the two sources diminishes, the delay can be minimized in larger locations, but this would conflict with the need to suspend the system as high as possible. As usual, a compromise needs to be found, which is aligning with a point that is two and a half times the height of the system suspension. 12 For instance, the preset provided with EDGE121SP SUB and with AXIOM Systems allows you to set a delay in the SUB or in the HIGH pass band which modifies the MID-L, too. 80 6. Operating guide 6.4. INSTALLATION OF THE SYSTEM point P and the flown array. This can be done with a laser range finder or calculated trigonometrically using the measured distance from the Sub to point P, and the measured distance between the vertical axis of the flown array and point P and the known height of the flown array. In the case of the use of a rangefinder, where the result is instantaneous, if the distance between the flown array and point P is greater than that between the Sub and point P, it will be necessary to delay the Sub output. Likewise, if the contrary is true, it will be necessary to delay the signal of the suspended system, therefore the MID-L/HIGH pass bands from the processor. The delay to apply to one or the other outputs is exactly the difference in meters between the two audio paths. The Proel DSO26 processor allows the user to input the necessary delay directly in meters, but to calculate the delay in milliseconds it is necessary only to apply the simple mathematical formula: ∆T = dSAT − dSUB c For example, if the sub is 2 meters ahead with respect to the ideal position, the value to add to the preset delay of the processor is: ∆T = dSAT − dSUB ∼ 2 = 0.006 [s] = 6 [ms] = c 344 There are two possible situations, depending on the value of ∆T : if it is positive, the sub is ahead in phase of the flown system and must be delayed, as illustrated in figure 6.4, this is the most common situation as it is often necessary to position the Sub line in front of the stage; if ∆T is negative, the flown system is ahead in phase of the sub and must be delayed, this unusual situation is illustrated in figure 6.5. Figure 6.4: SUB ahead in phase; SUB must be delayed. Figure 6.5: Flown Array ahead in phase; flown array must be delayed. In the case where no measurement system capable of determining the phase response of the system is available, it is necessary to stop at this point. Even when such a tool is available it is advisable to 81 6.4. INSTALLATION OF THE SYSTEM 6. Operating guide Figure 6.6: Delay adjustment, SUB signal lags in phase. proceed with the physical measurement of the distances involved and utilize the values obtained from this to set the delay in the processor. This method will allow you to begin with a delay value which is very close to that which is exact, without introducing possible errors caused by uncertainty, misuse or malfunction of the external measurement instrumentation. Now, we will examine the use of SmaartLive for the alignment of the Sub pass band. The comments here, however, are valid for any system capable of taking similar measurements. In order to take reliable measurements in the frequency range reproduced by the SUB and MID-L outputs in the crossover region it is necessary to use the measurement microphone in a ground-plane configuration13 . On the other hand, it is necessary to resist the temptation to use the automatic delay finder available in the software application: in the working frequency range of the SUB pass band, the errors possible with the automatic procedure can be enormous. The correct procedure is to measure initially the delay of the MID-L/HIGH pass band and input that data to SmaartLive, in order to have a “clean” readout of the phase diagram, and then measure the response of the MID-L and SUB pass bands. The situations that can be revealed here are still two: the SUB is ahead in phase of the MID-L or the SUB is delayed in phase with respect to the MID-L. Figure 6.6 is a screenshot of Smaartlive demonstrating a system with the SUB output behind in phase. Figure 6.7, instead, shows a system with the SUB ahead. Working with the fine delay adjustment for the SUB pass band14 , it is possible to cancel the difference in phase decline in the crossover region, and perfectly align the system. Figure 6.8 shows a screenshot of the measurement of the system previously measured with the SUB ahead in phase, correctly realigned with a slight increase in the delay time preset in the processor for the SUB output. Supplementary Delays In the case where the sound reinforcement system requires a secondary system for the coverage of the stage front or for areas not covered by the main system, it is necessary to impose supplementary delays in order to realign the phase of the secondary systems with the main system in the areas where coverage will be superimposed. This can be done either geometrically, as described above for the alignment of 13 For 14 Or, further details see Appendix B. consequently, on the MID-L/HIGH pass band if that was the pass band delayed. 82 6. Operating guide 6.4. INSTALLATION OF THE SYSTEM Figure 6.7: Delay adjustment, SUB signal ahead in phase. Figure 6.8: Delay adjustment, SUB signal perfectly in phase. 83 6.5. DURING THE SHOW 6. Operating guide the subs or, given that the frequencies are high, with the automatic delay finder function of SmaartLive (or with an impulse peak alignment function of other measurement systems). Equalization At this point the system should be completely and correctly set up with regard to time alignment, and it is possible to proceed with any necessary equalization. Equalization requires a notable level of ability and experience on the part of the operator. It should be clear that every complex combination of system and environment has a certain sonic footprint that results from the physical characteristics of each. It is not possible to alter these characteristics through equalization. It is not possible to alter the complex interaction of the physical characteristics of a sound system and an environment through equalization. At this point, equalization should therefore be minimal. If not, some aspect of system setup has been overlooked or some part of the system design process has gone wrong, as the system is either not adapted to the application or has not been configured correctly. For example, if the system is notably lacking in the low end of the frequency spectrum, the correct solution is to adjoin additional low-frequency devices, not to equalize with boosted low frequency levels. Proceeding with heavy equalization is more likely to aggravate than correct the situation. Before proceeding with any equalization, it is critical to listen carefully to the system with very familiar musical program material while exploring the audience areas in order to verify the coverage and frequency balance. It is important to resist the temptation to equalize for a perfect response in a single point. This will inevitably throw out of balance the general timber in other areas. It can be useful to equip yourself with a real-time analyzer and a transfer function analyzer during this phase of set up but15 , again, you should avoid equalization based on measurements taken from a single point of the venue. Equalization can be achieved using 1/3 octave equalizers. More correctly, parametric equalizers which have less selective intervention should be used, maintaining the philosophy that the adjustments are made only to correct a general state in the interaction of sound system and environment. 6.5 During the show All of the procedures described so far should be completed well before the show and, if well planned and executed, can be completed rather quickly. During the performance it is still possible and often necessary to intervene on the equalization of the system. Above all, this is to adapt its performance to the new environmental situation brought about by the arrival of the public and, in the case of outdoor events, to adapt to probable changes in temperature and humidity. 6.5.1 Level adjustment During the performance, it is good practice to monitor the correct operation of the electro acoustic elements of the system. It is essential to monitor the intervention of the limiters in the processor and the status indicators of the power amplifiers. These could reveal an excessively zealous use of the system by the sound engineer. Some power amplifiers permit status monitoring through remote control software which can be done directly from a PC at the soundboard16 . Continuous limiter intervention in the processor or in the amplification clearly suggests that the system is being pushed beyond its limit. It is not possible to go beyond this and, in fact, it is advisable to try to bring the signals down to more modest levels at this point. There is absolutely no advantage sonically to push the system into clipping. This situation is another clear indication of faulty design and planning 15 With the non-marginal advantage of using a musical signal rather than pink noise, especially when working in environments which host other working activities that are not related to the event. 16 Some even allow reading the impedance of the load connected, giving an immediate indication of the situation of the components. 84 6. Operating guide 6.5. DURING THE SHOW of the sound reinforcement system: the system is not adapted to the sound pressure levels required by the situation. 6.5.2 Equalization adjustment The changes in atmospheric and environmental conditions between the set up of the system and the actual performance can be quite noticeable. In closed venues, the arrival of the audience drastically augments the acoustic absorption characteristics of the room, with consequential changes in the reverberation decay time. At open air events, instead, the changes in temperature and humidity combined with the need to project the sound very long distances can have dramatic effects on the highest-frequency range. Very often shelving filters are used to compensate this at the source and retain the sound pressure lost to attenuation and therefore equalize the response of the system for a certain distance. Obviously there are limits to the additional gain which can be applied to the HIGH pass band that cannot be exceeded without the introduction of distortion or even the destruction of the high frequency transducers. In open-air situations other factors can intervene, such as wind and thermal profiles which can create phenomena of focalization, acoustic shadowing and other general destabilization of the sound field. 85 7. Typical applications The AXIOM systems have been designed to be extremely modular. The following chapter, shows an example of some of the typical applications for live concert systems and fixed installations. These are just few of the many possible configurations of the AXIOM system. 7.1 Medium concert system 1 ! "#$%&'#()&#*+#,) ./0))#12"#$%&02"*343%& ./0))#12"#$%&02"*343%& ./0))#12"#$%&02"*343%& 5 *3(%637(0*"0(%* 5 #,)",)"0(%* ! "#$%&"0(%*"*,7 13718,0*3)9&0':'06% 87 7.2. MEDIUM CONCERT SYSTEM 2 7.2 7. Typical applications Medium concert system 2 !"#$%!&'$!()*!+', -./''!01 !"#$/1 (232#$ -./''!01 !"#$/1 (232#$ -./''!01 !"#$/1 (232#$ 4 (2Ȏ&/( /&#( 4 !+' +' /&#( !"#$ /&#( (+6 )02607+/(2'8$/%9%/5# 88 7. Typical applications 7.3 7.3. COMPACT CONCERT SYSTEM Compact concert system ( # )&*+ %"* ',- !". /0$"" 12# )&*$2#'343&* /0$"" 12# )&*$2#'343&* /0$"" 12# )&*$2#'343&* '3%&536%$'#$%&' !"#!"#$%&' ( # )&*#$%&'#'!6 ,13617!$'3"8*$+9+$5& 89 Appendix A Vertical Array theory Vertical arrays, commonly referred to as line arrays, have earned enormous popularity among professional users. The fundamental principals used as a basis of the design and operation of these electro acoustic systems unfortunately have not enjoyed the same proliferation as the systems themselves. In this appendix, we will briefly analyze the phenomenon of interference which serves as a base for the control of directivity of bass frequencies which is exploited in vertical arrays, and the conditions which need to be satisfied by a high frequency source used in the same. First of all, we repeat two definitions that help to clarify the meanings of two oft-misunderstood terms. The definition of Array is: “an ordered arrangement”, therefore the definition of line array is “an ordered linear arrangement”. In electro-acoustic texts you find the more precise definition: “a group of omnidirectional sources, arrayed in a straight line in close proximity one to the other and radiating in phase with equal levels”. Very often a line array is confused with a line source. While a line source is a hypothetical, linear source, the line array is only an approximation of this. A.1 The Lobing Phenomenon Briefly analyzing the emission of an array along its vertical axis without resorting to any mathematical formulae, here we refer to a few simulations. The simulated array here (see figureA.1) is composed of 16 omnidirectional sources spaced at 32 cm intervals, for a total length of about 5 meters. You can see how, because of the phenomenon of interference, the array is extremely directional at low frequencies but as frequencies rise, the phenomenon becomes increasingly discontinuous until it disappears altogether. Therefore, with spherical sources there is always a precise frequency above which it is not possible to exploit the effect of directivity control due to the interference between sources. This frequency is determined by the distance between the various sources, referred to as “step”. The phenomenon is due to the different composition of summation and cancellation in different directions in function of frequency. It is possible to schematize this principle with a design: In the primary direction of radiation the contributions of the various sources are summed coherently, 91 A.2. WAVE FRONTS AND SOURCE CURVATURE A. Vertical Array theory Figure A.1: Simulation of the radiation along the vertical axis of an array composed of 16 omnidirectional sources with a step of 32cm. while off axis these contributions tend to cancel out due to the differences in radiation path and, consequently, in phase. Furthermore, it can be verified that the control of directivity at low frequencies is dependent on the overall length of the array. Therefore, at low frequencies it is possible to make constructive use of interference in order to obtain a combined output from the sources with a resultant increase in sound pressure level. The dependence of the maximum frequency for this phenomenon on the step could incite designers to reduce the step to a minimum, but the problem of finding components with the required characteristics within the required dimensions becomes insurmountable. In actual vertical array systems therefore, the interference is exploited at the low end of the frequency spectrum while it is carefully reduced in the high end by using HF sources that are extremely directive. A.2 Wave Fronts and Source Curvature Figure A.2: Structure of an array using curvilinear sources. Vertical arrays are the physical approximation of theoretical linear sources, whether they are linear or variably curved. Portions of the system exist which do not radiate- gaps- due to the physical structure and the spacing of the source elements. Moreover, the radiating elements of real systems emit wave fronts that can be quite different from the flat wave fronts of sources. Here, we discuss only the effect of the curvature of the wave fronts of the sources1 . The HF components of a vertical array system that are based on a conical waveguide produce curved wave fronts. When combined in and array, these sources appear more as a series of superimposed arcs 1 For a more detailed treatment please see the already mentioned Ureda review, Analysis of Loudspeaker Line Arrays. JAES, Vol. 52, No. 5, May 2004. 92 A. Vertical Array theory A.2. WAVE FRONTS AND SOURCE CURVATURE than a continuous flat source. If we compare the polar diagram of a continuous flat source to an array of curved sources, we see that the dispersion is very similar, with small differences only in the lateral lobes. Imposing the condition that the lateral lobes remain at a level of at least 10dB lower than the central lobe, we find that the curvature of the source is one-fourth the wavelength of the lowest frequency it must reproduce. Therefore it is not necessary, even in the use of a perfectly straight array, to use HF devices that are perfectly flat. 93 Appendix B Notes on system measurement The measurement of the response of audio systems can be carried out either with a real-time spectrum analyzer or with an instrument capable of revealing the complex response, including modulus and phase. If we model the system to be measured as a Linear Time-Invariant system1 , it is possible to analyze its operation by means of the character of its frequency response. B.1 Time-Frequency Relationship Figure B.1: Time-Frequency Relationship and system representation in both domains A Linear Time-Invariant (LTI) system can be described by both its frequency response and its impulse response (see Figure B.1). There is a mathematical tool, the Fourier Transform, which allows you to pass easily from one domain to the other. A very effective numerical implementation of this is called the Fast Fourier Transform (FFT). The advantage of analyzing the frequency response is due to the fact that while in the time domain the correlation between input signal and output signal is rather complex, in the frequency domain it is simple multiplication. 1 This assumption could be correct only if the system were driven to levels excluding non linear operations. The condition of time invariance guarantee system performance stability through time. A typical phenomenon introducing variance on time is power compression. 95 B.2. THE PERFECT SYSTEM B.2 B. Notes on system measurement The Perfect System For a system to be perfect or, rather, for it to be free of linear distortion, theoretically it must have a flat mode response (in the band of interest) and a linear phase response (if visualized on a linear frequency scale). Figure B.2: Characteristics of the Perfect System The inclination of the phase response curve is directly proportional to the time delay introduced by the system; a more sharply inclined curve indicates a longer delay. Figure B.3: The Effect of Delay on the Phase Curve As previously implied, a deviation in phase linearity indicates a temporal distortion in the signal or, more specifically, that the various frequency components of the signal take different amounts of time to pass through the system. B.3 Measurement Methods With the use of a real-time spectrum analyzer and an input signal with known characteristics, such as pink noise2 , and assuming that the signal source and the microphone are linear, we can measure the 2 Stressing the system with a known frequency content signal X (f ) and measuring the output signal from system Y (f ), you can characterize its operating mode, that is its frequency response. Stressing with pink noise and measuring with an octave fraction 96 B. Notes on system measurement B.4. ENVIRONMENTAL REFLECTIONS spectrum of the output as the response of the system. With this method, we are given no information about phase. In order to acquire data about phase response, it is necessary to use an instrument of measure more complex that utilizes test signals known to the instrument (the pink noise to which we referred previously is known only for its frequency content, but not for its temporal content). There are systems that use MLS3 , or swept sinusoidal signals, and others that utilize dual channel FFT, i.e. the comparison of two signals applied at the input and output of the system4 . This table briefly summarizes the characteristics of some systems of measurement: Type RTA MLS/Chirp Dual Chann. FFT Module Yes Yes Yes Phase No Yes Yes Musical signal No No Yes The most useful information, at least regarding a live sound installation, can be obtained from measurement equipment which uses the cross-correlation method. Most importantly, as evidenced above, with an RTA it is not possible to acquire phase information and therefore not possible to have information about delays introduced on the various pass bands of the system. B.3.1 Wrapped Phase In systems of measurement, the phase is represented on a logarithmic scale; thus it will not appear as a line, but as a curve with ever-increasing inclination in one direction. Furthermore, these instruments display phase on a graph with and axis scaled from -180◦ to +180◦ , and not absolute phase. As the instruments displays every variation in phase equal to 360◦ as a return of the sinusoid to the same value, it displays a peculiar “wrap-around” at the point where this occurs. This can essentially be considered as a display artifact and has no bearing on the analysis of the system, as when the phase graph makes a drastic leap from one extreme of the axis to the other it is not because of some discontinuity of the system, but because the graph simply picks up from one end of the axis where it left off on the other. B.4 Environmental Reflections In the previous paragraphs we have not yet introduced a factor that consistently affects real-world measurements. The instrumentation used for the measurements listed above is calibrated with the assumption that the assumed propagation of the system under test is in an anechoic chamber or in an environment with absolutely no environmental reflection. In a real world measurement situation, with the microphone on a stand 1.2 to 1.8 meters high, it is necessary to consider the nearest reflections and, inevitably, the reflection from the ground. The measurement with the microphone on a stand is sufficiently accurate for the higher end of the frequency spectrum, but not at all reliable for the Mid to Low range. When taking measurements for the time alignment of the SUB pass band, it is essential to position the microphone in a ground-plane configuration, as close to the surface of the ground as possible. This method avoids ground reflections and provides a reliable measurement in the Mid to Low range. Contrarily, this method will not yield reliable results for the High end of the spectrum. In summary: There is no single correct position for the measurement microphone that will give reliable results for the entire audio spectrum. It will always be necessary to reposition the microphone according analyzer, the reading on the Y (f ) instrument exactly corresponds to the sought H(f ) module, as the stimulus contains a constant quantity of energy per each octave. 3 For instance, MLSSA and CLIO Systems. For further information check www.mlssa.com and www.cliowin.com. 4 For instance, SmaartLive, CLIO and SIM. Further details are available at www.siasoft.com, www.audiomatica.com and www.meyersound.com/products/sim/sim3/. 97 B.5. SELECTION OF A MEASUREMENT MICROPHONE B. Notes on system measurement (a) (b) Figure B.4: Measurement microphones position: (a) on microphone boom stand, (b) in ground-plane. to the use intended for the results of the measurement. For time alignment of the Subs, it is necessary to position the microphone in the ground plane. B.5 Selection of a measurement microphone When using an RTA or a transfer function measurement instrument, it is of paramount importance that the measurement microphone has a linear response. It is therefore necessary to test at a sound pressure level at which the response of the microphone remains linear; otherwise the resulting data from your measurements will be the sum of the responses of the system under test and those of the microphone itself. This will obviously result in tremendous errors5 . There are many measurement microphones on the market with very low costs, but with unknown characteristics. The problems caused by the use of a microphone with unknown characteristics greatly outweigh the cost of a reliable measurement microphone. B.6 Mono or Stereo Measurement? Typically concert sound systems are stereo with one array per channel. How should one of these be measured in order to be correctly aligned and equalized? This is not an easy question to answer and should be evaluated case by case, however there are some general rules which can be applied to provide reliable results. For the alignment you should proceed one channel at a time. It can be assumed that the Left and Right channels are perfectly symmetrical, and once one channel is set up it is sufficient to simply copy the delay times in the processor from one side to the other. As for the equalization, the measurement and adjustment can be applied to one channel at a time or directly to the system in stereo. In the second 5 Equalizing the measurement microphone response together with the system. 98 B. Notes on system measurement B.6. MONO OR STEREO MEASUREMENT? case, however, it is necessary to use the measurement system in a very critical manner. Real time analysis is based on a mono source, a pink noise generator, and therefore the Left and Right channels will reproduce the same signal. It is therefore possible to move about the listening area to measure the frequency response. If, instead, a measurement method based on cross-correlation is used, to which channel should one refer for measurement, Left or Right? A solution is to position the microphone equidistant from the Left and Right systems and input a mono reference signal, the sum of Left and Right. Any other method for this is considered by the authors to be nonsensical and of dubious practical utility. 99 Appendix C Useful Formulae and Tables In this appendix we review some formulae and reference tables useful in the everyday use of the AXIOM vertical array system. C.1 Calculation of the speed of sound The velocity of the propagation of sound c in air depends fundamentally on the temperature according to the formula: m c = 331.4 + 0.6 · T s where T is temperature in ◦ C. C.2 Calculation of wavelength Wavelength λ is a function of frequency and the speed of sound according to the following formula: λ= c [m ] f where c is the speed of sound and f is frequency. The following table provides some examples of wavelength based on a temperature of 21◦ C and therefore the speed of sound c = 344 [m/s]: f [Hz] 20 31.5 63 125 250 500 1k 2k 4k 8k 16k 20k λ [m] 17.2 10.9 5.46 2.75 1.38 0.688 0.344 0.172 0.0860 0.0430 0.0215 0.0172 101 C.3. CONVERSION DELAY-DISTANCE AND DISTANCE-DELAY C.3 C. Useful Formulae and Tables Conversion Delay-Distance and Distance-Delay When the speed of sound is known, the relationship between time delay t in milliseconds and distance d in meters can be expressed be the following: t = 1000 · d= C.4 d [ms] c t ·c [m ] 1000 Notions of Trigonometry Sometimes it is not possible to use measurement tools such as laser range finders. In these situations it is still possible to derive necessary distance measurements from simple measurements taken with a tape measure. The distances to measure (in meters) are H , L and dSUB . The value of h easily be obtained from the value of H and the mounting details from the LAC software. The value of dSAT is given by: √ dSAT ∼ = L2 + h2 [m] From this result, one can then calculate the difference in sound path length between SUB and SAT and, consequently, the delay (in seconds) to input to the processor: ∆T = C.5 dSAT − dSUB [s] c Air attenuation The air introduces a notable attenuation at high frequencies. This attenuation is fundamentally a function of the relative humidity and expressed in dB/km. In the case of sound projection over very long distances, the total attenuation can be very high. 102 C. Useful Formulae and Tables C.5. AIR ATTENUATION Attenuation of sound in air (50m) 0 −5 Attenuation [dB] −10 −15 −20 20% 40% 60% 80% −25 −30 1k 10k 20k frequency [Hz] Figure C.1: Attenuation in function of relative humidity at a distance of 50m. This table presents some attenuation values, expressed in dB/km, for vaious levels of relative humidity and at a temperature of 20◦ C: freq. [Hz] 1 1.25 1.6 2 2.5 3.15 4 5 6.3 8 10 12.5 16 20 10% 14 21 32 45 63 85 110 130 160 180 190 210 230 260 20% 6.5 9.4 14 22 32 49 75 110 160 220 280 360 430 510 30% 5 6.7 9.8 14 21 32 49 74 110 170 240 340 470 600 40% 4.7 5.9 8.1 11 16 24 36 55 84 130 190 280 420 580 103 50% 4.7 5.7 7.5 9.9 14 20 30 44 68 110 160 240 360 520 60% 4.8 5.7 7.2 9.3 12 17 26 38 57 89 130 200 320 470 70% 5 5.9 7.2 9 12 16 23 33 50 78 120 180 280 420 80% 5.1 6.1 7.4 9 11 15 23 33 45 69 100 160 250 380 90% 5.3 6.3 7.5 9.1 11 15 20 28 42 63 95 140 230 350 352(/ ,QWHUQDWLRQDO/WG /RQGRQ 8. 352(/%(1(/8; (OVW*OG 352(/ '(876&+/$1'*PE+ (PVGHWWHQ 1(7+(5/$1'6 '(876&+/$1' 352(/ $8675,$*PE+ 352(/)5$1&( 3DULV 1HXPDUNW )5$1&( $8675,$ 352(/86$,QF 352(/6S$ (O3DVR7; :RUOG+HDGTXDUWHUV)DFWRU\ 352(/ .25($&2/7' 86$ ,7$/< .25($ 352(/86$ 352'8726086,&$,6 /'$ *\XQJJL'R 352(/*5283 ($67$6,$/7' &DVDLV7RPDU +21*.21* 32578*$/ 02/%,3P! 7ORLD(EADQUARTERS&ACTORY 6IAALLA2UENIA 3ANT/MERO4E)4!,9 4EL &AX %MAILINFO PROELGROUPCOM WWWPROELGROUPCOM