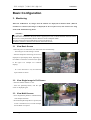
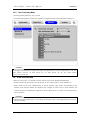
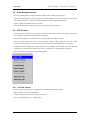
1
Caution
This device is registered as an EMC for commercial purposes. Vendors and users should be aware of this
EMC registration. If this device is sold or purchased by mistake, the device will need to be altered for
domestic use.
FCC Compliance Statement
Caution : Any changes or modifications in the construction of this device which are not expressly
approved by the party responsible for compliance could void the user's authority to operate the
equipment.
NOTE : This equipment has been tested and found to comply with the limits for a Class A digital
device, pursuant to part 15 of the FCC Rules. These limits are designed to provide reasonable
protection against harmful interference when the equipment is operated in a commercial environment.
This equipment generates, uses, and can radiate radio frequency energy and, if not installed and used in
accordance with the instruction manual, may cause harmful interference to radio communications.
Operation of this equipment in a residential area is likely to cause harmful interference in which case
the user will be required to correct the interference at their own expense.
Warning
This is a class A product. In a domestic environment this product may cause radio interference, in which
case the user may be required to take suitable correction measures
Warning
1. If the built-in Lithium battery is replaced by another type of battery, there is a risk of explosion.
Therefore it is necessary to replace the battery with the same type of battery or an identical one. In
addition, be sure to dispose of worn-out batteries properly because they may cause environmental
pollution.
2. Do not throw the battery into a fire, or heat , disassemble, cut or discharge it because those treatments
can cause the failure of device.
3. Do not recharge the remote controller’s battery.
Cautions
1. Do not put a large monitor or other heavy objects on the SVR-1630 when using it.
2. The SVR-1630 is designed for indoor use and therefore is not waterproof or dampproof. Therefore
before use it is necessary to fully understand the operating environment requirements detailed in the user
manual, and to use the device within the scope of the terms of service. For cleaning the device, wipe it
gently using a clean and dry cloth.
3. The SVR-1630 can be damaged by electric shock. Be careful to use AC power of 110V ~ 220V.
4. The SVR-1630 can be damaged by physical shock because it contains an HDD. Therefore, do not
throw or drop the device.
5. The SVR-1630 is made of metal. If it is thrown at anybody it may cause harm. Install the device in a
safe place out of the reach of children.
6. If the SVR-1630 does not operate correctly, do not disassemble it without authorization. Contact your
local agency for after sales service. The warranty will become invalid if it is disassembled without
authorization.
7. The SVR-1630 can transfer images in real time via a network and can be used for monitoring,
depending on the installation location. Therefore check the laws in the relevant area carefully, and then
install the device in such a way as not to infringe any of its laws.
SVR-1630
Contents
Contents
Executive Summary ................................................................................................................7
1.
Product Introduction........................................................................................................7
2.
Product Description ........................................................................................................9
2.1
Front View ...............................................................................................................9
2.2
Rear View..............................................................................................................12
2.3
Installation Summary .............................................................................................12
Basic Configuration ..............................................................................................................13
3.
4.
4
Monitoring ....................................................................................................................13
3.1
View Basic Screen.................................................................................................13
3.2
View Single Image in Full Screen...........................................................................13
3.3
View Multi-Screens ................................................................................................13
3.4
Channel Switching.................................................................................................14
3.5
View Automatic Switching Screen ..........................................................................14
3.5.1
Basic System Mode ........................................................................................14
3.5.2
User Switching Mode......................................................................................15
3.6
View Event Screen ................................................................................................15
3.7
View Enlarged Screen ...........................................................................................16
3.8
PTZ Control ...........................................................................................................16
3.8.1
Pan/Tilt Control...............................................................................................16
3.8.2
Zoom/Focus Control .......................................................................................17
3.8.3
Load Preset ....................................................................................................17
3.8.4
Save Preset....................................................................................................17
3.8.5
Clear Preset ...................................................................................................17
3.8.6
Auxiliary On ....................................................................................................17
3.8.7
Auxiliary Off ....................................................................................................17
3.9
Relay Control.........................................................................................................18
3.10
Screen Lock ..........................................................................................................18
3.11
Search System Log ...............................................................................................19
3.12
Monitor B...............................................................................................................20
3.12.1
Monitoring.......................................................................................................20
3.12.2
Multiple Channels Playback ............................................................................20
3.12.3
1 Channel Playback........................................................................................21
Playback.......................................................................................................................22
2004.07.2001 (v 1.0)
Samsung Techwin CO.,Ltd.
Contents
4.1
5.
SVR-1630
Playback Mode ......................................................................................................22
4.1.1
Playback in Single Screen Playback Mode......................................................22
4.1.2
Playback in Split Screen (2x2/3x3/4x4) ...........................................................22
4.1.3
Playback of Images of Channel 5 to 16 in 2x2 Split Screen .............................22
4.1.4
Zoom Screen..................................................................................................22
4.1.5
Other Playback Functions...............................................................................23
4.2
Search Mode .........................................................................................................23
4.3
COPY/BACKUP/DELETE ......................................................................................25
4.3.1
Copy Image ....................................................................................................25
4.3.2
Backup Data...................................................................................................26
4.3.3
Delete Data ....................................................................................................27
4.3.4
Internal/External CD-RW Backup ....................................................................27
Menu Configuration ......................................................................................................28
5.1
Quick Setup...........................................................................................................28
5.1.1
Time Setting ...................................................................................................28
5.1.2
Recording Setup.............................................................................................31
5.2
Camera Setup .......................................................................................................33
5.3
Schedule Record Setup .........................................................................................35
5.3.1
All Channel Setup...........................................................................................35
5.3.1
Setup by Channel ...........................................................................................36
5.4
Event Record Setup...............................................................................................39
5.4.1
Sensor Setup..................................................................................................39
5.4.2
Motion Detection Setup...................................................................................40
5.4.3
Text Setup ......................................................................................................41
5.4.4
All Channel Event Recording Setup ................................................................43
5.4.5
Setup by Channel ...........................................................................................44
5.5
Event Action Setup ................................................................................................45
5.5.1
Event Schedule ..............................................................................................45
5.5.2
Event Setup....................................................................................................46
5.6
Monitor Setup ........................................................................................................47
5.6.1
Monitor A & Monitor B .....................................................................................47
5.6.2
VGA Monitor ...................................................................................................48
5.7
System Setup ........................................................................................................49
5.7.1
Audio Setup....................................................................................................49
5.7.2
Time Schedule Setup......................................................................................50
5.7.3
Specific Time Setup ........................................................................................51
5.7.4
Security Setup ................................................................................................52
Samsung Techwin CO.,Ltd.
2004.07.2001 (v 1.0)
5
SVR-1630
Contents
5.7.5
Disk Setup......................................................................................................53
5.7.6
Network Setup ................................................................................................54
5.7.1
Serial Setup....................................................................................................60
5.7.2
Other Functions ..............................................................................................61
5.8
Disk Management..................................................................................................63
5.8.1
Disk Manager .................................................................................................64
Expansion..............................................................................................................................66
6.
External Device Connection..........................................................................................66
6.1
Use Text Device.....................................................................................................66
6.1.1
Text Setup ......................................................................................................66
6.1.2
RS232 Menu Setup in Serial Setup.................................................................67
6.1.3
Setup in Event Recording ...............................................................................68
6.1.4
Setup in Schedule Recording..........................................................................69
6.2
Keyboard...............................................................................................................70
6.2.1
COM1 RS232 Menu Setup in Serial Setup......................................................70
6.2.2
PTZ Menu Setup in Serial Setup.....................................................................70
Appendix ...............................................................................................................................71
1.
Technical Specification..................................................................................................72
2.
Use an IP Address in a Local Network ..........................................................................75
6
2.1
Executive Summary...............................................................................................75
2.2
IP Configuration and Network Class.......................................................................75
2.3
Class C Network ....................................................................................................76
2004.07.2001 (v 1.0)
Samsung Techwin CO.,Ltd.
오류! 스타일이 정의되어 있지 않습니다.
SVR-1630
Executive Summary
1. Product Introduction
The SVR-1630 is a new concept DVR, simultaneously saving 16-Channel analog video, audio, text data
and event data. Moreover, its unique Wavelet algorithm enhances image quality and innovatively reduces
video file size.
The SVR-1630, with its unique Wavelet algorithm, presents much clearer and more accurate images with
a better than 50% efficiency over existing JPEG. Through this innovative reduction of file size, the SVR1630 can save images from 16 channels in a 200GB Hard Disk, at 5fps per channel, for 15 days. In
addition the SVR-1630 simultaneously saves and plays images with one channel audio.
The SVR-1630 enables users to save CCTV images immediately after power connection, using the quick
setting menu. The quick setting menu is programmed to optimize image quality and storage performance.
Furthermore, the SVR-1630’s storage capacity is easily expanded to 4TB using 2 IEEE 1394 ports. For
convenient backup, the SVR-1630 adopts FAT32, one of the major Windows formats, and so the backedup Hard Disk is immediately available through the user’s PC. The SVR-1630 also enables copying of 60
second’s worth of small images using a USB port.
Samsung Techwin CO.,Ltd.
2004.07.2001 (v 1.0)
7
오류! 스타일이 정의되어 있지 않습니다.
SVR-1630
Major Features
- 16-Channel Video Input
- 1 Channel Audio support
- Simultaneous recording, playback, backup and network recording and playback (Pentaplex)
- Up to 240 fps recording rate
- Up to 480 fps real time display speed
- Real-time monitoring and recording on the PC Monitor and CCTV Monitor
- Dual CCTV Monitor support (1 Normal, 1 Spot)
- VGA Output (1 Normal)
- Built-in Hardware Quad Splitter for Analog Channels
- Built-in software multiplexer for 16-Channel split monitoring
(1 / 2x2/3x3 /4x4 Screen Mode Support)
- Up to 4TB Storage Capacity (Expansion by external HDD using IEEE 1394)
- A variety of recording and playback conditions
- Unique file system for effective event data management
- Saving of image data with relevant text data such as ATM/POS
- 16 Sensor Inputs and 4 Event Outputs
- MD Search (Detailed setting of 64 MD zones)
- Backup using IEEE 1394 (FiWi)
- PTZ control using RS232 and RS485/RS422
- User-friendly 32bit True Color Graphic OSD menu
- Dynamic IP (DHCP, Dynamic IP)
- Unique Wavelet compression algorithm: 1-5KB
- Imbedded Linux OS for safety and efficiency
- Easy interface using Jog/Shuttle
- Remote controller
- Registration of up to 32 DVRs in the SVR Manager (PC user interface)
(Managing a total of 512 Channels (32 DVRs x 16 Channels) as one program)
8
2004.07.2001 (v 1.0)
Samsung Techwin CO.,Ltd.
오류! 스타일이 정의되어 있지 않습니다.
SVR-1630
2. Product Description
2.1 Front View
(4) Function Buttons
(3) IEEE 1394 &
USB Interface
(1) Status LED
:
HDD
RX/TX :
:
REC
(5) Channel Buttons
(2) Remote Controller
(6) Play
(1) Status LED
(6) Jog/Shuttle
Receiver
flashes when the HDD is active
flashes during monitoring on a network
flashes during image saving
(2) Remote Controller Receiver
(3) IEEE 1394 and USB Interface
IEEE1394 and USB Port, one each
Samsung Techwin CO.,Ltd.
2004.07.2001 (v 1.0)
9
오류! 스타일이 정의되어 있지 않습니다.
SVR-1630
(4) Function Buttons
: goes to the higher menu in the setting or locks the screen
ESC
:
sets menu
MENU(▲)
: copies, backs up or deletes images saved in the 1 Screen Mode
COPY
: switches and views all images from all cameras connected
AUTO(◀)
Press this button for over 1 sec to activate the User Sequnce Mode
: selects when setting
ENTER
Displays image data in the Monitoring/Playback Mode
HELP
: selects the monitor (A or B) to control
A/B(▶)
: turns the Relay on or off in the Monitoring Mode.
AR RST
Returns to the original status in case of event pop-up.
: manually controls the Relay Output
RELAY(▼)
: Enlarges images in the 1 Screen Mode
ZOOM
(5) Channel Buttons
Selects the video channels for monitoring and playback.
Each channel button has an LED at the top and the LEDs indicate status by their color
(6) Play Button
ENTER
PTZ
SEARCH
PRESET
MULTI
ESC
REC
SLOW
PLAY
PAUSE
STOP
FAST
DIR
Jog Dial
Shuttle
10
: opens the PTZ control menu or setting menu
: searches the images/events saved in the 1 Screen Playback Mode
searches the logs saved in the Monitoring Mode
Switches to Preset Load in the PTZ Mode
: changes the Split Screen Mode
: goes to the previous step in the menu
: converts the current recording status
Keeps the ON status during REC waiting status.
: plays slower than normal speed
: starts and pauses playback (still image is displayed)
: stops the Playback Mode
: plays faster than normal speed
: changes the playback direction
: changes the playback direction
: adjusts the playback speed
2004.07.2001 (v 1.0)
Samsung Techwin CO.,Ltd.
오류! 스타일이 정의되어 있지 않습니다.
SVR-1630
(7) Jog Shuttle
(8) Power Switch
Power On/Off switch. On OFF, the power off procedure varies depending on the system setting. See the
section “4.5 Supplying Power and Running” in “Install Manual” for more details.
Samsung Techwin CO.,Ltd.
2004.07.2001 (v 1.0)
11
오류! 스타일이 정의되어 있지 않습니다.
SVR-1630
2.2 Rear View
(4) Video Input & Loopback
(2) Power Connection
(1) Audio In/Out
(5) Video Output
(6) Serial & DIO Port
(2) Ethernet
(7) VGA Port
(1) Audio In/Out
One andio input and one audio output terminal
(2) Ethernet
(3) Power Connection
(4) Video Input and Loopback
16 Video Input Terminals and Loopback Terminals
(5) Video Output
4 Video Output Terminals (2 Normal CVBS, 1 Normal Y/C, 1 Spot)
(6) Serial and DIO Port
: Block of 16 Sensor Input Terminals
Sensor In
: Block of 4 Relay Output Terminals
Relay Out
: RS232 9Pin D-Sub Connectors
COM1
: RS422/485 Terminal Block
COM2
COM3/COM4 : RS232 & RS422/485, RJ45 Connectors
: IEEE 1394 Connector
IEE1394
(7) VGA Port
1 VGA Video Output Terminal
2.3 Installation Summary
- Camera Connection
- Monitor Connection
- Ethernet Connection (for remote access to the DVR or for registering IP cameras)
- Audio Connnection
- Power Connection and Start-up
12
2004.07.2001 (v 1.0)
Samsung Techwin CO.,Ltd.
오류! 스타일이 정의되어 있지 않습니다.
SVR-1630
Basic Configuration
3. Monitoring
When the SVR-1630 is on, images from all channels are displayed in Monitor Mode. (When 8
Channels are connected, the images are displayed on the 3x3 split screen). This section is for using
all the SVR-1630 monitoring modes.
<Cautions>
The SVR-1630 supports dual monitors (A and B). Monitor A (Normal) supports all the functions
described below and Monitor B (Spot) doesn’t support split screen, or Menu and Zoom functions. When
Monitor A is in Playback Mode, Monitor B doesn’t work in Playback Mode.
Therefore the functions described below are based on Monitor A.
In addition, Monitor A should be activated for functional controls.
3.1 View Basic Screen
- When the power is switched on, the SVR-1630 starts automatically.
-
The LED goes on and booting is started.
- After the completion of booting, the screen is
displayed in split display mode, depending on
the number of channels connected (the figure
to the right is an example of 4 Channel
display)
※ If a User Password is set, the Password
Input window is shown.
3.2 View Single Image in Full Screen
- Enter the channel number to view.
- Press the [MULTI] button, and the split
screen is displayed again.
3.3 View Multi-Screens
- Press the [MULTI] button to simultaneously
view multiple channels.
- Each time the [MULTI] button is pressed, the
screen is switched to 2x2, 3x3 and 4x4 Split
Screen Mode in sequence
Samsung Techwin CO.,Ltd.
2004.07.2001 (v 1.0)
13
오류! 스타일이 정의되어 있지 않습니다.
SVR-1630
3.4 Channel Switching
Rotate the Shuttle Ring in Single Screen or Multi Screen Mode, and the screen shows the next channel’s
image.
3.5 View Automatic Switching Screen
The Automatic Switching Mode consists of a Basic System Mode and a User Switching Mode defined by
the user. Press the [AUTO] button for over one second, and the User Switching Mode is activated.
3.5.1
Basic System Mode
-Automatically switches all channels using the [AUTO] button.
- Press the [MENU] button to set the switching interval (default value is 5 Sec.)
- Go to “Monitor” in the OSD menu.
- Go to “Monitor A”, the sub-menu of “Monitor”, and press [ENTER].
- Set the desired value between 1 to 60 seconds by selecting “Seq. Switching (sec)”. When it is set to OFF,
the Automatic Switching Mode doesn’t work.
- Press the [AUTO] button in any of the Split Modes except the 4x4 Split Screen, and the Automatic
Switching Mode is activated.
- To end the Automatic Switching Mode, press the [AUTO] button again.
<Caution>
Basic System Mode is available when the number of cameras connected is higher than the number of
current split screens. That is, when more than 2 cameras are connected in Single Screen Mode and more
than 5 cameras in 2x2 Split Mode. Automatic Switching doesn’t work in 4x4 Split Mode.
14
2004.07.2001 (v 1.0)
Samsung Techwin CO.,Ltd.
오류! 스타일이 정의되어 있지 않습니다.
3.5.2
SVR-1630
User Switching Mode
- Press the [AUTO] button for over 1 second.
- For User Switching Mode, set the User Sequence Configuration item in the OSD Menu “Monitor A”.
<Cautions>
1. The User Switching Mode can define up to 16 Channels.
2. The figure above defines 6 sequences in order: 2x2 Split Screen (1,2,3,4) Æ Full Screen (1) Æ 2x2
Split Screen (5,6,7,8) Æ Full Screen (5) Æ Full Screen (8) Æ 3x3 Split Screen
(9,10,11,12,13,14,15,16).
3.6 View Event Screen
- When an event occurs, it is possible to set the relevant screen to be displayed automatically.
- For the relevant Pop-up window cycle, set the time in “Event Pop-Up (sec)” under “Monitor A”.
- When several events occur simultaneously in several channels, split screens corresponding to the
number of the relevant channel are displayed. For example, if events occur in three channels, the
relevant images are automatically displayed on the 2x2 Split Screen. To return to the original screen,
press any button.
<Cautions>
1. When Event Pop-up Hold (sec) is off, the Event Pop-up function doesn’t work.
2. When Event Pop-up Hold (sec) is set to Keep, the original screen is not displayed unless you press
one of the buttons.
Samsung Techwin CO.,Ltd.
2004.07.2001 (v 1.0)
15
오류! 스타일이 정의되어 있지 않습니다.
SVR-1630
3.7 View Enlarged Screen
- Press the [ZOOM] button in Single Full Screen Mode, and the image is enlarged X 2.
- When the [ZOOM] button is pressed, the position of the enlarged screen is in the center. You can move
the enlarged screen by 10 steps to the right and left and 7 steps upward and downward.
- Use the Jog Dial and Shuttle to move the screen.
- Press the [ZOOM] button again, and the screen is returned to the original size.
3.8 PTZ Control
- Connect the PTZ Controller to the DVR and set the relevant protocol in the “Serial Setup” menu. You
can control the PTZ while watching images in real time.
- Press the Channel Button to control the PTZ, and the Single Screen Mode activates.
- Press the [PTZ] button, and you can control Pan/Tilt. Press the button again, and you can control
Zoom/Focus. Each time you press the [PTZ] button, PAN/TILT and ZOOM/FOCUS are toggled.
- Under the Pan/Tilt or Zoom/Focus control mode, press the [MENU] button, and the PTZ menu (Pan/Tilt,
Zoom/Focus, Load Preset, Save Preset, Clear Preset, Auxiliary On, Auxiliary Off) is displayed.
- Select the desired menu and press the [ENTER] button.
3.8.1
Pan/Tilt Control
This menu is for using the PAN and TILT function in Real-Time Monitoring Mode.
- Select “Pan/Tilt” in the PTZ Menu OSD.
- Control Pan and Tilt using the arrow keys on the front.
Pan : Left and Right Key. Tilt : Up/Down Key
16
2004.07.2001 (v 1.0)
Samsung Techwin CO.,Ltd.
오류! 스타일이 정의되어 있지 않습니다.
3.8.2
SVR-1630
Zoom/Focus Control
This menu is for using the Zoom and Focus function in Real-Time Monitoring Mode.
- Select ‘Zoom/ Focus’ in the PTZ Menu OSD.
- Control Zoom and Focus using the arrow keys on the front.
Zoom : Left and Right Key. Focus : Up/Down Key
3.8.3
Load Preset
This menu is for moving to a preset location in Real-Time Monitoring Mode.
- Select ‘Load Preset’ in Real-Time Monitoring Mode.
- Press the relevant preset number button
3.8.4
Save Preset
This menu is for presetting a new location in Real-Time Monitoring Mode.
- Adjust the camera position using the ‘Pan/Tilt’ and ‘Zoom/Focus’ menus.
- Press the [MENU] button.
- Select ‘Save Preset’ in the PTZ Menu OSD.
- Press the number button to preset.
3.8.5
Clear Preset
This menu is for deleting a saved preset.
- Press the [MENU] button under PTZ control mode.
- Select “Clear Preset” in the PTZ Menu OSD.
- Press the Preset Number to delete (1~16)
3.8.6
Auxiliary On
This menu is for using a PTZ Auxiliary.
- Press the [MENU] button under PTZ control mode.
- Select “Auxiliary On” in the PTZ Menu OSD.
- Press the Auxiliary Number to use (1~16)
3.8.7
Auxiliary Off
This menu is for releasing a PTZ Auxiliary.
- Press the [MENU] button under PTZ control mode.
- Select “Auxiliary Off” in the PTZ Menu OSD.
- Press the Auxiliary Number to release (1~16)
Samsung Techwin CO.,Ltd.
2004.07.2001 (v 1.0)
17
오류! 스타일이 정의되어 있지 않습니다.
SVR-1630
3.9 Relay Control
- This menu turns the Relay on or off. (The SVR-1630 supports 4 Relay outputs.)
- Press the [RELAY] button.
- The “Relay On” Icon is displayed on the screen.
- Press the relevant Relay number (from 1 to 4), and the Relay Output signal is transmitted.
- Press the [RELAY] button twice to release Relay. The “Relay Off” Icon is then displayed.
- Press the Relay Number to release, and the relevant Relay is off.
3.10 Screen Lock
- This menu is for preventing unauthorized users from controlling the menu when an administrator or
authorized user is not on site.
- This function requires the setting of a “User Password” prior to use.
- Press the [Esc] button, and the “Screen Locked” message is shown at the bottom. Lock Mode is activated.
- In Lock Mode, none of the buttons work. The buttons are reactivated when Lock Mode is released.
- Whenever you press any button in Lock Mode, the “User Password” window is displayed. Enter the
relevant password, and Lock Mode is released.
18
2004.07.2001 (v 1.0)
Samsung Techwin CO.,Ltd.
오류! 스타일이 정의되어 있지 않습니다.
SVR-1630
3.11 Search System Log
Press the ‘SEARCH’ key, and the menu for selecting events and system logs appears. Select the System
Log in the menu, and you can search for system logs.
Up to 1,000 logs can be saved. When the number of logs exceeds 1,000, the oldest log is deleted.
The log types are described below.
Power On : The power is connected.
Power Off : The power is disconnected correctly using the switch on the front.
Power Interrupt : The power is disconnected in error.
Config Changed : The configuration is changed by the menu or network manager.
Record Off : Recording is stopped by pressing the REC switch.
Record On : Recording is resumed by press the REC switch.
Time Shift Start : When the time is changed, the time before the change is displayed.
Time Shift Finish : When the time is changed, the time after the change is displayed.
Samsung Techwin CO.,Ltd.
2004.07.2001 (v 1.0)
19
오류! 스타일이 정의되어 있지 않습니다.
SVR-1630
3.12 Monitor B
3.12.1 Monitoring
Monitor A monitors the images from multiple channels and Monitor B monitors the image from one
channel in a large screen. You can monitor in a variety of combinations as explained below.
Monitor A
Monitor B
4x4 Split Screen 1 Channel Monitoring
Mode
3x3 Split Sceen User Switching
Mode
2x2 Split Screen 1 Channel Monitoring
Sequence
Remarks
Separately monitors the most important channel while
monitoring the images of 16 other channels
Monitors 7 channels in the User Switching Mode while
monitoring 9 channels in the 3x3 Split Screen Mode
Separately monitors the important channels while
monitoring images by 4-channel in Automatic
Switching Mode
3.12.2 Multiple Channels Playback
Monitor A searches and plays several images in split screen and Monitor B monitors the image from one
channel in a large screen. That is, it is possible to monitor channels during playback.
20
2004.07.2001 (v 1.0)
Samsung Techwin CO.,Ltd.
오류! 스타일이 정의되어 있지 않습니다.
SVR-1630
3.12.3 1 Channel Playback
Monitor A monitors images from multiple channels and Monitor B searches and plays the image from one
channel.
Samsung Techwin CO.,Ltd.
2004.07.2001 (v 1.0)
21
오류! 스타일이 정의되어 있지 않습니다.
SVR-1630
4. Playback
Image playback is performed in single Screen Playback Mode or Split Screen (2x2/3x3/4x4) Mode.
4.1 Playback Mode
4.1.1 Default Playback Mode
- Press the ‘PLAY/PAUSE’ button in Monitoring Mode.
- Press the ‘PLAY/PAUSE’ button, and the 16 images are played at 1x speed as the default.
<Cautions>
Press the Play button in Monitoring or Playback Mode, and the images of all channels will played. That
is to say that the images, about 30 seconds before the current time, are always played.
In addition, you can enter the desired channel number, and the image of the relevant channel is played.
4.1.2
Playback in Split Screen (2x2/3x3/4x4)
- Press the [MULTI] button in the Playback Mode. (Each time the MULTI button is pressed, the screen is
switched to 2x2, 3x3 and 4x4 Split Screen in sequence)
- The images from channel numbers 1 to 4 are played.
- Select the channel number, and the relevant image is played in Single Screen Playback Mode.
4.1.3
Playback of Images of Channel 5 to 16 in 2x2 Split Screen
- Press the [AUTO] button in the 2x2 Split Screen.
- Each time the [AUTO] button is pressed, the channel number is switched to the next number (1,2,3,4 Æ
5,6,7,8)
<Caution>
Press the [AUTO] button in 1 /3x3 Split Screen, and the images are played in the same way as
explained above.
4.1.4
Zoom Screen
- Press the [ZOOM] button in Single Screen Playback Mode.
-The image is enlarged X 2.
- When the [ZOOM] button is pressed the position of the default enlargement screen is in the center. You
can move the enlarged screen by 10 steps to the right and left and 7 steps upward and downward.
- Use the Jog Dial and Shuttle to move the screen.
- Press the [ZOOM] button again, and the original screen reappears.
22
2004.07.2001 (v 1.0)
Samsung Techwin CO.,Ltd.
오류! 스타일이 정의되어 있지 않습니다.
4.1.5
SVR-1630
Other Playback Functions
PLAY/PAUSE
STOP
SLOW
FAST
DIR
Jog Dial
Shuttle
: plays at 1x speed or pause
: stops playback and exits
: plays at 1/2 speed
: increases the playback speed each time this button is pressed
(x2,x4,x8,x16,x32)
: changes the playback direction each time this button is pressed
: Turn the Jog Dial, and images are played one by one.
: Rotate the Shuttle Ring, and the playback speed is changed depending on the
direction it is turned. Clockwise direction increases speed and anticlockwise direction reduces speed.
4.2 Search Mode
This menu is for searching time or event logs in Search Mode and playing the data of a specified
time.
Samsung Techwin CO.,Ltd.
2004.07.2001 (v 1.0)
23
오류! 스타일이 정의되어 있지 않습니다.
SVR-1630
- Select [SEARCH] mode in Single Screen Playback Mode.
- Select the “Search Time / Event Log” when the menu appears.
- Start Record Time : indicates the starting time of the data saved.
- End Record Time : indicates the closing time of the data saved.
- Time Search : Sets the date and time to search
- Set the date and time, and the images in the relevant sector are played and the event log list for the
relevant sector is displayed at the bottom.
- Press the [ESC] button to close Search Mode.
<Note> How to Use Log Browser
1. Press the Left/Right keys, and the pages are displayed one by one.
2. Press the Up Key in the first log of the first page, and the previous log block is shown.
3. Press the Down Key in the last log of the last page, and the next log block is shown.
24
2004.07.2001 (v 1.0)
Samsung Techwin CO.,Ltd.
오류! 스타일이 정의되어 있지 않습니다.
SVR-1630
4.3 COPY/BACKUP/DELETE
This menu is for copying, backing up and deleting the recorded images.
- Press the [COPY] button in Single Screen Monitoring Mode or Playback Mode.
4.3.1
Copy Image
This menu is for copying certain parts of the selected channel and uses a USB Memory Stick.
Time
Designates the duration to copy. The length can be from 1 second to 60 minutes from the current image.
Select Disk
Selects the object to copy.
<Note> Cautions in Copying
The Copy function is to back up the images saved to a USB Memory Stick, so it can only be used
during playback. If you use the Copy button while monitoring, the Copy function may not work
properly.
Samsung Techwin CO.,Ltd.
2004.07.2001 (v 1.0)
25
SVR-1630
4.3.2
오류! 스타일이 정의되어 있지 않습니다.
Backup Data
Start Date & Time / End Date & Time
Determines the scope of backup.
Select Disk
Determines what Disk is used for backup.
Backup files are automatically divided into units of 700MB.
<Note>
USB is not supported for backup.
26
2004.07.2001 (v 1.0)
Samsung Techwin CO.,Ltd.
오류! 스타일이 정의되어 있지 않습니다.
4.3.3
SVR-1630
Delete Data
This menu is for deleting specified sectors of data saved in the Hard Disk. The data to delete is limited to
the Hard Disk that is currently used and doesn’t have any effect on the backup disk.
The scope of data to delete is always from the oldest data in the Hard Disk to the specified time point.
<Note >
1. When data is deleted, 0% appears at first, and a “Deletion Complete” message is displayed when the
data is completely deleted.
2. While deleting data, the HDD LED is on.
3. While deleting data, images are not saved.
4. The size of one block in the SVR-1630 file system is 64MB. Since data is deleted in blocks, the data
may not be deleted to the exact time that you specify.
4.3.4
Internal/External CD-RW Backup
The backup device is indicated as [C] in the internal and external CD Writer list. You can backup the
contents of the Hard Disk to CD-RW media.
It is necessary to use CD-RW media of over 700MB.
It is not allowed to use media such as DVD-RAM.
Samsung Techwin CO.,Ltd.
2004.07.2001 (v 1.0)
27
오류! 스타일이 정의되어 있지 않습니다.
SVR-1630
5. Menu Configuration
For changing the menu, the Jog Dial and Shuttle Ring are replaced by the Up/Down and Left/Right
buttons, respectively.
MENU : Up
AUTO : Left
A/B : Right
RELAY : Down
ENTER : goes to the sub-menu
5.1 Quick Setup
There are three methods for image recording setup: Quick Setup, Schedule Record and the Event Record
Menu. Quick Setup is for easy setting of recording with the same conditions for all analog channels.
Schedule Record is to set a variety of conditions by time zone and channel. Event Record is to set the
recording conditions for when an event occurs. In addition, Quick Setup includes the Time Setting Menu.
5.1.1 Time Setting
The time zone is set to “UTC 00:00 Dublin” as default when the DVR is delivered.
The first thing to do in the DVR setup is to match the time to that in the relevant region. The time setting
is very important in terms of protecting users’ recording data.
Changing the time [Date/Time] of the DVR may affect the recording images. In this case, you may need
to format the Hard Disk.
<Button Input Procedure >
-Press the [MENU] button on the front of the SVR-1630.
-Go to the “Quick Setup” menu.
-Go to the “Date/Time” menu of “Quick Setup” (using the arrow keys on the front)
-Press the [ENTER] button.
- When the buttons are properly entered, a window is displayed as shown below.
- To go to each sub-menu, select the sub-menu using the arrow keys and press the [ENTER] button.
28
2004.07.2001 (v 1.0)
Samsung Techwin CO.,Ltd.
오류! 스타일이 정의되어 있지 않습니다.
SVR-1630
Time Zone
Select the time zone using the arrow keys on the front of the SVR-1630. Each time the arrow buttons are
pressed, the time zone is changed. (To go to the previous menu, press the [ESC] button on the front. This
operation applies equally to the OSD menu.)
Daylight Saving
This menu is interlocked with the time zone setting menu. That is, the menu is activated only when a
region where daylight saving time has been applied in the time zone setting menu. The regions where
daylight saving time is applied are programmed in the same way as the time zone in MS Windows. In this
manual, when the SVR-1630 is installed in regions where daylight saving time is applied, the relevant
daylight saving time is set using the Left and Right keys.
Sync with NTP
Sets whether to synchronize the time with the NTP (Network Time Protocol) server.
<Note>
See the paragraph “5. 7.6.5 NTP Setup” in the section 5.7.6 Network Setup for more details about NTP.
Samsung Techwin CO.,Ltd.
2004.07.2001 (v 1.0)
29
오류! 스타일이 정의되어 있지 않습니다.
SVR-1630
Date Mode
Sets the time display mode. Set the desired display mode to “MM/DD/YYYY” , “YYYY/MM/DD” or
“DD/MM/YYYY” using the Left and Right keys.
Date/Time
Press the Left and Right keys, and you can change the year, month and date menu in sequence. Select
each menu using the Up and Down keys.
Apply Date/Time
It is necessary to press the “Apply Date/Time” button to apply the Date/Time setting values. Press the
button, and a dialogue box is displayed as shown below.
<Note>
For other settings, when the setting menu is completely closed, the setting values are automatically
saved. However, the “Date” & “Time” setting can cause the serious damage in the HDD Recording File
System so it is not saved automatically. For applying the changes, you need to save them manually by
pressing the [Apply Date/Time] button.
30
2004.07.2001 (v 1.0)
Samsung Techwin CO.,Ltd.
오류! 스타일이 정의되어 있지 않습니다.
SVR-1630
5.1.2 Recording Setup
The Recording Setup in Quick Setup is for setting all analog channels to employ the same
conditions every time.
<Button Input Procedure >
- Select “Record”, the sub-menu of “Quick Setup”.
Configuration Status
This only displays the recording setting status. If the user sets recording conditions only to Quick Setup,
“Macro Setup” is indicated. When you change any part of the Schedule Record menu, “Customer Setup”
is displayed.
<Note>
“Macro Setup” is displayed only when the Schedule Recording for all channels is the same.
Samsung Techwin CO.,Ltd.
2004.07.2001 (v 1.0)
31
오류! 스타일이 정의되어 있지 않습니다.
SVR-1630
Record Rate/Quality
There are a total of 5 setting conditions. (No Rec./Low/Standard/High/Customer).
Setting conditions, apart from “Customer”, “Rate (fps)” and “Quality” are automatically interlocked:
when 1fps/Q5 & “Low”, 5fps/Q5 & “Standard”, 15fps/Q5 & “High” are set, “Customer” Rate (fps) and
Quality can be set separately. The setting conditions for “Event Record”, “Standard” and “Pre Record /
Post Record Time” are set to one second each.
Audio Record
Sets whether or not to record Audio. When Audio Record is set to “Yes”, “Sync with Audio” is set to
“All” so it is interlocked to all channels during playback.
Event Record
Sets whether to record, depending on the Event Record setting conditions.
Apply
For applying the setting values, press the “Apply” button and then the [ESC] button. The previous menu
is displayed. Next, the SVR-1630 starts recording according to the defined recording method.
32
2004.07.2001 (v 1.0)
Samsung Techwin CO.,Ltd.
오류! 스타일이 정의되어 있지 않습니다.
SVR-1630
5.2 Camera Setup
Sets the details of each channel.
The defined values are applied to the Monitoring and Recording Modes in the same way.
<Button Input Procedure>
- Press the [MENU] button and go to “Cam 1~Cam 16”, the sub-menu of “Camera”.
Name
Sets the camera name.
Press the [ENTER] button, and the relevant text setup menu is displayed.
<TIP> Text Input in the Text Input Dialogue Box
Use the arrow keys to enter characters.
Use the Up/Down keys to select the characters to enter and Left/Right keys to go to the position for
character entry.
Samsung Techwin CO.,Ltd.
2004.07.2001 (v 1.0)
33
SVR-1630
오류! 스타일이 정의되어 있지 않습니다.
Camera
Press the [ENTER] button and set whether or not to use cameras by selecting “Enable/Disable” using the
[◄] or [►] button.
Type
This only shows the input video signal (NTSC/PAL). It is automatically set by the DVR.
Color
Press the [ENTER] button and set “Color/B/W” using the [◄] or [►] button.
AGC (Auto Gain Control)
Press the [ENTER] button and set “Enable/Disable” using the [◄] or [►] button.
Brightness/Contrast
Press the [ENTER] button and set the desired values from “-9” to “+9” using the [◄] or
[►] button.
Covert
With Covert menu, you can hide the channels in Monitor Mode.
Press the [ENTER] button and set “Off/A/B/Both” using the [◄] or [►] button.
A : hides channels in Monitor A
B : hides channels in Monitor B
Both : hides channels in Monitors A and B.
PTZ Home/PTZ Idle Time
When any movement is detected at a certain time (PTZ Idle Time) during PTZ control, the screen is
moved to the defined Preset.
Press the [ENTER] button and set the Preset Number and Time using the [◄] or [►] button.
PTZ Port
Press the [ENTER] button and set the PTZ ports connected to the relevant channels using the [◄] or [►]
button.
Address
Press the [ENTER] button, and the text input window for the PTZ Base Address Setup is displayed.
34
2004.07.2001 (v 1.0)
Samsung Techwin CO.,Ltd.
오류! 스타일이 정의되어 있지 않습니다.
SVR-1630
5.3 Schedule Record Setup
This menu is to set the recording conditions by channel and time schedule. When you set the
Schedule Record in “Quick Setup” and change the setting value in this menu, the new setting
replaces the previous setting.
5.3.1
All Channel Setup
This setup is very similar to the record setting in Quick Setup. The All Channel Setup is to set all analog
channels by hour or schedule to the same conditions.
You can set all channels according to a schedule of Full Time, Weekday Day, Weekday Night, Weekend
Day and WeekEnd Night.
<Note>
1. The differences from the record setting in Quick Setup are that this setup doesn’t have the Audio
Record Setup, and sets whether to record at a specific time.
2. Press the “Apply” button to apply the setting.
3. See Setup by Channel for details.
Samsung Techwin CO.,Ltd.
2004.07.2001 (v 1.0)
35
SVR-1630
오류! 스타일이 정의되어 있지 않습니다.
5.3.1 Setup by Channel
Time Schedule
The Time Schedule sets the recording conditions for cameras according to each time schedule. The time
zones are divided into four zones: Weekday Day/Weekday Night/Weekend Day/Weekend Night. Night
and Day and Weekday and Weekend Time Setting can be set in the “System” menu.
36
2004.07.2001 (v 1.0)
Samsung Techwin CO.,Ltd.
오류! 스타일이 정의되어 있지 않습니다.
SVR-1630
<Time Schedule Setup>
For setting the time schedule, go to the “System” menu.
Weekday Start/End
Sets the time zone during weekdays from Monday to Sunday using the Left and Right buttons. Time
zones that are not set are set to the weekend time zones.
Day Start/End
Sets the day time zones using the Left and Right buttons. Time zones that are not set are set to the night
time zones.
Record Rate/Quality
There are a total of 5 setting conditions. (No Rec./Low/Standard/High/Customer).
Setting conditions apart from “Customer”, “Rate (fps)” and “Quality” are automatically interlocked: when
1fps/Q5 & “Low”, 5fps/Q5 & “Standard”, 15fps/Q5 & “High” are set, the “Customer” Rate (fps) and
Quality can be set separately. The setting conditions for “Event Record”, “Standard” and “Pre Record /
Post Record Time” are set to one second each.
Special Time Record
This menu is used to differentiate recording conditions by setting specific time zones. That is, when you
set specific day time zones for weekdays, you can record differently according to two setting conditions.
The specific time zones are set in the “System” menu.
Samsung Techwin CO.,Ltd.
2004.07.2001 (v 1.0)
37
오류! 스타일이 정의되어 있지 않습니다.
SVR-1630
There are a total of 5 setting conditions: No Rec./Low/Standard/High/Same as above (The same values
set in “Record Rate/Quality” are applied).
< Specific Time Zone Setup >
Go to the “System” menu to set the specific time zones.
You can set up to 4 time zones as specific time zones.
Event Record
Press the [ENTER] button and set “Yes/No” using the [◄] or [►] button.
Set the detailed event recording conditions in the “Event Record” menu.
This menu only sets whether to record, depending on the event recording setup.
38
2004.07.2001 (v 1.0)
Samsung Techwin CO.,Ltd.
오류! 스타일이 정의되어 있지 않습니다.
SVR-1630
5.4 Event Record Setup
This menu is to set the event recording conditions. It is necessary to set the “Event Record” menu to
“Yes” in “Schedule Record” to enable the SVR-1630 to record events, after the recording conditions
are set.
In addition, it is necessary to set “Event Source” before the Event Recording Setup.
5.4.1
Sensor Setup
This menu is to set the presence and types of input sensor.
The sensors support two types: Normal Open (N.O.) and Normal Close (N.C.).
Configuration Status
This indicates the status of recording conditions. If you set the recording conditions only to All Ch,
“Macro Setup” is displayed. If you change any one of the individual sensor settings, “Customer Setup” is
dislayed.
All ch
Sets all sensors to the same conditions. Select from Off/N.O./N.C. and press the “Apply” button.
Configuration
You can invididually set 16 sensors (S1~S16).
Samsung Techwin CO.,Ltd.
2004.07.2001 (v 1.0)
39
오류! 스타일이 정의되어 있지 않습니다.
SVR-1630
5.4.2
Motion Detection Setup
This menu is to set the MD of each channel. All channels (Cam 1~Cam 16) are set to the same
conditions and can be set up separately.
Motion Detection
Sets seven MD sensitivities; Off, Lowest, Low, Standard, High, Highest
MD Area
Sets the MD Area. You can set 64 (8(H) X 8(W)) areas.
The default value is “Select All”. Press the “Custom Area” button, and the MD Area setup window is
opened.
Include Video Loss
This menu is to set whether, when no video signal is detected, it should be taken as MD. It can be set to
Yes or No.
<Note>
Press the “Apply” button for all channel setup. If this is not done, the setting is not applied.
40
2004.07.2001 (v 1.0)
Samsung Techwin CO.,Ltd.
오류! 스타일이 정의되어 있지 않습니다.
SVR-1630
<MD Area Setup >
You can directly set the MD Area on the screen.
Press the “Customer Area” button, and a setup window divided into 64 cells (8 by 8) is displayed.
The areas set to MD are greyed out. Select the desired MD Areas using the arrow buttons and press the
“ENTER” button. After setting, press the “ESC” button, and you go to the previous menu.
5.4.3
Text Setup
This menu is to set the input text information. It is necessary to set COM1 in “SystemÆSerial
Setup” in the OSD menu.
Samsung Techwin CO.,Ltd.
2004.07.2001 (v 1.0)
41
오류! 스타일이 정의되어 있지 않습니다.
SVR-1630
Record
Selects whether to save the text data or not.
Monitoring
Selects whether to display the text data on a monitor.
Sync with Text
Selects the channels to interlock with text information.
Seek Header
Data in a variety of types is transferred from external devices (Access Control, POS, ATM). If protocols
such as Star Finger 007 have already been registered and supported, this menu is not required. If not, this
menu is required as the parameter to identify the configuration of data in text information that is
continuously transferred. That is, all data has a starting and ending point. The Header means information
inserted to indicate the starting point. When Header information is defined in this menu, and the SVR1630 detects the relevant characters, the SVR-1630 identifies that the header is the starting point for one
piece of data. This menu allows you to set two headers, enabling detection of up to two headers,
because one device can transfer a variety of data to external devices.
Delimiter
Each device can require different Delimiter values. Please contact your local vendor or see the relevant
manual
Timeout (ms)
The number of lines defined below means the maximum number of text lines that one piece of data can
use. Although data is standardized, the data can be long or short. For example, ATM sets three lines on the
field for customer names. If one person registers only their first and last name, that person will use two
lines less than others when using ATM. The SVR-1630 can’t automatically detect this difference. So the
SVR-1630 considers the last line as the final line after a certain period of time from the final input, and
decides whether to save the input data as complete data.
Lines
Defines the maximum lines for one piece of data.
42
2004.07.2001 (v 1.0)
Samsung Techwin CO.,Ltd.
오류! 스타일이 정의되어 있지 않습니다.
5.4.4
SVR-1630
All Channel Event Recording Setup
This menu sets all analogue channels in the same conditions.
Configuration Status
Displays the recording condition status. When you set All ch, “Macro Setup” is displayed. When you
change by channel, “Customer Setup” is displayed.
Sensor/MD
Sets whether to interlock with Sensor/MD events.
Pairing means one-to-one interlocking between the channel and the Sensor/MD.
Text
This menu should be set to On for displaying or saving text information.
<Note>
1. Press the “Apply” button to apply All Channel Setup
2. See Setup by Channel for details.
Samsung Techwin CO.,Ltd.
2004.07.2001 (v 1.0)
43
오류! 스타일이 정의되어 있지 않습니다.
SVR-1630
5.4.5
Setup by Channel
Event Source (*=All)
- You can select up to 4 Sensor/MDs and text inputs in the Event Source menu.
- Select the Sensor/MD by pressing the relevant number button.
- Set On/Off using the arrow keys for selecting text.
- Set the PTZ Preset according to the relevant event input.
Record Rate/Quality
There are a total of 4 setting conditions (Low/Standard/High/Customer).
Setting conditions apart from “Customer”, “Rate (fps)” and “Quality” are automatically interlocked: when
1fps/Q3 & “Low”, 5fps/Q3 & “Standard”, 15fps/Q3 & “High” are set, “Customer” Rate (fps) and
Quality can be set separately. The setting conditions for “Event Record”, “Standard” and “Pre Record /
Post Record Time” are set to one second each.
Pre Record Time (sec)
The Pre Record Time can be set up to 10 seconds.
Post Record Time (sec)
This menu can be set to up to 60 seconds.
44
2004.07.2001 (v 1.0)
Samsung Techwin CO.,Ltd.
오류! 스타일이 정의되어 있지 않습니다.
SVR-1630
5.5 Event Action Setup
This menu sets matters such as the Relay Command according to each time schedule. Event action
is set to four time zones: Weekday Day, Weekday Night, Weekend Day, Weekend Night. It is
necessary to set Replay, Buzzer and E-mail to activate event actions after the schedule setup.
5.5.1
Event Schedule
Select Action Source
For Relay 1~Relay 4, Buzzer and E-mail, up to 4 Sensors and MDs can be set. Or it can be set to ANY.
For text, you can set to Yes or No.
Press the relevant number button to select the Sensor/MD.
Special Time
Decides whether to apply the setting values above to specific time zones.
<Note>
1. All Channel Setup is applied to the time schedule in the same way.
2. Press the “Apply” button to apply All Channel Setup.
Samsung Techwin CO.,Ltd.
2004.07.2001 (v 1.0)
45
오류! 스타일이 정의되어 있지 않습니다.
SVR-1630
5.5.2
Event Setup
Relay Configuration
Sets whether or not to use R1~R4.
Buzzer
Sets whether or not to use the Buzzer.
E-mail
Enters the E-mail Address to receive event notices.
SMTP
Enters the DNS of the Mail Relay Server.
Sending Interval (min)
Sets the E-mail sending interval
<Note>
For using the E-mail Notice function, the DNS should be set in Network Setup.
46
2004.07.2001 (v 1.0)
Samsung Techwin CO.,Ltd.
오류! 스타일이 정의되어 있지 않습니다.
SVR-1630
5.6 Monitor Setup
This menu sets the relevant modes when displaying images on the monitor. Monitor A,
Monitor B and the VGA Monitor are set in this menu.
5.6.1 Monitor A & Monitor B
Event Pop-up (sec)
Sets as the relevant screen is automatically opened when any event occurs. The duration of the pop-up
window is from 5 to 10 seconds. If Event Pop-up is set to “Keep”, the pop-up window is kept until you
press any button.
Seq. Switching (sec)
Sets the automatic switching time from 1 to 60 seconds.
<Note>
If channel number 1 has a pop-up and channel number 2 follows before the hold time expires, the screen
is changed to 2x2 Split Mode and channel numbers 1 and 2 are displayed at the same time. The hold
time is automatically extended from the final pop-up time(for up to 8 channels)
User Sequence Configuration
Edits the Automatic Switching function of the User Mode.
Samsung Techwin CO.,Ltd.
2004.07.2001 (v 1.0)
47
SVR-1630
오류! 스타일이 정의되어 있지 않습니다.
<Cautions>
1. You can define up to 16 User Modes.
2. The figure above defines 6 sequences in order: 2x2 Split Screen (1,2,3,4) Æ Full Screen (1) Æ 2x2
Split Screen (5,6,7,8) Æ Full Screen (5) Æ Full Screen (8) Æ 3x3 Split Screen
(9,10,11,12,13,14,15,16).
5.6.2 VGA Monitor
Select the VGA Monitor item in the Monitor Menu, and you can then set the Monitor mode to use.
48
2004.07.2001 (v 1.0)
Samsung Techwin CO.,Ltd.
오류! 스타일이 정의되어 있지 않습니다.
SVR-1630
5.7 System Setup
5.7.1 Audio Setup
The SVR-1630 supports only one channel audio recording. However, it can be interlocked with any
channel during playback.
Record
Sets whether or not to record audio.
Audio Gain
The Audio Gain can be set from –7 to +8.
+20dB
Sets whether or nor to amplify the audio input. This menu is configured for a case where the audio is not
checked, because of low input level, when using an external device (microphone).
Sync with Audio
Sets which channel will be interlocked in playing recorded images.
Samsung Techwin CO.,Ltd.
2004.07.2001 (v 1.0)
49
SVR-1630
오류! 스타일이 정의되어 있지 않습니다.
5.7.2 Time Schedule Setup
This menu sets the time zone to define for weekday, weekend, night and day.
Weekday Start/End
Sets the weekday time zones from Monday to Sunday using the Left and Right keys. Time zones that are
not set are set to weekend time zones.
Day Start/End
Sets the day time zones using the Left and Right buttons. Time zones that are not set are set to night time
zones.
50
2004.07.2001 (v 1.0)
Samsung Techwin CO.,Ltd.
오류! 스타일이 정의되어 있지 않습니다.
SVR-1630
5.7.3 Specific Time Setup
You can set other specific time zones in each time zone (Weekday Day, Weekday Night, Weekend
Day and Weekend Night). For example, you can apply a variety of conditions by separately setting
lunch times or meeting times.
You can set up to 4 time zones as specific time zones.
Samsung Techwin CO.,Ltd.
2004.07.2001 (v 1.0)
51
SVR-1630
오류! 스타일이 정의되어 있지 않습니다.
5.7.4 Security Setup
User Password
The User authority can only access monitoring and playback. The default is “1111”. When the user
password is set to “Yes”, the screen is locked, and users can only access monitoring and playback.
Admin Password
The Administrator authority can access all functions. The default is “9999”.
Remote Setup
When this menu is set to “Enable”, you can perform remote setting using the SVR-1630 Manager.
Remote Relay
When this menu is set to “Enable”, you can control “Relay Out” using the SVR-1630 Manager.
52
2004.07.2001 (v 1.0)
Samsung Techwin CO.,Ltd.
오류! 스타일이 정의되어 있지 않습니다.
SVR-1630
5.7.5 Disk Setup
Repeat (Schedule)
If there is no available space in the Hard Disk, data is automatically deleted, with the exception of event
recording images.
Repeat (Event)
If there is no available space in the Hard Disk, event recording images are automatically deleted.
Backup Reminder
This menu is for notifying backup periods by day, week and month.
Day/Date/Time
The setting values are applied differently according to the setting values in “Backup Reminder”.
Samsung Techwin CO.,Ltd.
2004.07.2001 (v 1.0)
53
오류! 스타일이 정의되어 있지 않습니다.
SVR-1630
5.7.6 Network Setup
There are 5 sub-menus; Network, xDSL, SWR, Port Settings, and NTP Settings
5.7.6.1
Network
When the SVR-1630 is connected to a network, the relevant network information is set in this menu.
Type
Sets the type (Ethernet/xDSL) of network line connected to the SVR-1630. When the SVR-1630 is
connected to a private line, cable modem or LAN, set to “Ethernet”.
When the SVR-1630 is connected to an xDSL line with the PPPoE method, set to “xDSL”. However, if
an xDSL line is connected, but not with PPPoE, set to ‘Ethernet’.
DHCP
Activates the DHCP function when the DVR is automatically received IP from the DHCP server.
‘DHCP’ is used in LAN environments where the DHCP Server is activated. For mid-range and large
operations, the DHCP Server is operated with a LAN. For small operations, the NAT (Network Address
Translation) function of the HUB is generally used.
IP Address, NetMask, and Gateway Address, DNS
Sets the IP address, Network Mask, Broadcast address, Gateway address and DNS address.
54
2004.07.2001 (v 1.0)
Samsung Techwin CO.,Ltd.
오류! 스타일이 정의되어 있지 않습니다.
5.7.6.2
SVR-1630
xDSL
When the SVR-1630 is connected to an xDSL line and the PPPoE method is used, it is necessary to
set the user ID and password.
User ID/Password
When the SVR-1630 is connected to xDSL, it is necessary to set a user ID and password.
Status
Indicates the SVR-1630’s connection status.
Samsung Techwin CO.,Ltd.
2004.07.2001 (v 1.0)
55
오류! 스타일이 정의되어 있지 않습니다.
SVR-1630
5.7.6.3
SWR
When the DVR is connected to a cable modem or an xDSL Modem, the IP addresses are changed
for every ISP connection. In this case, you will not know the changed IP address. When you register
the DVR using a dynamic IP in the SWR Server, you can easily identify the changed IP address
whenever you connect to the DVR.
To register a dynamic IP address to SWR, set as described below.
SWR Interval
The registration interval should be set in “SWR Interval” for continous registration. The dynamic IP
address regularly updates information to the SWR Server according to the setting values. If you set the
registration interval as ‘0” or the SVR-1630 doesn’t send any information for two days, the relevant data
is deleted from the SWR.
SWR URL
This menu is to set the server address to register. The SWR Address that Samsung Techwin uses is
webthru.to.
56
2004.07.2001 (v 1.0)
Samsung Techwin CO.,Ltd.
오류! 스타일이 정의되어 있지 않습니다.
Grup ID and
Internet
Group
SVR-1630
SVR
IP
IP
ISP
and IP
Assign Group ID
Group ID
Register SWR address and
Group ID on SVR Manager
SVRs of selected Group
User
SWR
SVR registers its
Group ID and
Dynamic
in SWR
IP address
SVR Manager
SVR Manager
accesses SWR and gets
SVR1630's IP addresses
of the registered Group
Group ID
Group ID is to set the group name to register the SVR-1630. It is recommended not to use a simple group
name, to avoid potential duplication of names.
Status
Indicates the SVR-1630’s registration status.
Samsung Techwin CO.,Ltd.
2004.07.2001 (v 1.0)
57
오류! 스타일이 정의되어 있지 않습니다.
SVR-1630
5.7.6.4
Port Settings
Monitoring Port / Playback Port
The SVR-1630 uses the 8001 port as the Monitoring Port and the 8105 port as the Playback Port. For
changing ports, press the [ENTER] button and enter the port directly in the Text Input Setup Window.
TP Server Port
Sets the port when using the TP (Transparent) Server.
Firewall / Port
When the network is blocked by a firewall and only one port is available, you can use a single port for
both the Monitoring and Playback Ports. For changing ports, select the “Port” menu and enter the value
directly.
58
2004.07.2001 (v 1.0)
Samsung Techwin CO.,Ltd.
오류! 스타일이 정의되어 있지 않습니다.
5.7.6.5
SVR-1630
NTP Settings
NTP (Network Time Protocol) synchronizes the times of devices connected to the network. It
consists of a server providing the standard time on the network and a client that receives and
synchronizes the time through the connection with the server.
NTP Mode
Sets whether to run the NTP mode of the SVR-1630 as a client or as a server.
NTP Server Location
When the NTP Mode is set to Client, this is enabled. Sets whether the NTP server is on a Local Network
or the Internet (Public).
NTP Local Server IP
When the NTP Server Location is set to Local, this is enabled. Sets the server IP. Enter the IP of the SVR1630 in which the NTP Mode is set to Server or NPT Server IP on the local network.
Interval (min)
Sets the interval to synchronize the time.
<Note>
When the NTP Mode is Client, the Sync with NTP in “ Quick Setup Æ Date/Time (Time Setup) should
be set to ON
Samsung Techwin CO.,Ltd.
2004.07.2001 (v 1.0)
59
오류! 스타일이 정의되어 있지 않습니다.
SVR-1630
5.7.1
Serial Setup
The SVR-1630 can set up to use 4 COM ports.
Device
Sets the external devices connected to the SVR-1630.
Interface
This menu sets the Interface to RS422 or RS485 in the “RS422/485” menu.
COM1 and COM3 are fixed to RS232.
Baud rate/Parity/Stop (bit)/Data (bit)
Enters the appropriate values according to the external device.
60
2004.07.2001 (v 1.0)
Samsung Techwin CO.,Ltd.
오류! 스타일이 정의되어 있지 않습니다.
5.7.2
SVR-1630
Other Functions
<Button Input Procedure>
- Press the [MENU] button and go to “Etc.” under “System”
Remote Control ID
Sets up to 16 Remote Controller IDs. You can control up to 16 units of SVR-1630 using one remote
controller.
<Registration of Remote
Controller>
- Point the remote controller toward the SVR-1630.
- Press the “ID” button of the remote controller until the SVR-1630 reacts.
- When the Remote Controller ID matches the SVR-1630 ID, all the Event LEDs of the SVR-1630 go
on and sounds are emitted.
- After matching the ID, you can use the remote controller.
- See the “SVR-1630 Installation Guide” for details.
Samsung Techwin CO.,Ltd.
2004.07.2001 (v 1.0)
61
오류! 스타일이 정의되어 있지 않습니다.
SVR-1630
Keyboard Control Address
This menu sets the address of keyboard connected to SVR-1630.
The default setting is “32”. If several SVR-1630 units are connected to one keyboard, the address set on
the keyboard, that is, “32”, can crash to other DVR address. In this case, you need to change the keyboard
address to the other value.
Keyboard PTZ Address
This menu is used to control each PTZ camera connected to multiple units of SVR-1630 using one
keyboard. When you assign the first camera address connected to each SVR-1630, the addresses of other
cameras are automatically designated. For example, if 5 cameras are connected to the first SVR-1630 and
6 cameras are connected to the second SVR-1630, set 1 to the first SVR-1630 and 6 to the second SVR1630. That is, the cameras for the first SVR-1630 are assigned PTZ addresses from 1 to 5 and the cameras
for the second SVR-1630 are automatically assigned PTZ addresses from 6 to 11. Remember that
addresses are automatically assigned to cameras when PTZ devices are not connected.
DVR ID
Sets the SVR-1630 name.
Record No Video
Automatically sets whether to record for No Video.
Language
The OSD menu supports multiple languages. Select the desired language.
H/W Version & S/W Version
Displays the hardware and software information.
Reset Values
Initializes all settings to the default values set in the factory. Press the “Reset Value” button for
initialization.
62
2004.07.2001 (v 1.0)
Samsung Techwin CO.,Ltd.
오류! 스타일이 정의되어 있지 않습니다.
SVR-1630
5.8 Disk Management
This section explains how to add or format internal and external Hard Disks. The SVR-1630
supports a variety of external storage methods.
<Button Input Procedure>
Press the [MENU] button and go to “DISK”, the next “System”menu .
Samsung Techwin CO.,Ltd.
2004.07.2001 (v 1.0)
63
오류! 스타일이 정의되어 있지 않습니다.
SVR-1630
5.8.1
Disk Manager
The Hard Disk mounted is automatically identified.
Select Disk
Selects the HDD to set.
Action
Selects the desired action in the “Add/Remove/Format/Confirm Removed/Add used” menu.
[Add]
[Remove]
: adds an HDD for recording. The added HDD is automatically
formatted.
: Logically removes the currently used HDD. The HDD can be reused without
formatting using the “Add used” command later.
[Confirm Removed]
: completely deletes the HDD when it is separated from the SVR-1630 but
remains in the list.
[Add used]
: uses the HDD previously formatted in DVR without formatting using this
command. However, “ Add Used’ can be applied only when the
HDD is added as the Primary HDD.
64
2004.07.2001 (v 1.0)
Samsung Techwin CO.,Ltd.
오류! 스타일이 정의되어 있지 않습니다.
SVR-1630
Type
The indications relating to the HDDs are explained below.
[R]
[V]
[F]
[C]
[X]
IntA
IntB
R-HDD
Ext
The HDD is completely formatted for recording and can save data.
The HDD is currently connected, but already formatted for the DVR file
system. The HDD is changed to [R] using ‘ Add Used’ . No formatting is
required.
The HDD is currently connected, but the file system is different from the
DVR. So format is done after “ Add” and then it is changed to [R]. Or
indicates the FAT 32 file system connected for backup.
Internal or external CD-Recorder
The HDD cable is not connected or has some problems. Do ‘ Confirm
Removed’ to delete the HDD from the list
Internal Primary HDD
Internal Auxiliary HDD
HDD in the internal hard rack
External HDD. The orders of External HDDs can be changed according to
the identified order.
Samsung Techwin CO.,Ltd.
2004.07.2001 (v 1.0)
65
오류! 스타일이 정의되어 있지 않습니다.
SVR-1630
Expansion
6. External Device Connection
6.1 Use Text Device
For using the text device, the text menu, RS232 menu of serial setting, event recording menu and
schedule recording menu shall be set.
6.1.1
Text Setup
Set the Record and Monitoring menu to Yes and enter the desired values for the interlocking channels.
When Star Finger 007 is connected, set only the relevant device. For other devices, set to Manual and set
all sub-menus.
66
2004.07.2001 (v 1.0)
Samsung Techwin CO.,Ltd.
오류! 스타일이 정의되어 있지 않습니다.
6.1.2
SVR-1630
RS232 Menu Setup in Serial Setup
Set the connection device as text in COM1 in the Serial Setup menu. And set the appropriate values for
Baud Rate, Parity, Stop and Data.
Samsung Techwin CO.,Ltd.
2004.07.2001 (v 1.0)
67
SVR-1630
6.1.3
오류! 스타일이 정의되어 있지 않습니다.
Setup in Event Recording
Set the Text Event to Yes.
68
2004.07.2001 (v 1.0)
Samsung Techwin CO.,Ltd.
오류! 스타일이 정의되어 있지 않습니다.
6.1.4
SVR-1630
Setup in Schedule Recording
Set the Event Recording to Yes. In this case, set each Event Recording in the desired time zones from
Weekday Day, Weekday Night, Weekend Night and Weekend Day to Yes.
<Caution>
Each time the Help button is pressed, the image display step is changed. The default for monitoring
displays only channel numbers, and each time the Help button is pressed, the display is changed to
channel IDs, text display, event display and HDD status display. In contrast, the default for playback is
changed to all data display, channel IDs, text display, event display and channel number display.
Therefore, for viewing text information, press the Help button in monitoring or playback to set the
channel IDs and text display.
Samsung Techwin CO.,Ltd.
2004.07.2001 (v 1.0)
69
오류! 스타일이 정의되어 있지 않습니다.
SVR-1630
6.2 Keyboard
It is necessary to set two items for using a keyboard: the RS232 menu and the PTZ menu in Serial
Setup.
6.2.1
COM1 RS232 Menu Setup in Serial Setup
Set the connection device in RS232 in the Serial Setup menu to Keyboard. And set the appropriate values
for Baud Rate, Parity, Stop and Data.
6.2.2
PTZ Menu Setup in Serial Setup
Set the communication environment between cameras, other devices and the SVR-1630 to control using
the keyboard.
Contact your local vendor for detailed setup by product.
70
2004.07.2001 (v 1.0)
Samsung Techwin CO.,Ltd.
오류! 스타일이 정의되어 있지 않습니다.
SVR-1630
Appendix
Samsung Techwin CO.,Ltd.
2004.07.2001 (v 1.0)
71
SVR-1630
오류! 스타일이 정의되어 있지 않습니다.
1. Technical Specification
Hardware
32bit RISC Embedded processor (266MFPS)
Flash memory: 8Mbyte
RAM: 64Mbyte
OS: Embedded Linux
Storage Devices
Int.: 2 HDD bays
Ext: 2 IEEE 1394 (FireWire) connection ports
Supports Disk Management Tool for all disks (Reboot
is required when the HDD is changed)
Total manageable capacity: 4 TB
Image Quality Control
5 Levels (Q1-Q5)
Image Compression
Compression Algorithm: Differential Wavelet
Compression Rate: 20:1 ~500:1
Average file size: 3 ~ 5KB (Standard Quality)
Video Channel
NTSC or PAL video formats are supported
16Ch. analog video inputs via BNC connector
Record Performance
(on 360X243) Analog Ch
Max. 240fps(NTSC) / 200fps(PAL) in total
Max 30fps (NTSC) per channel if 8ch used
Max. 15fps (NTSC) per channel if 16ch used
Schedule Record
Daily: Day / night / Four-segment time frame
Weekly: Weekdays / Weekends
Status: Schedule / Event
Matrix Digital Output Schedule
Daily: Day / night / Four-segment time frame
Weekly: Weekdays / Weekends
Conditions: MD, sensor input
Configurable Record Conditions
Record Rate: None to 30 fps
Image quality: 5 Levels
Event conditions: MD & sensor inputs
Pre/ Event Record Time
Intelligent file system
72
Pre Record Time : 1 ~ 10 seconds
Event Record Time : 1 ~ 60 seconds
Data-loss protection against power failure
2004.07.2001 (v 1.0)
Samsung Techwin CO.,Ltd.
오류! 스타일이 정의되어 있지 않습니다.
SVR-1630
Event Triggered Video Data Preservation
Overwrite prevention of Event triggered data
Event Log Record
Log archiving on HDD
Log search & monitoring via Network
Data (Video & Audio Clip) Back-up
External HDD: IEEE1394 (FireWire)
Data Copy (Max. 1 minute video clip)
VHS Video Tape: Video output port for VCR
Backup Notification: Daily / Weekly / Monthly
PnP USB storage (Compact Flash, Smart Media,
Memory Stick, SD Card)
Display Performance
Frame Rate on CCTV Monitor: Max. 480fps
Frame Rate on PC: Max. 60fps
Display Channel: Quad, Auto Sequential
Misc.
Play Rate : 1x, 2x, 4x, 8x, 16x (FWD & REV)
Supports Step-Forward, Step-Reverse.
Instant data access based on time and event log
Digital Zoom
2 times digital zoom (Live & Playback Mode)
Event Triggered Pop-up Video
Triggered by motion detection or sensor input
PTZ Control
Ports: RS232 (2), RS485/RS422 (2)
Local User
Front panel push button & IR Remote
(controls IP video channels as well)
Remote User
On-screen PTZ control by PC
Preset: 8 points per channel
Group: 1 group per channel
‘Return Home Position’ support
Sensor Inputs and Event Outputs
Software-controlled 16 sensor inputs
Software-controlled 4 event outputs
Samsung Techwin CO.,Ltd.
2004.07.2001 (v 1.0)
73
SVR-1630
오류! 스타일이 정의되어 있지 않습니다.
Audio Record and Playback
Input: 1Ch, line-in, 1Vpp
Output: 1Ch, line-out, 1Vpp
Level: -7 ~ 8 Record level control
Supports 20dB Amp. for low level audio record
Supports local and remote audio monitoring
Network
Protocol: TCP/IP, ARP, ICMP, DHCP, PPPoE
Line: 10/100Mbps Ethernet (RJ-45)
Simultaneous User Support over Network
Monitoring: Max. 5 users
Playback: Max. 5 users
Management and Firmware Upgrades
Firmware upgrades via Network
Security
Password (User or Administrator Authentication)
Watermarking (For image copying)
Power
AC Free Volt
Power Consumption (with 2HDD)
Max. 85W
Typical 60W
Environmental Spec
Operating: 41 ~ 113 degrees F.
Storage: -49 ~ 149 degrees F.
74
2004.07.2001 (v 1.0)
Samsung Techwin CO.,Ltd.
오류! 스타일이 정의되어 있지 않습니다.
SVR-1630
2. Use an IP Address in a Local Network
2.1 Executive Summary
When using the Internet, you connect to servers in other locations, receive information and exchange emails using an IP address. You can’t get access to the Internet without an IP address.
At present, the public IP used worldwide is limited. There are 5 kinds of network holding multiple IPs
from Class A to Class E. In particular, the most common network is the Class C network.
2.2 IP Configuration and Network Class
1) IP Configuration
xxx
xxx
X1
X2
xxx
X3
xxx
X4
(xxx: 0 – 255)
2) Network Class
Classs A: holds all IPs with numbers from 0 to 127 for X1.
- Network ID: X1
- Host ID: X2, X3, X4
- The Class A Networks available in the world are 128 in total.
Class B: holds all IPs with numbers from 128 to 191 for X1.
- Network ID: X1, X2
- Host ID: X3, X4
- The Class B Networks available in the world are 65,534 in total.
Class C: holds all IPs with numbers from 192 to 223 for X1.
- Network ID: X1, X2, X3
- Host ID: X4
- This class is the most commonly used IP address. The Class C Networks available in the world
are 2,097,152 in total.
Class D: holds all IPs with numbers from 224 to 239 for X1.
- This is for Multicast and general users don’t use this network.
Class E: holds all IPs with numbers from 240 to 255 for X1.
- This network is not currently used.
Samsung Techwin CO.,Ltd.
2004.07.2001 (v 1.0)
75
오류! 스타일이 정의되어 있지 않습니다.
SVR-1630
2.3 Class C Network
1) Address Feature
IP Address: The three number of X4 indicates the Host ID, which ranges from 0 to 255. However, 0 and
255 are used as the Network ID and Broadcast Address. The IP addresses actually used are 244 in total,
from 1 to 244.
Network ID: is the local network ID to check the relevant network identification on the Internet. In
general, the most preceding number of the local network is assigned.
Gateway Address: is the IP address that is assigned to a router connecting the Internet and local network.
It is a channel to connect a local network with an assigned network ID to the Internet. In general, the next
number of the local network ID is assigned.
Broadcast Address: is for broadcasting to all devices connected to the local network. It is the address as
the final destination. This address is calculated by formula and all devices connected to the local network
have the same broadcast address.
Subnet Mask Address: subdivides the local network and makes each subnet into a different network
(remote network). It defines the size of one network (number of IPs included). The address assigned as
the Subnet Mask address is limited. (0, 4, 8, 16, 32, 64, 128, 192)
2) Network Configuration
● 1 Network
Network ID: xxx.xxx.xxx.0
Gateway Address: xxx.xxx.xxx.1
Subnet Mask: 255.255.255.0
Broadcast Address: xxx.xxx.xxx.255
IP Addresses: xxx.xxx.xxx.2 – xxx.xxx.xxx.254
76
2004.07.2001 (v 1.0)
Samsung Techwin CO.,Ltd.
오류! 스타일이 정의되어 있지 않습니다.
SVR-1630
● Two Networks of the same size (1/2 + 1/2)
Sub-Network ID: xxx.xxx.xxx.0
Gateway Address: xxx.xxx.xxx.1
Subnet Mask: 255.255.255.128
Broadcast Address: xxx.xxx.xxx.127
IP Addresses: xxx.xxx.xxx.2 – xxx.xxx.xxx.126
Sub-Network ID: xxx.xxx.xxx.128
Gateway Address: xxx.xxx.xxx.129
Subnet Mask: 255.255.255.128
Broadcast Address: xxx.xxx.xxx.255
IP Addresses: xxx.xxx.xxx.130 – xxx.xxx.xxx.254
● Three Networks (1/2 + 1/4 + 1/4)
Sub-Network ID: xxx.xxx.xxx.0
Gateway Address: xxx.xxx.xxx.1
Subnet Mask: 255.255.255.192
Broadcast Address: xxx.xxx.xxx.63
IP Addresses: xxx.xxx.xxx.2 – xxx.xxx.xxx.62
Sub-Network ID: xxx.xxx.xxx.64
Gateway Address: xxx.xxx.xxx.65
Subnet Mask: 255.255.255.192
Broadcast Address: xxx.xxx.xxx.127
IP Addresses: xxx.xxx.xxx.66 – xxx.xxx.xxx.126
Sub-Network ID: xxx.xxx.xxx.128
Gateway Address: xxx.xxx.xxx.129
Subnet Mask: 255.255.255.128
Broadcast Address: xxx.xxx.xxx.255
IP Addresses: xxx.xxx.xxx.130 – xxx.xxx.xxx.254
Samsung Techwin CO.,Ltd.
2004.07.2001 (v 1.0)
77
오류! 스타일이 정의되어 있지 않습니다.
SVR-1630
● Four Networks (1/4 + 1/4 + 1/4+1/4)
Sub-Network ID: xxx.xxx.xxx.0
Gateway Address: xxx.xxx.xxx.1
Subnet Mask: 255.255.255.192
Broadcast Address: xxx.xxx.xxx.63
IP Addresses: xxx.xxx.xxx.2 – xxx.xxx.xxx.62
Sub-Network ID: xxx.xxx.xxx.64
Gateway Address: xxx.xxx.xxx.65
Subnet Mask: 255.255.255.192
Broadcast Address: xxx.xxx.xxx.127
IP Addresses: xxx.xxx.xxx.66 – xxx.xxx.xxx.126
Sub-Network ID: xxx.xxx.xxx.128
Gateway Address: xxx.xxx.xxx.129
Subnet Mask: 255.255.255.192
Broadcast Address: xxx.xxx.xxx.191
IP Addresses: xxx.xxx.xxx.130 – xxx.xxx.xxx.190
Sub-Network ID: xxx.xxx.xxx.192
Gateway Address: xxx.xxx.xxx.193
Subnet Mask: 255.255.255.192
Broadcast Address: xxx.xxx.xxx.255
IP Addresses: xxx.xxx.xxx.194 – xxx.xxx.xxx.254
78
2004.07.2001 (v 1.0)
Samsung Techwin CO.,Ltd.