1
Owner's Manual
6.75 HORSEPOWER
21" REAR DISCHARGE
POWER PROPELLED
ROTARY LAWN MOWER
Model No.
917.379601
•
•
•
•
•
•
Safety
Assembly
Operation
Maintenance
Espa5ol
Repair Parts
NOTE: Engines which are certified to comply wifh California and U.S. EPA emission regulations
for SORE (Small Off Road Equipment), are csrtHied to operate on regular unleaded gasoline,
and include the following emission control systems: Engme Modification (EM), and Three-way
Catalyst ('rwc) (If so equipped).
AVISO: Los motores homologados para cumplir con la reglarnentacibn sobre emisiones de
California y de la Agencia de ProtecciSn Ambiental estadounidense (EPA) para equipos
peduel_os no circulantss (SORE) funcionan con gasolina normal sin plomo, e inclwen los
sigu_entessistemas de control de ernisiones: modificaci(_n del motor (EM) y catafizador de tdple
acckSn ('rwc) (en caso de tenerk_).
The D.O.M. decal includes engine life specifications for the emissions-related useful life pedod of
your engine, This pedod relates to the emission compliance life as certified by EPNCARB. To
find the/ife pedod specification for your engine, please match one of the following letters with the
letter pdnted on your O.O.M. decal: (C) 125 hours, (B) 250 hours, (A) 500 hours.
La calcomanla D.O.M incluye especiifcaciones sobre la duraci6n del motor pare el perlode de
vida Ofil de su motor relaccionade con emisiones. Este pedodo se relaciona con la duraci¢_nen
conformidad con las emisiones seg_n Io certificado por EPNCARB. Pare hailer la especificacibn
del per[odo de ,/ida de su motor, mire cudl de las siguientes lelras viene impresa en su
calcomenfa D.O.M.: (C) 125 horas, (B) 250 horas, (A) 500 bores.
CAUTION:
Read and follow all
Safety Rules and Instructions
before operatingthis equipment
Sears, Roebuck and Co., Hoffman Estates, IL 60179
Visit our Craftsman web.site: www.sears.condcraftsman
Warranty .................................................
2
Safety Rules ........................................ 2-4
Assembly ................................................
5
Operation ............................................. 6-9
Maintenance Schedule ........................ 10
Maintenance .................................... 10-13
Product Specifications .......................... 11
Service and Adjustments................. 14-15
Storage ............................................ 15-16
Troubleshooting .............................. 17-18
Repair Parts ..................................... 35-43
Parts Ordedng ........................ Back Cover
LIMITED TWOYEAR WARRANTY ON CRAFTSMAN POWER MOWER
For two years from date of purchase, when this Craftsman Lawn Mower is maintained,
lubdcatsd, and tuned up according to the operating and maintenance instructionsin
the owner's manual, Sears will repair free of charge any defect in matedal or workmanship.
If this Craftsman Lawn Mower is used for ccmmercial or rental purposes, this warranty
applies for only 90 days from the date of purchase.
This Warranty does not cover:
• Expendable ]ternswhich become worn dudng normal use, such as rotary mower
blades, blade adapters, belts, air cleaners and spark plug.
• Repairs necessary because of operator abuse or negligence, including bent
crankshafts and the failure to maintain the equipment accordingto the instructions
contained in the owner's manual.
Warranty service is available by returning the Craftsman power mower to the nearest
Sears Service Center/Department in the United States. This warranty applies only
while this product is in use in the United States.
This Warranty gives you specific legal rights, and you may also have other rights which
vary from state to state.
Sears, Roebuck and Co., D/817 WA, Hoffman Estates, Illinofs 60179
IMPORTANT: This cutting machine is capable of amputating hands and feet and
throwing objects, Failure to observe the following safety Instructions could result in
sedous injury or death.
• Be sure the area is clear of other
I. GENERAL OPERATION
people before mowing. Stop machine if
• Read, understand, and follow all
anyone enters the area.
instructions on the machine and in the
• Do not operate the mower when
manual(s) before starting. Be thorbarefoot or weadng open sandals.
oughly familiar with the controls and
Always wear substantial foot wear.
the proper use of the machine before
• Do not pull mower backwards unless
starting.
absolutely necessary. Always look
• Do not put hands or feet near or under
down and behind before and while
rotating parts. Keep clear of the
moving backwards.
discharge opening at all times.
• Do not operate the mower without
• Only allow responsible individuals,
proper guards, plates, grass catcher or
who are familiar with the instructions, to
other safety protective devices in place.
operate the machine.
• See manufacturer's instructions for
• Clear the area of objects such as
proper operation and installation of
rocks, toys, wire, bones, sticks, etc.,
accessodes, Only use accessories
which could be picked up and thrown
approved by the manufacturer.
by the blade.
• Stop the blede(s) when crossing gravel
drives, walks, or roads.
• Stop the engine (motor) whenever you
leave the equipment, before cleaning
the mower or unclogging the chute.
• Shut the engine (motor) off and wait
until the blade comes to complete stop
before removing grass catcher.
• Mow only in daylight or good artificial
light.
• Do not operate the machine while
under the influence of alcohol or drugs.
• Never operate machine in wet grass.
Always be sure of your footing: keep a
firm hold on the handle and walk; never
run,
• Disengage the self-propelled mechanism or drive clutch on mowers so
equipped before starting the engine
(motor).
• If the equipment should start to vibrate
abnormally, stop the engine (motor)
and check immediately for the cause.
Vibration is generally a warning of
trouble.
• Always wear safety goggles or safety
glasses with side shields when
operating mower.
I1. SLOPE OPERATION
Slopes are a major factor reiatsd to slip
and fall accidents which can result in
severe injury. All slopes require extra
caution. If you feel uneasy on a slope, do
not mow it.
DO:
• Mow across the face of slopes: never
up and down. Exercise extreme caution
when changing direction on slopes.
• Remove obstacles such as rocks, tree
limbs, etc.
• Watch for holes, ruts, or bumps. Tall
grass can hide obstacles.
DO NOT:
• Do not tdm near drop-offs, ditches or
embankments. The operator could lose
footing or balance.
• Do not tdm excessively steep slopes.
• Do not mow on wet grass. Reduced
footing could cause slipping.
II1. CHILDREN
Tragic accidents can occur if the operator
is not alert to the presence of children.
Children are often attracted to the
machine and the mowing activity. Never
assume that children will remain where
you last saw them.
• Keep children out of the tdmming area
and under the watchful care of another
responsible adult.
• Be alert and turn machine off if children
enter the area.
• Before and while walking backwards,
look behind and down for small
children.
• Never allow children to operate the
machine.
• Use extra care when approaching blind
comers, shrubs, trees, or other objects
that may obscure vision.
IV. SERVICE
• Use extra care in handling gasoline
and other fuels. They are flammable
and vapors are explosive.
- Use only an approved container.
. Never remove gas cap or add fuel
with the engine running. Allow
engine to cool before refueling. Do
not smoke.
- Never refuel the machine indoors.
- Never store the machine or fuel
container inside where there Is an
open flame, such as a water heater.
• Never run a machine inside a closed
area.
• Never make adjustments or repairs with
the engine (motor) running. Disconnect
the spark plug wire, and keep the wire
away from the plug to prevent accidental starting.
• Keep nuts and bolts, especially blade
attachment bolts, tight and keep
equipment in good condition.
• Never tamper with safety devices.
Check their proper operation regularly.
• Keep machine free of grass, leaves, or
other debds build-up. Clean oil or fuel
spillage. Allow machine to cool before
stodng.
• Stop and inspect the equipment if you
stdke an object. Repair, it necessary,
before restarting.
• Never attempt to make wheel height
adjustments while the engine (motor) is
running.
• Grass catcher components are subject
to wear, damage, and deterioration,
which could expose moving parts or
allow objects to be thrown. Frequently
check components and replace with
manufacturer's recommended pads,
when necessary.
• Mower blades are sharp and can cut.
Wrap the blade(s) or wear gloves, and
use extra caution when servicing them.
• Do not change the engine governor
setting or overspeed the engine.
ALook for this symbol to point out
important safety precautions. It means
CAUTIONIll BECOMEALERT!!I YOUR
SAFETY IS INVOLVED.
CAUTION: In order to prevent
accidental starting when setting up,
transpo_ng, adjusting or making repairs,
always disconnect spark plug wire and
place wire where it cannot contact spark
plug.
AWARNING: Engine exhaust, some of its
constituents, and certain vehicle
components contain or emit chemicals
known to the State of California to cause
cancer and birth defects or other
reproductive harm.
A CAUTION: Muffler and other engine
parts become extremely hot dudng
operation and remain hot after engine has
stopped. To avoid severe bums on
contact, stay away from these areas.
_.WARNING: Battery posts, terminals and
related accessohes contain lead and
lead compounds, chemicals known to the
State of California to cause cancer and
birth defects or other reproductive harm.
Wash hands after handling.
These accessories were available when this lawn mower was produced. They are not
shipped with your mower. They are also available at most Sears retail outletsand
service centers. Most Sears stores can also order repair parts for you, when you
provide the model number of your lawn mower. Some of these accessories may not
apply to your lawn mower.
LAWN MOWER PERFORMANCE
CLIPPING
DEFLECTOR
FOR nEAR DISCHARGE LAWN MOWERS
MULCHERKrrs
STABILIZER
FOR
SIDE CISCHARGE
GRASSCATCHERS
LAWN MOWERS
FOR
REAR DISCHARGE
GRASS
LAWN CATCHERS
MOWERS
GAS CANS
LAWN MOWER MAINTENANCE
MUFFLERS
BELTS
AIR FIL'n_RS
aLADES
SLADE
ADAPTERS
4
SPARK PLUGS
WHEELS
ENGINE OIL
Read these instructionsand this manual
in its entirety before you attempt to
assemble or operate your new lawn
HOWTO SET UPYOUR
MOWER
TO UNFOLD HANDLE
mower.
LAWN
IMPORTANT: Unfold handle carefully so
as not to pinch or damage control cables.
1. Raise handles until lower handle
section locks into place in mowing
position.
2, Remove protective padding, raise
upper handle section into place on
lower handle end tighten both handle
knobs.
3. Remove handle padding holding
operator presence control bar to
upper handle.
Your lawn mower handle can be adjusted
toryour mowing comfort. Refer to "ADJUST HANDLE" in the Service and
Adjustments section of this manual.
IMPORTANT: This lawn mower is
shipped WITHOUT OIL OR GASOLINE in
the engine.
Your new lawn mower has been assembled at the factory with the exception
of those parts left unassembled for
shipping purposes. All parts such as nuts,
washers, bolts, etc., necessary to complete the assembly have been placed in
the parts bag. To ensure safe and proper
operation of your lawn mower, all parts
and hardware you assemble must be
tightened securely. Use the correct tools
as necessary to ensure proper tightness.
TO REMOVE LAWN MOWER FROM
CARTON
1. Remove loose parts included with
mower.
2. Cut down two end comers of carton
and lay end panel down flat.
3. Remove all packing materials except
padding between upper and lower
handle end padding holding operator
presence control bar to upper handle.
4. Roll lawn mower out of carton and
check carton thorougly for additional
loose parts.
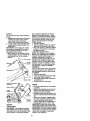
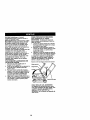
Operator
con_ol bar
Lift u
Lower handle
TO INSTALL A'I-FACHMENTS
Your lawn mower was shipped ready to
be used as a mulcber. To convert mower
to bagging, see "TO CONVERT MOWER"
in the Operation section of this manual.
5
KNOWYOUR LAWN MOWER
READ THIS OWNER'S MANUAL AND SAFETY RULES BEFORE OPERATING YOUR
LAWN MOWER. Compare the illustrationswith your lawn mower to familiarize yourseff
with the location of various controls and adjustments. Save this manual for future
reference.
These symbols may appear on your lawn mower or In literature supplied with the
product. Learn and understand their meaning.
CAUTION
OR WARNING
ENGINE
ON
ENGINE
FAST
SLOW
CHOKE
FUEL
OIL
DANGER,
OFF
KEEP HANDS
AND FEET AWAY
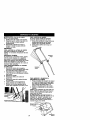
Operator presence control bar
Engine zone
control cable
Starter handle
4andle knob
Gasoline cap
Grass
Air filter
primer
Engine oil ca
Muffler
Drive cover
Housing
IMPORTANT: This lawn mower is shipped
WITHOUT OIL OR GASOLINE in the engine.
Wheel adjuster
(on each wheel)
MEETS CPSC SAFETY REQUIREMENTS
Sears rotary walk-behiod power lawn mowers conform to the safety standards of the
Amedcan National Standards Institute and the U.S. Consumer Product Safety Commission. The blade turns when the engine is running.
Operator presence control bar - must
be held down to the handle to start the
engine. Release to stop the engine,
Primer - pumps additional fuel from the
carburetor to the cylinder for use when
starting a cold engine.
Starter handle - used for starting engine.
Drive control lever - used to engage
power.propelled forward motion of lawn
mower.
6
Theoperation
ofanylawn TO ADJUST CUTrlNG HEIGHT
mower
canresultinforeign Raise wheels for low out and lower
objects
thrown
intothe
wheels for high cut, adjust cutting height
eyes,whichcanresultin
to suit your requirements. Medium
severe
eyedamage.
position is best for most lawns.
Always
wearsafety
glasses
oreye
• To change cutting height, squeeze
shields while operating your lawn mower
or performing any adjustments or repairs.
We recommend a wide vision safety
mask over spectacles or standard safety
glasses.
HOWTO USEYOUR LAWN MOWER
ENGINE SPEED
The engine speed was set at the factory
for optimum performance. Speed is nat
adjustable.
ENGINE ZONE CONTROL
adjuster lever toward wheel. Move
wheel up or down to suit your requirements. Be sure all wheels are in the
same satitng.
NOTE: Adjuster is propedy positioned
when plate tab inserts into hole in lever.
Also, 9-position adjusters (if so equipped)
allow lever to be positioned between the
plate tabs.
Lc:_verWheelsfor High Cut
_,CAUTION: Federal regulations require
an engine control to be installed on this
lawn mower in order to minimize the dsk
of blade contact injury. Do not under any
cimumstances attempt to defeat the
function of the operator control.The blade
turns when the engine is running.
• Your lawn mower is equipped with an
operator presence control bar which
requires the operator to be positioned
behind the lawn mower handle to start
and operate the lawn mower.
RaiseWheelsfor LowCut
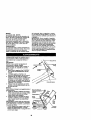
Pivot
Operatorpresencecontrolbar
Ddve
control
DriVe control
disengaged
Lever
TO CONVERT MOW1ER
Yourlawn mowerwas shippedready to be
used as a mulcher.To convertto hegging :
REAR BAGGING
• Liftreer door of the lawn mowerand place
the grssscatcherframe hooksontothe
door pivotpile.
• To convertto mulching operaf_co,remove
grasscatcherand dose rear door.
ACAUTION: Do not run your lawn mower
without clipping deflector or approved
grass catcher in place. Never attempt to
operate the lawn mower with the rear
door removed or propped open.
DRIVE CONTROL
• Self.propelling is controlled by holding
the operator presence control her down
to the handle and pushing the drive
control lever forward until it clicks; then
releasing the lever.
• Forward motion will stop when the
operator presence control bar is
released. To stop forward motion
without stopping engine, release the
operator presence control bar slightly
until the drive control disengages. Hold
operator presence control bar down
against handle to continue mowing
without serf-propelling.
• To keep drive control engaged when
turning comers, push down on handle
and lift trent wheels off ground while
turning lawn mower.
To engage
drive control
P/ateTab_
7
Rear
Grass
catcher
handle
TO EMPTY GRASS CATCHER
1. Lift up on grass catcher using the
frame handle.
2. Remove grass catcher with clippings
from under lawn mower handle.
3. Empty clippings from bag using both
frame handle and bag handle.
NOTE: Do not drag the bag when
emptying; it will cause unnecessary wear.
/
Grass
frame
hand/e
Bag
A, WARNING: Experience indicates that
alcohol blended fuels (called gasohol or
using ethanol or methanol) can attract
moisture which leads to separation and
formation of acids during storage. Acidic
gas can damage the fuel system of an
engine while in storage. To avoid engine
problems, the fuel system should be
emptied before storage of 30 days or
longer. Drain the gas tank, start the
engine and let it run until the fuel lines
and carburetor are empty. Use fresh fuel
next season. See Storage Instructionsfor
additional information. Never use engine
or carburetor cleaner productsin the fuel
tank or permanent damage may occur.
_, CAUTION: Fill to bottom of gas tank
filler neck. Do not overfill. Wipe off any
spilled oil or fuel, Do not store, spill or
use gasoline near an open flame.
I
Engine oil cap
BEFORE STARTING ENGINE
ADD OIL
Your lawnmower is shipped without oil in
the engine. Engine holds 20 oz. of oil.
For type and grade of oil to use, see
=ENGINE" in Maintenance section of this
manual.
1. Be sure lawnmower is level and area
around oil fill is clean.
2. Remove engine oil cap and fill to the
full line on the dipstick. Pour oil slowly.
Do not over fill.
NOTE: Allow oil to settle down into engine
for accurate reading. To read proper level,
tighten engine oil cap, then remove it to
read the dipstick,
3. Reinstall engine oil cap and tighten.
• Check oil level before each use. Add
oil it needed. Fillto full line on dipstick.
• Change the oil after every 25 hours of
operation or each season. You may
need to change the oil more often
under dusty, dirty conditions.
ADD GASOLINE
• Fill fuel tank. Use fresh, clean, regular
unleaded gasoline with a minimum of
87 octane. Do not mix oil with gasoline. Purchase fuel in quantities that
can be used within 30 days to assure
fuel freshness.
Gasoline filler cap
TO START ENGINE
NOTE: Due to protective coatings on the
engine, a small amount of smoke may be
present during the inkial use of the
product and should be considered
normal.
I. To start a cold engine, push pdmer
three (3) times before trying to start.
Usa e firm push. This step is net
usually necessary when starting an
engine which has already run for a
few minutes.
2. Hold operator presence control bar
down to the handle and pull starter
handle quickly. Do not allow starter
rope to snap back.
8
TO STOP ENGINE
• To stop engine, release operator
presence control bar.
NOTE: In ccoler weather it may be
necessary to repeat pdming steps. In
warmer weather over pdming may cause
flooding and engine will not start. If you
do flood engine, wait a few minutes
before attempting to start and do not
repeat priming steps.
MOWINGTIPS
• Under certain conditions, such as very
tall grass it may be necessary to raise
the height of cut to reduce push ng
effort and to keep from overloading the
engine and leaving clumps of grass
clippings. It may also be necessary to
reduce ground speed and/or run the
lawn mower over the area a second
time.
• For extremely heavy cutting, reduce the
width of cut by overlapping previously
cut path and mow slowly.
• For better grass bagging and most
cutting conditions, the engine speed
should be set in the fast position.
• When using a roar discharge lawn
mower in moist, heavy grass, clumps of
cut grass may not enter the grass
catcher. Reduce ground speed
(pushing speed) and/or run the lawn
mower over the area a second time.
• If a trail of clippings is left on the dght
side of e rear discharge mower, mow in
a clockwise direction with a small
overlap to collectthe clippings on the
next pass.
• Pores in cloth grass catchers can
become filled with dirt and dust with
use and catchers will collect less grass.
To prevent this, regularly hose catcher
off with water end let dry before using.
• Keep top of engine around starter clear
and clean of grass clippings and chaff.
This will help engine air flow and
extend engine life.
MULCHING MOWINGTIPS
IMPORTANT: For best performance,
keep mower housing free of built-up
grass and trash. See =CLEANING" in the
Maintenance section of this manuel.
• The special mulching blade will recut
the grass clippings many times and
reduce them in size so that as they fall
onto the lawn they will disperse into the
grass and not be noticed. Also, the
mulched grass will biodegrade quickly
to provide nutrients for the lawn.
Always mulch with your highest engine
(blade) speed as this will provide the
best recutting action of the blades.
• Avoid cutting your lawn when it is wet.
Wet grass tends to form clumps and
interferes with the mulching action.
The best time to mow your lawn is the
early aftemcon. At this time the grass
has dried and the newly cut area will
not be exposed to the direct sun.
• For best results, adjust the lawn mower
cutting height so that the lawn mower
cuts off only the top one-third of the
grass blades. If the lawn Is overgrown
it will be necessary to raise the height
ef cut to reduce pushing effort and to
keep from overloading the engine and
leaving clumps of mulched grass. For
extremely heavy mulching, reduce your
width of cut by overlapping previously
cut path and mow slowly.
• Certain types of grass and grass
conditions may require that an area be
mulched a second time to completely
hide the clippings. When doing a
second cut, mow across or perpendicular to the first cut path.
• Change your cutting pattern from week
to week. Mow north to south one week
then change to east to west the next
week. This will help prevent matting
and graining of the lawn.
9
Check for LcoSe Fasteners
Clean/Inspect Grass Catcher
_
(IfEquIpped_
Iv/ I ,,/
M
clean Lawn Mower
O
(Power-ProFelled
Clean
Under DriveMowers)
Cover
Check ddve belt! ulleys
I
I, 4
l/
i/
i//
ER (p ower.Propell_oPMowers)
Check]Sharpen/Replace Blade
I_
b/s
Lubdcation Chart
Clean Batteq//Rechaq
Electric
StartMowem
_
tf
_
_4
E
Check Engine Oil Level
N Change Engine OII
G Clean _Jr Filter
I
Inspect Muffler
N Clean or Replace Spad< Plug
E
11,/1.2
i/=
_//
Replace Air Filter Paper Cartridge
I//=
I. Ct_ng o _m oftmlwhen ope_g
ultd_ a h,mvy I_d or ll_high_
2. SeP..k_ morn olten '_
opetatJP__ dldy or dusP/c_it_s.
3 - R_
I_adesmorn_
_
t_n_oera_ure_
LUBRICATION
mowingIn=_¢y soil.
CHART
4 _Charge 48 hcum _ end of 8_ason.
(_) Wheeladjuster
GENERAL RECOMMENDATIONS
wheel)
The warranty on this lawn mower does
not cover items that have been subjected
to operator abuse or negligence. To
receive full value from the warranty,
operator must maintain mower as
instructed in this manual.
Some adjustments will need to be made
periodically to properly maintain your
unit.
All adjustments in the Service and
Adjustments section of this manual
should be checked at least once each
season.
• Once a year, replace the spark plug,
clean or replace air filter element and
check blade for wear. A new spark
plug and clean/new air filter element
assure proper air-fuel mixture and help
your engine run better and last longer.
• Follow the maintenance schedule in
this manual.
(
I
[
I
\
(_ Brake
spnng
bracket
_-
Rear
(_) Handle bracket mounting pins
door _nge
(_ Spray lubricant
(_ See "ENGINE" In Maintenance
BEFORE EACH USE
1. Check engine oil level.
2. Check for loose fasteners.
LUBRICATION
Keep unit well lubdcated (See "LUBRICATION CHART").
I0
section.
IMPORTANT: Do not oil or grease
plastic wheel bearings. Viscous
lubricants will attract dust and dirt that
will shorten the life of the self-lubricating bearings. If you feel they must be
lubricated, use only a dry, powdered
graphite type lubricant sparingly.
PRODUCT
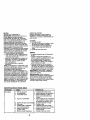
SPECIFICATIONS
SERIALNUMBER:
DATE
OFPURCHASE:
GASOLINE
CAPACITY/TYPE:
1.5QUARTS
UNLEADED
REGULAR
OIL'TYPE (API-SF-SJ):
OIL CAPACITY:
SAE 30 (ABOVE 32°F); SAE 5W-30 (BELOW 32°F
20 OZS.
SPARK PLUG (GAP: ,045")
BLADE BOLTTORQUE:
CHAMPION RESISTOR TYPE RJ19LM4
35-40 FT. LBS.
The model and serial numbers will be found on a decal attached to the rear of the
lawn mower housing.Record both sedal number and date of purchase in space
provided above.
LAWN MOWER
Always observe safety rules when
performing any maintenance.
TIRES
• Keep tires free of gasoline, oil, or insect
control chemicals which can harm
rubber.
• Avoid stamps, stones, deep ruts, sharp
objects and other hazards that may
cause tire damage.
BLADE CARE
For best results, mower blade must be
kept sharp. Replace bent or damaged
blades.
TO REMOVE BLADE
1. Disconnect spark plug wire from spark
plug and place wire where it cannot
come in contact with spark plug.
2. Turn lawn mower on its side. Make
sure air filter and carburetor are up.
3. Use a wood block between blade and
mower housing to prevent blade from
turning when removing blade bolt.
NOTE: Protect your hands with gloves
and/or wrap blade with heavy cloth.
4. Remove blade bolt by turning counterdcokwlse.
5. Remove blade and attaching hardware (bolt, lock washer and hardened
washer).
NOTE: Remove the blade adapter and
check the key inside hub of blade
adapter. The key must be in good condition to work properly. Replace adapter if
damaged.
TO REPLACE BLADE
1. Position the blade adapter on the
engine crankshaft. Be sure key in
adapter and crankshaft keyway are
aligned.
2. Position blade on the blade adapter
aligning the two (2) holes in the blade
with the raised lugs on the adapter.
3. Be sure the trailing edge of blade
(opposite sharp edge) is up toward
the engine.
4. Install the blade bolt with the lock
washer and hardened washer into
blade adapter and crankshaft.
5. Use block of wood between blade and
lawn mower housing and tighten the
blade bolt, turning clockwise.
• The recommended tightening torque is
35-40 ft. Ibs.
IMPORTANT: Blade bolt is grade 8 heat
treated.
Crankshait
Key_.
Blade
Blade
bolt
shaft
washer
11
Trailing edge
Blade adapter
TO SHARPEN BLADE
NOTE: We do not recommend sharpening blade - but ff you do, be sure the
blade is balanced.
Care should be taken to keep the blade
balanced. An unbalanced blade will
cause eventual damage to lawn mower
or engine.
• The blade can be sharpened with a file
or on a grinding wheel. Do not attempt
to sharpen while on the mower.
• To check blade balance, drive a nail
into a beam or wall. Leave about one
inch of the straight nail exposed. Place
center hole of blade over the head of
the nail. If blade is balanced, it should
remain in a horizontal position. If either
end of the blade moves downward,
sharpen the heavy end until the blade
is balanced.
GRASS CATCHER
• The grass catcher may be hosed with
water, but must be dry when used.
• Check your grass catcher often for
damage or detedoration. Through
normal use it will wear. If catcher
needs replacing, replace only with a
manufacturer approved replacement
catcher. Give the lawn mower model
number when ordedng.
DRIVE WHEELS
Check front drive wheels each time
before you mow to be sure they move
freely.
The wheels not turning freely means
trash, grass cuttings, etc. are in the ddve
wheel area and must be cleaned to free
drive wheels,
If necessary to clean the ddve wheels,
check beth front wheels.
1. Remove hubcaps, hairpin cotters and
washers.
2. Remove wheels from wheel adjusters.
3. Remove any trash or grass cuttings
from inside the dust cover, pinion and/
or drive wheel gear teeth.
4. Put wheels back in place.
NOTE: If after cleaning, the drive wheels
do not turn freely, contact a Sears or other
qualified service center.
GEAR CASE
• To keep your drive system working
prepedy, the gear case and area
around the drive should be kept clean
and free of trash build-up. Clean under
the ddve cover twice a season.
• The gear case is filled with lubdcant to
the proper level at the factory. The only
time the lubdcant needs attention is if
service has been performed on the
gear case.
• If lubdcant is required, use only Texaco
Starplex Premium 1 Grease, Part No.
750369. Do not substitute.
ENGINE
LUBRICATION
Use only high quality detergent oil rated
with API service classification SF-SJ.
Select the oil's SAE viscositygrade
according to your expected operating
temperature,
NOTE: Although multi-viscosifyoils
(5W30, 10W30 etc.) improve startingin
cold weather, these multi-viscosityoils
will result in increased oil consumption
when used above 32°F. Check your
engine oil level more frequently to avoid
possible engine damage from running
low on oil.
Change the oil after every 25 hours of
operation or at least once a year if the
lawn mower is not used for 25 hours in
one year.
Check the crankcase oil level before
startingthe engine and after each five (5)
hours of continuous use. Tighten oil plug
securely each time you check the oil
level.
12
TO CHANGE ENGINE OIL
NOTE: Before tipping lawn mower to
drain oil, drain fuel tank by running
engine until fuel tank is empty.
1. Disconnect spark plug wire from spark
plug and place wire where it cannot
come In contact with spark plug.
2. Remove engine oil cap; lay aside on a
clean surface,
3. Tip lawn mower on its side as shown
and drain oil into a suitable container.
Rock lawn mower back end forth to
remove any oil trapped Inside of
engine.
4. Wipe off any spilled oil on lawn mower
and on side of engine.
5. Fill engine with oil. (See "ADD OIL" in
the Operacion section of this manual.)
6. Reconnect spark plug wire to spark
plug.
Collar
Turn
clockwise
to
C_p
Slot
Air filter"
Air _iter cover
clockwise
Turn
courterto tighten
MUFFLER
Inspect end replace corroded muffler as it
could create a fire hazard and/or damage.
SPARK PLUG
Replace spark plugs at the beginning of
each mowing season or after every 100
hours of operation, whichever occurs first.
Spark plug type and gap setting are
shown in =PRODUCT SPECIFICATIONS"
in Maintenance section of this manual.
CLEANING
AIR FILTER
Your engine will not run properly and may
be damaged by using a dirty air filter.
Replace the air filter every 100 hours of
operation or every season, whichever
occurs first. Service air cleaner more
often in under dusty conditions, Do not
wash air filter.
TO CHANGE AIR FILTER
1. Remove the air filter by turning
clockwise to the stop and pull away
from collar.
2. Remove filter from inside of cover,
3. Clean the inside of the cover and the
collar to remove any dirt accumulation.
4. Insert new filter Into cover.
5. Put air filter cover and filter into collar
aligning the tab with the slot.
6. Push in on cover and turn counterclockwise to tighten.
IMPORTANT: For best performance,
keep mower housing free of built-up
grass and trash. Clean the underside of
your mower after each use.
ACAUTION:
Disconnect spark plug wire
from spark plug and place wire where it
cannot come in contact with the spark
plug.
• Clean the underside of your lawn
mower by scraping to remove build-up
of grass and trash.
• Clean engine often to keep trash from
accumulating. A clogged engine runs
hotter and shortens engine life.
• Keep finished surfaces and wheels free
of all gasoline, oil, etc.
• We do not recommend using a garden
hose to clean lawn mower unless the
electrical system, muffler, air filter and
carburetor are covered to keep water
out. Water in engine can result in
shortened engine life.
CLEAN UNDER DRIVE COVER
Clean under drive cover at least twice a
season. Scrape underside of cover with
putty knife or similar tool to remove any
build-up of trash or grass on underside of
drive cover.
13
A, CAUTION: Before performing any
service or adjustments:
1. Release control bar and stop engine.
2. Make sure the blade and all moving
parts have completely stopped.
3. Disconnect spark plug wire from spark
plug and place where it cannot come
in contact with plug.
TO ADJUST HANDLE
The upper handle may be adjusted to
four (4) different height positions.
1. Loosen both handle knobs only
enough to allow the upper handle to
pivot to the desired adjustment
position.
2. -tighten both handle knobs securely.
LAWN MOWER
TO ADJUST CU111NG HEIGHT
See "TO ADJUST CU'I-rlNG HEIGHT" in
the Operation section of this manual.
REAR DEFLECTOR
The rear deflector, attached between the
rear wheels of your mower, is provided to
minimize the possibility that objects will
be thrown out of the rear of the mower
into the operator mowing position. If the
deflector becomes damaged, it should be
replaced.
TO REMOVE/REPLACE DRIVE BELT
1. Remove ddve cover. Remove belt
from gearcase pulley by pushing
down on pulley and rolling belt off it.
2. Turn lawn mower on its side with air
filter and carburetor up.
3. Remove blade.
4. Remove debds shield.
5. Remove belt from engine pulley on
crankshaft.
6. Install new bell by reversing above
steps.
7. Always use factory approved bell to
assure fit and long life.
Handle
Knob
Handle
Knob
Drive
cover
Push
14
TO ASSEMBLE GRASS CATCHER
1. Put grass catcher frame into grass bag
with rigid part of bag on the bottom.
Make sure the frame handle Is outside
of the bag top.
2. Slip vinyl bindings over frame.
NOTE: If vinyl bindingsare too stiff, hold
them in warm water for a few minutes. If
bag gets wet, let it dry before using.
ACAUTION:
Do not run your lawn mower
without clipping deflector or approved
grass catcher in place. Never attempt to
operate the lawn mower with the rear
door removed or prepped open.
Catcher
handle
fram_
_'
bindings
Frame
immediately prepare your lawn mower for
storage at the end of the season or If the
unit will not be used for 30 days or more.
LAWN MOWER
When lawn mower is to be stored for a
period of time, clean it thoroughly, remove
all dirt, grease, leaves, etc. Store in a
clean, dry area.
1. Clean entire lawn mower (See
"CLEANING" in the Maintenance
section of this manual).
ENGINE
ENGINE SPEED
Your engine speed has been factory set.
Do not attempt to increase engine speed
or it may result in personal injury. If you
believe that the engine is running too fast
or too slow, take your lawn mower to a
Sears or other qualified service center for
repair and adjustment.
CARBURETOR
Your carburetor has a son-adjustable
fixed main jet for mixture control. If your
engine does not operate propedy due to
suspected carburetor problems, take your
lawn mower to a Sears or other qualified
service center for repair and/or adjustment.
IMPORTANT: Never tamper with the
engine governor, which is factory set for
proper engine speed. Overspeeding the
engine above the factory high speed
setting can be dangerous. If you think the
engine-governed high speed needs
adjusting, contact a Sears or other
qualified service center, which has proper
equipment and expedenoe to make any
necessary adjustments.
2. Lubricate as shown in the Maintenance section of this manual.
3. Be sure that all nuts, bolts, screws,
and pins are securely fastened.
Inspect moving parts for damage,
breakage and wear. Replace ff
necessary.
4. Touch up all rusted or chipped paint
surfaces; sand lightly before painting.
15
HANDLE
You can fold your lawn mower handle for
storage.
1. Squeeze the bottom ends of the lower
handle toward each other until the
lower handle clears the handle
bracket, then move handle forward.
2. Loosen upper handle mounting bolts
enough to allow upper handle to be
folded back.
IMPORTANT: When folding the handle
for storage or transportation, be sure to
fold the handle as shown or you may
damage the control cables.
• When setting up your handle from the
storage position, the lower handle will
automatically lock into the mowing
position.
Handle
Squeeze to fo;d
Hairpin cotter
Operator
control bar
Fold
Lower
Fold
backward
MoWing
position
ENGINE
FUEL SYSTEM
IMPORTANT: It is important to prevent
gum deposits from forming in essential
fuel system parts such as carburetor, fuel
filter, fuel hose, or tank during storage.
Also, experience indicates that alcohol
blended fuels (called gasohol or using
ethanol or methanol) can attract moisture
which leads to separation and formation
of acids dudng storage. Acidic gas can
damage the fuel system of an engine
while in storage.
1. Drain the fuel tank.
2. Start the engine and let it run until the
fuel lines and carburetor are empty.
• Never use engine or carburetor cleaner
products in the fuel tank or permanent
damage may occur.
• Use fresh fuel next season.
NOTE: Fuel stabilizer is an acceptable
alternative in minimizing the formation of
fuel gum deposits during storage. Add
stabilizer to gasoline in fuel tank or
storage container. Always follow the mix
ratio found on stabilizer container. Run
engine at least 10 minutes after adding
stabilizer to allow the stabilizer to reach
the carburetor. Do not drain the gas tank
and carburetor if using fuel stabilizer.
ENGINE OIL
Drain oil (with engine warm) and replace
with clean engine oil. (See "ENGINE" in
the Maintenance section of this manual).
CYLINDER
1. Remove spark plug.
2. Pour one ounce (29 ml) of oil through
spark plug hole into cylinder.
3. Pull starter handle slowly a few times
to distributeoil.
4. Replace with new spark plug.
OTHER
• Do not store gasoline from one season
to another.
• Replace your gasoline can if your can
starts to rust. Rust and/or dirt in your
gasoline will cause problems.
• If possible, store your unit indoors and
cover it to give protection from dust and
dirt.
• Cover your unit with a suitable protective cover that does not retain moisture.
Do not use plastic. Plastic cannot
breathe, which allows condensation to
form and will cause your unit to rust.
IMPORTANT: Never cover mower while
engons and exhaust areas are still warm.
CAUTION: Never store the lawn mower
with gasoline in the tank inside a building
where fumes may reach an open flame or
spark. Allow the engine to cool before
stodng in any enclosure.
16
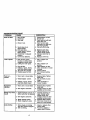
TROUBLESHOOTING
CHART
PROBLEM
CAUSE
Does not start
CORREC_ON
1. Dirty air filter.
2. Out of fuel.
3. Stale fuel.
4. Water in fuel,
5. Spark plug wire is
disconnected.
6. Bad spark plug.
7. Loose blade or broken
blade adapter•
8. Control bar in released
position.
9. Control bar defective.
Loss of power
1. Rear of lawn mower
housing or cutting blade
dragging in heavy grass•
2. Cutting too much grass.
3. Dirtyair filter.
4. Buildup of grass, leaves,
and trash under mower.
5. Too much oil in engine.
6, Walking speed too fast.
Poor cutuneven
1. Worn, bent or loose blade.
2. Wheel heights uneven.
3. Buildup of grass, leaves
and trash under mower.
Excessive
vibration
1. Worn, bent or loose blade.
2. Bent engine crankshaft.
Starter rope herd
topun
1. Engine flywheel brake is on
when control bar is released
2. Bent engine crankshaft.
3. Blade adapter broken.
4. Blade dragging in grass.
Loss of drlve
1. Drive wheals not turning
with ddve control engaged.
2. Belt not ddving.
17
1. Clean/replace air filter.
2. Fill fuel tank.
3. Drain tank and refill with
fresh clean fuel.
4. Drain fuel tank and
carburetor and refill tank
with fresh gasoline.
5. Connect wire to plug.
6. Replace spark plug.
7. Tighten blade bolt or
replace blade adapter.
8. Depress control bar to
handle.
9. Replace control bar.
1. Set to =Higher Cut"
position.
2. Set to =Higher Cut"
position.
3. Clean/replace air filter.
4. Clean underside of mower
housing.
,5. Check oil level.
16• Cut at slower walking
speed.
1. Replace blade. Tighten
blade bolt.
2. Set all wheels at same
height.
3. Clean underside of
mower housing.
1. Replace blade. Tighten
blade bolt.
2. Contact a Sears or other
qualified service center.
1. Depress control bar to
upper handle before
pulling starter rope.
2. Contact a Sears or other
qualified service center.
3. Replace blade adapter.
4. Move lawn mower to cut
grass or to hard surface.
1. Adjust or replace drive
control cable.
2. Put belt on pulleys or
replace belts if broken.
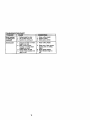
TROUBLESHOOTING
CHART
PROBLEM
CAUSE
CORRECTION
Grass catcher
rlotflll|ng (ifso
i_lulpped )
1, Cutting height too low.
2. Lift on blade worn off.
3. Catcher not venting air.
1, Raise cutting height.
2. Replace blade.
3. Clean grass catcher,
Hard to push
1, Grass is toe high or wheel
height is too low,
2. Rear of lawn mower
housing or cutting blade
dragging in grass,
3. Grass catcher too full.
4. Handle height position not
dghtfor you.
1. Raise cutting height.
18
2. Raise rear of lawn mower
housing one (1) setting
higher.
3. Empty grass catcher.
4. Adjust handle height to
suit,
Garantia ................................................ 19
Reglas de Seguridad ...................... 19-21
Montaje ................................................. 22
Operaci6n ........................................ 23-26
Mantenimiento ...................................... 27
Programa de Mantenimiento ........... 27-30
Especificaciones del Producto ............. 28
Servicio y Adjustes .......................... 31-32
Almacenamiento ............................. 32-33
Identificacl6n de problemas ............ 33-34
Partes de repuesto ............ Vea el manual
ingldsdel duello
GARANTIA LIMITADA DE DOS AI_IOS PARA LA SEGADORA A MOTOR CRAFTSMAN
Pot dos (2) aSos, a partir de la fecha de compra, cuando esta Segadora Craftsman se
mantenga, lubnque y afine segiln les instrucciones para la operacibn y el mantenimiento an el
manual dal duello, Sears reparal_ gratis todo defecto en el rnatedal y la mano de obra.
Si la Segadora Craftsman se usa para fines comerciales o de arriendo, esta gamntla sblo se
aplica per noventa (90) dlas a pertir de la fecha de compra,
Esta Garantla no cubre:
• Artlculos qua se desgastan dumnte el uso normal tales como les cuchilles segaderes
rotatodas, los adaptaderes de la cuchilla, las correes, los filtros de aim y las bujfas.
• Reparaciones necesarias debido al abuso o a la negligenoia del operador, inoluy6ndose a los
cigOeSales doblados y a la falta de rnantenimiento del equipo segt_nlas ir_struccionesqua se
incluyan en el manuel del due5o.
EL SERVICIO DE GARANTIA ESTA DISPONIBLE al devolver la segadora a motor Craftsman al
Centro/Departmento de Servicio Sears mas cercano en los Estados Un[dos. Esta garantla se
aplica solarnenfe miantras el producto este en uso en los Estados Unidos.
Esta Garantla le otorga derechos legales especificos, y puede qua tambi_n tenga ol_os
dereshos qua varlan de estado a esfado.
Sears, Roebuck and Co., D/817 WA, Hoffman Estates, Illinois 60179
USA
IMPORTANTE: Esta maquina cortadaora es capaz de amputar las manos y los manos y los
pies y de lanzar objetos. Si no se observan las instrucciones de seguddad siguientes se pueden
producir lesiones graves o la muerte.
• No tire de la segadora hacia atrds a menos
I. OPERAClON
qua sea absolotarnente necesario. Mire
• Antes de empezar, debe familiadzarse
siempre hacia abajo y hacia delrbs antes y
completamente con los controles y el uso
mlentres qua se mueve hacla atr_s.
correcto de la maquina. Para esto, defoe leer
• No opera la segadora sin los respeclivos
y comprender todas las instrucciones qua
resguardos, las placas, el recogedor de
aparecen an la rnaquina y an los manuales
c_sped u otros aditarnentos dise ados peru
de operaci6n.
su proteccidn y seguridad.
• No ponga les manos o los pies cerca o
• Refilbase alas instrucclones del fabdcante
debajo de las partes mtatodas. Mant6ngase
para el fancionamianto e insfalaci6n de
siempre lejos de la abertura de la descarga.
accesodos. Use t_nicamente accesodos
• Permita qua solamente las personas
aprobados per el fabdcante.
responsables qua estltn familiadzades con
• Detenga la cuchilla o las cuchinas cuendo
les instrucciones opemn la mdquina.
cruce por calzadas, calles o caminos de
• Despeje el drea de objetos tales como
grava.
piedras, juguetes, alarnbres, huesos, palos,
• Parar el motor cada vez qua se abandona
etc. qua pueden ser recogidos y lanzados
el aparato, antes de limpiar la segadora o de
pot las cucldllas.
remover realdnos del tubo.
• Asegi_rese qua el Ares no se hallen
• Apagar el motor y esperar basra qua las
personas, antes de segar. Pare la m_iquina
cuchinas est6n completarnente parades
si algulen antra en el Area.
antes de remover el receptor de hierba.
• No opera la rnaquina sin zapatos o con
• Segar solamente con luz del dla o con una
sandallas abiertas. PcSngaseelempre
buena luz aditictal.
zapatos s61idos.
• No opere la mAquina bajo la influencia del
alcohol o de las drogas.
19
• Nunca opera la maquina cuando la hierba
est6 mojada. Aseg0rsse alempre de tener
buena tracci6n en sus pies; rnantenga el
mango firmemente y camine; nunca corra.
• Desconectar el rnecanismo de propulsi6n
autbnoma o el embrague de transmisi6n en
las segadoras que Io tienen antes de poner
so marcha el motor.
• Si el equipo empezara a vibmr de una
manera anormal, pare el motor y revise de
inmediato para avsriguar la causa.
Generalmente la vibraci6n soale indicar que
exists alguna aveda.
• Siemlxe use gafas de seguddad o anteojos
con protecci6n lateral cuando opere la
segadora.
II. OPERACION
SOBRE LAS CUESTAS
Los accidentes ocurran con m_s frecuencia
en las cuestas. Estos accidentes ocurran
debido a resbaladas o ca[das, las cuales
pueden resu[tar en graves lealones. Operar la
recorladora en cuestas requiere mayor
concentraci6n. Si se siente inseguro en una
cuesta, no la recorte.
HACER:
• Puede recortar a travds de la supedicie de
la cuesta, nunca hacia arriba y hacia abajo.
Proceda con extrema precauci6n cuando
cambie de dtreccibn en las cuestas.
• Renueva todos los objetos extmfios, tales
con10 guijarrco, raiT_s, etc.
• Debe prestar atencibn a hoyos, bachas o
protuberancias. Recuerde que la hierba alta
puede esconder obst_culos.
NO HACER:
• No recorte cerca de pendientes, zanjas o
terraplsnes. El operador puede perder la
traccic_nso los pies o el equilibrio.
• No recorle cuestas demasiado inclinadas.
• No recorte en hierba mojada. La reducci6n
en la tracci6n de la pisada puede causar
resbalones.
Ill.Nil;lOS
Se puedso pmducir accidemes trdgions si el
operador no presta atencibn a la presencia de
los nifios. A msoudo, los niP_osse denten
atmldos per la m_quina y per la actividad de la
siega. Nunca suponga que los nifios van a
permanecer en el misrno lugar donde los rio
pot _Itima vez.
• Mantenga a los niSos alejados del _rea de la
siega y bajo el cuidado estdcto de otra
persona adulta responsable.
• Estd alerta y apague la mdquina al hay nifios
que entran al _ea.
• Antes y cuando este retrocediendo, mire
hacia arras y hacia abajo pare verificar si
hay nifios pequeF_os.
• Nunca permita que los nifios operen la
n_quina.
• Tenga un cuidado extra cuando se acerque
a esquinas donde no hay visibilidad, a los
arbustos, drboles u otros objetos que
pueden intededr con su IInea de visibn.
IV. SERVICIO
• Tenga cuidado extra al manejar la gasolina
y los demds combustibles. Son inflamables
y los gases son explosivos.
- Use solamente un envase aprobado.
. Nunca remueva la tape dal dep6sito de
gaso]ina o agregue combustible con el
motor funcionando. Permita que el motor
se enfde antes de volver a pone
combustible. No fume.
. Nunca vueiva a poner combustible en Ia
mdquina en recintos cerrados.
- Nunca almacsne la rn_quina o el envase
dal combustible dentin de alg0n lugar en
donde baya una llama expuesta, tal como
la del calentador de agua.
• Nunca haga funcionar una rndquina dentro
de un _rea cerrada.
• Nunca haga ajustes o reparaciones
mientras el motor est_ sn marcha.
Desconecte el cable de la bujla, y
mant6ngalo a clerta distancia de _sta para
pmvenir un armnque accidental.
• Mantenga las tuercas y los pemos,
especialrnente los pernos del accesodo de
la cuch_lla,apretados y maotenga el equipo
en buenas condiciones.
• Nunca manipule de forma indebida los
dispositivos de seguddad. Controls
regularmen_e su funcionamiento correcto.
• Mantenga la mdquina libre de hierba, hojas
u otras acumulaciones de desperdicio.
Limpie los derrames de aceite o combustible. Permita que la mdquina se enfde antes
de aJmacenada.
• Pare e inspeccione el equipo si le pega a un
objeto. Repdralo, sl es necesado, antes de
bacedo arrancar.
• En ning,',ncaso hay que regular la altura de
las ruedas mientras el motor est_ en
marcha.
• Los cornponentes del receptor de la blerba
van sujetos a desgaste, dafios y deterioro,
que pueden exponer las parles en
movimlento o permitir que objetos sean
disparados. Contmlar frecoentemente y
cuando sea necesado sustituir con parles
aconsejades per el fabdcante.
• Las cuchillas de la segadora estdn afiladas
y pueden cortar. Cubdr las hojas o Ilevar
guantes, y utilizar precauciones especiales
cuando se efectOa mantenimiento sobre las
mismas.
• No cambie el ajuste del regulador dal motor
ni exceda su velocidad.
2O
_Bu_lue esle slmboloque seffala le_ prgcaucicnes de seguddad de imp(Jrlanda. Quiem decir IIIATENCI_)N!II IIIESTE ALERTOIII SU
SEGURIDAD ESTA COMPFIOMETIDA.
_RECAUCI6.N.:
Siempre desconectee_
a_mtxe de _ buj_ y ix_jdo donde nopueda
en_ar en contacto con ta bujia, para evitar el
arranque pot acddente, durante ta p_'epara,
ck_, el
_anspole, el ajuste o cuando se hacen
reparadones.
_,ADVERIT.NCIA: El tubo de escape del motor,
algunos de sus ou',s'Cuyentesy algunos
c_nponentes del vehlculoconlJeneno
desprendenproduct,s qulntcos conocides en el
Estadode California como causa de cdncery
defectosal nacimientou o_Vosda_os
reproductivos.
_ADVERTENCIA:
Los banes, t_s
y
accesoriosrelativosde la baleda contienen plomo
o compuestosde ptorno, productosquimacos
ccnoddos en el Estado de Californiacomo causa
de c_lncery defectos aJr_dmierdo u _JOS da_os
reproduc'dvos.Lavar las rnanos despuds de
manlpulados.
A_PRECAUCIC_N: El silenciador y otras piezas
del motor Ilegan a set exVemadarnente
calientes dwante la operacibn y siguen siendo
calientes despu6s de que el motor haya
parado. Para evitar quemaduras severas,
permanezca lejos de estas _reas.
Estos accesodos estaban disponibles cuando se produjo la segadora. No son
facllltados junto al cortacesped. Tambi6n est_n disponibles en la mayoda de las
tiendas de Sears y en los centros de servicio. La mayorl'a de las tiendas Sears tambi_n
pueden mandar a pedir partes de repuesto para usted, si les proporciona el n0mero
del modelo de su segadora. Algunos de estos accesodos tal vez no se apliquen a su
segadora.
RENDIMIENTO DE LA SEGADORA
DESVIADOR DE RECORTES
PARA SEGADORAS CON DESCARGA TRASERA
pAPA
SEGADORAS
CON
DESCARGA
RIECOREDOR
TRASERA
MANTENIMIENTO
JtJEGO$ PARA LA ACOLCHADORA
PARA
SIE_AS
CON
DESCARGA
RECOREDOR
LATERAL
_
IENVASES
DEQ,_OI.INA
DE LA SEGADORA
SILENCIADORES
CORREAS
ESTABILI_.ADORE8
CUCNILLAS
RLTROS
DE CUCHII.LA
21
DE AIRE
BUJJAS
RUEDA$
DEL MOTOR
Lea estas instrucciones y el manual
completamente antes de l_atar de montar u
operar su segadora nueva.
IMPORTANTIE: ESTE CORTACESPED VIENE
SiN ACEITE O GASOLINA EN EL MOTOR.
Su segadora nueva ha sido rnontada en la
fdbdca con ta excepci6n de aquellas partes
que so dejaron sin montar por razones de
env[o. Todas las partes como las tuercas, las
arandalas los pemos, etc., que son
necesadas para completar el montaje ban s do
cotocadas an la bolsa de pertes. Para
asegurarse que su segadora tuncione an
forma segura y adecuada, todas las partes y
los artfculos de ferreteda que se rnonten
tienen que ser apretados segurarnente. Use
1as herramiantas correctas, como sea
necesado, pard asegumr que se apdeten
adecuadamente.
PARA REMOVER
LA SEGADORA
DE
LA CAJA DE CART(_N
I. Remueva la.s partes sueltas que se
incluyen con la seg;_dora.
2. Code las dos esquinas de los extremos de
la caja de cartdn y tianda el panel del
extrerno piano.
3, Remueva todo et material de empaque,
excepto la cu_ entre el mango superior y
61 inferior, y la cu_a que sujeta la barra de
los control que exige la presencia del
operador junto con el mango superior.
4. Haga rodar la segadera hacia afuera de la
caja de cartbn y revlsala cuidadosamente
para verificar si todevla quedan partes
sueltas adicionales.
COMO
PREPARAR
SU SEGADORA
PARA DESDOBLAR EL MANGO
IMPORTANTE: Despliegue el mango con
mucho cuidado para no pe]lizcar o da_ar los
cables de control.
1. Levante los mangos hasta que la seccibn
del mango inferior se asegure an su lugar,
en ta posicibn para segar.
2. Remueva la curia protentora, levante la
secci6n del mango superior hasta su tugar
en el mango inferior, y apriete ambas
maniltas dal mango.
3. Remueva la curls dal mango que sujeta la
barra de los control que exige la presencia
del operarior junto con el mango superior.
El mango de ta segadora puede ajustarse
seg0n le acomode para segar, Refi6rase a
"AJUSTE DEL MANGO" en la Seccibn de
Servialo y Ajustos de este manual.
Barrade controlquesxlgela presencladeloperador
Mangosupedor
MangoInferior
Levantar
Poslclbnparasegar
PARA INSTALAR LOS ACCESORIOS
Su segadora fue envlade lista para usarse
como una acolchadora de capa vegetal. Para
convertiria de mode que puede ensacar,
refi6rase a =PAPA CONVERIR LA
SEGADORA" an la Secci6n de Operaci6n de
este manual.
22
FAMILIARICESE
CON SU SEGADORA
LEA ESTE MANUAL DEL DUEllO Y I.AS REGLAS DE SEGURIDAD ANTES DE OPERAR SU
SEGADORA. Compare las ilustraciones con su segadom para familiadzarse con la ubicacibn de
los diversos contreles y ajustes, Guards este manual pare relerencia en el fuluro.
Estos simbolos pueden apareser sobre su segadora o on la lltemtura proporclonada
el producto. Aprenda y comprenda sus slgnlflcados.
ATrENCI(_N 0
ADVERTENGIA
MOTOR
ENCENDIDO
MOTOR
APAGADO
R/_PIDO
LENTO
ESTRANGU
LACi(_N
con
COMACEITIE
PELIGRO, GUARDE LAS
BUb'_TIBLE
MANOSYLOSPIESLEJOS
Barra de control que exlge
la pmsenc/a del operador
Cable de control
de zona del motor
Control de impulsk_n
Tspa del deposlto
de la gasollna
Rltro de airs
T_oa del deposito de
ace[te del motor con
varllla indlcadom de rWel_
Ce_dor
Silenclador
Cubleda de la
IMPORTANT: Este cortacesped viene
SIN ACEITE 0 GASOLINA en el motor.
AJustador
de la rueda
(encadarueda)
CUMPLE CON LOS REQUISITOS DE SEGURIDAD DE LA CPSC
Las segadoras a motor, que se conducen desde la parts de aVds, rotatodas, Sears, cumplen
con los estdndares de seguddad del Amedcan National Standards Institute y de la U.S. Consumer Product Safety Commission. La cuchilla gira cuando el motor estd funcionando.
Cebador - bombea combustil_s adicional
desde el carbumdor al cilindro para uso
cuando se neceelta hacer arrancar un motor
frfo.
Palanca de control de la Impulal6n - se usa
para enganchar la segadora para rnovimiento
hacla adalante impulsada a motor.
23
Cord6n arrancador - se usa para hacer
arrancar el motor.
Barra de control que _xlge la prencla del
operador - tiene que sujetar.se abajo, junto
con el mango, para hacer arrancar el motor.
Su61tela para parar el motor.
segadom
puede
hacer
que
saran
objetos
extrahos
dentro
Laoperaci6n
desus
ojos,
Ioque
decualquier
puede
producir
daF,,os
graves
en_stos.
Siempre use anteojos de seguridad o
protecci6n para los ojos mianl_'as opera su
segadora o cuando haga ajustes o
reparaciones. Recomendamos una mascara
de seguridad de visi6n amplia, para uso
espejuelos o anteojos de seguridad
estandarte.
COMO USAR SU SEGADORA
VELOCIDAD DEL MOTOR
La velocidad del motor se estabteci6 en la
f_tbrica para un randimianto 6ptimo. La
velocidad no se puede ajustar.
CONTROL DE ZONA DEL MOTOR
_,PRECAUCI6N:
Las regulaciones fedemles
ex_gen que se instale un control para el motor
en esta segadora para reducir a un mlnimo el
desgo de lesionarse debido al contacto con la
cuchilla. Por rdng0n motivo 1rate de eliminar ta
funcibn del control del operador. La cuchilla
gira cuando el motor est_ funcionando.
• Su sngadora viene equipada con una barra
de contmles que exigen la presencia del
operador, Io que requiere que el operador
est_ detrds del mango de la segadora para
haceda arrancar y operade.
CONTROL DE LA IMPULSI(_N
• La autoimpulsi6n se controla al sujetar la
barra de control que exige ta presencia del
opera,dor hacia abajo an el mango y al
empujar la palanca de control de la
impulsi6n hacia adelante hasta qua suene
=clic," luego se suelta la palanca.
• El movimianto hacia adelante pamrb cuando
la barra de control qua exige la presencia
del operador se suelta. Para parar el
movimiento hacia adelante sin parar el
motor, suelte la barra de control qua exige la
presencla del operador un goco hasta que
se desenganche el control de la impulsl6n.
Sujete la barra de control que exige la
presencia del
operador abajo en contra del mango para
continuar segando sin autolmpulsi6n.
• Para mantener el control de la impolsibn
enganchado cuando se de vue_ta en las
esquinas, empuje el mango hacia abajo y
levante las ruedas dolantems fuera del
suelo al girar la sngadora.
de controlqueedge la presencladel operador
PARA AJUSTAR
LA ALTURA DE
CORTE
Levante las ruedas para el code ba_oy baje
las nJedas para el corte alto., ajuste la altura
de code para que se acomode a sus
requisltos. La posici6n del modio es la mejor
para la mayoda de los c_spedes.
• Para cambiar la altura de corte, empuje la
palanca del ajustador hacia la ruede. Mueva
la meda hacia arriba o hacia abajo de mode
que se acomode a sus requisites.
Aseg0rese que todas las ruedas queden
igualmante ajustades.
AVISO: El ajustador esta correctamente
colocado cuando las orejas de la placa est_n
insertadas en el agujem del mango. Tambi6n,
tos ajustes de 9 posiciones (si equipado)
permitan que el mango puede ser movido
entre las orejas de la placa.
Para un codeafro,
baJelas ruedas
pare un codeba]o,levantelas nJedas
PARA CONVERTIR
LA SEGADORA
Su segadora rue enviada lista para usarse
como acolchadora de capa vegetal. Para
converlir la a una operaciGn de ensacado:
SEGADORAS CON DESCARGA TRASERA
• Levantar la puerta trasera de cortac6sped y
co;onar los ganchos del arn_zdn de la
recelectora de hierba an los pasadores del
quicio de la puerta.
• Para pasar a la opercaibn de
acolcharniento, remover la recoleotora de
hierba y cerrar la pueda trasera.
d_PRECAUCI_N: No haga funcionar su
segadora sin el desviador de recortes o sin el
recogsdor de cdsped, aprobados, en su lugar.
Nunca trate de operar la segadora cuando se
ha removido la puerla trasera o cuando est,_
un poco abierta.
Msngo det
bastidor
del
recoged_
dec_sped
AGREGUE GASOLINA
• Llene el estanque de combustible. Use
gasolina regular, sin plomo, nueva y fimpia
1. Levante el recogedor de c&sped usando el
con el minima de 87 octanos. (El uso de
mango del bastidor.
gasolina con plomo aumentard los
2. Remueva el recogedor de c_sped, con los
degbsitos de 6xido de plomo y carbono y se
recortes, de debajo del mango de la
rnducir_ la duraci6n de la vdivula), No
segadora.
mezcte el aceite con la gasolina. Pare
3. Vac[e los recortes de la bolsa usando
asegumr que la gasolina utilizada sea
tanto el mango del bastidor como _1de ta
fresca compre estanques los cuales
bolsa.
AVISO: No arrastre la bulsa cuando la vacfe;
puedan ser utilizados dumnte los primeros
30 dias.
se producird un desgaste innecesade.
_DVERTENCIA:La
expedencia ha indicado
que los combustibles mezclados con alcohol
(co_oddos como gasohol, o el uso de etanol o
metand) pueden straer la humedad, la que
conduce a la seperacibn y formaci6n de
dcldos dumnte el almacenamiento. La gasolina
Mango del
ac|dica puede da6ar el sisterna del combusbastidor del
tible de un motor durante el almacenamiento.
Pare evitar los problemas con el motor, se
de crisped
debe vaciar el sistema del combustible antes
de guardado por un per[ode de 30 dias o rn_s.
Vacfe el estanque del combustible, haga
Mar=g(
arrancar el motor y hdgalo funcionar hasta
bolsa
que las tineas del combustible y el carburader
I
queden vacfos. La prbxima temporada usa
combustible nuevo. Vea las instrucciones para
El Almacenam[ento para rnds informacibn.
Nunca use pmdustos de lirnpieza para el
ANTES DE HACER ARRANCAR
EL
motor o para el carburador en el estanque del
MOTOR
combustible pues se pueden producir da_os
p_rr_anentes.
AGREGUE ACEITE
ECAUCI(SN: Llene hasta ta parte inferior
Su segadora rue enviada sin acelte en el motor.
del cuello de relleno del estanque de gasolina.
El motor puede contener 20 oz. de aceite. Para
1'4oIo Ilene demasiado. Limpie el aceite o el
el tipo y la calidad vea =MOTOR" en la seccibn
combustible derramado. No elmacene,
de las Mantenimiento en este manual.
derrame o use gasolina cerca de una llama
1. AsegOrese que ta segadora est6 nivetada y
que el drea alrededor del depbsito de ace_te expuesta.
est_ limpia.
2. Remueva la tapa del dep6sito de aceite del
motor y rellene has_ la Ifnea de llano en
Tapadeldeposito
Tapadeldeposito
6sta. Vac[e el aceite lentarniente. No to Ilene
demasiado.
AV]SO: Permita que el aceite se aciente bien
en el motor para una leotura exacta. Para leer
el nivel apropiado, apdete la tapa del retleno del
aceite de motor, remuewla para leer la wdlla
medidora del aceite.
3. Vuelva a instalar la tapa del dep_ito del
de aceite_delmotor
de lagasolina
acelte y apri6tela.
• Revise el nivel del acelte antes de cada uso.
Agregue aceite si es necesado. Llene hasta
la Ilnea de Ileno en ta vadlla ind_cadorade
nivel.
• Camble el acelte despu_s de 25 horas de
operacibn o ur_ vez por temporada. Punde
necesitar cambiar el aceite m_s a menudo
cuando las condiciones son polvorosas o
sucfas.
PARA VACIAR
EL RECOGEDOR
DE
ClaSPED
25
PARA HACER ARRANCAR
EL MOTOR
NOTA: Debido alas capes protectoras del
motor, una cantidad peque_a de humo puede
estar presents durente el uso inicial del
producto y se debe considerar normal.
1. Para hacer alTancar un motor frio, empuje
el cebador l_es (3) races antes de tratado.
Empuje firmaments. Este peso
normalmente no es necosade cuande se
hace arrencar un motor qua ya ha estado
funcionando por unos cuantos minutos.
2. Sujete la barra de conlroles qua exigen ta
prasancia del operedor abajo en el mango
y tire el mango del armncador
rdpidamente. No perm_ta qua el cord6n del
armncador se devuelva abruptamente.
PARA PARAR EL MOTOR
• Para parer el motor, suelte la barre de
controles qua exigen la prasencia del
operedor.
AVISO; En climas mds fdos puede qua sea
necesado rapetir los pesos del cebado. En
ctimas rods calurosos el cebar demasiado
puede producir el ahogo y el motor no va a
arrancar. Si se ahoga el motor espere unos
cuantos minutos antes de tretar de hacedo
arrancar y no mpita los pesos del cebado.
CONSEJOS PARA SEGAR
• Bajo ciertas condiciones, tal como cdsped
muy alto, pueda sar necasario el elevar la
alture del code pare reducir el asfuerzo
necesado para ampejar la segadora y para
evitar sobrecargar el motor, dejando
montones de recortes de c_sped. Puede
qua sea necesario reducir la velocided del
recorddo y/o haga funcionar la segadora
sobre el _rea per segunda vez.
• Pare un corte muy posado, reduzca el
aosho del come pesando perciaJmente pot
encima del lugar anteriormente cortado y
siegue lentamente.
• Para un major ensacado del cdsped y pera
la mayoda de las condiciones de come, la
velosidad del motor debe ajustarse a la
posicibn de r_pido.
• Cuando use una segadore con dsscarga
tmsere sn c_sped hdmedo y pasado, los
montones del c&sped cortado puede qua no
entrenen el mcogedor de c_sped. Reduzca
la velodded del recorndo (velocidad de
empuje) y/o haga funcionar la segadore
sobre el &rea per segunda vez.
• Si queda una huella de cortes en el lado
derecho de una sagadora con descarga
trasera, siegue en la diraccibn en qua giren
las manillas del reloj, sotapando un poco
para recaudar los mcortes en la prbxima
pasada.
• Los poros en los mcogedores de c6sped
de lela pueden Ilenarsa con mugre y pelvo
con el uso y los recogedores recaudardn
menos c_spsd. Pare evitar 6sto, rocle el
recogedor con la manguera de agua
regularmente y dejelo secarse antes de
usarlo.
• Mantenga la perte superior del motor,
atmdedor del arrancador, despejada y sin
recortes de c6sped y paja. Esto ayudar_ el
flujo del airs del motor y extender_ su
duraci6n.
CONSEJOS PARA SEGAR Y ACOLCHAR
IMPORTANTE: Pare obtenar el major
rendimainto mantenga la caja de la segador a
sin acumlacion de cesped y basura. Vea
"LIMPIEZA" en seccion de Mantsnirnento de
este manuel.
• La cuchilla acolchadore especial va a volvsr
a cortar los recortss de c6sped muchas
veces, y los reduce en tama6o, de modo
qua si se caen en el cdsped se van a
dispesar entre 6ste y no se van a notar.
Tambi6n, el c6sped acolchado saw a
deshacer rdpidemente entregando
substancias nutritivas para el c6sped.
Siempre acolche con la velocidad del motor
(cuchilla) mds alta, pues asl se obtendrd la
major accibn de recite de las cuchillas.
• Evtte codar el cdsped cuando est_ mojado.
El c_sped mojado tiende a formar montones
e inlediere con la acci6n de acolchade. La
major hora para segar el c6sped es
tempreno en la tarde. A esa hora dste se ha
secado y el drea mci6n cortada no quedard
expeesta al sol directo.
• Para obtener los mejores resultados, ajuste
la altuta del corte de la segadora de modo
qua data corta solamente el tercio superior
de las hojas de c_sped. En el caso de qua
el cdsped haya credde demasiado, peede
ser necesado el elevar la attura del come
para reducir el esfuerzo necesar_o para
empujar la segadora y pare evitar
sobrecargar el motor, dejando montones de
reco_les de cdsped. Para un acolchamiento
muy pesado, reduzca el ancho del corte
pasando por encima del lugar antedermente
cortado y siegue lentamente.
• Ciertos lJpos de cdsped y sos condiciones
pueden exigir que un drea tenga qua set
acolchada per segunda vez pera esconder
completamante los recortes. Cuande se
haga el segundo coma, siegue alravosado o
en forma perpendicular a la pesada del
primer come.
• Cambie su patr6n de corte de sernana a
semana. Siegue de node a sur una semana
y luego cambie de este a oeste la prbxima
samana. Esto avitard qua el c6sped ss
anrede y cambie de direcci6n,
26
f
PROG
RAMA
DEMANT
ENIMIENTO
LLENE LAS FECHAS
A MEDIDA
_
Revlsarsi hay$uJetadores
suettos
_S_S_o_
_,
j,_
_
_/_'_o_o_
V"
ti/
Llmpia r/Inspe(_iona r el recogedor de
Limplar
la_egadem
_/
AG mlsldn
Llmplar
debajo
de la_lbiertadela
trans.
(segadoras
con poder propulsot)
v'
D
Revt_rlascorreasylaspoleaslm
ul-
Revisaro/afila_/ca
mbiarla cuchllla
=A
I Tablade lubdcac_n
LlmpiarIsbaterfa/recargar
(segaderas
conarranque
el_trlco)
_ ;_ l
i
Carnb[ar
Rev_sar el
elaceitedelmotor
nlvel del acelte
11/1.2
Limplar
el fiRro
de abe
Inspec_lonar
els_encladcr
_i
_/'
R
Limp[at o/cambl_ r la bujla
Camblar
el cartucho
depapel
deaim
I 234-
v'
V
II_
I_4
I_
ik/2
de_filtro
Camblat rPJhsa menudo cu_do m opera be)o_
peud_ o m=arnbi_ des _ al_s terqperaturas,
Dar senddo nt_l a rn_nudocua_do M opera er_condlclo_m suda_ o pelvoroeas.
Cambie [a_ _cldllas mzt_ a rr_nudo CL_ldo zdegUe _ ter_o amroP,o.
Cargar pot 48 how.__111_de ]a taw_orada.
TABLA
RECOMENDAClONES
GENERALES
La garantfa de esta segadom no cubre los
artlculos que han estado sujetos _1 _buso o a
la negligoncia del operador, para recibir todo el
valor de la garantla, el operador tiene qua
mantener la segadora seg,3n las instrucciones
descritas en este m_nuaL
Hay algunos ajustes que se tienen que hacer
an forma peri_dica para poder mantener su
unidad adecuadaruente.
Todos los ajus_es en la seccibn de Servicio y
Ajustes de este manual tienen que ser
revisados por Io menos un vez pot cada
temporada.
• Una vez al aSo, cambie la bujla, limpie o
cambie el elemento del fiftro de aim y revise
si la cuchilla estd desgastada. Una bujfa
nueva y un elernento del fittro de aim limpio/
nuevo asegoran la ruezcla de airscombustible adecuade y ayudan a qua su
motor funcione mejor y que dure ruds.
• Siga el programa de mantenirniento en este
manuel.
DE LUBRICACI(_N
_arueda
(_) Puntel de
resorte del
freno
del motor
Bisagra de
la puerta
traser
(_) Clavija de montaje del puntal del mango
_) Rocle el lubrlcante
ANTES DE CADA USO
1. Revise el nivel del aceite del motor.
2. Revise si hay sujetadores sueltos.
LUBRICACI(_N
Mantsnga la unidad bien lubi'P-.ada(vea _a
='rABLA DE LUBRICACI(_N"),
(_)Vee "MOTOR"e_ laucclon de Mantenlmkmto
27
IMPORTANTE: No acetie o engrase los
rod_mientos de la rueda de plastico. Los
lubdcantes viscosos ateamn polvo y
mugre, Io acortara la duracion de los
rudamientos autolubdcantes. Si cree que
tienen que lubdcarse, use Iosarnente un
lubricants tipo crafito, de polvo seco, an
forma moderada.
ESPECIRCACIONES
DELPRODUCTO
_IOMERODESERIE:
:ECHADECOMPRA:
:APACIDAD
Y T[PO DE GASOLINA:
1.5 CUARTOS REGULAR SIN PLOMO
nPO DEACEITE (API-SF-SJ):
3APACIDAD
DEACEFTE:
SAE 30 ISOBRE 32_FI; SAE 5W-30 IDEBAJO 32°F)
20 OZ. DE CAPACIDAD
BUJ[A(ABERTURA: .045")
[ORSI(_NDELPERNODELACUCHILLA:
CHAMPION FU19LM4
35-40 F_ LBS.
El num8ro del nodelo y el de sede se encuentran en Ta celcornania adjunta a _aparte tmsera
de la caja de la segadora. Debe registrar tanto el num6ro de sede come ta techa de compra y
mantengalos en un lugar seguro pare refencia en et fu_ro.
;EGADORA
Siempre observe las reglas de seguddad
cuando haga el mantenimlento.
LLANTAS
• Mantenga las Ilantas sin gasolina, aceite o
substancias quimios.s para control de
insectos que pueden daRar la goma.
• Evite los tocones, las piedras, las gdetas
pmfundas, los objetos a_lados y otros
peligros que pueden darlar alas tlantas.
CUIDADO DE LA CUCHILLA
Para obtener los mejores resultados, la
cuchilia de la segadora tienen que mantenerse
afilada. Cambie la cuchilla doblade o deRade.
PARA REMOVER LA CUCHILLA
1. Desconecte el alambre de la bujia y
p6ngalo en donde no puede entr_ en
contacto con _sta.
2. Haga descansar la segadora en su 1ado.
Asegdrese que el filtm de aire y que el
osrburador queden mirando hacia abajo.
3. Use un bloque de madera entre la cuchilla
y la caja de la segadora pare evitar que la
cuchilla gire cuando se le quite el pemo.
AVISO: Proteja sus manos con guantes y/o
envuelwt la cuchilla con una tela gruesa.
4. Remueva el pemo de la cuchilla girdndolo
en el sentido contrafio en qos giran las
manillas del reloj.
5. Remueva la cuchilla y los articulos de
ferreteria adjuntadores (el pemo, la
arendela de ssguridad y la arandela
endurecida).
AVISO: Remueva el adaptador de la cuchilla y
revise el cubo intedor de la ranura del
adaptador de la cuchilla. L_ ranura tiene que
estar en buenas condiciones para que
funcione en forma adecuada. Cambie el
adaptador si est_ deRado.
PARA CAMBIAR LA CUCHILLA
1.
Ponga el adaptador de la cuchilla en el
ciguefial del motor. Asegdrese que la
ranura del adaptador y que el chavetem
del cigue_al est_n alineados.
2. Ponga la cuchiIla en el adaptador de dsta
alineando los dos (2) agujeros en la
cuchilla con las salientes elevadas en el
adaptador.
3. Asegdrese de que el borde de salida de la
cuchilla (opuesto el borde afilado) est_
hacia arriba hacia el motor.
4. lnstele el pemo de la cuchilla con la
arandela de seguridad y la arandela
endurecida en el adaptador de la cuchilla y
el elgueRal.
5. Use un bloque de madera entre la cuchilla
y la caja de la segadora y _odete el perno
de la cuchilla girdndolo en el sentido en
que giran las maniElasdel reloj.
• La torsi6n para apretar recomendada es de
35 - 40 pies libras.
IMPORTANTE: El perno de la cuchilla es
clase 8 tratade a calo.
Adeptaderde la c_hnla
Chaveterodel
Ranura_
Arandelade
ciguenal
Cuchila
ctJchllla
28
L_-
Borde de s_lida
Adep_der
de la cuchllla
PARA AFILAR LA CUCHILLA
AVISO: No mcomendemos el afilar la cuchilla
- pero si Io hace, aseg_rese de que quede
balanceade.
Se tiene que tener cuidado de mantenerla
balanceeda. Una cuchilla que no estA
balanceada vaa preducir eventuelrnente daf_o
en la segadora o en el motor.
• La cuchilla puede afllarse con una lima o en
una mede rectJficadora. No trate de afitada
mLentras se encuentra en la segadora.
•para
revisar el balance de ta cuchilla, dave
un elavo en una viga o en ta pared. Deje
alrededer de una pulgada de un clavo recto
expuesto. Ponga el agujem central de la
cuchilla sobre la cabeza del clavo. Si la
cuchilla estd balanceada debe parmanecer
en Saposicide horizontal. Si cualquiera de
los exVernos de la cuchilla se mueve hacia
ahajo, afile el extremo pasedo hasta que
Asia quede balanceade.
RECOGEDOR DE ClaSPED
• El recogedor de cdsped puede set mciado
con el agua de la manguera paro liene que
es_r seco cuando se vaya a usar.
• Revise su recogedor de cAsped a menudo
pare veriticar siestA daRado o deterJorado.
Se va a desgastar con el uso normal. Si se
necesita cambiar el recogedor, cdmbielo
solamente par uno que sea aprobedo por el
fabricante. D6 el n_mem dal modelo de la
segadom cuando Io ordene.
RUEDAS DE IMPULSIAN
Revise las ruedas de impulsiAn delanteras
cade vez antes de segar, para asegurame de
que se mueven libremente.
Si las ruedas no giran libremente qulem decir
qce hay basura, re(odes de cAsped, etc. en el
Area de las ruedas de impulsi(_ny tienen que
limpiarse para lihararlas.
Es necesade limpiar las medas de impulsibn;
revise ambas ruedas delanteras.
1. Remueva los tapacubos, las clavijas de
horquilla y las arandelas.
2. Remueva las ruedas de los ajustadores de
las ruedas.
3. Remueva la basura y los recortes de
c_sped de dentro de la cubierta contra el
pelvo, pit,de y/o de los dientes de los
engranajes de las medas de impulsibn.
4. Ponga las ruedas de vuelta en su lugar.
AVISO: Si despuAs de timpiar las ruedas de
imputsibn no giran libremente, p_ngace en
contanto con su centro de sen/ielo Sears o
con un otto centre de servicio cualificado.
CAJA DE ENGRANAJES
•Para
mantener el sistema de impulsibn
funcionando en forma adecuada, la caja de
engranajes y el Area alrededor de la
imputsi(_ntienen que mantenerse limpias y
sin acumulacibn de basum. Limpie debajo
de la cubierta de la impulsibn dos veces por
temporada.
• La caja de engranajes se Ilena con
lubricante haste el nivel adecuado en la
fdbrice. La tlnice vez que el lubdcente
necesha atencibn es cuando ce le ha
pmstado servicio ata caja de engmnajes.
• Si se cecesita lubdcante, use solernente
Gmsa Texaco Starplex Premium 1, Parte
No. 750369. No use substitntos.
MOTOR
LUBRICACI(_N
Use solarnente aceite de detergente de alia
calidad clasificedo con la clasificeck_n SF-SJ
de servicio API. Seleccione la calidad de
viscosidad SAE seg0n su temperature de
operacibn esperada.
SAE VISC(_rW GRADES
AVISO: A pesar de que los aceites de
multiviscosided (5W30, 10W30, etc.) mejoran
el arranque en clime fr[o, estos aceltes de
multiviscosidad van ha aumentar el consumo
de aceite cuando se usan en temperatures
sol_'e 32 ° _ Revise el nivel del aceite del
motor mds a menudo, pare evitar un posible
daSo en el motor, debido a que no tiene
suflciente aceite.
Cambie el aceite despu(Ys de 25 horas de
operacibn o por Io menos una vez al aSo si la
segadora se utiliza menos 25 horas el aRo.
Revise el nivel del aceha del c_rter antes de
arrancar el motor y despuds de cada cinco (5)
horas de uso continuade. Apdete el tapbn del
aceite en forma segura cada vez que revise el
nivel del aceite.
29
PARA CAMBIAR EL ACEITE DEL MOTOR
AVISO: Antes de inclinar la segadom pare
drenar el aceite, drene el tanque de combustible haciendo coffer el motor hasta que el
tanque este vacio.
1. Desconeote el alambre de la bujla y
pbngelo de modo que no pueda entrar en
contacto con _sta.
2. Remueva lalapa del depbsito del aceite;
ddjela a un lade en una supedLcielimpia.
3. Incline la cortadora de cdsped per este
costado tal como se muestra y purgue et
aceite en un recipiente idbneo. Mueva la
segadora de atrds para adelante para
remover todo el aceite que su haya
quadado atmpado denim del motor.
4. Limpie lodo el aceite derramado en la
segadora yen el lade del motor.
5. Rellene el motor con aceite. (Vea "PAPA
AGREGAR EL ACEITE" en la seccibn de
Operacibn de este manual.)
6. Vuelva a conectar el alambm de ta bujla a
6sta.
ErlVaSe
FILTRO DE AIRE
Su motor puede sufdr averias y funcionar de
manera incorreota con un tiltro del elre sucio.
Sustituir el papel del cartucho una vez al afio o
tras 100 horas de funcionamiento, rn_s a
menude si so utiliza en condiciones de
suciedad y polvo particulates. No lave el filtro
de aire.
PARA CAMBIAR EL FILTRO DE AIRE
1. Remueva el filtro de aim girdndelo en el
sentido en que girela de las manillas del
reloj para apretada, basra el tope, y mtirelo
del collar.
2. Remueva el flttm de la parte interior de la
cubierta.
3. Limpie ta parte intedor de la cubierta y el
collar para remover toda acumulaci6n de
mugre.
4. Inserte el filtro nuevo en la cubierta.
5. Ponga la cubierla de1111tro
de aire dentro
del collar alineando la oreja con la ranura.
6. Empuje la cubierta hacla adentm y glrela
en el sentido contrado de las manillas del
reloj para apretada.
C_lar
\
Glre en el sentido alas mani[[asdel
reloj para
remover
Abrazadera
Filtro de aire
Cubleda del filtro de aim
Glreen
d senUdo
contrarlo las manillas
del reloj para aprelar
SILENCIADOR
Inspeccione y cambie el silenciador si estd
corroido puede producir un peligro de incendio
y/o de_o.
BUJJAS
Cambie las buj[as al comienzo de cada
tempomda de siega o despu6s de cada 100
horas de operacibn, Io que suceda pdmero. El
tipo de bu lay el ajuste de la abertura
aparecen en =ESPECIFICAC ONES DEL
PRODUCTO" secci(_ de este manual
LIMPIEZA
IMPORTANTE: Para obtener el mejor
rendimiento, rnantenga ta caja de la segadora
sin acumulacion de cesped y basura. Limpin la
parte de abajo de su ssgadora despues de
cada uso.
4_.PRECAUCI6N: Desconeote el alambre de
la bujia y pbngalo en donde no pueda entrar
en contacto con dsta.
• Ltmpie la parte infedor de su segadora
raspdndola para remover la acumulaci6n de
cdsped y basure.
• Umpie el motor a menudo para evitar qua
se acumule la basura. Un motor tapedo
funciona rnds caliente y se acorta su
duracibn.
• Mantenga las superficies pelidas y las
ruedas sin gasolina, aceite, etc.
• No recomendamos el uso de una manguera
de Jardln para limpiar la segadora a menos
qua el sistema eldotrfco, el silenciador, el
filtro de aire y el carburador est_n tapados
para evitar qua les entre el agua. El agua en
el motor puede acortar la duracibn de dste.
LIMPIE DEBAJO DE LA CUB|ERTA DE LA
IMPULSION
Limpie debajo de la cubierfa de la impulsibn
por Io menos dos veces cada temporade.
Raspe debajo de la cubierta con un cuchillo
para masilla o con una herramienta parecida,
para remover toda acumulackYn de cSsped o
basura en la perte inferior de la cubierta de la
impulsibn.
3O
_.PRECAUCI_N:
Antes de dar calquier
sewico o de hacer ajustes:
1. Suelte la barra de control y pare el motor.
2. Aseg,3rese qua ta cuchi,a y qua lc_daslas
partes rnovibles se hayan detenide
completamente.
3. Desconecte el alambre de la bujla y
p6ngalo an donde no pueda e_T_r en
contacto con dsta.
SEGADORA
PARA AJUSTAR LA ALTURA DE CORTE
Vea "PARA AJUSTAR LA ALTURA DE
CORTE" en la seccibn de Operacibn de es_e
manual.
DESVIADOR TRASERO
Se propomiona un desviador trasero, adjunto
entre las ruedas traseras de su segadom,
para reducir a un mfnimo la posibilided que
objetos sean lanzados hacia afuera de la parte
trasem de la ssgadera, en la posici_ en
dende se encuentra el operador. Si se daSa el
desviador debe cambiarse.
PARA REMOVER/CAMBIAR
LA CORREA
DE ]MPULSI(_N
1. Remueva la cubierta de la impulsibn.
Remueva la correa empujando hacia abajo
en la polea de la caja de engrana}es.
2 Haga descansar la segadora en su lado
con el filtro de aim y el carburador mimnde
hacla ardba.
3. Remueva la cuchilla.
4. Remueva la defensa en contra de|
desperdicio.
5. Remueva la correa de la polea del motor
en el ciguehal.
6. Instale la cortea nueva siguiendo los
pasos anteriores en el orden inverso.
7. Siempre use la correa aprobada por la
fdbdca para asegurarsa qua calce y dure.
PARA AJUSTAR EL MANGO
Et mango supedor quede ser ajustado a
cuatm (4) distintas posiciones de altura.
1. Atloie a_as patellas del mango solamen_
ba.stante para permitJrqua el mango
superior gire a la posicibn deseada.
2. Apriete ambas penllas del mango con
sagurk_ad.
Manillade
rr_ngo
Manillade
mango
PARA MONTAR Y ADJUNTAR EL
RECOGEDOR DE ClaSPED
I. Ponga el bastidor del mcogedor de c_sped
en la bolsa del cdsped con la parte dg]de
de la bolsa en la parte infedor. Asegdrese
qua el mango del bastidor estd en e]
extedor de la parte supedor de la bolsa.
2. Deslice los suietadores de v_nnosobre el
bastidor.
AVISO: Si los sujetadores de vinilo esldn muy
dums, n_talos en agua caliente pot algunos
min_os, Si se mcja ta botsa, d6iela qua se
seque antes de usarla.
_1_PRECAUC (_N: No haga funcionar su
segadora sin el desviador _le recortes o sin el
recogedor de c6sped, apmbados, en su
lugar. Nunca trate de operar la segadora
cuando se ha removido la puerta trasera o
cuando estd un poco abierta.
Mangl
delrecogedor
Abertumdel
31
basUdc_
MOTOR
VELOCIDAD DEL MOTOR
La velocidad del motor ha side ajustada en la
f_brica. No tmte de aurnentar la velocldad pal
motor pues se pueden pmducir tesiones
personales. Si cree qua el motor est_
funcionando demasiado rdpido o dernasiado
lento, lleve su segadora a mas con su centro
de servicio Seam o con un otto centro de
servicio cuelificado.
CARBURADOR
Se carburador tiene un chorro principal fijo no
ajustabte para contmlar la mezcla. Si su motor
no est_ tuncionande en forma adecuada
debido a problemas que se sospecha vienen
[nrnedJatamenteprepare su segadora pare el
alrnacenamiento al final de cada temporada o
si la unidad no se vaa user pot 30 dfas o
mzts.
SEGADORA
Cuando se va a guardar la segadora pot
cierto periodo de fiempo, limpiela
cuidadosamente, rernueva toda la mugre, la
grasa, tas hojas, etc. Gu_dela en un _rea
limpia y seca.
1. Limpie tode la segadora (Vea 'I.IMPIEZA"
en la seccibn de Mantenimiento de este
manual).
2. Lubrlquela segdn se muestra en la
seccibn de Mantenimiento de este manual.
3. Asegdrese de qua todas las tuercas y
clavijas y todos los pemos y tomillos est_n
apretados en fonna segura, Inspaccione
las paMes que se mueven pare verfficar si
est_i,ndai'iadas, quebradas o desgastadas.
C&mbielas si es necesado.
4. Retoque todas las supedicies que es16n
oxidadas o con la pintura picade; use una
lija antes de pintar.
MANGO
Puede doblar el mango de su segadora para el
elmacenarniento.
1. Apriete los extrernos intedores del mango
infedor entre sl hasta que el mango inferior
quede separado del puntal del mango,
tuego mu6valo hacia adelante.
2. Suelte los pemos de montaje del mango
superior Io suficiente corno pare permitir
que et mango superior se pueda doblar
haela atr_s.
IMPORTANTE: Cuando doble el mango pare
el elmacenamiento o el transports, asegurese
que 1o doble seg0n se muestra o purde dafiar
los cables de control.
• Cuando prepare sus mangos a partir de la
posicibn de elmasenamiento, el mango
intedor autorndticamente se asegurar& en la
posici6n pare segar.
del carburador, Ileve su segadora a contacto
con su centro de servicio Sears o con un otro
centre de servicio cualificado para reparada y/
o ajustada.
IMPORTANTE: Nunca manip_e el mgulador
del motor, el qua ha eldo ajustado en la fdbdca
para la velocided del motor adecuada. Puede
ser peligroso hacer funcionar el motor a una
velocidad por sobre el ajuste de alia velocided
de la f_bdca. Si cree que la velocidad aMa
regulada del motor necesita ajus_e,contaclo
con su centro de servicio Sears o con un otro
cerrtro de servicio cualificade, el qua cuenta
con el equipo adecuado y la experiencia pare
hater los ajustes necesarlos.
)lnfeflo_
Apdete pare doblar
ClavlJade ho_quilla
Barrade conb'olque
exlgela Pmsenciadel"_'_'_/1_
/111
-"'%
•
"
"°
Dollar
adelarlie //
,s%,9"
o..
._/_
/li'!
,",4
t
I
atrds
MOTOR
SISTEMA
OECOMBUSTIBLE
IMPORTANTE:
Esimportante
evitar
quese
formen
depbsitos
degoma
enpartes
tundamenteles
delelslema de combustible
tales como el carbumdor, el tiltm del combustible, la manguera del combustible o en el
estanque dumnte el alrnacenamlento. La
expedencia tambidn indica qua los combustibles rnezclados coil alcohol {conocido corno
gasohol o qua tienen etanol o metanol) pueden
atmer humedad, Io qua conduce a la
separacion y a la formaelon de acidos durante
st almacenamiento. La gasolina aeldica puede
da_ar el sistema de combustible de un motor
durante el periodo de elmacenamiento.
1. Drene el estanque de combustibte.
2. Haga arrancar el motor y d_jelo tuncionar
hasta qua las Hneas dal combustible y el
carburador est_n vacios.
• Nunca use los productos para limpieza del
carbumdor o del motor en el estanque de
combustible pues se pueden producir
da_os permanentes.
• Use combustible nuevo la pr6xima
temporada.
AVISO: El establlizador de combustible es una
altemativa aceptable para reducir a un m(nimo
la tormaci6n de depbsitos de goma en el
combustible durante el periodo de
elmacenamiento. Agregue establlizador a la
gasolina en el estanque de combus_ble o en el
envase para el alrnacenamiento. Siempre siga
la pmpomibn de mezcla qua se encuentra en
el envase del establlizader. Haga tuncionar el
motor por Io menos 10 minutos despu6s de
agregar el estabilizador, para permitir que este
Ilegue el carburador. No drene la gasolina del
estanque de gasolina y el carburador si se
estd usando estabilizado_ de combuslible.
ACEITE DEL MOTOR
Drene el aceite (con st motor caliente) y
c_lmbielo con aceite de motor limpio. (Vea
=MOTOR" en la seccibn de Mactenimiento de
este manual.)
ClLINDRO
1. Remueva la bujfa.
2. VacIe 29 ml (una onza) de aceite a traves
del agujero de la bujla en el cilindm.
3. Tire la manina de ananqua lentamente
unas cuantas races para distribuir el
aceite.
4. Carnbie por una bujla nueva.
OTROS
• No guarde la gasolina de una temporade a
la otra.
• Cambie el envase de la gasotina si se
empieza a oxidar. La _idacibn y/o la mugre
en su gasolina producir_n problemas.
• Si es posible, guarde su unidad en un
recinto cer_do y cdbrala para pmtegeda
contra el polvo y la mugre.
• Cubra su unidad con un forro protector
adecuado qua no retenga la hurnedad. No
use pldstico. El pI_stico no puede respirar, Io
qua permile la formacid_nde condensacibn,
Io qua producird la oxidacibn de su unidad.
IMPORTANTE: Nunca cubra la segadora
mientms el motor y las ames de escape to
davia estan caliectes.
_I, PRECAUCI(_R: Nunca elmacene la
segadora con gasolina en el estanque dentro
de un edHicio en donde tos gases pueden
alcanzar una llama expuesta o una chispa.
Permita qua se enfr_e el motor antes de almacenada en elgdn recinto cerrado.
IDENTIFICACI(_N DE PROBLEMAS
PROBLEMA
No arranca
CORRECCI(_N
CAUSA
1. Filtro de aim sucio.
2. Sin combustible,
3. Combustible r_cio.
1. Limpie/camble el tgtm de aire.
2. Llene el estanque de combustible,
3. Drene el estanque y vuelva a
Ilenarlo con combustible limpio
y nuevo.
4, Drene el estanque de combustible
4, Agua en el combustible.
y el carburador y vuelva a Ilenar
el estanque con gasolina nueva,
5. Alamlxe de bujla desconectade i 5. Conecte el elambre a ta bujla.
6. Bujla mala,
6. Camble la bujia.
7. Cuchilla suelta o adaptador
7. Apdete el perno de la cuchilla
de la cuchilla quebrado.
ramble el adaptador de la cuch, la.
8. Barm de conlxolen la
8. Preelone la bana de control
posicibn suelta.
hacia el mango.
9. Barra de control dstectuosa.
9. Camble la barra de comml.
33
IDENTIFICACION
DEPROBLEMAS
PROBLEMA
Felts de fuer'za
CAUSA
CORRECCI6N
1. Cuchilla desgastada,
0 suelta.
dobtada
1. Ajuste ala posici6n de "Code
m_s alto."
2. Affura de las rusdas
dispareja.
2. Ajuste ala posicibn de "Code
3. Velocidad del motor lenta.
4. Acumulacidn de cdsped, hojas
o basura debajo de ta segadora.
5. Demasiade aceite en el motor.
6. Velocided de recorddo
demasiado rapida.
Mal corted|spareJo
3. m_Ls
afro."
Limpie/cambie
e_filtro de airs.
:4. Limpie la parle inferior de la
caja de la segadora.
5. Revise el nivel del ace|re.
6. Code a una velocidad de
recorddo rods lenta,
1. Cuchilla desgastada, doblada
o suetta.
2. Altura de las nJedas dispareja.
3. Acumutacibn de c_sped, hojas
o basura debajo de la segadora
Vlbracldn
excBsiva
1. Cuchiga desgastada, doblada
o suelta.
2. Cigueltal del motor doblado.
Cord6n
arrancador
d|f|c|l de tlrar
1. El freno de1 volante del motor
esld aplicado cuando se suelta
le barra de control.
2. Cigueltal del motor dobtado.
3. Adaptador de cuchilla quebrado.
4, La cuchnla se arrastra en
el c_sped.
P6rdlda de
lmpulsi6n
1. Ruedas impulsoms no giran
cuandoel control de imputsibn
est_ enganchado.
2. La correa no estd impulsando.
1. Cambie la cuchilta. Apdete el
pemo de la cuchilla.
2. Ajuste todas las ruedas ala
misrna eltora.
3. Limpie la parle infedor de la
caja de la segadora.
1. Cambie la cuchilla. Apdete el
pemo de la cuchilla.
2. Pbngase en contacto con su
centro de servicio Seam o con un
otto centro de servicio cualilicado.
1. Presione ta barra de control hacia
el mango supedor antes de tirar el
cordbn arrancador.
2. Pbngase en contacto con su
centre de servicio Sears o con un
ntro centro de servicio cualificado.
3. Cambie el adaptador de la ouch|tie.
4. Mueva la segadora aun lugar en
donde el cdsped ha sido cortado o
a una supedicie firme para hacer
arrancar el motor.
1. Ajuste o cambie el cable de
conlrol deimpulsi6n, si estd roto.
2. Ponga las correas en las poleas o
cdmbielas si estdn rotes.
Recogedor de
c_sped no se
liens (sl vlene
equlpado)
1. Altura de code demasiado baja. 1. Eleve ta altora de code.
2. Levantamlento de la cuchilla
2. Cambie las cuchillas.
desgastado.
3. Recogedor sin ventilacibn de air. 3. Umpie el recogedor de c6spsd.
3if|cll de empuJar
1. El c_sped estd demasiado alto o
la altura de la meda demasiado
baja.
2. Parts trasera de la
caja/cuchilta de la segadora
arrastr_ndese en el cSsped.
3. Recogedor de cesped
demasiade Ileno.
4. Posicidn de la altum del mango
no adecuada pars usted.
34
1. Eleve la altura de corle.
2. Eleve la parts trasera de la caja de
la segadora (1) un lugar rods alto.
3. Vacle el recogodor de cdsped
4. Ajuste la altora del mango de
modo que le acomode.
CRAFTSMAN ROTARY LAWN MOWER- - MODEL NU MBER 917.379601
GEAR CASE ASSEMBLY - - PART NUMBER 175258
I
1
i
KEY PART
NO. NO,
1
2
3
4
6
7
8
9
10
11
DESCRIPTION
KEY PART
NO. NO.
DESCRIPTION
12
13
14
15
16
17
18
19
BUShing
plug
HellcsI Gear
Clutch Jaw
Grease
E-Ring
HI-Pro Key
Spring Bracket
17490416
Tapping Screw 1/4-20 x 1-1/4
175248X004 Fngagernent Bracket
137053
Shifter
57072
SeaJ
48373
Gear Case Halves Kit
(Includes Key Numbers 4 and 7)
77881
Bearing
137051
Worm Shaft
175257
Drive Shaft
57079
Hard_ned Washar
131484
C_utch Yoke
700343
86447
137050
7504380(
75(_69
12000003
850848
81585)(004
NOTE: AJIcomponent dimensions given In U.S. inches.
1 inch = 25.4 mm
35
CRAFTSMAN
ROTARY
LAWNMOWER- MODEL NUMBER 917.379601
27
31
35
13
31
43
28
35
13 10_
12
46
45
47
25
CRAFTSMAN ROTARY LAWN MOWER- - MODEL NUMBER 917.379601
KEY
NO.
1
2
3
4
5
6
7
8
g
10
11
12
13
14
16
16
17
18
19
20
21
22
23
24
25
26
27
28
3O
31
PART
NO.
175391X479
151721X479
169780
le8552
171407
136376
517g_
66426
175794
128415
175069X479
175070X479
17060418
175062}(479
175061X479
175243
175244
132004
153638
1783_8
88652
85543
67677
-- -
DESCRIPTION
UppprHandle
LowerHandle
Control Bar
EngineZone Control Cable
HandleBoit
Hand_eKnob
HainpinCotter
Wi_T_
Rear Door Kit (Incl. Key #15 & 17)
Pop Rivet
Suppod Bracket LH
Suppod Bracket RH
Screw 14-20 x 5/8
Handle Bracket Assembly (Left)
Handle 8racket Assembly (Right)
SpdngLH
Spndg RH
Kpps Locknut 1/4-20
Rppe Guide
Rear Skirt
Hinge Screw 1/4-20 x 1-1/4
Engine Pu,ey
Hi-Pro Key #505
Engine, Craftsman, Model Number
143.016732 (See Breakdown)
t 504_6
Hex Head Thread Rolling Stew 3/8-16 x 1-1/8
839_3
Hex Flange Nut
150341
Wheel
175231
Shoulder Bolt 5/16-18 x .33
165751X004 Axle Arm AsSembly RR
7010G7
Selector Knob
KEY
NO.
PART
NO.
DESCRIPTION
:_
34
35
36
38
39
43
44
45
46
47
48
49
50
78
79
3O
81
82
---
175060)(004
165762X004
175O12
165912
176185
176235
175083
176289
85463
851514
175064
851074
850263
851064
170954
170953
178574
170955
170956
161058
179359
Selector Spdng
Axle Arm Assembly LR
Hubcap
Bolt
Washer, Step
Pushnm
Bottom Belt Cover
Lawn Mower Housing (incl. Key #1O, 11, 12& 45)
DangerDeal
Blade Adapter
Blade21"
Hardened Wasndr
Helical Washer 3/6-24 x 1-3/8 Gr, 8
Hex Head Machine Screw 3/6-24 x 1-5/8 Gr. 8
Handle Adjuster, Outl;ide, LH
Handle Adjuster, Inside, I.H
Handle Adjuster Spdeg
Handle Adjuster, Inside, RH
Handle Adjuster, OutSide, RH
Warning Dec,al (Not Shown)
Owners M=nual(English/Spanish)
Available accessories not included with lawn mower.
- 917.33314
Clipping Deflector (Available in Sewlce Dept. only)
-71 33623
Gss Can
-71 33500
Fuel Stabilzer
-71 33000
SAE 30W Oil (20 oz.)
NOTE: All component dimensions given i_ U.S. inches.
1 inch = 25.4 mm
tl
/
14
CRAFTSMAN ROTARY LAWN MOWER- - MODEL NU MBER 917.379601
_:_
KEY
NO.
PART
NO.
DESCRIPTION
1
3
4
5
6
8
9
11
12
13
14
15
16
18
26
145755
751152
158755
175436
150495
175012
145212
150340
1L:K)00C58
137054
88080
88118
67725
701037
1752_2
ConboJCable Assembly
Locknut #10-24
Hex W_sher Head Screw 1/4-20 x 2.12
V-Beit
Spdng Reta.lner
Hubcap
Loeknut
Wheel & "rite Assembly
E4_ing
PiN0_
Dust Cover
FeltWasher
Washer 1/2 x 1-1/2 x .134
Selector Knob
Pan Head Tapping Screw #10-24 x 2-3/4
KEY
NO.
PART
NO.
28
31
32
35
36
37
38
40
41
54
55
57
175065
132010
137052
151521
175258
137090
63601
75192
151520
175064
175739
175058
DESCRI_
Drive Cover
Hex Flange Nut
Drive Pulley
Wheel Adjuster Assembly (Left)
Gear Case AsSembly
Sprig
Locknut 1/4-20
Spnng
Wheel Adjuster Assembly (Right)
Grassbag Assembly
Ddveshaft Cover
Frame
NOTE: All component dimensions gNen In U.S. inches.
1 inch = 25.4 mm
CRAFTSMAN 4-CYCLE ENGINE
MODEL NUMBER 143.016732
400
130
120
119
t95
41
4171r/_
125
275,
"306
4O
MODEL NUMBER 143.016732
CRAFTSMAN 4-CYCLE ENGINE
I_L'y
NO.
PART
NO.
1
2
6
7
12
12A
12B
14
15
18
17
18
19
2O
30
40
41
42
43
45
46
48
50
52
69
7O
72
75
80
81
82
83
86
89
90
92
37465
26727
33734
36557
30"775
36558
36694
2_r/'7
30589
34839A
31335
551018
38381
326OO
37464
4_027
4OO42
4OOO6
2_81
36777
39610A
27241
37460
29914
3760_
376O8
37614
27897
30574A
30590A
3_591
30588A
55O488
611004
611112
650815
650816
34443(3
610118
551007
37480
37047
36787
36825
36780
100
101
10_
104
110
119
120
125
125
126
130
135
150
151
151A
159
172
174
37288
37289
6021A
37598
31672
31673
40017
36783
36784
38300
DESCRIPTION
Cylinder (Incl. 2 & 20)
Dowel Pin
Breather Element
Breather Ass'y. (Incl. 6 & 12A)
BreatherTube
Breather Cover & Tube (Incl. 12B)
Breather Tube Elbow
Washer
Governor Rod (Incl. 14)
Govemo_"Lever
Governor Lever Clamp
Screw, Torx T-15, 8-32 x 19/64"
Extension Spring
Oil Seal
Crankshaft
Piston, Pin & Ring Set (Bid.)
Piston & Pin Ass_/. (Btd.) (Incl. 43)
Ring Set (Std.)
Piston Pin Retaining Ring
Connecting Rod Ass_/. (Incl. 46)
Connecting Rod Bait
Valve Lifter
Ca_nshalt Exhaust(MCR) (Ind. 104)
OII Pump Assembly
• Mounting Flange Gaaket
Mcuntlng Flange (Incl. 72 thru 83)
Oil Drain Plug
Oil Seal
Governor Shaft
Washer
Governor Gear Ass'y. (Incl. 81)
Govemor Spool
Screw, 1/4-20 x 1-1/4"
Flywheel Key
Flywheel
Belleville Washer
Flywhael Nut
Saild State IgnlUen
Spark Plug Cover
Screw, T-15, 10-24 x 15/16"
Cam Bushing
GroundW]re
• Cylinder Head Gasket
Cylinder Head
Exhaust Valve (1/39" OS)
(Includes Key Number 151
Exhaust Valve (Std.) (Incl. 151)
intake Valve (Std.) (Incl. 151)
Screw, 5/16-18 x 1-1/2"
Resistor Spark Plug (RJ19LM4)
Valve Spflng
Valve Spdng Cap
Intake Valve Seal
• Valve Cover Gasket
Valve Cover
Screw, 10-24 x 9/16"
NO.
PART
NO.
178
182
184
185
186
189
1gl
195
207
216
223
224
238
239
241
245
250
260
261
262
283A
275
277
285
287
290
292
298
300
301
3(;5
306
307
309
309A
310
311A
313
347
37OA
37OC
37OR
380
390
400
418
29752
6201
26756
37466
32653
650839
39559A
610_73
34336
33086
650451
36786
650939
34338
36919
383_5
37122
36980
30200
850831
37184
37483
650988
35000A
650926
29774
26460
28763
36916
37656
35647
37610
35499
650583
650783
35648
37611
34080
651038
36261
37318
37317
640_71
590739
37613
36085
417
900
900
.....
DESCRIP11ON
Nat & Lock Washer, 1/4-28
Screw, 114-28 x 7/8"
• Carburetor To Intake Pipe Gasket
Intake Pipe
Governor Link
Screw, 1/4-20 x 3/8 °
S.E. Brake Bracket (Incl. 105)
TelTninai
Ttlmftte Link
R.P.M. AdJuatlng Lever
Screw, 1/4-20x 1"
• Intake Plpa Gasket
Screw, 10-32 x 49/64"
* AirCleanerGasket
Air Cleaner Collar
Aft Cleaner Filter
Aft Cleaner Cover
Blower Housing
Screw, 10-24 x 9/16"
Screw, I/4-20 x 1/2"
Starter Gdlle
Muffler
Screw, 1/4-20 x 2-5/16"
Stader Cup
Screw, 8-32 x 21/64"
Fuel Line
Fuel Line Clamp
Screw, 10-32x35/64"
Fuai Tank (Incl. 292 & 301 )
Fuel Cap Ass_/
Oil FillTube
* =O'-Rlng
"C_-P,Ing
Screw, 10-32 x 1/2"
Screw, 10.24 x 3/4"590568
Dipstick
Hold Down Bracket
Spacer
Screw, 10.32x51/64"
Lubdcatlon Decal
Pdrner Decal (3 X)
Warning Decai
Carburetor (Incl. 184)
Rewind Stader
Gasket Set (Incl. Items Marked •)
Spark Arrestor Kit (Optional
(Includes Key Number 417)
650760
Screw, 8-39 x 3/8" (Optional)
750865
RepL S/B Order from 71-999
750867A
Repl. Engine, order from 71-999
RPM: High 29OO to 3200
NOTE: Dis engine could have been bulit with 590702
starter.
NOTE: All component dftnenslons given In U.S.
inches. 1 inch = 25.4 mrn.
41
CRAFTSMAN 4-CYCLE ENGINE
MODEL NUMBER 143.016732
I
KL=V PART
NO. NO.
-1
2
4
5
6
7
16
17
18
20
20A
25
27
28
29
30
31
35
36
36A
37
40
44
47
48
60
D_SCRIPnON
640271
Carburetor (Includes 184 of Engine Parts Ust)
31615
Throttle Shaft & Lever Assembly
31767
Throffie Return Spring
631184
* DustSealWasher
631183
* OustSeal (Thmnle)
640070
Throttle Shutter
65_ro06 * Shutter,Screw
631807
Fuel Fitting
6510_5
Throttle Crack Screw/Idle Speed Screw
630766
Tension Spring
640027
Idle Resblctor Scxew
640200
_dle Restrlctor Scrwe Cap (Black)
631867
FlOWBOW1
631024
* FloatShall
632019
Roar
631028
* FloatBowl_O'Ring
631021
" Irdet Needle. Seat, & Clip (Includes 31)
6310P.2
SpdngClip
640259
P rkner Bdlb/Retalne r Ring
640080
Main Nozzle Tube
63_766
Ca_uretor Tube
632547
* _O" Ring, Main NozzleTube
6_
H_ghSpeed Bowl NOt
27110A * BowlNutWasher
630748
* Welch PlUg, Idle Mixture Well
631_7
* Welch Plug, Atmospheric Vent
63_f60B
Repair kit (Includes Items Marked * in Notes)
42
CRAFTSMAN 4-CYCLE ENGINE
MODEL NUMBER 143.016732
m
I_-Y
PART
-1
NO.
2
3
4
590702
59_99A
NO.
5906(X)
590696
590601
Recoil _'tarter
Sprtng Pin (Includes Key Number 4)
DESCRIP_
Washer
Retainer
washer
m_ -7
5
6
590697
590698
Brake
SterterSpring
Dng
._
8
7
11
590700
5906_
590703
pulley
& Rewind Spring Assembly
DogSprLng
Starter Housing Assembly
(40dngree grommet)
13
12
590701
590535
Stader
Starlet Handle
Rope 198"x 9/84" diameter)
--e
Q
'--_
.__[]
tl
(_--3
V--14
tll
_--'
PART
NO. NO.
DESCRIPI1ON
- -
590739
Rewind Stadm
6
7
8
1t
3
590616
59O617
590618A
590638
590740
12
13
14
59C535
590701
590760
Starter Dng
DogSpdng
Pu_ey & Rewind Spdng Assembly
Starter Housing AsSembly
Retainer grommet)
(40degree
Starter Rope (98" x 9/64" diameter)
Starter Handle
SpdngCIIp
III --7
43
Forrepairofmajor brand appliancesIn your own home...
no matter whomade it,no matterwho solditt
1-800.4-MY-HOME ® iv_i_ne,dayorr_l-t
(1-8oo-46s-46_)
(u.s.A.andCanada)
For repairof carry4nproducts like vacuums, iava'_equipment,and
electronics,callfor the nearestSears Partsand Repair Center.
1-800..488-1222
_,
dayc_r_l (U.S.A.
only)
wINw.seatl&com
Forthe repiacernentparts, accessoriesand owner'smanuals
thatyou needto do-it-yourself,
callSears PartsDirect_J
1-800-366-PART
(1-800_7278)
6 a.m.-11 p.rR, 7 daysaweek
(U.S.A. ctdy)
www.sea_cornip,
amdlrect
To purchaseor inquire abouta SearsServiceAgreement
or SearsMaintenanceAgreement:
1-800-827-6655 (u.s._.)
7 a.m.- 5 p.m.,CST, Mon.- Sat.
Parape_ser_ode_ac_.
a
domici_ y pataerderlar plazas:
1-888-SU-HOGAR_
(_-a_Ts4-64_
1-800-361-6665 (_)
9 &m.-8 p_n. EST,M - F, 4 p.m.Sat
AuCana_pour
senr_enfrang_
1-800.LE-FOYF_.R
uc
www_ars.ca
@ 8ea_ Reebu_ altd Co.
® Registered Trademark / TM Trademark / sa Service Mark of Seam, Roebuck and Co.
® Mama Registrada / TM Mama de Fdbdea / s_ Mama de SewIcio de Seam. Roebuck and Co.
wc Marque de commerce / Me Marque d6posda de Seam, Roebuck and Co.
179359 04,13.01 BY
Printed in U.S.A.