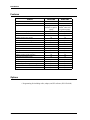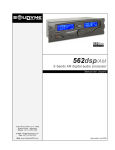
1
Model 280/284 Digital Tone Remotes Product Manual 025-9346G Software License The Zetron software described in this manual is subject to the terms and conditions of Zetron's Software License Agreement, a copy of which is contained on the product distribution media or otherwise provided or presented to buyer. Installation and/ or use of the Zetron software constitutes acceptance of Zetron's Software License Agreement. Limited Warranty Buyer assumes responsibility for the selection of the Products to achieve buyer's or its customer's intended results obtained from the Products. If buyer has provided Zetron with any requirements, specifications or drawings, or if Zetron provides buyer with such materials, such materials are provided solely for buyer's convenience and shall not be binding on Zetron unless agreed in writing by the President of Zetron. ZETRON DOES NOT WARRANT THAT THE PRODUCTS OR ITS CUSTOMER'S REQUIREMENTS OR SPECIFICATIONS OR THAT OPERATION OF THE PRODUCTS WILL BE UNINTERRUPTED OR ERROR FREE. SUBJECT TO THE LIMITATIONS SET FORTH BELOW, Zetron warrants that all Zetron Products and Zetron Accessories will be free from material defects in material and workmanship for one year from date of shipment (except where indicated otherwise in the Zetron Price Book). For buyer's convenience, Zetron may purchase and supply additional items manufactured by others. In these cases, although Zetron's warranty does not apply, buyer shall be the beneficiary of any applicable third party manufacturer's warranties, subject to the limitations therein. Zetron's warranty covers parts and Zetron factory labor. Buyer must provide written notice to Zetron within the warranty period of any defect. If the defect is not the result of improper or excessive use, or improper service, maintenance or installation, and if the Zetron Products or Zetron Accessories have not been otherwise damaged or modified after shipment, AS ZETRON'S SOLE AND EXCLUSIVE LIABILITY AND BUYER'S SOLE AND EXCLUSIVE REMEDY, Zetron shall either replace or repair the defective parts, replace the Zetron Products or Zetron Accessories or refund the purchase price, at Zetron's option, after return of such items by buyer to Zetron. Shipment shall be paid for by the buyer. No credit shall be allowed for work performed by the buyer. Zetron Products or Zetron Accessories which are not defective shall be returned at buyer's expense, and testing and handling expense shall be borne by buyer. Out-of-warranty repairs will be invoiced at the then - current Zetron hourly rate plus the cost of needed components. THE FOREGOING WARRANTY AND THE THIRD PARTY MANUFACTURER'S WARRANTIES, IF ANY, ARE IN LIEU OF ANY AND ALL OTHER WARRANTIES EXPRESSED, IMPLIED OR ARISING UNDER LAW, INCLUDING, BUT NOT LIMITED TO, THE IMPLIED WARRANTIES OF MERCHANTABILITY, NON-INFRINGEMENT AND FITNESS FOR A PARTICULAR PURPOSE. Limitation of Liability Zetron makes no representation with respect to the contents of this document and/or the contents, performance, and function of any accompanying software. ZETRON SHALL NOT UNDER ANY CIRCUMSTANCES BE LIABLE TO BUYER OR ANY THIRD PARTY FOR ANY INCIDENTAL, SPECIAL, CONSEQUENTIAL OR INDIRECT LOSS OR DAMAGE ARISING OUT OF OR CONNECTED WITH BUYER'S PURCHASE OR USE OF PRODUCTS OR SERVICES, INCLUDING WITHOUT LIMITATION, LOSS OF USE, LOSS OR ALTERATION OF DATA, DELAYS, LOST PROFITS OR SAVINGS, EVEN IF ZETRON HAS BEEN ADVISED OF THE POSSIBILITY OF SUCH DAMAGES AND EVEN IF THE LIMITED REMEDY ABOVE IS FOUND TO FAIL OF ITS ESSENTIAL PURPOSE. IN NO EVENT SHALL ZETRON'S LIABILITY (WHETHER FOR NEGLIGENCE OR OTHER TORT, IN CONTRACT OR OTHERWISE) EXCEED THE PRICE PAID TO ZETRON FOR THE PRODUCTS. IP networks by their nature are subject to a number of limitations, such as security, reliability, and performance. Anyone using non-dedicated IP networks, such as shared WANs or the Internet, to connect to any Zetron Products or systems should consider and is responsible for these limitations. ©Zetron, Inc. All rights reserved worldwide. This publication is protected by copyright; information in this document is subject to change without notice. The Zetron logo is a registered trademark of Zetron Incorporated. Other company names and product names may be the trademarks or registered trademarks of their respective owners. This publication may not be reproduced, translated, or altered, in whole or in part, without prior written consent from Zetron, Inc. Regulatory Compliance Information on Disposal of Old Electrical and Electronic Equipment and Batteries (applicable for EU countries that have adopted separate waste collection systems) Products and batteries with the symbol (crossed-out wheeled bin) cannot be disposed as household waste. Old electrical and electronic equipment and batteries should be recycled at a facility capable of handling these items and their waste byproducts. Contact your local authority for details in locating a recycle facility nearest to you. Proper recycling and waste disposal will help conserve resources whilst preventing detrimental effects on our health and the environment. Notice: The sign “Pb” below the symbol for batteries indicates that this battery contains lead. FCC Class A User Information This equipment has been tested and found to comply with the limits for a Class A digital device, pursuant to Part 15 of the FCC Rules. These limits are designed to provide reasonable protection against harmful interference when the equipment is operated in a commercial environment. This equipment generates, uses, and can radiate radio frequency energy and, if not installed and used in accordance with the instruction manual, may cause harmful interference to radio communications. Operation of this equipment in a residential area is likely to cause harmful interference in which case the user will be required to correct the interference at his own expense. EMC Compliance Standards This product meets the requirements of the standards listed below. • FCC Part 15 - Radiated & Conducted Emissions (USA) ICES-003 - Radiated & Conducted Emissions (Canada) Regulatory Compliance Markings • FCC Part 15 (USA) 3 Safety Summary STOP Warning! For your safety and the protection of the equipment, observe these precautions when installing or servicing Zetron equipment: • Follow all warnings and instructions marked on the equipment or included in documentation. • Only technically qualified service personnel are permitted to install or service the equipment. • Be aware of and avoid contact with areas subject to high voltage or amperage. Because some components can store dangerous charges even after power is disconnected, always discharge components before touching. • Never insert objects of any kind through openings in the equipment. Conductive foreign objects could produce a short circuit that could cause fire, electrical shock, or equipment damage. • Remove rings, watches, and other metallic objects from your body before opening equipment. These could be electrical shock or burn hazards. • Ensure that a proper electrostatic discharge device is used, to prevent damage to electronic components. • Do not attempt internal service of equipment unless another person, capable of rendering aid and resuscitation, is present. • Do not work near rotating fans unless absolutely necessary. Exercise caution to prevent fans from taking in foreign objects, including hair, clothing, and loose objects. • Use care when moving equipment, especially rack-mounted modules, which could become unstable. Certain items may be heavy. Use proper care when lifting. Change List for Rev G, 22 October 2012 • Added a caution statement on page 33. 4 025-9346G Contents Contents Introduction. . . . . . . . . . . . . . . . . . . . . . . . . . . . . . . . . . . . . . . . . . . . . . . . . . 7 General . . . . . . . . . . . . . . . . . . . . . . . . . . . . . . . . . . . . . . . . . . . . . . . . . . . . . . . . . . . . . . 7 Parallel Status Indication . . . . . . . . . . . . . . . . . . . . . . . . . . . . . . . . . . . . . . . . . . . . . . . 7 Digital Audio . . . . . . . . . . . . . . . . . . . . . . . . . . . . . . . . . . . . . . . . . . . . . . . . . . . . . . . . 8 Automatic Audio Leveling . . . . . . . . . . . . . . . . . . . . . . . . . . . . . . . . . . . . . . . . . . . . . . . 8 Reliable Audio Quality . . . . . . . . . . . . . . . . . . . . . . . . . . . . . . . . . . . . . . . . . . . . . . . . . 8 Paging Encoder . . . . . . . . . . . . . . . . . . . . . . . . . . . . . . . . . . . . . . . . . . . . . . . . . . . . . . 9 Operator Interface . . . . . . . . . . . . . . . . . . . . . . . . . . . . . . . . . . . . . . . . . . . . . . . . . . . . 9 Liquid-Crystal Display . . . . . . . . . . . . . . . . . . . . . . . . . . . . . . . . . . . . . . . . . . . . . . . . . . 9 Programmable Key Functions . . . . . . . . . . . . . . . . . . . . . . . . . . . . . . . . . . . . . . . . . . . 10 Privacy Mode and Supervisory Control . . . . . . . . . . . . . . . . . . . . . . . . . . . . . . . . . . . . . 10 Call Decoder . . . . . . . . . . . . . . . . . . . . . . . . . . . . . . . . . . . . . . . . . . . . . . . . . . . . . . . 11 Features . . . . . . . . . . . . . . . . . . . . . . . . . . . . . . . . . . . . . . . . . . . . . . . . . . . . . . . . . . . . 12 Options . . . . . . . . . . . . . . . . . . . . . . . . . . . . . . . . . . . . . . . . . . . . . . . . . . . . . . . . . . . . . 12 Specifications. . . . . . . . . . . . . . . . . . . . . . . . . . . . . . . . . . . . . . . . . . . . . . . . 13 Overview . . . . . . . . . . . . . . . . . . . . . . . . . . . . . . . . . . . . . . . . . . . . . . . . . . . . Part Numbers . . . . . . . . . . . . . . . . . . . . . . . . . . . . . . . . . . . . . . . . . . . . . . General . . . . . . . . . . . . . . . . . . . . . . . . . . . . . . . . . . . . . . . . . . . . . . . . . . . . . Programmable Items . . . . . . . . . . . . . . . . . . . . . . . . . . . . . . . . . . . . . . . . . . . Paging . . . . . . . . . . . . . . . . . . . . . . . . . . . . . . . . . . . . . . . . . . . . . . . . . . . . . . Tone Levels . . . . . . . . . . . . . . . . . . . . . . . . . . . . . . . . . . . . . . . . . . . . . . . . . . Call Decoder . . . . . . . . . . . . . . . . . . . . . . . . . . . . . . . . . . . . . . . . . . . . . . . . . . . . . . . . .. .. .. .. .. .. .. . . . . . . . .... .... .... .... .... .... .... 13 13 14 15 16 16 16 Operation . . . . . . . . . . . . . . . . . . . . . . . . . . . . . . . . . . . . . . . . . . . . . . . . . . . 17 Overview . . . . . . . . . . . . . . . . . . . . . . . . . . . . . . . . . . . . . . . . . . . . . . . . . . . . . Power. . . . . . . . . . . . . . . . . . . . . . . . . . . . . . . . . . . . . . . . . . . . . . . . . . . . . . . . Switch Functions . . . . . . . . . . . . . . . . . . . . . . . . . . . . . . . . . . . . . . . . . . . . . . . . Indicators . . . . . . . . . . . . . . . . . . . . . . . . . . . . . . . . . . . . . . . . . . . . . . . . . . . . . Function Tones . . . . . . . . . . . . . . . . . . . . . . . . . . . . . . . . . . . . . . . . . . . . . . . . . Power On . . . . . . . . . . . . . . . . . . . . . . . . . . . . . . . . . . . . . . . . . . . . . . . . . . . . . Volume Setting . . . . . . . . . . . . . . . . . . . . . . . . . . . . . . . . . . . . . . . . . . . . . . . . . In-Use Screens . . . . . . . . . . . . . . . . . . . . . . . . . . . . . . . . . . . . . . . . . . . . . . . . . Call Decoder . . . . . . . . . . . . . . . . . . . . . . . . . . . . . . . . . . . . . . . . . . . . . . . . . . . Paging Feature . . . . . . . . . . . . . . . . . . . . . . . . . . . . . . . . . . . . . . . . . . . . . . . . . .. .. .. .. .. .. .. .. .. .. .. .. .. .. .. .. .. .. .. .. 17 17 17 20 21 21 22 22 23 24 5 Contents Installation . . . . . . . . . . . . . . . . . . . . . . . . . . . . . . . . . . . . . . . . . . . . . . . . . 27 Overview . . . . . . . . . . . . . . . . . . . . . . . . . . . . . . . . . . . . . . . . . . . . . . . . . . . . . . . . . . . . . 27 Required Equipment . . . . . . . . . . . . . . . . . . . . . . . . . . . . . . . . . . . . . . . . . . . . . . . . . . 27 Generic System Diagram . . . . . . . . . . . . . . . . . . . . . . . . . . . . . . . . . . . . . . . . . . . . . . . 28 Setup Mode Switch Functions . . . . . . . . . . . . . . . . . . . . . . . . . . . . . . . . . . . . . . . . . . . . . . 28 Paging Encoder Setup . . . . . . . . . . . . . . . . . . . . . . . . . . . . . . . . . . . . . . . . . . . . . . . . . 30 Unselect Volume Setup . . . . . . . . . . . . . . . . . . . . . . . . . . . . . . . . . . . . . . . . . . . . . . . . 32 Installation of System Components . . . . . . . . . . . . . . . . . . . . . . . . . . . . . . . . . . . . . . . . . . 32 Wall Mounting of the Remote . . . . . . . . . . . . . . . . . . . . . . . . . . . . . . . . . . . . . . . . . . . . 32 Power Connections . . . . . . . . . . . . . . . . . . . . . . . . . . . . . . . . . . . . . . . . . . . . . . . . . . . 33 External Audio Connections . . . . . . . . . . . . . . . . . . . . . . . . . . . . . . . . . . . . . . . . . . . . . 33 Supervisor Takeover Connection . . . . . . . . . . . . . . . . . . . . . . . . . . . . . . . . . . . . . . . . . . 34 Line Connections . . . . . . . . . . . . . . . . . . . . . . . . . . . . . . . . . . . . . . . . . . . . . . . . . . . . . 34 Level Setting of System Components . . . . . . . . . . . . . . . . . . . . . . . . . . . . . . . . . . . . . . . . . 35 Setting TX Audio Level Using External Test Equipment . . . . . . . . . . . . . . . . . . . . . . . . . . 35 Single Remote - No External Test Equipment . . . . . . . . . . . . . . . . . . . . . . . . . . . . . . . . . 36 Multiple Remotes - No External Test Equipment . . . . . . . . . . . . . . . . . . . . . . . . . . . . . . . 36 Setting the Transmit Deviation . . . . . . . . . . . . . . . . . . . . . . . . . . . . . . . . . . . . . . . . . . . 38 Adjusting the Equalization Curves . . . . . . . . . . . . . . . . . . . . . . . . . . . . . . . . . . . . . . . . . 38 Controls and Jumpers . . . . . . . . . . . . . . . . . . . . . . . . . . . . . . . . . . . . . . . . . . . . . . . . . . . . 40 Controls . . . . . . . . . . . . . . . . . . . . . . . . . . . . . . . . . . . . . . . . . . . . . . . . . . . . . . . . . . . 40 Jumpers . . . . . . . . . . . . . . . . . . . . . . . . . . . . . . . . . . . . . . . . . . . . . . . . . . . . . . . . . . . 41 Terminal Connections . . . . . . . . . . . . . . . . . . . . . . . . . . . . . . . . . . . . . . . . . . . . . . . . . . 42 Key Cap Labels (Master Sheet) . . . . . . . . . . . . . . . . . . . . . . . . . . . . . . . . . . . . . . . . . . . . . 44 Programming . . . . . . . . . . . . . . . . . . . . . . . . . . . . . . . . . . . . . . . . . . . . . . . 45 Overview . . . . . . . . . . . . . . . . . . . . . . . . . . . . . . . . . . . . . . . . . . . . . . . . . . . . . . . . . . 45 Installing the ZIPR Software . . . . . . . . . . . . . . . . . . . . . . . . . . . . . . . . . . . . . . . . . . . . . 45 Serial Interface . . . . . . . . . . . . . . . . . . . . . . . . . . . . . . . . . . . . . . . . . . . . . . . . . . . . . . 46 Tips on Using the Program . . . . . . . . . . . . . . . . . . . . . . . . . . . . . . . . . . . . . . . . . . . . . . 47 Feature Set Reference . . . . . . . . . . . . . . . . . . . . . . . . . . . . . . . . . . . . . . . . . . . . . . . . . 50 Programming a Remote . . . . . . . . . . . . . . . . . . . . . . . . . . . . . . . . . . . . . . . . . . . . . . . . 63 Programming Specific to the Model 284 . . . . . . . . . . . . . . . . . . . . . . . . . . . . . . . . . . . . . 73 Paging Format Data Tables . . . . . . . . . . . . . . . . . . . . . . . . . . . . . . . . . . . . . . . . . . . . . . 75 6 025-9346G General Introduction General The Model 280 and Model 284 Digital Tone Remotes contain all the unique features and audio performance required to handle critical communications in the public safety and utility market segments. It is designed to provide the highest quality audio and most dependable operation to fully support the rigorous demands of emergency, multi-operator applications. This family of Digital Tone Remotes is programmable so that they may be customized to meet the needs of any dispatch center. They are EIA-compatible and interface seamlessly to the most popular brands of base stations and repeaters, such as those from Motorola, General Electric, and E.F. Johnson. They all support both 2-wire simplex and 4-wire duplex operation. The Model 284 can support lines to four separate base stations or repeaters. Parallel Status Indication Most tone remotes only display the last command sent by that particular remote. This creates confusion in multi-operator applications where several remotes control the same base station. This can be crucial for public safety dispatchers who need to know the exact configuration of the base station without guesswork. With the Model 280, however, the display of each remote can be updated when any remote in the system sends a command to the base station. A Model 280 will show the latest base station frequency as well as other parameters such as intercom and privacy. The Model 284 is also capable of parallel status indication, and can provide parallel status for all four base stations. Whenever the operator switches from one line to another, the remote will update its display with the current status for that base station. 7 Introduction Digital Audio The digital processing of voice audio is a major innovation in the performance of tone remote controllers. It not only provides clean and sharp audio at the speaker, but it also makes the remote easier to use. An operator can begin speaking immediately upon pressing the transmit button. With other tone remotes, it is necessary to wait first for the function tones to be sent to the base station; otherwise, the initial syllables of the operator's words are clipped off because the station was not keyed yet. The Models 280 and 284 include an innovative, momentary digital delay that buffers the voice audio while the remote is sending the function tones. This supports critical communications by always allowing the dispatchers to speak instantly, instead of having to force themselves to remember to wait a second to let the remote catch up. The capability to speak immediately makes the Models 280 and 284 ideal for upgrading dispatch centers where the operators are accustomed to using DC remotes. They can transition to the new tone remote equipment without having to develop a new set of habits when they go to transmit. The Model 280 and 284 have the capability to mute all incoming guard and function tones from parallel remotes. A tone detector combined with a momentary audio delay allows for complete tone muting. Automatic Audio Leveling Most remote-controlled radio systems require control from multiple points. The various audio levels are thus often quite different, depending upon their point of origin and the path taken back to the base station. Mobile radios, parallel remotes, and distant remotes may all sound different to the operator. The Zetron Digital Tone Remotes address these issues through the use of high-quality, digital audio processing similar to that used in CD players. Even if a given audio level fluctuates on a daily basis, these remotes detect the change and compensate for it. Reliable Audio Quality Other tone remotes use analog filters and tone generators that require precise adjustment and ongoing maintenance. If these designs are not serviced regularly, they will degrade with time and temperature, and eventually become unreliable and offer poor quality audio. The circuits in the Digital Tone Remotes, on the other hand, are crystal-controlled for stable operation over the specified temperature range. The audio quality does not drift and suffer with age. The remote even performs a self-test every time it is powered up to verify proper operation. 8 025-9346G General Paging Encoder The Digital Tone Remote is equipped with a versatile, built-in, paging encoder. This provides an easy method of selecting specific field radios and pagers for receiving alerts and voice pages. The encoder supports Two-Tone (both 100- and 1000-call), DTMF (all 16 tone pairs), Five-Tone signaling (EIA, CCIR, ZVEI tone groups), and Pulsed-Tone Dialing. Since it is built-in to the remote, it saves desk space in the dispatch area and eliminates extra wiring and interface problems during installation. One of the most unique features of the encoder is a page-by-name database. As soon as a pager code is entered, the name of the person assigned to that pager appears on the display to verify the selection. If the operator does not know the pager code to begin with, he or she can quickly scroll through the whole list of names in the database until the right choice is found. The encoder is ergonomic and easy-to-use even during emergencies. To further support emergency applications, up to 10 fixed paging stacks can be preprogrammed into the Digital Tone Remotes. Like a telephone speed-dial number, a stack page is a sequence of pages (up to 10 pager codes) sent one after the other, which is initiated with no more key strokes than an individual page. Operator Interface An operator has two ways to transmit. The operator may simply press the TRANSMIT key on the deskset and begin talking. The Digital Tone Remote picks up his or her speech on its built-in electret microphone and an automatic level-control maintains proper gain. The operator will hear the receive audio from the base station over the deskset's built-in speaker. For more private conversations, the operator can use the handset. Lifting the handset out of its cradle automatically mutes the deskset speaker and microphone, and shifts those functions to the handset. The TRANSMIT function is also shifted to the press-bar on the handset. Everything is automatically shifted back to the deskset when the handset is returned to its cradle. One exception to this automatic control swapping is the PAGE function. Pages can only be made using the TRANSMIT button on the deskset, regardless of whether the handset is off hook or not. The Digital Tone Remotes also provide connections inside the deskset to support applications requiring external desk microphones, or headset/footswitch combinations. Liquid-Crystal Display A high quality LCD display provides for both ease-of-use and makes the maximum amount of information available to the operators. For quicker and more secure frequency selection, each frequency can be displayed with an accompanying text string. For page-byname purposes, text strings can be assigned to individual pager codes. To provide a visual indication that the system is operating at adequate volume levels, VU meter is included on the display for both receive and transmit levels. For further 9 Introduction convenience, a battery-backed clock is included on the display which can be programmed for either the 12- or 24-hour format. This clock can also be disabled during setup for dispatch centers that require the use of a central, master clock. Programmable Key Functions The Zetron Digital Tone Remotes have been specifically designed to support being customized to fit the exact needs of the end user. The installer simply plugs in a PC and selects which functions are to be assigned to the programmable keys on the remote. Once the installer has programmed a single remote, the configuration can be saved and then quickly uploaded into other units, allowing the installer to quickly clone as many parallel remotes as the system requires. The assignable functions include the following: • Single frequency selection assigned to each key (F1 - F8) • Coded/Clear • Privacy • Second receiver mute On/Off • Mute • Wild I, Wild II • 1 kHz Alert • Siren Alert • High/Low Alert • Off-hook Speaker Mute • Unselect Mute • Call Decoder Mute • Double frequency selection assigned to the top row of keys (F1/F2, etc.) • • • • • • • • • Intercom Repeat On/Off PL1, PL2, PL3, PL4 Monitor Supervisor takeover 5-beep Alert Fast Siren Alert Instant Call Hook Disable Since the programming is done in software, there is no need to spend time moving jumpers or making other tedious adjustments. Adding capability to existing units is a snap since a unit does not have to be opened to make operational changes. Adding frequencies or pagers is as simple as editing the system programming file on a PC, so no messy, time consuming hardware changes are required. An additional advantage of the Digital Tone Remotes being programmed from a PC is that the programming software can print out complete hard copy of how a remote is programmed. This makes it easy to do the right thing and document the system setup for future reference. Privacy Mode and Supervisory Control A privacy feature may be implemented during multi-remote applications. This allows an operator to silence and lock out other, parallel Model 280s or 284s in the system. The other operators will not be able to initiate any functions until the privacy mode is released, however, their displays will still indicate the true status of the radio station. 10 025-9346G General An output is provided for supervisory takeover control. In an emergency situation a supervisory operator can cut off other remotes to seize immediate control of the system. The remote used by this supervisor would be wired in the system such that, electrically speaking, it was the closest remote in the system to the base station termination panel. The output on the deskset is an open-drain FET that can be used to operate an external, usersupplied relay. When operated, this relay would be used to break the connection to the other remotes in the system, and would supply the needed 600 Ω termination to the line. Call Decoder The call decoder feature works in conjunction with a Zetron HEAR Decoder and allows field radios to alert a specific remote or group of remotes. This is useful for cases where the remote operators wish to hear only those transmissions intended for themselves and not hear all traffic on the channel. When an incoming call is decoded, the alerted remote (or remotes) will unmute audio, flash an LED, and (optionally) send an audible alert tone out the speaker. 11 Introduction Features Feature Base Stations (number of lines) Frequencies Keys Alphanumeric display of channel names Unselect audio Parallel status Parallel function tone muting Instant transmit (talk during function tones) Privacy mode Intercom mode Clock VU meter for transmit and receive level Paging encoder 4-wire line interface, full duplex audio Handset, speaker, front panel mic Line operated Transmit light Programmable hook switch functions Accessory audio port Selectable dynamic range and mic gain Alert tones Call Decoder Model 280 Model 284 1 4 F1 to F8 F1 to F8 9 programmable, 9 programmable, transmit, keypad for transmit, 4 line select, paging keypad for paging yes yes no yes yes yes yes yes yes yes yes yes advanced advanced standard standard yes yes yes yes yes yes yes yes yes yes yes yes yes yes yes yes yes yes yes yes Options • Programming kit including cable, adapter, and PC software (P/N 950-9449) 12 025-9346G Overview Specifications Overview This section of the manual lists all of the physical and electrical specifications of the Zetron family of Digital Tone Remotes. Whenever an item applies only to, or specifically excludes, a particular model of remote, this will be noted. Part Numbers Item Part Number Model 280 Digital Tone Remote 901-9479 Model 284 Multi-Line Tone Remote 901-9498 Switching power supply 802-0692 Programming kit, includes the following: 950-9449 • Zipr Configuration Utility • Serial Adapter • 6-Conductor modular cable 601-1085 815-9136 709-7365 13 Specifications General Power DC Standby Connections Temperature Range Size / Weight Adjustments Display LEDs Controls Configuration Data Retention Functions Selective Calling Filters Tx Audio Delay Rx Audio delay Line Type Line Connector Audio Input Audio Output Distortion Frequency Response 14 10.5 - 16 VAC or DC, draws 650 mA maximum, 300 mA nominal, Optional wall transformer Connection for standby power, 11 - 14 VDC, 650 mA maximum Power supply, standby power, line interface (2- or 4-wire), PTT open drain output, supervisor open drain output, external PTT input, external audio input, external audio output, ground. Uses screw terminal connectors. 0° - 60° Celsius, 95% relative humidity at +50°C (non-condensing) 8.3"W x 4.4"H x 9.5"D 3 lb. (the Model 284 is 4 lb.) Line Transmit level trim, the Model 284 has control for each line 2-line by 16-character LCD indicates station status, time of day, transmit and receive VU level, paging capcode entries, and operating prompts (paging, talk, etc.) Alphanumeric labels (names) up to 16 digits may be assigned to each frequency of each line [Model 284 = (F1 to F8)(4 lines) = 32 labels] The Model 284 has VOX, Select, Transmit, and LOTL indications for each line Transmit, Monitor, and programmable LEDs per switch function Volume, Transmit, Monitor, 16-digit keypad for paging, Clear, and nine assignable keys Done via PC with adapter, cable, and PC software (programming kit is optional) Nonvolatile EEPROM Assignable function tone frequencies from 650-2050 Hz; Single frequency select (F1-F8), Double frequency select (F1/F2), Coded/Clear, Intercom, Privacy, Repeat on/off, Rx2 Mute on/off, PL1, PL2, PL3, PL4, Wild I, Wild II, Supervisor takeover, Mute, 5-beep Alert, High/Low Alert, Siren Alert, Fast-Siren Alert, Steady Alert, Instant Call, Off-hook speaker mute, Hook disable, Call Decoder Mute, and Monitor. The Model 284 has Unselect Mute. Two-Tone, DTMF, Five-Tone, and Pulsed Tone Dialing. Includes leading digit multiformat selection, strapped digits, alert tones, tone-only or tone & voice per format, gain and equalization curves selectable per format Tx notch filter removes guard tone components from microphone audio; Rx notch filter removes guard tone from speaker and handset audio. Intelligent audio processing may be enabled so that parallel remote function tones are not heard Selectable on/off to delay microphone audio during guard and function tone transmission Selectable on/off to delay speaker and ear piece audio so that parallel remote function tones may be detected and muted 2-wire, or 4-wire, leased line voice grade audio circuit, or copper connection Screw terminals 600 Ω or 6000 Ω impedance, accommodates line losses up to 20 dB Adjustable up to +12 dBm into 600 Ω < 2% at full output, Signal-to-noise > 50 dB, Hum and Cross-talk all -50 dB at full output -3 to +1 dB from 250-3000 Hz. (except for the guard tone notch) 025-9346G Programmable Items Compression Input level increase of 30 dB above knee of compression causes < 3 dB output increase Programmable Items Guard Tone High Level Guard Tone Duration Low Level Guard Tone Duration Function Tone Duration Clock Display VU Meter Display Function Frequencies Monitor Frequency PL Strip Frequency Function Keys Programmable Keys #1 through #4 2100, 2175, 2325, 2600, 2800, 2970 Hz. Guard tone notch will follow 120 mSec default, selectable 0-900 mSec. Tx audio delay will follow Continuous during transmit 40 mSec default, selectable 0-250 mSec. Tx audio delay will follow On/Off, 12/24 hour format, time set, Displays Hours:Minutes On/Off, two styles available, Normal or Precise 650, 750, 850, 950, 1050, 1150, 1250, 1350, 1450, 1550, 1650, 1750, 1850, 1950, or 2050 Hz Any function frequency Any function frequency 9 programmable keys may be assigned specific functions, the 4 keys in the top row include green and red LEDs to indicate selected status, they would typically be used when more than four frequencies (F1-F4) are required, the 4 keys in the second row include single red LEDs to indicate status, different function tones may be sent "toggle" keys such as Coded/Clear, the LED shows the current selected function Can be programmed as: No function, Single Frequency select (F2), Double Frequency select (F3/F4), Coded/Clear, Intercom, Privacy, Repeat On/Off, Rx2 Mute On/Off, PL1, PL2, PL3, PL4, Wild I, Wild II, Supervisor takeover, Mute, 1 kHz Alert, 5-beep Alert, High/Low Alert, Siren Alert, Fast-Siren Alert, Instant Call, Off-hook Speaker Mute, Hook Disable, Call Decoder Mute, Unselect Mute (Model 284 only) Can be programmed the same as keys 1-4, except that they cannot support Double Frequency select. Programmable Keys #5 through #8 Can be programmed as: Monitor, Page Send, or any other non-Frequency select Programmable Key #9 (located above Transmit function key) The Model 284 has four line select keys located between the programmable Line Select Keys Rx Audio Delay Tx Audio Delay function keys and the paging keypad. Each key has both a green and a red LED for status indication. Green is the selected line on that remote. Flashing red indicates Vox activity on a line. Rapidly flashing red indicate the Call Decoder has been triggered. Solid red indicates that the station controlled by a line is actually in transmit. On/Off. Mute function tones from parallel remotes On/Off Allows user to begin speaking while the function tones are sent 15 Specifications Alphanumeric Labels Speaker Audio Mute Timeout Unselect Audio 16 character names for each frequency select (F1-F8), the Model 284 has a full set of programmable labels for each line controlled Programmable as to whether the speaker is muted or active when the handset is off-hook Programmable from 0 to 240 seconds The Model 284 can provide combined select and unselect audio at its speaker. Audio from unselected lines is summed at individually programmable levels. If line 4 is not used to control a station, it may be used to drive an external, amplified speaker with separate unselect audio. Paging Database Stack Page Formats Tone & Voice Talk Time Instant Calls 50 entries maximum, 10-digit capcodes, 16-character display labels Up to 10 stacks of up to 10 capcodes each 2-tone (100-call and 1000-call), DTMF (1-8 digits), 5-tone (up to four digits can be strapped), Pulsed Tone Dialing 0 to 60 seconds, programmable Individual or Stack pages may be initiated with a single key press. Tone Levels High Level Guard Low Level Guard Guard Notch Function Tones Tone Accuracy +3 dB relative to maximum audio level (typically 10 dBm) -30 dB relative to high level guard tone (typically -20 dBm) -50 dB, removes guard tone from Tx audio 10 dB below high level guard tone (typically 0 dBm) 0.5 Hz Call Decoder Decoder Enable Individual Call Group Call Decoder Mute Audible Call Alert 16 Selectable per line Any function frequency Any function frequency Any function frequency Programmable 0 to 240 second duration 025-9346G Operation Overview This section discusses the normal operations of the remote deskset. It will cover how to operate the controls and the indications that should be observed by the operator as he or she uses the unit. Power Earlier models are powered once the power supply is connected. Later models have a power switch at the back/top of the unit. Switch Functions Refer to Figure 1 while reviewing the switch function descriptions for the Digital Tone Remotes. Transmit The TRANSMIT button is located in the lower right corner of the unit. Pressing and holding this button will cause the remote to send the keying tone sequence to the transmitter. When the handset is taken off hook, this control function is automatically transferred to the PTT bar on the handset, and returned again when the handset is replaced in its cradle. If an external desk microphone or foot switch is interfaced to the remote, then their PTT function will be in parallel with the controls in the remote. The second function served by this button is the sending of pages. The PTT bar on the handset, an external foot switch, or an external microphone PTT can only be used to send voice transmissions, not pages. The TRANSMIT button can be programmed to have no other function than sending pages if the end users want it that way. Monitor Typically, this function will be assigned to the button in the lower right corner of the remote just above the TRANSMIT button. Pressing the MONITOR button will unsquelch 17 Operation the receiver for channel monitoring. Pressing TRANSMIT will return the receiver to the squelched condition. Clear The CLEAR button is located on the right hand side of the remote, the top button in the column of three that has the TRANSMIT button in it. This button is primarily used to clear paging entries made from the keypad. It is also used in the SETUP mode. This button has no indicator LED associated with it since its effect will be seen in the LCD display window. Figure 1: Digital Tone Remote Controls Maintenance 11:38 -20-15-10 -7 -5 -3 -1 0 +1 +2 dBm Volume Model 284 Multi-line Tone Remote F1 F2 F3 F4 F5 F6 RPTR ON/OFF Prrogrammable function keys F1 through F8 Keypad for optional paging MUTE ALERT 1 ALERT 2 UNSEL MUTE LINE 1 LINE 2 LINE 3 LINE 4 1 2 3 A 4 5 6 B 7 8 9 C 0 # D Down 18 Base station line select keys CLEAR Programmable function key F9 MON TX Up 025-9346G Line Select Keys This row of keys only exists on the Model 284, Multi-line Tone Remote. One of these keys would be programmed for each one of the base station control lines interfaced to the remote. Each of these keys has two LEDs associated with it, a green and a red. The green LED indicates the currently selected line for this remote. The red LED is used to indicate activity on the other, unselected base station lines. A flashing red LED indicates VOX activity on the associated line, and a solid red light indicates that base station currently being held in transmit. If the Call Decoder feature is enabled, a rapidly flashing red LED indicates that and incoming call has been decoded. The Model 284 keeps track of the control tones used on each line interfaced to it. Whenever a new line is selected, the remote will automatically update its LCD display to show the current status for that base station. Programmable Keys The Digital Tone Remotes have eight programmable buttons arranged in two horizontal rows of four, just below the LCD display. The first row of four are dual function buttons. These buttons are normally used for channel selection and can have either one or two frequencies assigned to each button. The buttons in the top row can also be used for any of the other programmable functions (except Monitor and Page Select). The second row of programmable buttons are single function buttons. The second row of buttons can be used for channel selection (single channel only), or for such functions as intercom, privacy, mute alert tones, etc. There is a ninth programmable button just above the TRANSMIT button. This is usually programmed to be the MONITOR button, however, if the end user does not need the monitor function, then this button can be programmed for any other function except channel select. Aside from the first button in the top row, the rest of the programmable buttons on the deskset can be disabled if they are not going to be assigned a function. Paging Keypad The Model 280 and 284 remotes have a 16 button keypad to support paging entries. Pages can be entered in two ways. The operator can enter the capcode of the pager directly on the keypad, or the list of programmed pagers can be stepped through by using the “*” and “#” keys as up/down scrolling keys. Once the desired capcode is displayed, the operator presses a button to send the page. This Page Send function can be programmed for either the TRANSMIT button or the button just above it. When the operator enters a digit, the deskset looks in its database to see which paging format, if any has been assigned to that leading digit. As the operator continues to enter digits, the deskset will look in the user portion of the database to see if the entire entry matches any of the 50 paging users. If it does, then the name of that user appears in the display. If no match is found, then the entry is tested to ensure that it at least conforms to the capcode rules for the paging format selected. If the leading digit has no paging format 19 Operation assigned to it or the complete entry is not a valid capcode under the rules for the format in use, then the remote will return an error message and prompt the operator to try again. Paging entries can be canceled or cleared either before or after a page is made by pressing the CLEAR button which is next to the upper right hand corner of the paging keypad. When the function of the TRANSMIT button is tied to paging, pressing TRANSMIT will result in a re-transmitting of the last page entered as long as it remains in the display. The operator should press the CLEAR key to return the TRANSMIT button to supporting voice transmissions. One of the attributes that can be programmed on an individual basis for paging users is whether or not a “talk-time” comes after the page. If a talk-time is assigned then the remote will keep the transmitter keyed and pass voice audio to it for the programmed duration. If the operator wishes to extend the talk-time, this can be done by pressing and holding any of the PTT controls at the remote (it doesn't have to be the TRANSMIT button). If the operator wishes to cancel the talk-time before it would normally expire, then momentarily “tapping” any of the PTT controls will cancel the rest of the talk-time. Indicators Refer to Figure 1 while reviewing the display descriptions for the Digital Tone Remotes. Transmit The TRANSMIT button has a red LED inside it that is used to indicate when the base station is in transmit. The remote turns this indicator on and off based on whether or not it is detecting low level guard tone on the system. This means it will indicate properly regardless of which remote in the system has sent the keying tone to the transmitter. Monitor The red LED inside the button programmed for the Monitor function will be lit when ever the remote (or any other remote in the system) has unsquelched the receiver. If another function has been assigned to this key, the LED will be lit whenever that function is selected. Programmable Keys The top row of programmable buttons all have two LED's associated with them, a green and a red. The green LED being lit would indicate the first frequency being selected and the red indicates that the alternate frequency is selected when the button is programmed for two channels. The second row of programmable buttons only have a single red LED each. This LED being lit indicates that the button's function is selected. LCD Display The Digital Tone Remotes are equipped with a two line by sixteen character LCD display. This display is used to provide general status information and specific information about pages being made. The top line is used to show the channel selected (F1, F2, ...etc.) and 20 025-9346G each channel can have an alphanumeric label assigned to it so that operators can more easily confirm they have the correct channel selected. The default use for the bottom line of the display is a VU meter on the left side and a clock on the right. The VU meter gives a real time indication of audio levels for both receive and transmit audio. The clock can be configured to display in either the 12-hour or 24-hour format when the remote is set up. The clock display can also be disabled for those dispatch centers using a central “master clock” for logging their calls. Function Tones The operator should not hear any control/function tones being sent when he or she operates any control on a Model 280 or 284, since the remote mutes its speaker or headset audio while those tones are being sent. They should not hear any tones from parallel remote equipment in the system either, since the remotes are programmed to recognize the tones from other units and mute its receive audio until they are finished as well. The one exception is that the operator will hear any Alert tones sent for as long as the function button is held down. Parallel function tone muting may also be disabled, if desired. The programmable features for the Digital Tone Remotes allow the installer to choose whether the function tones for channel selection are sent when the key-press is made or only after PTT is pressed. In the Model 280 and 284, the installer can also enable or disable the masking of the function tones from other parallel remotes. Power On When power is first applied to the remote, it will display a message in the LCD window similar to Figure 2. Figure 2: Initial Power-On Screen Model 280P V1.0 System Label The top line identifies the remote and gives the version number of its installed software. The lower line can have a 16 character label programmed into it to identify the system the remote is setup for. After a few seconds delay the display will change to the one shown in Figure 3. Figure 3: Retrieving Non-volatile Memory Model 280P V1.0 Configuring...The “configuring” display will remain for a few seconds, as the remote retrieves all of its programmable operating parameters from nonvolatile memory. The hyphen (shown at the 21 Operation right hand end of the lower line) will be rotating slowly in a clockwise direction to indicate that the unit is operating normally during this time. When the remote finishes configuring itself, its display will look something like Figure 4. Figure 4: Post Power-On Display F1 Channel Label 11:35 The exact text appearing on the top line and the presence of the clock display will depend on how the remote was configured when it was initially programmed from a PC. The VU meter will appear as solid “block” characters whenever there is audio present and extend from left to right in bar graph fashion, starting at the left end of the second line. Volume Setting The volume of the receive or intercom audio coming from the local speaker built into the deskset is controlled with the knob next to the LCD display. When you lift the handset and the receive audio is transferred there, the knob still controls the audio level. If the internal speaker is disabled because the remote has been interfaced to an external speaker or headset, the knob will control the receive audio level to the external device as well. In-Use Screens Aside from the annunciator LEDs for each of the function buttons, the Digital Tone Remotes present most of their status information in the LCD display. A typical display might look like Figure 5. Figure 5: A Typical Display Security 8:47 The currently selected frequency (F1-F8) will be displayed on the top row as programmed. This will be updated when any remote in the system selects a new frequency. The individual remote you are looking at will show whatever alphanumeric label is programmed into it for the current channel. The label can be up to 16 characters in length (the full width of the top line). On the bottom line, the current time of day will be displayed on the right end if the clock option is enabled. The time of day and whether it is displayed in a 12- or 24-hour format can be set from the keypad Setup mode (explained in Section 4). The bar graph shown at the left end of the bottom line is typical of what the VU meter would show while receiving or transmitting a message. 22 025-9346G Call Decoder The call decoder feature works in conjunction with a Zetron HEAR Decoder and allows field radios to alert a specific remote or group of remotes. This is useful for cases where the remote operators wish to hear only those transmissions intended for themselves and not hear all traffic on the channel. When an incoming call is decoded, the alerted remote (or remotes) will unmute audio, flash an LE, and (optionally) send an audible alert tone out the speaker. The call decoder feature allows maximum flexibility in using a Zetron HEAR Decoder. The HEAR Decoder decodes over the air DTMF or pulsed tone signaling and translates it function tones sent to the remotes and/or base station. In some installations, the HEAR Decoder will be used without the call decoder enabled. In these cases the HEAR Decoder is responsible for muting and unmuting the base station. An example of this type of system is one in which the base station is muted by something in addition to the HEAR Decoder, such as upon CTCSS or DCS signaling. When the call decoder is used, muting is done at the remote instead of at the base station. This is typically done in order to selectively unmute individual remotes out of a group connected to a signal base station. The call decoder feature is also used for installations in which a visual or audible indicator is necessary to alert the operator of an incoming call. To use the call decoder feature, the call decoder must be enabled using the ZIPR configuration software. On a M284, the call decoder may be enabled on a per line basis. The call decoder is triggered when the remote detects either the group or individual call alert frequency. These frequencies are programmable to any function tone from 650 to 2050 Hz, and should be programmed with its own individual call alert frequency, and a group of remotes would share a common group call alert frequency. The remote can also be programmed to mute receive audio upon receiving a mute function tone, which could originate from either a HEAR Decoder or parallel remote. If the call decoder is enabled, the unit defaults to muting receive audio, and receive audio is muted whenever the handset is placed on-hook. Audio is unmuted when one of the call alert frequencies is detected, if the handset is taken off-hook, or if the remote initiates any transmit activity. A key is also usually programmed for Call Decoder Mute, allowing the operator to manually mute or unmute audio, and providing and LED indication of the current mute status. When a call alert frequency is detected, receive audio is unmuted and an LED starts flashing rapidly. On a M284 the red LED of the corresponding line flashes rapidly, while on a M280 the Call Decoder Mute LED flashes. The flashing stops when the call is acknowledged, which happens if the corresponding line button is pressed, the Call Decoder Mute button is pressed, the handset is taken off-hook, or if the remote initiates any transmit activity. An optional audible alert can also be sent when a call is decoded. This alert tone sends a ringing sound for approximately 1 second followed by a 3 second pause. The alert will continue for a programmable duration of time, or until the operator presses a key or lifts the handset. 23 Operation Paging Feature The number of formats supported, the different ways in which to initiate a page, keyup delay, tone levels, and frequency equalization curves are all organized to allow the end users to operate the remote in the ways that suit their needs rather than reorganizing their operations to suit the remote. The formats supported by the Digital Tone Remote are DTMF (both pre-programmed page and live), Two-Tone 100-call, Two-Tone 1000-call, 5-Tone (0 to 4 digit strapping available), and Pulsed-Tone Dialing (similar to the old IMTS signaling). Each one of these formats can be assigned to one or more leading digits when the remote is programmed by the installer. The equalization curve to use during the transmission of a page in each format can be assigned at the same time. This allows the remote to compensate for whatever losses the path has and ensures the tones arrive at the transmitter in adequate condition to make a good page. The Digital Tone Remote has an internal data base which allows you to pre-define the paging parameters for certain users. The reason for having a database, as opposed to just making the operator manually enter each capcode before paging, becomes more obvious as such features as alphanumeric labels for the users and stack paging are discussed. The remote has a fifty user database in which it holds the capcodes, alphanumeric labels, and transmitter assignments (if any) of individual users. The entries are used to support both identifying pages for the operator before they are sent and the programming of stack pages. In a different part of this database the remote stores the lists for the ten stack pages it can hold. Each stack page can include up to ten individual pages. Leading Digit Entry When the remote is programmed by the installer, each of the paging formats that it will support is assigned a “leading digit” along with all its other parameters such as tone groups, tone timing, strapped digits, and which equalization curve to use. To use this method of paging entry, the operator enters a digit on the DTMF keypad while the remote is not transmitting. If the digit pressed is not assigned as a leading digit the operator will see an error message to that effect. If the digit is a valid leading digit for a paging format, then the second line of the LCD display will show the leading digit and a series of dashes that indicates the required number (or the maximum number) of characters to be entered for that format. The operator then enters the rest of the capcode for the pager or radio they wish to signal. As the capcode is entered, the Digital Tone Remote will scan its 50-user database for a match, and if it finds one it will show the name of the user on the top line of the display. This feature allows the operator to confirm their entry prior to making the page. If the entry is not in the database but conforms to the requirements of the format, the remote will continue to show just the information entered. To make the page, simply press the Page Send button. To cancel a page without transmitting, press the CLEAR button. If the entry made after the leading digit does not conform to the requirements of the format, the remote will return an error message. Use the CLEAR button to cancel the entry and try again. 24 025-9346G Note The transmitting of pages can only be accomplished by pressing either the TRANSMIT button in the lower right hand corner of the remote deskset, or the button above it, depending on the system programming. The PTT bar in the handset will not cause a page to be transmitted, even if the handset is off-hook. Single Format Paging If only one paging format is to be supported, the remote does not require that a leading digit be entered to make a page. The user simply enters the capcode of the pager or radio they wish to signal. Operation proceeds as described above with the exception that no leading digit is entered. Scrolling through the Database If the operator knows the name of the party he or she needs to signal, but is not sure of the paging capcode to send, he or she can scroll through the database of pre-programmed paging users until they find the name they want and then send the page. To start the process of scrolling through the database the operator presses either the “*” or the “#” keys on the DTMF keypad. The remote will start at whatever location the database pointer was set to when the last page or search was done, and, depending on which key is pressed first, work its way up or down the list showing user names on the top line and leading digit/capcodes on the bottom line. The remote will wrap around to the other end of the list any time it crosses the 1-to-50 boundary, going in either direction. Once the desired user is displayed, the operator only needs to press the Page Send button to send out that page. The operator cannot switch to scrolling the database on the fly, that is, the “*” and “#” keys will only initiate the scrolling action if they are the first key pressed for a paging entry. If the operator starts out to do a direct entry of a paging capcode, and then presses the “*” or “#” key, the deskset will treat the key-press as part of the capcode entry and judge it on the basis of whether or not it is a valid entry for the format selected. If the operator realizes after starting the entry that he or she has forgotten the full capcode, the operator should press the CLEAR button first, and then start scrolling through the database with the “*” or “#”. One of the advantages of entering users into the paging database is that, in addition to identifying their pages by name and defining the format and capcode they use, the programmer can also assign the channel they use, if necessary. If the user has a channel assigned, then whenever their page is entered, either manually or by scrolling, the remote will automatically switch the radio to the correct channel before the page is sent out. Once the page is completed, the remote will remain on the channel that the page switched it to, until the operator or a parallel remote makes a change. It is also necessary to enter users’ pages into the database if they are to be part of any stack pages, since the remote calls up the pages from memory based on those user numbers when it is doing a stack page. 25 Operation Stack Paging The Digital Tone Remotes support the function of stack paging, that is, paging a number of different users as the result of a single paging entry on the remote. The Digital Tone Remotes can support a total of ten stack pages, and each of these stacks can have up to ten pagers included in them. The stack must be programmed into the remote by the installer. In order to allow entry of stack pages, this function has a leading digit assigned to it just like the paging formats do. The operator enters this digit and the remote will display it in the bottom line with dashes to prompt for two more digits. The stacks one through ten are called by entering the numbers 90 through 99 respectively. Once you enter the number of the prompt on the bottom line will change to “Stack 1”, “Stack 2”, etc. as appropriate. When you press the TRANSMIT button the remote will go into transmit and start sending the pages in the stack, displaying the name of each user as it sends that user's page. If any of the users in the stack had specific frequencies assigned as part of their paging programming, then the remote will make the frequency selections as part of the stack page too. The base station will remain on the last frequency selected during the stack page. The Alert tones and talk-time (if any) that follow the stack page will be determined by whatever was programmed for the last pager in the stack. If the stack entered has no pagers programmed in it, then the prompt will change to “Unknown user” for about four seconds, and then return to idle without any further action. The leading digit used for stack paging can also be used to page individual database users. If you follow the leading digit with a two-digit number between 01 and 50, the remote will display the user in that slot and you can page them. If the user number you enter is not programmed, the remote will display “unknown code” followed by “* or # searches”, and return to the idle condition. If you enter a number from 51 to 89, the remote will remind you that user numbers lie between 01-50 and stacks 90-99, and then return to the idle state. Live DTMF Signaling The last form of signaling to be discussed is live DTMF. In order for this feature to work, DTMF must already be programmed into the remote as the paging format for one of the leading digits, even if you don't intend to use it for paging in the normal sense. The reason for this is to provide a place in the database for such necessary information as relative level and which equalization curve to use when transmitting DTMF. Unlike the other forms of audible signaling, you do NOT use a leading digit in order to send DTMF live from the remote. What is required is that the remote be in transmit already when you start pressing keys on the DTMF keypad. When we speak of the remote being in transmit, this means the operator needs to be holding down the transmit button, handset PTT bar, or pressing the foot switch of his or her own remote when they start keying in the DTMF. If the radio is transmitting as the result of a keying tone from another remote in the system, then the Digital Tone Remote will think that the operator wants to do leading digit paging and behave accordingly. The DTMF digits transmitted in the live mode go out “live”, with what ever duration and interval timing the operator gives them while pressing the keys. 26 025-9346G Overview Installation Overview This section contains information and instructions on installing Zetron’s Digital Tone Remotes into either new or existing radio systems. It covers both the physical installation of the unit and the initial setting of audio levels. It does not cover the programming of the remote as far as functions of its programmable buttons or its paging feature. Those features are covered in Programming on page 45. Note ! This equipment generates, uses, and can radiate radio frequency energy. If not installed and used in accordance with this manual, it may cause interference to radio communications. Caution! Installation of this equipment should be accomplished by personnel with experience in radio systems. Specialized knowledge in telephone systems is also important to ensure a smooth interface when connecting with the Telco network. Required Equipment The installation of the Digital Tone Remote requires very little equipment. Aside from the hand tools necessary to deal with the site wiring, you need the following items: • Phillips screwdrivers, both #1 and #2 • Flat-blade screwdriver, small “tweaker” size to attach wires at terminal strip and adjust levels • AC voltmeter (RMS), or a dB meter referenced to 600 Ω (this is only necessary in systems with only a single remote) to set the transmit audio levels out of the remote (you can use an oscilloscope if you have to) • A radio service monitor to check and/or set transmit deviation levels 27 Installation Generic System Diagram Figure 6 gives the general layout of a typical remote system. The common cable path will run out from the termination panel at the base station site to the farthest remote in the system. This remote must be set to a 600 Ω impedance in order to properly terminate the transmission line. Any other remotes in the system which are bridged across the line closer to the termination panel must be set to a high impedance in order to keep them from loading the line. The setting of an individual remotes impedance is done with jumpers that are set at the time it is interfaced to the transmission line. Figure 6: Typical Remote System Layout Base Station Remote #1 Hi-Z Termination Remote #2 Hi-Z Termination Remote #3 600 Ω Termination Remote Termination Panel Wire line, or possible leased line Setup Mode Switch Functions While the bulk of the programming necessary to define the functions of a remote is done using a PC and the off-line programming software, there are still some items involved in setting up a unit that are taken care of from the front panel. The instructions given here cover how to enter and exit the Setup mode and the special functions assigned to the keys while in that mode. The Setup mode involves the top two rows of programmable keys on the front of the deskset, and the middle key in the column of three to the right of the DTMF keypad. The top row will be referred to as function keys 1-4 (left to right), the second row as function keys 5-8, and the key above the transmit button is function key 9, as shown in Figure 7. To enter the setup mode, press function keys 1 and 8 simultaneously. The LCD display should say “Setup Mode” on the top line. Once in setup mode, the functions of the nine keys are as described in Table 1. 28 025-9346G Setup Mode Switch Functions While Figure 7 does not show them, nor Table 1 mention them, the four Line Select buttons on the Model 284 remain functional while in the setup mode. The level setting tests can be done on each of the four lines by using the Line Select keys to choose which one to work on. Table 1: Key Functions in Setup Mode Key # Function Description 1 HOURS UP 2 3 MINUTES UP RX dBm METER Used for setting the time of day clock. Press this key multiple times to cycle the hours upward. Holding the key instead will cycle the hours at an increasing rate. If the clock option is not installed, this key will have no function. If the clock option hardware is not installed in the unit but inadvertently the “clock” is enabled via the PC configuration software, the display will show “12:00”. Used for setting the time of day clock. Similar to the Hours Up key. Displays the RX audio level in decibel milliwatts relative to 600Ω. In a multiple deskset installation, this can be used to set the transmit level of each deskset. Since the dBm meter is referenced to 600Ω, you must have the terminating resistor jumpers (JP2 and JP4) set to the “A” position for the reading to be accurate. Press function key 3 again to exit this test. 4 Note: Normally, the VU meter is post AGC. While this setup mode is active, the AGC is disabled for correct dBm meter readings. TRANSMIT LEVEL The one adjustment that needs to be made at the deskset is the transmit level. SET This test provides a single tone of either 300, 1000, or 3000 Hz transmit at 0 dBm. Repeated presses of this key cycle between the three tones. To cancel the test, press function key 9 (typically Monitor), or the CLEAR key. To set the level, connect an AC voltmeter or dBm meter (see Key 3) to the TX audio pair. Adjust the variable resistor marked "TX LVL" for 0 dBm at 1000 Hertz, or 2.19 Volts peak-to-peak (775 millivolts AC RMS). [This will be R3 in the Model 280, and it could be R14, R100, or R99 in a Model 284.] 5 6 7 HOURS DOWN MINUTES DOWN LINE LEVEL SET 8 12/24 HOUR CLOCK DISPLAY CLEAR / CANCEL SETUP MODE 9 Note that a transmit function tone sequence is produced when this setup mode is invoked. This will key up the transmitter on the frequency (F1-F8) that was selected before the setup mode was accessed. This is a useful way to check the transmit deviation. If a different frequency is desired, exit the setup mode (via key 9), select the appropriate frequency, then re-enter the setup mode (via function keys 1 + 8). Used for setting the time of day clock. Similar to Hours Up. Used for setting the time of day clock. Similar to Hours Down. This mode is for setting an approximate transmit level in the absence of a Volt or dBm meter (see key 3). It is only an approximation, but should be sufficient for most installations. Press this button, then adjust the trimmer resistor marked "TX LVL" until the VU meter in the LCD display reads +3.5 dBm. Press the button again to cancel the mode. JP1 (also JP2, JP7, and JP10 in a Model 284) must be in position “B” for this test to work correctly. Selection of 12 or 24 hour mode for the time of day clock (if the option is installed). This key may be used to cancel a test in progress or if no tests are active, return the unit to normal operation. 29 Installation Figure 7: Key Functions in Setup Mode Setup Mode -20-15-10 -7 -5 -3 -1 0 +1 +2 dBm Volume Model 280 Tone Remote “1” Hours Up “2” Minutes Up “3” RX dBm “4” TX Level “5” Hours Down “6” Minutes Down “7” Line Level “8” 12/24 Clock 1 EQ 1 2 EQ 2 3 A 4 5 6 B 7 Freq. ↓ 8 Unsel. Volume 9 Freq. ↑ C Level ↓ 0 # Level ↑ D CLEAR “9” Down Cancel Up Paging Encoder Setup In addition to the function keys used in the basic setup mode, there are additional keys which are assigned special functions used for editing the equalization curves (used to compensate for the frequency response of the line during the transmission of paging tones). These keys are shown in Figure 8. The “1” and “2” keys on the paging keypad are used to select an equalization curve. 30 025-9346G Setup Mode Switch Functions Figure 8: Key Functions for Paging Encoder Setup Equal. #1 Equal. #2 3 A 4 5 6 B Freq. Down Unsel. Volume Freq. Up C Level Down 0 Level Up D Down Clear / Exit Clear / Exit Up Keypad “1” = Test/Adjust Equalization Curve #1 Pressing the “1” key on the paging keypad will send a function sequence out on the channel (F1-F8) that was selected when the setup mode was entered. This will key up the transmitter while a test tone at 0 dBm sweeps from 300 to 3000 Hertz repeatedly. Using a service monitor measuring deviation on the transmit frequency, the frequency response may be equalized so that paging tones are transmitted with equal levels across the frequency spectrum. This test provides 30 points across the spectrum that can be adjusted +/-10 dB each. To make adjustments, use the “*” and “#” keys (also marked as down and up) to adjust the level in dB, and the “7” and “9” keys to select which of the 30 frequency bands to adjust. Holding any of these keys will “freeze” the sweep at the frequency shown on the LCD display so the measurement can be made on the service monitor. For each of the 30 points, adjust the amplitude up or down until the deviation is correct. When all frequency bands have been adjusted, save the equalization by pressing the “1” key again, or cancel the adjustments by pressing the “CLEAR” key or Setup mode Key #9. Keypad “2” = Test/Adjust Equalization Curve #2 Everything works similarly to keypad “1” except that it applies to the second equalization curve data set. To save any changes made, be sure to press the “2” key again prior to pressing the “CLEAR” key or the Setup mode #9 key to exit the test. Cancel the changes made by just pressing “CLEAR” or Setup mode #9 without pressing “2” first. To end the setup mode, press the “CLEAR” key or Setup mode Key #9. The Setup mode will also self-cancel after two minutes of keyboard inactivity. The remainder of the features and options are set in the PC off-line configuration software. On-line help is available within this software. Figure 7 gives a quick overview of keys discussed for front panel setup of the remote. 31 Installation Unselect Volume Setup In a Model 284 the Setup Mode also provides access to setting the volume of unselect audio. The audio level from each line can be set individually in this mode using the keys shown in Figure 8. In actual operation, the composite audio signal is formed by summing the audio from each unselected line at that line’s volume setting. The volume of the selected line’s audio is not affected by this setting. Keypad “8” = Adjust Unselect Volume Pressing the “8” key on the paging keypad allows for adjustment of the unselect volume level of the currently selected line. A bar graph will appear showing the current relative level, and any audio that comes in on the selected line while in this mode will be heard at this volume setting. The volume may be decreased or increased by pressing either the “*” or “#” keys, respectively. The volume from another line may be set by simply pressing the Line key for the new line while in this mode. To terminate this test mode and return to the general Setup Mode, press either the “CLEAR” key, the Setup Mode #9 key, or the keypad “8” key. Unlike the procedure for setting the paging equalization curves, there is no special action required to save the unselect volume settings. The Model 284 will save whatever levels are in effect when this mode is exited. Installation of System Components The following sets of instructions cover connecting the Digital Tone Remote to the system wiring and various pieces of accessory equipment. Wall Mounting of the Remote The Zetron remote is shipped configured for desktop use, but can easily be reconfigured in the field for wall mounting. The only tools needed are a few screwdrivers of appropriate size. This is being covered now because you should make the conversion before connecting wires in order to avoid having to reconnect the wiring on every unit affected. Remove the bottom of the deskset and rotate the bottom 180 degrees. Re-dress the wiring, and then secure the bottom of the case again. Locate the plastic cover for the extension number, found under the handset, and carefully remove it. Use a small screwdriver to remove the screw underneath, and rotate the handset hook so that its “tooth” sticks out to provide a hanger for the handset. Reinstall the screw and the label cover. Hang the unit on the wall by slipping the slide mount holes on its bottom over mounting screws on the wall. 32 025-9346G Installation of System Components ! Caution! To prevent induction of high frequency signals from the circuit board electronics, interface wires should not be allowed to drape over the circuit board, but instead should be routed directly toward the access at the bottom of the unit. Power Connections The Digital Tone Remotes must be properly grounded. The simplest method for proper grounding is to use Zetron's 13.5VDC switching power supply (P/N 802-0692) in a grounded outlet. This power supply accepts 100VAC to 240VAC, uses an IEC power connector, and is certified in several countries. If you are not using the power supply mentioned above, then you must supply your own AC or DC power (or both for DC standby) and a separate grounding wire. For AC power, attach the leads of the 12 volt AC wall transformer to the connections labeled “AC1” and “AC2” of the terminal block “TB3”. For DC power or DC standby, connect 12 volt DC power to the connections labeled “DC+” and “GND” on terminal block “TB3”. Regardless of AC or DC power, an earth ground connection must be made to one of the “GND” terminals of “TB3”. For location and pinout of terminal TB3, see Figure 14 and Table 6 on page 43. ! Caution! For DC Standby applications, the DC power supply level should not exceed +14 volts. External Audio Connections The deskset has a built in front panel microphone and speaker. Should an external audio interface like an external speaker or a desk mic be required, connections for microphone, speaker, and PTT have been provided on the terminal block “TB3”. The speaker output “SPK” is a low level output that follows the front panel volume control. It is for driving a headphone speaker, or other amplified speaker. It does not have the power to drive an external speaker directly. To disable the front panel speaker, put the connector “P4” in the B position. The microphone connection “MIC” is a high impedance (10 kΩ) line level input, which is intended for connection to a dynamic microphone element. The trim-pot R81 sets the gain of this input from 1/10 to 30 times. Adjust it so that U13 pin 3 has approximately 1 Volt peak-to-peak of speech. JP6 should be in Position B when using this input. There is also a “PTT” input that will activate transmit when grounded, for connection to a desk mic or foot-switch. In a Model 284, if an external unselect audio speaker is to be used, it is connected in place of the Line 4 TX pair (Line 4 cannot be used in this configuration). Connect the amplified speaker to the terminals labeled “2W-4” and “2W+4” of terminal strip “TB2”. 33 Installation If a headset with a carbon or electret mic element is to be used with the Tone Remote it should be plugged into the 4-conductor handset jack. A headset interface box is available from Zetron for connecting a 4- or 6-wire headset with a two pronged jack to the handset jack. If a footswitch is to be used with the headset, the footswitch can be wired to the “PTT” input of “TB3” with “JP6” in Position A (no desk mic allowed in this configuration). When using a headset, the handset must be off hook in order for transmit audio to be routed from the headset mic instead of the front panel microphone. The audio levels have been optimized for a handset and will need adjustment if a headset is used. Note With headsets offered by Zetron (P/N 950-0030 and 950-0032): Change R54 to a 20 kΩ (1/8 watt 5%) resistor Change R62 to a 2 kΩ (1/4 watt 5%) resistor With other headsets, pots may be inserted in place of these resistors to achieve the proper audio levels. Supervisor Takeover Connection If several remotes are connected in parallel to a single base station, the remote closest to the base station should be designated as the supervisor remote. A key on this remote can be programmed to toggle the Supervisor Takeover output. When active, the terminal labeled “SUP” of “TB3” will be pulled to ground. This output should be connected to drive a relay or other device which disconnects the other remotes from the system. Line Connections These steps cover connecting the Digital Tone Remote to the wire run from the termination panel. With the bottom cover removed, route the TX pair (TX/RX pair for 2-wire) through the entrance hole of the bottom cover and connect them to the screws labeled “2W-1” and “2W+1” of terminal block TB1. Set the termination jumpers (JP1 and JP4) on the deskset to the high-impedance setting (Position B). For the Model 284, use “2W-2” and “2W+2” of terminal strip “TB2” for the Line 2 TX, “2W-3” and “2W+3” for Line 3 TX, and “2W-4” and “2W+4” for Line 4 TX. Set JP2, JP3, JP7, JP8, JP9, and JP10 to Position B. This step is for 4-wire installations only, skip ahead to step 3 if yours is a 2-wire installation. Route the RX pair through the entrance hole and connect them to the screws labeled “4W-1” and “4W+1” of the terminal block TB1. For the Model 284, use “4W-2” and “4W+2” of terminal strip TB2 for the Line 2 RX, “4W-3” and “4W+3” for Line 3, and “4W-4” and “4W+4” for Line 4. Repeat step 1 (and 2 if applicable) for each deskset in the system. 34 025-9346G Level Setting of System Components All termination jumpers should be in the high impedance position except for the last deskset at the end of each line. If there is only one deskset, then it is the end of the line. Set this deskset to the low impedance mode (JP1 = Position A for 2-wire, and JP4 = Position A for 4-wire. For the Model 284, also set jumpers JP3, JP8, and JP9 to Position A for 4wire, and set jumpers JP2, JP7, and JP10 to Position A for 2-wire). Level Setting of System Components The matter of setting the transmit audio levels out of the remotes in the system will be discussed from two perspectives; a system with only one remote, and a system with multiple remotes. In the case of a single remote, methods involving external test equipment, and a fall-back method if no test equipment is available will both be discussed. In a system using multiple remotes, you should be able to complete the level checks without additional test equipment. After the audio level from the individual remotes has been set, you can then use any of the remotes as a source of audio for setting the transmit deviation at the base station. These examples are written for the Model 280 remote and only refer to R3 as the transmit level control. When working with a Model 284, the procedure is the same except that the correct line should be selected, and the correct level control for the line selected must be used. (Line 1 = R3, Line 2 = R14, Line 3 = R100, Line 4 = R99) Note The “Transmit Level Set” test used in the following procedures will not only cause the remote to put audio tones on the transmission line back to the termination panel, it will also key the transmitter on whichever channel was selected prior to entering the Setup mode on the remote. The installer should ensure that transmitting on the channel selected will not cause any interference with other radio users before starting the test. If it is necessary to select another channel, exit the Setup mode and do so before starting the test. Setting TX Audio Level Using External Test Equipment The first procedure given assumes that the installer has some sort of external test equipment (multi meter or oscilloscope) available to measure the remote’s transmit level. Attach the test equipment across the transmit wire pair. This will be the wires attached to TB1-8 and TB1-9, regardless of whether this is a 2-wire or a 4-wire installation. The transmit pair must have a 600 Ω load on it for this test to work correctly. Enter into the front panel Setup mode by pressing the function keys #1 and #8, as shown in Figure 7. 35 Installation Press function key #4 to start the “Transmit Level Set” test. Cycle the same key until the 1000 Hz test tone is selected. The display should look like Figure 9. The transmitter will be keyed and a 1000 Hz tone will be going out. Figure 9: Transmit Level Set Screen TX Test Tones 1000.0 Hz On the bottom of the remote, locate the potentiometer labeled “TX LVL 1” (R3) and adjust it until meter across the transmit line reads 0 dBm, or 775 millivolts RMS (or 2.19 volts peak-to-peak on an oscilloscope). When finished, press the “CLEAR” key or function key #9 to terminate the test. Press the same key again to exit the Setup mode. Single Remote − No External Test Equipment The method that follows is an alternate method, to be used only in the event that you need to install a single remote without any test equipment available. It is only an approximation, but it should be good enough to get you by in most systems until you can check the level with a meter. JP1 (and JP2, JP7, and JP10 for Model 284) must be in position B (unterminated) for this to work correctly. Enter into the front panel Setup mode by pressing the function keys #1 and #8, as shown in Figure 7. Enter into the Set Line Level test by pressing function key #7 on the remote. The display will show the name of the test mode momentarily, and then switch to a screen that looks something like Figure 10. Figure 10: Line Level Set -2.3 Tx dBm Locate the potentiometer labeled “TX LVL 1” (R3) on the bottom of the unit and adjust it until the digital dBm readout on the top line of the display reads +3.5 dBm. Press the #7 function key again to exit the Line Level test, and then press the CLEAR key or the #9 function key to exit the Setup mode. Multiple Remotes − No External Test Equipment The following steps can be followed in systems that have multiple remotes. It allows the installer to use one of the remotes in the system as the test meter while setting the levels on 36 025-9346G Level Setting of System Components all the other remotes. Doing the test this way may require the installer to enlist the aid of another person and set up temporary communications between the remote sites, depending on the layout of the system and the distance between remotes. The remotes should be connected to a base station or equivalent 600 Ω termination during this test. The last deskset in the system (the one set to 600 Ω to terminate the line) will be used as the level meter while setting the Tx level in the other remotes. Enter into the Setup mode by pressing both function keys #1 and #8, as shown in Figure 7. When the setup screen is displayed, press function key #3 to enter the RX dBm Meter function. The display will show a digital readout on the top line that should look like Figure 11. Figure 11: Rx dBm Meter Screen -30 dBm On another deskset in the system, enter the Setup mode using the #1 and #8 function keys, then press function key #4 to enter the Transmit Level Set function. Cycle the same key again until the display on that deskset indicates that the test tone going out is at 1000 Hz. Locate the potentiometer on the bottom of the deskset labeled “TX LVL 1”(R3) and adjust it until the level read on the terminating remote’s display is +0.0 dBm for a 2-wire installation, or +3.0 dBm for a 4-wire installation. Once this is done, press the CLEAR key or function key #9 to stop the transmit tone. Then press the key again to exit the Setup mode. Repeat steps 2 and 3 for all of the other remotes in the system except the one being used as a dBm meter. Once you have finished with all of the other remotes in the system, return to the terminating remote and press function key #3 again to take it out of the Rx dBm Meter mode. Press function key #4 to place this remote in the Transmit Level Set mode. Cycle the same key to select the 1000 Hz test tone. Go to one of the other remotes and enter the Setup mode. Then press function key #3 to start the Rx dBm Meter function. Adjust the “TX LVL 1”(R3) potentiometer on the terminating remote until the Rx dBm meter reads +3.0 dBm (NOT +0.0 dBm like the other remotes). Once you are finished, press the CLEAR key or function key #9 twice to cancel the test mode and exit the Setup mode on the terminating remote. Then press function key #3 on the remote acting as a meter, and finally press CLEAR or function key #9 to exit the Setup mode on that remote as well. 37 Installation Setting the Transmit Deviation Once the transmit audio level out of the remote desksets have been set, you can use any remote in the system as a source of test tone for setting the base station transmitter deviation. Set up your service monitor to measure the deviation on one of the system’s channels. Select a deskset and use it to select the same channel on the base station that you set the service monitor for. Then enter the Setup mode by pressing function keys #1 and #8. Start the Transmit Level Set test by pressing function key #4, and then press it again to select the 1000 Hz test tone. Now that you have a 1000 Hz tone at 0 dBm on the line, follow the procedure for your base station or termination panel to set the final transmitter deviation to the proper level. Remember that the remote will exit Setup mode automatically after two minutes of no front panel key-press activity, so be ready to measure and adjust when you start this, or you may have to put the remote back into the Setup mode when you are only half through. When you are finished you can exit the test and the Setup mode by pressing either the CLEAR key or function key #9 twice. Adjusting the Equalization Curves When pages are made, it is highly desirable that the paging tones all cause an equal amount of deviation at the transmitter, regardless of their frequency. The transmission path between the remotes and the transmitter can attenuate the paging tones selectively and thus interfere with this happening. The remotes have two separate equalization curves available that can be both set up and assigned to the various paging formats independently. These equalization curves are only applied to the transmission of paging tones. They are not used during the transmission of control tones or voice. The equalization curves can be looked at, altered, or even set to one of four preset equalization curves by using the off-line programming software (ZIPR) that is used to set up the rest of the deskset’s features. The equalization curves shown on the PC cover the audio spectrum from 300 to 3000 Hz (inclusive) in 28 steps of 100 Hz each. The relative output level at each frequency can be adjusted over a range from -10 to +10 dB, in 1 dB increments. While this feature of the ZIPR software is convenient, it does not allow you to test the results of your adjustments in real time. To do that you need to set up your service monitor and use one of the desksets in the Setup mode. Set up your service monitor to measure deviation on one of the base station’s channels. Select the same channel on one of the remotes and then place the remote in the Setup mode by pressing function keys #1 and #8 together. Choose the equalization curve you want to work on and press the appropriate key on the deskset’s DTMF keypad (see Figure 8). For this example press the digit “1” for equalization curve #1. 38 025-9346G Level Setting of System Components The remote will key the transmitter and then begin sweeping the audio band from low to high. The display should appear as shown in Figure 12. To step up or down through the range of frequencies use the “9” or the “7” key respectively. The frequency displayed in the screen will change, and its current output level will be displayed. To get the sweep to pause and remain on a single tone long enough to make a measurement, press the “7” or the “9” key and hold it down for as long as the measurement takes. This takes a little technique since the unit will always step as you press the key and then stop on the next tone as you hold it. Figure 12: Setting the Equalization Curve Set EQ curve 1 937 Hz, 0 dB If your measurement indicates that the tone’s level needs to be increased or decreased, release the key you are holding and use the “*” or “#” keys respectively to lower or raise the tone’s output level. The new output level will be displayed as you change it. Repeat steps 3 and 4 until the unit can sweep through the whole range without the deviation level on the service monitor varying excessively at any point. Press the “1” key again to save the equalization curve #1 settings (you would use “2” with curve #2). The deskset displays the message “Comprehending...”, as shown in Figure 13, while it stores the new curve data in its memory. When it finishes this and returns to the Setup mode prompt, press the CLEAR key or the function #9 to exit the Setup mode. Figure 13: Exiting the Equalization Test Set EQ curve 1 Comprehending Once the curves have been adjusted for the system in the remote deskset you were using, the ZIPR software can be used to read the new data to a file on disk and to clone that data into other remotes to save having to run this test on each and every unit. 39 Installation Controls and Jumpers The two following lists are made available as a quick reference for the technician or installer. The explanations are brief and to the point. They mainly serve a fast way to find out a little more about controls and jumpers found on the analog board schematics. Controls 40 R3 TX Level (1) R5 Volume R14 TX Level (2) R99 TX Level (4) R100 TX Level (3) Found on the fourth page of the schematics, this potentiometer is used to set the level of the transmit audio leaving the deskset for the termination panel. In a Model 284, this would be the control for Line 1. Found on the third page of the schematics, this potentiometer is used to control the level of the receive audio coming from the deskset speaker or the handset ear piece. Found on the fourth page of the schematics, this control is used in the Model 284 to set the transmit level for Line 2. Not used in the Model 280 tone remote. Found on the fifth page of the schematics, this control is used in the Model 284 to set the transmit level for Line 4. Not used in the Model 280 tone remote. Found on the fifth page of the schematics, this control is used in the Model 284 to set the transmit level for Line 3. Not used in the Model 280 tone remote. 025-9346G Controls and Jumpers Jumpers JP1 2-wire RX Termination (1) JP2 2-wire RX Termination (2) JP3 4-wire RX Termination (2) JP4 4-wire RX Termination (1) JP5 JP6 JP7 External Audio Enable 2-wire RX Termination (4) JP8 4-wire RX Termination (3) JP9 4-wire RX Termination (4) JP10 2-wire RX Termination (3) Selects whether the unit provides a high or low impedance termination to Line 1. The default position is “A”, which terminates the line at 600 Ω. In multiple remote systems, all the remotes should be in the “B” position (6000 Ω), except for the farthest remote that terminates the line in 600 Ω. JP1 should always be in position “B” for 4-wire systems. This jumper is used in the Model 284 to select a high or low impedance termination to Line 2. In multiple remote systems, all the remotes should be in the “B” position (6000 Ω), except for the farthest remote that terminates the line in 600 Ω. JP2 should always be in position “B” for 4wire systems. Not used in the Model 280 tone remote. This jumper is used in the Model 284 to select a high or low impedance termination to Line 2. In multiple remote systems, all the remotes should be in the “B” position (6000 Ω), except for the farthest remote that terminates the line in 600 Ω. JP3 should always be in position “B” for 2wire systems. Not used in the Model 280 tone remote. Selects whether the unit provides a high or low impedance termination to Line 1. The default position is “A”, which terminates the line at 600 Ω. In multiple remote systems, all the remotes should be in the “B” position (6000 Ω), except for the farthest remote that terminates the line in 600 Ω. JP4 is always in position “B” for 2-wire. There is no JP5 in the Digital Tone Remotes. Enables or Disables the external mic input. Default position is disabled, position “A”. This jumper is used in the Model 284 to select a high or low impedance termination to Line 4. In multiple remote systems, all the remotes should be in the “B” position (6000 Ω), except for the farthest remote that terminates the line in 600 Ω. JP7 should always be in position “B” for 4wire systems. Not used in the Model 280 tone remote. This jumper is used in the Model 284 to select a high or low impedance termination to Line 3. In multiple remote systems, all the remotes should be in the “B” position (6000 Ω), except for the farthest remote that terminates the line in 600 Ω. JP8 should always be in position “B” for 2wire systems. Not used in the Model 280 tone remote. This jumper is used in the Model 284 to select a high or low impedance termination to Line 4. In multiple remote systems, all the remotes should be in the “B” position (6000 Ω), except for the farthest remote that terminates the line in 600 Ω. JP9 should always be in position “B” for 2wire systems. Not used in the Model 280 tone remote. This jumper is used in the Model 284 to select a high or low impedance termination to Line 3. In multiple remote systems, all the remotes should be in the “B” position (6000 Ω), except for the farthest remote that terminates the line in 600 Ω. JP10 should always be in position “B” for 4wire systems. Not used in the Model 280 tone remote. 41 Installation Jumper Configuration The line impedance of the tone remote is configured using jumpers. Remotes are configured for either a low impedance (600Ω) if they terminate the transmission line, or a high impedance (6000Ω) if they do not. Table 2 covers the configuration of the Model 280 remote. Table 3 covers the configuration of all four line inputs on the Model 284. Table 2: Model 280 Jumper Configuration Line Number Terminating Remote (600Ω) Non-Terminating Remote (6000Ω) Line 1 = 2-wire Line 1 = 4-wire JP1 = A & JP4 = B JP1 = A & JP4 = A JP1 = B & JP4 = B JP1 = B & JP4 = B Table 3: Model 284 Jumper Configuration Line Number Terminating Remote (600Ω) Non-Terminating Remote (6000Ω) Line 1 = 2-wire Line 1 = 4-wire Line 2 = 2-wire Line 2 = 4-wire Line 3 = 2-wire Line 3 = 4-wire Line 4 = 2-wire Line 4 = 4-wire JP1 = A & JP4 = B JP1 = A & JP4 = A JP2 = A & JP3 = B JP2 = A & JP3 = A JP10 = A & JP8 = B JP10 = A & JP8 = A JP7 = A & JP9 = B JP7 = A & JP9 = A JP1 = B & JP4 = B JP1 = B & JP4 = B JP2 = B & JP3 = B JP2 = B & JP3 = B JP10 = B & JP8 = B JP10 = B & JP8 = B JP7 = B & JP9 = B JP7 = B & JP9 = B Terminal Connections Table 4, Table 5, and Table 6 provide the pinout descriptions for the three connection terminal strips found on the main PCB of the Digital Tone Remotes. Figure 14 shows the relative position of the terminal strips to one another, and the order in which their pins are numbered. Please note that the terminal designated TB2 is present only in the Model 284. Table 4: Terminal Pinouts for TB1 42 Pin # Label 1 GND 2 GND 3 PTT OUT 1 4 PTT OUT 2 5 PTT OUT 3 6 PTT OUT 4 7 4W+1 8 2W+1 9 2W–1 10 4W–1 Description Ground Ground Line 1 PTT Output (Output FET collector releases ground when active) Line 2 PTT Output (Output FET collector releases ground when active) Line 3 PTT Output (Output FET collector releases ground when active) Line 4 PTT Output (Output FET collector releases ground when active) Line 1 4-Wire Audio (+) [RX Audio only] Line 1 2-Wire Audio (+) [TX Audio when used in 4-wire] Line 1 2-Wire Audio (–) [TX Audio when used in 4-wire] Line 1 4-Wire Audio (–) [RX Audio only] 025-9346G Controls and Jumpers Table 5: Terminal Pinouts for TB2 Pin # Label 1 4W+2 2 2W+2 3 2W–2 4 4W–2 5 4W+3 6 2W+3 7 2W–3 8 4W–3 9 4W+4 10 2W+4 11 2W–4 12 4W–4 Description Line 2 Line 2 Line 2 Line 2 Line 3 Line 3 Line 3 Line 3 Line 4 Line 4 Line 4 Line 4 4-Wire Audio (+) [RX Audio only] 2-Wire Audio (+) [TX Audio when used in 4-wire] 2-Wire Audio (–) [TX Audio when used in 4-wire] 4-Wire Audio (–) [RX Audio only] 4-Wire Audio (+) [RX Audio only] 2-Wire Audio (+) [TX Audio when used in 4-wire] 2-Wire Audio (–) [TX Audio when used in 4-wire] 4-Wire Audio (–) [RX Audio only] 4-Wire Audio (+) [RX Audio only] 2-Wire Audio (+) [TX Audio when used in 4-wire] 2-Wire Audio (–) [TX Audio when used in 4-wire] 4-Wire Audio (–) [RX Audio only] Table 6: Terminal Pinouts for TB3 Pin # Label 1 AC1 2 AC2 3 GND 4 DC+ 5 GND 6 SUP 7 PTT 8 MIC 9 SPK 10 GND Description 12VAC Input 1 12VAC Input 2 Ground +VDC Input Ground Supervisory Control Output External PTT Input External Microphone Input External Speaker Output Ground Figure 14: Terminal Numbering for TB1, TB2, and TB3 10 TB1 1 10 12 TB2 TB3 1 1 43 Installation Key Cap Labels (Master Sheet) This page is provided as a reusable master from which you can make copies of the key cap labels. They are correctly sized so that if you cut along the outside lines of the boxes, the labels should just fit inside the removable covers of the programmable keys on the tone remotes. Blanks have been provided so that you can type up your own labels if you need to. TX TX MON MON PAGE F1 F2 F3 F4 F5 F6 F7 F8 PL 1 PL 2 PL 3 PL 4 MUTE ICOM SPVSR Privacy CLEAR R2 ON/OFF RPTR ON/OFF WC1 ON/OFF WC2 ON/OFF ALERT ALERT ALERT ALERT 2 3 4 5 44 UNSL MUTE CODED ALERT CLEAR 1 F1 F2 F3 F4 F5 F6 F7 F8 F1 F3 F2 F4 F3 F5 F4 F6 F5 F7 F6 F8 LINE 1 LINE 2 LINE 3 LINE 4 025-9346G Programming Overview This section deals with using the Zetron ZIPR Off-line Programming Interface software and the serial port interface adapter to configure the Digital Tone Remotes. It covers installing the software on your PC, connecting the PC to the unit using interface adapter, a few tips on using the program, a summary of the programmable features, and how to program a remote. There are several reasons for using PC software for configuring the tone remote desksets. The primary ones are power and convenience. Much effort has gone into making the Digital Tone Remotes as flexible as possible in terms of what the installer can custom configure in the field. This was done to make it easy to match whatever configuration the end-user was already using in their system; however, it also means that there are a large number of items that can be programmed. Allowing the installer to enter all this programming from the front panel switches (or forcing him or her to do so) would soon turn into an annoying maze of keypad commands. Turning the job over to ZIPR exports all the programming overhead from the remote to a PC and gives the installer a much more powerful interface to use in entering changes. Other benefits that result from this arrangement are: • The ability to easily read the data out of remotes that you don't know the history of and document how they are configured. • The ability to clone previously programmed remotes with little time or effort. • An easy method to produce written records of the programming in a remote for archive purposes. This section requires you to have all the contents of your programming kit (P/N 950-9449) handy. For a list of these items, see Part Numbers on page 13. Installing the ZIPR Software Install the ZIPR software on your computer as directed by the installation disk. 45 Programming Serial Interface The purpose of the Serial Interface adapter is to convert from the voltages normally used in RS-232 serial ports on computers to the TTL levels used in the serial port on the Digital Tone Remote desksets. The entire adapter is housed inside what looks like the shell for a DB-25 cable connector, and is powered off the RS-232 port. If your PC has a DB-9 type socket for the serial port you intend to use, then you will need to provide the 9-pin-to-25pin serial port adapter. The cable supplied with the adapter has a regular 6-pin RJ11 plug on the end that plugs into the adapter, and a specially keyed 6-pin plug on the end that plugs into the deskset. The plug and socket for the deskset end were made unusual in order to prevent installers from mistakenly inserting the cable into the handset socket. Selecting the COM Port Before the ZIPR software can communicate with the deskset, it will need to know which COM port is being used by the serial adapter (this is the only serial configuration information it needs). The following steps show how to select a COM port. 1. Go to the directory on your hard disk that has the ZIPR software in it and start the program by running ZIPR.EXE. 2. The program will bring up its Main menu screen with the copyright window displayed. The copyright will disappear after a short time, or can be removed immediately by pressing any key. 3. The next window to appear will prompt you to select which type of equipment you will be working on. Use the arrow keys to highlight the “EIA” line and then press ENTER. The program will again briefly display a copyright window which can be closed by pressing any key. Please note, to bypass this selection window in the future, run ZIPREIA instead of ZIPR. 4. Use the Left/Right arrow keys to move the highlighted bar across to the “Setup” position. 5. Highlight the “Comm port” selection in the small window that opened under Setup. Use either the Up/Down arrow keys or press the letter “C”. Once “Comm port” is selected, press ENTER. 6. The program will open a new window and prompt you to select the appropriate serial port using the SPACE BAR. The software will only allow you to choose COM 1 or COM 2. Once the proper port is showing, press the F10 key to save the setting and exit this window. 7. If you want to, you can select the Printer option at this time and select your printer port. If you wish to go straight to reading a remote or to exiting the program, use the Left/Right arrow keys to move the highlighted bar over to the appropriate heading. 46 025-9346G Tips on Using the Program General Layout The ZIPR program was designed to be as easy and straight forward as possible. The various selection windows are equipped with text boxes to explain their purpose and how to use them, and additional, context sensitive Help windows can be called up for many menu items. To call up a Help window, press the F1 key. If a Help window is available for the menu item you currently have selected, then you will see it displayed. The Main window has five categories in it, and they will all display menus when selected by moving the highlighted bar to their position using the Left/Right arrow keys. The categories and menus are shown in Table 7. Table 7: ZIPR Main Window Categories and Menus (F)ile (O)pen (S)ave s(A)ve as (D)elete (E)xit (D)eskset (R)ead (W)rite (C)onfiguration (E)dit (P)rint (S)etup (C)omm port (P)rinter (H)elp (H)elp (C)ontacting Zetron (V)ersion (A)bout With only one exception, all of the these items will bring up their windows within the Main window that is already open. The one exception is the (E)dit function under (C)onfiguration. The (E)dit function will open a large new window over the top of the Main window, and it will display the categories and menus shown in Table 8. Note that some menu items will not appear for a Model 280 due to the features being unavailable for that model. 47 Programming Table 8: Edit Window Menus for Model 284 (K)ey assignments key (1) key (2) key (3) key (4) key (5) key (6) key (7) key (8) key (9) Key (S)ummary (K)ey L1 k(E)y L2 ke(Y) L3 key (L)4 (A)lphanumeric labels line 1 al(P)hanumeric labels line 2 alp(H)anumeric labels line 3 alpha(N)umeric labels line 4 (F)requencies g(U)ard tone h(O)ok (I)ntercom ca(L)l alert (M)ute frequency (P)rivacy F(A) Frequency F(B) Frequency F(C) Frequency F(D) Frequency F(E) Frequency F(F) Frequency F(G) Frequency F(H) Frequency (O)ptions (S)ystem parameters (L)ine parameters c(A)ll Decoder (P)aging (K)eyup delay f(O)rmat (F)ormat parameters (A)udible paging tones (L)ive DTMF (U)ser summary e(D)it users (P)urge all users (S)tacks (I)nterstack delay e(Q)ualization 1 (E)qualization 2 Moving Around When you first enter the Main window or the Edit window, there will not be a highlighted bar visible, selecting any of the categories. The first action you will need to take is to press either the left or right arrow key in the PC keyboard. This will make the highlighting appear. To move the highlight to the category you wish to work with, just continue pressing the left/right arrow until you get there. The highlighting will wrap around, in either direction, and reappear at the other side of the window. Note that the top level categories have highlighted letters in them, the same way their menus do. Another method for moving from one category to another is to press the “ALT” key plus the highlighted letter for the category you wish to select. Once you have stopped on a category, its menu box will be displayed underneath it. You can select an item from this menu (highlight it) by either pressing the letter displayed in bold capital in the item’s name (the ALT key is not necessary in this case), or by using the up/down arrow keys. Once the item is highlighted, press the ENTER key to open the item’s own window. Once the menu structure has been navigated and the desired parameter reached, data entry falls into two main classes. The technician is either stepping through a list of 48 025-9346G predetermined choices until a suitable one appears, or directly entering a numeric value or an alpha label. In the case of choosing from a list, the technician presses the SPACE BAR (or the left/right arrow keys) to step through the list and then the ENTER key to accept the choice displayed. In the case of direct entry parameters, a number or text string (within the limitations of the parameter) is typed in, followed by pressing the ENTER key. The parameter selected for programming can be changed at any time by using the up / down arrow keys. An important thing to remember is the difference between using the ESC key or the F10 key to leave a window. In windows that allow you to enter or change information, if you use the ESC key to exit the window the program will also abandon any of the changes you made. If you want to save your changes, you will need to use the F10 function key to exit the window. Default Files When the ZIPR program is installed, a number of “default” files are provided with it. When the function (O)pen is selected from the (F)iles menu, a list of these files will be displayed. The files will be labeled to indicate which model of remote they apply to and what sort of system configuration they support. A sample of these is shown in Figure 15. STOP Warning! These default files should be used for training only. They should NOT be used for an actual upload because of the possibility of a firmware version mismatch. A firmware version mismatch may result in erratic operation or a total hardware lock up. Programming a remote should always be done with a configuration that is “read” from the remote to be programmed. Figure 15: Opening a File in ZIPR 49 Programming These default files are provided to give the technician the ability to become familiar with the menus and options within the 280 and 284 without the need to be connected to a tone remote. The specific menu items available for programming based on your remote's firmware version is only determined by the Zipr programming utility when a remote is read and the firmware configuration is obtained. Saving Files ZIPR has two commands in the (F)ile menu for saving the programming for a remote to disk. The commands are “(S)ave” and “s(A)ve as”. The (S)ave command takes the file that is currently open in the computer’s memory and saves it to disk. If the directory already has a file by the same name, ZIPR will warn the technician of this and give him or her an opportunity to cancel the save so that the open file can be named something different. If the technician chooses to go ahead with the save then ZIPR will overwrite the existing file on the disk. The s(A)ve as command also saves the currently open file to disk, however, it first prompts the technician to provide a new name for the file to be saved under. This name is actually the descriptive label that shows up in the open file window (see Figure 15) and not the DOS file label used when saving the file to disk. The technician should use a label that identifies the site location or system the remote is used at so it will be obvious in the future what the file was for. The s(A)ve as command will also prompt the technician for a decision if it finds that there is already a file with the same name. If you try to exit the ZIPR program after opening and editing a file, without first saving the file, then the ZIPR program will warn the technician that the data will be lost and give him or her a chance to cancel the “e(X)it” command so the file can be saved. If the decision is made to go ahead and exit anyway, then the work done and changes made to that file will be lost. Feature Set Reference A quick reference to the programmable menu items found in ZIPR for the Digital Tone Remotes (especially for when you cannot turn on your PC and open the programming file) is provided here. The list covers all of the programming choices displayed when the (E)dit window is opened for a Model 284 remote. Those items that apply only to the Model 284 are marked. The parameters are grouped according to the menus in which they appear. Programmable Key Functions The functions listed here are all assignable to any of the programmable function keys #1 through #9. Any functions that are specific to a particular key will be noted as such. 50 025-9346G Coded/Clear This is a toggle function in which one function tone is sent to the base station upon activating the function and another is sent when disabling it. Typically used to enable/ disable a voice scrambling device at the station. Repeater On/Off Another toggle function with different function tones sent upon turning on or off this feature. Typically used to place the repeater in/out of service. 2nd Receiver Mute Another toggle function with different function tones sent upon turning on or off this feature. Typically used to mute the audio taken from a second receiver at the station. Wild Card #1 Another toggle function with different function tones sent upon turning on or off this feature. Can be assigned for any function that is special to the particular system the remote is used in. Wild Card #2 This serves the same function as Wild Card #1. Hook Disable This is a toggle function with different function tones sent upon turning on or off this feature. It also has the property that while the feature is activated, any function tones that are programmed to be sent whenever the handset is taken on or off-hook will no longer be transmitted. This is typically used for a function such as “Emergency Monitor” in which this button forces the base station into Monitor and keeps it there, even if the remote is programmed to go out of Monitor upon placing the handset back on-hook . PL1 Select Used to select which PL tone is being transmitted. This function sends a function tone upon pressing this key. It remains active until a different PL key is selected. Up to four separate PL select keys can be programmed. Supervisor Takeover This allows the supervisor’s remote to take control of the station. No function tones are transmitted. When active, the terminal of TB3 labeled “SUP” is pulled to ground (normally high impedance). This output can be used to disconnect other remotes from the system. 51 Programming Mute This mutes the local audio output from the remote deskset. It remains active for the programmed length of the mute timeout. Off-hook Speaker Mute This mutes the speaker when the handset is off-hook, but audio is still passed to the handset for semi-private conversations. It remains active for the programmed length of the mute timeout. Unselect Mute This mutes the Unselect audio output on a Model 284. If the Unselect audio is being summed with the selected line audio out the front speaker, the selected line audio will continue to be passed normally. The mute remains active for the programmed length of the mute timeout. This is not available in the Model 280. Call Decoder Mute This mutes the speaker and handset speaker when active. It is a toggle function which can send function tones whenever the key is depressed, but typically is configured for not sending function tones. Function tones are typically only assigned to this key if it is desired to be able to mute or unmute a parallel remote with this key. The Call Decoder Mute function is typically used in conjunction with the Call Decoder feature. If the Call Decoder is enabled on this line, the function is toggled by the call alert unmute (group or individual) and mute frequencies. If the Call Decoder is enabled, the function defaults to the muted state and returns to muted whenever the handset is placed on hook. On a M280, the LED associated with this key will flash rapidly when a call alert is decoded. Alert This causes the remote to key the transmitter and send the alert tone specified. One key can be defined for each of the five alert tones; beep, warble, slow siren, fast siren, steady tone. Intercom This establishes the intercom function between remote desksets without keying the transmitter. It can be programmed to operate with or without function tones. If function tones are sent when turning on/off intercom, then any parallel Model 280s or 284s can also be forced into or out of intercom. 52 025-9346G Privacy This mutes the local audio output at the other desksets in the system to allow private communication with the radio users. Function tones are sent upon turning on/off privacy. Parallel Model 280s or 284s (if programmed for the correct privacy tones) will mute their audio and flash the Privacy LED upon detecting the Privacy on tone. They will unmute upon detecting the Privacy off tone, or Privacy will automatically time out after 25 seconds of inactivity. Instant Call This allows the page for an individual user, or a particular stack, to be assigned its own key. This function can be programmed to transmit the page or stack automatically with just the single key press, or it can be programmed to call up the user in the display, awaiting the Page Send key to transmit the page. The frequencies listed in Table 9 are those frequencies commonly used by the programmable function keys. When a function is assigned to a specific key, the program will prompt the technician to specify which frequency is to be used to turn that function on/off or toggle it. Default values are supplied for each function, however, any other frequency can be assigned as necessary to match the remote termination panel in use. Table 9: Common Function Control Tones. 650 Hertz 750 Hertz 850 Hertz 950 Hertz 1050 Hertz 1150 Hertz 1250 Hertz 1350 Hertz 1450 Hertz 1550 Hertz 1650 Hertz 1750 Hertz 1850 Hertz 1950 Hertz 2050 Hertz (K)ey Assignments Key (1) Programmable function key #1 can be assigned as “Fa Select” or as “Fa/Fb Select”. It can also be assigned to any of the functions found in Programmable Key Functions on page 50. Key (2) Programmable function key #2 can be assigned as “Fb Select” or as “Fc/Fd Select”. It can also be assigned to any of the functions found in Programmable Key Functions on page 50. Key (3) Programmable function key #3 can be assigned as “Fc Select” or as “Fe/Ff Select”. It can also be assigned to any of the functions found in Programmable Key Functions on page 50. 53 Programming Key (4) Programmable function key #4 can be assigned as “Fd Select” or as “Fg/Fh Select”. It can also be assigned to any of the functions found in Programmable Key Functions on page 50. Key (5) Programmable function key #5 can be assigned as “Fe Select”, or it can also be assigned to any of the functions found in Programmable Key Functions on page 50. Key (6) Programmable function key #6 can be assigned as “Ff Select”, or it can also be assigned to any of the functions found in Programmable Key Functions on page 50. Key (7) Programmable function key #7 can be assigned as “Fg Select”, or it can also be assigned to any of the functions found in Programmable Key Functions on page 50. Key (8) Programmable function key #8 can be assigned as “Fh Select”, or it can also be assigned to any of the functions found in Programmable Key Functions on page 50. Key (9) Programmable function key #9 can be assigned as “Monitor” or “Page Send”. It can also be assigned to any of the functions found in Programmable Key Functions on page 50. Key (S)ummary This menu item is not a key attribute, but rather an aid to technicians programming remotes. Selecting this key and pressing ENTER will bring up the user summary screen, which provides a quick check of the current programming for all function keys in the file currently being edited. (K)ey L1 This function is only found in Model 284 remotes. This stands for “Line Key L1”. It is used to enable this key if there is a base station or repeater connected to this line. It should be disabled if there is no station connected. This will also allow the technician to specify which frequencies are available on this base station (Fa through Fh). 54 025-9346G K(E)y L2 This function is only found in Model 284 remotes. This stands for “Line Key L2”. It is used to enable this key if there is a base station or repeater connected to this line. It should be disabled if there is no station connected. This will also allow the technician to specify which frequencies are available on this base station (Fa through Fh). Ke(Y) L3 This function is only found in Model 284 remotes. This stands for “Line Key L3”. It is used to enable this key if there is a base station or repeater connected to this line. It should be disabled if there is no station connected. This will also allow the technician to specify which frequencies are available on this base station (Fa through Fh). Key (L)4 This function is only found in Model 284 remotes. This stands for “Line Key L4”. It is used to enable this key if there is a base station or repeater connected to this line. It should be disabled if there is no station connected. This will also allow the technician to specify which frequencies are available on this base station (Fa through Fh). You will not be allowed to edit this line’s function if the unselect audio is being routed out of the line 4 transformer. You may select that option in the Options: System Parameters menu. (A)lphanumeric labels line 1 This menu item allows the technician to assign meaningful text labels to the various frequencies enabled for Line 1. Whenever a position is programmed, the text entered will be shown on the top line of the remote’s display when that frequency is selected. The labels can be up to 16 characters in length, including spaces, and utilize any combination of upper and lower case letters or numerals. The Model remote only has one line and so will only have one label list (Alphanumeric labels). Al(P)hanumeric labels line 2 This menu item allows the technician to assign meaningful text labels to the various frequencies enabled for Line 2. Whenever a position is programmed, the text entered will be shown on the top line of the remote’s display when that frequency is selected. The labels can be up to 16 characters in length, including spaces, and utilize any combination of upper and lower case letters or numerals. This menu item applies to Model 284 remotes only. Alp(H)anumeric labels line 3 This menu item allows the technician to assign meaningful text labels to the various frequencies enabled for Line 3. Whenever a position is programmed, the text entered will be shown on the top line of the remote’s display when that frequency is selected. The labels can be up to 16 characters in length, including spaces, and utilize any combination 55 Programming of upper and lower case letters or numerals. This menu item applies to Model 284 remotes only. Alpha(N)umeric labels line 4 This menu item allows the technician to assign meaningful text labels to the various frequencies enabled for Line 4. Whenever a position is programmed, the text entered will be shown on the top line of the remote’s display when that frequency is selected. The labels can be up to 16 characters in length, including spaces, and utilize any combination of upper and lower case letters or numerals. This menu item applies to Model 284 remotes only. This menu can only be used if the unselect audio function is not being used. (F)requencies The items in this menu allow the technician to assign control tones to the Guard tone and Hook functions. It also provides a second place for the Intercom and Privacy control tone frequencies to be programmed. These are provided here so that a remote can be programmed to recognize the Intercom or Privacy tones without having a key assigned to these functions. This menu also provides a convenient second place to program the control tones for the frequency select functions Fa through Fh. With the exception of the Guard tone function all the other functions covered here draw their control tones from those found in Table 9. G(U)ard tone This menu item sets the Guard tone frequency. You can choose the control tone from the following frequencies: 2100 Hz, 2175 Hz, 2325 Hz, 2600 Hz, 2800 Hz, 2970 Hz. H(O)ok This menu item sets the control tones that are to be sent whenever the handset is taken off hook or placed on hook. It draws its control tones from the frequencies listed in Table 9 (I)ntercom This menu item sets the control tones used to turn on/off the intercom function between remotes. It draws its control tones from the frequencies listed in Table 9. Ca(L)l alert This Menu item sets the control tones used to unmute audio if the Call Decoder feature is enabled. It draws its control tones from the frequencies listed in Table 10. Either the group or individual function tone causes audio to be unmuted in the same way. The terminology of “group” and “individual” simply refers to the typical usage, in which one function tone will unmute a group of remotes, while other function tones are used to unmute individual remotes. 56 025-9346G (M)ute frequency This menu item sets the control tone to mute audio if the Call Decoder feature is enabled. It draws its control from the frequencies listed in Table 10. (P)rivacy This menu item sets the control tones used to turn on/off the privacy function between remotes. It draws its control tones from the frequencies listed in Table 9. The function can also be disabled from this screen. F(A) Frequency through F(H) Frequency Each of these menu items works the same way. Basically, they provide a quick way to assign new control tones to the frequency select functions Fa through Fh. The tones available to choose from are listed in Table 9. You cannot change a key’s function here, only the tone used to invoke the frequency select function assigned. (O)ptions This menu is used to set parameters that affect overall system operation. (S)ystem parameters The items shown in Table 10 are present in all remotes under the (S)ystem menu. Table 10: System Parameters Parameter Time of day VU Meter Enable Intercom Mode Dial DTMF during TX Parallel Tx Lockout Range Displayed, Not Displayed Normal, Precise, Off Locked, Momentary Yes, No Yes, No Front Panel Transmit Transmit/Page, Page only Adjacent Deskset Yes, No Muting Microphone Lo to Hi sensitivity Description Sets whether or not the time of day is displayed in the window of the deskset. Sets whether the VU meter function is displayed, and if so, how. Sets whether the unit stays in Intercom only while the Intercom key is held down, or if the unit stays in Intercom mode until the key is pressed again. Sets whether or not live DTMF dialing is allowed when the deskset has the transmitter keyed. Sets whether this deskset is locked out for any transmit or select function if another deskset in the system is already in transmit. Determines whether the deskset transmit key serves for general transmitting and paging, or is only used to send pages. When enabled, this option mutes this deskset’s speaker when other desksets are transmitting to prevent feed back between adjacent units. You may adjust the sensitivity of the microphone using this setting. This may be thought of as gain for the microphone. It affects all microphone inputs. Use the left/right arrows to step through available levels. 57 Programming Parameter Range Description Guard Tone Duration 0 to 900 milliseconds Function tones sent When selected Upon transmit Function Tone 0 to 250 Duration milliseconds Function Tone Yes, No Removal Sets the duration of the high level Guard Tone. Type in a value and press ENTER. Sets whether function control tones are sent immediately when their key is pressed, or only after the transmit key is pressed. Sets the duration of the function tones. Type in a value and press ENTER. Sets whether this deskset will mute its speaker while function tones are being sent by parallel desksets. If set to Yes, the receive audio will be slightly delayed. Immediate Talk Yes, No Sets whether or not this deskset will buffer the operator’s voice audio while the function tones are being sent. If set to Yes, the transmit audio will be delayed slightly. Additional Talk Delay 0, 100, 200, 300, In order to use the “Immediate Talk” feature properly, you may 400 milliseconds require additional audio delay to give the mobiles time to unsquelch. This additional delay time is set using this menu. The time is shown in milliseconds. If the menu item “Immediate Talk” is set to “No”, then this delay timer will not be used. Use the Spacebar to step through settings. Four Wire Option Yes, No Sets whether or not this deskset is capable of full-duplex audio. It should always be set to “No” for 2-wire installations. In the Model 284 this function appears in the Line parameters menu. AGC Dynamic Range Lo ↔ Hi If leased lines are not used the dynamic range of the AGC circuit can be reduced to improve the level of background noise picked up by the deskset. Set low-loss lines to low and high-loss lines to high. In the Model 284 this function appears in the Line parameters menu. Parallel Status Yes, No Sets whether or not this deskset updates its display when parallel desksets change the channel of the base station. If set to No, this deskset will continue to display the last channel selected from its own front panel. Supervisors Unit Yes, No When set to Yes, it makes this deskset a Supervisor unit, and it will be immune to the Privacy function when used by other desksets in the system. This function should not be confused with the Supervisor output, which is used to disconnect other remotes from the system. Unselect Audio Off, Handset/Spkr, You may listen to audio that is received on the lines that are not Line 4 selected. Use this setting to control the selection. The audio may be routed out the Line 4 interface to a speaker that you connect, or heard on the handset and built in speaker. It may also be turned off completely. Use the Spacebar to step through the available settings. Unselect Mute During Yes, No Enable this function to automatically mute the unselect audio while Tx you are transmitting. If you do not have the unselect audio enabled, this function will not make a difference. Use the Spacebar to toggle this setting. Off Hook Speaker Yes, No To keep the speaker enabled when the handset is off hook, set this Enable function to “Yes”, otherwise leave it set to “No”. The receive audio will be present in the ear piece of the handset in both cases. Use the Spacebar to toggle this setting. 58 025-9346G Parameter Mute Timeout Range Description 0 to 240 seconds Enter a Mute timeout value in this field. When a mute function is selected, the speaker will automatically be unmuted after this amount of time elapses. To disable the expiration of this timer, enter a value of “0:00” (minutes:seconds). The maximum time allowed is 4:00 minutes. Please note, if you enter the time without a colon, it will be interpreted as seconds. For example, entering a value of “130” ill set the timeout to 130 seconds, which is the same as 2 minutes 10 seconds (2:10). (L)ine parameters The (L)ine parameters group, shown in Table 11, only appears for Model 284 remotes. The actual Line parameters window contains twelve selects, that is, all three of the parameters shown for each of the four lines. Table 11: Line Parameters Parameter Range Description Line 1 Default Frequency: Fa to Fh Full Duplex Line 1: Yes, No AGC Dynamic Range Line 1: Lo ↔ Hi Unselect Audio Line 1 Lo ↔ Hi Selects the frequency that the remote will indicate is selected upon power up. Configures the remote concerning whether or not simultaneous transmit and receive is allowed on this line. It should always be set to “No” for 2-wire installations. The dynamic range of the AGC circuit can be reduced to improve the level of background noise picked up by the deskset. Set low-loss lines to low and high-loss lines to high. Leased lines should be set to high. You may adjust the volume of unselected audio on a line by line basis. The lowest setting will completely mute the audio from this line. C(A)ll decoder The Call decoder parameters group, shown in Table 13 applies to both the M280 and M284. The menu on the M284 allows enabling the decoder per line, while the M280 just has a single enable/disable selection. 59 Programming Table 12: Line Parameters Parameter Range Description Line 1 Call Decoder Enabled, Enable or disable the call alert decoder on each line. Enabling the decoder enables the call alert unmute and mute frequencies on the line. Reception of either of the call alert unmute frequencies will cause the remote to unmute audio, rapidly flash an LED, and send an audible call alert “ringing” tone. Enter a call alert timeout in this field. Upon receiving a call alert unmute function tone, the call alert ringing will continue until either the call is acknowledged, or this amount of time has expired. The call alert LED will continue to flash rapidly until the call is acknowledged, regardless of this timeout. To disable this timeout, enter a value of 0. Just as with the Mute Timeout, the time may either be entered with a colon (minutes:seconds) or just as a number, which will be interpreted as seconds. You may adjust the volume of the call alert ringing tone. The minimum volume setting turns off the ringing completely. Note that the ring volume is also affected by the volume control knob on the remote. Disabled Call Alert Timeout 0 to 240 seconds Ring Volume Lo -- Hi (P)aging The following commands are used to configure the paging feature. (K)eyup delay This parameter sets the time that the remote delays between keying the transmitter and sending a page. The range for this parameter is from 250 to 2000 milliseconds. When entered, the period is rounded off to the nearest hundredth of a second. The default value is 750 milliseconds. F(O)rmat This parameter is used to select a paging format for the remote. If a single format is selected here then no leading digits are used to enter pages into the remote. If the system requires the use of multiple paging formats, then the “Multi (Lead digits)” selection should be used. (F)ormat parameters This parameter behaves differently depending on how the “f(O)rmat” parameter is set. If a single paging format was selected, then this menu item will open directly on the window in which you set the timing and tone parameters for that format. If “Multi (lead digits)” was selected, then the first window to open is for assigning paging formats to the individual leading digits. The up/down arrows are used to select leading digits and the space bar is used to toggle through the various paging formats. Once a leading digit and a paging format have been selected, the parameter setting window for that format can be opened by pressing F9. Be sure to use the F10 key when exiting any of these windows so that your selections and settings will be saved. If you use the ESC key to exit a window 60 025-9346G after making changes, the ZIPR program will ask you first whether or not you really want to abandon the changes made. (A)udible paging tones This is a Yes/No setting. When set to Yes, the paging tones being sent to the transmitter will also be heard out the local speaker on the remote deskset. (L)ive DTMF This parameter selects a leading digit for allowing live DTMF to be sent from the deskset key pad. If a single paging format has been selected for the entire remote, then this parameter should be set to “0”. (U)ser summary The remote desksets have an internal database for paging that will hold up to 50 users. The (U)ser summary menu selection will display all of the paging database user specific programming in one list. The screen for the first forty users is shown in Figure 16. Pressing any key will switch you to a similar screen for the remaining paging users. Pressing any key again will return you to the (P)aging menu screen. This feature is a display-only convenience. No editing can be performed from this screen. Figure 16: User Summary Screen E(D)it users The remote desksets have an internal database for paging that will hold up to 50 users. This window is used to add, delete, or edit users in that database. Use the up/down arrow keys to select a user position in the database, and then press ENTER to edit the settings for that user. The database automatically wraps around from 50 to 1, or 1 to 50, depending on which direction you are traveling in. The user positions in this database are used to 61 Programming provide alphanumeric labels for paging users, to support the Instant Call feature (single key press paging), and the Stack Page feature. Each user position provides for an alphanumeric label, the paging capcode for that user (including the leading digit for the correct paging format), and the assignment of a specific transmit frequency to be used whenever this user is paged. The default for all users is for the page to be made on whichever frequency is selected. (P)urge all users This menu item is provided simply as a quick way to completely clean the entire paging database. It should only be used when the technician intends to completely reprogram the deskset’s user database. (S)tacks This window is used to create and to edit fixed stacks of pages in the deskset’s database. Use the up/down arrow keys to select a particular stack, and then press ENTER to access editing for that stack. Once you are editing a stack, once again the up/down arrow keys are used to select a particular user position in the stack, however, this time the space bar is used to step through the paging database and select an individual user for that stack position. Unassigned user positions must be set to “End of Stack”. The stack positions should be assigned sequentially starting with number one and any unused positions must be at the end of the stack. (I)nterstack delay This parameter sets the time delay used by the deskset to create an interval between each of the pages sent when a stack page is made. The range for this parameter is 250 to 2000 milliseconds, and the value entered will be automatically rounded off to the nearest hundredth of a second. The default value is 500 milliseconds. E(Q)ualization 1 This menu item will open a window from which the technician can edit the #1 equalization curve that the deskset uses for paging. This window shows a complete graphic representation of the frequency versus output level settings for this curve. While this window allows the curve to be altered, the results of changes made here can not be tested here. For this reason, this menu item should not be used until operational experience with the tone remote system indicates which changes are necessary to enhance paging transmissions. (E)qualization 2 This menu item works exactly like the “e(Q)ualization 1” selection, except that it applies to equalization curve #2. 62 025-9346G Programming a Remote Since many persons learn better by example than by just reading a dry review of the “facts”, this subsection is devoted to the steps involved in taking one of the default files, renaming it, editing its features, saving it to disk, and then writing it to the remote. For the purposes of this example, the system will have three Model 280 remotes connected to a single base station that can operate on two channels. The Intercom feature will be enabled to allow the different remote stations to talk to each other without keying the transmitter. Getting a File to Edit First, start the ZIPR program and get to the Main window. The steps for doing this are: Go to the directory on your hard disk that has the ZIPR software in it and start the program by running ZIPR.EXE. The program will bring up its Main menu screen with the copyright window displayed. The copyright will disappear after a short time, or can be removed immediately by pressing any key. The next window to appear will prompt you to select which type of equipment you will be working on. Use the arrow keys to highlight the “EIA” line and then press ENTER. The program will again briefly display a copyright window which can be closed by pressing any key. The window now open is referred to as the Main Window. Select the (O)pen command from the (F)ile menu either by using the arrow keys or pressing ALT + O. The window shown in Figure 15 will open. Select the default file for “Model 280 Default T2/R2” by using the arrow keys to highlight that file, then press ENTER. Before doing anything else, it is a good idea to save this file under another name so that any editing done to it will not alter the original default file. Select the s(A)ve as command in the File menu and press ENTER. The program will open a new window and prompt for a new name to save this file under. Type in “example 1” and press ENTER. The program will save a copy of the currently loaded file with this label (assigning a file number automatically, i.e. ZCNFGxxx.CFG). Use the arrow keys to shift the selected menu over to (C)onfiguration and then select the (E)dit command and press ENTER. The Editing window opens and you are now ready to start customizing the Model 280. We will now work our way through assigning functions to some of the programmable keys, assigning alphanumeric labels to the radio channels, entering a few pagers with user labels, and creating a stack page. 63 Programming Selecting Key Functions The Model 280 has nine programmable function keys. The default file loaded at the beginning of this example has already assigned the following functions to these keys: Key #1: Fa/Fb Select Key #6: PL2 Select Key #2: Alert (slow siren) Key #7: PL3 Select Key #3: Repeater on/off Key #8: PL4 Select Key #4: 2nd Receiver Mute Key #9: Monitor Key #5: PL1 Select We will be looking at key #1 and changing the functions of keys #7, #8, #9. Use the arrow keys to select the (K)ey assignments menu (or press ALT+K), then select key #1. The screen shown in Figure 17 will appear. Figure 17: Function Select Screen for Key #1 Highlight the “Fa/Fb” function arrow keys and then press ENTER. The next screen to appear is shown in Figure 17. Whenever a function is assigned to a key that requires control tones, the program will prompt for the frequency of the tones for that function. You can either accept the default value that is offered, or use the arrow keys to select another frequency from the list. The tones selected for a function will be determined by the programming of the termination panel at the base station or repeater. Press ENTER to accept the selected frequency. 64 025-9346G Figure 18: Selecting Function Tones for Key #1 Once the necessary control tones have been selected, the program will return to the original key assignment screen. Use the arrow keys to move down the list and select key #7, then press ENTER. Use the arrow keys to select the Mute function. The next widow to open asks you to adjust the level of muting when this function is in use. This number indicates what percentage of normal volume will be present when the Mute function is being used. The default value is 0%, that is, no audio is output. The level can be increased to 45% of normal volume, and then the setting wraps around back to 0%. Use the left/right arrow keys to adjust this setting and note that the level changes in 5% increments. Set this level to 25%, then press ENTER. Use the arrow keys to select key #8 and press ENTER. Use the arrow keys in the function select window to set key #8 as the Intercom control. Like key #1, the program will ask you to select on/off control tones for the Intercom function. This tone should be chosen from frequencies not recognized by the repeater termination panel, so that only the tone remote desksets in the system respond to them. For this example, just press ENTER to accept the default values offered. This completes the key assignments for the example. The Key summary menu item can be used to check your work, as shown in Figure 19. 65 Programming Figure 19: Key Summary Display Assigning Alphanumeric Labels Select the (A)lphanumeric labels function, at the bottom of the keys list and press ENTER. The window shown in Figure 20 will open. The function of this window is to allow the installer to assign text labels to the radio channels to aid the system operators in identifying which channel is selected. The labels can be up to 16 characters in length, including spaces. To enter or change a label, simply use the arrow keys to select a label position and then type in your entry. The program will overwrite the existing label with whatever you type. When you are done making entries, use the F10 key to save your entries and return to the Editing window. Figure 20: Assigning Channel Labels 66 025-9346G Configuring the Paging Feature Note If paging will not be used, then the paging feature should be disabled. Otherwise, lockup may occur when the Page Send key is pressed. See Deactivating the Paging Feature on page 69. From the (E)diting window, select the (P)aging menu using the arrow keys. The first thing we will do in this example is to configure the remote to support multiple paging formats. The default is for DTMF only. Select the f(O)rmat command and press ENTER. A window similar to Figure 21 will open, however, in the “Format Select” window it will show “DTMF only”. Use the SPACE BAR to step through the choices until “Multi (lead digits)” appears and then press F10 to save the new setting. Figure 21: Selecting Paging Formats Supported From the (P)aging menu, select (F)ormat parameters and press ENTER. The window that opens will look like Figure 22. Use the SPACE BAR to step through the formats until Digit 0 reads “Get user from database”, then press ENTER. The select bar will automatically increment down the list to Digit 1. Use the SPACE BAR to set this leading digit to “Two-tone 1000 Call” and then press ENTER. Use the arrow keys to move the bar down to Digit 3. Use the SPACE BAR to set this leading digit to “DTMF format” then press ENTER. 67 Programming Figure 22: Assigning Leading Digits to Paging Formats At this point, the three leading digits “0”, “1”, and “3” have each been assigned paging formats, however, we still have not adjusted any of the parameters specific to these formats. Use the arrow keys to move the bar back up Digit 0, then press the F9 key. A new window will open that allows you to specify a Talk time to follow a stack page and an Alert tone if you wish. Press F10 to accept the default settings for this window. Move the bar to Digit 1 and press F9. The Two-tone parameter window will open, as shown in Figure 23. Use the up/down arrow keys to select a parameter and the SPACE BAR to step through the available choices. The Help window will offer information specific to whichever parameter is selected. See Paging Format Data Tables on page 75 for more information on the timings, tone groups, and codes plans of the Two-tone format. 68 025-9346G Figure 23: Two-tone Paging Parameters Use F10 to save the parameters for the Two-tone format, then move the bar down to select Digit 3 and press F9. The DTMF parameters window will open. Once again, use the arrow keys to select parameters and follow the instructions in the Help window to set them. Then use the F10 key to save the changes. No additional data tables are provided for the DTMF format since there is only one tone set. Deactivating the Paging Feature If paging is active on units not deployed in a paging network, the units may experience a lock up in transmit. This occurs only if the end user enters enough digits (8 or more) and then presses the page/transmit key. The ZIPR configuration item "Paging format disabled" does not deactivate Paging in a manner necessary to avoid transmit lockup issues. If paging is not going to be used, the following configuration needs to be set in order to prevent a lock up in transmit. Use the following steps to ensure that the selected format is “Multi (lead digits)” and the Leading Digit Formats have all digit selections set to “none”: 1. Open the ZIPREIA2 utility and navigate to “format”: ZiprEIA2, Configuration, Edit, Paging, Format. 2. Select “Multi (leading digits)”. 3. Navigate to “format parameters”: ZiprEIA2, Configuration, Edit, Paging, format parameters. 4. Select “none”. 5. Press F10 to save. 6. Upload the new configuration to the Model 280 or Model 284. 69 Programming Setting Up Users and Stacks The Digital Tone Remotes will allow the operator to make any page that is valid within the parameters of the paging formats it is programmed to support. If a leading digit is entered followed by a valid capcode and then the transmit key is pressed, then the remote will key the transmitter and send the page. The remotes also have a User database, in which certain specified pages (leading digit + capcode) can be given an alphanumeric label and be set to only be transmitted on a particular channel if necessary. This database allows the remote to confirm an operator’s entry by displaying the label whenever that paging sequence is entered on the keypad. It also allows the operator to search for a page by stepping through the database using the “*” and “#” keys and then pressing the transmit key to send the page in the display. This database also supplies information necessary for the Stack page feature. For the example programming session we have been working on, we will enter six pagers into the database, and then combine them all into a stack. The list pages will include four two-tone pages to people and two DTMF pages to control equipment. The pages are shown in Table 13. Table 13: Paging Users for Example Unit User # Label Page 1 2 3 4 5 6 City Police Fire Dept. Medic Units County Sheriff Siren #1 Siren #2 1234 1236 1324 1433 3234567 3345672 From the (E)dit window, move to the (P)aging menu and select the e(D)it users command. The program will open a window like the one shown in Figure 24. The User #1 window shown should be blank because no users exist in the default file we started with. Press the ENTER key and the selection bar will show up in the user window on the Name line. Type in the name “City Police” and press ENTER. The bar will drop to the Capcode line, where you type “1234” (leading digit 1 + the two-tone capcode 234) and press ENTER. The select bar will drop automatically to the Station line. If you press the SPACE BAR a few times you will see this parameter cycle through the radio channels (Fa to Fh, sorry but no labels used here) and return to Any. This parameter can be used to make the remote automatically switch a specific channel any time the associated page is made. For this example we will leave it set to Any. Press the F10 key to save the entries made to User #1 and return to the screen shown in Figure 24. 70 025-9346G Figure 24: Edit User Database Entry Window Use the arrow keys to select User #2, press ENTER to start programming the parameters on that user and enter the data from the list, just as we did for User #1. Work your way down the list of users. When you have finished with User #6, keep pressing F10 until you are back at the (P)aging menu. The (U)ser summary menu selection will display all of the paging database user specific programming in one list. The screen for the first forty users is shown in Figure 16. Pressing any key will switch you to a similar screen for the remaining paging users. Pressing any key again will return you to the (P)aging menu screen. This feature is a display-only convenience. No editing can be performed from this screen. Move down the menu and select (S)tacks, then press ENTER. The program will open the Stacks window with the selection bar on Stack #1. Since all of the stacks in the default file were empty, the list of pages shown will be blank. Press ENTER to open programming on Stack #1 and a selection bar will appear at the Page #1 position. Press the SPACE BAR once to bring up the “City Police” label. Press ENTER and the selection bar will drop to the Page #2 position. Press the SPACE BAR several times to bring up “Fire Dept.” and then ENTER. Continue in this fashion until the first six pages are set up as shown in Figure 25, then press F10 to save the entries. At this point we have finished the programming involved in this example, so continue pressing F10 to save your work and move back up through the windows to the program’s Main window. Select the (F)ile menu and then the (S)ave command. The program will warn you that there is already a file in existence with the same name as the file currently loaded in memory and instruct you on how to abort the save procedure so that s(A)ve as can be used instead. Since we started out by using s(A)ve as to rename our file something different from the default file, we don’t need worry about it now. Press the “Y” key to over write the version of “example 1” on the computer’s hard disk. 71 Programming Figure 25: Stack Page Programming Window Writing to a Remote The follow sequence of steps will allow the technician to write the contents of a programming file into a new (or used) remote. Plug the Zetron RS-232 adapter (Part No. 815-9136) into the serial port of the computer running the ZIPR program. Use an adapter if necessary to interface the 25-pin DB package to whatever hardware the computer uses. Plug the modular cable into the adapter, and plug the keyed end of the cable into the mating jack on the bottom of the remote to be programmed. This is on the side opposite the handset jack. Apply power to the remote and allow it to finish its power-up testing and configuration. If it is not already running, start the ZIPR program on the computer and select programming for the Model 280 and 284 devices. From the Main window, select the (S)etup menu and the (C)omm port command. Press ENTER, when the window opens, confirm that the serial port selected is the same port that the adapter was connected to in step one. From the Main window select the (F)ile menu and the (O)pen command and load the file into memory that you wish to program into the remote. If you have just finished editing and saving a file, it will still be in memory and available to load into a remote. Select the (D)eskset menu in the Main window and then the (W)rite command. Press ENTER and the program will open a new window indicating that it is writing to the remote and show what percentage of the process is completed. While it is being written to the remote will show the message “Receiving...” on the top line of its display. This will be following by the message “Comprehending... ” as its writes the new information into its EEPROM memory. The remote will repeat the “Configuring” process it when through 72 025-9346G after power-up and then it is ready to operate based on the new programming loaded into it. If you attempt to write to a remote without first loading a programming file, or if the model of the remote connected to the computer does not match the hardware model of the loaded file, the ZIPR program will prompt you concerning the problem and suggest what you will need to do to resolve the conflict. If you want to create hard copy of the file you just loaded into the remote, do the following: Select the (P)rinter command in the (S)etup menu and select the correct parallel port for your printer. If “None” is selected, then ZIPR will print the configuration file to the ZIPR directory on the hard disk as a text file which can be printed later. Go to the (C)onfiguration menu, select the (P)rint command, and press ENTER. The ZIPR program will print out all of the parameter settings in the currently loaded configuration file. The printout generated will vary in length depending on the number of paging formats setup in the remote and the number of stack pages programmed. The minimum length will be five pages. Programming Specific to the Model 284 The Model 284, unlike the 280, has the capability of controlling lines to as many as four separate base stations or repeaters. This means that the Model 284 also has programming menus and procedures that are unique to itself. Under (O)ptions in the (E)dit window, the Model 284 has an extra set of items in its (S)ystem parameters menu concerning unselected audio. The receive audio from the lines which are not currently selected can be routed out the speaker on the deskset (or the handset when off hook), or it can be routed out the transformer for Line 4 to an external speaker. When the “Line 4” option for this parameter is selected, the remote’s capacity is reduced to handling only three lines. The unselected audio feature can also be turned off altogether. If the unselect audio feature is enabled, then you also have a choice whether or not it will be automatically muted whenever the remote goes into transmit. The default condition for both of these items is for the unselected audio to come out of the handset and for it to be automatically muted whenever transmitting. The Model 284 has a menu selection for configuring each one of its Line Select keys. As shown in Figure 26, each line is enabled independently along with which of the channel select keys will function when that line is selected. The Model 284 also maintains a separate list of alphanumeric labels for each line enabled. The window in Figure 27 is for assigning labels to Line 1. These windows work the same 73 Programming way as the single line remotes. Remember the labels are limited to 16 character in length, including spaces. Figure 26: Enabling Line Select Keys Figure 27: Assigning Channel Labels for Line 1 The last window that is unique to the Model 284 is the (L)ine parameters window, under (O)ptions, see Figure 28. The purpose of this window is to allow you to choose a default channel for each line, specify its interface type, adjust its AGC dynamic range, and select its unselect volume level. 74 025-9346G Figure 28: Line Specific Parameters Paging Format Data Tables The data tables presented here are meant to aid the installer in configuring the paging feature in the remote desksets to work with the pagers that the end user already has in service. There is no information provided for the DTMF or Pulsed Tone formats because all the information the installer needs is provided in the information windows that appear in the ZIPR program. The data provided here relates to the Two-tone and Five-tone formats. Since the information provided to installer about existing pagers in these formats may very well be “incomplete”, it is hoped that the additional information provided here will assist the installer in figuring out how to configure paging feature in the remotes. Two-Tone What additional information will be needed for the Two-tone format is determined by whether the paging is organized in 100 call blocks or 1000 call codeplans and if the pager information was supplied as tone frequencies or as “tone numbers” from a particular tone group. The following data tables are provided for the Two-tone format: Table 14. Tone Groups - Motorola 1 to 6, plus A Table 15. Tone Groups - Motorola B, Z, 10, 11 and GE A', B', C' Table 16. Codeplans - Motorola B, C, D, E, F, G Table 17. Codeplans - Motorola H, J, K, L, M, N Table 18. Codeplans - Motorola P, Q, R, S, T, U Table 19. Codeplans - Motorola V, W, Y, MT and GE X, Y, Z Table 20. Standard Two-tone Timings 75 Programming Table 14: Tone Groups - Motorola 1 to 6, plus A Tone Groups Mot. 1 Mot. 2 Mot. 3 Mot. 4 Mot. 5 Mot. 6 Mot. A T0 O1 N2 E3 4 N5 U6 M7 B8 E9 R Diagonal 330.5 349.0 368.5 389.0 410.8 433.7 457.9 483.5 510.5 539.0 569.1 600.9 634.5 669.9 707.3 746.8 788.5 832.5 879.0 928.1 1092.4 288.5 296.5 304.7 313.0 953.7 979.9 1006.9 1034.7 1063.2 321.7 339.6 358.6 378.6 399.8 422.1 445.7 470.5 496.8 524.6 553.9 584.8 617.4 651.9 688.3 726.8 767.4 810.2 855.5 903.2 1122.5 1153.4 1185.2 1217.8 1251.4 1285.8 1321.2 1357.6 1395.0 1433.4 358.9 398.1 441.6 489.8 543.3 602.6 668.3 741.3 822.2 912.0 569.1 979.9 569.1 569.1 979.9 979.9 979.9 Table 15: Tone Groups - Motorola B, Z, 10, 11 and GE A', B', C' 76 Tone Groups Mot. B Mot. Z GE A' GE B' GE C' Mot 10 Mot. 11 T0 O1 N2 E3 4 N5 U6 M7 B8 E9 R Diagonal 371.5 412.1 457.1 507.0 562.3 623.7 691.8 767.4 851.1 944.1 346.7 384.6 426.6 473.2 524.8 582.1 645.7 716.1 794.3 881.0 682.5 592.5 757.5 802.5 847.5 892.5 937.5 547.5 727.5 637.5 652.5 607.5 787.5 832.5 877.5 922.5 967.5 517.5 562.5 697.5 667.5 712.5 772.5 817.5 862.5 907.5 952.5 532.5 577.5 622.5 1472.9 1513.5 1555.2 1598.0 1642.0 1687.2 1733.7 1781.5 1830.5 1881.0 1930.2 1989.0 2043.8 2094.5 2155.6 2212.2 2271.7 2334.6 2401.0 2468.2 979.9 979.9 742.5 742.5 742.5 none none 025-9346G Table 16: Codeplans - Motorola B, C, D, E, F, G Codeplans Capcodes Mot. B Mot. C Mot. D Mot. E Mot. F Mot. G 0xx 1xx 2xx 3xx 4xx 5xx 6xx 7xx 8xx 9xx Groups Used 2+4 1+1 2+2 3+3 1+2 1+3 2+1 3+1 2+3 3+2 1,2,3,4 N/A 1+1 2+2 1+2 4+4 1+4 2+1 4+1 2+4 4+2 1,2,4 N/A 1+1 2+2 1+2 1+5 5+5 2+1 5+1 2+5 5+2 1,2,5 N/A 1+1 2+2 1+2 2+1 1+6 6+6 6+1 2+6 6+2 1,2,6 N/A 1+1 1+3 3+3 4+4 3+1 1+4 4+1 3+4 4+3 1,3,4 N/A 1+1 1+3 3+3 3+1 5+5 1+5 5+1 3+5 5+3 1,3,5 Table 17: Codeplans - Motorola H, J, K, L, M, N Codeplans Capcodes Mot. H Mot. J Mot. K Mot. L Mot. M Mot. N 0xx 1xx 2xx 3xx 4xx 5xx 6xx 7xx 8xx 9xx Groups Used N/A 1+1 1+3 3+3 3+1 1+6 6+6 6+1 3+6 6+3 1,3,6 N/A 1+1 1+4 4+1 4+4 5+5 1+5 4+5 5+4 5+1 1,4,5 N/A 1+1 1+4 4+1 4+4 1+6 6+6 6+1 4+6 6+4 1,4,6 N/A 1+1 1+5 5+1 1+6 5+5 6+6 6+1 5+6 6+5 1,5,6 4+2 2+3 2+2 3+3 4+4 3+2 2+4 4+2 3+4 4+3 2,3,4 4+2 2+3 2+2 3+3 3+2 5+5 2+5 5+2 3+5 5+3 2,3,4,5 77 Programming Table 18: Codeplans - Motorola P, Q, R, S, T, U Codeplans Capcodes Mot. P Mot. Q Mot. R Mot. S Mot. T Mot. U 0xx 1xx 2xx 3xx 4xx 5xx 6xx 7xx 8xx 9xx Groups Used 4+2 2+3 2+2 3+3 3+2 2+6 6+6 6+2 3+6 6+3 2,3,4,6 4+2 2+4 2+2 4+2 4+4 5+5 2+5 4+5 5+4 5+2 2,4,5 4+2 2+4 2+2 4+2 4+4 2+6 6+6 6+2 4+6 6+4 2,4,6 4+2 2+5 2+2 5+2 2+6 5+5 6+6 6+2 5+6 6+5 2,4,5,6 4+2 3+4 4+3 3+3 4+4 5+5 3+5 4+5 5+4 5+3 2,3,4,5 4+2 3+4 4+3 3+3 4+4 3+6 6+6 6+3 4+6 6+4 2,3,4,6 Table 19: Codeplans - Motorola V, W, Y, MT and GE X, Y, Z Codeplans Capcodes Mot. V Mot. W Mot. Y Mot. MT GE X GE Y GE Z* 0xx 1xx 2xx 3xx 4xx 5xx 6xx 7xx 8xx 9xx Groups Used 4+2 3+5 5+3 3+3 3+6 5+5 6+6 6+3 5+6 6+5 4,5,6 4+2 4+6 6+4 5+6 4+4 5+5 6+6 4+5 5+4 6+5 2,4,5,6 N/A A+A B+B Z+Z A+B A+Z B+A Z+A B+Z Z+B A,B,Z 4+2 1+1 2+2 1+2 4+4 5+5 2+1 4+5 5+4 2+4 1,2,4,5 A'+A' B'+A' B'+B' A'+B' C'+C' C'+A' C'+B' A'+C' B'+C' N/A A',B',C' B'+B' C'+B' C'+C' B'+C' N/A N/A N/A N/A N/A N/A B',C' A'+A' C'+A' C'+C' A'+C' N/A N/A N/A N/A N/A N/A A',C' Table 20: Standard Two-tone Timings 78 1st Gap 2nd Group Call Type 1.0 0.4 1.0 1.0 1.0 0.4 0.5 0.4 0 0 0 0.3 0 0 0 0 3.0 0.8 3.0 3.0 1.0 0.8 0.5 0.4 8.0 8.0 6.0 6.0 4.0 4.0 3.0 3.0 GE std, Mot std Tone+Voice Motorola Tone Only NEC-B NEC-A NEC-C NEC-M NEC-L NEC-D 025-9346G Five-Tone Table 21contains information on the tone group frequencies and timings used in the four tone groups supported by the Digital Tone Remotes. Table 21: Five-tone Format Tone Groups and Timing Tone Number EIA CCIR ZVEI 0 1 2 3 4 5 6 7 8 9 A Group B C 2nd Address D Repeat # Timing in ms Preamble Gap Tone X Tone 600 741 882 1023 1164 1305 1446 1587 1728 1869 2151 2433 2010 2292 459 1091 1981 1124 1197 1275 1358 1446 1540 1640 1747 1860 2400 930 2247 991 2110 1055 2400 1060 1160 1270 1400 1530 1670 1830 2000 2200 970 810 2796 885 2600 680 690 65 33 65 690 65 100 100 690 65 70 70 (All tone frequencies are in hertz.) 79 Programming 80 025-9346G