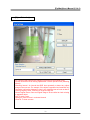
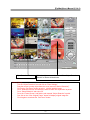
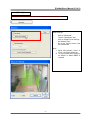
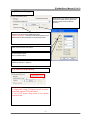
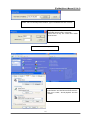
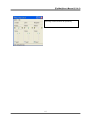
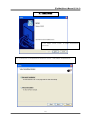
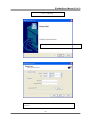
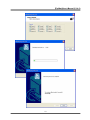
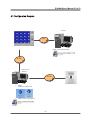
1
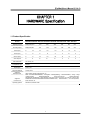
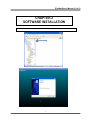
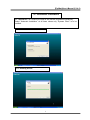
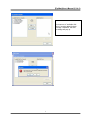
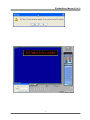
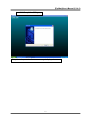
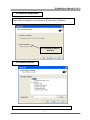
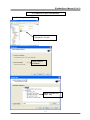
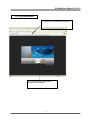
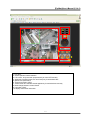
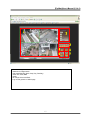
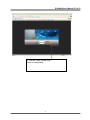
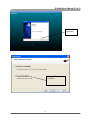
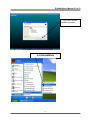
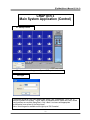
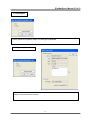
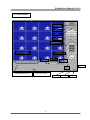
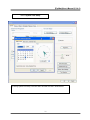
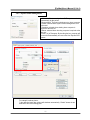
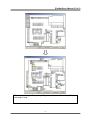
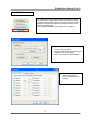
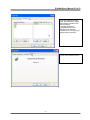
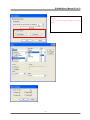
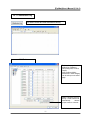
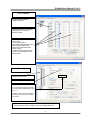
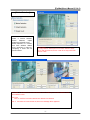
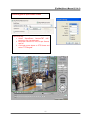
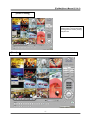
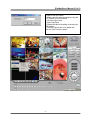
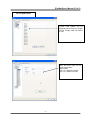
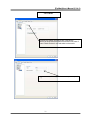
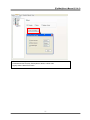
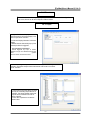
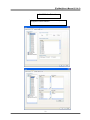
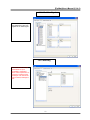
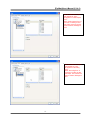
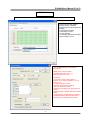
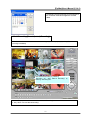
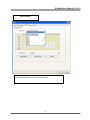
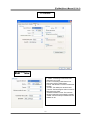
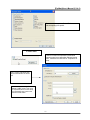
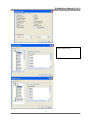
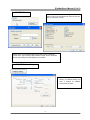
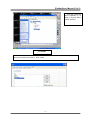
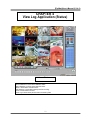
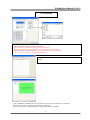
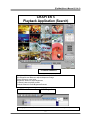
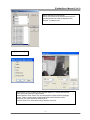
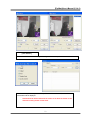
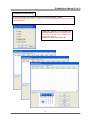
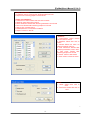
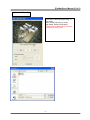
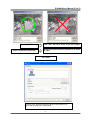
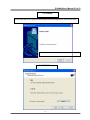
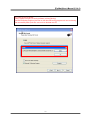
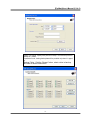
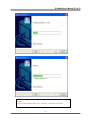
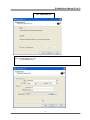
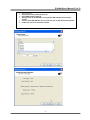
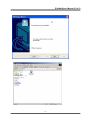
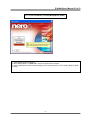
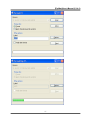
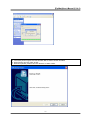
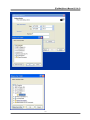
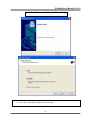
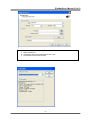
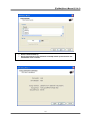
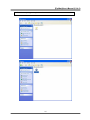
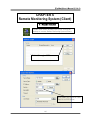
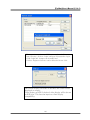
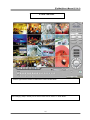
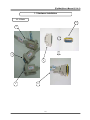
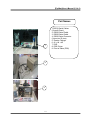
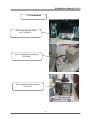
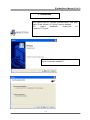
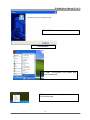
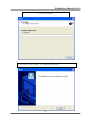
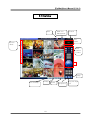
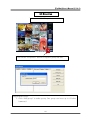
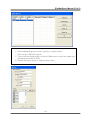
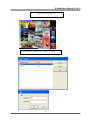
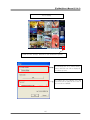
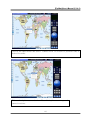
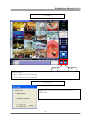
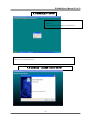
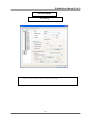
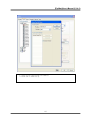
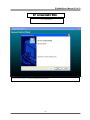
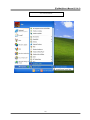
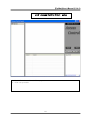
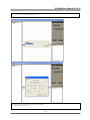
[EyeMax]User’s Manual (5.1.4.0)
1
[EyeMax]User’s Manual (5.1.4.0)
TABLE OF CONTENTS
Chapter1. Hardware Specification-------------------------------------------------4
1.1 Product Specification------------------------------------------------------------4
Chapter 2. Software Installation --------------------------------------------------- 5
2.1 Automatic Installation------------------------------------------------------- 6
2.1.1 Definition------------------------------------------------------------- 6
2.1.2 Installation Method Selection---------------------------------------------- 6
2.1.3 Installing Drivers------------------------------------------------------- 6
2.1.4 DVR File System Installation----------------------------------------------- 7
2.1.5 Completion & Retry----------------------------------------------------- 10
2.2 Manual Installation--------------------------------------------------------- 11
2.2.1 Definition ----------------------------------------------------------- 11
2.2.2 Software Selection------------------------------------------------------ 11
2.3 Remote Client Installation---------------------------------------------------- 12
2.3.1 Using Eyemax S/W ------------------------------------------------- 12
2.3.2 Using Web Browser -------------------------------------------------- 13
2.4 Uninstallation------------------------------------------------------------- 18
2.5 Program Execution -------------------------------------------------------- 19
Chapter 3. Main System Application (Control)----------------------------------------20
3.1 Startup Screen------------------------------------------------------------ 20
3.2 Login------------------------------------------------------------------- 20
3.3 Exit/Logout---------------------------------------------------------------21
3.4 System information ------------------------------------------------------------ 21
3.4 Control Screen------------------------------------------------------------ 22
3.6 Setup------------------------------------------------------------------- 23
3.6.1 System --------------------------------------------------------------23
3.6.1.1 DVR Information---------------------------------------------------23
3.6.1.2 System Time Setup--------------------------------------------24
3.6.1.3 System Power Management--------------------------------------------25
3.6.1.4 Auto Switching Interval-------------------------------------------------26
3.6.1.5 E-map------------------------------------------------------------ 26
3.6.1.6 TV-out-------------------------------------------------------------28
3.6.1.7 On-screen Display----------------------------------------------------29
3.6.1.8 Text Inserter--------------------------------------------------------- 31
3.6.1.9 Hard Disk Usage------------------------------------------------------ 34
3.6.1.10I-phone ------------------------------------------------------------ 34
3.6.1.11 Maintenance Log ---------------------------------------------------------35
3.6.2 Device--------------------------------------------------------- 36
3.5.2.1 Camera[Motion/Object Detection/People Counter/Mosaic/Data retain/PTZ/Virtual Keypad/Access Control]----- 36
3.6.2.2 Output Device -------------------------------------------------------- 53
3.6.2.3 Input Device---------------------------------------------------------- 54
3.6.2.4 Audio --------------------------------------------------------------- 55
3.6.2.5 Alert---------------------------------------------------------------- 56
3.6.3 Event------------------------------------------------------------------ 58
3.6.3.1 Input--------------------------------------------------------------- 58
3.6.3.2 Motion Detection------------------------------------------------------- 59
3.6.3.3 No Video Signal-------------------------------------------------------- 60
3.6.3.4 Watch Dog----------------------------------------------------------------60
3.6.4 Schedule --------------------------------------------------------------- 63
3.6.4.1 Recording [Manual Recording]- --------------------------------------------- 64
3.6.4.2 Device---------------------------------------------------------------- 65
3.6.5 Network---------------------------------------------------------------- 66
3.6.5.1 DVR Server----------------------------------------------------------- 66
3.6.5.2 Web Server----------------------------------------------------------- 67
3.6.5.3 Central Station-------------------------------------------------------- 67
3.6.5.4 E-mail ------------------------------------------------------------- 68
3.6.5.5 Dial Alarm----------------------------------------------------------- 71
3.6.5.6 IP Address Setup----------------------------------------------------- 71
3.6.6 User----------------------------------------------------------------- 72
Chapter 4 View Log Application (Status)----------------------------------------------- 74
4.1 Screen Features------------------------------------------------------------ 74
2
[EyeMax]User’s Manual (5.1.4.0)
4.1.1Event log-------------------------------------------------------------- 75
Chapter 5 Playback Application (Search)---------------------------------------------- 76
5.1 Search Features 1 ---------------------------------------------------------- 76
5.2 Search Features 2 ---------------------------------------------------------- 76
5.2.1 Playback-------------------------------------------------------------- 76
5.2.2 Event/Object/Text/People Count Search ------------------------------------ 77
5.2.3 Monitoring & Searching --------------------------------------------------- 82
5.2.4 Bookmark & Go To------------------------------------------------------ 83
5.2.5 Save ----------------------------------------------------------------- 83
5.2.6 Print ----------------------------------------------------------------- 87
5.2.7 Backup--------------------------------------------------------------- 88
5.2.7.1 DFS Backup------------------------------------------------------88
5.2.7.2 EXE Backup------------------------------------------------------92
5.2.7.3 Run CD Burner(For Non WindowsXP Users)-------------------95
5.2.7.4 Run CD Burner(For WindowsXP Users Only)------------------99
5.2.7.5 Playback-------------------------------------------------------------------103
Chapter 6 Remote Monitoring System (Client)------------------------------------------- 104
6.1 Program Execution-------------------------------------------------------------------104
6.2 Remote Save and Backup-------------------------------------------------------------------106
6.3 Real Time Audio-----------------------------------------------------------------------------107
Appendix 1 POS DVR-------------------------------------------------------------- 108
1.1Hardware Installation------------------------------------------------------- 109
1.1.1 Parts -------------------------------------------------------------- 109
1.1.2 Installation ---------------------------------------------------------- 111
1.2 Software Installation ------------------------------------------------------112
1.2.1 Installation & Setup---------------------------------------------------- 112
Appendix 2 I-phone ------------------------------------------------------------112
2.1 Installation --------------------------------------------------------------113
2.2 Execution ---------------------------------------------------------------114
2.3 Audio Setup -------------------------------------------------------------115
Appendix 3 MDVR ------------------------------------------------------116
3.1 Installation --------------------------------------------------------------117
3.1.1 Start ---------------------------------------------------------------118
3.1.2 Selection of Installation Method --------------------------------------------118
3.1.3 On Installing -----------------------------------------------------------119
3.1.4 Finish ----------------------------------------------------------------119
3.2 Overview ----------------------------------------------------------------120
3.3 Execution ----------------------------------------------------------------121
3.3.1 Properties----------------------------------------------------------121
3.3.2 Log in & Log out ------------------------------------------------123
3.3.3 Set up ------------------------------------------------------------124
3.4 E-map ----------------------------------------------------------------------125
3.5 Event ----------------------------------------------------------------------126
3.6 Search ----------------------------------------------------------------------128
3.6.1 Save --------------------------------------------------------------------128
3.6.2 Back up -------------------------------------------------------------129
Appendix 4 Access Control DVR-----------------------------------------131
4.1 Configuration Diagram ----------------------------------------------------------132
4.2 Installing FP Server--------------------------------------------------------------133
4.3 Installing “Access Control Server”--------------------------------------------133
4.3.1 On Installing ------------------------------------------------------------------134
4.3.2 Finish-----------------------------------------------------------------------------134
4.4 DVR Setup---------------------------------------------------------------------------135
4.4.1 Setup----------------------------------------------------------------------135
4.5 Access Control Search-----------------------------------------------------137
4.6 Access Control Client--------------------------------------------------------138
4.6.1 Installing----------------------------------------------------------------------138
4.6.2 Execution--------------------------------------------------------------------139
4.6.3 Access Control Client Setup--------------------------------------------140
3
[EyeMax]User’s Manual (5.1.4.0)
CHAPTER 1
HARDWARE Specification
1.1 Product Specification
Models
DVS-9030/ DVS-9060 / DVS-9120 / DVS-9240 / DVS-9480 / DVS-9424 / DVS – 9448 / DVS-9832
Displaying Speed
30fps(NTSC)/ 60 /
120 /
240 /
480 /
480
480
240
Recording Speed
30fps(NTSC)/60/
120/
240/
120/
240
480
240
16 /
16 /
16
16
32
Video Inputs
4/
16 /
16 /
Audio Inputs
1/
2/
4/
8/
4/
8
16
8
Sensor Inputs
4/
4/
16 /
16 /
16 /
16
16
8
Alarm Outputs
2/
2/
8/
8/
8/
8
8
8
Video Resolution
CIF, Half D1, D1
Compression Type
Supported
Signal Types
MPEG-4
Supported Network
Supported
Backup Devices
TCP/IP, PSTN
Supported
PTZ Protocols
Operating Systems
NTSC / PAL
HDD, DVD/R, CD/RW, Network Driver, etc.
C&B Tech-CND100200&SMART, Changzhou Minking-Minking, CTNCom-HD0670, Dong Yang
Unitech-DSC230,
DRAGON-DRAGON,
Dynacolor-TPD7720,
Geosan-GRX1000,
GOLDENEYE-GOLDENEYE, InterM-VRX2201, KALATEL-KTD312, KJK-KJK, LG-LPTA100L, PELCO D&P,
SAMSUNG-SCC641&SDZ160R&SPD1600&SPX1000&SPT1000, SONY-EVID3031, Vicon-Survey&2000,
ZITEC-ZITECH, etc.
Windows XP, Windows 2000
4
[EyeMax]User’s Manual (5.1.4.0)
CHAPTER 2
SOFTWARE INSTALLATION
Steps: 1. Insert Eyemax S/W. 2. Double-click “Eyemax.English(5.1.4.0)”.
5
[EyeMax]User’s Manual (5.1.4.0)
2.1 Automatic Installation
2.1.1 Definition: It is a method to install all the relevant softwares automatically.
Select “Automatic Installation” at all times unless only “Eyemax Client” is to be
installed.
2.1.2 Installation Method Selection
2.1.3 Installing Drivers
6
[EyeMax]User’s Manual (5.1.4.0)
2.1.4 DVR File System Installation
* Definition: Occupying disk
capacity to record data
* Steps: 1. Select drives from
“Available Disk Drive Capacity”
2. Click “Add”.
3. Click “Initialization”.
* Caution: 1. Be very careful not
to add “C Drive”, for it is used for
O/S and DVR softwares.
2. HDD has to be initialized to
record data
Selecting “Quick Initialization” will lead to the initialization
of entire disk capacity added. Otherwise, put in desirable
number to initialize. Note that the number can not
exceed total capacity added.
Initializing With Archiving the Data: This is to increase
DFS storage by taking additional space from the current
“Reserved Capacity”. So new value for “Reserved
Capacity” can not exceed the current one.
Minimum 300MB is recommended for DVR performance.
Initialization process will be
performed automatically.
Click “Close” upon completion.
7
[EyeMax]User’s Manual (5.1.4.0)
At least one of “available disk
drive” must be added for data
storage. Otherwise, the alert
message will pop up.
8
[EyeMax]User’s Manual (5.1.4.0)
9
[EyeMax]User’s Manual (5.1.4.0)
2.1.5 Completion & Retry
Retry the entire procedure if an error message is displayed.
10
[EyeMax]User’s Manual (5.1.4.0)
2.2 Manual Installation
2.2.1 Definition: It is a method to install selected softwares manually.
Select “Manual Installation” only in the case of “Eyemax Client” installation.
2.2.2 Installation Method
Selection
2.2.2 Software Selection
Note: The rest of the procedures are the same as “Automatic Installation”.
11
[EyeMax]User’s Manual (5.1.4.0)
2.3 Remote Client Installation
2.3.1 Using Eyemax S/W
Double-click
“Eyemax(5.1.4.0).exe”.
Select “Manual
Installation”.
Select “Eyemax DVR
Client” only.
12
[EyeMax]User’s Manual (5.1.4.0)
2.3.2 Using Web Browser
1. Type in the IP address of DVR server.
2. Log in first before downloading
Remote Client Program.
13
[EyeMax]User’s Manual (5.1.4.0)
3
1
4
5
6
7
8
9
10
2
1, Live View
2. Screen splits and channel selection
3. PTZ control : Only users with proper authority to control PTZ remotely.
4. Advanced: Controlling preset, tour and E-map only for authorized users.
5. Speed: PTZ speed control
6. To save live image to JPEG
7. To listen Audio of a selected channel applied only for authorized user remotely
8. Mode change between Live and Search
9. Log In/Out or EXIT
10. Display web browser information.
14
[EyeMax]User’s Manual (5.1.4.0)
1
2
3
4
6
1, Searched Image
2. Selection for image search
3. Play back(Fast back, Back, Stop, Play, Fast Play)
4. Save: AVI, JPEG, BMP
5. Audio
6.To change Tab to CONTROL
7.Log out and go back to LOG IN page
15
5
7
[EyeMax]User’s Manual (5.1.4.0)
3. Click the “Install Remote Client”
button for downloading.
16
[EyeMax]User’s Manual (5.1.4.0)
5. Click “Next”
to proceed.
6. Select “Manual
Installation.
17
[EyeMax]User’s Manual (5.1.4.0)
7. Click “Next” to finish
installation process.
2.4 Uninstallation
18
[EyeMax]User’s Manual (5.1.4.0)
2.5 Program Execution
Find the icons on the desktop to execute “Eyemax DVR” and “Eyemax DVR Client”.
Or find “Eyemax DVR” under “All Programs”.
19
[EyeMax]User’s Manual (5.1.4.0)
CHAPTER 3
Main System Application (Control)
3.1 Startup Screen
The above screen will appear as Eyemax DVR system starts.
3.2 Login
The default values for User and Password are “admin” and “no password”. Click “OK” to
execute Eyemax DVR system. To give “admin” a password and to create new users, certain
configurations are required (Setup/User). Only “admin” and users with appropriate
authorization have access to the Setup menu.
Note: Virtual keypad is available on the right top of GUI if needed
20
[EyeMax]User’s Manual (5.1.4.0)
3.3 Exit/Logout
To end Eyemax DVR system, select “Exit” and type in password.
3.4 System Information
Click on System Information to see DVR system information, such as OS version, CPU, RAM, HDD, IP
address, DVR model and DVR software.
21
[EyeMax]User’s Manual (5.1.4.0)
3.5 Control Screen
Model Name
Setup
Network
Adjust
PTZ Adjustment
Camera Layout Panel
PTZ Control
Volume
E-map
I-phone
Power
Light
Camera Selection Panel
Manual Output Panel
Status
22
Search
Control
[EyeMax]User’s Manual (5.1.4.0)
3.6 Setup
3.6.1 System
3.6.1.1 DVR Information
Create a DVR name and put in admin. info. They
will be displayed on outgoing e-mails.
23
[EyeMax]User’s Manual (5.1.4.0)
3.6.1.2 System Time Setup
By clicking System Time Setup, users are able to set Date and Time in DVR software.
24
[EyeMax]User’s Manual (5.1.4.0)
3.6.1.3 System Power Management
* Period: Select a day that DVR system reboots
automatically by the period.
* Reserved time: Time set to shut down or to reboot computer
* Disable: selected when System Power Management is not
to be used
* Shutdown: selected when shutting down computer is
required at the time set
* Reboot: selected when rebooting computer is required at the
time set
* Exit & Turn off Computer: By checking the box, computer will
be turned off automatically as a user exits from Eyemax DVR
system.
z Details: First select either “Shutdown” or “Reboot” to enable Period.
For example in above picture,
7 days after the basic date, system will shutdown automatically. “Details” shows the set
date and it will be the starting point.
25
[EyeMax]User’s Manual (5.1.4.0)
3.6.1.4 Auto-switching Interval
Auto-switching Interval is a function that allows green square
around selected camera to move to the next one at the
interval set.
e.g.) Camera 1 -> 10 sec. -> Camera 2 ->10 sec. -> Camera
3….
3.6.1.5 E-map
Click on the “E-map” button to design E-map.
Click on “Open Map Image ”to select an E-map image.
26
[EyeMax]User’s Manual (5.1.4.0)
The above is a designed E-map sample. Drag mouse to position Camera/Input/Output
and design E-map.
27
[EyeMax]User’s Manual (5.1.4.0)
Click on the E-map button positioned next to the I-phone button to open E-map.
White Camera: Not on Recording, Yellow Camera: On Recording,
White Input/White Output: Not Activated, Yellow Input/Yellow Output: Activated
3.6.1.6 TV-OUT
TV-OUT is a function that sends selected cameras to a call monitor
(external analog monitor). Click on the “TV-OUT” button for setup.
28
[EyeMax]User’s Manual (5.1.4.0)
The Number of TV-out Supported
9030
1
9480
2
9060
1
9424
3
9120
1
9448
1(2)
9240
2
9832
1(2)
* The models such as 9240 (240FPS/240FPS) ,
9480(480FPS/120FPS) and 9448(480FPS/480FPS)
support 2 TV-OUTs. 9424 (480FPS/240FPS) support 3
TV-OUTs and the rest of the models support 1.
* Setup Options:
1. Same as Server Screen Mode
( For 9480, 9448) - TV-OUT Monitor displays what’s
on DVR server.
Manual Channel Selection - Channels are selected
manually. Once “Manual Channel Selection” is
selected, channels can also be selected manually on
Control screen by placing mouse on camera picture
and clicking the right mouse.
2. Auto Channel Switching - Selected channels
rotate to display at the switching interval set.
* Switching Interval: The length of time to stay at one
camera
3.6.1.7 On-screen Display
Font Settings: Font change on screen display.
Postion Setting: Position change on screen
display.
29
[EyeMax]User’s Manual (5.1.4.0)
On a camera screen, you may click one right mouse to control OSD as bellows.
* Show Camera Names and Status: By checking it, camera names and status will be displayed on camera
pictures.
* Show Motion Detection Blocks: By checking it, green motion detection blocks will be displayed on camera
pictures when recording schedule is set as “M” (Setup/Schedule).
* Show Object Detection Blocks: By checking it, blue object detection blocks will be displayed on camera
pictures.
Note : One right mouse click can be a very useful tool. Manual TV-out and OSD setup can be done. Additionally,
instant recording can start by one click.
30
[EyeMax]User’s Manual (5.1.4.0)
3.6.1.8 Text Inserter
Text Inserter is a function that allows Eyemax DVR system to integrate
with POS machines. Simply select POS driver like selecting PTZ driver
to enable POS text inserter program and transactions that occur will be
displayed on selected camera pictures. Transaction recording and text
search are possible as well.
For more detailed installation and information, refer to Appendix 1.
How to Set
1. Tick the “Using Text Inserter”
2. Choose a connected POS driver.(POS driver is
addable as PTZ protocol adding.)
3. Click on Advanced to set hardware feature.
*Device Connection:
Select camera(s) and a
comport connected with POS
system(s)
31
[EyeMax]User’s Manual (5.1.4.0)
* Text Filter: Register important
goods and useless text to display
distinguishably and search POS
data conveniently.
* Important goods items:
Pre-registered items will be
displayed in red characters.
* Useless text: It is not going to be
displayed during transaction.
* About: Shows POS S/W version.
32
[EyeMax]User’s Manual (5.1.4.0)
Font Settings: Font change on screen
display.
Postion Setting: Position change on screen
display.
33
[EyeMax]User’s Manual (5.1.4.0)
3.6.1.9 Hard Disk Usage
Hard Disk Usage is to select data storage method. If “Once” is selected,
data will be stored up to the point where HDD reaches its maximum
capacity. If “Recycle” is selected, data will be overwritten from the point
HDD reaches its maximum capacity based on “First In First Out”.
3.6.1.10 I-Phone
I-Phone is “Two-Way Audio Communication”.
Check the box, go to Control Screen, and click on the I-Phone
button for audio communication. For more detailed I-Phone setup,
refer to Appendix 2.
* Port No.: A port number for I-Phone use has to be set up.
Normally the default value is good to use.
* Timeout: It indicates the maximum length of connection
trial. If there is no response within the value set, call will be
cancelled.
* Accept Automatically: To accept counter part’s IP-phone
connection without checking a confirmation message.
34
[EyeMax]User’s Manual (5.1.4.0)
3.6.1.11 Maintenance Log
It is used to record and view maintenance history.
3.6.2 Device
Device sub-screen is
divided into 5 different
setup categories; Camera,
Output,
Input, Audio and Alert.
All devices in each category
can be set up on one same
page.
Modify Framerate itself :By
ticking it, DVR software will
automatically
allocate
proper frames to channels.
35
[EyeMax]User’s Manual (5.1.4.0)
3.6.2.1 Camera
Cameras will be enabled by
checking the boxes.
Different resolutions and recording
frame rates can be set up for
different cameras.
* Video Signal Type: Select either
NTSC or PAL.
* Auto Channel Scan: It
automatically identifies all the active
video channels. Make sure to
always click and scan after S/W
version change.
* Default: It sets “Event Recording
Frame” and “Recording Frame” as
default values.
[Camera]
Double-click on “Camera”for more
individual Camera setup.
Select recording picture quality.
Using Still Image :
It is a function that captures still image
when Recording schedule mode is set
as E or H.
(Caution) Under R mode at Recording
schedule, this function stop recording
the channel.
* Pre-alarm (max. 10 sec.): Length of time to be recorded before event
* Post-alarm (max. 10 min.): Length of time to be recorded after event
36
[EyeMax]User’s Manual (5.1.4.0)
[Motion Detection]
Select a function between
Motion
detection,
Object
detection and People Count.
Motion detection is a function
that DVR software detects
every movement or motion by
comparing a frame with its
previous frame.
Zone Setting:
1. Drag mouse on desired place to set motion detection zones.
2. To clear the zones set, click on “Clear all” or drag mouse after
click on “clear”:.
Use Details: To set more than one motion detection zone. Possible up to 16 motion detection zones
with all different colors.
How to set
Click on “Add Zone” and select another zone desired to be detected.
Note: If the number of zones exceeds 16, above error message will be appeared.
37
[EyeMax]User’s Manual (5.1.4.0)
z
Zone All: Displays all areas
together that have been set
for the zones.
z
z
38
Setting All: Selecst whole
area
Delete Zone: Deletes zones
one by one.
[EyeMax]User’s Manual (5.1.4.0)
[Object Detection]
It is a function that marks all the changes occurred from the original scene.
Eyemax will detect new & missing objects after a certain period of time (detecting
interval).
*Detecting Interval: An interval that DVR tries repeatedly to detect any object
change in the zone set. For example, if the object is appeared and remained only
5 seconds, it will not be detected in case 1 min. detecting interval is set as above.
*Viewing Original Frame: Checking an original image set.
*Set as Original Frame: Save an original image to be surveilled to check missing
or appeared object.
*Set: To mark a zone.
*Setting All: Select all zone in a selected channel
*Clear All: To clear set zone.
39
[EyeMax]User’s Manual (5.1.4.0)
Object Detection Blocks
Click the right mouse and select
Blocks” to remove all the blocks.
“Clear Object Detection
How to Set up:
•
Tick the “Object Detection” box and click on “Zone Settings”.
•
Drag the mouse to select object detection zone (same as “Motion Detection”).
•
Click on the “Set Frame” button to select original (default) image.
•
Go to “Detection Interval” and determine when to mark new object after its pause.
•
Go to “Setup/Schedule” and select “M”
•
Go to the “Control Screen” and find the red-squared “Object Detection” symbol.
•
One click on the “View Original Frame” button will display original image set.
•
Click it again to reactivate the “Set Frame” button.
40
[EyeMax]User’s Manual (5.1.4.0)
[People Counter]
It is a function that counts people coming in and out of a certain place.
How to Set up:
1. Set Count Interval.
2. Set zone by dragging
mouse.
3. If a directional counting is
needed, select one.
*Motion Detection: Counting
by Motion Detection.
*Input Device: Counting by
Input Device such as sensor.
*Reset Everyday: Tick box to
reset everyday automatically.
*Interval(Sec.):
Counting
interval from the time object
is detected.
st
*Check Movement from 1
nd
Zone to 2 : Counting based
on the direction a place to
another.
*Check Movement from 2nd
Zone to 1st: Counting based
on the direction a place to
another.
*Set: Set the first zone.
*Set 2nd Zone: Set the
second zone to be detected.
*Clear: Clear the zone
selected.
*Setting All: Selects all areas
on the screen.
*Clear All: Clear all zones
selected.
41
[EyeMax]User’s Manual (5.1.4.0)
[Mosaic]
It is a function that veils restricted areas to keep regular users uninformed.
How to Set up:
•
•
•
•
•
Click on “Advanced”.
Tick the “Use Mosaic” box.
Click on “Mosaic Zone Settings”.
Set “Mosaic Zone”.
Go to the “Control Screen” and
find veiled areas.
Note
1. While using Mosaic, “Save” or
“Print” can not be performed.
2. To see unveiled area, logging in
as “Admin” or “Admin Mode” is
required.
42
[EyeMax]User’s Manual (5.1.4.0)
[Data Retain]
It is a function that retains data only for the period set. For example, if 10 days is set, Eyemax will
delete all previous data before 10 days regardless of the capacity remaining in HDD.
How to Set up:
•
Click on “Advanced”
•
Tick the “Use Data Retain”.
•
Click on “Detail”. to select a day period to
retain
Note: Warning message to inform as above will be
appeared. To continue, click on “Yes”
43
[EyeMax]User’s Manual (5.1.4.0)
[PTZ Camera Setup]
When using a PTZ camera, check the box
and select a model name. Eyemax DVR
system supports nearly 40 different
protocols.
* Camera ID: Leave it as it is if only one PTZ camera is used.
Otherwise, give each camera a different number.
* Restore as Previous : Tick the box and set time period to move
camera back to initial position after a certain period of time.
Select the port used for PTZ camera.
* Bit per Second: It is 9600 for most of PTZ cameras. But a few
can have different values.
Refer to camera manual.
* Apply All: The same settings will be applied to the rest of the
cameras by clicking on “Apply All”.
PTZ Control by Drag and Drop
How to Set Up:
1. Simply ticks “Using PTZ Mouse Control” as above
and select a proper PTZ model name.
2. On a PTZ screen, drag mouse to the desired
position to see.
44
[EyeMax]User’s Manual (5.1.4.0)
Virtual Keypad for Speed Dome Camera
How to Set Up:
1. Select “SpeedDome Camera/TBT INC.”
protocol to run Virtual Keypad.
2. Set proper Camera ID, Port, Bit per Second,
and etc.
3. Click right mouse button on PTZ Screen and
select “ PTZ Keypad”.
45
[EyeMax]User’s Manual (5.1.4.0)
Click on “Menu” to go into Camera OSD.
Once preset and touring have been set through this virtual keypad, they must be
controlled by the keypad.(Menu buttons on GUI will not work.)
For example, when preset 1 is set, press 1 on the keypad and “Preset”. Then it moves to
the Preset No. 1 position.
Note:
Now only limited Speed Dome models are available to run this keypad.
46
[EyeMax]User’s Manual (5.1.4.0)
[Preset & Touring]
Either click the right mouse on
camera picture or click on the Preset
(Touring) button for Preset (Touring)
setup and use.
[Preset]
“Preset” is a function that enables a camera to move from one position to another automatically.
47
[EyeMax]User’s Manual (5.1.4.0)
* Steps to Set up Presets *
1. Move camera to a desired position using the
PTZ Control on Control screen.
2. Click the right mouse.
3. Name the preset.
4. Repeat the above for setting up as many as
256 presets.
5. Click the right mouse to run preset and
click the “Auto” button to stop it.
48
[EyeMax]User’s Manual (5.1.4.0)
[Touring]
“Touring” is a function that enables a group of selected presets to work repeatedly.
* Steps to Set up a Tour *
1. Click the right mouse.
2. Name the tour.
3. Click on “Add”.
4. Select a preset.
5. Click “OK”.
6. Repeat the above to have more than 1 preset in the tour.
7. Click the right mouse to run the tour.
* Dwell: The length of time that camera will pause before moving to the next preset.
* Speed: Moving speed for selected preset.
49
[EyeMax]User’s Manual (5.1.4.0)
50
[EyeMax]User’s Manual (5.1.4.0)
Advanced PTZ setup can be done by one right mouse click. Make sure that the PTZ camera to set
up supports advanced PTZ control functions first.
51
[EyeMax]User’s Manual (5.1.4.0)
[Access Control]
It is a function that integrates Access Control into DVR system.
For Access control DVR, please refer to another document “Access control DVR”.
How to Set up:
•
Click on “Advanced”
•
Click
on
“Access
Control
Integration”
•
Type in “IP Address” and Port
Number
of
access
control
connected PC.
Note: For more information about Access
Control Integration, refer to the appendix
4, please.
52
[EyeMax]User’s Manual (5.1.4.0)
3.6.2.2 Output Device
Eyemax DVR system can be equipped
with as many as 8 output devices. Simply
check the boxes for use. In addition,
outputs can be manually activated from
Control screen (Manual Alarm).
Double-click on “Output” for
individual output setup.
*
*
*
*
Name: Output device name.
Length of Activation: The length of output activation (1-60 sec.).
Length of Standby: The length of output deactivation until reactivation (0-60 sec.).
Apply All: The same settings will be applied to the rest of the output devices.
53
[EyeMax]User’s Manual (5.1.4.0)
3.6.2.3 Input Device
Eyemax DVR system can be
equipped with as many as 16 input
devices. Simply check the boxes
for use.
Each and every input can be
tuned independently.
Signal Types:
NO(+) & (-) detached normally
NC(+) & (-) attached normally
54
[EyeMax]User’s Manual (5.1.4.0)
3.6.2.4 Audio
Eyemax DVR system is equipped with as
many as 8 audio channels.
Simply connect cameras to audio channels
for use, and audio recording will be
completed as chosen.
(e.g.) The above selections indicate that
Audio2 will record Camera3, Audio3 will
record Camera5, etc.
Input Gain (1-15): It is audio level control
similar to volume control.
55
[EyeMax]User’s Manual (5.1.4.0)
3.6.2.5 Alert
Eyemax DVR system is equipped with 1 alert device.
Alert is the beep inside the system that sounds in the case of
event. Check the box for use and select an alert mode.
Length of Activation: The length of alert activation (1-60 sec.).
56
[EyeMax]User’s Manual (5.1.4.0)
*Event Sound Settings:
To differentiate alert sound by Events(Sensor, Motion, and No video
Signal), select a Wave File for each.
57
[EyeMax]User’s Manual (5.1.4.0)
3.6.3 Event
“Event” consists of 3 different groups; “Input”, “Motion Detection” and “No Video Signal”. On
this menu, devices can be set to respond to different events.
3.6.3.1 Input
* Length of Full Screen Display:
The time length for full screen display in the
case of input device activation.
* Full Screen Display Channels: Full Screen
Display
: Selected camera channel will pop up if the
linked input device is triggered.
The equipment of application:
Events triggered by Input or Motion
detection can pop on a desired screen among
DVR
system/
DVR+TV-OUT1/TV-OUT2/TV-OUT3.
* Link to Recording: One Input device can have as many as 16 recording cameras on
activation. The below example shows that Camera1 will record in the case of
Input1 activation.
* Link to Output: One Input device can have
as many as 8 activating output devices on
activation. The above example shows that
Output1 will be activated in the case of
Input1 activation.
* Link to Alert: Input device can also be
linked to alert.
58
[EyeMax]User’s Manual (5.1.4.0)
3.6.3.2 Motion Detection
The same identical concepts and methods as “Input”
are applied to “Motion Detection”.
59
[EyeMax]User’s Manual (5.1.4.0)
3.6.3.3 No Video Signal
The same identical concepts
and methods as “Input” are
applied to “No Video Signal”.
3.6.3.4 Watchdog
The same identical concepts
and methods as “Input”
are applied to “Watchdog”.
When “Video Capture Error” is
occurred, it is linking to Alert
and Output. User can link the
event to Reboot, Message on
DVR.
60
[EyeMax]User’s Manual (5.1.4.0)
The same identical concepts
and methods as “Input”
are applied to “Audio Capture
Error”.
When “Audio Capture Error” is
occurred, it is linking to Alert
and Output. User can link the
event to Reboot, Message on
DVR.
The same identical concepts
and methods as “Input”
are applied to “Recording
Error”.
When “Recording Error” is
occurred, it is linking to Alert
and Output. User can link the
event to Reboot, Message on
DVR.
61
[EyeMax]User’s Manual (5.1.4.0)
The same identical concepts
and methods as “Input”
are applied to “Recording
Error”.
When “Disk Writing Failed” is
occurred, it is linking to Alert
and Output. User can link the
event to Reboot, Message on
DVR.
62
[EyeMax]User’s Manual (5.1.4.0)
3.6.4 Schedule
“Schedule” is a place where the different activities of different devices are determined.
Each camera can have different
recording options; scheduled
recording by time & day and selective
recording.
* R: Recording at all times
* E: Recording on event
* N: Stop recording
* H: Recording at all times and higher
frame recording on event
* Use Scheduled Backup: To set backup
automatically.
Please refer to next to example.
* Automatic Start Time: At 1 a.m. it
Automatically starts back up.
Time Period
* From: When “Apply Previous Date” is
checked, 2 a.m. means yesterday. If not, it is
coming 2 a. m.
* To: Same concept as “From”.
* Channel: Cameras wish to backup.
* Select All: Select all cameras
* Password: Give password to play back back
up data.
* Retype Password: Retype password to double
confirm.
* Target Directory: Selects directory to backup.
* Create Subdirectory Name as Date: Gives
created directory name based on the date.
3.5.4.1 Camera
63
[EyeMax]User’s Manual (5.1.4.0)
The holiday recording schedule set at the bottom of
the “Schedule” table will be applied to selected
dates.
3.6.4.1 Recording [Manual (Instant) Recording]
It is a function that enables users to react on an emergency situation properly by making Eyemax start
recording immediately.
Start “Manual Recording” by selecting
“Recording On”. Stop “Manual Recording” by
selecting “Recording Off”.
Note : 1. The purple icon indicates that it is on “Manual Recording”.
2. Only ‘Admin’ can use “Manual recording”.
64
[EyeMax]User’s Manual (5.1.4.0)
3.6.4.2 Device
Select detailed schedule for recording on motion detection.
65
[EyeMax]User’s Manual (5.1.4.0)
3.6.5 Network
3.6.5.1 DVR Server
* Supported Network:
1. TCP/IP - Connecting to DVR Server from
Client using Lan or DSL
2. PSTN - Connecting to DVR Server from
Client using PSTN or ISDN modem
3. None - Not allowed to connect to DVR Server
remotely
* Port No.: The default port number is 9091.
* Timeout: The time length of trials to connect to
DVR Server from Client
* Maximum Number of Users: The maximum
number of users that can be logged in remotely.
* Details: It shows all the port numbers that are
available to use.
66
[EyeMax]User’s Manual (5.1.4.0)
* Transmitted Video Quality: Video quality to be transmitted to Client.
As a reminder, the higher video quality gets, the slower network transmission speed becomes.
Therefore, it is often recommended to select low video quality when using “Narrowband”.
* Bandwidth: Make sure to select the right bandwidth to have the right network performance.
Note : Eyemax will automatically appoint a proper IP address to router. No router setup required.
3.6.5.2 Web Server
* Port No.: Fixed HTTP Port No.
* Web Login Required: If the box is checked, login is
required when connecting to DVR server using web
browser. If the box is NOT checked, automatic login as
“anonymous” will be done.
3.6.5.3 Central Station
“ Central Station” is a function that enables Client with static IP
to manage multi DVR sites. Check the box and click on
“Properties” for setup.
* Note: “DVR Manager” must be installed on Central Station
Server (Client). For more details, refer to Appendix 3.
Type in the IP address of Central Station Server (Client with Static IP) and click on
“Reported Events” for more setup.
67
[EyeMax]User’s Manual (5.1.4.0)
Choose events to report to Central Station server
and set reporting time period.
3.6.5.4 E-mail
E-mail is a function that enables Eyemax DVR
system to send out e-mails when selected events
occur. Check the box and click on “Properties” for
setup.
Note : Some e-mail servesr may
require authentication for ID and
PW.
Make sure to put in the right IP
address of SMTP server. Then, click
on “Reported Events” for more setup.
The “Reported Events” menu is the
same as Central Station.
68
[EyeMax]User’s Manual (5.1.4.0)
Send camera(s) to send out image(s)
when the event occurs.
69
[EyeMax]User’s Manual (5.1.4.0)
70
[EyeMax]User’s Manual (5.1.4.0)
3.6.5.5 Dial Alarm
“Dial Alarm” is a function that enables Eyemax DVR
system to call out on selected events. Check the box and
click on “Properties” for setup.
Modem card must be installed inside Eyemax DVR system to make this
function work. Type in phone (mobile) number to report. Click on “Reported
Events” (same setup as Central Station) for more setup.
3.6.5.6 IP Address Setup
Clicking “IP Address Setting” will
open a window for Network
Connections as below.
71
[EyeMax]User’s Manual (5.1.4.0)
Click right mouse and
select Properties for IP
setup for Eyemax DVR’s
network functions.
3.6.6 User
Users can be added, deleted or modified with different authorized access and control levels.
There are no limits in the number of users created.
72
[EyeMax]User’s Manual (5.1.4.0)
* Authorized Access: Checked functions will
be allowed to access remotely.
* Accessible Channels: Checked channels will
be allow to view remotely.
* Control Level: The lowest number will be allowed to have the first priority to set up, control, etc remotely.
* Admin Mode: A user who can go into the
setup and program (given the same
authorization as “Admin”). Only ONE user with
“Admin Mode” can log in remotely.
* Network: If checked, remote access authorization will be given.
* Multi-access: If checked, multi-users with
the same user name can log in remotely at the
same time.
*Minimize: An authority that can minimize S/W.
Time Set :
It’s a function that enables Administrator to set time for certain users to log in only for the time allowed.
73
[EyeMax]User’s Manual (5.1.4.0)
CHAPTER 4
View Log Application (Status)
4.1 Screen Features
Recording Camera: It shows recording status.
Sensor Detection: It shows sensor detection status.
Motion Detection: It shows motion detection status.
Alarm: It shows alarm activation status.
HDD Capacity: It shows HDD capacity used for recording.
Event: It shows events occurred.
Event Log: It shows all the previous events occurred by date.
74
[EyeMax]User’s Manual (5.1.4.0)
4.1.1 Event Log
* Date: All dates with events will be marked in bold numbers.
* List: All events for a certain selected date will be shown.
* Delete All Logs: If clicked, all the previous records will be deleted.
* Delete This Log: If clicked, only the events for a certain selected date will be deleted.
* Refresh: If clicked, events will be updated. *Print: Print the event log of a selected date.
* Save as: Save an event log of selected date with text file.
* Network Client Log : Remote login records will be also kept on DVR
server.
* Status of HDD: Show the HDD status as the specified color, based on the main board’s S.M.A.R.T(Self or
Smart Monitoring, Analysis and Reporting Technology) configuration.
*Green - normal, Orange - partially damaged, Red –Require the replacement of HDDs.
75
[EyeMax]User’s Manual (5.1.4.0)
CHAPTER 5
Playback Application (Search)
5.1 Search Features 1
Calendar: All dates with recorded data will be marked in bold numbers.
Blur/Sharp/Normal: Buttons to adjust sharpness of image
Zoom: Buttons to zoom in/out
Brightness: buttons to adjust brightness
Contrast: buttons to adjust contrast
Default: Default for Zoom/Brightness/Contrast
5.2 Search Features 2
5.2.1 Playback
Clicking right mouse on Time bar for Browse… and select a folder containing backup data
76
[EyeMax]User’s Manual (5.1.4.0)
For playback, simply select date, screen mode (1, 4, 9, 16, etc.), time by one click on
the time bar and click the play button.
What different colors mean on the time bar:
1. Blue: Recorded data by sensor & motion detection
2. Purple: Recorded data by 24-hour-recording
3. White: No recorded data in all cameras
4. Gray: No recorded data for some cameras
5. Green: Blue + audio
6. Light Green: Purple + audio
7. Dark Red : Purple + recorded text data (POS)
8. Orange : Even- recorded data with recorded text data.
9. Dark Yellow : Event-recorded data + recorded text data + audio
10. Yellow : Purple + recorded text data + audio
Stop
Play Backward * 2
Play
Play * 2
Play Backward
Event/Object/text/People count / Access control search
Move to the First Data
Move to the Last Data
Move1 Frame Backward
Move 1 Frame Forward
5.2.2 Event/Object/Text /People Count/Access Control Search
[Event Search]
Click the Event/Object Search button and select
“Event”.
77
[EyeMax]User’s Manual (5.1.4.0)
Select channels for Event Search.
Select one event from the event list and click “OK”,
and the selected event will be displayed. Click
Refresh” to update the list.
[Object Search]
Object Search is only to search certain selected objects for a certain period of time.
Scan: Set the time period for object search
Motion Detection Zone: Select “Set” and mark areas for object search by dragging
mouse. “Clear” is used to erase certain areas inside motion detection zones.
Sensitivity: Set motion detection sensitivity level.
Clear All: Click on it to clear all the motion detection zones set.
78
[EyeMax]User’s Manual (5.1.4.0)
[Text Search ]
It is to search POS text data with image according to selected time period and item.
Put in an item (Reference), select time period and click on “Search”, and a list with
transactions will be displayed.
-
Searched words will be retained in the combo ox in down-list format so the
data can be easily shown in next serch.
79
[EyeMax]User’s Manual (5.1.4.0)
[People/POS Count Search]
It is to search people count statistics according to selected time period & camera.
Through this function, the results of people count and POS transaction can be analyzed by the
hour and cameras.
Select date, camera & time, and statistics will
be shown as below. Statistics are distinguished
as People Counting, POS Counting, and
POS/People Counting.
Statistics can also be saved as text file.
80
[EyeMax]User’s Manual (5.1.4.0)
* People Count Search
1. Transaction Count: Counting when DVR gets data from POS.
2. People count: Counting people in certain zones.
* People Count Statistics
1. Camera/Hour: Select camera and hour wish to search
2. Start/End: Select date wish to search
3. Total Transaction: Results after searching transaction count in total
4. Total Count: Results after searching people count in total
5. Search: Click it to start search
6. Delete/Delete All: To erase data in statistics
7. Report: To save it in text file
* Statistics
1. Camera/Hour: Select camera
and hour wish to search
2. Start/End: Select date wish to
search
3. Camera All/Hour All: Click it to
select all cameras and hour.
4. Total Transaction: Results after
searching transaction count in total
5. Total Count: Results after
searching people count in total
6. Search: Click it to start search
7. Close: Click it to close the menu.
* Save
1. Select: Select menu wish to
save.
2. Time Period: Select date wish to
save.
\
81
[EyeMax]User’s Manual (5.1.4.0)
* How to read data and graph
1. Counted number of (T)ransaction/ Counted number of (P)eople count
2.
Red Color: Rate of people count
Green Color: Rate of Transaction
The Pie Graph will show at a glace how many transactions have been performed, compared to
the number of people counted.
82
[EyeMax]User’s Manual (5.1.4.0)
5.2.3 Monitoring & Searching
It is a feature that enables user to view live video while searching recorded data.
Click the right mouse and select “Monitoring On” to
view live video. Click the right mouse again and select
“Monitoring Off” to go back to “Search Mode”.
83
[EyeMax]User’s Manual (5.1.4.0)
5.2.4 Bookmark & Go To
Bookmark (Favorites): Added data from “
Object Search” are stored here.
Go To: Select desired time to search and click
“OK”.
5.2.5 Save
Watermark(Image)
Using Watermark(Image): To attach a certain logo or special
picture on AVI file.
AVI: For saving motion pictures and audio
BMP: For saving images. Watermarked images can
be saved.
JPEG: For saving regular still images. Quality is not
as good as BMP but less HDD is used.
Save in JPEG with Time Period: For scheduled save in
JPEG
84
[EyeMax]User’s Manual (5.1.4.0)
z Watermark Setting
Select each for desirable watermark
setting.
Click on “Browse” to find
watermark image or
logo.
85
[EyeMax]User’s Manual (5.1.4.0)
[Save in AVI Format]
Click “Start” to start saving and “Stop” to
stop saving.
Mute: Saving video only (no audio)
High Speed: Saving in high speed
Click time period settings and put the time
priod that you want to save.
86
[EyeMax]User’s Manual (5.1.4.0)
[Save in BMP
Format]
Click “Start”and select “BMP” as you save images.
Saved images can be checked using “Watermark
Proofer”.
[Watermark Proofer]
Execute “Watermark Proofer” and check if
certain saved images are forged or not.
87
[EyeMax]User’s Manual (5.1.4.0)
[Save in JPEG Format]
[Save in JPEG with Time Period]
Click “Start” and select “JPEG” as you save images.
Select time period and select channels to be saved
in JPEG.
5.2.6 Print
Click the “Print” button and follow the same printing procedure as
you would normally print out documents.
88
[EyeMax]User’s Manual (5.1.4.0)
5.2.7 Backup
The recorded data can be copied from the hard disk to external storage devices, such as CD-R, DVD.
Back up recorded data using various backup devices.
5.2.7.1 DFS Back up
89
[EyeMax]User’s Manual (5.1.4.0)
DFS: Save in DFS file format.
Dialog: Show the directory of burning software (ex.Nero Burning)
External CD Burning Program: User can run the other CD burning program such as nero burning.
After successfully back up the file, user can burn the data onto CD.
90
[EyeMax]User’s Manual (5.1.4.0)
Select Time Period : Specify time period for backup. The minimum period for
backup is 1 minute.
If password is set, viewing backup data will be possible only when it is typed
in.
Backup Folder : Click the “Browse” button, select a drive to back up
and enter a desired folder name.
91
[EyeMax]User’s Manual (5.1.4.0)
Play CD-Burning: Check to burn the backup data through an external Burning
program.
Log File: Shows “Backup Start Time”, ”Directory”, ”Status-fail or Success”.
92
[EyeMax]User’s Manual (5.1.4.0)
5.2.7.2 EXE Back up
Any recorded data can be saved as “.exe” file. No viewer program is required to see saved data.
Note : 1. file size limited up to 1 GB.
2. 1 channel backup only.
93
[EyeMax]User’s Manual (5.1.4.0)
1.
2.
3.
4.
5.
6.
Select “EXE File”.
Specify time period, password, drive, etc.
Select ONE channel to back up.
Specify file size up to ONE GB. If it is larger than 1GB, multiple exe files will be
created.
Tick the “Once Make EXE File” box to create only one file with the file size specified.
Double-click the exe file created to see data.
94
[EyeMax]User’s Manual (5.1.4.0)
95
[EyeMax]User’s Manual (5.1.4.0)
5.2.7.3 Run CD Burner ( For Non Windows XP Users)
1. Install bundle CD and install INCD.
3.After installing INCD, run “InCDL.exe” which is the INCD Launch Program.
4. Insert a blank RW CD and then start formatting it (If it is a brand-new one, click “Format” instead of “Quick
Format”).
96
[EyeMax]User’s Manual (5.1.4.0)
97
[EyeMax]User’s Manual (5.1.4.0)
5. Leave the Eyemax Program and insert the blank RW CD which has been formatted.
6. Select “Backup” and click “Next” to start.
7. Select time period & password and click “Browse” to create a folder.
98
[EyeMax]User’s Manual (5.1.4.0)
99
[EyeMax]User’s Manual (5.1.4.0)
5.2.7.4 Run CD Burner ( For WindowsXP Users Only)
Windows XP users can back up data directly in a CD without exiting the Eyemax Program.
1. Tick the “Save in CD data of backup” box and click “Next”.
100
[EyeMax]User’s Manual (5.1.4.0)
2.
3.
4.
5.
Select Time Period : Specify time period and password.
Select CD-RW drive.
Create folder name if it should be used and click “Next”.
CD information will be shown as below.
101
[EyeMax]User’s Manual (5.1.4.0)
6. Select 1 channel to back up.
7. Identify the maximum file size indicated. An attempt to back up more than the size
indicated will result in a failure.
102
[EyeMax]User’s Manual (5.1.4.0)
8. After completing back up, find the files created in the CD.
103
[EyeMax]User’s Manual (5.1.4.0)
5.2.7.5 Playback
1.
2.
Click the “Start” button and run the “DVR’s Playback Program”.
Select a folder (subfolder) to see saved data.
104
[EyeMax]User’s Manual (5.1.4.0)
CHAPTER 6
Remote Monitoring System (Client)
6.1 Program Execution
Double-click on the “EyeMax DVR Client” icon on the
desktop to execute Remote Monitoring System (Client).
Click “Add” to register DVR servers.
Note: Make sure to put the same
Port No. as DVR server.
105
[EyeMax]User’s Manual (5.1.4.0)
There can be more than one DVR server registered. Select one
from “Servers”, click on “Login” and type in password to log in.
* Edit: Login info. changes can be made here.
* Delete: Registered servers can be deleted with one click.
Full Screen Display on Event: If checked, full screen will be
displayed on events.
Video display as RGB: if checked, video display will be shown
as RGB type. This function improves client display
compatibility.
106
[EyeMax]User’s Manual (5.1.4.0)
6.2 Remote Save and Backup
The instant AVI file save of real time video can be done remotely.
1. Click the right mouse to start saving.
2. Click the right mouse to stop saving.
Remote Backup can also be done.
The same procedure is used as “DFS Backup”.
107
[EyeMax]User’s Manual (5.1.4.0)
6.3 Real Time Audio
Click the right mouse and select “Enable Audio” to hear real time audio.
Note: Changing “Setup” remotely can be done if remote user is “Admin” or “Admin Mode”.
108
[EyeMax]User’s Manual (5.1.4.0)
Appendix 1
POS DVR
TABLE OF CONTENTS
1.1 Hardware Installation
1.1.1 Parts
1.1.2 Installation
109
[EyeMax]User’s Manual (5.1.4.0)
1.1 Hardware Installation
1.1.1. Parts
5
1
+
2
4
3
6
110
[EyeMax]User’s Manual (5.1.4.0)
Part Names
7
8
9
111
1.RS232 Serial Cables
(Cross & Direct)
2. RS232 Serial Cable
3. RS232 Serial Cable
4. RS232 Serial Converter
(9 pins into 25 pins)
5. Gender Changer
6. #1 + #4 + #5
7. DVR
8. POS Printer
9. Point of Sales (POS)
[EyeMax]User’s Manual (5.1.4.0)
1.1.2 Installation
Part # 2 goes into the COM
Port 1 of Part # 7.
Part # 1 goes into the serial port
of Part # 8.
Part # 3 goes into the serial port
of Part # 9.
112
[EyeMax]User’s Manual (5.1.4.0)
Appendix 2
I-phone
TABLE OF CONTENTS
2.1 Installation
2.2 Execution
2.3 Audio Setup
113
[EyeMax]User’s Manual (5.1.4.0)
2.1 Installation
Any system used for “Two-way Communication” must have
static IP and “iphone(1.0.1.0).exe” must be installed.
For
I-phone
installation,
double-click
on
“iphone(1.0.1.0).exe”.
Click “Next” to start installation process and
select “Automatic Installation”.
114
[EyeMax]User’s Manual (5.1.4.0)
Click “Finish” to complete the process.
2.2 Execution
Go to “Start”, “All Programs”, find “I-phone” and
select it for execution.
Find the I-phone icon at the right bottom and click
it for the next step.
115
[EyeMax]User’s Manual (5.1.4.0)
Select “Call” for Two-Way Communication”, type in IP address and click “Connect”.
Property: The default port number is 8015 and
the default timeout value is 5 seconds.
Leave them as they are unless other values
must be used.
2.3 Audio Setup
Go to “Control Panel”, ”Sounds, Speech and
Audio Devices” and “Sounds and Audio Devices”.
Then, go to “Audio”, “Sound playback” and click
“Volume”.
116
[EyeMax]User’s Manual (5.1.4.0)
Recording Control should be set up this way.
117
[EyeMax]User’s Manual (5.1.4.0)
Appendix 3
MDVR
118
[EyeMax]User’s Manual (5.1.4.0)
3.1 Installation
3.1.1 Start: Click “Next” to start installation
process.
3.1.2 Selection of Installation Method: Select “Automatic Installation”.
119
[EyeMax]User’s Manual (5.1.4.0)
3.1.3 On Installing
3.1.4 Finish: Click “Finish” to complete installation.
120
[EyeMax]User’s Manual (5.1.4.0)
3.2 Overview
Multi-site
Management
Exit
Search
Site
Name
Screen
Mode
PTZ
Camera
Control
Setup
Live Viewing
E-Map
121
Event
Properties
Log in & Log
out
[EyeMax]User’s Manual (5.1.4.0)
3.3 Execution
3.3.1 Properties.
Click on the “Properties” button to register group and site.
Registration Steps:
1. Click “Add group” to make group. One group can have up to 64 sites
(cameras).
122
[EyeMax]User’s Manual (5.1.4.0)
2. After making all groups, select a group to register sites.
Click on the “Add site” button.
3. Type in all the required info. as below. Make sure to put in the same user
and password used on DVR.
4. Repeat the above steps to register more sites.
123
[EyeMax]User’s Manual (5.1.4.0)
3.3.2 Log in & Log out
Click on the “Log in & out” button to log in.
124
[EyeMax]User’s Manual (5.1.4.0)
3.3.3 Setup
Click on the “Setup” button to use different opions.
By tickinging the box, camera name,
status, and POS text will be displayed
on camera picture.
By ticking the box, MDVR user and
password will be asked in the event of
the execution of MDVR.
125
[EyeMax]User’s Manual (5.1.4.0)
3.4 E-Map
Click on the “Setup” button to use different opions.
Click on the “E-Map” button to configure E-Map. To create an E-Map image, click
on the right mouse and select “Open E-Map”. Only BMP file can be in use.
126
[EyeMax]User’s Manual (5.1.4.0)
Click on the right mouse and select “Camera Lock” to be able to position DVRs at
desired locations.
Click on the right mouse and select “Save Setting” to save image and
camera locations.
127
[EyeMax]User’s Manual (5.1.4.0)
After configuration, selected E-Map image and all DVR sites at selected locations can
be viewed. To visit DVR site using E-Map, simply double-click on camera-shaped
icon. Any DVR (camera-shaped icon) blinking in red and blue has event occurred.
3.5 Event
“Event” displays all the events coming in from registered DVRs. Select
a site and click on the right mouse to connect.
128
[EyeMax]User’s Manual (5.1.4.0)
3.6 Search
Save
Backup
Search Steps:
1. Select date from the calendar.
2. Select time from the time bar.
3.6.1 Save
Image can be saved either in BMP File or in
JPEG File
129
[EyeMax]User’s Manual (5.1.4.0)
3.6.2
Backup
Back up recorded data using various backup devices.
If password is set, viewing backup data will be possible only when it is
typed in.
130
[EyeMax]User’s Manual (5.1.4.0)
131
[EyeMax]User’s Manual (5.1.4.0)
Appendix 4
Access Control DVR
132
[EyeMax]User’s Manual (5.1.4.0)
4.1 Configuration Diagram
Client PC
TCP/IP
Install “access Control Cleint”
TCP/IP
Network Server
(FP Server)
TCP/IP
TCP/IP
1.
Install
“FPServer_Setup_V2.09”
2. Install “Access control Server”
133
[EyeMax]User’s Manual (5.1.4.0)
4.2 Installing FP Server
Start: Click “Next” to start installation
process.
* Do not install “Hamster installation”
For more information for “Virdi terminal Setup”, please refer “300N user’s guide and
“FPS Server Program manual”
4.3 Installing ““Access control Server”
134
[EyeMax]User’s Manual (5.1.4.0)
4.3.1 On Installing
4.3.2 Finish: Click “Finish” to complete installation.
135
[EyeMax]User’s Manual (5.1.4.0)
4.4 DVR setup
4.4.1 Set up.
1) Click “Access control” button in camera set up page.
136
[EyeMax]User’s Manual (5.1.4.0)
1 ) Type Access control(Virdi)’s IP address.
2 ) Click “OK” to finish set up.
137
[EyeMax]User’s Manual (5.1.4.0)
4.5 Access Control Search
1. Click the “access control” Search button
2. Set the time period for search.
3. Click “search”.
4. Double click the filtered data, it shows the image.
138
[EyeMax]User’s Manual (5.1.4.0)
4.6 “Access Control Client”
4.6.1 Installing
Start: Click “Next” to start installation process.
139
[EyeMax]User’s Manual (5.1.4.0)
4.6.2 Execution
140
[EyeMax]User’s Manual (5.1.4.0)
4.6.3 “Access Control Client” setup
1. DoubleClick Access Control Client program.
2. Click “set up” button.
141
[EyeMax]User’s Manual (5.1.4.0)
3. Fill out Server(DVR)’s information.
4. Type IP Address and User name / PW of DVR server.
142
[EyeMax]User’s Manual (5.1.4.0)
5. Click “OK” to logon to DVR server.
6. Set the time period that you want to search.
7. Click “OK” to search.
143
[EyeMax]User’s Manual (5.1.4.0)
144


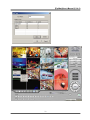
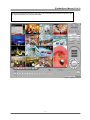
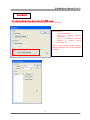
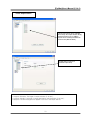


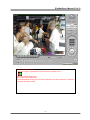
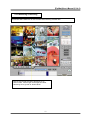
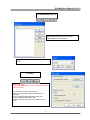
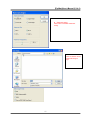


![[Proxyview]User`s Manual (5.1.4.0)](http://vs1.manualzilla.com/store/data/005658349_1-e7f841297d622d23913e7f3fcabf599d-150x150.png)