1
Instruction Manual
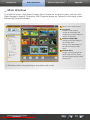
Click one of the following tabs to jump to that section of the manual.
ImageBrowser EX
CameraWindow
• EOS camera users: Use EOS Utility instead of CameraWindow for these operations. Also refer to the EOS Utility Instruction Manual, provided in PDF format.
• Tab and button colors identify the current section—green for ImageBrowser EX
and blue for CameraWindow.
Downloaded From VideoCamera-Manual.com Manuals
ImageBrowser EX
User Guide
CEL-SV5PA210
Downloaded FromCo
Manuals
CVideoCamera-Manual.com
ont
nten
ten
entts
ts
2
Introduction
Basic Operations
Advanced Operations
Appendix
Manual Conventions and Navigation, System
Considerations
Conventions in This Manual
Manual Navigation
Supported Operating Environments
System Requirements
Conventions in This Manual
The following labels are used to distinguish sections in this manual:
Windows
Mac OS
Indicates operations in Windows environments.
Indicates operations in Mac OS environments.
Windows operations are used in some cases to illustrate instructions in this manual. On
Macintosh keyboards, the equivalent of ‘Ctrl’ is ‘command’, and the equivalent of ‘Enter’
is ‘return’. Instead of right-clicking, Macintosh users can hold ‘command’ and click.
Screenshots in explanations are mainly from Windows. Some screen elements may be different in Mac OS environments.
Indicates operating precautions that should be followed, or important information to
note. Be sure to read these sections.
Indicates operating tips and convenient ways to use the software. Read these sections as
needed.
Downloaded FromCo
Manuals
CVideoCamera-Manual.com
ont
nten
ten
entts
ts
3
Introduction
Basic Operations
Advanced Operations
Appendix
Manual Navigation
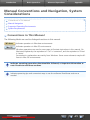
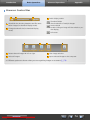
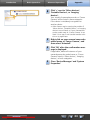
• Click tabs or buttons to access other pages.
Tabs
Click a tab on the top of the page to access the first page in that section.
Buttons
Navigation is also possible by clicking the buttons on the bottom of the page.
1
1 Jump to the table of contents
(= 9).
2
3
4
3 Jump to the previous page.
4 Jump to the next page.
2 Return to the page shown before
you clicked the link.
• Click links to access other pages.
Click links in the manual shown in blue, such as “XXXXX” or (= XX), to access the page mentioned.
Supported Operating Environments
• Windows 7 and Mac OS X 10.8 screenshots and procedures are used to illustrate instructions
in this manual. If you are using another version of operating system, the actual screens and
procedures may be different.
• Screens and procedures may also vary depending on the model of camera/camcorder, and not
all functions may be available, as noted in relevant sections of this manual.
• Use the software when online to take advantage of auto updating. Note that auto updating is
not available when offline, which will prevent you from obtaining any new functions that are
released.
Downloaded FromCo
Manuals
CVideoCamera-Manual.com
ont
nten
ten
entts
ts
4
Introduction
Basic Operations
Advanced Operations
Appendix
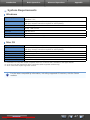
System Requirements
Windows
Operating System
Windows 8 / 8.1
Windows 7 SP1
Computer
Computer running one of the above operating systems (preinstalled); Internet connection required for auto updating
CPU (Still Images)
1.6 GHz or higher
CPU (Movies)
[HD models]
Core 2 Duo 1.66 GHz or higher
[Full HD models]*1
Camcorders: Core i5 3.0 GHz or higher
Digital cameras: Core i7 2.8 GHz or higher
RAM (Still Images)
64-bit: 2 GB or more
32-bit: 1 GB or more
RAM (Movies)
2 GB or more
Free Hard Disk Space
ImageBrowser EX: 250 MB or more*2
PhotoStitch: 40 MB or more
Display
1,024 x 768 resolution or higher
*1 Recommended specifications for Full HD movie playback in ImageBrowser EX.
*2 Includes Silverlight 5.1 (max. 100 MB).
Downloaded FromCo
Manuals
CVideoCamera-Manual.com
ont
nten
ten
entts
ts
5
Introduction
Basic Operations
Advanced Operations
Appendix
Mac OS
Operating System
OS X 10.9*¹, 10.8*¹
Computer
Computer running one of the above operating systems (preinstalled); Internet connection required for auto updating
CPU (Still Images)
Core 2 Duo or higher
CPU (Movies)
[HD models]
Core 2 Duo or higher
[Full HD models]*2
Camcorders: Core i5 3.0 GHz or higher
Digital cameras: Core i7 2.8 GHz or higher
RAM (Still Images)
2 GB or more
RAM (Movies)
2 GB or more
Free Hard Disk Space
ImageBrowser EX: 350 MB or more*3
PhotoStitch: 50 MB or more
Display
1,024 x 768 resolution or higher
*1 Information on computer models compatible with OS X 10.9 and 10.8 is available on the Apple website.
*2 Recommended specifications for Full HD movie playback in ImageBrowser EX.
*3 Includes Silverlight 5.1 (max. 100 MB).
For the latest compatibility information, including supported OS versions, visit the Canon
website.
Downloaded FromCo
Manuals
CVideoCamera-Manual.com
ont
nten
ten
entts
ts
6
Introduction
Basic Operations
Advanced Operations
Appendix
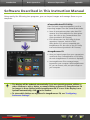
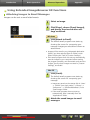
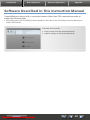
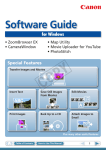
Software Described in This Instruction Manual
Using mainly the following two programs, you can import images and manage them on your
computer.
zCameraWindow/EOS Utility
Used for basic image management, such as
importing images from the camera/camcorder.
• Users of cameras/camcorders other than EOS
cameras: Use CameraWindow for these operations. Also refer to the CameraWindow User
Guide (provided in PDF format).
• EOS camera users: Use EOS Utility for these
operations. However, versions of EOS
Utility before 2.10 are not compatible with
ImageBrowser EX. Also refer to the EOS Utility
Instruction Manual (provided in PDF format).
zImageBrowser EX
• Once you import images from your camera/camcorder and close CameraWindow or EOS Utility,
the main ImageBrowser EX window is displayed.
• Use ImageBrowser EX to manage images
imported to your computer. With ImageBrowser
EX, you can browse, edit, and print images on
your computer.
• The display will be updated automatically if you use operating system utilities or
other software to move, delete, or rename folders registered in ImageBrowser EX
(or images in these folders) while ImageBrowser EX is in use. If the display is not
updated automatically, click
in the toolbar.
• To view which folders are registered in ImageBrowser EX, see “Configuring
Preference Settings”.
Downloaded FromCo
Manuals
CVideoCamera-Manual.com
ont
nten
ten
entts
ts
7
Introduction
Basic Operations
Advanced Operations
Appendix
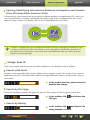
Starting ImageBrowser EX Alone
To browse, edit, and print images already imported to your computer, you can also start
ImageBrowser EX as follows:
Windows
Mac OS
• Double-click the desktop icon.
• In the taskbar, click the ‘Start’ menu → ‘All Programs’ → ‘Canon Utilities’ →
‘ImageBrowser EX’ → ‘ImageBrowser EX’ icon.
• Click the ‘ImageBrowser EX’ Dock icon.
• Navigate to the ‘Applications’ folder → ‘Canon Utilities’ folder →
‘ImageBrowser EX’ folder and double-click the ‘ImageBrowser EX’ icon.
Accessing Help
Depending on the screen, a Help button (
of screen elements.
Downloaded FromCo
Manuals
CVideoCamera-Manual.com
ont
nten
ten
entts
ts
) is displayed. Click for instructions or a description
8
Introduction
Basic Operations
Advanced Operations
Appendix
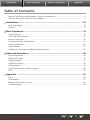
Table of Contents
Manual Conventions and Navigation, System Considerations ......................................................... 3
Software Described in This Instruction Manual ................................................................................ 7
Introduction ............................................................................................................. 10
Importing Images ......................................................................................................................... 10
Printing ........................................................................................................................................ 16
Basic Operations ...................................................................................................... 19
Screen Elements ........................................................................................................................... 19
Switching Display Modes .............................................................................................................. 23
Browser Area Tasks ...................................................................................................................... 24
Properties Window: Image Details ................................................................................................ 25
Viewing Slideshows ...................................................................................................................... 26
Playing Movies ............................................................................................................................. 27
Updating the Software and Obtaining New Functions .................................................................. 28
Advanced Operations ............................................................................................. 29
Organizing Images ....................................................................................................................... 29
Editing Still Images ....................................................................................................................... 35
Tagging Images ............................................................................................................................ 41
Preference Settings ....................................................................................................................... 44
Editing Movies .............................................................................................................................. 45
Using Online Services, Emailing Images ......................................................................................... 48
GPS .............................................................................................................................................. 53
Appendix ................................................................................................................. 56
Index ............................................................................................................................................ 56
Uninstallation ............................................................................................................................... 57
Memory Card Folder Structure ..................................................................................................... 58
Troubleshooting ........................................................................................................................... 60
Downloaded From VideoCamera-Manual.com Manuals
9
Introduction
Basic Operations
Advanced Operations
Appendix
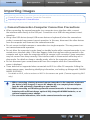
Importing Images
Camera/Camcorder–Computer Connection
Precautions
EOS Cameras Only: Importing Images with
EOS Utility
Non-EOS Cameras: Importing Images with
CameraWindow
Importing Images from Memory Cards
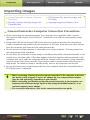
Camera/Camcorder–Computer Connection Precautions
• When connecting the camera/camcorder to a computer via an interface cable, connect
the interface cable directly to the USB port. Connection via a USB hub may prevent correct
operation.
• Using other USB devices (except USB mouse devices or keyboards) when the camera/camcorder is connected may prevent correct operation. In this case, disconnect the other devices
from the computer and reconnect the camera/camcorder.
• Do not connect multiple cameras or camcorders to a single computer. This may prevent correct camera/camcorder operation.
• Do not allow the computer to enter sleep (or standby) mode while a camera/camcorder is connected via an interface cable. If this does happen, leave the interface cable connected to the
computer and try to wake the computer while the camera is still connected. Some computers
may not recover from sleep correctly if the interface cable is disconnected while they are in
sleep mode. For details on sleep or standby mode, refer to the computer user manual.
• Do not disconnect your camera/camcorder from the computer while the CameraWindow or
EOS Utility screen is displayed.
• When connecting a battery-powered camera/camcorder to the computer, make sure
the device is fully charged, or use an AC adapter kit or a compact power adapter
(may be sold separately, depending on your model).
• When connecting an AA battery-powered camera/camcorder to the computer, use
batteries with sufficient charge, optional fully charged AA NiMH batteries, or an
optional compact power adapter.
• For connection instructions, refer to the camera/camcorder user guide.
Downloaded FromCo
Manuals
CVideoCamera-Manual.com
ont
nten
ten
entts
ts
10
Introduction
Basic Operations
Advanced Operations
Appendix
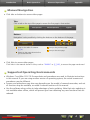
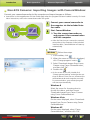
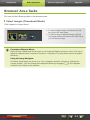
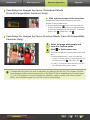
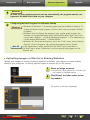
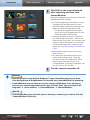
Non-EOS Cameras: Importing Images with CameraWindow
Connect your camera/camcorder to the computer and import images as follows:
• Instructions in this ImageBrowser EX User Guide apply when the program has been installed correctly. For installation instructions, refer to the camera/camcorder user guide.
1
Connect your camera/camcorder to
the computer via the included interface cable.
2
Start CameraWindow.
Æ Turn the camera/camcorder on
and prepare it for communication
with the computer.
• After the first time you connect the camera/
camcorder to the computer via the included
interface cable, CameraWindow will start up
automatically.
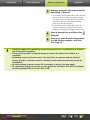
Camera
Windows
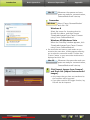
Follow these steps.
1. In the taskbar, click
.
2. When the screen on the left is displayed,
.
click ’Change program’ next to
3. Select ‘Downloads Images From Canon
Camera using Canon CameraWindow’,
and then click ‘OK’.
4. Double-click
.
• On the screen on the left, double-click
‘Change general settings’ and adjust the settings as desired. From now on, whenever the
camera/camcorder and computer are ready
for communication, your selected program
will start up automatically.
Windows 8
Select the screen for choosing what to
do with the device, and then choose
‘Downloads Images From Canon Camera
using Canon CameraWindow’.
Windows Vista
On the screen displayed, select ‘Downloads
Images From Canon Camera using Canon
CameraWindow’.
Windows XP
On the screen displayed, select ‘Canon
CameraWindow’, and then click ‘OK’.
Downloaded FromCo
Manuals
CVideoCamera-Manual.com
ont
nten
ten
entts
ts
11
Introduction
Basic Operations
Advanced Operations
Mac OS
Appendix
Whenever the camera and computer are ready for communication,
CameraWindow will start up.
Camcorder
Windows
Select ‘Canon CameraWindow’
and click ‘OK’.
Windows 8
Select the screen for choosing what to
do with the device, and then choose
‘Downloads Images From Canon Camera
using Canon CameraWindow’.
Windows XP/Windows Vista
When the ‘AutoPlay’ window appears, click
‘Downloads Images From Canon Camera
using Canon CameraWindow’.
• If a camcorder and memory card reader are connected at the same time, a dialog appears allowing
you to select the camcorder model. Confirm that
‘Canon Camera’ or your camcorder model name is
displayed and click ‘OK’.
Mac OS
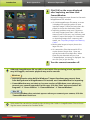
3
Whenever the camcorder and computer are ready for communication,
CameraWindow will start up.
Click [Import Images from Camera],
and then click [Import Untransferred
Images].
• Only images that you have not transferred to
the computer will be imported.
• If you have used the GPS logger function, log
files will also be imported.
Downloaded FromCo
Manuals
CVideoCamera-Manual.com
ont
nten
ten
entts
ts
12
Introduction
Basic Operations
Advanced Operations
4
Appendix
Click [OK] on the screen displayed
after importing, and then close
CameraWindow.
Imported images are now shown in the main
ImageBrowser EX window.
• On initial ImageBrowser EX startup, a screen
is displayed for specifying where to save
imported images. Follow the instructions displayed to choose the destination folder .
• Importing problems may occur if there are
too many images (more than 1,000) on the
memory card. In this case, use a memory card
reader to import the images. For instructions
on importing images from a memory card
reader, see “Importing Images from Memory
Cards”.
• Movies take longer to import, due to the
larger file size.
• On camcorders, files that exceed 4 GB or
movies that are longer than 1 hour are
split and recorded as multiple files. When
these files are detected and you close
CameraWindow, a message is displayed. You
can click [Yes] to join the files.
5
Turn the camera/camcorder off.
Although ImageBrowser EX can still be used while files are being joined, operation
may be sluggish, and movie playback may not be smooth.
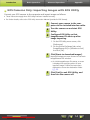
Windows
• Importing movies using built-in Windows 7 import functions may prevent them
from being shown in ImageBrowser EX. Instead, use CameraWindow for importing.
• CameraWindow may not start up in some versions of Windows, even when you
connect your camera/camcorder. In this case, click the ‘Start’ menu and select ‘All
Programs’ Æ ‘Canon Utilities’ Æ ‘CameraWindow’ Æ ‘CameraWindow’.
Mac OS
• If CameraWindow does not start up even when you connect your camera, click the
‘CameraWindow’ Dock icon.
Split movie files can also be joined by right-clicking their folder in ImageBrowser EX and choosing the menu command to combine them.
Downloaded FromCo
Manuals
CVideoCamera-Manual.com
ont
nten
ten
entts
ts
13
Introduction
Basic Operations
Advanced Operations
Appendix
EOS Cameras Only: Importing Images with EOS Utility
Connect your EOS camera to the computer and import images as follows:
• These instructions apply when EOS Utility has been installed correctly.
• For further details, refer to the EOS Utility Instruction Manual (provided in PDF format).
1
Connect your camera to the computer via the included interface cable.
2
Turn the camera on and start EOS
Utility.
3
Configure EOS Utility so that
ImageBrowser EX starts up after
image importing.
1. On the EOS Utility menu screen, click
[Preferences].
2. On the [Linked Software] tab, select
[ImageBrowser EX] in [Software to link]
and click [OK].
4
Click [Starts to download images].
Imported images are now shown in the main
ImageBrowser EX window.
• On initial ImageBrowser EX startup, a screen
is displayed for specifying where to save
imported images. Follow the instructions
displayed to choose the destination folder
(= 13).
5
Downloaded FromCo
Manuals
CVideoCamera-Manual.com
ont
nten
ten
entts
ts
Click [Quit] to exit EOS Utility, and
then turn the camera off.
14
Introduction
Basic Operations
Advanced Operations
Appendix
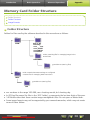
Importing Images from Memory Cards
ImageBrowser EX is used to import images from memory cards. You can use this program with
EOS cameras as well as other cameras/camcorders.
First, insert the memory card in the
memory card reader.
Windows
When a screen is displayed for
selecting an action, choose ‘View/
Download Images Using Canon
ImageBrowser EX’.
ImageBrowser EX now starts
up, and the screen on the left is
displayed.
Mac OS
When you insert a memory card
in the memory card reader,
ImageBrowser EX starts up and the
window on the left is displayed.
Follow the instructions displayed to import images.
Downloaded FromCo
Manuals
CVideoCamera-Manual.com
ont
nten
ten
entts
ts
15
Introduction
Basic Operations
Advanced Operations
Appendix
Printing
Printing Individual Images on a Sheet
Printing Contact Sheets
Printing Individual Images on a Sheet
Print individual images on single sheets of paper as follows:
Printing Scenes in Movies
Although movies cannot be printed, you can extract, save, and print still images from movies.
For instructions on extracting still images from movies, see “Extracting Multiple Images from
Movie”.
1
Downloaded FromCo
Manuals
CVideoCamera-Manual.com
ont
nten
ten
entts
ts
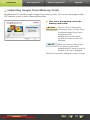
Select an image to print, click [Print],
and then select [Print Images].
16
Introduction
Basic Operations
Advanced Operations
2
Appendix
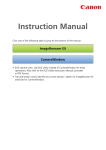
Complete the print settings as
desired.
1 Specify the printer, paper size, borderless printing
1
options, and so on.
4
5
2 Select your preferred printing format for the shoot-
ing date/time.
3 Specify whether or not to maintain the aspect ratio
2
3
of cropped images when you print them.
4 Crop images to avoid printing unwanted image
areas.
5 Add text to images before printing.
3
Downloaded FromCo
Manuals
CVideoCamera-Manual.com
ont
nten
ten
entts
ts
Click [Print].
The image is now printed.
17
Introduction
Basic Operations
Advanced Operations
Appendix
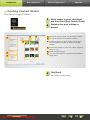
Printing Contact Sheets
Print rows of images as follows:
5
1
6
1
Select images to print, click [Print],
and then select [Print Contact Sheet].
2
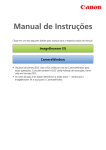
Complete the print settings as
desired.
1 Specify the printer, paper size, and other options.
2 Specify the number of rows and columns.
4
3 Configure settings to print details such as shoot-
ing information, a header or footer, and page
numbers.
4 Preview the images to print. Also, select images to
rotate or crop.
2
5 Rotate selected images.
6 Crop selected images to avoid printing unwanted
3
image areas.
3
Downloaded FromCo
Manuals
CVideoCamera-Manual.com
ont
nten
ten
entts
ts
Click [Print].
The image is now printed.
18
Introduction
Basic Operations
Advanced Operations
Appendix
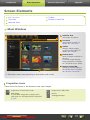
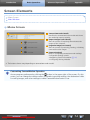
Screen Elements
Main Window
Toolbar
Tree View
Browser Control Bar
Launcher Area
Main Window
1
1 Launcher Area
3
2
Select tasks to perform.
2 Tree View
4
Select folders to view. For
details, see “Tree View”.
3 Toolbar
Rotate or delete images,
or perform other tasks. For
details, see “Toolbar”.
4 Browser Area
Rows of images are shown in
this area.
Icons near images indicate
image properties. For details,
see “Properties Icons” below.
5 Browser Control Bar
Settings governing display in
the browser area. For details,
see “Browser Control Bar”.
5
• The buttons shown vary depending on camera/camcorder model.
Properties Icons
These icons are shown in the browser area, near images.
Images shot in Stitch Assist mode
Images shot in AEB mode
RAW Image
To view RAW images shot in aspect ratios
other than 4:3, use Digital Photo Professional
(= 39).
Movies
Downloaded FromCo
Manuals
CVideoCamera-Manual.com
ont
nten
ten
entts
ts
Geotagged images
19
Introduction
Basic Operations
Advanced Operations
Appendix
Tree View
Imported images are managed on the basis of folders. To view or browse images organized by
folders, shooting date, or other criteria, click the relevant item (folder) listed in the tree view.
• By default, importing images using CameraWindow or EOS Utility will create new folders to store them, named
with the shooting dates.
1
1 [Folders]
Shows destination folders where images are stored.
2
3
2 [Shooting Date]
Images organized by shooting date. Browse images by selecting a
date (year/month/day).
3 [People]
People’s names (as assigned to images or acquired from cameras supporting Face ID) are listed here. This area is useful when browsing
shots of friends, family members, or other people. (Only available with
cameras supporting Face ID.)
4
4 [Landmarks]
Folders named after landmarks. By adding landmark names here that
represent shooting sites or areas, you can assign images to specific
landmark folders to view them together.
5
6
5 [Groups]
Folders named after groups. By adding group names of your choice,
you can assign images to specific group folders to view them
together.
6 [History]
Shows images recently imported or printed.
7 [Smart Grouping]
7
Folders can be created according to your preferred conditions. Once
you import images into ImageBrowser EX, the images are automatically sorted into relevant folders depending on which conditions they
match. For details, see “Advanced Image Searching Conditions: Smart
Grouping”.
• The buttons shown vary depending on camera/camcorder model.
Downloaded FromCo
Manuals
CVideoCamera-Manual.com
ont
nten
ten
entts
ts
20
Introduction
Basic Operations
Advanced Operations
Appendix
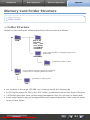
Image Storage Location
By default, images imported using CameraWindow are stored in the following location in new
folders created based on shooting date. Do not move, delete, or rename the folders registered
in ImageBrowser EX (or images in these folders) with operating system utilities or other software while ImageBrowser EX is in use.
Windows
Mac OS
• Windows 8, Windows 7 or Vista: On the C drive in ‘Users’ → ‘XXXXX’ (user
login name) → ‘My Pictures’ or ‘Pictures’
• XP: On the C drive in ‘Documents and Settings’ → ‘XXXXX’ (user login name)
→ ‘My Documents’ → Stills: In ‘My Pictures’; Movies: In ‘My Videos’ (may not
exist in some environments)
On the startup disk (Macintosh HD, for example) in ‘Users’ → ‘XXXXX’ (user
login name) → ‘Pictures’
Launcher Area
Most tasks in ImageBrowser EX are done by clicking a launcher button in the main window and
following instructions in the new window displayed.
1
Click a desired launcher button.
2
Follow the instructions to complete
the task.
If a menu is displayed below the button,
select a desired item. These items may
vary depending on your model of camera/
camcorder.
Launcher Buttons
[Import/Camera Settings]
Import images or return images to the
memory card.
[Share]
Attach images to email messages, or
upload them to sharing websites.
[Slide Show]
Start a slideshow of images.
[CANON iMAGE GATEWAY]
Use CANON iMAGE GATEWAY services.
[Edit]
Edit images.
[Map]
View geotagged images on a map.
(Geotagged shots only.)
[Print]
Print images.
• The buttons shown vary depending on camera/camcorder model.
Downloaded FromCo
Manuals
CVideoCamera-Manual.com
ont
nten
ten
entts
ts
21
Introduction
Basic Operations
Advanced Operations
Appendix
Toolbar
Rotate images and perform other tasks.
1
2
3
7
4
5
6
1 Update
5 Filter by File Category
Update the information shown in the tree view
and browser area.
Show only images of the selected file type in the
browser area.
2 Back/Forward
6 Filter by Rating
View other folders as needed.
Show only images of the selected rating in the
browser area.
3 Rotate 90° Counterclockwise/Clockwise
7 Search with Texts
Rotate selected images 90° left or right.
• To rotate original images to match the appearance of rotated images on the screen, right-click
images and choose [Rotate According to
Rotation Info].
Show only images with text descriptions that
include the text you enter. Matching images are
shown in the browser area.
• Images can be searched by file names, folder
paths, people’s names (for images from cameras
supporting Face ID), and information added to
images (landmark names, group names, tags, or
comments).
4 Delete
Delete selected images.
Deleted images are moved to the ‘Recycle Bin’ or
‘Trash’ on the desktop.
Browser Control Bar
Settings governing display in the browser area.
1
2
3
5 6
4
1 Sort
7
4 Switch Display Modes
Sort images according to the
selected order.
2 Show Image Information
Show/hide the properties icon,
file name, shooting date/time,
and rating near images in
Thumbnail mode.
3 Show Image Properties
Show the properties area, to
the right of the browser area.
Downloaded FromCo
Manuals
CVideoCamera-Manual.com
ont
nten
ten
entts
ts
Clicking this button will switch
among display modes for the
main window.
Thumbnail Mode
Preview Mode
Full Screen
5 Fit to Screen
Resize images to fit the
window. (Only available in
Preview mode)
6 Original Image Size
Show images at the original
size. (Only available in Preview
mode)
7 Zoom In or Out
Zoom in or out (in Preview
mode) or resize thumbnails (in
Thumbnail mode).
22
Introduction
Basic Operations
Advanced Operations
Appendix
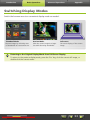
Switching Display Modes
Switch the browser area to a convenient display mode as needed.
Thumbnail Mode:
Browse images by reviewing rows
of thumbnails at a convenient size.
Preview Mode:
View the current image at a larger
size while browsing thumbnails.
Full-screen:
Full-screen display of the current
image.
Returning to the Original Display Mode from Full-Screen Display
To return to the previous display mode, press the ‘Esc’ key, click the current still image, or
double-click the current movie.
Downloaded FromCo
Manuals
CVideoCamera-Manual.com
ont
nten
ten
entts
ts
23
Introduction
Basic Operations
Advanced Operations
Appendix
Browser Area Tasks
You can do the following tasks in the browser area:
Select Images (Thumbnail Mode)
Click images to choose them.
• To select multiple images, hold down the ‘Ctrl’
key as you click each image.
• To select a range of adjacent images, click the
first image and then hold down the ‘Shift’ key as
you click the last image.
Convenient Shortcut Menus
Right-clicking a blank area of the screen or an image will display a shortcut menu. The menu
presents supported and convenient functions in one place. Try using these menus for greater
efficiency.
Using the Image Navigator
In Preview mode when you zoom in or out, a navigator window is shown to indicate the
current position. You can change the image area shown by dragging
in this navigator
window or by clicking in the window.
Downloaded FromCo
Manuals
CVideoCamera-Manual.com
ont
nten
ten
entts
ts
24
Introduction
Basic Operations
Advanced Operations
Appendix
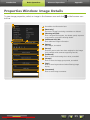
Properties Window: Image Details
To view image properties, select an image in the browser area and click
trol bar.
in the browser con-
1
1 Show/hide the information item.
2 [Read-only]
Prevent the image from being overwritten or deleted.
3 [Shooting Info] Tab
View a brightness histogram, the shutter speed, exposure
compensation, and other shooting details.
2
3
4 [Additional Info] Tab
4
View additional image information.
5
6
7
8
5 [Rating]
Rate images, as needed.
6 [Person]
Identifies persons who have been assigned to the image.
(Only available with cameras supporting Face ID.)
7 [Landmark]
View or enter the shooting site or area, as needed.
8 [Groups]
View or enter the image group name, as needed.
9 [Tags]
9
10
Downloaded FromCo
Manuals
CVideoCamera-Manual.com
ont
nten
ten
entts
ts
View or enter keywords used when filtering image
display.
10 [Comments]
View or enter image comments.
25
Introduction
Basic Operations
Advanced Operations
Appendix
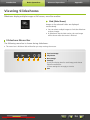
Viewing Slideshows
Slideshows display multiple images at full screen, one after another.
Click [Slide Show].
Images in the selected folder are displayed
consecutively.
• You can select multiple images to limit the slideshow
to those images.
• In slideshows that include movies, the next image
will be shown after the movie is finished.
Slideshow Menu Bar
The following menu bar is shown during slideshows.
• The menu bar is hidden a little while after you stop moving the mouse.
1 Previous Image
2 Play/Pause
1
2
3
4
5
3 Next Image
4 Settings
Specify the display time for each image, and choose
slideshow transitions.
• These settings do not apply to movies.
5 Exit
Downloaded FromCo
Manuals
CVideoCamera-Manual.com
ont
nten
ten
entts
ts
26
Introduction
Basic Operations
Advanced Operations
Appendix
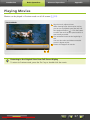
Playing Movies
Movies can be played in Preview mode or at full screen (= 22).
Preview Mode
1 Play the movie, adjust volume.
When viewing super slow-motion movies,
you can use a playback speed bar and realtime playback button ( ). Click the button
to watch the movie at the speed at which it
was actually recorded.
2 Trim unneeded scenes at the beginning or
end.
You can also select and delete unneeded
scenes in digest movies.
1
3 Extract still images from movies.
2
3
Returning to the Original View from Full-Screen Display
To return to Preview mode, press the ‘Esc’ key or double-click the movie.
Downloaded FromCo
Manuals
CVideoCamera-Manual.com
ont
nten
ten
entts
ts
27
Introduction
Basic Operations
Advanced Operations
Appendix
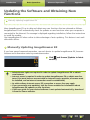
Updating the Software and Obtaining New
Functions
Manually Updating ImageBrowser EX
Keep ImageBrowser EX up to date and obtain any new functions that are released as follows.
ImageBrowser EX will automatically check for updates or new functions when your computer is
connected to the Internet. If a message is displayed regarding installation, follow the instructions
to install the update.
Use ImageBrowser EX when online to take advantage of auto updating. This feature is not available when offline.
Manually Updating ImageBrowser EX
If you have several cameras/camcorders, use each device to update ImageBrowser EX, because
features and information varies by camera/camcorder.
and choose [Update to latest
Click
version].
• Administrator rights are required in order to update ImageBrowser EX or obtain
new features.
• Internet access is required in order to update ImageBrowser EX or obtain new features. (You must have an account with an Internet service provider, a browser must
be installed, and an Internet connection must be established.)
• As with ordinary Internet access, ISP connection or access fees may apply.
• If you cannot use auto updating, visit the Canon website for information about
ImageBrowser EX updates or new functions.
• If the user guide for your desired software is not updated automatically, download
it from the Canon website.
Downloaded FromCo
Manuals
CVideoCamera-Manual.com
ont
nten
ten
entts
ts
28
Introduction
Basic Operations
Advanced Operations
Appendix
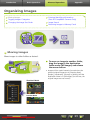
Organizing Images
Moving Images
Tagging Images: Categories
Entering Identifying Information
(Face ID-Compatible Cameras Only)
Changing the Image Sort Order
Image Search
Returning Images to Memory Cards
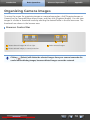
Moving Images
Move images to other folders as desired.
To move an image to another folder,
drag the image to the destination
folder under [All Images] and release
the mouse button.
• Images will be copied instead of moved when the
selected original images are in [Shooting Date],
[People], [Landmarks], [Groups] or [History] and the
destination folder is in [All Images]. (In this case, the
original images are not moved.)
Thumbnail Mode
Preview Mode
Downloaded FromCo
Manuals
CVideoCamera-Manual.com
ont
nten
ten
entts
ts
29
Introduction
Basic Operations
Advanced Operations
Appendix
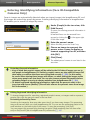
Tagging Images: Categories
To organize images by landmarks or groups, first create the landmark or group folder, and then
drag images to the folder to assign them to that category.
Note that the actual files of images registered to [Landmarks] or [Groups] folders are not moved
from where they are stored on the computer. However, be careful when deleting images in
[Landmarks] or [Groups] folders, because this will also delete the image file.
1
Select [Create Landmark] or [Create
Group] and enter the name of the
new folder.
2
Drag images to the folder to assign
them to, and then release the mouse
button.
The images are now tagged as belonging to
the specified folder.
Clicking a folder will display the images
assigned to that folder.
• Deleting a [Landmarks] or [Groups] folder will only
delete the folder, not the images assigned to it.
• Images can be searched by categories, because the
images you assign to categories are automatically
tagged with that folder information.
You can also create groups by selecting images, accessing the properties window, clicking the
[Additional Info] tab, and entering the names of landmarks or groups.
Changing the Image Sort Order
You can sort images in the browser area according to your selected criterion.
,
In the browser control bar, click
and in the menu, select the sorting
criterion.
Downloaded FromCo
Manuals
CVideoCamera-Manual.com
ont
nten
ten
entts
ts
30
Introduction
Basic Operations
Advanced Operations
Appendix
Entering Identifying Information (Face ID-Compatible
Cameras Only)
Faces in images are automatically detected when you import images into ImageBrowser EX, and
the images are sorted into groups by person. Entering identifying information in ImageBrowser
EX enables you to search for images by names.
1
Under [People] in the tree view, click
[Add Person].
A screen for entering personal information is
displayed.
Unwanted faces can be removed from
groups by clicking the
in the upper right
of the face image.
2
Enter the person’s name.
3
Choose an image to represent the
person, enter a name to display on
cameras supporting Face ID, and then
click [OK].
4
Click [Close].
When finished, press the ‘Enter’ key.
The added person’s name is now listed in the
tree view.
Protecting Personal Information
• Keep in mind that people’s names will be added to the Exif data of images you use to
add people to ImageBrowser EX. Similarly, people’s names are also added to image Exif
data when you confirm that faces were recognized correctly (= 33). For this reason,
be careful when sharing these images with others, or when posting the images online
where many people can view them. You can also remove personal information before
uploading images or movies to sharing websites from ImageBrowser EX (= 51).
• To delete registered identifying information, right-click the person’s name in the
tree view and choose [Delete]. (This will also remove the person’s name from image
Exif information.)
Editing Registered Identifying Information
To change images used for searching, registered people’s names, or images used to represent
people, right-click the person’s name in the tree view.
Processing to Search by Faces
Searching for images by faces may take some time if you have many images. This processing
may continue even after you close ImageBrowser EX. You can see the processing status in the
small window on the lower right of the screen. To stop the processing, click [Exit].
You can prevent this processing by clearing the option [Keep analyzing face info even after
exit] on the [Face ID] tab in ImageBrowser EX preferences (= 44).
Downloaded FromCo
Manuals
CVideoCamera-Manual.com
ont
nten
ten
entts
ts
31
Introduction
Basic Operations
Advanced Operations
Appendix
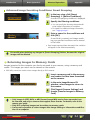
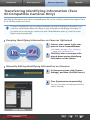
Syncing Identifying Information Between a Computer and Camera
(Face ID-Compatible Cameras Only)
Information on your camera can be acquired to register people in ImageBrowser EX, when you
use CameraWindow. Similarly, identifying information you enter in ImageBrowser EX can be
applied to your camera. For details, refer to the CameraWindow User Guide.
A screen is displayed for you to configure automatic syncing of identifying information if you
connect a camera when either the camera or your computer has identifying information. If
you prefer not to see the sync screen each time CameraWindow starts up, clear the option
[Synchronize automatically].
Image Search
Show only images matching your specified conditions in the browser area as follows:
Search with Texts
Images can be searched by file names, folder names, people’s names (for images from cameras
supporting Face ID), and information added to images (landmark names, group names, tags, or
comments).
In the toolbar text box, enter texts that
describe the images.
Search by File Type
Group the display by specific file types, as desired. Select types of still images or movie files.
In the toolbar, click
file type.
and choose the
Search by Rating
In the toolbar, click
and choose the
rating (number of stars).
Downloaded FromCo
Manuals
CVideoCamera-Manual.com
ont
nten
ten
entts
ts
32
Introduction
Basic Operations
Advanced Operations
Appendix
Searching for Images by Faces: Thumbnail Mode
(Face ID-Compatible Cameras Only)
Click a person’s name in the tree view.
Images that may include the person are now
shown in the browser area.
• Images labeled with
in the lower right may not
include the person. Move the cursor over the frame
to view the message [Add this person?]. To add the
. Otherwise, click
.
person, click
Searching for Images by Faces: Preview Mode (Face ID-Compatible
Cameras Only)
1
Select an image with people and
view it in Preview mode.
2
Click
in the browser area.
The person’s name is now shown under their
face.
• Names labeled with [?] may not match the
person. To add the person, move the cursor over
. Otherwise, click
.
the frame and click
• If only [?] is shown in the name box, click the
box and enter the person’s name.
If image searching does not work as expected, try adjusting the bar for [The number of similar
faces displayed when searched by person] on the [Face ID] tab in ImageBrowser EX preferences
(= 44). For example, if incorrect images are included in search results, slide the bar toward
[Min], and if desired images are not found, slide it toward [Max].
Downloaded FromCo
Manuals
CVideoCamera-Manual.com
ont
nten
ten
entts
ts
33
Introduction
Basic Operations
Advanced Operations
Appendix
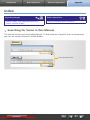
Advanced Image Searching Conditions: Smart Grouping
1
In the tree view, click [Smart
Grouping] Æ [Define Conditions].
A screen for specifying conditions is displayed.
2
Specify the filtering conditions.
• You can specify the shooting date and additional image information as conditions.
• For details on additional image information,
see “Tagging Images”.
3
Enter a name for the conditions and
click [OK].
A new folder is created, and images matching your specified conditions can be viewed
in the folder.
• Even images imported later that match the condition
will appear in the folder automatically.
Be careful when deleting any images in [Smart Grouping] folders, because the original
images will be deleted.
Returning Images to Memory Cards
Images imported to the computer can also be returned to your camera, using a memory card
reader. The images you return can be viewed on the camera.
• EOS Utility cannot be used to return images directly to EOS cameras.
1
Insert a memory card in the memory
card reader that has been formatted
on the camera.
2
In the main ImageBrowser EX
window, select images to return to
the camera.
3
Click [Import/Camera Settings] and
choose [Transfer Images to Memory
Card].
• Only images in JPEG, MOV, or MP4 format (except MP4 movies from camcorders) can
be returned, and only to cameras that support these formats. For details, refer to the
camera user guide.
• Only DCF-compliant images can be written to memory cards.
• It may not be possible to return images after image editing or information modification on a computer.
Downloaded FromCo
Manuals
CVideoCamera-Manual.com
ont
nten
ten
entts
ts
34
Introduction
Basic Operations
Advanced Operations
Appendix
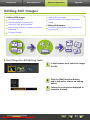
Editing Still Images
• Editing JPEG Images
Correcting Red-Eye
Adding Text to Images
Using PhotoStitch to Create a Panoramic
Image
Adjusting Images Automatically
Adjusting Color and Brightness
Emphasizing Outlines in Images to Increase
Sharpness
• Editing RAW Images
Processing RAW Images with Digital Photo
Professional
Cropping Images
First Steps for All Editing Tasks
Downloaded FromCo
Manuals
CVideoCamera-Manual.com
ont
nten
ten
entts
ts
1
In the browser area, select the image
to edit.
2
Click the [Edit] launcher button,
and in the menu, choose an editing
option.
3
Follow the instructions displayed to
complete the task.
35
Introduction
Basic Operations
Advanced Operations
Appendix
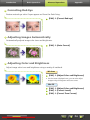
Correcting Red-Eye
Restore natural eye color if eyes appear red from the flash firing.
[Edit] Æ [Correct Red-eye]
Adjusting Images Automatically
Automatically adjusts image color tone and brightness.
[Edit] Æ [Auto Correct]
Adjusting Color and Brightness
Adjust image color tone and brightness using a variety of methods.
Windows
[Edit] Æ [Adjust Color and Brightness]
• On the screen displayed next, you can also adjust
images using a histogram and tone curves.
Mac OS
[Edit] Æ [Adjust Color and Brightness]
[Edit] Æ [Correct Levels]
[Edit] Æ [Correct Tone Curves]
Downloaded FromCo
Manuals
CVideoCamera-Manual.com
ont
nten
ten
entts
ts
36
Introduction
Basic Operations
Advanced Operations
Appendix
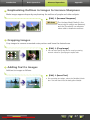
Emphasizing Outlines in Images to Increase Sharpness
Make images appear sharper by emphasizing the outlines of people and other subjects.
[Edit] Æ [Increase Sharpness]
Windows
The Unsharp Mask [Radius] is the
size at which outlines are detected,
and the [Threshold] is a reference
value used to determine outlines.
Cropping Images
Crop images to remove unwanted outer portions and leave the desired area.
[Edit] Æ [Crop Image]
• You can also specify the area to crop by entering
numeric values or specifying an aspect ratio.
Adding Text to Images
Add text to images as follows:
[Edit] Æ [Insert Text]
• For smoother text edges, select the [Antialias] check
box. Text will blend into the background better.
Downloaded FromCo
Manuals
CVideoCamera-Manual.com
ont
nten
ten
entts
ts
37
Introduction
Basic Operations
Advanced Operations
Appendix
Using PhotoStitch to Create a Panoramic Image
Create wide panoramic images from a series of shots taken while moving the camera slightly
before each shot.
[Edit] Æ [Stitch Photos]
If a message is displayed regarding insufficient memory, try the following:
• Close all programs other than PhotoStitch.
• Use fewer images. Reduce the file size of the images.
• On the [Save] tab, select [Adjust image] and specify a smaller size in [Saved Image
Size].
Using PhotoStitch with Stitch Assist
For images captured in Stitch Assist shooting mode, PhotoStitch can automatically detect the
image order and merge direction, making it easier to merge the images. (Some models of
camera/camcorder may not offer Stitch Assist mode.)
Downloaded FromCo
Manuals
CVideoCamera-Manual.com
ont
nten
ten
entts
ts
38
Introduction
Basic Operations
Advanced Operations
Appendix
Processing RAW Images with Digital Photo Professional
RAW images can be converted to JPEG or TIFF format.
1
In ImageBrowser EX, click [Edit] and
choose [Process RAW Images].
Digital Photo Professional now starts up.
• You can also start the program by clicking
the ‘Start’ menu, selecting ‘All Programs’
or ‘Programs’, and then selecting ‘Canon
Utilities’ → ‘Digital Photo Professional XXX’
(with XXX indicating the version number) →
‘Digital Photo Professional’.
Tool Palette in Digital Photo Professional
1 2 3
4
5
2
Select the folder where the images
are saved.
3
Select an image.
4
Click
5
Using the tool palette, adjust image
brightness and white balance as
needed.
[Edit image window].
The tool palette is displayed.
• Modification details (information on image processing conditions) are saved as a “recipe” with the
image.
• In Digital Photo Professional, optimal image
adjustment for the scene or subject is possible by
specifying a Picture Style.
• Image attributes that can be modified vary depending on your model of camera.
1 Tone curves can be used to adjust all RGB chan-
nels at once or each channel individually.
2 Reduce noise in evening shots or at high ISO
speeds.
3 Correct lens aberration in images shot with EOS
cameras.
4 Adjust image brightness, white balance, or the
Picture Style.
5 Adjust contrast, color tone, saturation, and other
attributes.
Downloaded FromCo
Manuals
CVideoCamera-Manual.com
ont
nten
ten
entts
ts
39
Introduction
Basic Operations
Advanced Operations
Appendix
Printing
To print from Digital Photo Professional, select images in the main window and then select the
desired print function in the [File] menu. The following printing options are available:
Printing Option
Description
Print
Images are automatically arranged for printing one image per sheet.
Print with detailed
setting
Arrange images as desired for printing one image per sheet. Add titles, shooting information, and so on, if you prefer.
Print contact sheets
Print rows of images on a single sheet. (You can also specify the layout and number of
images, add text, and more.)
• Shooting RAW images is only possible on cameras that support RAW format. For
details, refer to the camera user guide.
• Only RAW images supported by Digital Photo Professional can be processed by the
program. Be sure to refer to the camera user guide.
• A more detailed description of operations is available in the Digital Photo
Professional Instruction Manual, which EOS camera users can view from the
included CD-ROM and other users can download from the Canon website.
RAW Images Defined
RAW image files contain the unmodified data captured by the camera image sensor. Unlike
ordinary JPEG images, the data is essentially "raw" (unadjusted and uncompressed), which
enables image processing (conversion) on a computer with no loss of image quality.
Camera-Based Image Processing
Ordinary
Shooting
Image sensor
data from the
shot
Computer-Based Image Processing
Image Adjustment
Compression
JPEG Image
Automatic image adjustment and compression
Shooting RAW Images
RAW Image
• Supported by most programs
• Data is already compressed, so image
adjustment tends to reduce quality
RAW Image Processing in
Digital Photo Professional
Image Adjustment
Compression
JPEG/TIFF
Images
• View and adjust images without loss of image
quality
• Requires processing in Digital Photo Professional
before viewing with most programs
Downloaded FromCo
Manuals
CVideoCamera-Manual.com
ont
nten
ten
entts
ts
40
Introduction
Basic Operations
Advanced Operations
Appendix
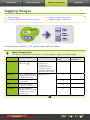
Tagging Images
Rating Images
Tagging Images: Keywords
Tagging Images: Landmarks and Groups
Tagging Images: Comments
In the properties window (= 25), specify image details as desired.
Types of Image Details
The following additional information is used to organize, display, and label images.
Information
Details
How to Add
Rating
Rate favorite images by
adding stars ( )
• ImageBrowser EX
• Digital Photo
Professional
• Camera/camcorder
(Favorites setting)
• Windows 8/Windows 7/
Windows Vista (Rating)
{
{
Landmark
Classify images by identifying landmarks (places or
buildings where shot)
ImageBrowser EX
{
×
Group
Classify images by adding
a group name
{
×
Tag
Choose the subject or
event from an editable list
{
×
Comments
Annotate images as
desired; describe shooting
conditions, your memories, and so on
{
×
• Tags shown below thumbnails can be selected by clicking
Downloaded FromCo
Manuals
CVideoCamera-Manual.com
ont
nten
ten
entts
ts
Used in Searching
Images
Shown Below
Thumbnails
in the browser control bar.
41
Introduction
Basic Operations
Advanced Operations
Appendix
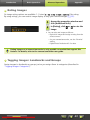
Rating Images
Six image rating options are available: 1–5 stars ( ,
,
,
,
), No rating.
=
By using ratings, you can restrict image display to only your favorite images (
22).
1
Access the properties window and
click [Additional Info].
2
In [Rating], click
image.
or
to rate the
• You can also rate images as follows:
– Right-click images and assign a rating from the
shortcut menu.
– On your camera/camcorder, use the “Favorite”
setting.
– Digital Photo Professional 3.9 or later
Rating images on a camera/camcorder is only possible on models that support this
feature. For details, refer to the camera/camcorder user guide.
Tagging Images: Landmarks and Groups
Assign images to landmarks or groups just as you assign them to categories (described in
“Tagging Images: Categories”).
Downloaded FromCo
Manuals
CVideoCamera-Manual.com
ont
nten
ten
entts
ts
42
Introduction
Basic Operations
Advanced Operations
Appendix
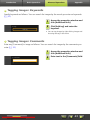
Tagging Images: Keywords
Specify keywords as follows. You can search for images by the words you enter as keywords
(= 32).
1
Access the properties window and
click [Additional Info].
2
Click [Add tag] and enter the
keyword.
• You can tag images by right-clicking images and
choosing the tag in the menu.
Tagging Images: Comments
Enter any [Comments] in image as follows. You can search for images by the comments you
enter (= 32).
Downloaded FromCo
Manuals
CVideoCamera-Manual.com
ont
nten
ten
entts
ts
1
Access the properties window and
click [Additional Info].
2
Enter text in the [Comments] field.
43
Introduction
Basic Operations
Advanced Operations
Appendix
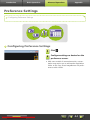
Preference Settings
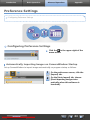
Configuring Preference Settings
Configuring Preference Settings
1
Click
2
Configure settings as desired on the
preferences screen.
.
• With some models of camera/camcorder, customization may require you to add another destination
folder. In this case, access ImageBrowser EX preferences to add a folder.
Downloaded FromCo
Manuals
CVideoCamera-Manual.com
ont
nten
ten
entts
ts
44
Introduction
Basic Operations
Advanced Operations
Appendix
Editing Movies
Editing Movies
Extracting Multiple Images from Movie
Editing EOS Video Snapshot (EOS Cameras Only)
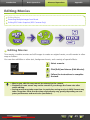
Editing Movies
Trim movies, combine movies and still images to create an original movie, or edit movies in other
ways as follows.
You can also add titles or other text, background music, and a variety of special effects.
1
Select a movie.
2
Click [Edit] and choose [Edit Movies].
3
Follow the instructions to complete
the task.
• Movies you edit this way cannot be returned to the camera.
• Playback of some scenes may not be smooth if you change the frame rate after
movie editing.
• Saving movies may take some time. In particular, saving movies in MOV format may
take a long time. Note that the time required may vary greatly depending on computer performance and movie size (resolution).
Downloaded FromCo
Manuals
CVideoCamera-Manual.com
ont
nten
ten
entts
ts
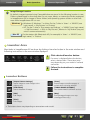
45
Introduction
Basic Operations
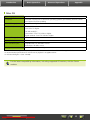
Supported Movie Length
Maximum supported lengths of movies
you can save are shown on the right. A
message will be displayed if you attempt
to save a movie longer than this. In this
case, trim the movie or reduce the size
(resolution).
• Movies shot with EOS cameras that
you edit this way are converted to the
movie compression format specified by
ImageBrowser EX before saving. For this
reason, the movies may be in a different
movie compression format than specified
by the camera.
Advanced Operations
Size (Resolution)
1920×1080
1280×720
640×480
320×240
Appendix
Max. Length (MOV)
23.976 fps/
50 fps/59.94 fps*
25 fps/29.97 fps*
Less than 10 min.
—
Less than 20 min. Less than 10 min.
Less than 30 min. Less than 20 min.
Less than 60 min.
—
* On cameras, 23.976 fps is indicated as 24 fps, 29.97 fps as
30 fps, and 59.94 fps as 60 fps.
Size (Resolution)
1280×720
Max. Length (MP4)
Less than 30 min.
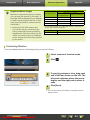
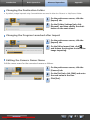
Trimming Movies
Trim unneeded portions at the beginning or end as follows:
1
Select a movie in Preview mode.
2
Click
3
To specify portions to trim, drag each
end of the bar shown on the left. The
left point indicates where the movie
begins, and the right point, where it
ends.
4
Click [Save].
.
• You can also select and delete unneeded scenes in
digest movies.
Downloaded FromCo
Manuals
CVideoCamera-Manual.com
ont
nten
ten
entts
ts
46
Introduction
Basic Operations
Advanced Operations
Appendix
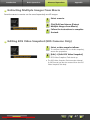
Extracting Multiple Images from Movie
Favorite scenes in movies can be saved separately as still images.
1
Select a movie.
2
Click [Edit] and choose [Extract
Multiple Images from Movie].
3
Follow the instructions to complete
the task.
Editing EOS Video Snapshot (EOS Cameras Only)
1
Select a video snapshot album.
2
[Edit] Æ [Edit EOS Video Snapshot]
To confirm that the file is a video snapshot,
access the properties.
EOS Video Snapshot Task starts up.
• The EOS Video Snapshot Task Instruction Manual
(in PDF format) can also be accessed from the EOS
Video Snapshot Task Help.
Downloaded FromCo
Manuals
CVideoCamera-Manual.com
ont
nten
ten
entts
ts
47
Introduction
Basic Operations
Advanced Operations
Appendix
Using Online Services, Emailing Images
Available Services
Using Extended ImageBrowser EX Functions
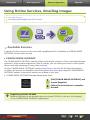
Available Services
A variety of online services can be used with ImageBrowser EX. Availability of CANON iMAGE
GATEWAY services varies by area.
CANON iMAGE GATEWAY
The CANON iMAGE GATEWAY website offers online photo services to Canon camera/camcorder
customers. After member registration (free of charge), you can share your shots in online photo
albums and take advantage of many other services.
Visit the CANON iMAGE GATEWAY website (http://canon.com/cig) for the latest information
on where the services are available around the world. Also check your regional CANON iMAGE
GATEWAY website to see which services are offered in your area.
• CANON iMAGE GATEWAY Member Registration (Free)
1
Click [CANON iMAGE GATEWAY] and
choose [Register].
2
Follow the instructions to complete
the task.
Registering from the CD-ROM
Member registration is also possible using the included CD-ROM. In this case, click [Register]
on the CANON iMAGE GATEWAY installer panel.
Downloaded FromCo
Manuals
CVideoCamera-Manual.com
ont
nten
ten
entts
ts
48
Introduction
Basic Operations
Advanced Operations
Appendix
• Using CANON iMAGE GATEWAY
Click [CANON iMAGE GATEWAY] and
choose the desired option.
Using Extended ImageBrowser EX Functions
• Attaching Images to Email Messages
Your shots can be shared as email attachments.
• Uploading Movies to YouTube
Your movies can be uploaded to YouTube. (Requires YouTube registration in advance. For details, visit
the YouTube website.)
• Uploading Images to Facebook
Your shots can be uploaded to Facebook. (Requires Facebook registration in advance. For details, visit
the Facebook website.)
Downloaded FromCo
Manuals
CVideoCamera-Manual.com
ont
nten
ten
entts
ts
49
Introduction
Basic Operations
Advanced Operations
Appendix
Using Extended ImageBrowser EX Functions
Attaching Images to Email Messages
Images can be sent as email attachments.
1
Select an image.
2
Click [Share], choose [E-mail Images],
and specify the size and other settings as desired.
Windows
3
Click [Attach to Email].
The default email program now starts up,
showing the screen for composing your
message. Images you selected are shown as
attachments.
• Images will be saved in your designated destination
folder if you have selected [Save to Folder] under
[After Finishing the Task] in [Custom Settings].
• If the email program does not start up automatically,
save the images to your computer before starting
the program manually, and then attach and send the
images. Specify where images are saved in [Custom
Settings], as needed.
Mac OS
3
Click [Finish].
The default email program now starts up,
showing the screen for composing your
message.
• Images are saved on the startup disk in ‘Users’
→ ‘XXXXX’ (user login name) → ‘Library’ →
‘Preferences’ → ‘SendEmailUserData’, in the
‘Email Images’ folder.
• If the email program does not start up
automatically, start it manually from the
‘Applications’ folder.
4
Downloaded FromCo
Manuals
CVideoCamera-Manual.com
ont
nten
ten
entts
ts
Attach the saved images to email
messages.
50
Introduction
Basic Operations
Advanced Operations
Appendix
Windows
In order for your email program to start up automatically, the program must be configured as the MAPI client used on your computer.
Configuring the Email Program for Automatic Startup
Windows
Mac OS
• Windows 8, Windows 7: An email program must be installed in advance. To
change the default email program, click the ‘Start’ menu and select ‘Default
Programs’.
• Windows Vista: Configure the settings in your regular email program. For
example, to configure Windows Mail, start Windows Mail, and in the ‘Tools’
menu, select ‘Options’ → ‘Default Messaging Programs’ → ‘This application is
not the default Mail handler’ → ‘Make Default’.
• Windows XP: Start Internet Explorer, and in the ‘Tools’ menu, select ‘Internet
Options’. On the ‘Programs’ tab, specify the program next to ‘E-mail’.
In the ‘Applications’ folder, double-click the ‘Mail’ icon to start Mail. In
the ‘Mail’ menu, select ‘Preferences’, and then specify the program on the
‘General’ tab.
Uploading Images or Movies to Sharing Websites
Upload your images or movies to sharing websites as follows. Use images or movies already
saved to your computer, or directly upload images or movies still on the camera.
1
Select an image or movie.
• Only movies can be selected for YouTube, and
only images for Facebook albums.
2
Click [Share], and then select a sharing website.
The screen on the left is displayed.
Downloaded FromCo
Manuals
CVideoCamera-Manual.com
ont
nten
ten
entts
ts
51
Introduction
Basic Operations
Advanced Operations
3
Appendix
Remove personal information before
uploading, if desired.
• To remove personal information from selected
images or movies, after selecting an image
or movie in the [List] area shown on the left,
select [Delete privacy-related information
(such as people and places)].
• To remove personal information from all
images or movies in the [List] area, select
[Apply to all images] or [Apply to all movies].
4
Enter a description, and then click
[Upload].
5
Enter your user name and password
for the sharing website, and then
click [Log in].
• Indefinite support for uploading cannot be guaranteed, in consideration of website
specifications and updates.
• It may not be possible to upload images or movies that have been edited on a
computer.
• Uploading requires Internet access. You must have an account with an Internet
service provider, a browser must be installed, and an Internet connection must be
established.
• As with ordinary Internet access, ISP connection or access fees may apply.
• The maximum length for movies you can upload to YouTube is less than 15 minutes,
and the maximum file size is less than 2 GB.
Downloaded FromCo
Manuals
CVideoCamera-Manual.com
ont
nten
ten
entts
ts
52
Introduction
Basic Operations
Advanced Operations
Appendix
GPS
Viewing Geotagged Images on a Map: Map Utility
Viewing Geotagged Images on a Map: Map Utility
Using geotagged images and GPS logs, you can easily see on a map where shots were taken and
view the route traveled with the camera.
It is also easy to add or delete location information.
This program uses Google Maps™ to display image locations and routes traveled on a map.
Location information in images and GPS logs is sent to service providers.
• Uploading requires Internet access. You must have an account with an Internet
service provider, a browser must be installed, and an Internet connection must be
established.
• As with ordinary Internet access, ISP connection or access fees may apply.
• Google, Google Maps, and Google Earth are trademarks of Google Inc.
• Geotagged shots and GPS logs may contain personally identifiable information. Be
careful when sharing the files or posting images online where many people can
view them.
• Do not use Map Utility with images you are currently editing in Digital Photo
Professional. This may prevent your changes from being saved correctly.
Downloaded FromCo
Manuals
CVideoCamera-Manual.com
ont
nten
ten
entts
ts
1
Select an image.
2
Click [Map].
Map Utility now starts up.
53
Introduction
Basic Operations
Advanced Operations
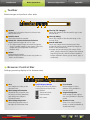
Appendix
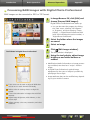
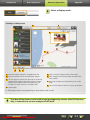
Select a display mode.
3
Viewing or editing routes
2
3
1
8
7
4
5
6
1 Lists the images selected in ImageBrowser EX.
5 Add or remove image location information.
2 Enter a location to find corresponding images.
6 Label images in the current map area with land-
3 Click to export location files that can be viewed in
Google Earth. (Use of these files requires Google
Earth to be installed. Note that display may be
incorrect in some versions of Google Earth.)
mark names.
7 Shooting locations are indicated by pins on the
map.
8 The current image is shown in a pop-up window.
4 Add images.
• The buttons shown vary depending on camera/camcorder model.
This Map Utility feature works with images geotagged by cameras with GPS functionality or cameras that can use smartphone GPS data.
Downloaded FromCo
Manuals
CVideoCamera-Manual.com
ont
nten
ten
entts
ts
54
Introduction
Basic Operations
Advanced Operations
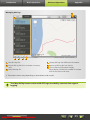
Managing GPS logs
Appendix
6
1
2
3
4
5
1 Lists GPS log files.
4 Change GPS log time difference information.
2 Import GPS log files from a camera or memory
5 Remove a GPS log file from the list.
card.
3 Add a GPS log file.
6 Click to filter log information display.
Adjust display conditions as needed for a better
view of the route on the map.
• The buttons shown vary depending on camera/camcorder model.
This Map Utility feature works with GPS logs recorded by cameras that support
logging.
Downloaded FromCo
Manuals
CVideoCamera-Manual.com
ont
nten
ten
entts
ts
55
Introduction
Basic Operations
Advanced Operations
Appendix
Index
Importing/Returning Images
Editing Images
“Import images from cameras/camcorders”
“Import images from EOS cameras”
“Import images from memory card readers”
“Return favorite images to the camera”
“Edit still images”
“Convert RAW images”
“Edit movies”
Printing
Browsing Images
“View images at full screen”
“View movies”
“Check image details”
“View slideshows”
“Search images by faces”
“Print individual images”
“Print rows of images as samples”
Other Operations
“Adjust software/camera operation”
Organizing Images
“Organize images into folders”
“Organize images into categories”
“Search images by various conditions”
“Sort image display”
Searching for Terms in This Manual
This manual can be read using Adobe Reader. To find instances of specific terms or expressions,
you can use search functions in Adobe Reader.
Windows
Mac OS
Downloaded FromCo
Manuals
CVideoCamera-Manual.com
ont
nten
ten
entts
ts
Enter the text to find.
56
Introduction
Basic Operations
Advanced Operations
Appendix
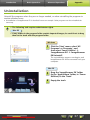
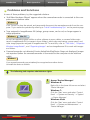
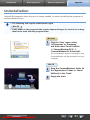
Uninstallation
Uninstall the programs when they are no longer needed, or when reinstalling the programs to
resolve software issues.
• Uninstallation of ImageBrowser EX is described here as an example. Other programs can be uninstalled the
same way.
• The following task requires administrator rights.
Mac OS
• If any folders in the program folder contain imported images, be careful not to drag
them to the trash with the program folder.
0
Windows
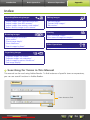
1
Click the ‘Start’ menu, select ‘All
Programs’ or ‘Programs’, and
then select ‘Canon Utilities’ Æ
‘ImageBrowser EX’ Æ ‘ImageBrowser
EX Uninstall’.
The uninstallation process now begins, and
ImageBrowser EX will be removed from your
computer.
Mac OS
Downloaded FromCo
Manuals
CVideoCamera-Manual.com
ont
nten
ten
entts
ts
1
Drag the ‘ImageBrowser EX’ folder
(in the ‘Applications’ folder, in ‘Canon
Utilities’) to the ‘Trash’.
2
Empty the trash.
57
Introduction
Basic Operations
Advanced Operations
Appendix
Memory Card Folder Structure
Folder Structure
Folder Contents
Image Formats
Folder Structure
Folders for files used by the software described in this manual are as follows:
*
DCIM
One of the
following:
• xxx_ _ _mm
• xxx_mmdd
• xxxCANON
• xxxEOSxx
Folder containing files for managing images in the
DCIM folder
CANONMSC
yymmddx.LOG (GPS log files)
GPS
Folder created when DPOF settings are configured
Contains files for managing DPOF instructions.
MISC
yymmddx.LOG (GPS log files)
GPS
•
•
•
•
xxx: numbers in the range 100–999; mm: shooting month; dd: shooting day.
In GPS log file names (for files in the ‘GPS’ folder), yy represents the last two digits of the year.
*All folders other than these contain image management files. Do not open or delete them.
Some image formats may not be supported by your camera/camcorder, which may not create
some of these folders.
Downloaded FromCo
Manuals
CVideoCamera-Manual.com
ont
nten
ten
entts
ts
58
Introduction
Basic Operations
Advanced Operations
Appendix
Folder Contents
File Name
IMG_xxxx.JPG
_MG_xxxx.JPG
IMG_xxxx.CR2
_MG_xxxx.CR2
IMG_xxxx.CRW
_MG_xxxx.CRW
xxxx.TIF
ST
_xxxx.JPG
MVI_xxxx.MOV
MVI_xxxx.AVI
MVI_xxxx.MP4
MDG_xxxx.MOV
MDG_xxxx.MP4
Type of File
Image files in JPEG format
JPEG image files shot in the Adobe RGB color space
Image files in RAW format
RAW image files shot in the Adobe RGB color space
Image files in RAW format
RAW image files shot in the Adobe RGB color space
RAW image files shot with EOS-1D or EOS-1Ds cameras
Image files shot in Stitch Assist mode
Movie files
Movie files
Movie files
Digest movie files
Digest movie files
• xxxx represents a four-digit number or letters.
•
in file names of sets of images shot in Stitch Assist mode represents a letter, starting with A.
Image Formats
ImageBrowser EX supports the following formats of images shot with Canon cameras or
camcorders:
Still Images
• JPEG (.JPG)
Image format used by most cameras and camcorders. Images may appear grainy if edited and saved
repeatedly.
• RAW (.CRW/.CR2/.TIF)
Proprietary image format developed by Canon, designed to preserve digital camera image sensor
output, with no loss of image quality. Shooting RAW images is only possible on cameras that support
RAW format.
• TIFF (.TIF)
Widely used image format.
Movies
Files in this format are labeled with a movie icon in the browser area of ImageBrowser EX.
• AVI (.AVI)
Standard Windows movie format.
• MOV (.MOV)/MP4 (.MP4)
Widely used movie format.
Downloaded FromCo
Manuals
CVideoCamera-Manual.com
ont
nten
ten
entts
ts
59
Introduction
Basic Operations
Advanced Operations
Appendix
Troubleshooting
Initial Troubleshooting Tips
Problems and Solutions
Resolve software issues as described in this section.
Initial Troubleshooting Tips
In case of problems, first check the following points:
• Does your computer meet the system requirements?
Refer to the system requirements in the camera/camcorder user guide.
• Is your camera/camcorder connected to the computer correctly?
For connection instructions, refer to the camera/camcorder user guide.
Also confirm that you are using the correct cable, and that it is firmly connected.
• Are your camera/camcorder and the computer ready to send or receive data?
Some models of camera/camcorder must be in playback mode before data can be sent or received
from a computer. For details, refer to the camera/camcorder user guide.
• Is there sufficient battery power?
When using a battery-powered camera/camcorder, confirm that there is enough charge left.
When connecting your camera/camcorder to a computer, you can conserve battery power by using an
AC adapter kit or a compact power adapter (may be sold separately, depending on your model).
Downloaded FromCo
Manuals
CVideoCamera-Manual.com
ont
nten
ten
entts
ts
60
Introduction
Basic Operations
Advanced Operations
Appendix
Problems and Solutions
In case of these problems, try the suggested solutions.
• ‘Add New Hardware Wizard’ appears when the camera/camcorder is connected to the computer via an interface cable.
Windows
Click ‘Cancel’ to close the wizard, and temporarily disconnect the camera/camcorder from the computer. Try to resolve the problem by referring to “Initial Troubleshooting Tips” on the previous page.
• Tags assigned in ImageBrowser EX (ratings, group names, and so on) no longer appear in
image properties.
Windows
Mac OS
Do not use operating system utilities or other software to move, delete, or rename folders registered in ImageBrowser EX (or images in these folders), which may erase ratings, group names, and
other image properties assigned in ImageBrowser EX. To avoid this, refer to “Tree View”, “Properties
Window: Image Details”, and “Organizing Images” and use ImageBrowser EX to work with images
and folders.
• Camera/camcorder not detected, Events dialog/AutoPlay/Device Stage not displayed, Images
not imported (when the camera/camcorder is connected to the computer via an interface
cable)
Windows
Your camera/camcorder may mistakenly be recognized as another device.
Uninstall the device as follows:
The following task requires administrator rights.
1
Access ‘Device Manager’.
Windows 8:
Right-click in the lower-left corner and select
‘Device Manager’.
Windows 7:
Click the ‘Start’ menu and select ‘Control
Panel’ → ‘System and Security’ → ‘System’
→ ‘Device Manager’.
Windows Vista:
Click the ‘Start’ menu and select ‘Control
Panel’ → ‘System and Maintenance’ →
‘Device Manager’.
Downloaded FromCo
Manuals
CVideoCamera-Manual.com
ont
nten
ten
entts
ts
61
Introduction
Basic Operations
Advanced Operations
Appendix
Windows XP:
Click the ‘Start’ menu and select ‘Control
Panel’ → ‘Performance and Maintenance’
→ ‘System’. On the ‘Hardware’ tab, click
‘Device Manager’.
2
Click ‘+’ next to ‘Other devices’,
‘Portable Devices’, or ‘Imaging
devices’.
Your model of camera/camcorder or ‘Canon
Camera’ will be listed in these categories
if the device is mistakenly recognized as
another device.
• Other factors may be causing the problem if
‘Other devices’, ‘Portable Devices’, or ‘Imaging
devices’ are not listed, or if your camera/camcorder model name or ‘Canon Camera’ is not
listed. Go to step 5 and consider another solution or try again later.
3
Right-click on your camera/camcorder
model name or ‘Canon Camera’, and
then select ‘Uninstall’.
4
Click ‘OK’ after the confirmation message is displayed.
If applicable, delete all instances of your
camera/camcorder model name or ‘Canon
Camera’ listed in ‘Other devices’, ‘Imaging
devices’, or both categories.
5
Downloaded FromCo
Manuals
CVideoCamera-Manual.com
ont
nten
ten
entts
ts
Close ‘Device Manager’ and ‘System
Properties’.
62
Introduction
Basic Operations
Advanced Operations
Appendix
ImageBrowser EX User Guide
1.
2.
3.
4.
Unauthorized reproduction of this manual in whole or part is prohibited.
Information in this manual is subject to change without notice.
Illustrations or screenshots in this manual may differ slightly from actual products.
Notwithstanding the preceding items, Canon cannot be held liable for any loss arising from the use of
this software.
© CANON INC. 2014
Downloaded FromCo
Manuals
CVideoCamera-Manual.com
ont
nten
ten
entts
ts
63
CameraWindow
User Guide
CEL-SV5PA210
Downloaded FromCo
Manuals
CVideoCamera-Manual.com
ont
nten
ten
entts
ts
64
Introduction
Basic Operations
Advanced Operations
Appendix
Manual Conventions and Navigation, System
Considerations
Conventions in This Manual
Manual Navigation
Supported Operating Environments
System Requirements
Conventions in This Manual
The following labels are used to distinguish sections in this manual:
Windows
Mac OS
Indicates operations in Windows environments.
Indicates operations in Mac OS environments.
Windows operations are used in some cases to illustrate instructions in this manual. On
Macintosh keyboards, the equivalent of ‘Ctrl’ is ‘command’, and the equivalent of ‘Enter’
is ‘return’.
Screenshots in explanations are mainly from Windows. Some screen elements may be different in Mac OS environments.
Indicates operating precautions that should be followed, or important information to
note. Be sure to read these sections.
Indicates operating tips and convenient ways to use the software. Read these sections as
needed.
Downloaded FromCo
Manuals
CVideoCamera-Manual.com
ont
nten
ten
entts
ts
65
Introduction
Basic Operations
Advanced Operations
Appendix
Manual Navigation
• Click tabs or buttons to access other pages.
Tabs
Click a tab on the top of the page to access the first page in that section.
Buttons
Navigation is also possible by clicking the buttons on the bottom of the page.
1
1 Jump to the table of contents
(= 69).
2
3
4
3 Jump to the previous page.
4 Jump to the next page.
2 Return to the page shown before
you clicked the link.
• Click links to access other pages.
Click links in the manual shown in blue, such as “XXXXX” or (= XX), to access the page mentioned.
Supported Operating Environments
• Windows 7 and Mac OS X 10.8 screenshots and procedures are used to illustrate instructions
in this manual. If you are using another version of operating system, the actual screens and
procedures may be different.
• Screens and procedures may also vary depending on the model of camera/camcorder, and not
all functions may be available, as noted in relevant sections of this manual.
• Use the software when online to take advantage of auto updating. Note that auto updating is
not available when offline, which will prevent you from obtaining any new functions that are
released.
Downloaded FromCo
Manuals
CVideoCamera-Manual.com
ont
nten
ten
entts
ts
66
Introduction
Basic Operations
Advanced Operations
Appendix
System Requirements
Windows
Operating System
Computer
CPU
RAM
Interface
Free Hard Disk Space
Display
Windows 8 / 8.1
Windows 7 SP1
Computer running one of the above operating systems (preinstalled), with an included
USB port; Internet connection required for auto updating
1.6 GHz or higher
64-bit: 2 GB or more
32-bit: 1 GB or more
USB and Wi-Fi*1
150 MB or more
1,024 x 768 resolution or higher
*1 Wi-Fi connections require supported cameras.
Mac OS
Operating System
Computer
CPU
RAM
Interface
Free Hard Disk Space
Display
OS X 10.9*1, 10.8*1*2
Computer running one of the above operating systems (preinstalled), with an included
USB port; Internet connection required for auto updating
Core 2 Duo or higher
2 GB or more
USB and Wi-Fi*3
150 MB or more
1,024 x 768 resolution or higher
*1 Information on computer models compatible with OS X 10.9 and 10.8 is available on the Apple website.
*2 OS X 10.8.2 or later required for Wi-Fi connections (with supported cameras only)
*3 Wi-Fi connections require supported cameras.
For the latest compatibility information, including supported OS versions, visit the Canon
website.
Downloaded FromCo
Manuals
CVideoCamera-Manual.com
ont
nten
ten
entts
ts
67
Introduction
Basic Operations
Advanced Operations
Appendix
Software Described in This Instruction Manual
CameraWindow interacts with a connected camera (other than EOS cameras)/camcorder to
enable the following tasks.
• EOS camera users: Use EOS Utility for these operations. Also refer to the EOS Utility Instruction Manual (provided in PDF format).
Available tasks include:
• Import images from the camera/camcorder
• Organize images on the camera/camcorder
Downloaded FromCo
Manuals
CVideoCamera-Manual.com
ont
nten
ten
entts
ts
68
Introduction
Basic Operations
Advanced Operations
Appendix
Table of Contents
Manual Conventions and Navigation, System Considerations ....................................................... 65
Software Described in This Instruction Manual .............................................................................. 68
Introduction ............................................................................................................. 70
Importing Images ......................................................................................................................... 70
Basic Operations ...................................................................................................... 74
Screen Elements ........................................................................................................................... 74
Image Importing Options .............................................................................................................. 77
Organizing Camera Images .......................................................................................................... 78
Advanced Operations ............................................................................................. 79
Transferring Identifying Information (Face ID-Compatible Cameras Only) ...................................... 79
Preference Settings ....................................................................................................................... 80
Appendix ................................................................................................................. 82
Index ............................................................................................................................................ 82
Uninstallation ............................................................................................................................... 83
Memory Card Folder Structure ..................................................................................................... 84
Troubleshooting ........................................................................................................................... 86
Downloaded From VideoCamera-Manual.com Manuals
69
Introduction
Basic Operations
Advanced Operations
Appendix
Importing Images
Camera/Camcorder–Computer Connection Precautions
Importing Images with CameraWindow
Camera/Camcorder–Computer Connection Precautions
• When connecting the camera/camcorder to a computer via an interface cable, connect
the interface cable directly to the USB port. Connection via a USB hub may prevent correct
operation.
• Using other USB devices (except USB mouse devices or keyboards) when the camera/camcorder is connected may prevent correct operation. In this case, disconnect the other devices
from the computer and reconnect the camera/camcorder.
• Do not connect multiple cameras or camcorders to a single computer. This may prevent correct camera/camcorder operation.
• Do not allow the computer to enter sleep (or standby) mode while a camera/camcorder is connected via an interface cable. If this does happen, leave the interface cable connected to the
computer and try to wake the computer while the camera is still connected. Some computers
may not recover from sleep correctly if the interface cable is disconnected while they are in
sleep mode. For details on sleep or standby mode, refer to the computer user manual.
• Do not disconnect your camera/camcorder from the computer while the CameraWindow
screen is displayed.
• These tasks are not supported when connected via Wi-Fi to a Mac OS computer: Editing the
camera owner name, transferring identifying information, and setting up linkage with CANON
iMAGE GATEWAY.
– For details on Wi-Fi, refer to sections on Wi-Fi in the camera user guide. (Cameras supporting Wi-Fi
only.)
• When connecting a battery-powered camera/camcorder to the computer, make sure
the device is fully charged, or use an AC adapter kit or a compact power adapter
(may be sold separately, depending on your model).
• When connecting an AA battery-powered camera/camcorder to the computer, use
batteries with sufficient charge, optional fully charged AA NiMH batteries, or an
optional compact power adapter.
• For connection instructions, refer to the camera/camcorder user guide.
Downloaded FromCo
Manuals
CVideoCamera-Manual.com
ont
nten
ten
entts
ts
70
Introduction
Basic Operations
Advanced Operations
Appendix
Importing Images with CameraWindow
Connect your camera/camcorder to the computer and import images as follows:
• Instructions in this CameraWindow User Guide apply when the program has been installed correctly. For installation instructions, refer to the camera/camcorder user guide.
1
Connect your camera/camcorder to
the computer via the included interface cable.
2
Start CameraWindow.
Æ Turn the camera/camcorder on
and prepare it for communication
with the computer.
• After the first time you connect the camera/
camcorder to the computer via the included
interface cable, CameraWindow will start up
automatically.
Camera
Windows
Follow these steps.
.
1. In the taskbar, click
2. When the screen on the left is displayed,
click ’Change program’ next to
.
3. Select ‘Downloads Images From Canon
Camera using Canon CameraWindow’,
and then click ‘OK’.
4. Double-click
.
• On the screen on the left, double-click
‘Change general settings’. You can now
adjust the settings so that whenever the
camera/camcorder and computer are ready
for communication, CameraWindow will start
up automatically.
Windows 8
Select the screen for choosing what to
do with the device, and then choose
‘Downloads Images From Canon Camera
using Canon CameraWindow’.
Windows Vista
On the screen displayed, select ‘Downloads
Images From Canon Camera using Canon
CameraWindow’.
Downloaded FromCo
Manuals
CVideoCamera-Manual.com
ont
nten
ten
entts
ts
71
Introduction
Basic Operations
Advanced Operations
Appendix
Windows XP
On the screen displayed, select ‘Canon
CameraWindow’, and then click ‘OK’.
Mac OS
Whenever the camera and computer are ready for communication,
CameraWindow will start up.
Camcorder
Windows
Select ‘Canon CameraWindow’
and click ‘OK’.
Windows 8
Select the screen for choosing what to
do with the device, and then choose
‘Downloads Images From Canon Camera
using Canon CameraWindow’.
Windows XP/Windows Vista
When the ‘AutoPlay’ window appears, click
‘Downloads Images From Canon Camera
using Canon CameraWindow’.
• If a camcorder and memory card reader are connected at the same time, a dialog appears allowing
you to select the camcorder model. Confirm that
‘Canon Camera’ or your camcorder model name is
displayed and click ‘OK’.
Mac OS
3
Whenever the camcorder and computer are ready for communication,
CameraWindow will start up.
Click [Import Images from Camera],
and then click [Import Untransferred
Images].
• Only images that you have not transferred to
the computer will be imported.
• If you have used the GPS logger function, log
files will also be imported.
Downloaded FromCo
Manuals
CVideoCamera-Manual.com
ont
nten
ten
entts
ts
72
Introduction
Basic Operations
Advanced Operations
4
Appendix
Click [OK] on the screen displayed
after importing, and then close
CameraWindow.
Imported images are now shown in the main
ImageBrowser EX window.
• On initial ImageBrowser EX startup, a screen
is displayed for specifying where to save
imported images. Follow the instructions displayed to choose the destination folder.
– For details on ImageBrowser EX preferences, refer to the ImageBrowser EX User
Guide (provided in PDF format).
• Importing problems may occur if there are
too many images (more than 1,000) on the
memory card. In this case, use a memory card
reader to import the images. For instructions
on importing images from a memory card
reader, see “Importing Images from Memory
Cards”.
• Movies take longer to import, due to the
larger file size.
• On camcorders, files that exceed 4 GB or
movies that are longer than 1 hour are
split and recorded as multiple files. When
these files are detected and you close
CameraWindow, a message is displayed. You
can click [Yes] to join the files.
5
Turn the camera/camcorder off.
Windows
• Importing movies using built-in Windows 7 import functions may prevent them
from being shown in ImageBrowser EX. Instead, use CameraWindow for importing.
• CameraWindow may not start up in some versions of Windows, even when you
connect your camera/camcorder. In this case, click the ‘Start’ menu and select ‘All
Programs’ Æ ‘Canon Utilities’ Æ ‘CameraWindow’ Æ ‘CameraWindow’.
Mac OS
• If CameraWindow does not start up even when you connect your camera, click the
‘CameraWindow’ Dock icon.
Downloaded FromCo
Manuals
CVideoCamera-Manual.com
ont
nten
ten
entts
ts
73
Introduction
Basic Operations
Advanced Operations
Appendix
Screen Elements
Menu Screen
Main Window
Menu Screen
1
1 Camera/Camcorder Details
Identifies the camera/camcorder model and shows
the remaining memory capacity.
2 [Import Images from Camera]
2
3
4
Start the process of importing camera/camcorder
images to the computer.
3 [Organize Images on Camera]
Start the process of protecting, rotating, or deleting
camera/camcorder images.
4 [Camera Settings]
Used for configuring camera/camcorder settings.
Configurable settings include:
• Registering Face ID Information (= 31)
• Configuring Sharing Websites
• The buttons shown vary depending on camera/camcorder model.
Customizing CameraWindow Operation
Access program preferences by clicking the
button in the upper right of the screen. On this
screen, you can change the startup screen, automatic importing settings, the destination folder
for saving images, and other settings to make CameraWindow easier to use.
Downloaded FromCo
Manuals
CVideoCamera-Manual.com
ont
nten
ten
entts
ts
74
Introduction
Basic Operations
Advanced Operations
Appendix
Main Window
To access this screen, click [Import Images from Camera] on the menu screen, and then click
[Select Images to Import]. Otherwise, click [Organize Images on Camera] on the menu screen,
followed by [Organize Images].
1
3
4
1 Return to the menu screen.
2 Tree View
Images on the camera/
camcorder that match the
conditions you select here are
shown on the right.
2
3 Browser Control Bar
Settings governing display in
the browser area.
Display varies depending on
the selected menu screen
items.
4 Browser Area
Images not imported yet are
labeled with an icon. Show
selected images against a blue
background.
3
• The buttons shown vary depending on camera/camcorder model.
Downloaded FromCo
Manuals
CVideoCamera-Manual.com
ont
nten
ten
entts
ts
75
Introduction
Basic Operations
Advanced Operations
Appendix
Browser Control Bar
1
2
3
3 Switch display modes.
Thumbnail Mode
View thumbnails of multiple images.
1 Show/hide the shooting date/time and file name
below images (in thumbnail display mode).
Preview Mode
Double-clicking an image will also switch to preview display.
2 Change thumbnail size (in thumbnail display
mode).
Full-screen
1
2
3
4
1 Rotate selected images 90° left or right.
3 Clear image selection.
2 Select all images.
4 Import selected images to the computer.
• Different options are shown when you are organizing images on a camera (= 78).
Downloaded FromCo
Manuals
CVideoCamera-Manual.com
ont
nten
ten
entts
ts
76
Introduction
Basic Operations
Advanced Operations
Appendix
Image Importing Options
Importing Selected Images
Importing All Images
Importing Selected Images
Import desired camera/camcorder images as follows:
To access the screen for choosing
images to import, click [Import Images
from Camera] on the menu screen, and
then click [Select Images to Import].
Select images to import and click
[Import] to start importing the images
to your computer.
Importing All Images
Import all camera/camcorder images as follows:
On the menu screen, click [Import
Images from Camera], and then click
[Import All Images].
Downloaded FromCo
Manuals
CVideoCamera-Manual.com
ont
nten
ten
entts
ts
77
Introduction
Basic Operations
Advanced Operations
Appendix
Organizing Camera Images
To access the screen for organizing images on cameras/camcorders, click [Organize Images on
Camera] on the CameraWindow menu screen, and then click [Organize Images]. You can view
images in a folder in thumbnail mode by selecting the desired folder in the tree view area. The
thumbnails are shown in the browser area.
Browser Control Bar
1
1 Rotate selected images 90° left or right.
2
3
3 Delete selected images.
2 Protect selected images, or cancel protection.
Clicking
[Delete] will delete the selected images from your camera/camcorder. Be
careful when deleting images, because deleted images cannot be restored.
Downloaded FromCo
Manuals
CVideoCamera-Manual.com
ont
nten
ten
entts
ts
78
Introduction
Basic Operations
Advanced Operations
Appendix
Transferring Identifying Information (Face
ID-Compatible Cameras Only)
Identifying information you enter in ImageBrowser EX can be used by cameras that support Face
ID to identify people you shoot.
A screen is displayed for you to configure automatic syncing of identifying information if you
connect a camera when either the camera or your computer has identifying information. If
you prefer not to see the sync screen each time CameraWindow starts up, clear the option
[Synchronize automatically].
Keeping Identifying Information on Cameras Optimized
1
Connect your camera to the computer to access CameraWindow.
• For details, see steps 1–2 in “Importing
Images with CameraWindow”.
2
Click [Yes] when a message is displayed about syncing identifying
information on the camera.
Manually Editing Identifying Information on Cameras
Downloaded FromCo
Manuals
CVideoCamera-Manual.com
ont
nten
ten
entts
ts
1
On the menu screen, click [Camera
Settings], and then click [Set Person].
2
Clear [Synchronize automatically].
You can now select and edit personal information manually.
79
Introduction
Basic Operations
Advanced Operations
Appendix
Preference Settings
Configuring Preference Settings
Configuring Preference Settings
Click the
in the upper right of the
menu screen.
Automatically Importing Images on CameraWindow Startup
Set up CameraWindow to import images automatically on program startup as follows:
Downloaded FromCo
Manuals
CVideoCamera-Manual.com
ont
nten
ten
entts
ts
1
On the preferences screen, click the
[Import] tab.
2
On the [Auto Import] tab, choose
[Start importing images automatically when this software is
launched.].
80
Introduction
Basic Operations
Advanced Operations
Appendix
Changing the Destination Folder
• By default, images imported using CameraWindow are saved in either the ‘Pictures’ or ‘My Pictures’ folder.
1
On the preferences screen, click the
[Import] tab.
2
On the [Folder Settings] tab, click
[Browse], and then specify the destination on the next screen.
Changing the Program Launched after Import
1
On the preferences screen, click the
[Import] tab.
2
On the [After Import] tab, click
and choose the program to start after
image importing.
Editing the Camera Owner Name
Edit the owner name for the connected camera as follows:
Downloaded FromCo
Manuals
CVideoCamera-Manual.com
ont
nten
ten
entts
ts
1
On the preferences screen, click the
[Camera] tab.
2
On the [Set] tab, click [Edit] and enter
the new name in the box.
3
Click [Set].
81
Introduction
Basic Operations
Advanced Operations
Appendix
Index
Importing Images
Other Operations
“Import images from cameras/camcorders”
“Import selected images”
“Adjust software/camera operation”
Searching for Terms in This Manual
This manual can be read using Adobe Reader. To find instances of specific terms or expressions,
you can use search functions in Adobe Reader.
Windows
Mac OS
Downloaded FromCo
Manuals
CVideoCamera-Manual.com
ont
nten
ten
entts
ts
Enter the text to find.
82
Introduction
Basic Operations
Advanced Operations
Appendix
Uninstallation
Uninstall the programs when they are no longer needed, or when reinstalling the programs to
resolve software issues.
• The following task requires administrator rights.
Mac OS
• If any folders in the program folder contain imported images, be careful not to drag
them to the trash with the program folder.
Windows
1
Click the ‘Start’ menu, select
‘All Programs’ or ‘Programs’,
and then select ‘Canon Utilities’
Æ ‘CameraWindow DC 8’ Æ
‘CameraWindow DC 8 Uninstall’.
The uninstallation process now begins, and
CameraWindow will be removed from your
computer.
Mac OS
Downloaded FromCo
Manuals
CVideoCamera-Manual.com
ont
nten
ten
entts
ts
1
Drag the ‘CameraWindow’ folder (in
the ‘Applications’ folder, in ‘Canon
Utilities’) to the ‘Trash’.
2
Empty the trash.
83
Introduction
Basic Operations
Advanced Operations
Appendix
Memory Card Folder Structure
Folder Structure
Folder Contents
Folder Structure
Folders for files used by the software described in this manual are as follows:
*
DCIM
One of the
following:
• xxx_ _ _mm
• xxx_mmdd
• xxxCANON
• xxxEOSxx
Folder containing files for managing images in the
DCIM folder
CANONMSC
yymmddx.LOG (GPS log files)
GPS
Folder created when DPOF settings are configured
Contains files for managing DPOF instructions.
MISC
yymmddx.LOG (GPS log files)
GPS
•
•
•
•
xxx: numbers in the range 100–999; mm: shooting month; dd: shooting day.
In GPS log file names (for files in the ‘GPS’ folder), yy represents the last two digits of the year.
*All folders other than these contain image management files. Do not open or delete them.
Some image formats may not be supported by your camera/camcorder, which may not create
some of these folders.
Downloaded FromCo
Manuals
CVideoCamera-Manual.com
ont
nten
ten
entts
ts
84
Introduction
Basic Operations
Advanced Operations
Appendix
Folder Contents
File Name
IMG_xxxx.JPG
_MG_xxxx.JPG
IMG_xxxx.CR2
_MG_xxxx.CR2
IMG_xxxx.CRW
_MG_xxxx.CRW
xxxx.TIF
ST
_xxxx.JPG
MVI_xxxx.MOV
MVI_xxxx.AVI
MVI_xxxx.MP4
MDG_xxxx.MOV
MDG_xxxx.MP4
Type of File
Image files in JPEG format
JPEG image files shot in the Adobe RGB color space
Image files in RAW format
RAW image files shot in the Adobe RGB color space
Image files in RAW format
RAW image files shot in the Adobe RGB color space
RAW image files shot with EOS-1D or EOS-1Ds cameras
Image files shot in Stitch Assist mode
Movie files
Movie files
Movie files
Digest movie files
Digest movie files
• xxxx represents a four-digit number or letters.
•
in file names of sets of images shot in Stitch Assist mode represents a letter, starting with A.
Downloaded FromCo
Manuals
CVideoCamera-Manual.com
ont
nten
ten
entts
ts
85
Introduction
Basic Operations
Advanced Operations
Appendix
Troubleshooting
Initial Troubleshooting Tips
Problems and Solutions
Resolve software issues as described in this section.
Initial Troubleshooting Tips
In case of problems, first check the following points:
• Does your computer meet the system requirements?
Refer to the system requirements in the camera/camcorder user guide.
• Is your camera/camcorder connected to the computer correctly?
For connection instructions, refer to the camera/camcorder user guide.
Also confirm that you are using the correct cable, and that it is firmly connected.
• Are your camera/camcorder and the computer ready to send or receive data?
Some models of camera/camcorder must be in playback mode before data can be sent or received
from a computer. For details, refer to the camera/camcorder user guide.
• Is there sufficient battery power?
When using a battery-powered camera/camcorder, confirm that there is enough charge left.
When connecting your camera/camcorder to a computer, you can conserve battery power by using an
AC adapter kit or a compact power adapter (may be sold separately, depending on your model).
Downloaded FromCo
Manuals
CVideoCamera-Manual.com
ont
nten
ten
entts
ts
86
Introduction
Basic Operations
Advanced Operations
Appendix
Problems and Solutions
In case of these problems, try the suggested solutions.
• Cannot find imported images.
Windows
Mac OS
See “Changing the Destination Folder” and check where images are being saved.
• ‘Add New Hardware Wizard’ appears when the camera/camcorder is connected to the computer via an interface cable.
Windows
Click ‘Cancel’ to close the wizard, and temporarily disconnect the camera/camcorder from the computer. Try to resolve the problem by referring to “Initial Troubleshooting Tips” on the previous page.
• Camera/camcorder not detected, Events dialog/AutoPlay/Device Stage not displayed, Images
not imported (when the camera/camcorder is connected to the computer via an interface
cable)
Windows
Your camera/camcorder may mistakenly be recognized as another device.
Uninstall the device as follows:
The following task requires administrator rights.
1
Access ‘Device Manager’.
Windows 8:
Right-click in the lower-left corner and select
‘Device Manager’.
Windows 7:
Click the ‘Start’ menu and select ‘Control
Panel’ → ‘System and Security’ → ‘System’
→ ‘Device Manager’.
Windows Vista:
Click the ‘Start’ menu and select ‘Control
Panel’ → ‘System and Maintenance’ →
‘Device Manager’.
Windows XP:
Click the ‘Start’ menu and select ‘Control
Panel’ → ‘Performance and Maintenance’
→ ‘System’. On the ‘Hardware’ tab, click
‘Device Manager’.
Downloaded FromCo
Manuals
CVideoCamera-Manual.com
ont
nten
ten
entts
ts
87
Introduction
Basic Operations
Advanced Operations
2
Appendix
Click ‘+’ next to ‘Other devices’,
‘Portable Devices’, or ‘Imaging
devices’.
Your model of camera/camcorder or ‘Canon
Camera’ will be listed in these categories
if the device is mistakenly recognized as
another device.
• Other factors may be causing the problem if
‘Other devices’, ‘Portable Devices’, or ‘Imaging
devices’ are not listed, or if your camera/camcorder model name or ‘Canon Camera’ is not
listed. Go to step 5 and consider another solution or try again later.
3
Right-click on your camera/camcorder
model name or ‘Canon Camera’, and
then select ‘Uninstall’.
4
Click ‘OK’ after the confirmation message is displayed.
If applicable, delete all instances of your
camera/camcorder model name or ‘Canon
Camera’ listed in ‘Other devices’, ‘Imaging
devices’, or both categories.
5
Downloaded FromCo
Manuals
CVideoCamera-Manual.com
ont
nten
ten
entts
ts
Close ‘Device Manager’ and ‘System
Properties’.
88
Introduction
Basic Operations
Advanced Operations
Appendix
CameraWindow User Guide
1.
2.
3.
4.
Unauthorized reproduction of this manual in whole or part is prohibited.
Information in this manual is subject to change without notice.
Illustrations or screenshots in this manual may differ slightly from actual products.
Notwithstanding the preceding items, Canon cannot be held liable for any loss arising from the use of
this software.
© CANON INC. 2014
Downloaded FromCo
Manuals
CVideoCamera-Manual.com
ont
nten
ten
entts
ts
89