1
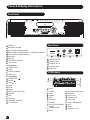
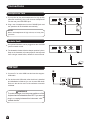
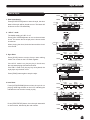
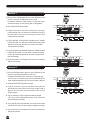
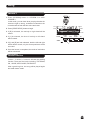
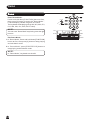
Electronic Keyboard
Owner’s Manual
A.B.C.
TOUCH
DUAL
LOWER
DSP
SUSTAIN
INFORMATION FOR YOUR SAFETY
Caution!
2
The normal function of the product may by Strong
Electro Magnetic Interference.
If so, simply reset the product to resume normal
operation by following the instruction manual.
In case the function could not resume, please
use the product in other location.
Contents
Panel & Display Description
Play Back the Recording.............................................16
Front Panel.................................................................. 4
Song
Rear Panel...................................................................4
Lesson Mode..............................................................17
LCD Display................................................................. 4
Lesson 1.....................................................................18
Preparation
Power Supply............................................................... 5
Setting the Music Stand...............................................5
Lesson 2.....................................................................18
Lesson 3.....................................................................19
Grade Function.......................................................... 19
Demo
Connections
Enter Demo................................................................20
Headphones Jack.........................................................6
Exit Demo...................................................................20
Sustain Jack.................................................................6
USB Jack..................................................................... 6
Function Menu
Transpose.................................................................. 21
Basic Operation
Octave........................................................................21
Power Switch............................................................... 7
Beat............................................................................21
Master Volume.............................................................7
Split Point...................................................................21
MIDI IN.......................................................................22
Voices and Effects
MIDI OUT................................................................... 22
Select a Voice.............................................................. 8
Touch......................................................................... 22
Dual Voice....................................................................8
Lower Voice/Split Point.............................................. 9
Tune........................................................................... 22
Sustain.........................................................................9
DSP Effect.................................................................. 9
Style Control
Select a Style..............................................................10
Reverb Level................................................................
22
Chorus Level..............................................................23
Pedal Assign...............................................................23
Chord Dictionary........................................ 24
The Accompaniment Section.......................................10
MIDI Function
Start a Style................................................................ 11
What is MIDI.............................................................. 25
Stop a Style................................................................ 12
USB Connection.........................................................25
Main/Fill...................................................................... 12
MIDI Application......................................................... 25
Tempo.........................................................................12
Appendices
Chord Recongnize..................................................... 13
Metronome..................................................................15
Specifications.............................................................26
One Touch Setting...................................................... 15
Accomp Volume..........................................................15
Appendix 2 - Style List................................................29
Record
Appendix 4 - Song List...............................................30
Start Recording...........................................................16
Appendix 5 - Chord List............................................. 30
Stop Recording...........................................................16
Appendix 6 - MIDI List................................................31
Appendix 1- Voice List................................................27
Appendix 3 - Demo List..............................................29
3
Panel & Display Description
Front Panel
OFF-ON
9V
100 SONGS
100 STYLES
0 0 1-0 14 Classic
015-040 Favorite
041-066 Folk
067-080 Kid's Song
081-085 Ball room
086-100 Piano & Keyboard
0 0 1-0 15 Beat & Pop
016-028 Rock
029-038 Dance
039-048 Soul & Funk
049-058 Jazz
059-070 Country
SUSTAIN
USB
300 VOICES
0 0 1-0 39 Piano
040-062 Mallet
063-083 Organ
084-100 Guitar
101-128 Bass
129-147 Strings
071-080 Latin
081-090 Tradi tional
091-100 Piano
21
VOICE
L&R
- TEMPO +
44
MASTER VOLUME
2
2
METRO
CHORD
DICT.
1 3
5
LESSON
6
STYLE
1
STYLE
SONG
FUNCTION
4
PLAY
7
START /
STOP
SYNC
8
INTRO /
ENDING
10 11 12
9
17
7
2
3
4
5
6
7
8
9
VOICE/STYLE/SONG
FUNCTION
In Style Mode
10
11
12
13
START/STOP
SYNC
INTRO / ENDING
MAIN / FILL
11
12
13
14
15
16
17
18
START/STOP /
PAUSE
REW
FF
DUAL
DEMO
ONE TOUCH SETTING
LOWER
DSP
20
SUSTAIN
NUMERIC KEYPAD
21
LCD DISPLAY
19
18
13
YES
NO
20
Rear Panel
9V
OFF-ON
1
1
POWER ON/OFF
2
POWER JACK
PHONES JACK
SUSTAIN JACK
USB JACK
3
4
5
SUSTAIN
USB
4
5
3
2
1
LCD Display
7
1
77
8
9
10
A.B.C.
11
2 TOUCH
12
15
16
13
14
17
18 19
1
2
33
44
55
6
77
99
10
A.B.C.
TOUCH
DUAL
LOWER
DSP
SUSTAIN
CHORD
VOICE/STYLE/DEMO
/SONG
TEMPO/COUNT
BEAT
DUAL
33
LOWER
44
DSP
55
SUSTAIN 6
16
8
4
9
0
In Song Mode
10
6
8
19
FILL
SONG
TEMPO +/MASTER VOLUME
LEFT HAND LESSON MODE
RIGHT HAND LESSON MODE / CHORD DICTONARY
AUTO BASS CHORD/LESSON
RECORD
METRO
3
5
246-258 Pad
259-266 Effects
267-279 Ethnic
280-290 Percussive
291-297 Synth
298-300 Drum Set
14 15 16
13
1
2
148-170 String
Ensemble
171-190 Brass
191-206 Reed
207-221 Pipe
222-245 Lead
14
ONE TOUCH SETTING
RECORD
BASS CLEF
TREBLE CLEF
15
NOR / VAR
16
61-KEY KEYBOARD
LEFT
RIGHT
LESSON 1 / 2 / 3
11
12
13
17
18
19
9
Preparation
Power Supply
This electronic keyboard can be powered by the current
of a standard household wall outlet (using the specified
AC adaptor) or by batteries.
OFF-ON
1. Using the AC Adaptor
Make sure that only the AC adaptor specified for this
electronic keyboard is used. The adaptor shall be 9V
DC output, center positive type. Be sure to turn off the
electronic keyboard before you connect the adaptor into
the AC wall outlet and the cord into the unit.
9V
SUSTAIN
USB
AC Outlet
AC Adaptor
CAUTIONS!
Use only the specified AC adaptor. Using other
2. Using Batteries
Always make sure to turn the keyboard off before
inserting new batteries or replacing old ones.
types of adaptor creates the risk of and electrical
shock.
For safety sake, be sure to unplug the AC adaptor
To insert batteries
Open the battery compartment on the bottom of the
keyboard.
Insert 6 “AA”-size (SUM-3, Lr6) batteries into the battery
compartment and follow the correct polarity.
Replace the compartment cover and make sure that it
locks firmly in place.
from the wall outlet whenever leaving the
electronic Keyboard unattended for a long time.
Low battery indications
Any of the following symptoms indicate low battery power.
Replace the batteries as soon as possible if any of the
following occurs.
SUM-3, LR6,"AA"SIZE OR EQUIV
CAUTIONS!
When inserting batteries, make sure to follow the
polarity marking.
Never use batteries of different types.
Never mix old batteries with new ones.
Replace the batteries as soon as possible after
any sign of discharge.
Always remove the batteries from the battery
compartment when the keyboard is not expected
to be used for a long period of time.
A dim and difficult-to-read LCD display.
Abnormally low speaker/headphone volume.
Distortion of the sound output.
Sudden power failure when playing at high volume.
Abnormal rhythms or demo songs are played.
Dimming of the display when playing at high volume.
Setting Music Stand
Please set up the music stand as the instruction below:
A.B .C.
TOU CH
DUA L
LOW ER
DSP
SUS TAIN
5
Connections
Headphones Jack
1. If you prefer to play with headphones for high quality
personal monitoring, plug a set of stereo headphones
into the rear panel PHONES jack.
OFF-ON
9V
SUSTAIN
USB
OFF-ON
9V
SUSTAIN
USB
2. Plug a set of headphones into the PHONES jack and
the speakers will be disabled automatically.
NOTE:
Never use headphones in high volume, as it may hurt
your ears.
Sustain Jack
1. An optional footswitch can be plugged into the SUSTAIN
jack for sustain control.
2. The footswitch functions like the damper pedal of a piano.
Step on the footswitch, all notes played on the keyboard
have a longer sustain effect, release for normal sound.
USB Jack
1. Connect PC or other USB host devices that support
USB Audio.
2. For devices with USB cable, after the driver is installed
and initialization is finished, you can choose USB Audio
Device in the device menu of the software to transfer
midi data.
WARNING
To avoid damages, turn the power switches of this
keyboard and all related devices OFF if you want to
plug in or unplug between this instrument with all
related devices.
6
Basic Operation
Power Switch
1. First, please ensure the correct connection has been
made based on the previous instruction.
POWER
OFF - ON
2. Turn the [POWER] switch on. The LCD display lights up.
NOTE:
If the LCD display does not light up after you turned
on the keyboard, please check the power supply.
Master Volume
MASTER VOLUME
1. The keyboard volume could be adjusted from 0 to 31
by pressing [MASTER VOLUME + ] and [MASTER
VOLUME -] button LCD will display MVL XX.
2. Press [MASTER VOLUME +] and [MASTER VOLUME -]
buttons simultaneously to set to the default value MVL
23.
MASTER VOLUME
NOTE:
If the keyboard is in silent, that means the volume may
has been adjusted to its minimum level or the headphones
jack has been connected.
7
Voices and Effects
There are 300 voices in total (See appendix).
Select a Voice
VOICE
1. The default VOICE is “NO.01 Acoustic Grand piano”.
LCD displays “VOICE 1” and the voice number.
STYLE
SONG
2. The [+/YES] and [-/NO] buttons:
Press [+/YES] or [-/NO] button to select the voice you want.
The selected voice number will be shown on the display.
The number buttons:
The number buttons can be pressed directly to select
your desired voice.
FUNCTION
1
2
3
4
5
6
7
8
9
3. After selecting a voice, you can now play the keyboard.
0
NOTE:
YES
NO
Use [STYLE/SONG/VOICE] button to switch mode
(Voice Mode, Style Mode and Song Mode).
When repeatedly press [STYLE/SONG/VOICE] button,
will quit “Song Mode” and enter “Voice Mode” or from
“Voice Mode” switch to “Style Mode”.
While playing song, you can not switch mode.
Dual Voice
Yo u can play two sounds at the same time on the
keyboard. It is called “Dual Voice mode”. When the dual
function is off, the voice indicator is VOICE 1. When the
dual function is on, the voice indicator is VOICE 2.
The dual voice function is set to OFF when keyboard
power on.
1. During the VOICE 1 status, you could press and
hold down [FUNCTION] button at first, and then
press [1] button to enter the dual voice mode.
“VOIC E 2” an d “D U AL ” i c o n w o u l d b e l i g h te n e d
simultaneously. The number of the dual voice will
b e d i s p l a y e d o n t h e L C D . N o w, y o u c a n g e t t w o
different sounds at the same time when pressing
one key.
FUNCTION
1
2
3
4
5
6
7
8
9
0
NO
YES
DUAL
A.B.C.
TOUCH
LOWER
DSP
SUSTAIN
2. Press [+/YES] / [-/NO] button or number buttons to
select you desired voice.
The default DUAL VOICE number is NO.154 Synth
Strings 3.
3. Press and hold down [FUNCTION] button at first,
and then press [1] button to turn off the DUAL VOICE.
The note you play sounds a single voice of Voice 1.
NOTE:
While the keyboard is splitted, only the right hand can
respond the dual voice, the left hand area can’t.
8
Eg. Piano
Eg. Cello
Two voice will sound
at the same time.
Lower Voice / Split Point
You can play two sounds on different parts of the
keyboard. It is called “Split Mode”.
The lower voice function is set to OFF when
keyboard power on.
1. Press and hold down [FUNCTION] button at first,
then press [4] button to turn on the LOWER VOICE,
LCD lights the “LOWER” flag and displays “VOICE L”
and its number.
FUNCTION
1
2
3
4
5
6
7
8
9
0
2. Press [+\YES] / [-\NO] button or number button to
select the voice you want. The default lower voice
number is “No.154 Synth Strings 3”.
3. Press and hold down [FUNCTION] button at first,
then press [4] button to turn off the LOWER VOICE.
LCD darkens its flag.
YES
NO
DUAL
A.B.C.
TOUCH
LOWER
DSP
SUSTAIN
NOTE:
The default split key is F#3(19), Turn to “Function Menu”
page for more detail.
Sustain
This function helps you to get a voice with a
sustained effect, while playing the keyboard.
The sustain effect is set to OFF when keyboard
power on.
FUNCTION
1
2
3
4
5
6
7
8
9
0
1. P ress and hold down [FUNCTION] button at first,
then press [7] button to activate the sustain effect.
The “SUSTAIN” flag lightens on the display.
2. Press and hold down [FUNCTION] button at first,
t h en press [7] button to eliminate the sustain effect.
effect. The “SUSTAIN” flag will disappear.
YES
NO
DUAL
A.B.C.
TOUCH
LOWER
DSP
SUSTAIN
NOTE:
When you step on the sustain pedal, the sustain effect
will be stronger than the effect by pressing [SUSTAIN]
button.
Dsp Effect
This function allows you to perform the overall
sound in a realistic style.
The DSP Effect is set to ON when keyboard power
on.
FUNCTION
2
3
4
5
6
7
8
9
0
1. Press and hold down [FUNCTION] button at first,
then press [6] button to turn on DSP effect.
The “DSP” flag lightens on the display.
NO
A.B.C.
2. Press and hold down [FUNCTION] button at first,
then press [6] button to turn off the DSP effect.
The “DSP” flag will disappear.
1
TOUCH
YES
DUAL
LOWER
DSP
SUSTAIN
9
Style Control
The keyboard has a total of 100 styles, from 01 to
100, including 10 piano styles.
Select a Style
VOICE
1. Press the [STYLE/SONG/VOICE] button to set the
keyboard to the “Style Mode”. The default STYLE 1 is
NO:01; LCD will display the STYLE flag and its number.
STYLE
A.B.C.
DUAL
SONG
TOUCH
LOWER
DSP
SUSTAIN
2. [+/YES] and [-/NO] buttons:
Press [+/YES] or [-/NO] to choose your desired style.
The selected style number will be shown on the display.
The number buttons:
The number buttons can be pressed directly for selecting
the number of your desired style.
FUNCTION
1
2
3
4
5
6
7
8
9
3. After selecting a style, you can start playing the keyboard.
0
4. When a style is playing, you can select a new style at
any time. The number of the new style will be displayed
on the LCD immediately. If the style changes at beat
one, the new style will be played at once; if the style
changes at other beats, the new style will start in the
next measure. The new style will be playing with the
old tempo.
NO
YES
NOTE:
The style, song and voice use composite button [STYLE
/SONG/VOICE]. You could press the button continuously
to quit “Voice Mode” and enter “Style Mode”, or switch
“Style Mode” to “Song Mode”.
The Accompaniment Section
Accompaniment consists of Intro, Main, Fill and Ending.
Using different sections based on the different structures
of styles enable you to enhance the overall musical
performance.
INTRO
Press the [INTRO/ENDING] button to insert an intro section before you start to play . The rhythm will begin with
a 2-4 measure introduction which will be followed by a
menu section.
FILL and MAIN
While the accompaniment is playing, you can fill in
the rhythm/accompaniment by pressing the [FILL]
button.This will automatically insert a fill section.
After fill section over, Accompaniment will automatically return to the MAIN style.
Each main section consists of 1 to 4 measures.
ENDING
When you press the [INTRO/ENDING] button, it brings
ending section appropriate for the accompaniment, and
then stop the performance.
10
STYLE
SONG
START /
STOP
SYNC
INTRO /
ENDING
FILL
Style Control
Start a Style
STYLE
1. Start immediately:
Press [START/STOP] button to start the style, the drum
beats of the style will be played at once. The beats will
START /
STOP
SYNC
INTRO /
ENDING
FILL
SONG
DUAL
A.B.C.
TOUCH
LOWER
be shown on the LCD alternately.
DSP
SUSTAIN
2. “A.B.C.” mode
L&R
CHORD
DICT.
The default setting of A.B.C. is off.
Press [A.B.C./LESSON] button to turn on the auto bass
chord. The area to the left of split point is known as the
chord area.
When playing the chord, both the bass and the chord
LESSON
DUAL
A.B.C.
TOUCH
LOWER
voice sound.
DSP
SUSTAIN
STYLE
3. Sync Start
Press [SYNC] button to enter the sync start waiting
mode. The 4 beats on the LCD flash together.
START /
STOP
SYNC
INTRO /
ENDING
FILL
SONG
Flash simultaneously
If the A.B.C. mode is on, play any key in chord area,
the style start playing with bass and chord.
If the A.B.C. mode is off, play any key on keyboard, the
style plays only the drum voice.
DUAL
A.B.C.
TOUCH
LOWER
DSP
SUSTAIN
Press [SYNC] button again to stop the style.
4. Intro Start:
STYLE
Press [INTRO/ENDING] button when the style is not
playing, NOR flag will flash on the LCD, indicating the
START /
STOP
SYNC
INTRO /
ENDING
FILL
SONG
indicates the intro section is ready to play.
Flashing
DUAL
A.B.C.
TOUCH
LOWER
DSP
SUSTAIN
Press [START/STOP] button, then the style starts with
an intro section, followed by the main section.
STYLE
START /
STOP
SYNC
INTRO /
ENDING
FILL
SONG
11
Style Control
Stop a Style
1. Stop immediately
STYLE
The accompaniment can be stopped at any time by
pressing [START/STOP] button.
START /
STOP
SYNC
INTRO /
ENDING
FILL
START /
STOP
SYNC
INTRO /
ENDING
FILL
START /
STOP
SYNC
INTRO /
ENDING
FILL
SONG
2. Ending stop
STYLE
Press [INTRO/ENDING] button to complete style with an
ending section.
SONG
3. Sync stop
STYLE
Press [SYNC] button to stop playing style, the synchronized start mode will be activated.
SONG
Main/Fill
STYLE
1. In MAIN mode, press [FILL] button to insert 1 measure
fill section and LCD flashes “NOR”; after one measure
is over, MAIN style will be returned.
START /
STOP
SYNC
INTRO /
ENDING
FILL
SONG
Flashing
DUAL
A.B.C.
TOUCH
LOWER
DSP
2. Press and hold down [FILL] button when style is playing,
the selected FILL pattern repeats continuously until the
button is released.
SUSTAIN
STYLE
START /
STOP
SYNC
INTRO /
ENDING
FILL
Press and
hold down
SONG
Flashing until button
is released
A.B.C.
TOUCH
DUAL
LOWER
DSP
SUSTAIN
Tempo
- TEMPO +
A.B.C.
1. Press [TEMPO +] or [TEMPO - ] button to change the
tempo: 30 - 280
TOUCH
DUAL
LOWER
DSP
SUSTAIN
2. Press [TEMPO +] and [TEMPO - ] button simultaneously to set the tempo value back to its default.
- TEMPO +
A.B.C.
TOUCH
DUAL
LOWER
Note:
DSP
When the style stops while selecting style, the
tempo will change with the style automatically to
the default tempo. When style is playing, the tempo
will not change with the style.
SUSTAIN
12
Style Control
Chord Recognize
L&R
CHORD
DICT.
“A.B.C.” is disabled during the default setting.
Press [A.B.C.] button to turn on this “auto bass chord”
function; the A.B.C. flag on the LCD is lightened. The
left section of the keyboard is known as the “chord area”,
while playing the chord, both the bass and the chord
voices phonate.
LESSON
DUAL
A.B.C.
TOUCH
LOWER
DSP
Press [ A.B.C. ] button again to turn off “auto bass
chord” function. The “A.B.C.” flag will disappear
SUSTAIN
There are 2 ways to detect a chord: “single finger
detect” and “multi fingers detect”.
To play a major chord
Press the root note of the chord
If the chord played is based on "multi fingers detect", it
is recognized as the “multi fingers chord”.
If not, “single finger chord” will be recognized.
To play a minor chord
Press the root note together with the
nearest black key to the left of it .
Single Finger Chords
To play a seventh chord
Press the root note together with the
nearest white key to the left of it .
This method allows you to play chords easily within the
accompaniment range of the keyboard using only one,
two, or three fingers.
Examples of Single Finger Chord are “C, Cm, C7 and
Cm7”, shown as below:
To play a minor seventh chord
Press the root notes together with
the nearest white and black keys to
the left of it (three keys altogether) .
Multi Finger Chords
This method allows you to produce an accompaniment
by playing chords with normal fingerings within the
CM (9)
CM (#11)
accompaniment range of the keyboard.
To play Multi Chords ( Example for C chords)
A total of 32 chords are provided as below:
( 5)
Caug
11
16
17
23(#11)
18
19
20
21
22
24
25
26
27(#9)
28
Cdim
( 13)
30
( 9)
(13)
( 5)
CM
Cdim
29
aug
aug
31
aug
Notes enclosed in parentheses are optional;
the chords could be recognized without them.
13
Style Control
Chord Basics
Three or more notes played together constitute a
“chord”.
The most basic chord type is the "triad" consisting three
notes:
the root, third, and fifth degrees of the corresponding
scale.
A “C major triad”, for example, is made up of the notes
C (the root), E(the third note of the C major scale),and
G (the fifth note of the C major scale).
In the C major triad shown as above, the lowest note is
the “root” of the chord(this is the chord’s “root position”
...using other chord notes for the lowest note results in
“inversion”). The root is the central sound of the chord,
which supports and anchors other chord notes.
The distance(interval) between adjacent notes of triad
in root position is either a major or minor third.
The lowest interval in our root-position triad (between
the root and the third) determines whether the triad is a
major or minor chord, and we can shift the highest note
up or down by a semitone to produce two additional
chords, as shown below.
The basic characteristics of the chord sound remain
intact even if we change the order of the notes to create
different inversions. Successive chords in a chord
progression can be smoothly connected, for example,
by choosing the appropriate inversions (or chord
“voicings”).
Reading Chord Names
Chord names tell you just about everything you need to
know about a chord (other than the inversion/voicing).
The chord name tells you what the root of a chord is,
whether it is a major, minor, or diminished, whether it
requires a major or flatted seventh and what alterations
or tension does it use...all at a glance.
Some Chord Types
14
One Touch Setting
One Touch Setting is a powerful and convenient
function that allows you to reconfigure all settings instantly with the touch of a single button.
In this function, 1 types of parameters will be
loaded for operating the current style.
FUNCTION
1. Press and hold down [FUNCTION] button at first, and
then press [3] button to turn on the “O.T.S.” function.
1
2
3
4
5
6
7
8
9
0
The O.T.S. flag on the LCD will be lightened.
While O.T.S. is on, the relative type of the parameter
will be loaded according to the current style, and the
keyboard will turn the A.B.C. mode on automatically.
NO
YES
DUAL
A.B.C.
TOUCH
LOWER
2. Press and hold down [FUNCTION] button at first, and
DSP
then press [3] button to turn off the O.T.S. function. LCD
darkens its flag.
SUSTAIN
Metronome
1. Press [METRO] button to turn on the metronome.
METRO
2. Press [METRO] button again to turn off the metronome.
3. Metronome could not be played in SONG mode.
NOTE:
A.B.C.
Metronome can be played along with the tempo as
accompaniment whenever you turn on a style.
TOUCH
DUAL
LOWER
DSP
SUSTAIN
Metronome could be played in Recording Mode, but
it would not be recorded.
Accomp Volume
1. Press [ACCOMP +] or [ACCOMP -] button to adjust
volume of accompaniment in style playing. The
LCD displays the accomp volume which range
between 0 and 31. Default Accomp Volume is 28.
A.B.C.
L&R
DUAL
CHORD
DICT.
TOUCH
LOWER
DSP
SUSTAIN
LESSON
2. Press [ACCOMP +] and [ACCOMP -] button together to
mute the ACCOMP track.
A.B.C.
L&R
CHORD
DICT.
TOUCH
DUAL
LOWER
DSP
3. Press [ACCOMP +] and [ACCOMP -] button together
again to turn on the ACCOMP volume.
SUSTAIN
LESSON
NOTE:
When in “Song Mode” or recording playback status, the
Accomp Volume function will be invalid.
15
Record
Start Recording
PLAY
1. Press the [RECORD] button, the four-beat indicator on
the LCD will flash simultaneity, indicating the “record
waiting status”.
A voice and style can be selected in this status.
The ACCOMP track and MELODY track can be recorded
together.
Flash simultaneously
DUAL
A.B.C.
TOUCH
LOWER
DSP
SUSTAIN
2. When all the settings have been done in “Record Waiting
Status”, play the keyboard (the chord area when
recording ACCOMP) or press [START/STOP] button;
it will start recording and the beat will be displayed
according to the current tempo.
NOTE:
Once the recording of one track is started, the original
data in the track will be overwritten.
In “Record Status”, song mode will be invalid.
It means, you could not switch to the Song Mode by
pressing [STYLE/ SONG/VOICE] button.
STYLE
START /
STOP
SYNC
INTRO /
ENDING
FILL
START /
STOP
SYNC
INTRO /
ENDING
FILL
SONG
Stop Recording
1. STOP AUTOMATICALLY
While recording, once the capability is full, the recording
will be stopped automatically. “FULL” will be displayed
on the LCD.
2. STOP MANUALLY
Press [RECORD] button again to stop the recording
immediately.
When a style is playing, press the [INTRO/ENDING]
button, it will stop recording automatically after “ending”.
Play back the Recording
Press and hold down [REC] button 2 seconds to play back
the recorded data.
Press [REC] button again (or press [START/STOP] button)
could quit playback.
NOTE:
If you power off the keyboard, the recorded data would
be erased.
When the capability is empty, “NULL” will be displayed
on the LCD, and then quit playback state automatically.
16
PLAY
STYLE
SONG
Song
There are total 100 songs in this keyboard
(see Appendix). Each song can be practised
in the MELODY OFF mode.
1. START/STOP song
Press [SONG/STYLE/VOICE] button to enter the “song
mode”, LCD will display “SONG” flag and its number.
All songs will be played in a loop.
DUAL
A.B.C.
VOICE
STYLE
SONG
TOUCH
LOWER
DSP
SUSTAIN
STYLE
START /
STOP
INTRO /
ENDING
SYNC
FILL
2. LOOP:
The second time you start playing the song by pressing
SONG
[START/STOP] button, it will play the current song
repeatedly.
If you want to play all songs in a loop, you should quit
song mode at first, and then enter song mode again.
3. SELECT song:
Use [+/YES] / [-/NO] button or numeric keypad to select
your desired song.
FUNCTION
1
2
3
4
5
6
7
8
9
0
4. REW, FF and PAUSE
When a song is playing, press [ ] button to speed forward
the song.
Press [ ] to rewind the song (base on measure);
Press [ ] to pause the song.
NO
STYLE
START /
STOP
SYNC
YES
INTRO /
ENDING
FILL
NOTE:
SONG
When playing song, [STYLE/ SONG/VOICE] button is invalid.
If the song is in pause, the [ ] and [ ] function will be invalid.
When switch from “Style Mode” to “Song Mode”, the keyboard
will be waiting for 3 seconds, and then all songs will be
playing in a loop.
In “waiting status”, you could press [STYLE/ SONG/
VOICE] button again to switch to “Voice Mode”.
Lesson Mode
Learning a new song primarily involves with the timing
of the piece and the accuracy of a note. Thus the song
learning function focuses on these two elements to
help you better play a song.
L&R
1. In song mode (when a song is not playing), press
[A.B.C./LESSON] button to enter the Lesson mode.
2. There are 3 levels to score the performance of your
playing. You can use [R] or [L] button to select which
hand to practice. If neither hand is selected, the
keyboard will choose the right hand automatically.
If [L] and [R] are both selected, you can use two hands
to do the lesson togther.
NOTE:
The contents for practising with left hand varied according
to different types of songs. If you choose a chord
song, the left hand practices the chord, otherwise, the left
hand will be used to practise the melody.
L&R
CHORD
DICT.
LESSON
A.B.C.
TOUCH
CHORD
DICT.
LESSON
DUAL
LOWER
DSP
SUSTAIN
NOTE:
When a song is playing, the notes and keyboard
displayed on the LCD indicate the melody and
chord position, the numbered musical notation
displayed on the LCD shows the last note played by
the RIGHT track, and it will be convenient for you to
practice .
The [R] and [L] function is invalidation in “Style Mode”
and “Voice Mode”.
17
Song
Lesson 1
L&R
CHORD
DICT.
1. Press [A.B.C./LESSON] button to enter LESSON 1, the
lesson 1 flag will be lightened on the LCD.
Evaluation is based on the accuracy of the time value,
and the accuracy of note playing will not be graded.
LESSON
DUAL
A.B.C.
2. Press [START/STOP] to begin.
TOUCH
LOWER
DSP
3. If [R] is selected; it will mute the melody of the right
hand position and you will have to follow the timing of
the right hand. As long as the timing is correct, the
melody will be sounded.
SUSTAIN
STYLE
START /
STOP
SYNC
INTRO /
ENDING
FILL
SONG
4. If [L] is selected ; it will mute the changing chord / melody
by the left hand. You will have to follow the timing of the
left hand. As long as the timing is correct, the chord /
melody will be sounded.
L&R
5. If [L] and [R] are both selected, the chord / melody on both
hands will be muted. You will have to follow the timing
of both the left and right hands, and the song will then
play accordingly.
6. Once the lesson is completed, the result of evaluation
will be announced.
CHORD
DICT.
LESSON
DUAL
A.B.C.
TOUCH
LOWER
DSP
SUSTAIN
Lesson 2
L&R
CHORD
DICT.
1. Press [LESSON] button again to enter LESSON 2, the
lesson 2 flag will be lightened on the LCD.
Evaluation is based on the accuracy of notes playing.
Accuracy of time value will not be considered as the
song could keep going only if the correct note is played.
LESSON
DUAL
A.B.C.
TOUCH
LOWER
DSP
2. Press [START/STOP ] button to begin.
3. If [R] is selected, only the left hand will be played
automatically until the first note on the right hand is
played. The song will not proceed until the correct
note is played.
4. If [L] is selected, only the right hand will be played.
The song will not proceed until the notes of the left
hand are played correctly.
5. If [L] and [R] are both selected, the song will proceed
only when the notes of both hands are played correctly.
6. Once the lesson is completed, the result of evaluation
will be announced.
18
SUSTAIN
STYLE
SONG
START /
STOP
SYNC
INTRO /
ENDING
FILL
Song
Lesson 3
L&R
CHORD
DICT.
1. Press [LESSON] button in LESSON 2 to enter
LESSON 3 .
In this mode, you can hear what you play whether the
notes are right or wrong, evaluation is based on the
correctiveness of both the time value and notes.
2. Press [START/STOP ] button to begin.
LESSON
DUAL
A.B.C.
TOUCH
LOWER
DSP
3. If [R] is selected, the melody on right hand will be
muted.
4. If [L] is selected, the chord / melody on left hand
will be muted.
5. If [L] and [R] are both selected, both the left and right
hands will be muted, only the accompaniment will be
sounded.
SUSTAIN
STYLE
START /
STOP
SYNC
INTRO /
ENDING
FILL
SONG
6. Once the lesson is completed, the result of evaluation
will be announced.
Grade Function
Lesson 1 / Lesson 2 / Lesson 3 all have the grading
function. There are five levels, including: TRY AGAIN,
OK , GOOD, VERY GOOD, EXCELLENT.
After a grade is given, the song will be played again
and retain lesson mode.
19
Demo
Demo
Enter Demo Mode:
Press and hold down [FUNCTION] button at first,
then press [2] button to enter the “Demo Mode” ,
LCD will display "DEMO" flag and its number.
The keyboard will be playing songs 082, 001, 063, 073,
012, 046, 004, 031, 025, 060 in a loop.
FUNCTION
2
3
4
5
6
7
8
9
0
NO
NOTE:
You can enter “Demo Mode” anytime by press the right
buttons.
1
A.B.C.
TOUCH
YES
DUAL
LOWER
DSP
Exit Demo Mode:
1. In “Demo Mode”,Press and hold down [FUNCTION]
button at first, then press [2] button to stop playing
and exit demo mode.
2. In “Demo Mode”,press [START/STOP] button to
stop playing and exit demo mode
NOTE:
In “Demo Mode”, keyboard was invalid.
20
SUSTAIN
Function Menu
Press [FUNCTION] key to enter the menu of function.
The default option of function menu is “TRANSPOSE”.
Everytime you enter the menu, it will return to the option
that you selected last time.
Repeatedly press [FUNCTION] key to select the option
you would like to set.
Use the [+/YES] / [-/NO] button to set the parameter.
The option and the parameters are indicated on the
right:
NOTE:
If there is no action 5 seconds after pressing the
[FUNCTION] key ,it will quit the function menu
automatically.
Press [YES] and [-NO] button together to set the
option value back to its default.
The reverb and chorus level will change with the
Option
LCD
Display
Range
Default
TRANSPOSE
xPS 00
-12 ~ 0 ~ 12
0
OCTAVE
OCt 00
-1 ~ 0 ~ 1
0
BEAT
bEt 04
0, 2 ~ 9
4
SPLIT POINT
SPt 19
1 ~ 61
19
MIDI RECEIVE
CHI ALL
01 ~ 16, ALL
ALL
MIDI TRANSMIT
CHo 01
01 ~ 16
01
TOUCH
TCH 02
1,2,3,OFF
2
TUNE
TUE 00
-50 ~ 50
0
REVERB LEVEL
REL XXX
0 ~ 127
045
CHORUS LEVEL
CHL XXX
0 ~ 127
0
PEDAL ASSIGN
SUStAn,SOFT,ST-SP
SUSTAIN,SOFT,START/STOP
SUSTAIN
automatically to the default level.
Transpose
Press [FUNCTION] button to enter the TRANSPOSE
sub-menu. The LCD displays the current transpose
value.
Use [+/YES] / [-/NO] to adjust the transpose value
from -12 to 12 semitones.
The default setting is 000.
FUNCTION
TOUCH
LOWER
DSP
SUSTAIN
0
YES
NO
Octave
DUAL
A.B.C.
FUNCTION
TOUCH
Press the [FUNCTION] button to enter the OCTAVE
sub-menu. The LCD displays the current octave value.
Use [+/YES] / [-/NO] to adjust the octave value
from -1 to 1 octaves.
The default setting is 000.
LOWER
DSP
SUSTAIN
0
YES
NO
Beat
Press the [FUNCTION] button to enter the BEAT
sub-menu.
The LCD displays the current beat value.
Use [+/YES] / [-/NO] to select the beat value.
The beat value includes: 0, 2-9, 9 types of value.
DUAL
A.B.C.
DUAL
A.B.C.
FUNCTION
TOUCH
LOWER
DSP
SUSTAIN
0
YES
NO
Split Point
Press the [FUNCTION] button to enter SPLIT POINT
sub-menu. The LCD displays the current split point
value.
Use [+/YES] / [-/NO] button to adjust the split point
value from 1 to 61. The keyboard can be also used to
change the split point.
The key of the split point is the part of the left area.
The default setting is 019.
DUAL
A.B.C.
FUNCTION
TOUCH
LOWER
DSP
SUSTAIN
0
NO
YES
21
Function Menu
MIDI IN
RECEIVE can be used to set the channel of MIDI IN.
Channel 1-16 can be selected by pressing [+/YES] /
[-/NO] button.
DUAL
A.B.C.
FUNCTION
TOUCH
LOWER
DSP
The default setting is ALL.
SUSTAIN
0
YES
NO
MIDI OUT
DUAL
A.B.C.
TRANSMIT can be used to set the channel of MIDI OUT.
Channel 1-16 can be selected by pressing [+/YES] /
[-/NO] button.
FUNCTION
TOUCH
LOWER
DSP
SUSTAIN
The default setting is 001.
0
YES
NO
Touch
Press [FUNCTION] button to enter the TOUCH sub-menu.
The LCD displays the current touch level.
DUAL
A.B.C.
FUNCTION
TOUCH
LOWER
Use [+/YES] / [-/NO] button to select touch level from off
to level 3. if the value is set as OFF, that means no touch
response to keyboard, and LCD darkens”TOUCH”flag.
DSP
SUSTAIN
0
Default level of touch response is 002.
YES
NO
Tune
Press [FUNCTION] button to enter the TUNE sub-menu.
The LCD displays the current tune value.
Use [+/YES] / [-/NO] button to adjust the tune value from
DUAL
A.B.C.
FUNCTION
TOUCH
LOWER
DSP
-50 to 50 (stand for -100 to 100 cents)
SUSTAIN
The default setting is 000.
0
NOTE:
YES
NO
This setting will be effective to both voice and style.
Reverb Level
Press [FUNCTION] button to enter the REVERB LEVEL
sub-menu.The LCD displays the current reverb level.
Use [+/YES] / [-/NO] button to adjust the level from 0 to
127, the default level is 045.
DUAL
A.B.C.
TOUCH
LOWER
FUNCTION
DSP
SUSTAIN
0
NO
22
YES
Function Menu
Chorus Level
DUAL
A.B.C.
Press [FUNCTION] button to enter the CHORUS LEVEL
sub-menu.The LCD displays the current chorus level.
FUNCTION
TOUCH
LOWER
DSP
SUSTAIN
Use [+/YES] / [-/NO] button to adjust the chorus level
from 0 to 127.
The default level is 000.
0
NO
YES
Pedal Assign
Press [FUNCTION] button to enter the PEDAL
ASSIGN sub-menu. The LCD displays the type of pedal.
Use [+/YES] /[-/NO] button to select the pedal type.
The pedal type includes: pedal sustain, pedal soft and
pedal start/stop.
DUAL
A.B.C.
FUNCTION
TOUCH
LOWER
DSP
SUSTAIN
0
The default type is pedal sustain.
Pedal Sustain
If pedal assign is set as “pedal sustain”, step on the
sustain pedal, all notes on the played on the keyboard
have a longer sustain.
NO
YES
Pedal Soft
If pedal assign is set as “pedal soft”, step on the soft
pedal, all notes on the played on the keyboard have a
soft effect.
Pedal Start/Stop
If pedal assign is set as “pedal start/stop”,the pedal
will have the same function as [START/STOP] button.
23
Chord Dictionary
Chord Dictionary is essentially a built-in “chord book”
showing you the individual notes of the chords.
It is ideal for you to learn the name of certain chords
and to learn how to play them instantly.
L&R
CHORD
DICT.
1. In song mode (when song is not playing),Press and
hold [CHORD DICT./R] button 2 seconds to enter the
DICT mode.
LESSON
The LCD shows “diCt”. In this mode, the keyboard
notes in the right area can be played to assign the
Chord Type and the Chord Root.
DUAL
A.B.C.
TOUCH
LOWER
DSP
SUSTAIN
2. For example, if we want to play a Cm7 Chord. Press
the C key in the section of the keyboard labeled Chord
DUAL
A.B.C.
Root. (The note does not sound).
The root note you set will be shown on the display.
TOUCH
LOWER
DSP
SUSTAIN
Press the m7 key in the section of the keyboard
which has labeled Chord Type (The note does not
sound).The notes you should play for the specified
chord (root note and chord type) are shown on the
display as the notation and also in the keyboard
diagram.
Chord name
(root and type)
DUAL
A.B.C.
TOUCH
3. When the Chord Type and Chord Root are confirmed,
the LCD will display the Chord and its keyboard
position. A bell sound will be heard if you play it
correctly.
LOWER
DSP
SUSTAIN
Individual notes
of chord(keyboard)
4. Press [CHORD DICT./R] button again to exit the Chord
Dictionary mode.
NOTE:
The notes you played in order to assign as the Chord
Type / Chord Root could not be heard.
If you play the chord correctly, you could hear the clap
sound.
If the chords are not be played correctly, a bass sound
would be heard.
The chord should be played below the split point(chord
area).
The Chord Type and Chord Root are indicated as the
follows:
Chord Root:
NOTE
Chord root
NOTE
C6
C
F#6
C#6
C#/Db
G6
D6
Eb6
D
Ab6
Eb/D#
A6
E6
C6
Bb6
F6
F
B6
Chord root
F#Gb
G
Ab/G#
A
Bb/A#
B
Chord type:
NOTE
NOTE
Chord type
7(b9)
M
C5
C#4
m(9)
C#5
7(9)
D4
6
D5
7(#9)
Eb4
7(b13)
mM7
Eb5
E4
M7
E5
7(13)
F4
m
F5
7(#11)
dim7
F#4
m(9)
F#5
G4
m6
G5
dim
Ab4
m7(9)
Ab5
7aug
A4
Bb4
B4
24
Chord type
C4
m7
A5
aug
m7b5
Bb5
7sus4
7
B5
sus4
Notation of chord
MIDI Function
What is MIDI
1. MIDI stands for "Musical Instrument Digital Interface",
that is the standard interface between a PC and other
electronic instrument(s).
2. USB connection can be used for midi data transference
with a computer or other USB host devices that support
USB audio devices.
3. The keyboard can only be connected to the PC.
4. Use the keyboard as a tone generator, the data (MIDI)
recorded on the PC can be played on the keyboard.
NOTE:
While a recorded data and a style are being played,
you can not use the MIDI IN function, or the song you
are playing will have an error occurs for the same
channel.
USB Connection
1. System Requirements
CPU: 300 MHz or higher, Pentium 2
Memory: 64MB or more
Driver: CDROM 24X
OS: WINDOWS 2000/XP
2. The Method of Connection
Connect a standard USB cable between the rear-panel
of the USB jack of this instrument and the USB jack
of your computer (USB cable will be sold separately).
3. USB Precautions
Please observe the following precautions while connecting the instrument with the a computer via a USB
cable.Failure to do, so can cause the instrument and/or
the computer to hang up(freeze), possibly causing
corruption or losing the data.
If the instrument or computer hangs up, turn the power
of both devices off and then turn it on again after a few
MIDI Application
1. PC recorded data (MIDI) can be played on the keyboard.
2. You need not to install the USB Driver for WINDOWS
2000/XP.
25
Specifications
LCD display
Keys
Multi-functional LCD
61 keys with Touch Response
Polyphony
32-note polyphony(max)
Voice
Style
Demo Song
300 Voices
100 Styles
100 Songs; 10 Demos
Control button
Master Volume, Tempo +/-, R / Accomp+/Chord Dict., A.B.C/Lesson,
Rec/Play, Metro, Voice, Style, Song, Fuction, Start/Stop, Sync,
Intro/Ending, Fill, Dual, Touch, Sustain, Dsp, Demo, O.T.S., +/YES, -/NO
Accompaniment Control
Start/Stop, Sync, Intro/Ending, Fill
Song Control
Start/Stop
Record Function
Record
Power Supply
Dimension
Weight
9V
AC Power, Headphones, Sustain, USB
4Ω 3w x 2
940(W)x356(D)x136(H)mm
3.75kg(without batteries)
Attachment
Music stand, Manual
Connectors
Speaker
26
, Pause
, Rew
, FF
Appendix 1- Voice List
NO.
NAME
PIANO
NO.
NAME
NO.
NAME
NO.
NAME
41
Dark Celesta
82
Tango Accordion
122
Slap Bass 2
83
Dark Tango Accordion
123
Slap Bass 3
124
Slap Bass 4
01
Acoustic Grand Piano
42
Celesta & Sine
02
Piano Dark
43
Reecho Bell
03
Octave Piano 1
44
Celesta & Music Box
84
Nylon Guitar
125
Synth Bass 1
04
Octave Piano 2
45
Glockenspiel
85
Chorus Nylon Guitar
126
Synth Bass 2
05
Piano & Choir
46
Glockenspiel & Sine
86
Stereo Nylon Guitar
127
Synth Bass 3
06
Grand Piano / W
47
Music Box
87
Steel Guitar
128
Synth Bass 4
07
Bright Piano 1
48
Vibraphone
88
12 String Guitar
08
Bright Piano
49
Vibraphone / W
89
Detuned Steel Guitar
129
Violin 1
09
Stereo Bright Piano
50
Vibraphone & Bell
90
Jazz Guitar
130
Violin 2
GUITAR
STRINGS
10
Detuned Piano
51
Vibraphone & Harpsichord 91
Clean Guitar
131
2 Violin
11
Chorus Piano
52
Marimba
92
Stereo Clean Guitar
132
Viola 1
12
Bright Piano 1 / W
53
Marimba
93
Soft Clean Guitar
133
Viola 2
13
Bright Piano 2 / W
54
Sine Marimba
94
Chord Clean Guitar
134
2 Viola
14
Piano & Vibraphone
55
Stereo Marimba
95
Muted Guitar
135
Cello 1
15
Electric Grand Piano
56
Marimba & Vibraphone
96
Stereo Muted Guitar
136
Cello 2
16
Electric Grand Piano / W 57
Wood Drum
97
Chord Muted Guitar
137
Contrabass 1
17
Honky-Tonk Piano
58
Xylophone
98
Overdrive Guitar
138
Contrabass 2
18
Honky-Tonk Dark
59
Tubular Bells 1
99
Distortion Guitar
139
Tremolo Strings 1
19
Honky-Tonk 1 / W
60
Tubular Bells 2
100
Guitar Harmonics
140
Tremolo Strings 2
20
Honky-Tonk 2 / W
61
Tubular Bells 3
141
Pizzicato Strings 1
21
E.Piano 1
62
Dulcimer
22
Stereo E.Piano 1
23
50’s E.Piano
24
BASS
101
Acoustic Bass 1
142
Pizzicato Strings 2
ORGAN
102
Acoustic Bass 2
143
Orchestral Harp 1
63
Drawbar Organ
103
Acoustic Bass Detuned
144
Orchestral Harp 2
E.Piano 1 / W
64
Drawbar Organ Stereo
104
Velocity Crossfade Bass
145
Stereo Harp
25
E.Piano 2 / W
65
Soft Stereo Drawbar Organ
105
Jazz Style
146
Timpani 1
26
E.Piano 3 / W
66
Mellow Drawbar Organ
106
A.Bass & Mute G.T.
147
Timpani 2
27
E.Piano 4 / W
67
Bright Drawbar Organ
107
Finger Bass 1
28
E.Piano 2
68
Percussive Organ
108
Finger Bass 2
148
Strings Ensemble 1
29
Detuned E.P. 1
69
Percussive Organ Detuned
109
Dark Finger Bass
149
Strings Ensemble 2
110
Detuned Finger Bass
150
Stereo Strings 1
STRINGS ENSEMBLE
30
Detuned E.P. 2
70
Rock Organ
31
Harpsichord
71
Church Organ
111
Velocity Bass
151
Stereo Strings 2
32
Harpsichord / W
72
Detuned Church Organ
112
Bass & Distortion Guitar
152
Synth Strings 1
33
Harpsichord Octave 1
73
Octave Church Organ 1
113
Pick Bass 1
153
Synth Strings 2
34
Harpsichord Octave 2
74
Octave Church Organ 2
114
Pick Bass 2
154
Synth Strings 3
35
Harpsichord Off
75
Reed Organ
115
Mute Pick Bass
155
Stereo Synth Strings 1
36
Clavichord
76
Stereo Reed Organ
116
Pick & Finger Bass
156
Stereo Synth Strings 2
37
Stereo Clavic
77
Accordion 1
117
Pick Bass & Clean Guitar
157
Choir Aahs
38
Clavichord / W
78
Accordion 2
118
Detuned Pick Bass
158
Dark Aahs
39
Clavichord Wah
79
Stereo Accordion
119
Fretless Bass 1
159
Stereo Aahs 1
80
Harmonica
120
Fretless Bass 2
160
Stereo Aahs 2
121
Slap Bass 1
161
Mellow Choir Aahs
MALLET
40
Celesta
81
Dark Harmonica
27
Appendix 1- Voice List
NO.
NAME
NO.
NAME
NO.
NAME
NO.
NAME
162
Aahs & SynStr
202
English Horn 2
242
Voice Lead 2
280
Tinkle Bell
163
Big Aahs
203
Bassoon 1
243
Fifths Lead
281
Agogo
164
Voice Ooh
204
Bassoon 2
244
Bass & Lead 1
282
Steel Drums
165
Synth Voice 1
205
Clarinet 1
245
Bass & Lead 2
283
Bass Drum
166
Synth Voice 2
206
Clarinet 2
284
Wood Block
167
Stereo Synth Voice
246
New Age Pad 1
285
Snare
PIPE
PAD
168
Orchestra Hit
207
Piccolo
247
New Age Pad 2
286
Taiko Drum
169
Orchestra Hit Stereo
208
Flute 1
248
Warm Pad 1
287
Melodic Tom
170
Orchestra Hit Octave
209
Flute 2
249
Warm Pad 2
288
Synth Drum
BRASS
210
Recorder 1
250
Poly Synth Pad 1
289
Reverse Cymbal
290
Chinkle
171
Trumpet 1
211
Recorder 2
251
Poly Synth Pad 2
172
Trumpet 2
212
Pan Flute 1
252
Choir Pad 1
173
Dark Trumpet
213
Pan Flute 2
253
Choir Pad 2
291
Synth 1
174
Wah Trumpet
214
Blown Bottle 1
254
Bowed Pad 1
292
Synth 2
175
Trombone 1
215
Blown Bottle 2
255
Bowed Pad 2
293
Synth 3
176
Trombone 2
216
Shakuhachi 1
256
Metallic Pad
294
Synth 4
177
Tuba 1
217
Shakuhachi 2
257
Halo Pad
295
Synth 5
178
Tuba 2
218
Whistle 1
258
Sweep Pad
296
Synth 6
179
Muted Trumpet 1
219
Whistle 2
297
Synth 7
180
Muted Trumpet 2
220
Ocarina 1
259
Rain
221
Ocarina 2
260
Soundtrack
298
Standard Drum Set
261
Crystal
299
Rock Drum Set
300
Electronic Drum Set
EFFECT
DRUM SET
181
Horn 1
182
Horn 2
183
5th Horn Orchestra
222
Square Lead 1
262
Atmosphere
184
Brass Ensemble
223
Square Lead 2
263
Brightness
185
Synth Brass 1
224
Square Lead 3
264
Goblins
186
Synth Brass 2
225
Lead Sine
265
Echoes
187
Synth Brass 3
226
Slow Square Lead
266
Sci-Fi
188
Synth Brass 4
227
Thick Square
189
Synth Brass 5
228
Quint
267
Sitar
190
Octave Synth Brass
229
Sine Solo
268
Detuned Sitar
REED
230
Sawtooth Lead 1
269
Banjo 1
LEAD
ETHNIC
191
Soprano Sax 1
231
Sawtooth Lead 2
270
Banjo 2
192
Soprano Sax 2
232
Stereo Sawtooth 1
271
Shamisen 1
193
Alto Sax 1
233
Stereo Sawtooth 2
272
Shamisen 2
194
Alto Sax 2
234
5th Sawtooth
273
Koto 1
195
Tenor Sax 1
235
Calliope Lead 1
274
Koto 2
196
Tenor Sax 2
236
Calliope Lead 2
275
Kalimba 1
197
Baritone Sax 1
237
Chiff Lead 1
276
Kalimba 2
198
Baritone Sax 2
238
Chiff Lead 2
277
Bagpipe
199
Oboe
239
Charang Lead 1
278
Fiddle
279
Shania
200
Sweet Oboe
240
Charang Lead 2
201
English Horn 1
241
Voice Lead 1
28
SYNTH
PERCUSSIVE
Appendix 2- Style List
NO.
NAME
BEAT & POP
NO.
NAME
NO.
NAME
NO.
NAME
27
Rock Shuffle
52
Swing Fox
78
Jazz Samba
28
Charlston
53
Big Band
79
Reggae
54
Big Band Meduim
80
Pop Reggae
01
8 Beat 1
02
8 Beat 2
03
8 Beat 3
29
Disco 1
55
Jazz Waltz
04
8 Beat 4
30
Disco 2
56
Ragtime
81
March 1
05
60’
s 8 Beat
31
Disco Funk
57
Dixeland
82
March 2
06
8 Beat Ballad
32
Dance
58
Quick Step
83
German Marc h
07
8 Beat Rock
33
House 1
84
6/8 March
08
16 Beat 1
34
House 2
59
Country 1
85
Polka
09
16 Beat 2
35
Rap
60
Country 2
86
Pop Polka
10
16 Beat Pop
36
Euro Beat
61
Pop Country
87
Waltz
11
16 Beat Shuffle
37
Hip Hop
62
Country Rock
88
Slow Waltz
12
Ballad
38
Techno
63
Country Folk
89
Vienna Waltz
13
Slow Ballad
SOUL & FUNK
64
3/4 Country
90
Musette
14
16 Beat Ballad
39
Funky Pop
65
Country Waltz
15
Unplugged
40
Jazz Funk
66
Country Shuffle
91
8 Beat
41
Cool Funky
67
Country Boogie
92
Ballad
ROCK
DANCE
COUNTRY
TRADITIONAL
PIANO
16
Rock
42
Soul 1
68
Country Blues
93
Boogie
17
Pop Rock
43
Soul 2
69
Country Quick Step
94
Jazz
18
Fast Rock
44
Soul Shuffle
70
Bluegrass
95
Swing
19
Slow Rock 1
45
Soul Blues
96
Jazz Waltz
20
Slow Rock 2
46
R&B
71
Bossa Nova 1
97
Twist
21
Rock & Roll
47
6/8 Gospel
72
Bossa Nova 2
98
March
22
Heavy Metal
48
Pop Groove
73
Rhumba
99
6/8 March
23
Blues Boogie
100
Waltz
JAZZ
LATIN
74
Pop Rhumba
75
Cha Cha
24
Blues
49
Swing
25
Shuffle
50
Cool Jazz
76
Pop Cha Cha
26
Blues Shuffle
51
Pop Swing
77
Tango
Appendix 3- Demo List
NO.
NAME
01
Samba
02
Cannon
03
When Johnny Comes Marching Home
04
Butterfly
05
Toy Symphony
06
In The Rain
07
Minuet
08
The Old Gray Mare
09
Turkey In The Straw
10
Cielito Lindo
29
Appendix 4- Song List
NO.
NAME
CLASSIC
NO.
NAME
NO.
NAME
NO.
NAME
26
Deck The Halls
52
When The Saints Go Marching In
78
La Cucaracha
Grandfather’s Clock
53
Twinkle Twinkle Little Star
79
Home Sweet Home
80
Up On The House Top
01
Cannon
02
Thais Meditation
28
America The Beautiful
54
Happy Birthday To You
03
Old France
29
The Sideway
55
Little Brown Jug
04
Minuet
30
The Entertainer
56
Michael Row The Boat Ashore
81
Kuerchake Dance
05
Ode To Joy
31
The Old Gray Mare
57
Old King Cole
82
Samba
06
Wiegenlied
32
Aloha Oe
58
Jamaica Farewell
83
Tango Of Cuba
07
The “Surprise” Symphony
33
Solveig’s Song
59
Τройк а
84
Russian
8
Swan Lake
34
Camptown Races
60
Cielito Lindo
85
9
Spring From “The Four Seasons”
35
Carry Me Back To Old Viginia
61
If You’re Happy And You Know It,
Clap Your Hands
10
Habanera From “Carmen”
36
The Blue-Bells Of Scotland
62
American Patrol
86
Four Little Swans
11
Joy To The World
37
O Sole Mio
63
When Johnny Comes Marching
Home
87
Did You Ever See a Lassie
12
Toy Symphony
38
Jingle Bells
64
Green Sleeves
88
Spring
13
Humoreske
39
Battle Hymne Of The Republic
65
Santa Lucia
89
Impromptu
40
Silent Night
66
Szla Dzieweczka
90
Gavotte
91
Nocturne
Pizzicato Polka
27
Kuckuckswalze
14
FOLK
FAVORITE
BALLROOM
KID’S SONG
Polka
PIANO & KEYBOARD
Огонек
67
Angels We Have Heard On High
92
42
Aula Lee
68
Skip To My Lou
93
Musical Moments
43
House Of The Rising Sun
69
London Bridge Is Falling Down
94
Reggae
44
Danny Boy
70
Humpty Dumpty
95
All Kind Of My Everything
45
I’ve Been Working On The Railroad
71
Home On The Range
96
Valse No.6 “Petit Chien”
46
In The Rain
72
This Old Man
97
Rondeau
From The New World
47
She Wore A Yellow Ribbon
73
Butterfly
98
Chrysanf
22
The Yellow Rose Of Texas
48
My Bonnie
74
Ten Little Indians
99
Invention a 2 Voix
23
Ave Maria
49
Yankee Doodle
75
Polly-Wolly- Doodle
100
Jesus, Saviour Pilot Me
24
My Old Kentucky Home
50
Red River Valley
76
Santa Claus Is Coming To Town
25
Turkey In The Straw
51
Auld Lang Syne
77
Sippin ’Cider Through A Straw
15
Long, Long Ago
41
16
Old Folks At Home
17
Oh! Susanna
18
Jeannie With The Light Brown Hair
19
Bill Bailey Won’t You Come Home
20
Annie Laurie
21
Appendix 5- Chord List
NO. Chord Name / [Abbreviation]
Normal Voicing
Chord (C) Display
NO.
Chord Name / [Abbreviation]
Normal Voicing
Chord (C) Display
0
Major [M]
1-3-5
C
C
16
Minor major ninth [mM9]
1-2-b3-(5)-7
CmM9
CmM7(9)
01
Major sixth [6]
1-(3)-5-6
C6
C6
17
Diminished [dim]
1-b3-b5
Cdim
C
Cdim
C
02
Major seventh [M7]
1-3-(5)-7
CM7
CM7
18
Diminished seventh [dim7]
1-b3-b5-6
Cdim7
Cdim7
03
Major seventh sharp eleventh
[M7#11]
1-(2)-3-#4-(5)-7
CM7#11
CM7#11 19
Seventh [7]
1-3-(5)-b7
C7
C7
04
Major add ninth [Madd9]
1-2-3-5
Cmadd9
CM(9)
20
Seventh suspended fourth [7sus4] 1-4-5-b7
C7sus4
C7sus4
05
Major ninth [M9]
1-2-3-(5)-7
CM9
CM7(9)
21
Seventh flatted fifth [7b5]
1-3-b5-b7
C7b5
C7b5
06
Major sixth add ninth [6 9]
1-2-3-(5)-6
C6 9
C6(9)
22
Seventh ninth [7 9]
1-2-3-(5)-b7
07
Augmented [aug]
1-3-#5
Caug
Caug
23
Seventh sharp evelenth [7#11]
08
Minor [m]
1-b3-5
Cm
Cm
24
Seventh thirteenth [7 13]
09
Minor sixth [m6]
1-b3-5-6
Cm6
Cm6
25
Seventh flatted ninth [7b9]
C7 9
1-2-3-#4-(5)-b7
or 1-(2)-3-#4-5-b7 C7#11
1- 3-(5)-6-b7 or
C7 13
2- 3-5-6-b7
1-b2-3-(5)-b7
C7b9
10
Minor seventh [m7]
1-b3-(5)-b7
Cm7
Cm7
26
Seventh flatted thirteenth [7b13]
1-3-5-b6-b7
C7b13
C7b13
11
Minor seventh flatted fifth[m7b5] 1-b3-b5-b7
Cm7b5
Cm7b5
27
Seventh sharp ninth [7#9]
(1)-#2-3-(5)-b7
C7#9
C7#9
12
Minor add ninth [madd9]
1-2-b3-5
Cmadd9
Cm(9)
28
Major seventh augmented [M7aug] 1-3-#5-7
13
Minor ninth [m9]
1-2-b3-(5)-b7
Cm9
Cm7(9)
29
Seventh augmented [7aug]
(1)-3-#5-b7
C7aug
C7aug
14
Minor eleventh [m11]
1-(2)-b3-4-5-(b7)
Cm11
Cm7(11) 30
Suspended fourth [sus4]
1-4-5
Csus4
Csus4
15
Minor major ninth [mM7]
1-b3-(5)-7
CmM7
CmM7
One plus two plus five [1+2+5]
1-2-5
C1+2+5
C
30
31
C7 9
C7#11
C7 13
C7b9
CM7aug CM7aug
Appendix 6- MIDI List
Transmitted
Recognized
Remarks
1ch
ALL
Default
1-16ch
1-16ch
Changed
3
Default
X
Mode
Messages
X
3
***********
Altered
X
0-127
0...127
Note
***********
0...127
Number
True voice
Velocity :
Note on
O 9nH,V=1-127
O 9nH,V=1-127
Note off
X (9nH,V=0)
X (9nH,V=0; 8nH,V=0-127
After
X
X
Keys
Touch
Chs
X
X
Pitch Bend
O
O
Control
0
O
O
Bank Select
Change
1
X
O
Modulation
O
5
X
Portamento Time
6
O
O
Data Entry
7
O
O
Volume
10
X
O
Pan
11
X
O
Expression
64
O
O
Sustain Pedal
65
X
O
Portamento ON/OFF
66
X
O
Sostenuto Pedal
67
0
O
Soft Pedal
80
0
O
Reverb Program
81
0
O
Chorus Program
91
0
O
Reverb Level
93
0
O
Chorus Level
120
X
O
All Sound Off
121
X
O
Reset All Controllers
123
0
O
All Notes Off
Program
O
O
***********
0...127
Change :
true #
System Exclusive
X
O
System
:Song Position
X
X
Common :Song Select
X
X
: Tune
X
X
System
:Clock
X
X
Real Time :Commands
X
*1
X
*1
Aux
:LOCAL ON/OFF
X
X
:All Notes Off
0
O
Messages :Active sense
X
O
:Reset
X
O
*1
Note:
When the accompaniment is started, an FAH message is transmitted.
When accompaniment is stoped, an FCH message is transmitted.
When an FAH message is received, accompaniment is started.
When an FCH message is received, accompaniment is stoped.
Function
Basic
Channel
Mode 1: OMNI ON , POLY
Mode 3: OMNI OFF , POLY
Mode 2 : OMNI ON , MONO
Mode 4 : OMNI OFF , MONO
O
X
: YES
: NO
31
M5_G06