1
nstruction Manual
HEAVY
DUTY
HEDGE
TRIMMER
Models 900.79951,
900.79952,
900.79974
& 900.79975
900°79973,
&CAUTION:
,, Safety
Before using this product,
read this manual and follow
,, Operation
® Maintenance
all its Safety Rules and
Operating Instructions.
Sears,
Roebuck
EspaSol
and Co., Hoffrnan
Estates,
IL 60179
USA
www.sears.com/craftsman
Form No.628275-00
Nov. '04
Printed in Mexico
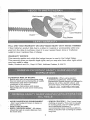
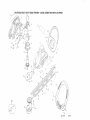
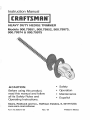
!
Lock
Bail
Trigger
Cord Retainer
Plug Blades
FULL ONE YEAR WARRANTY
ON CRAFTSh_iAN
HEAVY
DUTY HEDGE
TRIMMER
If this Craftsman product fails due to a defect in material or workmanship within one
year from the date of purchase, return it to your nearest Sears store or Craftsman
outlet to have it replaced
free of charge.
WARRANTY
SERVICE
This warranty
This warranty
applies only while this hedge trimmer is used in the United States.
gives you specific legal rights, and you may also have other rights which
vary from state to state.
Sears, Roebuck and Co., Dept. 817WA,
Hoffman
Estates,
IL 60179
TO REDUCE RiSK OF iNJURY:
o Before any use, be sure everyone using
this tool reads and understands all safety
instructions and other information
contained in this manual.
. Save these instructions and review
frequently prior to use and in instructing
others.
&WARNING:
When using electric
gardening appliances, basic safety
precautions should always be followed to
reduce risk of fire, electric shock, and
personal injury, including the following:
" AVOID DANGEROUS
ENVIRONMENT
- Don't use hedge trimmers in damp or
wet locations.
o DON'T USE iN RAIN.
o KEEP CHnLDREN AWAY - All visitors
should be kept at a safe distance from
the work area.
o DRESS PROPERLY - Don't wear loose
clothing or jewelry. They can be caught
in moving parts. Use of rubber gloves
and substantial footwear is
recommended when working outdoors.
Wear protective hair covering to contain
long hair.
READ ALL _NSTRUOTDONS.
° USE
SAFE_GLASSES
-Alsouseface
ordustmask
ifoperation
isdusty.
° GROUND FAUL] ° CIRCUIT
INTIRRUPTER
(GFCI} protection
should be provided on the circuit(s) or
outlet(s) to be used for the hedge
trimmer. Receptacles are available
having builbin GFCI protection and may
be used for lhis measure of safety.
o USE RIGHT APPLIANCE
- Do not use
appliance for any job excepl that for
which it is intended.
AW'ARNING:
To reduce the risk of electric
shock use only with an extension cord
intended for outdoor use, such as SW-A,
SOW-A, S] W-A, STOW-A, SJW-A,
S JOT-A, SJTW-A or SJTOW-A.
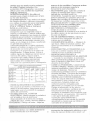
o E.XTENStON CORD. Make sure your
extension cord is in good condition.
When using an extension cord be sure it
is heavy enough [o carry the current your
product will draw. An undersized
extension cord will cause a drop in line
voltage resulting in loss of power and
overheating. The following table shows
the correct size to use depending on
cord length and nameplate ampere
rating. If in doubt, use the next heavier
gage. The smaller the gage number, l_e
heavier the cord.
£_li_i_um
Gage for Bx_er_sion Cords
VAC Tools
Tetal Cord Length
Amp Ralng
More than 0
Not More than 6
More than 6
Not More than 10
More than 10
Not more lhan 12
More than 12
Not more than 16
(AWG) t20
0-25 I 26-50
AWGJ AWG
L1 -
6
18
16
A DANGER= Risk of cut. Keep hands away
from blades. Keep both hands on
handles when power is on.
o DO NOT A_TEB_iPT to remove cut
malerial or hold material to be cut when
blades are moving. Make sure trimmer
switch is ol when clearing jammed
material from blades. De not grasp the
exposed cutting blades or cutting edges
when picking up or holding the hedge
trimmer.
ACAUTtON:
Blades coast after turn off,
o DON'T fORCE IIEE)I(_E -R_II_IB;_BR - It
will do the job better and with less
likelihood of a risk of injury sJ:the rate for
which iI was designed.
o ©Ot,4'T OVERREAOIol
Keep proper
footing and balance at all times.
- S°i°_:_{ALERt - Watch what you are
doing. Use common sense. Do not
operate hedge trimmer when you are
tired.
° @ISOOI',!{_IECT H!?.©GE TRII:_4B_HR from
the power supply when nol in use or
when servicing or cleaning.
o STOIIE IbLE IIE-DGB TRII_IMER
IBDOOIIS - When not in use, hedge
trimmer should be stored indoors in a dr)/
and high or locked-up place-- out of reach
ol children.
° MAIN IAIN HEDLIB¢RIWII;*}ER W!TII
Ct-_.RI - Keep CL.!tirig blades sharp and
clean for' bes! performance and to reduce
the risk of injury. Inspect extensior_ cord
periodically and replace if damag{:_d.
Keep handles dry, clean and free from oit
and grease.
• CHECK ©AB91AGE[t>R_,RTS - before
further use of the hedge trimmer, a guard
or other parl that is damaged should be
carefully checked to determine that it will
operate properly and perform its
intended function. Check for alignment ol
moving parts, binding of moving paris,
breakage of parts, mounting and any
olher condition that may affect its
operation. A guard or other pa!t that is
damaged should be properly repaired or
replaced by an authorized sen/ice cenier
unless otherwise indicated elsewhere in
this manual.
14
}
t2
_
Not
Recommended
o AVOI© UNIN]°ENTtONAL
STARTING Don't carry plugged in hedge trimmer
with finger on switch. Be sure switciq is
off when plugging in.
° ©ON'T ABUSE CORD - Never carry
hedge trimmer by cord or yank it to
disconnect from receptacle. Keep cord
from heat, oil, and sharp edges.
Double insulated tools are constructed
throughout with two separate layers of
electrical insulation or one double
thickness of insulation between you and
the tool's electrical system. fools built
with this insulation system are not
intended to be grounded. As a result,
your tool is equipped with a two prong
plug which permits you to use extension
cords without concern for maintaining a
ground connection.
NOTrE: Double insulation does not take
theplace
ofnormal
safety
precautions
when
operating
thistool.Theinsulation
system
isforadded
protection
against
injury
resulting
fromapossible
electrical
insulation
failure
within
thetool.
Replacement
parts:
When
servicing
all
tools,
USEIDENTICAL
REPLACEMENT
PARTS.
Repair
orreplace
damaged
cords.
Toreduce
theriskofelectric
shock,
this
equipment
hasapolarized
plug(one
blade
iswider
thantheother).
This
equipment
must
beused
withasuitable
polarized
2wireor3wireextension
cord.
Polarized
connections
willfittogether
onlyoneway.Make
surethatthe
receptacle
endoftheextension
cordhas
large
andsmall
blade
slotwidths.
Ifthe
plugdoes
notfitfullyintotheextension
cord,reverse
theplug.
Ifitstilldoes
not
fit,obtain
asuitable
extension
cord.Ifthe
extension
corddoes
notfitfullyintothe
outlet,
contact
aqualified
electrician
to
install
theproper
outlet.
Donotchange
thetoolplugorextension
cordinany
way.
Health
riskfromthese
chemical
_WARNING:
Some
dustcreated
varies,depending
onthe
whenusing
lawnandgarden
power
tools exposures
environment
inwhich
y
ou
areworking
contains
chemicals
known
tocause
andhowoftenyoudothistypeorwork.
cancer,
birthdefects
andother
Toreduce
yourexposure
tofl_ese
reproductive
harm.
chemicals
follow
product
label
instructions
toapply
c
hemicals
suchas
Some
examples
ofthese
chemicals
are: fertilizers,
insecticides,
herbicides
or
ocrystalline
silica
fromsand,
bricks
and pesticides.
When
using
these
tools,
wear
other
masonry
dust
equipment
suchasgloves
and
•arsenic
andchromium
fromchemicallysafety
dustmasks
which
areespecially
treated
lumber
(CCA)
designed
tofilteroutmicroscopic
ocompounds
infertilizers
particles.
ocompounds
ininsecticides,
herbicides
andpesticides
SAVE THESE nNSTRUOT_ONS
FOR FUTURE USE
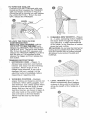
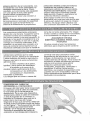
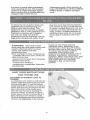
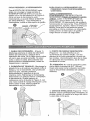
ATI°ACHING EXTENSION CORD TO
TRJM_,IER
An extension cord retainer is built into the
switch handle that prevents the tool from
coming unplugged. To use this feature,
simply double the extension cord about 8
inches from the end, and insert it into the
slot in the bottom of the handle area.
Hook the loop formed by doubling the
cord over the tab, as shown in Figure 1.
Gently tug on the cord to insure that it is
firmly retained in the trimmer's handle.
Plug the receptacle end of the extension
cord into the plug blades in the trimmer.
TO TURN THE TOOL ON
Pull the LOCK BUTTON back with your
thumb and then squeeze the TRIGGER
with your fingers as shown in Figure 2.
(Once the tool is running you can release
the LOCK BUTTON.)
To turn the tool
OFF, release the TRIGGER.
3
TO LOCK THE TOOL ON FOR
CONTINUOUS
RUN
WITH THE TOOL RUNNING
pull the
LOCK BUTTON ALL THE WAY back,
release the TRIGGER, then release the
LOCK BUTTON. The tool is now locked
ON. To turn the tool OFF, squeeze and
release the TRIGGER. NOTE: In order to
lock the tool on, it is important to first
release the trigger and then release the
lock button.
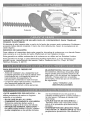
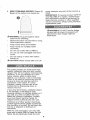
TRI#,_[VlING NEW GROWTH - (Figure
4) -A wide, sweeping motion, feeding
the blade teeth through the twigs is
most effective. A slight downward tilt
of the blade, in the direction of motion
ives the best cutting.
CAUTION: Do not use the trimmer for
cutting stems greater than 3/4" (10ram).
Use the trimmer only for cutting normal
shrubbery found around houses and
buildings.
TRIMMING
INSTRUCTIONS
1 EXTENSION
CORD = (Figure 1)
Always keep extension cord behind
trimmer and away from the trimming
operation. Never drape it over a
hedge being trimmed. If you cut or
damage the cord, unplug it at the
electrical outlet immediately, before
inspecting or repairing cord.
WORKING
POSmON
- Maintain
proper footing and balance and do not
overreach. Wear safety goggles, nonskid footwear and rubber gloves when
trimming. Hold the tool firmly in both
hands and turn the tool ON. Always
hold the trimmer, as shown in figure 3,
with one hand on the switch handle
and one hand on the bail handle.
Never hold the tool by the blade
guard.
4.
LEVEL HEDGES (Figure 5) - To
obtain exceptionally
level hedges,
a piece of string can be stretched
along the length of the hedge as a
guide.
5. SIDE-TRIMMING HEDGES (Figure 6)
Begin at the bottom and sweep up.
@
never immerse any part of the tool into a
liquid.
IMPORTANT: To assure product SAFETY
and RELIABILITY, repairs, maintenance
and adjustment should be performed by
Sears service centers or other qualified
service personnel, always using identical
replacement parts.
i_i I i__i/i_/,!_ i_ _i_i '
AWARNING:
To guard against injury
observe the following:
Read instruction manual before using,
Save instruction manual.
Keep hands away from blades.
Keep hands on handles
overreach.
Don't
Do not use under we_ _u,lditions.
Do not use with damaged
cords.
extension
Do not unplug or store with switch
locked on.
ACAUTION:
Blade coasts after turn off.
The cutting blades are made from high
quality, hardened steel and with normal
usage, they will not require resharpening.
However, if you accidentally hit a wire
fence, stones, glass or other hard
objects, you may put a nick in the blade.
There is no need to remove this nick as
long as it does not interfere with the
movement of the blade. If it does
interfere, unplug unit and use a fine
toothed file or sharpening stone to
remove the nick.
If you drop the trimmer, carefully inspect
it for damage. If the blade is bent,
housing cracked, or handles broken or if
you see any other condition that may
affect the trimmer's operation, contact
your local Sears Service Center for
repairs before putting it back into use.
Fertilizers and other garden chemicals
contain agents which greatly accelerate
the corrosion of metals. Do not store the
tool on or adjacent to fertilizers or
chemicals.
With the unit unplugged, use only mild
soap and a damp cloth to clean the tool.
Never let any liquid get inside the tool;
_WARNING"
DO NOT use the hedge
trimmer with any type of accessory or
attachment. Such usage might be
hazardous.
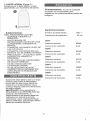
CRAFTSMAN
HEAVY
I
DUTY
HEDGE
TRIMMER
-
MODEL
NUMBER
The
Model Number
Number in
will
found on the Nameplate.
the Model
all be
correspondence
regarding
SEE BACK
PAGE FOR PARTS
ORDERING
900.799518,
Always
your
tool. mention
900.799520
I
I
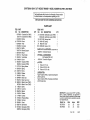
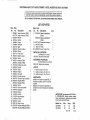
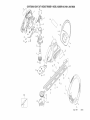
iNSTRUCTiONS
PARTS LIST
ITEM
NO.
1
iTEM
PART
NO.
607666-01
603177-00
2
394262-00
{3
4
330019-04
394488-01
5
394486-00
6
7
8
394471-00
380973-00
387542-00
9
10
381817-01
394261-01
_11
12
158495-00
394260-01
13
394260-00
157315-00
14
394263-00
{15
16
330019-09
148902-00
17
18
19
394265-01
394469-00
394474-00
20
605942-03
397295-04
21
22
98022-20
148641-00
23
24
394476-00
133952-00
25
26
27
87486-00
151625-00
137646-OO
28
29
394058-01
395871-00
30
627482-00
628279-00
DESCRiPTiON
QTY
ClamshelISet
1
Set (79952)
1
NO.
NO.
DESCRiPTiON
QTY
31
627638-00
628280-00
Identification
Identification
1
16
1
32
33
34
603179-00
148814-00
98022-16
Warning
Bearing
Screw
Label
Armature
Baffle
1
1
800
429698-00
Grease
(4 lb.)
Bearing Support
Brush
Brush Holder
1
2
2
Clamshell
(79951)
PART
Spring
Screw
Field
PARTS
NOT
628275-00
OPTmONAL
1
Screw
4
605510-00
1
1
NOTES:
Spring
(79951)
(79952)
Washer
1
Spring
Screw
1
2
Washer
Switch
1
1
Gear Case
Gear Case Cover
1
1
Blade
& Gear (79951)
1
Blade & Gear (79952)
Screw
Lock Nut
1
2
6
Spacer
Washer
Contact
6
1
1
Polarized
Terminal
Guard
Blade
Bail Handle
1
2
1
1
Nameplate
(79951)
1
Nameplate
(79952)
1
iLLUSTRATED:
Instruction
1
1
1
1
4
1
(SuppliedwithUnit)
Manual
1
ACCESSORIES:
(Not Supplied With Unit)
Lock Button
Actuator
Actuator
Label (79951)
Label (79952)
Connection
Diagram
3
Torque
to 12 in. Ibs.
11
15
Torque
Torque
to 20-24
to 16-20
LUBRiCATiON:
Apply 4-5 grams
in. Ibs.
in. Ibs.
of BDL 2.0 grease
around gear &
pinion in gear box.
Apply 2-3 grams of BDL 2.0 grease around
and drive gear area.
blade
iMPORTANT! To assure product SAFETY and RELIABILTY, all repairs, maintenance, and adjustments to
Sears products should be performed by Sears company-owned or authorized service organizations using tactory replacement parts,
Model
No.
900.799510
900.799520
Volts
120
I20
Arnps
2.8
2.8
Engr:
RWA
SPM
3100
3100
10/04TS
CRAFTSMAN HEAVY DUTY HEDGE TRgMMER - MODEL NUMBER 900.799510, 900.799520
7
80O
Engr:
RWA
10/04TS
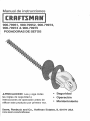
Manual de instrucciones
900.79951, 900°79952, 900°79973,
900.79974 & 900.79975
PODAOORAS DE SETO$
APRECAUCiON:
Lea y siga todas
las reglas de seguridad e
instrucciones de operaci6n antes de
utilizar este producto por primera vez.
Sears,
Roebuck
and Co., Hoffrnan
www.sears.com/craftsman
o Seguridad
o Operaci6n
o Mantenimiento
Estates,
RL60179 USA
Bot6n
Asa
guridad
Retenedordel
cable de
extensi6n
Protector
as de
GARANTJA OOMPLETA DE UN A[?_OPARA EL CORTAOEROO PARA TRABAJO
PESADO CRAFTSMAN.
Si durante el afro transcurrido a partir de la fecha de compra este cortacerco Craftsman
presenta fallas debido material o mano de obra defectuosa, Sears la reemplazar& sin
costo alguno.
SERVm010 DE GARANTJA
Para obtener el reemplazo bajo esta garantia, devuelva el cortacerco a su tienda Sears
m&s cercana o a un punto de venta Craftsman en los Estados Unidos.
Esta garantia es v_lida solamente si el cortacerco se utiliza en los Estados Unidos.
Esta garantia le otorga a usted derechos legales especificos y otros derechos que
pueden variar dependiendo del estado. Sears, Roebuck and Co., Dept. 817WA,
Hoffman Estates, IL 60179
PARA REDUC[R EL R[ESGO DE
LESnONES:
. Antes de cualquier uso, asegBrese que
cualquier persona que vaya a utilizar esta
herramienta lea y comprenda todas las
instrucciones de seguridad y la
informaci6ncontenida en este manual.
o Conserve estas instrucciones y rep&selas
con frecuencia antes de usar la
herramienta e instruir a otras personas.
_ADVERTENOJA; Siempre que utilice
herramientas el6ctricas de jardina debe
seguir ciertas precauciones b&sicas de
seguridad, a fin de reducir los riesgos de
incendio, choque electrico y lesiones
personales, entre las que se encuentran
las siguientes.
LEA 7ODAS LAS
INSTRUOOIONES
°EVITE AMBIENTES PELIGROSOS -- No
utilice podadoras de setos en lugares
mojados o inundados.
• NO SE USE BAJO LA LLUV[A.
° OONSERVE ALEJADOS A LOS NINOS.
Todos los visitantes deben estar a
distancia segura de la zona de trabajo.
" VISTASE DE MANERA ADEOUADA
No utilice ropas sueltas ni joyas, pueden
quedar atrapadas en las partes mSviles.
Se recomienda el uso de guantes y
calzado antiderrapante cuando trabaje a
la intemperie. CQbrase el cabello si Io
tiene largo.
. UTILIOE GAFAS DE SEGURIDAD -Tambien utilice una mascarilta contra
polvo si la operaci6n que efectuara Io
produce
• INTERRUPTOR DE CIRCUmTOPARA
FALLAS EN LA TIERRA (GFO[) Se debe
proporcionar protecci6n a los circuitos o
2
manos de las cuchillas. Consen/e
manos en los mangos cuando la
herramienta
esl;5 encendida.
clavijas que se usarb.n con ta podadora
de setos. Existen contactos con
p_otecci6n GFC! int,sgrada y se pueden
utilzar para esta medida de seguridad.
,, __;I_sE
El_ ARARAI"O
AI_R©RIADAB,'iEIIS_i£o No utilice el
aparato para ning_.in trabajo para el que
no ha sido diseBado,
i_A[)V£RI°i_YO!A:
Rata reducir el riesgo
de choque el6cizico, utilicese solamente
con cables de extensi6n para intemperie,
como los siguientes: SW-A, SOW-A,
STWoA, STOW-A, SJW-A, SJOW-A,
SJTW-A o SJTOW-A.
'_ O@RD©MES _._E8Xi°EftSIO_I°
AsegOrese que su extensi6n es_6 en
buenas condJciones. Cuando utilice LiRa
ex_:ensi6n, aseg(wese que !.enga el ca/bre
suficiente para conducir la corriente que
su herramienl.a necesita, extensi6n con
calibre menor al necesario causar_ una
caida_ en eJ voitqe de J8 iinea, resWtando
en p6rdida de potencia y
sobrecaleniamiento.
La tabla siguiente
muestra el calibre correcto isara usarse,
de acuerdo con Ia tongil.ud de ta
extensi6n yet amperaie en la placa de
ideniificaci6n.
Si dene dudas, _titice el
calibre siguienb,
iviientras inenoi sea el
n(trnero del calbre, mayor se!'fa la
capacidad del cable. BIack& Decker
pone a su disposici6n extensiones
atelrizadas de 3 conduci.ores para
utilizarse con spa atos para !a internperie.
Calibic_ u_fnfmo pa_'a cot'do_as
I_,_0I}qTF!BIWE quitar material cortado ni
sujetar el material que vaya a co4ar
cuando las cuchillas est@_ en
movirnJento. Aseg6rese que eJ interruptor
est6 en posici6n de apagado antes de
tirnpiar las cuchiilas de materiaJ atascado.
No toque las c_chillas expuestas ni !os
fibs cuando tevanie o sujete ta podadora,
PRECAUCION:
las cuchillas giran
despu6s de apagar la podadora.
110 I---LI_R_3i£ LA RODAP)O_IA
-- I lar_
meier e! trabaio y con metros
probabilidades
de ocasionar una lesi6n si
se utlza dentro de Ios par_:__meires para
los que se disefi6.
lqO SI{ SOBIIIIX'F!II,I_A
Siempre
conserve bien apoyados tos pies, Io
mismo que el equiiibrio.
OOB1S_I_VIS_
AL!RTA
-- Observe Io
que hace. Utilice el senddo corn@s. No
opere ia herramienta
si se encuentra
cansado,
©l[SOOl,iIOWI
LA t;>O_A©O_A
de la
toma de corriente cuando no la use o
cuando Ie vaya a efectuar servicio.
QIUiA_i_I SAdO "i°£OblO LA
pO!Iy_JI_OIA
OUi:G,I©O NO LA iI:III!_LIi
-- Cuando no se empiee, la podadora
debe permanecer
guardada en un tugar
seco y elevado o bajo lave fuera det
alcance de los nii_os.
CIJD_{ LA I_O_ADORAo
Consewe ias
cuchilas afiladas y limpias para obtener
meiores resultados y para reducir el
riesgo de !esiones. 13evise las
extensiones
peri6dicamenie
y c@s]bieias
si esi£n daf_adas. Conserve los mangos
secos, flnpios y Iibres de aceite y grasa
BEVISI AS Is_AIclI-ES _}A@Af}AS --
de a£_.,nsi6n
Antes de seguir ultizando
!a podadora,
una guarda u otras partes que se
encuentren daF_adas deben ser
cuidadosamente
revisadas para
determinar si cumpien con su funci6n.
Revise la aineaci6n
de las piezfi_s
m6vJles, sus uniones, venfique que no
haya frs.cturas en ias piezas o sus
montajes ni cualquier otra condici6n que
pueda afecta_ su operaci6n. Una guarda
u otra parle dafladas deben ser
repa_adas apropiadamente
o
reemplazadas
en un centro de servicio
autorizado a menos que se indique Jo
contrario en el manual.
,_ _SV[FRISZLE'B,_OWUDDO ACOi©AHi
AL
No cargue Ia podadora conectada con el
dedo en et inten'uptoh Aseg@ ese due el
interruptor esi:e en posiciOn de apagado
antes de conectar!a.
_ _,_0 IViALi'IiAS t< EL OOR
Oi_i
ILIOWRIOOo
Nunca cargue I8. podadora
pot el cable ni ire de @ste pala
desconectarlo
de la toma de corriente.
Las '- e_s.mlen_as
_ ' _
est_n consl.ruidas
con. dobleaistamiento
con dos c_.l._-_,>
-s_,-..,,--.
ambas
3
separadas de aislamiento ei-d_ctdco o una
capa de espesor dobie eni:re tsted V el
t.
sistema elOctrico de la herramienta. Las
herramientas con doble aislamiento no
necesitan conectarse a tierra. Como
resultado, su herramienta est& equipada
con una clavija de dos patas que le
permite utilizar extensiones sin
preocuparse per tener una conexiOn a
tierra.
NOTA: El doble aislamiento no reemplaza
las precauciones norrnales de seguridad
cuando se opere la herramienta. El
sistema de aislamiento le proporciona
protecciOn aRadida contra las lesiones
resultantes de posibles fallas en el
aislamiento electrico de la herramienta.
PARTES DE REPUESTO_ Solamente
emplee refacciones idOnticas cuando
haga servicio. Repare o reemplace los
cordones electricos daRados.
Este equipo cuenta con una clavija
polarizada (con una pata mas ancha que
la otra) para reducir el riesgo de choque
elOctrico. El equipo debe utilizarse con
una extension adecuada de 2 o 3 cables.
Las conexiones polarizadas solamente
ajustan de una manera. Asegt3rese que la
conexiOn hembra de la extension tenga
una ranura grande y una m&s pequeha. Si
la clavija no se ajusta completamente a la
extension, inviertala. Si a_n asi no ajusta,
consiga una extension adecuada. Si la
extensi6n no se ajusta pot completo a la
toma de corriente comuniquese con un
electricista calificado para que le instale la
toma de corriente adecuada. Per ningQn
motivo cambie ia clavija en la herramienta
o en la extension de ninguna manera
substancias quimicas que se sabe
producen c_.ncer, defectos de nacimiento
y otros defectos del sistema reproductor.
Algunos ejemplos de estas substancias
quimicas son:
la sflice cristalina de la arena,
ladrillos y otros polvos de albaOileria
el arsOnico y el cromo de la
madera tratada quimicamente (CCA)
compuestos en los fertilizantes
compuestos en insecticidas,
herbicidas y pesticidas
Los riesgos que se corren a causa del
contacto con esos productos varian,
dependiendo del ambiente en que usted
trabaja y la frecuencia con que usted
realice este tipo de trabajo. Para reducir la
exposiciOn a estas substancias quimicas,
siga ias instrucciones para aplicar
productos quimicos tales como
fer'dlizantes, insecticidas, herbicidas o
pesticidas. AI utilizar herramientas
elOctricas, use equipo de seguridad como
guantes asi como mascarillas contra el
polvo especialmente dise_adas para filtrar
particulas microscOpicas.
OONF_..X!ONDEL OABLE DE
_ENSION
AL OORTAOEROO
El mango del interruptor tiene incorporado
un retenedor para el cable de extension,
Io cual evita que la herramienta se
desenchufe. Para usar este dispositivo,
simplemente doble el cable de extension
a unas 8 pulgadas de su extreme, e
insertelo en la abertura que est& en la
parte inferior del &rea del mango.
Enganche el lazo que se form6, doblando
el cable sobre la lengOeta segt3n se ilustra
en las Figura 1. Tire suavemente del cable
para verificar que est& firmemente
retenido en el mango del cortacerco.
Enchufe el recept&culo del cable de
extension en las clavijas del cortacerco.
AGUARDE ESTAS
INSTIRUOOIONES PARA US@
FOTURO
El polvo creado al usar herramientas
eiOctricas para cesped y jardin contiene
PARA
PRENDER
LAHERRAMBENTA PARA FiJAR LA HERRA_IERTA EN
PRENDIDO PARA FUNOIONA[',,dlENTO
TireelBOTON
DESEGURIDAD
hacia
CONTmNUO.
atr&s
conelpulgar
yluego
apriete
el
INTERRUPTER
DEGATILLO
conlos
CON LA HERRAMIENTA
dedos
comesedemuestra
enlaFigura
2. FUNOIONANDO tire del BOTON DE
(Una
vezquelaherramienta
est,.
SEGURIDAD OOMPL_TAM_NTE NAOIA
funcienando,
yapuede
liberar
elBOTON ATRAS, suelte el INTERRUPTER DE
DESEGURIDAD.)
ParaAPAGAR
la
GATILLO, y luego libere el BOTON DE
herramienta,
suelte
elinterrupter
degatillo. SEGURIDAD. La herramienta ha quedado
Bot6n
Interrupter
de Gatillo S
/
1. CABLE DE EXTENSION - (Figura 1)
Mantenga siempre el cable de extensi6n
detr_.s del cortacerco y alejado de la
operaci6n de corte. No Io deje nunca sobre
un cerco que se estercortando. Si usted
corta o daSa el cable, desconectelo del
tomacorriente inmediatamente, antes de
inspeccionar o reparar.
2. POSIClON DE TRABAJO -Mantenga la
pisada firme y el balance apropiado todo el
tiempo y no se extralimite. Use protecci6n
para los ojos, calzado protector
antirresbalante y guantes de goma
mientras coda. Mantenga la herramienta
firmemente con ambas manes y PRENDA
la herramienta. Sujete siempre el
cortacerco come Io ilustra la Figura 3, con
una mane sobre el mango interrupter y una
mane sobre el asa. Nunca sujete la
herramienta per el protegehoja.
funcionando de manera fija. Para APAGAR
la herramienta, apriete y libere el GATILLO.
NOTA: Para que la herramienta quede
prendida en forma continua, es importante
soltar primero el interrupter de gatillo y
luego liberar el bot6n de seguridad
3. OORTE DE NUEVA VEGE'£AOION (Figura 4) - Lo m_.s efectivo es un
movimiento de barrido amplio, con los
dientes de la hoja avanzando a trav6s de
las ramitas. Una inclinaci6n leve de la hoja,
en direcci6n del movimiento, da el mejor
resultado al cortar.
ATENCION" No use el cortacerco para
cortar tallos mayores de 3/4" (10mm).
Uselo s61opara cortar arbustos normales
que se encuentran alrededor de casas y
edificios.
4. CERCOS NWELADOS (Figura 5) - Para
obtener cercos perfectamente nivelados, se
puede montar un cordel a Io largo del cerco
y usar 6ste come guia.
5.CORTE
LATERAL
(Figura
6)Comience por la parte inferior, y vaya
ascendiendo con movimiento de barrido.
_,ADVERTENClA:
El uso de cualquier
accesorio no recomendado para
emplearse con estaherramienta puede ser
peligroso.
ESPEOIFIOAOIONES
AAdvertencia:
PARA PROTEGERSE
CONTRA
LESIONES,
OBSERVE LO
SIGUIENTE:
LEA EL MANUAL DE
INSTRUCCIONES
ANTES DE USAR
LA PODADORA,
CONSERVE
EL
MANUAL.
CONSERVE
LAS MANOS LEJOS DE
LAS CUCHILLAS.
CONSERVE
LAS MANOS EN LOS
MANGOS.
NO SE SOBRE EXTIENDA.
PRECAUCION
- LA CUCHILLA GIRA
DESPUES
DE APAGAR LA
PODADORA.
NO SE UTILICE EN CONDICIONES
DE MUCHA HUMEDAD.
NO SE UTILICE CON UNA
EXTENSION
DAiklADA.
NO SE DESCONECTE
NI SE
GUARDE CON EL INTERRUPTOR
ASEGURADO
EN POSICION
DE
ENCENDIDO.
Solamente utilice jabSn suave y un trapo
ht3medo para limpiar la herramienta.
Nunca permita que ningen liquido se
introduzca en la herramienta; nunca
sumerja ninguna parte de la herramienta
en ningen liquido.
liViPORTANTE: Para garantizar la
SEGURIDAD y la CONFIABILIDAD del
producto, las reparaciones, el
mantenimiento y los ajustes deben ser
realizados por centros de servicio
autorizados u otras organizaciones de
servicio calificadas, que siempre utilicen
partes de repuesto identicas.
Tension de alimentaciSn
120V ","
Frecuencia de operaci6n:
60 Hz
79951
Potencia nominal:
268W
Consumo de corriente:
79952
2,4A
Potencia nominal:
223W
Consumo de corriente:
2,0A
79973
Potencia nominal:
257W
Consumo de corriente:
2,3A
79974
Potencia nominal:
268W
Consumo de corriente:
79975
2,4A
Potencia nominal:
268W
Consumo de corriente:
2,4A
CRAFTSMAN
HEAVY
DUTY
HEDGE
TRIMMER
-
I El nLimero de modelo se encuentra
en la placa
m3mero de modelo en toda la correspondencia
VEA LA PAGINA
DE ATRAS
PARA LAS
MODEL
NUMBER
de identificaci6n.
o cuando ordene
INSTRUCOmONES
900.799510,
Siempre mencione
partes de repuesto.
SOBRE
COMO
90G,799520
el J
I
ORDENAR
USTA DE PARTES
Pieza
No.
Parte
No.
Pieza
Descripcion
Cant.
1
607666-01
Juego
de carcaza
(79951)
(79952)
2
603177-00
394262-00
Jue9o de carcaza
Resorte
¢3
4
5
330019-04
394488-01
394486-00
Tornillo
Campo
Armadura
6
394471-00
Bafle
7
8
380973-00
387542-00
Soporte
Carbbn
9
381817-01
Porta carb6n
1
de Balero
Descripcion
1
628280-00
603179-00
148814-00
(79952)
Etiqueta
Balero
1
1
1
34
98022-16
800
429698-00
2
394261-01
Bot6n de seguro
1
158495-00
Tornillo
8
12
13
14
394260-01
394260-00
157315-00
394263-00
Actuador
(79951)
Actuador
(79952)
Roldana con resorte
Resorte
1
1
1
1
¢15
16
330019-09
148902-00
Tornillo
Roldana
2
1
17
18
394265-01
394469-00
Interruptor
Caja de engranes
1
1
19
394474-00
Tapa de la caja de engranes
1
20
21
605942-03
397295-04
98022-20
Segueta
Segueta
Tornillo
1
1
2
22
23
24
25
148641-00
394476-00
133952-00
87486-00
Tuerca de seguridad
Espaciador
Rordana
Contacto
6
6
1
1
26
27
151625-00
137646-00
Hoja polarizada
Terminal
1
2
28
394058-01
Guarda
1
29
395871-00
Mango
30
627482-00
628279-00
Placa de identificaci6n(79951)
Placa de identificaci6n(79952)
1
1
1
Cant.
Etiqueta de identificad6n
(79951)
Etiqueta de identilicad6n
1
10
en arco
32
33
No.
627638-00
1
2
{11
(79951)
(79952)
No.
31
1
1
15
1
1
Parte
PARTES
NO
de advertencia
Tornillo
Grasa
4
(1,8 kg (4 Ibs))
(Suministradas con la unidad)
Manual del instrucciones
628275-00
ACCESORUOS
1
OPCIONALES:
(No Suministrado
605510-00
1
ILUSTRADAS:
Diagrama
con la unidad)
de conexiones
(h NOTAS:
3
11
Apriete
Apriete
a torque de 12 in. Ibs.
a torque de 20 a 24 in. Ibs.
15
Apriete
a torque
de 16 a 20 in. Ibs.
LUBRICAOI6N:
Aplique de 4
alrededor de
engranes.
Aplique de 2
alrededor de
cuchilla.
a 5 gramos de 9rasa BDL 2.0
engrane y pi56n en la caja de
a 3 gramos de grasa BDL 2.0
la zone de engranes de transmisiSn y
iIMPORTANTE!
Para garantizar la SEGURIDAD
y
la CONFIABILIDAD,
deberan
hacerse
reparaciones, mantenimiento
y ajustes de este producto
en los Centros de Servlcio Sears.
Modelo
No.
900.799510
900.799820
Volts
120
120
Amps
2,8
SPM
3100
2,6
3100
Engn RWA
10/04TS
CRAFTSMAN
HEAVY
DUTY
HEDGE
TRIMMER
- MODEL
NUMBER
900.799510,
900.799520
15
\
26
\
22
@
%
Engr:
RWA
10/04TS
Your Home
lawn and garden equipment, or heating and cooling systems,
Forrepair-inyourhome-of
all majorbrand
appliances,
no matter who made it, no matter
who sold it[
For the replacement parts, accessories and
owner's manuals that you need to doqt-yourself.
For Sears professional installation of home appliances
and items like garage door openers and water heaters.
1-800-4-MY-HOME
Call anytime,
®
(1-800-469-4663)
day or night (U.S .A. and Canada)
www.sears.com
www.sears.ca
Our Home
For repair of carry-in items like vacuums, lawn equipment,
and electronics, call or go on-line for the location of your nearest
Sears Parts& Repair Center.
1-800-488-1222
Call anytime,
day or night (U.S.A.
only)
www.sears.com
......
To purchase a protection agreement (U.S.A.)
or maintenance agreement (Canada) on a product serviced by Sears:
1-800-827-6655
(U.S.A.)
Para pedir servicio de reparaciOn
a domicilio, y para ordenar piezas:
1-888-SU-HOGAR su
(1-888-784-6427)
1-800-361-6665
(Canada)
Au Canada pour service en fran£ais:
1 800 LE FOYER
uc
(1-800-533_6937)
i
www.sears.ca
t
® Registered Trademark / TI
1, Trademark / st_' Service Mark of Sears, Roebuck and Co.
® Marca Registrada / TI._Marca de F&bdca / su Marca de Servicio de Sears, Roebuck and Co.
_,_cMarque de commerce / _,_D
Marque d_pos_e de Sears, Roebuck and Co.
® Sears, Roebuck
and Co.
nstruction Manual
HEAVY
DUTY
HEDGE
TRIMMER
Models 900.79951,
900.79952,
900.79974
& 900.79975
900°79973,
&CAUTION:
,, Safety
Before using this product,
read this manual and follow
,, Operation
® Maintenance
all its Safety Rules and
Operating Instructions.
Sears,
Roebuck
EspaSol
and Co., Hoffrnan
Estates,
IL 60179
USA
www.sears.com/craftsman
Form No.628275-00
Nov. '04
Printed in Mexico
!
Lock
Bail
Trigger
Cord Retainer
Plug Blades
FULL ONE YEAR WARRANTY
ON CRAFTSh_iAN
HEAVY
DUTY HEDGE
TRIMMER
If this Craftsman product fails due to a defect in material or workmanship within one
year from the date of purchase, return it to your nearest Sears store or Craftsman
outlet to have it replaced
free of charge.
WARRANTY
SERVICE
This warranty
This warranty
applies only while this hedge trimmer is used in the United States.
gives you specific legal rights, and you may also have other rights which
vary from state to state.
Sears, Roebuck and Co., Dept. 817WA,
Hoffman
Estates,
IL 60179
TO REDUCE RiSK OF iNJURY:
o Before any use, be sure everyone using
this tool reads and understands all safety
instructions and other information
contained in this manual.
. Save these instructions and review
frequently prior to use and in instructing
others.
&WARNING:
When using electric
gardening appliances, basic safety
precautions should always be followed to
reduce risk of fire, electric shock, and
personal injury, including the following:
" AVOID DANGEROUS
ENVIRONMENT
- Don't use hedge trimmers in damp or
wet locations.
o DON'T USE iN RAIN.
o KEEP CHnLDREN AWAY - All visitors
should be kept at a safe distance from
the work area.
o DRESS PROPERLY - Don't wear loose
clothing or jewelry. They can be caught
in moving parts. Use of rubber gloves
and substantial footwear is
recommended when working outdoors.
Wear protective hair covering to contain
long hair.
READ ALL _NSTRUOTDONS.
° USE
SAFE_GLASSES
-Alsouseface
ordustmask
ifoperation
isdusty.
° GROUND FAUL] ° CIRCUIT
INTIRRUPTER
(GFCI} protection
should be provided on the circuit(s) or
outlet(s) to be used for the hedge
trimmer. Receptacles are available
having builbin GFCI protection and may
be used for lhis measure of safety.
o USE RIGHT APPLIANCE
- Do not use
appliance for any job excepl that for
which it is intended.
AW'ARNING:
To reduce the risk of electric
shock use only with an extension cord
intended for outdoor use, such as SW-A,
SOW-A, S] W-A, STOW-A, SJW-A,
S JOT-A, SJTW-A or SJTOW-A.
o E.XTENStON CORD. Make sure your
extension cord is in good condition.
When using an extension cord be sure it
is heavy enough [o carry the current your
product will draw. An undersized
extension cord will cause a drop in line
voltage resulting in loss of power and
overheating. The following table shows
the correct size to use depending on
cord length and nameplate ampere
rating. If in doubt, use the next heavier
gage. The smaller the gage number, l_e
heavier the cord.
£_li_i_um
Gage for Bx_er_sion Cords
VAC Tools
Tetal Cord Length
Amp Ralng
More than 0
Not More than 6
More than 6
Not More than 10
More than 10
Not more lhan 12
More than 12
Not more than 16
(AWG) t20
0-25 I 26-50
AWGJ AWG
L1 -
6
18
16
A DANGER= Risk of cut. Keep hands away
from blades. Keep both hands on
handles when power is on.
o DO NOT A_TEB_iPT to remove cut
malerial or hold material to be cut when
blades are moving. Make sure trimmer
switch is ol when clearing jammed
material from blades. De not grasp the
exposed cutting blades or cutting edges
when picking up or holding the hedge
trimmer.
ACAUTtON:
Blades coast after turn off,
o DON'T fORCE IIEE)I(_E -R_II_IB;_BR - It
will do the job better and with less
likelihood of a risk of injury sJ:the rate for
which iI was designed.
o ©Ot,4'T OVERREAOIol
Keep proper
footing and balance at all times.
- S°i°_:_{ALERt - Watch what you are
doing. Use common sense. Do not
operate hedge trimmer when you are
tired.
° @ISOOI',!{_IECT H!?.©GE TRII:_4B_HR from
the power supply when nol in use or
when servicing or cleaning.
o STOIIE IbLE IIE-DGB TRII_IMER
IBDOOIIS - When not in use, hedge
trimmer should be stored indoors in a dr)/
and high or locked-up place-- out of reach
ol children.
° MAIN IAIN HEDLIB¢RIWII;*}ER W!TII
Ct-_.RI - Keep CL.!tirig blades sharp and
clean for' bes! performance and to reduce
the risk of injury. Inspect extensior_ cord
periodically and replace if damag{:_d.
Keep handles dry, clean and free from oit
and grease.
• CHECK ©AB91AGE[t>R_,RTS - before
further use of the hedge trimmer, a guard
or other parl that is damaged should be
carefully checked to determine that it will
operate properly and perform its
intended function. Check for alignment ol
moving parts, binding of moving paris,
breakage of parts, mounting and any
olher condition that may affect its
operation. A guard or other pa!t that is
damaged should be properly repaired or
replaced by an authorized sen/ice cenier
unless otherwise indicated elsewhere in
this manual.
14
}
t2
_
Not
Recommended
o AVOI© UNIN]°ENTtONAL
STARTING Don't carry plugged in hedge trimmer
with finger on switch. Be sure switciq is
off when plugging in.
° ©ON'T ABUSE CORD - Never carry
hedge trimmer by cord or yank it to
disconnect from receptacle. Keep cord
from heat, oil, and sharp edges.
Double insulated tools are constructed
throughout with two separate layers of
electrical insulation or one double
thickness of insulation between you and
the tool's electrical system. fools built
with this insulation system are not
intended to be grounded. As a result,
your tool is equipped with a two prong
plug which permits you to use extension
cords without concern for maintaining a
ground connection.
NOTrE: Double insulation does not take
theplace
ofnormal
safety
precautions
when
operating
thistool.Theinsulation
system
isforadded
protection
against
injury
resulting
fromapossible
electrical
insulation
failure
within
thetool.
Replacement
parts:
When
servicing
all
tools,
USEIDENTICAL
REPLACEMENT
PARTS.
Repair
orreplace
damaged
cords.
Toreduce
theriskofelectric
shock,
this
equipment
hasapolarized
plug(one
blade
iswider
thantheother).
This
equipment
must
beused
withasuitable
polarized
2wireor3wireextension
cord.
Polarized
connections
willfittogether
onlyoneway.Make
surethatthe
receptacle
endoftheextension
cordhas
large
andsmall
blade
slotwidths.
Ifthe
plugdoes
notfitfullyintotheextension
cord,reverse
theplug.
Ifitstilldoes
not
fit,obtain
asuitable
extension
cord.Ifthe
extension
corddoes
notfitfullyintothe
outlet,
contact
aqualified
electrician
to
install
theproper
outlet.
Donotchange
thetoolplugorextension
cordinany
way.
Health
riskfromthese
chemical
_WARNING:
Some
dustcreated
varies,depending
onthe
whenusing
lawnandgarden
power
tools exposures
environment
inwhich
y
ou
areworking
contains
chemicals
known
tocause
andhowoftenyoudothistypeorwork.
cancer,
birthdefects
andother
Toreduce
yourexposure
tofl_ese
reproductive
harm.
chemicals
follow
product
label
instructions
toapply
c
hemicals
suchas
Some
examples
ofthese
chemicals
are: fertilizers,
insecticides,
herbicides
or
ocrystalline
silica
fromsand,
bricks
and pesticides.
When
using
these
tools,
wear
other
masonry
dust
equipment
suchasgloves
and
•arsenic
andchromium
fromchemicallysafety
dustmasks
which
areespecially
treated
lumber
(CCA)
designed
tofilteroutmicroscopic
ocompounds
infertilizers
particles.
ocompounds
ininsecticides,
herbicides
andpesticides
SAVE THESE nNSTRUOT_ONS
FOR FUTURE USE
ATI°ACHING EXTENSION CORD TO
TRJM_,IER
An extension cord retainer is built into the
switch handle that prevents the tool from
coming unplugged. To use this feature,
simply double the extension cord about 8
inches from the end, and insert it into the
slot in the bottom of the handle area.
Hook the loop formed by doubling the
cord over the tab, as shown in Figure 1.
Gently tug on the cord to insure that it is
firmly retained in the trimmer's handle.
Plug the receptacle end of the extension
cord into the plug blades in the trimmer.
TO TURN THE TOOL ON
Pull the LOCK BUTTON back with your
thumb and then squeeze the TRIGGER
with your fingers as shown in Figure 2.
(Once the tool is running you can release
the LOCK BUTTON.)
To turn the tool
OFF, release the TRIGGER.
3
TO LOCK THE TOOL ON FOR
CONTINUOUS
RUN
WITH THE TOOL RUNNING
pull the
LOCK BUTTON ALL THE WAY back,
release the TRIGGER, then release the
LOCK BUTTON. The tool is now locked
ON. To turn the tool OFF, squeeze and
release the TRIGGER. NOTE: In order to
lock the tool on, it is important to first
release the trigger and then release the
lock button.
TRI#,_[VlING NEW GROWTH - (Figure
4) -A wide, sweeping motion, feeding
the blade teeth through the twigs is
most effective. A slight downward tilt
of the blade, in the direction of motion
ives the best cutting.
CAUTION: Do not use the trimmer for
cutting stems greater than 3/4" (10ram).
Use the trimmer only for cutting normal
shrubbery found around houses and
buildings.
TRIMMING
INSTRUCTIONS
1 EXTENSION
CORD = (Figure 1)
Always keep extension cord behind
trimmer and away from the trimming
operation. Never drape it over a
hedge being trimmed. If you cut or
damage the cord, unplug it at the
electrical outlet immediately, before
inspecting or repairing cord.
WORKING
POSmON
- Maintain
proper footing and balance and do not
overreach. Wear safety goggles, nonskid footwear and rubber gloves when
trimming. Hold the tool firmly in both
hands and turn the tool ON. Always
hold the trimmer, as shown in figure 3,
with one hand on the switch handle
and one hand on the bail handle.
Never hold the tool by the blade
guard.
4.
LEVEL HEDGES (Figure 5) - To
obtain exceptionally
level hedges,
a piece of string can be stretched
along the length of the hedge as a
guide.
5. SIDE-TRIMMING HEDGES (Figure 6)
Begin at the bottom and sweep up.
@
never immerse any part of the tool into a
liquid.
IMPORTANT: To assure product SAFETY
and RELIABILITY, repairs, maintenance
and adjustment should be performed by
Sears service centers or other qualified
service personnel, always using identical
replacement parts.
i_i I i__i/i_/,!_ i_ _i_i '
AWARNING:
To guard against injury
observe the following:
Read instruction manual before using,
Save instruction manual.
Keep hands away from blades.
Keep hands on handles
overreach.
Don't
Do not use under we_ _u,lditions.
Do not use with damaged
cords.
extension
Do not unplug or store with switch
locked on.
ACAUTION:
Blade coasts after turn off.
The cutting blades are made from high
quality, hardened steel and with normal
usage, they will not require resharpening.
However, if you accidentally hit a wire
fence, stones, glass or other hard
objects, you may put a nick in the blade.
There is no need to remove this nick as
long as it does not interfere with the
movement of the blade. If it does
interfere, unplug unit and use a fine
toothed file or sharpening stone to
remove the nick.
If you drop the trimmer, carefully inspect
it for damage. If the blade is bent,
housing cracked, or handles broken or if
you see any other condition that may
affect the trimmer's operation, contact
your local Sears Service Center for
repairs before putting it back into use.
Fertilizers and other garden chemicals
contain agents which greatly accelerate
the corrosion of metals. Do not store the
tool on or adjacent to fertilizers or
chemicals.
With the unit unplugged, use only mild
soap and a damp cloth to clean the tool.
Never let any liquid get inside the tool;
_WARNING"
DO NOT use the hedge
trimmer with any type of accessory or
attachment. Such usage might be
hazardous.
CRAFTSMAN
HEAVY
I
DUTY
HEDGE
TRIMMER
-
MODEL
NUMBER
The
Model Number
Number in
will
found on the Nameplate.
the Model
all be
correspondence
regarding
SEE BACK
PAGE FOR PARTS
ORDERING
900.799518,
Always
your
tool. mention
900.799520
I
I
iNSTRUCTiONS
PARTS LIST
ITEM
NO.
1
iTEM
PART
NO.
607666-01
603177-00
2
394262-00
{3
4
330019-04
394488-01
5
394486-00
6
7
8
394471-00
380973-00
387542-00
9
10
381817-01
394261-01
_11
12
158495-00
394260-01
13
394260-00
157315-00
14
394263-00
{15
16
330019-09
148902-00
17
18
19
394265-01
394469-00
394474-00
20
605942-03
397295-04
21
22
98022-20
148641-00
23
24
394476-00
133952-00
25
26
27
87486-00
151625-00
137646-OO
28
29
394058-01
395871-00
30
627482-00
628279-00
DESCRiPTiON
QTY
ClamshelISet
1
Set (79952)
1
NO.
NO.
DESCRiPTiON
QTY
31
627638-00
628280-00
Identification
Identification
1
16
1
32
33
34
603179-00
148814-00
98022-16
Warning
Bearing
Screw
Label
Armature
Baffle
1
1
800
429698-00
Grease
(4 lb.)
Bearing Support
Brush
Brush Holder
1
2
2
Clamshell
(79951)
PART
Spring
Screw
Field
PARTS
NOT
628275-00
OPTmONAL
1
Screw
4
605510-00
1
1
NOTES:
Spring
(79951)
(79952)
Washer
1
Spring
Screw
1
2
Washer
Switch
1
1
Gear Case
Gear Case Cover
1
1
Blade
& Gear (79951)
1
Blade & Gear (79952)
Screw
Lock Nut
1
2
6
Spacer
Washer
Contact
6
1
1
Polarized
Terminal
Guard
Blade
Bail Handle
1
2
1
1
Nameplate
(79951)
1
Nameplate
(79952)
1
iLLUSTRATED:
Instruction
1
1
1
1
4
1
(SuppliedwithUnit)
Manual
1
ACCESSORIES:
(Not Supplied With Unit)
Lock Button
Actuator
Actuator
Label (79951)
Label (79952)
Connection
Diagram
3
Torque
to 12 in. Ibs.
11
15
Torque
Torque
to 20-24
to 16-20
LUBRiCATiON:
Apply 4-5 grams
in. Ibs.
in. Ibs.
of BDL 2.0 grease
around gear &
pinion in gear box.
Apply 2-3 grams of BDL 2.0 grease around
and drive gear area.
blade
iMPORTANT! To assure product SAFETY and RELIABILTY, all repairs, maintenance, and adjustments to
Sears products should be performed by Sears company-owned or authorized service organizations using tactory replacement parts,
Model
No.
900.799510
900.799520
Volts
120
I20
Arnps
2.8
2.8
Engr:
RWA
SPM
3100
3100
10/04TS
CRAFTSMAN HEAVY DUTY HEDGE TRgMMER - MODEL NUMBER 900.799510, 900.799520
7
80O
Engr:
RWA
10/04TS
Manual de instrucciones
900.79951, 900°79952, 900°79973,
900.79974 & 900.79975
PODAOORAS DE SETO$
APRECAUCiON:
Lea y siga todas
las reglas de seguridad e
instrucciones de operaci6n antes de
utilizar este producto por primera vez.
Sears,
Roebuck
and Co., Hoffrnan
www.sears.com/craftsman
o Seguridad
o Operaci6n
o Mantenimiento
Estates,
RL60179 USA
Bot6n
Asa
guridad
Retenedordel
cable de
extensi6n
Protector
as de
GARANTJA OOMPLETA DE UN A[?_OPARA EL CORTAOEROO PARA TRABAJO
PESADO CRAFTSMAN.
Si durante el afro transcurrido a partir de la fecha de compra este cortacerco Craftsman
presenta fallas debido material o mano de obra defectuosa, Sears la reemplazar& sin
costo alguno.
SERVm010 DE GARANTJA
Para obtener el reemplazo bajo esta garantia, devuelva el cortacerco a su tienda Sears
m&s cercana o a un punto de venta Craftsman en los Estados Unidos.
Esta garantia es v_lida solamente si el cortacerco se utiliza en los Estados Unidos.
Esta garantia le otorga a usted derechos legales especificos y otros derechos que
pueden variar dependiendo del estado. Sears, Roebuck and Co., Dept. 817WA,
Hoffman Estates, IL 60179
PARA REDUC[R EL R[ESGO DE
LESnONES:
. Antes de cualquier uso, asegBrese que
cualquier persona que vaya a utilizar esta
herramienta lea y comprenda todas las
instrucciones de seguridad y la
informaci6ncontenida en este manual.
o Conserve estas instrucciones y rep&selas
con frecuencia antes de usar la
herramienta e instruir a otras personas.
_ADVERTENOJA; Siempre que utilice
herramientas el6ctricas de jardina debe
seguir ciertas precauciones b&sicas de
seguridad, a fin de reducir los riesgos de
incendio, choque electrico y lesiones
personales, entre las que se encuentran
las siguientes.
LEA 7ODAS LAS
INSTRUOOIONES
°EVITE AMBIENTES PELIGROSOS -- No
utilice podadoras de setos en lugares
mojados o inundados.
• NO SE USE BAJO LA LLUV[A.
° OONSERVE ALEJADOS A LOS NINOS.
Todos los visitantes deben estar a
distancia segura de la zona de trabajo.
" VISTASE DE MANERA ADEOUADA
No utilice ropas sueltas ni joyas, pueden
quedar atrapadas en las partes mSviles.
Se recomienda el uso de guantes y
calzado antiderrapante cuando trabaje a
la intemperie. CQbrase el cabello si Io
tiene largo.
. UTILIOE GAFAS DE SEGURIDAD -Tambien utilice una mascarilta contra
polvo si la operaci6n que efectuara Io
produce
• INTERRUPTOR DE CIRCUmTOPARA
FALLAS EN LA TIERRA (GFO[) Se debe
proporcionar protecci6n a los circuitos o
2
manos de las cuchillas. Consen/e
manos en los mangos cuando la
herramienta
esl;5 encendida.
clavijas que se usarb.n con ta podadora
de setos. Existen contactos con
p_otecci6n GFC! int,sgrada y se pueden
utilzar para esta medida de seguridad.
,, __;I_sE
El_ ARARAI"O
AI_R©RIADAB,'iEIIS_i£o No utilice el
aparato para ning_.in trabajo para el que
no ha sido diseBado,
i_A[)V£RI°i_YO!A:
Rata reducir el riesgo
de choque el6cizico, utilicese solamente
con cables de extensi6n para intemperie,
como los siguientes: SW-A, SOW-A,
STWoA, STOW-A, SJW-A, SJOW-A,
SJTW-A o SJTOW-A.
'_ O@RD©MES _._E8Xi°EftSIO_I°
AsegOrese que su extensi6n es_6 en
buenas condJciones. Cuando utilice LiRa
ex_:ensi6n, aseg(wese que !.enga el ca/bre
suficiente para conducir la corriente que
su herramienl.a necesita, extensi6n con
calibre menor al necesario causar_ una
caida_ en eJ voitqe de J8 iinea, resWtando
en p6rdida de potencia y
sobrecaleniamiento.
La tabla siguiente
muestra el calibre correcto isara usarse,
de acuerdo con Ia tongil.ud de ta
extensi6n yet amperaie en la placa de
ideniificaci6n.
Si dene dudas, _titice el
calibre siguienb,
iviientras inenoi sea el
n(trnero del calbre, mayor se!'fa la
capacidad del cable. BIack& Decker
pone a su disposici6n extensiones
atelrizadas de 3 conduci.ores para
utilizarse con spa atos para !a internperie.
Calibic_ u_fnfmo pa_'a cot'do_as
I_,_0I}qTF!BIWE quitar material cortado ni
sujetar el material que vaya a co4ar
cuando las cuchillas est@_ en
movirnJento. Aseg6rese que eJ interruptor
est6 en posici6n de apagado antes de
tirnpiar las cuchiilas de materiaJ atascado.
No toque las c_chillas expuestas ni !os
fibs cuando tevanie o sujete ta podadora,
PRECAUCION:
las cuchillas giran
despu6s de apagar la podadora.
110 I---LI_R_3i£ LA RODAP)O_IA
-- I lar_
meier e! trabaio y con metros
probabilidades
de ocasionar una lesi6n si
se utlza dentro de Ios par_:__meires para
los que se disefi6.
lqO SI{ SOBIIIIX'F!II,I_A
Siempre
conserve bien apoyados tos pies, Io
mismo que el equiiibrio.
OOB1S_I_VIS_
AL!RTA
-- Observe Io
que hace. Utilice el senddo corn@s. No
opere ia herramienta
si se encuentra
cansado,
©l[SOOl,iIOWI
LA t;>O_A©O_A
de la
toma de corriente cuando no la use o
cuando Ie vaya a efectuar servicio.
QIUiA_i_I SAdO "i°£OblO LA
pO!Iy_JI_OIA
OUi:G,I©O NO LA iI:III!_LIi
-- Cuando no se empiee, la podadora
debe permanecer
guardada en un tugar
seco y elevado o bajo lave fuera det
alcance de los nii_os.
CIJD_{ LA I_O_ADORAo
Consewe ias
cuchilas afiladas y limpias para obtener
meiores resultados y para reducir el
riesgo de !esiones. 13evise las
extensiones
peri6dicamenie
y c@s]bieias
si esi£n daf_adas. Conserve los mangos
secos, flnpios y Iibres de aceite y grasa
BEVISI AS Is_AIclI-ES _}A@Af}AS --
de a£_.,nsi6n
Antes de seguir ultizando
!a podadora,
una guarda u otras partes que se
encuentren daF_adas deben ser
cuidadosamente
revisadas para
determinar si cumpien con su funci6n.
Revise la aineaci6n
de las piezfi_s
m6vJles, sus uniones, venfique que no
haya frs.cturas en ias piezas o sus
montajes ni cualquier otra condici6n que
pueda afecta_ su operaci6n. Una guarda
u otra parle dafladas deben ser
repa_adas apropiadamente
o
reemplazadas
en un centro de servicio
autorizado a menos que se indique Jo
contrario en el manual.
,_ _SV[FRISZLE'B,_OWUDDO ACOi©AHi
AL
No cargue Ia podadora conectada con el
dedo en et inten'uptoh Aseg@ ese due el
interruptor esi:e en posiciOn de apagado
antes de conectar!a.
_ _,_0 IViALi'IiAS t< EL OOR
Oi_i
ILIOWRIOOo
Nunca cargue I8. podadora
pot el cable ni ire de @ste pala
desconectarlo
de la toma de corriente.
Las '- e_s.mlen_as
_ ' _
est_n consl.ruidas
con. dobleaistamiento
con dos c_.l._-_,>
-s_,-..,,--.
ambas
3
separadas de aislamiento ei-d_ctdco o una
capa de espesor dobie eni:re tsted V el
t.
sistema elOctrico de la herramienta. Las
herramientas con doble aislamiento no
necesitan conectarse a tierra. Como
resultado, su herramienta est& equipada
con una clavija de dos patas que le
permite utilizar extensiones sin
preocuparse per tener una conexiOn a
tierra.
NOTA: El doble aislamiento no reemplaza
las precauciones norrnales de seguridad
cuando se opere la herramienta. El
sistema de aislamiento le proporciona
protecciOn aRadida contra las lesiones
resultantes de posibles fallas en el
aislamiento electrico de la herramienta.
PARTES DE REPUESTO_ Solamente
emplee refacciones idOnticas cuando
haga servicio. Repare o reemplace los
cordones electricos daRados.
Este equipo cuenta con una clavija
polarizada (con una pata mas ancha que
la otra) para reducir el riesgo de choque
elOctrico. El equipo debe utilizarse con
una extension adecuada de 2 o 3 cables.
Las conexiones polarizadas solamente
ajustan de una manera. Asegt3rese que la
conexiOn hembra de la extension tenga
una ranura grande y una m&s pequeha. Si
la clavija no se ajusta completamente a la
extension, inviertala. Si a_n asi no ajusta,
consiga una extension adecuada. Si la
extensi6n no se ajusta pot completo a la
toma de corriente comuniquese con un
electricista calificado para que le instale la
toma de corriente adecuada. Per ningQn
motivo cambie ia clavija en la herramienta
o en la extension de ninguna manera
substancias quimicas que se sabe
producen c_.ncer, defectos de nacimiento
y otros defectos del sistema reproductor.
Algunos ejemplos de estas substancias
quimicas son:
la sflice cristalina de la arena,
ladrillos y otros polvos de albaOileria
el arsOnico y el cromo de la
madera tratada quimicamente (CCA)
compuestos en los fertilizantes
compuestos en insecticidas,
herbicidas y pesticidas
Los riesgos que se corren a causa del
contacto con esos productos varian,
dependiendo del ambiente en que usted
trabaja y la frecuencia con que usted
realice este tipo de trabajo. Para reducir la
exposiciOn a estas substancias quimicas,
siga ias instrucciones para aplicar
productos quimicos tales como
fer'dlizantes, insecticidas, herbicidas o
pesticidas. AI utilizar herramientas
elOctricas, use equipo de seguridad como
guantes asi como mascarillas contra el
polvo especialmente dise_adas para filtrar
particulas microscOpicas.
OONF_..X!ONDEL OABLE DE
_ENSION
AL OORTAOEROO
El mango del interruptor tiene incorporado
un retenedor para el cable de extension,
Io cual evita que la herramienta se
desenchufe. Para usar este dispositivo,
simplemente doble el cable de extension
a unas 8 pulgadas de su extreme, e
insertelo en la abertura que est& en la
parte inferior del &rea del mango.
Enganche el lazo que se form6, doblando
el cable sobre la lengOeta segt3n se ilustra
en las Figura 1. Tire suavemente del cable
para verificar que est& firmemente
retenido en el mango del cortacerco.
Enchufe el recept&culo del cable de
extension en las clavijas del cortacerco.
AGUARDE ESTAS
INSTIRUOOIONES PARA US@
FOTURO
El polvo creado al usar herramientas
eiOctricas para cesped y jardin contiene
PARA
PRENDER
LAHERRAMBENTA PARA FiJAR LA HERRA_IERTA EN
PRENDIDO PARA FUNOIONA[',,dlENTO
TireelBOTON
DESEGURIDAD
hacia
CONTmNUO.
atr&s
conelpulgar
yluego
apriete
el
INTERRUPTER
DEGATILLO
conlos
CON LA HERRAMIENTA
dedos
comesedemuestra
enlaFigura
2. FUNOIONANDO tire del BOTON DE
(Una
vezquelaherramienta
est,.
SEGURIDAD OOMPL_TAM_NTE NAOIA
funcienando,
yapuede
liberar
elBOTON ATRAS, suelte el INTERRUPTER DE
DESEGURIDAD.)
ParaAPAGAR
la
GATILLO, y luego libere el BOTON DE
herramienta,
suelte
elinterrupter
degatillo. SEGURIDAD. La herramienta ha quedado
Bot6n
Interrupter
de Gatillo S
/
1. CABLE DE EXTENSION - (Figura 1)
Mantenga siempre el cable de extensi6n
detr_.s del cortacerco y alejado de la
operaci6n de corte. No Io deje nunca sobre
un cerco que se estercortando. Si usted
corta o daSa el cable, desconectelo del
tomacorriente inmediatamente, antes de
inspeccionar o reparar.
2. POSIClON DE TRABAJO -Mantenga la
pisada firme y el balance apropiado todo el
tiempo y no se extralimite. Use protecci6n
para los ojos, calzado protector
antirresbalante y guantes de goma
mientras coda. Mantenga la herramienta
firmemente con ambas manes y PRENDA
la herramienta. Sujete siempre el
cortacerco come Io ilustra la Figura 3, con
una mane sobre el mango interrupter y una
mane sobre el asa. Nunca sujete la
herramienta per el protegehoja.
funcionando de manera fija. Para APAGAR
la herramienta, apriete y libere el GATILLO.
NOTA: Para que la herramienta quede
prendida en forma continua, es importante
soltar primero el interrupter de gatillo y
luego liberar el bot6n de seguridad
3. OORTE DE NUEVA VEGE'£AOION (Figura 4) - Lo m_.s efectivo es un
movimiento de barrido amplio, con los
dientes de la hoja avanzando a trav6s de
las ramitas. Una inclinaci6n leve de la hoja,
en direcci6n del movimiento, da el mejor
resultado al cortar.
ATENCION" No use el cortacerco para
cortar tallos mayores de 3/4" (10mm).
Uselo s61opara cortar arbustos normales
que se encuentran alrededor de casas y
edificios.
4. CERCOS NWELADOS (Figura 5) - Para
obtener cercos perfectamente nivelados, se
puede montar un cordel a Io largo del cerco
y usar 6ste come guia.
5.CORTE
LATERAL
(Figura
6)Comience por la parte inferior, y vaya
ascendiendo con movimiento de barrido.
_,ADVERTENClA:
El uso de cualquier
accesorio no recomendado para
emplearse con estaherramienta puede ser
peligroso.
ESPEOIFIOAOIONES
AAdvertencia:
PARA PROTEGERSE
CONTRA
LESIONES,
OBSERVE LO
SIGUIENTE:
LEA EL MANUAL DE
INSTRUCCIONES
ANTES DE USAR
LA PODADORA,
CONSERVE
EL
MANUAL.
CONSERVE
LAS MANOS LEJOS DE
LAS CUCHILLAS.
CONSERVE
LAS MANOS EN LOS
MANGOS.
NO SE SOBRE EXTIENDA.
PRECAUCION
- LA CUCHILLA GIRA
DESPUES
DE APAGAR LA
PODADORA.
NO SE UTILICE EN CONDICIONES
DE MUCHA HUMEDAD.
NO SE UTILICE CON UNA
EXTENSION
DAiklADA.
NO SE DESCONECTE
NI SE
GUARDE CON EL INTERRUPTOR
ASEGURADO
EN POSICION
DE
ENCENDIDO.
Solamente utilice jabSn suave y un trapo
ht3medo para limpiar la herramienta.
Nunca permita que ningen liquido se
introduzca en la herramienta; nunca
sumerja ninguna parte de la herramienta
en ningen liquido.
liViPORTANTE: Para garantizar la
SEGURIDAD y la CONFIABILIDAD del
producto, las reparaciones, el
mantenimiento y los ajustes deben ser
realizados por centros de servicio
autorizados u otras organizaciones de
servicio calificadas, que siempre utilicen
partes de repuesto identicas.
Tension de alimentaciSn
120V ","
Frecuencia de operaci6n:
60 Hz
79951
Potencia nominal:
268W
Consumo de corriente:
79952
2,4A
Potencia nominal:
223W
Consumo de corriente:
2,0A
79973
Potencia nominal:
257W
Consumo de corriente:
2,3A
79974
Potencia nominal:
268W
Consumo de corriente:
79975
2,4A
Potencia nominal:
268W
Consumo de corriente:
2,4A
CRAFTSMAN
HEAVY
DUTY
HEDGE
TRIMMER
-
I El nLimero de modelo se encuentra
en la placa
m3mero de modelo en toda la correspondencia
VEA LA PAGINA
DE ATRAS
PARA LAS
MODEL
NUMBER
de identificaci6n.
o cuando ordene
INSTRUCOmONES
900.799510,
Siempre mencione
partes de repuesto.
SOBRE
COMO
90G,799520
el J
I
ORDENAR
USTA DE PARTES
Pieza
No.
Parte
No.
Pieza
Descripcion
Cant.
1
607666-01
Juego
de carcaza
(79951)
(79952)
2
603177-00
394262-00
Jue9o de carcaza
Resorte
¢3
4
5
330019-04
394488-01
394486-00
Tornillo
Campo
Armadura
6
394471-00
Bafle
7
8
380973-00
387542-00
Soporte
Carbbn
9
381817-01
Porta carb6n
1
de Balero
Descripcion
1
628280-00
603179-00
148814-00
(79952)
Etiqueta
Balero
1
1
1
34
98022-16
800
429698-00
2
394261-01
Bot6n de seguro
1
158495-00
Tornillo
8
12
13
14
394260-01
394260-00
157315-00
394263-00
Actuador
(79951)
Actuador
(79952)
Roldana con resorte
Resorte
1
1
1
1
¢15
16
330019-09
148902-00
Tornillo
Roldana
2
1
17
18
394265-01
394469-00
Interruptor
Caja de engranes
1
1
19
394474-00
Tapa de la caja de engranes
1
20
21
605942-03
397295-04
98022-20
Segueta
Segueta
Tornillo
1
1
2
22
23
24
25
148641-00
394476-00
133952-00
87486-00
Tuerca de seguridad
Espaciador
Rordana
Contacto
6
6
1
1
26
27
151625-00
137646-00
Hoja polarizada
Terminal
1
2
28
394058-01
Guarda
1
29
395871-00
Mango
30
627482-00
628279-00
Placa de identificaci6n(79951)
Placa de identificaci6n(79952)
1
1
1
Cant.
Etiqueta de identificad6n
(79951)
Etiqueta de identilicad6n
1
10
en arco
32
33
No.
627638-00
1
2
{11
(79951)
(79952)
No.
31
1
1
15
1
1
Parte
PARTES
NO
de advertencia
Tornillo
Grasa
4
(1,8 kg (4 Ibs))
(Suministradas con la unidad)
Manual del instrucciones
628275-00
ACCESORUOS
1
OPCIONALES:
(No Suministrado
605510-00
1
ILUSTRADAS:
Diagrama
con la unidad)
de conexiones
(h NOTAS:
3
11
Apriete
Apriete
a torque de 12 in. Ibs.
a torque de 20 a 24 in. Ibs.
15
Apriete
a torque
de 16 a 20 in. Ibs.
LUBRICAOI6N:
Aplique de 4
alrededor de
engranes.
Aplique de 2
alrededor de
cuchilla.
a 5 gramos de 9rasa BDL 2.0
engrane y pi56n en la caja de
a 3 gramos de grasa BDL 2.0
la zone de engranes de transmisiSn y
iIMPORTANTE!
Para garantizar la SEGURIDAD
y
la CONFIABILIDAD,
deberan
hacerse
reparaciones, mantenimiento
y ajustes de este producto
en los Centros de Servlcio Sears.
Modelo
No.
900.799510
900.799820
Volts
120
120
Amps
2,8
SPM
3100
2,6
3100
Engn RWA
10/04TS
CRAFTSMAN
HEAVY
DUTY
HEDGE
TRIMMER
- MODEL
NUMBER
900.799510,
900.799520
15
\
26
\
22
@
%
Engr:
RWA
10/04TS
Your Home
lawn and garden equipment, or heating and cooling systems,
Forrepair-inyourhome-of
all majorbrand
appliances,
no matter who made it, no matter
who sold it[
For the replacement parts, accessories and
owner's manuals that you need to doqt-yourself.
For Sears professional installation of home appliances
and items like garage door openers and water heaters.
1-800-4-MY-HOME
Call anytime,
®
(1-800-469-4663)
day or night (U.S .A. and Canada)
www.sears.com
www.sears.ca
Our Home
For repair of carry-in items like vacuums, lawn equipment,
and electronics, call or go on-line for the location of your nearest
Sears Parts& Repair Center.
1-800-488-1222
Call anytime,
day or night (U.S.A.
only)
www.sears.com
......
To purchase a protection agreement (U.S.A.)
or maintenance agreement (Canada) on a product serviced by Sears:
1-800-827-6655
(U.S.A.)
Para pedir servicio de reparaciOn
a domicilio, y para ordenar piezas:
1-888-SU-HOGAR su
(1-888-784-6427)
1-800-361-6665
(Canada)
Au Canada pour service en fran£ais:
1 800 LE FOYER
uc
(1-800-533_6937)
i
www.sears.ca
t
® Registered Trademark / TI
1, Trademark / st_' Service Mark of Sears, Roebuck and Co.
® Marca Registrada / TI._Marca de F&bdca / su Marca de Servicio de Sears, Roebuck and Co.
_,_cMarque de commerce / _,_D
Marque d_pos_e de Sears, Roebuck and Co.
® Sears, Roebuck
and Co.