1
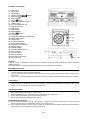
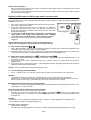
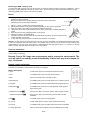
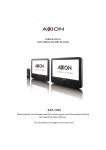
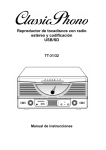
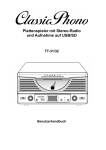
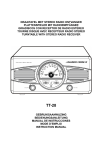
Turntable Player with Stereo Radio and USB/SD Encoding TT-31/32 Instruction manual IMPORTANT SAFETY INSTRUCTIONS: Install and use the device only as described in the user manual. This device must be used in combination with a power supply as specified in the specification table. If you are not sure of the type of power supply used in your home, consult your power company. Do not use loose or damaged cords and/or plugs. The power outlet must be located close the device and must be easily accessible. Make sure that power outlets or extension cables are not over overloaded. Overloading can cause short-circuits or fire. Always pull the plug when removing it from the power outlet. Do not pull the power cord. This may cause a short-circuit. If you notice smoke, an excessive build-up of heat or any other unexpected phenomena, you should disconnect the plug from the power outlet immediately. Disconnect the plug from the power outlet during lightning storms. Disconnect the plug from the outlet when the device will not be used for a long time. Do not step on the power cord and don’t pinch the power cord. Do not place heavy objects on the power cord or any other cables as this may damage the cord or cables. Keep the device away from children! When they play with the power cord, they can seriously injure themselves. Keep the power cable away from rodents and rabbits. Make sure all ventilation openings are clear at all times, do not cover or block them. Leave 5 cm (2”) free space around the device. Always make sure the device is well ventilated. Keep the device away from heat sources such as radiators, heaters, stoves, candles and other heat-generating products Avoid using the device near strong magnetic fields. Do not use this device when condensation may occur. Do not use this device near water or other liquids. Do not use this device in a damp room. Do not use this device near a swimming pool. Electrostatic interference may interfere with the normal use of this device. If this occurs, reset the device and restart it according to the instructions in the user manual. The display is made of plastic and might break when it’s damaged. Beware of sharp plastic splinters when the screen breaks to avoid injury. Should the unit become wet, immediately remove the plug from the power outlet and let the appliance fry for 72 hours before trying to use it again. Remove the batteries from the device and/or remote control if they will not be used for a long time. This device and the supplied accessories contain sensitive components. Never drop them, put them in a microwave, burn them or paint them. Do not bite or suck on the device and/or supplied accessories. Do not insert the device or the supplied accessories in your ears, mouth or other body orifices. This device and/or accessories contain small parts that may lead to a choking hazard. Therefore, keep it away from children. When connecting the device, if a connector does not seem to fit, do not force it. Be careful when using this device when participating in traffic, the sound might distract your attention. BATTERY INSTALLATION The battery compartment is located on the back of the remote control. 1. Remove the battery compartment door by pressing in on the tab and lifting it off. 2. Insert two (2) AAA size batteries (not included) into the battery compartment following the polarity markings inside the battery compartment. 3. Slide the compartment door back in the remote control Battery Precautions z Replacement of batteries must be done by an adult. z Do not mix old and new batteries. z Do not mix alkaline, standard (carbon-zinc) or rechargeable (nickel-cadmium) batteries. z The supply terminals are not to be short-circuited. z Non-rechargeable batteries are not to be recharged. z Exhausted batteries are to be removed. z Only batteries of the equivalent type are to be used. z Batteries are to be inserted with the correct polarity. z Dispose of batteries properly. Do not dispose of batteries in fire. The batteries may explode or leak. Location of controls 1) 2) 3) 4) 5) 6) 7) 8) 9) 10) 11) 12) 13) 14) 15) 16) 17) 18) 19) 20) 21) 22) 23) 24) 25) 26) 27) 28) 29) 30) Dust cover Dial pointer Left speaker Play/Pause/Stop button button Skip down Source button Record button Power off/functions selector Volume knob 3.5 mm headphone jack SD/mmc card slot USB socket LCD display Right speaker Skip up button +10 button Repeat/Intro/Random mode button Radio band selector Tuning knob X-bass on/off button Power LED indicator FM stereo LED indicator Remote sensor Spindle adaptor Turntable speed selector Pick-up holder Line out socket FM wire antenna Auto stop on/off switch AC power cord Caution: Usage of controls or adjustments or performance of procedures other than those specified may result in hazardous radiation exposure. This unit should not be adjusted or repaired by anyone except qualified service personnel. Precautions for use Installation • • • Unpack all parts and remove protective material. Do not connect the unit to the mains before checking the mains voltage and before all other connections have been made. Do not cover any vents and make sure that there is a space of several centimeters around the unit for ventilation. Connection 1. 2. Connect the power cord (30) to AC outlet Switch the Function selector (8) to “ Phono or USB/SD “ function. If the backlight at LCD display is light up, the device is on. Now your device is ready to play the music. Listening to radio Manual tuning 1. 2. 3. 4. Turn Function selector (8) to select “ Tuner ” mode. Select the desired band by Radio band selector (18) (AM or FM or FM-stereo). Tune to the required station by turning the Tuning knob (19). Adjust Volume knob (9) to the desire volume level. FM & FM-stereo reception z z Set the Radio band selector (18) at “ FM ” position. Programs are received in mono mode. In particular when stereo signal are weak. It is preferable to receive the program in mono. Set the radio band selector (18) at “FM-ST” position for receiving stereo programs. The FM-stereo LED indicator (22) will light up to show FM stereo program is receiving. EN-1 Hints for best reception:- AM : the receiver has a built-in am bar antenna. If reception is weak, slightly rotate or re-positioning of the unit will usually improve the am reception. FM : the receiver has a built-in FM wire antenna hanging at the rear cabinet. This wire should be totally unraveled and extended for best reception. Playback of MP3 song via USB storage media or memory card Connecting The system is able to decode and playback all MP3 file which stored in the memory media with USB connecting port or SD/MMC memory card. 1. 2. z 3. Set Function selector (8) at USB/SD mode and then press source button (6) to select “ USB or card” mode. Plug-in the USB plug with the face up & make sure it is plugged in completely or insert the memory card in the direction of the arrow as shown on the label on the underside of the memory card slot cover. Insert straight without bending. Connecting the USB upside down or backwards could damage the audio system or the storage media (USB thumb drive / SD/MMC card). Check to be sure the direction is correct before plugging in. The system will start reading the storage media automatically after plugging in. Remark: USB port does not support connection with USB extension cable and is not designed for communication with computer directly. z Play / Pause / Stop mode 1. Press “ Play/Pause/Stop ” button (4) once to pause the playback, the playing time will be freeze & flashing on the LCD display (13). Press again to resume normal playback. 2. Press and hold the “ Play / Pause /Stop “ button (4) for over 2 seconds during playback mode. The system will go to stop mode and total track nr. on the USB/SD media will appear on the LCD display (13). z Skip/search mode (skip/search up 1. During play or pause mode, if “Skip up” button (15) is pressed. It will go to next track and display the track no. and change to play mode. During play or pause mode, if “Skip down” button (5) is pressed. It will go to previous track and change to playback mode. If press and hold the “ Skip up/down button “ (15/5) during MP3 playback, the playing track will go fast forward or backward until the button being released. 2. 3. / skip/search down ) Remark : The system will be silent during search up/down mode z +10/-10 tracks(by remote handset) 1. Press “ +10 button (16) or -10 button (on remote control) to skip to your favorite track more convenience. Remark - The system can detect and read the file under MP3 format only though the USB port or SD card slot If a MP3 player is connected to the device via the USB socket, due to variances in MP3 encoding format, some MP3’s may not be able to play via the USB socket. This is not a malfunction of the system. ID3 (file/artist/album) function (by remote handset) 1. Press the “ Info “ button during playback of MP3 file, the song file/artist/album is being displayed. Press the “ Info ” button again to turn off the function. Song file name search function (by remote handset) You can search the track by the file name during stop mode:1. Press the “ Find “ button once, then press the “Skip up ” (15) (or Skip down ) button (5), you can search a file under alphabet order on LCD display, then press the “ Play/Pause/Stop ” button (4) to start the playback of the selected track. Remark:- In that case of no name had been assigned for the track, “ NOFILE “ is being displayed” on LCD display (13). - The LCD display supports the English language only MP3 track format requirement:MP3 bit rate : 128 kbps. - The performance of playing MP3 is various from the quality of USB/SD media and the method of encoding. EN-2 z z Repeat/intro/random mode Press the repeat/intro/random button (17) during playback, you can select the difference modes as followed:(1) repeat 1 Play mode Repeat single track Repeat all tracks Intro play mode Random mode Off mode z (2) repeat all track (3) intro play (4) random (5) off mode indicator on LCD display all Intro Random ----------------- Repeat play You can listen the desired tracks or all tracks repeatedly by this function. z Intro play You can listen the beginning (10 seconds) of each file by this function & save time to when searching the desire song z Random play You can listen to all the tracks in a random order by using this function Tracks programming (by remote control) Up to 10 tracks can be programmed for MP3 file and play in any order. Before use, be sure the system is at stop mode before programming:1. Set in USB/SD mode & set at stop mode. 2. Press the “Program” button, “ Prog “ will appear on LCD display (13). Moreover, it will indicate program no. and digits for track no. to be programmed. (15) or down buttons (5). 3. Select a desired track by pressing Skip up 4. Press the “ Program ” button to store the trace into memory. 5. Repeat steps 3 and 4 to enter additional tracks into the memory if necessary. 6. When all the desired tracks have been programmed, press “ Play/Pause/Stop ” button (4) to play the MP3 file in assigned order. 7. To cancel the programmed file, stop playback the unit and then press “Program” button on remote control until “ Prog “ has disappear on LCD display (13). Encoding of Phono into MP3 file The system is able to encode the phono to MP3 format and recording at memory media with USB connecting port or SD/MMC card. A) Phono encoding 1) Insert the USB or SD media to the main unit refer the “Playback of MP3 song via USB storage media or memory card section”. 2) Set the function button to “ Phono “ mode and then press the “ Rec “ button (7) directly. 3) 4) 5) The LCD display will show “ “ or “ “&“ “ and flashing, and the system is starting the encoding mode after few seconds,. Start playback at phono for the track which you want to recorded. After finish of recoding, press the “ Rec “ button (7) until the LCD stop flashing and return to “ phono “ mode. Remark:The recording speed is 1:1 and according to the actual playing time of the phono The system will create a folder and then store the encoded track in it. The recording format is set at – MP3 bit rate : 128 kbps, sampling rate : 44.1khz No song title will be recorded during encoding mode. If both media (USB/SD) inserted to the device, the device will on default record to USB media when encoding from phono. - Because this device has USB as default recording device at USB mode encode, please do not insert the USB media during encoding to SD card, it causes the device does to not function properly. B) track separation (by remote handset) You can divide the music into tracks by pressing the “ “ (track separation) button once at the remote control during encoding from phono to USB/SD, the system will generate a new track and continue the recording. The text “ phono “ at LCD display will flash one time, it mean the device has created a new track successfully. EN-3 Removing of USB / memory card To remove the USB / memory card, turn off the power or switch the function mode to tuner first. For USB port – unplug it by pulling out the USB device directly, for memory card – press the memory card inward & then release, now the card being partially eject and you can remove it by hand. Phono Note: - Remove the stylus protector. Be sure that the tone arm is being detached from the tone arm rest before operating and re-secured again afterwards. 1. 2. 3. 4. Select to “ Phono ” function from function selector (8) Set the speed selector to the proper position depending on the record to be played. Place the record on the platter (use the spindle adaptor if required). Lift the tone arm from the rest and slowly move it to the record side. The platter will start to rotate. Place the tone arm to the desired position on the record. Adjust the volume to the desired level. At the end of the record, the platter will automatically stop rotating. Lift the tone arm from the record and return it to the rest. To stop manually, lift the tone arm from the record and return it to the rest. 5. 6. 7. 8. Remark : as some kind of record the auto-stop area was out of the unit setting, so it will stop before the last rack finish. In this case, select the auto-stop switch (29) to “ off “ position, then it will run to the end of the record but will not stop automatically (turn off the unit by power button or switch back the auto-stop switch (29) to “ on “ position to stop the platter to rotate). Then put back the tone arm to the rest position. Line out connection You can connect the system to your hi-fi system by connecting the line out socket (27) to the auxiliary input socket with a RCA cable (not included). Remark: Due to ErP stage two requirements and to protect the environment. The unit will switch to standby mode automatically if there isn’t any music played for over 15 minutes. Remote control transmitter Battery installation (battery not included) The infra-red transmitter requires 2 AAA size battery for operation. Button description 1) Find In MP3 mode, press to active file name search function. 2) Info In USB/SD mode, press to active the ID3 feature 3) Rec Press to active/de-active recording function 4) Rep/intro/ran In USB/SD mode, press to active repeat / intro / random function 5) Program In USB/SD mode, press to activate/deactivate program function 6) Play/Pause In USB/SD mode, press once to start playback. Press again to enter pause mode. 7) Skip/search forward Press once to skip to next track, press & hold to search forward Skip/search backward Press once to skip to previous track. press & hold to search backward 8) Stop In USB/SD mode, press to stop playback. 9) +10/-10 In MP3 mode, press to skip 10 track forward or backward 10) Source In USB/SD mode, press to select USB or SD function repeatedly 11) Track separation Press to divide the recording track at turntable during encoding EN-4 The USB memory stick should be plugged into the unit directly. Don’t use an USB extension cable because it can cause interference resulting in failing of data. Service and support For information: http://www.axxion-electronics.com/ For support: http://axxionsupport.zendesk.com Axxion helpdesk: Germany 0900-1520530 (Local charges) The Netherlands 0900-23553626 (Local charges + 1ct P/min) Belgium 02-6200115 France 0170480005 (Local charges) (Local charges) The helpdesk is accessible from Monday to Friday from 9 AM till 6 PM. In case your device needs repair, our helpdesk will redirect you to your local dealer. Axxion offers service and warranty in accordance to European law, which means that in case of repair (both during and after the warranty period), you should contact your local dealer. Please note: It is not possible to send products to directlyAxxionfor repair. Important note: If this unit will be opened, or accessed in any way by a non-official service center, the warranty expires immediately. This symbol indicates that the relevant electrical product or battery should not be disposed of as general household waste in Europe. To ensure the correct waste treatment of the product and battery, please dispose them in accordance to any applicable local laws of requirement for disposal of electrical equipment or batteries. In so doing, you will help to conserve natural resources and improve standards of environmental protection in treatment and disposal of electrical waste (Waste Electrical and Electronic Equipment Directive). EN-5