1
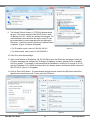
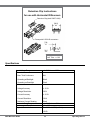
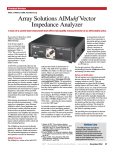
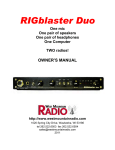
RIGrunner 4005i
www.westmountainradio.com
1020 Spring City Drive
Waukesha, WI 53186
262-522-6503
[email protected]
©2015 West Mountain Radio, All rights reserved. All trademarks are the property of their respective owners.
Thank you for choosing the RIGrunner 4005i with Internet and WIFI capabilities. The RIGrunner 4005i is a
sophisticated 12 VDC power controller and distribution system, intended for use in remote-control applications.
The RIGrunner 4005i allows EMCOMM and Repeater operators the ability to monitor and control the power
distribution of their systems from any PC or Internet-ready mobile device.
Please read these instructions carefully before
setting up and using the
RIGrunner 4005i.
Mounting Location
Consider a location that gives easy access and is easy to see. The location should be close, or central, to
most of the equipment; especially those that draw large amounts of current. Locate the power source in close
proximity to the RIGrunner, remembering every wire has resistance, and longer wires have more resistance.
Understand that #10 cable of 10 feet or more will not allow for adequate full output supply to the RIGrunner
without a significant voltage drop.
Install in a cool, dry place with good ventilation. Do not place on top of an amplifier or room heater and do
not cover the unit. It is recommended to not place in the engine compartment of a car, or directly on the floor
within the car, as water from rain or snow many damage the unit.
Connecting to Equipment
RIGrunners come standard with Anderson Powerpole®. Powerpole® are genderless and the same connector
arrangement works for both supply and load. Consider updating all cables that supply or use 12VDC to use
Powerpole® connectors for quick, convenient connections to equipment.
Assembly of Powerpole® to cables should follow the amateur radio standard also used by RIGrunners.
Powerpole® may be installed by soldering or crimping. Powerpole® general installation instructions can be
found at www.westmountainradio.com/Powerpoleinstall or view the video presentation on PWRcrimp Tool and
Powerpole®.
IMPORTANT: Be sure that assembly of the pairs is correct. ALWAYS verify that RED+PLUS and BLACK—
MINUS is correct.
Back Panel Descriptions
The far right connector is DC IN for input of a power supply or battery. It is recommended to plug in equipment
with the highest power consumption to start at Powerpole® Node 1 and continue down the Powerpole® nodes
for lower drain units. Typically 12V input amplifiers and 100W RF output transceivers should be near Node
1, VHF radios in the middle nodes, and smaller accessories in Nodes 4 and 5. All Powerpole® nodes have
software adjustable fuses. Fuse configuration and adjustment procedures discussed in a later section of this
manual.
Expansion Port connector is an 8-pin MiniDIN and allows for future accessories from West Mountain Radio
such as antenna rotor control, CI-V, and daisy-chain of equipment. Details on the expansion port pins and
configuration is discussed later in this manual.
Ethernet Port connector is a standard RJ45 jack to connect the RIGrunner 4005i to any Internet connection or
router.
Anderson Power Products® and Powerpole® is a registered trademark of Anderson Power Products, Inc.
West Mountain Radio
2
Operating Manual
Back Panel
Ethernet
Port
Expansion
Port
Powerpole® Nodes
“Nodes” 1 - 5
DC IN Powerpole®
Connection
Front Panel Description
LCD – status screen operating in two modes: Scrolling status mode or Individual status mode.
Next/Exit Buttons – operation for LCD display
Node LEDs – The LED above the button indicates the current state of that node
• Unlit – Powerpole® node is not active and no power is being supplied to the node.
• Green – Powerpole® node is active and power is being supplied to the node.
• Red – The soft fuse has blown and no power is being applied to the node.
• Node Enable Buttons – button press will toggle the ON/OFF state of each node or Reset Fuse.
Front Panel
Node LED
Status Indicators
Node Enable Buttons
LCD Display
Next/Exit Buttons
Node Enable and Soft Fuses
Each Powerpole® node has a toggle button to enable/disable node. Pressing the corresponding button will
toggle the ON/OFF state of the Powerpole® node. The LED above the button indicates the current state of
that Powerpole®.
The ON/OFF state is stored in program memory and retained if power is lost to the RIGrunner.
Each node has a “soft fuse”, meaning that it is a user configurable setting. The fuse value can be configured
from the web browser over a network connection. If the soft fuse has been blown, the Node Enable Button
must be pressed twice to return to ON status. NOTE: The first button press disables the node and the second
button press enables the node.
West Mountain Radio
3
Operating Manual
Status Screen
The LCD status screen operates in two modes:
• Scrolling status mode (See FIGURE 1)
• Individual status mode (See FIGURE 2)
Press the NEXT button while in scrolling status mode to go to the individual status mode.
Press the EXIT button while in individual status mode to return the unit to scrolling status mode. Press either
button at any time to temporarily enable the backlight on the LCD.
The LCD status screen and the NEXT and EXIT buttons generally are used to view unit information and
settings. In order to configure the unit, the user must use a web browser over the network.
Scrolling Status Mode: The LCD will display status of all the connected nodes.
Supply: 13.80 V
Node 1: 0.15 A
Figure 1 – Scrolling status screen
The top line displays the current voltage of the power supply. The bottom line displays the status of one node
at a time for a few seconds before scrolling to the next node. If the node is enabled, it will display the load (in
Amps) drawn from that node. If the node is disabled, it will display OFF in that position.
Individual Status Mode: The LCD status screen will continue to display a screen until the NEXT or EXIT
button is pressed. If NEXT is pressed it will display the next status screen. If EXIT is pressed, it will return to
the scrolling status mode. The following is an example of an individual screen.
Node 1 Descriptive String
Node 1: 0.15 A
Figure 2 – Individual status screen
The top line shows a descriptive name for this node, which can be configured using a web browser over the
network. The bottom line displays the load or whether the node is OFF.
Network Status Screen: While still in Individual Status Mode, press NEXT past each node status to view the
network status information.
Network Status:
192.168.100.220
Figure 3 – Network status screen
In this screen, the second line gives the current network status, and has the following possible values:
• Not Connected – No network connection is found. If using Ethernet, verify that a good Ethernet cable
has been connected from a hub/PC to the RIGrunner. If using Wifi, verify that all of the WIFI SSID and
security settings are valid for the WIFI router.
• DHCP Not Bound – A network connection has been found, but no IP information has been sent by
a DHCP server. More information about this is detailed in the Networking section of the RIGrunner
manual.
• IP Address – An IP address is a set of 4 numbers, with each number separated by a ‘.’. This number
represents the address on the network, and is the address that can be open with a web browser.
More information about this is detailed in the Networking section of the RIGrunner manual.
West Mountain Radio
4
Operating Manual
DHCP Status Screen: Press NEXT when viewing the Network Status Screen to view the DHCP client
configuration information.
DHCP (Auto IP):
Disabled
Figure 4 – DHCP status screen
This screen displays the current DHCP client configuration. DHCP is a protocol that allows for auto IP address
configuration. If enabled, the RIGrunner will attempt to talk to a DHCP server to get IP address configuration
automatically. In order to enable this, there must be a DHCP server on the network. Most modern routers have
DHCP support. Additional information and details are discussed in the Networking section of this manual.
HTTP Port Screen: Press NEXT when viewing the DHCP Status Screen to view the HTTP Port web browser
information.
HTTP Port
80
Figure 5 – Network status screen
The HTTP port is the TCP/IP port that the RIGrunner’s webserver is using for web browser connections.
The default port used by all web browsers is 80. But in order to route or use port-forwarding on some router
configurations, it may be required to change this port. More information about this is detailed in the Networking
section of this manual.
DHCP Toggle, WIFI Networking Mode Toggle and Factory Reset
DHCP Toggle
By holding down the NEXT and EXIT buttons for 5 seconds the RIGrunner will start a special menu that allows
the user to toggle the DHCP setting or perform a factory reset.
Disable DHCP?
Next=N, Exit=Y
Figure 6 – DHCP toggle screen
Figure 6 shows the DHCP toggle screen, and is the first choice shown after holding down the NEXT and EXIT
buttons for 5 seconds. Pressing the EXIT button will toggle the existing value of the DHCP client configuration
and then return to normal operation. This only toggles the DHCP client configuration of the RIGrunner. Refer
to the manual of the router in use to adjust the DHCP server configuration.
WIFI Networking Mode Toggle
If you are using a WIFI version of the RIGrunner 4005i, pressing the NEXT button on the FIGURE 6 screen
will bring up the WIFI networking mode screen as shown in FIGURE 7. If you are not using a WIFI RIGrunner
4005i you can skip to FIGURE 8.
Enable Ad-Hoc?
Next=N, Exit=Y
Figure 7 – WIFI networking mode toggle screen
FIGURE 7 shows the WIFI networking mode toggle screen. The RIGrunner 4005i can either be placed into AdHoc mode or Infrastructure mode. The differences between these two modes are documented in the section
labeled WIFI Networking.
West Mountain Radio
5
Operating Manual
If Ad-Hoc networking mode is enabled, the first line of FIGURE 7 will say ‘Disable Ad-Hoc?’. Pressing the
EXIT button will set WIFI networking mode to Infrastructure. A reboot of the RIGrunner is required for this
change to have effect.
Factory Reset
If Infrastructure networking mode is enabled, the first line of FIGURE 7 will say ‘Enable Ad-Hoc?’. Pressing the
EXIT button will set WIFI networking mode to Ad-Hoc. A reboot of the RIGrunner is required for this change to
have effect. Pressing the NEXT button on the FIGURE 7 screen will go to the Factory reset screen as shown in
FIGURE 8.
Factory Reset: Press the NEXT button to advance the toggle of DHCP screen to Factory Reset screen.
Factory Reset?
Next=N, Exit=Y
Figure 8 – Factory reset screen
Press the EXIT button will perform a factory reset.
Press the NEXT button to bypass performing a factory reset and return the unit to normal operating mode.
Below is a list of the initial values that will be set if a factory reset is performed.
NOTE: Toggling the DHCP client or performing a factory reset requires a power-cycle in order to take effect.
Factory Defaults:
• DHCP client: Enabled
• IP Address: 192.168.100.220
• Netmask Address: 255.255.255.0
• Gateway Address: 192.168.100.1
• HTTP Port: 80
• HTTP username and password are cleared
• Node descriptive strings are clear
• Device String: RR4005i
• Expansion port pins set to high impedance
• All soft fuses set to 40A
• WIFI SSID: MY_WIFI
• WIFI networking mode: Infrastructure
• WIFI channels used: All
• WIFI security mode / encryption: Open (none)
• E-mail server configuration cleared
• All e-mail alerts disabled
West Mountain Radio
6
Operating Manual
Rebooting the Device
By holding the EXIT button down for 3 seconds, the device will prompt if you want to reboot (reset) the device:
Reboot Unit?
Next=N, Exit=Y
Figure 9 – Reboot prompt screen
Pressing the NEXT button will ignore the request and the unit will operate normally. Pressing the EXIT button
will cause the unit to be rebooted. A reason for wanting to reboot the unit is to load new or changed network
settings.
WIFI Networking Configuration
Ad-Hoc vs Infrastructure
The RIGrunner 4005i can be placed in two different WIFI networking modes: Ad-Hoc or Infrastructure.
Infrastructure is the more common WIFI networking mode, where all WIFI devices on the network connect
to one WIFI access point (aka AP, gateway or router). With Infrastructure mode several devices can be
connected to one network. Ad-Hoc mode is a peer-to-peer network connection that can only be shared
between two devices. The most common use of Ad-Hoc is a direct connection between two computers or
between a smart phone and another device.
When the RIGrunner 4005i is using Infrastructure mode, the RIGruner 4005i acts like a common TCP/IP client.
In this mode the TCP/IP settings, such as IP address or DHCP, needs to be configured to match the network
that the RIGrunner 4005i is to join. See the section labeled ‘TCP/IP Networking Configuration’ for more help
on this.
When the RIGrunner 4005i is using Ad-Hoc mode, the RIGrunner 4005i acts more like a server. In this mode
the DHCP client setting is ignored, instead the RIGrunner 4005i acts as a DHCP server and will assign IP
addresses to clients that connect to the RIGrunner 4005i (if the client has DHCP enabled). Also in the Ad-Hoc
mode, the RIGrunner 4005i acts as a DNS server. If the client connecting to the RIGrunner 4005i is using the
RIGrunner 4005i as the DNS server, the RIGrunner 4005i will answer all DNS queries and point the result to
the RIGrunner 4005i. That means opening a browser to http://someplace.com it will open the web-page on the
RIGrunner 4005i. The application of this is, with minimal configuration, a smart phone or client PC can connect
to the RIGrunner 4005i and access the web-pages. If the client connecting to the RIGrunner 4005i is using
DHCP to get IP configuration, the client will automatically use the RIGrunner as a DNS server.
Configuration of WIFI networking
In order to make the RIGrunner 4005i connect properly to an established Infrastructure network, the RIGrunner
4005i needs to be configured for that network’s parameters. The settings that need to be set are the SSID (the
unique name of the infrastructure network), the security mode and encryption key. All of these parameters are
unique to each network.
These settings can be set on configuration web-page on the RIGrunner 4005i. Network access is required to
use the configuration web-page on the RIGrunner 4005i, here are some ways you can access these webpages
before the RIGrunner 4005i is configured for your network:
West Mountain Radio
7
Operating Manual
Setup a WIFI access point (aka AP, router or gateway) to the RIGrunner 4005i default settings:
1. The RIGrunner 4005i’s factory default settings for SSID are ‘MY_WIFI’, infrastructure mode, no WIFI
security and DHCP client enabled. You can reset RIGrunner 4005i to factory default settings by
following the directions in the section labeled ‘DHCP Toggle, WIFI networking mode toggle and Factory
Reset’.
2. Setup a WIFI AP using the SSID ‘MY_WIFI’ and no network security and DHCP server enabled. Refer
to the manaul of the WIFI AP for directions on this setup.
3. Use another PC with WIFI networking using the same network settings (SSID set to ‘MY_WIFI’ and
DHCP client enabled).
4. Once this PC is connected to the WIFI ‘MY_WIFI’ network, use this PC to access the web-pages of the
RIGrunner 4005i and use the configure web-page to set the RIGrunner 4005i for the desired network
settings. To do this, use a web-browser and open the IP address of the RIGrunner 4005i. The IP
address of the RIGrunner 4005i can be determined by viewing the Network status screen (see FIGURE
3). If the network status screen says no network, then verify that the AP is using the proper settings in
step 2 above.
5. Once the WIFI settings on the RIGrunner 4005i have been changed, reboot the unit and then use the
network status screen on the RIGrunner 4005i to verify connection to the desired network.
Connect to RIGrunner 4005i in Ad-Hoc mode:
1. The RIGrunner 4005i’s factory default settings for SSID is ‘MY_WIFI’, infrastructure mode, no WIFI
security and DHCP client enabled. You can reset RIGrunner 4005i to factory default settings by
following the directions in the section labeled ‘DHCP Toggle, WIFI networking mode toggle and Factory
Reset’.
2. Change the RIGrunner 4005i WIFI mode to Ad-Hoc using the directions in this manual, see the section
labeled ‘DHCP Toggle, WIFI networking mode toggle and Factory Reset’. A reboot of the RIGrunner
4005i is required after changing to Ad-Hoc mode.
3. Using a PC or smart phone, connect to the Ad-Hoc network labeled ‘MY_WIFI’. This is the RIGrunner
4005i.
4. Make sure the PC or smart phone has DHCP client enabled, so the PC or smart phone will get IP
address information automatically from the RIGrunner 4005i.
5. Once the PC or smart phone makes a connection, use a web browser and open the config web-
pages of the RIGrunner 4005i and change the WIFI settings to the desired network settings. This
can be done by either using the static IP address of the RIGrunner 4005i (which by factory default is
192.168.100.220) or by using any server name (ex: http://someserver.com)
Don’t forget when using the web-pages to change network settings of the RIGrunner 4005i to change
the WIFI networking mode to infrastructure.
6. Once the WIFI settings on the RIGrunner 4005i have been changed, reboot the unit and then use the
network status screen on the RIGrunner 4005i to verify connection to the desired network.
If the RIGrunner 4005i is not connecting to the WIFI AP properly even though it appears all the network settings
are correct, verify that the WIFI AP doesn’t have a MAC address filter in place that is blocking unknown WIFI
devices from using the network.
West Mountain Radio
8
Operating Manual
WIFI radio frequency region
RIGrunner 4005i’s are shipped by West Mountain Radio using the FCC radio frequency region. If the
RIGrunner 4005i is to be used in a different region then this setting will have to be changed. To change this
region the NEXT and EXIT button have to be held down during power-up and then held for over 5 seconds.
This will then be displayed on the LCD of the RIGrunner 4005i:
Set WIFI Region?
Next=N, Exit=Y
Figure 10 – WIFI region warning screen
Pressing EXIT button on FIGURE 10 will cause the RIGrunner 4005i to return to normal operation. Press
NEXT button on FIGURE 10 will acknowledge the change request, and the LCD on the RIGrunner 4005i will
now display:
FCC
Next=N, Exit=Y
Figure 11 – WIFI region setting screen
Pressing the NEXT button on FIGURE 11 will cycle between the valid radio frequency regions supported by
the RIGrunner 4005i. Pressing the EXIT button on FIGURE 11 will cause the selected region to be saved to
memory, and the unit will return to normal operation.
Here is an overview of the valid radio frequency regions supported:
FCC – USA. Channels 1-11 valid.
IC – Canada. Channels 1-13 valid.
ETSI – Europe. Channels 1-13 valid.
JAPANA – Japan 802.11b only. Only channel 14 valid. The RIGrunner 4005i WIFI is 802.11b, so this channel/
region would be valid for use.
JAPANB – Japan full access. Channels 1-13 valid.
Using the factory reset command (detailed in this manual’s section labeled ‘DHCP Toggle, WIFI networking
mode toggle and Factory Reset’) will not change this value back to FCC.
TCP/IP Networking Configuration
Using DHCP Client
If the local network being used by the RIGrunner has a DHCP server, it is strongly recommended to enable the
DHCP client on the RIGrunner, as it will significantly simplify the network configuration required. The DHCP
client of the RIGrunner is enabled by default. Refer to the manual of a gateway, routers or server in use to
determine if DHCP is enabled or how to enable a DHCP server on the network.
The DHCP client of the RIGrunner can be enabled using the NEXT and EXIT buttons on the front of the
RIGrunner. If DHCP is enabled, the IP address and connection status of the RIGrunner can be viewed in one
of two ways:
West Mountain Radio
9
Operating Manual
•
View the network status screen on the front of the RIGrunner. (See Figure 3 of the Status Screen
section of this manual)
•
View the DHCP client list of the DHCP server. Refer to the DHCP server manual for the router or server
PC in use for additional instructions. The default name that will be displayed in the DHCP client list is
“RR4005i”, but this name can be changed by using the Configure web-page of the RIGrunner.
Using Static IP (no DHCP Client)
If the network being used by the RIGrunner does not have a DHCP server, the static IP configuration of the
RIGrunner has to be changed to be compatible with the RIGrunner. For example, if the IP range of the network
is 10.0.*.* the IP address of the RIGrunner needs to be changed to a valid number in the range and the
netmask needs to be changed to 255.255.0.0. If the IP range of the network is 192.168.100.*, then the factory
default settings of the RIGrunner would be valid.
Changing the network configuration of the RIGrunner can only be done through a web browser. Therefore,
commonly a PC IP address might need to be temporarily changed to the RIGrunner’s factory default
192.168.100.220 network range.
Set-up Network Configuration in Windows
7: (steps are similar for other versions of
Windows):
1. See the ‘DHCP Toggle and Factory Reset’
section in this manual for directions to disable
the DHCP client on the RIGrunner.
2. Disconnect PC from any Ethernet networks.
3. Connect an Ethernet cable directly from the
PC to the RIGrunner. Most modern PCs will
detect this configuration and automatically
perform a network crossover. If the PC does
not perform this function then an Ethernet
crossover cable will have to be used.
Figure 12
4.Open the Control Panel from the Start Menu.
(Figure 12 window will appear)
5.Make sure the Control Panel is in ‘View by:
Category’ mode (see top left of Control Panel) and
select View network status and tasks. (Figure 13
window will appear)
6.Select ‘Change adapter settings’ on the left side of
the screen. (Figure 14 window will appear)
7.Right click on ‘Local Area Connection’ and select
Properties. (Figure 15 window will appear)
Figure 13
West Mountain Radio
8.Left click on Internet Protocol Version 4 (TCP/IPv4)
and click on Properties button.
10
Operating Manual
Figure 14
9. The Internet Protocol Version 4 (TCP/IPv4) window should
be open. This screen configures the DHCP client or static
IP address of the PC. Before any settings are changed, it is
recommended to write down the old values so the PC can
be restored back to normal operation after configuring the
RIGrunner. Confirm the Use the following IP address button
is selected. (Figure 16 window will appear)
• For IP address, enter a value of ‘192.168.100.221’
Figure 15
• For Subnet mask, enter a value of ‘255.255.255.0’
10.Click OK to save these settings.
11.Open a web browser to the address 192.168.100.220 to open the RIGrunner web-pages. Select the
Configure web-page and configure the IP settings (IP Address, netmask, gateway) to be compatible
with your network. For example, if the network that the RIGblaster is running on is a range of 10.0.0.*,
then an IP Address of 10.0.0.220 would be valid (if not already used on the network) with a netmask of
255.255.255.0. (Figure 17 will appear)
12.Click on Save Config button. The new network settings are now saved to the RIGrunner and will be
applied on the next power-cycle. Power-cycle the RIGrunner.
Figure 17
Figure 16
West Mountain Radio
11
Operating Manual
13.Click Back in the web browser to the Internet Protocol Version 4 (TCP/IPv4) page and return the
network settings to the previous state.
14.Open the web browser and using the IP address set in Step 11, verify the setting are correct. The
RIGrunner is now accessible from the network.
Web Pages
The status and configuration of the RIGrunner can be viewed remotely using a web browser over the network
connection. Each Powerpole® node can also be remotely controlled from a web browser.
Main Web-pages
There are four main web-pages, each with Help integrated within the page:
• Home – view power supply status (voltage), view status of each Powerpole® node (enabled, current
draw) and turn ON/OFF each node.
• XML – raw XML information of status of the power supply and Powerpole® nodes. Useful for
interfacing with external logging software.
• Expansion – Control of the 8-pin expansion port. See the Expansion Port section of this manual for
more information.
• Config – Set a descriptive name for RIGrunner, set a descriptive name for each Powerpole® node,
set soft fuse point, set network configuration, set username/password, and more.
The web pages can be password protected to prevent unauthorized remote access. The username/password
can be set on the Config page.
E-mail alerts
The RIGrunner 4005i can be configured to send e-mail alerts. For example, the RIGrunner 4005i can send an
e-mail if one of the fuses has blown. This can be configured on the config web-page.
In order to send e-mails, the RIGrunner 4005i must have access to an SMTP server. An SMTP server is a
server on the internet that relays e-mails. The configuration web-page can be used to point the RIGrunner
4005i to a valid SMTP server.
In order to prevent unauthorized access or the relaying of spam e-mails, many SMTP servers have strict rules
about who can access the server. SMTP servers may ignore clients for the following reasons:
• Outside it’s local network.
• E-mails not destined to someone on it’s network.
• E-mails not sent from someone on it’s network.
• Invalid authorization (username and password required).
West Mountain Radio
12
Operating Manual
If the RIGrunner 4005i appears to be configured correctly but no e-mails are being received the configure webpage can be used for debugging. On the configure web-page there is a row labeled ‘E-mail Status’. Here are
a description of some of the values seen on this row:
• ‘Idle’ – no attempts to send an e-mail performed since power-up.
• ‘Busy’ – currently trying to send an e-mail.
• ‘OK’ – last e-mail appeared to be sent successfully.
• ‘Waiting for SMTP to be free’ – Many SMTP servers will block an e-mail client if it tries to send too
many e-mails in a short time period. To prevent the RIGrunner 4005i from doing this, there is a 3
minute delay between e-mails. If a trigger event occurred within that 3 minute period, that e-mail will
be delayed until this period has expired.
• “FAIL, XXX, YYY’ – An error occurred on last e-mail. XXX will be a descriptive tag of the problem.
YYY is an SMTP result code.
If XXX is ‘CONNECT’ that means it could not make a TCP/IP connection to the SMTP server.
Verify that the E-mail hostname and E-mail port are correct for the desired SMTP server. If using a
hostname instead of an IP address (ex someserver.com) then verify that the DNS server setting of the
RIGrunner 4005i is correct.
If YYY is not 0, that means the SMTP server responded with an error during the transaction. An
internet search of SMTP result codes will give an overview of the many errors that are possible. If
presented with an error code, an internet search of that error may yield information as to why the
SMTP server is rejecting the e-mail.
Expansion Port
The following pin-out is of the 8-pin expansion port on the back of the RIGrunner:
Pin
1
2
3
4
5
6
7
8
Description
Supply voltage. This is the same voltage as the supply that is
powering the RIGrunner (8 to 15 Volts)
Ground
Serial output, TTL (3.3V). Can be connected to external drivers
(RS232, RS485, etc).
Serial input, TTL (3.3V). Can be connected to external drivers
(RS232, RS485, etc).
Analog output (0 to 3.3V)
Analog output (0 to 3.3V)
Analog input (0 to 3.3V)
Analog input (0 to 3.3V)
Figure 18
The analog output pins are activated by using pulse width modulation (PWM) with variable duty cycle. This can
be converted to an analog voltage simply by adding an RC filter.
NOTE: Applying voltage greater than 3.3V to any of the serial, analog output or analog input pins can damage
the RIGrunner.
West Mountain Radio
13
Operating Manual
Retention Clip Instructions
for use with Horizontal RIGrunners
Retention Clip (sku# 58257-1092)
[20.8]
.82
Powerpole® 15/30/45 connectors
[7.9]
.31
[6.1]
.24
[12.1]
.48
[mm] Toler: +- 0.5
inch Toler: +- 0.02
Specifications
Input Voltage Range
Current:
min. 8.0V / max. 15.5V
Max. Total Continuous
40A
Operating w/Backlight
80mA
Operating no Backlight
Monitor:
70mA
Voltage Accuracy
+/- 2.5%
Voltage Resolution
0.01V
Current Accuracy
+/- 2.5%
Current Resolution
0.01A
Minimum Current Reading
Electronic Fuse Range
Environmental Temperature
Physical Dimensions
50mA
min. 0.01A / max. 40A
-10 to 85C
8” x 5.25” x 1.625” (LxWxH)
1.0 LB
West Mountain Radio
14
Operating Manual
Additional Resources
Go to our support page for more assistance:
http://www.westmountainradio.com/supportrr.htm
Go to our OpTips page for connection tips:
http://www.westmountainradio.com/optipsrr.htm
RIGrunner Warranty
The RIGrunner is warranted against failure due to defects in workmanship or materials for one
year after the date of purchase from West Mountain Radio or an authorized dealer. If purchased
from an authorized dealer it must be returned with a copy of the original sales receipt or proof of
purchase.
Warranty does not cover damage caused by abuse, accident, misuse, improper or abnormal
usage, failure to follow instructions, improper installation, alteration, lightning, or other incidence
of excessive voltage or current. If failure occurs within this period, return the RIGrunner
or accessory to West Mountain Radio at your shipping expense with a full explanation and
necessary proof of purchase. The device or accessory will be repaired or replaced, at our
option, without charge, and returned to you at our shipping expense. Repaired or replaced
items are warranted for the remainder of the original warranty period. You will be charged for
repair or replacement of the RIGrunner or accessory made after the expiration of the warranty
period.
West Mountain Radio shall have no liability or responsibility to customer or any other person
or entity with respect to any liability, loss, or damage caused directly or indirectly by use or
performance of the products or arising out of any breach of this warranty, including, but not
limited to, any damages resulting from inconvenience, loss of time, data, property, revenue, or
profit, or any indirect, special incidental, or consequential damages, even if West Mountain Radio
has been advised of such damages.
Except as provided herein, West Mountain Radio makes no express warranties and any implied
warranties, including fitness for a particular purpose, are limited in duration to the stated duration
provided herein.
Anderson Power Products® and Powerpole® is a registered trademark of Anderson Power Products, Inc.
West Mountain Radio
15
Operating Manual