1
Operator's Manual
CRAFTSMAN°
2.1 cu.in./36cc 2-Cycle
GASOLINE
CHAIN SAW
Model No.
358.351042 - 14 in. Bar
@
Read
and follow all Safety Rules and Operating
ARNING:
Instructions before first use of thks product.
_
For
to your
questions
this product:
Call answers
7 am-7 pro,
Mort-Sat;
Sun,about
10 am-7
pm
•
1-800-235-5878
Sears, Roebuck and Co., Hoffrnan Estates, IL 60179 USA
53OO84294 12/29/99
52
Opera,on
6
11
14
Mal_
Service and Adjusbnents
16
17
18
ShootingChad
EndssionsStatement
Parts Ust
Spanish
Parts&Ordering
20
23
Back
FULL ONE YEAR WARRANTY ON CRAFTSMAN ® GAS
CHAIN SAW
For one year from the date of purchase, when this Craftsman Gas Chain Saw is
malntaln_ lubricatedend bated up accordingto the owner's rnanuaJ,Seres _11
repak',free of charge, any defect in mater_ orworkmans_.
This warranty exdudas the bar, chain, spark plug and air filter, which are
expendable pads, end besome worn duringnormal use.
if Ibis Gas _
Saw is used for commercialor rental purpoees,this warranty
applfasfor 30 days from the date of purchase.
WARRANTY SERVICE IS AVAILABLEBY RETURNING THIS CHAIN SAW TO
THE NEAREST SEARS SERVICE CENTER IN THE UNITED STATES.
This wan'antygives you specificlegal rights,end you may also have other rights
wtdchvary from state to state.
Seam, Roebuck and Co., D/817 WA, Hoffman Estates, IL 60179
WARNING:
Always disconnect spark
plug wire when making repairs except
for carburetor adjustments. Because a
chain saw is a high-speed woodcutting
tool, careless or Improper use of this
tool can cause serious injury.
PLAN AHEAD
• RestriCt the use of your saw to adutt
users who understend and cen follow
the safety rules, precauUens, end operating i_ns
found in this
manual.
-
Snug
F_
_
C ing
/
Prote_on
HeawDuty
G=ov
duty, non-slip gloves; eye protection
such as non-foggfng, vented goggles
or face screen; an approved safety
hard hat; and sound barriers (ear
plugs
ormufgers)to protestyour
hearing.Regular users should have
hearing checked regularly as chain
saw no_se can damage hearing. Secure hair above shoulder length.
• Keepall partsof your bedyawayfrom
the chain when the engele IS running.
• Keep children, bystanders, and
reals at least 30 feet (10 meters)
away from the work area when starting and using the saw.
• Do not handle or operate a chain saw
when you am fatigued, ill, or upset, or
if you have taken atcohol, drugs, or
medication. You must be In good
pr_rs_al
cond:,tion
andmanta_ aiert.
If you have any condition that might
be aggjave_l
by strenuous _rk,
check wifh doctor befom operaUng.
Do not start cutting untlt you have ,_
dear work area, sacure footing, and
especially if you are felling a free, a
• Wear protective geer. _ways use
steel-toed safety footwear wilh non-
_
8_;
mJg-m_ doa_g; hee_- rstn_ path.
2
OPERATE
YOUR SAW SAFELY
• Oo nof operate with one hand. Sed-
ousINuryto theopera_, hek_ or
byatanCW_
mayrNu_ fromone•
-
•
•
handed operation. A chain saw Is intended lot two-handed use.
Operate the chain saw only in a wellventilated outdoor ama.
DO not operate saw from a ladder or
in a tree, unless you am spec_aily
bained to do soo
Make sure the chain will not make
contact with any object wh,e staring
the engine. Never W to start the saw
when the guide bar is In a cut.
Do not pin pressure on the saw, es-
• Store the unit and fuai In a cool, dry
wail ve_ilated spaoe whem fuel vapom cannot reach spad_ or open
lk_rm _om wa_ heatm, ele_
motom or switd_,
fumaces, etc.
GUARD
AGAINST
KICKBACK
Foaowa. safatyru_s to h_p avo_
kickback and other forces whtch can
_,uR _ seriousk_ury.
peda,yatthe e._ oft_ cuLDo_
•
so can cause you to lose control
when the cut is completed.
• Hand camj saw onlywhen eng'me is
stopped.
Ca.y w_ muf_ awayfrom
Clear The Woddng Area
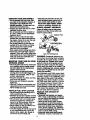
body; guide bar & chain proiecting beWARNING: Rotational I_ckback can
hind you; guide bar preterably covered with a scabbard.
occur when the moving chain contacts
an object at the upper portion of the tip
MNNTAIN YOUR SAW IN GOOD of _e gu_ bar. Con_ at me upper
WORKING ORDER
pOrtionof the tip of the guide bar can
• Have air cha'_ sa_ serv_ pedormed c_e the chain to dig into me object,
by a quelilled service dealer except
which otops the chain for an instanL The
the _
Ik_d i. the mak_l_-e
resu_ Is a llghlning f_l_, m_rse reactk_
section of this manual.
which kicks the guide bar up and back
• Maim cmlam the saw d-,a_ stops
movlng when the throttle frlgger Is mleased. For cormotion, refer to "Carburator Adjustments. _
• Keep the handles dry, clean, and free
from oil or fuel m_lure.
• Keep caps and fasteners securely
.ghtened.
• Use only Craftsman accessories and
replacement parts as recommended.
Nevermodifyyoorsaw.
HANDLE FUEL WITH CAUTION
o Do not smoke while handlingfuel or
while operating the saw.
Pinch-Wlckback and PUtHn Occur when
the chain is suddenly stopped by being
pinched,caught,orbycontactinga foreignobject in the wood. This sudden
stopping of the d'=ain resdls in a fever*
sal of the chain force used to cut wood
and causes the saw tO move in the oppos'rle direction of the chain rota_on.
Plnch-IOcld_ackdrivesthe sawstrelght
back toward the operator. Puff-In pulls
the saw away from the operator.
REDUCE THE CHANCE
OF
KICKBACK
• Recog,_ ._ I_ck
canhappen.
a basic und_,anding of _
_oas wl'_ sourc_
fuel is __ sp_b_or or
ix.xed.
i i.
Eltn'dnnateail
'N_jno With
you _
reduco the elemeht of surpdse
MIx and pour fuel In an outdoorarea
which conUtbut_ to acddent._
and use an approved, marked con*
• Never tat the moving chain contact
tainer for ell fuel purposes.Wipe up
a_y objeot at the tip of the guide bar.
ail fuelspr_sbeforestaring saw.
• Move at least 10 feet (3 meters) from
fueling site before starting.
• Turn the engine off and let saw co_ in
a non-combustible area, not on dry
leave_ skaw, paper, atc. Slewiy m_
move fuel cap and refuel unit.
• Keep working area free from obs_'uctk)ns such as other trees, _,
rocks, fences, stumps, etc. Eltmlr_te
or avok_ any obsUuction that your saw
chain could hit while cuffing.
tensioned. A loose or dull chain can
increasetm
_
of Iddlback. For
B cimin sharpening
low _
tens_
at regu_r intmva_
_
sec_
but never
tightane_L
•
.Ifeep ..__. I:_ly trom bebg in a dlmd
L_ wHh the cumng chain.
or thrown olf l:_ian,:_ and losa cora_ol.
• speed,
=H)gm
and_Unue
atf.,
• _j
c.t aZx_ s_o_r he_. _ _
_ the chi _cumng
movlng
at a
_. cunt_ ofsaw
_.__
gmatorc_ance above_to ma_ta_
._L
W_:
The _
_ea_
am
• Do npt attempt cuts s_zrt_g with the
.l_uded
• Watch tot"shifting logs or other forces
tures w}]_not totally eliminate this dan-
,p o__ bar._ge c.ts),
on your saw to he_ reduce -
r_=rdofk_c,
however,
_<_lea.
thatcould€ose a cutandrdr_ or fall get.Do notratyonlyon safetydevices.
Jmocha_.
• Ha_;_uard:
• u_,, spec,_P._d_
deigned
_m_i ._pur_ _
Avoid Pinch-K]ctd)ack:
• Be e_mmety aware of _ua_tons or
obstructions that can cause material
to r_
ttm
cor,_-,,_
• Pos#bn of front and rear _:
dissand
_
w#heacho4J_a'.The
spread and "in-line" pos_on of the
narms provided by this desig_ work
• Do not cut more than one log at a
_
_no-
to _e ba_nce an_ res_,-
• Do not twlst saw as bar is wlthdrawn
born an unden_rt whe_ bucking,
Avoid Pulldn:
mnce in €onVolllng the plvot of the
saw ba_ Joward t}_ op_ator if kick.
back occurs.
at _11 spee_ and the saw housing
agmnst wood.
Use wedges made of plastic or wood.
Never u_e met_ to hotd _ cut open.
MAINTAIN
CONTROL
signed with a small radius tip which
re_lu_)s me _ze of the kk:kbac_ dan_er zone, This type bar has been
.,oemone_rated to s_lnf_an_
reduce
me number and sarlousnes_ of kickbacks when tested in accordance with
ANSi B175.1.
Stand to me lef_of U_esaw
Thumb on
i
undersk_
Bbow
4
prone to drcutatton disordem or
rnumer
e.dsp_ a.em_g_
wl1_ rne_ the reqtmmlenlsof
vesset
damage
__
heaW.J
people. If symptoms occm such as
Callfornla Codes 4442 and 4443. All
U.S. fom_ land and thestat_ of
Cal_rn_ Idaho,Mak'le,krmneSOta,
NewJemey,Oregon,andWash_jton
dmnge in skin color or texture, or lops
seek medicalattemion. An
antl-v_aUon system does not
guarantee_e avoidanceoft_ese
pr_lems. Users vd_oopera_ power
tools on a continualand regular basis
must dosely mor_or thelr physlcal
cond'dlonand the conditionof this tool.
CIf/_l $R,4M_i ff Ih_ _nvi8 to be used
for ¢ommerclallogglng,you must order
a_l l.sta_ a ¢hai. l_ke t_ _rnlW wgh
Federal OSHA Regulationsfor Corn- merdM Logging. Contactyour Sears
8ewlce Center or cal 1-800-235-5878.
SI_RK_
Yon'saw _
equlppedwith a temperature llm_ng
CARl"ONCONI"ENI_
Check carton contents agadnst the foI-
_4ng,sL
_
by law thal many l.temal
combustionengines be equippedwith a
spark amestor sc_erL _fyou operate a
chainsaw in a state or locale where
such reg_
exist, you are leg_ly_
res_e
t_ ma_
U_e
operatfngcon(gtionof g,,eseparts.
Fagureto do so i8 a vlolationof the law.
Refer to Customer Responsibilities
cha_ttn g_e _
se_k3n.
S'rANDARDS: Thls chain saw Is Usted
by'_
_
Inc. k_
_¢cordance with American National
Standards for Gasollne-Powered Chain
Saws Safety Requirements (ANSI
B17S._-199t).
NOT_ It _s normal to hear the fuel _er
ratUe In an empty fuel tank.
Model 358,351042
. cha_saw(_ _
• Bar tool
• 2-cycle engine oil
(Baro, not}nck.,ded)
• Examine parts for damage. Do not
usedamaged
parts.
• If you need assistance or find that
pextsarem_sl_gordamaged,
please
call 1-800-235-5878.
Your unit has been factory tested and
the carburetor predsely adjusted. As a
result you may smell gasoline or find a
drop of oilfiuei mskkm on b'_ muffler
when you unpack the unit.
ASSEMBLY
Your saw is fugyassembled;no
assembly Is necessary.
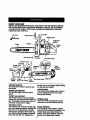
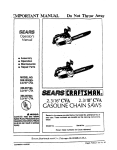
1010W YOUFI _I_W
READ THIS OPEP_TOR_
MANUAL. AND SAFETY RULES BEFORE OPEP_T-
ING YOUR CI,'tAINl_t_W.,P_mpam the ilu_lndl_
¢dth youTunit to fan_lladze
youmeifwflh the IocaUonof U_evarious controlsand acre,
Save th_
manualfor fumm reference.
'+- .....
Bar OHFi, Cap
+I
Housing
Fuel Mix RII Cap
Cylinder Cover
Fast Idle
Lockout
Chain
[7_recOon
of Travel
Rear
Handle
Thro_tle Choke
Trigger Knob BarClamp Chain Bar Clamp Nuts GUkle Bm
Catcher
ON/STOPSWITCH
The ON/STOPSw_h _ usedto stop
the engine.
CHOKE KNOB
The Choke Knob activates the choke to
provideadditionalfuel to the engine
duringcold sta_ng.
THROT/1.E TRIGGER
T'ne throttle trigger controls engine
speed.
THROTTLE
i
throttle lockout and tdgger while holding
Itle fast tdle Io_k button.
LOCKOUT
Tt_ throme lockoutrnustbe pressed
before you can squeeze the throttletrig- PRIMER BUlB
g_r. Thi_ fe_um pmvent_you from _
The Pz_r_ Bulbd_ulat_ fueHo the
carburetorto providequickerstarling.
cidentallysqueezing_e uigger.
FAST IDLE LOCK
The fast Idle lock holds the throttle fig.
,_in the m+_inOposition._
CHAIN TEN_IN
me It is norm_ for a new chain to _
Idle lock by pressing the throttle
lockout and _
the throttle trigget. With the thro_e Vlgger squeezed,
press the fa_ Idie lock. _
the
during first 30 minutes of operation. You
should check your chaintension frequently. See Chain Tensionunder the
Sen_ce and _
sect_n.
BEFORE STARTING ENGINE
Ilrms and Cafobreexare enNW-Use fresh
WARNING:
fuel ned season. See STORA(_ insltuc-
Be sum to read the fuel
Jw_,ing Ir,formaUmi.._e safe, roles tions_
_
Nev_ use
_
engl.e or cerburetor dean_
saction of this manual before you begin. _
in the fuel tank 0r permanent
If you do not undersland U1efuel bandamage may occur.
dl_g Information do not attempt to fuel See the STORAGE sacBon f_r additlona/
your unit. Seek help from someone that Informa_on.
does understand _ k'_a'n'_on or call
the customer assistance help line at
STOPPING
YOUR ENGINE
• Move On_
switch to STOR
1-800-235-SB78.
• it engine does not stop, pull choke
GUIDE BAR AND CHAIN OIL
knob out fully.
The chain oiler provides continuous luSTARTING YOUR ENGINE
brlcatk)n to the chain and guide bar. Be
sum to fill the bar oil tank when you fill COU) ENGINE OR WARM ENGINE
_ fu_ tank(Capac_=6.aft.oz.).
AFTER RUNleNG OUT OF FUEL
notavailable,youmy usaa good
er bulbsix times.
• Move On/St_ switchto ON.
Prkn_ Bulb
• Fuel engine w#h 40:1 fuel mix.
For maximum guide bar and chain life,
• Fill bar oil tank with bar oil.
we mcommend you usa Craftsman
chain saw bar oil. If Craftsman bar oil is • Prime engine by slowly pressingprim_tade SAE 30 oil un_ you am abte to
obtain Craftsman brand. The oil output
rs
metered
cu+ng
ot a-
tion. Your saw will use approximately
one tank of bar oil for every tank of fuoi
mix. Always fill the bar oil tank when
you fill the fuel tank.
__
FUELING ENGINE
This e_ine b cer_
to operate on
unleaded gasoline. Before operation,
CholB Podtimm
gasoiinemustbe mixed'w_ a good
quality 2-cycle air-cooled engine og. We
• Actuate choke by pullingchoke knob
recommend Craftsman brand oil. Mix
fu,y out.
gasoilne and oil at a ratio of 40:1 (A
• Set saw on the ground.Grip front
40:1 ratio Is obtained by mixing 3.2
handle with your left hand and place
ounces o__ with I gaJJonof unJea(:h_
rightfoot through rear handle.
gasoline). DO NOT USE automotive oil
or bcet oil. These oils will cause engine
Starter Rope
damage. When mixing fuel follow the
Instruct_w pdnted on the container.
Once o, _s added to the gasoi_e.
tHand
shake container momentarily to assure
on Front
thaHhefu_ Isthoroughlymlxed.
Handle
Always read and follow the safety rules
relatingto fuel beforefuelingyourunit.
IMPORTANT
Expeden_indk_s tha_a_ohoibk_ded
_._,ls(_led gaso_ orusingehand or
methanoi) can a,ract _
which
k_ds to sepera_n and tonnatJon of
FoCX
-nvoughRearHan_e
• Set fast idle by depressingthe l_ro_e
k)ckw_hyourdolorhand."rhen,
_eeze andho_ thromeV,,gger.
W_
ad_ do_restor_e. A_d_ 0as_n
damageS_e_el systemof _n engine
_-_ _ storam.
To avoid engine probkx_
your thumb, press the fast idle lock
downand hokt Next, release the
throttletdgger.
the fuel sys-
t_rnst_.k_be empU_bek_, storagefor - oO Nor squeezethrometdg_r dur30 days or Io_ler, Drain the gas tank,
sin1 the en_ne and _t _t mn unblthe rue
ing starting; oths_utce, it will be neceesary to reeet H'mfast _te lock.
7
_rr.: Whenp.mngtheetarterrope, OPERATINGTmS
do notuse the full extent of the rope.
Do net letS_llar ropeImapba_L HoM
hand_. Letropemw_d ¢ow_.
- Pt¢letarter ropehandleP_Jy and
quicidy with your right hand unbl the
• Cheok chain tenalea before first uea
_
e_r 1n-_nu_of _
_
Chain Tension in the MeJ'4enanou
section.
• Cutwoodonly.Do notoutmetal,plas-
tisa, masonry, non-wood building materials, etc.
• Stop the saw if the chain strikes a foreign object. Inspect the saw and repumng
hand_unaengine
et=ts.
parr parts as necessary.
• Above 40°I, allow engine to run for
_
s seconds.
Push._e • Keep the chain out of dirt and sand. Even a small amount of dirt will quickchoke knob in to tha OFF positk_;
ly dull a chain and increase the possithen squeeze and release throttle tdgbility of kickback.
get to altow eagle to k_e.
• Below 40OF, allow englne to warm up • Practice cuffing a few small logs using
for 30 seconds to I minute with choke
me._
steps.n,_ w_ he_p
you
get
the
"feel"
of
using
your
saw
before
at partial position. Push choke knOb in
youbeg_a majorsaw_-eoperatk_.
to the OFF position; then squeeze and
releasethroBetriggerto allowengine • Squeeze the throttle trigger and alto idle.
low the engine to reach full speed
before cutting.
• _ stopeng*_, moveOn/Stop_
• Begin cuffing with the saw frame
to the STOP position.
eng_ ettemm to start,butnomore
than 5 pu,s. Then, push in choke
knob to the partial position. Resurne
atta_ttJe k_g.
STARTING A WARM ENGINE
DO NOT USe the choke to start a warm
engine or flooding and hard starling
may occur.
• Move On_
• Keep the engine at full speed the
entire time you am cutting.
• AitowUle chaJn to out for you. Exert
only light downward pressure.
• Release the #_oftle trigger as soon
as the cut is completed, allowing the
engine to k_. If y0u run the saw at
II g,4"offiewithout a cutting load,
switchto ON.
• Set fast Idle lock.
• Be mxe choke is in tha OFF potion.
• With saw on ground, grip front handle
with left hand and place your right foot
through rear handle.
_
wear can occur.
• To avoid losing control when cut is
_mplete, do net put _
o.
saw at end of cut.
• Pult sts,ter rope handle unmeng_e
starts.
- Squeaze and re_easetrwotlfetdggor
to returnengine to Idle speed.
•_
entre_-e suff__=
TREE FELLING TECHNIQUES
DIFFICULT STARTING OR
WARNING: Check for brokenor dead
STARTING A FLOODED ENGINE brancheswhich can fag whik)cumng
The enginemaybe fl0odedif it hasnot causingsedous Injury,Do not cut near
s_stedafter 10raJs. Flooded_O_nes building=or electricalwires if you do not
canbe clearedof excessfualwiththe knowttm directJ0n of line fall, nor cut at
_o_
procedure:
nightsince you wiU not be able to sae
**Engage the fast idle lock.
Vertfy that the On/b'topowitch i_ In the
ONposition.
Push choke knob to the OFFposition,
W_ saw on ground,grip front hendk)
well, nor duringbad weather such as
rain, enow, or strong,#_ds, e_.
• Carefully plan your sawing operaUon
in advance.
- Clear the work am_LYou need a ctee_
with left hand end place dght toot
area all mound the bee so you can
thrOugh mar handle.
have secure footing.
• Pull starter rope handle until engine
• Study the nafural conditionstha_ can
starts,
_mse the tree to falt in a pe_lcular
• Starting could require many puls dedirection.These conditionsinclude:
pending on I_)w badiy the unit is
• The wind direc_on and speed.
flooded. If engine sti|l fags to s_t, re• The lean of the tree. The leen of a
fer to lhe _11NG
chart or
tme mlg_ net be apparem due to
call 1-800-235-5878.
uneven or slopingterrain. Use a
8
plumbor level to determine the dlrectk_ of tree isan.
• Weight and branches on one side.
• Surroundingtrees and obatade_
. Look for deoay and roL Ifthe bunk is
rotted, it can snap and fall toward the
• _
Th_ hk_ _, h_p praventthe tres
Hinge holds tree on
saJmpand helpa
€omml fa,
thore is enough room for
the tree to fall. Maintain a distance of
2-1/2 tree lengths _rom the nearest
person or other objects. Engine noise
can d_own out a warr_g call.
• Remove dirt, stones, loose bark,
nails, stapl_ and wire from the uee
where cuts are to be made.
NOTE:Beforefeaingcutis_,
-
use wedges to open the cut when
necessary to control the direction of fall
To avoid kickback and chain damage,
usewoodor plestlcwedges,butnever
Plan a dear retre_ pa_
steel or iron wedges.
• Be alert to signs that the tree is reedy
tofa_ =addng sounde,
w_en_gof
_----0--=,,_-
C_recuon
ofFa, -
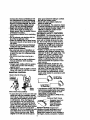
FELLING
LARGE TREES
(6 Inches in dlarneter or larger)
The notch method is used to fell large
t_}es. A notch is cut on the side of the
tmo in _e dosJroddL.'oc_0n of fall. After
a felling cut is made on the opposite
side of tree, the tree wiE tend to fall In
the direction of the notch.
NOTE: ff tree has large buttress roots,
remove them before making the notch.
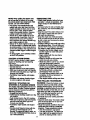
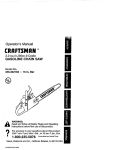
NOTCH CUT AND FIELUNG TREE
• Make notch cut by cutting the top of
the notch first. Cut through 1/3 of the
dtameter of the tree. Next complete
the nol_ by cuffing the bo_r_ See
illustration. Once the notch is cut, remove the wedge of woed from tree.
F'lnaJcuthere
First cut
\
Notch-.__==
7
_Bcond
the felling cut, or movement in fire upper branches.
• As tree starts to fall, stop saw, put it
down, and get away quiddy on your
planned retreat path.
• Be extremelycaul_us withpartially
fallen tress ttmt may be poorly supported. When a tree doesn't fall completety, set the saw aside and pull
down the b-ee with a cable winch,
block and taclde, or tractor. Donor
use your saw to cut down a partiaJly
fallen tree.
CU'i'I1NG
A FALLEN
TREE
_UcCKING)
ng is the term used for cutting a
fallen tree to the desired log size,
WARNING:
Do not stand on the log
beingcut.AnyperUoncanrollcausing
loss of footing and control. Do not stand
downhill of the log being cut.
IMPORTANT POINTS
• Cut only one logata time.
• Cut shattered wood very carefully;
shmp pieces of wood could be flung
toward operator.
• Use a sawhorse to cutsmalllogs..
Never allow another person to ho_d
the log while cutting and never hold
the logw#hyourtogorfoot.
• Do not cut in an area where logs,
r_,
androo_are=rigid. Dragbgs
Into a dea_ .area before curling them.
• Alter removlng the woed, make the
BUCKING
TECHMQUES
felling cut on the opposite side of the
WARNING:
If saw hocomes pJr_l_l
notch. Thb b done by maldng a c_t
two indles higher than the cen- or hung In a log, don't try to force It out.
ter of the notch. This will leave
You can lose q=ontrol of the saw resuitenough uncut wood between the felling in injury and/or damage to the saw.
ing cut and the notch to form a hinge. Stop Itm saw, drive a wedge of plestlc
9
t
or woodintothe cut ur_ _=esaw _
be
removed
ea_. ResWt
sawa.d.cpxeUh/
reem_
the cuL Do not use a me_
wed_ Do not etten_ _orestmtyour
ssw w_n _ _ l_ncl_ or hung _ a Io_
tJsea wedgetoremovepln_ed ssw
1_Cut
Turn stay OR: a_l u_ a _c
or
wooden wedge to force cut open.
Overcuttlng beans on Ule t_p side of
the Ing w.h the bot_n of gw saw
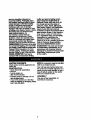
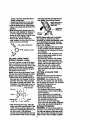
BUGKING USING A LOG OR
SUPPOITr STAND
_dow_,_
. Remember
yourrside
_ cut_
_
the compres._on
of thea_'ay_
;og _He-
whe,_
pressure
_,
fer to the glusb'atlonbelow for your
first and second cut).
• Your first cut should exterld 1/3 of gle
d_._tefofthe_g.
• Rn_h w_hyoursecondcut.
Undemumng involvescuUJngon the
undersideof the logwith top of saw
againstt_e log. When undercuttinguse
lightupwardpressure. Ho_dsaw firmly
and maintaincontrol.The saw wilttend
to push beck toward you.
WARNING: Never turnsaw upside
dewn to undercut. The saw cannot be
controlledin this position.
l_Cut
Always make your flint cut on the
compression side of the log.
UMBING
Second oJt
AND PRUNING
WARNING:
Never climb into a tree to
limb or prune. Do not stand on ladders,
platforms, a log, or in any position
which can _ause you to lose your balance or control of the saw.
IMPoFrrANT POINTS
• Watchoutforspdngpo_.
Springpoles are small size limbs
w_dch can M1dptoward you, or pull
you off balance. Use extreme caution
when culling small size limbs.
BUCKING WITHOUT A SUPPORT
Watch out for
• Ovemutthrough 1/3 ofthe d_neter of • Be alert for _.
_
that _te bent or und_ presme log.
sure. Avoidbeing smJck by _e
• Roll the _0goyer and finishwith ase_
branch or b_ saw when the terudon In
orld overctlL
1he wood fibers is released.
• Watch for logs witha compresion
side See ib.skation above for cutlk_
logs w_tha compre_sionside.
. Frequentlyclem _
out of the
way to avoid ldpping over them.
10
I
• IImb a tree only after it is cut down.
- Leevethelargerltmbsundemea_the
felled tree to support the 11_eees you
work.
• Start aHhe bese of b_e felled t_e a_
work toward the top, cumng bn_ches
and limb_ Remove small limbs with
one oat
• Keep the tree between you and the
chain.
• Remove larger, supporting branches
wRhthe_r_._jscutu_t_mk_s
_
am 'ldgherthan your shouldef. Get a professionalto do the job.
• Make your f_t cut 1/3 oftheway
throughthe bottom of the limb,
• Next rnakea secondcut oll the way
mmuOh the arab.
* Finish the pruning operation by using
an ovomut so that the stump of the
#mb _
I to 2 Inches from the
trunk of the tree.
de-
scdbed in the bucking section.
• Always use an overcut to cut ernail
freelyhangingUmbs.Undercuttingcoutd cause I|_ to fal and
pinchthe saw.
PRUNING
WARNING: Limit pruningto limbs
shoulder heightor below. Do not cut if
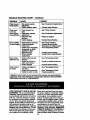
CUSTOMER
RESPONSIBILITIES
Fill in dates as you cen_olete
regular service
Before
Use
Check for damaged/worn parts
p-
Check forlooee_ene_
p-
Check chain tension
pi
Check chain sharpness
p-
Check guide bar
p,,
After Every Every Yearty! Service 1
Use 5 hrs. 25 hrs.
Dates
Clean unit & labels
v'
Clean air filter
c ./ ceet
artier
screen & inspect muffler
Replace spark plug
GENERAl.
RECOMMENDATIONS
The warranty on this unit does not coyer items that have been subjected to
operator abuse or negligence. To recetve full vaiue from the warranty, IP.e
opemt_ must maintain unit as instructed in this manual Various adjustmeets
will need to be made periodically to
properly maintain your unit.
• Once a year, replace the spark plug,
air fliter element, and check guide bar
aed chain for wear. A new spork plug
and air _tar element assures proper
prun better and last longer.
WARNING:
Disconnect the spa_ p_g
before performing maintenance except
for carburetor adj_nts.
LUBRICATION
Bar
Sprocket
•
,
2 Bar
on "_
F'_Cap
'il']
_r-fu_ m_um end he_ youreng_e 2 Use Craftsmanchain saw ba_o_
11
CHECK FOR DAMAGED OR
WORN PARTS
Replacement
of damaged/wom
parts
shouldbe referredto yourSearsServiceCenter.
NOTE:It is normalfora smallamount
of og to appear under the saw after en-
glnestops.Do nofconfusathlswltha
leaking oil tank.
• On/Stop Switch - Ensure On/Stop
switch functions properly by moving
the switch to the "Stop" position.
Make sure engine stops; then restart
A_ustJng Sorew - 1/4 Turn
• Uft up t|p of guide bar to check for
sag. Releasa Ifp of guide bar, then
tum adjusting screw 1/4 turn clockwise. Repeat until sag does not exist.
• While lifting tip of guide bar, tighten
bar clamp nuts with the bar tool.
3orque to 10-15 ft-lbs.
engine andcontinue.
• Fuel Tank - Do not usa saw If fuel
tank shows signs of damage or leaks,
• Oil Tank - Do not use saw If oR tank
shows signs of damage or leaks.
CHECK FOR LOOSE
FASTENERS
AND PARTS
• Bar Clamp Nut
• Chain
• Muffler
- Cylind. Shield
,Air Filter
• Clutch Drum/Sprocket
• Handle Screws
• VibraUon Mounts
• Starter Housing
• Handguard
CHECK CHAIN TENSION
• Use the screwdriver and of the bar
tool to move chain amend guide bar
to ensure kinks do not exist. The
chain should rotate freely.
I
I I
I
• Use the screwdriver end of the bar
tool to move chain around guide bar.
• If chain does not rotate, If is too tlgttt.
Slightly loosen bar clamp nuts and
turn adjusting screw 1/4 _
coBderdockwise. Ri_ghten bar clamp nuts.
• if chain Is too loose, R wt| sag below
the guide bar. DO NOT operate the
saw if the chain is loose.
CHECK CHAIN SHARPNESS_
A sharp chain makes wood chips. A
dull chain makes a sawdust powder
and cuts slowly.
CHAIN SHARPENING
Chain sharpening requires special
tools. You can purchase sharpening
tools at Sears or goto a professidnaJ
chain sharpener.
CHECK GUIDE BAR
Conditions which require guide bar
maintenance:
• Saw cuts to one side or at an angl_
Saw bas to be furced threugh the cuL
Inadequatosupptyof ogto ber/cha|n.
Bar Clamp Nuts
• loosen bar damp nuts un_l they are
flr r
me
• Turn adjusting screw clockwise until
chin berdy touches the boom of
guide bar.
Check the condition of guide bar each
time chain is sharpened. A worn guide
bar witl dan__.ge the chain and make
cutting difficult. To maintain guide
• MoveOniS
-v tchto"Stop,"
• Remove bar and chain from saw.
• Clean all sawdust and any other
debris from the 9uide bar groove and
_S=_lum
From
t%
Guide Bar Groove_
sprocket hole after each use.
bar to ensure all Bnks are in bar groove.
..
12
• Addfubdcant
mc_.se.
to sprockof hok) after
_
I_FFLER
AND
SPARK
ARRESTOR SCREEN
- Oawlng _tg_Je b_ rills _; a narm_
process of rail wear. Remove these
burrs wtU1aflat file.
As ete unlt ts ueed, e_lfoon depos_
build UP on the muffler and spark
arrestor screen, and mustbe removed
• _p_s__,_f_
J_ev__he_m_
tO restore square edges and sides,
_L_
_!_
i_L_
ing engine performance.
breaks occur.spark'fms'_r m:me_If
Rupla_em
Worn Gmow
t_'mol Groove
Replace guide bar when the groove is
worn, the guide berlsbent or cracked,
the mils occurs. If replacement is nec-
_sar_, us. o.ly_ gu_ barspec,_
your saw in file repair parts list or on
the docal located onlhed_ainsaw.
_UmT
&I.ABEt_
MufflerCover
a mild detergent.
CLEAN AIR FILTER
A dMy _dr/_lur de_'mtse_ tt_ t_and
performance of the engine and increasesfuel consumption and h_'n_ui
___yau_ak_
after 15 tanks of fuel or 5 hours of op-
CLEANING
THE
SPARK
ARRESTORa(_aEEI_I
Cleaning is required every 25 hours of
operalJbn or annua, y, whichever comes
r_.
morn fTequently in dusty conditions. A
us_l ai_tIRer oan nev_ be _
cleened. It is advisable to replace your
e_rIflter with a new one _fter every 50
• Loosen and remove the 2 muffler coy-
ever comes first. To clean filter:
arrestor screen assembly. Notice the
orientation of these parts for reassem-_lg.
• _
the s_ark arrestor scr.een with a
• Loosan3screwson q_nder ceve_ .
• Remove file muffler cover (cover
_snapsoffmuf_body).
•-Remove c_nder cover.
• Remove air filter.
• Clean _ air filter using hot soapy
water. Rinse with dean cool water.
-Arr_rry cb_y
l_Ore r_'f_J_a_r_. - _
• Ughtly oll air filter before installing to
=reprove the efficiency Of all filter: Use •
v_ bru_ Replacescreenif breaks
ere found.
Replace any-broken o_ _rado_l muf,
tier pads.
RelnSta_dffiuser and spark arrestor
s='eenasseml_ withround_
• Reinstall air filter.
• Reinstall cylinder cover and 3 screws
(Is-_o _.].
• Reinstall muffler cover and 2 screw_
(7-8 _t-_bs).
REPLACE
SPARK PLUG
The spark plug stmuld be _
each year to ensure file engine starts
easierandrumbetter.|gr_on _ls
Cylinder
:Cover
• Loosen 3 screws on cylinder cover.
* Pull off the spark plug boot.
discard.
13
,
_
_U_
_
,_41h
_
Ch_;Inpion
_
a_4RCJTY
in¢_. _D_(_
spad(
wrehch (I0-i_) #-Ibs). 5pane plug gap
_.__._
_
Boot_
_ Cy_
r
• p_ns=,thesparkpbgboot.
should be .025 in.
__
Oe_ G_u_
when handling _n.
_
cl__ n _
_.
Ing the first 15 minut_ of operaUon. You
should recheck yow chain tmsion fr_
requfred.SeeChainTensionse_on.
• Move On/Stop switchto _e Stop
position.
• Replace the old.chaln when it beworn or damaged.
• Use only the Low-Kickbackreplacement ,chin _
.in the rep_J_
r
Drive Links
• Place chain over and behind clutch.
• .Fit bottom of drive links between teeth
in sprocket nose.
: Fit chain drive links into bar groove.
Pull guide bar forward unt_ chain is
.snug.in guide bar groove.
• Now, Inetait bar clamp making sure
the adjusting pin is positioned in the
lower hole In the guide bar.
and chain is also specified on a decal
located on the chain saw.
• See your Sears Sen_ice Cent_ to replace bi_dShar_n ind'_idual-i_utters
on _ur _.
• Remove bar clamp nuts.
- Removeberdamp.
Low_
Hole
• Remove the old chain.
AdJus_nng
Guide Ba_
• Install bar P.J_ nul_ _andfirK_l__,
ti_l_en-b-nly_Do-_Ot]Jght_n ar_yflJ_
at
Clamp
Nuts
r T.m _.P_mw:by
hand_cQur_
terclockwise until adjusting pin just
S{[di_L_ ={:_m¢
{n_mh{nd
_c_utch.drum
until
guide bar stops againstdutch
drum _ocket_
• Carefu_ remove new chain from
package. Hoid _
links as shown.
with-thedrive
Bar Clamp Nuts
CHAIN ADJUSTMENT
•_i.
Tension" in_ntonance
section.
14
CLEANFUEL FILTER
Sta_rtmotor, let it mn for 3 minute_;, and
running dry of fuel, _lOV_lfU_l
C_/_e.,
tainor assembly from tank. Pull filter
engine does not start, refer to troubleshooting chart or call 1-800-235-58'_°
_
_d_gent
andrinse.DWthor-
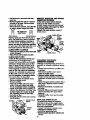
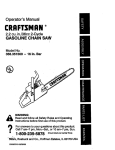
C*a,RBIJ_=TOR
WARNING:
The chain will be moving
dudng most of thiS procedure. Wear
ADJUSTING
Idle :_peed-T
all _
engine runs without chain movement or
_ns.
Dudng the low
_Ure_._,e.
speed after each turn of the screw. The
chain must not move at idle speed,
___,_ca_e
_
i_rly
can_enthj
PROCEDURE
_.
• Turn clockwise to increase engine
speed if engine staffs or dies.
• Turn _ou_mdod_wJse
Io decrease
s_.
dam-
....................................
agetPm e.gfne as weg as_,_,e oath.we._ _ f_,.'__
me_f
:t_r. ;l.f'_I/._l_':{_;Ib_r'._:_
chain does not move at Idle speed and
are unsure about performing this proce- ifl_i_fo_
Is-sate.........
dure, call our customerassistancehelp LowSpeedl_re-L
line at 1-800235-5878.
Allow engine to idle. Then accelerate
or flooding may give the impression of
an improperly adjusted carburetor,
_;_t;___
_
bef_re_ing the carburetor,
gine hesitates, bogs down, or smokes
during acceleration, l_Jm mixture screw
d_ckwisa in 1/_s-_m ir_cramants
perf()_:mance iS _i_3/:
i_at
this
o_._, a:d_ty_Rer, d_ty",ue]-_er._t_a.d:,.o_,_.
if-en-
• hec_buretor
_ _bean
cerefu.y
set_t p.mccoy..
%___r
U_e_v
Adlustments rnav be neces-
j_mem.
_.opp/.ad:
Aner _!esng
8oFmm_nts,
conditions:
-rnent at idle. Reset if necessary.
• Chain moves at Idle. See "Idle Speed" High Speed Mlxture-H
under adjuatinJt procedure_
_
uaw w=l not k_e. See"ldle _)eoand "Low Speed Mixture'undor ad_sting procedure..
,• Engine dies or hesitates when _t
should accelerate. See "Acceleration
.Check-" uncler adjusling procedure.
• Lossof cumngpower:See"High
_.bdure
=
-
.
•
H"uederedlusUng
There are three adjustment screws on
the carburetor. They are labeled H, L,
and T. _m.,_,ated:l,_:me
area
_e
_ Prl_merbulb:
.
.DO NOT operate engine at full throttle
for prolonged pedods while making adjusUnents. Damage to t_s engine can
.occer. Make a test cut. Based on per_
of the saw whge cuffing, edjust the high speed mixture seffing in
1/.16-turn increments.as follows:
• Clockwise um'l saw has 0ood powerin
the cut w_h nO hedCaUon.Do not adjust
bysou_ orsps_ but_:Whow
wel_the saw pedom_ In the cut.
• CounterclockwLse if the saw has
in the cut.
CARBURETOR PRESETS
_
the plast_ nmlter caps beyond the
.................
If carburetor presets are not needed,
_the _ne
• Turn both mixture screws countor-
adjustment
counterdododse
untilyou
.........
cinckwf_eu_l theystop,
• Turn the idle sl_,=_l sqrew €lodoNtse
until it stops. Now turn counterclockwise 4-1/2 full turns.
_
_,:.check
acceleration and chain movement at
_or
_"
_
or h_a_
i_
of
have smooth _
with no chain
movement at idle. Recheck =KI adjust as
necessW
_ accep_ _
15
_da_
or m_e.
IIz_r to 1_ g_ine
in I_ fijei te_k or
WARNING:
fue_sterage-e_,_r;-Felk_.themix
•_AIl_Jbe_er_l_.t_caol,Jmd secure instmclionsfound on stabilizercontainthe unit before stodngor transporting, era. Run engine mleagt 5 mlnu_ after
6_are_hai_aw and fiJeHna_ve,
.aJ;k_a_er.
CRAFTSMAN 40:1, 2-cycle engine oItventilated area where fuel vapors
(_reoe_ _ e_r_y Uend_m
c_mot rea_ spa_ or open ltames
from water heater_, ele(_¢ motQr_or fuel stabilizer. If you do not use this
Sears oil,_u can_a:k_
a _a_ stabtlt_
sw#ohes,fuma(_e, eto.
to your _
tank.
• Store chain saw with all guards in
place and potion ¢h_n saw so that ENGINE
any sham objectcam_ accid_
• Remove sp_ plug and pour I teacause Injury.
.......
spoonof 4o:_. 2-cyde e_glne o, (alr
• Store chain saw we, out of the reach- cooJe_
U_Oh mem_k _uOo_of children.
ing. 8lowly pua the starter rope 8 to
10 _
10_
OIL
EXTERNAL SURFACES
• Replace spark plugwith new one of
ff _
chain sawJs'tobe _ed
fora
recommendedtype and heat range.
• Clean air f_l_r.
e storage. ,,_Torem a Cleandry area. • Check enlJmunitfor loose screws,
nuts_ and,bolt_ _
anydamguidebar.
_ _,
_en,.or_
p_. ......
per or doth.
use onlyfl'esh
fuelhavingtheproper
gasolr.e to oil ratio.
FUEL SYSTEM
Section of this manual, see message
labeled iMPORTANTrqgaxcE_ttte use
of gasohol in your chain saw.
Fuel stabilizer is an acceptable aRema-
• Do not store gasolinefrom one sea.
s_nto a,ne_.
- Replace your gasol'inecan if_ starts
to rust.
16
TROUBLE
SHOOTING CHART
CAUSE
TROUBLE
REMEDY
• _neon swechoff.
°.E_leeded.
• Move Ignitk)n switch to ON.
_dyaf_
• Fuel tank empty.
• Fdl tank with correct fuel mixture.
_'_ng.
• Fuel not reaching
carburetor.
• (_neck for dirty fuel filtar;, mp!ace_
Check forkinkedor split"fue
line;
-Engine
wOlnot
•.See ,Slaning_lrueti0ns."
• Carburetor requires
ad_-tme_.
• None of the above.
• -Idle speed set toohigh
_oJ_v.
• Low Speed Mixture
I• repair_or
replace.
See "Carburetor
Adjustments." .-
• Crankshaft seals worn.
• _x_pre_nlow.
• See=Carburetor
Adjustments:
_
• See "CarburetorAdjustments."
• Contact Sears Service
• Contact Sears Service
• None of the above.
Engine will not
a_e,
lacks power,
or dies under
_Joad.
• Contact Sears Service.
• Airfilterdirty.
•'Spa_plug'roul_.
• Clean or replace air filter.
-,'Clean 0rrel_ace plug
=andmgep,
• See =Carburetor Adjustments."
• Carburetor requires
• Exhaust ports or muf-
-nerouUet_ugged.
• Compression low.
•-None -ofU';e _/e.
- Contact Sears Service.
• Contact Sears Service.
• Contact Sears Se_'ce.
_EngZnesmokes
excessively.
• Fuel mixture Incorrect.
• Air filter dirty.
• High Speed Mixture
• Empty fuel tank and refill with
-o_rr-e_-rfu-el'r_0_ _e.
• Clean or replace air filter.
• See "Carburetor Adjustments."
=reqaims-adjum._
Engine runs
hot.
• Crankcase leak.
• Contact Sears Sen/ice.
• Fuel mixture incorrect.
• See "Fueling Your Unit."
....Spark_pk_r_,_=xre_
• High Speed Mixture
-sbTfO0 Te_ah.
• Exhaust ports or tourtier outlets plugged.
• See "Carburetor Adjustments."
• Contact Sears Service
-,.Glean =spark _rrestor .s,_ree_.
muffler outlet screen.
=•Ctsan "am_.
fins dirby.
• None Of the above,
Oirinad_luate
for bar end
Chain
•Contact Sears Service.
- PIll 01;lank.
-- Contact Sears SePAce.
* Oitlank empty.
• Oil pump or oil filter
clogged.
• -Guldeobar,o,4-,de
b_ocked.
•. Remov_ bar.and r,leen.
17
TROUBLE SHOOTING CHART
- Continued
TROUBLE
CAUSE
REMEDY
Chain moves
• Idle speed requires
• See "Carburetor Adjustments."
• Cnotact Sears Sendce.
Clu_h requires repair.
Chain does
I n0t mov_
• Chain tension too
• _r
Is accelerated.
• See "Chain Tension."
.ght.
• See,_Adjustme_
_Klzdres
adjustment.
* e_e
_-Rep_r ormplaee.
bar'mils
pinched,
• C_t_hs_ppthg.
,_c1_alfft_sl0nlncorr_t.
damagad.
• Chain worn.
• Cutters
ercutsroughly
• Contact Seam Service.
• Reshatpen or replace Chain.
• Cuttersdua,_impropsdy • See "Sharpening_n."
sharpened, or depth
* Contact Sears Service.
. lnstafl _nln
r_ht-_re_l_n.
Chain stops
within:the cot.
Chain cuts at
an angle.
- Chain cutter tops not
_ilad-ltat.
• Guide bar burred or
bent;,rails uneven.
• See "Sharpening Chain."
-P_,k_h _Jipplng
, Co,act
. £.u_s damagedno
• See"s_rpno_ Q_"
• Repair or replace guide bar.
one side.
° :Chain du_ orr oneside.
• Guide bar bent or worn.
° See _
SnomSenA_.
Chin."
• Replace gtJide bar.
If situations occur which are not covered in this manual, use care arid good
ASSISTANCE HELPtJNE at 1-80@235-5878.
YOUR WARRANTY RIGHTS AND OBUGA'nONS: The U. S. Environmental
Protection Agency/California Air Resources Board and SEARS, ROEBUCK
AND CO., USA are pleased to explain
the emissions control system warranty
on your lawn and garden equipment
engine. All new uUllty and lawn and garden equipment engines must be designed, built, and equipped to meet the
stringent anti-s_nog standards. SEARS
must wawant the emission control system on your lawn and garden equip
ment engine for the periods of time
listed below provided there has been
no abuse, neglect, or Improper maint6nance of your lawn and garden equip
ment engine. Your emission conbol
system includes parts such as the carburetor and the ignition system. Where
a wanantable condition exits, SEARS
will repair you,- lawn and garden equip
merit engine at no cost to you. Expeusas covered under wan'anty include
diagnosis, parts and labor. MANUFACTURER'S WARRANTY COVERAGE: If
any emissions related part on your engine (as listed under Emissions Control
18
Wan_.W Parts Ust) Is _
or a
defectin lhe materials or workmanship
of_'le engine causes the failure of such
an emls61onrelined part, the part will be
RIOD: Any w=canted part which Is not
scheduledfor replacement as required
rnaintenance,orwhich is scheduled
only for regular Inspectionto the effect
repalred or mplaced by SEARS. OWNER'S WAI_RANTY _BIMTIES: As the lawn and garden equipment engine owner, you are
responsible for the performance of _e
_ownUlredmaintenance listed in your
er's Manual. SEARS recommends
that you reta_ all receipts covedng
maintenance on your la_ and garden
equipment engine, but SEARS cannot
of =repair or replace as necessar_ shall
be warrarded for 2 yearn. Any warranted part which Is scheduled for replaceme_ as required maintenance
shall be warranted for the period of time
up to the first scheduled replacement
point for that part. DIAGNOSIS: The ..
owner shall not be charged for dlagnostic labor which leads to the determination that a wananted part is defective if
the dlagnost_ work is performed atan
approved SEARS servicing center.
CONSEQUENTIAL
DAMAGES:
SEARS may be liable for damages to
other engine components caused by
the failure of a wan'anted part still under
warranty. WHAT IS NOT COVERED:. All
failures caused by abuse, neglect, or
improper maireenanceam notcovered.
AIDI_GN _:! MODIFIED PAJFII"S:The
use of add-on or modified parts can be
grounds for disallowing a warranty claim,
SEARS is not liable to cover failures of
dew warrantysolelyforthe lackof receipts0rfor your failure to ensure the
performance ofallscheduled maJmer_mce. As the lavm and garden equip
ment erie
owner, you should be
aware that SEARS may deny you war-"
ranty coverage if your lawn and garden
equipment engine or a part of it has
faled due,_ abuse, neglect, ,in_mper
maintenance, unapprov_lmodiflcatlons, or the use of parts not made or
approved by the original equipment
manufacturer. You are responsible for
presenting your lawn and garden equip
merit engine to a SEARS authorized
repair center as soon as a problem exIsts. Warranty repairs should be completed in a reasonable amount of time,
not to exceed 30 days. If you have any
questions regarding your warranty
rights and responsibilities, you should
contact your neareet authorized service
center or call SEARS at
1-800-473-7247
W/I_RRANTY COMMENCEIMENT DATE: The warranty pedod begins on the date the lawn and
garden equipment engine is purchased.
LENGTH OF COVERAGE: This warrarity shall be for a pedod of two years
from the initial date of purchase. WHAT
IS COVERED:. REPAIR OR REPLACE,.
MENT OF PARTS. Repair or replacement of any warranted pad will be performed at no charge to the owner at an
approved SEARS servicing center, ff
you have any questions regarding your
warranty rights and responsibilities, you
should contact your nearest authorized
:see_"e :center :or_callSEARS at
1-800-473-7247.
WARRANTY PE-
warrantedpartscausedbythe u6eof
add-on or modified parts. HOW TO
FILE A CLAIM: If you have any questions regarding your warranty dghts and
responsibilities, you should contact
your nearest authorized service center
or call SEARS at 1-800-473-7247.
WHERE TO GET WARRANTY SERVICE: Wana_
services or repairs shall
be provided at all SEARS service centers. call: 1-800-473-7247. MAINTENANCE, REPLACEMENT AND REPAIR
OF EIIISSlON RELATED PARTS: Any
SEARS approved replacement part
used In the perlormance of any warranty maintenance or repair on emission
related paris will be provided without
Charge to the owner if the part is under
warranty. EMISSION CONTROL WARRANI_ PARTS U_.
Carburetor, Igrfitlon System: Spark Plug (covered up to
maintenance schedule), Ignition
Module. MAINTENANCE STATEMENT:.
The owner is responsible for the performance of all requked maintenance as
.defmed_in .the
,owlmslr'$
_mamraL
19