Download Seagate Mirra Setup guide
Transcript
Copyright Copyright © 2003 - 2007 Seagate Technology LLC. All rights reserved. No part of this publication or the Seagate Mirra software, in source code or object code form, may be reproduced, stored in a retrieval system, or transmitted in any form or by any means, electronic, mechanical, photocopying, recording or otherwise, without the prior written consent of Seagate Technology LLC. Contact information is available on the web at http://support.mirra.com. This product includes software developed by the Apache Software Foundation (http://www. apache.org/). This product includes software developed by the JDOM Project (http:// www.jdom.org/). This product includes software developed by the Jetty Project, Mort Bay Consulting Pty. Ltd. (Australia) (http://jetty.mortbay.org/jetty/index.html). This product includes the Java 2 Platform, Standard Edition developed by Sun Microsystems, Inc. (http://java.sun.com/j2se/). This product includes portions of the Debian Linux distribution (http:// www.debian.org/) and associated packages distributed according to the Debian Free Software Guidelines (http://www.debian.org/social_contract#guidelines). Copyrights for the open source software components are provided in the Copyrights folder on your Mirra PC software CD. To request copies of open source software used in this product, visit the www.mirra.com web site. Copyright (c) 2002 Chew Keong TAN BigInteger Class Version 1.03 Copyright (c) 2002 Chew Keong TAN All rights reserved. Permission is hereby granted, free of charge, to any person obtaining a copy of this software and associated documentation files (the "Software"), to deal in the Software without restriction, including without limitation the rights to use, copy, modify, merge, publish, distribute, and/or sell copies of the Software, and to permit persons to whom the Software is furnished to do so, provided that the above copyright notice(s) and this permission notice appear in all copies of the Software and that both the above copyright notice(s) and this permission notice appear in supporting documentation. THE SOFTWARE IS PROVIDED "AS IS", WITHOUT WARRANTY OF ANY KIND, EXPRESS OR IMPLIED, INCLUDING BUT NOT LIMITED TO THE WARRANTIES OF MERCHANTABILITY, FITNESS FOR A Mirra Manual for Macintosh Release 2.2 i PARTICULAR PURPOSE AND NONINFRINGEMENT OF THIRD PARTY RIGHTS. IN NO EVENT SHALL THE COPYRIGHT HOLDER OR HOLDERS INCLUDED IN THIS NOTICE BE LIABLE FOR ANY CLAIM, OR ANY SPECIAL INDIRECT OR CONSEQUENTIAL DAMAGES, OR ANY DAMAGES WHATSOEVER RESULTING FROM LOSS OF USE, DATA OR PROFITS, WHETHER IN AN ACTION OF CONTRACT, NEGLIGENCE OR OTHER TORTIOUS ACTION, ARISING OUT OF OR IN CONNECTION WITH THE USE OR PERFORMANCE OF THIS SOFTWARE. Trademarks Seagate™ and the Mirra logo are trademarks of Seagate Technology LLC, which may be registered in some jurisdictions. Patents Patent Number: U.S. Patent 6,928,476 U.S. and International Patents Pending Changes The material in this publication is for information only and is subject to change without notice. While reasonable efforts have been made in the preparation of this document to assure its accuracy, Seagate Technology LLC assumes no liability resulting from errors or omissions in this document, or from the use of the information contained herein. Seagate Technology LLC reserves the right to make changes in the product design without reservation and without notification to its users. Disclaimer IF THIS PRODUCT DIRECTS YOU TO COPY MATERIALS, YOU MUST HAVE PERMISSION FROM THE COPYRIGHT OWNER OF THE MATERIALS TO AVOID VIOLATING THE LAW, WHICH COULD RESULT IN DAMAGES OR OTHER REMEDIES. Important Safety Instructions The following instructions pertain to the risk of fire, electric shock, or bodily injury. Please read all of these instructions carefully. 1. Save these instructions for later use. 2. Follow all the instructions and warnings marked on this product or included in this manual. 3. Do not place Mirra on an unstable cart, stand, or table. The product may fall, causing serious damage to the product. Mirra Manual for Macintosh Release 2.2 ii 4. Keep away from excessive heat or moisture. Inadequate ventilation may cause internal component failure. Do not use your product near water. 5. Never push objects of any kind into the product through the cabinet openings. Objects may touch dangerous voltage points or short out parts that could result in a fire or electrical shock. Never spill liquid of any kind on the product. Unplug the product from the main power outlet if exposed to liquids, rain, or water. 6. Connect your product only to an AC power source as indicated on the product's information label. If you're not sure of the type of AC power available, consult your local power company. a. CAUTION: TO PREVENT ELECTRIC SHOCK, FULLY INSERT PLUG INTO GROUNDED AC OUTLET. DO NOT USE A PLUG WITH A RECEPTACLE OR OTHER OUTLET UNLESS THE BLADES CAN BE FULLY INSERTED TO PREVENT BLADE EXPOSURE. b. PROTECT POWER CORDS FROM BEING WALKED ON, ROLLED OVER, CRIMPED, BENT, OR PINCHED, PARTICULARLY AT PLUGS, CONVENIENCE RECEPTACLES, AND THE POINT AT WHICH THEY CONNECT TO THE SERVER. 7. Turn off and unplug your product from the main electrical power outlet before cleaning. Use a damp cloth for cleaning. Do not use liquid cleaners or aerosol cleaners. Aerosol cleaners may be harmful to the environment Do not attempt to open your Mirra Sync and Share Personal Server. Only Seagate Technology LLC can safely repair your Mirra. Opening the Mirra or attempting to modify it will subject you to a risk of injury, may damage the product, and will void your warranty. Go to http://support.mirra.com for service. MirraGuard Data Guarantee If one of your computer hard drives fails, all data backed up on your Mirra Sync and Share Personal Server will be restored. Seagate will assist you in the restoration and, if necessary, Seagate’s Data Recovery Service will commit up to $1,000 to recover and restore your data. See details on line at www.seagate.com. Mirra Limited Warranty One year parts and labor. 052407 Mirra Manual for Macintosh Release 2.2 iii Contents Chapter 1: Introduction . . . . . . . . . . . . . . . . . . . . . . . . . . . . . . . . . . . . . . . . . . . . . . . . . . . . . . . . . 1 System Requirements . . . . . . . . . . . . . . . . . . . . . . . . . . . . . . . . . . . . . . . . . . . . . . . . . . . . . . . . . . 1 Network Requirements . . . . . . . . . . . . . . . . . . . . . . . . . . . . . . . . . . . . . . . . . . . . . . . . . . . . . . . . . . 2 Chapter 2: Connecting the Components . . . . . . . . . . . . . . . . . . . . . . . . . . . . . . . . . . . . 3 Using a Router . . . . . . . . . . . . . . . . . . . . . . . . . . . . . . . . . . . . . . . . . . . . . . . . . . . . . . . . . . . . . . . . . 3 Using an Apple AirPort Wireless Router . . . . . . . . . . . . . . . . . . . . . . . . . . . . . . . . . . . . . 3 Apple Airport Extreme . . . . . . . . . . . . . . . . . . . . . . . . . . . . . . . . . . . . . . . . . . . . . . . . . . 3 If the Mirra is Your Only Wired/Ethernet Device 3 If the Mirra is Not Your Only Wired/Ethernet Device 3 Apple Airport Express . . . . . . . . . . . . . . . . . . . . . . . . . . . . . . . . . . . . . . . . . . . . . . . . . . 4 Connecting your Mirra to your Macintosh . . . . . . . . . . . . . . . . . . . . . . . . . . . . . . . . . . . . . . . . 4 Setting Up a Single Computer . . . . . . . . . . . . . . . . . . . . . . . . . . . . . . . . . . . . . . . . . . . . . . 4 Setting Up Multiple Computers . . . . . . . . . . . . . . . . . . . . . . . . . . . . . . . . . . . . . . . . . . . . . 5 Connecting your Mirra to a Power Source . . . . . . . . . . . . . . . . . . . . . . . . . . . . . . . . . . . . . . . . 6 Chapter 3: Setting Up your Mirra . . . . . . . . . . . . . . . . . . . . . . . . . . . . . . . . . . . . . . . . . . . . 8 Installing the Mirra Software . . . . . . . . . . . . . . . . . . . . . . . . . . . . . . . . . . . . . . . . . . . . . . . . . . . 8 Setting Up the Mirra Software . . . . . . . . . . . . . . . . . . . . . . . . . . . . . . . . . . . . . . . . . . . . . . . . . 15 Creating a New Web Account . . . . . . . . . . . . . . . . . . . . . . . . . . . . . . . . . . . . . . . . . . . . . . . . . . . 25 Organizing your Mirra . . . . . . . . . . . . . . . . . . . . . . . . . . . . . . . . . . . . . . . . . . . . . . . . . . . . . . . . . . 29 Using Mirra Icons and Aliases . . . . . . . . . . . . . . . . . . . . . . . . . . . . . . . . . . . . . . . . . . . . . 29 Using the Mirra Widget . . . . . . . . . . . . . . . . . . . . . . . . . . . . . . . . . . . . . . . . . . . . . . . . 30 Setting Mirra Preferences . . . . . . . . . . . . . . . . . . . . . . . . . . . . . . . . . . . . . . . . . . . . . . . . . 31 Changing Your Email Address. . . . . . . . . . . . . . . . . . . . . . . . . . . . . . . . . . . . . . . . . . . . . . 32 Adjusting Network Settings . . . . . . . . . . . . . . . . . . . . . . . . . . . . . . . . . . . . . . . . . . . . . . . 36 Advanced Network Settings for Manual Addressing . . . . . . . . . . . . . . . . . . . . 37 Setting Up Multiple Users on One Computer . . . . . . . . . . . . . . . . . . . . . . . . . . . . . . . . 37 Using Mirra with Mac OSX Fast User Switching . . . . . . . . . . . . . . . . . . . . . . . . 41 Setting Up Multiple Computers with One Mirra . . . . . . . . . . . . . . . . . . . . . . . . . . . . . 41 Backing Up to Multiple Mirras . . . . . . . . . . . . . . . . . . . . . . . . . . . . . . . . . . . . . . . . . . . . . 42 Accessing the Mirra Screens . . . . . . . . . . . . . . . . . . . . . . . . . . . . . . . . . . . . . . . . . . . . . . . . . . 42 Displaying the Task Menus . . . . . . . . . . . . . . . . . . . . . . . . . . . . . . . . . . . . . . . . . . . . . . . . . . . . . 43 Reading the Status Bar . . . . . . . . . . . . . . . . . . . . . . . . . . . . . . . . . . . . . . . . . . . . . . . . . . . . . . . 44 i Table of Contents Mirra Manual for Macintosh Chapter 4: Using the Mirra Status Screen. . . . . . . . . . . . . . . . . . . . . . . . . . . . . . . . .45 Displaying the Status Tasks Menu . . . . . . . . . . . . . . . . . . . . . . . . . . . . . . . . . . . . . . . . . . . . Working with Problem Files . . . . . . . . . . . . . . . . . . . . . . . . . . . . . . . . . . . . . . . . . . . . . . . . . . . . Opening the Problem Files Window . . . . . . . . . . . . . . . . . . . . . . . . . . . . . . . . . . . . . . . . . Fixing Problem Files . . . . . . . . . . . . . . . . . . . . . . . . . . . . . . . . . . . . . . . . . . . . . . . . . . . . . . . Mirra Status Tasks . . . . . . . . . . . . . . . . . . . . . . . . . . . . . . . . . . . . . . . . . . . . . . . . . . . . . . . . . . . Configuring a Mirra Name or Advanced Network Settings . . . . . . . . . . . . . . . . . . Setting/Changing an Access Password . . . . . . . . . . . . . . . . . . . . . . . . . . . . . . . . . . . . Dismissing an Alert . . . . . . . . . . . . . . . . . . . . . . . . . . . . . . . . . . . . . . . . . . . . . . . . . . . . . . Dismissing All Alerts . . . . . . . . . . . . . . . . . . . . . . . . . . . . . . . . . . . . . . . . . . . . . . . . . . . . . Viewing Alert Details . . . . . . . . . . . . . . . . . . . . . . . . . . . . . . . . . . . . . . . . . . . . . . . . . . . . . Showing Problem Files . . . . . . . . . . . . . . . . . . . . . . . . . . . . . . . . . . . . . . . . . . . . . . . . . . . . 46 47 47 50 51 51 52 52 52 53 53 Chapter 5: Backing Up & Restoring Folders . . . . . . . . . . . . . . . . . . . . . . . . . . . . . . . .54 Folder-naming Issues . . . . . . . . . . . . . . . . . . . . . . . . . . . . . . . . . . . . . . . . . . . . . . . . . . . . . . . . . Using the Backup & Restore Screen . . . . . . . . . . . . . . . . . . . . . . . . . . . . . . . . . . . . . . . . . . . Displaying the Backup & Restore Tasks Menu . . . . . . . . . . . . . . . . . . . . . . . . . . . . . . . . . . Selecting Folders for Backup . . . . . . . . . . . . . . . . . . . . . . . . . . . . . . . . . . . . . . . . . . . . . . . . . . Recommended Backups . . . . . . . . . . . . . . . . . . . . . . . . . . . . . . . . . . . . . . . . . . . . . . . . . . . New Backups . . . . . . . . . . . . . . . . . . . . . . . . . . . . . . . . . . . . . . . . . . . . . . . . . . . . . . . . . . . . . From the Backup & Restore Tasks Menu . . . . . . . . . . . . . . . . . . . . . . . . . . . . . . . From the Finder . . . . . . . . . . . . . . . . . . . . . . . . . . . . . . . . . . . . . . . . . . . . . . . . . . . . . . Backing Up your Home Folder . . . . . . . . . . . . . . . . . . . . . . . . . . . . . . . . . . . . . . . . . . . . . Excluding Folders during Initial Backup . . . . . . . . . . . . . . . . . . . . . . . . . . . . . . . . . . . . Excluding Folders after the Initial Backup . . . . . . . . . . . . . . . . . . . . . . . . . . . . . . Checking Backup Status on your Computer . . . . . . . . . . . . . . . . . . . . . . . . . . . . . . . . . . . . Verifying a Backup . . . . . . . . . . . . . . . . . . . . . . . . . . . . . . . . . . . . . . . . . . . . . . . . . . . . . . . . Opening Backups on your Mirra from the Finder . . . . . . . . . . . . . . . . . . . . . . . . . . . . Reading the Activity Log . . . . . . . . . . . . . . . . . . . . . . . . . . . . . . . . . . . . . . . . . . . . . . . . . . Accessing Backups from Other Computers Connected to Your Mirra . . . . . . . . . . . . Copying Files from Another Computer Connected to Your Mirra . . . . . . . . . . . . . . . . . Copying a Folder from Another Computer . . . . . . . . . . . . . . . . . . . . . . . . . . . . . . . . . . Copying a File from Another Computer . . . . . . . . . . . . . . . . . . . . . . . . . . . . . . . . . . . . . Restoring Folders After a Crash . . . . . . . . . . . . . . . . . . . . . . . . . . . . . . . . . . . . . . . . . . . . . . . Backup & Restore Tasks . . . . . . . . . . . . . . . . . . . . . . . . . . . . . . . . . . . . . . . . . . . . . . . . . . . . . . Backing Up a New Folder . . . . . . . . . . . . . . . . . . . . . . . . . . . . . . . . . . . . . . . . . . . . . . . . . . Selecting Recommended Backups . . . . . . . . . . . . . . . . . . . . . . . . . . . . . . . . . . . . . . . . . Removing a Folder from Backup . . . . . . . . . . . . . . . . . . . . . . . . . . . . . . . . . . . . . . . . . . . Saving a Folder . . . . . . . . . . . . . . . . . . . . . . . . . . . . . . . . . . . . . . . . . . . . . . . . . . . . . . . . . . . Saving a File . . . . . . . . . . . . . . . . . . . . . . . . . . . . . . . . . . . . . . . . . . . . . . . . . . . . . . . . . . . . . Saving a File Version . . . . . . . . . . . . . . . . . . . . . . . . . . . . . . . . . . . . . . . . . . . . . . . . . . . . . . Mirra Manual for Macintosh Table of Contents 55 56 58 59 59 62 63 65 65 66 67 69 69 70 70 71 74 74 76 77 78 78 78 79 79 80 81 ii Undeleting a File or Folder . . . . . . . . . . . . . . . . . . . . . . . . . . . . . . . . . . . . . . . . . . . . . . . . . 82 Restoring a Version of a File . . . . . . . . . . . . . . . . . . . . . . . . . . . . . . . . . . . . . . . . . . . . . . . 83 Restoring a Folder . . . . . . . . . . . . . . . . . . . . . . . . . . . . . . . . . . . . . . . . . . . . . . . . . . . . . . . . 84 Stopping a Restore . . . . . . . . . . . . . . . . . . . . . . . . . . . . . . . . . . . . . . . . . . . . . . . . . . . . . . . 85 Opening a Folder . . . . . . . . . . . . . . . . . . . . . . . . . . . . . . . . . . . . . . . . . . . . . . . . . . . . . . . . . . 85 Opening a Folder in Finder . . . . . . . . . . . . . . . . . . . . . . . . . . . . . . . . . . . . . . . . . . . . . . . . . 85 Opening a File in Finder . . . . . . . . . . . . . . . . . . . . . . . . . . . . . . . . . . . . . . . . . . . . . . . . . . . . 86 Revealing a File or Folder in Finder . . . . . . . . . . . . . . . . . . . . . . . . . . . . . . . . . . . . . . . . . 86 Sharing a Folder via the Web . . . . . . . . . . . . . . . . . . . . . . . . . . . . . . . . . . . . . . . . . . . . . . . 87 Sharing a Folder via the Local Network . . . . . . . . . . . . . . . . . . . . . . . . . . . . . . . . . . . . . 87 Viewing Previous Versions of a File. . . . . . . . . . . . . . . . . . . . . . . . . . . . . . . . . . . . . . . . . . 87 Purging Files and Folders from your Personal Server . . . . . . . . . . . . . . . . . . . . . . . . 88 Notes on Backing Up and Restoring Files and Folders . . . . . . . . . . . . . . . . . . . . . . . . . . . 89 Chapter 6: Sharing Folders . . . . . . . . . . . . . . . . . . . . . . . . . . . . . . . . . . . . . . . . . . . . . . . . . . . 90 Displaying the Sharing Tasks Menu . . . . . . . . . . . . . . . . . . . . . . . . . . . . . . . . . . . . . . . . . . . . . 91 Using the Sharing Screen . . . . . . . . . . . . . . . . . . . . . . . . . . . . . . . . . . . . . . . . . . . . . . . . . . . . . . 92 Sharing via the Web . . . . . . . . . . . . . . . . . . . . . . . . . . . . . . . . . . . . . . . . . . . . . . . . . . . . . . . . . . . 94 Opening the Share via the Web Window . . . . . . . . . . . . . . . . . . . . . . . . . . . . . . . . . . . . . 94 From the Sharing Screen . . . . . . . . . . . . . . . . . . . . . . . . . . . . . . . . . . . . . . . . . . . . . . 94 From the Backup & Restore Screen . . . . . . . . . . . . . . . . . . . . . . . . . . . . . . . . . . . . 96 From the Finder . . . . . . . . . . . . . . . . . . . . . . . . . . . . . . . . . . . . . . . . . . . . . . . . . . . . . . . 98 Using the Share via the Web Window . . . . . . . . . . . . . . . . . . . . . . . . . . . . . . . . . . . . . . 100 Selecting a Folder to Share . . . . . . . . . . . . . . . . . . . . . . . . . . . . . . . . . . . . . . . . . . 100 Selecting Recipients to Share With . . . . . . . . . . . . . . . . . . . . . . . . . . . . . . . . . . . 101 Entering Addresses with the Apple Address Book 102 Typing Email Addresses 103 Setting Folder Permissions . . . . . . . . . . . . . . . . . . . . . . . . . . . . . . . . . . . . . . . . . . . 104 Sending a Message to Recipients . . . . . . . . . . . . . . . . . . . . . . . . . . . . . . . . . . . . 104 Completing the Share . . . . . . . . . . . . . . . . . . . . . . . . . . . . . . . . . . . . . . . . . . . . . . . . 104 Sharing via the Local Network . . . . . . . . . . . . . . . . . . . . . . . . . . . . . . . . . . . . . . . . . . . . . . . . . 106 Opening the Share via the Local Network Window . . . . . . . . . . . . . . . . . . . . . . . . . . 106 From the Sharing Screen . . . . . . . . . . . . . . . . . . . . . . . . . . . . . . . . . . . . . . . . . . . . . 107 From the Backup & Restore Screen . . . . . . . . . . . . . . . . . . . . . . . . . . . . . . . . . . . 108 From the Finder . . . . . . . . . . . . . . . . . . . . . . . . . . . . . . . . . . . . . . . . . . . . . . . . . . . . . 110 Using the Share via the Local Network Window. . . . . . . . . . . . . . . . . . . . . . . . . . . . . 112 Selecting a Folder to Share . . . . . . . . . . . . . . . . . . . . . . . . . . . . . . . . . . . . . . . . . . . 112 Selecting Recipients on the Local Network . . . . . . . . . . . . . . . . . . . . . . . . . . . . . 113 Setting Folder Permissions . . . . . . . . . . . . . . . . . . . . . . . . . . . . . . . . . . . . . . . . . . . 114 Completing the Share . . . . . . . . . . . . . . . . . . . . . . . . . . . . . . . . . . . . . . . . . . . . . . . . 114 Synchronizing Folders . . . . . . . . . . . . . . . . . . . . . . . . . . . . . . . . . . . . . . . . . . . . . . . . . . . . . . . . 114 Synchronizing Versions . . . . . . . . . . . . . . . . . . . . . . . . . . . . . . . . . . . . . . . . . . . . . . . . . . . 114 iii Table of Contents Mirra Manual for Macintosh Working with Synchronized Folders . . . . . . . . . . . . . . . . . . . . . . . . . . . . . . . . . . . . . . . Stopping Synchronization . . . . . . . . . . . . . . . . . . . . . . . . . . . . . . . . . . . . . . . . . . . . . . . Sharing Tasks . . . . . . . . . . . . . . . . . . . . . . . . . . . . . . . . . . . . . . . . . . . . . . . . . . . . . . . . . . . . . . . Sharing a Folder via the Web . . . . . . . . . . . . . . . . . . . . . . . . . . . . . . . . . . . . . . . . . . . . Sharing a Folder via the Local Network. . . . . . . . . . . . . . . . . . . . . . . . . . . . . . . . . . . Opening a Folder. . . . . . . . . . . . . . . . . . . . . . . . . . . . . . . . . . . . . . . . . . . . . . . . . . . . . . . . . Opening or Revealing a File or Folder in Finder . . . . . . . . . . . . . . . . . . . . . . . . . . . . . Stopping a Share . . . . . . . . . . . . . . . . . . . . . . . . . . . . . . . . . . . . . . . . . . . . . . . . . . . . . . . Synchronizing Folders . . . . . . . . . . . . . . . . . . . . . . . . . . . . . . . . . . . . . . . . . . . . . . . . Stopping Synchronization . . . . . . . . . . . . . . . . . . . . . . . . . . . . . . . . . . . . . . . . . . . . Changing Web Shares . . . . . . . . . . . . . . . . . . . . . . . . . . . . . . . . . . . . . . . . . . . . . . . . . . . . Changing Local Network Shares . . . . . . . . . . . . . . . . . . . . . . . . . . . . . . . . . . . . . . . . . Saving a Folder . . . . . . . . . . . . . . . . . . . . . . . . . . . . . . . . . . . . . . . . . . . . . . . . . . . . . . . . . . Saving a File . . . . . . . . . . . . . . . . . . . . . . . . . . . . . . . . . . . . . . . . . . . . . . . . . . . . . . . . . . . . Saving a File Version . . . . . . . . . . . . . . . . . . . . . . . . . . . . . . . . . . . . . . . . . . . . . . . . . . . . . Undeleting a File or Folder . . . . . . . . . . . . . . . . . . . . . . . . . . . . . . . . . . . . . . . . . . . . . . . Restoring a Version of a File . . . . . . . . . . . . . . . . . . . . . . . . . . . . . . . . . . . . . . . . . . . . . Stopping a Restore . . . . . . . . . . . . . . . . . . . . . . . . . . . . . . . . . . . . . . . . . . . . . . . . . . . . . . Viewing Previous Versions of a File . . . . . . . . . . . . . . . . . . . . . . . . . . . . . . . . . . . . . . . . Notes on Sharing Folders . . . . . . . . . . . . . . . . . . . . . . . . . . . . . . . . . . . . . . . . . . . . . . . . . . . . 115 117 117 117 117 118 118 118 119 119 120 122 123 124 125 126 127 128 128 128 Chapter 7: Setting Up Web Access . . . . . . . . . . . . . . . . . . . . . . . . . . . . . . . . . . . . . . . . .130 Displaying the Web Access Tasks Menu . . . . . . . . . . . . . . . . . . . . . . . . . . . . . . . . . . . . . . . Creating a Mirra Web Account . . . . . . . . . . . . . . . . . . . . . . . . . . . . . . . . . . . . . . . . . . . . . . . . Enabling Folders for Web Access . . . . . . . . . . . . . . . . . . . . . . . . . . . . . . . . . . . . . . . . . . . . . Web Access Tasks . . . . . . . . . . . . . . . . . . . . . . . . . . . . . . . . . . . . . . . . . . . . . . . . . . . . . . . . . . . Troubleshooting a Web Access Connection . . . . . . . . . . . . . . . . . . . . . . . . . . . . . . . . Enabling a Folder for Web Access . . . . . . . . . . . . . . . . . . . . . . . . . . . . . . . . . . . . . . . . Disabling a Folder for Web Access . . . . . . . . . . . . . . . . . . . . . . . . . . . . . . . . . . . . . . . . Enabling All Folders for Web Access . . . . . . . . . . . . . . . . . . . . . . . . . . . . . . . . . . . . . . Disabling All Folders for Web Access . . . . . . . . . . . . . . . . . . . . . . . . . . . . . . . . . . . . . Auto-enabling Web Access for New Backups . . . . . . . . . . . . . . . . . . . . . . . . . . . . . . Disabling Web Access for New Backups . . . . . . . . . . . . . . . . . . . . . . . . . . . . . . . . . . . Notes on Accessing Files on the Web . . . . . . . . . . . . . . . . . . . . . . . . . . . . . . . . . . . . . . . . . Chapter 8: Reading the Activity Log 130 132 135 137 137 137 137 137 137 138 138 138 . . . . . . . . . . . . . . . . . . . . . . . . . . . . . . . . . . . . . . .139 Displaying the Activity Log Tasks Menu . . . . . . . . . . . . . . . . . . . . . . . . . . . . . . . . . . . . . . . 140 Chapter 9: Managing Your Mirra . . . . . . . . . . . . . . . . . . . . . . . . . . . . . . . . . . . . . . . . . . . .142 Checking the Backup Status of all Computers . . . . . . . . . . . . . . . . . . . . . . . . . . . . . . . . . 142 Mirra Manual for Macintosh Table of Contents iv Turning Off your Personal Server . . . . . . . . . . . . . . . . . . . . . . . . . . . . . . . . . . . . . . . . . . . . . . 143 Returning to Factory Defaults . . . . . . . . . . . . . . . . . . . . . . . . . . . . . . . . . . . . . . . . . . . . . . . . 144 Changing a Mirra Web Account . . . . . . . . . . . . . . . . . . . . . . . . . . . . . . . . . . . . . . . . . . . . . . . . 145 Troubleshooting . . . . . . . . . . . . . . . . . . . . . . . . . . . . . . . . . . . . . . . . . . . . . . . . . . . . . . . . . . . . . . 146 Technical Support . . . . . . . . . . . . . . . . . . . . . . . . . . . . . . . . . . . . . . . . . . . . . . . . . . . . . . . . . . . . 146 Telephone Support . . . . . . . . . . . . . . . . . . . . . . . . . . . . . . . . . . . . . . . . . . . . . . . . . . . . . . . 146 Online Support . . . . . . . . . . . . . . . . . . . . . . . . . . . . . . . . . . . . . . . . . . . . . . . . . . . . . . . . . . . 146 MirraGuard Data Guarantee . . . . . . . . . . . . . . . . . . . . . . . . . . . . . . . . . . . . . . . . . . . . . 146 Index v ...............................................................................i Table of Contents Mirra Manual for Macintosh Chapter 1: Introduction This manual provides information about how to connect your Mirra™ Personal Server and install, set up, and use the Mirra software. Your shipping container should include the following components: Your shipping container should include the following components: • Seagate Mirra Sync and Share Personal Server • AC power cable • Ethernet cable • Mirra software CD (contains this electronic Mirra Manual) • Mirra license key sticker (affixed to the Mirra software CD sleeve) • Mirra Setup Guide (printed on the pocket folder insert in the shipping • container) Mirra Getting Started Guide System Requirements The Mirra software can be installed on Macintosh computers that meet these minimum system requirements: • Power PC G3, G4, or G5 processor running Mac OS X 10.3.9 or higher — OR — Intel Core Duo or Core Solo processor running Mac OS X 10.4.6 or higher • 256 MB RAM • 50 MB of free disk space • Ethernet network support and CD-ROM drive • Broadband always-on Internet connection (such as DSL or cable) Mirra Manual for Macintosh Release 2.2 1 Network Requirements Your Personal Server must be connected to a router or hub with an open Ethernet port. If you have only one computer and connect to the Internet with a broadband modem, you must install a router or a hub so that your Personal Server and your computer can share the same Internet connection. If you have a different configuration, see Setting Up a Single Computer or Setting Up Multiple Computers in Chapter 2 for further details on connecting your Personal Server to your computer. Note: If you have a wide area network (WAN) that uses a router to bridge different subnets, you can use your Personal Server only with computers connected to the same subnet. Mirra Manual for Macintosh Release 2.2 2 Chapter 2: Connecting the Components Using a Router You should have a router on your network for several reasons: 1. To set up a local network so that other computers can connect to your Mirra. 2. To connect the local network to the Internet. 3. To provide firewall protection between the local network (including the Mirra) and the Internet. You should always use a router that includes a firewall to connect your local network to your Internet Service Provider (ISP) because the firewall blocks unauthorized access to your local network from the Internet. Using an Apple AirPort Wireless Router Apple Airport Extreme If the Mirra is Your Only Wired/Ethernet Device If you use an Apple AirPort Extreme wireless router and your Personal Server is your only wired/Ethernet device, simply plug the Ethernet cable from your Mirra into the LAN Ethernet port of your AirPort. (Don’t plug it into the WAN Ethernet port or your Mirra won’t work properly.) If the Mirra is Not Your Only Wired/Ethernet Device If you use an Apple AirPort Extreme wireless router with more than one wired/ Ethernet device, you must use a hub or a switch to connect the AirPort to all wired/ Ethernet devices. Do not use an additional router, as a router will prevent your wireless devices from communicating with your Mirra. Step 1: Plug an Ethernet hub or switch into the Ethernet LAN port of your Apple AirPort. Step 2: Plug both your Mirra and your other wired/Ethernet device(s) into the hub. Mirra Manual for Macintosh Release 2.2 3 Apple Airport Express The Apple Airport Express has no LAN Ethernet ports, so there’s no way to connect your Personal Server to your local network. You can do one of two things: 1. Purchase a wireless router such as the Apple Airport Extreme that does have wired LAN Ethernet ports and follow the directions above. 2. Purchase an Ethernet-to-wireless bridge to connect your wireless network to the wired Ethernet port your Personal Server requires. Connecting your Mirra to your Macintosh The Mirra can be used with one computer or with multiple computers. Setting Up a Single Computer Connect your Mirra to a router (such as the Apple AirPort Base Station) using the Ethernet cable included in your shipping carton. Once connected, your setup should resemble the one shown in Figure 2~1: Figure 2~1 Connecting your Personal Server with a Single Computer In Figure 2~1, your Personal Server is connected to a router which is, in turn, connected to a broadband modem and to the computer. Some broadband modems and wireless access points include a router, so your setup might look different. Mirra Manual for Macintosh Release 2.2 4 Setting Up Multiple Computers If you already have multiple computers sharing a broadband Internet connection, you probably already have a router. Check for an available Ethernet port and use the provided Ethernet cable to connect your Personal Server to the router as shown in Figure 2~2: Figure 2~2 Connecting your Personal Server with Multiple Computers Your configuration might look different than the one pictured in Figure 2~2. Connect your Personal Server to your router in the same way you connect other computers. Mirra Manual for Macintosh Release 2.2 5 Connecting your Mirra to a Power Source To connect your Mirra to a power source, Step 1: Plug the appropriate end of the provided power cable into the power slot on the rear of your Personal Server. Make sure it’s firmly and completely seated. Figure 2~3 Mirra Power Plug Outlet Step 2: Connect the other end of the power cable to an AC power source. Step 3: On the front of the Mirra, press and release the power button: Figure 2~4 Mirra Power Button • The green light to the right of the power button shines steadily. • The amber light to the left of the power button starts blinking after a few seconds. Mirra Manual for Macintosh Release 2.2 6 When the amber light shines steadily and a startup tone sounds, you have successfully installed your Personal Server. (If the amber status light shuts off, check the Mirra web site for help at http://support.mirra.com.) Mirra Manual for Macintosh Release 2.2 7 Chapter 3: Setting Up your Mirra Installing the Mirra Software You must install the Mirra software on each Macintosh computer in your network that you want to connect to your Personal Server. Note: You must have Administrator privileges (or the Administrator’s password) to install the Mirra software on your computer. However, Administrator privileges are not required to run the Mirra application. To install the Mirra software, Step 1: Insert the Mirra CD in your computer's CD-ROM drive and launch the installer: Figure 3~1 Introduction Step 2: Click Continue. Mirra Manual for Macintosh Release 2.2 8 The Release Notes window opens: Figure 3~2 Release Notes Step 3: When you’ve finished reading the Release Notes, click Continue. Mirra Manual for Macintosh Release 2.2 9 The Mirra License Agreement opens: Figure 3~3 Mirra License Agreement Step 4: If you agree, check I have read and accept the terms of the License Agreement and click Continue. Mirra Manual for Macintosh Release 2.2 10 The Select Destination window opens: Figure 3~4 Select Destination Use this window to tell Mirra where to install the Mirra software and aliases. Note: Aliases will be created for ALL Mirra users on this computer. Step 5: Decide whether to accept the default destination folder or choose a folder and select any locations at which you want a Mirra alias. Step 6: Click Continue. Mirra Manual for Macintosh Release 2.2 11 If you selected Choose Folder to change the destination folder, the Choose a Folder dialog opens: Figure 3~5 Save Dialog Step 7: Select a destination folder and click Choose to return to the Installer. The Select Destination screen now displays the folder you’ve selected. Step 8: Click Continue. Mirra Manual for Macintosh Release 2.2 12 The Pre-Installation Summary screen opens: Figure 3~6 Pre-Installation Summary Step 9: To change any previous settings, click Go Back. When you’re satisfied with your settings, click Install to begin the installation. Step 10: Enter your Administrator name and password at the prompt. Mirra Manual for Macintosh Release 2.2 13 The Installing screen informs you of the progress of the installation: Figure 3~7 Installing Mirra Manual for Macintosh Release 2.2 14 When the installation is complete, the Finish Up window opens: Figure 3~8 Finish Up Step 11: Click Launch Mirra to close the Installer and automatically open Mirra Setup. — OR — Click Done to exit the Installer and set up the Mirra software at another time. Setting Up the Mirra Software Mirra Setup walks you through the steps to set up your Mirra4 Mac software. Mirra Manual for Macintosh Release 2.2 15 The Welcome screen introduces Setup: Figure 3~9 Welcome Step 1: Click Next. Mirra Manual for Macintosh Release 2.2 16 The Find your Personal Server window opens: Figure 3~10 Find Your Personal Server Step 2: Select your Personal Server and click Next. The License Key window opens: Figure 3~11 License Key Mirra Manual for Macintosh Release 2.2 17 Entering a license key insures that only authorized Personal Servers are added to the Mirra network and that only authorized computers in your network have access to your Personal Server. If multiple computers are connected to your Personal Server, you must enter this license key on each computer. Your Mirra license key sticker is affixed to the Mirra software CD sleeve. Step 3: Enter your license key and click Next. The Personal Server Name window opens: Figure 3~12 Personal Server Name Step 4: Give your Personal Server a name of your choosing or accept the default name, Mirra Personal Server, and click Next. Note: You can change the Personal Server name at any time in the Mirra application (see Adjusting Network Settings). Mirra Manual for Macintosh Release 2.2 18 The Access Password window opens: Figure 3~13 Access Password The Access Password window offers the option of password protection for your backed up folders. If other computers are connected to your Mirra and you don't set a password, any Mirra user can use the Backup & Restore screen to access, edit, or delete your backed up folders. • You can set a password now or do it later from the Status screen in the Mirra application. • If you set an Access Password, it will apply to all your folders; you cannot assign it to some folders and not to others. • If you set a password, you won’t have to enter it to open your own folders on your own computer. But you will have to enter it if you want to access a backed up folder from a different computer than the one on which you created the password. Caution: Mirra cannot recover your Access Password for you. If you forget it, you will not be able to restore folders from your Personal Server. Step 5: If you wish, enter and confirm a password and click Next. Mirra Manual for Macintosh Release 2.2 19 The Web Account window opens: Figure 3~14 Web Account Although you can use Mirra’s Backup & Restore feature without creating a Mirra Web Account, you must create a Web Account in order to use the Web Access and Folder Sharing features. Step 6: If you’ve previously created a Mirra Web Account, enter the email address you used to create that account. If you’re creating a new Mirra Web Account, enter the email address you want to associate with this Personal Server. After you finish Setup, you’ll complete the creation of your Web Account (see Creating a New Web Account). Step 7: Click Next. Mirra Manual for Macintosh Release 2.2 20 The Backup window allows you to select some basic folders for backup: Figure 3~15 Backup The folders listed in the Backup window are those most frequently selected for backup. Once you’ve completed Setup, you’ll be able to back up other folders not listed in this window or folders listed here but not selected during Setup. Step 8: Select the folders you want to back up to your computer and click Next. Mirra Manual for Macintosh Release 2.2 21 The Thank You window opens: Figure 3~16 Thank You Step 9: Click Finish to close Setup. Three items open automatically on your desktop when Setup closes: Mirra Manual for Macintosh Release 2.2 22 • The Mirra web site Product Registration page: Figure 3~17 Mirra Product Registration Although registering your Mirra is not required, you must register to activate the MirraGuard™ Data Guarantee and receive update notices from Mirra — To register now, complete the Mirra Product Registration form. Mirra Manual for Macintosh Release 2.2 23 • The Connecting screen, which informs you that the Mirra software is connecting to your Personal Server: Figure 3~18 Connecting Screen • A Configure Backup window for each folder you selected for backup during Setup: Figure 3~19 Configure Backup — For each folder, change the folder name if you wish and click Back Up to verify that you want to back it up. Mirra Manual for Macintosh Release 2.2 24 Creating a New Web Account Although you can now use the Mirra software to back up folders without creating a Web Account, you cannot access your folders remotely or share them with others until you create a Web Account. In the Web Account window of Setup, you entered an email address to be associated with your free Mirra Web Account. Now you must complete the creation of your Web Account on the Mirra web site. Until you create a Web Account, the Web Account Information area of the Web Access screen in your Mirra application indicates that your Mirra is connected but that your Web Account has not yet been confirmed: Figure 3~20 Web Access Screen — No Web Account Mirra Manual for Macintosh Release 2.2 25 To complete the creation of your Mirra Web Account, Step 1: Check the email account associated with the email address you used to create your Mirra Web Account. Usually within a few minutes, you receive a message resembling the one shown below with a link to the Mirra web site: Figure 3~21 Create Your Mirra Account Email If you don’t receive an email, • Check your Spam folder to be sure your Mirra email hasn’t mistakenly been identified as spam. • Make sure you’re checking the email account that matches the email address you used to create your Web Account. • Click Resend Email Now on the Web Access screen in your Mirra application. If the email isn’t there, contact Mirra Technical Support at http://support. mirra.com. Step 2: Click the link in the email. Mirra Manual for Macintosh Release 2.2 26 You’re taken directly to the Create Account page on the Mirra web site, where your email address has already been entered: Figure 3~22 Create Web Account Step 3: Enter your name and enter and confirm a password of your choosing. Step 4: Click Create Account. Mirra Manual for Macintosh Release 2.2 27 The Thank You page opens: Figure 3~23 Thank You Step 5: Return to the Web Access screen in the Mirra application on your desktop. Mirra Manual for Macintosh Release 2.2 28 The Web Access screen now reflects the confirmation of your Web Account: Figure 3~24 Web Access Screen — Web Account Confirmed You’ll receive an email confirming the creation of your Web Account and another confirming the registration of your Mirra. Organizing your Mirra Using Mirra Icons and Aliases During the installation of the Mirra software, a Mirra icon is placed in your menu bar. The icon indicates whether your Mirra is connected and working properly and can be used to open the Mirra application and to set preferences . To open the Mirra application, Step 1: Click the Mirra icon in the menu bar. Mirra Manual for Macintosh Release 2.2 29 Step 2: Select Open Mirra from the pull-down menu: Figure 3~25 Mirra Menu Bar Icon Menu The Mirra icon is normally red. A gray icon indicates that your connection has been lost. The Mirra icon pulses slowly when backups are in progress. You can turn off the pulsing behavior if you wish. To turn off the pulsing behavior, Step 1: Click the Mirra icon in the menu bar. Step 2: Select Turn Mirra Icon Animation Off from the pull-down menu. In addition to the menu bar icon, Mirra aliases appear on your desktop and in your home folder if you selected those options during the software installation. You can click any of them to open the Mirra application. Note: The Mirra application is located in the Applications folder or wherever you installed it. Using the Mirra Widget Note: The Mirra widget is available in Tiger (Mac OS X 10.4) and Leopard (Mac OS X 10.5). When you install the Mirra software, a Mirra icon is placed in the widget bar of the Dashboard. You can drag the Mirra widget onto your desktop so you can easily track what your Mirra is doing without opening the Mirra application. Mirra Manual for Macintosh Release 2.2 30 To access the Mirra widget, Step 1: Make the Dashboard active by clicking the icon in the Dock or pressing F12. Figure 3~26 Mirra Widget Step 2: Click the Open (+) button in the lower left cornerto reveal the widget bar. The widget bar, which displays all widgets on your Mac, slides into view at the bottom of the screen. Step 3: Click the arrow buttons on either side of the widget bar to display more widgets until the Mirra widget is displayed. Step 4: To activate the Mirra widget, click its icon or drag it out of the widget bar. Step 5: To close the widget bar, click the close button on the lower-left part of the screen right above the Widget Bar. Step 6: To return to your desktop, press F12 or click the desktop. Setting Mirra Preferences You can use the Mirra Preferences window to set Notification, Web Access, Mirra Update Reminder preferences, and turn the pulsing menu bar icon on or off. To set Mirra preferences, Step 1: In the Mirra menu bar, click Mirra > Preferences. Mirra Manual for Macintosh Release 2.2 31 The Mirra Preferences window opens: Figure 3~27 Mirra Preferences Step 2: Make your choices for new alert notification preferences, web access preferences, and Mirra Update reminder preference. Step 3: Close the window to save your preferences. Changing Your Email Address Your Mirra Web Account uses your email address to identify your user account. So if you change your email address, you must associate your new address with your Mirra Web Account. When you change your email address, you are in effect creating a new Mirra Web Account. However, you can use the same login name and password you used with your previous email address. Mirra Manual for Macintosh Release 2.2 32 To change your email address, Step 1: In the Web Account Information area of the Web Access screen, click Change/Create next to your current email address: Figure 3~28 Change/Create Account Link The Create a Mirra Web Account window opens: Figure 3~29 Create a Mirra Web Account Window Step 2: Enter your new email address and click OK. Mirra Manual for Macintosh Release 2.2 33 Step 3: Check your email. Usually after a few minutes you receive a message from Mirra resembling the message shown below with a link to the Create Account page on the Mirra web site: Figure 3~30 Create Your Mirra Account Email Step 4: Click the link in your email. Mirra Manual for Macintosh Release 2.2 34 You’re taken to the Mirra web site Create Account page: Figure 3~31 Create Account Page Step 5: Enter a username and enter and confirm a password of your choosing. Step 6: Click Create Account. The Thank You page opens: Figure 3~32 Thank You Mirra Manual for Macintosh Release 2.2 35 Step 7: Return to the Mirra application on your desktop. Adjusting Network Settings You can customize the network configuration for your Mirra by changing the name you gave your Mirra or entering advanced network settings, such as static IP addressing. Almost everyone will use the default network settings. Use Advanced Network Settings only if you need to set static IP addressing and only if you have the technical expertise necessary to configure network settings. Note: If you enter incorrect settings, you may not be able to connect to your Mirra. If that happens, contact Mirra Technical Support at http://support.mirra.com. To adjust your network settings, Step 1: In the Tasks menu on the Status screen, click Configure. The Mirra Configuration window opens with the current name of your Personal Server displayed: Figure 3~33 Mirra Configuration Step 2: Enter a name of your choosing for this Personal Server. Note: The name you choose affects only your Personal Server and does not change any network settings on your computer. Mirra Manual for Macintosh Release 2.2 36 Step 3: Enter the desired IP and DNS Server information. Step 4: Click OK to save your changes and close the Advanced Network Settings window. For additional information about advanced network settings, see Advanced Network Settings for Manual Addressing. Advanced Network Settings for Manual Addressing Most modern routers and broadband modems are able to share your Internet connection using automatic address assignment (DHCP) for computers in your network along with address sharing (NAT). If your networking equipment does not include these features or if you have other requirements or constraints, you may need to manually set an Internet address for Mirra. Contact your broadband Internet provider for more information about sharing your Internet connection and about the type of addressing required for your network. If static IP addressing is required, determine a static IP address or ask your Internet provider to do so. Use the Advanced Network Configuration option to enter this address information.\ If you use static IP addresses and want to move your Mirra to a different network, be sure to update the static IP address to avoid a conflict. Setting Up Multiple Users on One Computer If more than one person logs on to a computer that is backed up to a Personal Server, each person must create an individual Mirra Web Account in order to enable web access and file sharing for that individual’s folders. To create a Web Account after another user has already installed and licensed a Mirra, Step 1: Log onto a computer on which another user has already installed the Mirra software and created a Mirra Web Account. Mirra Manual for Macintosh Release 2.2 37 Step 2: Open the Mirra application and click the Web Access tab: Figure 3~34 Web Access Screen - No Web Account The Web Account Information area indicates that the Personal Server is connected and operating, but that you have not yet created a Mirra Web Account. Step 3: Click Change/Create next to Account. The Create a Mirra Web Account window opens: Figure 3~35 Create a Mirra Web Account Window Step 4: Enter the email address you want to associate with your Web Account and click OK. Mirra Manual for Macintosh Release 2.2 38 Step 5: Check your email for a message from Mirra resembling the message shown below with a link to the Mirra web site: Figure 3~36 Create Your Mirra Account Email If you don’t receive an email, check your Spam folder to be sure your Mirra email hasn’t mistakenly been identified as spam. If the email isn’t there, contact Mirra Technical Support at http:// support. mirra.com. Step 6: Click the link in your email. Mirra Manual for Macintosh Release 2.2 39 You’re taken to the Create Account page on the Mirra web site, where your email address is already entered:, Figure 3~37 Web Site Create Account Page Step 7: Enter a name and enter and confirm a password of your choosing. Step 8: Click Create Account. The Thank You page opens: Figure 3~38 Thank You Mirra Manual for Macintosh Release 2.2 40 Step 9: Step 10: Return to the application on your desktop. Check your email for a welcome message from Mirra: Figure 3~39 Welcome Email Using Mirra with Mac OSX Fast User Switching When users who share a computer change user accounts via fast user switching, the Mirra application remains open on both users’ desktops. Mirra continues to back up all users’ files. Once files have been selected for backup by any user on a computer connected to a Personal Server, those files are continuously backed up regardless of who is logged on at any given moment (and even when no one is logged on and the application is closed). Setting Up Multiple Computers with One Mirra In order to back up two or more computers to a Mirra, you must install the Mirra software and enter your Mirra license key on each computer. Each user on each computer must then create a separate Mirra Web Account in order to remotely access and share folders. Both Macs and PCs can be connected to the same Mirra. Mirra Manual for Macintosh Release 2.2 41 Backing Up to Multiple Mirras You can back up the folders on your computer to more than one Mirra Personal Server. For example, you can back up folders from your laptop to one Mirra at work and another Mirra at home, providing additional security through a redundant backup. To back up your folders to more than one Mirra, Step 1: Install the Mirra software on your computer. Step 2: Connect to and license each of your Mirras. After you’ve licensed your Mirras, the Mirra software automatically discovers whichever Mirra you’re connected to. If two Mirras are present simultaneously, the one most recently used is selected. We recommend that you use the same email address when creating a Mirra Web Account for each Mirra so that you can remotely access backups on all your Mirras with one login at www. mirra.com. Accessing the Mirra Screens Each Mirra function (Status, Backup & Restore, Web Access, Sharing, and Activity Log) has its own screen. To open a screen, click the tab associated with it: Figure 3~40 Mirra Screen Tabs Mirra Manual for Macintosh Release 2.2 42 Displaying the Task Menus Each Mirra function (Status, Backup & Restore, Web Access, Sharing, and Activity Log) has its own Task menu. You can display a Task menu in two ways: • Click Tasks on the menu bar of a Mirra screen: Figure 3~41 Tasks Menu from the Menu Bar — OR — Mirra Manual for Macintosh Release 2.2 43 • Click the Tasks button on a Mirra screen: Figure 3~42 Tasks Button Reading the Status Bar The Status Bar across the bottom of the Mirra application provides continuously updated information about the status of your Personal Server: connection status, amount of free disk space, time of the last synchronization, and most recent activity. When a backup is under way, the Status Bar reflects its progress. Figure 3~43 Status Bar Mirra Manual for Macintosh Release 2.2 44 Chapter 4: Using the Mirra Status Screen The Mirra Status screen provides you with information about the current status of your Personal Server: Figure 4~1 Status Screen Fields • The Connected to area tells you which Personal Server you’re connected to, how many computers are backed up to it, and how many files are backed up on it from all connected computers. • The Server – Computer Synchronization area tells you how many files are not yet backed up and, if all files are currently backed up, the completion time of the last backup. • The Server disk free indicator displays the amount of free disk space remaining on the Personal Server. • The Alerts pane displays all notifications, such as license and account verifications and backup and sharing confirmations. The date and name of each alert is provided. Mirra Manual for Macintosh Release 2.2 45 Displaying the Status Tasks Menu You can display the Status Tasks menu in two ways: • Click Tasks on the menu bar of the Status screen: Figure 4~2 Status Tasks Menu from the Menu Bar — OR — • Click the Tasks button on the Status screen: Figure 4~3 Tasks Button Mirra Manual for Macintosh Release 2.2 46 Working with Problem Files A problem file displays one of more of these characteristics: • The filename is too long. • The file is contained in a folder whose name is too long. • The file or folder pathname contains unsupported characters. • The file or its surrounding folder has no Read permission. When Mirra encounters a problem file, it generates an alert in the Alerts area of the Status screen. Figure 4~4 Problem File Alert Opening the Problem Files Window You use the Problem Files window to view problem files so that you can rename them and Mirra can back them up. You can open the Problem Files window in several ways: Mirra Manual for Macintosh Release 2.2 47 • Click Tasks on the menu bar of the Status screen and select Show Problem Files: Figure 4~5 Status Tasks Menu from the Menu Bar • Highlight the Problem File alert in the Alerts field, click Tasks on the menu bar, and select View Alert Details on the Tasks menu • Click the Tasks button on the Status screen and select Show Problem Files on the Tasks menu: Figure 4~6 Status Tasks Button Mirra Manual for Macintosh Release 2.2 48 • Double-click the Problem File alert in the Alerts area of the Status screen: Figure 4~7 Problem File Alert Mirra Manual for Macintosh Release 2.2 49 Fixing Problem Files To see information about a problem file and fix the problem, Step 1: Use one of the methods described in the previous section to open the Problem Files window: Figure 4~8 Problem Files If the name of the problem file is too long to be displayed, the first and last few characters of the name are displayed. Step 2: Double-click on a problem file in the list. The Finder opens the folder that contains the file and highlights the file. Step 3: If the problem is too long a filename or a file or folder name that contains unsupported characters, • Double-click the file name in the list to open the file in the Finder. • Shorten the filename or replace the unsupported characters in the Finder. — OR — If the problem is too long a pathname, rename the enclosing folders or move the folder higher up in the folder hierarchy. — OR — If the problem is no Read permission, • Choose Get Info from the File menu in the Finder • Give yourself Read permission. Mirra Manual for Macintosh Release 2.2 50 Step 4: Click OK. Mirra Status Tasks Configuring a Mirra Name or Advanced Network Settings To change the name of your Mirra or to enter advanced network settings, Step 1: On the Status Tasks menu, click Configure. The Mirra Configuration window opens: Figure 4~9 Mirra Configuration Window Step 2: In the Mirra Configuration window, • Enter or edit a name for your Mirra. • Enter or update IP address and DNS server information. Step 3: Click OK. Mirra Manual for Macintosh Release 2.2 51 Setting/Changing an Access Password To set an Access Password if you don’t already have one or edit a password you selected previously, Step 1: On the Status Tasks menu, click Set/Change Access Password. The Folder Access Password window opens: Figure 4~10 Folder Access Password Step 2: In the Access Password window, • Enter your old password if one exists. • Enter and confirm the new password. Step 3: Click OK. Dismissing an Alert To dismiss a selected alert, Step 1: In the Alerts area of the Status screen, select the alert to be dismissed. Step 2: On the Status Tasks menu, click Dismiss alert. The alert is deleted. Dismissing All Alerts To dismiss all alerts at once, Step 1: Click the Status tab. Step 2: On the Status Tasks menu, click Dismiss All alerts. Mirra Manual for Macintosh Release 2.2 52 All alerts are deleted and the Alerts area closes. Viewing Alert Details To display the details of an alert, Step 1: Double-click the alert. — OR — In the Alerts area of the Status screen, select the alert to be viewed. Step 2: On the Status Tasks menu, click View alert details. A window containing the details of the alert opens. Showing Problem Files To see information about a problem file and fix the problem, Step 1: In the Alerts area of the Status screen, double-click the Problem File alert. Step 2: In the Problem Files window, double-click on a problem file. The Finder opens the folder that contains the file and highlights the file. Step 3: If the problem is too long a filename, shorten the filename. — OR — If the problem is too long a pathname, rename the enclosing folders or move the folder higher up in the folder hierarchy. Step 4: Click OK. Mirra Manual for Macintosh Release 2.2 53 Chapter 5: Backing Up & Restoring Folders There are several reasons to use Mirra to back up important folders: • Your information is safe in the event of a computer crash. • Mirra saves up to eight versions of each file in a backed up folder. • You can access and work with your backed up folders remotely from any computer with an Internet hookup. • Once a folder has been backed up, any files and folders added to it are automatically backed up as well. • You can share the contents of backed up folders with others. Mirra automatically and continuously tracks any changes you make to the files in backed up folders and saves the eight most recent versions of each file. If you make changes to files while your computer is not connected to your Personal Server, those changes are tracked and the most recent version of each file is synchronized to your Mirra when you reconnect. Since this is an ongoing, automatic process, you no longer need to schedule updates or backups. Your computer must remain on while a backup is in progress in order to complete the backup. If your computer goes to sleep or you shut it down before a backup completes, Mirra will continue the backup where it left off when you turn the computer back on. Once the backup has finished, you can turn off your computer. Mirra does NOT back up the following files and folders: • Invisible or hidden files and folders (including system folders) • Files and folders you don’t have permission to view • Folders whose pathnames are longer than 1024 characters • Files and folders whose names are longer than 253 characters Mirra Manual for Macintosh Release 2.2 54 Note: If you back up files and folders that are constantly changing, such as program files or logs, your Personal Server will be constantly updating those files and your computer’s performance may be affected. Folder-naming Issues Once you’ve selected a folder for backup, you cannot change the folder name in any way. If you do change a folder name, you must again select that folder for backup after the name change. If you place a sub-folder within a backed up folder, the sub-folder is automatically backed up. If you then delete the sub-folder and subsequently place a file with the same name as the deleted sub-folder in the same location, that file will NOT be backed up. You must purge the deleted sub-folder before the file with the same name can be backed up. Mirra Manual for Macintosh Release 2.2 55 Using the Backup & Restore Screen The Backup & Restore screen displays the folders you’ve selected for backup on your Mirra and lists the files stored in them: Figure 5~1 Backup & Restore Screen Mirra Manual for Macintosh Release 2.2 56 If other computers are connected to your Mirra, folders backed up from those computers are also displayed on your Backup & Restore screen: Figure 5~2 Backup & Restore Screen with Local Network To access the files contained in a backed up folder, Step 1: In the list of backed up folders on the left, select the folder in which the file resides. Step 2: From the list that displays on the right side of the screen, select the desired file. Step 3: Use the Backup & Restore Tasks menu to manage the file. When you’re viewing your Backups on the Backup and Restore screen, if something changes in one of your backed up folders (for example, if a file is added), the change does not appear on the screen unless it occurs in the folder whose contents you most recently displayed Mirra Manual for Macintosh Release 2.2 57 Displaying the Backup & Restore Tasks Menu You can display the Backup & Restore Tasks menu in two ways: • Click Tasks on the menu bar of the Backup & Restore screen: Figure 5~3 Backup & Restore Tasks from the Menu Bar — OR — Mirra Manual for Macintosh Release 2.2 58 • Click the Tasks button on the Backup & Restore screen: Figure 5~4 Tasks Button Selecting Folders for Backup Recommended Backups The folders listed in the Recommended Backups window are the ones most often selected for backup. Once these folders have been backed up, any files and folders you add to them are automatically backed up as well. If you didn’t select folders for backup in Setup, you can do so now on the Backup & Restore screen. Note: You can also back up folders not listed in the Recommended Backups window; see New Backups for additional information. Mirra Manual for Macintosh Release 2.2 59 To select folders for backup in the Recommended Backups window, Step 1: On the Backup & Restore Tasks menu, select Recommended Backups.: Figure 5~5 Backup & Restore Tasks - Recommended Backups Mirra Manual for Macintosh Release 2.2 60 The New Backups window opens with the Recommended Backups tab selected: Figure 5~6 Recommended Backups Step 2: Select the folders you want to back up. Step 3: Click Back Up. The New Backups window closes and a Configure Backup window opens for each folder you’ve selected: Figure 5~7 Configure Backup Mirra Manual for Macintosh Release 2.2 61 Step 4: In each window, change the backup name if you wish and click Back Up. The Backup & Restore screen lists the folders you’ve selected for backup: Figure 5~8 Backup & Restore Screen New Backups You can back up folders not listed in the Recommended Backups window in two ways: 1. From the Backup & Restore Tasks menu 2. From the Finder Mirra Manual for Macintosh Release 2.2 62 From the Backup & Restore Tasks Menu To use the Backup & Restore Tasks menu to select folders for backup, Step 1: On the Backup & Restore Tasks menu, select New Backup: Figure 5~9 Backup & Restore Tasks - New Backup Mirra Manual for Macintosh Release 2.2 63 A New Backup window opens with the Other Folders tab selected: Figure 5~10 New Backup Step 2: Select the folder to be backed up and click Back Up. A Configure Backup window opens: Figure 5~11 Configure Backup Step 3: Change the backup name if you wish and confirm that this is the folder to be backed up. Step 4: Click Back Up. The folder is added to the list on the Backup & Restore screen. Mirra Manual for Macintosh Release 2.2 64 From the Finder When you install the Mirra for Macintosh software, Mirra-specific entries are added to the Finder's shortcut menu. Although you aren't required to restart your computer after you install the Mirra software, these Mirra entries won't appear on the shortcut menu until you do restart.. To select a folder for backup from the Finder, Step 1: Control-click (or right-click) the folder in the Finder. The shortcut menu appears: Figure 5~12 Shortcut Menu Step 2: Select Add Folder “Foldername” to Mirra Backups. The Configure Backup window opens. Step 3: Click OK. The folder is added to the list on the Backup & Restore screen. Backing Up your Home Folder There are both benefits and drawbacks to backing up your home folder. Mirra Manual for Macintosh Release 2.2 65 Benefit: • If you back up your home folder, any file or folder you add to the home folder (which includes your desktop) is automatically backed up. Drawback: • You cannot synchronize a folder from your Personal Server to your Macintosh in a folder that’s backed up. So if you’ve backed up your home folder, you must select another folder not located in your home folder in which to synchronize folders. We recommend synchronizing in your Shared folder (located on your hard drive in /Users/Shared). Excluding Folders during Initial Backup You can select a folder for backup but exclude from backup specific folders within the backed up folder. For example, you can select your home folder for backup but exclude the large and ever-changing Caches folder, whose backup is unnecessary and would regularly slow your system performance. To exclude folders from backup, Step 1: In the Configure Backup window, click Exclude Folders:: Figure 5~13 Configure Backup Mirra Manual for Macintosh Release 2.2 66 The Excluded Folder(s) window opens: Figure 5~14 Excluded Folder(s) If you’re backing up your home folder, the Library/Caches folder is listed in the Excluded Folder(s) window. Step 2: Click the + and - signs to add or remove folders from the Excluded Folders list: • To add a folder to the Excluded Folders list, click + and browse to the folder. • To remove a folder from the Excluded Folders list, select the folder in the list and click - . Step 3: When you’re finished, click Done to return to the Confirm Backup window. Step 4: In Confirm Backup window, click Back Up to save your configuration and begin your initial backup. Excluding Folders after the Initial Backup You can add or remove folders from the Excluded Folders list at any time. To add or remove a folder from the Excluded Folders list after your initial backup, Step 1: On the Backup & Restore screen, highlight the backup from which you want to exclude a folder. Mirra Manual for Macintosh Release 2.2 67 Step 2: On the Backup & Restore Tasks menu, select Exclude Folder(s) from Backup: Figure 5~15 Backup & Restore Tasks - Exclude Folder(s) from Backup The Excluded Folder(s) window opens: Figure 5~16 Excluded Folder(s) Mirra Manual for Macintosh Release 2.2 68 Step 3: Click the + and - signs to add or remove folders from the Excluded Folders list: • To add a folder to the Excluded Folders list, click + and browse to the folder. • To remove a folder from the Excluded Folders list, select the folder in the list and click - . Step 4: When you’re finished, click Done to return to the Backup & Restore screen. Checking Backup Status on your Computer Verifying a Backup While a backup is under way, the Status Bar at the bottom of the Mirra application indicates the backup progress of every file in each folder being backed up: Figure 5~17 Status Bar There are three ways to confirm that a folder has been backed up: 1. The folder is listed on the Backup & Restore screen. 2. An alert in the Alerts area of the Status screen confirms that the folder has been selected for backup. 3. The backup is listed in your Activity Log. On average, it takes approximately 20 minutes to back up one gigabyte of data on a 100Mb network. However, your data transfer rate will vary depending on a variety of factors: • Your OS configuration • The speed of your hard disk • The type of Ethernet switch/hub you’re using • The number of files in each folder being backed up • The types of files being backed up • The number of other computers on your network connected to your Mirra Mirra Manual for Macintosh Release 2.2 69 It takes a while to back up your folders for the first time because all the files in all your selected folders are being backed up at once. After the initial backup, keeping backups up to date is not as time consuming because only a few files change at any one time. Opening Backups on your Mirra from the Finder To go directly from the Finder to a backed up folder on your Mirra, even if the Mirra application is not open, Step 1: Control-click the folder in the Finder. The shortcut menu appears: Figure 5~18 Shortcut Menu Step 2: Select View folder “Foldername” in Mirra. If the Mirra application was not already open, it opens now and displays the contents of the selected folder on the Backup & Restore screen. Reading the Activity Log You can use the Activity Log to verify that your files are being correctly backed up or to ensure that a backup has completed before you shut down your computer. The Activity Log tracks, among other things, the addition or removal of files from backup and changes made to backed up files and folders and displays the 200 Mirra Manual for Macintosh Release 2.2 70 most recent activities. The Status Bar reflects current actions documented in the Activity Log. To view your Activity Log, Step 1: Click the Activity Log tab. The Activity Log opens: Figure 5~19 Activity Log Step 2: Scroll through the Activity Log to see the 200 most recent actions performed by your Mirra. Accessing Backups from Other Computers Connected to Your Mirra Your Backup & Restore screen displays the backed up folders from all computers connected to your Personal Server. You can access a folder backed up from another computer and work with the files contained in it from this screen • if the folder is not password protected. Mirra Manual for Macintosh Release 2.2 71 — OR — • if the folder is password protected but its owner has given you the password. If a folder is password protected and you don’t have the password but its owner has shared the folder with you, you can access it on the Sharing screen (see Managing Shared Folders for additional information). To view a folder backed up to your Personal Server from another computer, Step 1: Click the Backup & Restore tab. The Backup & Restore screen opens Figure 5~20 Computers Backed Up to this Mirra Step 2: Under Backups, click the folder to be opened. Step 3: If the folder is yours, or if it is not password protected, its contents are displayed. Mirra Manual for Macintosh Release 2.2 72 If an Access Password has been set, the Password Required window opens: Figure 5~21 Access Password Window • You’re asked to enter an access password for a password-protected folder from another computer or user only the first time you access that folder unless the password changes — you’re accessing a backup created after you entered the password the first time — this is the first time you’re accessing a backup from a different computer — Step 4: Enter the password and click OK. Figure 5~22 Accessing Backups from Other Computers Mirra Manual for Macintosh Release 2.2 73 The files contained in the selected folder are displayed. Copying Files from Another Computer Connected to Your Mirra If other computers have backed up folders to your Personal Server, you can copy those folders or the files in them to your computer using either the Restore to this Computer or the Save As menu option. Copying a Folder from Another Computer To copy a folder that’s been backed up to your Mirra by another computer, Step 1: On the Backup & Restore screen, select the folder to be copied: Figure 5~23 Backup & Restore Screen Step 2: On the Tasks menu, click either Restore to this Computer or Save As. Mirra Manual for Macintosh Release 2.2 74 • If the folder is not password protected, the Save Selected Folder As window opens. • If the folder is password protected, the Password Required window opens: Figure 5~24 Password Required Window Step 3: Enter the Access Password and click OK. Note: If you have not obtained the password from the owner of this folder, you cannot proceed. The appropriate window opens: Figure 5~25 Restore to this Computer and Save Selected Folder As Windows Step 4: Change the folder name if you wish, select the location at which you want to save the folder, and click OK. The folder is saved at the selected location. Mirra Manual for Macintosh Release 2.2 75 Copying a File from Another Computer To copy a file from a folder that’s been backed up to your Mirra by another computer, Step 1: On the Backup & Restore screen, select the file to be copied: Figure 5~26 Backup & Restore Screen Step 2: On the Tasks menu, click Save As. The Save Selected File As window opens: Figure 5~27 Save Selected File As Window Step 3: Change the File name if you wish, select the location at which you want to save the file, and click OK. The file is saved at the selected location. Mirra Manual for Macintosh Release 2.2 76 Restoring Folders After a Crash If your computer crashes, you can restore your backed up folders from your Personal Server to your recovered or new computer. When you install and set up the Mirra software on the new computer and open the Backup & Restore screen, all your backed up folders are listed as residing on your previous computer. Listed on the Backup & Restore Tasks menu is the Restore to this computer option. After you’ve restored your folders to your new computer, they exist on the new computer as static copies and are no longer backed up to your Personal Server. You must again select these folders for backup. After you’ve done so, two copies of each folder reside on your Mirra. You can delete the old copies to avoid confusion and redundancy. Note: Verify that your folders have indeed been completely restored and backed up before deleting the static copies. To restore each backed up folder from your Mirra to a recovered or new computer, Step 1: Reinstall and set up the Mirra software on your recovered computer or on a new computer. Step 2: On your desktop, open the Backup & Restore screen. A list of your pre-crash backed up folders is displayed. Step 3: Select a folder and click Restore to this computer in the Backup & Restore Tasks menu. If the folder was password protected, the Password Required window opens: Figure 5~28 Password Required Window Step 4: Enter your Access Password and click OK. Mirra Manual for Macintosh Release 2.2 77 A Restore to this Computer window opens: Figure 5~29 Restore to this Computer Step 5: Select a location for the folder, change the folder name if you wish, and click OK. The folder is restored at the selected location. Step 6: Repeat Steps 3 through 5 until all your folders have been restore on your new computer. Step 7: Select the restored folders for backup (see Selecting Folders for Backup). Step 8: Once you confirm that each folder has been completely restored and backed up, delete the static copy from the Mirra to avoid confusion and redundancy. Backup & Restore Tasks Backing Up a New Folder To select a folder for backup, Step 1: On the Backup & Restore Tasks menu, click New Backup. The New Backup window opens. Step 2: Select the desired folder and click Back Up. The Configure Backup window opens. Step 3: Click OK. Selecting Recommended Backups To select a folder for backup from the Recommended Backups window, Step 1: On the Backup & Restore Tasks menu, click Recommended Backups. Mirra Manual for Macintosh Release 2.2 78 The New Backup window opens. Step 2: Select the folders you want to back up A Configure Backup window opens for each folder. Step 3: Click OK in each Configure Backup window. Removing a Folder from Backup To stop backing up a folder, Step 1: On the Backup & Restore screen, select the folder to be removed. Step 2: On the Backup & Restore Tasks menu, click Remove Backup. The Remove Backup confirmation window opens: Figure 5~30 Remove Backup Confirmation Step 3: Click Remove to confirm the removal. Once removed from backup, the files in this folder are deleted from the Personal Server (but not, of course, from your computer). They can no longer be restored nor are changes made to them reflected on the Mirra. Saving a Folder To save a folder, Step 1: On the Backup & Restore screen, select the folder to be saved. You can hold down the Command key to select multiple folders. Step 2: On the Backup & Restore Tasks menu, click Save As. Mirra Manual for Macintosh Release 2.2 79 The Save Selected Folder window opens: Figure 5~31 Save Selected Folder Window Step 3: Rename the folder if you wish and select the location at which you want it saved. Step 4: Click OK. The new copy of a folder is not automatically backed up unless you have saved it within another folder already selected for backup. Step 5: Select the saved version for backup. Saving a File To save a file, Step 1: On the Backup & Restore screen, select the folder containing the file to be saved. You see a list of the files contained in the folder. Step 2: Select the file to be saved. You can hold down the Command key to select multiple files. Step 3: On the Backup & Restore Tasks menu, click Save As. The Save Selected File As window opens: Figure 5~32 Save Selected File As Window Step 4: Rename the file to be saved if you wish and select the location at which you want it saved. Mirra Manual for Macintosh Release 2.2 80 Step 5: Click Save. The file is saved at the selected location. The new copy of a file is not automatically backed up unless you have saved it within a folder already selected for backup. Step 6: Select the saved version for backup. Saving a File Version File versions are sorted in the order in which each version was created, with the earliest version listed first. The date displayed for each version reflects the date on which that version was modified according to your operating system’s time stamp. To save a version of a file, Step 1: On the Backup & Restore screen, select the file to be saved. Step 2: On the Backup & Restore Tasks menu, click View Version History. You see the version history for this file: Figure 5~33 Version Tasks Screen Mirra Manual for Macintosh Release 2.2 81 Step 3: Select the version of the file you want to save. Step 4: On the Backup & Restore Tasks menu, click Save Selected Version As. The Save selected version as window opens: Figure 5~34 Save Selected Version As Step 5: Rename the file if you wish and select the location at which you want it saved. Step 6: Click Save. The file is saved at the selected location and now appears in both its original and its new locations. Undeleting a File or Folder Backed up files and folders that have been deleted are stored indefinitely on your Mirra and remains on the Backup & Restore list as a grayed-out entry with a line drawn through it. You can undelete a file or folder and restore it to its original location. You cannot delete a file or folder from your computer using the Mirra application. You must make deletions in the original folder on your computer. Mirra Manual for Macintosh Release 2.2 82 To undelete a file or folder on your Personal Server, Step 1: On the Backup & Restore screen, select the file or folder to be undeleted. You can hold down the Command key to select muiltiple files or folders: Figure 5~35 Backup & Restore Screen with Deleted Folders Step 2: On the Backup & Restore Tasks menu, select Undelete Selected Items (or Undelete Folder or Undelete File). The files or folders are restored to their original locations on your computer and are no longer marked as deleted on your Backup & Restore screen. Restoring a Version of a File Since Mirra stores the eight most recent versions of each file, you can restore an earlier version to your computer. File versions are sorted in the order in which each version was created, with the earliest version listed first. The date displayed for each version reflects the date on which that version was modified according to your operating system’s time stamp. Note: Before you can restore a version of a deleted file, you must undelete it. Mirra Manual for Macintosh Release 2.2 83 To restore an earlier version of a file, Step 1: On the Backup & Restore screen, select the file to be restored. Step 2: On the Backup & Restore Tasks menu, click View Version History. Up to eight versions of this file are displayed. Step 3: On the Backup & Restore screen, select the file version to be restored. Step 4: On the Backup & Restore Tasks menu, click Restore Selected Version. The selected version of the file is restored to its original location on your computer. Restoring a Folder From Another Computer Connected to your Mirra. To copy to your computer a folder backed up from another computer connected to your Mirra, Step 1: On the Backup & Restore screen, select the folder to be copied. Step 2: On the Restore Tasks menu, click Restore to this computer. The Browse for Location window opens. Step 3: Select the location at which you want to copy the folder. Step 4: Click OK. From your Mirra After a Crash. To restore each backed up folder from your Mirra to a recovered or new computer, Step 1: Reinstall and set up the Mirra software on your recovered computer or on a new computer. Step 2: On your desktop, open the Backup & Restore screen. A list of your pre-crash backed up folders is displayed. Step 3: Select a folder and click Restore to this computer in the Backup & Restore Tasks menu. Step 4: If the folder was password protected, enter the password in the Password Required window. A Restore to this Computer window opens. Step 5: Select a location for the folder, change the folder name if you wish, and click OK. Mirra Manual for Macintosh Release 2.2 84 The folder is restored at the selected location. Step 6: Repeat Steps 3 through 5 until all your folders have been restore on your new computer. Step 7: Select the restored folders for backup (see Selecting Folders for Backup). Step 8: Once you confirm that each folder has been completely restored and backed up, delete the static copy from the Mirra to avoid confusion and redundancy. Stopping a Restore To stop restoring a folder, Step 1: On the Backup & Restore screen, select the folder being restored. Step 2: On the Backup & Restore Tasks menu, click Stop Restoring. Opening a Folder To open a folder in the Mirra application and access the subfolders and files stored in it, Step 1: On the Backup & Restore screen, select the folder to be opened. Step 2: On the Backup & Restore Tasks menu, click Open. A list of the sub-folders and files contained in the folder is displayed. Opening a Folder in Finder Copies of a backed up folder reside on both your computer and your Personal Server. If you have the Mirra application open on your computer, you can use it to open the folder in Finder so you can access the files stored in it. To open a folder in Finder through the Mirra application, Step 1: On the Backup & Restore screen, select the folder to be opened in Finder. Step 2: On the Backup & Restore Tasks menu, click Open in Finder. Mirra Manual for Macintosh Release 2.2 85 You see the contents of the folder in the Finder: Figure 5~36 Backed Up Folder Opened in the Finder Opening a File in Finder If you have the Mirra application open on your computer, you can use it to open a file in Finder so you can work on it in its original application (i.e. a Word document opens in Microsoft Word™). To open a file in Finder through the Mirra application, Step 1: On the Backup & Restore screen, double-click the folder containing the file. Step 2: Select the file. Step 3: On the Backup & Restore Tasks menu, click Open in Finder. Revealing a File or Folder in Finder Revealing a file or folder in Finder shows you the location of the item in Finder but does not allow you to open the item. To open or reveal a file or folder in Finder, Step 1: Select the file or folder in the right side of the Backup & Restore screen. You can hold down the Command key to select multiple files or folders. Step 2: On the Backup & Restore Tasks menu, select Reveal in Finder. Mirra Manual for Macintosh Release 2.2 86 Sharing a Folder via the Web To share a folder via the web, Step 1: On the Backup & Restore Tasks menu, click Share via the Web. The Share via the Web window opens. Step 2: Select the folder to be shared, the recipients, and the folder permissions. Step 3: Click OK. See Using the Share a Folder Window, for detailed instructions. Sharing a Folder via the Local Network To share a folder via the local network, Step 1: On the Backup & Restore Tasks menu, click Share via the Local Network. The Share via the Local Network window opens. Step 2: Select the folder to be shared, the recipients, and the folder permissions. Step 3: Click OK. See Using the Share a Folder Window, for detailed instructions. Viewing Previous Versions of a File Mirra tracks any changes you make to the files in a backed up folder and saves the eight most recent versions of each file. File versions are sorted in the order in which each version was created, with the earliest version listed first. The date displayed for each version reflects the date on which that version was modified according to your operating system’s time stamp. To view previous versions of a file, Step 1: On the Backup & Restore screen, click the folder that contains the file. Step 2: Select the desired file. Step 3: On the Backup & Restore Tasks menu, click View Version History. The eight most recent versions of this file are displayed. Mirra Manual for Macintosh Release 2.2 87 Purging Files and Folders from your Personal Server Purging Deleted Files from a Folder. Use the Purge feature to free up space on your Personal Server by permanently erasing deleted files. You can purge all deleted files from a folder at one time or you can purge them individually. To purge all deleted files from a folder at one time, Step 1: On the Backup & Restore screen, select the folder to be purged. Step 2: On the Backup & Restore Tasks menu, click Purge > Purge Deleted Files from Folder. All previously deleted files are permanently removed from the folder and can no longer be undeleted and restored. To purge a specific deleted file, Step 1: On the Backup & Restore screen, double-click the folder containing the deleted file. You see a list of the files contained in the folder. Step 2: Select the deleted file to be purged. Step 3: On the Backup & Restore Tasks menu, click Purge > Purge deleted file. The deleted file is permanently removed from the folder and can no longer be undeleted and restored. Purging Old Files Versions from a Folder. Use the Purge feature to free up space on your Personal Server by permanently erasing old versions of files. You can purge all previous versions of a file from a folder at one time or you can purge them individually. To purge all previous versions of all the files in a folder at one time, Step 1: On the Backup & Restore screen, select the folder to be purged. Step 2: On the Backup & Restore Tasks menu, click Purge > Purge Old File Versions from Folder. All previous versions of all the files in this folder are permanently removed from the folder; only the most recent version of each file remains. To purge all previous versions of a specific file from a folder, Step 1: On the Backup & Restore screen, double-click the folder containing the file. You see a list of the files contained in the folder. Step 2: Select the file for which you want to purge old versions. Mirra Manual for Macintosh Release 2.2 88 Step 3: On the Backup & Restore Tasks menu, click Purge > Purge Old Versions of File. All previous versions of this file are permanently removed from the folder; only the most recent version remains. Purging a Deleted Folder. Use the Purge feature to free up space on your Personal Server by permanently erasing deleted folders. To purge a deleted folder, Step 1: On the Backup & Restore screen, select the deleted folder to be purged. Step 2: On the Backup & Restore Tasks menu, click Purge > Purge Deleted Folder. The folder is permanently removed from the Mirra. Notes on Backing Up and Restoring Files and Folders • If you interrupt the backup of your files by turning off your computer or disconnecting from your network, Mirra remembers where you left off and picks up from there when you turn your computer back on or reconnect to your network. • Laptop users: Even when you disconnect your computer from the network, the Mirra software continues to track changes and automatically synchronizes the most recent version of each of your files to your Personal Server when you reconnect to the network. • Mirra backs up files even when the Mirra application is not open on your desktop. Mirra Manual for Macintosh Release 2.2 89 Chapter 6: Sharing Folders Mirra’s Sharing feature allows you to share the files stored in backed up folders both via the web at www.mirra.com and locally with other computers connected to your Personal Server. You do this by granting people access to specified folders stored on your Personal Server so they can view, download, edit, and save changes to the files stored in them. The Sharing screen displays information about folders you’re sharing with others and folders others have shared with you via the local network: Figure 6~1 Sharing Screen Note: Folders shared with you via the web do not appear on the Sharing screen since they can be accessed only via the web. Mirra Manual for Macintosh Release 2.2 90 Displaying the Sharing Tasks Menu You can display the Sharing Tasks menu in two ways: • Click Tasks on the menu bar of the Sharing screen: Figure 6~2 Sharing Tasks Menu from the Menu Bar — OR — Mirra Manual for Macintosh Release 2.2 91 • Click the Tasks button on the Sharing screen: Figure 6~3 Tasks Button Using the Sharing Screen The Sharing screen provides detailed information about folders you’re sharing with others and folders others have shared with you via the local network. In the Shared Folders pane: • Name of the person and the computer that created the shared folder • Folder name • Folder size • Name of the enclosing folder, if any • Date folder was last modified • Name of the person you’re sharing the folder with or the person who has shared the folder with you • Synchronized path if a folder has been sync’d Mirra Manual for Macintosh Release 2.2 92 In the Contents pane on the right • File name • File size • Date file was last modified • File type (i.e. .doc, .jpeg) Figure 6~4 Sharing Screen You can share backed up folders in two ways: 1. Via the web through a free, password-protected account at www.mirra.com. 2. Locally with any computer connected to your Mirra. Once you share a folder, any new files you add to that folder are automatically shared as well. Mirra Manual for Macintosh Release 2.2 93 Sharing via the Web You use the Share via the Web window to select a folder to be shared, identify the people with whom to share it, regulate how the shared folder may be used, and send an email message to the people with whom you’re sharing: Figure 6~5 Share via the Web Opening the Share via the Web Window You can open the Share via the Web window in three ways: 1. From the Sharing screen. 2. From the Backup and Restore screen. 3. From the Finder. From the Sharing Screen To open the Share via the Web window from the Sharing screen, Step 1: Click the Sharing tab. Mirra Manual for Macintosh Release 2.2 94 The Sharing screen opens: Figure 6~6 Sharing Screen - No Shares Sharing Screen - Populated If you have not yet shared any folders, the Sharing screen is empty. If you’ve previously shared folders or have had folders shared with you, they’re listed here. Step 2: On the Sharing Tasks menu, click Share via the Web. Figure 6~7 Share via the Web Mirra Manual for Macintosh Release 2.2 95 The Share via the Web window opens: Figure 6~8 Share via the Web From the Backup & Restore Screen To open the Share via the Web window from the Backup and Restore screen, Step 1: Click the Backup & Restore tab. Mirra Manual for Macintosh Release 2.2 96 The Backup & Restore screen opens: Figure 6~9 Backup and Restore Screen Step 2: Select a folder to share from the list of backed up folders. Step 3: On the Backup & Restore Tasks menu, click Share via the Web. Mirra Manual for Macintosh Release 2.2 97 The Share via the Web window opens with the name of the folder to be shared already entered: Figure 6~10 Share via the Web (Folder Name Entered) From the Finder To open the Share via the Web window from the Finder, Step 1: Control-click a backed up folder. Mirra Manual for Macintosh Release 2.2 98 The shortcut menu appears: Figure 6~11 Shortcut Menu Step 2: From the shortcut menu, choose Share Folder “foldername” via the Web. If the folder has not already been backed up, Share Folder “foldername” via the Web is disabled on the menu. Use the Add Folder “foldername” to Mirra Backups option to select the folder for backup. Once you’ve completed the backup process, Control-click on the folder again to share it. Mirra Manual for Macintosh Release 2.2 99 The Share via the Web window opens with the name of the folder to be shared already entered: Figure 6~12 Share via the Web (Folder Name Entered) Using the Share via the Web Window Selecting a Folder to Share Figure 6~13 Folder to Share If you’ve opened the Share via the Web window from the Backup & Restore screen or by Control-clicking on the folder in the Finder, the name of the folder to be shared is already displayed in the Folder to share field. If you’ve opened the window from any other Mirra screen, you must browse to the folder and select it. To select a folder to share, Step 1: Click Browse next to Folder to share Mirra Manual for Macintosh Release 2.2 100 The Browse for Folder window opens: Figure 6~14 Browse for Folder Window Listed are all the folders backed up on your Personal Server. Step 2: Select the folder to be shared and click OK. The name of the selected folder appears in the Folder to share field. Selecting Recipients to Share With Figure 6~15 Recipients to Share With Mirra Manual for Macintosh Release 2.2 101 The people with whom you share via the web are notified of the Share by email and are provided with a link to the Mirra web site, where they can quickly set up a free Mirra Web Account that allows them to access your folder. Entering Addresses with the Apple Address Book If you use Apple’s Address Book, you can use it to enter email addresses in the Recipients to share with field: Step 1: In the Share via the Web window, click the Address Book icon. Address Book opens: Figure 6~16 Apple Address Book Step 2: Select the people with whom you want to share this folder and click OK. Mirra Manual for Macintosh Release 2.2 102 The names appear in the Recipients to share with field of the Share via the Web window. Figure 6~17 Share via the Web Window with Addresses Typing Email Addresses To type in the email addresses of people with whom you want to share a folder, Step 1: Type an email address (one address per line). Step 2: Press Return. Continue to enter email addresses until you’ve added everyone with whom you want to share the folder. Figure 6~18 Mirra Manual for Macintosh Release 2.2 103 Setting Folder Permissions Use the Allow recipients to area to set the permissions attached to the folder you’re sharing: • Write to folder: Recipients may download, edit. upload, and add files to or delete files from the shared folder. • Download images: Recipients may download fullsize images. If you don’t give the people with whom you’re sharing this folder permission to download full-size images, they won’t be able to download the folder or any folders contained within it, even if none of the folders contains images. Sending a Message to Recipients Mirra sends people with whom you’re sharing a folder via the web an email with a link to the Mirra web site. You can change the default message in that email: Figure 6~19 Message to recipients • Leave the default message as it is or replace it with your own message. Completing the Share Step 1: Review the information you’ve provided in the Share via the Web window. Step 2: Click Share to complete the folder share. Mirra Manual for Macintosh Release 2.2 104 The people with whom you’re sharing a folder via the web receive an email containing your message and a link to the Mirra web site: Figure 6~20 Share a Folder Email Mirra Manual for Macintosh Release 2.2 105 Sharing via the Local Network You use the Share via the Local Network window to select a folder to be shared, identify the people connected to your Mirra with whom to share it, and regulate how the shared folder may be used: Figure 6~21 Share via the Local Network People with whom you share on your local network receive alerts on their Status screens informing them of your shared folder. When you share a folder with others connected to your Mirra, they can access it on your Personal Server and download the files stored in it to their local computers. Opening the Share via the Local Network Window You can open the Share via the Local Network window in three ways: 1. From the Sharing screen. 2. From the Backup and Restore screen. 3. From the Finder Mirra Manual for Macintosh Release 2.2 106 From the Sharing Screen To access the Share via the Local Network window from the Sharing screen, Step 1: Click the Sharing tab. The Sharing screen opens: Figure 6~22 Sharing Screen - No Shares Sharing Screen - Populated If you have not yet shared any folders, the Sharing screen is empty. If you have previously shared folders or have had folders shared with you, they’re listed here. Step 2: On the Sharing Tasks menu, click Share via the Local Network. Mirra Manual for Macintosh Release 2.2 107 The Share via the Local Network window opens: Figure 6~23 Share via the Local Network From the Backup & Restore Screen To access the Share via the Local Network window from the Backup & Restore screen, Step 1: Click the Backup & Restore tab. Mirra Manual for Macintosh Release 2.2 108 The Backup & Restore screen opens: Figure 6~24 Backup and Restore Screen Step 2: Select a backed up folder to share. Step 3: On the Backup & Restore Tasks menu, click Share via the Local Network. Mirra Manual for Macintosh Release 2.2 109 The Share via the Local Network window opens with the name of the folder to share already entered: Figure 6~25 Share via the Local Network (Folder Name Entered) From the Finder To access the Share via the Local Network window from the Finder, Step 1: Control-click on a backed up folder. Mirra Manual for Macintosh Release 2.2 110 The shortcut menu appears: Figure 6~26 Windows Dropdown Menu Step 2: From the dropdown menu, select Share Folder “foldername” via the Local Network. If the folder has not already been backed up, Share Folder “foldername” via the Web is disabled on the menu. Use the Add Folder “foldername” to Mirra Backups option to select the folder for backup. Once you’ve completed the backup process, Control-click on the folder again to share it. Mirra Manual for Macintosh Release 2.2 111 The Share via the Local Network window opens with the name of the folder to share already entered: Figure 6~27 Share via the Local Network (Folder Name Entered) Using the Share via the Local Network Window Selecting a Folder to Share If you’ve opened the Share via the Local Network window from the Backup & Restore screen or by control-clicking on the folder on your computer, the name of the folder to be shared is already displayed in the Folder to share field. If you’ve opened the window from any other Mirra screen, you must browse to the folder and select it. To select a folder to be shared, Step 1: Click Browse next to Folder to share: Figure 6~28 Browse for Folder to Share Mirra Manual for Macintosh Release 2.2 112 The Browse for Folder window opens: Figure 6~29 Browse for Folder Window Listed are all the folders backed up on your Personal Server. Step 2: Select the folder to be shared and click OK. The name of the selected folder appears in the Folder to share field. Selecting Recipients on the Local Network The Share via the Local Network window displays all the computers connected to your Personal Server and lists the users on each computer. To select Share recipients, • Select recipients from the list displayed beneath Recipients to share with: – To share with all users on a computer, select the computer. – To share with specific users on a computer, display the list of users and select those with whom you wish to share. Mirra Manual for Macintosh Release 2.2 113 Setting Folder Permissions Use the Allow recipients to area to set the permissions attached to the folder you’re sharing: • Write to folder: Recipients may download, edit. upload, and add files to or delete files from the shared folder. • Download images: Recipients may access this folder on the Mirra web site and download full-size images. Completing the Share Step 1: Review the information you’ve provided in the Share via the Local Network window. Step 2: Click Share to complete the folder share. Synchronizing Folders Once someone connected to your Personal Server has shared a folder with you, the Synchronize feature allows you to keep a synchronized copy of the folder on your own computer. Synchronizing a folder establishes a link between the copy on your computer and the copy stored on the Personal Server. If this folder has been shared with other computers connected to your Personal Server and they have also established a link to it, all copies are kept synchronized through the Personal Server. This allows people to work on the same folder, each on his or her own computer. For example, suppose that Computers 1, 2, and 3 are all synchronized to Folder A on a Personal Server. Changes made on Computer 1 to a file in that folder are automatically reflected in the copy of that file on the Personal Server and then, in turn, in the copy on Computers 2 and 3. Synchronizing Versions Mirra saves up to eight versions of a file to protect against permanent loss of data. However, Mirra does not provide version control. It creates versions on a first-come-first-served basis and orders them according to when they were backed up and not when they were actually edited. So when two or more people are working concurrently on a file in a synchronized folder, the copy most recently backed up to Mirra Manual for Macintosh Release 2.2 114 the Mirra appears as the most recent version even if it doesn’t contain the most recent edits. It’s possible (but unlikely) that the copy of the file on your computer containing your more recent edits may be overwritten by another person's edits. As a result, changes you made to the file may exist only in a previous version of the file no longer present on your computer, but still residing on the Mirra. Since Mirra saves up to eight versions of a synchronized file, you can retrieve an overwritten version. Working with Synchronized Folders Once a folder has been synchronized with other computers, the treatment of the copy of the folder on any of the synchronized computers affects the copies residing on everyone’s computers: • If a synchronized folder is deleted, its name is changed, or it’s moved to another location on any computer synchronizing the folder, the files contained in that folder disappear from the Mirra and from the others’ computers. However, the folder itself (now empty) remains on the other computers. If anyone now adds files or folders to that sync’d folder, they appear on everyone’s computers. • If a folder containing sub-folders is created on computer A, shared and synchronized on computer B, and then deleted on computer B, the folder still resides on computer A and contains the original sub-folders, but they’re now empty. If a file is added to the folder on computer A, the folder is re-created on computer B and contains the new file but no sub-folders. To synchronize a folder that’s been shared with you, Step 1: On the Sharing screen, select the folder. Step 2: On the Sharing Tasks menu, select Synchronize to this Computer. Mirra Manual for Macintosh Release 2.2 115 A Synchronize to this Computer window explains what happens when you synchronize a folder to your computer: Figure 6~30 Synchronize to this Computer Step 3: Click OK. The Synchronize to window opens: Figure 6~31 Synchronize to Step 4: Select the location on your computer at which you want to place the synchronized folder. Step 5: Click OK. The folder appears at the selected location on your computer. Mirra Manual for Macintosh Release 2.2 116 Stopping Synchronization If you no longer want the changes you make to your copy of a folder to be reflected in the copy backed up on the Personal Server, you must stop the synchronization to break the link between the folder on your computer and the folder on the Personal Server. To stop the synchronization, Step 1: On the Sharing screen, select the folder. Step 2: On the Sharing Tasks menu, select Stop Synchronization. The folder on your computer is no longer linked to the copy stored on the Personal Server and is no longer backed up. However, the copy on your computer still exists and is accessible unless you delete it from your computer. Sharing Tasks Sharing a Folder via the Web To share a folder via the web, Step 1: On the Sharing Tasks menu, click Share via the Web. The Share via the Web window opens. Step 2: Select the folder to be shared, the recipients, and the folder permissions. Step 3: Click OK. See Using the Share a Folder Window, for detailed instructions. Sharing a Folder via the Local Network To share a folder via the local network, Step 1: On the Sharing Tasks menu, click Share via the Local Network. The Share via the Local Network window opens. Step 2: Select the folder to be shared, the recipients, and the folder permissions. Step 3: Click OK. See Using the Share a Folder Window, for detailed instructions. Mirra Manual for Macintosh Release 2.2 117 Opening a Folder To open a folder, Step 1: On the Sharing screen, select the folder to be opened. Step 2: On the Sharing Tasks menu, click Open. Opening or Revealing a File or Folder in Finder Opening a file or folder in Finder is the equivalent of double-clicking the item in Finder to open it. Revealing a file or folder in Finder shows you the location of the item in Finder but does not allow you to open the item. To open or reveal a file or folder in Finder, Step 1: Select the file or folder in the right side of the Sharing screen. You can hold down the Command key to select multiple files or folders. Step 2: On the Sharing Tasks menu, select Open in Finder or Reveal in Finder. Stopping a Share To stop sharing a folder, Step 1: On the Sharing screen, select the desired folder. Step 2: On the Sharing Tasks menu, click Stop Sharing this folder. The Stop Sharing Folder confirmation window opens: Figure 6~32 Stop Sharing Folder Confirmation Step 3: Click Yes. Step 4: The folder is removed from the list on the Sharing screen and can no longer be accessed by anyone with whom you previously shared it. Mirra Manual for Macintosh Release 2.2 118 Synchronizing Folders To synchronize a folder that’s been shared with you, Step 1: On the Sharing screen, select the folder. Step 2: On the Sharing Tasks menu, select Synchronize to this computer. A Synchronize to this Computer window explains what happens when you synchronize a folder to your computer: Figure 6~33 Synchronize to this Computer Step 3: Click OK. The Browse for Location window opens: Step 4: Select the location on your computer at which you want to place the synchronized folder. Step 5: Click OK. The folder appears at the selected location on your computer. Stopping Synchronization To stop a synchronization, Step 1: On the Sharing screen, select the folder. Step 2: On the Sharing Tasks menu, select Stop synchronization. The folder on your computer is no longer linked to the copy stored on the Personal Server and is no longer backed up. Mirra Manual for Macintosh Release 2.2 119 Changing Web Shares To add or remove people from the list of recipients via the web or change the permissions you assigned to a folder, Step 1: On the Sharing Tasks menu, click Change Who Shares via the Web. Figure 6~34 Sharing Tasks Menu Mirra Manual for Macintosh Release 2.2 120 The Share via the Web window opens: Figure 6~35 Share via the Web Displayed are the people with whom this folder is being shared and the permissions you’ve set for this folder. Step 2: To remove a name from the list of recipients to share with, click the box preceding the name to deselect it. Step 3: To add a name to the list of recipients to share with, add the name from your Address Book or enter it in the field beneath By email address. Step 4: Make the desired changes to the permissions listed below Allow recipients to. Step 5: If you’ve added a recipient, you can edit the Message to recipients. People added to your Recipients list (and only those people) receive a Share notification email. If you’ve removed people from your Share list, they can no longer access the folder. Step 6: Click OK. Mirra Manual for Macintosh Release 2.2 121 Changing Local Network Shares To add or remove people from the list of recipients on your local network or change the permissions you assigned to a folder, Step 1: On the Sharing Tasks menu, click Change Who Shares via the Local Network: Figure 6~36 Sharing Tasks Menu Mirra Manual for Macintosh Release 2.2 122 The Share via the Local Network window opens: Figure 6~37 Share via the Local Network Displayed are the computers and/or the users with whom this folder is being shared and the permissions you’ve set for this folder. Step 2: To remove a name from the list of recipients to share with, click the box preceding the name to deselect it. Step 3: To add a name to the list of recipients to share with, click the box preceding the name to select it Step 4: Make the desired changes to the permissions listed below Allow recipients to. Step 5: Click OK. Saving a Folder To save a folder, Step 1: On the Sharing screen, select the folder to be saved. You can hold down the Command key to select multiple folders. Step 2: On the Sharing Tasks menu, click Save As. Mirra Manual for Macintosh Release 2.2 123 The Save Selected Folder As window opens: Figure 6~38 Save Selected Folder As Window Step 3: Rename the folder if you wish and select the location at which you want it saved. Step 4: Click OK. The folder is saved at the selected location. The new copy of a folder is not automatically backed up unless you have saved it within another folder already selected for backup. Step 5: Select the saved version for backup. Saving a File To save a file, Step 1: On the Sharing screen, select the folder containing the file to be saved. You see a list of the files contained in the folder. Step 2: Select the file to be saved. You can hold down the Command key to select multiple files. Step 3: On the Sharing Tasks menu, click Save As. The Save Selected File As window opens: Figure 6~39 Save Selected File As Window Step 4: Rename the file to be saved if you wish and select the location at which you want it saved. Mirra Manual for Macintosh Release 2.2 124 Step 5: Click Save. The file is saved at the selected location. The new copy of a file is not automatically backed up unless you have saved it within a folder already selected for backup. Step 6: Bck up the saved version. Saving a File Version File versions are sorted in the order in which each version was created, with the earliest version listed first. The date displayed for each version reflects the date on which that version was modified according to your operating system’s time stamp. To save a version of a file, Step 1: On the Sharing screen, select the file to be saved. Step 2: On the Sharing Tasks menu, click View Version History. You see the version history for this file: Figure 6~40 Version Tasks Screen Mirra Manual for Macintosh Release 2.2 125 Step 3: Select the version of the file you want to save. Step 4: On the Sharing Tasks menu, click Save Selected Version As. The Save selected version as window opens: Figure 6~41 Save Selected Version As Step 5: Rename the file if you wish and select the location at which you want it saved. Step 6: Click Save. The file is saved at the selected location and now appears in both its original and its new locations. Undeleting a File or Folder Backed up files and folders that have been deleted are stored indefinitely on your Mirra and remains on the Sharing list as a grayed-out entry with a line drawn through it. You can undelete a file or folder and restore it to its original location. You cannot delete a file or folder from your computer using the Mirra application. You must make deletions in the original folder on your computer. Mirra Manual for Macintosh Release 2.2 126 To undelete a file or folder on your Personal Server, Step 1: On the Sharing screen, select the file or folder to be undeleted. You can hold down the Command key to select muiltiple files or folders: Figure 6~42 Sharing Screen with Deleted Folders Step 2: On the Sharing Tasks menu, select Undelete Selected Items (or Undelete Folder or Undelete File). The files or folders are restored to their original locations on your computer and are no longer marked as deleted on your Sharing screen. Restoring a Version of a File Since Mirra stores the eight most recent versions of each file, you can restore an earlier version to your computer. File versions are sorted in the order in which each version was created, with the earliest version listed first. The date displayed for each version reflects the date on which that version was modified according to your operating system’s time stamp. Note: Before you can restore a version of a deleted file, you must undelete it. Mirra Manual for Macintosh Release 2.2 127 To restore an earlier version of a file, Step 1: On the Sharing screen, select the file to be restored. Step 2: On the Sharing Tasks menu, click View Version History. Up to eight versions of this file are displayed. Step 3: On the Sharing screen, select the file version to be restored. Step 4: On the Sharing Tasks menu, click Restore Selected Version. The selected version of the file is restored to its original location on your computer. Stopping a Restore To stop restoring a folder, Step 1: On the Sharing screen, select the folder being restored. Step 2: On the Sharing Tasks menu, click Stop Restoring. Viewing Previous Versions of a File Mirra tracks any changes you make to the files in a backed up folder and saves the eight most recent versions of each file. File versions are sorted in the order in which each version was created, with the earliest version listed first. The date displayed for each version reflects the date on which that version was modified according to your operating system’s time stamp. To view previous versions of a file, Step 1: On the Sharing screen, click the folder that contains the file. Step 2: Select the desired file. Step 3: On the Sharing Tasks menu, click View Version History. The eight most recent versions of this file are displayed. Notes on Sharing Folders • You can share entire folders or you can share sub-folders. Mirra Manual for Macintosh Release 2.2 128 • Once you share a folder, any new files you add to it are automatically shared as well. Even if you turn off your PC and take it off the network, your Mirra continues to share those photos and files over your broadband connection. Mirra Manual for Macintosh Release 2.2 129 Chapter 7: Setting Up Web Access The Web Access screen provides information about your Web Account and lists the backed up folders that can be enabled for web access: Figure 7~1 Web Access Screen Once you’ve created a Mirra Web Account and have enabled your backed up folders for web access, you can view, download, edit, and upload the files stored in them from any computer connected to the Internet by signing in at www.mirra.com. Displaying the Web Access Tasks Menu You can display the Web Access Tasks menu in two ways: Mirra Manual for Macintosh Release 2.2 130 • Click Tasks on the menu bar of the Web Access screen: Figure 7~2 Web Access Tasks Menu from the Menu Bar — OR — • Click the Tasks button on the Web Access screen: Figure 7~3 Tasks Button Mirra Manual for Macintosh Release 2.2 131 Creating a Mirra Web Account You must create a Mirra Web Account at www.mirra.com before you can use the Web Access feature. If you did not create a Web Account during the Mirra software Setup, this is reflected in the Web Account Information area of the Web Access screen: Figure 7~4 Web Access Screen - No Mirra Web Account To create a Mirra Web Account, Step 1: Click the Web Access tab. The Web Access screen opens. Step 2: In the Web Account Information area, click Change/Create next to Account. Mirra Manual for Macintosh Release 2.2 132 The Create a Mirra Web Account window opens: Figure 7~5 Create a Mirra Web Account Step 3: Enter your email address and click OK. Step 4: Check your email. Usually after a few minutes, you receive a message from Mirra resembling the message shown below with a link to the Mirra web site: Figure 7~6 Create Account Email Mirra Manual for Macintosh Release 2.2 133 If you don’t receive an email, check your Spam folder to be sure your Mirra email has not mistakenly been identified as spam. If the email isn’t there, contact Mirra Technical Support at http:// support. mirra.com. Step 5: Click the link in your email. You’re taken to the Create Account page on the Mirra web site, where your email address is already entered: Figure 7~7 Web Site Create Account Page Step 6: Enter a name and enter and confirm a password of your choosing. Step 7: Click Create Account. Mirra Manual for Macintosh Release 2.2 134 The Mirra Thank You page opens: Figure 7~8 Thank You Page Enabling Folders for Web Access You can automatically enable or disable all backed up folders for web access or you can enable or disable folders on an individual basis. Mirra Manual for Macintosh Release 2.2 135 To set your preference for enabling folders for web access, Step 1: Display the Web Access Tasks menu: Figure 7~9 Web Access Tasks Menu Step 2: Make the desired selection: • Enable Access: Enable a currently disabled folder for web access. • Disable Access: Disable a currently enabled folder for web access. • Enable All: Enable all folders not currently enabled for web access. • Disable All: Disable all folders that are currently enabled for web access. • Auto-enable Web Access for New Backups: Automatically enable folders for web access at the time they’re selected for backup. • Disable Web Access for New Backups: Automatically disable folders for web access at the time they’re selected for backup. Mirra Manual for Macintosh Release 2.2 136 Web Access Tasks Troubleshooting a Web Access Connection To open online Help when troubleshooting connection problems, • On the Web Access Tasks menu, select Troubleshoot Web Access Connection. Your browser opens and points to the appropriate Help item at http:// www.mirra.com/help/2.2Mac/index.html#connectionDown. Enabling a Folder for Web Access To enable a folder currently disabled for web access, Step 1: On the Web Access screen, select the folder to be enabled. Step 2: On the Web Access Tasks menu, select Enable folder. Enabled appears in the Web Access column next to the selected folder. Disabling a Folder for Web Access To disable a folder currently enabled for web access, Step 1: On the Web Access screen, select the folder to be disabled. Step 2: On the Web Access Tasks menu, select Disable folder. Disabled appears in the Web Access column next to the selected folder. Enabling All Folders for Web Access To enable all folders not currently enabled for web access, • On the Web Access Tasks menu, click Enable all. Enabled appears in the Web Access column next to each folder. Disabling All Folders for Web Access To disable all folders that are currently enabled for web access, • On the Web Access Tasks menu, click Disable all. Disabled appears in the Web Access column next to each folder. Mirra Manual for Macintosh Release 2.2 137 Auto-enabling Web Access for New Backups To automatically enable folders for web access at the time they’re selected for backup, • On the Web Access Tasks menu, select Auto-enable Web Access for New Backups. Disabling Web Access for New Backups To automatically disable folders for web access at the time they’re selected for backup, • On the Web Access Tasks menu, select Disable Web Access for New Backups. Notes on Accessing Files on the Web • Files can be accessed on the web even if your computer is turned off as long as your Personal Server is on. • Files downloaded to a remote computer now reside on that computer. If you don’t want the files to remain on that computer (for example, if you’re using a public computer at an Internet cafe), be sure to delete the downloaded files and empty the Recycle Bin before you log off. • If there‘s a poor connection, it may take several seconds for the remote computer to connect to your Personal Server. Mirra Manual for Macintosh Release 2.2 138 Chapter 8: Reading the Activity Log The Activity Log tracks activity as it occurs on your Personal Server and displays the 200 most recent actions performed by the Mirra as you work: Figure 8~1 Activity Log The Activity Log documents the actions performed by your Mirra: • The addition or removal of files from backup, sharing, or web access • Changes to backed up or shared files and folders • Mirra file syncs • Mirra file scans • File uploads and downloads • Folder restores • Undeletes • Warnings and error messages Mirra Manual for Macintosh Release 2.2 139 Actions documented in the Activity Log are reflected in the Status Bar. Displaying the Activity Log Tasks Menu You can display the Activity Log Tasks menu in two ways: • Click Tasks on the menu bar of the Activity Log screen: Figure 8~2 Activity Log Tasks Menu from the Menu Bar — OR — Mirra Manual for Macintosh Release 2.2 140 • Click the Tasks button on the Activity Log screen: Figure 8~3 Tasks Button To view the Activity Log, • Click the Activity Log tab. The Activity Log opens. Listed are the 200 most recent events logged by Mirra, with the activity, status, file path, date, and time of each event. To clear the Activity Log, • Select Clear Activity List on the Activity Log Tasks menu. Mirra Manual for Macintosh Release 2.2 141 Chapter 9: Managing Your Mirra Checking the Backup Status of all Computers To review the status of all computers connected to your Personal Server, Step 1: Sign in at the Mirra web site at www.mirra.com. You see the Mirra Backups page: Figure 9~1 Mirra Web Site Step 2: Click Details. Mirra Manual for Macintosh Release 2.2 142 The Mirra Details page displays the current status of all computers backed up to your Personal Server: Figure 9~2 Mirra Details Page Turning Off your Personal Server Since your Personal Server continuously backs up your computer and must be turned on in order for you to access folders remotely, you should leave it on all the time. However, if you need to move your Personal Server, you must first turn it off. To turn off your Mirra, Step 1: Press the power button on the front panel quickly once and release it. DO NOT HOLD DOWN THE POWER BUTTON. The amber status light to the left of the power button blinks while your Personal Server is shutting down. This takes approximately 30 to 60 seconds. When both LED lights have turned off, it’s safe to proceed. Step 2: Remove the cables from the rear of the Personal Server. You must wait until your Personal Server is completely shut down before disconnecting power. If you disconnect power while it’s running or while it’s in the Mirra Manual for Macintosh Release 2.2 143 process of shutting down, your backed up files can become corrupted. Wait until both lights beside the power button are off before disconnecting power. Returning to Factory Defaults Caution: Read the follows instructions carefully before you begin your factory reset. To erase the contents of your Personal Server and return all settings to the factory defaults, Step 1: If possible, use your Mirra desktop application to remove all backups from your Personal Server. Step 2: Run the Mirra Uninstaller, found in your Applications folder (or wherever you installed it). Step 3: Delete the folder /Library/Application Support/Mirra. Step 4: Go to <Current User Home Folder>/Library/Application Support/Mirra and move the Mirra folder to the Trash. Step 5: Press the power button in the following sequence while your Personal Server is running: Press the power button three (3) times in quick succession. Although a beep follows each button press, the beeps usually occur more slowly than the button presses. Do not slow down your button presses to wait for the beeps. Press the button rapidly 3 times. (b) After you’ve pressed the button for the third time, wait 10 to 15 seconds until the Personal Server beeps quickly 3 times in succession and the amber light flashes 3 times. (a) (c) Again press the power button 3 times. When the amber light shines steadily and the startup tone sounds, your Personal Server settings have been returned to the factory defaults. Note: If you make a mistake at any point in this sequence, simply wait two minutes and begin again. Mirra Manual for Macintosh Release 2.2 144 
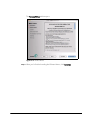
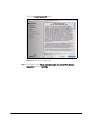
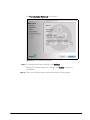
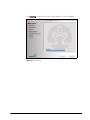
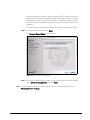
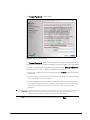
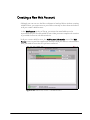
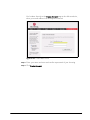
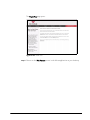
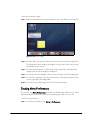
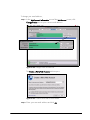
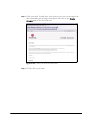
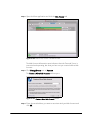
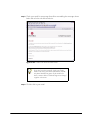
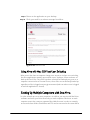
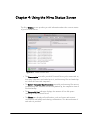
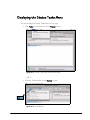
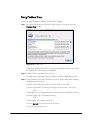
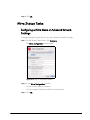
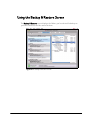
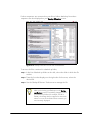
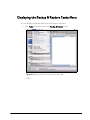
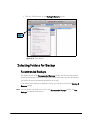
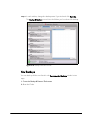
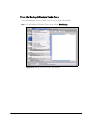
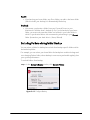
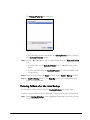
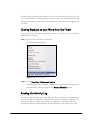
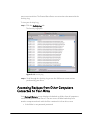
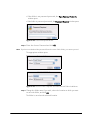
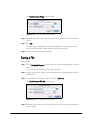
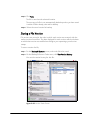
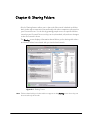
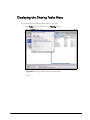
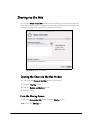
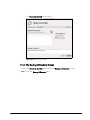
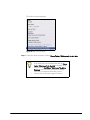
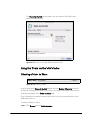
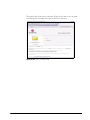
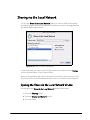
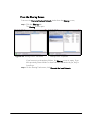
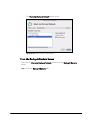
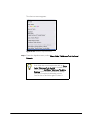
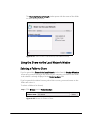
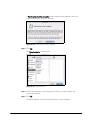
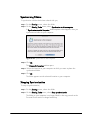
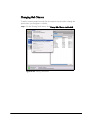
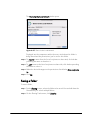
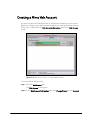
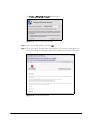
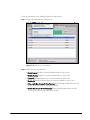
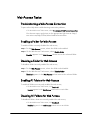
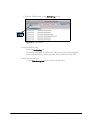
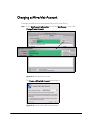
Changing a Mirra Web Account To change the Web Account associated with your Personal Server, Step 1: In the Web Account Information area of the Web Access screen, click Change/Create Account: Figure 9~3 Change/Create Account The Create a Mirra Web Account window opens. Figure 9~4 Create a Mirra Web Account Window Mirra Manual for Macintosh Release 2.2 145 Step 2: Enter the email address of the new account and click OK. Shortly you’ll receive a confirmation email and an opportunity to verify or create your password for the new account. Troubleshooting If you encounter problems while setting up or using your Personal Server, read through this Manual for possible solutions. In addition, check the Mirra web site for help at http://www.mirra.com/support/. Technical Support Please be sure to read our Frequently Asked Questions at http://www.mirra.com/ support/index.html before contacting Mirra Technical Support. You can also access our Mirra Help & Tech Support web page by selecting Help > Online Help in the menu bar of your desktop Mirra application. Telephone Support Telephone support is available free of charge for the initial setup of your newly purchased Personal Server. Click the Support tab at www.mirra.com for phone numbers and hours of operation. Have the serial number of your Mirra and your license key ready. Online Support Once you’ve completed your initial setup, you can receive additional Technical Support on line by submitting an Online Case Form at http://www.mirra.com/ support/submit_case.html. MirraGuard Data Guarantee If one of your computer hard drives fails, all data backed up on your Mirra Sync and Share Personal Server will be restored. Seagate will assist you in the restoration and, if necessary, Seagate’s Data Recovery Service will commit up to $1,000 to recover and restore your data. Details can be found on line at www.seagate.com. Mirra Manual for Macintosh Release 2.2 146 Index A Access Password 19, 73 Access Password for a password-protected folder from another computer or user 73 Accessing Backups from Other Computers on your Mirra 71 Accessing the Mirra Screens 42 Activity Log 70 Adjusting Network Settings 36 Administrator Privileges 8 Advanced Network Settings 37 Manual Addressing 37 Apple Airport Express 4 Apple Airport Extreme 3 B Backing Up & Restoring Folders 54 Checking Backup Status 69 Displaying the Backup & Restore Tasks Menu 58 Files Mirra Does Not Back Up 54 Folder-naming Issues 55 Selecting Folders for Backup 59 Using the Backup & Restore Screen 56 Backing Up to Multiple Mirras 42 Backing Up your Home Folder 65 Backup & Restore Tasks 78 Backing Up a New Folder 78 Opening a File in the Finder 86 Opening a Folder 85 Opening a Folder in the Finder 85 Purging Files and Folders 88 Removing a Folder from Backup 79 Restoring a Folder to this Computer 84 Restoring a Version of a File 83, 127 Mirra Manual for Macintosh Index i Saving a File 80, 124 Saving a File Version 81, 125 Saving a Folder 79, 123 Selecting a Recommended Backup 78 Sharing a Folder via the Local Network 87 Sharing a Folder via the Web 87 Stop Restoring 85, 128 Undeleting a File or Folder 82, 126 Viewing Previous Versions of a File 87, 128 Backup Status 142 C Changing a Mirra Account 145 Changing Your Email Address 32 Checking Backup Status Verifying a Backup 69 Checking Backup Status on your Computer 69 Components 1 Connecting Screen 24 Connecting the Components 3 Connecting your Mirra to a Power Source 6 Connecting your Mirra to your Macintosh 4 Using a Router 3 Connecting your Mirra to your Macintosh Setting Up a Single Computer 4 Setting Up Multiple Computers 5 Copying a File from Another Computer 76 Copying a Folder from Another Computer 74 Copying Files and Folders from Another Computer Connected to Your Mirra Copying a File from Another Computer 76 Copying a Folder from Another Computer 74 Copying Folders from Another Computer on your Network 74 Creating a Mirra Web Account 26, 132 Creating a New Web Account 25 Creating a Web Account If You Don’t Receive an Email 26 D Displaying the Backup & Restore Tasks Menu 58 Mirra Manual for Macintosh Index ii Displaying the Sharing Tasks Menu 91 Displaying the Status Tasks Menu 46 Displaying the Web Access Tasks Menu 130, 140 E Enabling Folders for Web Access 135 Excluding Folders after the Initial Backup 67 Excluding Folders during Initial Backup 66 F File Versions 81, 83, 87, 125, 127, 128 Files Mirra Does Not Back Up 54 Folder Permissions 104, 114 Folder-naming Issues 55 Changing a Folder Name 55 Giving a file the same name as a deleted folder 55 I Installing the Mirra Software 8 L Local Network Accessing Backups from Computers on your Local Network 71 Stopping Synchronization 119 M Mac OSX Fast User Switching 41 Managing Your Personal Server 142 Changing a Mirra Web Account 145 Checking Backup Status of all Computers 142 Returning to Factory Defaults 144 Technical Support 146 Troubleshooting 146 Turning Off your Personal Server 143 Manual Addressing 37 Mirra Configuration Window 36 Mirra License Agreement 10 Mirra Manual for Macintosh Index iii Mirra Screens Activity Log 140 Backup & Restore Screen 56 Sharing Screen 92 Status Screen with Alerts 45 Web Access Screen 130 Mirra Setup Wizard Folders Recommended for Backup 21 Mirra Status Screen 45 Alerts 45 Free Disk Space Indicator 45 Server - Computer Synchronization 45 Mirra StatusTasks 51 Configuring a Mirra Name or Advanced Network Settings 51 Dismissing All Alerts 52 Dismissing an Alert 52 Setting/Changing an Access Password 52 Showing Problem Files 53 Viewing Alert Details 53 Mirra Web Account 20 MirraGuard Data Guarantee 146 Multiple Computers with One Mirra 41 Multiple Users on One Computer 37 N Network Requirements 2 New Backups From the Backup Tasks Menu 63 From the Finder 65 Notes on Accessing Files on the Web 138 Notes on Backing Up and Restoring Files and Folders 89 Notes on Sharing Folders 128 O Opening a Folder 118 Opening Backups on your Mirra from the Finder 70 Opening or Revealing a Folder in Finder 118 Opening the "Share via the Local Network" Window 106 From the Backup & Restore Screen 108 Mirra Manual for Macintosh Index iv From the Finder 110 From the Sharing Screen 107 Opening the "Share via the Web" Window 94 From the Backup & Restore Screen 96 From the Finder 98 From the Sharing Screen 94 Opening the Problem Files Window 47 Organizing your Mirra 29 Adjusting Network Settings 36 Advanced Network Settings for Manual Addressing 37 Backing Up to Multiple Mirras 42 Changing Your Email Address 32 Setting Mirra Preferences 31 Setting Up Multiple Computers with One Mirra 41 Setting Up Multiple Users on One Computer 37 Using Mirra Icons and Aliases 29 Using Mirra with MacOSX Fast User Switching 41 P Problem Files 47 Fixing Problem Files 50 Product Registration 23 Purging Files and Folders Purging Deleted Files from a Folder 88 Purging Old Files Versions from a Folder 88, 89 R Reading the Activity Log 139 Reading the Mirra Status Screen 45 Reading the Status Bar 44 Recommended Backups 21, 59 Restoring a Folder From Another Computer Connected to your Mirra 84 From your Mirra After a Crash 84 Restoring Folders After a Crash 77 Restoring Folders from Another Computer on your Network 74 Returning to Factory Defaults 144 Revealing a Folder in Finder 86 Mirra Manual for Macintosh Index v S Selecting Folders for Backup 59 Backing Up your Home Folder 65 Excluding Folders after the Initial Backup 67 Excluding Folders during Initial Backup 66 New Backups 62 Recommended Backups 59 Setting Folder Permissions Download images 114 Write to folder 114 Setting Mirra Preferences 31 Setting Up Multiple Computers with One Mirra 41 Setting Up Multiple Users on One Computer 37 Setting Up the Mirra Software 15 Creating a New Web Account 25 Setting Up Web Access 130 Creating a Mirra Web Account 132 Enabling Folders for Web Access 135 Web Access Tasks 137 Setting Up your Mirra 8 Installing the Mirra Software 8 Sharing Folders 90 Sharing Tasks 117 Using the Sharing Screen 92 Sharing Tasks Changing Local Network Shares 122 Changing Web Shares 120 Sharing a Folder via the Local Network 117 Sharing a Folder via the Web 117 Stopping a Share 118 Stopping Synchronization 119 Synchronizing Folders 119 Sharing via the Local Network 106 Opening the "Share via the Local Network" Window 106 Selecting a Folder to Share 112 Selecting Recipients on the Local Network 113 Setting Folder Permissions 114 Using the Share via the Local Network Window 112 Sharing via the Web 94 Entering Addresses with the Apple Address Book 102 Mirra Manual for Macintosh Index vi Notifying Web Share Recipients 104 Opening the "Share via the Web" Window 94 Selecting a Folder to Share 100 Selecting Recipients to Share With 101 Setting Folder Permissions 104 Typing Email Addresses 103 Using the Share via the Web Window 100 Shipping Container Components 1 Shortcut menu 65 Status Bar 44, 69 Stopping Synchronization 117 Synchronizing Folders 114 Stopping Synchronization 117 Synchronizing Versions 114 Working with Synchronized Folders 115 Synchronizing Versions 114 System Requirements 1 T Task Menu Items Auto-enabling Web Access for New Backups 138 Changing Folder Shares 122 Disabling a Folder for Web Access 137 Disabling All Folders for Web Access 137 Disabling Web Access for New Backups 138 Dismissing All Alerts 52 Dismissing an Alert 52 Enabling a Folder for Web Access 137 Enabling All Folders for Web Access 137 Opening a File in the Finder 86 Opening a Folder in the Finder 85 Restoring Folders from Another Computer on your Network 74 Saving a File 80, 124 Setting/Changing an Access Password 52 Sharing a Folder 117 Stopping a Share 118 Stopping Synchronization 117, 119 Viewing Alert Details 53 Viewing Previous Versions of a File 87, 128 Web Access Tasks 137 Task Menus 43 Backup & Restore Tasks 78 Mirra Manual for Macintosh Index vii Mirra StatusTasks 51 Sharing Tasks 117 Web Access Tasks 137 Technical Support 146 Online Support 146 Telephone Support 146 Troubleshooting 146 Turning Off your Personal Server 143 U Using a Router 3 Using an Apple AirPort Wireless Router 3 Using Mirra Icons and Aliases 29 Using the Mirra Widget 30 Using Mirra with Mac OSX Fast User Switching 41 Using the Backup & Restore Screen 56 Using the Mirra Widget 30 V Verifying a Backup 69 Viewing Alert Details 53 Viewing Previous Versions of a File 87, 128 W Web Access Tasks 137 Disabling a Folder for Web Access 137 Disabling All Folders for Web Access 137 Enabling All Folders for Web Access 137 Troubleshooting a Web Access Connection 137 Working with Synchronized Folders 115 Mirra Manual for Macintosh Index viii