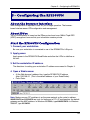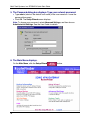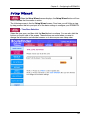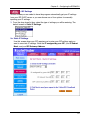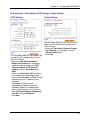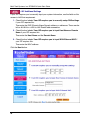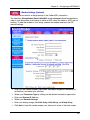
1
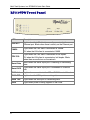
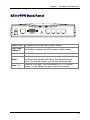
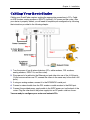
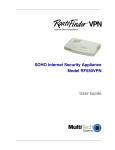
SOHO Internet Security Appliance
Model RF550VPN
Quick Start Guide
Quick Start Guide
RouteFinder Internet Security Appliance
Model RF550VPN
PN S000237E
Revision E
Copyright © 2003
This publication may not be reproduced, in whole or in part, without prior expressed written permission
from Multi-Tech Systems, Inc. All rights reserved.
Multi-Tech Systems, Inc. makes no representations or warranties with respect to the contents hereof
and specifically disclaims any implied warranties of merchantability or fitness for any particular
purpose. Furthermore, Multi-Tech Systems, Inc. reserves the right to revise this publication and to
make changes from time to time in the content hereof without obligation of Multi-Tech Systems, Inc. to
notify any person or organization of such revisions or changes.
Revision
A
B
Date
11/26/01
01/25/02
Description
Initial release.
Changes to some screen captures. Formatting changes. Added a
Configuring the PC section.
C
05/17/02
D
10/08/02
E
04/08/03
New examples. New screen captures. SSH IPSec Sentinel new
version (v 1.3). Advanced features are now discussed in the User
Guide only.
Changes to the Virtual Server section, Administrative Settings,
and VPN Connection. Software version 4.63.
Software version 4.64.
Trademarks
The Multi-Tech logo is a trademark of Multi-Tech System, Inc. Windows is a trademark of Microsoft. All
other trademarks are owned by their respective companies.
Headquarters
Multi-Tech Systems, Inc.
2205 Woodale Drive
Mounds View, Minnesota 55112
(763) 785-3500 or (800) 328-9717
Fax (763) 785-9874
Internet Address: http://www.multitech.com
Contents
1 – Introduction and Description .........................................................1
RouterFinder Documentation.............................................................1
RF550VPN Front Panel.....................................................................2
RF550VPN Back Panel .....................................................................3
2 – Installation .......................................................................................4
Safety Warnings ................................................................................4
System Requirements .......................................................................4
Unpacking Your RouteFinder ............................................................4
Cabling Your RouteFinder .................................................................5
3 – Configuring the PC..........................................................................6
4 – Navigating the Screens.................................................................12
5 – Configuring the RF550VPN...........................................................13
About the Browser Interface ............................................................13
Start the RF550VPN Configuration..................................................13
Setup Wizard...................................................................................15
6 – Technical Support .........................................................................26
Chapter 1 – Introduction and Description
1 – Introduction and Description
Welcome to the world of Internet security. Your Multi-Tech SOHO RouteFinder VPN
Internet security appliance, Model RF550VPN, is ideal for the small branch office or
telecommuter who needs secure access to the corporate LAN.
In addition to providing a WAN Ethernet port for DSL or cable broadband Internet
access, it offers both LAN-to-LAN and client-to-LAN connectivity. The SOHO
RouteFinder supports up to 5 IPSec tunnels and provides 3DES encryption with 700K
bps throughput.
RouteFinder Documentation
The Quick Start Guide
The Quick Start Guide is a shorter version of this User Guide. It is included in printed
form with your RF550VPN. Both guides are intended to be used by systems
administrators and network managers. They provide the necessary information for a
qualified person to unpack, cable, and configure the device for proper operation.
The User Guide
The User Guide can be installed from the CD by clicking Install Manuals on the
Installation screen or downloading the file from our Web site at:
http://www.multitech.com
Save or Print the User Guide
Once the User Guide is displayed on screen using Adobe Acrobat Reader, you can
save the .pdf file to your system or print a copy.
Setup Examples and Other Helpful Documents
There are five reference documents to help you setup and use your RF550VPN. These
reference guides are located on the CD that accompanies your RouteFinder and also
on the Multi-Tech Web site. Check the Multi-Tech Web site occasionally as other
documents may be added in the future.
Adobe Acrobat Reader
Adobe Acrobat Reader is a free program for viewing PDF formatted documents. It can
be installed from the CD (click on Install Manuals and select Install Adobe Acrobat
Reader).
1
Multi-Tech Systems, Inc. RF550VPN Quick Start Guide
RF550VPN Front Panel
Link
ACT
100
10
FDX
COL
1
2
3
4
Serial
WAN
Data DCD
Link RXD TXD
PWR
LEDs
Description
Link ACT
Lights when the LAN client is correctly connected to the
Ethernet port. Blinks when there is activity on the Ethernet port.
100/10
Lights when the LAN client is connected at 100MB.
Off when the LAN client is connected at 10MB.
Lights when the LAN client is connected as full duplex.
FDX COL
2
Off when the LAN client is connected as half duplex. Blinks
when there are collisions on the network.
Serial Data
Blinks when the Serial async port is receiving or transmitting
data.
Serial DCD
Lights when the Serial async port is connected to a remote
site.
WAN Link
Lights when connection to the 10BaseT WAN is established.
WAN RXD
Lights when the WAN port is receiving data.
WAN TXD
Lights when the WAN port is transmitting data.
PWR
Lights when power is being supplied to the router.
Chapter 1 – Introduction and Description
RF550VPN Back Panel
5VDC
WAN
Serial
Reset
4
3
2
1
Power 5VDC The power port connects the AC power adapter.
10 BT WAN
(10Base-T)
The WAN port connects the xDSL modem or cable modem.
Serial
The Serial port connects a standard modem (optional).
Reset
The Reset button resets the router to factory defaults. Press and
hold button until the serial LEDs blink. Then release the reset
button. Do not press it again - you will clear the current data.
Ports 1 - 4
There are 4 LAN ports. You can connect to PCs, FTP servers,
printers, or other devices you want to put on your network.
3
Multi-Tech Systems, Inc. RF550VPN Quick Start Guide
2 – Installation
Safety Warnings
1. Never install telephone wiring during a lightning storm.
2. Never install telephone jacks in a wet location unless the jack is specifically
designed for wet locations.
3. This product is to be used with UL and cUL listed computers.
4. Never touch uninsulated telephone wires or terminals unless the telephone line has
been disconnected at the network interface.
5. Avoid using a telephone during an electrical storm. There may be a remote risk of
electrical shock from lightening.
7. Do not use the telephone to report a gas leak in the vicinity of the leak.
8. To reduce the risk of fire, use only No. 26 AWG or larger Telecommunications line
cord.
System Requirements
· Microsoft Internet Explorer 4.0+ or Netscape Navigator 4.0+
· One computer with an installed 10Mbps, 100Mbps or 10/100Mbps Ethernet card
· One Modem or ISDN TA (if a dialup backup connection is needed)
· One RJ-45 xDSL/Cable Internet connection
· TCP/IP protocol installed
· UTP network Cable with a RJ-45 connection
Unpacking Your RouteFinder
· The RF550VPN shipping box contains the following items:
· The RouteFinder RF550VPN
· System CD
· Power Supply
· This Quick Start Guide
If any of the items is missing or damaged, please contact Multi-Tech Systems, Inc.
4
Chapter 2 – Installation
Cabling Your RouteFinder
Cabling your RouteFinder requires making the appropriate connections to PCs, Cable
or xDSL modem, analog modem or ISDN TA (optional), AC power and the router. After
your device is properly cabled, you will need to complete your configuration by following
the instructions provided in the following chapter.
1. Turn the power off on all network devices (PCs, cable modems, DSL modems,
analog modems, ISDN TAs, and the router).
2. Plug one end of a cable into the Ethernet port and other into one of the 4 LAN ports.
(If you have more than one PC, connect the others in the same way to the other LAN
ports).
3. If using an analog modem, connect it to the RF550VPN’s serial port.
4. Connect a network cable from the DSL modem or cable modem to the WAN port.
5. Connect the provided power supply cable to the 5VDC power port on the back of the
router. Plug the other end of the power supply into an AC power outlet as shown.
You are ready to configure your router and network PCs.
5
Multi-Tech Systems, Inc. RF550VPN Quick Start Guide
3 – Configuring the PC
You must establish TCP/IP communication on each PC (make sure a Network Card or
Adapter has been installed into each PC).
If Your Operating System Is Windows 98/Me:
Note: The following procedures are based on Windows 98. Procedures may differ
slightly in Windows Me. For Windows 98, check to see that you have installed the
Windows 98 patch dated August 1998.
1. Click Start | Settings | Control Panel.
2. Double-click the Network icon.
3. On the Configuration tab, select the TCP/IP protocol line associated with your
network card/adapter.
4. If the TCP/IP protocol line associated with your network card/adapter is listed,
proceed to Step 5. If not listed, see the User Guide, Appendix B, for installation
directions.
5. Then click the Properties button.
6
Chapter 3 – Configuring the PC
6. The TCP/IP Properties window displays. Click the IP Address tab to set your
workstation’s IP Address.
7. In the IP Address dialog box, choose one of the following:
· To set a Dynamic IP Address, check Obtain an IP Address Automatically.
Dynamic Addresses are used in the Example Reference Guide in Example 2
– Site B and Example 3 – Site B.
· To set a Fixed IP Address, check Specify an IP address. Fixed Addresses
are used in all the examples in the Example Reference Guide, except the two
mentioned above. For our example, set the address to 192.168.2.x.
Click OK.
8. You have completed the client settings. Click OK to close out of the Network Control
Panel.
9. Windows will ask you to restart the PC. Click the Yes button.
Note: Repeat these steps for each PC on your network.
7
Multi-Tech Systems, Inc. RF550VPN Quick Start Guide
If Your Operating System Is Windows NT:
1. Click Start | Settings | Control Panel.
2. Double-click the Network icon.
3. The Network dialog box displays. Click the Protocols tab. Select the TCP/IP
protocol line associated with your network card/adapter. If TCP/IP is not listed,
see the User Guide, Appendix B, for installation directions.
4. Click the Bindings tab.
8
Chapter 3 – Configuring the PC
5. The Bindings dialog box displays.
In the Show Bindings for drop-down list box, select all adapters. A list of all
adapters displays on the lower part of the screen.
Double-click the entry for your Ethernet card adapter. This expands the list.
Verify that TCP/IP is included in the list below your adapter name.
6. TCP/IP and your adapter are now setup.
9
Multi-Tech Systems, Inc. RF550VPN Quick Start Guide
7. Next, select the Protocol tab to set your workstation’s IP Address.
8. Click the Properties button and choose one of the following:
·
To set a Dynamic IP Address, check Obtain an IP Address Automatically.
Dynamic Addresses are used in Examples Reference Guide in Example 2 –
Site B and Example 3 – Site B.
· To set a Fixed IP Address, check Specify an IP address. Fixed Addresses are
used in all the examples, except the two mentioned above. For our example,
set the address to 192.168.2.x.
Click OK.
9. Close out of the Control Panel.
10. Repeat these steps for each PC on your network.
10
Chapter 3 – Configuring the PC
If Your Operating System Is Windows 2000/XP
1. Click Start | Settings | Control Panel. Double-click the Network and Dial-Up
Connections icon.
2. The Network and Dial-Up Connections screen displays. Right-click the Local Area
Connection icon and choose Properties.
3. The Local Area Connection Properties dialog box displays.
· Select Internet Protocol [TCP/IP]. Once the protocol is selected, the name of
your adapter card should display in the Connect using box.
· Click the Properties button.
4. The Internet Protocol (TCP/IP) Properties dialog box displays. Set your workstation’s
IP Address.
· To set a Dynamic IP Address, check Obtain an IP Address Automatically. Dynamic
Addresses are used in the Examples Reference Document in Example 2 – Site B
and Example 3 – Site B.
· To set a Fixed IP Address, check Specify an IP address. Fixed Addresses are used
in all the examples, except the two mentioned above. Click OK.
5. Close out of the Control Panel.
6. Repeat these steps for each PC on your network.
11
Multi-Tech Systems, Inc. RF550VPN Quick Start Guide
4 – Navigating the Screens
Buttons on the Main Menu
When you select a function by clicking the button at the top of the screen, the button will
change from red to blue denoting that this is now the active screen.
Buttons on the Function Screens
·
Buttons at the Top of the Screen: These are the main function buttons. They allow
you to move from one function to another: Device Information, Device Status, Setup
Wizard, Advanced Settings, System Tools, and Help.
·
Buttons on Side of the Screen: These are submenus under some of the main
functions. When you select one of these buttons, it will turn from red to blue denoting
that this is now the active selection.
·
Links: Click on Main Menu to return to the Main Menu. Click on Logout to exit the
program.
12
Chapter 5 – Configuring the RF550VPN
5 – Configuring the RF550VPN
About the Browser Interface
Initial configuration is required in order for you to begin operation. The browserbased interface eases VPN configuration and management.
About IPSec
The VPN functionality is based on the IPSec protocol and uses 168-bit Triple DES
(3DES) encryption to ensure that your information remains private.
Start the RF550VPN Configuration
1. Connect your workstation.
Be sure your workstation is connected to one of the RF550VPN’s LAN ports.
2. Apply power.
Apply power to the RF550VPN RouteFinder and allow the LEDs to stabilize on
the unit.
3. Set the workstation IP address.
The directions for setting your workstation IP address are covered in Chapter 3.
4. Open a Web browser.
·
·
At the Web browser’s address line, type the RF550VPN IP address
(http://192.168.2.1 (This is the default address of your RouteFinder).
Press Enter.
Note: Make sure your PC’s address is on the same network as the router’s address.
WINIPCONFIG and IPCONFIG are tools for finding out a PC’s IP configuration: the default
gateway and the MAC address. In Windows 95/98/Me, type WINIPCONFIG. In Windows
2000/NT, type IPCONFIG.
13
Multi-Tech Systems, Inc. RF550VPN Quick Start Guide
5. The Password dialog box displays. Type your network password.
· Type admin (admin is the default user name) in the user name box. Leave the
password box empty.
· Click OK. The Setup Wizard screen displays.
Note: To change your password, select Advanced Settings, and then choose
Administrative Settings. See the User Guide for details.
6. The Main Menu displays.
On the Main Menu, click the Setup Wizard
14
button.
Chapter 5 – Configuring the RF550VPN
Setup Wizard
When the Setup Wizard screen displays, the Setup Wizard button will turn
blue to indicate that the screen is active.
The following screen is the first Setup Wizard screen. From here you will follow a stepby-step process that lets you input all of the basic settings to configure your RF550VPN.
– Time Zone Selection
Select the time zone, and then click the Next button to continue. You can also click the
buttons on the left side of the screen. These buttons are useful when you want to
change the information on individual screens or to choose your own setup order.
15
Multi-Tech Systems, Inc. RF550VPN Quick Start Guide
– Device IP Settings
On this screen, enter the internal LAN IP address that you want to assign to the LAN
port of the RF550VPN. This is not the IP address from your ISP – it is the local internal
LAN IP address.
Device IP Address: The default IP address of your RF550VPN: 192.168.2.1.
Device IP Subnet Mask: The subnet mask can usually be left at its default of
255.255.255.0
Click the Next button.
16
Chapter 5 – Configuring the RF550VPN
– ISP Settings
On this screen you can select to have the program automatically get your IP settings
from your ISP DHCP server or you can choose one of four options for manually
inputting your IP settings.
1. From the drop down list box, select the type of settings you will be entering. The
default screen is Static IP Settings.
2a. Static IP Settings
Use this screen when your ISP requires you to enter your ISP settings and you
want to use static IP settings. Enter the IP assigned by your ISP, your IP Subnet
Mask, and your ISP Gateway Address.
17
Multi-Tech Systems, Inc. RF550VPN Quick Start Guide
2b. Other ISP Setting Options: Connect to Cable ISP and PPPoE Settings
Connect to Cable ISP
Use this screen to have the program
automatically get your IP settings from your
ISP DHCP server and to see a description of
each option.
· Select Connect to Cable ISP.
· Click Next.
18
PPPoE Settings
Use this screen when your ISP requires you
to enter your ISP settings and you want to
use PPPoE settings.
· Enter your User Name, Password, Retype
the Password (for verification), and select
your idle time.
· Select your Connection Type by clicking
on the desired connection type button.
· Choose either Dynamic or Fixed. This will
determine how you IP address will be
assigned.
A Dynamic IP address is one automatically
assigned by your ISP.
A Fixed IP address is an address that
always stays the same. You will have to
enter the Fixed IP address assigned by
your ISP and your IP Netmask.
· Click Next.
Chapter 5 – Configuring the RF550VPN
2b (Continued). Other Options: PPTP Settings, Telstra Settings
PPTP Settings
Use this screen when your ISP requires you
to enter your ISP settings and you want to
use PPTP settings.
· Enter your User Name, Password,
Retype the Password (for verification),
select your idle time, enter your PPTP
Client IP address, PPTP Server IP
address, and your Connection ID or
Name.
· Select your Connection Type by clicking
on the desired connection type button.
· Choose either Dynamic or Fixed. This will
determine how you IP address will be
assigned.
A Dynamic IP address is one
automatically assigned by your ISP.
A Fixed IP address is an address that
always stays the same. You will have to
enter the Fixed IP address assigned by
your ISP and your IP Netmask.
· Click Next.
Telstra Settings
Use this screen when your ISP requires you to
enter your ISP settings and you want to use
Telstra settings.
· Enter your User Name, Password, Retype
the Password (for verification), and your
Default Domain name.
· Click Next.
19
Multi-Tech Systems, Inc. RF550VPN Quick Start Guide
– ISP Additional Settings
If your ISP requires you to manually input your system information, use the fields on this
screen to fulfill that requirement.
1. Check the box labeled Your ISP requires you to manually setup DNS settings
if your ISP requires this.
Then enter the DNS (Domain Name Server) address or addresses. These can be
left as 0.0.0.0 for a LAN-to-LAN RouteFinder connection.
2. Check the box labeled Your ISP requires you to input Host Name or Domain
Name if your ISP requires this.
Then enter the Host Name and the Domain Name.
3. Check the box labeled Your ISP requires you to input WAN Ethernet MAC if
your ISP requires this.
Then enter the MAC address.
Click the Next button.
20
Chapter 5 – Configuring the RF550VPN
– Modem Settings (Optional)
A modem can be used as a dialup backup to the Cable/xDSL connection.
The checkbox Dialup Modem When Cable/xDSL is not connected should be checked in
order to use the modem as a backup to cable or xDSL when the cable or xDSL are not
working. To add the modem to your setup, connect the modem and input the ISP
account settings.
·
·
·
·
·
·
Enter your ISP Phone Number, User Name, Password, Retype the Password (for
verification), and select your idle time.
Select your Connection Type by clicking on the desired connection type button.
Enter your External IP Address.
Select your Baudrate Settings.
Enter your dialing strings: Pre-Initial String, Initial String, and Dialup String.
Click Next to have the system accept your data and to move to the next screen.
21
Multi-Tech Systems, Inc. RF550VPN Quick Start Guide
– VPN Settings
Use this screen to input your LAN-to-LAN VPN settings and/or your Client-to-LAN VPN
settings.
1. In the Connection Name field, type a name that describes a connection you would
like to make.
Example: Site A.
2. Click the Add button, and the VPN Settings detail screen will display (see the next
screen). Once you have entered the settings, the Connection Name displays on the
lower half of the screen (above).
3. Click the checkbox if you want to Disable Internet Access (VPN Tunnel Only).
4. You can then edit, delete, or enable/disable this connection by clicking the
corresponding buttons.
5. To enable this connection, check the Enable box.
Note: If you uncheck the Enable box, the connection will not be active, but the
parameters will remain on the screen for you to enable, edit, or delete as desired.
22
Chapter 5 – Configuring the RF550VPN
– Enter the VPN Specific Settings
Your Connection Name defaults into the Connection Name box. Enter the following:
VPN Setting Name
Description
Enable/Disable UID Accept the default Disable UID. When Disable is
selected the Local and Remote IPSEC Identifier
fields are not active. Enable UID is an option for
compatibility purposes only (other IPSEC VPN
gateways might require you to input a Local and
Example
Disable
23
Multi-Tech Systems, Inc. RF550VPN Quick Start Guide
Remote IPSec Identifier).
Enable Keep Alive When enabled, will automatically renegotiate VPN if a Enabled
tunnel is temporarily interrupted.
Choose whether the remote site will be used by a
Remote Site
single user or a LAN.
When enabled, will allow Microsoft File and Printer
Enabled
Enable NetBIOS
sharing
to
communicate
information
about
computers
Broadcast
on the network.
192.168.10.0
Remote IP Network Enter Remote IP Network address (LAN) for Site B.
255.255.255.0
Remote IP Netmask Enter Remote IP Netmask address for Site B.
Enter Remote Gateway IP address (WAN) for Site B. 204.26.122.3
Remote Gateway
IP/FQDN
Select the Network Interface from the drop-down list
WAN
Network Interface
box.
ETHERNET
If You Select IKE for the Secure Association, the Following Fields Display
Secure Association
Perfect Forward Secure
Encryption Protocol
PreShared Key
Key Life
IKE Life Time
Select IKE (the default) to set how inbound packets will be
filtered. IKE primarily encompasses router key exchange and
the negotiation of security policy. Selecting IKE activates the
remaining input settings on this screen.
Check the Enabled button.
Select 3DES.
Enter the PreShared Key name. You
1234
can enter an alphanumeric name, but it
must match the security code for the
RouteFinder at site B.
Enter the amount of time that tells the
3600 seconds
router to renegotiate the Key
is 60 minutes
Enter the amount of time that tells the
28800 seconds
router to renegotiate the IKE security
is 8 hours
association.
Click the Save button. Your defined connections are displayed at the bottom of this screen
where you can edit or delete them.
This concludes the basic configuration of your SOHO RouteFinder.
It is a good idea to save the settings at this time by clicking the Save and Restart
button.
Chapter 6 in the User Guide provides the directions for using the RouteFinder’s
Advanced Settings.
24
Chapter 5 – Configuring the RF550VPN
– Save and Restart
After you have finished entering and/or editing the information on the previous screens,
click the Save and Restart button on the left-hand side of the screen. This will save all
of the preceding settings and restart the device. After the restart, the device will function
according to the saved settings.
During the save and restart process, system messages will let you know that you
have successfully configured the settings for the device and saved the settings. You
will see a status bar across the bottom of your browser showing the progress of the
startup process.
25
Multi-Tech Systems, Inc. RF550VPN Quick Start Guide
6 – Technical Support
Multi-Tech provides free technical support for as long as your product remains in
service. Before calling Technical Support, please read through the Troubleshooting
chapter in the User Guide. Also, complete the Recording RouteFinder Information
section below.
Contacting Technical Support
Country
Using email
By phone
France
India
U.K.
Rest of
World
[email protected]
[email protected]
[email protected]
[email protected]
+(33) 1-64 61 09 81
+(91) 124-340778
+(44) 118 959 7774
800-972-2439 (U.S. & Canada)
or +763-785-3500
Recording RouteFinder Information
Before placing a call to our Technical Support staff, record the following information
about your Multi-Tech RouteFinder.
Model no.: ____________________________________________________________
Serial no.: ____________________________________________________________
Firmware version: ____________________________________________________
List information that indicates the status of your RouteFinder in the space provided
before calling tech support. Include screen messages, diagnostic test results, problems
with a specific application, etc.
_____________________________________________________________
_____________________________________________________________
On-line Warranty Registration
If you have access to the World Wide Web, you can register your Multi-Tech product
online at the following URL http://www.multitech.com/register
Contacting Multi-Tech by Internet
Multi-Tech System, Inc. maintains a Web site and an FTP site at:
http://www.multitech.com
ftp://ftp.multitech.com
26
Warranty
Multi-Tech Systems, Inc., (hereafter “MTS”) warrants that its products will be free
from defects in material or workmanship for a period of two, five, or ten years
(depending on model) from date of purchase, or if proof of purchase is not
provided, two, five, or ten years (depending on model) from date of shipment.
MTS MAKES NO OTHER WARRANTY, EXPRESS OR IMPLIED, AND ALL
IMPLIED WARRANTIES OF MERCHANTABILITY AND FITNESS FOR A
PARTICULAR PURPOSE ARE HEREBY DISCLAIMED.
This warranty does not apply to any products which have been damaged by
lightning storms, water, or power surges or which have been neglected, altered,
abused, used for a purpose other than the one for which they were manufactured,
repaired by Customer or any party without MTS’s written authorization, or used in
any manner inconsistent with MTS’s instructions.
MTS’s entire obligation under this warranty shall be limited (at MTS’s option) to
repair or replacement of any products which prove to be defective within the
warranty period or, at MTS’s option, issuance of a refund of the purchase price.
Defective products must be returned by Customer to MTS’s factory – transportation
prepaid.
MTS WILL NOT BE LIABLE FOR CONSEQUENTIAL DAMAGES, AND UNDER
NO CIRCUMSTANCES WILL ITS LIABILITY EXCEED THE PRICE FOR
DEFECTIVE PRODUCTS.
Note: To read the warranty and repair policy in its entirety, see the User
Guide on the RF550VPN CD.
S000237E