1
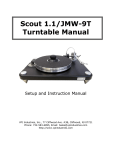
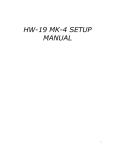
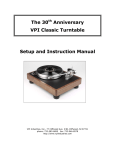
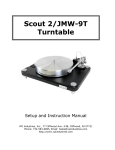
THE HW-19 JR TURNTABLE
SETUP AND INSTRUCTION
MANUAL
VPI INDUSTRIES INC., 77 CLIFFWOOD AVE #3B, CLIFFWOOD N.J. 07721
PHONE: 732-583-6895 FAX: 732-946-8578
www.vpiindustries.com
1
PRELIMINARY REMARKS
•
Save the carton and all internal fillers and plastic bags. If you should ever need to carry or
ship the HW-19 JR any distance, there is much less chance of it suffering damage in transit if
it is properly packed in its original carton.
•
Electrical Requirements: HW-19’s are designed to run on 115 VAC 60 Hz, or 230 VAC 50
Hz. The shipping carton shows which is the correct voltage for your unit.
CAUTION: TO PREVENT FIRE OR SHOCK HAZARD, DO NOT EXPOSE THIS UNIT TO
RAIN OR MOISTURE.
UNPACKING
•
Remove the corrugated sheet on which these instructions were lying. You will see plastic
bags with contents as follows:
A- 4- Rubber feet
B- Drive belt (with white powder)
C- Record clamp
•
Take out the three bags and put them aside. Remove large foam sheet and small pieces.
You will now see the dust cover (with hinges attached) in its plastic bag. Lift out the
cover and set it aside for now in a safe place.
•
Remove the corrugated sheet on which the cover was lying. The turntable’s main chassis
is now visible. Remove the white foam pieces. Take the base out of the carton by
grasping it on opposite sides and lifting straight up. The four plastic corner blocks should
fall off into the carton. If any remain on the base, take them off and set them aside. They
should be kept along with all the other fillers.
•
Place the base straddling two sturdy chairs of the same height. This will give you access
to the top and bottom of the turntable during assembly. Now, remove the plastic bag
from the base.
CAUTIONS:
Be careful not to damage the pulley and motor shaft.
Watch out for the line cord.
Be careful not to dislodge any of the Sorbothane at the base’s four corners.
•
•
•
•
NOTE: The hinge holders on the rear of the base are normally loose to allow the dust cover to
be attached. They will be tightened later on.
•
•
Locate the plastic envelope containing the drive belt. Remove the belt, shaking it as you
do so to deposit the excess powder back into the bag. Shake off all loose powder. Do not
discard the bag. It contains sufficient extra powder to allow re-powdering the belt many
more times.
Fit the belt around the outside of the platter. Next, pull the portion of the belt that is
adjacent to the motor pulley and stretch it to fit around the motor pulley’s top (smaller
2
diameter) groove. Replace the Motor Cover Plate. Make sure each post has a lock
washer atop it before putting the Cover Plate in place. Making the caps finger-tight is all
that is required.
MOUNTING THE TONEARM
•
•
If you have a pre-cut arm board: Confirm that it is the correct board for the arm you are
mounting. Fasten the tonearm to the board according to its manufacturer’s directions.
Attach the tonearms cable according to its maker’s directions.
3/16”
WOOD FRAME
SORBOTHANE
STARTING THE JR FOR THE FIRST TIME
•
•
•
•
•
•
The JR’s on/off switch is on the left front of the base’s “skirt.” It is a push-push type
switch with two positions, “in” and “out.” Push it a couple of times and make sure that it
is in the “out” position.
Plug the JR into an outlet that provides the required voltage as indicated on the carton.
Depress the on/off switch. The turntable should start and come up to speed. Please note
that the JR is not a broadcast turntable and does not come up to speed within one
revolution. The type of high-torque motor that is required for such a rapid start would
degrade the audio performance of the turntable.
In the unlikely event that the motor does not start, first check to make sure that the wall
outlet is “live” by plugging in a lamp or some other device known to be working. If the
outlet is live and the JR does not work, please contact your dealer or the factory for
advice and needed repair.
NOTE: The motor will take from 5-6 hours to “break in.” In other words, the JR’s
performance will subtly improve during this time as the motor bearings reaches their
operating norm.
Place the JR on the shelf on which it will be used. With the turntable running at 33, the
belt will run parallel to the chassis and within the middle 1/3 of the platter. You do not
have to be fanatical about this, leveling by eye is sufficient. However, if you do want to
be a fanatic, put a bubble level on the platter. Center the bubble by rotating the base’s
rubber feet to raise or lower each corner as needed.
3
FINAL ASSEMBLY
•
•
Place the dustcover on the JR by slipping the hinge flanges into the sockets on the rear of
the base. Close the cover. Each of its front corners should rest on one of the small round
pads on the base’s front corners. If necessary, push gently on the front of the cover until
it does so. You may also have to pull up slightly on one of the rear corners. Once the
cover is squarely resting on the base, tighten the screws on the back of the base’s hinge
sockets with a No. 2 Phillips screwdriver.
Now that you have completed assembling your new JR, please take a few moments to fill
out and mail the warranty registration card. In the unlikely event that you need warranty
service, our having the card on file will make it easier for us to help. If you take the
additional step of sending a photocopy of your dealer’s sales receipt along with the card,
handling any warranty claim will be made even easier for both of us.
SPEED CHANGE
•
•
The JR offers speeds of 33 1/3 and 45 RPM. Moving the belt from one groove on the
motor pulley to another as follows changes speed: Turn off the motor, remove the Motor
Cover Plate, and with a clean finger, pull gently on the belt and move it to the other
groove. The smaller diameter groove is for 33 1/3 RPM and the larger for 45 RPM.
Replace the Motor Cover Plate and turn on the turntable. Make sure each post has a lock
washer atop it before putting the Cover Plate in place. Making the caps finger-tight is all
that is required.
USE OF THE RECORD CLAMP
•
•
•
•
•
•
•
The JR’s platter is made from materials that effectively damp vinyl disk resonance’s.
Using a mat on the turntable’s platter will be of no benefit and will, in fact, degrade
performance. To take full advantage of the platter’s damping effect, it is necessary to use
the supplied record clamp.
The record clamping system consists of three pieces: a rubber washer, a specially
machined plastic puck, and a knurled Delrin ™ screw-down clamp.
NOTE: Clamping brittle polystyrene or shellac records is not recommended. If you
want to clamp these disks, do not use the rubber washer beneath them. In addition, clamp
them very lightly to avoid the possibility of cracking the record.
Place the rubber washer over the spindle and gently push it down so that it rests flat on
the center of the platter.
Place the record to be played on the turntable. Next, take the puck and holding it with the
flat side up, place it over the spindle on top of the record.
Finally, take the knurled clamp and screw it down (flat side down) over the puck.
Tighten it enough that the periphery of the record is brought in contact with the platter.
You will notice that over tightening will sometimes result in the periphery lifting off
again. Do not over tighten.
After using the clamp system for a while, the proper amount of tightening will become
pretty much automatic.
4
•
The action of the clamp system is to provide uniform compression of the record at the
outer edge of the label area. First, the periphery of the record is forced into contact with
the platter. Then, the rest of the grooved area is pushed into contact.
ADDITIONAL TIPS
•
•
•
•
•
•
Keep the platter scrupulously clean. Since no mat is used on the JR, any dirt can easily
be transferred to the record—especially since the clamp holds the record down under
pressure.
We recommend that the dust cover be off when playing records. Under most
circumstances this will result in cleaner sound since the cover acts as a “sail” catching
acoustic feedback.
However, when the turntable is not in use, having the dust cover on is strongly
recommended. Remember that it is very important that the platter be kept clean so that
dirt is not transferred to the record.
In choosing a location for your JR, bare in mind that wall mounting is generally
preferred. Placing the turntable on a shelf mounted on a sturdy wall is usually the best
way to isolate the turntable from footfalls and other shock and vibration. Alternatively,
one of the steel and lead turntable stands may be used if the floor is firm and does not
bounce when you walk. There are a number of stands on the market and your dealer will
be able to advise you concerning which ones meet your particular requirements.
If the MK-3 must be placed on a piece of furniture or in an equipment cabinet which is
not perfectly stable, things can be improved by wedging something reasonably hard
between the furniture or cabinet and the wall against which it is placed. Please be aware
that doing so may mar the wall and /or the back of the piece of furniture or cabinet.
Under most circumstances, you will then be able to walk around while a record is playing
with out the arm hopping around.
Use of the VPI SDS is strongly recommended (Commercial Message!). It is our
experience that a couple of benefits are derived. First, the SDS isolates the turntable’s
motor from the incoming electric line providing ultra-stable line voltage and frequency.
This results in cleaner overall sound. The second benefit is that the SDS allows fine pitch
control. Varying the line frequency control on its front panel varies the MK-3 motor’s
speed.
POSSIBLE PROBLEMS
•
•
Hum—A low buzzing or humming sound heard whenever the amplifier or receiver is
switched to, “phono”, varies with the volume control setting, and is heard when no
record is being played. If hum is heard only when playing a record, the hum is recorded
on the record. This is actually a cartridge/arm/turntable problem. Usually all that is
needed to eliminate the hum is to run a ground wire from the turntable chassis to the
chassis of the amplifier or receiver. Simply attach a suitable length of thin, flexible wire
(test probe wire is ideal) to any convenient screw on the underside of the JR chassis.
Connect the other end to the ground connector on the amplifier or receiver (if in doubt,
check the amplifier or receiver’s manual or call its manufacturer).
Depending upon the tonearm you are using, it may also be possible to run a short wire
from the turntable chassis to the arm’s ground connection under the arm board. If this
does not cure the hum, disconnect the short wire and run a separate ground wire as above.
5
•
•
•
If running a ground wire from the chassis does not eliminate the hum, there may be a
more complex problem involving the particular arm/cartridge combination. VPI will
attempt to provide assistance, but please understand that it is not possible for us to be
familiar with all the numerous arm/cartridge combinations. You may also want to
contact both the arm and cartridge manufacturers.
Motor overheating—synchronous motors, such as the one used in the HW-19 JR,
normally show a 30 degree to 40 degree C rise in temperature after they have been
running for a while. Therefore, you can expect that the motor pulley will become hot to
the touch. It’s perfectly normal. Relax and forget about it.
Motor does not turn smoothly—when they are turned off, synchronous motors do not turn
as easily as Induction motors. If you attempt to rotate the motor pulley by hand, you will
feel some resistance. You will notice that it “jumps” from position to position as it turns.
This is the result of the multiple-pole internal permanent magnet. Again, it’s perfectly
normal. Keep relaxing.
Noisy motor—some noise is normal from the type of synchronous motor used on the JR.
You needn’t be concerned unless: 1) you can hear motor noise through the loudspeakers
while playing records (make sure it’s not just with one or two records); or 2) you can hear
the noise from across the room when no record is being played (not through the
loudspeakers). If either of these conditions is apparent, please contact your dealer or the
factory for assistance.
MAINTENANCE
•
The drive belt on the HW-19 JR is made of pyrothane and, under ordinary conditions,
will provide long service. Dusting the belt every three months with talcum powder will
provide for a smoother start up and turn off. For optimum performance we recommend
installing a new drive belt every two years. There is enough powder in the bag for many,
many powderings. Seal the bag and shake the belt around in it. Shake excess powder
back into the bag as you remove the belt. Shake off all loose powder.
• The main bearing of the turntable and the bearing of the motor should both be lubricated
using 40 weight motor oil. Slick 50 is preferred, but any good motor oil will do. One
drop on the motor shaft, and two drops on the main bearing shaft and two down the hole
of the main bearing well, is sufficient.
• NOTE: Compounds containing silicones are not recommended for use on or near any
electronic equipment. While silicone polishes give a high-luster finish, another property
of silicones is migration. The tiniest amount can spread itself in an extremely thin layer,
degrading electrical contacts. Once a contact has been contaminated with silicone, it is
nearly impossible to clean it completely off.
• The JR’s dust cover and acrylic chassis may be cleaned with glass cleaner. Do not use
solvents, abrasives, or other glass cleaners of any sort. Make sure not to drip any
cleaning solution on the turntable or its base.
• The platter should be kept scrupulously clean so that no dirt is transferred to the record
being played. Windex ™ is the best cleaner we have found. Note: any cleaner must be
completely dried off before placing a record on the platter. Be sure to use a clean, lintfree cloth to wipe with.
• The natural finish wood base has a hard lacquer finish. No care is needed beyond a
periodic dusting with a clean, soft cloth. Do not use solvents, abrasives, or other cleaners
of any sort.
6
.
WARRANTY
VPI INDUSTRIES, INC. LIMITED WARRANTY OF THE NW-19 MK-3 TURNTABLE
VPI Industries, Inc. (VPI) warrants this unit against defects in materials and/or workmanship for
two (3) years from the date of purchase by the original retail purchaser. VPI’s sole obligation
under this warranty is limited to the repair or replacement, at VPI’s option, of any part(s) found
to be defective. VPI’s obligation to repair or replace defective parts is the purchaser’s sole and
exclusive remedy, and VPI shall not be liable for any direct or indirect injury and/or property
damage arising out of the use of the product or defect in or failure of the product.
This warranty does not extend to any unit whose serial number has been defaced or altered. Any
product that VPI determines contains a defect or malfunction due to incorrect installation,
modification, misuse, or servicing by the purchaser, or service technician not authorized by VPI
to perform such service will not be warranted. This warrantee does not cover trivial or cosmetic
defects that do not impair the unit’s normal function.
VPI reserves the right to make changes in this product without assuming any obligation to install
such change in any product previously manufactured. This warranty to repair or replace
defective parts is in lieu of all other express or implied warranties of merchantability or fitness
for a particular purpose. There are no warranties that extend beyond the description herein.
Some states do not allow exclusion of implied warranties or limitation of incidental or
consequential damages, so the above exclusion or limitations may not apply to you. This
warranty gives you specific legal rights, and you may also have other rights that vary from state
to state.
7