1
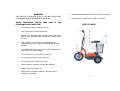
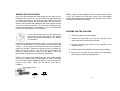
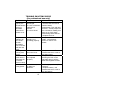
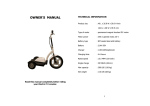
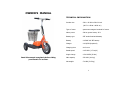
OWNER’S MANUAL
TECHNICAL INFORMATION
Product size
: 38 L x 26.8 W x 38.6 H inch
(96.5 L x 68 W x 98 H cm)
Read this manual completely before riding
your Electric Tri scooter.
Type of motor
: permanent-magnet brushed DC motor
Motor power
: 260 w geared motor, 36 V
Battery type
: IBT sealed lead acid battery
Battery
: 10.5AH 36V IBT battery
Charger
: 110V/220V(optional)
Charging time
: 4-6 hours
Rated speed
: 10.5 MPH ( 17 km/h)
Single charge
: 12.4 MILES (20 km)
Max capacity
: 220 LBS (100 kg)
Net weight
: 70 LBS (31.5 kg)
1
WARNING
THE ELECTRIC TRISCOOTER IS NOT A TOY AND SHOULD NOT
BE OPERATED BY ANY ONE UNDER 12 YEARS OLD.
Safety Instruction (Please take note of the
followings before each ride)
•
The maximum weight capacity is 100 kg.
•
Only one person at a time should ride.
•
Always wear protective gear including knee and elbow
pads and an approved safety helmet when riding the tri
scooter.
•
Before riding be sure to check that all pivot points,
locking buttons, quick releases, and latches are secured
properly.
•
The power switch lock must be in the “off” position when
the tri scooter is being charged.
•
Do not use the tri scooter when it is raining.
•
Do not place the battery near heat or fire.
•
Do not expose the charger near water.
•
Check if battery is properly charged and installed.
•
Charge battery after each use.
•
Always ride on dry paved surfaces. Wet and uneven
surfaces are a hazard.
2
•
Sand and loose impediments are your enemy, avoid them.
•
Never operate too fast for your skills or condition.
LIST OF PARTS
3
1.
2.
3.
4.
5.
6.
7.
8.
9.
front mud guard
front fork
handlebar
handlebar quick release
handlebar tube clamp
seat quick release
seat tube quick release
seat
basket
Tool kits in the tool bag
Handle Bar
1.
2.
3.
4.
5.
6.
1. Charger
2. Allen wrench (8-10mm)
3. Allen wrench (14- 17mm)
4. Allen wrench (14- 17mm)
5. Screwdriver
6. Wrench (6mm)
7. Wrench (3mm)
brake lever
power switch button
battery gauge
thumb throttle
red button: head light
green button: horn
Note: When you begin to rider
the scooter, the acceleration
power is very high causing the
green light on the battery
gauge turns to yellow quickly.
This is normal, and will not affect the total range that you will get
from the scooter.
Charger convertible cable
(Optional-For Sale!)
4
5
Fuse (inside the battery bag)
Note: For professional
reference only.
CHARGING THE BATTERIES
Before you ride the tri scooter for the first time you must charge
the batteries for 4-6 hours using the supplied charger.
Charging note:
1. After charging the battery, it can last for 2-3days. But
we still suggest you charge the battery everyday .
And you’d better charge the battery 2-3H longer after
the full charging. It’s good to battery.
2. When the battery gauge shows empty,you’d bettery
charge the battery as soon as possible.
3. Empty battery is also necessary: Ride the vehicle on
the smooth road until it’s stop because of the currency
protection. After that you can recharge the battery.
Option 1:
To charge the batteries, plug the charger into
the charger socket located on the rear side of
the battery/ controller compartment. Then
plug the charger into a wall outlet.
Option 2: (for professional use only)
Remove the screws from the battery compartment located at the
front part of the footboard. Disconnect the
wires. Lift the battery box. Connect the
battery and charger using the charger
convertible cable. Plug the charger into the
wall outlet.
7
6
RIDING THE TRI SCOOTER
Once you have completed the initial charge you are ready to ride.
Remember, this is not a toy. The tri scooter can reach speeds up
to 20 km/h depending on the terrain and the weight of the rider.
You must wear a helmet and protective pads. You must also be
aware of all local laws and ordinances that govern and/or restrict
the use of powered scooters. The laws and ordinances vary
greatly from municipality to municipality. It is your responsibility
to know and abide by your local restrictions.
NOTE 2: When scooter is parked, press the power switch button
to the “off” position; this will avoid anyone from accidentally
pushing the throttle causing the scooter to speed forward. Failure
to do this could lead to an accident.
FOLDING THE TRI SCOOTER
To ride, plug the key into the key ignition and
turn the key to the “ON” position. The battery
gauge will illuminate indicating that the battery
is in operation.
Hold onto the handlebars with both hands. Your left fingers will
control the brakes and your right thumb will control the thumb
throttle. As you depress the throttle lever with your thumb the
speed will increase. Release the thumb throttle and apply the
brake to stop the scooter. You will control the speed of the
scooter by using both the throttle and the brake. When the
brake handle is squeezed it cuts power to the throttle.
1. Unplug the power connecting plugs.
2. Unscrew the bolts and nuts from the connecting tube
clamp using the enclosed allen wrenches .
3. Lift the connecting tube (which is also attached to the
handlebar tube).
4. Carefully place the handlebar tube on the footrest frame.
5. Finger screw the bolts and nuts back to the connecting
tube clamp to avoid any misplacements.
NOTE 1: You may use the balancing wheel (the smaller middle
rear wheel) to balance the tri scooter when you want to ride with
the front wheel raised. WARNING: Never try stunts beyond the
control of your skills. Never ride too fast for your skills or
condition.
Power switch button
off
8
on
9
MAINTENANCE
Battery: (for professional use only)
The tri scooter is powered by three 12 volts, 7Ah, rechargeable
batteries secured in a battery bag. Other than recharging, these
batteries need no maintenance. To prolong battery life, you must
recharge the battery after each use. You must also charge your
tri scooter if it has not been used for 30 days or more. If you
must replace the batteries, they are located at the battery
compartment at the footboard. To get them, remove the
compartment cover by loosening the screws. To remove the
batteries disconnect the wires from the battery terminals. Replace
the batteries with new ones and reconnect the wires. Follow the
instructions on charging batteries to charge the new batteries.
WIRING DIAGRAM
(for professional reference)
10
11
TROUBLE SHOOTING GUIDE
(for professional use only)
Problem
The power
light by the
thumb throttle
does not
illuminate
when the tri
scooter is on.
Cause
1. Battery is
discharged.
2. Loose connection
inside the tri
scooter.
3. Fuse is blown.
The power
indicator by
the thumb
throttle
illuminates
but tri scooter
still does not
work.
Clicking noise
coming from
motor
When the
brake lever is
squeezed the
tri scooter
does not stop.
Scooter is
losing speed.
1. The throttle
handle is not
operating properly.
1. Brush in motor
has come loose.
1. The brakes are
not adjusted
properly.
1. Low battery
2. Battery is
defective
Solution
1. Recharge your tri scooter.
2. Remove the screws that
hold the battery
compartment cover and raise
the cover. Visually inspect all
wire connections making sure
there are no loose wires,
reconnecting those that are.
3. Replace the fuse.
1. Replace the throttle
handle. Call Customer
Service to order a new
throttle
1. Replace motor. Call
Customer Service to order a
new 250w motor.
1. Adjust the brake by
loosening the bolt on the
rear brake wheel, pull the
cable and retighten the bolt.
1. Recharge your battery for
4-6 hours.
2. Replace battery. Call
Customer Service to order a
new 36v battery.
12