1
OWNERS
MANUAL
MODEL
NO.
315.27441
CAUTION:
Read Rules for
Safe Operation
and Instructions
Carefully
CRAFTSMAN.
INDUSTRIAL
GRINDER
DOUBLE
DIE
INSULATED
SAVE THIS
MANUAL
Warranty
Introduction
FOR
FUTURE REFERENCE
Operation
Repair
612547-871
10-00
SEARS,
Parts
®
Designed
exclusively for and sold only by
ROEBUCK
AND CO., Hoffman
Estates, IL 60179
PRINTED
IN U S A
FULL ONE YEAR WARRANTY ON CRAFTSMAN
INDUSTRIAL DIE GRINDER
If this Craftsman Industrial
Die G_nder fails due to a defect
of purchase,
Sears will repair it, tree of charge¸
WARRANTY
SERVfCE
IS AVAILABLE
IN THE UNITED STATES.
This warranty
grv_s you specific
Sears,
BY SIMPLY
legal rights,
Roebuck
and
in matehal
RETURNING
or workmanship
THE TOOL
and you may also have other
Co.,
DEPT.
817
WA, Noffman
within one year from the date
TO THE
rights
NEAREST
whioh vary from
Estates,
SEARS
STORE
state to strife.
IL 60179
INTRODUCTION
DOUBLE INSULATION is a concept in safety, in elecIMPORTANT -- Servicing of a tool with double intrlc power tools, which eliminates the need for the
sulation requires extreme care and knowledge of the
usual three wire grounded power Cord and grounded
system and should be performed only by a qualified
supply system. Wherever there is electric current in
service technician. For service we sugges you
thetooltherearetwoeompletesetsofinsulationto
return he DO toyournearestSearsStoreforrepair.
protect the user. All exposed metal parts are isolated
Always use original factory replacement part_ when
from the internal metal motor components with proservicing
tectlng insulation.
Your Grinder Is a compact, powerful tool packed with a wealth of usefulness for professional tool and die
makers and home "handymen."
There is a wide variety of cutters, grinding wheels, mounted wheels and
points, carbide cutters, burrs, etc., available at your Sears Catalog or Retail Stores. With these accessories
you can carve, rout, sharpen, grind, milt, file, rasp, and deburn
RULES FOR SAFE OPERATION
READ ALL INSTRUCTIONS
1.
2.
3.
4.
5.
6.
KNOW YOUR POWER TOOL - Read owner's
manual carefully. Learn its applications and limitations as well as the specific potential hazards
related to this tool,
GUARD AGAINST
ELECTRICAL
SHOCK BY
PREVENTING
BODY
CONTACT
WITH
GROUNDED
SURFACES,
For example: Pipes,
radiators, ranges, refrigerator enclosures.
KEEP GUARDS IN PLACE and in working order.
KEEP WORK AREA CLEAN.
Cluttered areas
and benches invite accidents.
AVOIDDANGEROUSENVIRONMENT,
Don'tuse
power tool in damp or wet locations or expose to
rain. Keep work area weft fit.
KEEP CHILDREN
AND VISITORS AWAY.
All
visitors should wear safety glasses and be kept a
safe distance from work area. DO not let visitors
contact tool or extension cord.
Page 2
7
STORE
IDLE TOOLS.
When
not in use tools
should be stored in a dry, high or locked-up place
- out of the reach of children.
8. DON'T FORCE TOOL. It wifl do the job better and
safer at the rate for which it was designed.
9. USE RIGHT TOOL. Don't force smalt tool or attachment to do the job of a heavy duty tool. Don't
use tool for purpose not intended - for example Don't use a circular saw for cutting tree limbs or
logs.
10. WEAR PROPER
APPAREL.
NO loose clothing or jewelry to get caught in moving parts.
Rubber gloves and non-skid footwear are recommended
when
working outdoors.
Also,
wear protective
hair and keep
vents.
hair covering
it from being
to contain long
drawn into air
RULES
FORSAFEOPERATION
(Continued)
11. ALWAYS WEAR SAFETY GLASSES. Everyday
eyeglasses have only impact-resistant lenses; they
are NOT safety glasses,
12. PROTECT YOUR LUNGS. Wear a face or dust
25 KEEP HANDS AWAY FROM GRINDING AREA,
26. NEVER USE IN AN EXPLOSIVE ATMOSPHERE,
Normal sparking of the motor could ignite fumes,
27, INSPECT TOOL CORDS PERIODICALLY
and if
damaged, have repaired at your nearest Sears
Repair Center. Stay constantly aware of cord location.
28. INSPECT EXTENSION CORDS PERIODICALLY
mask if cutting operation is dusty.
PROTECT YOUR HEARING, Wear hearing protection dudng extended periods of operation.
14. DON'T ABUSE CORD. Never carry tool by cord
or yank it to disconnect
from receptacle.
Keep
cord from heat, oil and sharp edges.
15. SECURE WORK. Use clamps or a vise to hold
work. Both hands are needed to operate the tool.
16 DON'T OVERREACH.
Keep proper footing and
balance at all times. Do not use on a ladder or
13
!7.
!8
and replace if damaged.
KEEP HANDLES
DRY, CLEAN, AND FREE
FROM OIL AND GREASE. Always use a clean
cloth when cleaning. Never use brake fluids, gasoline, petroleum-based
products or any strong solvents to clean your tool.
30, STAY ALERT. Watch what you are doing and
use common sense. Do not operate tool when
you are tired. Do not rush.
31. CHECK DAMAGE D PARTS. Before further use
of the tool, a guard or other part that is damaged
should be carefully checked to determine that il
will operate properly and perform its intended
function, Check for alignment of moving parts,
binding of moving parts, breakage of parts, mounting, and any other conditions that may affect its
operation. A guard or other part that is damaged
should be properly repaired or replaced by an
authorized service center unless indicated elsewhere in this instruction manual.
DOES NOT
32. DO NOT USE TOOL IF SWITCH
TURN IT ON AND OFF. Have defective switches
29.
unstable support.
MAINTAIN
TOOLS WITH CARE.
Keep tools
sharp at all times, and clean for best and safest
performance.
Follow instructions
for lubricating
and changing accessories.
DISCONNECT
TOOLS. When not in use, before
servicing, or when changing attachments, b_ades,
bits, cutters, sandpaper, etc., atl tools sbouId be
disconnected from power supply
19 REMOVE ADJUSTING KEYS AND WRENCHES.
Form habit of checking to see that keys and adjusting wrenches are removed from tool before
turning it on.
20. AVOID ACCIDENTAL
STARTING.
Don't carry
plugged-in tools with finger on switch. Be sure
switch is off when plugging in
21. MAKE SURE YOUR EXTENSION
CORD IS IN
GOOD CONDITION.
When using an extension
cord. be sure to use one heavy enough to carry
the current your product will draw. An undersized
cord will cause a drop in line voltage resulting in
loss of power and overheating, A wire gage size
(A W.G.) of at least 16 is recommended
for an
extension cord t00 feet or less in length. A cord
exceeding 100 feet is not recommended.
If in
doubt, use the next heavier gage. The smaller the
gage number, the heavier the cord.
22 OUTDOOR USE EXTENSION CORDS. When tool
is used outdoors, use only extension cords suitable for use outdoors. Outdoor approved cords
are marked with the suffix W-A, for example SJTW-A or SJOW-A.
23. DO NOT OPERATE WITH GRINDING
WHEEL
without using guard.
24. ALWAYS select grinding wheels or wire brushes
that have maximum operating speeds which are
not exceeded by the nameplate
speed of the
grinder,
replaced by an authorized service center,
Inspect for and remove all nails or foreign objects
from workpiece before sanding or grinding.
MEDICATION.
DO not op34. DRUGS, ALCOHOL,
erate tool while under the influence of drugs, alcohol, or any medication.
USE ONLY IDENTICAL
35, WHEN SERVICING
CRAFTSMAN
REPLACEMENT
PARTS.
36, POLARIZED PLUGS. To reduce the risk of electric
shock, this tool has a polarized plug (one blade is
wider than the other). This plug will fit in a polarized
outlet only one way. If the plug does not fit fully in
the outlet, reverse the plug. if it still does not fit,
contact a qualified electrician to install the proper
outtet. DO not change the plug in any way.
37. SAVE THESE INSTRUCTIONS.
Review them frequently and use them to instruct others who may
use this tool. If you loan someone this tool, loan
them these instructions also.
33,
Page 3
OPERATION
CUSTOMER INSTRUCTfONS
1.
DO read thoroughly
INTRODUCTION
and
OPERATING INSTRUCTIONS before using your
GRINDER.
DON'T use your GRINDER before reading
thoroughly
INTRODUCTION
and OPERATING
INSTRUCTIONS.
2.
DON'T leave Grinder unattended before disconnecting from power source.
2.
DO disconnect power cord when cleaning or
doing maintenance on tool.
3.
DON'T force tool, allow Grinder to perform as it
was designed,
3.
DO be sure the voltage of the power supply
agrees with the nameplate marking on the unit,
4.
DON'T allow children to operate Grinder.
4.
DO use correct size extension cord as recommended.
5.
DON'T carry unit by power cord.
6.
DON'T use
wheels.
1.
cracked
or
damaged
grinding
5.
DO replace cord when frayed.
6,
DO use only specified replacement
7.
DON'T use wheels not recommended
R.P.M. of this grinder.
7.
DO disconnect from power source and store in
a clean dry place,
8.
8.
DO use correct grinding wheel or burr for the
job.
DON'T plug grinder cord into receptacle
without turning switch to "OFF" position.
9.
DON'T
handle
work bench,
9.
DO check wheel mandrel and grinder chuck for
dirt or other foreign material before wheels are
mounted in chuck.
10.
DO true wheels with stone or dressing stick to
eliminate vibration and maintain free cutting
11.
10.
parts.
Page 4
grinder
carelessly,
for the
or drop
on
DON'T use any means to tighten or loosen co_let chuck except the wrench provided. Striking
a chuck may cause serious damage.
DON'T
flying.
coo!+
plug or cover air vents to keep dust from
Vents must be kept open to keep motor
12.
DON'T use wheels
26,500 R.P.M.
or files
rated less than
13.
DON'T use Grinder in an explosive atmosphere,
OPERATION
Ccoo.°ued)
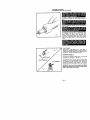
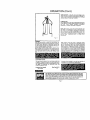
For ease of operation and maintaining proper controL hold your Grinder with both hands as shown in
Clamp or otherwise secure the work to prevent it
from shifting.
Always point the cutter so that if it should slip there
is no danger to any part of your body. Never wear
loose clothing or jewelry when operating your
Grinder. They could get caught in moving parts causing injury. Always keep head away from grinding
area. Hair could get caught in moving parts causing
injury,
COLLET SHAFT
Your grinder is equipped with a collet shaft to
receive 1/4" diameter mandrels, A collet reducer is
,supplied which, when used with this coUet shaft, will
receive 1/8" diamter mandrels. See F/g. 2,
GRINDING
WHEELS
The maximum diameter grinding wheels recommended
for use with 1/4" mandret is 1 ", See Fig. 3.
Grinding wheels should be used when working wilh hard
materials. Do not use grinding wheels when working with
soft materials, such as nonferrous metals. Nonferrous
metals such as aluminum, brass, copper, etc. will load up
the wheel and willnot aJlow wheel Io cut as it was designed.
IMPORTANT: Never use wheels rated below 26,500
RPM,Wheels rated less tha,q 26,500 could disintegrate
while in use causing serious injury.
Page 5
OPERATION
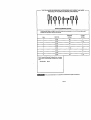
DO
EXCEED
THESE
GRINDING
WHEEL
SIZES
Plain Wheels
Shaped Wheels
1/4" Mandrel
1/4" Mandrel
Wheel Dia.
Wi,!h
Ovel
hang
NOT
(Cont.)
Wheel Thickness
Wheel Dia.
3/4
1
1
1-1/2
1-1/4
1
3/4
5/8
1/2
3/8
1/8"
Wheel Thickness
1
3/4
11/16
1/2
1/4
1
1-1/8
1-1/4
3/4
1-1/16
1/8" Mandrel
Mandre_
Wheel Dia.
Wheel Thickness
1
3/4
5/8
1/2
3/8
1/8
1/4
1/4
3/8
1/2
Wheel
1/4
5/8
1/2
3/8
Dia.
Wheel
Thicknes_
1/2
1/2
3/8
1/2
For additional information consult "The safety requirements
for the Use, Care and P!otection of
Abrasive Wheels" ANSI B7.1-1978. Write "The American National Standards institute, Inc, 1430
Broadway, New York, New York, 10018,"
SAFE AND EFFICIENT OPERATION
Always allow your Grinder to operate as it was
designed, Never force tool. Excessive pressure on
tool can be the cause of poor results and a source of
Pressure between wheel and work should never be
so heavy to cause bending or springing of Mandrel
This is of particular importance when using wheels
with small Mandrel diameters.
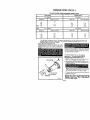
TO ATTACH WHEEL OR FILE TO GRINDER
IMPORTANT -- BE SURE POWER CORD IS
DISCONNECTED FROM POWER SUPPLY.
1. See Fig. 4. Press eollet shaft looking pin and turn
shaft until pin engages into hole in shaft.
2. Insert mandrel into eollet shaft a minimum of 5/8"
to prevent wheel or file from disengaging from
grinder while in use.
___LOCKING
NOTE: Inserting mandrel a minimum of 5/8" into
collet shaft provides a minimum overhang which
will insure less vibration and better results.
PIN
3. Tighten collet nut securely with wrench provided
4. Release locking pin.
M_ANDRCE
OLLET SHAFT
Fig.
4
NOTE: ALWAYS CHECK CUTTER FOR TIGHTNESS
BEFORE EACH USE, LOOSE CUTTER CAN BE
THROWN
FROM TOOL WITH CONSIDERABLE
FORCE CAUSING INJURY.
Page 6
OPERATION
(Cont.)
WiRE HANGER
-- (See Fig. 5). A wire hanger
is provided for your convenience
and ease of storage.
To
install,
insert
the ends of the hanger
into the holes
on each side of the grinder
housing.
LUBRICATION
All the bearings in this tool are lubricated with a suf.
ficient amount of high grade lubricant for the life of
the unit
under
normal
operating
conditions,
therefore, no further lubrication is required,
NOTE: When being used with Tool Post Holder, Item
No. 25846, it i_ necessary to remove rubber boot, Key
No. 3 on parts list, before attaching to Tool Post
Holder. Should assembly of Die Grinder into TOOl
Post Holder be somewhat difficult, it might require
prying
open clamping
slots in holder
with
screwdriver
Fig
5
GENERAL
Only the parts shown on parts list, page eleven, are
intended to be repaired or replaced by the customer.
All other parts represent an important part of the
double insulation system and should be serviced only by a qualified service technician.
Avoid using solvents when cleaning plastic parts.
Most plastics are susceptible to various t_,pes of
commercial solvents and may be damaged by their
use. Use clean cloths to remove dirt, carbon dust,
etc.
EXTENSION
CORDS
The use of any Extension Cord wdl cause
of power, TO keep this loss to a minimum
vent overheating and motor burn,out, use
ing table to determine the MINIMUM
(A,W.G,) Extension Cord.
Extension Cord Length
25-100 Feet
[
When electric tools are used on fiberglass
boats,
sports cars, etc., it has been found that they are subject to accelerated
wear and possible premature
fairure, as the fiberglass chips and grindings are
highly abrasive to bearings, brushes, commutator,
etc. Consequently
it is not recommended that this
tool be used for extended work on any fiberglass
material. During any use on fiberglass it is extremely
important that the tool is cleaned frequently by blowing with an air
some loss
and to prethe followwire size
Extension
available
Cords
suitable
at your
nearest
for use with your grinder
Sears
Retail
are
Stores.
wire Size A,W.G.
16
The operation of any die grinder can result in foreign objects being thrown into your
eyes, which can result in severe eye damage. Before beginning power tool operation,
always wear safety goggles or safety glasses with side shields and a full face shield
when needed. We recommend Wide Vision Safety Mask for use over eyeglasses or
standard safety glasses with side shields, available at Sears Retail Stores.
Page 7
|
THE FOLLOWING RECOMMENDED ACCESSORIES ARE CURRENT AND WERE -AVAILABLE AT THE TIME THIS MANUAL WAS PRINTED
1
1
2
2
MOUNTED
3
GRINDING
4
5
6
POINTS
Grinding point heads are made of aluminum oxide and are mounted on "finch x 1/4 inch steel shafts.
Suitable uses are finish cutt]ng or die cutting,
Key
Item No.
1
64723
Diameter
Length
Inches
Inches
3/8"
1"
1
64724
1/2"
1-1/2"
2
64725
3/4"
1"
2
64728
1"
1"
3
64721
11/16"
7/8"
4
64727
1'
1/2"
5
64729
1•
1"
6
64726
3/4"
1-1/8'
Set of 6 assorted
Mounted Grinding
Points, Includes
1/2 Inch up to I inch diameter,
1/2 inch u p to 1-1/2 Irlch
long.
Item Number
64720
The use of attachments or accessories not listed above might be hazardous.
Page 8
NOTES
Page 9
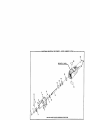
CRAFTSMAN
INDUSTRIAL
DIE GRINDER
-- MODEL NUMBER
315.27441
19
SEENOTE"A"PAGE11
14
13
12
7
6
SEE BACK PAGE FOR PARTS ORDERING
INSTRUCTIONS
.CRAFTSMAN
INDUSTRIAL
DIE GRINDER
--
MODEL NUMBER
315.27441
The Model Number will be found on a plate attached to the Motor Housing.
Always mention the Model Number in ag correspondence
regarding your
iNDUSTRIAL DIE GRINDER or when ordering repair parts.
t
I
I
PARTS LIST
Key
No,
Part
Number
1
621248-001
1/8"
2
989985-003
Co!let
3
611866-001
Rubber
4
714281-000
Wrench .....................................................
5
611833-003
Spindle Housing ...............................................
1
6
616445-001
Screw(#8.18x5/gFiI,
4
7
611917-003
Lock Pin ......................................................
1
8
965889-001
Retaining Ring ................................................
1
g
620789-006
Loading
Spring ................................................
1
lg
990352.001
Ball Bearing (NTN #6OOlZZC3/1E) ...............................
1
11
989724-002
Output
Shaft .................................................
1
12
611915-001
Loop Spring ...................................................
1
13
990353.001
Ball Bearing (NTN #608ZZC3/1E) .................................
1
14
611664-002
Bearing Adapter ...............................................
1
16
912171-801
Retaining
1
17
971226-001
Data Plate ....................................................
1
18
971227-001
Logo Plate ....................................................
1
19
611948-001
Wire Hanger ..................................................
1
612547-871
Owner's Manual
Description
Quantity
Collet ...................................................
1
Nut ..................................................
1
Boot ..................................................
Hd, T,C.) ...................................
Ring ................................................
1
1
NOTE: "A" - The assembly shown represents an important part of the Double Insulated System. To avoid the
possibility of alteraBon or damage to the System, service should be performed by your nearest Sears
Repair Center, Contact your nearest Sears Retail Store,
*Standard Hardware Item --
May Be Purchased Locagy
Page
11
Get it fi×ed; at your home Qr ours!
For repair of major brand appliances in your own home...
no matter who made it, no matter who sold it!
1-800-4-MY-HOME
sMAnytime,
day or night
(1 "800-469"4663)
www.sears.com
To bring in products such as vacuums, lawn equipment and electronics
for repair, call for the location of your nearest Sears Parts & Repair Center,
1-800-488-1222
Anytime, day or night
www.sears.com
For the replacement parts, accessories and owner's manuals
that you need to do-it-yourself, call Sears PartsDirect sM!
1-800-366-PART
(1-800-366-7278)
eam.- 11p,m.CST,
7
daysaweek
www.sears.comlpartsdirect
To purchase or inquire about a Sears Service Agreement:
1-800-827-6655
7 a.m. - 5 p.m. CST, Mon.-
Para pedir servicio de reparacion a domicilio,
y para ordenar piezas con entrega a domicilio:
Sat.
Au Canada pour service en fran_:ais:
1.877.LE.FOYERSM
1-888-SU-HOGARs,_
{1-877-533*6937)
(1-888-784-6427)
_ Registered
Trademark,
,M _a
r_ OfOf
Se_Se_rsR_,eb_kR_,eb_k
ar_