1
CaflOll
Instruction Manual
DIGITAL VIDEO CAMCORDER
CANONINC.
Canon Europa N.V.
P.O. Box 2262, 1180 EG Amstelveen,
m=
the Netherlands
C
g.
0=
Canon UK Ltd.
Ribcon Way
Luton Bedfordshire LU4 9UR
Telephone 0870-241-2161
O
Canon Australia Pry. Ltd
1 Thomas Hott Drive, North Ryde, N.S.W. 2113, Australia
Telephone 805-2000, Fax 887-4484
Canon New Zealand
Ltd
Fred Thomas Drive, Takapuna, P.O. Box 33-336, Auckland,
Telephone 486-1570, Fax 486-6420
New Zealand
Canon Singapore Pte. Ltd
79 Anson Road #09-01/06, Singapore 079906
Telephone (65)-532-4400, Fax (65)-221-2939
Canon Hongkong Company Ltd
9/F, The Hong Kong Club Building, 3A Chater Road, Centrat, Hong Kong
Canon Latin America, Inc.
Sates & Enquiries: 6505 Blue Lagoon Drive Suite 325 Miami PL 33126 USA
€
CallOll
Minil'li,3!"
Digita=
--Video
3
o
MV450/MV450i
Printed
PUB.DIE-158
0201A/Ni9.5
on 70% reused
© CANON iNC. 2001
DY8-9020-094-000
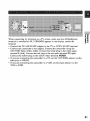
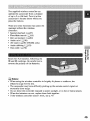
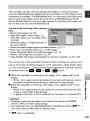
This instruction book explains the use of the MV450 and MV450i
camcorders. The main difference between these models is that the MV450i
paper.
PRINTED iN JAPAN
IMPRIME AU JAPON
B
|
includes a DV Recording and Analog Line-in Recording function. Please
note that illustrations and explanations in this instruction book refer mainly to
the MV450 model.
PAL
o.
WARNING:
TO REDUCE THE RISK OF ELECTRIC SHOCK, DO NOT REMOVE COVER (OR
BACK). NO USER SERVICEABLE PARTS INSIDE. REFER SERVICING TO
QUALIFIED SERVICE PERSONNEL.
WARNING:
TO REDUCE THE RISK OF FIRE OR ELECTRIC SHOCK, DO NOT EXPOSE THIS
PRODUCT TO RAIN OR MOISTURE.
"6
CAUTION:
TO REDUCE THE RISK OF ELECTRIC SHOCK AND TO REDUCE ANNOYING
INTERFERENCE, USE THE RECOMMENDED ACCESSORIES ONLY.
CAUTION:
D SCONNECT THE MA NS PLUG FROM THE SUPPLY SOCKET WHEN NOT N USE.
For Users in the UK
When nplacing the fuse cnly a ccrmct]y rated approved type should be used and be sure to m-fit
the fuse COVer.
CAUTION:
CUSTOMERS IN THE U.K. SHOULD READ THIS BEFORE USING THIS PRODUCT.
CHANGING THE FUSE
THE MAINS LEAD ON THIS PRODUCT IS FI13"ED WITH A NON-REWIREABLE
(MOULDED) PLUG, INCORPORATING A 3 AMP FUSE. SHOULD THE FUSE NEED TO
BE REPLACED AN ASTA OR BSI APPROVED BS1362 FUSE OF THE SAME RATING
MUST BE USED.
ALWAYS REFIT THE FUSE COVER AFTER REPLACING THE FUSE. NEVER USE THE
PLUG WITH THE FUSE COVER OMITTED.
CHANGING THE PLUG
IF THE FITTED PLUG IS NOT SUITABLE FOR YOUR SOCKET OUTLETS, IT SHOULD
RE CUT OFF AND AN APPROPRIATE PLUG FITTED IN ITS PLACE. IF POSSIBLE FITAN
APPROPRIATE 3 AMP FUSE. IF THE NEW PLUG HAS NO FUSE, THEN FIT A 5 AMP
FUSE AT THE DISTRIBUTION BOARD.
AC POWER CORD CONNECTION
The wires in the mains lead of this apparatus am colcursd in accordance with the following
cord.
(IMPORTANT)
Mains I_d
_
BLUE ..................NEUTRAL
BF_OWN............... L]VE
II
As the colours of the wins in the mains lead may nct correspond with the co[cured rnerk'ngs
identifyingthe terminals in your plug, proceed as fo][ows: The wire which is co]ound BLUE
must be connected tc the terminal which is marked with the ]etter N or co]ound black. The
wire which is co]ound BROWN must be connected tc the terminal which is marked with the
letter L or colcund red. Neither B]ue win cr Brown win is tc be ccnnected to the Earth pin
of a 3 pin plug.
THE SEVERED PLUG MUSI" BE DESTROYED IMMEDIAI'ELY TO AVOID ANY POSSIBLE
ELECTRIC
SHOCK
HAZARD.
J0A-560 [pentificet[cn p[ate is ]cceted on the beItorn.
• Use of CV-150FiCV-_50F DV cable is necessary to comply with the technical recluirernent of
EMC D nct vs.
2
Using the Vafiuus Recordthg Prugrams .,55
Important Usage Insh-uctthns .................... 2
Thank you for Choosing a Car_on .............. 5
Introducing the MV450/MV,150i
.............. 6
Using Digital Effcg,ts ................................
59
Using the Multi-Linage Screen ................ @I
Authu Rcg_dthg ......................................
66
Setting the SoU-Timer ..............................
68
Using the VL-3 Vidc_oLight
£:
Finding Your Way Around
the MVd 50iMVd 50i .............................. 7
~ Preparations ~
Powe_g Your Camc_dur
...................... 10
Loading a Cassette ..................................
15
(optional) ............................................
70
Using the DM-50 Mio'uphone
(optional) ............................................
71
~ When Making Manual Adj_lments
Using AE Shift ........................................
o
.,~
72
Setting the Shutter Speed ........................ 73
~ Basic Recording ~
Basic Recordl_g ......................................
17
Zooming ..................................................
21
Adjusting Fucus Manually ...................... 75
U_mg the LCD Screen ............................ 23
~ Basic Playback ~
Pl_,iag Back a Casscge .......................... 26
Connections for Playback on a
TV Surean ............................................
30
Setting the White Balanc_ ........................ 76
~ For Playback ..~
Displ_,ing Date, Time and Came,order Data
ff)ala Code)
78
Searehing the Tape (Photo Search/
Date Search) ........................................
81
Returning to a Pre-Marked Position ........ 82
Tips fur Makthg Bcgcz Vidc&_s................ 34
Editing tea VCR ......................................
83
Dubbing with Digital Video Equipment _84
~ General ... ~
Turnlr_g file Image Stabilizgr Off ............ 36
U_mg the Menus ......................................
37
Us/rag the Wi_eless Contrellut .................. ,15
Ad_usth_g the Sdc£&able Coluur
Light-up Buttons ................................ 48
ReconlJng from a VCR, TV or Ar_alog
Ca:atcorder-Ar_alog Line-in
(MV450i only) ....................................
88
R_cordl_g Over Existh_g Scanes-AV Insert
Editing (MV,150i only) ........................ 90
Audio Dubbing ........................................
93
Setting the Audio Mix .............................. 98
~ For Recording
...~
Conacx,th_g to a IK? ................................
109
Setting the Date and Time ........................ 49
Taking Still Pi_tms
to Cassette .............. 52
Searching and R_viewiag
While Recordthg ................................
54
Conter]ls, CONt.
3
Marking a SOil [rrtage ftxr Pfintiag
(_int Mark) ......................................
Memory Card Introduction .................... 101
Reeordiag Still Images tu a
MenlO_ Card ....................................
119
FtXnrLatfinga Memtxry Card .................... 120
Othar ]nf_xnrtation and Proeattfiuns ........ 121
105
.O
Recordiag an Image ffum a Cassette
as a Still Image ..................................
107
Preparing the Cam¢,t_dex ........................ 124
Reeordiag from Anuther DV Device
as a Still Image ..................................
108
Nutes on Using file Batteries .................. 126
Maintanan¢_ .......................................... 129
Viewing Still Images ..............................
109
?ruublashooting ......................................
133
Preventing Ae_i_tantal Erasure (Protect) ,,111
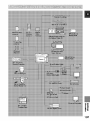
The MV450iMV,150i System Diagram..137
Emsing Still Images ................................
112
Optional Aoeass(xd as ..............................
138
Cumbinfl_g Images and Rcc_,;_ding
Them tu a Cassette (Card Mix) ........ 114
Screen Displays ......................................
1,11
Speci f_icatiuns ........................................
Index ......................................................
1,18
1,19
Cupyiag Memory Card Still Images
tu a Cassette ...................................... 118
Menu at a Glan¢_ ..................................
152
In addition to the contents aed
index please refer to:
• Finding Your Way .4a'ound
the MV450/MV45tJi (_217)
• Screen displays ( E212]
]41)
• Tmublesheoting -- in case you run
into any preblems ( _ 133)
• Menu at a Glance ( LI2]152)
Symbols
Cupying Still Images fl'um a Cassette..,, 117
used in this [ns_action
iEmlua[:
[2121
: Reference
[]
page numbers
: Functions that can be operated
frem the body of the camcorder
: Functions that can be operated
frem the wireless controller
[]
: Supplementary
notes for
carncorder operation
._ : Operation confirmation
beeps
( _ 2O)
* Capital letters ate used te refer to
settings displayed ]n the menus and
buttens labelled on rite camcorder
it,serf, e,g, Press the IvIENU buttem
4
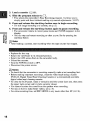
First, we'd like _ thank yeu for
purchasing this Canon camcorder. Its
advanced technology rlt_es it very
easy _) use -- you will soon be rlt_ing
high-quality videos which will give you
pleasure fur years to come.
To get the most out of your new
camcerder, we yecemmend
that yeu
read this manual thoreughly
-- there
are m_ny sephisdcateO
features which
will add to yeur recording enjoyment,
Your camcurder is supplied
fellowing accessories:
with rite
o
To get started we suggest that yeu
master the basic operatiarts of the
carncerder first, befere moving on to
use its full range of features,
* When cennecting the camcorder to
your personal computer, um the
eption'al CV-150F or CV-250F DV
cable.
5
. _
"_
_
_"
•
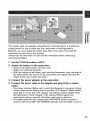
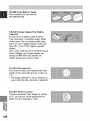
Using a DV cable,
• cottnect the
MV450]MV45t3i to a PC
equipped with a D¥
terminal and transfer your
originM itrmges to your
PC.
Stabilizes your
recordings
even in long
telephoto shots.
Allows the Canon Vider_ Light VL-3
or the DirectionM Stereo Microphone
DM-50 (both optional) m be easily
attached aed powered by the
Record fbr 1.5× 2:< or 3x longer than
when irt SP mode-- up to 4 hours on
an 80 minute tape,
camcol'der's
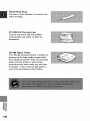
Record, manage and store still images
on a MulliMediaCard or a highcapacity SD Memory C',ml, (Both
cards are inserted in_ the same slot in
the carncorder,) Combine still images
recorded on the card with your original
movies or still images, Also great for
easy O-attsfer of sO11images to a PC.
_
Lets you record vivid, virtually blurfree still images of moving subjects
onto a memory card,
Just press the photo
button to capture still
owit
power
source,
Advattced digital
technology
allows you to
add spec'ial effects during
reco_ng
or playback,
Display 4, 9 or 16 still
images at ottee with the
multi-image
screen.
Add new sound to
_
prerer_rded
tape.
riginal sound on a
pictures,
A 2.5" LCD screen
makes it easy for you R_
shoot coMur_l, well
composed video. It is
'also great for playback.
B
Connect R_a VCR or attalog
carncorder and record m a DV tape in
the MV450i, .Also, replace original
images on a pre-recorded tape,
7
g
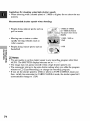
Bef'ure operating
your ea_ncorder,
you will need to use the power
adapter
to:
Provide power from a rnaiim outlet
or
Charge a battery pack
[] Noles:
• The power adapter converts c_r_nt from a household power socket (100-240 V
AC, 50/60 Hz) to the DC current used by your carn_rder,
• If rite adapter is used next to a TxLit may eau_ bars to appear on rite TV I
move the adapter away from rite TV or rile aeriN cable,
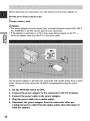
Use the power
outlet, Mways
adapter to provide
rum the carn_rder
your eameorder with instant power from a mains
off before connec_ng/removing
rite power
source,
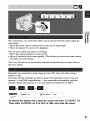
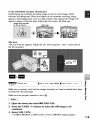
1. Set the POWER
switch to OFF.
2. Connect
the power adapter
to the e_tmcorder's
3. Connect
the power cable to the power adapter.
DC IN terminal.
4. Plug the power cable into a mains outlet.
5. Disconnect the power adapter
from the came_rder after use.
Unplug the power cable from the mains outlet, then disconnect
from the adapter.
10
it
:+
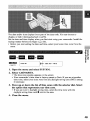
Your battery pack was pardally chin,god before it left the factory, It should
enough power for you to check that your camcorder is working properly,
have
However, you must charge the battery pack fully if you want it to power rite
carncorder
for more than a few minutes.
Always turn rite camcorder
removing the battery.
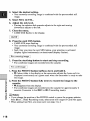
1. Set the POWER
off and r'ai_
rite viewfinder
before connecting]
switch to OFE
2. Attach the battery to the e_mcorder.
* Remove the battery pack's terminal cover,
, Rotate the viewI_nder upwards,
. V¢ith tim triangle on the battery pack pointing downwards, align tim edge of
tim battery pack with the line on tim camcorder, press lightly and slide tim
battery down until it clicks into place,
3. Connet_t the power adapter
to the c_mcorder.
4. Connet_t the power cable to the adapter
and plug it into a mains
outlet.
* The chmge indicator flashes red to show that chmging is in progress, Single
flashes mean that the battery pack is less titan 75% charged. Double flashes
mean titat it is more titan 75% cltm'ged, The indicator glows steadily when
the battery pack is fully charged. If'tim indicator blinks rapidly and
continuously (twice a second), the battery pack m W be defective,
. The battery pack will Mso chm'ge when tlte POWER switch is turned to
positions otlter titan OFF. The CHARGE indicator may both flash or stay lit.
11
5. When charging is complete, disconnect the power adapter from the
camcorder. Unplug the power cable from the mains outlet, then
disconnet_t it from the adapter.
6. Remove the battery pack after use.
• Rotate the viewfinder upwards.
• Press attdhold rile BATT. RELEASE button while you slide the battery up,
[]
_
'_ '__
Notes:
* Never connect an unspecified
pr_xtuct to the camcorder's
DC terminal.
Likewise, do not connect rite power adapter to an unspecified
product.
• You carl tied detailed notes for using the batteries in the "Notes on Using rite
Batteries" ([.£1126), The_ notes include charging and recording times and how
to install the backup
battery.
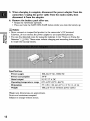
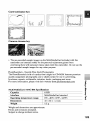
Specifications
Power
consttmpfion
IC/0-240 V AC, 50/60 Hz
34 W
Rated
mttput
9,5 V, 2,7 A DC
Power
s_ppiy
Operating
temperature
Dime_mions
Weight
range
0°C_,0°C (32°F-104°F)
57 x 28 x 104 mm (2 V4 x 1 V._x 4 V8 in)
180 g (6 _/8oz) (without power cable)
Weight attd dimensions are approximate,
Errors attd omissions excepted,
Subject m change without notice.
12
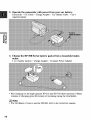
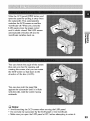
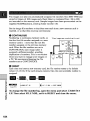
The Compact Power Adapter CA-560 included with the carncorder cart be used
_ong with the CR-560 Kit for 3 different ways to power the camcorder or charge
battery packs:
1. Charge rite BP-5C/0 Series battery packs with power frem your car battery.
2. Operate rite camcorder with power from your car battery,
3. Charge rite BP-5C/0 Series battery packs from a household mains outlet,
The Charge
Adapter/Car Battery
1. Charge the BP-500
battery.
1 or 2 battery pack(s)
Cable Kit CR-560 includes
Series battery
the fbllowing:
packs with power from your car
+ Chmge Adapter + Car Battery
Cable
> car's cigarette
lighter
• Fast charging for the high-capacity BP-522 and BP-535 (both option_), Fifteen
m_nutes of chmging gives 60 minutes of"recording (using the view:finder),
Time requi_red for fa311charge
front car ba_:ery cx h,31tsehold
t hr. 20 rain,
BP-5t2
BP-5II
(opti,3nal)
BP-522
(optional)
I hr. dO rain,
BP-535
(optional)
2 hr. 30 rain,
outlet
l hr. 20 rain,
13
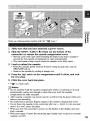
2, Operate the camcorder with power from your car battery.
Carncorder + DC Cable + Charge Adapter + Car Battery Cable > ear's
cigarette lighter
•m
,3
3, Charge
outlet.
the BP_500 Series battery
1 or 2 battery
pack(s)
packs from a household
mains
+ Ch_uge Adapter + Compact Po VJ er Adapter
• Fast charging fbr rite high-capacity
BP-522 and BP-535 (both optional), Fifteen
ntinutes of charging g_ves 60 minutes of recording (using the v_ewfinder),
[]
Note:
• For tull de 'ttuls ot ho
14
to use the CR-560
reter to its insm_ction
manual.
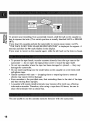
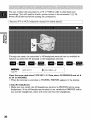
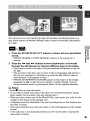
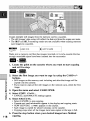
O_fly u_
1.
Make
2.
Slide
vider_casrettes
sure
markeA widt die_r"rl_
logo,*
that
you have
attached
the OPEN
[ EJECT
-- switch
a power
m,
P,=
source.
(on the bottom
of the
eame_rder)
to release
the cassette
compartment
cover.
• Pull the cover fully open (while holding rite button) and wait a couple of
reconds for the cassette compartment
to open automatically,
• The confirtrmtion
beep sounds when the cassette cover fully opens,
3. Load or unload the cassette.
• Insert rite casrette gently v¢iffl the window facing
REC/SAVE tab up,
• Remove the cassette by pulling it straight out.
4.
Press the _
for it to close.
5.
Click
the
cover
mark
back
on the compartment
ffm grip belt
until
it cricks,
attd file
and
wait
into place.
• _r_rI_'Vis a trade mark,
[]
Notes:
• Do not interfere with diecassette compamnent
while it is opening or closing
aurx_matically, and do not attempt to close rite erwer until the cassette
compartlnent
has fully retracted,
• M'ter loading a cassette, use record rearch ( _._ 54) to find fire point where you
want to st',u't recording,
• Be careful not _ get your fingers caught in rite cassette compartlnent
cover.
• Do not leave the cassette in the carncorder after use -- return it to its ease and
store it in a cool, clean, dry place,
• When you turn the carncorder's
power on I_ flashes in the display until you
load a cassette,
• With some types of tapes the remaining tape display may not give an accurate
reading ( _ 142),
15
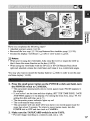
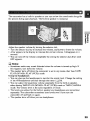
•
•_ '27o protect your recording from accidental erasure, slide the tab on the cassette so
m_ that it exposes the hole, (This switch position is usually labelled SAVE or ERASE
i.
m_
OFF.)
you load this cassette and put the camcorder in record pause mode ( _ 17),
'q'HE TAPE IS SET FOR ERASURE
PREVENTION"
is displayed fbr approx. 4
sex_mds and then the [_ mark flashes in the display,
J:t"you want to recordon the cassette again, slide the tab back so the hole is closed,
To protect the tape heads, transfer cassettes directly from the tape case to the
carncorder -- do not open the tape pretect eever or touch the tape itself,
Do not use cassettes where the tape has been damaged or spliced -- they may
damage the camcorder.
Do not insert anytlting into the small holes on the cassette or cover them witlt
cellophane tape.
Handle cassettes with care -- dropping them or exposing them to extermfl
shocks may cau_ internal damage,
Store cassettes in the provided case, first rewinding them to the start of the tape
and then storing them upright.
A cassette with metal plated termimds may bedtime dirty with use, affecting
information
transfer, Therefore, after ushlg a tape about 10 times, be sure to
clean the terminNs with a cotton bud.
You are ermble m use the cas_tte
1B
memory
_nction
with this camcorder.
:!
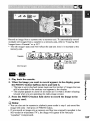
Have you completed rite following steps?
• Attached a power source ( _ ]0).
• Removed rite lens cap ( [._ ] 24) and fastened the shoulder strap ( _ ] 25).
• Choren the display: viewfieder ( _21] 24) or LCD screen (_123).
[] Notes:
• When you're using the viewfinder, _lly clore the LCD or rotate the LCD so
that it faces rite sane direction as the lens (_23).
• When using the viewfinder with the BP-522 or BP-535 Battery Pack (both
optional) attached, extend the viewfinder and rotate it to a co_ortable angle,
You may 'also walt to install the backup battery ( _
aid time display ( _ 49).
128) in order to set the date
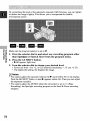
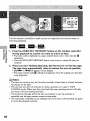
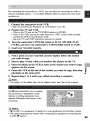
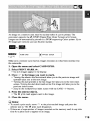
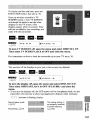
1. Press the small green button on the POWER switch and hold, turn
the POWER switch to CAMLERA.
• The camcorder automatically sets to _rd
pause mode. PAUSE appears in
the display,
• If"you haven't set the date and time display, SET THE TIME ZONE, DATE
.AND TIME appears in the display. For setting rite time zone, see p, 49, For
setting the date and time, see p, 51.
• The camcorder power indicator lights up red.
• The confinnadon beep sounds.
• The camcorder will turn itself" oft"if"you leave it in _rd
pause mede for
more than about 5 minutes, To remm to record pause mode, turn rite
POWER din m OFF and then back m CAMERA.
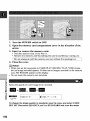
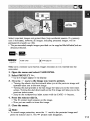
2. Make sure the TAPE/CARD
switch is set to TAPE.
• For still image recording m a memory card see p, _05.
17
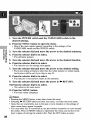
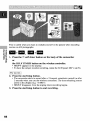
3. Load a cassette
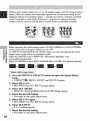
( _21S).
4. Slide the program selector to _.
• This selects the camcorder's Easy Recording p_gram, It allows you to
simply point and shoot without rrmking any rrmnual edjustxnents ( [.L]57).
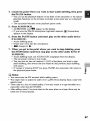
5. Press and release the start/stop button once to begin recording.
• Fur still image recording to a casrette, see p, 52,
6. Press and release the start/stop button again to pause recording.
• The camcurder returns to _rd
pause mede and PAUSE reappears in the
display,
• Yeu cart stop and restart recording as often as you like by pressing the
start/stop button,
[] Note:
• ..M'terloading a cassette, start recording when the tape counter has s_pped,
• Replace the lens cap,
• Return the view:finder to its retracted position.
• Return the LCD s_,av.enflush to die camcorder body.
• Unlead the cassette.
. Turn rite Po\%rER switch to OFF.
• Disconnect the power source,
[] Notes:
• To check that the carncerder is recording correctly_ make a test recording first.
• Before _rmking important recordings, clean rite video heads using a Canon
DVrvI-CL Digital Video Head Cleaning Cassette or a eommerc'ially available
digital video heed cleaning cassette.
• To close the LCD panel, rotate it vertically until the screen faces you, then press
the upper right eomer until it clicks securely closed.
• You cannot monitor the sound from the speaker when recording.
• For tips on how to make better videos, see p, 34.
• Fer extra recording time, set REC MODE to any merle other than SP ( _ ] 9).
18
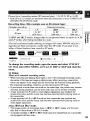
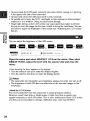
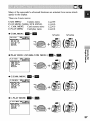
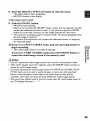
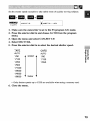
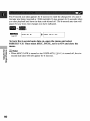
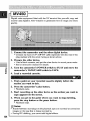
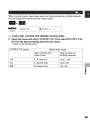
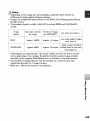
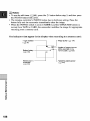
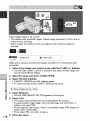
Choose from 4 recording medes: SP (standard play), ] .5x SP, 2x SP or 3x SP,
', Only SP attd LP medes are available whun the camcorder is ret to CARD PLAY
(M_¢450i: PLAY(VCR)) mode,
Recording
times (this example
Standard te_rding
SP
80 mJn,
uses an 80-minute
LP
] ,5x SP
(120 mJn.)
tape)
Extended recording
I--JSP
2× SP
(160 rrfin.)
[]LP
3× SP
(240 rrfin,)
h F--ISPand I_LP modes, nuages data is compressed twice as much as in SP
and LP modes when being _orded
to a tape.
You can't ado sound (audio dubbing) or images (AV inrerc: MV450i only) to a
tape that has been recorded in a mode other than SP mode, If"you plan to ure
ether of these functions later, te_rd in SP mede.
m+m,
MENU
(_37)
m+,
,veR set uP
[ _ NL,
Yd
m
_ ,_Ec _ODE....SP
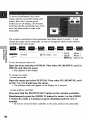
1b change the recording mode, open the menu and select VCR SET
UP. Then selet_t REC MODE, set it to LP, I_SP or []LP and close the
menu.
[] Notes:
About all 3 e_unflefl recording motifs
• When recording and playing back rapes in one of die extended recording modes,
the nacre of the tape and usage eeedidons may affect recording, mosaic-like
anire may appear in the image and the seued may be distx_rted d_ng playback.
Fer irnpo_ant recordings, therefore, set the earncorder to SP rmxte.
• _ yeu re_rd in morn than one mode on the same tape, the picture may be_me
dis_ted during playback and die time code may not be written eerreetly.
• A tape recorded in LP mode on other digital equipment may produce die
mosaic-like noise and the sound may become disrx_rted when playing back on
this cameeMer.
• A tape recorded in LP or IqLP mode on this cameeMer may produce the
mosaic-like noise and the sound may become disrx_rted when playing back on
other digital equipment.
About _SPond
_LPmodes
• The image quality ef reanrdings done in V--ISPor lilLP modes will be lower
than that of these done in SP or LP modes.
• A casrerte re_rded in [] SP or []LP mede canant be played back on a carncorder
not equipped with that rmxte,
19
• You might not be able to do DV dubbing
I---ISPor I---ILPmode.
een'eefly
with the camcorder
set to
• The _eoc_rding [r_v,te might not appear in the display €_onec_y if you switch between
I---ISPand I---ILPwhile the carneorder is eonneeteO to another digital video de_ce,
• When rite recording mcxte is changed to []SP or I-:ILP, rite camcorder modifies
rite image for appropriate recording in that mode.
Produces
playback
images in the ] 6:9 fbrmat
on widesc_,en
"IWs,
for
3_
MENU
F
( [212]
37)
L
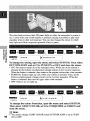
']Foswitch 16:9 to ON, open the menu and select CAM.SET
select 16:9, set it to ON and close the menu.
UP. Then
[] Notes:
• "16:9" is shown in the display when you switch rite 16:9 mode on.
• You cannot u_ rite ] 6:9 mede with rite Easy Recording program.
• You cannot u_ the ] 6:9 mede when the multi-image screen is set. The ] 6:9
display becomes set to "- - -",
• If you play back a recording made for 16:9 on a normal TV scaeen, the image
will appear to be vertically "squashed" (compressed),
The camcorder's short operation confirmation beeps are indicated by .b,in the
illustrations. Beeps sound upon certain carncorder operations such as when you
turn the carneerder on, during the _-timer
countdown, right before the
carneerder's automatic shut-off; and 'also upon any unusuN condition of the
carneerder, Beeps are not recorded on the tape,
re+m,
i IMl±"rk'd
[ I',JE'-'Yd
(m
V
MENU
(_Ti)
/,sysTeM
_ *B_
ON
']Foturn the beep off, open the menu and select SYSTEM.
BEEP, set it to OFF and close the menu.
2o
Then select
The camcorder's
each
so_ne:
• Move
• Move
] Ox zoom lens allows you to choose
rite best picture angle for
rite zoom conO'o] towards W to zoom out to wide-angle.
it towards T to zcx_m in to telephoto.
You can also control the speed of zootrfing:
• Move rite control slightly to zoom slowly,
• Move ]t farther to zoom more quickly, (The farther you move the zoom eentrol,
rite fas_r the zoom speed,)
The T and W buttons
rite zcx_m speed.
on rlte wireless
controller
adjust rite picture
angle, but not
Magnifies the camcorder's zoom range by up to 2t2_ 0]P to 4:< when using a
memory card).
The zoom control continues to work as usual. "_2mcan f_eely zoom lit and out
between ] x and 200:< magnification -- the cameerder automatically switches
between optical z_)om]ng (up to ] Ox) and digital z_)om]ng (lOx to 200x),
F
MENU
(_Z137)
40X
L
_[b change the digital zoom, open the menu and select CAM.SET
Then select D.ZOOM, set it to OFF or 200× and close the menu.
LIP.
21
[] Notes:
• When zooming as a rule, keep at least : m (3 ft 33/8 in) between you and your
subject, However when the zoom is at rite wide-angle position, you can focus
on a subject as close as 1 cm (_/*in).
• Image resolution is slightly lower when the magnification is greater than : 0x.
• You cannot u_ digital zoom when the multi-image screen is set. The display
becomes "
".
• The zcx_m indicator appears for 4 sexx_nds.When [he digital zoom is _t to 40×,
the zoom indicator extends (light blue),
When the digital zoom is set m 200x zoom, rite zcx_m indicator extends again (a
darker
blue).
22
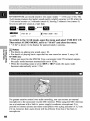
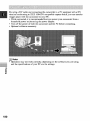
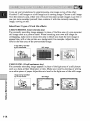
Slide the LCD panel OPEN button and
open the panel by pulling it away from
rite camcorder. This automatically
switches rite LCD screan on and the
view:tqnder off, When you clore rite
LCD panel, press the upper cortter
until it clicks closed. The LCD screan
automatic'ally
switches oft" attd the
view:t5nder switches back on.
You can choose the angle of the screen
that suits you best by ope_fing and
rotating die screen, aiso you can rotate
the LCD screen so that faces in the
direction
of the lens ( _I_ 25).
You can also push the panel fiat
against the carncorder until it is flush
with rite side, with the screen facing
outwards,
[] Notes:
• Avoid touchhlg the LCD screen when moving tlle LCD panel,
• Do not hold the carncorder by tlle LCD panel or the viewfinder,
• Make sure you open the LCD panel at 90 °, before attempfng to rotate it,
23
• Always rotate rite LCD panel vertically into place, before closing it or pushktg
it flat against the side of the camcorder,
• Always fully close rite LCD panel until it clicks securely,
• Be careful not rx_leave the LCD, viewfinder or lens exposed rx_diseet sunlight
outdoors or in a window. Doing so could cause damage.
• Bright light f',dlktg on the LCD screen may cause glare that makes it difficult
for you rx_view rite image, In this case, switch rx_using rite viewt_nder, You are
also able _ adjust the brightness of the scxcen (see "Adjusting the LCD screen"
below)
You cart adjust rite brightness of rite LCD scxeen
l
MENU
( LI337)
F
L
Open the mentl
BRIGHTNESS,
menu.
and select DISP.SET
adjust the level with
UP from the menu. Then select
the selector
dial and close the
A bar Showktg [he level appears in die display
• 'Ihrn the _lector dial up to make the display brighter
• 'Ihrn the _]ector dial down to make the display darker
[] Notes:
• The camcorder will remember your brightness setting even after you mm it off
• The bfighmess of"the LCD does not _(ffect that of"the recorded images or the
viewt] rider,
About tim LCI) Screen
The LCD screen built in_) this camcorder is a high precision product
However, small black dots or bright points of light 0ext, blue or gmett) may
appear constattfly on rite LCD scxeett This is not a malfmtcfion of the LCD screen
artd they are not recorded on the tape (F_ective dots: more than 99 99%)
24
When you rum rite LCD panel so that it
faces rite same disection as the lens,
you can watch yeurself during
recording or let your subject menitor
recording, The viewfinder is 'also
ac_vated when the panel is in this
positien, (Adjust fire view:fieder,
iiiiiiiiiiiiiiiiiiiiiiiiiiiiiiiiiiiiiiiii_"
"'"_iiiiiiiiiiiiiiiiiiiiiiiiiiiiiiiiiiiiiiiiiiiiiiiiiiiii
iiiii
iiiiiiiiiiiii
iiiiiiiiiiiiiiii
iiiiiiiiiiii
_]24)
* You can cheese the display style,
reversed (mJrrer on) or net (mirror
o#), The recording itself is
unaffected regardless of which one
you chock.
MENU
(_337)
_DISPrSEruP
_ _'_1..o. ...... o.
rib turn the mirror mode off, open the menu and select DISP.SET
Then select MIRROR,
set it to OFF and dose the menu.
The indicators
torned on:
that appear
in the LCD display
•
when ?vHRROR
UP.
is
REC
REC PAUSE
EJECT
[_
NO mtrd
q
El<<<< Recording to elmemory mtrd J
Self-timer ( [&368)
• These attd 'all ether indicators
appear normally
in the ¥iew:finder,
25
17 _,1
•m
,3
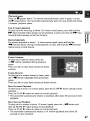
You can use the LCD screen for _nstant, on-tlte-slx_t playback. The camer_rder also
plays back the sound track via the built-in speaker ([.._2129),
* When you play back a tape, you can Nso close the LCD panel with its scyeen
side facing up.
. When you're using the view:finder to view playback, clo_ the LCD panel,
27oplay back your recordktgs on a 2W, see p, 30.
To use the wireless controller, see p. 45,
[] Nolo:
• To avoid accidental recording, make sure that you slide the mb on the cas_tte
so that it exposes the hole (the switch position is usuNly labelled SAVE or
ERASE OFF),
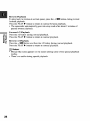
Attach a power sourc_ and ttwn the POWER
(MV450i: PLAY (VCR)).
• The power indicator lights up green.
I.
.
Make sure the 'rAPE/CARD
switch to PLAY
switch is set to 'rAPE.
3, Load the cassette.
4, Press the II_ (play) button to start playback.
• 2"oend playback, press the • (srx_p)button.
• To wktd the tape forwards, stop playback and press the _
(fast forward)
button,
• 27ow_ed the tape backwards, stop playback and press the _
(rewind)
buttom
• N the playback picture is rough (mosaic-l_ke noise), clean the v_dee heads
using a Canon DVM-CL Dig_tui Video Head Cleaning Cassette or a
eernmercially available dig_tui v_deo head cleaning cassette,
2B
Playback pause
Press the II (pause) button, To resume noruml playback, press ]t again, mr press
the _" (play) button, The camcorder automaticaily goes into stop mode after about
5 minutes' playback pause,
Fast forward
playback
To play back the recording at about 11,5 times normal speed, press and hold the
_'
(Nst forward) button during norrmd playback or press and hold the _
(fast
fbrward) button during norrmd fast Iorw+mL
Rewind playback
For reverse playback at about : : ,5 times normal speed, press and hold the
(rewind) butten during normal playback or press and hold the _
0'ew]nd)
button during normal rewind.
Franle
Advance
To play back frame by frame, press rite
+] I |_ button repeatedly during playback
pause.
Press and hold m play back continuous frame
advance.
Fra_ae
_ever_e
To play back _n reverse frame by frame, press
rite -/III I burton repeatedly during playback
pause.
Press and hNd m play back continuous frame reverse.
Slaw Forward Playback
To play back at about ]/5 noruml speed, press rite SLOW |t,- butten durhlg noruml
playback.
Press the PLAY Ib button to return to normal playback,
• The camcorder aUtolnaticaily returns rx_playback ',ffter alxmt 30 seeeeds of slow
playback.
Slaw Reverse Playback
To play back _n reverse at about :/5 normal speed, press the -/'411 button and
riten the SLOW |_ button during norrmd playback.
Press the PLAY Ib button to return to normal playback,
• The camcorder automatically
returns to xl reverse playback after about 30
seconds of slow playback.
27
Reverse Playback
To play back in reverse at normal speed, press rite -/4111 button during norrmd
forward playback.
Press the PLAY I1_button to return to nomml for_'ard playback.
• The camcorder automatically goes into stop mode after about 2 minutes of
pau_d reverse playback,
Forward
:<2 Playback
Press the x2 button during norrmd playback.
Press the PLAY Ib button to return to nornml playback,
II
Reverse :<2 Playback
Press the -/<II button attd tlten the x2 button during norrmd playback.
Press the PLAY Ib button to return to nornml playback,
[] Notes:
• Mosaic-like noise appears on the screen during some of the speci_ playback
modes.
• There's no audio during special playback,
28
The eamcorder has a built-in speaker so you can review the sound track alongside
fire picture during tape playback, The built-in speaker is monaural.
:1
Adjust the speaker wflume
by turning the selector
dial.
• Tllrn the selector dial up to increase the volume, and down to lower the volume,
• A bar appears in the display to indicate the curt'ant volume, It disappears in 4
seeartds,
• You can turn off the voNme completely by mining the selector dial down until
OFF appears,
[] Notes:
• Sometimes audio may sound distorted when the volume is turned up high.
this happens, turn down the volume,
• The speaker turns oft+when the eamcorder is set to any mode other than TAPE
PLAY (IvIV450i: PLAY (VCR)) mode,
Using the headphones
• You can also use the headphones to monitor the sound track, Change the setting
of the AVlheadphones terminal through the menu ([22130),
• You can adjust the headphone volume separately fmrlt the built-in speaker,
either during TAPE PLAY (MV450i: PLAY (VCR)) mode or TAPE CAIvIERA
iltode. The volume level is the same regardless of mode,
• The levels you adjust for the built-in speaker and headphones are memorized
separately. The camer_rder remembers your levels even if you turn the
eameorder off and back on again.
• The speaker turns oft+when you use headphones,
29
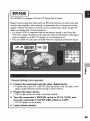
You can connect the carncorder to a TV or VCR in order _ play back your
recordings, You will need to attach a [x_wer source m the carncorder ( [22]10).
Power oil" 'all devices befbre starting the connections,
See your TV or VCR instruction
m_nual
fbr _rther
details,
17 II
•m
[3
Through
function
the menu, the carncorder's
AV/headphone
as either rite AV ter_rfinN or rite headphone
terminal can be switched
termJnM,
[ I_ l±Yd
to
I I:Jl'-A+d
m
MENU
_vc_ _T U_
Open the men_ and select VCll
to AV or PHONES.
• When rite terminal
is switched
_) _AV!_H_+..AV
SET UP, Then select AV/PHONES
_ PHONES,
PHONES
and set it
appears in rile display.
Using the headplmnes
• Make sure you switch rite AV/headphones terminal m PHONES before using
headphones. _ the AV/headphones termin_ is not switched to PHONES before
you use rite hemtphones, noise will come out from the hemtphones.
3O
31
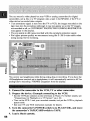
Fer higher picazve quality, we rexx_mmendplaying back _onlings
art S (S_)tenrfimfl.
ort a TV with
i+
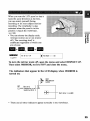
When connecti.ng for playback on a 'IW scxeen, make sure the AV/he',gtphene
terminal is switched _ AX_ lI PHONES appears in rite d_splay, sw_tch the terra, Hal,
• U_ rite S-_50 S-v_deo Cable to connect the S-v_deo terminus+ Use the
STV-250N Stere_ Video Cable to connect rite AUDIO terminals, CeHt_ect the
white plug to the white AUDIO
terminal
L (left), Connect
the red plug _ the red
AUDIO terminal Pl (right)+ De not connect the yellow plug,
• If" you are connecting
the carncerder
to a 'IW, set the TV_qDEO
the carncerder
to a VCR,
_lector
on the
television to x,,qDEO,
• If" you are connecting
VCR to LINE.
32
set rite _nput _lector
on the
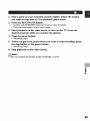
NNNNNNNNNNNNNNNNNNNNNNNNNNNNN
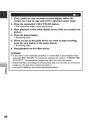
When
connecting for playback on a TV screen, make sure the AV/beadphone
terminal is switched to AV, If"PHONES appears in the display_ switch tbe ter_rfimfl.
• Connect the camcorder using the ST_250N
Stereo Video Cable. Connect the
o
_m_'•
m=
_ to
white plug to the white audio terminel L (left'). Connect the red plug to the red
audio terminal R (tight). Connect rite yellow plug to rite yellow video terminal
VIDEO.
• If" you are connecting
television to VIDEO,
the carncorder
to a TV, set rite TV/VIDEO
selector
• If" you are connecting
VCR to LINE.
the carncorder
to a VCR, _t the input selector
on the
on the
[] Note:
• If you are going to use the TV as a monitor while you are shooting, remember
to keep the TV volume turned down as long as rite cameorder's audio terminals
are connected, It"the sound from rite TV speakers is picked up by rite
microphone, an unpleasant high-pitched squeel, celled feedback, may be
produced.
33
For ma×imum
stabil_ty_ grip the camcorder
_n your right
necessary support rite camcorder with your left hand,
_,¥1th practice, you
fll be able to operate the controls by
touch, without taking your eye off the action.
\ /
hand and keep your right elbow pressed
against
your body,
__ii_ii
]+
"
To prevent any unwanted movement, you can mount rite
camcorder on a tripod, (+._rany flat surface at a suitable
height) and operate it w_th rite wireless controller,
• When you are using a tripod, be careful not to leave rite
v_ewfqnder expo_d to bright sunl_gltt or it may melt,
(The light is concentrated
by rite v_ewfinder lens.)
• Make sure that rite fastening screw of the tripod is no
kruger than 5+5 mm (V4 inch), or _t will damage rite
cgrncorder,
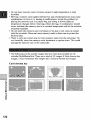
The most importm_t element ]tt the scene does not have _
be _n the centre. For a more _nterestittg p_cture, try to
position your subject so it is slightly m one side, Leave
some space ott the side of rite frame ritat the subject _s
facing or moving towards,
Don't cut oft +the top of rite subject's he',gt, aed don't cut
people off at the neck, hips or knees (ynove a little bit
above or below).
Watch out for distracting objects in rite backgmued,
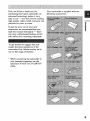
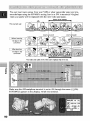
34
J
Instead of zooming while _rding
try
to choose your picture attgle before you
begin, A good way to tell a story with
video is to begin w]rit a long shot that
establishes rite situation
and then move
Long shot
Medium shot
]n with medium shots and close-ups m
show the details, Remember to change
your viewpoint for each shot.
Close-up
Remember that any eamcorder
movement or change lit picture angle
should have a definite purpose. Avoid
unnecessm'y or hNf-hearted
movements.
Use pans to yecord a landscape or
fblMw a moving subject, Decide the
area you want to cover and stmld facing
rite end of your panning angle. W]rimut
moving your feet, turn your waist to rite
starting position, SPart recordhtg, attd
iiiiiiiiiiiiiiiiiiiiiiiiiiiiiiiiiiiiiiiiiiiii_ii_iiiiiiiiiiiiiiiiiiiiiiiiiiiiiiiiiiiiiiii
iiiiiiiiiiiiiiiiiiiiiiiii
_° _
•
"iiiiiiiiiiiiiiiiiiiiiiiiiiii
iiiiiiiiiiiiiiiiiiiiiiiii
¸ _
,_iiiiiiiiiiiiiiiiiiiiiiiiii
after a few seconds begin to turn slowly
from rite waist. Hold rite fin_ image for
a few sex_nds before you stop
recording,
Tilt rite camcorder
up to exaggerate
rite
heightintroductionrite
top of
of rite
a building
tosubjeCt.subjects
foratexample,
Tilt
down
the bottom,
from
as an
iiiiiiiiiiiiiiiiiiiiiiiiiiiiiiiiiiiiiiiiiiiiiiiiiiiiiiiii
_'_iiiiiiiiiii
_iiiiiiiiiiiiiiiiiiiiiiiiiiiiiiiiiiii
_,
_.;,
35
With most carn,x_rders
even rite slightest hand movements will be noticeable
during telephoto recording. However, rite MV450/MV45tJi's
image stabilizer
'allows you to obtain steady recordings even at h_glt magnification,
F
MENU
g:2
/*e_M,S_TU_
L
_)_,MAG__.o_,o_
're turn the image stabilizer off, open the menu and select CAM.SET
UP. Then select IMAGE S. _i)), set it to OF_' and close the menu.
• The (_1_)mark disappears from the display when the stabilizer is off.
• The image stabilizer cannot be _ed
off when rite program selector is set _
rite [7 (Easy Recording) position.
[] Notes:
• 'ISte image stabilizer is designed to deal with a normal degree of camcorder
shake.
• Keep the image stabilizer turned off when the camcoyder is mounted on a
tripod.
', The image stabilizer is not as effective as usu',fl during the Low L]ghI mode,
36
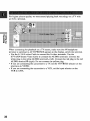
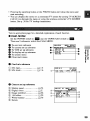
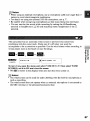
Many of rite camcorder's advgnced fu_ctions am _legte_ from metros w_ficlt
appem" in fire d_splay,
"l_tere gre 4 fr/_i_l rll_ttllS:
CAM. MENU
Camera menu
PLAY MF2qU (M450i :VCR MENU)
C, C&M. MENU
Card camera menu
C,PLAY MENU
Card play menu
( [._
(_
(_
(_
° c_U._NU_+_
V_R
39)
412)
42)
43)
MV450
MV450i
_ET LIP
DISF_.$Er I_p
8Y,_TEM
_'EETLI FIN
l _AN,gEr
LIP
O PLAY MENU (MV450i: VCR MENU) 1_
PLAY _ENLI
_A_D
SET
_AED
O_EN.
DIS?,$ET
$ySTEN
4_ETU_N
_ELr
i
_ET
+( _
)
_g
÷
LIP
LIP
. c.c_. MENU
_ +
0 C.PLAY
_,_LAY
DI_,_ET
MENU
MENU I_EL,
_
"1"(_)
_ET
UP
37
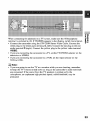
1. q[llrn the POWER
desired
switch and the TAPE/CARD
switch to the
settings.
2. Press the MENU button to open the menu.
• One of'_te main menus appears, according to tile settings of fire
TAPE/CARD switch and rite POWER switch,
::13. 1llrn
_
4,
the selector
dial and move the arrow to the desired
submenu.
I_T.SS the selector dial in to select.
The submertu appuars,
q[llrn the selector
dial and move the arrow
to the desired
function.
6, Press the selector dial in to select.
• The _nctien _nd its settings only appear,
7, 1llrn the sdec, tor dial and move the arrow to the desired setting.
• It"you are setting a funetien other than ritewhite balance or shutter speed,
the _ttetiott will be set if yeu skip _ step 11+
8. Press the sdector dial in to sdect.
• The _nctien is set and yeu return te rite submenu.
9. lhrn the sdec, tor dlal and move the arrow to 4m RETURN.
10.Press
the sdector
* Yeu return
dial in to sdet_L
to rile rl!_Jn rl!_rlu,
ll.Press
the MENU button.
* The main menu disappe._.trs,
[] Notes:
• Pressing the MENU but_m at any time closes rite m_nu+
• Selecting '_ RETURN rakes you back one m_nu, or closes the main menu,
• Items ritat are unawilable, due to the rape or c_,ts'dsituation or the settings of
other m_nu items, appear in purple,
• You may often find it convettJent to use the wireless eontreller to move around
rite menus, Press its MENU button to open/close the metro _utd use the a_'ow
keys in place of turning the _lector dial, Push rite SET button to select.
38
, Pmssktg tlte starffsmp burton or the PHOTO button will close tlte menu and
start recording.
• You can display rite menus on a connected TV screen by 0.ruling "IN" SCREEN
( [2121
14] ) on through the menu or usktg rite wireless controller's
TV SCREEN
button. See p, 30 for TV hookup instrucNons,
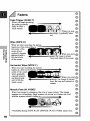
T_l
to appyopriate page fbr a detailed
• CAM.
explanation
of each _nction.
MENU
Set the PO_3,rER switch to m
and the TAPE]CARD
There are 5 submenus wRhkt the CAM. MENU,
O To e_,mlmix submenu
To camera set up submenu
To VCR _t up submenu
O To display set up submenu
To system menu
Close main menu
SW
_
to m.
itch
CMd. MEHU
0-
,_$EL._SET
i_LOSE
_ii_s_iiiiiiiiiiiiiiiiiiiiiiiiiiiiiiiiiiiiiii
CAMlSET
UP
0
SET
UP
e
_=_
0
m .
_---VCR
DlSP,S£T
UP
_---SYSTEM
_RETURN
o_,,ff
l
Card mix submenu
@ Mix type ..............................
@ Mix level .............................
Camera
@
@
@
@
@
set
up
[2121H
5
[2121
] ]6
CARD MIX
100-0001
D 45/50
@---MIX
TYRE*.,,CARD
CHROMA
MIX LEVEL.,,-_+
--
submenu
Shutter speed .........................
Digital zoom .........................
Image stabilizer .....................
] 6:9 effect .............................
W1fte balance .......................
_ 73
_ 2]
[.£] 36
[..221
20
_ 76
rCAMrSET
U_
D.ZOCM ......
_SEL
40x--
_ET
_)---IMA_E S._.ON
1_;9 ........
OFF-Q)---Wa[TE DAL...AUTC
_R_TURH
-@
-@
®
® Remm
39
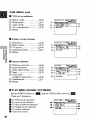
CAM. MENU,
0
cont.
VCR set up submenu
@ Rexx._rd mode .........................
_
_ Wind so'inert ..........................
_)) Audio mode ..........................
_:.2,AV or headphones .................
_ Retum
_ 67
_166
_ 30
0
Display
19
_SEL
_
VCR SET UP ...... _SE_Lu
®--_ii_£i£i£i£_iiiiiiiiiiiiiiiiiiiiiiiii
WIND SCREER.OFF-_0---AUDIO
MODE..1261t
AVCPHONES...AV-_---÷RETURN
ET"
-®
-@
set up submenu
_ Brightness ............................. [..L]_4
5_ M3tror mode .......................... [._ _-5
0_
"
_ 141
6_ Date/time display .................. [.22151
DlSP.SET
_¢---TV
UP _EL,_SET
MIRROR ......
ON-SCREEN,..ON
D/T DISPLAY.OFF--
--@
=g
0
System submenu
_ Wireless corttro]ler ................
_ Light-up buttons ...................
_)) Button light colour ................
_:.2,Beep ......................................
_ Time zone/
Daylight saving time .............
_ Date/time set .........................
_ Retum
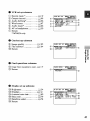
PLAY MENU (MV450i:
Set _te POWER switch to _
There are 5 submenus.
0
O
O
O
O
O
4O
To VCR set up submenu
To card set up submenu
To card operations submenu
To display _t up submenu
To system submenu
Close main menu
_46
_ 48
_48
_ 20
_ 49
_51
SYSTEM
:_SEL,_ET
i_LOSE
BUTTONLIGHT.ON
_m-LIGHT
COLOR.BLUE
BEEP ........
ON m
_m-T.ZORE/DST
.....
D/TIME SET..--,---.
---@
....
-@
-@
_m-_RETURN
VCR MENU)
) and the TAPE/CARD switch to _.
O
m
O@-
CARD S_T UP
-CARD OPER,
DISP.SET
UP
-SYSTEM
_RETURN
0
--_
VCR set up submemt
(._
@
(_
@
@
@
Record mode * ......................
Output channel ......................
Audio dubbing* ....................
Wind screen ..........................
Audio m_xte* ........................
AV or headphones .................
_._ ] 9
[2_ 99
_ 96
_ 67
_ 66
[_ 30
VCR
SET
UP
_SEL,_ET
OUTPUT CR,,.L/R
m
_---AUDIO
DUB,,.AUDIO
WIHD SCREEN,
®---AUDIO
MODE,.12bit
AV/PHONES,,.AV
m
O---*RETURN
IN
--@
--@
@ Remm
* MV450_ only
0
Card set up submenu
@ Image quNity ...................... _
@ File numbers ....................... _
@Remm
Card operations
102
104
CARD
SET
UP _EEL,_ET
_g_EOSE
FILE
NOS,,*.CONTIHUCUS-
-®
l
submenu
@ Copy from cassette to c_,ml. [.212111
7
_ Remm
CARD
OPER,
_EL,
_SET
_LOSE
©--
@
_ItETUFIN
Display vet up submenu
_:_ Brightness ............................. [212124
@ D_splays .............................. _ 141
@ 6-seocmd auto date ................ _2180
@ Data code .............................. _ 79
@ Date/time select .................... _ 78
rDISP,SET
UP _SEL
_ET
DISPLAYS,*.*ON-_--
-®
--SSEC.DATE***OFF
DATA CODE*..DATE[TIEE-_}----D/TIME
SEL..DATE
& TIME
_ETURN
@ Remm
41
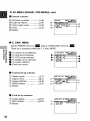
PLAY MENU (MV4.50i: VCR
System
MENU),
cont.
s_bmen_
_} Wis'eless e_ntroller ................
@ Light-up buttons ...................
@ Button light eolour ................
@ Beep ......................................
@ Return
• C. CAM.
[.1_46
_ 48
_ 48
_2o
SYSTEM
_SEL._ET
OI_HiH_N_NNNNN
_CLOSE
BUTTORLIGHT,ON I
_I-LIGHT
_OLOR,BLUE
BEEP........
ON I
_I-*RETURN
-@
-@
MENU
Set dte POWER switch to m
and the TAPE/CARD switch to m.
•
There are 5 submenus V./" l_un
the C, CAM, MENU,
;_
:= g=
OTocarnera_tupsubmenu
O TO card set up submenu
TO VCR set up submenu
0
TO display _t up submenu
TO system submenu
@ Close main menu
0
Camera set up s_bmen_
@
@
@
@
@
Shutter speed .........................
Digital zoom .........................
Image stabilizer .....................
White balance .......................
Retum
e-
_ARD
SETUP
OlSP.SET
UP
e---SYSTEM
_73
_21
_36
_ 76
@
O
0
UP
Card _t up submenu
,_, Image quahtT ...................... _ 10,(-%
@ File numbers ....................... _21104
(--%
@ Return
42
CARD SET UP _SEL._SET
i_LOSE
FILE
@I-*RETURN
ROS,,.._ONTINUOUS-
-q)
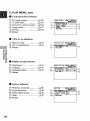
I_ VCR set up submemt
@ AV or headphones ................. _ 30
rVOR
SET UP
_EL
_ET
_RETURN
0
Display set up submenu
_ Brightness .............................
@ Mirror mode ..........................
@ TV screen ............................
@ Date]time
display ..................
[2121
24
E212]
25
F.L]14-1
[212151
DISP,SET
UP _PL._SET
i_LOSE
NIRROR ......
ON-8GtEEH,,,OH
DIT DISPLAY,OFF-(_---*RETURN
_---TV
-@
-@
@ Ream
o_.g
System submenu
_) Wireless
_}
@
@
@
................
[2151
46
Light-up buttons ...................
Button light colour ................
Beep ......................................
Time z_tte/
conm_ler
[.L]48
[21_48
_21 20
Daylight saving time .............
Date]time set .........................
[.]2349
[2151
51
l
SYSTEM
D/TIME
-*RETURN
@ Ream_
• C. PLAY MENU
Set the POWER switch to ( 1_
) and the TAPE/CARD switch to _.
There are 4 submenus within the C. PLAY MFANU.
To card operations submenu
To VCR _t up submetlu
To display set up submenu
To system submenu
Close main menu
C,PLAY
Qm
OQ-
MENU _SEL,_ET
_gCEOSE
_ii_ _ _ iiiiiiiiiiiiiiiiiiiiiiiiiiiiiiiiiiiiii
¥CR SET UP
-DISP._ET
UP
_YSTEM
-÷RPTUlH
_
0
0
43
C. PLAY MENU,
cont.
0
Card operations sttbrnemt
@
@
@
@
@
(_)
To linage protect .................
To pdm mark ......................
Copy from card to cassette ,,,
Image erase .........................
Format .................................
Return
[_ 111
LL] 119
_ 118
_ 112
_ 120
CARD
GPER.
_SEL._SET"
Qm
_PHINT
-_3
-_-_
MARK_
@---eOPY[D*t_I
IMAGE
ERASE
@---FORaAT
<"RETURN
VCR set up submenu
,Z, Record mode .........................
@ AV or headphones .................
,9, Return
[.L] 19
[.2S130
VGH SET UP
AVIPHONES
€RETURN
=8,
0
Display set up subrnenu
_
_))
_
_)
Brightness ............................. _24
Displays .............................. L_ 141
Date/time select .................... _78
Return
0
System submenu
_) Wireless
_)
_
_
_
44
controller
................
Light-up button .....................
Button light colour ................
Beep ......................................
Return
_46
_2148
_48
_ 2(3
'DlSP,SET
UP _SEL._SET
i_!_LOSE
DISPLAYS,..,ON-_'---D/TIHE
SEL.,DATE
_RETURN
rSYSTEM
G TIME
-®
@
_EL._SET
i_!_CLOSE
BUTTGHLIGHT*ON--
(_----LIGHT
CGLGR,BLUE
BEEP ........
(_b----_,FIETURN
ON--
-®
-®
The supplied wireless controller can
operate the camcorder from a distance
of up m 5 m (16 feet'), Point it at the
camcorder's remote sensor while you
press the buttons.
There are some functions that cannot be
operated without the wireless
controller:
Special playback (_2127)
Photo/date s_h
(_2181)
Zero set memory ( Eli 82)
Audio mix ( E.£]98)
AV inert ( _ 90: IvIV450i rudy)
Audio dubbing (E2[2193)
Data code ( _ 78)
o_._Insert t_'o AA batteries following the
and @ markings. Be careful not m
reverse rite polarity of the batteries.
l
[] Notes:
• When using the wiyeless contreller in brightly lit places or outdoors, the
effective range will be less,
• The camcorder may have difficulty picking up rite remote control sigttMs at
exWemely close range,
• Do not leave the cruttroller exposed to direct sunlight, or in hot or humid places,
• When the batteries run out, replace them both together.
• If the wireless controller doesn't work, see p+47,
45
27oprevent interference from other
Canon wireless controllers being used
nearby, there are 2 remote sensor
modes and an off setting, The wireless
ernttmller and the cameorder have m be
set rx_rite same mode in order to be
er_mpatible,
The wireless controller and rite eameorder have been pre_t to mode ]. N you
change the mode on rite cameorder, be sure to change [he mode on the wireless
controller to rite same m_xte.
Iml÷
m
MENU(_37) _+Y+TE_
_ _L._MOT_***e_,
=g
To turn
[he remote
sensor
[{i_ 1
Ili_ 2
OFFg:_
: Mode ]
: Mode 2
: Sensor off
off:
Open the menn and select SYSTEM.
OFF(/i_ and close the menn.
• ((_ appears in rite display,
Then select WLJ_EMOTE,
set it to
27ochange [he mode,,,
,..on the carner_rder:
Open the menu and select SYSTEM. Then select WL.REMOTE,
to ((!.,_, 1 or _<,-_.2 and close the menu.
• The selected m_.e will appear on the display fbr 4 seconds,
set it
,..on the wireless eonm_ller:
Press and hold the REMOTE
SET button
on the wireless
e_ntroller.
Simultaneously
press the ZOOM W button for mode l or the ZOOM
T button for mode 2. Continue to press simultaneously
for over 2
seconds.
• Be sure to _t the wireless controller to the same mode as rite eameorder.
46
If yotw wireless
c_ntroller
isn't working:
Make sure the carn_rder
and rite wireless con0"oller
are both set to rite same
mode, Check rite m_vde rite cam_rder
is set to by pushing any button
rite REMOTE SET button on rite wireless con0"oller, The cameorder's
other than
mode
appears in purple for about 4 _conds. Set the wireless eon0"oller's mode
accordingly
by presshtg the aforementioned
button combinations.
If rite wireless
conO'oller still doesn't work, change the batteries.
[] Note:
• The m_de the carn_rder
power on.
is set to also appears fur 4 sexx_ndswhen you turn the
tit
_g
l
47
_,,
The clear but0tms above ritz LCD panel light up when the eamcorder's
power is
on, or only when one of the buttons is presred, m_ng
it possible to play back
cassettes when in dark surroundings.
You can 'also change ritz eoleur in which
they light up to blue, _rquoise
(greenish blue) or green.
I I",,1
I_,Y4
I la W__Y4
m
=g
MENU
( _ 37)
_-sYsrE_
I') ,_uttcNulaHt,cN
To change the setting, open the menu and sdect SYSTEM. Then sdect
BUTTONLIGHT
and set it to PUSH ON or OFF and close the menu.
• ON: The buO,orts remain
lit in fire indicated
colour. _,Vldle one of the butK_ns is
pressed, 'all rite buttons simultaneously
change _burs
in rite 3-colour _uence,
When rite button is relea_,
dtey return rx_the original _bur
_r
a few seconds,
. PUSH ON: Buttons light up on]y while one of them is presred. Then, all rite
butRms siml.dtanermsly change coMurs in the 3-colour sequence, When ritz
but0tm is released, they mm off again after a few seconds,
• OFF: Buttons do not light up,
v
MENU
(_371
,.sYsrE_
))/_LfGsrCOLOR.BLUE
L
To change the c_lour from blue, open the menu and selet_t SYSTEM.
Then selet_t LIGHT COLOR, set it to TURQUOISE
or GREEN and
close the menu.
48
[] Note:
• You cannot change LIGHT COLOR when BUTTON-LIGHT is set to PUSH
ON or OFF.
The date and/or time display fbsns
display or hide it during playback
Set the date and time display when
backup battery before you begin (
* Before you start setting the date
pan of the data code. You can choose to
(_78),
you first sPart using your camcorder. Install the
_ ] 28).
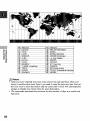
and time, select your home time zone frem the
fllgl'lU,
+lm,
1. Open the menu
Im+lm
and select SYSTEM.
2. Select 'lP.ZONE/DS'lP.
• The time zone display appears on the screen,
• Your camcorder's time zone is factory-preset to Paris, It"you are at anoNer
time zone, select your time zone first and daylight saving time (DST) setting
if necessary.
3. Move up or down the list of time zones with the selet_tor dial. Select
the option that represents your time zone.
• _ you are now in daylight saving time, _lect die time zone with the
daylight saving time mark !_ next m the area.
4. Close the menu.
49
=g
No "T'ime
zone
No Tim8ZOEG
[]
[]
LONDON
PAF_IS
[]
[]
WELLGTN(We[]ington}
SAMOA
[]
[]
[]
[]
[]
CAlnO
MOSCOW
DUBAI
KAp_,CHI
DACCA
[]
[]
[]
[]
[]
HONOLU(Honolulu)
ANCHOI3(Anohomge_
L.A. _LosAr',_eles}
DENVErl
CHICAGO
[]
[]
[]
[]
[]
BANGKOK
H. KONG (Ho_g Kong)
TOKYO
SYDNEY
SOLOMON
[]
[]
[]
[]
[]
N.Y. (New York_
CARACAS
RIO _Riode J_neiro)
FE]3NAN.(FernandodeNoronha}
AZORES
[] Notes:
• After you have selected your time zone and set the date and time, when you
Wavel to another time zone, there is no need to reset the date and time, lust _t
rite time zone to yeur destination and the cancordar's dock will automatically
change to display the correct time fer yeur destination.
• The camcorder automatically accounts for the rtuntber of days in a month and
leap year.
5O
After you set the date and time, the date/time and home time zone will be
displayed fbr about 4 seconds each time you turn the power on.
MENU(
[_ 37)
1. Open
_'_Y_T_a
the menu
_
_'D;TlaE SET., 12:_1
.JAH._01
and select SYSTEM.
2. Select D[FIMLE SET.
• The year display staff.s to flash.
3. 'htrn the selector dial up and down to change the year. Press the
dlal in to move to another part of the display.
• Once you move from the year, the next part of the display starts flashing.
4. Set the month,
day, hours, and minutes
5. Press the MLENU button when finished,
in the same way.
and to start
_"
€ii _,
the dock.
[] Notes:
• To make a change m part of the date attd time, press the selector dial in at step
3 to move to the part to be changed, T_ the dim to m_e the change, then
close the menu,
• 'rite date can be set to any year between 2001 and 2030,
• N you press the MENU button in the middle of setting the date and time, you
leave the menu, and the clock sParts.
• N you press the selector dial in after setting the minutes you can set the date
and time again from the start.
You can ehocse to display or hide the date arid time display during recording,
When the date attd time display is _t to ON, the date and time show in the lower
left-hand comer of the display but the time zone disappears in about 4 seoc_nds.
The large, 4-sexx_ed display will no longer appear when you turn on the power, It
is not automatically
superimposed
on your m/,_rdings.
MENU
(_37)
_r*D[S_,S[T
UP
_k_ _*D;T
DISPLA¥.@_
To turn it on, open the menu and select DISP.SE'r UP. Then select D/'r
DISPLAY, set it to ON and close the menu.
51
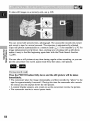
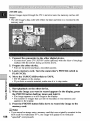
To take still images on a memory card, see p. 105,
You can record still pictures like a photograph, The camcorder records the picture
and sound m tape fur several seconds, The exposure is autotrmticaily adjusted,
Copy still photos automatically m a memory card ( _21] ] 7) fur transfer m a PC for
ffrmge enhancement and printout, .-Mso,s_tarfingyour shooting with a still photo
makes it easy m find the begimling again later with the Photo Search _nction
(_[2181),
=g
You can take a still picture at any time during regular video recording, or you carl
put the carncorder into record, pause mode first, then take a still picture,
[During re_rd
mode l
Press the PHO'IO button fully down and the stir picthre will be taken
immediately.
. Tile carncorder takes the image immediately, attd then records the "photo" to the
tape for approximately 6 seconds*. During tiffs 0me the camcorder 'also records
the sound, and tile display shows the sail picture,
• A counter display appears, and counts up as the carncorder records tile picture,
• Tile carncorder reds
to record, pause mode,
52
[During record pause mode l
1. Press the PHOTO button halfway down and hold it:
• "PHOTO" flashes at rite bottom right of display,
• Exposure is locked,
• During autofbcus 0 flashes whke in rite display as rite eamcorder 'adjusts the
focus and it is displayed continuously as a green mark when the camcorder
is ready to take the still picture,
• If the subject is unsuitable for aumfoeus (_.1134), rite eameorder may not
be able to focus, and @ may continue m flash white in the display. Continue
to hMd rite PHOTO button halfway down, then press the FOCUS button and
adjust the focus manually with rile selector diM,
• If you are using maanM focus ( _ 75), the @ mark starts as a eontinous
green mark. Focus with rite selector dial.
2.
Press the PHOTO
button fully down to take the still picture.
', The eamcorder takes rim image irrlrnediately, and riten records the "photo" to
rite tape fbr appmxi_rmtely
6 _conds*,
Bring
this time the carncorder also
rec_rds the sound, and the display shows rite still picture.
• A counter display appears, attd counts up as the earncorder records rite
picture. 0 disappears from rite display,
• The eamcorder returns to record pause mode,
_
_ ..
-_ g
ff
[] Notes:
• The cameorder automatically returns to rex_M pause mede after recording a
still image for approximately 6 _conds*, ff you turn rite POWER switch to
OFF during that time, the carncorder will respond only after recording is
er_mplete.
• The wireless con_'oller's PHOTO button has no ladf-way setting. Press rite
button _lly and rite eameorder immediately takes the "photo".
• Only take '_photos" where it is bright enough m see the image in rite display,
* 8 _conds
in NSP or INLP recording
mode.
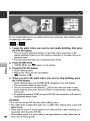
53
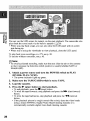
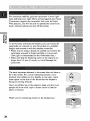
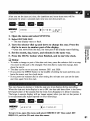
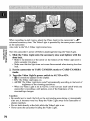
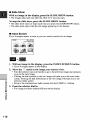
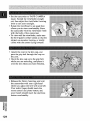
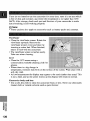
When the camcorder is in record pause
mode, you can ure rexx_rd search m
play the tape fbrwards or backwards to
find the point where you want to start
or resume recording, This is use_
whert you wartt _ add a new reene to a
previously used cassette. By using
record rearch, you can ensure a smooth,
noire-free join between rite new scene
attd the old one.
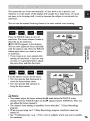
1. Press and hold the REC
SEARCH
+ or - button on the camc_rder
while you check the picture in the display.
• The + button plays the recording forwards and rite - button plays it
backwards.
=g
2. Release the button when you find the point where you want to start
recording.
• The carncorder returns to record pause mode.
When the camcorder is in record pause mode, you can use record review to play
back the last few seconds of your recording attd then remm automatically to
record paure mode, You can quickly make sure that a scene has rexx_rdedproperly
attd then go on to shoot the next scene, without producing arty noise in the picture,
1. Press and release the "_J (record review) button while you check the
picture in the display.
• The carner_rder rewinds the tape, plays back the last few se_nds, and returns
to record pause mode,
[] Note:
• Noise may appear on rite screen when you play the tape backwards,
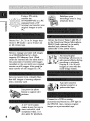
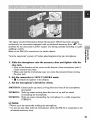
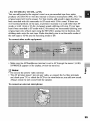
54
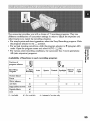
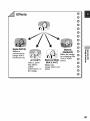
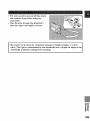
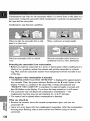
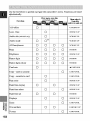
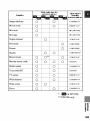
The camcorder provides you with a choice of 7 recording programs, They use
different combinations of earocorder settings in order to adjust rite exposure and
other functions to march the recording situation,
* For sirople point-and-shoot operation, select the Easy Reer_rding program. Slide
rite program _lector m the Z position,
. For nor_rml shooting _mditions, slide the program selector to [] (program AE)
mode, Open the pmgxarn menu and select AUTO ( [2_56).
. For various other reeordittg conditions, the c_nco_er has 5 more specialised
AE (auto exposure) pmgraros.
Ca"
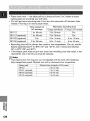
Availability of functions in each recording program
l
Position
of
_
program sclcg,ter
Recording
Program
V-(Easy
Auto
Rccording_
Shuttca" Spc£zl
Focns
Sports
P_'alt
O
Spoflighl
Ix_w
Light
A
O
A
White balarme
O
X
AE Shift
X
ImagesrabiD_ (0S£_l,_:
ON
O
Digital c.ffcx,ts
16:9
X
X
O
O
O : Av'_ablc
Sand&
Snow
X : No_ available
O
A : Automate ;_on
O
only
55
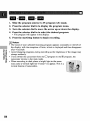
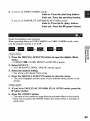
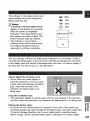
1. Slide the program
selector
to [] (program
AE) mode.
2. Press the selector
dial in to display the program
3. _[llrn the selector
dial to move the arrow up or down the display.
4. Press the selector dial in to selet_t the desired
• The program will appear _n the d_splay,
5. Press the start/stop
=g
56
menu.
program.
button to begin recording.
[] Notes:
• The name of your selected recording program appears constantly on the left of
the display, with the exception of Auto which is displayed and then disappears
after 4 seconds,
• Awfid changing programs during reo0rding as the brightness of the image may
change suddenly,
• If you switch the carncorder from the Pl program to the [] program, the
carncorder returns to the Auto mode,
• When recording in dark places a bright light in the scene
may cause a verdcM l_ght bar ("smear") to appear. Th_s _s a
normal feature of camcorders,
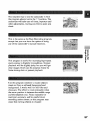
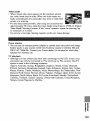
The simplest way _) use rite camcorder is with
rite program selector set to rite _ position, The
carncorder will take care of fbcus, exposure and
other adjustments,
leaving you free to point and
shoot.
This is the same as the Easy Recording program,
except that you now have the option of using
arty of the carn_rder's
manuN _nctions.
This prognram is use_l for recerding high-speed
sports scenes in lmghtly lit conditions, Normal
playback will be slightly jerky, but you will get
clear images which can be analysed frame by
frame during slow or paused playback,
l
Use tltis program outdoors to m_e subjects
staid out from a softened foreground
and
background.
It works well for sfill-lifes and
clo_-ups.
The effect is most noticeable when
the zoom position is between the middle range
and rite telephoto end, Focus manually for
rrmximum accuracy, and be care_
when
recording action scenes, as this program may
cause fast moving objects to shudder,
57
This progrmn is designed for recording spotlit
scenes, such as on a stage. The exposure is
automatically adjusted for glare-free rex_rdktgs
of subjects lit by a er_ncantzated light source.
I
Use this program in places where the
background
is so bright that rite subject appears
underexposed
in the display I a sunny beach or
ski resort, fbr example. You may notice some
shudder when recording m_._ving subjects,
=g
58
This program 'allows you to lexx_rd in dimly lit
places, h is generally best used for clo_-ups
of
slow or stationmy subjects, as moving subjects
may leave a trailing after-image.
However, you
can take 'advantage of this to c_ate spec'ial
effects, by rapid z_._mJng or by panning along
with a moving subject, Picture qu',dity will nN
be as g_._d as in normal lighting cottditkuts, and
autof_cus may not work as well as usual.
Use rite camcorder's
digital effects
• Faders:
• Effects:
• Multi-inmge
for more interesting
productions.
Start or end scenes on a tape with a fade to or from black
( [._ 60). Fade Trigger, Vertical Wipe, Horizontal Wipe,
Mosaic Fade*
Add flawmr m your recordings
( _2] 61).
._t, Black and White, Sepia, Mosaic
Screen: Divides flte display m show 4, 9 or 16 still photos. Has 4
transition speed options: Nst, moderate, slow and manual
(_264).
• Available in TAPE PLAY (MV450i: PLAY (VCR)) m_xte
only.
Availability of digital effects by mode
TAPE
CAMERA
PHOTO
TAPE PLAY
/MV4 5Oi:
PLAY (VCR))
CARD
CAMERA
CARD PLAY
/MV4 5Oi:
PLAY .(VCR))
Faders
0
X
O
X
iZ
Effects
0
O
O
0
_Z
Multi-image
Scrt_ect
0
0
O
0
_Z
© : Availabk,
X : Not availaNe
• The types of digital effects you are able to u_ depends on the setting
TAPE/CARD
switch, the POWER switch and the recording program,
of the
[] Notes:
• _,Vherl you do not want _ u_ digital effects, press the DIGITAL EFFECTS
button attd select D,EFFECT I_ from the digital effects menu, Press the
DIGIT.M_ EFFECTS button to close the menu,
• The camcurder remembers
your chosen digital effect setting until you change it,
• DigitM effects can be selected but not operated on a blank bNe screen (appears
in TAPE PLAY (_vIV450i: PLAY (VCR)) mode), The display continues to flash,
• DigitM effects operated during TAPE PLAY (_vIV450i: PLAY (VCR)) mode are
not recorded on_ the origitafl tape.
• DigitM effects can be added to another tape when dubbing using the AV out
terminai (TAPE PLAY (MV450i: PLAY (VCR)) mode), but not the DV out
terminal.
• You cannot operate digital effects while photo/date
searching,
• It" you slide the program selec'tor to Z (Easy Recording)
while the digital effect
display is flashing, it will disappear from the display and reappear when you
return to [] (program ?d_) mode,
, The digital effect display will flash for 2 seconds after setting, even if
DISPLAYS is set m OFF in the menu.
59
Effects
Sepia (SEPIA)
Mosaic
Makes a
monochrome
image w_tlt a
brownish tint,
Art (ART)
Adds a paintlike effect,
called
solarizatiott, m
the image.
(MOSAIC)
Blurs tlte image
by enlarging rite
s_ze of some
Black and White p_xels,
(BLK & WHT)
Makes the
image black and
white,
61
Digital effects can be set with rite _mtrols on tim body of the camcorder or the
wireless controller, Pressing rite _
buttons on tim wireless controller
_rrespond to turning the selector dim up and down, and pressing rite SET button
_rresponds to pressing the selector dial in.
_
_,_
Sound and i]crmgefade together.
Wlten operating feders in TAPE CAMERA mode make sum the program relector
is set to IN.
m
=g
,¢
[ Select fader ]
1. Press the DIGITAL
EFFECTS
button to open iRe digital effet_ts
menu,
* D.EYFECT _,
FADER, EFFECT attd IvIULTI-S appear.
2. Selet_t FADER.
. FADE-T, VcTPE II, WIPE=
settings appear. M.FADE 'also appears in
TAPE PLAY(MV450i: PLAY(VCR)) mode,
3. Selet_t the desired setting.
* You return to tlte digital effects menu.
4. Press the DIGITAL EFFECTS
button to close the menu.
. The name of your selected fader flashes in rite display,
[Federo /off]
5. Press the ON/OFF button.
* The name of your selection stops flashing,
. Each time you press the ON/OFF button, the chosen fader is activated
(display lights continuously) or deactivated (display flashes).
B2
6. If yoN're [n TAPE CAMERA
mode:
Fade in- Press the start/stop
Fade out- Press the start/stop
button,
button,
If yoN're in TAPE PLAY (MV450i:PLAY
(VCR)) mode:
Fade in- Press the I_ (play) button,
Fade out- Press the II (pause)
Sound records/plays
back normally,
When operating effects in TAPE CAMERA
sure the pr%_ram _lector is set to IN.
or CARD
CAMERA
button.
mode, make
llI
[Select effect ]
1. Press the DIGITAL
menu,
• D.EFFECT
2.
[_i,
EF_'ECTS
FADER,
button
EFFECT
3. Select the desired
to open the digital effects
attd MULTI-S
Select EFFECT.
• ART, BLK&_3,q-IT, SEPIA, MOSAIC
• You remm
_,,
o I-
settings
appear.
t-"=_
I
appear,
setting,
to rite digital effects menu,
4. Press the DIGITAL
• The iltenu disappears
display.
EF_'ECTS
button
to close the menu,
mid the name of your selected
setting flashes in dte
[Effect on/off]
5, If you're in TAPE PLAY (MV450i:
I_ (play) button.
PLAY (VCR)) mode, press the
6. Press the ON/OFF button.
• The nante of your selection srx_psflashing and takes effect on the display.
• Each time you press dte ON]OFF button, the chosen effect is activated or
deactivated.
63
Divides your display image into 4, 9 or 16 smaller images with rite Image Capture
feature. With this feature, rite camcorder captures the c_rrent scene being shot or
replayed, Choose the tyansition speed -- marmal, fast (every 4 frames), mederate
(every 6 frames) or slow (every 8 frames) -- at whieh to capture a moving
subject, such as a person playing tennis or gNf, Sound is recorded normally,
4 images
=g
16 images
9 images
When operating the multi-image
scxeen in TAPE CAMERA or CARD CAMERA
mode, m_e sure the pyogram selector is set to _,
In TAPE PLAt" (MV450i: PLAt" 0€'CR)) mode, you can only operate the multiimage scxeen in the following playback modes:
When M.S,SPEED
is _t to MANUAL:
Still picture playback, slow
forward/rever_
playback
When M.S,SPEED
is _t to FAST, MODERATE
or SLOW: Still picture playback
re÷m,
m÷ilm,,
[ Selec_t multi-image
scvgen
1. Press the DIGITAL
menu,
D,EFFECT
_,
]
EFFECTS
FADER,
EFFECT
button
to open the digital effects
and MULTI-S
appear,
2. Select MULTI-S.
M.S, SPEED
and M.S. SPLIT settings
appear.
3. Select !_LS. SPEED.
MANUAL,
FAST, MODERATE
4. Select the desired
You return 0t_the digital
5. Select MULTI-S
M.S, SPEED
B4
and SLOW settings
setting.
effects menu.
again.
and M.S. SPLIT settings appear.
6.
Select 3&S.SPLIT.
4, 9, : 6 settings appear,
7.
Select the desired
setting.
You return 0t_the digital effects menu.
appear,
8. Press the DIGITAL EFFECTS button
• The digital effects menu disappears
• MULTI-S flashes in the display,
to close the menu,
[MultMtrmge semen on/eft ]
9. Push the ON]OFF button.
• MULTI-S stops flashing,
• Manual: As you press rite ON/OFF button, scenes will be captured one Mter
another rite indicated number of times. If you push and hold rite ON/OFF
button for more than a second, the last image e_ptured will be erased,
• The currently recording image is framed in blue, The frame disappears after
rite last image is captured.
• Automatic: The eamcorder will capture rite indicated tmmber of images at
rite indicated speed.
10Jf you're in TAPE CAMERA mode, push the start/stop
begin recording.
• The multi-image screen is recorded to rite tape,
If you're in CARD CAMERA mode, press the PHOTO
record the multi-image
screen to the memory card.
button to
button
to
[] Notes:
• You cart operate rite multMmage screen from rerx_rd or record pause mode.
• +M:terall rite images have been captured, press rite ON/OFF button quickly to
cancel rite multi-image screen.
• Nyou are operating rite multi-image screen in TAPE PLAY (_vIV450i: PLAY
WCR)) mede attd you stop or pause rite tape, or press any other playback
button or rite date]pho_ search button, the multMmage screen will be
cancelled. (This does not apply wirit the MANUAL multMmage speed.)
• You cannot use digital zoom or the 16:9 mode when rite multi-image screen is
set. The display becomes "- - -",
a_,"
off
MVgS0/MV450i
can record sound in twe audio modes
--
_6-bit and _ 2-bit. The
6-bit mede produces the higher sound quality (slightly superier
2-bit mede recerds on 2 channels (stereo 1), leaving 2 channels
fer you to add new sound at a later date.
to CD) while the
free (steree 2)
tm+m, m+ v, 0,tu
m+
p
_M,q.4
F
MENU
_vc_ _T UP
_/_uDIo
MOD_,,12H_
k
( _ 37)
To switch to the 16_bit mode, open the menu and selet_t VCR SET LIP.
Then selet_t AUDIO MODE, set it to "16 bit" and close the menu.
• "16 bit" is showrt h't [:liedisplay for approxh_uately 4 sexx._rtds.
=g
[_ Notes:
For details on adding new sound, see p, 93.
• For details of playing back a tape the has new sound on sterex._2, see p, 98,
MV4ff0i olfly
• When you record to rite MV450i frollt a eamcorder with DV termirafl outputs,
the audio mode becomes automatically set r_ 12 bit.
• When the recording m_.e ie set m NSP or I-dLP mode the audio mode
becomes automatically set r_ 12 bit,
Fer greater creative eerttre] over audio recording, you can eertrtect art external
tnicmphotte to the camcerder via the MIC termJttM, When using the MIC termJttM,
use a mJcrephone with a built-in power supply (condenser mJca'ophone). It is
[x_ssible to connect Mmost any stere,_ trfica'ophotte with a pNg diameter of 3.5 mm
(_]* in), however,
rrlicrophotte,
66
their audio levels
will be different
from that of the built-in
[] Notes:
* When using an external microphone, use a microphone cable not longer titan 3
meters to avoid eleem_magnedc inerference.
* For de'tails on using the opdonal DM-50 trfica'ophone,see p, 71,
* Be careful when using long micrephones as titey may extend inrx_the frame,
* You can monitor the sound while recording by setting the AV/lteedphone
terminal m headphones (_2130) aed attachhlg stereo headphones m the (3
terminal,
The camcorder has att automatic wind screen _ prevent wind noise from
interfering with tire sound track, Make sure it's off when you want rite
micrephone to be as sensitive as possible, Use rite wind screen when recording in
windy
places
such as the beach
or near buildings,
re÷m,
MENU
(_37)
[,¥CB
,:,g-
SET
UP
]_
,WIN_
8¢_EEN,
,0;;
1b turn it on, open the menu and select VCR SET UP. Then select WIND
SCREEN, set it to ON and dose the menu.
• WS [] is shown in the display when you turn the wktd screen on,
[] Notes:
,, The wind so'men can be used for audio dubbing with tire built-in micrephone
well as rex_rding.
• The wind screen does not operate when an extermfl tdicmphone
is eennected
tire MIC terminal or the edvanced accessory shoe.
as
to
67
This is useful when you want to include
movies or still photographs,
1.
Press
the
© se[f-tlmer
button
yourse]f
in the picture
on the body
of the
when recording
¢_mcorder
or
the
SELF
TIMER
button
on the wireless
• SELF-T appears in rite display.
• To have the subject monitor recording,
controller.
rotate rite LCD panel 180 ° ( _.2_25).
For movies ]
2. Press the start/stop
button.
, The camcorder s'tarts to record after a ] 0-seotmd countdown period (or after
2 seconds when you use the wireless controller), The time remaining counts
down in rite display (e,g, "5 SEC'),
• SELF-T disappears from the display when recording begins,
3. Press the start/stop
68
button
to end recording.
I R_r stills ]
2. Press a PHO_[_) button on the camc_rder body or the wireless
controller.
* The camcorder automatically adjusts rite focus 2 seconds before rite
countdown is complete, The O mark flashes white then turns gj'een _,ffterrite
focus and exposure are set, If"you are using rite wireless controller, the @
mark starts flashing immediately _,ffteryou press rite PHOTO button.
* The camcorder takes rite picture fbr approximately 6 _conds (8 se_mds in
NSP or NILP recordhlg mode).
[] ['lot_s:
• To c_tncel the _lf-timer be:tore the countdown has begun press the © SELF
TIMER button.
• To c_tncel the _lf-timer once rite countdown has begun, press rite © SELF
TIMER button start]stop if you're shooting movies, or PHOTO if you're taking
a still image,
€ii _,,
off
Bg
When recording in dark rooms attach the Video Light to the carncerder's
r,r
•
advanced accessory shoe. The ¥1deo
Light
is
powered by the same power
as rite camcorder.
source
Also refer to rite VL-3 Video Light instructions.
Turn rite camcorder's
lw
power
attaching/removing
the Video Light,
Slide the Video Light onto the accessory shoe and tighten with the
shoe lock.
* Slide in rile direction of"rite arrow art the bottom of"rite Video Light until it
clicks securely into place.
* Make sure that the light does not come disotmnected when turning the shoe
lock.
2. Set the eamcorder
mode.
3.
off before
to 'rAPE
CAMERA
mode
or CARD
CAMERA
q[ilrn the Video Light's power switch to AUTO or ON.
• [] (Connection)
appears in rite display,
• O/'_: The Video Light stays on,
• AUTO: The Video Light turns on/off automatically
acot_rding _ the level of"
brightness of the shooting _mditions.
. When the Video Light is set to AUTO, it will not turn itself" on/off while the
camcorder is recording a still picture, even if" rite brightness of" the
surroundings
changes,
Caution:
* Be care_ not to touch rite bulb or the sun'ounding area during or immediately
after use; it becomes very hot. Keep rite Video Light away from flammable or
plastic materi_s.
* Do not look directly at rite bulb wlfile rite Video Light is on,
* Never carry rite camcorder holding rite Videx_Light.
7O
The highly sensitive Directional
Stereo Mica'ophone DM-50 has been designed
exclusively
fbr carncorders equipped with an advanced accessory shoe ,J'_', It is
7 during cassette recording or audio
powered by the carncorder s power supply, Use
dubbing ( _ 93),
Refer m the DM-50's instructions fbr further dePails,
T'um the camcorder's
power
off befbre attaetfing/removing
the microphone,
1. Sfide the microphone onto the accessory shoe and tighten with the
shoe lock.
• Slide in rite direction of the arrow on rite bottom of the _rfic_'ophone until it
clicks securely into place,
• Make sure that rite m]ca'ophone does not _rne disconnected when turning
rite shoe lock,
2. Set the e_tme_rder to TAPE CAMERA
• [] (Connection) appears in the display,
3. Set the microphone's
dlrectivity
l
mode.
switeh.
SHOTGUN: Clearly picks up sound _ving from the front of the ruicmphone
(monaurel),
STEREOI:
Picks up sound arriving from the front of, as well as sound
s_unding
the m]cnrophone.
STEREO2:
Picks up sound surrounding the microphone in a wider range than
STEREO 1,
[] Notes:
• Never cm'ry the carn_rder holding the _rfic_'ophone,
• Do not u_ any other external mica'ophones wlfle the DM-50 is connected _ the
'advanced accessory shoe,
71
By ermtrolling rite level of rite automatic exposure (AE) _nction you can lighten
or darken the image slightly. This _lows you to compensate for backlit,
overexposed scenes,
_
Make sure the pregr_n
_
1. Press the selector dial in and select any recording
program
than Spotlight or Sand & Snow from the program menu.
2. Press the AE SHIFT button.
._
= _
_.
• _AE
selector
is set to IPI
other
appears light blue.
3. _[1lrn the selector dial to choose your desired level.
• Levels are from -2 to +2, in 0.25 interv_s (excluding -] .75 attd +1,75),
• The higher rite setting, rite brighter rite iruage,
[] Noles:
• You cannot adjust the exposure without the ml_mark before AE in the display.
Push the AE SHIFT button so that ml_appears before AE. Then you can adjust
rite exposure manuNly.
• You cannot adjust the AE Slfift when the carncorder is _t to Z (Easy
Recording),
the Spotlight recording program or rite Sand & Snow recording
probnram.
72
Set the Shutter speed manually
MENU
*e_,SETuP
to take stable shots of quickly
moving
subjects,
p),,.s,u''_R
..... AUTO
( _ 37)
1. Make sure the eameorder is set to the [] (program AE) mode.
2. Press the selector dial in and choose AUTO from the program
menu.
3. Open the menu and select CAM.SET UP.
4. Select SHUTTER.
5. Press the selector
dial in to select the desired
TAPE
speed.
CARD
AUTO
1/50
shutter
AUTO
slower
1_0
1/120
1/120
1/250
1_50
€ii
_,,
,:,g
1/500
1/1000
1/2000
1/4000
1/8000
faster
• Otfly shutter speeds up to 1/250 are avai]able when using a memory card,
6. Close the menu.
73
Guidelines for shooting using high shutter speeds
• When shooting with a shutter speed of ]/1000 or higher,
directly,
Recommended
shutter speeds when shooting:
• People doing outdoor spoyts such as
golf or tennis
_I_000or 114000
(or_18000to_meze
_hG _[orm
evermmore
clearly)
• Moving cars or trains or other
rapidly moving vehicles such as
111000,11500 or
11250
loller
coasters
• People doing ktdoor sports such as
basketball
=g
74
do not Shoot the sun
[] Noles:
• You are unable to set the shutter speed _n any recordhlg
AUTO, "['lie
SHUTTER
d_splaybecomes setto "
• The image may not aDpeay sm_tll when a high shutter
• The carncorder reds
to the auto shutter _tting when
_lector to [::] (Easy Recording),
or change the re_rding
• If"you set the shutter speed to 1/500 or above in TAPE
then switch the carncorder to CARD CAIvIERA mode,
automatically
change to ] 1250,
11120
program
other than
speed is _t,
you slide rite program
pyogram.
CAMERA mode and
the shutter speed will
The cmxIcorder can fbcus aur_maticNly. All you have to do is point it, and
whatever is in the centre of rite display will usually be in sharp focus. It" it does
not seem to be fbcusing well, it may be because the subject is not suitable for
autofbcas.
You can use the manual
focusing
funedon
fbr more control
over fbcusing,
Press the FOCUS button to rum off
autofbcas. The fbcus reemins locked at
(_I_M.FOCUS appears in the display,)
YOU can now 'adjust the fbcus manu_ly
with the selector diN. Press [he FOCUS
button
you want to return
the
pointagain
set when
by autofbcus.
@
_
_
_ autofk_cus.
* _,
• If you zoom in on your subject after
turning off autofbcas
it may not stay
_ g
_
in fbcus. It is generNly best to adjust
rite zoom first and then rite focus,
m+
t -'!_N #-1
Use the selector din to _t the fbcus.
* Tllrn the _lector din downward m
L
move the focus farther away,
* Tllrn the _lector din upwards
bring the focus nearer.
_
[] Notes:
• You cannot adjust the focus without the II_ mark before M.FOCUS in the
display. Push the FOCUS button so that II_ appears before M,FOCUS. Then you
can adjust rite focus manually,
• "CitemanuN fbcus setting is cancelled if you mlect the _ (Easy Recording)
program,
• When you are using the _ (Easy Recording) program, aumfoeus cannot be
turned off:
• See '_Fmubleshooting" on p, : 33 for a list of subjects which may not be suitable
for aurxffoeus,
75
The carner_rder's auto white b_ance
system compensates for a wide range of
lighting _mditions. Although slight
variations are unavoidable, erfiours will
appear natural in virtually every
situation.
In some cases, you will get better
results by _tting the white balance
yourselL or using one of the two preset
modes:
:.5: Indoor Mode
• Under h_flogen or studio/video
lighting
• Subject is of one dominant cNour
• C]ose
_
ups
Outdoor mode
, In daylight, especiNly for closeUps and where rite subject is of
one do_rfinant colour
_g
MENU
(_37)
[_:*_,_rT U_
_ ,.w,IT: B*t...*UTO
1. Make
sure the c_meorder
2. Open
the menu and selet_t CA_vLSET LTP.
3. Select WHITE
is set to the [] (program
AE) mode.
BAL.
4. a) For the indoor, outdoor or auto settings, press the selet_tor dial in
to choose the setting.
• _:/-_ appears in the display whan you set the white balance m
indoor/ouuloor mcxte.
b) To set the white balance yourself, point the eamc_rder at a white
object (such as a sheet of paper) and zoom in tmtil it t'dls the
display. Then press the seleetor dial in to selet_t SET _.
* Make sure to _mtinue pointing the camcorder at the white object until
you have finished setting the white balance.
* The _.L display flashes then remains lit,
* Depending on the light source, the flashing may at times continue, The
result will remain better titan with the anm setting and you can continue
recording,
5. Close the menu.
7B
Setting the white balance martually will probably
than auto white balance when shooting:
work better
Subjects with one dominant colour, such as sky+ sea or fbrest
Close-ups
In rapidly
changing
lighting
conditions
In places lit by certain types of fluorescent or mercm"y vapour
lights
_g
[] Notes:
,, Turn the digital 7_om oil"(jr neccessary) to set a more accurate white bMance+
,, If you have set rite white balance and lighting conditions change, re_t the white
balance,
• Try to yecord with light from a single source. Correct white bMance cannot be
ob 'rainedfor two types of lighting at once,
• You cannot mt the white b',dance or cho'.._sethe indoor/outdoor mode when the
program selector is set m the 17 (Easy Recording) program.
,, The white bMance returns r_ the AUTO setting when you slide the prognram
selector m 17 (Easy Recording).
• When you turn the camcorder on, the white bMance returns to AUTO, ff you
then switch the white b+flaece to SET, the camcorder will remember your last
setting,
,, During normal outdour shooting, setting to AUTO may provide better results,
l
77
A data eerie, eentaining the date and time the recording was made and other
eameorder data (shutter speed and exposure settings) is automatically meerded on
a special data _ction of the tape.
• Only the date and time appear in the data code when using a memory card,
Bring
TAPE PLAY (MV450i: PLAY (VCR)) mode the data code can be
displayed or hidden while the carncorder is in play, slow or still mode,
=g
Cameorder data may be displayed as "- - -" during fast forward rewind reverse
playback, fbrward attd reverse ><2playback.
Press the DATA CODE button on the wireless controller. When using
a cassette, press it while the eamcorder is in play, slow or still mode.
• Press it once to display, once more to ldde it.
Select whether you want the date, the time, or both to show up on your data code
display ( [2_ 79).
re+i/i,
m+ m,
q
MENU
((.._37)
,.D,SP,SEr
UP
F
/_/'.D;TIM__EL.,[)._TE_TIL_E
JL
1b change the date and time combination,
open the menu and selet_t
DISP.SET UP. Then select D/TIMLE SEL, set it to DATE, TIME or
DATE & TIME and close the menu.
78
You can also choose to display cameerder data (shutter speed and exposure
settings) in cassette data codes.
[ I',iI:Vl
m+(
To change,
open
the menu
CODE, set it to DATEfrlME,
close the menu.
and
sdect
DISP.SET
CAMERA
DATA
UP. Then
selet_t
or CAM.
& D/T and
DATA
Possible data code combinations for cassettes:
3/3"ME $ E_ _)
DateITime
Date/Time &
Camera data
Camera data
off
Date
I
I
Time
Date & Time
ININ
[]
Notes:
• The data code will read "- - -" in the following situations:
- _ring
playback of a blm_k section of tape,
- If the tape was reeerdad before entering the date and time in the camcorder's
memory,
- If the tape was reeerdad on a camcorder without a data code _nctiom
- If noise or tape damage prevents the data code from being read.
• It" a recording made on MV450/MV450i
is played back on a differett_ DV
camcorder, the data cede may not be displayed correctly.
• The data code will appear in the display even if DISPLAYS ( [22 ] 41) has been
set r_ OFF through the menu,
79
The 6-second aura
the tape was being
you start playback
adjust for any time
date appears for 6 seconds to mark rite changeover of a day if
lem._rded m ] 2:(Y0rrfidnJghL It also appears for 6 _conds when
and have the data code turned off, The f-second auto date will
zone changes you have indicated.
[I-JIF__4
F
MENU
(_._37)
],D]S_,S_Tup
L
_)
_$ECr
DATE...O_
']Foturn the 6-second auto date on, open the menu and select
DISP.SET UP. Then select 6SEC. DATE, set it to ON and close the
menu,
[] Note:
• When 6SEC,DATE is turned on but DISPLAYS ( _.121
141) is turned off; rlte sixsecond auto date will still appear for 6 seconds.
=g
8O
This Nlows you to move quickly ritrough still pictures recorded anywhere on a
tape (photo search) or between different days or areas of recording (date search)
on a tape,
1. Press the SEARCH SELECT button to choose between photo/date
search.
• PHOTO SEARCH or DATE SEARCH is shown itt the display for 4
_g
seconds.
2. Press the _
and _
buttons
to move backwards
or forwards
through the still pictures or between different days of recording.
• Press once to move m the start of"rite prevkms/next still picture or day on
rite tape.
• You cart press more than artee m move to rite con'esponding still pietare or
day (up to a ma×im_
of 10 times), e,g. press the _ button 5 times to
move forward 5 still pictures or days.
• PHOTO SEARCH]DATE SEARCH appears in the middle of Ne display
Nongside the _ or I_1 mark and n_ber to seareh through, You can
change direction easily by pressing Ne burton for Ne opposite direction.
[] Notes:
• Press • (stop) m stop mid-reareh,
• If you begin a search very clore to tlte start of a recorded still picture during
photo search, the earncorder may skip sWaight past it,
• When you have set the area for tlte World Clock, date search also looks for tlte
change in date based on the adjusted time,
• A date/area cannot be identified if rite total recording time on that day/area was
less than 1 trfittute.
• Date search playback may start just before or _ter rite beginnktg of'rite located
section,
• If Ne data _de is not displayed correctly you will not be able to operate Ne
date search con'ecfly.
81
Use tlte wireless controller to mark a point on a tape fltat you want m return m
fk_llowing playback.
re÷m,
_
,_
=m.d
_ g_
=
I I',iI_,Y4
1. Press the ZERO SET MLEMORY button on the wireless controller
during playback at a point you want to return to later.
• The time code _s replaced by a tape counter that is set m zero with the []
_ndication.
• Press the ZERO SET ME2vIORY button once more rx_cancel the zero ret
memory.
2, Vchen you have finished playback, fast forward or rewind the tape.
The tape stops automatically
when it reaches the zero set position.
RTNII_ or _IR'FN al_pears _n the d_splay,
The tape counter with _ indication disappears from the display attd the time
code reappears,
[] Notes:
• The zero ret memory may not function _rrectly where there is a break between
recordings on the tape.
• You can also ure zero set memory to mark a position on a tape _n TAPE
CAMERA mode, When you then play back the tape, presshlg rew_ed will take
you back m the pre-marked position.
• If you remove the tape while the 7x:ro ret memory is set, the memory ]s
cancelled and the tape ermnter reverts to time code.
• The camcorder remembers your retting even if you turn ]t off and back on again
or move the program selector.
82
By connecting the carn_rder
m a VCR, you carl edit your recordings in order m
remove unwarged scenes -- or combine different shots to create your own videx_
productions.
1. Connet_t the c_Lmcorder to the VCR,
, See "Connections
2. Prepare
for Playback
on a TV Scxeen"
on p+ 30+
the TV and VCIL
• Turn on rite TV artd set the 2WPcqDEO
selector
to VIDEO,
• Turn on rite VCR and set _ts ktput selector to LINE. Imad a blank cassette
and put rite VCR in record pause mode.
• See your TV and VCR ktstruction
manuNs
fbr details.
3. _[llrn the came_rder's
POWER switch to PLAY (MV450i: PLAY
(VCR)), and move the camcorder's
TAPE]CARD
switch to 'rAPE.
4. Load your recorded
cassette.
1. Find a point on your recorded
you want to copy.
cassette
sllghtly
2. Start to play it back while you monitor
3. Start recording
appears
the pit_mre on the TV.
on the VCR as soon as the section
you want to copy
on the screen,
m
4. Pause the VCR at the end of the section
playback on the c_unc_rder,
5. Repeat
before the set_tion
you want to copy, then stop
steps I to 4 until your edited recording
gL
-=4
is complete.
[] Note:
• The quality of"rite edited tape will be sl_ghriy lower than ritat of"rite original.
The t_ termiHal Nlows you to connect
rite carncorder to equipment. Some
buttons on ezt_ting equipment may
operate differently from tho_ on rite
carncerder,
[] Notes:
• I._ (LANC) _s a tr',gtemark+ It star_ds for Local Application CoHtrol Bus System,
• We carmot g_araHtce
LANC I._ symbol,
the results
when connecting
to eZlu_pmeHt not bearing
the
83
MV450 ]
D_gital vider_ equipment fitted with the DV termJrtal lets you edit, copy and
transfer data digitally, with virtually no generation loss in image attd sound
quality.
1. Connect the camcorder and the other digital device.
• Connect the Canon CV-_ 50F DV cable (optional) with the side of the
plug marked with the arrow facing as shown above.
2. Prepare the other device.
. Load a blank cassette, and put the other device in record pause mode,
• See its ins0-oction manual for details.
3. q[hrn the camcorder's
POWER switch to PLAY and move the
came_rder's
TAPE/CARD
switch to TAPE.
4. Load a recorded
cassette.
1. Find a point on your recorded
section you want to dub.
2. Press the camcorder's
• Playback starts.
cassette
slightly
before the
play button.
3. Start recording
on the other devic_ as the section
copy appears on the screen.
you want to
4. When you get to the point where you want to stop dubbing,
press the stop button or the pause button.
• Playback stops,
[] Notes:
• Blanks between recordings on the playback tape are recorded as anomalous
images on the tape that is being recorded to.
• During DV dubbing, you cannot add digital effects,
MV450i I
The M_450i
xs eqmpped
wlrit the DV Recording
fuac_on.
Digital video equipment fired wirit the DV terminal lets you edit, copy and
transfer data digitally, with vi_u_ly no generation loss in hnage and sound
quality, The DV termin_ is for borit line-in and line-out, since a single DV
cable carl handle data in borit dire_ons,
• If a digital VCR is connected and an anom_dous signal is sent from rite
VCR, the hnages recorded on the tape may 'also be anormdous (alritough it
may not appear so on rite T_" image), or not recorded at all,
• You are unable to dub tapes _rded
with the copyright protective sigmfl.
_=.'
I Example
dubbing
to the carn_rder
1. Connet_t the eame_rder
]
and the other
digital device.
• Connect rite Canon C_]50F
DV cable (optiotafl) with the sides of rite
plugs marked with the am_ws facing as shown above,
2. Prepare
• T_n
the other
on rite power
devle_.
and load a recorded
3. 'htrn the e_ncorder's
move the came_rder's
cassette,
PO_'cER switch to PLAY (VCR),
TAPE/CARD
switch to TAPE.
and
• DV 1N appe_trs in the display,
4. Load a blank cassette.
85
1. Find a point on your recorded cassette slightly before the
section you want to copy and set it to playback pause mode.
2. Press the eameorder's
REC PAUSE button.
• The camcorder enters record pause mode
3. Start playback
picture.
on the other digital
device
while you monitor
the
4. Press the pause button.
• Recording starts.
5. When you get to the point where you want to stop recording,
press the stop button or the pause button.
• Recording s_ps,
.
Stop playback
on the other
device.
[] Notes:
• If the cable is not connected properly, o_"if the cable is unconnected
when
you press REC PAUSE, the camcorde_" displays the caution "CHECK THE
DV INPUT," An anom_flous in_ge may also flash onto the screen.
• Bl_lks between yeconiings on the playback tape aye leconted as attomalous
images on the tape that is being yeconted to.
• During DV dubbing, you cannot add digital effects,
_3
nl
8B
Copyright precaution
Ce_.airt pre-texx_rdeO videx_rapes, :lJhlts and other materials, as well as some
television pmgrammes are ot_pyrighteO. Unauthorize_t recording of these materials
may violate copyright protect.on laws.
Copyright signals
When playing back:
If you try t_._play back a tape that contains copyright con0"ol s_gnMs for the
pmtectkm of s_.fftware,"COPYRIGHT PROTECTF£) PLAYBACK IS
RESTRICTED" appears in the d_splay f_._ra few sexx_ndsand then the camcorder
displays a blank blue screen; y_.mcannot view the contents of the tape,
When rexx_rding:
If you try t_._record from software that comains copyright con0"ol s_gnals for the
pmtectkm of s_.fftware, "COPYRIGHT PROTECTF£)
DUBBING RESTRICTED"
appears _n the d_splay; y_.m canar_t record the contents of the software.
You cannot record copyright pmtectkm
s_gnals r_ a rape using this camcorder.
I:z
87
You can record a video played on your VCR or attalog carn_rder
(for digital
carn_rders
see p, 84) or a TV program onto a tape in the MV450i, if" rite TV or
other device has audiolvideo
outputs.
• If" an anomalous signal is sent f_rn rite TV or VCR, rite images re_rded
on rite
• may not appear so on the TNr, xmage),
r
tape may `dso be anormdous (although xt
not re_rded at `dl or COPYRIGHT PROTECTED DLrBBING RESTRICTED
may appear in rite display.
• You are unable to dub tapes re_rded
with rite copyright protective
• For higher picture qu`dity, we recotrgnend using rite S-150 S-video
doing analog line-in recording.
You cannot use headphones
while doing analog line-in
recording,
sigmd,
cable when
If you have the
•
....
.+
A'V/'lteadphones
terrmnal
set to headphones, it w_ll aurx_mat_c`dly s_V* _tch to A'V• tot
an'dog line-in recording. PHONES disappears from ritedisplay.
1. Connect
the camcorder
to the VCR, TV or other camcorder.
2. Prepare the devle_. (Example connecting to the VCR)
• Set the T'V/Vide_ selector on the television to Video. For furflter details, see
"Connections for Playback on a T%• Screen, on p. 30+
• '1"urnon the VCR. Load your recorded cassette, and put rite VCR in playback
pause mode.
• See your TV and VCR instruction rn_nu'als for details.
3. _[k_rn the cmnczrder's
PO_'cER switch to to PLAY(VCR),
the camcorder's
TAPE]CARD
switch to 'rAPE.
4. Load a blank cassette.
88
and move
1. Find a point on your recorded cassette slightly before the section
you want to copy and set it to playback pause mode.
2. Press the REC PAUSE button.
• S-vide_ _nd AV ]N/OUT t_TnJnals work as input tgrmJnals,
• The camcorder enters record pause mode,
3. Start playback
on the other device or turn on the TV to see the
desired program
while you monitor the picture.
4. Press the pause button.
* Recording starts.
5. When you get to the point where you want to stop recording,
the stop button or the pause button.
* Recording stops,
6. Stop playback
[]
press
on the other device.
Note:
• You can monitor
tlte picture
m rite vie
trader or LCD,
m
t_
=..
t_
89
You cg.n insert new scenes f_m your VCR or other carner_rder ont,_ your prerecorded tape using the l'vW450i's attal,_g line-kt or DV Jn terminals, Original
vJder_ g.nd audio will be replaced with rite new video and audio.
Scene7) be i_sertee
I1
'1
The piayL, aek tape
Inser: _r:.
pont
1i_'_ end beinl
Before ms_a'_i_g
'l_ae _p_ in th_
._
in_rdt_g
'l'he tap_in t_
e_co_
The video and audio of Ilte new scene replace II_a! of the old.
Make sure the AV/headphone
terrlfinal Js set _ AV through
It" PHONES appears in the dJsplay_ switch [he terlrlinal,
9O
the menu ( _
30),
The tape in the MV450i:
When using the MV450i's AV insert _nction,
otfly record to tapes recorded in SP
mode with continuously
recorded time codes.
If"there are non-recorded
portions or portions recorded in a mode other than SP
mode on the tape, recording will stop.
The playback
tape:
Ure only tapes without non-lex_rded
portions,
If there are non-recorded
portions or changes in the recording mode, you may not
be able to insert AV correctly.
You cannot insert AV in ritz following cases:
• The playback tape has been poorly _rded.
• During special playback: fast forward playback, rewind playback or slow
playback ere, (analog only),
TV:
You cannot insert AV from a TV program with anomah.ms
such as when rite p_gram
itself received poor signals,
synclt_mized
signals,
[Example recording from a VCR]
1. Connect the came, order to the VCR.
m
_=.'
2, Prepare the VCR and T\_
* Set the TV/'_qdeo selector on the televison to Video, For further details, see
"Connections for Playback on a TV Screen" on p. 30.
. T'urn on dte VCR and load a tex_rded cassette.
* See TV and VCR instruction manuals for details.
3. 'htrn the eameorder's
POWER switch to PLAY (VCR) and load a
recorded cassette.
. Make sure the REC/SAVE tab on the cassette has been slid to REC (glosed
position),
4, Move the cameorder's
TAPE/CARD
switch to 'rAPE,
91
1. On the VCR, locate a point 3 seconds before the scene to be
inserted. Set the VCR to playback pause mode.
2. On the e_Lmeorder, press
point. Set the came.order
• You earl use the playback
special playback functions
playback mode,
PLAY and locate the recording
start
to playback pause mode.
buttons on rite body of the ear,corder ur the
on the wireless controller in the same way as in
3. Press the AV INSERT button.
• AV INSERT and @11 appear in rite display,
.
Play back the cassette
in the VCR.
5. To start inserting, press the PAUSE button
• 011 changes m liD.
.
7.
,E
Ill
92
of the c_Lmeorder.
To stop inserting, press the STOP button of the e_me_rder.
• Inserting stops and AN"INSERT disappears from the display. The cartmorder
returns to stop mode,
• If"instead of"pressing STOP you press PAUSE, the ear,corder returns to the
AN"insert paum mode,
• If"you set rite zero set memory at the position on the tape where you want to
stop inserting, every time you return to that point, the carncorder will cancel
•its ANT• msemng
• r and enter stop mode.
Stop playback
on the VCR.
- For MV450 (For MV4S0i, _195).
You earl add sound to rite original sound on a pre-recorded
tape recorded irt the
SP m_xie with 12-bit sound. Use the internal or an external trfic_'ophone, The
original soued will not be erased,
Fur best results, 'add sound to tapes that have been recorded with this carneerder
in SP mode with 12-bit sound. If there are non-recorded
portions on the tape, or
portions recorded in a mode other than SP mode, or with 16-bit or 12-bit, 4channel sound, dubbing will stop, You cannot dub audio onto a tape recorded with
12-bit and 16-bit sound intermingled,
To connect mt _xter_ml microphone:
iiiiiiiiiiiiiiiiiiiiiiiiiiiiiiiiiiiiiiiiiiiiiiiiiiiiiiiiiiiiiiiiiiiiiiiiiiiiiiiiii
_
• _iiiiiiiiiiiiiiiiiiiiiiiiiiiiiiiiiiiiiiiiiiiiiiiiiiiiiiiiiiiiiiiiiiiiiiiiiiiiiiiiiiiiiiiiiiiiiiiiiiiiiiiiiii
[] Notes:
• When using an e_xter_mlmicrophone
_
Connect it to the microphone
terminal.
When using the DM-50 microphone
_
Make sure nothing is connected to
rite rrfica'ophone
When using the built-in microphone
_
=.'
termin_.
Make sure nothing is connected to
either the rrfic_'opltone terminal
or
the accessory shoe,
• To u_ your 2W to monitor videx_, connect the S-video terminal ( _ 32) or the
AV terminM (use only the video plug) to your 2W. You can monitor
the sound
with headphones only when using the S-video terminal ( _ 30).
Turn the carncorder's
POWER switch to PLAY and move the carncorder's
TAPE]CARD
switch to TAPE, Load a reeerded cassette.
• Make sure the REC]SAVE
position).
tab on the cassette
has been slid m REC (closed
93
Do not eonnectldiscenneet any cables m/from the etuncorder when dubbing audio
or preparing _ dub audio.
m+m
Locate the point where you want to start audio dubbing, then press
the PAUSE button.
• You can u_ rite playback burns on the body of the camcorder or rite
special playback functions on the wireless ot_ntroller in the same way as in
playback mode,
• The carncorder becomes set _ playback pause mode,
2. Press AUDIO DUB.
• AUDIO DUB. attd 111 appear on the display.
lw
Press the PAUSE button.
• Audio dubbing starts,
• Dire_'t your voice into the trficmphone,
" 111 changes to O.
,-q
,E
BI
4,
94
When you get to the point where you want to stop dubbing, press
the STOP button.
• Audio dubbing stops and AUDIO DUB, disappears front the display,
• The carncorder returns to stop mode,
• You can also set zero set memory (_182) at the place you want to stop
audio dubbing, then every time you return m that position, audio dubbing
will cancel.
• It"instead of pressing STOP you press PAUSE, the camot_rder will return to
the playback pause mode.
[] Notes:
• You can not use the DV termfnal while adding sound.
• You nfight want to adjust rite audio infix (_._98) when playing back a tape with
added sound.
• There may be a loss of"sound quality if you add sound to a tape recerded on a
earncorder other than the IvIV450,
• After adding sound 3 or more times _ the same place on a tape, there may be
some Mss in sound quality,
- For MV450i (For MV450, _93),
You earl add sound to rite original sound on a pre-recorded tape from audio
products (AUDIO IN') or with the internal or external mica'ophone (MIC. IN), The
originN seund will not be erased, For best results, add sound to tapes that have
been terx_rded with tiffs eameorder _n SP merle with 12-Nt sound, If there are
non-recorded portions on the tape, or portions recorded ]n a mode other than SP
mode, or w_tlt 16-bit or 12-bit, 4-eharmel sound, dubNng w_ll stop, If your tape
hasn't been terx_rded in SP mode with 12-bit sound, we recommend dubNng your
originN tape onto a blank tape using the MV45t3i's arlMog line-in func_on, then
dubbing audio onto the new tape, Make absolutely sure te _t the audk_ mode of
fire new tape to 12-bit and the recording mode m SR
To connect
other audio equipment:
•
•
•
• Make sure the A¥lheadphones
terminal
is set m AV_ throughr
H PHONES appears in the display, switch the term]nM,
the menu ( [_ 30),
I11
[] Notes:
• Do not um the yellow video
• The AV term]nal deesn't put
arid check yeur T%', or check
Always check the new sound
To connect
on _xter_ml
E'q.'
termiwaL
out any video, so connect the S-video terminNs
the LCD or the viewfinder as yeu add new sound.
with the speaker,
microphone:
95
[] Notes:
• When osing an e_eFm_l microphone ,-F Connect it to the _rficrophone
rennin'd,
When osing the DM-50 mkropllone
_" Make sure nothing is eonnecred to
rite microphone termimfl,
Whmz oslng the blfilt-ln microphone _1, Make sure nothing is eonnecred to
either rite microphone terminM or
rite accessory shoe.
• To use your TV to mo_fitor video, connect the S-video rermiwal (_32)
or rite
AV terminal (use only the video plug) to your TV, You can monitor the soued
with headphones only when using rite S-video termimfl ( _ 30).
Turn rite camcorder's POWER switch to PLAY 0€'CR) and move rite camcorder's
TAPE/CARD switch to TAPE. Iz_'_ a recorded cassette,
• Make sure the REC/SAVE tab on the cassette has been slid to REC (closed
position),
,-.q
,E
ud
Do not connect]disconnect
or preparing m dub audio.
any cables
m/from
rite camcorder
m÷m
(_
37)
1. Open
96
the menu and selet_t VCR SET UP,
2. Selet_t AUDIO
DUB.
3. Selet_t AUDIO
LN or !vHC. LN and close the menu.
when dubbing
audio
4. Locatethe pointwhereyouwant to start audio
dubbing, then press
the PAUSE button.
• You cart use the playback buttons on the body of the ¢am,x_rder or the special
playback functions on the wireless _ntroller in the same way as ht playback
mode.
• The camcorder becomes set to playback pau_ mode.
5. Press AUDIO DUB.
• AUDIO DUB, and -_ll appear on rite display,
,, If you have the DIvI-50 micxophone (optional) attached, [] (Connection)
appears in the display,
6. Press the PAUSE button (and start play on the other audio
ff AUDIO LN).
* Audio dubbing sParts.
* Direct your voice into the microphone.
" Ill changes to I.
devlc_
7. When you get to the point where you want to stop dubbing, press
the STOP button (and then stop play on the other audio device if
AUDIO IN).
,, Audio dubbing stops attd AUDIO DUB. disappears from the display.
• 'Cite camcorder returns to stop mode.
• You can also set zero mt memory ( [2_ 82) at the place you want to stop
audio dubbing, then every time you return to that position, audio dubbing
will cancel.
• If instead of pressing STOP you press PAUSE, the carncorder will return to
the playback pause mode.
=.'
[] lqot_s:
, You cannot use the DV terminal while adding soued,
• You might want to 'adjust the audio mix (_2198) when playing back a tape with
'added sound,
• There may be a loss of"sound quality if"you 'add sound _ a tape recorded on a
camcorder other than the IvIV450i.
• .AA:teradding soued 3 or more times to the same place on a tape, there may be
some loss in sound quality.
97
Wlten you play back a tape that was rexx_rded in ]2-bit mode, you can set the
audio output m play: stereo 1 (the originM sound), sterex._2 (any new sound,
dubbed to the tape after recording), or mix the bMance between the two.
• Audio from the 16-bit mode only eentains stereo 1 soued and so you cannot!do
not need m select the audio mix. The same is 0-oe for the 12-bit stereo I mode,
unless new sound has been 'added post-reeerding.
m+:
1. Choose the output,
° Press AUDIO MONITOR on the wireless controller,
• Starting with rite last selected setting, 4 settings appear as you push rite
button:
- STEREOI for just steree 1,
- STEREO2 for just steree 2,
- MIX/FIXED for an equal mix of stereo ] and 2.
- MIXF'_:ARI, (mix variable) for when you want to mix the balance between
stereo 1 and 2,
• To simply choo_ STEREOI, STEREO2 ur MIX/FIXED, make sure your
choice appears on the display.
• lI you choose M1X_;ARI., you can go on to mix the bMance,
• Use the ST-liST-2 keys to mix the balance. A bar showing the mix appears
on the screen for 4 sexxmds.
!
[] Note:
• When you have chosen the output, STEREO1, STEREO2, MIX/FIXED or
MIX]VARI, is shown in the top left of the display for a few seconds, II you turn
rite power off the output is set to STEREOL
98
When you play back a tape whose audio has been recorded
you carl change rite output chgnnels of that sound.
on multiple
channels
I ",,1
IF_,Yd
_m
MENU(_3?) I *VcR+ETuP
1. Load a tape recorded
1_*_uTpuTcH+++L_
with multiple-channel
audio.
2. Open the menu and select VCR SET UP. Then select OUTPUT
set it to the desired setting and close the menu.
• Refer to the following list.
OUTPUT
CH,
Played back sound
CH setting
Tape recorded
stereo sound
with
Tape recordedon
mul_plecharmels
L/R
L+R chartnels
main + sub
IlL
L clatnnel otfly
main only
R/R
R charme] only
sub only
m
=.'
99
By using a DV cable attd connecting rite camcorder to a PC exluipped with a DV
terminal conforming to IEEE 1394/DV compatible capture board, you can transfer
images taken wJtb the camcorder to your PC,
• While connected, it is recommended
that you power your eamcorder from a
household power socket using the power adapter,
• Ttml off rite power of both the carncorder and the PC before connecting.
• Optional software necessmy.
[] Note:
• Operation may not work correctly+ depending on tire software you are using,
and the specifications
wl
100
of your PC and its _rtings,
The camcorder can take, store and trmnage still images on 2 types of memory
cards: rite MultiMediaCard
(supplied with rite camcorder) or an SD IVIemory Card
(commerci_ly
available). The MultiMediaCard
is an ultra-small,
ultra-light media
that can record still images. About rite same size as a MultiMediaCard,
rite SD
(Secure Digital) Memory Card has a large capacity for recording still images, and
fits into rite same slot as the IvIultiIvIediaCard.
You can do tire following
with a memory.
• Record
105)
still images
(_
_
• Ymw still _mages 3 ways: Single (
109), Slide show (_21110), Index screen
([121110)
° Select rite quality of images recorded on
the card ( [L_ 102)
• Protect import.ant images against accidentM erasure ( _ 111 )
• Era_ ( _2] 112) and print mark ( _ 119) still images
• Create interesting effects by combining images ( _ 114)
• Record a still image from a cassette ( [._ 107)
• Copy multiple still images autotrmtically
_ artd from a cas_tte
(_
117, 118)
You can use most of the camcorder's functions when recording to a memory card,
such as the various recording prog'rams ( _ 55), self-timer ([..I2168),shutter speed
( [_ 73), white balance ([2]2176)artd other manual adjustments. Available functions
are marked wiflta rile m
•
•
+m
or _
+(m)
icons.
While rite camcorder is recording the still image, >>>> appears red* in rite
display,
+ While >>>> appears red in rite display, do not remove rite memory card or
disconnect the power source. Doing so could result in data damage,
While rite camcorder is re_eviHg a still image <<<< appears green* in the
display,
+ While <<<< appears gxeen in rite display, do not remove rite memory card,
Doing so could result in data da_rmge,
* It appears white when itt rrfin'or mode aed art the sc'tv_n of a connected TV,
)Im[portaut
Inserting or removing the memory card without first setting the POWER
switch to OFF can result itt data damage.
• This cam_rder
u_s only MulliMediaCards
or SD Memory Cards (_'_1)
You cannot use arty other types of memory
to.
_g
_,
_,
**).
cards,
** _'_1) logo is a trademark.
101
1. _[1lrn the POWER
switch
to OFF.
2. Open the memory
card compartment
cover in the direction
of the
arrow.
3. Insert or remove the memory card.
• Push rite memory card all the way kt
• Remeve the memery card by pushing the card in and letting it spring out
Do not attempt to pull the memory c',mJ out without first pushing it in
4. Close the cover.
[] Notes:
• When yeu _t the camcorder to CARD PLAY (MV450i: PLAY (VCR)) m_e,
the last image recorded appe_'s, If there are no images recorded on the memory
card, NO IMAGES appears in the display,
• Do not touch ritz memory card terminals,
Select the quality of a still image to be lecerded,
O
E
t¢
D_
to
MENU(
_ 3_)
[_
_
_
]_) _¢ut_
..... _E
_l_ chmlge the image quali_ to standard, open the menu anti select CARD
SET UP. Then select QUALITY, set it to STANDARD anti close the menu.
102
[] Notes:
• Depending on the image you are recording, sometimes there will be ne
difference in image quality between settings,
• Images are compres_d and recorded in the JPEG (Joirtt Photographic Experts
Group) retreat.
• The number of pixels is 640 x 480 (VGA) in beth FINE and STANDARD
modes.
Image
qualit)'
Nc,eessav memoq
per image
Numbe,r of images
per 8MB MMC*
Use when you warit to,..
FINE
Approx. 180KB
Appmx, 43 images
print out, etc.
STANDARD
Appmx, 98KB
Appmx, 78 images
,,.a_caell images toEraails,
irmlude them in your own
home page, ere,
,..save hi_
quality images,
* These figures are approximate. The actual number you will be able to record
varies depending on the images. Remember that the sample images already
recerded on the supplied IvIultiMediaCard am included in the total number.
, The number of images that can still be recerded on a memory card may
sometimes decrease by 2 images at once,
. Refer to p, 144 for the memory card displays.
C
!g
¢D
3
O
R
103
The images you take are automatically
assigned file numbers from (.EIO:-9900 and
stored in fblders of 100 images each. Each folder is nuntbered from : tYOto 998
atul re_rded on the memory card, Sample images have been ple-iecorded
on the
supplied MultiMediaCard,
entering folder nuntber : 00.
Set the image file numbers so that they Ie_t each time a new memory card is
insetted or so that they eemtt up continuously.
0 CONTINUOUS
Numbering is eentinuous between cards, so
that the first file namber assigned on a new
memory card is : mole than the last file
number assigned on the previous memory
card. When the file numbers are _t to
CONTINUOUS, each image taken is
assigned a different number, avulding
duplication of numbers. This is eenvenient
when y,_mwant to manage your images on
a PC. We recommend keeping the file
numbers set m CONTINUOUS,
I_rec images _e r_,eoM_ on 13x,eg_.
I
U _F
_
101_i011
c_claad ta* a p:cm_
'_ 0
]
0 RESET
Each time you insert a new memory card, the file number resets m its default
v',flue (: O:-0: 01). It"the card already contains files, the next available number is
assigned,
(II".IIf__'l
0
E
III
104
To change the file numbering,
open the menu and select CARD SET
UP. Then select FILE NOS., set it to RESET and close the menu.
_HHHHHHHHHHHHHHHHHHHHHHHHHHHHHHHHHHHHHHHHHHHHHHHHHHHHHHHHHHHHHHHHHHHHHHHHHHHHHHHHHHHHHHHHHHHHHHHHHHHHHHHHHHHHHHHHHHHHHHHHHHHH___
The camcorder's
Pregressive
Photo _nc_ion
lets you take vivid, virtually
blur-
free still images of moving subjects onto a memory card. You can also record
onto a memory
card images
from a tape in the carncorder,
or images
input
fltmugh the DV in termiwal (MV45tJi only).
* Moving
pictures
cannot
be recorded
onto a memory
card,
, MV450i only: Images input through the AV in terminal cannot be recorded onto
a memory card,
. Memory cards cannot record audio.
. _ you are using an SD Memory Card, make sure the proteet switch is set to
'allow reoc_rding.
Make sure a memory
carncorder,
card that has enough
memory
avNlable
1. Press the small green button on the POWER
the POWER switch to CAMLERA.
2.
3.
is inserted
switch
into the
and hold, turn
Move the TAPE/CARD
switch to CARD.
,, The nuntber of images that can still be _x._rded on the memory card, attd
other information
appear in the display.
• The camcorder will turn itself off if you are using a battery and do not
operate the camcorder for more than about 5 minutes, Set the POWER
switch _ OFF and then back _ CAMERA.
Press the PHOTO
button halfway
and hold it.
• Exposure is locked,
,, During auto_bcus O flashes white in the display as the camcorder
'adjust the
focus and it is displayed continuously
as a green mark when the camcorder
is ready to take the still image.
4. Press the PHOTO button fully down to record the still picture.
• O disappears from the display.
• The image is recorded to the memory card.
• While the camcorder is re_rding the still image, >>>> appears red in the
display. (It appears white when in m_rmr mode attd on the screen of a
connected 2W.)
R
_g
O
105
[] Notes:
• Te use the self-timer ( [2_368),press rite © button before step 3, and then press
rite PHOTO button t_lly down,
• The wireless controller's PHOTO button has no half-way setting. Press the
button fully and the eamcorder iTrmaediately takes rite image.
• When rite PO'_VER switch Js set m CAMERA and rite TAPE/CARD switch is
moved frem TAPE m CARD, the eameorder modifies the image fk_rapprepfiate
_erdirtg
ertto
a tllemory
C_Lrd,
The indicators that appear in the display when recording to a memory, card:
Imag8stabilizer
i
mage quality ( [L_ 102)
Baol(up
b_te_+
(E_112a)
(_
Bakerypackis
exhausted
(_ 127)
0
E
=E
t_
,=_
106
_
=emOF'y card ( LI_ 105!
_em_iNng bat_rypower
(_ I_7)
Record an image from a cassette onto a memory c_,ml,To automatically record
multiple still images from a cassette m a memory card, refer m "Copying Still
Images from a Casrette" on p. 117.
* The still image's data erode will reflect tlte date and time ]t]s recorded to the
memory card,
I '1t"_+d
1. Play back the cassette.
2. When the image you want to record appears in the display, press
the PHOTO button halfway down and bold it.
* The tape is set to playback pause mode and the [tarnber of"images that can
still be recorded o[t the memory c_,mlappears i[t rite display.
* The display appears to close fbr an instant as ]f it were a Shutter releasing
(except when you are operating the multi-image screen),
3. Press the PHOTO
memory card.
button ftdly down to record
c
_w.
©
=
_,
the image to the
[] Notes:
. You can 'also set the cassette to playback paure mode ht step 1 attd record the
image w]tlt only 1 full press of PHOTO button.
* It"you reer_rd an ][rmge onto a memory card that was originally recorded ]n the
16:9 mode for w_descmen 3W's, the image w_ll appear to be vertically
"squashed" (compresred).
107
-MV450i onlyRecord images input ritmugh rite DV Jn terminal onto the memory card as still
images,
• "Citestill image's data code will reflect the date and time it is recorded to the
memory card,
1. Connect the eamcorder to the other digital device..
" Cortrtect tile Cartort CV-] 50F DV cable (optional) with rite sides of rile plugs
marked wJrit rite arrows facirtg as shown above.
2. Prepare the other device.
,. Turn on rile power and load a recorded cassette.
3. Load a memory
PLAY(VCR).
4.
Move
card. _[llrn the camcorder's
the TAPE/CARD
switch
• DV IN appears in rite display.
• If you have a cassette inserted,
POWER
switch to
to TAPE.
make sure it Js Jrt s_p mode.
O
[
1. Start playback
on the other device.
2. When the image you want to record appears
,-q
3. Press the PHOTO
memory card.
108
in the display,
the PHOTO
button halfway
down and hold it.
• The image appears as a still image in rite display,
• The number of" Jtrmges that can still be recorded on the memory
appears in rite display,
button fully down to record the image
press
card
to the
[] Note:
', If you record an image onto a memory card that was originNly recorded Jn the
16:9 mode fbr widescreen TV's, the image will appear m be verticNly
"squashed" (compressed),
Play back and view still images recorded on a memery card. (For details on
connecting m a TV, see "Connectiens
for Playback on a TV ScTeen" on p. 30)
• The cameorder may net be able to copy or play, etc., images re_rded
on a nonC_lon camcor_Jer.
Do not chmlge Ihe data recorded on a memory card.
• You may not be able to play back the following still images costly
on
this camcorder:
-Still
images that have not been recorded with this camcorder but
downloaded from a PC (excluding the sample images on p. 722-123)
-Still
hnages that have been _orded
with this camcorder but have
subsequently been enhanced on a PC
- Still hnages whose image [ile names have been changed on a PC
There are 3 ways to view still imag_:
• Single image
• Slide show:
One after the other automatic',dly
• Inde× screen:
Six images at once
Make sure a memory
earncorder.
card that has images
in order of recording
recorded
C
on it is inserted
in_
the
!g
O
• Single
1. 'htrn
O
Image
the POWER
switch to PLAY (MV450i:
PLAY(VCR)),
2. Move the TAPE/CARD
switch to CARD.
• The last image recorded appears in the display,
3. Search for the desired still image by pressing the CARD +Ibuttons.
• Press + to view the next image and - rx_view the previous image,
• Pressing + at the last image will take yeu _ the first image. Pressing - at
the first image will take you to the last image.
109
• Slide Show
With
an image in the display,
• The images
press the SLIDE SHOW button.
play back one ',ffter rite other for 5 seconds
each.
To stop the slide show, press the SLIDE SHOW button.
• The slide show starts or stops each time you press the SLIDE SHOW
• The slide show stops with rite last inaage appearing Jn the display.
button.
• Index Screen
Up to 6 images
appear
INDEX
at once so you can _areh
quickly
for an image.
101-_1_3
<<<<_4315t_
D
(II".IIf__'l
m
1. With an image
in the display,
press the INDEX
SCREEN
button.
* Up to 6 images appear in rite d_splay+
2. Move the _
_"
o
1=
m
t_
,-.q
110
3.
mark
to the image
you want to view.
. Turn rite selecrx_r dial downwards
to go rx_the prevkms _mage and upw+mls
to go to the next _mage.
* Tumhlg the di'al upwards at the last _mage w_l] take you rx_the next _ndex
screen. Tumhlg the di'al downwards m the first inaage w_ll take you rx_the
previous index screen,
* J_p
rx_the nextlprevious
index sca'een with the CARD +/- buttons,
Press the selector
dial in.
• The _mage you have marked
tills the whole display.
Select important images and protect them from accidental erasure, ff a memory
card is formatted, however, 'all images, includhlg protected images, will be
pe_ently
erased ( _ 120).
• The pre-recorded
sample images provided on the supplied MultiIvIediaCard
are
'already pyotected.
[ ",1t'Yd
m
MENU(
_
37)
[*_
_r
Make sure a memory
carncorder,
]_ "*_OT_T_
card that has images
recorded
1. Open the menu and select CARD
OPER.
on it is inserted
into the
2. Select PRO_[_C'lP o-..
• Up to 6 images appear kt the display,
3.
Move the Cr mark to the image
you want to protect.
• Tunfirtg rite selector dim downwards takes you to rite previous ilrmge aed
upwards takes you to the next image,
• Tlmfing the din upwards at the last image will take you to rite next iedex
scxeen, TXtrnktg the din downwards
at the first image will take you to the
previous index screen,
• Jump to rite next/previous
index sc_"een with the CARD +[- buttons.
c
-%
¢D
O
4. Press the selector dial in.
• The o-_ protect mark appears on rite image.
• Now you are unable m erase this image,
5. Close the menu.
[] Note:
• To cancel image protection, move the c2_ mark to the protected image and
press the selector din in, The o-. protect mark disappears.
111
Erase images singly or ell at once,
• You cannot erare protected images, Cancel image protection ( _ 111) first in
order m erase an image,
• Erase images with caution. Once an image has been erared it cannot be
restored.
(II".IIf__'l
_m
MENU(
_ 37)
[,e,,D o_,.
]_.) ,f_AGEERASE
Make sure a memory card that has images re,coNed on it is inserted into the
cameerder,
1. Move to the image you want to erase with the CARD +1- buttons.
• Use the index sereen ( [2_ 110) if necessm'y and make sum rite image you
want to erare fills the display,
2. Open the menu and select CARD OPEN.
3. Selet_t IMAGE ERASE.
• CANCEL, SINGLE and ALL rettings appear.
• To cancel erasing, relect CANCEL and close the menu.
0
E
III
To erase images one at a time I
4. Select SINGLE.
• ERASE THIS IMAGE'? NO YES appears in the display.
.
112
Selet_t YES.
• The image erases and the previous image appears for erasing,
• To erase attother single image, move to that image with the CARD +lbuttons, and select YES,
• If the image you are trying to erase is a protected image, YES appears in
purple and is unseleetable.
• If you select NO, you return to step 4.
6. Close the menu.
To erase 'all images
4.
on the memory
Select ALL.
,, ERASE ALL. IMAGES?
rite display,
Car_
[EXCEPT
at
once
FOR
1
o-_ IMAGES]
NO YES appeA.trs in
5. Select YES.
* All ]ntages except the pyotected ones are era_d.
. If" you sele/,,"tNO, you return to step 4,
6. Close the menu.
c
R
[g
O
R
113
Liven up your productions
by superimposing
one image on top of the otlter,
Combitte 2 still images or a still image and a moving image, Choose a still image
from rite memory card, either one of the pro-recorded
sample images ( _ 122) or
one you have recorded your_,
then combine it with the c_rrenfly re_rding
image, moving or still,
Select from 3 type_ of Card MLx effects:
CJtRD CItROMA
(Card chroma k_v)
The c_rrently tvx_rding image appears in place of tim blue area of a pro-recorded
still image such as a picture frame, When m/,_rding your own still image for
overlapping,
make sure to record tim area in which you want tim new image to
appear blue, witlt a blue c_in
as a background, for example. Adjust the mix
level in the blue area of the pre-recorded
image,
Imago being r'oecr_o,:J
by the camcorder
_ill im_g+
CJtRI) LUMI, (Card luminance key)
The c_rrently reer_rding image appears itt place of tim light area of a still picture
such as a haed-written llNstration or title. Make your own by drawing or writing
on a white piece of paper. Adjust the mix level itl tim light area of the still image,
Imago being r+cordefl
by'_hocamccrd+r
Stillimage
-'10
E
,_.q
114
CAM. CHROMA (Camera clu'oma key)
Superimpose the cuo'endy recording image on t_p of a still image, which
becomes its backgyound, Shoot rite subject (ff the c_rrenfly recording image
against a blue background, such as a bNe c_rtain. The origimfl still image will
appear in place of the blue area. Adjust the mix level in the bNe area.
Image boing rsco_
by _o
camcord*r
Still im_go
-'1Mix level
The m]x level bar appears. Adjust the mix level using the - and + at the ends of
the bar as guides,
C
_w.
Make sure a memory card that has images recorded on it and a cas_tte
inserted int_ the carncorder,
have been
!g
¢D
O
,7,
Make sure the prognrarn _lector is set to _1.
[Select]
1. Open
the menu
2. Press the CARD
combined.
and select mI_CARD MIX.
+[- buttons
to select the still image
to be
3. Select MIX TYPE.
• CARD CHROMA, CARD LUML, CAM, CHROMA settings appear.
115
w
Select the desired setting.
• Yeur currently recording image is combined with the pre-recorded still
image.
Selet_t MIX LEVEL.
6. Adjust
the mix level.
• Turning tile relector dial upwards adjusts
downwards
adjusts to rite left,
to rite fight and turning
7. Close the menu.
• CARD IvILXflashes in tile display,
[ Ore'Off ]
8. Press the card MIX button.
* CARD NEX stops flashing,
. Yeur currently recording image is combined with the pre-recorded still
image.
. Each time you press the card MIX button, yeur relection is activated
(display lights continuously) or deactivated (display flashes).
For a moving
image
I
1. Press the start/stop
button to start and stop recording.
• The combined images are recorded onto rite cassette,
For a still image
I
1. Press the PHOTO
button halfway
down and hold it.
• @ flashes white in the display as the camcerder adjusts rite focus attd it is
displayed continuously
as a gxeen mark when the camcorder is ready to take
the image.
E
2. Press
the PHOTO
button
fully
down
to record
the image
to the
cassette.
[,.
oE
* @ disappears from the display.
* The combined images are recorded onto rite cassette for appmxitrmtely
seconds (8 seconds in the [] SP or [] LP recording m_nle).
6
t_
o+ []
'_
=+
116
Notes:
• Ifyouch_lgethepositkmefthePOWERswitehormevetltepmg_amselector
from [] to El Easy Recording m_.e, relec't yeur still image for Card IvIix again.
• When setting Card IvIix you must cm"ry out steps 1 to 4.
Copies multiple
still images
from a tape _) _he memory
card
using _he Pho_)
Search functiott
, The still images
data codes will reflect
_he date and time the copies are _rmde
"JNL,'Vd
_m
MENU
JL
( [22137)
Make sure a memory card _hat has enough memory available and a recorded
cassette have been inserted into fue carncorder
1. Locate the first still image on the cassette that you want to copy
and stop the cassette at a point before that image.
• All the still images on the cassette after that [xfint will be copied onto the
t_Iemory
carcJ
• If you want _; copy all the images
on a cassette
rewind
the cassette
to the
beginning
2. Open the menu and select CARD
OPER.
R
3. Select COPY [_*_l.
• CANCEL attd EXECUTE settings appear
4
Select EXECUTE
• Select CANCEL to stop copying
• Cassette and card irfformatiott appear in the display and copying starts
• NOW COPYING
[r_c_l
appears in the display
• The camcorder automar_ically performs the Photo Search function to locate
still images attd copying starts. The currently copying image appears in the
display.
• Copying s_ps when the cassette is finished or the memory card is full
When the memory card is full CARD FULL will appear in the display
5. Press the stop button when your desired
copying.
images
[g
3
0
g,
have finished
117
Copies multiple still images from the memory card to a cassette.
• The still images' data codes will reflect the date aed time the eepies are made,
• The [] SP and []LP recording modes are not available when copying memory
card images to a cassette.
MENU(
_ 37)
[ I'c_RD
0[_£R'
] _) I,C_PY
[[5i_,_[_1
Make sure a memory card that has images recorded on it and a cassette that has
eanugh recordable space have been inserted into the carncorder,
I+:
_m
1. Locate the point on the cassette
and set it to stop.
where you want to start copying
_m
2, Selet_t the first image you want to copy by using the CARD
buttons.
+I-
• Still images on the memory card including and _ter that image will be
copied onto the cas_tte,
* It"you want to eepy N1 the still irrmges on the memory card, select the tqrst
image.
_,
o
E
= 3, Open the menu and selet_t CARD OPER,
m
•= 4, Selet_t COPY Ic_*t_l.
1:
• CANCEL and EXECUTE settings appear,
to
5, Select EXECUTE.
• Select CANCEL to stop eepying.
• Cassette and card information appear itt the display and copying starts.
• NOW COPYING ic_*_-nl appears itt the display.
• Each image is copied for about 6 seconds on the cassette,
• Copying stops when all the images have been eepiod or the tape is full.
118
6, Press the stop button when your desired
copying,
images
have finished
Animage
on a memory card must be markedbefore it can be printed, The
camcorder supports the _ DPOF (Digital Print Order Format) print ?brmat.
Images can be aurx_matically printed on a DPOF-supporting Canon printer, Up to
50 images per memory card can be print marked,
(_
37)
Make sure a memory card [hat has images recorded on it has been inserted into
rite camcorder.
1. Open
the menu
and select CARD
OPER.
2. Select PRINT MARK _.
• Up to 6 images appear in ghe display,
3.
Move c2_ to the image you want to mark.
• Tlmling die selector dial downwards takes you to the previous image and
upwards takes you to the next image
• Tlmfing the dial upwards at tbe last image will take you to rite next index
sca'een, 'Fuming the din downwards
at tbe first image will take you to the
previous index screen
• Jump to the next/previous
index so-een with tbe CARD +/- buttons
R
_g
4. Press the selet_tor dial in.
• The _ print mark appears next to rite image
O
5. Close the menu.
g,
[] Notes:
• To cancel a print mark, move <_ to the print-marked
image and press the
selee_r dial in. The _ print mark disappears,
• J:t"there are a large number of images recorded on the memory card, it may take
time for a print mark to appear on an image.
119
Format new memery cards, if
perrmtttettfly and quickly erase
protected images (tiffs includes
The MultiMediaC+trd
supplied
you get rite message CARD ERROR, or to
all the images on a memory c+trd, including
the pre-reot_rded card mix sample images)
with this camcorder lms already been forlrmrted
fk_r
you
* Be cautious
whett fk_rniattittg recorded
memory
cards
_dl images
will be
perlrmnettfly erased
o If you purchase additional memery cards, fer_rmt them with the camcorder not
a PC or other device
( _ 37)
Make sure a memery card is inserted into rite eamcorder
1. Open the menu and selet_t CARD OPER.
2. Selet_t FORMAT.
• CANCEL and EXECUTE settings appear
0
E
3. Selet_t EXECUTE.
• Select CANCEL to cancel fermattittg
• FORMAT TH_S CARD? NO YES appears to otmfirrxL
4. Selet_t YES.
• Fermattittg starts and NOW FORMATTING appears in rite display
• If you select NO, you return to step 3
5. Close the menu.
120
The camcorder formats memory cards in DCF (Design role for Camera File
system)
Images recorded on a memory card with this cameerder cart be tyansferred _ a
PC with the u_ of the fblk_wing products made for MulfiMediaCards
or SD
Memory Cards:
PC Card Adapter: Holds a memory card then inserts into rite PC card slot found
on most types of lapmp PCs.
PC Card Reader: Connects m a PC then accepts a memory card,
FD Adapter: Holds a MultiMediaCard
tben inserts into a PC's floppy disk drive.
If you need extra MultiIvIediaCard in addition to rite supplied one, use cards made
by SanDisk Corporation.
If you trlistakenly erase the card mix sample images plovided on rite
MultiMediaCard, ritey can be downloaded from the following home pages:*
htth:]]www,cmlon-europa,com/hroduct,'_pmducts.htlnl
htth://www,canon-asia.com/
htth://www,canon,com, au
*You will need a PC Card Adapter or PC Card Reader to be able to do W nload to a
memory card
* It"you purchase eddifiotafl memory cards, format ritem wirit tbe carncorder, not
a PC or other device. There have been cases where memory cards forlrmtted
with a PC or other device do not function properly,
* We reco_mnend saving backups of memory card i_rmges on your PC's hard
drive or other external memory device, linage data may be damaged or lost due
to a defect in a memory card, or if a memory card is expo_d to static
electricity Contents of a memory card cartrtot be compensated for should data
become damaged or lost.
. Do not remove rite power source or the memory card while rite camcorder is
accessing (recording to, reading erasing files from or formatting) rite memory
card card
. Do not u_ memory cards in places subject to s_ng tnagnetic fields
. Do not disassemble memory cards
. Do not bend or drop memory cards, or expose ritem to sWong vibrations or
extemal Shocks.
. Do not get memory cards wet.
. Do not remove rite memory card's label or affix other labels. Al_-ixlabels m the
memory card's case
c
_.
©
t*
!t
€_
o_
_,
121
+ Do not leave memory cards in places subject to high temperature or high
harnJdity.
° Moving a memory card rapidly between hot and cold temperaao'es may cause
condensation m form on it, leading to malfunctions. Avoid this problem by
placing the memory card in a plastic bag and letting it slowly adjust to
temperature changes before removing it from the bag. If'condensation should
occur, maintain ritz memory card at a constant temperature and let the moisture
evaporate naturally.
• Do not touch the memory card's terminals or let dust or dirt come in contact
with the tenn]nMs, Store and carry memory cards in their case to protect the
terminal area.
• There is only one correct way to insert memory cards into the carneerder, Do
ant foree_lly insert the memory cards backwards or upside down, Tiffs eeuld
damage the memory card or the camcorder.
+ The following are the sample images tltat have been pre-recorded
on the
included MultiMediaCard,
There are a total of 15 images: 8 Card chroma key
images, 5 Card luminance key i_rmges and 2 Camera chro_rm key images+
Card chroma
0
E
D_
t_
122
key
Card luminance
key
Camera
key
chroma
* The pre-recurded
sample images on the MultiMediaCard
included with this
camcorder are intended sNely fur the personM enjoyment gained from
_mtblifittg them w_tlt person_ videx._s taken with this camcorder. Do nut use the
pre-recorded
sample images fur any uther purpose.
PhomEssentiais
- Royalty Free Stock Photography
The PhomEssentials
suite of royNty-free
images on CD-RO:vI features premium
quality assignment photography and Js JdeNly suited fur use Jn edvertisJng,
brochures, reports, multimedia,
websites, books, packaging and more,
Fur mure ittfurmation, please visit tlteJr website www, phomessettfiNs.com
Mult_tediaCard
Capacity
!nterface
MMC-SM Specifications
8 MB
MultiMeO_aCard s_edard
Operating
temperature
Dimensions
rastge
Weight
c
!g
O
0°C-40°C (32°F -: 40°F)
32 x 24 × :.4 mm
1,5 g
Weight and dimens_otts are approximate.
Errors and omissions excepted.
Subject to change without notice,
123
i
Set
eamcorder
toXAPECAMERA
mode, Extend the viewfinder sTaight
out, then 'adjust the viewfinder fbcusing
Rotate the viewflnder to an angle that
allows
you to view comfortably.
Store
the eameorder with the viewfinder flush
lever the
_ suit
eyesight.
with
bodyyour
of the
carncorder,
To view with the viewfinder,
_
make sure
the LCD panel is either aimed so that the
subject can merfimr viewittg or mtally
clod
with the screen fachtg inwards,
Attach the cord _ tbe lens cap and
pass tbe grip belt through the loop on
the cord,
• Hook the lens cap on to the/.nhp
while you are re_rding,
belt
and place it
over the lens when you have finished.
• Relea_
the Yelcro tastemng
and hold
the cameorder with your right hand
while you adjust the belt wJ_lt your left,
Your index finger should reach the
zoom control and photo button, and
your _humb should reach the stas*Jstop
button _m_brtably.
124
_g_
_iii
• For extra mcurity and po_a_bility, attach
tile shoulder strap before using the
camcorder.
• Pass tim ends titmugh tite attacltment
bars and adjust the lengtit as sltown+
• Be eare_l
not to leave rite view:fieder exposed to bright sunlight, or it will
melt, ('rite ligltt is concentrated by tlte view:finder lens.) Adjust the angle of the
viewfinder to prevent sunlight from entering.
125
• These times vary -- the s_est polley is always to have 2 or 3 times as many
battery packs as you tlfink you will need.
• You will get more ye_rding
time _f you turn the camcorder off between shots,
ktste'w2 of leaving it in record pause mode.
Time needed
for
_11 recharge
Maximum
record_rtg
time
BP-512
hr. 10 mitt.
Using viewfi nder
2 hr. 30 mitt,
Using LCD screen
2 hn
BP-5_ 1 (optional)
hr. 10 mitt.
2 hr, 30 mJn,
2 hn
BP-522 (optional)
2 hr,
5 hr, _0 mJn,
4hr,]5
BP-535 (optional)
2 hr. 50 mitt.
8 hr, _5 illJtt,
6hr, 45 mJn.
mJn.
Recordktg time w_ll be shorter than usual at Mw temperatures,
You can u_ the
battery pack between 0 ° to 40°C (32 ° and ] 04°F), but _t works best between
10 ° to 30°C (50 ° and 86°F),
• If" fire battery pack starts to give you much less recording time than usual, _i has
reached rite end of" its life and must be replaced,
[] Note:
', Thcse figures show how long you can view playback with the LCD, after attaching a
fltlly-charged battery pack, Playback time will I'K'_shtxrtenedat low temperatures,
Battea'y pack
BP-512
BP-511 (optlonar)
BP-522 (optiottal)
BP-535 (optiottal)
126
Playback time (us]rig the LCD screen)
2 hr. 15 mitt.
2 hr. 15 mitt.
4 hr. 45 mkt.
7 hr. 4tl mkt.
The indicator in the display shows you
approximately
how much charge rite
battery pack has left:
[] Notes:
* "CHANGE THE BATTERY PACK"
appears in rim display for 4 seconds
when rim power is completely
exhausted, 'Cite empty battery mark
then appears and starts to flash, The
power indicator light 'also flashes.
. 'Cite indicator is not constant -different levels will be shown when
100%
,L
75%
4_
50%
4_
25%
you subject rite battery pack and
camcorder to different conditions.
You can recharge a lithium ion battery pack whenever it is convenient. Unlike a
conventiomfl
battery pack, it does not have to be fully discharged first. However,
as the battery pack will naturally discharge itself over dine, it is best to charge it
rite same day you plan to use it, or the day before,
Always atlaelJ the termilml coven
• Do not allow any metal objects _
touch rite tenrfinals
as riffs cart cause
a short circuit and damage the battery
pack. Attach rite terminal cover
whenever the battery pack is not
being u_d.
Keep the terminals dean.
• The camcorder, adapter or battery pack will not work preperly if rite terminals
are dirty, Attach the ter_rfin'al cover whenever rite battery pack is not being u_d.
Storing the battery pack.
, ff you do not use a battery pack for a period of more titan a few monrits any
remaining charge may cau_ damage to rite battery pack, and reduce usage time.
To prevent damage riterefore, aim to use a battery pack's complete charge
before storage. See the option_ battery pack's instructions
for further details.
127
Open the backup battery cover on the
battery attachment unit, and insert the
CR2025 lithium battery with the + side
facing outwards. Click the cover back
into place,
This backup battery alMws the
camcorder to remember the date attd
time and other settings when main power
source is removed, It has a life span of
about a year.
When it needs replacing (or if it has not been installed), the _'_ mark flashes in the
display, Remove the old battery by pushing up then releasing and lifting out, Make
sure to attach a power source to the camcorder first, so it will remember your
chosen settings when you change the battery.
DANGER!
'Ii'eat the battery, pack with care.
Keep it away from fire (_._rit m]ght expk_de).
Do not expose the battery pack _ temperatures gnreater than 60°C (140°F).
Do not leave it near a heater, or inside a car in hot weather, for example.
Do not try to disassemble or modify it,
Do not drop or knock it.
Do not get it wet,
WARNLNG!
The battery used in this device may present a fire or cberrfical burn hazard if"
trfistreated, Do not recharge, disassemble, heat above 100°C (212°F) or
incinerate,
Replace the battery with a Sony+ Hitachi Maxell, Sanyo or Panasonic CR2025
or _acell
DL2025, Use of"another battery may present a risk of"fire or
explosion.
The used battery should be retemed to the supplier for safe disposN.
128
Cautions:
* Do not pick up the battery using tweezers or other metal tools -- this will cause
a short circuit.
. Wipe the battery with a clean, dry ck_th rx_ensure proper eentact,
. Keep the battery pack out of reach of"children -- if it is swallowed, contact a
physician immediately, as the battery ease may break down and the battery
fluids damage the stozrmch and intestines.
. Do not disassemble, heat or immerse the battery in water, to avoid the risk of
explosion.
Avuld high temperatur_
and high humidity,
• Do not leave the carner_rder inside a car in hot weather, for example.
• Be careful of heat radiating from videm lighting eXlu_pm_nt.
• Do not take the earncorder into a humid room,
Avoid sudden changes in temperature.
• If you take rite camcorder from a cold place to a warm place,
form on rite lens and intemN parts ( [2121
132),
condensation
may
Do not point the lens or viewflndec at strong light sources,
• Never point it at rite sun, attd do not leave it aimed at a bright subject,
• Be especially care_l when leaving rite camcorder on a tripod.
Avoid magnetic or electric fields.
• Do not use rite camcorder dose to TV 7anstrfitters, portable er_rnmunicafion
devices or other sources of electric or magnetic radiation. They may cause
picture interference, or perrnanenriy damage rite camcorder.
Do not expoae the cameorder to water.
• Cover the carncorder when you are recording in vain or mist.
• There is a risk of electric shock ff water gets inside the carncorder -- contact
qualified _rvice personnel as soon as possible,
Prot_t
the lens,
• Sand and dust can darrmge rite lens -- be especiNly
careful on windy days,
Handle the cameorder gently.
• Vibration or shock can caum da_rmge.
• Do not use rite viewfinder or LCD panel as a carrying handle.
Do not disassemble
the emncerdec.
• This is very dangerous as there is a risk of electric shock -- ff the carncerder
does not func'tion preperly_ take it to qualified _rv]ce personnel.
o
129
It"you do not intend to use the camcorder for some time, store it in an area which
is free of dust and moisture, and where rite temperature is no higher tlatn 30°C
(86°17). After storage, cheek each part and Nnction of your camer_rder m make
sure everything is still worldng properly,
[] Note:
* These cautions _so apply to accessories such as battery packs and cassettes,
• Clean the viewfinder
screen, Rotate
the
viewfinder upwards• Remove the
viewfinder protect cover and clean by
inserting a cotton bud, When finished
return it flush with the camcorder,
, The view:t'inder scxegn scratches
Take care when cleaning
easily
I.,CD
• Clean the LCD screen using a
commereiNly
available
cleaning
cloth _br
glasses,
• Where
there is a big chartge in
temperature, moisture may form on the surf'ace of the screen. Wipe clean with a
soft, dry cloth,
• At low temperatures
rite display may appear to be much darker [han usual, Tiffs
is not a fault and as [he screen warrrts up the display will return to normal,
Camcorder body and lens
, Um a soft, dry cloth to clean the camcorder body or lens, Never use chemJcdly
treated cloth or volatile solvents such as paint thinner,
130
Video heads
• When mosaic-like noise appears on rite playback picture,
the video heads may be dirty. When the video heads are
badly eonta[rfinated, the eameorder may show a blank blue
screen or a warning,
• For rite best picture possible, after using the carncerder for
appreximately 20 hours, clean the video heads using Canen's DVM-CL Digital
Video Head Cleaning Cassette. It"the "anise" remains, repeat the cleaning (up
to maximum of 5 times),
• De not use a wet-type cleaning cassette, as this can cause damage,
_OWel"
SOUI'C_
• You can use the compact power adapter K_operate yeur carncorder and charge
battery packs in any country where the electricity
supply is between 100 and
_40 V AC, 50/60 Hz, Contact your Canen deNer fur informatien
about pNg
adapters for overseas u_,
TV playback
• Although you can always play back your recordings on the LCD screen, your
camcorder can only be connected to TVs whiuh use its PAL system, This TV
system is used in the fbllewing countries:
Algeria, Australia, Austria, Bangladesh, Belgium, Brerlei, China, Denmark,
Finland, Gerrnany_ HongKong, Iceland, India, Indonesia, Ireland, Italy, Jerdan,
Kenya, Kuwait, Liberia, MMaysia, Malta, Mozarnbklue, the Netherlands, New
Zealand, Nerrlt Korea, Nerway, Ornan, Pakistan, Pertugal, Qatar, Sierra Leone,
Singalx_re, South Africa, Spain, Sri Lanka, Swaziland, Sweden, Switzerlaed,
Tanzania, Thailand, Turkey, Uganda, United Arab Emirates, United Kingdom,
Yemen, former Yugoslavia, Zambia,
o
131
Condensation
may f'orrn on the carncorder when it is moved from a cold place to a
warm place, Using the carncorder while condensation
is pre_nt can damage both
the tape and the carncx_rder,
Condensation may become a problem:
When you take the camc_.:xdgrfrom a cold
plac_ to a warm room
When a cold room is heated rapidly
When the camcordgr is left in a humid
room
When the eao_ccrlxleris taken from a_ aixconditioneA morn to a w0xm, hurcdd place
Protecting the camcordec from condensation
, Before you take the carncorder to a warm or humid place where condensation
is
likely to be a pmbletr_ mflo'ad the cassette and put the camcorder in a plastic
bag. Wait until rite carncorder reaches room tempera_re
before you take it out
of"rite bag,
Wlmt happens
when eonde*mafion is deiecierl
, "CONDENSATION
HAS BEEN DETECTED"
is displayed for appreximately
four _conds,
Then, the power indicator flashes attd rite _ mark flashes in rite
display, If"there is a cas_rte in rite cam_srder, it stops automatic_ly
attd
"REMOVE THE CASSETTE"
is displayed for approximately
4 seconds attd
riten I_ flashes in the display, If you have the beep turned on, it will sound,
. The carncorder may not detect ri_e condensation
immediately
-- rite
condensation
warning may not start flas_fing for ] 0 to 15 trfinutes.
. You cannot load a cassette when condensation
is detected,
-o _
:_ _
o
•_
132
Wlmt yoa should do
. Remove ri_e cassette, leave rite cas_rte ¢x_mpartrnent open, attd turn rim
CarlIcoYder 0_,
. Leave it in a dry place until _he condensation
evaporates, After rite condensation
warning stops flasldng, wait at least another hour before Wying _ use rite
carncorder,
Refer to this checklist first if you have any problems with your cam_rder,
Possible explanations
are given fbr each problem on rite list -- turn _ the page
numbers Jn parenflte_s
for more Jnfbrlnation,
Make sure that the camcorder Js properly connected if you are using it with a TV
or VCR. Consult your deMer or service outlet if problems persist.
Problem
[] Nothing
buttons.
Cause and/or what to do about it
happeas
when I press the
[] The camcorder turned
itself off,
• The camcorder is not _t to the
appropriate mode ( _ 17, 26),
° The cassette is not loaded or is set for
erasure prevetttiott ( _ 15-16),
° The cassette has reached the end.
° The power source is not properly
connected, or the battery pack is
exXmastedor not properly a_ac+hed
( _2110-14-,127).
• The function cannot be used ]n that
recording pmgnmrn( _ 55),
• The carncorder was in record pause
mode fbr more titan about 5 mJttutes
( _ 17, ]05).
• The battery pack is exhausted
( [2L21
11-14, ]27).
[] The cassette compartment
stopped mid-operatian
wldle
loading/unloading a cassette,
•
* The battery pack s po W er is
exhausted. Recharge or change to a
new battery pack ( _21 ] ] -] _,).
[] The start/stop
work.
* The cassette is not loaded or is set fbr
erasure prevention ( _ 15-16),
* The cassette has reached the end.
button
doesn't
[] There's no pictvYe in the display,
* The camcorder is not _t to the
appropriate mode ( [.2121
] 7, 26),
[] There's a blank blue screen in the
display.
* You are attempting to play back or
record copyright pretected material
( _ 87),
. The vider_ heads are badly
cont_rfinated ( [23 131),
[] The camearder
• The _mcoJder Js on manualfoc_ (
75).
• The viewfieder lens needs adjusting
( _ IN),
• The lens Js dkty ( [..121
]30).
won't
focus.
133
[] Note:
• Some subjects are not suitable for aumfocus, fit there situations, you will often
get better results using rnanuN focus ( [._ 75), Focus on somethktg which is
about the same distance away, lock rite focus, and then point the camcorder at
your original, hard-m-fbcus subject,
Horizontal stripes
Many subjects at
different distances
Reflective surfaces
(e,g, shitty car
surfaces)
Fast rnovktg
objects
Problem
glass
Without
much
contrast (e.g. a
white wall)
Dark subjects
Night scenes
Cause and!or what to do about it
[] Some/all of the digital
don't work.
effects
[] The _ (play) button doesn't
work,
[] There's
Betfind
a bright stripe
on the
s_eell,
• There are a number of restrictions on
using rite digital effects ( _ 59-65),
• The carn_rder
is not set to TAPE
PLAY (MV450i: PLAY (VCR))
mede ( _ 26).
• The cassette is not loaded ( _21 : 5),
• The cassette has reached rite end,
• When reeordhlg in dark places a
bright light in rite scene may caure a
vertical light bar ("smear") rx_appear
This is a norm_fl feature of
calncorders.
o_-,
134
[] 'rile playback pieture is rough
(with ma_e-like
noise).
The video heads need cleatfing
(LI2113:),
[] 'rllere's no picture on the TV
screen, even though the tape is
moving.
The video heads need cleatfing
(_13:),
The TVPv'IDEO selector on ritz TV
ire't set m VIDEO ( _3:
-33),
[] There's
speaker
no sound coming
during ployboek,
from the
• The speaker has been turned off with
rite selector di_ (_129).
• Headphones
are being used,
Problem
Cause and/or what to do about it
[] The memory, curd will not insert.
* k is not turned the right way
( [_ ] 02). Turn it rite right way and
try inserting again,
[] The C:Bmark floslles red in the
display even though a memory
card Ires been inserted,
• Turn rite camoc_rder's power oft'and
back on again and remove and
reinsert rite card if necessary,
[] Nothing
buttons.
• The camcorder
happens
wllen I press the
is not mt to CARD
CAMERA or CARD PLAY
(MV450i: PLAY (VCR))
( E_] ] 05, 109) mode,
• The memory card is not inserted
(C._ ]02).
• You are using an SD Memory Card and
it is _t for erasure prevention, C_ge
the [x_sition of rite protect swish,
• The memory card is full. Erase
images ( _ 112) or insert a new
memory
card.
• The power source is not properly
connected ( _ 10), or rite battery
pack is exhausted or not properly
attached ( [_ 1], 127),
• The function cannot be used in that
recording
[] Tim PHOTO button doesn't work,
program
( _
55).
• The memory card is not loaded
(_]o2).
• You are using an SD Ivlemory Card and
it is _t for erasure prevention, C_ge
the [x_sition of rite protect swish,
• The memory card is full. Erase
images ( _ 112) or insert a new
memory
card.
• You have matched rite maximum file
n_ber.
Set rite file numbering
to
RESET ritmugh rite menu ( _ ] 04)
and insert a new memory card.
1a,5
* You are using an u_ortrmtted
memory card. Fortrmt the card
(_20).
[] The image
cannot
be erased.
° The image is pretected ( _ liD,
* You are using art SD Ivlemory Card
and it is set for erasure prevention.
Change the position of the preteet
switch,
Problem
[] The wireless
WOrk,
Cause and!or what
controller
doesn't
to do about it
* The remote senser mode is set to
OFF((:_
in the menu ( _ 46).
, The remote senser modes of the
wireless con_'oller and the carncorder
itself are different ( [_ 46).
. The batteries are dead or not inserted.
[] The power indicator
is flashing.
[] The cam_ordec malfunctions.
• Check
die screen displays
(_
141)
* Extermfl interference may cause the
camcorder's
mJcroprocesser
to
mal_nction
temporarily.
It" random
letters appear in the display or if
normal operation is interrupted,
remove aed then replace the power
source,
136
[] The DV cable is connected
correctly, but there's nothing in
the display,
. Remove
[] The carncordec becomes warm
daring use.
* This is not a rmflfunction
the cable and then reconnect
it or turn the power
again
off and back on
iiiiiiiiiiiiiiiiiii_ii_i_iiiiiiiiiiiiiiiiiiiiiiiiiiiiiiiiiiiiiii
__=.
137
BP-500 Seri_s Battery. Packs
Extra batteries for use with the
M_'450EvIV450i,
CR-560 Charge Adapter/Car Battery.
Cable Kit
Connect the car battery cable to power
your camcordar or recharge battery packs
on the move, The car battery cable plugs
into your car's cigarette lighter socket and
runs off a ] 2-24 V DC negative ground
battery,
Also, when u_d with the CA-560 Compact
Power Adapter, t_fis charge adapter can
charge the BP-500 series ]itlfium ion
battery packs from a mains outlet,
I'L-_O,_
1'ele-eonver
This tele-_mverter
ter
lens increases
rite focal
length of"the camcorder lens by a factor of
L9.
• The image stabilizer is not as effective as
usual when the tele-converter
is attached.
WD-_O,_
Wide-eol]lVel_er
This lens decreases focM ]engqh by a factor
of 0.7, giving you a wide perspective fbr
indoor Shots or panoram5c views,
O_-,
O
138
_
FS-30,SU Filter Set
Neutral density aod MC protector filters to
help you take eontrel of di_.cult lighting
conditions,
iiiiiiiiiiiii
...........................
ii ........................................................................
VL-3 Video IAgllt
Attach the Video Light to a eamcorder
when re_rding in dark rooms, When on its
automatic setting, rite Video Light turns
ordoff automatically according to the
brightness level of sh_._ting conditions.
DM-S0 Direetlolml Stereo Micropllone
This highly sensitive, super-directional
trficmphone attaches to a eamcorder's
advanced accessory shoe. It is a highly
sensitive microphone thin can be switehext
between functiotfing as a directional
_rficmphone (iltonaural) or a stereo
_rficmphone that also clearly picks up
sounds arriving from the front of the
rnicrophone,
for full recorded sound,
Zoom
Remote
Controller
ZR-1000
LANC t_ terminal of a Canon eameorder, it
is
possible
to controlis functions
suchtheas fire
When
riffs p_xtuet
plugged into
start and s_p of recording and rite zoom
a.nd focllsing _nctions
while the carncorder
is mounted on a tripod, without touching
rite eamcorder body itselfi
139
WS-20
Wrist
Strap
iiiiiiiiiiiiiiiiiiiiiiiiiiiiiiiiiiiiiiiiiiiiiiiiiiiiiiiiiiiiiiiiiiiiiiiiiiiiiiiiiiiiiiiiiiiiii
active shooting.
iiiiiiiiiiiiiiiiiiiiiiiiiiiiiiiiiiiiiiiiiiiiiiiiiiiiiiiiiiiiiiiiii
SC-IO00 Soft Carrying Case
A harltiy camcorder bag with padded
_mp',trtrnents and plenty of space for
_CeSSOtqeS.
CD-300 Digital Printer
This 300 dpi resolution printer is perfect for
printing out the high quality images taken
with digital camcorders. Print out panoraxrm
prints, pictures without a white border,
multiple-picture index cards, and add titles
to pictures, A clear overcoat adds luster to
your prints and reduces colour fading,
140
To display the date and time press the
DATA CODE burton. See also p. 78.
Press the wireless contreller's
TV
SCREEN burton or turn TV SCREEN
on through the menu to see rite other
displays on the TV screen. (The
displays appear wldte on-screem) They
will not be added to any _rdiHgs
you
make with rite camcorder.
MENU(
_ 37)
I _'DfsP' sET uP
1_
_Tv s¢_EEN'''_T_
I'o turn TV SCREEN off, open the menu and select DISP. SET UE
Then select TV SCREEN, set it to OFF and close the menu.
For instructions
on how to hook the carneerder
You can turn off the displays
to give you a clear screen fbr playback.
I -,,1
IF__yI
MENU
( _
37)
To turn
up to your TN_ see p, 30.
[I;II-_YI
;E
[,DfSPrSEr
the display
off, open
the menu
and
sdec, t DISP.
SET
UP.
Then select DISPLAYS,
set it to OFF <PLAYBK>
and dose the
menu,
* It" you turn the displays og; the LCD scv_ezl will be completely
blank, but the
eameorder will continue to show wartfing/eaution
displays when necessary,
@
(_
indicates
17)
a flashing
display.
iiiiiiiiiiiiiiiiiiiiiiiiiiiiiiiiiiiiii
_
The backup battery is
not iYmp¢fly installed,
_
i]
N _"
_
iiiiiiiiiiiiiiiiiiiiiiiiiiiiiiiiiiiiiiiii
°
t_ needs replacing
_
il
--:
141
Shows how rmtch
battcay power remains
( _] 127).
The battc_ pack is
cxhaustcd ([.,]21127),
Rewind ( _
Fast f_ward playback
( _ 27)
R_wind ply'back
(_'Z7)
Framc
No cassc_c is loaded,
Or 1$ is scI for
26)
_Klvmlce
playback
( [_ 27)
cffasltre
Fr_3c
prcvcnfion
1_,¥e1_C
(Z3 15,16),
playback
Remaining tape
(G-ec_n:more than five
mimttes.
Yellow: less than five
mimttcs.
Red: final fcw
seconds.)
Pl_'bax',k pause
(forward and reverse)
( _ 27)
..,finally, it tclh yoxt
when you have
c,_mpletely mn oxtt of
tape,
The camcord_t is
cjc£,th_g the tape
(_3 15),
( [_
27)
Slow pl_'b_k
(_
27)
>d_playback (ff_ward
iiiiiiiiiiiii iiiiii
xl playback (ftrrward
•
Photo
Search
( [_
81)
D_c Search ( _ 81)
The safe_ mcehardsm
is atuivatcd, Urdoad
the cassct-t¢ and turn
the camcz_clcs off.
Turn it on again and
rcload the cass¢_c,
Zoro sct n%:mt_
(fbrward and reverse)
( _ 82)
AV Insert Editing
( _ 90)
(MV450i ody)
Rceorgh_g mode
(_19)
Playback is stopped
Audio Dubbing
(_93)
= m
-_
Nccmal playback
(_26)
"_ _
Fast fbrward ( _
142
26)
iiiiiiiiiiiiiiiiiiiiiiiiiiillaaaaaaaaaaaaaa
_aaaaaaaaaai_
iiiiiiiiiiiiiiiiiiiiiiiiiili
iiiii_
Zt_om
display
(_ 21):
Optical
zoom
Audiomode
(_ 66)
_cal plus
40",<
digital
zoom
Data c_ode( _
78)
Op6cal plus 200×
digital morn
Zoom
iii
Zoom
ORt
Photo modz ¢_ 52)
• Setting the AF/AE. 0
mark fla_ms whi_
The image stabilL-_r
is o_tmc_lon ( _ 36).
• AFIAE kx;kezl. O
mark lights up green
(?AM. _¢ENU
• Tinter
PLAY MF2gU
(MV'_50i: VCR
MENU)
VC_ SET
DISC.SET
SYSTEM
UP
UP
CAM.SEt
UP
PLA_
MENU
R_co'Mk_g iYrogran_s
........
_
([22,S5),
EL,
CARD OPER,
_ISPrSET
U_
(_.D4o)
AR0 SET
_ETUR_
U_
Acrx_ssory is at'tachcxl
co adv_c_
accessory
shoe (_70,
71).
C.CAM. M_NU
DIS_.$ET
SYSTE_
_p
AE Shift ( _L_72)
I
C.PLAY MENU
( _2 _._)
Matmal
focus is
s_l_cted
(_
75).
Shur't_r spC'.xl ([._ 73)
Thc remote scnsor is
turned off (_,16).
Sclf-_33cr countdown
( _ 68)
Zero sct mem_,
(_82)
_%itc balancc is
(_76)
Set
Indoor
_\
Outdoor -X-
_g
£
14::
thedisplayThe
effect
16:gflashcs
mode:is
being
whan
the
soloctcd, and appoars
stoadily when it is
acfivatod ( [.]_20),
display flashcs
whan
file
fimction
isbcing
sclcctod and ,appears
stoadily when it is
activated ( _ 59)
j
Audio inDtt and
Microphone input
(MV,150i only,
_96)
Audio inDtt
iiiiiiiiiiiiiiiiiiiiiiiiiiiii_Nii_
Microphone input
iiiiiiiiiiiiiiiiiiiiiii
Niil
_i
DVinput ([,,_85,
_ii@_iiiiiiiiiiiiiiiiiiiiiiiiiiiiiiiii
..............................................
(MV450i only)
_iiiiiiiiiiiiiiiiiiiiiiiiiiiiiiiiiiiiiiii
_ N_iiiiiiiiiiiiiiiiiiiiiiiiiiiiiii
Condensation
108)
warning
iiiiiiiiiiiiiiiiiiiiiiiiiiiiiiiiiiiiNii_
iiiiiiiiiiiiiiiiiiiiiiiiiiiiiiiiiiiiiiiiiiiiii
4iiiiiiiiiiiiiiiiiiiiiiiiiiiiiiiiiii
_iNiiiiiiiiiiiiiiiiiiiiiiiiiiiiiiii
iiiiiiiiiiiiiiiiiiiiiiiiiiiiii!_!iiii
iiiiiiiiiiiiiiiiiiiiiiiiiiiiiiiiiiiiiiiiiiiiii
Thc wind scrcan is
_rncd on ( [._ 67).
I Memory
Card Displays
No memory card is
insartcd ( _] 102)
Voltmm level ( _._ 29):
SIK3akcr
Headphones
Imago quali_
( _ 102)
Standard
iiiiiiiiiiiiiiiiiiiiiiiiiiiiiiiiiii_N_
iiiiiiiiiiiiiiiiiiiiiiiiiiiiiiiiiii_ Fino
iiiiiiiiiiiiiiiiiiiiiiiiiiiiiiiii_
iiiiiiiiiiiiiiiiiiiiiiiiiiiiiiiiiii
Folder nm_tl:mr-File
The AV/hcadphones
torminal is switc,hc_l
to headphones
Audio Ol_tpl_t( _
98)
num_r
(_
1@1)
Slid_ show h_
progress ( _ 110)
R_cz_rding to a
momcry card
1oi,
io )
Mix balance (_198)
O,._
O
144
images
The
n_mber
that can
of still
still
be rc_*_rdcd on the
memory card ( [21_105)
(G_g, II: 6 _ more
images,
Yellow: Bctwcan 1
and 5 images
Red: No more images)
iiiiiiiiiiiiiiiiiiiiiiiii_
_°°_'°°
Accessirlg a mem_
card ([2]_1101)
_c_o_C_cI'_
s_u
i,_m_
o,iiiiiiiiiiiiiiiiiiiiiiiiiiiiiiiiii@iiil
still images on the
mem_y card
( _ 109)
_,_
This records counter information,
including hour, minute, _cond and
ttt_
Ca_ mix (_tH)
_e_
onnur_ber°naspe
.,e_ape
_tse",
'tisreset_
cede
autotrmfically when a new tape is
loaded,
,n TAPE
CAMERA
frame number
doesn't
appearmede,
in the_he
display,
Data code ( [._ 78)
€
When you s_tartrecording, the
camcorder counts from OSEC to
IOSEC. Shots which are she;ter than
ten _conds may be dig-_cult to edit
later. On the other hand, ]fyeu are not
planning to edit rite recording,
remember that a shot which does not
_nVain action should generally last no
longer than 10 _conds,
145
The camcorder displays
before disappearing,
various
caution
phrases
-- they appear for 4 seconds
Appears each time
you turn the power
on, until you set the
time z,_ne, date and
time ( _ 49),
possible after the
camct_der has
displayed file caution.
Appears when the
battezy pack is
ex_austczl
(L_ 127).
Appears when the
tape has reached the
end.
Refer to p,87
iiiiiiiiiiiiiiiiiiiiiiiiiiiiiiiiiiiiiiiiiiiiiiiiii
iiiiiiiiiiiiii_iN_iiiiiiiiiiiiiiiiii
Rcfertop,87orp,88
iiiiiiiiiiiiiiiiiiiiiiiiiiiiiiiiiiiiiiiiiiiiiiii
Refer to p.16
Appears when you try
to do audio dubbing
Appears when you
press the REC
PAUSE button if file
DV cable is not
connected _opesly
(_86)
AVinsm(VWl, C
only) on a tape
reco_dczl in any mode
other thm_ SP mode
( _ 90, 93).
iiiiiiiiiiiiiiiiiiiiiiiiiiiiiiiiiiiiiiiiiiiiiiiiii
(MV,150i only),
Refer to p.132
iiiiiiiiiiii_tiiiiiiiiiiii
146
Appearswhenyout_'
to do audio dubbing
iiiiiiiiiiiiiiiiiiiiiiiiiiiiiiiiiiiiiiiiiiiiiiii
::::::::::::::::::::::::::::::::::::::::::::::::
onataperc**:xdedin
16-bit audio cx 12thit,
4-cham_el mode
( _]93, 95).
iiiiiiiiiiii_!_i_iiiiiii
iiiiiiiiiiiiiiiiiiiiiiiiiiiiiiiiiiiiiiiiiiiiiiii
iiiiiiiiiiiiiiiiiiiiiiiiiiiiiiiiiiiiiiiiiiiiiiii
__
Appears if you have
triczl to mark 51 or
mc_e
images
fc_
printing, t_ if a mark
file cannot be, edited.
(L_ 119)
video heads when
*his caution appears,
I Memory card caution phrases
There are, i1oilrmges iiiiiiiiiiiiiiiiiiiiiiiiiiiiiiiiiiiiiiiiiiiiiiiiiiiii
rex_._ded on tale
memory card,
ivassible, If CARD
ERROR disappears
_tcs ,I seconds and
O flashes rczl,
ff_m_atthe memory
card, If C_ flashes
green, playback is
IVassible,
There is 11omore
_elrzxthillg memory
iiiiiiiiiiiiiiiiiiiiiiiiiiiiiiiiiiiiiiiiiiiiiiiiiiiii
iiiiiiiiiiiiiiiiiiiiiiiiiiiiiiiiiiiiiiiiiiiiiiiiiiiii
011 the
__
irtem_._
Card.
Chan,e_Ox_card_= iiiiiiiiiiiiiiii_ii_iiiiiiiiiiiiiiiii
.....................................................
.....................................................
arase images,
iiiiiiiiiiiiiiiiiiiiiiiiiiiiiiiiiiiiiiiiiiiiiiiiiiiii
Yol%have reae]lezlthe
iiiiiiiiiiiiiiiiiiiiiiiiiiiiiiiiiiiiiiiiiiiiiiiiiiiii
maximum
i__;
file
_._
iiiiiiiiiiiitl_i_iiiiiiiiiiiii
.....................................................
( [.._ lC_I"_
The ilrmge has lz.c_,n
inc_mpatible JPEG
fq_mat t_ othar
ft_m_atthat file
eamex_dci"
c,,all not
_ _1_
iiiiiiiiiiiiiiiiiiiii_iiiiiiiiiiiiiiiiiiiii
iiiiiiiiiiiiiiiiiiiiiiiiiiiiiiiiiiiiiiiiiiiiiiiiiiiii
ply' bat;k, or file
image data has been
dalrmgczl,
147
Power Supply (rated): 7.4 V 1_2
Power C_usumption
(while recording
with the AF tttrned on);
3.7 W (U_ing viewfindcx),
4.5 W (U_ing LCD scTecn)
"Iblevision system: CCIR start 'dard
(625 lines, 50 field_) PAL colottr signal
Video recording system: 3 rot_u_ heads,
helical seamling DV sys_m (Consume"
digital VCR SD/SDL system)
Digital compoueu_ recording
Audio recording system: PCM digit',d
sound: 16 bit (148kH_'] 2 eh), 12 bit
(32kHW4 oh), I---IsPiald []LP: 12bit
only (32 kHW 2 oh)
Image sensor: 1/4" CCD (charge
coupled device), approx. 540,000 pixels
(appro_. 34{),000 el]'c/_2ivepi_els)
"lhpe format: Videoc&ssettes bearing the
_]i'il_r mark.
Jhpe speed:
SP: 3/4 ips (18.83 ram/s),
LP: 1/2 ips (12.57 ram]s),
I-=IsP: 3/8 ips (9.42 mm/s),
I---ILP: 114 ips (6.29 ram]s)
Maximum recording tlme
(wlth an 80 mira cassette):
SP: 80 rain,, LP: 120 rain.,
I_IsP: 160 rain,, [_ILP: 2,40 rain.
Fast forward/rewind
time:
Approx. 2 rain. 20 sec. (wifll a 60 mhL
cassette)
Lens: F/LS-2.9,
10x Vower zoom,
4.2_42.0 rr_n
Focusing system: TTL autofocus,
marmal Rrcusing possible
Minimum focusing distance: 3f_ 3_1_in
(l m) O/s in (l era) on maximum wide
angle)
Maximum shutter speed: 1/8,000 sec.
(1/250 sec. when using a memory ea_x])
Minimum illumination: 2 lx (using the
Low Light pm__n'amin TAPE
CAMERA mode)
Recommended
illumination:
Mo_ than J00 lx
Filter diameter: 30.5 rr_n
148
Viewfinder: 0.44 in, TFT eolour LCD,
approx. 113,000 pixels
LCD screen: 2.5 in measu_d
diagonally, TFT coloox, approx.
112,000 pixels
Mica'ophone: Stcxeo elez_2ret condenser
ma crophone
DV Jbrminal*:
Special 4-pin ctmnector
(con I'o_ms to IEEE 1394)
AVlheadphone
terminal*:
¢ 3.5 rran
Audio input**: -10dBV/at least 40
kohms, _, R),
unb',danced
output: -10dBV (47 kohm l,y_)l
less than 3 kohms,
unbalatlced
Video: 1 Vp-p/75 ohms unbalanc_rd
S-video terminal*:
1 Vp-p (Y signal), 0.3 Vp-p (C sigu_)
NIIL: terminal input: ¢ 3.5 mm stc_o
_in_fijack,- 57 dBV (with 600 ohm
_inc)! at least 5 kohms
LANC U terminal:
¢ 2.5 mm _inni
_in_lijack
Operating temperature range:
0_40°C (32_-lfJ4°F)
Dimensions: 57 x 102 x 134 mm
(2 114x 4 x 5 lh in)
Weight: 54{) g (lib 3 oz)
Battery type: Rc_hargcablc lithium ion
battery
Rated voltage: 7.4 V IX.2
Operating temperature: O°_,O°C
(32_-104_F)
Battery capacity: 1100 tmAh
Dimensions: 38 x 21 × 55 rran
(1V_ x ;h x 2 V*,in)
Weight: 70 g (2 1/_oz)
* MV450: Output only.
MV450i: Input/output,
** MV450i only.
Weight and dimensions are ap_oximate,
Evrcxs and omissions exc/:,pted.
SuhjczZ m cJ_m_gewi_out nofic£,,
] 6:9, 20
[]
Data Code, 78
Date and Time, 49
Date Search, 81
Digital Effects, 59
Digital Zoom, 2]
DV Dubbing, 84
[]
Abroad, Using the Carttcorder,
Accessories,
5, ] 38
Adapter, AC, ]0-]2, ]4
AE Programs, 55
AE ShJf't, 72
131
Amdog line-in, 88
Art, 61
Audio Dubbing, 93
Audio Mix, 98
Audio Mode, 66
Audio Output, 99
Audio Recording
and Playback, 29, 66, 98
AudiolVxder_ Terminal, 30
Auto, 57
Autofbcus, 75, ] 34
AV Insert, 90
[]
Easy Recording, 57
Fxliting m a VCR, 83
Effects, 6]
Erasing Still Images from a
Memory Card, ] ] 2
Extendad Recording Time
Function, 19
External Mic_phone, 66, 93, 95
[]
Fade Trigger, 60
Faders, 60
Fast Forward, 26
Feedback, 33
File Numbers, ] 04
Finding Your Way Aa_mnd
the IvIV450flvIV450i, 7
Focusing, 75
Fomta_ing a Memory Card, ] 20
[]
Backup Battery, ] 28
Basic Rex_rding, ]7
Battery Chm'ger, ]3-]4
Battery Pack, ] ], 13-14, ]26
Beep, 20
Black and White, 6]
Buttons, light-up, 48
[]
[]
Cables, 5, 31
Cas_ttes, ] 5
Charging rite Battery Pack,
1], 13-14, 126
Choosing a Recording Program, 55
Clearfing the Carttcorder, 130
Clock, 5]
Comblifing Images, 114
Condensation, 132
Connecting _ a PC, 100
Connection m T%"or VCR, 30
Copying from Cas_tte to
rVIemory Card, 117
Copying from Memory Card m
Cassette, ] ] 8
Head Cleaning, 131
Headphones, 29, 30
Horizontal Wipe, 60
[]
Image Stabilizer, 36
Image Quality, 102
Index Screen, 110
Introducing the MV450/MV450i,
6
149
[]
[]
LANC, 83
LCD Screen, 23
Lens Cap, l_ALight-up buttons, 48
Imading Cassettes, 15
Imw Light, 58
LP Mode, ] 9
Recharging tlte Battery Pack, 126
Recording, 17, 105
Recording from Cassette _
Memory Card, 107
Recording from DV Device to
Memory Card, 108
Recording Programs, 55
Record Pause M_xte, 17
Record Review, 54
Record Search, 54
Remote Control, 45
Remote Sensor, 45-46
Rewind, 26
[]
Maintemutce, 129
Malting Better Videos, 34
Manual Focus, 75
Memory Card Introduction, 10]
Menus, 37
M]crephone, 66, 71,93, 95
Monitor Recording, 25
Mosaic, 61
Mosaic Fade, 60
Multi-Image Screen, 64
[]
Optional
Accessories,
138
[]
O_-,
O
150
Pause, Record, 17
PC Connection, 1@
Photo Search, 81
Playback, 26
Playback Connection, 30
Playback Pause, 27
Portrait, 57
Power Adapter, 10-12, 14
Powering Your Camcorder, 10
Pre-Marked Position, 82
Preparing the Camcorder, IN
Preventing Accidental Erasure, 111
Print Mark, 119
Problems, 133
Progressive Photo, 105
Protect, 111
[]
Sl vider_ input terminal, 32
Sample images, 122
Sand & Snow; 58
Screen Displays, 141
SD Memory Card, ] 01, ] 21
Self-Timer, 68
Sepia, 61
Shutter Speed, 73
Slide Show, 110
Speaker, 29
Spec]tications, 12, ] 23, 148
SP Mode, 19
Sports, 57
Spotlight, 58
Still Picture, 52, 105
Storage, ] 30
S-riders, 32
System Diagram, ] 37
[]
Tape Protection,
]6
Telephoto, 2]
Temperature, 12, ]26, ]30, 148
Tilne C_xle, 145
Tilne Zone, 49
Tips fer Making Better Vider_s, 34
Trip_xl, 34
Troubleshooting,
] 33
TV, 30, 14]
[]
Using rite Carncerder Abroad,
Using rite Menus 37
] 31
[]
VCR, 30
Vertical Wipe, 60
Vider_cassettes,
]5
Vider_ Heads, ]31
Vider_ Light, 70
Viewfinder,
124, 130
Viewing Still Images,
109
[]
White B_ance, 76
V,,'ide-angle, 2]
V,,'idescreen TV, 20
Wind S_xeen, 67
Wipe, 60
Wireless Con_x)ller,
45
[]
Zero Set Memory
Zooming
21
82
151
Use the list below _ quickly
alphabetically.
navigate
am listed
Then sele_ it
'_rom this
slJbmerm and _1.
0
C_.SV:T UP
f-see, Date
0
})_sP.sFr uP
Audio dub (MV_-5¢.I'_
otfly)
0
VCRsv:r UP
VCRSV,
T UP
Audio mode
0
O**
AWaeaapaones
O
O
O
O
vc_s_a'uP
aeep
0
0
0
0
sYsi_,,,
Brighmess
O
O
O
O
lxse.s_:r uP
Button light
0
0
0
0
SYSI_,_d
Button light eolour
0
0
0
0
SVSI_._d
Card mix
0
* CAt_l)MaX
O
Copy - card to cassette
CAR})OPV:R.
Copy - easmtte to card
0
c,_a_l)oe_;_.
Data _de
O
}*se,sFr UP
Date]time display
0
Date]time select
Date]time set
Displays
0
0
0
File numbers
Format
l)lse,s_:r ov
0
0
0
Erase
152
menu, Functions
First make sure the
camera is set to,,.
Function
] 6:9 effect
rite cmneorder's
0
l)lsP,s_:r uP
SVSI_Aa
0
l)lsP,sFr UP
0
CARl)OPHR.
0
c,_l) sv:l uP
0
c,_l) oev;R.
First make sure the
camera
is set to,,,
Fma_llon
"lhen _eleet it
from Ihls
Imagestabilizer
0
0
c_.s_:_u_
Mi_rarm_sde
0
0
,_s_.s_:_
c_'
Mixlevel
0
._. CARl) MIX
Mixtype
0
i,. CARl) MIX
Output
ehatmel
VCR SET UP
Print
CARl) OPER.
mark
Pmt, eet
0
Quality
0
Record m_xte
RelltOte
_tt$or
fflode
Shutter speed
Time 7_me/DST
0
0"*
0
0
0
0
0
0
CARl) OPER.
CARl) SFX' UP
0
0
0
VCR SET UP
0
s_s_
o_.s_,'_
u_
0
0
s_'s_
,_s_,.s_:_
c_'
Wldte b_ance
"Wind screen
0
Zoom
0
0
vc_s_.'_
u_
0
ca_.s_,'_
u_
*
_l_for
** MV450i
MV450i
only
o
153