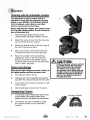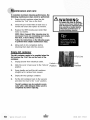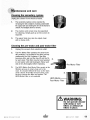
1
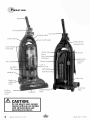
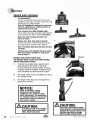
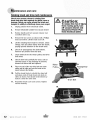
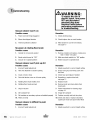
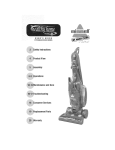
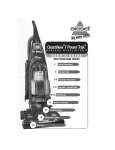
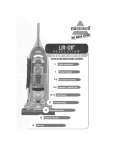
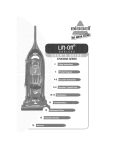
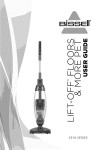
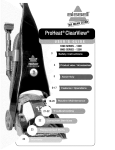
ii ¸¸
MULTI CYCLONIC
USER'S
GUIDE
8909/18Z6 SERIES
Safety Instructions
ProductView
Assembly
Operations
Maintenanceand Care
Troubleshooting
ConsumerServices
AdditionalAccessories
ReplacementParts
Warranty
forbuying
aBISSELL
MultiCyclonic
vacuum
We're glad you purchased a BISSELLvacuum. Everything we Know about floor
care went into the design and construction of this complete, nlgh-tech home
cleaning system. By purchasing this product you are helping BISSEL/with our
commitment to reducing our impact on the environment _nrougn an expanding
range of sustainable design efforts.
Your carpet cleaner is well made, and we back it with a limited one-year warranty.
We also stand behind it with a knowledgeable, dedicated Consumer Services department, so, should you ever have a problem, you'll receive fast, considerate assistance.
My great-grandfather invented the floor sweeper in 1876. Today, BISSELLis a
global leader in the design, manufacture, and service of high quality homecare
products like your carpet cleaner.
Thanks again, from all of us at BISSELL.
Mark J. Bissell
President and Chief Executive Officer
i
2¸¸¸¸¸¸¸
wwwbi sell00m
800.237.7691
TANTSAFETYINSTRUCTIONS
When using an electrical appliance, basic
precautions should be observed, including
the following:
Keephair, moose
clothing, fingers, and all parts of
body away from openingsand moving parts.
Turn off all controls before plugging or unplugging
vacuum cleaner.
READ ALL INSTRUCTIONS
BEFOREUSINGYOUR
UPRIGHTVACUUM.
Always connectto a polarizedoutlet (left slot is wider
than right). Unplugfrom outlet when not in use and
before conducting maintenance.
Use extra care when cleaning stairs.
Unplug before attaching the TurboBrush.
Do not pick up flammable materials (lighterfluid,
gasoline, kerosene,etc.) or use in the presenceof
explosive liquids or vapors.
•
Do not pick up toxic material (chlorine bleach,
ammonia, drain cleaner,etc.).
•
Do not use vacuum cleaner in an enclosed space
filled with vapors given off by oil base paint, paint
thinner, some moth proofing substances,
flammable dust, or other explosive or toxic vapors.
Do not modify the polarizedplug to fit a
non-polarizedoutlet or extension cord.
•
Do not pick up hard or sharp objects such as
glass, nails, screws, coins, etc.
Do not leave vacuum cleaner unattended
when it is plugged in.
•
Do not pick up anythingthat is burningor smoking,
such as cigarettes,matches,or hot ashes.
Unplug from outlet when not in use and
before servicing.
•
Do not usewithout filters in place.
•
Use only on dry, indoor surfaces.
•
Keepappliance on a levelsurface.
WARNING:
TOreduce the
risk of fire, electric shock,
or injury:
•
Do not use outdoors or on wet surfaces.
Do not allow childrento operatevacuum
cleaner or use as a toy.
Close attention is necessary when used by or near
children.
Do not use for any purposeotherthan describedin
this User'sGuide.
Useonly manufacturer's recommended
attachments.
Donotusewithdamagedcordor plug.
If appliance is not working as it should, has been
dropped, damaged, left outdoors, or dropped into
water, have it repaired at an authorized
service center.
• Do not pull or carry by cord,use cord as a handle,
close a door on cord, or pull cord around sharp
edges or corners. Do not run appliance overcord.
Keepcord awayfrom heatedsurfaces.
•
Do not unplug by pulling on cord.To unplug, grasp
the plug, not the cord.
•
Do not handlevacuum cleaneror plug with
wet hands.
•
Do not put any object into openings.Do not use with
any opening blocked; keep openingsfree of dust,
lint, hair,and anythingthat may reduceair flow.
www.bissell.com
SAVETHESE
INSTRUCTIONS
FOR
RITUREUSE
THISAPPLIANCEHAS
A POLARIZEDPLUG.
To reducethe risk of electricshock,this appliancehas a
polarizedplug(one bladeis widerthanthe other).This plug
wiUfit ina polarizedoutletonlyone way.If the plug does
[lot fit fuUyinthe outlet,reversethe plug.If it stiUdoes[lot
fit, contacta qualifiedelectricianto instaUa properoutlet.
Do not chalge the plug in anyway.
This model is for householduse only.
800.237.7691
view
CordCIi
ReleaseSwitch
DustingBrush/
Upholstery
Tool
QuickRelease
CordWrap
Stretch
Twistn'
Snat
Extension
Wand
Lock'n
PreMotor
Filter
Headlk
Hek
Adjustment
Knob
Furniture
Protection
Guard
Handle
Pow_erfoot Pedal
"HoseGrip
Base
Do not plug in yourvacuum
cleaneruntil you are familiar
CAUTION:
with all instructions and
operatingprocedures,
4
www.bissell.com
800.237.7691
Howto use this guide
Thisuser'sguidehasbeendesignedto helpyou
get the utmostsatisfactionfrom yourBISSELL
vacuum.You'llfind assemblyandoperating
instructions,
safetyprecautions,as well as
maintenanceandtroubleshootinginstructions.
Pleasereadthisguidethoroughlybefore
assemblingyourvacuumcleaner.
Pay particularattentionto the productdiagram,
assemblyinstructions,
andpart names.Locate
andorganizeall partsbeforeassembly.Following
thisuser'sguidewill greatlyenhanceyourability
to get the mostperformancefromyourBISSELL
vacuumfor manyyears.
WARNING:
Plastic film can be
dangerous.To avoid
danger of suffocation,
keep away from babies
and children.
Theonlytoolyou'llneedto assembleyour
vacuumcleaneris a Philips headscrewdriver.
Attachhandleto vacuum
1.
2.
3.
4.
Locatethe vacuum handle and removethe
screw packettaped to the baseof the handle.
Standthe vacuumuprightandslidethe baseof
the handlefirmly intothe groovesat the top of
the vacuumbody.
Oheckto be surethe handleis fittedto the
vacuumbody.If thereis a gapin front,continue
to pushfirmly untilthe handleis flush.
Insertthetwoscrewsfromthescrewpacketintothe
existingholes.Tightensecurelywithascrewdriver.
4.
Attachvacuum hoseand tools
1.
Posi'don
theTwist'n SnapHose assemblyon
the vacuumandlineup me tabson me baseof
the hosewithme corresponding
notches.Turnthe
Twist'nSnapHoseto the rightto lockintoplace.
2.
Slidethe endof the hosegrip ontothe hosegrip
base.Placethe hoseintothe hoseclip.
NOTE:Thepowerfoot
will notoperateeffectively
unlessthe hoseisfirmlyattachedto thebase.
TM
www.bissell,com
800.237.7691
3.
Attachvacuumhoseandtoolscontinued
3.
4.
Combination
Snapthe telescopingextensionwand,
crevicetool, and combinationtool into
storageclips as shown.
ThePetTurboBrush
snapson tothe holder
onthefrontofthe handle.
CreviceTook
Placethe PetTurboBrushin the holderby
hookingthe bottomontothe tab andpushing
the top of the TurboBrushintoplace.
Power switch/brush switch
Wand
Pet
Thepowerswitchislocatedjustbelowthe handle
onthe front ofthe detachablecanister.Pushthe
rockerswitch"ON" (I)to vacuum,and"OFF"(0)
whencleaningiscomplete.
Thebrushswitchis locatedjustbelowthe
handleon the frontof the detachablecanister
nextto the powerswitch.Thisswitchturnsthe
rotatingbrushon andoff.Thebrushswitch
shouldbe in the "ON" (I) positionfor normal
carpetcleaning,Youmay wantto turnthe brush
switch"OFF"(0) for barefloorcleaningor other
delicatesurfaces.
CAUTION:
Beforeusingyourvacuum,make
surethatbothfilters(Pre-Motor
andPost-Motor)are in place.Do
notoperateyourvacuumwithout
thesefilters.
Note: YourBISSELLLift-Off Multi CyclonicPet
vacuum is equipped with a special internal
switch that turns the rotating brushoff
whenever the unit is in the Upright position.
Handle position
6
1.
Upright- Forstorage andabove floor cleaning with specialtools.
2.
Normal Cleaning-Presshandlerelease
pedalonce. Usefor most householdfloor
cleaningtasks.
www. bi s se II .com
1.
Power
2.
Brush
800.237.7691
Operation
Power heightadjustment
Thepowerfooton yourvacuumcanbe
adjustedto cleanseveralfloorsurfaces.
NOTE:Foroptimalcleaningperformance,
adjustto the lowestpracticalsetting.If
yourcleaneris difficultto push,adjustto
the nexthighersetting.
1.
Placehandle in uprightposition.
2.
Turnheightadjustmentknobto desiredsetting.
LowestSetting - Forbarefloors.
MediumSettings - Forshortandmedium
pilecarpets.
HighestSetting - Forplushpilecarpet.
NOTE:Youmayalso adjust the setting while
in the normalcleaningposition.
Special tools
Yourvacuumis notonlya powerfulfloor vacuum
cleaner,it'salsoa versatilestairsandabovefloor
vacuumwhenyouselectoneof the specialtools.
Note:Thetoolscanbe usedwith the
vacuumin the UprightPositionor with the
DetachableCanister.
1.
Detachthe vacuum hose by graspingthe
hosegrip and lifting to separatefrom the
hosegrip base.
2,
Attach tools by firmly pushing onto vacuum
hose or telescoping extension wand.
Combinationdusting brush/upholstery tool:
Twotypes of cleaningtools are included in one
attachment.Rotatefor desired tool.
•
Usebrushside to dust furniture, blinds, books,
lamps,shelves,and baseboards.
•
Useupholsteryside for curtains, draperies,
cushions,fabrics.
[ CAUTION:
Alwaysplacevacuumcleaneron
floorin itsfullyUprightPosition
andmakesureit is lockedinto
placebeforeremovingCanister
or whenusingtools.Placingthe
Liff-Off in itsfull UprightPosition
automatically
stopsthe
rotatinqbrush.
Crevice tool:
Usein tight narrow spaces.
Telescopingextension wand:
Usewithdesiredattachmentfor a longerreach.To
extendthewand,twistthecollarto "Unlock"posi"donand pushawayfrom you.Twistthecollarto the
"Lock" posi"don
to lockinto placo.To retract,twist to
unlock,pulltoward you andtwist to relock.
www.bissell,com
800.237.7691
Special tools continued
PetTurhoBrush®:
Usefor removingdirt andpethairfrom stairs,
upholstery,
arearugs,andothersmallareas.Pull
towardsyou ina rakingmotion.
Note:PetTurboBrush
isdesigned
toremovepet
hairfromupholstered
or carpeted
surfaces.
It
shouldnotbeusedonpets.
Stair cleaningtool(selectmodelsonly):
Useforstairs,arearugs,andothersmallcarpeted
areas.Thistoolcanalsobe usedforbarefloors.
Note: Thestair cleaningtooldoesnot
storeon board.
Deluxebarefloortool(selectmodels):
Usefor barefloors.Swivelheadturnsto get
intotight spacesandfits undercabinets.
Note: Thedeluxebarefloorfooldoesnotstore
onboard.
Allitemsmaynotbeincluded
withyourmodel.
Moretoolsmaybeavailable;
toorderplease
refertopage18.
Buckle
ShoulderStrap(selectmodelsonly)
TheShoulderStrapmaybeusedwhilecleaning
withthe DetachableCanister.
1,
Toattachthe shoulderstrap,wraptheVelcro
endsattachedto me bottomofthe strap
securelyaroundthe canisterhandleasshown.
Toobtainmaximumstrength,overlapthe loose
endscompletelyandpresssecurelyin place.
2.
Theplasticbucklemustbe positionedontop of
the canisterhandle.
3.
The lengthof the strap may be adjustedas
requiredfor comfort.
NOTICE:
Whilevacuuming,certain
carpetsand lowhumidity
conditionsmay generatesmall
static discharges.Thedischarges
are entirelyharmlessand are not
associatedin anyway with the
main powersupply.
A CAUTION:
Toreducetheriskoftheshoulder
strapcomingloosein operation
followtheseinstructions.
8
wwwhi,sell oom
A CAUTION:
Donotpressthe ReleaseButton
whileusingtheCarryingHandleto
transport
thevacuumcleaner.
The
Canister
coulddetachcausing
therestofthevacuumtofall.
800,237.7691
Cleaningwith the detachablecanister
Thedetachablecanister feature makes it
possibleto easilytake the powerfulcleaning
actionof your BISSELLLift-OffMulti Cyclonic
Petto stairways,auto interiors,and other
hard-to-reachareas of your home.
1,
Beforedetachingthe canister,yourvacuummust
bein itsfullyuprightposition.Youdo notneedto
turn offthe powerfirst.
1. Pressme releasebuttonat me top of me
canisterhandleandlift the canisterto remove.
2.
Detachthe vacuum hosefrom the hosegrip
baseat the back of the canister.
3.
Attach the desiredtool(s)to the hosegrip at
the endof the VacuumHose.
4,
Whenyou're done, removethe tool(s)and
reconnectthe hoseto the hosegrip base.
5.
Returnthe canisterto the powerfoot by
aligningthe "feet" on the front with the
bumpson the foot of the uprightvacuum.
Pushthe canister toward the vacuum frame
until it "clicks" into place.
Powercordstorage
Whenyouare doneusingyourvacuum,returnit to
the Uprightpositionandstorethe powercord.
1.
Turnvacuum cleaneroff (0).
2.
Unplugpowercordby graspingthe polarized
plug (NOTthe cord)and disconnectfrom outlet.
3.
Looppower cord around cord wraps on side
of the canister.
4.
Clip moldedplug to power cord to secure.
CAUTION:
While the vacuum is in use, warm air
is emitted through the Post-Motor
Filter on the back of the Canister.
The bottom of the Canister may
also becomewarm. When using the
shoulderstrap, to avoid discomfort,
position the Canister so that these
parts are not directed towards or
touchingyour body.
TransportingCleaner
1.
Tomoveyourvacuumdeanerfromroomto room,
putmeHandlein1_eUprightPosifdon,
'dltme
deanerbackonits rearwheelsandpushforward.
2.
The cleanercan also be moved by using
the CarryingHandleon the Detachable
Canister.
www.bissell,com
Handle
800.237.7691
iintenance and care
Tomaintainmaximumcleaningperformance,the
followingmaintenancestepsmustbe performed:
1. Emptythe dirt container whenthe dirt
reachesthe "Full" line on the front,
2,
Checkthe pre-motorfilter at least oncea
monthand clean and replaceas needed.
3.
Replacethe HEPAmedia post-motorfilter
everysix months.
NOTE:Morefrequentfiltercleaningmay be
necessaryif youarevacuumingnewcarpet,
fine dust,or haveallergyconcerns.
Followthe instructions
onthe followingpages
toperformthesesimplemaintenance
steps.
4.
Allow parts to dry completelybefore
returningthem back into the vacuum.
/KWARNING:
Toreducethe riskof electric
shock,turnPowerSwitchOFF
anddisconnectpolarizedplug
from electricaloutletbefore
performingmaintenanceor
troubleshooting
checks.
Emptydirt container
Thedirt containerneedsto beemptiedwhenthe
dirt reachesthe "Full" lineon thefrontof the
container.
1.
Unplugcleanerfrom electricaloutlet,
2.
Slidethe Lock 'n Seal Leverto the "Unlock" Position
position.
3.
Grasphandleand pull the dirt container
straightout to removefrom vacuum.
4.
Emptydirt into garbagecontainer.
5.
Put the dirt container back in the vacuum
andslide the leverto the "Lock" position.
Line
Lock
Position
Thedirtcontainer
maybewashedin warm
waterwitha milddetergent.
Makesureit is
completely
drybeforereplacing.
i¸
10
www,bissell,com
800.237.7691
Maintenance and care
Cleaningthe secondarycyclone
1,
Unplugthe cleanerfrom electricaloutlet.
1.
Thesecondarycydonecanbereachedby
removingmedirt container,
reachingundernealh
me uppertankandturningthe rimof meframeto
unlock.Pullstraightdownto remove.
2.
The cyclone and screen may be separated
for cleaning.Simply pull up on the screento
separate.
3.
The uppertank may also be wiped clean
with a damp cloth.
Cleaningthe pre-motorand post-motorfilter
1.
Unplugthe vacuum from electricaloutlet.
2,
The Pre-MotorFilter protectsthe motorfrom
dirt particles.It is locatedin the slide out tray
underneaththe DirtContainer.If the filter
becomesdirty,pullout the tray,lift out the filter andclean.This filter may be handwashed
in cold waterwith mild detergent.Rinsewell
andair dry thoroughlybeforereplacing.
3,
2,
-Pre-MotorFilter
TheHEPAMediaPost-MotorFilterassistsinthe
filtration processto returncleanair to the
room.It is locatedbehindthe door onthe back
of the cleaner.Ifthe filter becomesdirty,open
3,
the door,removethe filter and replace.The
HEPAMediaFilteris not washable.
HEPAMedia
Post-Motor Filter
Do not operate cleaner
with damp or wet
filters or without all
filters in place.
www.bissell,com
800.237.7691
iintenanceand care
Rotatingbrushanddrivebeltmaintenance
Checkyourvacuumcleaner'srotatingfloor
brushanddrive beltregularlyfor debris,wear or
damage.Debriscan wraparoundthe brushand
hamperitsabilityto effectivelycleanyourcarpet.
1. Unplugcleanerfrom electricaloutlet.
2.
3.
4.
Caution:
To reducethe risk of injury
from movingparts,turn
off vacuumcleanerand
disconnectPowerPlug
from electricaloutlet.
Removedetachablecanisterfrom vacuumcleaner
Reclinehandleandturn vacuumcleanerover
sobottomside is up.
Removethe six screwsasshownwitha Phillips
headscrewdriver.
Liftthe brushcoveroff.
4.
Liftthe rotating floor brushto remove.Clean
strings,hair and otherdebris from the brush,
payingspecialattention to the brush ends.
6.
Checkair passagewayfor obstructions.
Removeany debris from this area.
7.
Cleandebris from the motor pulley and drive
belt areas.
Checkdrive belt carefullyfor wear,cuts or
stressedareas.If any damage is present,
discardold drive belt and replace.
6.-8.
Motor
Placeoneendofthe newdrivebeltovermotor
pulleyandtheotherendoverthebrushinthe
spacebetweenthebristles.
Passageway
10. Pullthe brushfirmly to stretchthe drivebelt
andplaceendsof brushdown intoslotson
sidesas shown.Turnbrushseveraltimes by
handto centerthe drivebelt.
DriveBelt
11. Repositionbrushcoverandscrews.Tighten
screwssecurely.
10.
12
www.bissell.com
800.237.7691
Maintenance and care
Replace light bulb
1.
Unplugcleanerfrom electricaloutlet.
2.
Removedetachablecanister and recline
handleof vacuum.
3.
Usinga screwdriver,removethe onescrew
as shown and lift off the lens.
4,
Removethe bulb from the socket bygrasping
bulb and pullingstraightout.Installthe new
bulb by pushingit gentlyinto the socket until
the bulb snapsinto place.
5.
Repositionlens and securewith the one
screw.
Z WARNING:
Toreducethe riskofelectric
shock,turnPowerSwitchOFF
anddisconnectpolarizedplug
fromelectricaloutletbefore
performingmaintenanceor
troubleshooting
checks.
TurboBrushmaintenance
The TurboBrushshould be checked regularly for clogs or debris wrapping around
the brush roll.
1,
Unplug vacuum from electrical outlet.
2.
If a clog is presentor debris is visible,unscrew
the two screws on the back of the TurboBrushto
removethe faceplateand clear any obstructions.
3,
To clean debris from the brush roll, removethe
screw located on the belt cover. Lift the belt
cover. Removethe brush roll from the drive belt
and clean debris.
4,
Repositionthe drive belt on the brush roll. Place
ends of brush roll in slots on sides as shown.
Repositionbelt cover and secure with shorter
screw. Repositionfaceplate and secure with two
longer screws.
www.bissell.com
2,
800,237.7691
iintenanceand care
Cleaningclogs
4.
Low suctionor poorpickupmay bedueto a clog
in the vacuumcleaner.It younoticea changein
the soundofthe motoror a reductionin the
spinningaction,checkfor clogs.
1. Unplugcleanerfrom electricaloutlet.
2.
EmptyDirt Container.
3.
CheckUpperTankfor build up or clogs.
4.
Removethe secondarycyclone andcheck
the suction inlet for a clog.
5.
Graspthe HoseGrip and lift to separatefrom
the suction opening.Checkfor a clog in the
Baseor the Hose.
Releasethe Twist n' Snaphosefrom the
vacuumby turning to the left. Straightenthe
hoseand unclogwith a long,narrow object
such as a broomstick.
Inlet
5.
If the low suction persists,follow the
instructionsfor Checkingthe RotatingBrush
on page 11 and inspectthe Air Passageway
for obstructions.
Opening
Air Passagewa_
14
www,bissell,com
800.237.7691
Maintenance and care
Thermal protector
An internalthermalprotectorhas beendesigned
intoyourcleanerto protectit fromoverheating.
Whenthe thermalprotectoractivates,the main
vacuummotorwill stopoperating.If this
happens,proceedasfollows:
1.
Turnthe cleanerOFF(0) and unplug from
electricaloutlet.
2.
Checkthe secondarycyclone area,PreMotor Filterand Post-MotorFilter for dirt
accumulation.
3,
Referto the "ClearingClogs"section.
4.
Whenthe motor coolsfor approximately30
minutes,the thermal protector automatically
resets andcleaning may continue.If the
thermal protectorcontinuesto activate after
following the abovesteps,your cleanermay
needservicing. Call BISSELLConsumer
Services,or visit the website.
IA Caution:
Toreducethe risk of
injuryfrom moving
parts, turn off vacuum
cleanerand disconnect
Power Plug from
electricaloutlet,
Note:Thethermalprotectorcontrolsthe
mainvacuummotoronly,notthe brush
motor.If the thermalprotectoractivates,
the brushwill continueto operatenormally;
however,therewill beno suction.
www.bissell=com
800,237.7691
iubleshooting
/ WARNING:
Toreducethe risk of
electricshock,turn power
OFFand disconnect
polarizedplugfrom
electricaloutletbefore
performingmaintenance
or troubleshooting.
Vacuumcleanerwon'trun
Possible causes
Remedies
1.
Powercord notfirmly pluggedin
1. Checkelectricalplug
2.
Blownfuse/trippedbreaker
2. Check/replacefuse or resetbreaker
3.
Thermalprotectoractivated
3. Allow cleanerto cool for 30 minutes,
see page15
No power at rotatingfloor brush
Possiblecauses
1.
Remedies
Canisteris not securelyseated
1. Removecanisterand replace,makingsure
thatit "clicks" into place
2.
Brushswitchturnedto "OFF"
2. Makesurebrushswitchis in "ON"position
3.
Vacuumis in uprightposition
3. Reclinevacuumto operatebrush
Vacuumcleanerwon'tpick up dirt
Possible causes
Remedies
1.
Incorrectheightadjustment
1. Adjustpowerfootto correctheightsetting
2.
Hosenotattachedto suctionopening
2. Grasphose grip and firmly push onto
the base
3.
Crackor hole in hose
3. Checkhoseandreplaceif needed
4.
Drivebelt broken,worn or off motor pulley
4. Repositionor replacedrive belt_
see page12
5.
Rotatingfloorbrushbristlesworn
5. Replacebrush
6.
Rotatingfloorbrushjammed
6. Removebrushand cleandebris from
brushends
7.
Clogin vacuum
7. Followinstructionsfor clearingclogs
on page14
8.
Dirtcontainerfull
8. Emptydirt container
9.
Dirtcontaineror secondarycyclonenot installedproperly 9. Positioncorrectlyand lock into place
10. Filtersare dirty
10. Checkandcleanor replacesecondary
cyclonepre-motorandpost-motorfilters
Vacuumcleanerisdifficultto push
16
Possible causes
Remedies
1.
1. Adjustpowerfootto correctheightsetting
Incorrectheightadjustment
wwwbissell com
800.237.7691
Visibledirt escapingfrom cleaner
Possible causes
Remedies
1.
Dirt containerfull
I.
2.
Filteror secondarycyclonemissingor installedincorrectly 2. Checksecondarycyclone,pre-motorand
post-motorfilterfor correctinstalla'don
3.
Dirt containerinstalledincorrectly
Emptydirt container
3. Pullout andre-insertdirt containercorrectly
Other maintenance or service not included in the manual should be performed by an
authorized service representative.
Thankyoufor selecting a BISSELLproduct.
If you should happen to need assistance during assembly or operation, call 1-800-237-7691.
Pleasedo notreturnthisproductto the store.]
ForanyqueslJonsorconcerns,BISSELLishappyto be ofservice.
Contactusdirectlyat 1-800-237-7691.
www.bissell=com
800,237.7691
;SELLconsumerservice
For informationabout repairsor replacementparts,or questionsaboutyour warramy,can:
BISSELLConsumerServices
1-800-237-7691
Monday-Friday
Saturday
8 a,m,-- 10 p,m,ET
9 a,m,- 8 p,m,ET
Orw_te:
BBSELLHomecae,Inc.
POBox 3606
@andRapids,M149501
AXN: ConsumerServces
O/vst the BBSELLwebsite www.bissell.com
When contactingBISSELL,have modelnumber of unit available.
Pleaserecord your Model Number:
Pleaserecord your PurchaseDate:
NOTE:
Pleasekeepyouroriginal
salesreceipt.
Itisyourproofofwarranty.
accessories
Theseitemsare availablefor purchaseas accessoriesfor yourBISSELLLift-Off MultiCyclonicPet:
To purchasecall 1-800-237-7691or visitwww.bissell.com.
Item
Part No.
Part Name
1
2
3
4
5
6
7
8
203-1063
203-1399
203-1099
203-6624
203-6625
203-2081
203-5542
98Q1-A
CreviceTool
PetTurboBrush
DustingBrush/Upholstery
Tool
StairCleaningTool(Availableon SelectModels)
TelescopingExtension
Wand
DeluxeBareFloorTool(Availableon SelectModels)
ShoulderStrap(Availableon SelectModels)
ShedAwayPetGrooming
Vacuum
Attachment
(Available
onSelectModels)
1
5
18
www,bissell,com
7
800.237.7691
Replacement parts - BISSELL Lift-Off Multi Cyclonic Pet series
Youmay purchasereplacementpartsfrom your retailer,by calling BISSELLConsumerServicesor by
visiting our website.To locatea retailernearyou, or to placean order usingVisa,MasterCard,Discoveror
AmericanExpress.call
BISSELLConsumerServices
1-800-237-7691
Monday- Friday 8 a.m. 10 p.m.ET
Saturday
9 a.m. 8 p.m.ET
Or visit our Website - www,bissell,com
Item
Part No.
Part Name
1
2
3
4
5
6
7
8
3200
203-1297
203-2073
203-2085
3290
3091
203-2445
203-2444
Style8 DriveBelt (2-Pack)
StandardHeadlightBulb
Twist'n SnapHose
BrushRoll- Grey(othercolorsalsoavailable)
Style8 Pre-MotorFilter
Style8 HEPAMediaPost-MotorFilter
SecondaryCyclone
Screen
O0
_i
www.bissell.com
_
800.237.7691
ii_iI
Thiswarranty
givesyouspecificlegalrights,andyoumayalsohaveotherrightswn_cn
mayvar_fromstatetostate.I1
youneedadditional
insl_uction
regarding
thiswarrantyor havequestions
regaralng
wnaTit maycover,pleasecontact
BISSELL
Consumer
ServicesbyE-mail,telephone,
or regularmailasdescribedDe_ow.
Limited One Year Warranty
Subjectto the *EXCEPTIONS
ANDEXCLUSIONS
identifiedbelow,uponreceiptof the productBISSELL
Homecare,Inc.will repairor replace(withnewor remanufactured
componentsor products),at BISSELL's
option,freeof chargefromthe dateof purchasebythe originalpurchaser,for oneyearanydefectiveor
malfunctioningpart.
Seeinformationbelowon "IfyourBISSELLproductshouldrequireservice".
Thiswarranty
applies
to produdusedforpersonal,
andnotcommercial
orrental
service.
Thiswarranty
doesnotapplytotans
orroulJne
maintenance
compenents
suchasfilters,pelts,
or brushes.
Damage
ormalfunction
caused
bynegligence,
abuse,
neglect,
unauthorized
repair,
oranyotherusenotinaccordance
withtheUser'sGuide
isnotcovered.
If your BISSELLproductshouldrequire service:
ContactBISSELLConsumerServicesto locatea BISSELLAuthorizedServiceCenterin yourarea.
If youneedinformationaboutrepairsor replacementparts,or if youhavequestionsaboutyour
warranty,
contactBISSELLConsumerServices.
Websiteor E-mail:
OrCall:
Orwrite:
www.bissell.com
BISSELLConsumerServices
BISSELLHomecare,Inc.
Usethe "CustomerServices"tab. 1-800-237-7691
POBox3606
Monday- Friday8 a.m. - 10 p.m.ET GrandRapids,MI 49501
ATTN:ConsumerServices
Saturday9 a.m. - 8 p.m.ET
BISSELLHOMECARE,
INC. IS NOTLIABLEFORINCIDENTAL
ORCONSEQUENTIAL
DAMAGESOF
ANYNATUREASSOCIATED
WITHTHEUSEOFTHISPRODUCT.BISSELL'SLIABILITYWILLNOT
EXCEEDTHEPURCHASEPRICEOF THEPRODUCT.
Somestatesdo not allowthe exclusionor limitationof incidental
or consequential
damages,
sothe abovelimitationor exclusionmaynot applyto you.
*EXCEPTIONS
ANDEXCLUSIONS
FROMTHETERMSOFTHE LIMITEDWARRANTY
THISWARRANTY
IS EXCLUSIVE
ANDIN LIEUOFANYOTHER
WARRANTIES
EITHERORALORWRITTEN.
ANYIMPLIEDWARRANTIES
WHICHMAYARISEBYOPERATION
OFLAW,INCLUDING
THEIMPLIED
WARRANTIES
OFMERCHANTABILITY
ANDFITNESSFORA PARTICULAR
PURPOSE,
ARELIMITEDTOTHE
ONEYEARDURATION
FROMTHEDATEOFPURCHASE
ASDESCRIBED
ABOVE.
Somestatesdonotallowlimitations
onhowlonganimpliedwarrantylasts,sotheabovelimitationmay
notapplyto you.
©2009 BISSELLHomecare, hc
Grand Rapids,Michigan
All rights reserved.Printedin Korea
Part Number 110-4086
Rev 2/09
Visit our website at:
www.bissell.com
www.bissell.com
_
800.237.7691