1
MS2105 owner.qxd 8/25/2003 4:21 PM Page 1
MS2105 owner.qxd 8/25/2003 4:21 PM Page 2
CONTENTS
1. Features . . . . . . . . . . . . . . . . . . . . . . . . . . . . . . . . . . . . . . . 3
2. Ungo-Net Interface Introduction . . . . . . . . . . . . . . . . . . . . . . 4
3. Remote Transmitter . . . . . . . . . . . . . . . . . . . . . . . . . . . . . . . 5
3.1 Remote Transmitter Layout . . . . . . . . . . . . . . . . . . . . 5
3.2 Battery Replacement . . . . . . . . . . . . . . . . . . . . . . . . . 5
4. Security System Operation . . . . . . . . . . . . . . . . . . . . . . . . . 6
4.1 Arming Operation . . . . . . . . . . . . . . . . . . . . . . . . . . . . 6
4.2 Remote Sensor Bypass . . . . . . . . . . . . . . . . . . . . . . . 6
4.3 Passive Arming . . . . . . . . . . . . . . . . . . . . . . . . . . . . . .6
4.4 Disarming Operation . . . . . . . . . . . . . . . . . . . . . . . . . .6
4.5 Tamper Alert . . . . . . . . . . . . . . . . . . . . . . . . . . . . . . . 7
4.6 Silent Arming / Disarming . . . . . . . . . . . . . . . . . . . . . . 7
4.7 Driver’s Door Priority Unlock . . . . . . . . . . . . . . . . . . . 7
4.8 Auto Rearm Feature . . . . . . . . . . . . . . . . . . . . . . . . . 7
4.9 Ignition Controlled Door Locks . . . . . . . . . . . . . . . . . . 7
4.10 Remote Panic . . . . . . . . . . . . . . . . . . . . . . . . . . . . . . 8
4.11 Emergency Override . . . . . . . . . . . . . . . . . . . . . . . . . 8
4.12 Valet Mode . . . . . . . . . . . . . . . . . . . . . . . . . . . . . . . . 9
4.13 Optional Trunk Release . . . . . . . . . . . . . . . . . . . . . . . 9
4.14 Optional Trunk Disarm Feature . . . . . . . . . . . . . . . . . 9
4.15 Programming Remote Transmitters . . . . . . . . . . . . . . 9
5. Remote Start Operation . . . . . . . . . . . . . . . . . . . . . . . . . . 10
5.1 Remote Starting . . . . . . . . . . . . . . . . . . . . . . . . . . . . 10
5.2 Shutdown . . . . . . . . . . . . . . . . . . . . . . . . . . . . . . . . . 10
5.3 Stop and Go . . . . . . . . . . . . . . . . . . . . . . . . . . . . . . . 10
5.4 Auto Cold Starting . . . . . . . . . . . . . . . . . . . . . . . . . . . 11
6. LCD 2-way Transmitter (MS2107) . . . . . . . . . . . . . . . . . . 11
6.1 Programming LCD 2-way Remote Transmitters . . . . . 11
7. User Selectable Programming Options . . . . . . . . . . . . . . . 12
5.1 Programmable Options . . . . . . . . . . . . . . . . . . . . . . . 12
5.2 Entering User Programming . . . . . . . . . . . . . . . . . . . 13
5.3 Default Reset For User Programming . . . . . . . . . . . . 13
8. Reference Charts . . . . . . . . . . . . . . . . . . . . . . . . . . . . . . . 14
6.1 Transmitter Operation . . . . . . . . . . . . . . . . . . . . . . . 14
6.2 Status Indicator (LED) Functions . . . . . . . . . . . . . . . .14
6.3 Siren Chirp Status . . . . . . . . . . . . . . . . . . . . . . . . . . .14
9. Warranty Information . . . . . . . . . . . . . . . . . . . . . . . . . . . . 15
10. Installation Information . . . . . . . . . . . . . . . . . . . . . . . . . . . 16
2
MS2105 owner.qxd 8/25/2003 4:21 PM Page 3
1. FEATURES
The Ungo MS2105 and MS2107 are state-of-the-art combination vehicle security and
remote controlled car starter systems. These systems offer features designed to deter and
detect potential intrusions to your vehicle, and send an alert signal when a zone is violated.
These systems will inform the user of any bad switches or sensors that may be causing
the system to function improperly, and when triggered the violated zone will be identified.
Your Ungo system protects both you and the contents of your vehicle with features such
as panic mode, dome light illumination, and ignition controlled door locking.
In addition to security features, the MS2105 and MS2107 will safely start your car by
remote control, without your key in the ignition. If your vehicle is powered by a diesel
engine, the ignition will turn on for several seconds prior to starting the engine, in order for
the glow plugs to warm up.
Once the engine is remote started, your preset accessories (heater/air conditioner) will be
turned on to provide you with the maximum comfort when you enter the vehicle. After
activation, the vehicle will run for approximately 15 minutes (or 25 minutes if selected by
your installer at the time of installation) before automatically shutting off.
The MS2107 adds the convenience and security of 2-way operation with LCD display
confirmation. The LCD display provides real-time information about the status of your
vehicle including arm/disarm confirmation, triggered sensor identification, engine running
indication, and more. For a complete description of the LCD transmitter functions, please
see the 2-way transmitter supplement included with the MS2107.
Standard Features
•
•
•
•
•
•
•
•
•
Optional Features
Two 5-Button VariCode3 1-way
•
•
•
•
•
•
•
•
Remote Transmitters (MS2105)
or
One 5-Button VariCode3 1-way
Remote Transmitter and One 2-way
LCD Transmitter (MS2107)
Status Indicator (LED)
Multi-Tone 120dB Siren
Dual Stage Shock Sensor
Built-in Starter Disable
Coded Emergency Override
Ungo-Net Interface
Flashing Parking Lights
Keyless Entry
Remote Trunk/Hatch Release
Dome Light Supervision
Hood and Trunk Protection
Power Window Roll Up
Driver's Door Priority Locks
Radar Sensor
Remote Head Light Control
Note: Some features may require additional parts and labor, and may not be appropriate for certain
vehicles. Consult your authorized Ungo dealer for assistance.
3
MS2105 owner.qxd 8/25/2003 4:21 PM Page 4
2. Ungo-Net Interface Introduction
The MS2105 and MS2107 are equipped with Ungo’s newest and most revolutionary
technology to date, the Ungo-Net bus system. Ungo-Net is a network system that allows
expansion, flexibility, and superior vehicle security through digital communication. This is
established through a PC link through either a computer or PDA, similar to a USB port on
a PC. Utilizing this interface, the alarm system and remote transmitters can be configured
to best suit the needs of the operator. This includes arming mode selections, auxiliary
functions, multiple vehicle operation, transmitter configuration, and interface modules.
For additional convenience and operation, households with multiple vehicles can utilize a
single remote transmitter to operate 2 vehicles. Eliminating the cumbersome cluster of
multiple remote transmitters. Also, the remote transmitters can be customized to better suit
the needs of the operator. The Arm and Disarm buttons can be consolidated into the one
button with the remaining buttons controlling assignable features.
Capitalizing on Ungo-Net, an optional LCD transmitter kit can be added to the security
system. This transmitter features 2-way communication with audible and visual
confirmation that provides vehicle status information and alerts the operator to violation
attempts.
In addition, system configuration, software upgrades, and diagnostics can be performed
through the Ungo-Net port. Thus allowing the Ungo dealer to maintain the utmost
protection and serviceability of the security system. Ungo-Net also allows the dealer to
troubleshoot false triggers and calibrate sensors quickly.
Ungo-Net Accessories
PCLINK: Includes Ungo-Net software, serial cable, instructions, and power supply.
FMKIT: Includes SAA217T (LCD transmitter), extended range antenna, instructions,
and transceiver module.
AUX BOX: Includes receiver module, wiring harness, and instructions.
4
MS2105 owner.qxd 8/25/2003 4:21 PM Page 5
3. REMOTE TRANSMITTER
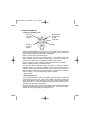
3.1 Remote Transmitter Layout
Arm/Lock
Silent Arm
w/ Shift
Disarm/Unlock
Silent Disarm
w/ Shift
Level Shift
Auxiliary 1
Auxiliary 2
w/ Shift
Start
The Ungo MS2105/MS2107 comes with one or two VariCode3 Remote Transmitters
used to control the system’s features. Each time a transmitter button is pressed, the
LED will flash to indicate that a transmission is taking place.
Button 1 Arms the system and locks the doors.*
Button 2 Disarms the system and unlocks the doors.* If the optional Driver’s Door
Priority Unlocking feature is installed, pressing Button 2 Disarms the system and
unlocks only the driver’s door. Pressing Button 2 again unlocks all doors.
Button 3 Activates the system’s auxiliary 1 output (usually used for trunk release).*
Button 4 Activates the system’s remote start feature.
The Level Shift Button temporarily changes the function of buttons 1-4 allowing
expanded operation and multi-car compatibility. Each time the Level Shift button is
pressed, a new level of commands are accessed up to a maximum of four levels (Level
Shift three times). Note: pages 3 and 4 are reserved for channel expansion modules or
multi-car operation. See your Authorized Ungo Dealer for details.
* Optional feature
3.2 Battery Replacement
Your Ungo remote transmitter uses a 12 volt alkaline battery (type 23A), which will need
to be replaced from time to time. Under normal conditions, the battery may last more
than 6 months before it needs replacement. When your remote transmitter’s battery
needs replacement, you will notice a decrease in operating range or a decrease in the
brightness of the transmitter’s LED indicator.
To change the battery, remove the 2 screws at the back of the transmitter and carefully
separate the top and bottom halves of the transmitter case. Insert the new battery,
carefully observing proper polarity, then replace the cover.
5
MS2105 owner.qxd 8/25/2003 4:21 PM Page 6
4. SECURITY SYSTEM OPERATION
4.1 Arming Operation
To arm the alarm system, press Lock button on the transmitter:
• The siren will chirp once.
• The parking lights will flash once.*
• The doors will lock.*
• The LED will come on solid for 5 seconds, and then begin to flash. After 10
seconds the alarm system is armed.
* Optional feature
4.2 Remote Sensor Bypass
To arm the system and bypass the shock sensor, hood/trunk inputs, press the Lock
button to Arm, then within 2 seconds press the Lock button again. The siren will
chirp 5 times to indicate Sensor Bypass mode. The doors will still be monitored.
4.3 Passive Arming (Programmable feature)
The passive arming feature allows the system to arm automatically. The remote
transmitter still can be used to arm the system at any time. This option is user
programmable (see User Accessible Programming Options).
To arm the alarm system passively:
1. Turn the ignition Off.
2. Exit the vehicle and close all the doors.
• The LED will begin flashing rapidly to indicate the system is preparing to arm.
• The siren will chirp 30 seconds after the last door is closed to indicate the
system is armed.
• The doors will lock.*
* Optional feature
4.4 Disarming Operation
To disarm the system press the Unlock button on the transmitter:
• The siren will chirp twice.**
• The parking lights will flash twice.*
• The doors will unlock.*
• The dome light will turn on for 30 seconds.*
* Optional feature
** If the alarm was triggered while away, the system will respond with 3 chirps
and 3 parking light flashes, see Tamper Alert.
6
MS2105 owner.qxd 8/25/2003 4:21 PM Page 7
4.5 Tamper Alert
On Disarming, if the system responds with three chirps, indicating the system was
triggered, turn on the ignition and the LED will flash the triggered zone 5 cycles.
LED Flashes (60 seconds):
1 flash
=
optional sensor
2 flashes
=
shock sensor
4 flashes
=
door
5 flashes
=
trunk
example: flash-flash-pause-flash-flash-pause = shock sensor
4.6 Silent Arming / Disarming (Programmable feature)
As an option, the system can be programmed to always Arm and Disarm the with or
without chirp confirmation (see User Accessible Programming Options).
To temporarily cancel the Arming and Disarming confirmation chirps, press the Level
Shift Button followed by the Arm or Disarm Button.
Note: The confirmation chirps will only be cancelled if the system status is normal. The
chirp indications for Tamper Alert and the open zone warning will not be cancelled when
the system is Armed or Disarmed silently.
4.7 Optional Driver's Door Priority Unlock
The optional Driver’s Door Priority Unlock feature provides a higher level of personal
safety by unlocking only the driver’s door upon disarming. Once disarmed, pressing the
disarm button again will unlock all doors. This optional feature may require additional
parts and labor, consult your Authorized Ungo dealer for more information.
4.8 Auto Rearm Feature (Programmable feature)
The Auto Rearm feature allows the system to automatically rearm itself in the event the
system becomes disarmed and a door is not opened within 30 seconds. This option is
user programmable (see User Selectable Programming Options).
4.9 Ignition Controlled Door Locks (Programmable feature)
The ignition door-locking feature allows the doors to automatically lock when the ignition
is turned On, and automatically Unlock when the ignition is turned Off.This option is user
programmable (see User Selectable Programming Options).
4.10 Remote Panic Feature
In the event of an emergency (PANIC) situation, the system's siren can be triggered for
45 seconds to attract attention. To activate the Panic feature, press and hold the Lock
button for 3 seconds.
7
MS2105 owner.qxd 8/25/2003 4:21 PM Page 8
•
•
•
•
The siren will sound.
The parking lights will flash.*
The doors will unlock.*
The starter disable will turn Off.*
* Optional feature
4.11 Coded Emergency Override (Programmable feature)
If the remote transmitter becomes lost or fails to operate, use the emergency override
feature to disarm the alarm system. Be sure that you have your ignition keys ready and
that you know the location of the Override switch before you perform this procedure.
To override the system:
1. Enter the vehicle.
• Because the alarm system is armed, the siren will sound.
2. Turn the ignition On.
3. Press the Override switch a number of times equal to the disarm code and continue
holding for 10 seconds on the last press. (If the default code setting has not been
changed, press and hold the override switch for 10 seconds to disarm to system.)
• The system will disarm.
• The siren will stop sounding.
• Starter disable will turn Off.
4. You can now start and drive the car.
5. If the disarm code is not entered correctly, turn off the ignition and begin again at
step 2.
6. Consult your authorized Ungo dealer to check the alarm system.
The default setting for the Emergency Override Disarm Code is 1. To change the
Emergency Override Code see User Selectable Programming Options, step 6.
Note: During installation, your installer can program the system to give a 15 second
entry delay when the system Arms passively. When the door is opened after the system
is Armed, the siren will give a series warning of chirps before sounding, giving you time
to perform the emergency override procedure.
4.12 Valet Mode
When placed into Valet Mode the security system will be disabled. However, the
optional keyless entry and auxiliary outputs will still function if installed.
To enter the Valet Mode:
1. Be sure the alarm system is disarmed.
2. Press and hold the Valet/Override button.
3. Turn the ignition On.
8
MS2105 owner.qxd 8/25/2003 4:21 PM Page 9
4. Continue holding the Valet/Override button for 3 seconds.
5. Turn the ignition Off.
• The siren will chirp once.
• The LED will turn On solid indicating the system is in Valet mode.
To exit Valet Mode:
1. Press and hold the Valet/Override button down.
2. Turn the ignition On.
3. Hold the Valet/Override button for 3 seconds.
4. Turn the ignition Off.
• The siren will chirp twice.
• The LED will turn off indicating the system is out of Valet mode.
4.13 Optional Trunk Release
Press the Trunk button for approximately 3 seconds to open the trunk. This optional
feature may require additional parts and labor, consult your Authorized Ungo dealer for
more information.
4.14 Optional Trunk Disarm Feature
The trunk disarm feature allows the alarm to disarm automatically when the Trunk
button is used to activate the optional trunk release. This eliminates having to disarm
the alarm system prior to activating the trunk release. This optional feature may require
additional parts and labor, consult your Authorized Ungo dealer for more information.
4.15 Programming 1-way (standard) Remote Transmitters
Make sure to have the desired transmitters ready and follow the steps below.
To program transmitters:
1. Turn the ignition ON.
2. Press and hold the Valet/Override switch for 5 seconds.
• The siren will chirp once.
3. Press the Lock button on the transmitter.
• The siren will chirp once.
4. Press the Lock button on the transmitter again.
• The siren will chirp twice.
5. Repeat steps 3 and 4 for each additional transmitter.
6. Turn OFF the ignition when transmitter programming is complete.
• The siren will chirp 3 times.
9
MS2105 owner.qxd 8/25/2003 4:21 PM Page 10
5. REMOTE START OPERATION
5.1 Remote Starting
To Remote Start the System:
1. Be sure the System is not in Valet Mode.
2. Press Button 4.
• The parking lights will turn on.
• The siren will chirp 3 times (if Armed, the shock sensor will turn off).
• The ignition will turn on.
• The engine will start and run for the duration of its programmed Run Timer.*
• The heater/air-conditioner will turn on (if turned on prior to exiting the vehicle).
• The LED will double flash.
*If the engine fails to start on the first attempt, it will repeat the starting procedure 2
more times.
Turning on the ignition key then pressing the brake pedal will disengage the MS2005
and allow you to operate and drive your vehicle in a normal manner.
5.2 Shut Down
Any of the following will shut down the engine when it is under Remote Start control:
1. Press Button 4 for 3 seconds.
• After the engine shuts down the doors will lock (if installed and programmed).
2. Press the brake pedal.
3. Open the hood (or trunk if connected).
4. Remote Start Time-Out (completion of the timed run cycle).
5.3 Stop and Go
The Stop and Go Feature allows you to remove the ignition key and exit the vehicle
while keeping the engine running during short stops.
To leave the vehicle running:
1. Press the brake pedal and hold.
2. While pressing the brake pedal, push Button 4 on the Remote Transmitter for 2
seconds.
• The LED will flash rapidly.
• The parking lights will flash 5 times.
3. Release the brake pedal.
4. Remove the key from the ignition switch.
5. You may now exit the vehicle, arm the alarm and lock the doors.
10
MS2105 owner.qxd 8/25/2003 4:21 PM Page 11
To re-enter the vehicle and resume driver control:
1. Disarm the alarm by pressing Button 2 on the Remote Transmitter.*
• The doors will unlock.*
2. Turn on the ignition.
3. Press the brake pedal to disengaged the MS2005.
• The LED will turn off.
*If optional keyless entry feature is installed.
5.4 Auto Cold Starting
The Auto Cold Starting Feature automatically starts the vehicle every two hours and
runs for the preset Run Time.
To enter Cold Start Mode:
1. Be sure ignition is off.
2. Press and hold the Valet switch.
3. Continue holding the Valet switch and press Transmitter Button 3 for 5 seconds
then release both buttons.
• The parking lights will flash 5 times.
• The engine will start and run for 30 seconds then shut down.
• The LED will double flash.
6. LCD 2-way Transmitter (MS2107)
6.1 Programming LCD 2-way Remote Transmitters
Make sure to have the transmitter ready and follow the steps below.
To program a transmitter:
1. Turn the ignition ON.
2. Press the Valet/Override switch twice and hold for 5 seconds.
• The siren will chirp once.
3. Press and hold the Lock button on the LCD transmitter for 2 seconds.
• The siren will chirp once.
• The LCD transmitter will beep.
4. Turn OFF the ignition when transmitter programming is complete.
• The siren will chirp 3 times.
11
MS2105 owner.qxd 8/25/2003 4:21 PM Page 12
7. User Selectable Programming Options
The Ungo MS2105/MS2107 features a user selectable programming table allowing
simple adjustments to match the user’s preferences.
User Programming Options Table
Feature
Button 1 (default) Button 2
1.
Arming Mode
Active
2.
Auto Rearm
On
Off
3.
Arming Chirps
Normal
Silent
Button 3
Passive
4.
Ignition Controlled Door Locking
On
Off
5.
Ignition Controlled Door Unlocking
All Doors
Driver’s Door
6.
Override Code Programming
Code Set
7.
Remote Start in Valet Mode
Enabled
Disabled
8.
Automatic Starting
Every 2 Hours
Every Hour
9.
Engine Run Time
15 minutes
25 minutes
Off
7.1 Programmable Options
1. Arming Mode: Selects whether or not the system will automatically Arm when
ignition is turned off.
2. Auto Rearming: Selects whether or not the security system will rearm if no activity
is detected after Remote Disarming. (If Passive Door Locking feature was selected
during installation, the system will also relock the doors.) Automatic Rearming only
takes place if the system was Armed (actively or passively) for at least 10 seconds
and then remotely disarmed.
3. Arming Chirps: Selects whether or not the security system will chirp when arm and
disarmed.
4. Ignition Controlled Door Locking: Selects whether or not the doors will lock when
the ignition is turned On. Ignition Controlled Door Locks will automatically lock the
doors 10 seconds after the ignition is turned On. To prevent the keys from being
locked inside the vehicle; the security system will not lock the doors if any of the
doors is open when the ignition is turned On.
5. Ignition Controlled Door Unlocking: Selects whether or not the security system
the doors will unlock when the ignition is turned Off. Ignition Controlled Door
Unlocking can be configured to unlock all the doors or driver's door only.
6. Override Code Programming: Selects the number of times the Valet button must
be depressed to override the system. The Override Code can be any number
between 1 and 15. (Default setting is 1)
12
MS2105 owner.qxd 8/25/2003 4:21 PM Page 13
6. Remote Start in Valet Mode: Selects whether or not the remote start can be
activated when the security system is in Valet mode.
8. Automatic Starting: Selects the timing interval for the automatic remote start
function. When the Automatic Starting feature is enabled by the user, the vehicle
will start and run every 2 hours or every hour depending on the programming option
selected for this step.
9. Engine Run Time: Selects the length of time the engine will remain running during
remote start operation.
7.2 Entering User Programming
To change any of the user programmable options, follow the steps below:
1. Turn the ignition ON.
2. Within 5 seconds, press the Valet/Override button 2 times and hold for 2 seconds.
• The siren will chirp, indicating that User Programming has been entered.
3. Press the Valet/Override button the number of times equal to the Option to be
changed.
• The siren will chirp each time the Valet/Override button is pressed.
4. Within 5 seconds, press the transmitter button corresponding to the desired
operating mode for that Option.
• The siren will chirp a number of times equal to the transmitter button pressed.
5. When finished, turn the ignition OFF to save changes.
7.3 Default Reset for User Programming
The user programmable options may be restored to the factory default setting at any
time. To restore the factory defaults follow the steps below:
1. Turn the ignition ON.
2. Within 5 seconds, press the Valet/Override button 2 times and hold for 2 seconds.
• The siren will chirp, indicating that Programming has been entered.
3. Press transmitter button 3.
• The siren will chirp 6 times indicating the reset signal has been received, and User
Options have been reset to factory default.
13
MS2105 owner.qxd 8/25/2003 4:21 PM Page 14
8. Reference Charts
8.1 Transmitter Operation
BUTTON
Lock
Unlock
Trunk
Lock
Lock then Lock
DURATION
Short
Short
Long (3 Seconds)
Long (3 Seconds)
Short then Short
FUNCTION
Arm
Disarm
Auxiliary 1 Output
Panic
Remote Sensor Bypass
8.2 Status Indicator (LED) Functions
LED STATUS
Off
Slow Flash
Rapid Flash
Rapid Flash (after disarm)
On Solid
On Solid (after arming)
On Solid (when disarmed and
not in Valet mode)
FUNCTION
System is disarmed in Active mode
System is Armed
Passive arming indication and auto rearm
System was triggered
Valet mode
On for 10 seconds, shock sensor trigger has
not yet armed
Door or hood/trunk is open
8.3 Siren Chirp Status
CHIRPS
1 Chirp
2 Chirps
3 Chirps
3 Chirps
2 Chirps when the ignition is
turned Off.
FUNCTION
System Armed
System Disarmed
System Disarmed, but system was triggered
while away.
5 seconds after arming indicates open hood,
trunk, or sensor trigger zone.
Door was open when the ignition was turned
off.
14
MS2105 owner.qxd 8/25/2003 4:21 PM Page 15
9. WARRANTY INFORMATION
This Ungo Security System is warranted against defects in material and workmanship. The main unit
and remote controls are covered by this limited lifetime warranty. This Limited Lifetime Warranty applies
to Ungo Security systems that have been installed by an authorized Ungo Security dealer. This warranty
is to the Original Purchaser ("Owner") and to the original vehicle in which it was installed into. This
warranty is not transferable to any subsequent owner(s) of the product(s).
Warranty Program:
Main Unit
Remote Controls
LCD Remote Control
Siren
Shock Sensor
LED
Valet/Override Button
Limited Lifetime
Limited Lifetime
Three years from date of purchase
One year from date of purchase
One year from date of purchase
One year from date of purchase
One year from date of purchase
The Warranty does not cover batteries or products deemed damage through alterations or installation. It
also does not cover products mishandled, misused, neglected, abused, water damaged, or with
removed/altered serial numbers.
PROOF OF PURCHASE WILL BE REQUIRED FOR WARRANTY SERVICE OF THIS PRODUCT.
This warranty does not cover the costs incurred for removal or reinstallation of the main unit and/or any
damage to the vehicle or the vehicle's electrical system.
The sole responsibility of Clarion Corporation under this Warranty shall be limited to the repair or
replacement of the product, at the sole discretion of Clarion Corporation.
If it becomes necessary to send the product or any defective part to Clarion Corporation, the product
must be shipped in its original carton or equivalent carton, fully insured, with shipping charges prepaid.
Clarion Corporation will not assume any responsibility for any loss or damage incurred in shipping.
ALL IMPLIED WARRANTIES EXCEPT TO THE EXTENT PROHIBITED BY APPLICABLE LAW SHALL
HAVE NO GREATER DURATION THAN THE WARRANTY PERIOD SET FORTH ABOVE. UNDER NO
CIRCUMSTANCES SHALL CLARION CORPORATION BE LIABLE FOR ANY LOSS OR DAMAGE,
DIRECT OR CONSEQUENTIAL, ARISING OUT OF THE USE OR INABILITY TO USE OF THE
PRODUCT. BECAUSE SOME STATES DO NOT ALLOW LIMITATIONS ON HOW LONG AN IMPLIED
WARRANTY LASTS OR EXCLUSIONS OR LIMITATIONS OF INCIDENTAL OR CONSEQUENTIAL
DAMAGES, THE ABOVE LIMITATIONS OR EXCLUSIONS MAY NOT APPLY TO YOU.
THIS WARRANTY GIVES YOU SPECIFIC LEGAL RIGHTS, AND YOU MAY ALSO HAVE THE OTHER
RIGHTS, WHICH VARY FROM STATE TO STATE.
Should you have any difficulties with the performance of this product during warranty, please call: 1-800GO-CLARION or visit your local Ungo dealer. You may also contact the National Service Manager at the
following address below for additional service help you may need.
Clarion Corporation of America
Attn: National Service Manager
661 W. Redondo Beach Blvd.
Gardena, Ca 90247
15
MS2105 owner.qxd 8/25/2003 4:21 PM Page 16
10. INSTALLATION INFORMATION
Date of Installation:
Installation Facility:
Facility Address:
Facility Phone Number:
Location of Valet/Override:
NOTES
Clarion Corporation of America
661 W. Redondo Beach Blvd.
Gardena, CA 90247
www.clarion.com
Ungo Security Corporation, Gardena, CA
97-MS2105-10 Rev. 1 (8/03)