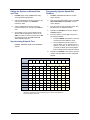
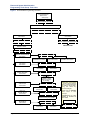
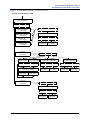
1
MITEL
5000 Communications Platform (CP)
Administrator Phone
Guide
System and Diagnostics Administrator Features
Quick Reference Guide
This guide provides information for frequently used administrator phone features. For more information about these
and other features, refer to the main Administrator Phone Guide.
Enabling or Disabling System
Diagnostics Mode
Default Administrator Feature Codes
While on-hook, enter the Diagnostics Mode feature code
(9900 or 9100) to enable/disable diagnostics mode.
DIAGNOSTICS ON/OFF appears. Then enter one of the
following diagnostics feature codes shown below.
Feature Name
Code
(U.S./Eur.)
Feature Name
Code
(U.S./Eur.)
Automatic Diagnostics Delivery On/Off
9823
Clear Network Alarm
9851
Clear System Alarm
9850
Compression On/Off
9982/9182
9981/9181
9900/9100
Diagnostic – ASAI Snoop Off
9926/9126
Compression Statistics
Diagnostic – ASAI Snoop On
9927/9127
Diagnostics On/Off
Diagnostic – Dump Extension
9933/9133
Enable Network Day
Diagnostic – Dump Node Info
9936/9136
Enable Network Night
9861
Diagnostic – Heap Dump
9943/9143
Modem Disable
9867
Diagnostic – Heap Statistics
9947/9147
Modem Enable
9866
Diagnostic – ISDN View
9948/9148
Modem Reset
9869
Diagnostic – Major Reset
9962/9162
Night Ring On/Off
9860
Diagnostic – Mark as Leaks
9945/9145
Periodic Diagnostics On/Off
9825
Diagnostic – Mark as Quiescent
9946/9146
Program Database
Diagnostic – Minor Reset
9964/9164
Program System Speed Dial
9801
Diagnostic – Network Freeze Zone System Histories
9939/9139
Set Network Date/Time
9810
Set Time/Date
9800
Diagnostic – Network Groups
9963/9163
Synchronize Network Time
9811
Diagnostic – Network Unfreeze Zone
- System History
9989/9189
Diagnostic – Print Auxdata
9972/9172
Diagnostic – Print Message Log
9975/9175
Diagnostic – Print Network Log
9976/9176
Diagnostic – Query Node Traffic
9978/9178
Diagnostic – Show Version
9928/9128
Diagnostic – SIP View
9987/9187
Diagnostic – Spare 1–3
9910-9912/
9110-9112
Diagnostic – System History
9974/9174
Diagnostic – View Displays
9983/9183
Seize Device
9973/9173
System History Freeze
9993/9193
System History Unfreeze
9998/9198
9862
9932/9132
Use the administrator phone to program the following
system features.
Setting the System Day or Night Mode
Dial 9860. NIGHT MODE IS ON (or OFF)
appears followed by THE SYSTEM IS IN NIGHT
MODE, if the system is in Night Mode. In Day
Mode, the display returns to the idle state.
Responding to Alarm Messages
1.
When a minor alarm indication appears, write
down the alarm information.
2.
While on-hook, dial 9850 (Clear System Alarm)
or dial 9851 (Clear Network Alarm).
3.
Look up the alarm in the administrator guide and
take the appropriate action.
Mitel® 5000 CP Administrator Phone Guide – Issue 3.2, September 2009
Setting the System or Network Date
and Time
Programming System Speed-Dial
Numbers
1.
Dial 9800 (single node) or 9810 (multi-node).
The programmed date appears.
1.
Dial 9801. PROGRAM SYS SPD # <number
range> appears.
2.
Use the dialpad buttons to enter the month, day,
and year. For example, enter 020308 for
February 3, 2008.
2.
Enter the System Speed Dial location code (000–
999 or 0000–4999). ENTER NAME <current
name> appears.
3.
Use the dialpad buttons to enter the time in
hours and minutes. For example, enter 0900 for
9:00.
3.
Enter the name or leave the existing name. See
the table below for dialpad characters.
4.
4.
If the system is set for 12-hour display format,
SELECT AM OR PM appears. Press 1 (or the
AM menu button) for A.M. or press 2 (or the PM
menu button) for P.M. SYSTEM DATE AND
TIME UPDATED appears.
Press # or the ACCEPT menu button. ENTER
NUMBER appears.
5.
Enter the number, up to 48 digits, using one of
the following methods:
Synchronizing Network Time
•
Press the REDIAL menu button to enter the
last external number dialed or saved.
•
Use the dialpad to enter the number. In
Numeric Mode, you can press # to enter a
hyphen (-) or press * to enter a colon (:). If
you make a mistake, press the backspace
button to delete the last characters entered.
Dial 9811. NETWORK TIME SYNCHRONIZED
appears.
6.
Press # or the ACCEPT menu button to save the
number. SYS SPD BIN # <number> UPDATED
appears.
Number of Times Button is Pressed in Alpha Mode
1
2
3
4
5
6
7
8
9
10
11
English/Spanish Characters
Japanese (Katakana) Characters1
1
-
&
(
)
1
A
I
U
E
O
a
2
A
B
C
’
2
KA
KI
KU
KE
KO
i
3
D
E
F
!
3
SA
SHI
SU
SE
SO
u
4
G
H
I
*
4
TA
CHI
TSU
TE
TO
e
5
J
K
L
#
5
NA
NI
NU
NE
NO
o
6
M
N
O
ñ
6
HA
HI
FU
HE
HO
tsu
7
P
Q
R
S
7
MA
MI
MU
ME
MO
ya
8
T
U
V
?
8
YA
YU
YO
.
,
yu
9
W
X
Y
Z
9
RA
RI
RU
RE
RO
yo
0
@
:
.
,
0
WA
WO
N
pa
ba
long
Button
1. Japanese characters are supported only if the Multilingual feature is enabled and
Japanese is installed as the secondary language. They are not supported on
phones operating in SIP mode.
Mitel® 5000 CP Administrator Phone Guide – Issue 3.2, September 2009
Part Number
580.8001
Mitel 5000 Communications Platform (CP)
Administrator Phone Guide
Issue 3.2, September 2009
Notice
This document is released by Mitel Networks Corporation as a guide for administrator phone users. It provides
information necessary to properly administer the system using a designated administrator phone.
The contents of this document reflect current company standards and are subject to revision or change without
notice. Some features or applications mentioned may require a future release and are not available in this
release. Future product features are subject to availability and cost. Some features may require additional
hardware and/or specific software.
The contents of this guide may include technical or other inaccuracies. Mitel reserves the right to make
revisions or changes without prior notice. Software packages released after the publication of this guide will be
documented in addenda to the guide or succeeding issues of the guide.
For sales, service, or technical support, contact you local authorized Mitel provider.
Enter provider information above.
If you do not know the contact information for your local provider, use the “Partners – Mitel Partner Locator” link
at the top of the Mitel Web site (www.mitel.com) to locate a nearby office.
If you have any questions or comments regarding this guide or other technical documentation, contact the
Technical Publications Department (USA) at:
[email protected]
Mitel® is a registered trademark of Mitel Networks Corporation.
All other trademarks mentioned in this document are the property of their respective owners, including Mitel Networks
Corporation. All rights reserved.
© 2005–2009 Mitel Networks Corporation
Personal use of this material is permitted. However, permission to reprint/republish this material for advertising or
promotional purposes or for creating new collective works for resale or redistribution to servers or lists, or to reuse any
copyrighted component of this work in other works must be obtained from Mitel Networks Corporation.
Contents
Contents
Overview
1
Introduction . . . . . . . . . . . . . . . . . . . . . . . . . . . . . . . . . . . . . . . . . . . . . . . . . . . . . . . . . . . . . . . . . . . . 2
Administrator Types . . . . . . . . . . . . . . . . . . . . . . . . . . . . . . . . . . . . . . . . . . . . . . . . . . . . . . . . . . 2
Additional References . . . . . . . . . . . . . . . . . . . . . . . . . . . . . . . . . . . . . . . . . . . . . . . . . . . . . . . . . 3
System Networks and Nodes . . . . . . . . . . . . . . . . . . . . . . . . . . . . . . . . . . . . . . . . . . . . . . . . . . . . . . 3
Multicultural English References . . . . . . . . . . . . . . . . . . . . . . . . . . . . . . . . . . . . . . . . . . . . . . . . . . 4
Phone and System Administration
5
Introduction . . . . . . . . . . . . . . . . . . . . . . . . . . . . . . . . . . . . . . . . . . . . . . . . . . . . . . . . . . . . . . . . . . . . 7
Phone Feature Button Differences . . . . . . . . . . . . . . . . . . . . . . . . . . . . . . . . . . . . . . . . . . . . . . . 7
Dialpad Character Descriptions . . . . . . . . . . . . . . . . . . . . . . . . . . . . . . . . . . . . . . . . . . . . . . . . . 7
Single-Node and Network (Multi-Node) Configurations . . . . . . . . . . . . . . . . . . . . . . . . . . . . . . . . 8
System Day and Night Modes . . . . . . . . . . . . . . . . . . . . . . . . . . . . . . . . . . . . . . . . . . . . . . . . . . . 8
Setting a Single-Node System in Day or Night Mode . . . . . . . . . . . . . . . . . . . . . . . . . . . . . . . . . 8
Selecting Nodes for Day or Night Mode . . . . . . . . . . . . . . . . . . . . . . . . . . . . . . . . . . . . . . . . . . . 8
System Date and Time . . . . . . . . . . . . . . . . . . . . . . . . . . . . . . . . . . . . . . . . . . . . . . . . . . . . . . . . . . . 9
Setting the System Date and Time . . . . . . . . . . . . . . . . . . . . . . . . . . . . . . . . . . . . . . . . . . . . . . . 9
Synchronizing Network Times . . . . . . . . . . . . . . . . . . . . . . . . . . . . . . . . . . . . . . . . . . . . . . . . . . 10
System Speed Dial . . . . . . . . . . . . . . . . . . . . . . . . . . . . . . . . . . . . . . . . . . . . . . . . . . . . . . . . . . . . . 11
Station (Phone) Programming Options . . . . . . . . . . . . . . . . . . . . . . . . . . . . . . . . . . . . . . . . . . . . 12
Enabling or Disabling Other Phones as Administrator Phones . . . . . . . . . . . . . . . . . . . . . . . . . 12
Enabling or Disabling Attendant Phones . . . . . . . . . . . . . . . . . . . . . . . . . . . . . . . . . . . . . . . . . . 13
Programming Extension User Names . . . . . . . . . . . . . . . . . . . . . . . . . . . . . . . . . . . . . . . . . . . . 14
Programming Phone Toll Restrictions . . . . . . . . . . . . . . . . . . . . . . . . . . . . . . . . . . . . . . . . . . . . 15
System Programming Options . . . . . . . . . . . . . . . . . . . . . . . . . . . . . . . . . . . . . . . . . . . . . . . . . . . 19
Entering an Administrator Phone Password . . . . . . . . . . . . . . . . . . . . . . . . . . . . . . . . . . . . . . . 19
Changing Do-Not-Disturb (DND) Messages . . . . . . . . . . . . . . . . . . . . . . . . . . . . . . . . . . . . . . . 20
Changing Default Reminder Messages . . . . . . . . . . . . . . . . . . . . . . . . . . . . . . . . . . . . . . . . . . 21
Changing Phone Extension Numbers . . . . . . . . . . . . . . . . . . . . . . . . . . . . . . . . . . . . . . . . . . . . 22
Swapping Phone Extension Numbers . . . . . . . . . . . . . . . . . . . . . . . . . . . . . . . . . . . . . . . . . . . . 23
Mitel® 5000 CP Administrator Phone Guide – Issue 3.2, September 2009
Page v
Contents
Individual Trunk Programming Options . . . . . . . . . . . . . . . . . . . . . . . . . . . . . . . . . . . . . . . . . . . . 25
Programming the Trunk Answer Supervision Type . . . . . . . . . . . . . . . . . . . . . . . . . . . . . . . . . 25
Programming Caller ID . . . . . . . . . . . . . . . . . . . . . . . . . . . . . . . . . . . . . . . . . . . . . . . . . . . . . . . 27
Programming the Hybrid Balance Option . . . . . . . . . . . . . . . . . . . . . . . . . . . . . . . . . . . . . . . . . 28
Programming DTMF or Dial Pulse Signalling . . . . . . . . . . . . . . . . . . . . . . . . . . . . . . . . . . . . . . 29
Programming Trunk Group Assignments . . . . . . . . . . . . . . . . . . . . . . . . . . . . . . . . . . . . . . . . . 30
Programming the Busy Trunk Option . . . . . . . . . . . . . . . . . . . . . . . . . . . . . . . . . . . . . . . . . . . . 31
Trunk Group Programming Options . . . . . . . . . . . . . . . . . . . . . . . . . . . . . . . . . . . . . . . . . . . . . . . 32
Programming Trunk Group Day or Night Answer Access . . . . . . . . . . . . . . . . . . . . . . . . . . . . . 32
Programming Trunk Group Day or Night Ring-in . . . . . . . . . . . . . . . . . . . . . . . . . . . . . . . . . . . 33
Programming Trunk Group Toll Restrictions . . . . . . . . . . . . . . . . . . . . . . . . . . . . . . . . . . . . . . . 34
Programming Trunk Group Trunk Lists . . . . . . . . . . . . . . . . . . . . . . . . . . . . . . . . . . . . . . . . . . . 35
Alarms . . . . . . . . . . . . . . . . . . . . . . . . . . . . . . . . . . . . . . . . . . . . . . . . . . . . . . . . . . . . . . . . . . . . . . . 38
Alarm Types . . . . . . . . . . . . . . . . . . . . . . . . . . . . . . . . . . . . . . . . . . . . . . . . . . . . . . . . . . . . . . . 38
Network Alarms . . . . . . . . . . . . . . . . . . . . . . . . . . . . . . . . . . . . . . . . . . . . . . . . . . . . . . . . . . . . . 38
Alarm Differences . . . . . . . . . . . . . . . . . . . . . . . . . . . . . . . . . . . . . . . . . . . . . . . . . . . . . . . . . . . 39
Responding to Alarms . . . . . . . . . . . . . . . . . . . . . . . . . . . . . . . . . . . . . . . . . . . . . . . . . . . . . . . . 39
Clearing Alarms . . . . . . . . . . . . . . . . . . . . . . . . . . . . . . . . . . . . . . . . . . . . . . . . . . . . . . . . . . . . 40
Internal Modem . . . . . . . . . . . . . . . . . . . . . . . . . . . . . . . . . . . . . . . . . . . . . . . . . . . . . . . . . . . . . . . . 42
Enabling or Disabling the Internal Modem . . . . . . . . . . . . . . . . . . . . . . . . . . . . . . . . . . . . . . . . 42
Resetting the Internal Modem . . . . . . . . . . . . . . . . . . . . . . . . . . . . . . . . . . . . . . . . . . . . . . . . . . 42
Network Group Diagnostics . . . . . . . . . . . . . . . . . . . . . . . . . . . . . . . . . . . . . . . . . . . . . . . . . . . . . 43
Running Network Group Diagnostics . . . . . . . . . . . . . . . . . . . . . . . . . . . . . . . . . . . . . . . . . . . . 43
Seizing a Device . . . . . . . . . . . . . . . . . . . . . . . . . . . . . . . . . . . . . . . . . . . . . . . . . . . . . . . . . . . . 44
History Freezes . . . . . . . . . . . . . . . . . . . . . . . . . . . . . . . . . . . . . . . . . . . . . . . . . . . . . . . . . . . . . . . . 45
Freezing or Unfreezing the System History . . . . . . . . . . . . . . . . . . . . . . . . . . . . . . . . . . . . . . . 45
Freezing or Unfreezing the Network History . . . . . . . . . . . . . . . . . . . . . . . . . . . . . . . . . . . . . . . 45
Page vi
Mitel® 5000 CP Administrator Phone Guide – Issue 3.2, September 2009
Contents
Reference
47
Troubleshooting Tips . . . . . . . . . . . . . . . . . . . . . . . . . . . . . . . . . . . . . . . . . . . . . . . . . . . . . . . . . . . 48
System Administrator and Provider Information . . . . . . . . . . . . . . . . . . . . . . . . . . . . . . . . . . . . 48
Administrator Troubleshooting Tips . . . . . . . . . . . . . . . . . . . . . . . . . . . . . . . . . . . . . . . . . . . . . 48
Programming Planning Sheets . . . . . . . . . . . . . . . . . . . . . . . . . . . . . . . . . . . . . . . . . . . . . . . . . . . 49
Administrator Phone Password . . . . . . . . . . . . . . . . . . . . . . . . . . . . . . . . . . . . . . . . . . . . . . . . . 49
Phone Information . . . . . . . . . . . . . . . . . . . . . . . . . . . . . . . . . . . . . . . . . . . . . . . . . . . . . . . . . . . 49
Do-Not-Disturb Messages . . . . . . . . . . . . . . . . . . . . . . . . . . . . . . . . . . . . . . . . . . . . . . . . . . . . . 50
Reminder Messages . . . . . . . . . . . . . . . . . . . . . . . . . . . . . . . . . . . . . . . . . . . . . . . . . . . . . . . . . 51
Changing Station Extension Numbers . . . . . . . . . . . . . . . . . . . . . . . . . . . . . . . . . . . . . . . . . . . 52
Swapping Stations . . . . . . . . . . . . . . . . . . . . . . . . . . . . . . . . . . . . . . . . . . . . . . . . . . . . . . . . . . 52
Individual Trunk Programming . . . . . . . . . . . . . . . . . . . . . . . . . . . . . . . . . . . . . . . . . . . . . . . . . 53
Trunk Group Programming . . . . . . . . . . . . . . . . . . . . . . . . . . . . . . . . . . . . . . . . . . . . . . . . . . . . 53
Default Feature Codes . . . . . . . . . . . . . . . . . . . . . . . . . . . . . . . . . . . . . . . . . . . . . . . . . . . . . . . . . . 54
Administrator Feature Codes . . . . . . . . . . . . . . . . . . . . . . . . . . . . . . . . . . . . . . . . . . . . . . . . . . 54
Diagnostics Feature Codes . . . . . . . . . . . . . . . . . . . . . . . . . . . . . . . . . . . . . . . . . . . . . . . . . . . . 55
Trunk Access Codes . . . . . . . . . . . . . . . . . . . . . . . . . . . . . . . . . . . . . . . . . . . . . . . . . . . . . . . . . 58
Phone Feature Codes . . . . . . . . . . . . . . . . . . . . . . . . . . . . . . . . . . . . . . . . . . . . . . . . . . . . . . . . 58
Index
Mitel® 5000 CP Administrator Phone Guide – Issue 3.2, September 2009
65
Page vii
Overview
Overview
Introduction . . . . . . . . . . . . . . . . . . . . . . . . . . . . . . . . . . . . . . . . . . . . . . . . . . . . . . . . . . . . . . . . . . . . 2
Administrator Types . . . . . . . . . . . . . . . . . . . . . . . . . . . . . . . . . . . . . . . . . . . . . . . . . . . . . . . . . . 2
Additional References . . . . . . . . . . . . . . . . . . . . . . . . . . . . . . . . . . . . . . . . . . . . . . . . . . . . . . . . . 3
Feature References . . . . . . . . . . . . . . . . . . . . . . . . . . . . . . . . . . . . . . . . . . . . . . . . . . . . . . . 3
Previous Software and Hardware Versions . . . . . . . . . . . . . . . . . . . . . . . . . . . . . . . . . . . . . 3
Administrator Programming Planning Sheets . . . . . . . . . . . . . . . . . . . . . . . . . . . . . . . . . . . 3
System Networks and Nodes . . . . . . . . . . . . . . . . . . . . . . . . . . . . . . . . . . . . . . . . . . . . . . . . . . . . . . 3
Multicultural English References . . . . . . . . . . . . . . . . . . . . . . . . . . . . . . . . . . . . . . . . . . . . . . . . . . . 4
Mitel® 5000 CP Administrator Phone Guide – Issue 3.2, September 2009
Page 1
Overview
Introduction
Introduction
This Mitel® 5000 CP Administrator Phone Guide provides instructions on using your
administrator phone to perform basic user and system administration on the MItel 5000
Communications Platform (CP). For quick access to frequently used feature instructions, you
can use the removable Quick Reference Guide included with this guide.
You must have access to an administrator phone, a phone designated to perform system and
phone administrative tasks, to perform tasks described in this guide. The system administrator
assigns the administrator phone in the 5000 CP Database (DB) Programming application. See
“Administrator Types” below.
For ease of use, when programming administrator features and to manage system alarm
messages, Mitel recommends using a display phone, such as the 5340 IP phone, 8662 IP
phone, 8660 IP phone, 8568 digital telephone, or 8560 digital telephone. You cannot use a
single line (analog) phone as an administrator phone. See “Phone Feature Button Differences”
on page 7 for more details about these phones.
Administrator Types
The following administrator types are referenced in this guide:
• Phone administrator (the audience for this guide): Uses the administrator phone to
perform various administrative functions such as changing system modes, managing
alarms, and programming basic phone features.
• Voice Mail administrator: Uses the administrator voice mailbox to perform end-user level
voice mail administration. Refer to the appropriate Voice Mail Administrator Guide:
o
For Enterprise® Messaging and Basic Voice Mail, refer to the Enterprise Messaging
and Basic Voice Mail Administrator Guide, part number 580.8009.
o
For NuPoint Unified Messaging (UM), refer to the NuPoint documentation at Mitel
Online Web site (http://www.edocs.mitel.com). For NuPoint administration, refer to the
Web Console Help and the Technical Documentation Online Help.
• System administrator: Uses the 5000 CP DB Programming application to configure all
phone system and voice mail features for your organization. Your system administrator
may be on site, or you may rely on your local MItel provider (the company that installed
your phone system and now services it) for system administration. All sales, service, and
technical support are handled at the local level by your authorized Mitel provider. If you do
not know the contact information for your local provider, use the “Strategic Partners &
Resellers – Mitel Partner Locator” link at the top of the Mitel Web site (www.mitel.com) to
locate a nearby office.
• Network administrator: Maintains the network and performs network-related tasks.
Page 2
Mitel® 5000 CP Administrator Phone Guide – Issue 3.2, September 2009
Overview
Additional References
Additional References
Refer to the following references for additional information.
Feature References
The administrator phone functions as both a standard system phone and an administrator
phone. However, because this guide describes features that are programmed from the
administrator phone only, refer to the appropriate phone user guides for detailed feature
descriptions and end-user instructions.
Previous Software and Hardware Versions
This guide provides instructions for Mitel 5000 CP v3.2 software. You may find that some
features referenced in this guide do not apply to your system. For more information, refer to the
hardware or software manuals for your product or software version. Contact your local
authorized Mitel provider (the company that installed your phone system and now services it) for
more information. If you do not have the contact information for your local provider, use the
“Strategic Partners & Resellers – Mitel Partner Locator” link at the top of the Mitel Web site
(www.mitel.com) to locate a nearby office.
Administrator Programming Planning Sheets
You can use the included programming planning sheets to help you plan your site system and
voice mail programming requirements. For programming planning sheets and default system
feature codes, see the “Reference” chapter beginning on page 47.
System Networks and Nodes
Two or more 5000 CP systems can be connected to form a network, providing a seamless
interface between the systems. For example, a 5000 CP system in Phoenix, Arizona can be
connected to another 5000 CP system in Tampa, Florida. System users can place calls across
the network to other extensions as if they were in the same building. However, each system can
have its own time settings, call configurations, System Speed-Dial contacts, and so on.
In this guide, all references to a network mean two or more connected systems. Each system in
a network is called a node.
The maximum capacities for networking appear in Table 1.
Table 1. System Network Capacities
Network Node or Device
System Nodes per network
Local devices per node
Capacity
99
3041
Off-node devices per node
10,0002
Devices per network
40,000
1. The maximum number of phones and trunks that can be installed is limited by
the number of voice channels and system memory resources available.
2. Depends on system licensing.
Mitel® 5000 CP Administrator Phone Guide – Issue 3.2, September 2009
Page 3
Overview
Multicultural English References
Multicultural English References
This guide is intended for audiences in the United States (U.S.) and in the Mitel European
market, which includes the United Kingdom (U.K.). Because of this dual support, dual
references are made to industry features, standards, and jargon, as appropriate throughout the
document. For the purposes of this administrator guide, British English terms are assumed to
apply to other English-speaking European cultures, as well.
For example, the U.S. telecom industry refers to an audio communication line between a public
switching system and a private switching system as a “central office (CO) trunk.” In the U.K.,
this same type of line is called a “local exchange trunk.”
This guide does not make a distinction between American English and British English spellings
of common words. Only American English spellings appear in this manual. For example, the
word “analog” is not spelled as “analogue.”
Page 4
Mitel® 5000 CP Administrator Phone Guide – Issue 3.2, September 2009
Phone and System Administration
Phone and System Administration
Introduction . . . . . . . . . . . . . . . . . . . . . . . . . . . . . . . . . . . . . . . . . . . . . . . . . . . . . . . . . . . . . . . . . . . . 7
Phone Feature Button Differences . . . . . . . . . . . . . . . . . . . . . . . . . . . . . . . . . . . . . . . . . . . . . . . 7
Dialpad Character Descriptions . . . . . . . . . . . . . . . . . . . . . . . . . . . . . . . . . . . . . . . . . . . . . . . . . 7
Single-Node and Network (Multi-Node) Configurations. . . . . . . . . . . . . . . . . . . . . . . . . . . . . . . . . 8
System Day and Night Modes . . . . . . . . . . . . . . . . . . . . . . . . . . . . . . . . . . . . . . . . . . . . . . . . . . 8
Setting a Single-Node System in Day or Night Mode . . . . . . . . . . . . . . . . . . . . . . . . . . . . . . . . . 8
Selecting Nodes for Day or Night Mode . . . . . . . . . . . . . . . . . . . . . . . . . . . . . . . . . . . . . . . . . . . 8
System Date and Time . . . . . . . . . . . . . . . . . . . . . . . . . . . . . . . . . . . . . . . . . . . . . . . . . . . . . . . . . . . 9
Setting the System Date and Time . . . . . . . . . . . . . . . . . . . . . . . . . . . . . . . . . . . . . . . . . . . . . . . 9
Synchronizing Network Times . . . . . . . . . . . . . . . . . . . . . . . . . . . . . . . . . . . . . . . . . . . . . . . . . 10
System Speed Dial. . . . . . . . . . . . . . . . . . . . . . . . . . . . . . . . . . . . . . . . . . . . . . . . . . . . . . . . . . . . . . 11
Station (Phone) Programming Options . . . . . . . . . . . . . . . . . . . . . . . . . . . . . . . . . . . . . . . . . . . . . 12
Enabling or Disabling Other Phones as Administrator Phones . . . . . . . . . . . . . . . . . . . . . . . . . 12
Enabling or Disabling Attendant Phones . . . . . . . . . . . . . . . . . . . . . . . . . . . . . . . . . . . . . . . . . 13
Programming Extension User Names . . . . . . . . . . . . . . . . . . . . . . . . . . . . . . . . . . . . . . . . . . . . 14
Programming Phone Toll Restrictions . . . . . . . . . . . . . . . . . . . . . . . . . . . . . . . . . . . . . . . . . . . 15
System Programming Options . . . . . . . . . . . . . . . . . . . . . . . . . . . . . . . . . . . . . . . . . . . . . . . . . . . . 19
Entering an Administrator Phone Password . . . . . . . . . . . . . . . . . . . . . . . . . . . . . . . . . . . . . . . 19
Changing Do-Not-Disturb (DND) Messages . . . . . . . . . . . . . . . . . . . . . . . . . . . . . . . . . . . . . . . 20
Changing Default Reminder Messages . . . . . . . . . . . . . . . . . . . . . . . . . . . . . . . . . . . . . . . . . . 21
Changing Phone Extension Numbers . . . . . . . . . . . . . . . . . . . . . . . . . . . . . . . . . . . . . . . . . . . . 22
Swapping Phone Extension Numbers . . . . . . . . . . . . . . . . . . . . . . . . . . . . . . . . . . . . . . . . . . . 23
Individual Trunk Programming Options . . . . . . . . . . . . . . . . . . . . . . . . . . . . . . . . . . . . . . . . . . . . 25
Programming the Trunk Answer Supervision Type . . . . . . . . . . . . . . . . . . . . . . . . . . . . . . . . . 25
Programming Caller ID . . . . . . . . . . . . . . . . . . . . . . . . . . . . . . . . . . . . . . . . . . . . . . . . . . . . . . . 27
Programming the Hybrid Balance Option . . . . . . . . . . . . . . . . . . . . . . . . . . . . . . . . . . . . . . . . . 28
Programming DTMF or Dial Pulse Signalling . . . . . . . . . . . . . . . . . . . . . . . . . . . . . . . . . . . . . . 29
Programming Trunk Group Assignments . . . . . . . . . . . . . . . . . . . . . . . . . . . . . . . . . . . . . . . . . 30
Programming the Busy Trunk Option . . . . . . . . . . . . . . . . . . . . . . . . . . . . . . . . . . . . . . . . . . . . 31
Trunk Group Programming Options . . . . . . . . . . . . . . . . . . . . . . . . . . . . . . . . . . . . . . . . . . . . . . . 32
Programming Trunk Group Day or Night Answer Access . . . . . . . . . . . . . . . . . . . . . . . . . . . . . 32
Programming Trunk Group Day or Night Ring-in . . . . . . . . . . . . . . . . . . . . . . . . . . . . . . . . . . . 33
Programming Trunk Group Toll Restrictions . . . . . . . . . . . . . . . . . . . . . . . . . . . . . . . . . . . . . . . 34
Programming Trunk Group Trunk Lists . . . . . . . . . . . . . . . . . . . . . . . . . . . . . . . . . . . . . . . . . . . 35
Mitel® 5000 CP Administrator Phone Guide – Issue 3.2, September 2009
Page 5
Phone and System Administration
Alarms. . . . . . . . . . . . . . . . . . . . . . . . . . . . . . . . . . . . . . . . . . . . . . . . . . . . . . . . . . . . . . . . . . . . . . . . 38
Alarm Types . . . . . . . . . . . . . . . . . . . . . . . . . . . . . . . . . . . . . . . . . . . . . . . . . . . . . . . . . . . . . . . 38
Network Alarms . . . . . . . . . . . . . . . . . . . . . . . . . . . . . . . . . . . . . . . . . . . . . . . . . . . . . . . . . . . . . 38
Alarm Differences . . . . . . . . . . . . . . . . . . . . . . . . . . . . . . . . . . . . . . . . . . . . . . . . . . . . . . . . . . . 39
Responding to Alarms . . . . . . . . . . . . . . . . . . . . . . . . . . . . . . . . . . . . . . . . . . . . . . . . . . . . . . . . 39
Clearing Alarms . . . . . . . . . . . . . . . . . . . . . . . . . . . . . . . . . . . . . . . . . . . . . . . . . . . . . . . . . . . . 40
Internal Modem . . . . . . . . . . . . . . . . . . . . . . . . . . . . . . . . . . . . . . . . . . . . . . . . . . . . . . . . . . . . . . . . 42
Enabling or Disabling the Internal Modem . . . . . . . . . . . . . . . . . . . . . . . . . . . . . . . . . . . . . . . . 42
Resetting the Internal Modem . . . . . . . . . . . . . . . . . . . . . . . . . . . . . . . . . . . . . . . . . . . . . . . . . . 42
Network Group Diagnostics . . . . . . . . . . . . . . . . . . . . . . . . . . . . . . . . . . . . . . . . . . . . . . . . . . . . . . 43
Running Network Group Diagnostics . . . . . . . . . . . . . . . . . . . . . . . . . . . . . . . . . . . . . . . . . . . . 43
Seizing a Device . . . . . . . . . . . . . . . . . . . . . . . . . . . . . . . . . . . . . . . . . . . . . . . . . . . . . . . . . . . . 44
History Freezes . . . . . . . . . . . . . . . . . . . . . . . . . . . . . . . . . . . . . . . . . . . . . . . . . . . . . . . . . . . . . . . . 45
Freezing or Unfreezing the System History . . . . . . . . . . . . . . . . . . . . . . . . . . . . . . . . . . . . . . . 45
Freezing or Unfreezing the Network History . . . . . . . . . . . . . . . . . . . . . . . . . . . . . . . . . . . . . . . 45
Page 6
Mitel® 5000 CP Administrator Phone Guide – Issue 3.2, September 2009
Phone and System Administration
Introduction
Introduction
You can use the administrator phone for several simple system administrative tasks. You may
notice some feature differences between the phone types, as described below. Use a Mitel
5340, 8662, 8660, 8568, or 8560 phone to administer the system.
Phone Feature Button Differences
Table 2 describes differences between the Mitel 5340, 8662, 8660, 8568, and 8560 phones
when using feature buttons to enter dialpad characters or activate features. For ease of use,
this guide refers to buttons in procedures by name instead of the icon designation. For example,
a procedure may refer to the Backspace button, which can be either the MUTE (Mute) button
(models 8662, 8660, and 8560) or the
(Hold) button (models 5340 and 8568). Refer to
the appropriate phone user guide for detailed phone feature descriptions.
Table 2. Mitel 8560, 8568, 8660, 8662, and 5340 Phone Button Differences
Mitel 8562, 8660
and 8560
Button as Referenced in Procedures
Backspace: Moves the cursor to the previous
position when entering characters.
MUTE
Forward: Moves the cursor to the next position
when entering characters.
Mitel 5340 and
8568
(Mute)
(Hold)
(Forward)
FWD
Special: Sometimes required to enter feature codes.
(Transfer)
(Special)
(Special)
Dialpad Character Descriptions
Table 3 shows dialpad character descriptions. When entering dialpad characters:
• To switch from Alpha Mode to Numeric Mode, press the Message button (button
designation depends on phone type) or the USE ALPHA MODE/USE NUMERIC MODE
menu button. The Message button and lamp button are lit in Alpha Mode. They are off in
Numeric Mode.
• In Numeric Mode, you can press # for a hyphen (-) or or * for a colon (:).
Table 3. Alphanumeric Equivalents for Dialpad Programming
Number of Times Button is Pressed
1
Button
2
3
4
5
6
7
8
9
10
11
Japanese (Katakana) Characters1
English/Spanish Characters
1
-
&
(
)
1
A
I
U
E
O
a
2
A
B
C
’
2
KA
KI
KU
KE
KO
i
3
D
E
F
!
3
SA
SHI
SU
SE
SO
u
4
G
H
I
*
4
TA
CHI
TSU
TE
TO
e
5
J
K
L
#
5
NA
NI
NU
NE
NO
o
6
M
N
O
ñ
6
HA
HI
FU
HE
HO
tsu
7
P
Q
R
S
7
MA
MI
MU
ME
MO
ya
8
T
U
V
?
8
YA
YU
YO
.
,
yu
9
W
X
Y
Z
9
RA
RI
RU
RE
RO
yo
0
@
:
.
,
0
WA
WO
N
pa
ba
long
1. Japanese characters are supported only if the Multilingual feature is enabled and Japanese is installed as the secondary language. They are not supported on phones operating
in SIP mode.
Mitel® 5000 CP Administrator Phone Guide – Issue 3.2, September 2009
Page 7
Phone and System Administration
Single-Node and Network (Multi-Node) Configurations
Single-Node and Network (Multi-Node) Configurations
Your system may be a stand-alone system (single node) or it may be connected to more than
one node as a network (multi-node). In some cases, you can use the administrator phone to
configure network node features. See “System Networks and Nodes” on page 3 for more
information.
System Day and Night Modes
Day or Night Mode determines a system trunk access, toll restriction, emergency outgoing
access, and related features for all phones on a node. Active calls are not affected when you
switch to Day or Night Mode.
Setting a Single-Node System in Day or Night Mode
You can set the local node in Day or Night Mode.
To set the Day or Night Mode status for a single-node:
Dial 9860. NIGHT MODE IS ON (or OFF) appears followed by THE SYSTEM IS IN
NIGHT MODE, if the system is in Night Mode. If the system is in Day Mode, the display
returns to the idle state.
Selecting Nodes for Day or Night Mode
You can select system nodes for Day or Night Mode.
To turn on Night Mode for a specific node:
1.
Dial 9861. ENABLE NIGHT MODE ON NODE appears.
2.
Enter the node number (01–99), or enter 00 to select all nodes (00 can also be used for
a single-node configuration). ENABLED NETWORK NIGHT MODE appears followed by
THE SYSTEM (or NODE <number>) IS IN NIGHT MODE.
To turn on Day Mode for a specific node:
Page 8
1.
Dial 9862. ENABLE DAY MODE ON NODE appears.
2.
When prompted, enter the node number (01–99). To select all nodes or for a single-node
configuration, enter 00. ENABLED NETWORK DAY MODE appears. The display then
returns to the idle state.
Mitel® 5000 CP Administrator Phone Guide – Issue 3.2, September 2009
Phone and System Administration
System Date and Time
System Date and Time
You can reset the system time or date when it is necessary, for example, when the system is
defaulted or for daylight-savings time. The date and time are shown on all display phones and
Station Message Detail Recording (SMDR) reports, which record call activity data.
If enabled in DB Programming, the 5000 CP system supports Automatic Daylight Savings Time
(British Summer Time, in Europe). If Network Time Protocol (NTP) is enabled for your system,
the network date and time automatically synchronize daily at 12:15 A.M. with an identified
atomic clock. Contact your system administrator for more information.
Setting the System Date and Time
You can change the date and time for an individual node or the entire network.
To set the system date and time:
At any time, you can press * to return to the previous menu, or press the Speaker
button to exit programming and cancel any unsaved changes.
NOTES
The Japanese language is not supported on Mitel 5000-series phones.
For the Japanese language, enter the date as year, month, day. For example,
080203 for February 3, 2008. Also, time prompts are reversed, and you set AM or
PM before the hour and minutes.
1.
Dial 9800 (single node) or 9810 (multi-node). The programmed date appears.
If you do not need to change the date, press # or the ACCEPT menu button to skip to
the TIME <programmed time> prompt, and then go to step 3.
2.
Use the dialpad buttons to enter the month, day, and year. For example, enter 020308
for February 3, 2008. The day of the week is automatically calculated and set by the
system when the date is entered. When finished, the displays shows the current time. If
you entered the date incorrectly, INVALID DATE appears, and you are prompted to enter
a new date.
If you do not need to change the time, press # or the ACCEPT menu button twice to exit.
SYSTEM DATE AND TIME UPDATED appears.
3.
Use the dialpad buttons to enter the time in hours and minutes. For example, enter 0900
for 9:00. If you entered the time incorrectly, INVALID TIME appears and you are
prompted to enter a new time.
4.
If the system is set for 12-hour display format, SELECT AM OR PM (AM=1 PM=2)
appears. Press 1 (or the AM menu button) for A.M. or press 2 (or the PM menu button)
for P.M. SYSTEM DATE AND TIME UPDATED appears. (If you press any button other
than 1 or 2, INVALID TIME appears, and you are prompted to enter a new time.)
Mitel® 5000 CP Administrator Phone Guide – Issue 3.2, September 2009
Page 9
Phone and System Administration
Synchronizing Network Times
Synchronizing Network Times
You can synchronize the minutes past the hour across a network configuration without changing
the hour. This is useful when nodes are in different time zones. If a node time is off by more
than 30 minutes, synchronizing the minutes may cause the hour to change. Also, network time
is automatically synchronized every day at 12:30 A.M. (00:30), using the time setting on the
lowest node number.
NOTE
If enabled, an NTP synchronization overrides the 5000 CP system synchronization
on any node that has NTP enabled (see “System Date and Time” above). Contact
your system administrator for more information.
To synchronize the clocks in all nodes in the network:
Dial 9811. NETWORK TIME SYNCHRONIZED appears.
Page 10
Mitel® 5000 CP Administrator Phone Guide – Issue 3.2, September 2009
Phone and System Administration
System Speed Dial
System Speed Dial
You can program System Speed Dial numbers. Any system user can then use the System
Speed Dial feature to dial the programmed numbers. (With v3.2, you can create system speed
dial entries in a CSV file and import/export the entries to/from DB Programming. See your
system administrator for details.)
System Speed Dial numbers can include hookflashes or pauses for dialing a series of numbers.
For example, a Speed Dial number can contain a pause, an access code, and a phone number.
To program or change System Speed Dial numbers and names:
NOTE
At any time, you can press * to return to the previous menu, or press the Speaker
button to exit the programming session and cancel any unsaved changes.
1.
Dial 9801. PROGRAM SYS SPD # (000-999 or 0000-4999) appears.
2.
Enter the Speed Dial location code (000–999 or 0000-4999). ENTER NAME <current
name> appears.
3.
Do one of the following:
•
Enter the name (or leave the existing name).
•
Press the CLEAR menu button or the backspace button (see page 7) repeatedly to
erase the current name and leave it blank.
4.
Press # or the ACCEPT menu button. ENTER NUMBER appears.
5.
Enter the number, up to 48 digits, using one of the following methods:
•
Press the REDIAL menu button to enter the last external number dialed or saved.
•
Use the dialpad to manually enter the number. If you make a mistake, you can
press the backspace button (see page 7) to move the cursor backward and delete
the last characters entered.
You can press the Special button (see page 7) once for an asterisk
(*), twice for a pound (#), three times for a hookflash (F), or four times
for a pause (P).
NOTES
6.
To use Private Branch Exchange (PBX) trunks in Speed Dial
numbers, enter the other system trunk access codes followed by a
pause. The lengths of the hookflash and the pause are determined by
the programmable Central Office (CO) Hookflash and Pause Digit
timers.
Press # or the ACCEPT menu button to save the number. You hear a single progress
tone when the number is accepted. SYS SPD BIN # <number> UPDATED appears.
To delete System Speed Dial names or numbers:
1.
Dial 9801. PROGRAM SYS SPD # (000–999 or 0000-4999) appears.
2.
Enter the Speed Dial location code (000–999 or 0000-4999). ENTER NAME <current
name> appears.
3.
Press the CLEAR menu button or the backspace button (see page 7) repeatedly until
the name is deleted, and then press # or the ACCEPT menu button. ENTER NUMBER
appears.
4.
Press the backspace button (see page 7) repeatedly until the number is deleted.
5.
Press # or the ACCEPT menu button to exit. SYS SPD BIN # <number> UPDATED
appears.
Mitel® 5000 CP Administrator Phone Guide – Issue 3.2, September 2009
Page 11
Phone and System Administration
Station (Phone) Programming Options
Station (Phone) Programming Options
NOTE
Because the following programming changes are saved in the system database,
you cannot make changes if the 5000 CP DB Programming application is open. If
you try to make changes, DATABASE IN USE BY OTHER APPLICATIONS
appears. The application must be closed before you can use the administrator
phone to make changes. Contact your system administrator for more information.
The following sections describe station (phone) options that you can program with the
administrator phone:
• “Enabling or Disabling Other Phones as Administrator Phones” below
• “Enabling or Disabling Attendant Phones” on page 13
• “Programming Extension User Names” on page 14
• “Programming Phone Toll Restrictions” on page 15
See Figure 1 on page 18 for the Database Option flowchart.
Enabling or Disabling Other Phones as Administrator Phones
You can enable or disable other phones as additional administrator phones. However, you
cannot use the administrator phone to disable itself.
To enable or disable administrator phones:
NOTE
Page 12
At any time, you can press * to return to the previous menu, or press the Speaker
button to exit the programming session and cancel any unsaved changes.
1.
Dial 9932 (9132 in Europe). If a password is required (see page 19), ENTER
PASSWORD appears (otherwise, go to step 3).
2.
Enter the password, and then press #. ENTER DATABASE OPTION (1 - 3) appears.
3.
Press 1 or the STATION menu button. ENTER STATION EXTENSION appears.
4.
Enter the extension number, or enter a partial extension number, and then press # or the
ACCEPT menu button. The extension information that best matches the partial number
appears. You can use the Volume buttons or the NEXT and PREVIOUS menu buttons to
scroll through entries.
5.
Press # or the ACCEPT menu button to accept the entry.
6.
Press 1 or the STATION FLAGS menu button. ADMINISTRATOR (ON = 1 OFF = 2)
appears.
7.
Press 1 or the ON menu button to enable the phone as an administrator phone, or press
2 or the OFF menu button to disable the phone as an administrator phone.
8.
Press # or the ACCEPT menu button. DATABASE UPDATED appears.
9.
When you are finished with all programming, press the Speaker button or # repeatedly to
exit the programming session.
Mitel® 5000 CP Administrator Phone Guide – Issue 3.2, September 2009
Phone and System Administration
Enabling or Disabling Attendant Phones
Enabling or Disabling Attendant Phones
You can enable or disable other phones as Attendant phones. Attendant phones can be called
by dialing 0 at the phones they serve. Usually, they are also programmed to provide these
services:
• Central operators for incoming calls
• Message centers
• Recall phones for unanswered calls
To enable or disable Attendant phones:
NOTE
At any time, you can press * to return to the previous menu, or press the Speaker
button to exit the programming session and cancel any unsaved changes.
1.
Dial 9932 (9132 in Europe). If a password is required (see page 19), ENTER
PASSWORD appears (otherwise, go to step 3).
2.
Enter the password, and then press #. ENTER DATABASE OPTION (1 - 3) appears.
3.
Press 1 or the STATION menu button. ENTER STATION EXTENSION appears.
4.
Enter the extension number, or enter a partial extension number, and then press # or the
ACCEPT menu button. The extension information that best matches the partial number
appears. You can use the Volume buttons or the NEXT and PREVIOUS menu buttons to
scroll through entries.
5.
Press # or the ACCEPT menu button to accept the entry.
6.
Press 2 or the STATION INFO menu button. ENTER STN INFO OPTION (1-2) appears.
7.
Press 1 or the ATTENDANT menu button. ENTER ATTENDANT EXTENSION appears.
NOTE
If NO ATTENDANTS PROGRAMMED appears, attendants must be
programmed in DB Programming before you can assign other stations as
attendants. If applicable, contact your system administrator for assistance.
8.
Enter the extension of the phone to be assigned as an Attendant. When the display
shows the circuit information, press # again to return to the ENTER STATION INFO
OPTION prompt. If necessary, repeat steps 7 and 8 for additional Attendant phones.
9.
When you are finished with all programming, press the Speaker button or # repeatedly to
exit the programming session.
Mitel® 5000 CP Administrator Phone Guide – Issue 3.2, September 2009
Page 13
Phone and System Administration
Programming Extension User Names
Programming Extension User Names
You can assign user names (the name shown on the display) to other system phones. You can
also change existing user names.
To program user names:
NOTE
1.
Dial 9932 (9132 in Europe). If a password is required (see page 19), ENTER
PASSWORD appears (otherwise, go to step 3).
2.
Enter the password, and then press #. ENTER DATABASE OPTION (1 - 3) appears.
3.
Press 1 or the STATION menu button. ENTER STATION EXTENSION appears.
4.
Enter the extension number, or enter a partial extension number, and then press # or the
ACCEPT menu button. The extension information that best matches the partial number
appears. You can use the Volume buttons or the NEXT and PREVIOUS menu buttons to
scroll through entries.
5.
Press # or the ACCEPT menu button to accept the entry. ENTER STATION OPTION
(1 - 3) appears.
6.
Press 2 or the STATION INFO menu button. ENTER STATION INFO OPTION (1 - 2)
appears.
7.
Press 2 or the USERNAME menu button. ENTER USERNAME appears.
8.
Enter the user name (up to 10 characters) using the dialpad buttons. See “Dialpad
Character Descriptions” on page 7 for dialpad character descriptions.
9.
Press # or the ACCEPT menu button. DATABASE UPDATED appears.
10.
Page 14
At any time, you can press * to return to the previous menu, or press the Speaker
button to exit the programming session and cancel any unsaved changes.
When you are finished with all programming, press the Speaker button or # repeatedly to
exit the programming session.
Mitel® 5000 CP Administrator Phone Guide – Issue 3.2, September 2009
Phone and System Administration
Programming Phone Toll Restrictions
Programming Phone Toll Restrictions
You can program toll restriction classes of service (COS) for specific system phones. A COS
restricts or allows certain digit patterns when external phone numbers are dialed. COS options
are programmed individually for phones, voice processing system applications, and trunk
groups. Separate COS designations are available for Day and Night Modes. A phone or trunk
group can have a combination of COS restrictions. See page 17 for instructions.
NOTES
System Speed Dial numbers can be programmed to bypass COS restrictions on a
system-wide basis. If the option is not enabled, all System Speed Dial numbers
are subject to toll restriction.
Because conditions may exist when critical or life-threatening situations need to be
reported, the Emergency Call access code (911 U.S. or 999/112 Europe) overrides
all toll restrictions and trunk access programming.
Table 4 below and Table 5 on page 16 describe default U.S. and European COS values.
Table 4. Default U.S. Class of Service Values
COS
Name
Restriction
01
ARS Only
This is a phone class of service only. It is not used for trunk groups. Also, the Automatic
Route Selection (ARS) feature, which is standard on the 5000 CP system, is required.
Calls can only be placed using the ARS feature. The user hears reorder tones when
attempting to place a call using any other method. A restricted user can still select
individual trunks if the trunks are designated as “exempt from ARS Only,” or if they were
transferred, were placed on hold, or are recalling or ringing. Trunk restriction determines
which trunks in the ARS route group can be selected by the phone or application.
02
Deny Area/
Office
This restriction is divided into eight user groups to allow the use of varying area/office
code restriction tables. This is useful for reducing restrictions for some of the phones,
applications, or trunk groups while increasing restrictions for others. Each phone,
application, and trunk group is assigned a day mode and a night mode user group in DB
Programming. Within each user group, area codes can be designated as restricted,
allowed, or extended. Restricting an area code prevents users from placing calls to that
area code. Allowing an area code allows all office codes within that area code.
Designating an area code as extended allows the programmer to determine which office
codes (up to 800) are allowed or restricted within that area code.
03
Deny
Operator
Calls to operator numbers are restricted.
04
Deny Toll
Access
Calls to numbers containing a toll string (defaults to 1) are restricted.
05
Deny
International
Calls to international numbers are restricted.
06
Deny Equal
Access
Calls that begin with equal access digits (10XXX or 101XXXX) are restricted.
07
Deny Local
Calls
Calls to local numbers are restricted.
08
Denied
Numbers
Calls to programmed “denied” numbers (defaults to 1900NXXXXXX+ and 976XXXX+)
are restricted.
09
Allowed
Numbers
Calls to programmed “allowed” numbers (defaults to 1800NXXXXXX+) are allowed,
even if number also matches a dial pattern in a restricted class of service that is
assigned to the phone, application, or trunk group being used.
COS designations 01 to 09 have default values. COS designations (10 to 16) do not have default values and are
blank. All COSs are programmable. Each may be specified as an “allowed” or “denied” class of service, dialing
patterns can be programmed for each, and each can be assigned to phones and trunk groups as needed.
Mitel® 5000 CP Administrator Phone Guide – Issue 3.2, September 2009
Page 15
Phone and System Administration
Programming Phone Toll Restrictions
Table 5. Default European Class of Service Values
COS
Name
Restriction
01
ARS Only
This is a phone class of service only. It is not used for trunk groups. Also, the Automatic
Route Selection (ARS) feature, which is standard on the 5000 CP system, is required.
Calls can only be placed using the ARS feature. The user hears reorder tones when
attempting to place a call using any other method. A restricted user can still select
individual trunks if the trunks are designated as “exempt from ARS Only,” or if they were
transferred, were placed on hold, or are recalling or ringing. Trunk restriction determines
which trunks in the ARS route group can be selected by the phone or application.
02
Deny
Operator
Calls to operator numbers are restricted.
03
Deny Toll
Access
Calls to numbers containing a toll string (TN+, TE, 010+, and T1+) are restricted.
04
Deny
International
Calls to international numbers (I+) are restricted.
05
Deny Local
Calls
Calls to local numbers (N+) are restricted.
06
Denied
Numbers
Calls to programmed “denied” numbers (0891+ and 0898+) are restricted.
07
Allowed
Numbers
Calls to programmed “allowed” numbers (0345+, 0500+, 0645+, and 0800+) are allowed,
even if number also matches a dial pattern in a restricted class of service that is
assigned to the phone, application, or trunk group being used.
Calls are restricted only if the dialed patterns match the denied pattern exactly. COS designations 01–07 have
default values. COS designations 10–16 do not have default values and are blank. All of the classes of service are
programmable. Each may be specified as an “allowed” or “denied” class of service, dialing patterns can be
programmed for each, and each can be assigned to phones and trunk groups as needed.
Page 16
Mitel® 5000 CP Administrator Phone Guide – Issue 3.2, September 2009
Phone and System Administration
Programming Phone Toll Restrictions
To program toll restrictions for specific phones:
NOTE
At any time, you can press * to return to the previous menu, or press the Speaker
button to exit the programming session and cancel any unsaved changes.
1.
Dial 9932 (9132 in Europe). If a password is required (see page 19), ENTER
PASSWORD appears (otherwise, go to step 3).
2.
Enter the password, and then press #. ENTER DATABASE OPTION (1 - 3) appears.
3.
Press 1 or the STATION menu button. ENTER STATION EXTENSION appears.
4.
Enter the extension number, or enter a partial extension number, and then press # or the
ACCEPT menu button. The extension information that best matches the partial number
appears. You can use the Volume buttons or the NEXT and PREVIOUS menu buttons to
scroll through entries.
5.
Press # or the ACCEPT menu button to accept the entry. ENTER STATION OPTION
(1 - 3) appears.
6.
Press 3 or the TOLL RESTRICTION menu button. TOLL RESTRICTION OPTION (1 - 2)
appears.
7.
Do one of the following:
•
Press 1 or the COS DAY menu button for day mode.
•
Press 2 or the COS NIGHT menu button for night mode.
SET DAY (or NIGHT) COS XX appears. If this is not the COS you want to program, use
the Volume buttons or the NEXT and PREVIOUS menu buttons to scroll to through the
options. See Table 4 on page 15 (U.S.) or Table 5 on page 16 (Europe) for COS
descriptions.
8.
When the display shows the correct COS, press 1 or the ON menu button to enable the
toll restriction, or press 2 or the OFF menu button to disable it.
9.
Press # or the ACCEPT menu button to save the COS programming. DATABASE
UPDATED appears followed by the TOLL RESTRICTION OPTION menu.
10.
Repeat steps 6 through 8 as necessary to program additional toll restrictions.
11.
When you are finished with all programming, press the Speaker button or # repeatedly to
exit the programming session.
Mitel® 5000 CP Administrator Phone Guide – Issue 3.2, September 2009
Page 17
Phone and System Administration
Programming Phone Toll Restrictions
Figure 1. Station Programming Flowchart
Enter Program Database
feature code 9932 (9132)
ENTER DATABASE OPTION
Press 1 or STATION
menu button
ENTER STATION EXTENSION
Type the extension number, and then press #.
ENTER STATION OPTION
Press 1 or STATION FLAGS
menu button
Press 2 or STATION INFO
menu button
Press 3 or TOLL RESTRICTION
menu button
STATION INFO OPTION
TOLL RESTRICTION OPTION
Select flag to program
Press 1 or
ON menu button
to enable
Press 2 or
OFF menu button
to disable
Press 1 or
ATTENDANT
menu button
Press 2 or
USERNAME
menu button
Enter
Attendant
extension
Enter
new
username
At any time, you can press * to return to the previous menu, or press the Speaker button to exit
programming and cancel any unsaved changes.
Press # or the ACCEPT menu button to save
changes.
Press 1 or COS
DAY menu button
for day mode
Press 2 or COS
NIGHT menu button
for night mode
SET DAY/NIGHT COS XX
If necessary, select COS number
to program by scrolling
Press 1 or
ON menu button
to enable COS
Press 2 or
OFF menu button
to disable COS
If wanted, select another COS
number to program by scrolling
INFORMATION IN THIS CHART IS SHOWN AS
FOLLOWS:
YOUR INPUT
PHONE DISPLAYS
Page 18
Mitel® 5000 CP Administrator Phone Guide – Issue 3.2, September 2009
Phone and System Administration
System Programming Options
System Programming Options
The following sections describe system options that you can program with the administrator
phone:
• “Entering an Administrator Phone Password” below
• “Changing Do-Not-Disturb (DND) Messages” on page 20
• “Changing Default Reminder Messages” on page 21
• “Changing Phone Extension Numbers” on page 22
• “Swapping Phone Extension Numbers” on page 23
See Figure 2 on page 24 for the System Database flowchart.
Entering an Administrator Phone Password
Because several of the features described in this guide are accessed and configured in the
system database, you should use a password to prevent unauthorized access.
You cannot use your administrator phone to assign passwords to other administrator phones.
Passwords must be assigned at the administrator phone where the password is used.
To enter an administrator phone password:
NOTE
At any time, you can press * to return to the previous menu, or press the Speaker
button to exit the programming session and cancel any unsaved changes.
1.
Dial 9932 (9132 in Europe).
2.
Press 2 or the SYSTEM menu button. ENTER SYSTEM OPTION (1 - 4) appears.
3.
Press 2 or the PASSWORD menu button. CHANGE PASSWORD TO appears.
4.
Do one of the following:
•
Enter a password (1 to 8 digits), and then press #.
•
Press # to erase the password and leave it blank.
VERIFY PASSWORD appears.
5.
Enter the password exactly as you did in step 4 above followed by #. DATABASE
UPDATED appears followed by the ENTER SYSTEM OPTION (1 - 4) menu. If you hear
reorder/fast-busy tones and see an error message, the passwords did not match and
you must start over at the CHANGE PASSWORD prompt.
6.
When you are finished with all programming, press the Speaker button or # repeatedly to
exit the programming session.
Mitel® 5000 CP Administrator Phone Guide – Issue 3.2, September 2009
Page 19
Phone and System Administration
Changing Do-Not-Disturb (DND) Messages
Changing Do-Not-Disturb (DND) Messages
You can delete or change the default DND messages. A phone in DND halts all pages,
incoming intercom calls, camped-on calls, and transferred calls to that phone. Queue callbacks,
recalls, and direct ring-in calls are not blocked. Another user calling the phone while it is in DND
hears a repeating signal of four fast tones and a pause. Display phones show the DND
message. The caller cannot camp on, but can queue or leave a station message at the phone.
In a network, each node has a list of DND messages that can be used only on that node. For
reference, you can view default DND messages and record new messages in Table 9 on
page 50. Refer to the appropriate phone user guide for more information about using DND
Messages.
NOTES
When using primary and secondary languages, the system has default DND
messages in both languages. When changing DND messages, you should keep
the meanings for the messages in both lists the same. For example, if you change
the primary language DND message “02” to “PAGE ME,” program a similar
message for message “02” in the secondary language.
You must use a Mitel 8660/8662 six-line display phone to reprogram messages
that use Katakana (Japanese) characters. The Japanese language is not
supported on the 5000-series phones.
To program DND messages:
NOTE
At any time, you can press * to return to the previous menu, or press the Speaker
button to exit the programming session and cancel any unsaved changes.
1.
Dial 9932 (9132 in Europe). If a password is required (see page 19), ENTER
PASSWORD appears (otherwise, go to step 3).
2.
Enter the password, and then press #. ENTER DATABASE OPTION (1 - 3) appears.
3.
Press 2 or the SYSTEM menu button. ENTER SYSTEM OPTION (1 - 4) appears.
4.
Press 1 or the DND MESSAGES menu button. SELECT DND MESSAGE # (01 - 20)
appears.
5.
Do one of the following:
•
Enter a message number, and then press #.
•
Press the SCROLL menu button, and then use the Volume buttons or the NEXT
and PREVIOUS menu buttons to scroll through the options.
6.
When the display shows the message that you want to change, enter the 1- to 16character new message (you do not have to select the message). See “Dialpad
Character Descriptions” on page 7 for dialpad character descriptions.
7.
Press # or the ACCEPT menu button. <Message> SCROLL OR EDIT appears.
8.
Press # or the ACCEPT menu button again. SELECT DND MESSAGE # (01 - 20)
appears. To program another message, scroll to the message you want and repeat steps
6 and 7. After programming all messages, press # while the display shows SELECT
DND MESSAGE # (01 - 20). DATABASE UPDATED appears followed by ENTER
SYSTEM OPTION (1 - 4).
NOTE
9.
Page 20
You must return to the ENTER SYSTEM OPTION (1 - 4) menu to save
DND message changes.
When you are finished with all programming, press the Speaker button or # repeatedly to
exit the programming session.
Mitel® 5000 CP Administrator Phone Guide – Issue 3.2, September 2009
Phone and System Administration
Changing Default Reminder Messages
Changing Default Reminder Messages
You can delete or change the default Reminder Messages. Reminder messages are set to
signal a phone at a specified time. The user can select one of 20 different messages and set
the reminder time up to 24 hours in advance.
In a network, each node has a list of Reminder Messages that can be used only on that node.
For reference, you can view default Reminder Messages or record new messages in the table
on Table 10 on page 51. Refer to the appropriate phone user guide for more information about
using Reminder Messages.
NOTES
When using primary and secondary languages, the system has default Reminder
messages in both languages. When changing Reminder messages, you should
keep the meanings for the messages in both lists the same. For example, if you
change the primary language DND message “02” to “Go to Airport,” program a
similar message for message “02” in the secondary language.
You must use a Mitel 8660/8662 six-line display phone to reprogram messages
that use Katakana (Japanese) characters. The Japanese language is not
supported on the 5000-series phones.
To change default Reminder Messages:
NOTE
At any time, you can press * to return to the previous menu, or press the Speaker
button to exit the programming session and cancel any unsaved changes.
1.
Dial 9932 (9132 in Europe). If a password is required (see page 19), ENTER
PASSWORD appears (otherwise, go to step 3).
2.
Enter the password, and then press #. ENTER DATABASE OPTION (1 - 3) appears.
3.
Press 2 or the SYSTEM menu button. ENTER SYSTEM OPTION (1 - 4) appears.
4.
Press 3 or the REMINDER MSGS menu button. SELECT REMINDER MSG # (1 - 20)
appears.
5.
Do one of the following:
•
Enter a message number, and then press #.
•
Press the SCROLL menu button, and then use the Volume buttons or the NEXT
and PREVIOUS menu buttons to scroll through the options.
6.
When the display shows the message that you want to change, enter the 1- to 16character new message (you do not have to select the message). See “Dialpad
Character Descriptions” on page 7 for dialpad character descriptions.
7.
Press # or the ACCEPT menu button. <Message> SCROLL OR EDIT appears.
8.
Press # or the ACCEPT menu button again. SELECT REMINDER MESSAGE # (01 20) appears. To program another message, scroll to the message you want and repeat
steps 6 and 7. After programming all messages, press # while the display shows
SELECT REMINDER MESSAGE # (01 - 20). DATABASE UPDATED appears followed
by ENTER SYSTEM OPTION (1 - 4).
NOTE
9.
You must return to the ENTER SYSTEM OPTION (1 - 4) menu to save
Reminder Message changes.
When you are finished with all programming, press the Speaker button or # repeatedly to
exit the programming session.
Mitel® 5000 CP Administrator Phone Guide – Issue 3.2, September 2009
Page 21
Phone and System Administration
Changing Phone Extension Numbers
Changing Phone Extension Numbers
You can change the extension number for any system phone. The new extension number
cannot be the same as an existing number.
To change a phone extension number:
NOTE
At any time, you can press * to return to the previous menu, or press the Speaker
button to exit the programming session and cancel any unsaved changes.
1.
Dial 9932 (9132 in Europe). If a password is required (see page 19), ENTER
PASSWORD appears (otherwise, go to step 3).
2.
Enter the password, and then press #. ENTER DATABASE OPTION (1 - 3) appears.
3.
Press 2 or the SYSTEM menu button. ENTER SYSTEM OPTION (1 - 4) appears.
4.
Press 4 or the STN EXTENSION menu button. ENTER SYS STN OPTION (1 - 2)
appears.
5.
Press 1 or the CHANGE EXT menu button. ENTER STATION EXTENSION appears.
6.
Enter the extension number, or enter a partial extension number, and then press # or the
ACCEPT menu button. The extension information that best matches the partial number
appears. You can use the Volume buttons or the NEXT and PREVIOUS menu buttons to
scroll through entries.
7.
Press # or the ACCEPT menu button to accept the entry.
After you select an extension, CHANGE <extension> TO EXTENSION appears.
8.
Enter the new extension number for the phone, and then press # or the ACCEPT menu
button to accept the entry. UPDATING DATABASE appears for approximately four
seconds followed by DATABASE UPDATED.
NOTE
9.
Page 22
If you entered an extension number that is already assigned,
CONFLICTING EXTENSION appears. After ENTER STATION
EXTENSION appears, enter another extension number.
When you are finished with all programming, press the Speaker button or # repeatedly to
exit the programming session.
Mitel® 5000 CP Administrator Phone Guide – Issue 3.2, September 2009
Phone and System Administration
Swapping Phone Extension Numbers
Swapping Phone Extension Numbers
A phone extension number can be reassigned to (swapped with) another phone. To swap
extensions, the two affected phones must meet the following criteria:
• Both phones (and the administrator phone) must reside on the same node.
• Both phones must be the same type. For example, if you are swapping a Mitel 8662 ITP
Mode phone extension number with another system extension number, the other
extension number must be assigned to another ITP Mode Mitel 8662. This applies to all
device types.
• Neither device can be the administrator phone performing the swap.
To swap phone extension numbers:
NOTE
At any time, you can press * to return to the previous menu, or press the Speaker
button to exit the programming session and cancel any unsaved changes.
1.
Dial 9932 (9132 in Europe). If a password is required (see page 19), ENTER
PASSWORD appears (otherwise, go to step 3).
2.
Enter the password, and then press #. ENTER DATABASE OPTION (1 - 3) appears.
3.
Press 2 or the SYSTEM menu button. ENTER SYSTEM OPTION (1 - 4) appears.
4.
Press 4 or the STN EXTENSION menu button.
5.
Press 2 or SWAP EXTS. ENTER STATION EXTENSION appears.
6.
Enter the extension number, or enter a partial extension number, and then press # or the
ACCEPT menu button. The extension information that best matches the partial number
appears. You can use the Volume buttons or the NEXT and PREVIOUS menu buttons to
scroll through entries.
7.
Press # or the ACCEPT menu button to accept the entry. SWAP <extension> WITH
EXTENSION appears.
8.
Enter the second extension number to be swapped. DATABASE UPDATED appears.
NOTE
9.
10.
CONFLICTING EXTENSION appears if the entered extension is the
administrator phone performing the swap, the same extension number as
the target phone, or the wrong device type.
After ENTER SYSTEM OPTION (1 - 4) appears, press # again to exit to the ENTER
DATABASE OPTION menu.
When you are finished with all programming, press the Speaker button or # repeatedly to
exit the programming session.
Mitel® 5000 CP Administrator Phone Guide – Issue 3.2, September 2009
Page 23
Phone and System Administration
Swapping Phone Extension Numbers
Figure 2. System Database Programming Flowchart
Enter Program Database
feature code 9932 (9132)
ENTER DATABASE OPTION
Press 2 or SYSTEM menu button
ENTER SYSTEM OPTION
Press 1 or
DND MESSAGES
menu button
SELECT DND
MESSAGE
Press 2 or
PASSWORD
menu button
CHANGE
PASSWORD
SELECT
REMINDER MSG
Enter message
number or select
DND message to
program by scrolling
Enter 0–8 digit
password and
press #
Enter message
number or select
message to program
by scrolling
(DND message)
SCROLL OR EDIT
VERIFY
PASSWORD
(Reminder message)
SCROLL OR EDIT
Enter the new
message using alpha
or numeric mode
and press #
Enter the new
password again
and press #
Enter the new
message using alpha
or numeric mode
and press #
If wanted, select
another message
to program
Press 4 or
STN EXTENSIONS
menu button
Press 3 or
REMINDER MSGS
menu button
If wanted, select
another message
to program
Press 1 or
CHANGE EXT
menu button
Press 2 or
SWAP EXTS
menu button
ENTER STATION
EXTENSION
ENTER STATION
EXTENSION
Enter the extension
number of the
phone to be changed
Enter the extension
number of the first
phone to be swapped
and press #
CHANGE (number)
SCROLL OR EDIT
SWAP (extension)
WITH EXTENSION
Enter the new
extension number
for the phone
and press #
Enter the extension
number of the second
phone to be swapped
and press #
At any time, you can press * to return to the previous menu, or press the Speaker button to exit
programming and cancel any unsaved changes.
Press # or the ACCEPT menu button to save
changes.
INFORMATION IN THIS CHART IS SHOWN AS
FOLLOWS:
YOUR INPUT
PHONE DISPLAYS
Page 24
Mitel® 5000 CP Administrator Phone Guide – Issue 3.2, September 2009
Phone and System Administration
Individual Trunk Programming Options
Individual Trunk Programming Options
You can program the following individual trunk options:
• “Programming the Trunk Answer Supervision Type” below
• “Programming Caller ID” on page 27
• “Programming the Hybrid Balance Option” on page 28
• “Programming DTMF or Dial Pulse Signalling” on page 29
• “Programming Trunk Group Assignments” on page 30
• “Programming the Busy Trunk Option” on page 31
See Figure 3 on page 36 for the Trunk Database flowchart.
Programming the Trunk Answer Supervision Type
Answer Supervision determines whether the system should consider a call valid when it
receives polarity reversal from the CO, or wait for the Valid Call timer to expire. Any outside call
put on hold becomes valid immediately, regardless of Answer Supervision or Valid Call timer
status. There are three Answer Supervision Type options:
• Polarity Reversal: A loop reversal must be received to consider the call valid. When the
first loop reversal is received, the call is made valid immediately, and the phone display
shows the call cost. When a second loop reversal is received, the system terminates the
call. If a second loop reversal is not received, the system does not terminate the call
unless the inside party hangs up or loss-of-loop is received from the telephone company.
• Valid Call Timer: The call is validated after the Valid Call Timer expires. All polarity
reversals received before and after the Valid Call Timer are ignored.
• Valid Call Timer with Polarity Reversal: If a loop reversal is received before the Valid
Call Timer expires, the call will be made valid immediately, and the phone display shows
call cost. When a second loop reversal is received, the system terminates the call. If a
loop reversal is not received before the Valid Call Timer expires, the call is made valid by
the timer. If a loop reversal is received after the timer expires, the loop reversal is ignored,
but the call cost is reset. If a second loop reversal is then received, the system terminates
the call. If a second loop reversal is not received, the system will not terminate the call
unless the inside party hangs up or loss-of-loop is received from the telephone company.
See page 26 for programming instructions.
Mitel® 5000 CP Administrator Phone Guide – Issue 3.2, September 2009
Page 25
Phone and System Administration
Programming the Trunk Answer Supervision Type
To program the Answer Supervision Type:
NOTE
1.
Dial 9932 (9132 in Europe). If a password is required (see page 19), ENTER
PASSWORD appears (otherwise, go to step 3).
2.
Enter the password, and then press #. ENTER DATABASE OPTION (1 - 3) appears.
3.
Press 3 or the TRUNK menu button. ENTER TRUNK OPTION appears.
4.
Press 1 or the INDIVIDUAL TRUNK menu button. ENTER TRUNK EXTENSION
appears.
5.
Enter the extension number, or enter a partial extension number, and then press # or the
ACCEPT menu button. The extension information that best matches the partial number
appears. You can use the Volume buttons or the NEXT and PREVIOUS menu buttons to
scroll through entries.
6.
Press # or the ACCEPT menu button to accept the entry.
7.
Press 1 or the ANS SUPERVISION menu button. ANS SUPERVISION OPTION (1 - 3)
appears.
8.
Select one of the following:
9.
10.
Page 26
At any time, you can press * to return to the previous menu, or press the Speaker
button to exit the programming session and cancel any unsaved changes.
•
Press 1 or the POLARITY-REVERSE menu button for the polarity-reversal
supervision type.
•
Press 2 or the VALID CALL menu button for Valid Call timer supervision.
•
Press 3 or the VALID + POLARITY menu button for Valid Call timer with Polarity
Reversal supervision.
Press # or the ACCEPT menu button to accept the entry. DATABASE UPDATED
appears.
When you are finished with all programming, press the Speaker button or # repeatedly to
exit the programming session.
Mitel® 5000 CP Administrator Phone Guide – Issue 3.2, September 2009
Phone and System Administration
Programming Caller ID
Programming Caller ID
You can enable or disable incoming and outgoing Caller ID for individual trunks.
To program Caller ID for an individual trunk:
NOTE
At any time, you can press * to return to the previous menu, or press the Speaker
button to exit the programming session and cancel any unsaved changes.
1.
Dial 9932 (9132 in Europe). If a password is required (see page 19), ENTER
PASSWORD appears (otherwise, go to step 3).
2.
Enter the password, and then press #. ENTER DATABASE OPTION (1 - 3) appears.
3.
Press 3 or the TRUNK menu button. ENTER TRUNK OPTION appears.
4.
Press 1 or the INDIVIDUAL TRUNK menu button. ENTER TRUNK EXTENSION
appears.
5.
Enter the extension number, or enter a partial extension number, and then press # or the
ACCEPT menu button. The extension information that best matches the partial number
appears. You can use the Volume buttons or the NEXT and PREVIOUS menu buttons to
scroll through entries.
6.
Press # or the ACCEPT menu button to accept the entry.
7.
Press 2 or the CALLER ID menu button. SET CALLER ID (ON = 1 OFF = 2) appears.
8.
Press 1 or the ON menu button to enable CALLER ID, or press 2 or the OFF menu
button to disable it.
9.
Press # or the ACCEPT menu button to accept the entry. DATABASE UPDATED
appears.
10.
When you are finished with all programming, press the Speaker button or # repeatedly to
exit the programming session.
Mitel® 5000 CP Administrator Phone Guide – Issue 3.2, September 2009
Page 27
Phone and System Administration
Programming the Hybrid Balance Option
Programming the Hybrid Balance Option
A field technician runs a Hybrid Balance Test to ensure that analog trunks connected to the
5000 CP system have the best hybrid balance settings. You can change the hybrid balance
setting for individual trunks.
To program the Hybrid Balance Option:
NOTE
1.
Dial 9932 (9132 in Europe). If a password is required (see page 19), ENTER
PASSWORD appears (otherwise, go to step 3).
2.
Enter the password, and then press #. ENTER DATABASE OPTION (1 - 3) appears.
3.
Press 3 or the TRUNK menu button. ENTER TRUNK OPTION appears.
4.
Press 1 or the INDIVIDUAL TRUNK menu button. ENTER TRUNK EXTENSION
appears.
5.
Enter the extension number, or enter a partial extension number, and then press # or the
ACCEPT menu button. The extension information that best matches the partial number
appears. You can use the Volume buttons or the NEXT and PREVIOUS menu buttons to
scroll through entries.
6.
Press # or the ACCEPT menu button to accept the entry.
7.
Press 3 or the HYBRID BALANCE menu button. HYBRID BALANCE OPTION (0 - 7)
appears.
8.
Enter the Hybrid Balance option (0 to 7), or use the Volume buttons or the NEXT and
PREVIOUS menu buttons to scroll through entries.
9.
Press # or the ACCEPT menu button to accept the entry. DATABASE UPDATED
appears.
10.
Page 28
At any time, you can press * to return to the previous menu, or press the Speaker
button to exit the programming session and cancel any unsaved changes.
When you are finished with all programming, press the Speaker button or # repeatedly to
exit the programming session.
Mitel® 5000 CP Administrator Phone Guide – Issue 3.2, September 2009
Phone and System Administration
Programming DTMF or Dial Pulse Signalling
Programming DTMF or Dial Pulse Signalling
You can program trunks for dual tone multi-frequency (DTMF) or dial pulse signalling.
To program DTMF or dial pulse signalling:
NOTE
At any time, you can press * to return to the previous menu, or press the Speaker
button to exit the programming session and cancel any unsaved changes.
1.
Dial 9932 (9132 in Europe). If a password is required (see page 19), ENTER
PASSWORD appears (otherwise, go to step 3).
2.
Enter the password, and then press #. ENTER DATABASE OPTION (1 - 3) appears.
3.
Press 3 or the TRUNK menu button. ENTER TRUNK OPTION appears.
4.
Press 1 or the INDIVIDUAL TRUNK menu button. ENTER TRUNK EXTENSION
appears.
5.
Enter the extension number, or enter a partial extension number, and then press # or the
ACCEPT menu button. The extension information that best matches the partial number
appears. You can use the Volume buttons or the NEXT and PREVIOUS menu buttons to
scroll through entries.
6.
Press # or the ACCEPT menu button to accept the entry.
7.
Press 4 or the SIGNALLING menu button. ENTER SIGNALLING OPTION (1 - 2)
appears.
8.
Press 1 or the DTMF menu button, or press 2 or the PULSE menu button.
9.
Press # or the ACCEPT menu button to accept the entry. DATABASE UPDATED
appears.
10.
When you are finished with all programming, press the Speaker button or # repeatedly to
exit the programming session.
Mitel® 5000 CP Administrator Phone Guide – Issue 3.2, September 2009
Page 29
Phone and System Administration
Programming Trunk Group Assignments
Programming Trunk Group Assignments
Each trunk must be assigned to a trunk group. You change the trunk group assignment for an
individual trunk.
To assign a trunk to a different trunk group:
NOTE
1.
Dial 9932 (9132 in Europe). If a password is required (see page 19), ENTER
PASSWORD appears (otherwise, go to step 3).
2.
Enter the password, and then press #. ENTER DATABASE OPTION (1 - 3) appears.
3.
Press 3 or the TRUNK menu button. ENTER TRUNK OPTION appears.
4.
Press 1 or the INDIVIDUAL TRUNK menu button. ENTER TRUNK EXTENSION
appears.
5.
Enter the extension number, or enter a partial extension number, and then press # or the
ACCEPT menu button. The extension information that best matches the partial number
appears. You can use the Volume buttons or the NEXT and PREVIOUS menu buttons to
scroll through entries.
6.
Press # or the ACCEPT menu button to accept the entry.
7.
Press 5 or the TRUNK GROUP menu button. ENTER TRUNK GRP EXTENSION
appears.
8.
Enter the trunk group number, or use the Volume buttons or the NEXT and PREVIOUS
menu buttons to scroll through entries.
9.
Press # or the ACCEPT menu button to accept the entry. DATABASE UPDATED
appears.
10.
Page 30
At any time, you can press * to return to the previous menu, or press the Speaker
button to exit the programming session and cancel any unsaved changes.
When you are finished with all programming, press the Speaker button or # repeatedly to
exit the programming session.
Mitel® 5000 CP Administrator Phone Guide – Issue 3.2, September 2009
Phone and System Administration
Programming the Busy Trunk Option
Programming the Busy Trunk Option
You can temporarily disable a trunk from service. While it is out of service it cannot be used to
place outgoing calls. However, incoming calls on analog trunks will still ring in and can be
answered. Incoming calls on Integrated Services Digital Network (ISDN) trunks cannot be
answered. The trunk remains out of service until the Trunk Busy Out timer expires or until you
place the trunk back in service.
To program the Busy Trunk option:
NOTE
At any time, you can press * to return to the previous menu, or press the Speaker
button to exit the programming session and cancel any unsaved changes.
1.
Dial 9932 (9132 in Europe). If a password is required (see page 19), ENTER
PASSWORD appears (otherwise, go to step 3).
2.
Enter the password, and then press #. ENTER DATABASE OPTION (1 - 3) appears.
3.
Press 3 or the TRUNK menu button. ENTER TRUNK OPTION appears.
4.
Press 1 or the INDIVIDUAL TRUNK menu button. ENTER TRUNK GRP EXTENSION
appears.
5.
Enter the extension number, or enter a partial extension number, and then press # or the
ACCEPT menu button. The extension information that best matches the partial number
appears. You can use the Volume buttons or the NEXT and PREVIOUS menu buttons to
scroll through entries.
6.
Press # or the ACCEPT menu button to accept the entry.
7.
Press 6 or the BUSY TRUNK menu button. MARK TRUNK BUSY (ON = 1 OFF = 2)
appears.
8.
Press 1 or the ON menu button disable the trunk, or press 2 or the OFF menu button to
enable the trunk.
9.
Press # or the ACCEPT menu button to accept the entry. DATABASE UPDATED
appears.
10.
When you are finished with all programming, press the Speaker button or # repeatedly to
exit the programming session.
Mitel® 5000 CP Administrator Phone Guide – Issue 3.2, September 2009
Page 31
Phone and System Administration
Trunk Group Programming Options
Trunk Group Programming Options
You can program the following trunk group options:
• “Programming Trunk Group Day or Night Answer Access” below
• “Programming Trunk Group Day or Night Ring-in” on page 33
• “Programming Trunk Group Toll Restrictions” on page 34
• “Programming Trunk Group Trunk Lists” on page 35
See Figure 3 on page 36 for the Trunk Group Database flowchart.
Programming Trunk Group Day or Night Answer Access
You can program separate lists for phones with allowed-answer access in day and night modes.
To program trunk group Day or Night Answer Access:
NOTE
Page 32
At any time, you can press * to return to the previous menu, or press the Speaker
button to exit the programming session and cancel any unsaved changes.
1.
Dial 9932 (9132 in Europe). If a password is required (see page 19), ENTER
PASSWORD appears (otherwise, go to step 3).
2.
Enter the password, and then press #. ENTER DATABASE OPTION (1 - 3) appears.
3.
Press 3 or the TRUNK menu button. ENTER TRUNK OPTION appears.
4.
Press 2 or the TRUNK GROUP menu button. ENTER TRUNK GROUP EXTENSION
appears.
5.
Enter the extension number, or enter a partial extension number, and then press # or the
ACCEPT menu button. The extension information that best matches the partial number
appears. You can use the Volume buttons or the NEXT and PREVIOUS menu buttons to
scroll through entries.
6.
Press # or the ACCEPT menu button to accept the entry. ENTER TRUNK GROUP
OPTION (1 - 6) appears.
7.
Press 1 or the ANS-ACCESS DAY menu button or press 2 or the ANS-ACCESS NIGHT
menu button. ENTER STATION EXTENSION appears.
8.
Enter the extension number, or enter a partial extension number, and then press # or the
ACCEPT menu button. The extension information that best matches the partial number
appears. You can use the Volume buttons or the NEXT and PREVIOUS menu buttons to
scroll through entries.
9.
Press # or the ACCEPT menu button to accept the entry.
10.
The extension number and a Yes/No menu are displayed. To include the phone in the
list, press 1 or the YES menu button followed by #. To exclude the phone from the list,
press 2 or the NO menu button followed by #. DATABASE UPDATED followed by
ENTER STATION EXTENSION appears.
11.
Select another extension number. Or, if you are finished programming the phone list,
press # or the ACCEPT menu button.
12.
When you are finished with all programming, press the Speaker button or # repeatedly to
exit the programming session.
Mitel® 5000 CP Administrator Phone Guide – Issue 3.2, September 2009
Phone and System Administration
Programming Trunk Group Day or Night Ring-in
Programming Trunk Group Day or Night Ring-in
You can program separate phone lists with ring-in for Day and Night Modes.
To program trunk group Day or Night Ring-in:
NOTE
At any time, you can press * to return to the previous menu, or press the Speaker
button to exit the programming session and cancel any unsaved changes.
1.
Dial 9932 (9132 in Europe). If a password is required (see page 19), ENTER
PASSWORD appears (otherwise, go to step 3).
2.
Enter the password, and then press #. ENTER DATABASE OPTION (1 - 3) appears.
3.
Press 3 or the TRUNK menu button. ENTER TRUNK OPTION appears.
4.
Press 2 or the TRUNK GROUP menu button. ENTER TRUNK GROUP EXTENSION
appears.
5.
Enter the extension number, or enter a partial extension number, and then press # or the
ACCEPT menu button. The extension information that best matches the partial number
appears. You can use the Volume buttons or the NEXT and PREVIOUS menu buttons to
scroll through entries.
6.
Press # or the ACCEPT menu button to accept the entry. ENTER TRUNK GROUP
OPTION (1 - 6) appears.
7.
Do one of the following:
•
To program the phone that will have ring in for this trunk group for day mode, press
3 or the RING-IN DAY menu button.
•
To program for night mode, press 4 or the RING-IN NIGHT menu button. ENTER
STATION EXTENSION appears.
8.
Enter the extension number, or enter a partial extension number, and then press # or the
ACCEPT menu button. The extension information that best matches the partial number
appears. You can use the Volume buttons or the NEXT and PREVIOUS menu buttons to
scroll through entries.
9.
Press # or the ACCEPT menu button to accept the entry.
10.
The extension number and a Yes/No menu are displayed. To include the phone in the
list, press 1 or the YES menu button followed by #. To exclude the phone from the list,
press 2 or the NO menu button followed by #. DATABASE UPDATED followed by
ENTER STATION EXTENSION appears.
11.
Select another extension number. Or, if you are finished programming the phone list,
press # or the ACCEPT menu button.
12.
When you are finished with all programming, press the Speaker button or # repeatedly to
exit the programming session.
Mitel® 5000 CP Administrator Phone Guide – Issue 3.2, September 2009
Page 33
Phone and System Administration
Programming Trunk Group Toll Restrictions
Programming Trunk Group Toll Restrictions
You can program toll restriction classes of service for the trunk groups. See “Programming
Phone Toll Restrictions” on page 15 for more information.
To program trunk group toll restrictions:
NOTE
1.
Dial 9932 (9132 in Europe). If a password is required (see page 19), ENTER
PASSWORD appears (otherwise, go to step 3).
2.
Enter the password, and then press #. ENTER DATABASE OPTION (1 - 3) appears.
3.
Press 3 or the TRUNK menu button. ENTER TRUNK OPTION appears.
4.
Press 2 or the TRUNK GROUP menu button. ENTER TRUNK GROUP EXTENSION
appears.
5.
Enter the extension number, or enter a partial extension number, and then press # or the
ACCEPT menu button. The extension information that best matches the partial number
appears. You can use the Volume buttons or the NEXT and PREVIOUS menu buttons to
scroll through entries.
6.
Press # or the ACCEPT menu button to accept the entry. ENTER TRUNK GROUP
OPTION (1 - 6) appears.
7.
Press 5 or the TOLL RESTRICTION menu button. TOLL RESTRICTION OPTION (1 - 4)
appears.
8.
Select one of the following toll restrictions:
9.
10.
Page 34
At any time, you can press * to return to the previous menu, or press the Speaker
button to exit the programming session and cancel any unsaved changes.
•
COS for day or night mode: For Day Mode, press 1 or the COS DAY menu
button, or press 2 or the COS NIGHT menu button Night Mode. SET DAY (or
NIGHT) COS <number> appears. If necessary, scroll to the correct COS. When the
display shows the correct COS, press 1 or the ON menu button to enable the toll
restriction, or press 2 or the OFF menu button to disable it. If applicable, repeat this
step to program additional COS toll restrictions.
•
Exempt from ARS: Press 3 or the EXEMPT FROM ARS button. EXEMPT FROM
ARS appears. Press 1 or the YES menu button to enable the option, or press 2 or
the NO menu button to disable it.
•
Subject to toll restriction: Press 4 or the SUBJECT TO TOLL menu button.
When the display shows SUBJECT TO TOLL, press 1 or the YES menu button to
enable the option. Or, press 2 or the NO menu button to disable it.
Press # or the ACCEPT menu button to continue. DATABASE UPDATED appears.
When you are finished with all programming, press the Speaker button or # repeatedly to
exit the programming session.
Mitel® 5000 CP Administrator Phone Guide – Issue 3.2, September 2009
Phone and System Administration
Programming Trunk Group Trunk Lists
Programming Trunk Group Trunk Lists
You can program a list of trunks for a trunk group.
To program trunk group trunk lists:
NOTE
At any time, you can press * to return to the previous menu, or press the Speaker
button to exit the programming session and cancel any unsaved changes.
1.
Dial 9932 (9132 in Europe). If a password is required (see page 19), ENTER
PASSWORD appears (otherwise, go to step 3).
2.
Enter the password, and then press #. ENTER DATABASE OPTION (1 - 3) appears.
3.
Press 3 or the TRUNK menu button. ENTER TRUNK OPTION appears.
4.
Press 2 or the TRUNK GROUP menu button. ENTER TRUNK GROUP EXTENSION
appears.
5.
Enter the extension number, or enter a partial extension number, and then press # or the
ACCEPT menu button. The extension information that best matches the partial number
appears. You can use the Volume buttons or the NEXT and PREVIOUS menu buttons to
scroll through entries.
6.
Press # or the ACCEPT menu button to accept the entry. ENTER TRUNK GROUP
OPTION (1 - 6) appears.
7.
Press 6 or the TRUNK LIST menu button. ENTER TRUNK EXTENSION appears.
8.
Enter the extension number, or enter a partial extension number, and then press # or the
ACCEPT menu button. The extension information that best matches the partial number
appears. You can use the Volume buttons or the NEXT and PREVIOUS menu buttons to
scroll through entries.
9.
Press # or the ACCEPT menu button to accept the entry.
10.
The display shows the extension number and a Yes/No menu. To include the phone in
the list, press 1 or the YES menu button followed by #. To exclude the phone from the
list, press 2 or the NO menu button followed by #. DATABASE UPDATED followed by
ENTER TRUNK EXTENSION appears.
11.
Select another extension number. Or, if you are finished programming the phone list,
press # or the ACCEPT menu button.
12.
When you are finished with all programming, press the Speaker button or # repeatedly to
exit the programming session.
Mitel® 5000 CP Administrator Phone Guide – Issue 3.2, September 2009
Page 35
Phone and System Administration
Programming Trunk Group Trunk Lists
Figure 3. Trunk Database Programming Flowchart
Enter
Program Database
feature code
9932 (9132)
ENTER DATABASE OPTION
Press 3 or TRUNK menu button
ENTER TRUNK OPTION
Press 2 or TRUNK GROUP
menu button
Press 1 or INDIVIDUAL TRUNK
menu button
ENTER TRUNK EXTENSION
ENTER TRUNK GRP EXTENSION
Type the trunk
extension number
SEE NEXT PAGE
INDIVIDUAL TRUNK OPTION
Press 1 or
ANSWER SUPERVISION
menu button
ANS SUPERVISION OPTION
Press 1 or POLARITY
REVERSE menu button
Press 2 or
CALLER ID
menu button
Press 3 or VALID +
POLARITY menu button
SET CALLER ID
Press 1 or ON
menu button
Press 3 or
HYBRID BALANCE
menu button
Press 2 or VALID
CALL menu button
Press 2 or OFF
menu button
HYBRID BALANCE OPTION
Enter option
number or select
option to program
by scrolling
Press 4 or
SIGNALLING
menu button
ENTER SIGNALING OPTION
Press 1 or DTMF
menu button
Press 5 or
TRUNK GROUP
menu button
Press 2 or PULSE
menu button
ENTER TRUNK GRP EXTENSION
Enter the trunk group number
Press 6 or
TRUNK BUSY
menu button
MARK TRUNK BUSY
Press 1 or ON
menu button
Page 36
Press 2 or OFF
menu button
At any time, you can press
* to return to the previous
menu, or press the Speaker button to exit programming and cancel any
unsaved changes.
Press # or the ACCEPT
menu button to save
changes.
INFORMATION IN THIS
CHART IS SHOWN AS
FOLLOWS:
YOUR INPUT
PHONE DISPLAYS
Mitel® 5000 CP Administrator Phone Guide – Issue 3.2, September 2009
Phone and System Administration
Programming Trunk Group Trunk Lists
Figure 3. Trunk Database Programming Flowchart (Continued)
CONTINUED FROM PREVIOUS PAGE
Enter the number of the trunk group
to be programmed
TRUNK GROUP OPTION
Press 1 or
ANS ACCESS DAY
menu button
ENTER PHONE EXTENSION
Press 2 or
ANS ACCESS NIGHT
menu button
Type the extension number
Press 3 or
RING-IN DAY
menu button
(Extension number) YES/NO
Press 1 or YES
menu button
Press 4 or
RING-IN NIGHT
menu button
Press 5 or
TOLL RESTRICTION
menu button
TOLL RESTRICTION OPTION
Press 1 or COS
Press 2 or COS
DAY menu button NIGHT menu button
SET DAY/NIGHT COS XX
If necessary, select COS number
to program by scrolling
Press 1 or ON
menu button
Press 6 or
TRUNK LIST
menu button
Press 2 or NO
menu button
Press 3 or EXEMPT
FROM ARS menu button
Press 4 or SUBJECT
TO TOLL menu button
EXEMPT FROM ARS
SUBJECT TO TOLL
Press 1 or YES
menu button
Press 2 or NO
menu button
Press 1 or YES
menu button
Press 2 or NO
menu button
Press 2 or OFF
menu button
ENTER TRUNK EXTENSION
Type the trunk number
(Extension number) YES/NO
Press 1 or YES
menu button
Mitel® 5000 CP Administrator Phone Guide – Issue 3.2, September 2009
Press 2 or NO
menu button
Page 37
Phone and System Administration
Alarms
Alarms
Alarms are generated on phones as the result of continuous self-diagnostics run within the
system and are a basic indicator that there is a problem or potential problem with the system.
The severity and type of alarm determines the corrective action necessary to resolve the
problem.
To allow you to monitor multiple nodes, the system provides both system alarms, which includes
voice processing alarms, and network-wide alarms. See Table 6 on page 41 for the complete list
of minor system and voice processing alarms.
Alarm Types
On the 5000 CP system, alarms are grouped into the following categories:
• Minor System alarms (000–019): These alarms indicate a system problem that usually
require calling service personnel.
• Minor Voice Processing alarms (020–039): These alarms indicate a voice processing
problem that normally are corrected without calling service personnel.
NOTE
Even when a voice processing alarm has been registered, the system may
still function correctly.
• Major System alarms (100–199): These alarms indicate a system problem that require
calling service personnel.
• Major Voice Processing alarms (200–224): These alarms indicate a voice processing
problem that require calling service personnel.
• Network alarms (225–244): These alarms indicate a system or voice processing problem
generated from a remote node. These alarms are handled the same as the local alarm is
handled. When a network alarm occurs, the local alarm (number) equivalent is displayed
on the first line of your administrator’s phone and the node where the alarm originated is
indicated on the second line. What distinguishes a network alarm from a local alarm is the
node information that appears on the second line of the phone’s display.
NOTE
The actual alarm numbers 225–244 are used internally by the system and do
not appear on your administrator’s phone. Instead, your administrator phone
shows the equivalent local alarm number between 000 and 224.
Network Alarms
The system provides both system alarms, including voice processing alarms, and network-wide
alarms so you can monitor multiple nodes:
• Network-Wide Alarms: When an event occurs that generates a network-wide alarm, the
alarm is broadcast to every node in the system. This is configurable in DB Programming
by your system administrator.
• System Alarms: System alarms appear only on the node on which the alarm was
generated.
Page 38
Mitel® 5000 CP Administrator Phone Guide – Issue 3.2, September 2009
Phone and System Administration
Alarm Differences
Alarm Differences
The system Alarm Reporting feature detects equipment failures. If there is a system failure that
affects service, a major alarm appears at all affected phones. When a minor equipment failure
occurs, a minor alarm is generated and appears on the primary attendant’s display and, if
enabled, at your administrator phone. When a Voice Mail alarm is in effect, the telephone
system may be functioning properly, but the voice processing system may be inoperative.
To differentiate between network-wide and local alarms, network-wide alarms appear on
administrator phones preceded by NET ALARM, and local system alarms are preceded with
SYS ALARM. Network-wide alarms override system alarms on your administrator phone. On
remote nodes, network-wide alarms indicate the name of the node on which the alarm occurred.
The node name is obtained from the username in DB Programming, if one is entered.
Otherwise, only the node number appears.
A major alarm message, MAJOR ALARM, appears on all display phones in the event of a
system-wide failure. The warning might also appear on a single phone if the phone or its cabling
is defective. Because they indicate that all or part of the system is inoperative, major alarms
require immediate attention from service personnel.
Responding to Alarms
A major alarm requires you to contact service personnel, while a minor alarm may or may not
require you to contact service personnel in addition to clearing the alarm.
To respond to a major alarm:
Take the action as described below:
•
#100-199 (major system alarms): An equipment failure has occurred that requires
the attention of service personnel.
•
#200-224 (major voice processing alarms): An equipment failure has occurred
that requires the attention of service personnel.
•
SYS ALARM #NNNN: Contact service personnel.
•
CALL TECHNICIAN: Write down all alarm information, including what was taking
place when the alarm occurred, and then contact service personnel.
To respond to a minor alarm:
1.
When a minor alarm indication appears, write down the alarm information.
2.
While on-hook, clear the alarm as described in “Clearing Alarms” on page 40. SYSTEM
(or NETWORK) ALARM CLEARED appears.
3.
Take the appropriate action as indicated in Table 6 on page 41.
Mitel® 5000 CP Administrator Phone Guide – Issue 3.2, September 2009
Page 39
Phone and System Administration
Clearing Alarms
Clearing Alarms
You can clear a network-wide alarm on the local node only or on every node in the network. To
clear an alarm, you can use either the administrator feature codes or menu buttons.
To use the feature codes to clear alarms:
Dial one of the following feature codes to clear the alarm:
•
Clear Network Alarm (9851): This feature code clears network-wide alarms on
every node in the network, but it does not affect system alarms. The Clear Network
Alarm feature code may be entered on any node in the network, but the Send
Network Alarms flag must be set for you to clear alarms on other nodes in the
network.
•
Clear System Alarm (9850): This feature code clears all local and network-wide
system alarm displays on your node.
After you enter the feature code, SYSTEM (or NETWORK) ALARM CLEARED appears,
and the highest priority alarm is cleared. If applicable, enter the feature code again to
clear the next alarm in the queue (only one alarm is cleared at a time).
To use menu buttons to clear alarms:
Do one of the following:
Page 40
•
Press the CLEAR ALL ALARMS menu button to clear all alarms. ALL ALARMS
CLEARED appears, and the display returns to the idle menu.
•
Press the CLEAR ALARM menu button to clear the currently displayed alarm.
SYSTEM (or NETWORK) ALARM CLEARED appears, and the display shows the
next highest priority, if applicable. If there are no more alarms, the display returns
to the idle menu.
Mitel® 5000 CP Administrator Phone Guide – Issue 3.2, September 2009
Phone and System Administration
Clearing Alarms
Table 6. Minor System and Voice Processing Alarms
Alarm Text
SYS ALARM #10
xNNNN OFF HOOK
Description and Action Required
A phone has remained off-hook and inactive past the expiration of the Inactivity Alarm
timer. The display and the SMDR indicate which phone is off-hook. The lamps in the
button for that station on attached Direct Station Select (DSS) units or Programmable
Key Module (PKM) units and on the Speed Dial buttons of other phones flutter
continuously.
Locate the phone and replace the handset in the cradle. Calls being transmitted over
the secondary voice path are not affected or interrupted by an off-hook alarm
condition.
SYS ALARM #11 xNNNN
EMERGENCY
A user has dialed the Emergency Call feature code. The system has seized a trunk
and dialed the emergency phone number that will bring responders to the location
where the 5000 CP Base Server is installed.
The default Emergency Call code for U.S. systems is 911, and the default code for
European systems is 999. Emergency dial sequences, such as 112 for some
European localities, can be programmed for the location where the 5000 CP Base
Server is installed. However, if an appropriate emergency phone number is dialed from
a remote location to ensure response to that location, no alarm will appear at the
administrator phones.
No action is required, just clear the alarm. To facilitate emergency services reaching
the party in need, determine who made the emergency call and where help is needed.
SYS ALARM #16
NO DELAYED MAJOR
The system was unable to perform a scheduled delayed major reset because the
system was not idle.
If this alarm recurs, contact service personnel.
SYS MGR LINK ERR #17 The certificate is not yet valid or the system is not connected to the appropriate
<error string>
System Manager server.
Contact service personnel.
SYS ALARM #18
SYS MGR INV CERT
A corrupt certificate was uploaded or there was an error in writing the file.
SYS ALARM #20
CHECK PRINTER
The printer is not functioning properly.
SYS ALARM #21
V-MAIL 80% FULL
The external voice mail disk space is 80 percent full. If it reaches 100 percent, Voice
Mail cannot accept any messages until disk space is made available.
Contact service personnel.
Check that the cable and the power cord are connected, and that it has paper and
toner.
Contact service personnel.
SYS ALARM #22
V-MAIL 100% FULL
100 percent of the external voice mail disk space is in use. Voice mail cannot accept
any messages until disk space is made available.
Contact service personnel.
SYS ALARM #23
SMDR 80% FULL
The SMDR disk space on the external voice processing system is 80 percent full. If it
reaches 100 percent before the SMDR information is cleared, no further SMDR
recording will be possible.
Contact service personnel.
SYS ALARM #24
SMDR 100% FULL
100 percent of the SMDR disk space on the external voice processing system is in
use. No further SMDR recording is possible.
Contact service personnel.
SYS ALARM #32
INSUF BAND
The IP Network does not have enough bandwidth to support the IP call that is
currently connected to the extension. If this alarm is generated frequently, it could
indicate a network problem that requires the attention of your network administrator.
Mitel® 5000 CP Administrator Phone Guide – Issue 3.2, September 2009
Page 41
Phone and System Administration
Internal Modem
Internal Modem
The 5000 CP system internal modem performs multiple functions. When enabled, the modem is
used for DB Programming, Message Print, SMDR, and for uploading software licenses.
Enabling or Disabling the Internal Modem
If disabled, the modem and extension are placed into DND. In DND, the modem rejects all calls
and does not allow camp ons. Any outside calls that attempt to ring a disabled modem are
automatically transferred to the primary attendant.
To enable/disable a modem:
1.
Dial 9866 (Modem Enable) or 9867 (Modem Disable). ENABLE (DISABLE) MODEM
EXT # appears.
2.
Enter the extension of the modem to enable or disable it. MODEM ENABLED (or
DISABLED) appears.
If an invalid modem extension is entered, INVALID MODEM EXTENSION appears.
Resetting the Internal Modem
The internal modem must be reset if it fails to answer an incoming call or is out of
synchronization with an external modem.
NOTICE
Possible data corruption. Do not reset the modem if it is connected to a DB Programming
session. If you do, the programming session is dropped, potentially corrupting the database.
For this reason, Mitel recommends that you assign the modem extension to a Speed Dial
button. During a reset, any call connected to the modem is dropped.
To reset the internal modem:
1.
Dial 9869. RESET MODEM EXT# appears.
2.
Enter the modem extension number. MODEM RESET appears.
If an invalid modem extension is entered, INVALID MODEM EXTENSION appears.
Page 42
Mitel® 5000 CP Administrator Phone Guide – Issue 3.2, September 2009
Phone and System Administration
Network Group Diagnostics
Network Group Diagnostics
The Network Group Diagnostics feature allows you to verify that Network Groups have been
programmed correctly. When the Network Group Diagnostics feature code is entered, the
platform initiates pings from each system-connected device and determines if the other devices
respond to the ping. If a device does not respond to the ping or if a firewall is detected, the
system issues a Message Print message. For more information about Message Print, refer to
the Message Print Diagnostics Manual, part number 550.8018.
The Network Group Diagnostics feature works on proprietary IP devices for the local node only.
It does not work across nodes.
Running Network Group Diagnostics
NOTICE
System Performance. Because this feature affects system performance, run the diagnostics
program after normal business hours when the system is idle.
To run the Network Group Diagnostics:
1.
Dial 9900 (9100 in Europe) to turn on diagnostics mode. DIAGNOSTICS ON appears.
2.
Dial 9963 (9163 in Europe). NET GRP CHECK (YES = 1 NO = 2) appears.
3.
When prompted, press 1 or the ACCEPT menu button to start the diagnostics feature.
NET GROUP DIAG IN PROGRESS appears.
When the diagnostics are complete, the phone displays one of the following messages:
• NET GROUP CHECK COMPLETED: Indicates that all IP devices within the Network
Groups are capable of communicating using peer-to-peer audio.
• NET GROUP CHECK ERRORS FOUND: Indicates that either some of the IP devices are
offline or there are NATs/firewalls located between the devices. Check Message Print to
determine which errors occurred.
Mitel® 5000 CP Administrator Phone Guide – Issue 3.2, September 2009
Page 43
Phone and System Administration
Seizing a Device
Seizing a Device
For troubleshooting purposes, you can enable diagnostics mode and then seize a specific trunk
or extension by entering the module, circuit, and device number.
The Seize Device feature is affected by trunk restriction. The administrator phone must have
outgoing access permission for the trunk to seize it. Toll restriction is applied to any calls placed
after the trunk is seized.
To seize a device:
1.
Dial 9900 (9100 in Europe), to turn on diagnostics mode. DIAGNOSTICS ON appears.
2.
Press the Special button (see page 7), and then dial 9973 (9173 in Europe). ENTER
BOARD appears.
3.
Enter the board (module) number, not the unit number, where the device to be seized is
located, while observing the following conditions:
4.
•
If you enter a single digit, press # after the digit to continue.
•
If you enter an incorrect module number or if the module is not entered in the
system, INVALID BOARD NUMBER appears.
•
If you have multiple ports (for example, dual-T1 or Internet Protocol Resource
Application (IPRA) ports) ENTER PORT appears.
Enter the (port) circuit number of the device to be seized. If you enter a single digit,
press # after the digit to continue. Valid numbers depend on the type of module. If you
enter an invalid module number, INVALID MODULE NUMBER appears.
If there is only one device on the selected port, the selected device is seized as if the
user had directly entered the extension or trunk number.
If there is more than one device on the selected port, ENTER DEVICE appears. Enter
the number of the device to be seized. Valid numbers depend on the type of devices
installed. If you enter an invalid device number, INVALID DEVICE NUMBER appears.
When the device has been selected, it is seized as if the user had directly entered the
extension or trunk access number.
5.
Page 44
Dial 9900 (9100 in Europe) to turn off diagnostics mode. DIAGNOSTICS OFF appears.
Mitel® 5000 CP Administrator Phone Guide – Issue 3.2, September 2009
Phone and System Administration
History Freezes
History Freezes
When certain system failures occur, service personnel may request a system history freeze
(system data snapshot), so they can analyze system activity for the time period preceding the
alarm.
NOTE
Do not perform these procedures unless directed to do so by service personnel.
Freezing or Unfreezing the System History
You can freeze or unfreeze the current node system history.
To freeze or unfreeze system history:
1.
Dial 9900 (9100 in Europe) to turn on diagnostics mode. DIAGNOSTICS ON appears.
2.
Dial 9993 (9193 in Europe) to freeze the system history, or dial 9998 (9198 in Europe) to
unfreeze the system history. HISTORY FROZEN (or UNFROZEN) appears. If you try to
change the state of the system history to its current status, HISTORY ALREADY
FROZEN (or UNFROZEN) appears.
3.
Dial 9900 (9100 in Europe) to turn off diagnostics mode. DIAGNOSTICS OFF appears.
Freezing or Unfreezing the Network History
You can freeze or unfreeze the network history for any node in the network. Service personnel
can then pull the information from each node for troubleshooting purposes. Nodes are assigned
to freeze zones by the database programmer to allow selective freezes. You must know which
zone to freeze or unfreeze.
A node can be in more than one freeze zone. If you freeze a zone that contains a node that is
already frozen, SOME NODES ALREADY FROZEN appears and the node remains frozen. If
you unfreeze a zone with unfrozen nodes in it, SOME NODES ALREADY UNFROZEN appears.
To determine the individual freeze status of the nodes, check the Message Print output.
To freeze or unfreeze network history:
1.
Dial 9900 (9100 in Europe) to turn on diagnostics mode. DIAGNOSTICS ON appears.
2.
Dial 9939 (9139 in Europe) to freeze the history a network node, or dial 9989 (9189 in
Europe) to unfreeze the history of a network node. SELECT FRZ ZONE (0–9) #
appears.
3.
Enter the number of the node you want to freeze or unfreeze. FREEZE ZONE XX IS
FROZEN (or UNFROZEN) appears. If you try to change the state of the system history
to its current status, FREEZE ZONE XX ALREADY FROZEN (or UNFROZEN) appears.
4.
Dial 9900 (9100 in Europe) to turn off diagnostics mode. DIAGNOSTICS OFF appears.
Mitel® 5000 CP Administrator Phone Guide – Issue 3.2, September 2009
Page 45
Reference
Reference
Troubleshooting Tips . . . . . . . . . . . . . . . . . . . . . . . . . . . . . . . . . . . . . . . . . . . . . . . . . . . . . . . . . . . 48
System Administrator and Provider Information . . . . . . . . . . . . . . . . . . . . . . . . . . . . . . . . . . . . 48
Administrator Troubleshooting Tips . . . . . . . . . . . . . . . . . . . . . . . . . . . . . . . . . . . . . . . . . . . . . 48
Programming Planning Sheets . . . . . . . . . . . . . . . . . . . . . . . . . . . . . . . . . . . . . . . . . . . . . . . . . . . 49
Administrator Phone Password . . . . . . . . . . . . . . . . . . . . . . . . . . . . . . . . . . . . . . . . . . . . . . . . . 49
Phone Information . . . . . . . . . . . . . . . . . . . . . . . . . . . . . . . . . . . . . . . . . . . . . . . . . . . . . . . . . . . 49
Do-Not-Disturb Messages . . . . . . . . . . . . . . . . . . . . . . . . . . . . . . . . . . . . . . . . . . . . . . . . . . . . . 50
Reminder Messages . . . . . . . . . . . . . . . . . . . . . . . . . . . . . . . . . . . . . . . . . . . . . . . . . . . . . . . . . 51
Changing Station Extension Numbers . . . . . . . . . . . . . . . . . . . . . . . . . . . . . . . . . . . . . . . . . . . 52
Swapping Stations . . . . . . . . . . . . . . . . . . . . . . . . . . . . . . . . . . . . . . . . . . . . . . . . . . . . . . . . . . 52
Individual Trunk Programming . . . . . . . . . . . . . . . . . . . . . . . . . . . . . . . . . . . . . . . . . . . . . . . . . 53
Trunk Group Programming . . . . . . . . . . . . . . . . . . . . . . . . . . . . . . . . . . . . . . . . . . . . . . . . . . . . 53
Default Feature Codes. . . . . . . . . . . . . . . . . . . . . . . . . . . . . . . . . . . . . . . . . . . . . . . . . . . . . . . . . . . 54
Administrator Feature Codes . . . . . . . . . . . . . . . . . . . . . . . . . . . . . . . . . . . . . . . . . . . . . . . . . . 54
Diagnostics Feature Codes . . . . . . . . . . . . . . . . . . . . . . . . . . . . . . . . . . . . . . . . . . . . . . . . . . . . 55
Trunk Access Codes . . . . . . . . . . . . . . . . . . . . . . . . . . . . . . . . . . . . . . . . . . . . . . . . . . . . . . . . . 58
Phone Feature Codes . . . . . . . . . . . . . . . . . . . . . . . . . . . . . . . . . . . . . . . . . . . . . . . . . . . . . . . . 58
Mitel® 5000 CP Administrator Phone Guide – Issue 3.2, September 2009
Page 47
Reference
Troubleshooting Tips
Troubleshooting Tips
The following sections include information to help you troubleshoot problems:
• “System Administrator and Provider Information” below
• “Administrator Troubleshooting Tips” below
System Administrator and Provider Information
Because this guide covers administrator phone features only, you may find that you need
additional assistance from your system administrator for issues such as creating new user
accounts or changing system settings.
Your system administrator may be onsite, or you may rely on your local provider (the company
that installed your phone system and now services it) for system administration. All sales,
service, and technical support are handled at the local level by your authorized Mitel provider. If
you do not know the contact information for your local provider, use the “Strategic Partners &
Resellers – Mitel Partner Locator” link at the top of the Mitel Web site (www.mitel.com) to locate
a nearby office.
Administrator Troubleshooting Tips
Table 7 includes administrator troubleshooting tips.
Table 7. Administrator Troubleshooting Tips
Problem
Possible Solution
I cannot access administrator phone
features.
You may be experiencing one of the following:
• You may not be using the administrator phone
assigned by the system administrator.
• If password protection is enabled, you must
enter a password before you can access
administrator phone features. To determine
your password, contact your system
administrator or local authorized provider. See
“System Administrator and Provider
Information” above.
Page 48
One of our employees has left the
company, and I need to change the user
name shown on the display.
See “Programming Extension User Names” on
page 14.
I need to change the system time shown
on the phone displays.
See “Setting the System Date and Time” on
page 9.
I cannot clear an alarm shown on the
phone display.
You can use the administrator phone to clear
alarms by entering the Clear System Alarm
feature code (9850).
Mitel® 5000 CP Administrator Phone Guide – Issue 3.2, September 2009
Reference
Programming Planning Sheets
Table 7. Administrator Troubleshooting Tips (Continued)
Problem
Possible Solution
System users cannot use “*67” to block
Caller ID when placing external calls.
To use “*67,” you must select an outside line
directly rather than using Automatic Route
Selection to select outside lines. Contact your
system administrator or local authorized provider
for more information. See “System Administrator
and Provider Information” on page 48.
I can change the system time, but when
I come in the morning, a different time
appears.
Your system may be configured to use Network
Time Protocol (NTP), which automatically
synchronizes network date and time at 12:15
A.M. daily, but the NTP server time is incorrect.
Contact your system administrator for assistance
in correcting the time on the NTP server.
Programming Planning Sheets
The following sections can help you plan and program your system. Use the sections for
reference and to record system-related information.
Administrator Phone Password
Administrator phone password: ___________________________
Phone Information
For each phone you are programming, record the following information.
Table 8. Phone Information
Options
Setting
Phone extension number
User name
Toll restriction classes of service
Administrator phone?
Yes or No
Attendant phone?
Yes or No
House phone?
Yes or No
Mitel® 5000 CP Administrator Phone Guide – Issue 3.2, September 2009
Page 49
Reference
Do-Not-Disturb Messages
Do-Not-Disturb Messages
You can change the default DND messages shown in Table 9. See “Changing Do-Not-Disturb
(DND) Messages” on page 20.
Table 9. Do-Not-Disturb Messages
Default DND Message
Primary Language
DND Message
Secondary Language
DND Message
MESSAGE 01 (DO-NOT-DISTURB)
MESSAGE 02 (LEAVE A MESSAGE)
MESSAGE 03 (IN MEETING UNTIL)
MESSAGE 04 (IN MEETING)
MESSAGE 05 (ON VAC. HOLIDAY 'TIL)
MESSAGE 06 (ON VAC. HOLIDAY)
MESSAGE 07 (CALL ME AT)
MESSAGE 08 (AT THE DOCTOR)
MESSAGE 09 (ON A TRIP)
MESSAGE 10 (ON BREAK)
MESSAGE 11 (OUT OF TOWN 'TIL)
MESSAGE 12 (OUT OF OFFICE)
MESSAGE 13 (OUT UNTIL)
MESSAGE 14 (WITH A CLIENT)
MESSAGE 15 (WITH A GUEST)
MESSAGE 16 (UNAVAILABLE)
MESSAGE 17 (IN CONFERENCE)
MESSAGE 18 (AWAY FROM DESK)
MESSAGE 19 (GONE HOME)
MESSAGE 20 (OUT TO LUNCH)
Page 50
Mitel® 5000 CP Administrator Phone Guide – Issue 3.2, September 2009
Reference
Reminder Messages
Reminder Messages
You can change the default Reminder Messages shown in Table 10. See “Changing Default
Reminder Messages” on page 21.
Table 10. Reminder Messages
Default Reminder Message
Primary Language
Reminder Message
Secondary Language
Reminder Message
MESSAGE 01 (MEETING)
MESSAGE 02 (STAFF MEETING)
MESSAGE 03 (SALES MEETING)
MESSAGE 04 (CANCEL MEETING)
MESSAGE 05 (APPOINTMENT)
MESSAGE 06 (PLACE CALL)
MESSAGE 07 (CALL CLIENT)
MESSAGE 08 (CALL CUSTOMER)
MESSAGE 09 (CALL HOME)
MESSAGE 10 (CALL CORPORATE)
MESSAGE 11 (CALL ENGINEERING)
MESSAGE 12 (CALL MARKETING)
MESSAGE 13 (CALL ACCOUNTING)
MESSAGE 14 (CANCEL DND)
MESSAGE 15 (CANCEL CALL FWD)
MESSAGE 16 (TAKE MEDICATION)
MESSAGE 17 (MAKE RESERVATION)
MESSAGE 18 (REVIEW SCHEDULE)
MESSAGE 19 (LUNCH)
MESSAGE 20 (REMINDER)
Mitel® 5000 CP Administrator Phone Guide – Issue 3.2, September 2009
Page 51
Reference
Changing Station Extension Numbers
Changing Station Extension Numbers
See “Changing Phone Extension Numbers” on page 22.
Table 11. Station Extension Numbers
Old Extension Number
New Extension Number
Swapping Stations
See “Swapping Phone Extension Numbers” on page 23.
Table 12. Swapped Extension Numbers
Extension Number
Page 52
Swapped with Extension
Mitel® 5000 CP Administrator Phone Guide – Issue 3.2, September 2009
Reference
Individual Trunk Programming
Individual Trunk Programming
Record the information in Table 13 for each trunk you want to program.
Table 13. Individual Trunk Programming
Information Required
Responses
Answer Supervision Type:
Polarity Reversal or Valid Call
or
Valid Call with Polarity Reversal
Caller ID?
Yes or No
Hybrid Balance:
Signaling:
DTMF or Dial Pulse
Trunk Group Number:
User name:
Trunk Group Programming
Record the following information in Table 14 for each trunk group you want to program.
Table 14. Trunk Group Programming
Information Required
Programming Plan
Phones with Day Answer Access:
Phones with Night Answer Access:
Phones with Day Ring In:
Phones with Night Ring In:
Toll Restriction Classes of Service:
Trunks in Trunk Groups:
Mitel® 5000 CP Administrator Phone Guide – Issue 3.2, September 2009
Page 53
Reference
Default Feature Codes
Default Feature Codes
Each of the station features is assigned a feature code. Using the station’s dialpad, these codes
are entered to select trunks, process calls, and use special features. The following tables show
default feature code values:
• “Administrator Feature Codes” below
• “Diagnostics Feature Codes” on page 55
• “Phone Feature Codes” on page 58
• “Trunk Access Codes” on page 58
Administrator Feature Codes
Table 15 summarizes feature codes accessible on administrator phones only.
Table 15. Administrator Feature Codes
Feature Name
Code
U.S. (Eur.)
Definition
Clear Network Alarm
9851
Clears network-wide alarms on every node in the network, but
will not affect system alarms. The Clear Network Alarm feature
code may be entered on any node in the network, but the Send
Network Alarms flag must be set for the administrator to clear
alarms on other nodes in the network.
Clear System Alarm
9850
Clears all local and network-wide system alarm displays on your
node.
Diagnostics On/Off
9900 (9100)
Enables or disables system diagnostics mode to perform
diagnostics functions such as freezing or unfreezing the
database, printing message logs, and seizing a device for
troubleshooting purposes.
Because diagnostics mode affects system performance, you
should run the diagnostics program when the system is idle.
Enable Network Day
9862
Places any or all remote nodes into day mode (you are prompted
for the node number).
Enable Network Night
9861
Places any or all remote nodes into night mode (you are
prompted for the node number).
Modem Disable
9867
Disables the internal modem; used in conjunction with the
assigned extension number of the modem.
Modem Enable
9866
Enables the internal modem; used in conjunction with the
assigned extension number of the modem.
Modem Reset
9869
Resets the internal modem when the modem fails to answer an
incoming call or to synchronize with an external modem.
NOTICE
Database corruption could occur if the modem is reset during
a DB Programming session. Mitel recommends that you
assign the modem extension to a Speed Dial button.
Night Ring On/Off
Page 54
9860
Places system in night mode or cancels night mode. While in
night mode, the night toll and trunk restriction lists are used.
Mitel® 5000 CP Administrator Phone Guide – Issue 3.2, September 2009
Reference
Diagnostics Feature Codes
Table 15. Administrator Feature Codes (Continued)
Feature Name
Code
U.S. (Eur.)
Definition
Periodic Diagnostics
On/Off
9825
Periodic diagnostics extends and improves the functionality and
checks and reconciliations performed on various resources in the
system.
Program System Speed
Dial
9801
Programs system-wide Speed Dial numbers when followed by
location codes (000–999 or 0000-4999).
Set Network Date/Time
9810
Programs the time and date for all nodes in the system. Local
time and date can also be reset by individual nodes.
Set Time/Date
9800
Programs system time and date.
Synchronize Network Time
9811
Synchronizes the minutes past the hour across the network.
If a node's time is off by more than 30 minutes, synchronizing the
minutes may cause the hour to change. Also, network time is
automatically synchronized every day at 12:30 AM (00:30), using
the time setting on the node with the lowest number.
Diagnostics Feature Codes
You must use the administrator phone and enter the Diagnostics Mode feature code (9900)
[9100 in Europe] before you can use the feature codes summarized in Table 16.
Table 16. Diagnostics Feature Codes
Feature Name
Code
U.S. (Eur.)
Definition
Compression On/Off
9982 (9182)
Compresses call processing messages sent to DB Programming,
speeding up transfers. You should not disable this feature unless
instructed to do so by support personnel.
Compression Statistics
9981 (9181)
Dumps various statistics related to the DB Programming
compression algorithm. This feature should be used only when
directed to do so by support personnel.
Diagnostic –
ASAI Snoop Off
9926 (9126)
Turns off the ASAI output to Message Print. ASAI is the protocol
the system uses to talk to DB Programming and the AVDAP.
Turning this feature on helps the support personnel debug the
messaging between Call Processing and DB Programming or Call
Processing and the AVDAP.
Diagnostic –
ASAI Snoop On
9927 (9127)
Turns on the ASAI output to Message Print. ASAI is the protocol
the system uses to talk to DB Programming and the voice
processing system. Turning this feature on helps the support
personnel debug the messaging between Call Processing and DB
Programming or Call Processing and the AVDAP.
Diagnostic –
Dump Extension
9933 (9133)
Allows a field technician to dump a device or structure when
debugging a problem. The system dumps the internal data
structures for that extension to message print. If you press the
pound button (#) you are prompted for a command. The command
allows you to enter an alphanumeric string of the structure to
dump.
Mitel® 5000 CP Administrator Phone Guide – Issue 3.2, September 2009
Page 55
Reference
Diagnostics Feature Codes
Table 16. Diagnostics Feature Codes (Continued)
Feature Name
Code
U.S. (Eur.)
Definition
Diagnostic –
Dump Node Information
9936 (9136)
Pressing the Dump Node Information feature code dumps
specified node information to Message Print for diagnostic
purpose. When the system prompts for a node number, enter the
applicable node number or zero (0) for all nodes within a network.
If the node does not exist, an error message saying INVALID
NODE NUMBER appears and prompts you for a node number
again.
After entering a node number, the system displays a confirmation
message on the phone display. This helps you analyze which
nodes are up and which nodes are down (the word ‘down’ does
not mean that the node is completely down, it simply means the
node is unreachable). For Example:
If all nodes are up, the display shows ALL NODES ARE UP X.
The ‘X’ represents the total number of the nodes.
If node 3 and 5 of a 5-node network are down, the display shows
# NODES DOWN 2 3 5.
Diagnostic –
Heap Dump
9943 (9143)
For internal engineering use only.
Diagnostic –
Heap Statistics
9947 (9147)
This feature code outputs miscellaneous heap information to
Message Print as well as putting up a message on the phone that
indicates the percentage of available dynamic heap memory. This
feature code is useful in determining if the system is losing heap
memory and how quickly the system may be losing it.
Diagnostic –
ISDN View
9948 (9148)
This feature code toggles through the three different ISDN view
output modes.
Entering the feature code the first time puts the ISDN view feature
into headers only mode. In this mode the system outputs all ISDN
messages to Message Print in header format (that is, it does not
contain any ISDN information elements).
Entering the feature code the second time puts the ISDN view
feature into full mode. In this mode the system outputs all ISDN
message to Message Print in full format (that is, each ISDN
information element).
Entering the feature code one more time turns this feature off.
Diagnostic –
Major Reset
9962 (9162)
For internal engineering use only.
Diagnostic –
Mark As Leaks
9945 (9145)
For internal engineering use only.
Diagnostic - Mark As
Quiescent
9946 (9146)
For internal engineering use only.
Diagnostic –
Minor Reset
9964 (9164)
For internal engineering use only.
Diagnostic –
Network Freeze Zone
System Histories
Diagnostic –
Network Unfreeze Zone
System Histories
9939 (9139)
The system fault history for any freeze zone in the network can be
halted (frozen) or re-enabled using these feature codes when
diagnostics mode is enabled. The fault history can then be
extracted from each zone and used by service personnel when
troubleshooting the system.
Page 56
9989 (9189)
Mitel® 5000 CP Administrator Phone Guide – Issue 3.2, September 2009
Reference
Diagnostics Feature Codes
Table 16. Diagnostics Feature Codes (Continued)
Feature Name
Code
U.S. (Eur.)
Definition
Diagnostic –
Network Groups
9963 (9163)
Allows you to verify that the Network Groups on the local node are
programmed properly. When 9963 is entered at an administrator’s
phone, the telephone system initiates pings from each IP device
on the local node and determines if the other devices respond to
the ping. If a device does not respond to the ping or if a firewall is
detected, the system issues a Message Print message.
Diagnostic –
Print Auxdata
9972 (9172)
(Not Programmable) Sends a report to a designated printer or file
that shows system reset history information to be used for
troubleshooting purposes.
Diagnostic –
Print Message Log
9975 (9175)
(Not Programmable) Sends a report to a designated printer or file
that lists system error messages to be used for troubleshooting
purposes.
Diagnostic –
Print Network Log
9976 (9176)
This feature code prints the network log to message print. This
feature is useful in determining the system of a networked system.
Diagnostic –
Query Node Traffic
9978 (9178)
Using this feature code you can query the status of various
devices on the system based on the status of the traffic flags in
DB Programming. The output is sent to Message Print.
Diagnostic –
Show Version
9928 (9128)
To check the call processing software version at an administrator's
phone, you can enable diagnostics mode, then enter this feature
code to view the version and date of the call processing software.
However, feature code 9928 displays the firmware version of the
phone if it is in SIP mode.
Diagnostic –
SIP View
9987 (9187)
Allows you to change the system wide SIP output value. Options
include No Output, Headers, and Full Output.
Diagnostic –
Spare 1–3
9910–9912
(9110–9112)
For internal engineering use only.
Diagnostic –
System History
9974 (9174)
For internal engineering use only.
Diagnostic –
View Displays
9983 (9183)
For internal engineering use only.
Program Database
9932 (9132)
Can be used for programming phone, system, and trunk
parameters.
Seize Device
9973 (9173)
Used during troubleshooting to seize a specific trunk or phone by
indicating the board number, port number, and device number.
System History –
Freeze
System History –
Unfreeze
9993 (9193)
The system fault history can be frozen or unfrozen using these
feature codes when diagnostics mode is enabled. Fault history is
used by service personnel when troubleshooting the system.
9998 (9198)
Mitel® 5000 CP Administrator Phone Guide – Issue 3.2, September 2009
Page 57
Reference
Trunk Access Codes
Trunk Access Codes
Table 17 lists trunk access codes used to select trunks when placing outgoing calls.
Table 17. Trunk Access Codes
Code
U.S. (Eur.)
Feature Name
Definition
Automatic Route Selection
(ARS)
92000
Allows the system to select the route wanted for placing a call, as
programmed in the database.
Trunk Group Access 1–208
92001–92208
Selects an available trunk from a programmed group of trunks for
placing an outside call.
Emergency Call
911
(999/112 or as
applicable)
Entering this feature code selects an outgoing trunk and
automatically dials the programmed Emergency Call number, which
is routed by default out Trunk Group 1.
Outgoing Call
8
Selects an outgoing trunk according to the programmed outgoing
access mode for that phone.
Phone Feature Codes
Table 18 lists phone feature codes.
Table 18. Phone Feature Codes
Feature Name
Code
Definition
Account Code –
All Calls Following
391
Allows the phone user to enter a forced or optional account code
that will apply to all calls following the entry of this feature code
and will appear in the SMDR. To disable the All Calls Following
feature, the feature code is entered again without an account code.
Account Code – Optional
390
Allows the phone user to enter an optional account code for SMDR
reports during an outside call.
ACD Agent Login
ACD Agent Logout
ACD Agent Login/Logout Toggle
326
327
328
These feature codes allow an ACD hunt group member (agent) to
log into and out of one or more ACD hunt groups. The agent will
only receive calls through the ACD hunt group while logged in.
ACD Agent Wrap-Up Terminate
329
When an ACD agent completes a call, no other ACD hunt group
call will ring at the phone until the ACD Wrap-Up Timer expires or
the agent enters this feature code to terminate the wrap-up
session.
Agent Help
375
The Agent Help feature allows a phone user to request help from a
designated “Agent Help Extension” during a two- or three-party
call.
Agent Help Reject
376
When a request-for-help call rings, the Agent Help Extension can
choose to join the call or enter this feature code to reject the
request.
Answer (Ringing Call)
351
Answers the call that has been ringing or holding the longest at
that phone.
Audio Diagnostics
320
When initiated, users are prompted to answer questions about the
audio problems by pressing specific keypad buttons.
Page 58
Mitel® 5000 CP Administrator Phone Guide – Issue 3.2, September 2009
Reference
Phone Feature Codes
Table 18. Phone Feature Codes (Continued)
Feature Name
Code
Definition
Automatic CO Access On/Off
360
(Not used on single line phones) Allows the phone user to
determine how ringing outside calls will be answered: simply by
lifting the handset or pressing the Speaker button (automatic
answer), or by lifting the handset or pressing the Speaker button
and pressing a Call button, individual trunk button or the ANSWER
button.
Automatic IC Access On/Off
361
(Not used on single line phones) Allows the phone user to
determine how ringing intercom calls will be answered: simply by
lifting the handset (automatic answer), or by lifting the handset and
pressing the IC button (or a Call button, if there is no IC button).
Automatic Trunk Answer
350
Using this feature code, phone users with allowed answer can pick
up trunks that are ringing into the system, but that are not actually
ringing at their phones. This feature does not pick up transferred
calls or recalls that are ringing at the phone.
Background Music On/Off
313
(Not used on single line phones) Turns on and off background
music heard through the phone speaker.
Barge-In
386
Allows the supervisor to barge-in on a call to help the hunt group
member/agent.
Call Forward All Calls
355
Immediately forwards all calls to another phone or to an outside
phone number.
Call Forward If Busy
357
Immediately forwards all calls to another phone or to an outside
phone number when the phone is in use.
Call Forward If No Answer
356
Forwards all calls to another phone or to an outside phone number
if not answered within a predetermined time.
Call Forward If No Answer/Busy
358
Forwards all calls to another phone or to an outside phone number
if not answered within a predetermined amount of time, or
immediately if the phone is in use.
Call Logging
333
Allows users of display phones to view missed, received, and
dialed calls.
Change Language
301
A phone user can change the assigned language for the phone by
entering the Change Language feature code while the phone is
idle.
CO Hookflash
330
Sends a timed hookflash over the trunk while on an outside call
(includes conference calls).
5
Connects from three to four parties in a conference. A conference
consists of any combination of inside and outside parties.
Data
340
Allows operation of a data device attached to a digital telephone.
Requires a modem-equipped data device. Supported on 5000 CP
systems equipped with appropriate digital interface equipment.
Default Phone
394
This single feature code cancels account codes for all calls
following, Do-Not-Disturb, manual call forwarding, background
music, ring intercom always, and queue requests; restores
handsfree mode, pages, hunt group calls, and system forwarding;
and returns phone volumes to default values.
Conference
Mitel® 5000 CP Administrator Phone Guide – Issue 3.2, September 2009
Page 59
Reference
Phone Feature Codes
Table 18. Phone Feature Codes (Continued)
Feature Name
Code
Definition
Directories
307
(Display phones Only) Allows display phone users to search for
extension numbers or System Speed Dial numbers. The number
can then be dialed, if appropriate.
Display Outside Party Name
On/Off
379
(Display phones Only) When the phone user enters this feature
code, while connected to a CO call that has outside party name
information, the display will toggle between the caller’s name and
number. If there is no outside party name or the Expanded CO Call
Information On Displays flag is disabled, the user will hear a burst
of reorder tone and see the CANNOT ACCESS FEATURE display.
If the Display Outside Party Name On/Off feature code is
programmed in a user programmable button with a lamp, the lamp
will be lit when the outside party name is enabled and off when the
outside party number is enabled.
Display Time/Date (ITP)
Show IP Address (SIP)
300
(Display phones Only) Temporarily displays the system date and
time, user name, and extension number during a call or when other
displays are shown.
Feature code 300 displays the IP Address of a phone if it is in SIP
mode.
Do-Not-Disturb
Do-Not-Disturb Cancel
Do-Not-Disturb On/Off
370
371
372
The Do-Not-Disturb feature code halts all intercom calls,
transferred calls, and pages to the phone. The Cancel code returns
the phone to normal operation. The on/off code can be used to
turn Do-Not-Disturb on or off.
Do-Not-Disturb Override
373
(Not used on single line phones) If enabled in the database, allows
the phone user to break through another phone’s Do-Not-Disturb
mode when placing an intercom call.
Enhanced Speakerphone Enable
310
(Digital telephones only) When entered at a digital telephone, this
feature code enables the enhanced speakerphone. Digital
telephones can also use the Special button + Speaker buttons.
Feature Key Default
395
(Not used on single line phones) Phones have user-programmable
feature buttons that can be set to enter feature codes. This code
returns the user-programmable buttons to the database default
values.
Group Listen
312
(Not used on single line phones) Allows a user to transmit a
conversation over the phone speaker while in handset or headset
mode.
Handsfree On/Off
319
(Not used on single line phones) Disables/enables the phone’s
handsfree intercom answering. Incoming intercom calls ring as
private calls if handsfree answering is disabled.
Headset Enable
Headset Disable
Headset On/Off
315
316
317
(Not used on single line phones) The enable code signals the
system that a headset has been connected to the phone. The
disable code returns the phone to normal operation. The on/off
feature code can be used to toggle the feature on or off.
Hold – Individual
336
Places a call on hold so that it can be picked up directly at that
phone or through a reverse transfer from any other phone.
Page 60
Mitel® 5000 CP Administrator Phone Guide – Issue 3.2, September 2009
Reference
Phone Feature Codes
Table 18. Phone Feature Codes (Continued)
Feature Name
Code
Definition
Hold – System
335
Places an outside call on system hold. It can be picked up directly
at any phone that has an individual trunk button and has allowedanswer and/or outgoing access for that trunk, or by the phone that
placed it on hold. (If used on conference or intercom calls, the
system places the call on individual hold.)
Hunt Group Remove
Hunt Group Replace
Hunt Group Remove/Replace
322
323
324
Removes the phone from its assigned hunt group(s) or places it in
again. Does not affect non-hunt group calls. The remove/replace
feature code can be used to toggle the feature.
LCD Contrast Adjustment
303
Adjusts the LCD contrast on the display. The phone must be idle to
use this feature.
Message
365
This feature code is used for leaving and retrieving a message
waiting indication at a called phone or the called phone’s message
center. Depending on how the message was left, the called phone
user either retrieves the message from his/her message center or
from the phone that left the message.
Message – Cancel
366
Allows the phone user to cancel a message waiting indication that
he or she left at another phone.
Message – Cancel Current
368
Cancels a message waiting indication that is waiting at the phone
without requiring the user to respond to it.
Message – Silent
367
Leaves a Message Waiting indication at a phone without first
placing an intercom call.
Mute On/Off
314
(Not used on single line phones) Turns the microphone on or off
during a call. If muted, the phone user can hear the other party, but
the party cannot hear the phone user.
Page
7
When followed by a paging zone code (0–9 or 0–49), it allows
announcements to be made through phone speakers and any
external paging speakers in the page zone.
Page On/Off
325
(Not used on single line phones) Halts pages through the phone
speaker or allows them to be received again.
Program Buttons
397
(Not used on single line phones) User-programmable feature
buttons and Station Speed Dial buttons can be programmed using
this feature code.
Personal Call Routing On
Personal Call Routing Off
Personal Call Routing On/Off
363
362
364
Allow the user to enable or disable the Personal Call Routing
feature (a licensed feature).
Personal Call Routing – Handoff
388
Provides the following functions:
Push: Allows the user to push an active call from his or her main
extension to an associated destination without disconnecting audio.
Pull: Allows the user connected to an active call on a mobile or
home phone to pull the call back to his or her main extension.
Program Phone Password
392
The phone password is used for the Remote Programming feature.
The password can be changed by entering the Program Phone
Password feature code at the phone or when using the Remote
Programming feature.
Mitel® 5000 CP Administrator Phone Guide – Issue 3.2, September 2009
Page 61
Reference
Phone Feature Codes
Table 18. Phone Feature Codes (Continued)
Feature Name
Code
Definition
6
Requests (or cancels) an automatic callback when a busy trunk or
phone becomes available.
Record-A-Call
385
If the system is programmed with a Record-A-Call application, the
phones can be programmed to use the Record-A-Call feature. It
allows users to enter a feature code whenever they want to record
an ongoing call in their designated Record-A-Call mailbox. Users
can retrieve the recorded messages later, just as they would any
other mailbox messages.
Redial
380
Redials the last outside phone number dialed or saved at the
phone (up to 48 digits). Also used to save numbers at phones
programmed for last number saved.
Redirect Call
331
Allows the phone user to route ringing outside, intercom, and
camped on calls to another phone, hunt group, or outside number.
Routing of the redirected call is still subject to trunk and toll
restrictions. This feature provides these options in addition to the
currently available options which allow the phone user to redirect
calls to Voice Mail or Do-Not-Disturb.
Reminder Message
Reminder Message Cancel
305
306
(Not used on single line phones) The phone user can set reminder
messages that signal the phone at specific times. Or, the user can
cancel all reminder messages for the phone.
Remote Configuration – Disable
343
Remote Configuration – Display
License Key
347
Reserved for controlled introduction. Disables the Remote
Configuration feature. The VPN connection from the Remote Proxy
Server to the 5000 CP system is terminated.
Reserved for controlled introduction. Displays the license key ID
(HASP key) for the 5000 CP system.
Remote Configuration – Enable
342
Remote Configuration – Reset
344
Remote Programming
359
Queue Request
Reverse Transfer (Call Pick-Up)
4
Reserved for controlled introduction. Enables a Remote
Configuration session. The Virtual Private Network (VPN) connection
from the 5000 CP system to the Remote Proxy Server is initiated.
Reserved for controlled introduction. Resets a Remote Configuration
session. The VPN connection from the 5000 CP system to the
Remote Proxy Server is reset.
Allows a user to place a phone in DND mode, forward the phone’s
calls, or change the password; either from another phone or
through DISA.
Picks up a call ringing or holding at a phone or hunt group.
Review Keys
396
(Not used on single line phones) User-programmable feature
buttons and Station Speed Dial buttons can be viewed using this
feature code.
Ring Intercom Always On/Off
377
Enables/disables the feature that allows the phone to always place
private (non-handsfree) intercom calls.
Ring Tone Selection
398
(Not used on single line phones) Selects the type of ringing alert
tone that will be heard from the phone.
Routing Off
304
Disables System OAI Offering Control for third-party applications.
This feature requires you to enter a password. Once you disable
routing, you cannot enable it again (i.e., only the third-party
application can enable routing).
Page 62
Mitel® 5000 CP Administrator Phone Guide – Issue 3.2, September 2009
Reference
Phone Feature Codes
Table 18. Phone Feature Codes (Continued)
Feature Name
Code
Definition
Station Monitor
321
(Hunt Group supervisors only) Allows a designated hunt group
supervisor to monitor a call of anyone in the associated hunt
group.
Station Speed Dial
Station Speed Dial Programming
382
383
Dials/programs one of the 10 Station Speed Dial numbers when
followed by a location code (0–9).
Steal
387
Allows the supervisor to take away a call from the hunt group
member/agent.
Switch Keymap
399
(Not used on single line phones) Allows a phone user to switch
between standard and alternate keymaps.
System Forward Enable
System Forward Disable
System Forward On/Off
352
353
354
Enables or disables the database-programmed System Forwarding
feature for this phone. The on/off feature code can be used to
toggle the feature on or off.
System Speed Dial
381
Dials one of the 1000-5000 System Speed Dial phone numbers
when followed by a location code (000–999 or 0000-4999). Also
used for reviewing System Speed Dial numbers.
Transfer to Hold
346
Transfers a call to another phone and places it on individual hold
so that it does not ring or send call waiting signals until it recalls.
Transfer to Ring
345
Transfers a call to another phone or to an outside phone number.
Mitel® 5000 CP Administrator Phone Guide – Issue 3.2, September 2009
Page 63
Index
Index
A
Diagnostics feature codes 55
Dialpad characters, entering 7
Administrator
feature codes 54
phone
enabling or disabling 12
password, programming 19
troubleshooting 48
phone troubleshooting 48
programming planning sheets 3
types 2
Alarms
clearing 40
descriptions 41
minor 39
network 39
system 39
Answer Supervision Type, programming 26
DND messages
programming 20
programming planning sheets 50
DND messages, Japanese language 20
E
Emergency calls, toll restriction override 15
English, multicultural references 4
Extension numbers
changing 22
swapping 23
F
Attendant phones, enabling or disabling 13
Automatic
daylight-saving time 9
Route Selection, ARS-only Class of Service 15
Automatic Route Selection,ARS-only Class of Service 16
B
Busy Out, programming 31
C
Feature codes
administrator 54
diagnostics 55
phone 58
Flowcharts
Station programming 18
System programming 24
Trunk programming 36
Freeze and unfreeze
network history 45
system history 45
H
Caller ID, programming 27
Capacities, network 3
Characters, dialpad 7
Class of Service
ARS only 15, 16
European values 16
History
network 45
system 45
Hookflash, speed dial 11
Clearing alarms 40
I
Codes
administrator feature 54
diagnostics feature 55
phone feature 58
trunk access 58
Individual trunk programming planning sheets 53
D
Internal modem
enabling and disabling 42
resetting 42
J
Day Mode, setting 8
Day or Night Answer Access, programming 32
Day or Night Ring-in, programming 33
Device, seizing 44
Japanese language
DND messages 20
entering characters 7
Reminder messages 21
Mitel® 5000 CP Administrator Phone Guide – Issue 3.2, September 2009
Page 65
Index
K
R
Katakana characters 7
Reminder Messages
changing 21
Japanese language 21
programming planning sheets 51
M
Major alarms 39
Messages
DND, programming 20
Reminder, changing 21
Minor alarms 39
Mode, Day or Night 8
Modem
internal, enabling and disabling 42
internal, resetting 42
Multicultural English references 4
Multi-node configuration 8
N
Network
alarms 39
capacities 3
history, freezing and unfreezing 45
single and multi-node configurations 8
synchronizing time 10
Night Mode, setting 8
S
Single node configuration 8
Speed dial
pauses and hookflashes 11
System 11
Stations
numbers, programming planning sheets 52
swapping, programming planning sheets 52
Synchronize network time 10
System
alarms 39
date and time, setting 9
history, freezing and unfreezing 45
programming options 19
Speed Dial
deleting names or numbers 11
toll restriction override 15
using 11
T
P
Time
Passwords, administrator phone 19
Toll restrictions
COS override for emergency calls 15
programming 15
Pause, speed dial 11
PBX trunks, speed dialing 11
Phone
attendant, enabling or disabling 13
dialpad characters, entering 7
extension
numbers, changing 22
user names, programming 14
Phone feature codes 58
Programming planning sheets
administrator phone password 49
DND messages 50
individual trunk programming 53
phone information 49
Reminder messages 51
station extension numbers 52
swapping stations 52
trunk groups 53
Provider information 48
daylight saving, automatic 9
setting 9
Troubleshooting
admininistrator phone 48
administrator phone features 48
Trunk groups
assigning trunks to 30
Day or Night Answer Access, programming 32
Day or Night Ring-in, programming 33
programming planning sheets 53
trunk lists, programming 35
Trunks
access codes 58
Answer Supervision Type, programming 26
assigning to trunk groups 30
Busy Out, programming 31
Caller ID, programming 27
polarity reversal 25
Valid Call Timer 25
U
User names, programming 14
Page 66
Mitel® 5000 CP Administrator Phone Guide – Issue 3.2, September 2009
Part No. 580.8001
Issue 3.2, September 2009
A691/9112A