1
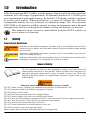
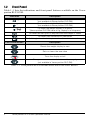
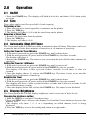
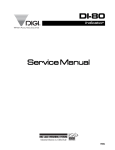
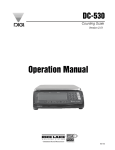
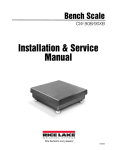
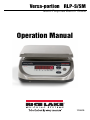
Versa-portion RLP-S/SM Multi-Purpose Bench Scale Operation Manual 115519 Contents About This Manual ......................................................................................1 Introduction .................................................................................................1 Front Panel . . . . . . . . . . . . . . . . . . . . . . . . . . . . . . . . . . . . . . . . . . . . . . . 1 Operation .....................................................................................................2 On/Off . . . . . . . . . . . . . . . . . . . . . . . . . . . . . . . . . . . . . . . . . . . . . . . . . . . 2 Tare . . . . . . . . . . . . . . . . . . . . . . . . . . . . . . . . . . . . . . . . . . . . . . . . . . . . . 2 Automatic Shut-Off Timer . . . . . . . . . . . . . . . . . . . . . . . . . . . . . . . . . . . . . 2 Display Brightness . . . . . . . . . . . . . . . . . . . . . . . . . . . . . . . . . . . . . . . . . . 2 Default Primary Unit . . . . . . . . . . . . . . . . . . . . . . . . . . . . . . . . . . . . . . . . . 2 G, lb and oz Conversion . . . . . . . . . . . . . . . . . . . . . . . . . . . . . . . . . . . . . . 2 Calibration ..................................................................................................3 Software Version and Span State Check . . . . . . . . . . . . . . . . . . . . . . . . . 3 Performing a Calibration . . . . . . . . . . . . . . . . . . . . . . . . . . . . . . . . . . . . . . 3 Enclosure Security . . . . . . . . . . . . . . . . . . . . . . . . . . . . . . . . . . . . . . . . . . 4 Setting the SPEC Value . . . . . . . . . . . . . . . . . . . . . . . . . . . . . . . . . . . . . . 4 Internal Count and A/D Count Display . . . . . . . . . . . . . . . . . . . . . . . . . . . 6 Appendix .....................................................................................................7 DC Battery Pack . . . . . . . . . . . . . . . . . . . . . . . . . . . . . . . . . . . . . . . . . . . 7 Battery Pack Replacement/Installation . . . . . . . . . . . . . . . . . . . . . . . . . . . . . .7 Battery Charging . . . . . . . . . . . . . . . . . . . . . . . . . . . . . . . . . . . . . . . . . . . . . . .7 Error Messages . . . . . . . . . . . . . . . . . . . . . . . . . . . . . . . . . . . . . . . . . . . . 8 Specifications .............................................................................................9 Versa-portion RLP-S/SM Limited Warranty ..............................................10 © 2011 Rice Lake Weighing Systems. All rights reserved. Printed in the United States of America. Specifications subject to change without notice. Rice Lake Weighing Systems is an ISO 9001 registered company. Version 2 12/2011 2 1.0 Introduction bThe Versa-portion RLP-S/SM is a multi-purpose bench scale that offers practical solutions for a full range of applications. Its internal resolution of 1/90,000 gives you maximum precision and accuracy. Its backlit LCD display enables operators to easily see weights. When portability is required, choose the optional rechargeable battery for over 60 hours of continuous usage. The Versa-portion RLP-S/SM is designed to reliably operate in many environments and withstand transport from one area of the plant to another or from one business to the next. This manual can be viewed or downloaded from the RLWS website at www.ricelake.com/manuals. 1.1 Safety Safety Signal Definitions: Indicates a potentially hazardous situation that, if not avoided could result in WARNING serious injury or death, and includes hazards that are exposed when guards are removed. Indicates a potentially hazardous situation that, if not avoided may result in CAUTION minor or moderate injury. Indicates information about procedures that, if not observed, could result in Important damage to equipment or corruption to and loss of data. General Safety Do not operate or work on this equipment unless you have read and understand instructions in the manual. Failure to follow the instructions or heed the warnings could result in injury or death. Contact any Rice Lake Weighing Systems dealer for replacement manuals. Proper care is your responsibility. WARNING Failure to heed may result in serious injury or death. DO NOT allow minors (children) or inexperienced persons to operate this unit. DO NOT operate without all shields and guards in place. DO NOT jump on the scale. DO NOT use for purposes other then weight taking. DO NOT place fingers into slots or possible pinch points. DO NOT use any load bearing component that is worn beyond 5% of the original dimension. DO NOT use this product if any of the components are cracked. DO NOT exceed the rated load limit of the unit. DO NOT make alterations or modifications to the unit. DO NOT remove or obscure warning labels. Keep hands, feet and loose clothing away from moving parts. Introduction 1 1.2 Front Panel Table 1-1 lists the indications and front-panel buttons available on the Versaportion RLP-S/SM. Indication * * *(kg) Description On when the weight display is in ounces *(not available in Versa-portion RLP-SM) On when the weight display is in pounds *(not available in Versa-portion RLP-SM) On when the weight display is in grams *(Versa-portion RLP-SM value is kg, display is in kilograms) On when the zero point is adjusted and the weight is stable On when tare subtraction is performed On (blinking) when the battery is weak and needs to be recharged Front-Panel Button Description Resets the weight display to zero Sets or clears the tare value Turns the display on/off Changes measurement units between lb, oz, g, kg (not available in Versa-portion RLP-SM) Table 1-1. Versa-portion RLP-S/SM Indications and Front-Panel Buttons 2 Versa-portion RLP-S/SM Operation Manual 2.0 Operation 2.1 On/Off 1.Press the POWER key. The display will blink 8.8.8.8.8.8. and show 0.000 when ready to weigh. 2.2 Tare Tare values can be used for up to half of scale capacity. Performing a Tare 1.Place the item to be tared (typically a container) on the platter. 2.Press the TARE key. 3.The display will show 0.000 with the tared item on the platter. Removing a Stored Tare 1.Remove the tared item from the platter. 2.Press the TARE key. 3.The display will show 0.000. 2.3 Automatic Shut-Off Timer The Versa-portion RLP-S/SM has a built-in automatic shut-off timer. This timer can be set to turn the unit off after three minutes of inactivity or 10 minutes of inactivity. Setting the Timer for Three Minutes 1.If the unit is powered on, press the POWER key until it shuts down. 2.With the unit powered off, press and hold the POWER key for three seconds. The display will show 3. 3.Release the POWER key. The timer is now set to turn the unit off after three minutes of inactivity. Setting the Timer for 10 Minutes 1.If the unit is powered on, press the POWER key until it powers off. 2.With the unit powered off, press and hold the POWER key for six seconds. The display will show 3 after a period of three seconds. It will show 10 after six seconds. 3.Once the display shows 10, release the POWER key. The timer is now set to turn the unit off after 10 minutes of inactivity. Disabling the Timer 1.If the unit is powered on, press the POWER key until it shuts down. 2.With the unit powered off, press and hold the POWER key for nine seconds. The display will show 3 after a period of three seconds and 6 after six seconds. It will show 999 after nine seconds. 3.Once the display shows 999, release the POWER key. The timer is now disabled. 2.4 Display Brightness The Versa-portion RLP-S/SM display brightness can be set to one of three levels. Changing the brightness setting 1.Hold the ZERO key and press Tare three times. 2.Press the ZERO key to increase the dimmer level and the Power button to decrease the dimmer level. 3.The display will show 1, 2, 3, or 4 depending on which dimmer level is being displayed. 4.Press the TARE key to save the setting and return to weigh mode. 2 Versa-portion RLP-S/SM Operation Manual 2.5 Default Primary Unit The Units button cycles through g, lb, and oz. (Versa-portion RPL-SM is only available in kg) Setting the Default Primary Unit 1.Hold the ZERO key and press the UNITS key three times. 2.Press the POWER key to cycle through available units. 3.When the desired default unit is displayed, press the TARE key to save the setting and return to weigh mode. 2.6 G, lb and oz Conversion (Not available in Versa-portion RLP-SM) G, lb and oz conversion is available only when SPEC08=011 (see Section 3.4). 1.Switch between units by pressing the UNITS key. (G) uppercase is the abbreviation for gross. Note (g) lowercase is the correct abbreviation for grams. Operation 3 3.0 Calibration To enter calibration mode, remove the screw on the bottom of the scale as shown in Figure 3-1. Use a small tool to press the span setup switch located under the screw. Setup will time out to verify the switch is set to the ON position. Then, perform a span switch state check (see Section 3.1). Remove Screw Figure 3-1. Setup Switch 3.1 Software Version and Span State Check 1.With the unit in weigh mode, press and hold the ZERO key. 2.With the ZERO key held, press and release the POWER key three times. 3.The display will show the software version for two seconds, then show the current span switch state (S-ON or S-OFF). After three seconds, the unit will return to weigh mode. 3.2 Performing a Calibration The Versa-portion RLP-S/SM must be calibrated in grams or kilograms, and SPEC 01 and 02 must be set for the gram value (or kg in the SM version). See Section 3.4. 1.With the unit in weigh mode, press and hold the ZERO key. 2.With the ZERO key held, press and release the POWER key twice, then press and release the TARE key. The display will show CAL00. Calibration 3 Note To exit calibration at any time, press the TARE key. 3.Ensure there is no weight on the platter, then press the ZERO key to calibrate the zero point. The display will show dashes, then CALSP. 4.Place the scale’s full capacity weight on the platter and press the ZERO key to calibrate span. The display will show dashes, then the weight value. Calibration weight is full grams capacity. Full capacity values are as Note follows: RLP-6S = 3000 g (3 kg); RLP-15S = 6000 g (6 kg); RLP-30S = 15000 g (15 kg); RLP-60S = 30000 g (30 kg). 5.The scale will return to weigh mode automatically. Power down the unit. 6.Calibration is complete. 3.3 Enclosure Security After an NTEP inspector has examined the unit, he/she will install security cables through three bolts on the underside of the scale. These cables prevent the unit from being tampered with by an unauthorized individual. If the cable is removed, NTEP certification will become void. Figure 3-2. Legal for trade seal; cable passes through three bolts 3.4 Setting the SPEC Value The SPEC value is used to specify decimal point position, minimum display, net/ gross multi-interval, resolution, weight single or multi-interval, decimal point figure, negative weight display mask, IR mode protection (SPAN switch must be turned on to allow calibration), start range (amount of weight that can be on the scale when it is turned on), re-zero range, manual tare cancellation, tare subtraction, tare accumulation, auto tare, weight reset, tare auto clear, zero tracking, re-zero, and the UNIT key function. See Table 3-1 on page 5. 1.Press the setup switch (see Figure 3-1). 2.With the unit in weigh mode, press and hold the ZERO key. 4 Versa-portion RLP-S/SM Operation Manual 3.With the ZERO key held, press and release the TARE key, then press and release the POWER key twice. The SPEC number is displayed. 4.To increment the SPEC setting value, press the POWER key. Refer to Table 3-1. 5.Press the ZERO key to save data and increase the SPEC count. 6.Press the ZERO key to advance to the next SPEC. 7.Press the TARE key to store SPECs and return to weigh mode. SPEC Number 00 01 02 03 04 Bit 2 Decimal point position 000 - None 001 - 2nd digit (0.0) 010 - 3rd digit (0.00) 011 - 4th digit (0.000) 100 - 5th digit (0.0000) 101 ~ 111 - Not used Minimum display 00 - 1 01 - 2 10 - 5 11 - 10 Resolution Selection 00 - 1/2000 01 - 1/3000 10 - 1/6000 11 - 1/7500 Decimal point figure for numeral 0 - Period 1 - Comma Bit 1 Bit 0 Net/gross multi-interval 0 - Gross 1 - Net Weight single interval or multi-interval 0 - Single interval Negative weight display mask 0 - Minus gross > 9e 1 - Minus gross weight Start range (amount of weight that can be on the scale when it is turned on; if there is more weight than allowed, the display will show all 8s) 00 - ±10% F.S. 10 - ±3%F.S. 01 - ±5% F.S. 11 - ±2%F.S. 05 Manual tare cancellation Tare subtraction Not NTEP 0 - Allow 0 - Allow 1 - Prohibit Approved 1 - Prohibit IR (inter resolution) mode protected by SPAN SW (SPAN switch must be turned on for calibration) 0 - No 1 - Yes Re-zero range 0 - ±2% F.S. 1 - ±3% F.S. Tare accumulation 0 - Allow 1 - Prohibit Table 3-1. SPEC Number And Bit Explanation (Defaults Are Bold) Calibration 5 SPEC Number Bit 2 Bit 1 06 Auto tare clear when rezero 0 - Allow 1 - Prohibit Weight reset when tare 0 - Allow 1 - Prohibit 07 Zero tracking when Tare 0 - Allow 1 - Prohibit Re-zero function 0 - Allow 1 - Prohibit 08 Unit key (Not used on Versa-portion RLP-SM) 000 - No 001 - For g and lb conversion 010 - Not used 011 - G, lb and oz 100 - 111 Not used Bit 0 Tare auto clear (Greater or equal to Gross 21e and greater or equal toNet 5e) 0 - Allow 1 - Prohibit Additional zero for weight when only fixed zeros are displayed (V1.02 and above) 0 - Allow (NTEP) 1 - Prohibit Table 3-1. SPEC Number And Bit Explanation (Defaults Are Bold) (Continued) 3.5 Internal Count and A/D Count Display 1.With the unit in weigh mode, press and hold the ZERO key. 2.With the ZERO key held, press and release the TARE key twice, then press and release the POWER key. The display will show ,,,,,0,. 3.Press the POWER key to display the A/D count. 4.To return to weigh mode, press the TARE key. Note 6 (G) uppercase is the abbreviation for gross. (g) lowercase is the correct abbreviation for grams. Versa-portion RLP-S/SM Operation Manual 4.0 Appendix 4.1 DC Battery Pack 4.1.1 Battery Pack Replacement/Installation An optional DC battery pack (PN 108516) for the Versa-portion RLP-S/SM is available and can be purchased from RLWS to ship with the scale or retrofit in the field. The rechargeable 6V 5.0 AH battery pack allows for up to 60 hours of scale use without an AC power supply (with display set to Dimmer Level 2). It is located in the bottom of the scale base. Use the following procedure to install or replace the battery pack. 1.Unplug the scale from power source. 2.Place scale its left side. CAUTION Do not turn the scale upside down. Always work with the scale on its side. Damage to the load cell can occur if the scale is turned upside down. 3.Unscrew the Phillips-head screws holding the battery compartment door closed. 4.Unscrew the two screws holding on the battery holding bracket and remove the bracket. 5.If you are removing a battery previously installed, remove the battery from its compartment, then disconnect the black (-) and red (+) electrical leads from the battery. If you are installing a new battery, go to step 6. 6.Attach the red lead to the positive (+) terminal of the new DC battery pack, and the black lead to the negative (-) terminal. Place new DC battery pack in battery compartment. 7.Replace the battery holding bracket and fasten it with its two screws. 8.Replace the battery compartment door and fasten it with the screws removed in Step 3. 9.Put the scale back upright on its feet. 10.Press the POWER key located on the front of the scale. 4.1.2 Battery Charging A fully charged battery allows for approximately 60 hours of continuous use. When the battery is low, the battery indicator light will light up. To charge the battery, plug in the AC power cord. Charge time is 8-10 hours. Appendix 7 4.2 Error Messages Display Description Solution 888888 OF The scale is not steady. The weight exceeds capacity + 9d, or something is on the platter when it was powered on. The negative weight exceeds the display limit. An error has occured in maintenance mode. There is an A/D error. There is a data flash erase error. There is a data flash program error. Place the scale on a firm, flat base. Remove any items from the platter and cycle power. UF Error E R R 01 E R R 02 E R R 03 Re-zero or cycle power. Repeat the operation. Contact the scale dealer or RLWS. Contact the scale dealer or RLWS. Contact the scale dealer or RLWS. Table 4-1. Error Messages 8 Versa-portion RLP-S/SM Operation Manual 5.0 Specifications Display Power Source LED, 6 digits DC 12V/1.5A, DC 6V5Ah rechargeable battery (Optional) Capacity RLP-6S RLP-15S RLP-30S RLP-60S Versa-portion RLP-SM RLP-3SM RLP-6SM RLP-15SM RLP-30SM 6.000 lb x 0.002 lb; 3000 g x 1 g; 60.00 oz x 0.02 oz 15.000 lb x 0.005 lb; 6000 g x 2 g; 150.00 oz x 0.05 oz 30.00 lb x 0.01 lb; 15000 g x 5 g ; 300.0 oz x 0.1 oz 60.00 lb x 0.02 lb; 30000 g x 10 g ; 600.0 oz x 0.2 oz Dimensions 251.6 mm x 289.7 mm x 134.6 mm Package Weight 6.3 kg Package Size 377 mm x 337 mm x 245 mm Capacity/Minimum Graduation/Tare Range 3 kg x 1 g 6 kg x 2 g 15 kg x 5 g 30 kg x 10 g Max Cap. Min Cap. Min Graduation 3 kg 20 g 1 g (1e = 30IR) 0 - 1.499 kg 6 kg 40 g 2 g (1e =30IR) 0 - 2.998 kg 15 kg 100 g 5 g (1e =30IR) 0 - 7.495 kg 30 kg 200 g 10 g (1e =30IR) 0 - 14.99 kg Display Indicators Certifications and Approvals Ounces, Grams, Pounds, NET, Center of Zero, Battery Usage Versa-portion RLP-SM Kilograms, NET, Center of Zero, Battery Usage Versa-portion (US version) Keyboard Measurement AM-10-0054 Canada Approved NA L CO N F E R CE t NA TI EN t CoC Number 10-068 HT S EI G UR ES ON W REZERO key, TARE key, ON/OFF key O Tare Range S AND ME A Resolution Display Resolution Internal Resolution 1/3000 1/90,000 Versa-portion RLP-SM (pending) OIML Platter Size 237.2 mm x 298.0 mm Operating Humidity 15 to 85% relative humidity Operating Temperature Rating 14° F to 104° F (-10° C to +40° C) IP68 Power Consumption 18W when using AC power 3W when using rechargeable battery Battery life: 60 hours of continuous usage CAUTION Do not use any parts on this scale that may contain lead. Specifications 9 Versa-portion RLP-S/SM Limited Warranty Rice Lake Weighing Systems (RLWS) warrants that all RLWS equipment and systems properly installed by a Distributor or Original Equipment Manufacturer (OEM) will operate per written specifications as confirmed by the Distributor/OEM and accepted by RLWS. All systems and components are warranted against defects in materials and workmanship for one year. RLWS warrants that the equipment sold hereunder will conform to the current written specifications authorized by RLWS. RLWS warrants the equipment against faulty workmanship and defective materials. If any equipment fails to conform to these warranties, RLWS will, at its option, repair or replace such goods returned within the warranty period subject to the following conditions: • Upon discovery by Buyer of such nonconformity, RLWS will be given prompt written notice with a detailed explanation of the alleged deficiencies. • Individual electronic components returned to RLWS for warranty purposes must be packaged to prevent electrostatic discharge (ESD) damage in shipment. Packaging requirements are listed in a publication, Protecting Your Components From Static Damage in Shipment, available from RLWS Equipment Return Department. • Examination of such equipment by RLWS confirms that the nonconformity actually exists, and was not caused by accident, misuse, neglect, alteration, improper installation, improper repair or improper testing; RLWS shall be the sole judge of all alleged non-conformities. • Such equipment has not been modified, altered, or changed by any person other than RLWS or its duly authorized repair agents. • RLWS will have a reasonable time to repair or replace the defective equipment. Buyer is responsible for shipping charges both ways. • In no event will RLWS be responsible for travel time or on-location repairs, including assembly or disassembly of equipment, nor will RLWS be liable for the cost of any repairs made by others. These warranties exclude all other warranties, expressed or implied, including without limitation warranties of merchantability or fitness for a particular purpose. Neither RLWS nor distributor will, in any event, be liable for incidental or consequential damages. RLWS and buyer agree that RLWS’s sole and exclusive liability hereunder is limited to repair or replacement of such goods. In accepting this warranty, the buyer waives any and all other claims to warranty. Should the seller be other than RLWS, the buyer agrees to look only to the seller for warranty claims. No terms, conditions, understanding, or agreements purporting to modify the terms of this warranty shall have any legal effect unless made in writing and signed by a corporate officer of RLWS and the Buyer. © 11/19/14 Rice Lake Weighing Systems, Inc. Rice Lake, WI USA. All Rights Reserved. RICE LAKE WEIGHING SYSTEMS • 230 WEST COLEMAN STREET • RICE LAKE, WISCONSIN 54868 • USA 10 Versa-portion RLP-S/SM Operation Manual 230 W. Coleman St. • Rice Lake, WI 54868 • USA U.S. 800-472-6703 • Canada/Mexico 800-321-6703 • International 715-234-9171 • Europe +31 (0)26 472 1319 www.ricelake.com www.ricelake.mx www.ricelake.eu www.ricelake.co.in m.ricelake.com © Rice Lake Weighing Systems 11/19/14 PN 44141 Rev D