1
A
m
UAL
imagine the possibilities
I hank yo_J lOt _ ,_Jrchasll_g llis Sams_Jng
_r¢_dUC[ I0 rec__ve rno[e complete service
please register you[ prod_ Jc! a[
www.samsung.com/register
Mode, I
SerhJ No
Contents
• Using the Channel menu
1
• Connecting to the Network
45
• Using the 3D function
127
Memorizing channels
14
o Setting the Wired Network
61
• Using the Explore 3D
138
Other Features
18
• Setting the Wireless Network
67
• Using the AIIShare Play
139
Managing the Network Connected Devices
79
• Connecting a USB Device
140
Setting the Setup
81
• Connecting to the PC through network
146
Setting the Time
82
• Screen Display
149
84
• Videos
150
85
• Photos
155
90
• Music
157
Changing the Preset Picture Mode
20
21
• Using the Sleep Timer
Adjusting Picture Settings
Changing the Picture Options
27
• Blocking Programs
Changing the Preset Sound Modes
36
• Economical Solutions
102
• AIIShare Play - Additional Functions
160
Sound Settings
37
• Other Features
104
• Using the DLNA Functions
165
39
• Support Menu
113
Adjusting Sound Settings
Setting the On/Off Timer
Othe_ Information
Troubleshooting
171
Anti-theft Kensington Lock
187
• License
189
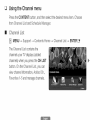
_3 Using the Channel
menu
Press the CONTENT button, and then select the desired menu item. Choose
from Channe_ List and Schedule Manager.
m
MENU _ Suppo_
_ Contents
Home _ Channe_ List --+ ENTER IB_
The Channe_ Mst contains the
channels your TV displays (added
channels) when you press the OH LIST
button. On the Channe_ Mst, you can
view channel information, Added Cho,
IFavodtes 1o5 and manage channels.
®
Added
Cho'
Shows
all
added
channels.
®
I%vo es 1o5' Shows all favorite channels, arranged in up to five groups.
Each group has a separate screen.
I_
The TV displays I%vo
I%vodtes.
es 1o5 only if you have added favorites using I[dit
%
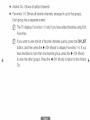
If you want to view the list of favorite channels quickly, press the CH LIST
button, and then press the I_ (OH Mode) to display I%vodtes 1o5. If you
have favorites in more than one favorite group, press the I_ (OH Mode)
to view the other groups. Press the 4 (OH Mode) to return to the Added
Oh°.
Using the function buttons with the Channe_ Mst,
® _
(Too_s)' Displays the option menu,
® _1_
Mode / Channel)'
Moves to the Favorites
list (if you have added
favorites using Edit Favo es) / Moves to other channels when you
select the IRrogra_ View in _ (Too_s) menu.
®
IZ3_(Watch /Ilnformation):
Press to watch the channel you selected./
Displays details of the selected program.
®
A
v
(Page)' Scrolls the Channe_ L,ist to the next or previous page.
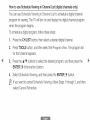
How
to
use
Schedule
Viewing
in
Channel
List
(digital
channels
only)
You can use Schedule Viewing in Channe_ Mst to schedule a digital channel
program for viewing. The TV will turn on and display the digital channel program
when the program begins.
To schedule a digital program, follow these steps:
1.
1
1
Press the CH LIST button, then select a desired digital channel.
Press TOOLS button, and then select the IP_ogram View. The program list
for that channel appears.
Press the A/T buttons to select the desired program, and then press the
ENTER E3_(_nformation) button.
Select Schedule Viewing, and then press the ENTER E3_button.
If you want to cancel Schedule Viewing, follow Steps 1 through 3, and then
select Cance_ Schedule.
Using
Option
Menu
Manage channels using the Channe_ IL]st menu options (Program
Favo
es0 Channe_ Hame Edit° IDe_ete0 Ilnformation0 Change
View0
Antenna°
Edit
Mode).
1.
Use the arrow buttons to select a channel, and then press the TOOLS button.
2.
Select an option, and then press ENTER E3_to activate the option or change
its settings.
® IR_ogram View (digital channels only): Displays the program when digital
channel is selected.
®
Edit IFavodtes ii_Im_: Set channels you watch frequently as favorites, Add
or delete the selected channel in IFavodtes 1 °5,
[]
[]
[]
%
Select Edit IFavo es, and then press the ENTER IZ3_button, The Edit
IFavodtes screen appears,
The Edit IFavodtes screen has five groups, IFavodtes 10 IFavodtes 2,
etc, You can add a favorite channel to any one of the groups, Select a
group using the A/T buttons, and then press ENTER E3_,
Select OK, and then press ENTER E3_twice,
If you want to edit or delete the channel as being IFavo es, change its
settings in I
it IFavodt
screen,
®
Channe_ Hame Edit (analog channels only): Assign a name of up to five
characters to a channel, For example, Food, Golf, etc, This makes it easier to
find and select the channel,
®
IDe_ete: Delete a channel from the channel list, When you use the channel
button to change channels, your TV only displays the channels on the channel
list.
®
Ilnformation: Displays details of the selected program,
I_
Press the Watch to switch the channel directly,
O
Change A_
_na: Switches to Air or Cable,
®
Edit Mode' You can select desired channels and edit it, For detailed
information about using Edit Mode, refer to "Using Option Menu in Edit
Mode",
Using Option
Menu in Edit Mode
Press the 4 / I_ button to select the channel mode (Added Ch°/A_
Channels /IFavo
es 1o5).
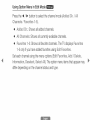
® Added Cho' Shows all added channels.
® A_ Channels: Shows all currently available channels.
•
IFavodtes 1o5: Shows all favorite channels. The TV displays IFavodtes
1o5 only if you have added favorites using Edit IFavodtes.
Set each channel using the menu options (Edit IFavodtes0 Add /IDe_ete0
Ilnformation0 IDese_ect0Select A_). The option menu items that appear may
differ depending on the channel status and type,
[]
[]
[]
®
Press the TOOLS button in Channe_ Mst screen, then select the Edit
Mode, A check box appears to the left of the channel,
Press the A/T buttons to select the desired channel, and then press
ENTER CZ}_button, The (,_) mark indicates the channel you've selected,
I_
You can select more than one channel,
I_
Press ENTER [Z}_button again to deselect the channel,
Press the TOOLS button, then select a function and change its settings,
Edit IFavo es: Set the selected channels you watch frequently as
favorites,
%
The Edit IF_avodtesscreen has five groups (Favorites 1, IF_avodtes2,
etc,), You can add a favorite channel to any one of the groups, Press
the A/T buttons to select a group,
®
Add
%
%
%
/IDe_ete: Delete or add a channel to display the channels you want,
The Add menu is only available in A_ Channels,
The Add menu only appears for deleted channels,
A gray-colored channel indicates the channel has been deleted,
® Ilnformation: Displays details of the selected program,
I_
Press the Watch to switch the channel directly,
® IDese_ect: Deselect the selected channels,
® Select A_: Select all the channels in the channel list,
m
u)e
®
MENU --_ 8uppo_
ENTER 83*J
_ Contents
Home _ 8chedu)e
Manager
Select the schedule menu item to access the Schedu)e Viewing function.
Schedu)e Viewing lets you display the channel you want at the time of your
choice.
Using Option
Menu
You can set the TV to display a desired channel automatically
on a day and at a
time of your choice. Set each channel using the menu options (Cance) Schedu)e,
Edit Schedu)e,
_}
Manua))y Schedu)e)
You must set the current time first using the Time _ C)ock function in the
Syste_ menu to use this function.
To use Schedule Viewing, follow these steps:
[]
Press the TOOLS button on the Schedule
Manually
[_
Schedule
[]
Schedule)
directly on the Schedule
screen.
Press the 4/I_/A/T
Start Time.
®
screen. Press the
to add a scheduled viewing.
You can press the Q (Manually
Manager
Manager
buttons to set Antenna°
Channel0 Repeat° IDate0 and
Select the desired broadcasting signal,
® Channel: Select the desired channel,
® Repeat: Select Once° Manual0 Sat_Sun0 Monool
or Everyday.
select Manual, you can set the day you want.
I_
A check (,_) mark indicates a day you selected.
® Date: You can set a desired date.
I_
Date is available only when you select Once in Repeat.
® Sta£ Time: You can set the start time you want.
If you want to edit or cancel a scheduled viewing, select the scheduled
viewing on the IBooking IL,,ist.Press the TOOLS button and select Edit
Schedule
or Cance_ Schedule.
If you
Cl Memorizing
(_
channels
MENU El3 _ Channe_--.
ENTER C3#
Your TV memorizes channels and adds the memorized channels to the Channe_
List with the Auto Program
function. Before your TV can memorize channels,
you must specify the signal source, either Air or Cab_e. If you select cable, when
you start Auto
, you must also specify the cable system type, STID0
HRO0 or IIIIRO.If you don't know your cable system type, contact your local cable
company for the information.
Most cable companies
use STD.
m
Antenna
{Ai_/Oab_e}
To begin the memorizing procedure, follow these steps:
[]
Push MENU rr[1 -+ Channe_-+
ENTER C3#.
2.
Select Antenna,
3.
Select the source of your TV signal, Air or Cable. Go to the next section,
Auto IR_ogram.
and then press ENTER C3#.
Selecting Air or Cable also changes the actual signal input from Air to Cab_e
or Cab_e to Air.
m
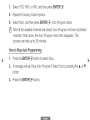
Auto IF rogra
Scans for channels automatically
To start Auto Program,
and stores them in the TV's memory,
follow these steps:
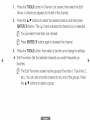
1.
Push MENU ITT!_ Channe_ _ ENTER IZ3_,
2.
Select Auto Program,
3.
Select Sta£, and then press ENTERIZ3_,
4.
Select Air or Cab_e or both by highlighting and then pressing ENTER IZ3_,
I_
and then press ENTERIZ3_,
If you selected Air or Cab_e or both on the Antenna
screen, your choice
will already be selected,
5.
Select Next, and then press ENTERIZ3_,
6.
If you selected Cab_e, the cable system screen appears, Select IDigita_ Cab_e
, and then press ENTER E3_.
I_
If you selected Air only, Auto Program
starts,
1
Select STID_MIIRO,or IIIIRO,and then press ENTER E3_.
8.
Repeat for Analog Cable Syste÷.
9.
Select Next, and then press ENTER E3_.Auto IRrogra_ starts.
After all the available channels are stored, Auto Program removes scrambled
channels. When done, the Auto Program menu then reappears. This
process can take up to 30 minutes.
How to Stop Auto Programming
1.
Press the ENTERE3# button to select Stop.
2. A message will ask Stop Auto Program? Select Yes by pressing the A or T
button.
3.
Press the ENTERE3# button.
Cl Other Features
i_
MENU ITN--+ Channel
_
ENTER (Z3_
m
This function filters out scrambled channels after Auto
This process may take up to 20-30 minutes,
How to Stop the Clear Scrambled
[]
Channels
Function
Press the ENTER E3#button to select Stop.
2.
Press the A button to select Yes.
3.
Press the ENTER C3#button.
@
This function is only available in Cable mode.
is completed,
m
Fine Tune
(analog channels only)
If the reception is clear, you do not have to fine tune the channel, as this is done
automatically during the search and store operation. If the signal is weak or
distorted, fine tune the channel manually.
® Select IFine Tune in the Channe_ menu,
_}
Fine tuned channels that have been saved are marked with an asterisk "." on
the right-hand side of the channel number in the channel banner.
®
To reset the fine-tuning, select Reset.
C3 Changing
m
the Preset Picture
Mode
[,,,,,,,,_:,_[ctu
MENU |
_ Picture _ Picture Mode _ ENTER E3_
Picture modes apply preset adjustments to the picture. Select a mode using the
A/T buttons, and then press ENTER E3,_.
_}
When connecting a PC, you can only select IEntertain and Standard.
® IDynamic: Suitable for a bright room.
® Standard: Suitable for a normal environment.
® Hatu
: Suitable for an eye comfortable display.
® Movie: Suitable for watching movies in a dark room.
® IEnte_ain: Suitable for watching movies and games.
I_
It is only available when connecting a PC.
Cl Adjusting
m
Picture
IBack_ight
Settings
/IBnghtness
MENU []33--_ Picture
_
IBack_ig
8ha
_
hess
Co,or / Tint (G/IR}
ENTERC3_
Your television has several options for adjusting picture quality. Select an option
using the A/T/4/I_
_}
buttons, and then press ENTEREE_.
NOTE
® When you make changes to IBack_ight0 Contrast°
Sha
IBng
hess0
hess0 Co,or or Tint (G/%, the OSD will be adjusted accordingly.
® When connecting
a PC, you can only make changes to IBack_ight0
, and Sharpness.
® You can adjust and store settings for each external device connected
the TV.
® Lowering picture brightness reduces power consumption.
to
m
Adjustment
_}
MENU _
--_ Picture _ Screen Adjustment
_ ENTER E3_
Screen Adjustment provides various picture size and aspect ratio options, Select
an option using the A/T/4/I_
buttons, and then press ENTER C3J,
® Picture Size: If you have a cable box or satellite receiver, it may have its own
set of screen sizes as well, However, we highly recommend you use your TV's
16:9 mode most of the time,
16:9: Sets the picture to 16:9 wide screen mode,
Zoom1: Magnifies the picture moderately, Cuts off the top and sides,
Magnifies the picture more than Zoom1,
Wide IF]t: Enlarges the aspect ratio of the picture so it fits the entire screen,
4:3:
Sets
I_
Do
on
the
not
the
retention
picture
set
left
your
and
to
4:3
TV
to
right,
(screen
mode,
4:3
or
burn)
For
format
top
which
and
analog
for
a long
bottom
is not
TV
programs,
time,
of the
covered
The
screen
by
the
borders
may
displayed
cause
image
warranty,
/ 1080i/1080p) or Component
(1080i/1 080p) signals, displays the full image without any cut-off,
I
: When
your
TV
inputs
HDMI
(720p
Smart View 1: Reduces original screen by 50%,
S_art View 2: Reduces original screen by 25%,
I_
NOTE
® Sma_ View I is enabled only in HDMI mode,
® S_a_ View 2 is enabled only in DTV and HDMI modes,
®
Position:
Adjusts the picture position. Position
is only available if Picture
size
is set to Zoom10 Zoom20 Wide IFit, or Screen fit.
I_
To use the Position
function after selecting Zoom10 Zoom2
or Wide Fit,
follow these steps:
[]
%
Select the Position, and then press the ENTER E3#button.
2.
Select the Position button, and then press ENTER C3#.
3.
Press the A or T button to move the picture up or down.
4.
Press the ENTER E3#button.
If you want to reset the pictures to its original position, select Reset in the
Position screen, and then press ENTER E3_.The picture will be reset to
its default position.
%
To use the Position function after selecting Screen I
when connected
to an HDMI (1080i/1080p) or Component (1080i/1080p) source, follow
these steps:
[]
%
Select the Position, and then press the ENTER E3_button.
2.
Select the Position button, and then press ENTER IZ3_.
3.
Press the A, T, 4 or I_ button to move the picture.
4.
Press the ENTER E3_button.
If you want to reset the pictures to its original position, select Reset in the
Position screen, and then press ENTER E3_.The picture will be reset to
its default position.
%
The picture size can vary depending on the input resolution when you
play content using Videos in A_Share IP_ay.
%
%
HD (High Definition): 16'9 - 1080i/1080p (1920xl 080), 720p (1280x720)
You can adjust and store settings for each external device you have
connected to an input on the TV,
%
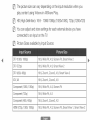
Picture Sizes available by Input Source:
DTV (1080i, 1080p)
16:% Wide Fi% 4:3_ Screen Fi% Smart View 2
DTV (720p)
16:% Wide Fi% 4:3_ Sma_ View 2
DTV (480i, 480p)
16:% Zooml_
Zoom2_ 4:3_ Smart View 2
AW, AV
16:% Zooml_
Zoom2_ 4:3
Component (1080i, 1080p)
16:% Wide Fi% 4:3_ Screen Fit
Component (720p)
16:% Wide Fi% 4:3
Component (480i, 480p)
16:% Zooml_
HDMI (720p, 1080i, 1080p)
16:% Wide Fi% 4:3_ Screen Fi% Smart View 1_ Sma_ View 2
Zoom2_ 4:3
C3 Changing
the Picture Options
m
Settings
_}
MENU rm _ Picture
Advanced
Settings
_ Advanced
Settings
are available in the Standard
To use, select an option using the A/T/4/I_
ENTER C3_.
_}
When connecting
---+ENTER {3_
and Movie modes.
buttons, and then press
a PC, you can only make changes to White IBa_ance and
®
IDynamic
Contrast
(Off
/IL,,ow / Medium
/ High):
Adjusts the screen contrast.
® IB_ack Tone (Off /Dark
/Darker
/Darkest}:
Select the black level to adjust the screen depth.
® IF_esh Tone: Emphasizes pink "Flesh Tone."
®
RGIB Only Mode (Off /Red
/ Green /IB_ue}:
Displays the Red, Green and IB_uecolor for
making fine adjustments
®
to hue and saturation.
Co,or Space (Auto / Hative}: Adjusts the range of colors (the color gamut)
available to create images.
® White I[ _ance: Adjusts the color temperature for a more natural picture.
IRoOffset / GoOffset /IBoOffset: Adjusts each color's (red, green, blue)
darkness.
Gain
/ GoGain /IBoGain: Adjusts each color's (red, green, blue) brightness.
Resets the White Balance to its default settings.
® Gamma: Adjusts the primary color intensity.
®
Lighting (Off / On): Reduces power consumption by reducing screen
brightness when the picture on the screen is motionless.
%
%
This function is not supported in SlIDmode.
When you change the IE ok_ight, Contrast , or IBrigh
Motion IL.ighting to Off.
%
Only available in Standard mode.
ess, the TV sets
m
IRiotu
Options
MENU |
_ Picture--+
Picture Options _ ENTER E3_
Select an option using the A/T/4/I_
buttons, and
then press ENTER IZ3_,
_}
®
When connecting a PC, you can only make
changes to Co,or Tone.
Co,or Tone (Coo_ / Standard / Warm1
%
or Warm2 will be deactivated
when
the picture mode is IDynamic,
%
You can adjust and store settings for each
external device connected to an input on
the TV.
* It may differ depending on the model.
®
Hoise IFi r (Off /II..............ow
/ Medium / High / Auto / Auto Visualization}:
If the broadcast signal received by your TV is weak, you can activate the
Hoise IFi r feature to reduce any static and ghosting that may appear
on the screen.
%
When the signal is weak, try each option until the TV displays best
picture.
Auto Visualization:
%
%
%
®
When changing analog channels, displays signal strength.
Only available for analog channels.
When the iltFO button is pressed, the signal strength bar is displayed.
When the bar is green, you are receiving the best possible signal.
MIPIEG Moise IFi r (Off /IL.ow / Medium / High / Auto): Reduces MPEG
noise to provide improved picture quality.
®
HIIDMIIIB_ack II,,,,,,,,,,,,,,,eve8
(Low/Norma_):
screen to adjust the screen depth,
I_
®
Lets you select the black level on the
Available only in HDMI mode (RGB signals),
Mode (Off /Auto1 /Auto2}' Sets the TV so that it senses and then
processes film signals from all sources automatically and adjusts the picture
for optimum quality,
%
%
Available in ATV, AV, Component (480i/1080i)
and HDMI (1080i),
If the screen does not seem natural, change its option to Off /Auto1
Auto2 in IFi_mMode,
®
Auto Motion
IR_us
(Off / @ear / Standa
/ Smoo
motion in fast moving scenes,
%
/ Custom /Demo}
:Enhances
The info screen on your TV displays the resolution and frequency of the
incoming video signal (60Hz). This frequency is not the frequency of the
picture the TV is displaying when you have Auto Motion IR_uson,
%
If noise occurs on the screen, please set Auto Motion IP_usto Off.
If Auto Motion IR_usis set to Custom, you can set IB_urReduction,
Judder Reduction° Reset manual@.
IB_urReduction: Adjusts the blur reduction level of video from all sources,
Judder Reduction: Adjusts the judder reduction level of video sources
playing movies.
Restores settings to default values.
®
ILIIEID
Motion IP_us(Off /On}: Removes drag from fast scenes with a lot of
movement to provide a clear picture,
I_
It will be deactivated when the picture mode is set to Natu
.
I_
The screen may become slightly darker when you play ILIIEID
Motion IP_us.
m
I:_es
Pi
u
_es
/ No)
Resets your current picture mode to its default settings,
C3 Changing
i_
II
the Preset Soun
odes
MENU !]]] --+ Sound --+ Sound Mode --+ ENTER [C4J
Sound
Mode
Use the A/T
buttons to select an option, and then press ENTER C3#.
® Standard:
Selects the normal sound mode.
® Music: Emphasizes music over voices.
® Movie: Provides the best sound for movies.
®
C_ear Voice: Emphasizes voices over other sounds.
®
Amplify: Increase the intensity of high-frequency sounds to allow a better
listening experience for the hearing impaired.
I_
If Speaker Select is set to IExtema_ Speaker, Sound Mode is disabled.
Cl Sound Settings
@9 MENU El3 ---, Sound --_ Sound IEffect --_ ENTER C3#
m
Sound
IE @or
(standard sound mode only)
Use the A/T
buttons to select an option , and then press ENTER E3#.
®
SIRS %uSurround MID(Off / On)
This function provides a virtual 5.1 channel surround sound experience
through a pair of speakers or headphones using HRTF (Head Related Transfer
Function) technology.
®
SIRS %ullDia_
(Off / On}
This function allows you to increase the intensity of a voice over background
music or sound effects so that dialog can be heard more clearly.
®
Use IEqua_izer to customize
sound setting for each speaker.
IBa_ance II..............
/IR: Adjusts the balance between the right and left speaker.
100Hz / 300Hz / I kHz / 3kHz / 10kHz (Bandwidth Adjustment):
volume level of specific bandwidth
Adjusts the
frequencies.
Resets the equalizer to its default settings.
%
If Speaker
Select is set to IExtema_ Speaker,
Sound IEffect is disabled.
Adjusting
m
Sound
IB ad c ast
MENU _
®
Settin
0 pt io ns
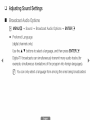
--_ Sound --_ Broadcast Audio Options
--_ ENTER E3_
Preferred Language
(digital channels only)
Use the A/T
buttons to select a language, and then press ENTER E3_.
DigitaI-TV broadcasts can simultaneously transmit many audio tracks (for
example, simultaneous translations of the program into foreign languages).
I_
You can only select a language from among the ones being broadcasted.
®
Mu_tioTrack Sound (MTS)
(analog channels only)
Select an option using the A/T
buttons, and then press ENTER IZ3_.
Mono: Choose for channels that are broadcasting
in mono or if you are
having difficulty receiving a stereo signal.
Stereo: Choose for channels that are broadcasting
in stereo.
SAP: Choose to listen to the Separate Audio Program, which is usually a
foreign-language
translation.
I_
Depending on the program being broadcast, you can listen to Mono0
Stereo or SAIP.
I_
When you press the TOOLS button in digital channel, you can select a
language from among the ones being broadcasted,
m
s II:::::::::_
IDIIIF O ut p ut
The SPDIF (Sony Phiiips Digital InterFace) outputs an uncompressed digital audio
signal when you connect the digital audio jack on the back of the TV to a digital
audio in jack on a receiver or home theater,
® Audio Format: You can select the Digital Audio output (SPDIF) format, The
available Digital Audio output (SPDIF) format may differ depending on the
input source,
I_
®
By connecting the TV to a receiver or home theater with IDo_by IDigi
and 5.1 ch speakers and selecting IDo_by IDigi , you can maximize your
interactive 3D sound experience,
Audio
IDe_ay: Lets you correct timing mismatches
between the audio track
and the video when you are watching the TV and listening to digital audio
output from the TV through an external device such as an AV receiver. When
you select Audio
, a slider appears. Use the 4/1_ buttons to adjust the
slider. Press ENTER IZ3_when done (0ms - 250ms).
m
Speaker
® Speaker
Settings
Select (llExtema_ Speaker
/$
8peake8
if you are listening to the sound track of a broadcast
or movie through an
external receiver, you may hear a sound echo caused by the difference in
decoding speed between the TV's speakers and the speakers attached to
your audio receiver, if this occurs, set the TV to IExtema_ Speaker,
%
When you set Speaker
Select to IExtema_ Speaker,
the TV's speakers
are turned off, You wiii hear sound through the external speakers only,
When you set Speaker
Select to _
Speaker,
both the TV's speakers
and the external speakers are on, You will hear sound through both,
%
When Speaker
Select is set to IExtema_ Speaker,
the VOLUME
and
MUTE buttons will not operate and the sound settings will be limited.
%
If there is no video signal, both the TV's speakers and the external
speakers wiii be mute,
®
Auto Volume (Off / Norma_/Night}
Norma_ equalizes the volume level on each channel so that when you change
channels, the volume level is the same,
Night equalizes and decrease the volume level on each channel, so each
channel is quieter, Night is useful at night, when you may want to keep the
volume low,
%
To use the volume control on the source device connected to the TV,
set Auto Volume to Off on the TV, Otherwise, a change to the volume
control of the source device may not be applied,
m
I:_eset Sound
_es
/ No_
Reset all sound settings to the factory defaults. Select Reset Sound,
press
ENTER {Z3_,select Yes on the pop-up, and then press ENTER E3_ again.
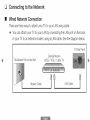
Connecting
m
Wired
to the
Network
etwork
Connection
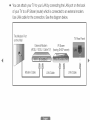
There are three ways to attach your TV to your LAN using cable:
® You can attach your TV to your LAN by connecting the LAN port on the back
of your TV to an external modem using a LAN cable, See the diagram below,
TV Rear Panel
The Modem Port on the Wall
External Modem
(ADSL / VDSL / Cable TV)
iiiiiiiiiiiiiiii
Modem Cable
®
You can attach your TV to your LAN by connecting the LAN port on the back
of your TV to a IP Sharer (router) which is connected to an external modem,
Use LAN cable for the connection, See the diagram below,
The Modem Port
on the Wall
TV Rear Panel
External Modem
(ADSL / VDSL / Cable TV)
Modem Cable
IP Sharer
(having DHCP server)
®
Depending on how your network is configured, you may be able to attach
your TV to your LAN by connecting the LAN port on the back of your TV
directly to a network wall outlet using a LAN cable, See the diagram below,
Note that the wall outlet is attached to a modem or router elsewhere in your
house,
TV Rear Panel
The LAN Port on the Wall
LAN Cable
®
If your network requires a Dynamic IP address, you should use an ADSL
modem or router that supports the Dynamic Host Configuration Protocol
(DHCP). Modems and touters that support DHCP automatically provide the
IP address, subnet mask, gateway, and DNS values your TV needs to access
the Internet so you do not have to enter them manually. Most home networks
use a Dynamic IP address.
Some networks require a Static IP address. If your network requires a Static
IP address, you must enter the IP address, subnet mask, gateway, and
DNS values manually on your TV's Cable Setup Screen when you set up the
network connection. To get the IP address, subnet mask, gateway, and DNS
values, contact your Internet Service Provider (ISP). If you have a Windows
computer, you can also get these values through your computer.
I_
You can use ADSL modems that support DHCP if your network requires
a Static IP address. ADSL modems that support DHCP also let you use
Static IP addresses.
%
%
It is not supported when the network speed is below or equal to 10Mbps.
Use Cat 6 (*STP Type) cable for the connection. (*Shielded Twist Pair)
m
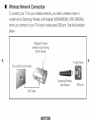
Wireless
Network
Connection
To connect your TV to your wireless network, you need a wireless router or
modem and a Samsung Wireless LAN Adapter (WIS09ABGNX, WISI 2ABGNX),
which you connect to your TV's back or side panel USB port, See the illustration
below,
Wireless IP sharer
(wireless router having
DHCP Server)
TV Side Panel
The LAN Port on the Wall
_ii!i!i_
_ _i_ii:_,_
Samsung Wireless
LAN Adapter
LAN Cable
USB port
Samsung's Wireless LAN adapter is sold separately and is offered by selected
retailers, Ecommerce sites, and Samsungparts,com, Samsung's Wireless
LAN adapter supports the IEEE 802,11 a/b/g and n communication protocols,
Samsung recommends using IEEE 802,11 n, When you play video over a network
connection, the video may not be played smoothly,
_[} NOTE
® You must use the "Samsung Wireless LAN Adapter" (WIS09ABGNX,
WISI 2ABGNX) to use a wireless network,
® Samsung Wireless LAN Adapter and The USB extension Cable are sold
separately and are offered by selected retailers, Ecommerce sites and
Samsungparts,com,
® To use a wireless network, your TV must be connected to a wireless IP
sharer (either a router or a modem), If the wireless IP sharer supports
DHCP, your TV can use a DHCP or static IP address to connect to the
wireless network,
®
Select a channel for the wireless IP sharer that is not currently being used,
If the channel set for the wireless IP sharer is currently being used by
another device nearby, this will result in interference and communication
failure,
® Your TV supports the following wireless security systems only:
Authentication Mode: WEP, WPAPSK, WPA2PSK
Encryption Type: WEP, AES
® If you select the HIGH PURE THROUGHPUT (Greenfield) 802,11 n mode
and the Encryption type is set to WEP or TKIP for your wireless router,
Samsung TVs will not support a connection in compliance with new Wi-Fi
certification specifications,
® If your wireless router supports WPS (Wi-Fi Protected Setup), you can
connect to the network via PBC (Push Button Configuration) or PiN
(Personal Identification Number), WPS will automatically configure the
SSID and WPA key in either mode,
®
®
If your
router,
TV
the
via
Ensure
LAN
®
modem,
"Samsung
the
TV
is turned
or
device
Wireless
off
is not
LAN
before
certified,
it may
not
connect
to
the
Adapter",
you
connect
the
Samsung
Wireless
Adapter,
Connection
Methods'
You
can
the
Auto
setup
the
wireless
network
connection
like
below,
®
-
Auto
Setup
-
Manual
-
W IPS (lip IBO)
(Using
Network
Search
function)
Setup
The TV may not recognize the Samsung Wireless LAN Adapter if it is
connected to the TV using a USB hub or USB extension cable other than
the cable supplied,
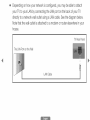
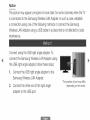
Notice
The picture may appear corrupted or have static for some channels when the TV
is connected to the Samsung Wireless LAN Adapter, In such a case, establish
a connection using one of the following methods or connect the Samsung
Wireless LAN Adapter using a USB cable in a place that is not affected by radio
interference,
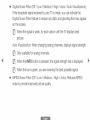
Connect using the USB right angle adapter, To
connect the Samsung Wireless LAN Adapter using
the USB right angle adapter, follow these steps:
[]
[]
Connect the USB right angle adapter to the
Samsung Wireless LAN Adapter,
Connect the other end of the right angle
adapter to the USB port,
* The position of port may differ
depending on the model.
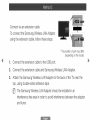
Connect via an extension cable
To connect the Samsung Wireless LAN Adapter
using the extension cable, follow these steps:
* The position of port may differ
depending on the model.
[]
2.
Connect the extension cable to the USB port,
Connect the extension cable and Samsung Wireless LAN Adapter,
3. Attach the Samsung Wireless LAN Adapter to the back of the TV near the
top, using double-sided adhesive tape,
I_
The Samsung Wireless LAN Adapter should be installed in an
interference-free area in order to avoid interference between the adapter
and tuner,
m
Settings
®
MENU_
-_ Network -_ Network Settings -_ ENTER E3_
Set the network connection
to use AIIShare
TM
and perform software upgrade,
For detailed settings for wired network, refer to the "Setting the Wired
Network", and for detailed settings for wireless network, refer to the " Setting
the Wireless Network" in this manual,
If you set the network, you can share the contents and update the functions
through the A_Share
It only supports A_Share IP_ayand software
upgrade, Other Internet functions are not supported,
m
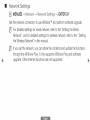
MENUI_
_ Hetwork _ Hetwork Status _ ENTERC3_
You can check the current network and Internet status.
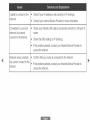
The
When
each
check
wired
list
for
wired
network
network
connection
connection
failed,
try
failure
to
apply
the
following
information
to
issue,
No network cable found.
IP auto setting failed.
•
Check that your network cable is plugged in.
•
If it is connected, make sure that the router is turned on; if it is on, try
turning it off and on again.
Try the following to set your IP address automatically or set your IP
address manually by selecting _P Settings.
,,
Ensure DHCP server is enabled on router and unplug and re-plug-in
the router.
•
Contact your Internet Service Provider for more information.
Unable to connect
to the
network.
Connected to your local
network, but cannot
connect to the Internet.
Network setup complete,
but cannot connect to the
Internet.
•
Check if your IP address is set correctly in _P Settings.
•
Contact your Internet Service Provider for more information.
•
Check your Internet LAN cable is connected correctly to LAN port of
router.
•
Check the DNS settings in _P Settings.
•
If the problem persists, contact your Internet Service Provider to
access the Internet.
•
Confirm that your router is connected to the Internet.
•
If the problem persists, contact your Internet Service Provider to
access the Internet.
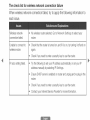
The check list for wireless network connection
failure
When wireless network connection failed, try to apply the following information to
each issue,
Wireless network
connection failed.
®
No wireless router selected. Go to Network
router.
Unable to connect to
wireless router.
•
Check that the router is turned on, and if it is on, try turning it off and on
again.
•
Check if you need to enter a security key to use the router.
•
Try the following to set your IP address automatically or set your IP
address manually by selecting _P Settings.
,,
Ensure DHCP server is enabled on router and unplug and re-plug-in the
router.
•
Check if you need to enter a security key to use the router.
•
Contact your Internet Service Provider for more information.
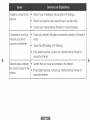
IP auto setting failed.
Settings
to select your
Unable to connect
to the
network.
Connected to your local
network, but cannot
connect to the Internet.
Network setup complete,
but cannot connect to the
Internet.
•
Check if your IP address is set correctly in _P Settings.
•
Check if you need to enter a security key to use the router.
•
Contact your Internet Service Provider for more information.
•
Check your Internet LAN cable is connected correctly to LAN port of
router.
•
Check the DNS settings in _P Settings.
•
If the problem persists, contact your Internet Service Provider to
access the Internet.
•
Confirm that your router is connected to the Internet.
•
If the problem persists, contact your Internet Service Provider to
access the Internet.
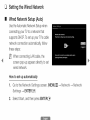
C3 Settin
m
Wired
etwork
the Wired
Network
Setup
(Auto)
Use the Automatic Network Setup when
connecting your TV to a network that
supports DHCR To set up your TV's cable
network connection automatically, follow
these steps:
_[} When connecting LAN cable, the
screen pop-up appears directly to set
wired network,
How to set up automatically
1.
Go to the Network
Settings
2.
Settings
screen. (MENU |
--_ ENTER IB#)
Select StaA, and then press ENTERE3#.
--+ Network
--+ Network
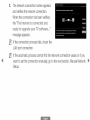
1
The network connection screen appears
and verifies the network connection.
When the connection has been verified,
the "The Ilntemet is connected and
ready to upgrade
your _
software°°°"
message appears,
If the connection
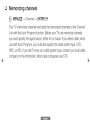
process fails, check the
LAN port connection,
If the automatic process cannot find the network connection values or if you
want to set the connection manually, go to the next section, Manual Network
Setup,
m
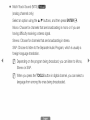
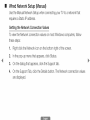
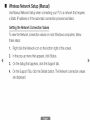
Wired Network Setup (Manual)
Use the Manual Network Setup when connecting your TV to a network that
requires a Static IP address.
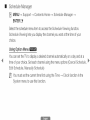
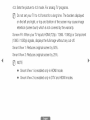
Getting the Network Connection
Values
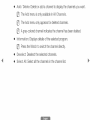
To view the Network connection values on most Windows computers, follow
these steps:
[]
Right click the Network icon on the bottom right of the screen.
2.
In the pop-up menu that appears, click Status.
3.
On the dialog that appears, click the Support tab.
4.
On the Support Tab, click the Details button. The Network connection values
are displayed.
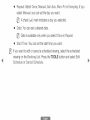
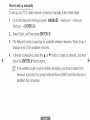
How
to
To set
[]
set
up
up
your
manually
TV's
cable
Go to the Hetwork
network
Settings
(MENU rrrl _ Hetwork
Settings
[]
1
[]
_
connection
manually,
follow
these
steps:
screen.
_ Hetwork
ENTER E3_)
Select Sta£, and then press ENTER E3_.
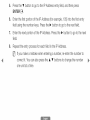
The network connection screen appears
and the verification process starts.
Press ENTER E3_.The verification process
stops. Select IIIIPSettings on network
connection screen. The IIIIP
Settings screen
appears.
In the top entry field, press ENTER E3_,and then set IIIIPSetting to IFnter
manually,
1
1
1
1
Press the T button to go to the IP Address entry field, and then press
ENTER _.
Enter the first portion of the IP Address (for example, 105) into the first entry
field using the number keys, Press the I_ button to go to the next field,
Enter the next portion of the IP Address, Press the I_ button to go to the next
field,
Repeat the entry process for each field in the IP Address,
I_
If you make a mistake when entering a number, re-enter the number to
correct it, You can also press the A/T buttons to change the number
one unit at a time,
9.
When
done
10.
Press
the
11.
entering
T
ENTER
_.
Repeat
the
1 2. When
The
done,
network
When
the
ready
to
IIIIP Address,
button
same
select
to
entry
OK
go
connection
upgrade
to the
process
at the
connection
been
_
ENTER
Subnet
for
appears
verified,
software°°°"
E3#.
Mask
Subnet
bottom
screen
has
your
press
fields,
Mask°
of the
and
the
page,
the
"The
message
and
then
Gateway,
and
and
then
press
verification
Ilntemet
appears.
press
IDHS
ENTER
process
is
connected
starts.
C3#.
Settin
m
Wireless
the Wireless
Network
Network
Setup
(Auto}
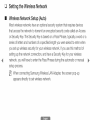
Most wireless networks have an optional security system that requires devices
that access the network to transmit an encrypted security code called an Access
or Security Key, The Security Key is based on a Pass Phrase, typically a word or a
series of letters and numbers of a specified length you were asked to enter when
you set up wireless security for your wireless network, If you use this method of
setting up the network connection, and have a Security Key for your wireless
network, you will have to enter the Pass Phrase during the automatic or manual
setup process,
_[} When connecting Samsung Wireless LAN Adapter, the screen pop-up
appears directly to set wireless network,
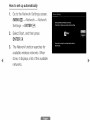
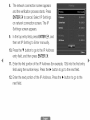
How to set up automatically
[]
Go to the Network Settings screen.
(MENU rrrl _ Network _ Network
Settings
aa
1
_
ENTER E3_)
Select StaR, and then press
ENTER E3_,
The Network function searches for
available wireless networks, When
done, it displays a list of the available
networks,
1
In the list of networks, press the A or T button to select a network, and then
press the ENTER IB_ button.
I_
If the wireless router is set to Hidden (invisible), you have to select Add
Network and enter the correct network Name (SSIIIID}and Security key to
establish the connection.
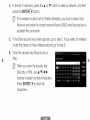
1
1
If the Enter security key screen appears, go to step 6. If you select an wireless
router that does not have wireless security, go to step 8.
Enter the security key (Security key or
PIN).
I_
When you enter the security key
(Security or PIN), use A/T/4/I_
buttons to select number/characters.
Press ENTER IB_ to enter the
characters.
%
%
You can also enter numbers by pressing the number buttons.
You should be able to find the Pass Phrase on one of the set up screens
you used to set up your router or modem.
1
1
When done, use the I_ button to move the cursor to Next, and then press
ENTER _.
The network connection screen appears and the verification process starts.
When the connection has been verified, the "The II ÷met is connected
ready to upgrade your _
I_
software°°°" message appears.
If the network does not accept the Security key (Security or PIN), select
IRetry or select lip Settings to enter the settings manually.
%
If you want to set up the connection manually, select lip Settings. Then,
go to the next section, "How to set up manually".
m
Wireless
Network Setup (Manual)
Use Manual Network Setup when connecting your TV to a network that requires
a Static IP address or if the automatic connection process has failed.
Getting the Network Connection
Values
To view the Network connection values on most Windows computers, follow
these steps:
[]
Right click the Network icon on the bottom right of the screen.
2.
In the pop-up menu that appears, click Status.
3.
On the dialog that appears, click the Support tab.
4.
On the Support Tab, click the Details button. The Network connection values
are displayed.
How
to
To set
[]
2.
[]
[]
set
up
up
your
manually
TV's
cable
network
connection
manually,
Go to the Hetwork Settings screen. (MENU |
Settings _ ENTER E3_)
follow
these
steps:
_ Hetwork _ Hetwork
Select Sta£, and then press ENTERE3,_.
The Network function searches for available wireless networks. When done, it
displays a list of the available networks.
In the list of networks, press the A or T button to select a network, and then
press the ENTER E3,_button twice.
I_
If the wireless router is set to Hidden (invisible), you have to select Add
Hetwork and enter the correct network Hame (SSIIIID}and Security key to
establish the connection.
e
e
If the Enter security key screen appears, go to step 6, If you selected an AP
or wireless router that does not have wireless security, go to step 8,
Enter the security key (Security key or PIN),
I_
When you enter the security key (Security key or PIN), use A/T/4/I_
buttons to select number/characters, Press ENTER IB_ to enter the
characters,
%
%
You can also enter numbers by pressing the number buttons,
You should be able to find the Pass Phrase on one of the set up screens
you used to set up your router or modem,
e
When done, use the I_ button to move the cursor to Next, and then press
the ENTER E3_button,
1
The network connection screen appears
and the verification process starts. Press
ENTER E3_to cancel, Select IIIIP
Settings
on network connection screen, The IIIIP
Settings screen appears,
1
In the top entry field, press ENTER E3_,and
then set IIIIP
Setting to Enter manually.
10. Press the T button to go to the IIIIP
Address
entry field, and then press ENTER E3_.
11. Enter the first portion of the IIIIP
Address (for example, 105) into the first entry
field using the number keys, Press the _ button to go to the next field,
12. Enter the next portion of the IIIIP
Address, Press the I_ button to go to the
next field,
13.
Repeat
I_
the
If you
entry
make
correct
one
unit
When
done
15.
Press
the
16.
Repeat
the
17.
When
done,
When
the
ready
to
each
when
also
field
in the
entering
press
the
IIIIP Address.
a number,
re-enter
A/T
buttons
to
press
ENTER
E3_.
the
change
number
the
to
number
at a time.
the
1!' button
_.
network
can
entering
ENTER
for
a mistake
it. You
14.
The
process
same
select
to
entry
OK
IIIIP Address,
go
process
at the
connection
connection
upgrade
to the
your
been
_
for
Mask
Subnet
bottom
screen
has
Subnet
appears
verified,
software°°°"
fields,
Mask°
of the
and
the
page,
the
"The
message
and
Gateway,
and
then
then
press
and
press
IDHS
ENTER
verification
process
Ilntemet
is connected
appears.
starts.
E3_.
m
Wireless
Network
Setup
(WPS(PBC))
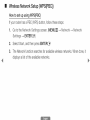
How to set up using WPS(PBC)
If your router has a PBC (WPS) button, follow these steps:
1.
Go to the Hetwork Settings screen, (MENU !_ --_ Network --_ Network
Settings _ ENTER IBm)
2.
Select Sta_, and then press ENTERE3_,
3. The Network function searches for available wireless networks, When done, it
displays a list of the available networks,
Select the WIPS(IIPIBO),
Press the WPS(PBC) button on your
router within 2 minutes, Your TV
automatically acquires all the network
setting values it needs and connects to
your network,
1
The network connection screen
appears, and network set up is done,
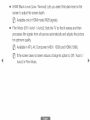
if Your TV Fails to Connect to the Internet
Your TV may not be able to connect to the Internet because your ISP has permanently
registered the MAC address (a unique identifying number) of your PC or modem, which it
then authenticates each time you connect to the Internet as a way of preventing unauthorized
access. As your TV has a different MAC address, your ISP can not authenticate its MAC
address, and your TV can not connect.
To resolve this problem, ask your ISP about the procedures required to connect devices other
than a PC (such as your TV) to the Internet.
If your Internet service provider requires an ID or password to connect to the Internet, your
TV may not be able to connect to the Internet. If this is the case, you must enter your ID or
password when connecting to the Internet.
The internet connection may fail because of a firewall problem. If this is the case, contact your
Internet service provider.
If you cannot connect to the Internet even after you have followed the procedures of your
Internet service provider, please contact Samsung Electronics at 1-800-SAMSUNG.
_naging the Network
m
Connected
Devices
Settings
®
MENU[]_ --_ Network _ A_Share Settings _ ENTER 83_
Set whether to allow a network connected device like a smartphone or tablet
to share content or control TV using an application downloaded on your mobile
device, For details on set up options, refer to the "Using the DLNA Functions",
m
IDevice Na_ e
MENU[]_
_ Network
--_ Device Name --_ ENTER E3_
Change the TV's name by keying in a name manually,
A keyboard appears on the screen and you can key in a name for your TV
manually using your remote control, For example, if you want to change the
name to Samsung TV, press each character using the A/T/4/I_
buttons,
and then select IDone,
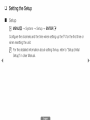
Cl Settin
m
the Setup
Setup
MENU[]_ _ Syste_
--_ Setup --_ ENTER _
Configure the channels and the time when setting up the TV for the first time or
when resetting the unit,
_}
For the detailed information about setting Setup
Setup)" in User Manual,
refer to "Setup (Initial
C3 Settin
m
the Time
Ti_e
®
@
®
MENU |
--_ 8yste$
_ Time _
ENTER 83_
The current time will appear every time you press the INFO button.
C_ock: Set the clock to use the various timer features of the TV.
I_
If you disconnect the power cord, you have to set the clock again.
C_ock Mode: Set the current time manually or automatically,
®
Auto: The TV sets the current time automatically
using the time from a
digital channel.
I_
You must have cable or an antenna connected
time automatically,
to the TV to set the
® Manual: Set the current time manually,
I_
Depending on the broadcast station and signal, the auto time set up
may not be correct, In this case, set the time manually,
C_ock Set: Set the Date and Time,
Select C_ock Set, Select IDate or Time, and then press ENTER IZ3_,Use the
number buttons or the A/T buttons to enter numbers, Use the 4/1_ buttons
to move from one entry field to the next, Press ENTER E3_when done,
I_
Available only when C_ock Mode is set to Manual,
Time Zone: Select your time zone.
I_
This function is only available when the C_ock Mode is set to Auto.
DST (Off / On}: Switches the DST (Daylight Saving Time) function on or off.
I_
This function is only available when the C_ock Mode is set to Auto.
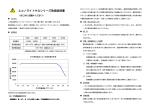
Cl Using the Sleep Timer
®
®
MENU Nll --_ System
--_ Time --_ S_eep Timer --_ ENTER 83_
S_eep Timer ii_!_:
Automatically
shuts off the TV after a preset period of
time. (80, 60, 90, 120, 150 and 180 minutes).
I_
Use the A/T
buttons to select a period of time, and then press
ENTER IZ3_.To cancel the S_eep Timer, select Of[.
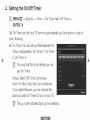
Settin
®
the On/Off Timer
MENU ml --_ 8yste$
_ Time _ On Timer <or> Off Timer
ENTER E3_
Set On Timer so that your TV turns on automatically
your choosing.
® On Timer: You can set up three separate On
Timer configurations.
(On Timer 10 On Timer
20 On Timer 3)
I_
You must set the clock before you can
use On Timer,
Setup: Select Off° Once°
MonoolFH0MonooSat0 Sat_Sun
or Manual,
If you select Manual, you can choose the
days you want On Timer to turn on your TV,
I_
The ,,/ mark indicates days you've selected,
at a time and on a day of
Time:
Set
buttons
the
to
Volume:
enter
Set
volume
level.
Source:
To
on.
You
hour,
minute,
numbers.
the
desired
select
the
Use
the
volume
source
Use
4/1_
level.
of the
the
number
buttons
Use
content
to
the
that
buttons
change
or
entry
buttons
will
play
the
to
when
A/T
fields.
change
the
TV
the
turns
can:
®
Select
TV
®
Select
USIIB
USB
®
am/pm.
and
and
have
have
the
TV
the
display
TV
play
a specific
back
photo
air
or
or
cable
audio
channel.
files
from
a
device.
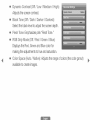
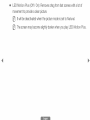
Select a source on your TV (HIIDMII1/IDVII_
HIIDMII2_AV_Component)
that you have connected a set-top box to, and have the TV display a
channel from the set-top box.
%
The USB device must be connected to your TV before you can select USIIB.
I_
If you
a source
®
Have
®
Set
the
set-top
TV
goes
on
®
I_
select
a cable
Leave
When
the
you
Channe_
other
or
satellite
box
set-top
select
options
than
to
box
set-top
the
or
box
channel
turned
on.
other
than
a source
will
_
USIIB,
must:
attached
you
_
you
to
want
or
to
USIIB,
that
source
watch
when
the
Antenna
the
and
disappear.
Antenna
(when
the
Source
is set
to
_):
Select
Air
or
Cable.
Channe_
(when
the
Source
is set
to
_):
Select
the
desired
channel,
/Photo (when the Source is set to USIIB):Select a folder in the USB
device containing the music or photo files you want to play when the TV turns
on automatically,
Music