1
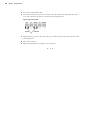
8.5 Fax Board Guide
Information in this document is subject to change without notice. Companies, names, and data used in examples herein are fictitious unless otherwise noted.
©2002 Captaris, Inc. All rights reserved. No part of this publication may be reproduced, transmitted, transcribed, stored in a retrieval system, or translated into any
language in any form by any means without the written permission of Captaris, Inc.
Portions copyright ©1999 Ligature. All rights reserved. Portions copyright ©1988, 1996 Aladdin Enterprises. All rights reserved. Portions copyright ©1993 Soft
Horizons. All rights reserved. Outside In® Viewer Technology copyright ©1992-2002 Inso Corporation. All rights reserved. Copyright © TMS, Inc. 1994-2002. All
rights reserved. Portions copyright ©2001 artofcode LLC. Portions Copyright ©1996, 2001 Artifex Software Inc. Portions Copyright ©1998 Soft Horizons. All Rights
Reserved. Adobe, Acrobat, and the Acrobat logo are trademarks of Adobe Systems Incorporated. Includes Adobe® PDF Library technology. All rights reserved.
PostScript is a trademark of Adobe Systems Incorporated. This software is based in part on the work of the Independent JPEG Group.
Captaris and RightFax are trademarks of Captaris, Inc. All other company names, brand names, and product names are the property and/or trademarks of their
respective companies.
Part number: 2005-25712-00 Rev 01
RightFax 8.5 Fax Board Guide
Contents
Introduction..................................................................................................................................................................5
Chapter 1: Brooktrout Analog Fax Boards ...................................................................................................................7
Installing Brooktrout TR1034 Series Analog Fax Boards ...................................................................................................................... 7
Installing Brooktrout TR112 Fax Boards ............................................................................................................................................. 9
Installing Brooktrout TR114 Series Analog Fax Boards ........................................................................................................................9
Installing Brooktrout TruFax Boards ................................................................................................................................................. 12
Testing Brooktrout Loop-Start Boards ...............................................................................................................................................14
Testing Brooktrout DID Boards ......................................................................................................................................................... 15
Chapter 2: Brooktrout Digital Fax Boards..................................................................................................................17
Supported Brooktrout TR1034 Series Digital Fax Boards ................................................................................................................... 17
Supported Brooktrout TR114 Series Digital Fax Boards .....................................................................................................................18
Supported Network Interface Cards .................................................................................................................................................. 19
Installing Digital Fax Boards and Network Interface Cards ................................................................................................................ 19
Chapter 3: Dialogic Analog Fax Boards .....................................................................................................................21
Installing Dialogic Analog Fax Boards...............................................................................................................................................21
Testing Dialogic Boards .................................................................................................................................................................... 25
Chapter 4: Dialogic Digital Fax Boards ....................................................................................................................27
Installing Dialogic Digital Fax Boards ...............................................................................................................................................27
Installing and Configuring the CPi/2400CT-T1 and CPi/3000CT-E1 .................................................................................................... 28
Testing Dialogic Boards .................................................................................................................................................................... 31
Appendix A: Working with DID Lines.........................................................................................................................33
Index ..........................................................................................................................................................................35
3
RightFax 8.5 Fax Board Guide
Introduction
T
he RightFax Fax Board Guide is designed for administrators who will be installing and
configuring fax boards for use with RightFax. This guide assumes you have knowledge of the
Windows NT and Windows 2000 operating systems as well as general knowledge of computer
hardware installation procedures and conventions. In addition, this guide assumes that you have
read and understand all documentation provided with your fax board.
RightFax supports a maximum of 15 fax boards or 96 fax channels per machine. To expand your
organization’s fax capacity beyond these limits, you must use remote BoardServers (described in
the RightFax Administrator’s Guide) or BoardServers on separate fax server machines.
The RightFax Fax Board Guide is intended only to supplement the documentation provided by your
fax board manufacturer and is not intended as a replacement. Although Captaris makes every effort
to ensure that the information in this guide is current, the functionality of the fax boards described
here is subject to change by the board manufacturers.
5
RightFax 8.5 Fax Board Guide
Chapter 1
Brooktrout Analog Fax Boards
B
efore installing any fax board into the RightFax server, you must first configure the board to
operate correctly and without hardware conflicts. If you are installing multiple fax boards of the
same or different types, watch for special notes specific to such instances. Be sure to record the I/
O addresses, DMA channels, and interrupts selected for each installed fax board; you may need this
information when configuring the fax boards in RightFax.
Warning Static discharge can severely damage your fax board. Exposing your fax board to static electricity
will void all warranties on the board. Always use caution when handling fax boards.
Installing Brooktrout TR1034 Series Analog Fax Boards
The Brooktrout TR1034 series of analog fax boards supports the v.34 fax standard, which allows fax
transmission at up to 33.6 kBPS. Instructions in this section apply to all supported Brooktrout
TR1034 analog fax boards unless otherwise noted. (If you are installing Brooktrout TR1034 series
digital fax boards, see ”Supported Brooktrout TR1034 Series Digital Fax Boards” on page 17.)
The following table lists all of the Brooktrout TR1034 series analog fax boards supported by
RightFax.
Table 1A Supported Brooktrout TR1034 Series Analog Fax Boards
Board model
Description
TR1034-P2L
Two loop-start channel PCI analog fax board.
TR1034-P4L
Four loop-start channel PCI analog fax board.
In Brooktrout’s naming scheme, “TR1034” is the board model, “P” stands for PCI, followed by the
number of channels, and then “L” for the loop-start phone line interface.
Setting the module number
Each installed Brooktrout TR1034 board must be assigned a unique “module number.” The module
number is set using a rotary switch located on the fax board. Refer to your Brooktrout
documentation for the location of the rotary switch on your particular fax board model.
Warning Do not use a pencil or any other object that conducts electricity to move the rotary switch on the
Brooktrout TR1034 board. Using graphite and other electrically conductive materials may cause severe
damage to the board.
The module number must be unique for each Brooktrout TR1034 fax board installed in a single
computer (i.e., you cannot have two TR1034 boards in the same computer with the same module
number setting). Module numbers do not need to be sequential. Also, do not set the module number
on any Brooktrout TR1034 board to 0 or 1 (these values are reserved by Brooktrout for diagnostic
purposes.)
Make a note of the module numbers you assign to each installed TR1034 fax board. You will need to
enter this information when configuring the RightFax software to communicate with the boards.
7
8
Chapter 1
Brooktrout Analog Fax Boards
Installing Brooktrout TR1034 fax boards
Fax boards can be installed in the RightFax server or in a separate computer called a “remote
BoardServer.” For information on using remote BoardServers, refer to the RightFax Administrator’s
Guide.
After you have properly set the module numbers on each of your Brooktrout TR1034 fax boards, you
are ready to install them. Always turn your computer off before inserting or removing any board,
and take all necessary precautions to prevent static discharge when handling any fax board.
Brooktrout TR1034 fax boards can be installed in any PCI bus slot.
After the fax boards are properly installed, refer to your Brooktrout documentation for instructions
on connecting the loop-start phone cables.
Downloading firmware to the Brooktrout TR1034
After your Brooktrout TR1034 fax boards have been installed, you must download the fax firmware
to the installed Brooktrout TR1034 boards.
To download the TR1034 fax firmware
1. Open a command prompt and change to the RightFax\RFBoard folder on the RightFax server.
2. Enter the following command:
Firmload.bat c channels path module
Where channels is the total number of channels on all of the installed TR1034 fax boards, path
is the path to the RFBoard\Boston folder on the RightFax server (this command only supports
short file names, so you may need to truncate folder names such as “Program Files”), and
module is the module number you have assigned to the board. If you have multiple TR1034 fax
boards installed, leave the module parameter out. This forces the program to scan for all module
numbers from 3 through F.
Example
Firmload.bat c 4 c:\Progra~1\RightFax\RFBoard\Boston 3
Completing the installation of your Brooktrout TR1034 fax boards
After your Brooktrout TR1034 fax boards have been installed and the fax firmware has been
downloaded to them, you should test the fax channels to ensure that the boards have been properly
configured and installed. For information on testing your fax channels, see ”Testing the ability to
send a fax” on page 15.
When you have completed installing and testing your Brooktrout TR1034 fax boards, you must
configure the RightFax software to communicate with the boards. For information on configuring
RightFax to work with your fax boards, refer to the chapter on configuring the RightFax
BoardServer in the RightFax Administrator’s Guide.
RightFax 8.5 Fax Board Guide
Installing Brooktrout TR112 Fax Boards
The Brooktrout TR112 series of fax boards are two channel analog boards supported by RightFax
but no longer manufactured by Brooktrout. These boards require you to set an I/O address and
hardware interrupt before installing. For details on these settings, see the following section,
“Installing Brooktrout TR114 Series Analog Fax Boards.”
Please refer to your Brooktrout documentation for instructions on setting the I/O and hardware
interrupts on your TR112 fax board.
Installing Brooktrout TR114 Series Analog Fax Boards
The Brooktrout TR114 series of analog fax boards consists of models with up to four channels of
some combination of loop-start and/or DID channels. Instructions in this section apply to all
supported Brooktrout TR114 analog fax boards unless otherwise noted. (If you are installing
Brooktrout TR114 series digital fax boards, see ”Supported Brooktrout TR114 Series Digital Fax
Boards” on page 18.)
The following table lists all of the Brooktrout TR114 series of analog fax boards supported by
RightFax.
Table 1B Supported Brooktrout TR114 Series Analog Fax Boards
Board model
Functionality
TR114-I1L
One loop-start channel ISA analog fax board.
TR114-I2C
One loop-start and one DID channel ISA analog fax board. Requires Tellabs 8012 power
supply.
TR114-I2D
Two DID channel ISA analog fax board. Requires Tellabs 8012 power supply.
TR114-I2L
Two loop-start channel ISA analog fax board.
TR114-I4C
Two loop-start and two DID channel ISA analog fax board. Requires Tellabs 8012 power
supply.
TR114-I4D
Four DID channel ISA analog fax board. Requires Tellabs 8012 power supply.
TR114-I4L
Four loop-start channel ISA analog fax board.
TR114-P1L
One loop-start channel PCI analog fax board.
TR114-P2C
One loop-start and one DID channel PCI analog fax board. Requires Tellabs 8012 power
supply.
TR114-P2D
Two DID channel PCI analog fax board. Requires Tellabs 8012 power supply.
TR114-P2L
Two loop-start channel PCI analog fax board.
TR114-P4C
Two loop-start and two DID channel PCI analog fax board. Requires Tellabs 8012 power
supply.
TR114-P4D
Four DID channel PCI analog fax board. Requires Tellabs 8012 power supply.
TR114-P4L
Four loop-start channel PCI analog fax board.
In Brooktrout’s naming scheme, “TR114” is the board model, “I” or “P” indicates ISA or PCI,
followed by the number of channels, and then a letter indicating the type of phone line interface
(loop-start, DID, or combination).
Brooktrout TR114 boards that support DID interfaces require an external –48V DC power supply.
Brooktrout recommends the Tellabs 8012 regulated power supply, which provides 250 mA of
current (see ”Connecting a Tellabs 8012 power supply to a DID fax board” on page 33). This must be
purchased separately from your fax board. Phone cables of the appropriate type for your phone
lines (RJ-45 or RJ-11) are also required.
9
10
Chapter 1
Brooktrout Analog Fax Boards
Setting the I/O address
Before installing the Brooktrout TR114 fax board into the RightFax server, you must manually set
the base I/O address of the board. The base I/O address is set on the board using switches 2 through
8 on the unit marked “SW1.” Refer to your Brooktrout documentation for the location of the SW1
unit on your particular fax board model.
Warning Do not use a pencil or any other object that conducts electricity to move the switches on the
Brooktrout TR114 board SW1 unit. Using graphite and other electrically conductive materials may cause
severe damage to the board.
The first fax channel on the board uses an address four greater than the base address, and each
channel after that uses an address four greater than the previous one. For example, if a Brooktrout
TR114-I4L board has its base address set to 260, the four fax channels on the board will use
addresses 264, 268, 26C, and 270. The recommended (factory set) base address for your first
Brooktrout TR114 board is 260. If you have multiple fax boards installed, be careful not to assign
overlapping I/O addresses.
The following table lists commonly used base address settings for TR114 fax boards. Using these
addresses may make it easier to prevent overlapping I/O addresses when you have multiple boards
installed.
Table 1C TR114 Switch Settings for Base I/O Addresses (Address Values Are Hexadecimal)
Base I/O address
Switch
2
Switch
3
Switch
4
Switch
5
Switch
6
Switch
7
Switch
8
100
On
On
On
On
On
Off
On
140
On
On
On
Off
On
Off
On
180
On
On
On
On
Off
Off
On
200
On
On
On
On
On
On
Off
220
On
On
Off
On
On
On
Off
240
On
On
On
Off
On
On
Off
260
On
On
Off
Off
On
On
Off
280
On
On
On
On
Off
On
Off
2A0
On
On
Off
On
Off
On
Off
2C0
On
On
On
Off
Off
On
Off
After you set the I/O addresses on each of your TR114 boards, make sure that switch #1 on the SW1
unit is set to the On position for one and only one TR114 fax board. If you have only one TR114 board
installed, this switch must be set to On. If you have multiple TR114 boards installed, this switch
should be set to On on one board, and set to Off on all the others.
RightFax 8.5 Fax Board Guide
Setting the hardware interrupt
The Brooktrout TR114 series of analog fax boards also requires you to configure an interrupt setting
on each board. The interrupt value is selected on the board using a jumper (which looks like a small
plastic cap covering two wires). Refer to your Brooktrout documentation for the location of the
interrupt header on your fax board model.
All Brooktrout TR114 fax boards installed in the same computer must use the same interrupt setting.
If a TR114 is already installed and operating, and you add another TR114 board, you must set the
hardware interrupt on the new board to the same value as the currently installed board.
The default interrupt setting for all Brooktrout TR114 series fax boards is 5. You can use this setting
or use any other interrupt setting that does not conflict with other devices on the computer. On
some computers, interrupt 3 may cause a conflict with the second serial port, and interrupt 4 may
conflict with the first serial port. If all of the Brooktrout TR114 boards are installed in 16-bit slots,
interrupts 10, 11, and 15 are often your best choices.
Note If you have a combination of ISA and PCI TR114 fax boards, you must set the interrupts used by your
ISA cards as “ISA only” in your server BIOS.
Installing Brooktrout TR114 fax boards
Fax boards can be installed in the RightFax server or in a separate computer called a “remote
BoardServer.” For information on using remote BoardServers, refer to the RightFax Administrator’s
Guide.
Warning Never insert a loop-start line into a DID port. Doing so will damage the fax board and void all
warranties. If you have any doubts, test the phone line with a volt meter prior to connecting it to a DID port to
ensure that no current exists on the line.
After all of your Brooktrout TR114 fax boards are configured to use the proper
I/O addresses and hardware interrupt, you are ready to install them. Always turn your computer
off before inserting or removing any board, and take all necessary precautions to prevent static
discharge when handling any fax board. ISA TR114 boards can be installed into either an 8-bit or 16bit slot in an ISA or EISA computer. PCI boards can be installed in any PCI bus slot.
After the fax boards are properly installed, refer to your Brooktrout documentation for instructions
on connecting the DID and/or loop-start phone cables and optional power supply.
Completing the installation of your Brooktrout TR114 fax boards
After your Brooktrout TR114 fax boards have been installed, you should test the fax channels to
ensure that the boards have been properly configured and installed. For information on testing your
fax channels, see “Testing Brooktrout Loop-Start Boards” (page 14), and “Testing Brooktrout DID
Boards” (page 15).
When you have completed installing and testing your Brooktrout TR114 fax boards, you must
configure the RightFax software to communicate with the boards. For information on configuring
RightFax to work with your fax boards, refer to the chapter on configuring the RightFax
BoardServer in the RightFax Administrator’s Guide.
11
12
Chapter 1
Brooktrout Analog Fax Boards
Installing Brooktrout TruFax Boards
The Brooktrout TruFax series of analog fax boards consists of models with one or two loop-start
channels. Multiple TruFax boards can be installed on a single computer, but TruFax boards cannot
be used in combination with any other type of fax board. Instructions in this section apply to all
supported Brooktrout TruFax boards unless otherwise noted.
The following table lists all of the Brooktrout TruFax series fax boards supported by RightFax.
Table 1D Supported Brooktrout TruFax Series Fax Boards
Board model
Functionality
TruFax
Two loop-start channel ISA analog fax board.
TruFax 100 PCI
One loop-start channel PCI analog fax board.
TruFax 200 PCI
Two loop-start channel PCI analog fax board.
Setting the I/O address
This section applies to the ISA TruFax board only. You do not need to set an I/O address on either
the TruFax 100 PCI or TruFax 200 PCI.
Before installing ISA TruFax boards, you must manually set the base I/O address on each board.
The base I/O address is set on the board using switches 1 through 8 on the address selection dip
switch unit on the fax board. Refer to your Brooktrout documentation for the location of this unit on
your board.
Warning Do not use a pencil or any other object that conducts electricity to move the switches on the SW1
unit. Using graphite and other electrically conductive materials may cause severe damage to the board.
Each fax channel on the TruFax uses four consecutive I/O addresses. The address specified on the
address selector switch defines the base I/O address for the first channel. The second fax channel on
the board uses an address four greater than the first channel. For example, if the TruFax has its base
address set to 140, the two fax channels on the board will use addresses 140 and 144. If you have
multiple ISA TruFax boards installed, be careful not to assign overlapping I/O addresses.
RightFax 8.5 Fax Board Guide
The following table lists commonly used base address settings for TruFax fax boards. Using these
addresses may make it easier to prevent overlapping I/O addresses when you have multiple boards
installed.
Table 1E TruFax Switch Settings for Commonly Used Base I/O Addresses
Base I/O
address
Switch
1
Switch
2
Switch
3
Switch
4
Switch
5
Switch
6
Switch
7
Switch
8
100
Off
On
Off
Off
Off
Off
Off
Off
108
Off
On
Off
Off
Off
Off
On
Off
110
Off
On
Off
Off
Off
On
Off
Off
118
Off
On
Off
Off
Off
On
On
Off
120
Off
On
Off
Off
On
Off
Off
Off
128
Off
On
Off
Off
On
Off
On
Off
130
Off
On
Off
Off
On
On
Off
Off
138
Off
On
Off
Off
On
On
On
Off
140
Off
On
Off
On
Off
Off
Off
Off
148
Off
On
Off
On
Off
Off
On
Off
150
Off
On
Off
On
Off
On
Off
Off
158
Off
On
Off
On
Off
On
On
Off
160
Off
On
Off
On
On
Off
Off
Off
168
Off
On
Off
On
On
Off
On
Off
Setting the hardware interrupt on the ISA board
Note This section applies to the ISA TruFax board only. You do not need to set a hardware interrupt on either
the TruFax 100 PCI or TruFax 200 PCI.
The ISA TruFax board requires you to configure an interrupt setting on each board. The interrupt
value is selected on the board using a jumper (which looks like a small plastic cap covering two
wires). Refer to your Brooktrout documentation for the location of the interrupt header on your
particular fax board model.
All ISA TruFax boards installed in the same computer must use the same interrupt setting. If a
TruFax board is already installed and operating, and you add another TruFax board, you must set
the hardware interrupt on the new board to the same value as the currently installed board.
You can use any interrupt setting that does not conflict with other devices on the computer. On
some computers, interrupt 3 may cause a conflict with the second serial port, and interrupt 4 may
conflict with the first serial port. If all of the TruFax boards are installed in 16-bit slots, interrupts 10,
11, and 15 are often your best choices.
Installing Brooktrout TruFax boards
Fax boards can be installed in the RightFax server or in a separate computer called a “remote
BoardServer.” For information on using remote BoardServers, refer to the RightFax Administrator’s
Guide.
After all of your TruFax boards are configured to use the proper I/O addresses and hardware
interrupt (if necessary), you are ready to install them. Always turn your computer off before
inserting or removing any board, and take all necessary precautions to prevent static discharge
when handling any fax board. The ISA TruFax board can be installed into either an 8-bit or 16-bit
slot in an ISA or EISA computer. The PCI boards can be installed in any PCI bus slot.
13
14
Chapter 1
Brooktrout Analog Fax Boards
After the fax boards are properly installed, refer to your Brooktrout documentation for instructions
on connecting the loop-start phone cables.
Completing the installation of your Brooktrout TruFax fax boards
After your Brooktrout TruFax fax boards have been installed, you should test the fax channels to
ensure that the boards have been properly configured and installed. For information on testing your
fax channels, see ”Testing Brooktrout Loop-Start Boards” on page 14.
When you have completed installing and testing your Brooktrout TruFax fax boards, you must
configure the RightFax software to communicate with the boards. For information on configuring
RightFax to work with your fax boards, refer to the chapter on configuring the RightFax
BoardServer in the RightFax Administrator’s Guide.
Testing Brooktrout Loop-Start Boards
After you have installed Brooktrout loop-start analog fax boards, you should test them to ensure
that the I/O addresses and hardware interrupts have been set properly and that faxes can be sent.
If the RightFax BoardServer service is running on the RightFax server, you must stop it before
performing these tests. To stop the BoardServer module, open a command prompt and enter the
following command:
net stop rfboard
Testing the I/O address settings
Note You do not need to run this program if you have installed Brooktrout TR1034 fax boards only.
If you have installed Brooktrout TR112, TR114, or TruFax boards, you must run the Faxinit program
to confirm that your fax board I/O settings are correct. This program scans the file Faxinit.cfg for I/
O addresses, and then checks those addresses for Brooktrout fax channels.
To test the fax board I/O address settings
1. Create a new text file called Faxinit.cfg on your RightFax server in the RightFax\RFBoard folder.
List the I/O addresses of your Brooktrout fax channels in the format:
addrs BaseI/0+4 NumChannels
where BaseI/0+4 is the base I/O address of the board plus four (to represent the first channel
on the board), and NumChannels is the number of channels on the board.
Example The following entry is used for a four-channel board with a base
I/O of 260:
addrs 264 4
2. After you have entered your fax channel I/O addresses for all installed Brooktrout fax boards,
save and close the file.
3. Open a command prompt and change to the RightFax\RFBoard folder on the RightFax server.
4. Enter the following command:
Faxinit Faxinit.cfg
The Faxinit program will confirm that the I/O addresses you entered in Faxinit.cfg correspond
to Brooktrout fax channels. If Faxinit.exe reports errors, you may have an address conflict. Check
the I/O addresses of each board and make changes if necessary.
RightFax 8.5 Fax Board Guide
Testing the ability to send a fax
Fax.exe is a command line utility that lets you send and receive faxes to test the functionality of
Brooktrout loop-start analog fax boards and the phone lines connected to them. Before running
Fax.exe, run the Faxinit program (see ”Testing the I/O address settings” on page 14) and make sure
that no errors are generated.
To test the ability to send a fax
1. Connect a phone line to the loop-start jack on the Brooktrout fax board.
2. Open a command prompt and change to the RightFax\RFBoard folder on the RightFax server.
3. Enter the following command:
Fax -u Channel -s ,,FaxNumber test1.ipk
Where Channel is the number of the channel you are testing (use 0 (zero) for the first channel, 1
for the second channel, etc.), and FaxNumber is the number of a fax machine where you will
receive the test fax. Include any additional digits or pauses you need to get an outside line or for
accounting codes.
Example
fax -u 0 -s ,,9,5551212 test1.ipk
4. When the test is successful, you will see the following message:
Remote ID: ‘’
Total pages: 1
Page: 1 bad lines 0 total lines 1058
Done
Go to your fax machine and verify that the fax was received.
If an error is reported or the fax does not arrive at the specified fax machine, you may have a
hardware interrupt conflict. Verify that no other boards are using the same interrupt setting and
re-run the test.
Testing Brooktrout DID Boards
You can test boards with both loop-start and DID channels or with DID channels only.
Testing boards with both loop-start and DID channels
If you have a board with both loop-start and DID lines, you can perform a loopback test to verify the
operation of both types of channels at the same time. In this test, you will send a fax from the loopstart channel to the DID channel. You can test only two channels at a time.
To perform a loopback test
1. Connect your DID power supply to the DC input jack and the fax board.
2. Using the cables supplied with the fax board, connect the RJ-45 ends to the fax board.
3. Using female-to-female adapters, connect the RJ-11 connectors at the other end of the cable to
each other.
Note There will be two RJ-11 ends if you have a two channel board and four RJ-11 ends if you have a
four-channel board. Connect cable A to cable A and cable B to cable B.
4. Open a command prompt and change to the RightFax\RFBoard folder on the RightFax server.
15
16
Chapter 1
Brooktrout Analog Fax Boards
5. Enter the following command:
Fax -u Channel -r test2.ipk
Where Channel is the number of the DID channel that will be receiving the test fax (use 0 (zero)
for the first channel 1 for the second channel, etc.)
6. Without closing the first command prompt window, open a second command prompt window
and change to the RightFax\RFBoard folder on the RightFax server.
7. Enter the following command:
fax -u Channel -s ,,1234 test1.ipk
Where Channel is the number of the loop-start channel that will be sending the test fax (use 0
(zero) for the first channel, 1 for the second channel, etc.)
8. Watch both command prompt windows. You should be able to see status messages as the fax is
sent and received by the board. If you receive error messages, you may have a problem with
your fax boards or the board configuration settings.
Testing boards with DID channels only
1. Open a command prompt and change to the RightFax\RFBoard folder on the RightFax server.
2. For each channel to test, enter the following command:
Fax -u Channel -r test2.ipk
Where Channel is the channel number to test (use 0 (zero) for the first channel, 1 for the second
channel, etc.)
3. Connect a standard analog (not PBX) telephone to the DID cable coming from the board that
corresponds to the channel number you are testing.
4. Pick up the handset, dial any four digits, and then listen for a fax tone.
8 If you hear the digits as you dial them but do not hear a fax tone, confirm that you have
correctly plugged the cable that corresponds to the channel number you are testing into the
telephone.
8 If you do not hear the digits as you dial them, check that the DID power supply is properly
connected to the board and plugged into a powered outlet.
If you hear a fax tone but have problems receiving faxes on this channel, then the problem most
likely lies with the phone company’s configuration of your DID circuit.
RightFax 8.5 Fax Board Guide
Chapter 2
Brooktrout Digital Fax Boards
B
efore installing any fax board into the RightFax server, you must first configure the board to
operate correctly and without hardware conflicts. If you are installing multiple fax boards of the
same or different types, watch for special notes specific to such instances. Be sure to record the I/
O addresses, DMA channels, and interrupts selected for each installed fax board; you may need this
information when configuring the fax boards in RightFax.
Warning Static discharge can severely damage your fax board. Exposing your fax board to static electricity
will void all warranties on the board. Always use caution when handling fax boards.
Supported Brooktrout TR1034 Series Digital Fax Boards
The TR1034 family of digital fax boards consists of models with up to thirty channels for T1, E1, or
PRI-ISDN telephone lines. Instructions in this chapter apply to all supported TR1034 digital boards
unless otherwise noted. If you are installing analog fax boards, see ”Installing Brooktrout TR1034
Series Analog Fax Boards” on page 7. RightFax currently supports the following TR1034 series
digital fax boards.
Table 2A Supported TR1034 Series Digital Fax Boards
Board model
Description
TR1034-P16H+E1
16 channel PCI digital fax board with built-in E1 interface.
TR1034-P24H+T1
24 channel PCI digital fax board with built-in T1 interface.
TR1034-P30H+E1
30 channel PCI digital fax board with built-in E1 interface.
TR1034-P8H+E1
8 channel PCI digital fax board with built-in E1 interface.
Because either a T1 or E1 network interface is built into each of these boards, no external network
interface card (NIC) is required.
17
18
Chapter 2
Brooktrout Digital Fax Boards
Supported Brooktrout TR114 Series Digital Fax Boards
The TR114 family of digital fax boards consists of models with up to 16 channels for your T1, E1,
PRI-ISDN, or BRI telephone lines. Instructions in this chapter apply to all supported TR114 digital
boards unless otherwise noted. If you are installing analog fax boards, see ”Installing Brooktrout
TR114 Series Analog Fax Boards” on page 9. RightFax currently supports the following TR114 series
digital fax boards.
Table 2B Supported TR114 Series Digital Fax Boards
Board model
Description
TR114-I12V
12 channel MVIP-only ISA digital fax board. Requires TRNIC network interface card.
TR114-I16V
16 channel MVIP-only ISA digital fax board. Requires TRNIC network interface card.
TR114-I2+BRI
2 channel ISA digital fax board with built-in BRI interface (supported in Europe only).
Does not require TRNIC network interface card.
2 channel PEB-only ISA digital fax board. Requires TRNIC network interface card.
TR114-I2P
Although this board is fully supported by RightFax, you must configure and install the
board exactly as you would the MVIP version TR114-I2V.
TR114-I2V
2 channel MVIP-only ISA digital fax board. Requires TRNIC network interface card.
TR114-I4+BRI
4 channel ISA digital fax board with built-in BRI interface (supported in Europe only).
Does not require TRNIC network interface card.
4 channel PEB-only ISA digital fax board. Requires TRNIC network interface card.
TR114-I4P
Although this board is fully supported by RightFax, you must configure and install the
board exactly as you would the MVIP version TR114-I4V with one exception.When
prompted for a bus interface, select PEB.
TR114-I4V
4 channel MVIP-only ISA digital fax board. Requires TRNIC network interface card.
8 channel PEB-only ISA digital fax board. Requires TRNIC+I24T network interface card.
TR114-I8P
This board must be configured in the RightFax board configuration as a TR114+I8V
(when prompted for a bus interface, select PEB) and installed using the instructions that
come with the fax board.
TR114-I8V
8 channel MVIP-only ISA digital fax board. Requires TRNIC network interface card.
TR114-I8V+T1
8 channel MVIP-only ISA digital fax board with built-in T1 interface. Does not require
TRNIC network interface card.
TR114-P16V
16 channel MVIP-only PCI digital fax board. Requires TRNIC network interface card.
TR114-P2+BRI
2 channel PCI digital fax board with built-in BRI interface (supported in Europe only).
Does not require TRNIC network interface card.
TR114-P2V
2 channel MVIP-only PCI digital fax board. Requires TRNIC network interface card.
TR114-P4+BRI
4 channel PCI digital fax board with built-in BRI interface (supported in Europe only).
Does not require TRNIC network interface card.
TR114-P4V
4 channel MVIP-only PCI digital fax board. Requires TRNIC network interface card.
TR114-P8V
8 channel MVIP-only PCI digital fax board. Requires TRNIC network interface card.
TR114-P8V+T1
8 channel MVIP-only PCI digital fax board with built-in T1 interface. Does not require
TRNIC network interface card.
In Brooktrout’s naming scheme, “TR114” is the board model, “I” or “P” indicates ISA or PCI,
followed by the number of channels, and then a letter indicating the type of bus used to
communicate with network interface card (MVIP or PEB). “+T1” in the board model number
indicates that the board includes an on-board digital interface and does not require a separate
network interface card.
For information on configuring the base I/O address, interrupt header, and MVIP settings of your
digital fax board and network interface card, please refer to your Brooktrout documentation.
RightFax 8.5 Fax Board Guide
Supported Network Interface Cards
Each of the supported digital fax boards must be connected to a separate network interface card,
which provides the digital interface appropriate to your phone line type. The network interface card
is physically connected to one or more of your digital fax boards via an MVIP or PEB data bus. (PEB
bus fax boards are supported only for T1 interfacing in conjunction with the Brooktrout
TRNIC-I24T and Dianatel EA24 network interface cards.)
The following table lists all network interface cards supported by RightFax including the types of
digital phone lines supported by the card.
Table 2C Supported Network Interface Cards
Supports
PRI-T1
Supports
T1
Supports
PRI-E1
Supports
E1
Supports
BRI
Brooktrout TRNIC I24T
No
Yes
No
No
No
Brooktrout TRNIC P24T
No
Yes
No
No
No
Dianatel EA24
No
Yes
No
No
No
Netaccess BRI-ISA8
No
No
No
No
Yes
NIC model
Netaccess BRI-PCI8
No
No
No
No
Yes
Netaccess ISALC-1E
No
No
Yes
Yes
No
Netaccess ISALC-1T
Yes
Yes
No
No
No
Netaccess ISALC-1T-csu
Yes
Yes
No
No
No
Netaccess ISALC-2E
No
No
Yes
Yes
No
Netaccess ISALC-2T
Yes
Yes
No
No
No
Netaccess ISALC-2T-csu
Yes
Yes
No
No
No
Netaccess PCI-24V
Yes
Yes
No
No
No
Netaccess PCI-24V-csu
Yes
Yes
No
No
No
Netaccess PCI-32V
No
No
Yes
Yes
No
Netaccess PCI-48V
Yes
Yes
No
No
No
Netaccess PCI-48V-csu
Yes
Yes
No
No
No
Netaccess PCI-64V
No
No
Yes
Yes
No
Installing Digital Fax Boards and Network Interface Cards
If you are combining digital fax boards with network interface cards, the boards should all be
installed into your RightFax server in a layout that allows easy connection of the MVIP ribbon cable
between the boards.
You can attach your network interface card to as many fax boards as it has channels available. For
example, a network interface card with 24 channels can be connected via MVIP ribbon cable to three
separate fax boards with eight channels each. In addition, you can install and configure two
separate network interface cards per RightFax server. The network interface card and fax boards do
not need to be connected in any particular sequence on the MVIP cable.
To configure RightFax to recognize fax and network interface cards
1. Install the network interface card and digital fax boards according to the instructions provided
by your board manufacturer.
2. On the RightFax server, run the BoardServer configuration program from Enterprise Fax
Manager.
19
20
Chapter 2
Brooktrout Digital Fax Boards
3. Click Add Brooktrout Board and add each of your installed digital fax boards to the list under
Global Board Settings.
4. Click each installed board in the list and complete its configuration information. For more
information on configuring fax boards in the BoardServer, refer to the RightFax Administrator’s
Guide.
After you have set up your fax boards in the BoardServer configuration program, you must
configure RightFax to recognize your network interface card. When you add a digital Brooktrout fax
board in the BoardServer configuration program, a new Digital Configuration option appears at the
top of the tree in the left pane. Click this option to run the digital configuration wizard. Complete
the wizard according to your network interface card types. For a description of any box, click the [?]
icon in the top right corner of the dialog box and then click the box you want help with. Options that
are unavailable either do not apply to the board type or settings you have selected, or the settings
are not optional.
RightFax 8.5 Fax Board Guide
Chapter 3
Dialogic Analog Fax Boards
B
efore installing any fax board into the RightFax server, you must first configure the board to
operate correctly and without hardware conflicts. If you are installing multiple fax boards of the
same or different types, watch for special notes specific to such instances. Be sure to record the
I/O addresses, DMA channels, and interrupts selected for each installed fax board; you may need
this information when configuring the fax boards in RightFax.
Do not load any Dialogic® software included with the fax board. RightFax software includes all the
necessary drivers and programs for your fax board.
Warning Static discharge can severely damage your fax board. Exposing your fax board to static electricity
will void all warranties on the board. Always use caution when handling fax boards.
Installing Dialogic Analog Fax Boards
Supported Dialogic analog fax boards include models with up to four loop-start or DID channels.
Instructions in this chapter apply to all supported Dialogic analog fax boards unless otherwise
noted. (If you are installing Dialogic digital fax boards, see Chapter 4, ”Dialogic Digital Fax Boards”.
21
22
Chapter 3
Dialogic Analog Fax Boards
The following table lists all of the Dialogic analog fax boards supported by RightFax.
Table 3A Supported Dialogic Analog Fax Boards
Board model
Description
CP
One loop-start channel ISA analog fax board. You can install up to 16 Dialogic CP boards
in a single computer.
CP4/LSI
Four loop-start channel ISA analog fax board.
CPD
One DID channel ISA analog fax board. You can install up to 16 Dialogic CPD boards in a
single computer. Requires an external –48V DC power supply.
CPD/220
Two loop-start and two DID channel ISA analog fax board. If your computer has a 220
watt power supply, you can install a maximum of two CPD/220 boards in one computer. If
your computer has a 300 watt power supply, you can install a maximum of three
CPD/220 boards.
CPi
One loop-start channel ISA analog fax board. You can install up to 16 Dialogic CPi
boards in a single computer.
CPi/100
One loop-start channel ISA analog fax board. You can install up to 16 Dialogic CPi/100
boards in a single computer.
CPi/200
Two loop-start channel ISA analog fax board.
CPi/200 PCI
Two loop-start channel PCI analog fax board.
CPi/400 PCI
Four loop-start channel PCI analog fax board. You can install up to six Dialogic CPi/400
boards in a single computer.
XPI
One loop-start channel ISA analog fax board.
XPI/100
One loop-start channel ISA analog fax board.
XPI/200
Two loop-start channel ISA analog fax board.
Warning The voltage level supplied by the CPD/220 fax board is considered dangerous. Never operate the
system when the chassis cover has been removed.
Setting the I/O address
Before installing your Dialogic fax boards, you may need to manually set the base I/O address of
each board.All fax boards are shipped from Dialogic with a default I/O address of 350. If more than
one fax board is installed in the same computer, this will result in an I/O address conflict. All of the
channels on each installed Dialogic board must have a unique I/O address.
Warning Do not use a pencil or any other object that conducts electricity to move DIP switches on any fax
board. Using graphite and other electrically conductive materials may cause severe damage to the board.
On the Dialogic CP, CP1, CPi/100, and CPD fax boards, the I/O address is set using six DIP
switches located on the mounting bracket. On the Dialogic CP4/LSI, CPi/200, and CPD/220 fax
boards, the I/O address is set using three DIP switches on the unit marked “SW1” on the fax board.
Refer to your Dialogic documentation for the location of the I/O address DIP switches on your
particular fax board.
Note The Dialogic CPi/200 PCI and CPi/400 PCI fax boards do not require you to set I/O address values.
Instead, these board models include a rotary switch that lets you specify a unique identifier number for each
installed board. For information on setting the unique identifier on these board models, see ”Setting the
board identifier” on page 24.
The I/O setting represents the first channel on the board. Any additional channels on the board
automatically use the next I/O addresses in sequence. If you are installing multiple boards, make
sure that the I/O address settings do not overlap. Any changes to the I/O address DIP switches
must be made before the fax board is installed.
RightFax 8.5 Fax Board Guide
The following table lists I/O addresses and their switch settings for Dialogic board models whose I/
O addresses are set using six switches on the mounting bracket.
Table 3B Mounting Bracket I/O Address Switch Settings
Physical
channel
number
I/O address
Switch
1
Switch
2
Switch
3
Switch
4
Switch
5
Switch
6
0 (default)
350–353
Off
Off
Off
Off
Off
Off
1
360–363
On
Off
Off
Off
Off
Off
2
370–373
Off
On
Off
Off
Off
Off
3
250–253
On
On
Off
Off
Off
Off
4
260–263
Off
Off
On
Off
Off
Off
5
270–273
On
Off
On
Off
Off
Off
6
150–153
Off
On
On
Off
Off
Off
7
160–163
On
On
On
Off
Off
Off
8
100–103
Off
Off
Off
On
Off
Off
9
104–107
On
Off
Off
On
Off
Off
10
108–10B
Off
On
Off
On
Off
Off
11
10C–10F
On
On
Off
On
Off
Off
12
110–113
Off
Off
On
On
Off
Off
13
114–117
On
Off
On
On
Off
Off
14
118–11B
Off
On
On
On
Off
Off
15
11C–11F
On
On
On
On
Off
Off
16
280–283
Off
Off
Off
Off
On
Off
17
284–287
On
Off
Off
Off
On
Off
18
288–28B
Off
On
Off
Off
On
Off
19
28C–28F
On
On
Off
Off
On
Off
20
290–293
Off
Off
On
Off
On
Off
21
294–297
On
Off
On
Off
On
Off
22
298–29B
Off
On
On
Off
On
Off
23
29C–29F
On
On
On
Off
On
Off
24
120–123
Off
Off
Off
On
On
Off
25
124–127
On
Off
Off
On
On
Off
26
128–12B
Off
On
Off
On
On
Off
27
12C–12F
On
On
Off
On
On
Off
28
130–133
Off
Off
On
On
On
Off
29
134–137
On
Off
On
On
On
Off
30
138–13B
Off
On
On
On
On
Off
31
13C–13F
On
On
On
On
On
Off
23
24
Chapter 3
Dialogic Analog Fax Boards
The following table lists I/O addresses and their switch settings for Dialogic board models whose I/
O addresses are set using three switches on the SW1 unit on the board.
Table 3C SW1 Unit I/O Address Switch Settings
Channel A I/O
address
Channel B I/O
address
Channel C I/O
address
Channel D I/O
address
Switch
1
Switch
2
Switch
3
350
360
370
250
Off
Off
Off
260
270
150
160
On
Off
Off
100
104
108
10C
Off
On
Off
110
114
118
11C
On
On
Off
280
284
288
28C
Off
Off
On
290
294
298
29C
On
Off
On
120
124
128
12C
Off
On
On
130
134
138
13C
On
On
On
Setting the board identifier
Each installed Dialogic CPi/200 PCI and CPi/400 PCI fax board must be assigned a unique board
identifier so the software can match the telephone numbers to the channels that reside on each
board. The unique board identifier is set using a rotary switch on the board.
To adjust the rotary switch, insert a small flat-head screwdriver in the arrow slot in the center of the
rotary switch. There are 16 available switch settings (from 0 to F hex). The arrow in the center of the
switch points to the current switch setting. Set each installed board to a unique switch setting.
Dialogic recommends setting the rotary switch before the board is installed. If you need to change
the board identifier after the board is installed, you must reboot the computer for the change to take
effect.
Installing Dialogic analog fax boards
Note For information on installing Dialogic CPD/220 fax boards, see ”Installing CPD/220 boards” on
page 25
Fax boards can be installed in the RightFax server or in a separate computer called a “remote
BoardServer.” For information on using remote BoardServers, refer to the RightFax Administrator’s
Guide.
After all of your Dialogic fax boards are configured to use unique I/O addresses, you are ready to
install them. Always turn your computer off before inserting or removing any board, and take all
necessary precautions to prevent static discharge when handling any fax board. Dialogic CP, CPi,
and CPi/100 boards can be installed into either an 8-bit or 16-bit slot. All other Dialogic CP series
boards must be installed in a 16-bit slot.
After the fax boards have been installed, refer to your Dialogic documentation for instructions on
connecting the phone cables.
RightFax 8.5 Fax Board Guide
Installing CPD/220 boards
Fax boards can be installed in the RightFax server or in a separate computer called a “remote
BoardServer.” For information on using remote BoardServers, refer to the RightFax Administrator’s
Guide.
After the CPD/220 fax boards are configured to use unique I/O addresses, you are ready to install
them. Dialogic CPD/220 boards must be installed in a 16-bit slots. Always turn your computer off
before inserting or removing any board, and take all necessary precautions to prevent static
discharge when handling any fax board. To ensure that your system chassis is properly grounded,
you must secure CPD/220 boards using the expansion slot mounting screws.
The CPD/220 is shipped with two Y-cables. Insert the loop start line RJ-11 connector into the port
labeled “L” on the mounting bracket. Insert the DID line connector into the port labeled “D” on the
mounting bracket. To begin loop-start service, plug the loop-start A and B cables into the loop-start
phone jacks. When you are ready to begin continuous DID service, plug the DID A and B cables into
the DID phone jacks.
Warning Never insert a loop-start line into a DID port. Doing so will damage the fax board and void all
warranties. If you have any doubts, test the phone line with a volt meter prior to connecting it to a DID fax
port to ensure that no current exists on the line.
The DID line must be maintained at –48V or the phone company may “busy out” the line
(effectively shutting down service). This means that the computer housing the CPD/220 must stay
on. If you take the system off-line, you may have to notify the telephone company to re-engage the
line.
Testing Dialogic Boards
Before you can perform the fax board tests described in this section, you must configure the
RightFax software to communicate with the boards. For information on configuring RightFax to
work with your fax boards, refer to the chapter on configuring the RightFax BoardServer in the
RightFax Administrator’s Guide.
To test your Dialogic fax boards
This test lets you confirm that your Dialogic boards are installed and working properly and are
connected to working phone lines.
1. Open a command prompt on the RightFax server and enter the following command:
net stop rfboard
This stops the RightFax BoardServer service.
2. In the command prompt window, change to the RightFax\RFBoard folder.
3. Start the Dialogic service by entering the following command:
net start gammafax
4. When the Dialog service is running, enter the following command:
sendfax ,,FaxNumber test001.tif ChannelNum
Where FaxNumber is the number of a working fax machine (including any prefixes necessary to
dial out of your phone system) and ChannelNum is the channel number to test.
If the test is successful, a test fax will arrive at the specified fax machine.
25
26
Chapter 3
Dialogic Analog Fax Boards
Checking the status of your fax channels
RightFax includes a utility that lets you ensure that the Dialogic drivers are running and properly
communicating with all of the channels configured in RightFax. This may also be useful in locating
channel problems.
To check the status of your Dialogic fax channels
1. Open a command prompt window and change to the RightFax\RFBoard folder.
2. Enter the following command:
ntspy.exe
The Ntspy program displays the real-time status of the configured Dialogic fax channels.
RightFax 8.5 Fax Board Guide
Chapter 4
Dialogic Digital Fax Boards
B
efore installing any fax board into the RightFax server, you must first configure the board to
operate correctly and without hardware conflicts. If you are installing multiple fax boards of the
same or different types, watch for special notes specific to such instances. Be sure to record the
I/O addresses, DMA channels, and interrupts selected for each installed fax board; you may need
this information when configuring the fax boards in RightFax.
Do not load any Dialogic® software included with the fax board. RightFax software includes all the
necessary drivers and programs for your fax board.
Warning Static discharge can severely damage your fax board. Exposing your fax board to static electricity
will void all warranties on the board. Always use caution when handling fax boards.
Installing Dialogic Digital Fax Boards
Supported Dialogic digital fax boards include models with up to 32 channels for T1, E1, or PRIISDN telephone lines. Instructions in this chapter apply to all supported Dialogic digital fax boards
unless otherwise noted. If you are installing Dialogic analog fax boards, see ”Installing Dialogic
Analog Fax Boards” on page 21.
Warning RightFax versions 8.5 and later do not support the CP6/SC, CP12/SC, or CP4/SC PEB bus Dialogic
digital fax boards. If you already have one or more of these fax boards installed, do not upgrade the
RightFax server to version 8.5 or later.
The following table lists all of the Dialogic digital fax boards supported by RightFax.
Table 4A Supported Dialogic Digital Fax Boards
Board model
Description
Connect to
NIC via
CPi/200 BRI
2 channel ISA fax board with ISDN BRI support.
N/A
CPi/2400CT-T1
24 channel ISA digital fax board with built-in T1 and PRI-ISDN
interface.
N/A
CPi/3000CT-E1
30/32 channel ISA digital fax board with built-in E1 and PRI-ISDN
interface.
N/A
CPi/400 BRI
4 channel ISA fax board with ISDN BRI support.
N/A
Dialogic digital fax boards may require new I/O settings or other configuration settings in order to
work with your specific phone line type. For more information, refer to the documentation included
with your digital fax board.
27
28
Chapter 4
Dialogic Digital Fax Boards
Installing and Configuring the CPi/2400CT-T1 and CPi/3000CT-E1
These instructions will help you install and configure one or more Intel CPi/2400CT-T1 or
CPi/3000CT-E1 fax boards for use with a RightFax server. To install one or more of these fax boards,
complete all of these steps in the order they are listed.
Mount the fax boards in the server chassis
For information on the hardware requirements and physical installation of one or more
CPi/2400CT-T1 or CPi/3000CT-E1 fax boards, refer to the documentation provided by the board
manufacturer.
Install the fax server or remote BoardServer software
If it is not already installed, install either the RightFax server or remote BoardServer software on the
computer in which the fax boards are located. For information on installing the RightFax server and
running remote BoardServer software (which lets you operate fax boards from a computer other
than your RightFax server), refer to the RightFax Administrator’s Guide.
Install the fax board hardware drivers
Install fax board hardware drivers on all computers in which the fax boards are installed. This install
program is provided with your RightFax server software on a separate CD.
1. Insert the “Fax Board Driver Install” CD. If AutoRun is not enabled, run \RightFax\Setup.exe.
This starts the RightFax Hardware Module install wizard. Click Next at the introductory screen.
2. Enter your name and company name when prompted. Click Next.
3. In the Setup Type screen, select Complete and then click Next.
4. In the Fax Hardware Selection screen, select Dialogic, and then specify the DM3 models. Click
Next.
5. Click Install to begin the installation.
6. Click Finish to complete the RightFax Hardware Module install wizard.
7. When prompted, re-start the computer.
Configure the fax board firmware
1. After the computer re-starts, the GammaLink/Dialogic Configuration dialog box opens.
2. Select DCM Utility.
3. In the Computer Name dialog box, select Local and click Connect.
RightFax 8.5 Fax Board Guide
4. In the Assign Firmware File dialog box, select a firmware file that corresponds to the type of
phone lines you will connect to the fax board. Select one of the options from the following table.
Table 4B CPi/2400CT-T1 and CPi3000CT-E1 Firmware Files
Firmware file
Phone line type
gdk_t1_em.pcd
Robbed-bit T1 using E&M start
gdk_t1_gs.pcd
Robbed-bit T1 using ground start
gdk_t1_ls.pcd
Robbed-bit T1 using loop start
gdk_isdn_4ess.pcd
ISDN PRI using 4ESS protocol
gdk_isdn_5ess.pcd
ISDN PRI using 5ESS protocol
gdk_isdn_dms.pcd
ISDN PRI using DMS protocol
gdk_isdn_net5.pcd
ISDN PRI using NET5 protocol
gdk_isdn_ntt.pcd
ISDN PRI using NTT protocol
5. Click OK. A list of installed Dialogic devices opens.
6. Expand the list of devices and under TDM Bus double-click Bus-0.
7. In the TDM Bus Configuration dialog box, select Media Type (User Defined) in the list of
parameters, and in the Value box select MuLaw.
8. Scroll down the list of parameters, select NETREF One FRU (User Defined), and type “GDK_T1 0”
or “GDK_E1 0” (depending on your board type) in the Value box.
9. Click OK to return to the list of installed Dialogic devices, and then close the Dialogic
Configuration Manager window. This returns you to the GammaLink/Dialogic Configuration
dialog box. Leave this dialog box open for the next set of steps.
Configure the RightFax BoardServer module
1. In the GammaLink/Dialogic Configuration dialog box, select BoardServer CPL.
2. In the Board Configuration dialog box, select Detect GammaLink Board.
3. When the Board Detection dialog box reports that GammaLink fax boards have been successfully
detected, click OK.
4. Configure the remaining options on the Board Configuration dialog box for all fax boards and
individual fax channels according to the instructions in the RightFax Administrator’s Guide.
5. When you have completed the options in the Board Configuration dialog box, click OK. This
returns you to the GammaLink/Dialogic Configuration dialog box. Leave this dialog box open for
the next set of steps.
29
30
Chapter 4
Dialogic Digital Fax Boards
Import a configuration profile
1. In the GammaLink/Dialogic Configuration dialog box, select Import Predefined Config.
2. In the Open Profile dialog box, select a profile that corresponds to the type of phone lines you will
connect to the fax boards. You must select one of the options from the following table.
Table 4C CPi/2400CT-T1 and CPi3000CT-E1 Profiles
Profile
Phone line type
gdk_cas_em_CPi2400CTT1.prf
Robbed-bit T1 using E&M start
gdk_cas_gs_CPi2400CTT1.prf
Robbed-bit T1 using ground start
gdk_cas_ls_CPi2400CTT1.prf
Robbed-bit T1 using loop start
gdk_isdn_4ess_CPi2400CTT1.prf
ISDN PRI using 4ESS protocol
gdk_isdn_5ess_CPi2400CTT1.prf
ISDN PRI using 5ESS protocol
gdk_isdn_dms_CPi2400CTT1.prf
ISDN PRI using DMS protocol
gdk_isdn_net5_CPi3000CTE1.prf
ISDN PRI using NET5 protocol
gdk_isdn_ntt_CPi2400CTT1.prf
ISDN PRI using NTT protocol
3. Click Open.
4. When prompted to enter the number of trunks, select the number of telephone line trunks that
will be connected to the fax board.
5. Click OK. This returns you to the GammaLink ISDN Configuration dialog box. Leave this dialog box
open for the next set of steps.
Start the Dialogic service
1. In the GammaLink/Dialogic Configuration dialog box, select DCM Utility.
2. In the Dialogic Configuration Manager window, click the button with the green circle located on
the toolbar. This starts the Dialogic service.
Figure 4.1 The Dialogic Service Start Button
3. When the Dialogic service is started, close the Dialogic Configuration Manager window, and then
close the GammaLink/Dialogic Configuration dialog box.
Start the RightFax BoardServer service
1. Run Enterprise Fax Manager.
2. Select the local server in the Server tree.
3. In the list of services in the pane at the bottom of the screen, right-click on the BoardServer Module
service, and select Start Service on the shortcut menu.
RightFax 8.5 Fax Board Guide
Testing Dialogic Boards
Before you can perform the fax board tests described in this section, you must configure the
RightFax software to communicate with the boards. For information on configuring RightFax to
work with your fax boards, refer to the chapter on configuring the RightFax BoardServer in the
RightFax Administrator’s Guide.
To test your Dialogic fax boards
This test lets you confirm that your Dialogic boards are installed and working properly and are
connected to working phone lines.
1. Open a command prompt on the RightFax server and enter the following command:
net stop rfboard
This stops the RightFax BoardServer service.
2. In the command prompt window, change to the RightFax\RFBoard folder.
3. Start the Dialogic service by entering the following command:
net start gammafax
4. When the Dialogic service is running, enter the following command:
sendfax ,,FaxNumber test001.tif ChannelNum
Where FaxNumber is the number of a working fax machine (including any prefixes necessary to
dial out of your phone system) and ChannelNum is the channel number to test.
If the test is successful, a test fax will arrive at the specified fax machine.
Checking the status of your fax channels
RightFax includes a utility that lets you ensure that the Dialogic drivers are running and properly
communicating with all of the channels configured in RightFax. This may also be useful in locating
channel problems.
To check the status of your Dialogic fax channels
1. Open a command prompt window and change to the RightFax\RFBoard folder.
2. Enter the following command:
ntspy.exe
The Ntspy program displays the real-time status of the configured Dialogic fax channels.
31
RightFax 8.5 Fax Board Guide
Appendix A
Working with DID Lines
D
ID (direct inward dialing) lines support inbound phone service only. Loop-start lines must be
used for outbound service. A DID interface assigns more than one telephone number to a pair of
wires (a telephone trunk). This enables RightFax to provide automatic routing of faxes to the
proper destination in a multi-user system.
For example, if a company is assigned one DID trunk and 100 telephone numbers ranging from 2399400 to 239-9499, when any one of the numbers in this range is dialed and the DID trunk is
available, the telephone company connects to the trunk and transmits the last few digits (usually
three or four) of the dialed number to the board. By detecting these digits, the fax boards can detect
which one of the 100 numbers was dialed by the caller.
If the 100 telephone numbers correspond to 100 different users on a RightFax system, each user
could have a private fax telephone number. All with only one telephone trunk and one fax channel
required.
If the trunk is busy receiving a fax for one of the users, callers to any of the other 99 numbers
encounter a busy signal. Because of this, you may require more than one DID trunk to which the
range of DID telephone numbers is assigned. The number of trunks required depends on the traffic
demands on the system.
Since DID trunks only support inbound calls, a fax messaging system using DID requires one or
more additional loop-start telephone channels for sending faxes.
Warning Never insert a loop-start line into a DID port. Doing so will damage the fax board and void all
warranties. If you have any doubts, test the phone line with a volt meter prior to connecting it to a DID fax
port to ensure that no current exists on the line.
For DID telephone service, RightFax recommends the following options be configured:
8 Set Trunk Type to “Loop Start.”
8 Set Service Type to “Wink Start.”
8 Set Signalling to “DTMF (Touch-Tone).”
8 Set Digit Length to “4.”
All DID fax boards must supply the DID trunk with continuous –48V DC power. Because no source
of –48V DC exists in the computer, this power must be supplied from an outside source. A Tellabs
8012 (or equivalent) regulated power pack can supply the necessary power.
Connecting a Tellabs 8012 power supply to a DID fax board
1. Turn off the computer.
2. Locate the contact block on the back of the power supply (opposite the plug end) and loosen the
contact labelled 48V RET.
3. Locate the supplied power cord, consisting of two wires (one green and one red) with a plastic
jack at one end and two metal prongs at the other end.
4. Connect the metal prong on the end of the green wire to the 48V RET contact and tighten the
contact screw.
33
34
Appendix A
Working with DID Lines
5. Loosen the contact labelled –48V.
6. Connect the metal prong on the end of the red wire to the –48V contact and tighten the contact
screw. The connection should now look like the following illustration.
Figure A.1 Power Supply Connection
7. Plug the plastic plug on the other end of the power cable into the DC input jack in the fax board
mounting bracket.
8. Turn on the computer.
9. Plug the Tellabs 8012 power supply into the wall socket.
RightFax 8.5 Fax Board Guide
Index
A
analog boards
Brooktrout 7
Dialogic 21, 22, 27
testing 25
B
board identifier 24
Brooktrout
analog boards 7
digital boards 17
installing digital boards 19
supported network interface cards 19
testing DID channels 15
testing loop-start channels 14
TR1034 analog boards 7
TR1034 digital boards 17
TR112 analog boards 9
TR114 analog boards 9
TR114 digital boards 18
TruFax analog boards 12
C
configure DID service 33
CPD/220, installing 25
D
Dialogic
analog boards 21, 27
channel status 26, 31
digital boards 27
I/O addresses 22
installing analog boards 24
installing digital boards 27
installing the CPD/220 25
PCI boards 24
supported analog boards 22
supported digital boards 27
testing analog boards 25
testing digital boards 31
DID
configuring 33
power supply 9, 33
testing channels 15
digital fax boards
Brooktrout overview 17
Dialogic 27
network interface cards 19
testing 31
TR1034 17
TR114 18
DIP switch settings
Dialogic boards 23, 24
TR114 10
TruFax 13
F
Fax.exe 15
Faxinit.exe 14
H
hardware interrupt
TR114 11
TruFax 13
I
I/O addresses
Dialogic 22
TR114 10
TruFax 12
install
Brooktrout digital boards 19
Brooktrout TR1034 analog boards 7– 8
Brooktrout TR112 analog boards 9
Brooktrout TR114 analog boards 9– 11
Brooktrout TruFax boards 12– 14
CPD/220 25
Dialogic analog boards 24
Dialogic digital boards 27
network interface cards 19
introduction 5
L
loop-start channels, testing 14
35
36
Index
M
module number, TR1034 7
mounting bracket 23
N
network interface cards
installing with Brooktrout boards 19
supported 19
Ntspy.exe 26, 31
P
power supply for DID 9, 33
S
Sendfax.exe 25, 31
SW1 unit 24
T
Tellabs 8012 power supply
connecting 33
for Brooktrout analog boards 9
test
Brooktrout DID channels 15
Brooktrout loop-start channels 14
Dialogic analog boards 25
Dialogic digital boards 31
TR1034 analog boards
installing 8
overview 7
TR1034 digital boards
installing 19
supported models 17
TR112 analog boards 9
TR114 analog boards
I/O DIP switch settings 10
installing 11
naming scheme 9
overview 9
setting the hardware interrupt 11
setting the I/O address 10
supported models 7, 9, 12
TR114 digital boards
installing 19
overview 18
TruFax
I/O DIP switch settings 13
installing 13
overview 12
setting the hardware interrupt 13
setting the I/O address 12