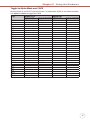
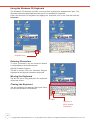
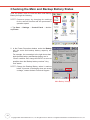
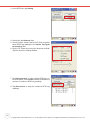
1
RH767 RFID Handheld Reader
User’s Manual
400558G Rev. G
Preface
About This Manual
This manual explains how to install, operate and maintain the RH767.
No part of this publication may be reproduced or used in any form, or by any electrical or
mechanical means, without permission in writing from the manufacturer. This includes but
is not limited to photocopying, recording, or information storage and retrieval systems. The
material in this manual is subject to change without notice.
© Copyright 2009 Unitech Electronics Co., Ltd. All rights reserved.
Unitech global Web site address: http:\\www.unitech-adc.com
Bluetooth is a registered trademark of Bluetooth SIG.
Microsoft, Windows and ActiveSync are either registered trademarks or
trademarks of Microsoft Corporation. Other product names mentioned
in this manual may be trademarks or registered trademarks of their
respective companies and are hereby acknowledged.
Unitech is a member of the Oracle Embedded Software Licensing
Program.
Regulatory Compliance Statements
Federal Communication Commission Interference Statement
This equipment has been tested and found to comply with the limits for a Class B digital
device, pursuant to Part 15 of the FCC Rules. These limits are designed to provide
reasonable protection against harmful interference in a residential installation. This equipment
generates, operates and can radiate radio frequency energy, and if not installed and used in
accordance with the instructions, may cause harmful interference to radio communications.
However, there is no guarantee that interference will not occur in a particular installation. If
this equipment does cause harmful interference to radio or television reception, which can be
determined by turning the equipment off and on, the user is encouraged to try and correct the
interference through one of the following:
●● Relocate the receiving antenna.
●● Increase the separation between the equipment and receiver.
●● Connect the equipment into an outlet on a circuit that is different from the receiver.
●● Consult the dealer or an experienced radio/television technician for help.
FCC Caution:
Any changes or modifications not expressly approved by the party responsible for compliance
could void the user’s authority to operate this equipment.
This device complies with Part 15 of the FCC Rules. Operation is subject to the following
two conditions: (1) This device may not cause harmful interference, and (2) this device must
accept any received interference, including interference that may cause undesired operation.
This device and its antenna(s) must not cohabitate or operate in conjunction with any other
antenna or transmitter.
i
FCC Radiation Exposure Statement
This equipment complies with FCC radiation exposure limits set forth for an uncontrolled
environment. End users must follow the specific operating instructions for satisfying RF
exposure compliance. Please follow the operation instructions in this manual to maintain
compliance with FCC RF exposure requirments. This RFID Handheld Terminal meets FCC
RF exposure guidelines when used in handheld or desktop operation.
RoHS Statement
This device conforms to RoHS (Reduction of Hazardous Substances)
European Union regulations that set maximum concentration limits on
hazardous materials used in electrical and electronic equipment.
Laser Information
The Unitech RH767 series is certified in the U.S. to conform to the DHHS/CDRH 21CFR
Subchapter J and IEC 825-1 requirnments. In addition, Class II and Class 2 products are not
considered to be hazardous. The RH767 series contains an internal Visible Laser Diode (VLD)
whose emissions do not exceed the maximum limits as set forth in the above regulations.
The scanner is designed so that there is no human access to harmful laser light during
normal operation, user maintenance or during prescribed service operations.
The laser safety warning label required by the DHHS/IEC is located on the RH767's back
panel.
CAUTION! Use of controls or adjustments or performance of procedures other than those
specified herein may result in hazardous laser light. Use of optical instruments
with the scanner will increase eye hazard. Optical instruments include
binoculars, microscopes and magnifying glasses. This does not include eye
glasses worn by the user.
IMPORTANT NOTE
FCC Radiation Exposure Statement: This equipment complies with FCC radiation exposure
limits set forth for an uncontrolled environment. This equipment should be installed and
operated with a minimum distance of 1.5 cm between the radiator and the user's body.
Warranty
Unitech Limited Warranty covers the following items that are free from defects during normal
use:
●● RH767 – 1-year limited warranty.
●● Lithium-Ion battery – 6-month limited warranty.
the warranty becomes void if equipment is modified, improperly installed/used, damaged by
accident/neglect, or if any parts are improperly installed or replaced by the user.
Use only the AC Adapter supplied. Using the wrong AC Adapter may damage the RH767 and
will void the warranty.
ii
Battery Notices
This Unitech RH767 is equipped with a Lithium-Ion Battery Pack and a Backup Battery.
However, the RH767 may not start without an external power source due to battery discharge
after extended storage periods. To charge the battery to full capacity, connect the RH767 to
an external power source with the USB Charging Cable or the Unitech RH767 Cradle. Initially
charge the RH767 for at least 16 hours.
The Backup Battery will receive power from an external power source, or through the main
battery (But, only if the main battery has adequate power). In order to prevent data loss due
to Backup Battery failure, connect the RH767 to the main Battery Pack or an external power
source.
NOTE: Turn the RH767 Backup Battery Switch to the ON position before initial use.
To garauntee optimal performance, replace rechargeable batteries every year or after 500
charge/discharge cycles. It is normal for the battery to physically expand after one year or
500 cycles. Although it does not cause harm, the battery can not be used again and must be
disposed of according to local battery saftey disposal procedures.
If the performance decrease is greater than 20 percent in a Lithium-Ion battery, the battery is
at the end of its life cycle. Do not continue to use the battery, and ensure that the battery is
properly disposed.
The length of time that a battery power lasts depends on the battery type and how the device
is used. Conserve battery life through the following:
●● Avoid frequent full discharges because this places additional strain on the battery. Several
partial discharges with frequent recharges are better than a deep one. Recharging a
partially charged Lithium-Ion battery does not cause harm because there is no memory.
●● Keep the Lithium-Ion battery cool. Avoid a hot car. For prolonged storage, keep the battery
at a 40 percent charge level.
●● Do not leave the lithium-Ion battery discharged and unused for an extended time period
because the battery will wear out and the longevity of the battery will be at least shorter
than half of the one with frequent recharges.
Battery Charge Notice
It is important to consider the environment temperature when charging the Lithium-Ion Battery
Pack. Charging is most efficient at room temperature or in a slightly cooler environment. It
is essential that batteries are charged within the temperature ranges of 32º F - 104ºF (0°C
- 40°C). Charging batteries outside of the specified temperature range could damage the
batteries and shorten their charging life cycle.
CAUTION! Do not charge batteries at a temperature lower than 32ºF (0°C), which will
increase the internal resistance to cause heat and make the batteries unstable
and unsafe. Please use a battery temperature detecting device for a charger to
ensure a safe charging temperature range.
Storage and Safety Notice
Although charged Lithium-Ion batteries may be left unused for several months, their capacity
may deplete due to buildup of internal resistance. In this case they will require recharging.
Lithium-Ion batteries may store at temperatures between -4Fº - 140Fº (-20°C to 60°C). But
the batteries may deplete more rapidly at the warmer end of this range. It is recommended to
store batteries at room temperature.
iii
Table of Contents
Preface....................................................................................i
Regulatory Compliance Statements................................................................................ i
Federal Communication Commission Interference Statement.................................. i
About This Manual................................................................................. i
FCC Radiation Exposure Statement......................................................................... ii
RoHS Statement....................................................................................................... ii
Laser Information........................................................................................................... ii
Warranty......................................................................................................................... ii
Battery Notices...............................................................................................................iii
Battery Charge Notice..............................................................................................iii
Storage and Safety Notice........................................................................................iii
Chapter 1...............................................................................1
Introducing the RH767...................................................................................................1
Features....................................................................................................................1
Getting Started...................................................................................... 1
Package Contents..........................................................................................................2
A Tour of the RH767.......................................................................................................3
Back View.................................................................................................................4
Bottom View..............................................................................................................5
Setting up the RH767.....................................................................................................5
Installing the Battery Pack........................................................................................5
Charging the Battery.................................................................................................8
Charging the Battery using the Synchronization Power Cable........................... 8
Charging the Battery with the Docking Station.................................................... 8
Checking the Battery Status................................................................................ 9
Connecting the RH767 to a PC................................................................................9
Turning the RH767 on for the First Time................................................................. 10
Powering On.....................................................................................................10
Using the Stylus................................................................................................ 11
Calibrating the RH767 Screen.......................................................................... 11
Setting the Time and Date................................................................................ 13
Adjusting the Screen Brightness....................................................................... 13
Chapter 2.............................................................................14
Using Function keys...............................................................................................14
Using the Hardware............................................................................ 14
Toggle to Alpha Mode and CAPS........................................................................... 15
Using the Windows CE Keyboard........................................................................... 16
Entering Characters..........................................................................................16
Moving the Keyboard........................................................................................16
Adjusting Settings.........................................................................................................17
Checking the Main and Backup Battery Status............................................................ 18
Using the Laser Scanner..............................................................................................19
Scanner Settings..........................................................................................................20
Scan2Key.....................................................................................................................21
Using the RFID.............................................................................................................21
Launching the RFID Demo Program...................................................................... 21
Chapter 3.............................................................................23
Establishing Device-PC Connection.............................................................................23
Installing Microsoft ActiveSync...............................................................................23
Connecting the Device to the Computer................................................................. 23
Getting Connected.............................................................................. 23
Using ActiveSync to Exchange Files............................................................................24
Using the WLAN...........................................................................................................25
Setting up the Wireless Local Area Network Card.................................................. 25
Obtaining an IP Address via DHCP Server....................................................... 25
Specifying an IP Address..................................................................................26
Wi-Fi Connection...............................................................................................27
Using the Summit Utilities................................................................................. 29
Admin Login............................................................................................................29
Scan Available AP...................................................................................................29
Encryption...............................................................................................................30
Commit and Activate...............................................................................................30
Appendix A...........................................................................31
Middleware Supporting List................................................................. 31
Appendix B...........................................................................32
System Specifications......................................................................... 32
Appendix C...........................................................................33
Worldwide Support.............................................................................. 33
v
Chapter 1
Getting Started
Introducing the RH767
RH767 UHF
Unitech’s RH767 Ultra High Frequency (UHF) handheld terminal is a rugged dual technology
multi-tag UHF RFID and bar code reader. It can read both EPC Gen 1 and Gen 2 RFID tags
and the device is embedded with RFID middleware and Windows CE 5.0. The RH767 has a
battery life of up to 12 hours. Connectivity options include WLAN 802.11b/g and Bluetooth.
It has an IP54 electronic enclosure sealing rating against the elements and a 4' (1.2 meter)
drop threshold to concrete.
RH767 HF
Unitech’s RH767 High Frequency (HF) handheld terminal is a rugged dual technology multitag HF RFID and bar code reader. It can read 15693/ISO 1443A/B RFID tags and the device
is embedded with RFID middleware and Windows CE 5.0. The RH767 has a battery life of
up to 20 hours. Connectivity options include WLAN 802.11b/g, and Bluetooth and GPRS is
possible via the PCMCIA slot. It has an IP54 electronic enclosure sealing rating against the
elements and a 4' (1.2 meter) drop threshold to concrete.
Features
●●
●●
●●
●●
●●
●●
●●
Dual Technology Bar Code Scanner & RFID (HF or UHF) Reader.
Embedded RFID Middleware.
Built-in Bar Code Scanner.
IP54 Rated and 4' (1.2m) Drop Threshold.
Windows CE 5.0 Professional Plus Operating System.
WLAN 802.11b/g and Bluetooth Connectivity.
GPRS via PCMCIA slot (HF Model Only).
1
Package Contents
Make sure the following items are in the RH767 box:
RH767 Terminal
Power Adapter and Cable
Battery Pack
Stylus
Synchronization and Power
Cable
CD-ROM
Quick Reference Guide
Cradle (Optional)
Please contact a regional Unitech service representative if anything is missing or appears
damaged.
2
Copyright 2009 Unitech Electronics Co., Ltd. All rights reserved. Unitech is a registered trademark of Unitech Electronics Co., Ltd.
Chapter 1 Getting Started
A Tour of the RH767
Front View
No. Component
1.
2.
3.
4.
5.
6.
7.
Status Indicator.
Description
Indicates battery and bar code scanning status.
Green - Battery charge is complete or a bar code is
successfully captured.
Red - Battery is charging, bar code scanner is activated
and processing.
LCD Touch-screen.
Displays the applications and data stored on the
device. The screen is touch-sensitive and responds to
the stylus or finger.
Alpha Mode Indicator.
Indicates Alpha Mode status.
Keypad.
Keypad interface for controlling the RH767. See Using
the Hardware on page 14 for more information.
Power Button.
Press this button to start the RH767. Alternatively, this
key must be pressed down for at least two seconds to
turn off the RH767.
Microphone.
Receives sound.
Right Scanner Trigger Button. Press to activate the Laser Bar Code Scanner.
3
Back View
No. Component
8.
Stylus.
9.
10.
Bar Code Scanner Window.
Infrared (IR) Port.
11.
12.
13.
14.
Left Scanner Trigger Button.
Reset Button.
Bar Code Scanner Trigger.
Battery Compartment.
15.
16.
Strap Hook.
RFID Antenna.
Description
Remove the Stylus from its holder and hold it like a
pen.
Scans bar codes.
Utilizes infrared technology to transmit and receive data
from other IR-enabled devices.
Press to activate the laser bar code scanner.
Use a paper clip to press the Reset Button.
Press to activate the Bar Code Scanner.
Houses the removable and rechargeable 7.4V LithiumIon 4050mAh Battery Pack.
Secures the strap to the RH767.
Receives data from an RFID tag.
4
Copyright 2009 Unitech Electronics Co., Ltd. All rights reserved. Unitech is a registered trademark of Unitech Electronics Co., Ltd.
Chapter 1 Getting Started
Bottom View
No. Component
17.
18.
Battery Compartment.
Universal Connector.
19.
PCMCIA Compartment
Description
Houses the rechargeable Lithium-Ion Battery Pack.
Connects the RH767 to the Synchronization Power
Cable, which connects to the computer’s USB Port. It
also connects to the AC Adapter, which plugs into an
external power source. This charges the device and
performs Microsoft ActiveSync operation.
Open this compartment to access the PCMCIA slot.
(It is optional to purchase the RH767 preloaded with a
PCMCIA Card, but only with the HF model.)
Setting up the RH767
Install and charge the battery, check the battery status, connect the RH767 to a PC, turn on
the RH767 for the first time, install an optional Wireless Local Area Network PCMCIA card
and calibrate the screen through the following:
Installing the Battery Pack
WARNING! If the battery pack is handled improperly there is risk of fire or burns. Do not
disassemble, crush, puncture, short external contacts, or dispose the battery
pack in fire or water. Do not attempt to open or service the battery pack. Dispose
of used batteries according to local recycling guidelines.
The backup battery prevents data loss when the main battery disconnects from the RH767.
This backup battery cell will only support the RH767 for a maximum of 72 hours.
NOTE:
●● T
urn the RH767's Backup Battery Switch to the ON postition and charge the main battery
pack for at least 16 hours before initial use. See page 6 for more informaiton.
5
1. Open the Battery Compartment by sliding the tabs in the direction as shown below:
2. Locate the Backup Battery Switch and turn it to the ON position.
Backup Battery Switch
3. Align the Battery Contacts with the Battery Compartment Contacts as shown below:
Battery Contacts
6
Copyright 2009 Unitech Electronics Co., Ltd. All rights reserved. Unitech is a registered trademark of Unitech Electronics Co., Ltd.
Chapter 1 Getting Started
4. P
lace the Battery Pack into the Battery Compartment and press the battery securely into
place.
5. R
eplace the Battery Compartment cover, push down the tabs and slide them back into the
lock position as shown below:
7
Charging the Battery
Charge the RH767 for at least 16 hours before initial use. Charge the device to full capacity
after a full day of use with the Synchronization Power Cable or the Docking Station.
CAUTION! Operating the RH767 for the first time without fully charging the Backup Battery
may result in data loss stored in the RAM memory. When the Main Battery is
removed, the Backup Battery retains data in the RAM memory for 72 hours;
charge the battery as soon as possible to avoid data loss.
NOTE: T
urn the Backup Battery Switch to the ON position before charging the battery. Data
loss may occur if the Backup Battery is not properly charged.
Charging the Battery using the Synchronization Power Cable
1. Connect the Synchronization Power Cable Connector to the RH767 (1).
2. Plug the AC Adapter cable into the USB Connector's power jack (2).
3. Connect the AC Adapter into an electrical outlet (3).
Charging the Battery with the Docking Station
1. P
lug the AC Adapter cable into the Docking Station's power jack, then connect the AC
Adapter into an electrical outlet.
8
Copyright 2009 Unitech Electronics Co., Ltd. All rights reserved. Unitech is a registered trademark of Unitech Electronics Co., Ltd.
Chapter 1 Getting Started
2. S
lide the RH767 into the Docking Station until it clicks into
place.
3. The connection is secure when the bottom edge of the
device aligns with the docking station. (The Docking
Station's LED indicator lights up green, while the RH767's
LED indicator lights up red.)
LED Status
RH767
Docking Station
LED
Description
Solid Red
Solid Green
Solid Green
Charging.
Charging Complete.
Power is On.
Checking the Battery Status
If the main battery level becomes low in the
appears
course of normal use, a status icon
on the RH767 screen's system tray indicating
low or very low battery status. In both cases,
perform a Microsoft ActiveSync operation to
backup data, then recharge the device as soon
as possible. If the battery level reaches low
status, the device will enter suspend mode; if
the battery level reaches very low status, the
device will enter deep sleep mode. In this case,
recharge the Battery within 72 hours.
When the backup battery charge is low, an icon
indicating that
appears in the system tray
the backup battery should be charged as soon
as possible.
Connecting the RH767 to a PC
Use the Synchronization Power Cable to connect the RH767 to a PC.
1. Connect the USB Connector jack to the RH767 (1).
2. P
lug the USB Connector into the PC's serial port and connect the AC Adapter into the USB
Connector (2).
3. Connect the AC Adapter into an electrical outlet (3).
9
Turning the RH767 on for the First Time
The device is ready for use after it has been charged for at least 16 hours. Start-up the
device to adjust the screen brightness, calibrate the display, and set up the system time zone
date and time.
Powering On
1. Turn on the device by pressing the Power Button on the RH767's front panel.
2. The Unitech RH767 welcome screen appears followed by the calibration screen.
Power Button
10
Copyright 2009 Unitech Electronics Co., Ltd. All rights reserved. Unitech is a registered trademark of Unitech Electronics Co., Ltd.
Chapter 1 Getting Started
Using the Stylus
CAUTION! Never use anything other than the RH767 Stylus on the screen.
1. Remove the Stylus from its holder.
2. Hold the stylus like a pencil.
3. L
ightly tap the tip of the Stylus to make a menu choice.
4. D
ouble-tap to open programs.
5. Use the Stylus to print letters or numbers.
Calibrating the RH767 Screen
The calibration screen automatically appears when the unit powers on for the first time or
after the system is reset.
11
Access the callibration screen
at any time by simultaneously
pressing the Func and ESC key.
Func Key
ESC Key
Use a stylus to tap a sequence of target marks
on the RH767’s screen. Firmly hold the stylus
on top of the target mark for a moment, and
then remove. Continue to tap the target mark
as it stops along the corners of the screen.
Press Enter to confirm the calibration or press
ESC to cancel.
12
Copyright 2009 Unitech Electronics Co., Ltd. All rights reserved. Unitech is a registered trademark of Unitech Electronics Co., Ltd.
Setting the Time and Date
In the Date/Time Properties window, use the stylus
to select the current date and time, time zone and
daylight saving time option.
Adjusting the Screen Brightness
Adjust the screen brightness by pressing Func
to enable the soft key function and press the
left arrow (decrease brightness) or right arrow
(increase brightness) cursor buttons.
Function Button
Increase Brightness
Decrease Brightness
13
Chapter 2
Using the Hardware
The following table describes the main keypad keys.
Key
Main Function
Press this button to turn the RH767 on. And hold this button for two
seconds to turn the RH767 off.
Pressing this button corresponds to tapping cancel or X.
Press the backspace key to erase characters.
Press the function key to perform alternative key functions. This key
is also used to toggle between upper and lower case alphabetic
characters.
Use the tab key to toggle between fields or to tab forward in word
processing applications.
Press the enter key to confirm an action or entry.
Use these cursor keys to navigate through applications. Press and
hold the Function key and then press the right and left arrows to
raise and lower the screen brightness.
~
Press the alpha key to toggle between numeric and alphabetic entry
modes.
Press these keys to enter numbers or characters depending on
whether the Alpha key has been pressed. Press 0 to enter a space.
Press this key to add punctuation.
Using Function keys
The RH767 provides many combination hot keys to activate specified screen setting functions
or programs. These hotkeys are useful for calibrating the touch-screen, toggling the backlight,
and adjusting screen contrast when the menu-driven operation is disabled. Below is the list of
hotkeys. To use the keys, press and hold Func in combination with the corresponding second
key.
Key
[FUNC]+
[FUNC]+
[FUNC]+
[FUNC]+
14
Function
Toggle Display Backlight.
Toggle Keypad LED Backlight.
Increase Screen Brightness.
Decrease Screen Brightness.
Chapter 2 Using the Hardware
Toggle to Alpha Mode and CAPS
Numeric Mode is the RH767's default function. In Alpha Mode CAPS is the default condition.
Use alpha and Func to toggle into CAPS.
Key
ESC
Backspace
Enter
1/F1/a
2/F2/b
3/F3/c
TAB/d
4/F4/e
5/F5/f
6/F6/g
+/^/h
%/BL/i
7/F7/j
8/F8/k
9/F9/l
-/_/m
./;/n
@/!/o
0/$/p
(/)/q
*/#/r
SPACE/s
“/’/t
,/?/u
[/]/v
//\/w
</>/x
=/&/y
DEL/z
Alpha OFF
FUNC UP
ESC
Backspace
Enter
1
2
3
TAB
4
5
6
+
%
7
8
9
.
@
0
(
*
SPACE
“
,
[
/
<
=
DEL
Alpha ON
FUNC DOWN FUNC UP
ESC
Backspace
Enter
F1
F2
F3
`
F4
F5
F6
^
Backlight
F7
F8
F9
_
;
!
$
)
#
SPACE
‘
?
]
\
>
&
~
ESC
Backspace
Enter
a
b
c
d
e
f
g
h
i
j
k
l
m
n
o
p
q
r
s
t
u
v
w
x
y
z
FUNC DOWN
ESC
Backspace
Enter
A
B
C
D
E
F
G
H
I
J
K
L
M
N
O
P
Q
R
S
T
U
V
W
X
Y
Z
15
Using the Windows CE Keyboard
The Windows CE Software provides a touch-screen keyboard for alphanumeric input. The
Windows based keyboard replicates the layout of a standard PC keyboard.
Open the Windows CE keyboard by tapping the keyboard icon on the task bar and tap
Keyboard.
Keyboard Icon
Entering Characters
To input a character, tap the onscreen button
corresponding to the desired symbol.
Special Character Support:
Tap áü to switch from the Standard English
keyboard to the Special Characters keyboard.
Moving the Keyboard
Tap the title bar to drag and place the keyboard
across the screen.
Closing the Keyboard
Tap the keyboard icon and tap Hide Input Panel
to close the Windows CE keyboard.
Title Bar
Tap Here to
Enter Special
Characters
16
Copyright 2009 Unitech Electronics Co., Ltd. All rights reserved. Unitech is a registered trademark of Unitech Electronics Co., Ltd.
Chapter 2 Using the Hardware
Adjusting Settings
Adjust the RH767's settings through the following:
1. Tap Start → Settings→ Control Panel.
2. The Control Panel appears.
In the control panel it is possible to adjust the backlight,
auto power off timer, system volume and processor
speed. In addition, users can assign functions to
buttons, configure menus, enter owner information and
setup connections.
17
Checking the Main and Backup Battery Status
View the power level for both the Main and Backup
Battery through the following:
NOTE: C
onserve power by changing the settings
for the auto-off function and the proccessor's
operation speed.
1. Tap Start → Settings → Control Panel → doubletap Power.
2. In the Power Properties window, under the Battery
tab, the main and backup battery capacity are
shown.
For example, the screenshot to the right shows that
both the Main battery and Backup battery are in
"Good" condition. But, charge the RH767 as soon as
possible when the Backup battery reaches "Very
Low" status.
NOTE: C
harge the Backup Battery when it reaches
below 10 percent. If the battery does not accept
a charge, contact Unitech Technical Support.
Main Battery Voltage
18
Copyright 2009 Unitech Electronics Co., Ltd. All rights reserved. Unitech is a registered trademark of Unitech Electronics Co., Ltd.
Chapter 2 Using the Hardware
Using the Laser Scanner
The RH767 has an integrated laser scanner, which reads all major bar code labels.
NOTE: R
eading software must be enabled in order to operate the scanner. This can be a
userloaded application or a pre-loaded utility such as a Scanner Setting.
Activate the laser scanner by pressing either one of the trigger keys located on the RH767's
left and right side. The RH767 has a built-in Scanner Setting utility that allows users to test
the device’s bar code scan function.
1. To launch Scanner Settings, simultaneously press Func and 7.
NOTE: A
lternatively, tap Start → Settings → Control Panel → double-tap Scanner.
Scan Button
19
2. T he Scanner Control Panel opens, where
it is possible to configure bar code scanner
parameters such as enabling or disabling
bar code symbologies, setting data
transmission options, configuring magnetic and
proximity reading options and setting power
management options.
3. Tap the Test tab to test the bar code scanner.
Press one of the RH767's bar code scanner
triggers and aim the scanner window at a 1D
bar code. For example, scan a bar code from a
soda can.
Scanner Settings
When it is necessary for the user to change
the default bar code symbology for a different
application, the Scanner Control Panel provides the
ability to change default symbology, place delimiter
characters behind scanned data, and save the
settings.
Simultaneously press Func and 7 to display the
Scanner Control Panel.
NOTE: A
lternatively, tap Start → Settings →
Control Panel → double-tap Scanner to
display the Scanner Control Panel.
20
Copyright 2009 Unitech Electronics Co., Ltd. All rights reserved. Unitech is a registered trademark of Unitech Electronics Co., Ltd.
Chapter 2 Using the Hardware
Scan2Key
The Scan2Key application routes input from a scanner
port to a keypad buffer, making all input from the scanner
emulate input from the keypad. Using Scan2Key,
scanned data can directly input into a scanner port
software application such as MS Mobile Word.
Simultaneously press Func and 7 to display the Scanner
Control Panel, then tap To Kpd to access Scan2Key
settings.
Using the RFID
The RH767 RFID sample application provides the
ability to read RFID Class 0 and Class 1 Gen2 RFID
tags. The RFID demo program is loaded in the Flash
Storage. Use the RFID tags that ship with the RH767
box for the RFID Demo program.
Launching the RFID Demo Program
Launch the RFID Demo program through the
following:
1. D
ouble-tap My Device, and double-tap Flash
Storge.
2. D
ouble-tap the RFID&Scanner folder, and doubletap the UnitechRFID Demo icon.
21
3. In the RFID tab, tap Setting.
4. Select A in the Antenna field.
5. C
heck ClassO, Class1 and/or UHF Gen2 to enable
these RFID tag readings in the Select Tag Types
to Inventory field.
6. S
et the RF Power by moving the slide bar to 27db.
Tap X to close the setting window.
7. Tap Start Inventory, to start reading RFID tags. In
the field below, the Counter column indicates the
number of continous RFID tag readings.
8. Tap Disconnect to stop the continous RFID tag
readings.
22
Copyright 2009 Unitech Electronics Co., Ltd. All rights reserved. Unitech is a registered trademark of Unitech Electronics Co., Ltd.
Chapter 3
Getting Connected
The Unitech RH767 enables users to link to a host computer using an RS232, IrDA, or WLAN
connection for data communication. Learn about an overview of the RH767's communication
options through the following:
Establishing Device-PC Connection
Installing Microsoft ActiveSync
Microsoft ActiveSync must be installed on the computer in order to exchange information
between the computer and the RH767. Microsoft ActiveSync is already installed on the
RH767.
NOTE: If a previous version of Microsoft ActiveSync is installed on the computer, uninstall it
first, before installing the latest version of Microsoft ActiveSync. The RH767 requires
Mircosoft ActiveSync 4.2 or higher.
Install Microsoft ActiveSync on the computer through the following:
1. C
lose any open programs, including those that run at startup, and disable any antivirus
software.
2. D
ownload the Microsoft ActiveSync software from the Microsoft ActiveSync Download
page at:
http://www.microsoft.com/downloads/details.aspx?FamilyID=7269173a-28bf-4cac-a68258d3233efb4c&DisplayLang=en
3. B
rowse to the location of the downloaded file, and double-click it. The installation wizard
begins.
4. F
ollow the instructions on the screen to install Microsoft ActiveSync.
Connecting the Device to the
Computer
1. After Microsoft ActiveSync is installed,
connect the RH767 to the PC (See
Connecting the RH767 to a PC on
page 9).
2. Start the RH767.
3. M
i c r o s o f t A c t i v e S y n c s t a r t s
automatically and configures the
communication port to work with the
RH767. The New Partnership setup
wizard automatically starts.
23
NOTE: If Microsoft ActiveSync doesn’t start automatically, click Start → Programs →
Microsoft ActiveSync. If a message appears indicating that it is unable to detect
a connection, click Cancel and manually configure the communication settings. To
manually configure the communication settings on the PC, click MAS → File →
Connection Setting → Connect Device.
4. Follow the onscreen instructions.
5. W
hen the configuration process is
complete, the Microsoft ActiveSync
window appears.
6. Synchronization
will initiate, and it will synchronize periodically or upon connection.
NOTE: A
PC can partner with multiple RH767s. But, an RH767 can only partner with up to
two computers.
Using ActiveSync to Exchange Files
Use Mircosoft ActiveSync to exchange information from the RH767 to the computer, and vice
versa. Information changes made in one location will not impact information on the other.
Synchronize the information to automatically update information on both the device and the
computer.
It is possible to copy two types of information to the RH767: files and Pocket Access Windows
CE Store information.
The following procedure only applies
to copying files. Refer to the Microsoft
ActiveSync Help on the computer for
instructions on how to copy Pocket
Access Windows CE Store information.
NOTE: F
iles created on the computer
may need to be converted by
Microsoft ActiveSync so that they
can be viewed and edited on the
RH767, and vice versa.
Copy files through the following:
1. Connect the RH767 to the computer.
2. I n M i c r o s o f t A c t i v e S y n c o n t h e
computer, click Explore.
24
Copyright 2009 Unitech Electronics Co., Ltd. All rights reserved. Unitech is a registered trademark of Unitech Electronics Co., Ltd.
Chapter 3 Getting Connected
Windows Explorer opens the Mobile Device window for the RH767.
3. Locate the desired file to copy on the RH767 or computer.
4. Do one of the following:
–To copy the file to the RH767, right-click the file and click Copy. Place the cursor in the
desired folder for the RH767, right-click, then click Paste.
– To copy the file to the computer, right-click the file and click Copy. Place the cursor in the
desired folder for the computer, right click, then click Paste.
Using the WLAN
Setting up the Wireless Local Area Network Card
The RH767 is loaded with connection software.
During initial installation, the RH767 automatically
detects RF cards and then displays the 'Summit
WLAN Adapter' window. Set the IP address through
the following:
●● Obtain an IP Address via DHCP Server.
●● Specify an IP Address.
Obtaining an IP Address via DHCP
Server
Check with the MIS department to determine
whether a DHCP server is available in the LAN
environment. If available, tap Obtain an IP address
via DHCP, and then tap OK.
25
Specifying an IP Address
If there is no DHCP server in the LAN environment,
assign an IP address to each RH767 through the
following:
1. Tap Start → Settings → Control Panel and then
double-tap Network and Dial-up Connections.
2. Double-tap SDCCF10G1.
3. Input the proper information in the IP address:,
Subnet Mask: and Default Gateway: field.
4. Tap the Name Servers tab, and then input
the proper information in the Primary DNS:,
Secondary DNS:, Primary WINS: and Secondary
WINS: field.
o avoid conflict with the LAN environment, consult
T
with the MIS department for the correct TCP/IP
setting.
26
Copyright 2009 Unitech Electronics Co., Ltd. All rights reserved. Unitech is a registered trademark of Unitech Electronics Co., Ltd.
Chapter 3 Getting Connected
Wi-Fi Connection
Unitech terminals come with a built-in RF facility. Setup the RF setting through the following:
1. Tap Start → Programs → Summit → scu.
2. Under the Main tab, in the Active Profile drop down
menu, select ThirdPartyConfig.
3. A window appears with the message: A Power Cycle is
required to make settings activate properly. Tap OK.
27
4. Tap OK.
5. W
arm Boot the RH767. Click Start →
Programs → Utilities → Bootmode → Warm
Boot.
6. Once the RF card is detected, the RF setting
window appears.
7. D ouble-tap Add New (Or double-tap the
preferred network) to add a new SSID.
8. Enter the SSID. Uncheck The key is provided
automatically. Enter the network key.
9. Tap OK. Start to search for an RF signal.
28
Copyright 2009 Unitech Electronics Co., Ltd. All rights reserved. Unitech is a registered trademark of Unitech Electronics Co., Ltd.
Chapter 3 Getting Connected
Using the Summit Utilities
Use the Summit Utility tool to setup or change the Wi-Fi setting
through the following:
Admin Login
1. To login as an Administrator tap Start → Programs → Summit
→ scu → Admin Login.
2. Enter the password (Default Password: SUMMIT). Tap OK.
Scan Available AP
1. Under the Profile tab, tap Scan for available AP.
2. S e l e c t t h e d e s i r e d A P a n d t a p
Connect.
3. Tap Yes to connect.
29
Encryption
1. To setup the encryption, scroll down the Encryption
field and select the encryption type in the network.
2. Tap WEP keys/PSK's.
3. Enter the WEP keys and tap OK.
Commit and Activate
1. Tap Commit to activate the setting.
2. Under the Main tab, select the profile to activate.
3. Under the Status tab, view the IP address and the
signal strength.
30
Copyright 2009 Unitech Electronics Co., Ltd. All rights reserved. Unitech is a registered trademark of Unitech Electronics Co., Ltd.
Appendix A
Middleware Supporting List
• Oracle Sensor Edge Server.
• Oracle Sensor Edge Mobile.
• Oracle Database Lite.
• Microsoft BizTalk R2.
** Please contact a Unitech service representative for detailed information regarding
supporting middleware.
31
Appendix B
System Specifications
Hardware
Memory: 64 MB ROM / 64MB SDRAM
Microprocessor: 400Mhz Intel X-Scale
Display: NEC (240 x 320 Pixels) Transflective TFT Color LCD, Support
256K Color, Backlight and Touch-screen
Operating System
Power
Microsoft Windows CE 5.0 Professional Plus
Battery Type: Rechargeable Lithium-Ion
Battery System: 7.4V 4050mAh (Double Cell)
Battery Life: RH767 HF: UP to 24 Hours RH767 UHF: Up to 16 Hours
Recharging Time: Within 6 Hours (Very Low Power Status)
Keypad with LED Backlight
36-key Keypad with Numeric Key, Alpha Key and Function Key
Standard Communications
Scanner Engine
RFID Reader
Physical
Characteristics
Environment
Bluetooth, 802.11b/g, USB 1.0 and IrDA
Integrated SE950 Laser Scanner
UHF 902 - 928Mhz, EPCG1C0, C1, Gen 2
HF 13.56Mhz 15693, 14443A/B
Dimension: 7.17”L X 3.46”W X 5.91”H
Weight: RH767 HF 24.05 oz.
Weight: RH767 UHF 26.81 oz.
Operating Temperature 23ºF - 122ºF (-5º - 50ºC)
Storage Temperature -4ºF - 140ºF (-20º - 60ºC)
Relative Humidity: 5% - 95% (Non-condensing)
Desktop Cradle
Key Accessories
2 Slot Battery Charger
4 Slot Battery Charger
4 Slot Multi-bay
Charging & Communication Cable
Unitech RH767 SDK, RFID Middleware SDK
Software
Development Kit
Microsoft Embedded Visual Tool
Unitech RFID Middleware support Oracle Sensor Edge Server,
Software
Microsoft BizTalk RFID, IBM WebSphere
CE, FCC, VCCI, NCC, CCC
Regulatory
32
Copyright 2009 Unitech Electronics Co., Ltd. All rights reserved. Unitech is a registered trademark of Unitech Electronics Co., Ltd.
Appendix C
Worldwide Support
Region
Global Operation Center
Unitech Taiwan
Unitech Asia Pacific & Middle
Unitech China
Unitech Japan
Unitech America
Unitech Latin America
Unitech Europe
Web site
www.unitech-adc.com
adc-utt.unitech.com.tw
www.unitech-utp.com.tw
www.ute.com.cn
www.unitech-japan.co.jp
www.ute.com
latin.ute.com
www.unitech-europe.nl
33