1
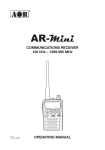
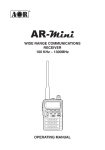
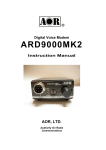
ARD25
MULTIMODE DATA RECEIVER
FOR USE WITH A COMPANION RECEIVER
INSTRUCTION MANUAL
AOR, LTD.
TABLE OF CONTENTS
1
Index
1-1
1-2
1-3
1-4
2
Introduction --------------------------------------------------------------------------------------- 2
Power requirements --------------------------------------------------------------------------- 3
Supplied accessories ------------------------------------------------------------------------- 3
Features ------------------------------------------------------------------------------------------ 3
Control and functions ------------------------------------------------------------------------------ 4
2-1
2-2
3
------------------------------------------------------------------------------------------------ 2
Front panel controls ---------------------------------------------------------------------------- 4
Rear Panel --------------------------------------------------------------------------------------- 5
Connection to a receiver ---------------------------------------------------------------------------- 6
3-1
3-2
Configuration of the AR5000 receiver ----------------------------------------------------- 6
Configuration of the companion receiver(s) ---------------------------------------------- 6
4
Switch on the ARD25 -------------------------------------------------------------------------------- 6
5
ARD25 Operation ---------------------------------------------------------------------------------------- 7
5-1
5-2
5-3
5-4
Power LED ---------------------------------------------------------------------------------------Receiver settings -----------------------------------------------------------------------------Receive mode ----------------------------------------------------------------------------------Speaker output level ----------------------------------------------------------------------------
7
7
7
7
6 Computer control information ----------------------------------------------------------------------- 8
7 Specifications --------------------------------------------------------------------------------------------- 8
8 FCC Information For Digital Device users ------------------------------------------------------- 9
9 Limited warranty ------------------------------------------------------------------------------------------ 9
1
1 Introduction
1-1 Introduction
Thank you for purchasing the ARD25 Multimode Data receiver.
In recent years, many communications have changed from analog mode to digital mode to meet
more communication demands. APCO Project 25, as an example, has been adopted by many
public safety or police departments in several major cities.
The ARD25 is designed to convert conventional APCO25 (P25) digital communications to analog
signals.
To get the best possible results, we recommend that you read this manual to fully familiarize
yourself with the ARD25.
Every effort has been made to make this manual correct and up to date. Due to continuous
development of the product (and by error or omission), anomalies may be found and this is
acknowledged.
© This manual is protected by copyright AOR, LTD. 2004. No information contained in this
manual may be copied or transferred by any means without the prior written consent of AOR,
LTD. AOR and the AOR logo are trademarks of AOR, LTD. All other trademarks and names are
acknowledged.
Some words of caution – The ARD25 is not effective on systems that use encryption or digital
modulation other than APCO Project 25. It cannot translate signals from receivers that do not
have a 10.7 MHz IF output, as the full channel bandwidth is needed to convert the signal from
digital to analog. The ARD25 does not add trunking capabilities to your receiver. Some
jurisdictions may limit the use of devices such as the ARD25.
2
1-2 Power requirements
The ARD25 comes with a 120 V AC adapter. The ARD25 is designed for operation from a
nominal 12 V DC regulated power supply (12 to 14 V is acceptable), which should be capable of
supplying a minimum of 1 amp, continuous.
[Note: Never connect the ARD25 directly to an AC outlet.]
The DC power jack uses a mini power connector and is wired center positive (+), the chassis of
the unit is at negative ground. To minimize the potential for power cable interference, it is
suggested that a ferrite clamp be fitted to the power cable.
[Safety Notice: Always disconnect the power supply from the AC outlet when not in use.]
Should the ARD25 appear to behave strangely, normal operation may easily be resumed by
resetting the microprocessor. Simply power off the ARD25 and disconnect the power supply.
Leave the power off for 30 seconds, and then re-connect and power back on again.
1-3 Supplied accessories
The following accessories are provided in the shipping box.
1
1
1
1
Speaker cable (with a 3.5 mm plug at each end)
BNC patch cable for IF connection
Instruction manual (this booklet)
120 V AC adapter
[Note: If used with the AR3000A receiver, a small modification to the receiver is needed in
order to provide the required 10.7 MHz IF output.]
1-4 Features
•
•
•
•
•
•
•
Decode APCO Project 25 digital voice signal (Non encryption mode)
Convert your analog receiver (equipped 10.7 MHz IF output) into a digital receiver
without any modifications to most receivers
Decode analog NFM (Narrow FM) signals
Compact size
Built-in speaker
Data output through RS-232C serial port
Compatible with other receivers
A receiver equipped with a 10.7 MHz IF output can provide signals to the ARD25.
3
2 Controls and functions
2-1 Front panel controls
The front panel of the ARD25 features three status LEDs, a power switch, gain control and
headphone jack.
1
Power switch
Slide the Power switch to the right to switch on the ARD25.
To switch off the ARD25, slide the Power switch to the left. The green LED will light when
power is on.
2
P- 25 LED
Lit while decoding P25 digital signals.
3
BUSY LED
Lit while receiving signals in analog mode or digital mode.
Lit while receiving encrypted digital signals (no decoding).
4
PHONES
Plug in stereo type headphones to disable internal speaker. (Audio signal is available in
monaural only.)
5
AF GAIN
Adjust speaker volume. Turn clockwise to increase audio.
4
2-2 Rear panel
The rear of the ARD25 has one (1) DB-9 connector for connection to a PC, one (1) BNC
connector for IF input, one (1) DC power connector, one (1) speaker input, and one (1)
speaker output.
1. RF IN
Using the supplied coaxial cable with a BNC connector at each end, connect to the IF
output from the companion receiver such as an AOR AR5000 series receiver.
2. SP IN (3.5 mm monaural jack)
Using the supplied speaker cable with a 3.5 mm plug at each end, connect to the radio
equipment’s speaker jack.
3. SP OUT (3.5 mm monaural jack)
Connect an external speaker to this jack to disable internal speaker.
4. 10101 (DB-9) connector
A serial communication connector for connection to a PC (RS-232C)
5. DC IN
Connect the supplied AC adapter to this connector. If you wish to operate with a 12 V
external regulated power supply, it should have a minimum continuous capacity of at
least 1 A.
The connector is wired center positive (+), outer negative (-).
5
3 Connection to a receiver
3-1 Configuration of the AR5000 receiver
Before connecting the ARD25 to a receiver, the power switch of the ARD25 and the
receiver must be turned off.
In order to operate the ARD25, the following setting is required for the AR5000
receiver.
External IF output: EXT – IF1
(Note: See details on page 29 of the AR5000 instruction manual.)
3-2 Configuration of the companion receivers
Your ARD25 may be used with the following companion receivers.
(Note: Some receivers require modifications.)
Model number
Remarks
============================================================
AR5000A+3
AR5000A
Set External IF output
AR5000+3
(See above)
AR5000
---------------------------------------------------------------------------------------------------------AR3000A
10.7 MHz IF modification required
---------------------------------------------------------------------------------------------------------AR8600
AR8600MKII
Select the WFM (Wide FM mode)
---------------------------------------------------------------------------------------------------------AR-ONE
Set IF output frequency to 10.7 MHz
-----------------------------------------------------------------------------------------------------------IC-R8500
ICOM ® IC-R8500
-----------------------------------------------------------------------------------------------------------IC-R7100
ICOM ® IC-R7100
==============================================================
Using the supplied coaxial cable with a BNC connector at each end, connect to the IF
output from the companion receiver and the IF IN on the rear panel of the ARD25.
4 Switch on the ARD25…
Using the supplied 120 V AC adapter, apply power to the ARD25.
It is important that the receiver is switched on FIRST, and then switch on the ARD25.
To switch off the ARD25, slide off the power switch to “off” and then switch off the AR5000.
Rotate the AF GAIN knob to approximately 10 o’clock position.
6
5 Operating the ARD25
5-1 Power LED
Once the ARD25 is switched on, the green LED will light indicating power is applied to the
ARD25.
5-2 Receiver settings
1.
2.
Set your receiver to the desired frequency.
If you intend to monitor analog NFM (Narrow FM) mode, set the squelch
threshold and adjust the volume control to 10 o’clock position.
5-3 Receive mode
(1) DIGITAL mode
As the input signal to the ARD25 is taken from the 10.7 MHz IF output (before the IF
filter) of your receiver, you can decode digital signals regardless of the receiver’s mode
setting.
(Note: If you are using the AR8600 receiver, you MUST set it to the WFM (Wide FM)
mode to activate the 10.7 MHz IF output. Otherwise, no digital signals can be
decoded.)
Once a digital signal is received, the front BUSY LED and the P-25 LED will light GREEN
and the recovered audio can be heard from the internal speaker.
If a signal is received and the front BUSY LED is lit RED, but no recovered audio is
heard from the internal speaker, the received digital signal may be encrypted. Also,
there must be adequate signal strength for the ARD25 to function properly.
(2) Analog mode
If the received signal is sent in the analog NFM (Narrow FM) mode, the front BUSY LED
will light, and you can hear audio from the internal speaker. You can also adjust the audio
level using the audio gain control of your receiver.
(Note: If you are using the AR8600 receiver, set it to the WFM (Wide FM) mode to
activate the 10.7 MHz IF output. However, you can recover analog NFM (Narrow FM)
signals from the internal speaker even when the external speaker cable is not
connected to the ARD25.)
5-4 Speaker output level
Rotate the AF GAIN knob to the desired speaker output level. If you wish to use your
external speaker, connect it to the SP OUT jack on the rear panel.
If you like to use headphones, plug in to the PHONES jack on the front panel.
7
6 Computer control information
Your ARD25 is controllable by a PC via the RS-232C interface. No specific hardware
interface is required, just a straight RS-232C cable.
The ARD25 is equipped with an RS-232C port in addition to the connection port for a
receiver. The RS-232C port uses a DB-9 connector.
The ARD25 RS-232C specification is as follows:
Baud rate: 9600 bps
Data bits:
8
Stop bits:
1
Parity:
None
Flow control: RTS / CTS
6-1 Computer control command set
With the ARD25 output, the following data is available through an RS-232C serial port.
(NOTE: NO recovered audio is available from the serial port.)
MI=************
AG=**
KY=****
TG=****
SI=******
DI=******
MI, AG, KY --- Encryption data
In the normal mode (non encryption mode), the output data will be:
MI=000000000000, AG=80, KY=0000
In the encryption mode, different data will be output.
(Decoding encryption is not possible.)
TG --- Talk Group (in 4 digits hexadecimal codes)
SI ---- Sender's ID number (in 6 digits hexadecimal codes)
DI ---- Receiver's ID sent by sender (in 6 digits hexadecimal codes)
Please note that the DI code is not usually sent (not used).
If it is the case, the DI will be displayed as ******
7 Specifications
Input signal:
Impedance:
Input level:
Receive modes:
10.7MHz IF
50 ohms
More than -105dBm
APCO Project 25 digital voice signal (Non
encrypted signal only)
8
Off frequency adjustment:
Signal modulation:
Squelch:
Power requirement:
Serial port:
Speaker input connector:
External Speaker output:
Headphone output:
Weight:
Dimensions:
Standard accessories:
Analog Narrow FM signal
Automatic (AFC)
± 20% from the specifications (Automatic adjustment)
Level squelch (Analog mode), adjustable squelch level
11 - 16 V DC, 140 mA (at 12 V DC) typical
RS-232C 9600bps Asynchronous, 8 bit, Non parity, 1
stop bit
3.5 mm mono
3.5 mm mono
3.5 mm stereo (signal output is mono)
Approximately 580 g (1.3lb)
156 (d) x 100 (w) x 32 (h) (mm)
6.15 (d) x 4 (w) x 1.3 (h) (inches)
Projections not included
120 V AC adapter, BNC patch cable,
speaker cable, instruction manual
Use of the ARD25 may be restricted in some jurisdictions. Signal conditions vary greatly,
as such; no warranty can be made on how the ARD25 will perform in every circumstance.
All specifications are subject to change without notice or obligations.
8 FCC Information for Digital Device users
This equipment has been tested and found to comply with the limits for a Class B digital
device, pursuant to Part 15 of the FCC Rules. These limits are designed to provide
reasonable protection against harmful interference in a residential installation.
This equipment generates, uses and can generate radio frequency energy and, if not installed
and used in accordance with the instructions, may cause harmful interference to radio
communications. However, there is no guarantee that the interference will not occur in a
particular installation. If this equipment does cause harmful interference to radio or television
reception, which can be determined by turning the equipment off and on, the user is
encouraged to try to correct the interference by one or more of the following measures:
Reorient or relocate the receiving antenna.
Increase the separation between the equipment and receiver.
Connect the equipment to an outlet on a circuit different from that to which the receiver is
connected.
Consult the dealer for technical assistance.
9 LIMITED WARRANTY
AOR USA, Inc. (AOR) warrants its products as described below:
AOR will repair or exchange equipment as a result of defects in parts or workmanship for a
period of one year from the date of original retail purchase from an authorized AOR dealer.
Exclusions
The following items are not covered by the AOR limited warranty:
1. Products that are damaged through accident, abuse, misuse, neglect, or user
9
modifications.
2. Problems that arise through failure to follow directions in the owner’s manual.
3. Exposure of the product to adverse or severe weather conditions, including
temperature extremes or water, including rainfall or immersion.
4. Exposure to toxic materials, biohazards, radioactive materials or other contamination.
5. Repairs attempted by parties other than AOR or its authorized personnel.
6. Damage that results from improper installation, including improper voltage and/or
reversed polarity, or exposure of a receiver to signal levels exceeding specifications.
7. Damage resulting through the use of accessories from manufacturers other than AOR.
8. Equipment that has had serial numbers removed or altered in any way.
9. Damage that occurred as a result of shipment. Claims must be presented to the carrier.
10. AOR is not responsible for any costs arising from installation or reinstallation of the
equipment, nor for any consequential (such as loss of use) damage claims.
Obtaining Warranty Service
1. You are responsible for shipping the product to AOR and any related costs.
2. Warranty claim must be accompanied by a legible copy of the original product purchase
receipt.
3. You must include a description of the problem(s) encountered with the product.
4. You must include your name, a valid ground shipping address (including zip code) and
telephone contact information.
5. AOR will ship the repaired (or replaced) product by ground transport.
Limitations
Any and all implied warranties, including those pertaining to merchantability and utility for a
specific purpose are limited to the duration of this limited warranty.
AOR’s limits on warranty pertain only to the repair or, at its option, replacement of defective
products. AOR shall not be liable for any other damages, including consequential, incidental
or otherwise, arising from any defect.
Some states do not allow limitations on how long an implied warranty lasts and may not
allow the exclusion of incidental or consequential damages. As such, the above limitations
may not apply in every case. This warranty gives you specific legal rights and you may have
other rights that apply in your state.
If you have questions about this limited warranty, or the operation of your AOR product,
contact AOR at (310) 787-8615 during normal business hours (9 am ~ 5 pm Pacific Time
Zone), or write to AOR USA, INC., 20655 S. Western Ave., Suite 112, Torrance, CA 90501.
You may also send a fax to AOR at (310) 787-8619. Additional information is available at the
AOR web site: www.aorusa.com
We suggest attaching your purchase receipt to this half of the warranty information sheet
and that you keep this information in a secure location.
AOR Model Number __________________________
Serial Number _______________________________
Dealer Name ________________________________
Purchase Date _______________________________
10
Manufactured by
AOR, LTD.
2-6-4, Misuji, Taitok-Ku
Tokyo, 111-0055, Japan
http://www.aorja.com
Distributed by
AOR USA, INC.
20655 S. Western Ave. Suite 112
Torrance, CA 90501, U.S.A.
Phone: 310-787-8615
Fax: 310-787-8619
http://www.aorusa.com
[email protected]
Copyright © 2004
All rights reserved
REV. 1.0
Printed in the U.S.A.
11