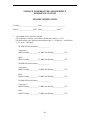
1
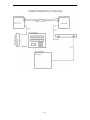
November 2005, ARM-TR-069
Contents
1.
2.
3.
4.
5.
6.
7.
8.
9.
10.
11.
Purpose................................................................................................................................................ 1
References ........................................................................................................................................... 1
Components ........................................................................................................................................ 1
Power Requirements ........................................................................................................................... 2
Safety Considerations.......................................................................................................................... 2
Corrective Maintenance ...................................................................................................................... 2
Depot Maintenance ............................................................................................................................. 3
Shipment Notification ......................................................................................................................... 4
Logistics .............................................................................................................................................. 4
Routine Maintenance .......................................................................................................................... 4
Troubleshooting Techniques ............................................................................................................... 5
Appendix A:
Appendix B:
Appendix C:
Appendix D:
Appendix E:
Appendix F:
Appendix G:
Bi-Weekly Procedures........................................................................................................A-1
Six-Month Procedures ........................................................................................................ B-1
Sensor Replacement Procedures......................................................................................... C-1
LoggerNet Set-Up ..............................................................................................................D-1
Perl Script Set-Up ............................................................................................................... E-1
NL-100 Set-Up ................................................................................................................... F-1
Wiring Diagrams ................................................................................................................G-1
iii
November 2005, ARM-TR-069
Surface Temperature Humidity Reference System
1. Purpose
The Surface Temperature and Humidity Reference (SURTHREF) System is intended to provide
accurate reference values of ambient temperature and relative humidity (RH) for comparison with
radiosonde pre-launch values.
2. References
ECR-00319 (Modify balloon Borne sounding system (BBSS) surface reference system at the
Southern Great Plains [SGP] site)
ECO-00319 (Modify the Chilled Mirror/BBSS surface reference system at the SGP site)
3. Components
The components of the SURTHREF system are as follows:
•
Meteorological Instrument Shelter. The shelter is a standard NWS “Stevenson screen”
modified to allow for operator access on two sides. The shelter dimensions are 20 inches
by 30 inches by 34 inches.
•
Instrument Shelter stand.
•
Aspirated Chamber. The chamber is fabricated from white polypropylene plastics. Its
dimensions are 11 inches by 13 inches by 18 inches (volume = 1.49 feet3). One end is
open and covered with a removable plate containing a 7-inch by 7.5-inch access port.
Two muffin fans, each rated at 115 cfm are mounted at the far end. The fans produce an
estimated face flow of 10.49 fps or 3.2 m/s. The chamber has six sensor ports on its top
surface to accommodate standard temperature and RH probes.
•
Sonde positioning platform. A polypropylene platform is mounted approximately 1 inch
above the bottom of the aspirated chamber. The platform is equipped with moveable
guides for positioning radiosondes. A user-controlled switch is mounted on the side of
the Aspirated Chamber to indicate when a radiosonde is placed in or removed from the
chamber.
•
Temperature and RH probes.
o
o
o
•
Vaisala HMP45D probes – four each, one spare.
Rotronics MP100H probes – four each, one spare.
See Appendix G, Wiring Diagrams.
Data logger. The system uses a Campbell Scientific Instruments CR23X data logger.
1
November 2005, ARM-TR-069
•
Campbell Scientific NL-100 Ethernet Device.
•
Allied Telesyn AT-MC13 Media Converter.
•
Dell Computer. The computer is configured to conform to Atmospheric Radiation
Measurement (ARM) Program Core personal computer (PC) standards.
4. Power Requirements
•
Muffin fans use 110V AC.
•
Data logger uses 12V DC through an AC/DC converter plugged into the GFCI.
•
Probes use 12V DC supplied by the data logger. The Vaisala probes require < 4 mA; the
Rotronics probes < 10 mA.
•
Enclosure heater uses 110V AC
•
Enclosure cooling fan uses 110V AC
•
Micro-switch uses 5V DC supplied by the data logger.
•
NL-100 is powered by 12V from the data logger.
•
The AT-MC13 Media converters uses 12V DC through an AC/DC converter plugged into
the GFCI.
5. Safety Considerations
Electrical safety is the largest concern when it comes to the SURTHREF System. Power for the
system is supplied by 110VAC that enters the enclosure and runs through a switch that controls
power to all devices (See Appendix G, Wiring Diagrams).
Work on any component that is powered by 110VAC must be done while de-energized. The
muffin fans that are used to aspirate the temperature and RH probes in the polypropylene
enclosure also use 110VAC, any work on these fans must also be done while de-energized.
Other safety considerations are insects, rodents and pinching of appendages in the Stevenson
Screen openings and data logger enclosure.
6. Corrective Maintenance
The SURTHREF System is designed to require a minimum amount of routine maintenance. If
the system does not operate properly or conform to the routine checks, the following steps should
be taken.
1.
Onsite check. See section entitled “Troubleshooting Techniques” on page 5 of this manual.
2
November 2005, ARM-TR-069
2.
Inform the instrument mentor if the troubleshooting techniques in this manual or from
experience are unable to locate/fix the problem.
Michael T. Ritsche
Argonne National Laboratory
Building 203
9700 S. Cass Ave
Argonne, Illinois 60439
Office: (630) 252-1554
FAX: (630) 252-5498
Email: [email protected]
Dr. Barry M. Lesht
Argonne National Laboratory
Building 203
9700 S. Cass Ave
Argonne, Illinois 60439
Office: (630) 252-1554
FAX: (630) 252-5498
Email: [email protected]
7. Depot Maintenance
Some components have been replaced due to malfunction or being out of tolerance and will be
returned to the vendor and/or manufacturer for service and/or repair. Normally, this will be done
after consultation with the instrument mentor. Many items can and will be repaired in the Repair
Lab at the SGP site’s Central Facility. All sensors will be returned to the SGP Central Facility
and given to George Sawyer. He will either have them repaired under warranty, repaired inhouse in the Repair Lab or send them to the appropriate vendor. If a unit or system has to be
shipped to the SGP site, ship to the address listed below. An ARM SGP shipment notification
form must be filled out and sent to SGP before the shipment arrives. A link to that form is below.
George Sawyer
ARM SGP CART Site
309600 EW 28
Billings, Oklahoma 74630
Voice: (580) 388-4053
FAX: (580) 388-4052
Email: [email protected]
http://sdsops.arm.gov/shipping/shipnote.html
The phone numbers below are the contact numbers to get the Return Material Authorization
(RMA) numbers required for return of the sensors. Serial numbers and the reason for return are
required.
3
November 2005, ARM-TR-069
Vaisala 1-888-824-7252 (follow prompts)
Rotronic 1-800-628-7101 ext. 20
8. Shipment Notification
All returns will be evaluated in the lab and repaired if necessary. If the unit cannot be repaired in
the lab, it will be sent to the manufacturer or appropriate vendor. An RMA number must be
obtained from the vendor. A SGP PR must be filled out with all of the appropriate information
including the obtained RMA number. The PR will list the quoted repair cost and/or a not to
exceed cost. The PR must be signed by all of the appropriate managers and then faxed to Laurel
Chapman at Argonne National Laboratory. When notified by Argonne National Laboratory that a
PO is in place, pack the unit appropriately and ship it to its repair destination.
Laurel Chapman
DIS Division, Bldg. 900 Rm B03B
Argonne National Laboratory
9700 S. Cass Ave
Argonne, Illinois 60439
Voice: (630) 252-2887
FAX: (630) 252-9792
Email: [email protected]
9. Logistics
The following expendables are used with the SURTHREF systems:
1.
2.
3.
The Vaisala HMI31/HMP35 temperature and RH meter using 9V batteries
A desiccant pack, CSI type DSC20/4, is used in the enclosure.
Temperature and RH probe filters.
The desiccant packs will require replacement approximately every six months. The site operators
should maintain an adequate inventory of this item. Contact Laurel Chapman to obtain
replacement packs when the supply level falls.
10. Routine Maintenance
Every Two Weeks
A single technician is required to perform the checks and preventative maintenance (See
Appendix A).
If equipment of sensor replacement is required, the following items may be needed:
•
•
•
replacement parts or sensors
users manual
HMI31/HMP35 temperature and RH probe.
4
November 2005, ARM-TR-069
Every Six Months
The following are required to perform the six-month checks, maintenance, and sensor verification
(see Appendix B):
•
•
•
•
desiccant pack
second person and radios
HMI31/HMP35 temperature and RH probe
assorted tools (wrenches, screwdrivers).
If equipment or sensor replacement is required, the following items may be needed (see
Appendix C):
•
•
replacement parts or sensors
users manual.
11. Troubleshooting Techniques
1.
Communication Outages: The PC communicates with the datalogger through various
peripheral devices (See Appendix G: Wiring Diagrams). Any one of these devices or the
cables connecting them can fail. If a communication outage occurs, check these devices for
power and proper functioning: NL-100, AT-MC13 Fiber Drivers.
2.
Failed Temperature and RH sensors: There are six sensors in the aspirated chamber. A
malfunctioning sensor should be obvious as the data from it will be significantly different
from the other sensors. Check for tight connections from the sensor wires to the datalogger
input channels. If connections are tight, a replacement sensor should be installed (see
Appendix C: Sensor Replacement Procedures).
3.
Aspirator Fan/Heater Failure: There are two muffin fans at the rear of the aspirated
chamber. There is one located in the datalogger enclosure along with a heater and two
thermostats. If any of the muffin fans fail, check for obstructions and/or that 110V power
is available. If the muffin fan in the datalogger enclosure fails, also check the thermostat
for a proper setting. Turning the thermostat up or down will allow power to the fan. The
same procedure can be used for the heater. See Appendix G: Wiring Diagrams for the AC
Power Wiring Diagram.
4.
“Sonde In” Switch Failure: The “Sonde In” switch is a user-operated switch. The switch is
a normally open switch. When the switch is closed 5V supplied by the datalogger is
present on the line. The program looks for any voltage on this line above 0V. There is also
a 100k ohm resistor. If the switch does not work, (1) check the connections, (2) check for
5V on the line, and (3) check for breaks in the cable. If all of the above check out ok then
the switch has gone either bad or there are dirty contacts preventing proper operation of the
switch. Either way, the switch will have to be replaced. See Appendix G: Wiring
Diagrams.
Computer Problems: The computer conforms to the ARM Core PC Standards. Problems with
the PC should be directed to Ron Reed or Tim Martin (630-252-8708). If neither can be reached,
contact the Mentor(s).
5
November 2005, ARM-TR-069
Appendix A
Bi-Weekly Procedures
November 2005, ARM-TR-069
SURTHREF
Preventative Maintenance Procedures
Frequency:
Mentor:
Bi-Weekly
Michael Ritsche, Barry Lesht
The following procedures are for performing the scheduled bi-weekly maintenance. All results
should be recorded on the PM checklist.
INSPECTION OF SITE GROUNDS NEAR THE INSTRUMENT
Visually inspect the site grounds around the instrument shelter for hazards such as rodent
burrows, buried conduit trench settling, and insect nests.
Checklist Response:
Problem:
Problem:
No problems noted.
See CM Report
See Comments
VISUAL INSPECTION OF INSTRUMENT COMPONENTS
Stevenson Screen
Check that the Stevenson Screen is in good working order. Ensure that the paint is in good shape
and that all hardware (hinges, latches, etc) is in good shape. Check for excessive rust on moving
metallic parts, cracked components and/or slats of the Stevenson Screen. Periodic painting of the
Stevenson Screen may be required.
Checklist Response:
Problem:
Problem:
No problems noted.
See CM Report
See Comments
Conduit, Cables, and Connectors
Check that all conduits and cables on the bottom of the control box are secure. Check all cables
and conduits for damage. Check all sensor and electrical wires inside the control box for damage.
Check the tightness of all sensor connection at the data logger. Check for water intrusion and that
the fan or heater is working.
Checklist Response:
Problem:
Problem:
No problems noted.
See CM Report
See Comments
A-1
November 2005, ARM-TR-069
Appendix B
Six-Month Procedures
November 2005, ARM-TR-069
SURTHREF
Six-Month Calibration Procedures
Frequency: Twice a year
Mentor: Michael Ritsche, Barry Lesht
To verify the accuracy and installation of the six temperature and RH probes the following will
need to be accomplished:
Remove the humidity cap from each of the sensors and clean or replace. The Vaisala probe
humidity cap is replaced on a similar time frame to the SMOS replacement. The Rotronic
humidity cap is made of wire mesh. This cap should be gently cleaned using a mild detergent and
soft bristled brush. It will need to dry thoroughly before re-installation. If major damage has
occurred, the humidity cap should be replaced.
Verification of the sensors is done with the Vaisala HMI31/HMP35 temperature and RH meter.
Set or hold the measuring portion of the meter inside the polypropylene aspirated chamber.
Ensure that the meter is centered and at similar height to the measuring portion of the six probes.
Turn on the meter and allow it to stabilize so that the meter readings are changing by less than
0.2°C and 1% RH. When the meter has stabilized, wait an additional five minutes before taking
readings. The readings from the sensors are available inside the sonde trailer and are located on
the PC in the program called BBSSRef.RTMC.
B-1
November 2005, ARM-TR-069
B-2
November 2005, ARM-TR-069
SURFACE TEMPERATURE AND HUMIDITY
REFERENCE SYSTEM
SENSOR VERIFICATION
Tested by:______________________ Date: ________/_________/__________
Started: __________________GMT Ended:__________________GMT
1. Vaisala HMP-45D Temperature and RH
(The temperature readings, once stabilized should match within +/- 0.5°C)
(The RH readings, once stabilized should match within +/- 3% RH for 0 – 90% RH and
+/- 4% for 90 – 100% RH)
V1 HMP-45D Serial Number:______________
Temperature:
HMI31 Reading:___________V1 HMP-45D Reading:_____________ P/F
RH%:
HMI31 Reading:___________V1 HMP-45D Reading:_____________ P/F
V2 HMP-45D Serial Number_______________
Temperature:
HMI31 Reading:___________V2 HMP-45D Reading:_____________ P/F
RH%:
HMI31 Reading:___________V2 HMP-45D Reading:_____________ P/F
V3 HMP-45D Serial Number________________
Temperature:
HMI31 Reading:___________V3 HMP-45D Reading:_____________ P/F
RH%:
HMI31 Reading:___________V3 HMP-45D Reading:_____________ P/F
B-3
November 2005, ARM-TR-069
2. ROTRONIC MPH100H Temperature and RH
(The temperature readings, once stabilized should match within +/- 0.5°C)
(The RH readings, once stabilized should match within +/- 3% RH for 0 – 90% RH and
+/- 4% for 90 – 100% RH)
R1 MPH100H Serial Number________________
Temperature:
HMI31 Reading:___________R1 HMP-45D Reading:_____________ P/F
RH%:
HMI31 Reading:___________R1 HMP-45D Reading:_____________ P/F
R2 MPH100H Serial Number________________
Temperature:
HMI31 Reading:___________R2 HMP-45D Reading:_____________ P/F
RH%:
HMI31 Reading:___________R2 HMP-45D Reading:_____________ P/F
R3 MPH100H Serial Number________________
Temperature:
HMI31 Reading:___________R3 HMP-45D Reading:_____________ P/F
RH%:
HMI31 Reading:___________R3 HMP-45D Reading:_____________ P/F
B-4
November 2005, ARM-TR-069
Appendix C
Sensor Replacement Procedures
November 2005, ARM-TR-069
Sensor Replacement Procedures
Both the Rotronic and Vaisala probes have removable sensing units. To access the sensing unit it
is necessary to remove the probe from the Aspirated Chamber.
•
Turn the copper retaining screw counter clockwise to loosen and remove the sensor from
the chamber.
•
Grasp the sensor body firmly and remove the sensing unit. If the whole unit needs to be
replaced, see Appendix G Wiring Diagrams.
•
Replace the sensing unit with a recently calibrated unit.
•
Return the sensor to the Aspirated Chamber and tighten the copper retaining screw by
turning it clockwise.
•
Check the BBSSRef.rtmc Overview screen to ensure the new unit is working properly
and compare the new sensors readings to the readings of the other sensors in the
Aspirated Chamber.
The CR23X program will need to be updated with the new sensors serial number. To change the
program you will need to log onto the collector PC as administrator. Once logged on as
administrator, double click on the shortcut “Shortcut to Administrative Tools” located on the
desktop. Next, double click on “Services.” Find LoggerNet in the list of services and highlight
by left clicking on it. On the left-hand side, two menu choices will show up in blue text. Choose
“Stop” to stop the service.
C-1
November 2005, ARM-TR-069
Once the service has been stopped, go to “Start” and choose “LoggerNet” to start the program.
When the LoggerNet menu bar is active, click on “EdLog.”
When Edlog starts go to “File>>Open” and navigate to the C:\SurTHRefPgm folder and choose
the .csi program (.csi should be default) and open it. Navigate to the lower section of the program
where the DAILY OUTPUT and LOGISTICS section is located.
C-2
November 2005, ARM-TR-069
****************DAILY OUTPUT and LOGISTICS***************************
;
;This output, once per day, captures the serial number
;of the six probes; three Vaisala HMP-45Ds and three Rotronic MP100H.
;The Rotronic probe serial numbers are: 92781,
;92782, 92783. The Vaisala probe serial numbers are: Y3110012,
;Y3110013, Y3110014. Campbell does not allow for text values
;to be entered so we capture the Vaisala probes SNs as 0012, 0013, 0014.
;The locations of the probes in the box are also captured in variables called
;XXlocate, where XX corresponds to V1, V2, V3 for the Vaisala probes and R1, R2, R3
;for the Rotronic probes. The location of a particular probe and the serial number
;should match. For example, if Vaisala probe 0012 is V1 and it is in
;location 1 then the value of V1probeSN should be 0012 and the value of V1locate
;should be 1. The ranges of values for locations are 1 - 12. The number
;of the location is as follows, if looking down on top of the
;box with the open end at the bottom.
;
;
;
fan
fan
;
;
;
3
6
;
;
;
2
5
;
;
;
1
4
;
;
;
OPEN END
;
;
;***********************************************************************
22: If time is (P92)
1: 0
Minutes (Seconds --) into a
2: 1440
Interval (same units as above)
3: 10
Set Output Flag High (Flag 0)
23: Set Active Storage Area (P80)^17083
1: 1
Final Storage Area 1
2: 2
Array ID
24: Real Time (P77)^22655
1: 1220 Year,Day,Hour/Minute (midnight = 2400)
C-3
November 2005, ARM-TR-069
;V1 probe serial number
25: Z=F x 10^n (P30)
1: 0012 F
2: 0
n, Exponent of 10
3: 31
Z Loc [ V1probeSN ]
;V1 probe location
26: Z=F x 10^n (P30)
1: 1
F
2: 0
n, Exponent of 10
3: 32
Z Loc [ V1locate ]
;V2 probe serial number
27: Z=F x 10^n (P30)
1: 0013 F
2: 0
n, Exponent of 10
3: 33
Z Loc [ V2probeSN ]
;V2 probe location
28: Z=F x 10^n (P30)
1: 5
F
2: 0
n, Exponent of 10
3: 34
Z Loc [ V2locate ]
;V3 probe serial number
29: Z=F x 10^n (P30)
1: 0014 F
2: 0
n, Exponent of 10
3: 35
Z Loc [ V3probeSN ]
;V3 probe location
30: Z=F x 10^n (P30)
1: 3
F
2: 0
n, Exponent of 10
3: 36
Z Loc [ V3locate ]
;R1 probe serial number
31: Z=F x 10^n (P30)
1: 92781 F
2: 0
n, Exponent of 10
3: 37
Z Loc [ R1probeSN ]
C-4
November 2005, ARM-TR-069
;R1 probe location
32: Z=F x 10^n (P30)
1: 4
F
2: 0
n, Exponent of 10
3: 38
Z Loc [ R1locate ]
;R2 probe serial number
33: Z=F x 10^n (P30)
1: 92782 F
2: 0
n, Exponent of 10
3: 39
Z Loc [ R2probeSN ]
;R2 probe location
34: Z=F x 10^n (P30)
1: 2
F
2: 0
n, Exponent of 10
3: 40
Z Loc [ R2locate ]
;R3 probe serial number
35: Z=F x 10^n (P30)
1: 92783 F
2: 0
n, Exponent of 10
3: 41
Z Loc [ R3probeSN ]
;R3 probe location
36: Z=F x 10^n (P30)
1: 6
F
2: 0
n, Exponent of 10
3: 42
Z Loc [ R3locate ]
Change the serial number in location 1 (see bold values above) of the appropriate instruction
number for a particular probe or location. For example, if the probe located in V2 was changed
go to Instruction 27 and change the serial number in location 1 of Instruction 27 (0013 above).
The same holds true for moving sensors or changing the location. If the probes in located in V2
and V3 are swapped the serial numbers also have to be swapped in the program.
Once the program has been changed, click on “save” and when the warning banner comes up
asking you to compile click on “yes.” If there are errors or warnings, stop and contact the
mentor(s). If there are no warnings, proceed with loading the program to the data logger. EdLog
can be closed at this time.
Go back to the main LoggerNet menu bar and click on “Connect.” When the “Connect” screen is
active, choose “BBSSRef” from the left hand menu location under Stations. Once the BBSSRef
logger is highlighted, click on the “connect” button under Control. When communication with
the logger has been established (wires connect) click on “Send” under Program. Choose the
C-5
November 2005, ARM-TR-069
program that was just updated above (C:\SurTHRefPgm) and send it to the logger, click on “Ok”
when the warning banner appears. Click on “Disconnect” under Control to stop communication
with the data logger and close the “Connect” screen.
After the program has been sent, view the Overview screen of the BBSSRef.rtmc program to
ensure the data appear reasonable and that everything appears to be working properly. Notify the
mentor(s) of the probe and program change so that they can verify that the changes appear during
the next daily output.
Once the changes have been made and the new program sent LoggerNet needs to be set as a
Service again.
Close the LoggerNet menu bar, double click on “Shortcut to Administrative Services,” and
double click on “Services” again. Navigate to LoggerNet and choose “start” from the two
choices listed in the left hand window. Once LoggerNet has started as a service close all screens
and log off as administrator.
C-6
November 2005, ARM-TR-069
Appendix D
LoggerNet Set-Up
November 2005, ARM-TR-069
LoggerNet Setup
Setup and start PC. Ensure the PC is connected to the network and the loggers and NL-100’s are
connected and running.
Create the following directories on the PC:
C:\ARM\bin
C:\SendDir\SurTHRef
C:\SurTHRefData
C:\SurTHRefPgm
Start LoggerNet if it not already running (task bar will be on desk top if it is)
Click on the Setup icon
Once the Setup interface starts, click on the Add Root button and choose IPPort.
D-1
November 2005, ARM-TR-069
Once the IPPort has been added, enter the IP address 198.124.98.19. Ensure the
Communications Enabled box is checked. Set Extra Response time to 0 s if not already done.
Call-back Enabled should not be checked.
D-2
November 2005, ARM-TR-069
Once the IPPort has been added you can change the name. Suggestion would be to change the
name to IPPort.Sur.19. This is not necessary but may help in identification.
Click on the Add button to add a datalogger under the IPPort. Choose CR_23X. Once you
highlight the logger type, click on the Add Now button. You must click on close afterwards to
shut down the Add Device window. Clicking the Add Now button will add multiple loggers if
done more than once. If this occurs, highlight the unwanted loggers by clicking on them and
clicking on the delete button.
D-3
November 2005, ARM-TR-069
Once the logger has been added you should rename it to SurTHRef either using the Rename
button or highlighting and using right mouse button
Left click on a logger to access the remaining connection information so that it can be
reconfigured.
D-4
November 2005, ARM-TR-069
Ensure the Communications Enabled box is checked and leave all settings under hardware tab as
default.
Click on the schedule tab and change the following settings: ensure Scheduled Collection
Enabled box is checked. Change Collection Interval to 01m, rest 0’s. Change Primary Retry
Interval to all 01m and Number of Primary Retries to 1. Uncheck Secondary Retry Interval and
Collect Ports and Flags. Leave everything else as defaults.
Click on Final Storage Area 1 tab and make the following changes to the settings: check the
Enable for Collections box and change the destination of the data file to the directory created in
step 2 (SurTHRefData) and change the name of the data file to SurTHRef.dat. Uncheck the Use
Default Name box. Under File Output Option, click the Append to End of File radio button.
Under Output Format, click the ASCII, Comma Separated radio button. Under Collect Mode,
click on Data Logged Since Last Call radio button and check the Collect All on First Call box.
D-5
November 2005, ARM-TR-069
Click on the Clock tab to make changes to the following settings: Leave Time Zone Offset as 0h
00m. Under Automated Clock Check, click the box Enabled. You can leave Initial Date as
default but make sure Initial Time is XX:XX:30 so that any clock check occurs at 30 sec past a
minute. Set Interval to 01 d, for once per day. Set the Allowed Clock Deviation to 1 sec.
D-6
November 2005, ARM-TR-069
You will not need to make any changes to the settings in the Final Storage Area 2 tab. Just
ensure that the Enabled for Collections box is not checked.
Once the above steps are complete, you should be able to connect to the logger using the Connect
button of the main menu.
D-7
November 2005, ARM-TR-069
The logger you added in the above steps will be located in the Stations menu. Highlight the
logger you wish to connect to and click on the connect button on the bottom. If everything is
connected and correct the wires of the Control display will connect. To send a program to the
logger, click on the Send button under the Program portion of the Connect screen. Navigate to
the directory where the program is stored (should be C:\SurTHRefPgm) and select the appropriate
program. Once the program has been selected, click on the Send button. A warning banner will
be displayed stating that continuing will cause all data to be lost. Continue to send the program
by clicking on the Ok button. Once the send is complete and the logger has compiled the
program, another message banner will be displayed, click on Ok to finalize the transmission.
Once connected and a program is running (assuming sensors connected) you can view the raw
data and final stored data by clicking on the numbers in the Data Displays section of the Connect
screen.
****A NOTE OF WARNING: CONNECTING TO A LOGGER USING THE CONNECT
SCREEN WILL DISABLE COMMUNICATIONS TO OTHER LOGGERS ON LOGGERNET.
NO DATA WILL BE COLLECTED WHILE YOU ARE CONNECTED THIS WAY.
REGULAR COMMUNICATIONS WILL BE RESTORED WHEN THE CONNECTION IS
SEVERED.
D-8
November 2005, ARM-TR-069
Appendix E
Perl Script Set-Up
November 2005, ARM-TR-069
PERL SCRIPT SET-UP
${DataDir} = The name of the output directory used by LoggerNet
${DataFile} = The name of the output file used by LoggerNet
${DataDir} = SurTHRefData
${DataFile} = SurTHRef.dat
1. Create directories:
- C:\ARM\bin
- C:\SendDir\SurTHRefData
2. Copy split_working_cdl.pl script to C:\ARM\bin
3. Install ActivePerl-5.8.0.806-MSWin32-x86.msi
- Choose default options
4. Schedule split_working_cdl.pl script in LoggerNet Tasks:
5. Click on Setup button on main LoggerNet task bar.
6. Click on the Task button.
E-1
November 2005, ARM-TR-069
8. Click on Add Scheduled button on lower left hand side of window.
9. Rename the task in the window by right clicking on the highlighted task and rename as
SplitSurTHRef
Change the following in the “Scheduled Event” section
Base Date: any previous date (i.e. 5/7/2004)
Base Time: 12:00:50 AM
Event Interval: 0 d 01 h 00m 00 s
In the “What Task Does” section do the following for each task.
Check box for Execute File:
File Name: C:\ARM\bin\split_working_cdl.pl
Command Line Options:
-f SurTHRef.dat –i /SurTHRefData –o /SendDir/SurTHRefData
The generic format is:
-f ${DataFile} –i /${DataDir} –o /SendDir/${DataDir}
E-2
November 2005, ARM-TR-069
Working Directory:
C:\SurTHRefData
The generic format is:
C:\${DataDir}
When finished, click on the Apply button.
E-3
November 2005, ARM-TR-069
Appendix F
NL-100 Set-Up
November 2005, ARM-TR-069
NL-100 SET-UP
In order to communicate with the NL-100 you need a Null-modem cable and a PC or Laptop with
a terminal communication package. It is assumed for the rest of this document that
HyperTerminal is used. You will also need 12VDC to power the NL-100.
Connect the null modem cable to the PC and the NL-100. You will need a cable with female
connections at both ends. Use gender adaptors if necessary. If this is the first time
communicating with the NL-100 after receipt from factory, go to step 1b.
1a. Open NL-100 by removing four screws. Connect boot jumper across both terminals.
1b. Connect power to NL-100 and connect Null Modem cable.
1c. Open hyperterminal and use following settings:
baud: 115200
databits: 8
parity: none
stop bits: one
flow control: none
F-1
November 2005, ARM-TR-069
2. Strike the Enter button a few times to get the attention of the NL-100 once the following is
returned you may continue:
NL100/105 (ver, show, edit, defaults, reset, help, bye):
3. Type E to Edit and make sure the following is set:
Tlink config [dis]
RS485 [dis]
CS I/O [dis]
RS232 Config [TCPServ]
RS232 bps [19K]
RS232 Serial Server Port [6781]
Ethernet 10-baseT [enabled]
10-baseT port IP# [198.124.98.19] * this value is logger IP address
mask [255.255.255.0] *whatever mask is used
default gateway [yes]
default gateway IP [198.124.98.1]
Pakbus node [678]
Clock neighbor node ID [0]
PakTcp Server config [dis]
PakTcp client config [dis]
Modbus/Tcp gateway config [dis]
Config monitor telnet port [23]
Telnet Session password [nl100]
Serial Server Watchdog [2]
Save
You can progress through the menu by pressing <ENTER>. If you make a mistake after entering
a setting, the up arrow can be used to move backwards. If you need help for a particular setting,
press the F1 key or the ? key. You can also choose to select <cancel> at the end instead of save if
you want to start over.
*
If the jumper was used it must be disconnected before returning the NL-100 to use. If this is not done, the
NL-100 will always be at the boot prompt and will be inaccessible for remote communications.
F-2
November 2005, ARM-TR-069
Appendix G
Wiring Diagrams
November 2005, ARM-TR-069
Rotronics MP100H-1 wiring table (three sensors)
Campbell CR23X
Connection
Wire Color
Function
Power Out – 12V
SE18, SE20, SE22
SE17, SE19, SE21
SEGnd, SEGnd, SEGnd
N/C
N/C
Green
White
Brown
Gray
Blue
Yellow
+12V
RH out
T out
Ground
DIO (not used)
Sig_0 (not used)
Vaisala HMP45D wiring table (three sensors)
Campbell CR23X Connection
Wire Color
Function
EX1, EX2, EX3
DH2, DH4, DH6
DL2, DL4, DL6
DH1, DH3, DH5
Power Out - 12V
SE13, SE14, SE15
Power Out - Ground
Power Out - Ground
Earth Ground
Yellow
White
Green
Black
Blue
Brown
Violet
Red
Grey
Pt100
Pt100
Pt100
Pt100
+12V
RH out
Ground
Ground
Shield
Vaisala HMP45D sensor units
Sensor Identifier Sensor Serial Number
V1
V2
V3
V4
Y3110012
Y3110013
Y3110014
Y3110015 (spare)
G-1
November 2005, ARM-TR-069
Rotronics MP100H-1 sensor units
Sensor Identifier Sensor Serial Number
R1
R2
R3
R4
92781
92782
92783
92784 (spare)
G-2
November 2005, ARM-TR-069
G-3
November 2005, ARM-TR-069
AC Power Wiring Diagram
G-4
1
H
2
L
G
3
H
L
4
H
100Ω
L
G
5
H
L
G
H
100Ω
Wh
G
Wh
Grn
Wh
L
G
E1
E2
E3
V1
Blk
Red/Vi
NL100
V2 Ylw
Rs
Rs
Rs
V1 Ylw
Grn
V3
V2
Blu
H
100Ω
Grn
Blk
Red/Vi
6
L
Blu
Red
12V
Blk
Red/Vi
G
Blu
V3 Ylw
Blk
14
15
17
18
19
20
21
22
Q
Q
Q
16
T
Q
T
Q
T
Q
+
+
+
+
+
+
+
+
+
Brn Wh Gry
G-5
V1 Brown
V3 Brown
G
Brn Wh Gry
R1
Grn
V2 Brown
G
23
G
100K
Brn Wh Gry
R2
Grn
R3
To aspirator box
Grn
H
24
G
5
G
12
12
G
November 2005, ARM-TR-069
13
November 2005, ARM-TR-069
G-6