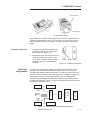
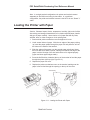
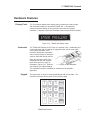
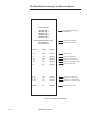
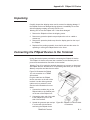
1
TRANZ 460
FDC Retail/Debit Purchasing Card Reference Manual
Application Version FRET462
VeriFone Part Number 25445, Revision C
Manual Revision 1.0
First Data Corporation
TRANZ 460 Retail/Debit Purchasing Card
Reference Manual
VeriFone Part Number 25445, Revision C
Manual Revision 1.0
Published: April 1997
VeriFone, Inc.
Three Lagoon Drive
Redwood City, CA 94065
Printed in the United States of America
Copyright 1997 VeriFone, Inc.
No part of this manual may be copied, distributed, stored in a retrieval
system, translated into any human or computer language, transmitted, in any
form or by any means, without the prior written consent of VeriFone, Inc.
Publications are not stocked at the address given above. Requests for
VeriFone publications should be made to your VeriFone representative.
VeriFone and TRANZ are registered trademarks of VeriFone, Inc.
PINpad is a trademark of VeriFone, Inc. All other trademarks or tradenames
appearing in this document are the property of their respective owners.
Table of Contents
1. Introduction
Unique Features....................................................................................... 1-1
Software Version ...................................................................................... 1-1
Integral Printer.......................................................................................... 1-2
PINpad Devices........................................................................................ 1-2
2. Features and Transactions Summary
New Features ........................................................................................... 2-1
Existing Features...................................................................................... 2-1
Terminal Transactions Summary....................................................... 2-3
Local or Terminal Functions Summary.............................................. 2-3
3. TRANZ 460 Terminal
Unpacking................................................................................................. 3-1
Loading/Unloading a Ribbon Cassette in the Printer .............................. 3-2
Installation ................................................................................................ 3-3
Single Terminal Configuration ........................................................... 3-3
Data Connections........................................................................ 3-3
DTR/RTS Switch and Power Connections ................................. 3-4
Telephone Connection ................................................................ 3-5
Multi-Lane Configuration.................................................................... 3-5
Loading the Printer with Paper ................................................................ 3-6
Hardware Features................................................................................... 3-7
Display Panel ..................................................................................... 3-7
Cardreader ......................................................................................... 3-7
Keypad ............................................................................................... 3-7
FDC TRANZ 460 Overlay.................................................................. 3-8
Maintenance ............................................................................................. 3-8
Cleaning ............................................................................................. 3-8
Returning the TRANZ 460 Terminal for Service ............................... 3-8
Troubleshooting........................................................................................ 3-9
Terminal Specifications ............................................................................ 3-11
Accessories .............................................................................................. 3-11
i
Table of Contents
4. General Programming
Entering the General Programming Mode ............................................... 4-1
Review a Field ................................................................................... 4-1
Change a Field .................................................................................. 4-1
Setting the Calendar/Clock ...................................................................... 4-2
"Emptying" a Field.................................................................................... 4-3
Entering Alphanumeric Characters .......................................................... 4-3
Copying or Downloading Data to Another Terminal ............................... 4-4
Fraud Control Programming..................................................................... 4-4
Eliminating "PROGRAMING ERROR" ..................................................... 4-5
Password Protection ................................................................................ 4-5
5. Programming the Terminal for Use
Host Information ....................................................................................... 5-1
Account Range Tables............................................................................. 5-2
Normal Entries for All Card Types..................................................... 5-3
Security Setup .......................................................................................... 5-4
Update Password ..................................................................................... 5-5
Options Setup........................................................................................... 5-5
Sale Type Description .............................................................................. 5-7
Printer/PINpad Device Type..................................................................... 5-7
Change Idle Prompt ................................................................................. 5-8
Clear Batch............................................................................................... 5-9
Card Type................................................................................................. 5-9
Memory Map of Important Locations................................................. 5-9
6. Standard Key Operations
Credit Sale................................................................................................ 6-1
Debit Sale................................................................................................. 6-3
Credit Return ............................................................................................ 6-4
Debit Return ............................................................................................. 6-6
Auth Only.................................................................................................. 6-7
Void .......................................................................................................... 6-9
Ticket Only ............................................................................................... 6-10
ii
Table of Contents
6. Standard Key Operations (cont’d.)
Deposit Inquiry ......................................................................................... 6-11
Close Batch .............................................................................................. 6-12
7. Terminal Functions
Item Review.............................................................................................. 7-1
Totals Review........................................................................................... 7-3
Demo Mode.............................................................................................. 7-4
Print Options............................................................................................. 7-5
8. Accessories
Appendix A. TRANZ 460 Integral Printer
Paper Detect ............................................................................................ A-1
Specifications ........................................................................................... A-1
Appendix B. PINpad 101 Device
Introduction ............................................................................................... B-1
PINpad Device Components.................................................................... B-1
Display ............................................................................................... B-1
Keypad ............................................................................................... B-2
Selecting a Location for the PINpad Device............................................ B-2
Unpacking................................................................................................. B-3
Connecting the PINpad Device to the Terminal ...................................... B-3
Cable Part Numbers .......................................................................... B-4
PINpad 101 Device Mounting .................................................................. B-4
Wall Mounting .................................................................................... B-4
Countertop Mounting ......................................................................... B-5
PINpad Device Startup............................................................................. B-5
The Idle Prompt........................................................................................ B-5
Using the Keypad..................................................................................... B-5
Maintenance ............................................................................................ B-6
Cleaning ............................................................................................. B-6
Returning the PINpad Device ............................................................ B-6
Troubleshooting ................................................................................. B-6
iii
Table of Contents
Appendix B. PINpad 101 Device (cont’d.)
Documentation ......................................................................................... B-7
Part Numbers ........................................................................................... B-7
Appendix C. PINpad 201 Device
Introduction ............................................................................................... C-1
PINpad 201 Device Components............................................................. C-1
Selecting a Location for the PINpad Device............................................ C-1
Unpacking................................................................................................. C-2
Connecting the PINpad Device to the Terminal ...................................... C-2
Cable Part Numbers .......................................................................... C-3
Cable Routing Channels.................................................................... C-3
PINpad 201 Device Mounting .................................................................. C-3
PINpad Device Startup............................................................................. C-3
The Idle Prompt........................................................................................ C-3
Using the Cardreader............................................................................... C-4
Using the Keypad..................................................................................... C-4
Maintenance and Keypad Diagnostics..................................................... C-5
Cleaning ............................................................................................. C-5
Returning the PINpad Device ............................................................ C-5
Troubleshooting ................................................................................. C-5
Appendix D. Prompts and Error Messages
Appendix E. ZONTALK Download Parameters
Data Type Codes ..................................................................................... E-1
Memory Locations .................................................................................... E-2
Appendix F. TRANZport 232
Introduction ............................................................................................... F-1
Unpacking................................................................................................. F-1
Typical Installation ............................................................................ F-2
DIP Switch Setting ............................................................................. F-3
Testing the TRANZ 460/TRANZport 232 Connection ....................... F-4
Specifications ........................................................................................... F-4
iv
Table of Contents
Appendix F. TRANZport 232 (cont’d.)
Physical.............................................................................................. F-4
Environmental .................................................................................... F-4
Power ................................................................................................. F-4
Port Configurations................................................................................... F-4
TRANZport 232 Kit ............................................................................ F-5
Service ............................................................................................... F-5
Glossary
Index
v
vi
1. Introduction
Congratulations on your choice of the VeriFone® TRANZ® 460 transaction
terminal. The TRANZ 460 terminal has many outstanding features that will
enable you and your merchants to perform your jobs faster and easier.
Please take the time to read this manual carefully so you become familiar
with the equipment and procedures you need to know to perform functions
and transactions on your terminal.
Unique Features
Unique features of the TRANZ 460 are its compact design allowing
hand-held operation, and an integral roll printer. The TRANZ 460 terminal
operates on an external power supply. This TRANZ 460 application is similar
to the FDC TRANZ 380 Retail Debit Purchasing Card application.
Software Version
The FDC application software package loads only in TRANZ 460 terminals
having EPROM version NEAEU200 or higher. To determine the software
version your terminal contains, unplug the power cord, then plug it in again.
The terminal’s display shows the current software version installed. This
reference manual is for application version FRET462.
Figure 1-1. The TRANZ 460 Terminal
TRANZ 460 Terminal
1-1
FDC Retail/Debit Purchasing Card Reference Manual
Integral Printer
The TRANZ 460 terminal supports an integral roll printer for printing receipts
and reports. This application allows you to program a unique merchant
header of up to six lines for your receipts. Appendix A provides printer
details as well as sample receipts and reports.
PINpad Devices
The TRANZ 460 terminal supports the PINpadTM 101 and PINpad 201
devices for debit transactions that require customer entry of Personal
Identification Numbers (PINs) to verify transaction amounts and totals. Either
PINpad device attaches easily to the terminal’s side panel. See Appendices
B and C for installation instructions and operating procedures.
Figure 1-2. PINpad 101 Device
1-2
TRANZ 460 Terminal
Figure 1-3. PINpad 201 Device
2. Features and Transactions Summary
New Features
Following is a list of new features that have been added to the FDC
Retail/Debit Purchasing Card application.
★ The application runs on a TRANZ 460 terminal.
★ All receipts and reports are modified to conform to the TRANZ 460
terminal’s 24-column format.
★ The Virtual Private Line (VPL) communications feature is now enabled
through Host setup.
Existing Features
•
The Purchasing Card feature can be enabled by turning on the Customer
Code prompt in Account Range setup.
•
You can enable Virtual Private Line (VPL) communications (DDOV/ISDN)
in the Options setup for faster host response during transactions.
•
There are two possible DDOV configurations using a single phone line:
— One POS terminal and a standard telephone, or
— Up to 5 POS devices using a multi-lane traffic controller (MTC).
•
The terminal features fraud control checks for manual entry and dual
track transactions.
•
You can enable tax calculation in Options setup and establish a tax rate
for calculation purposes.
•
An option in Account Range setup enables the Address Verification System (AVS) prompt. If enabled, the AVS code prints on receipts and
reports.
•
The application supports VISA Payment System (PS) 2000 functionality.
•
Two extended prompt fields can be enabled in Options setup for use during Sale, Ticket, or Return transactions.
•
Expanded Account Ranges
TRANZ 460 Terminal
2-1
FDC Retail/Debit Purchasing Card Reference Manual
2-2
•
You can select Debit functionality in the Setup function.
•
Two PINpad devices are available to support Debit functions.
•
You can enable split dial for the AMEX and Discover hosts in setup.
•
The Auto Close option in Setup enables the terminal to automatically perform the Close transaction and print reports.
•
The setup option Sale Type Description is available, enabling the terminal to prompt the operator to enter the description of a Sale transaction.
•
Current settings are displayed at each setup prompt.
•
While reviewing a transaction, the Item Review function allows you to
Void, Edit, and print each transaction.
•
You can print terminal totals by card type and detail reports by item
number.
•
All captured transactions are numbered for buffer review.
•
The idle prompt includes the total number of spaces left for transaction
storage in the current batch.
•
The prompt for entry of the card account number indicates the item number for that transaction.
•
You can customize up to 6 merchant header lines for receipts and reports, as well as 6 flexible customer agreement lines and 3 flexible
message lines.
•
The abbreviated record display, as well as the full buffer review, includes
code letters indicating transaction type: S = Sale, R = Return, VS = Void
Sale, VR = Void Return, etc.
•
Card ranging includes the option for the Retail Terms prompt.
•
The application performs expiration date checking for expired cards.
•
A setup option allows you to customize the idle prompt.
•
Demo Mode simulates the communications process and host response.
TRANZ 460 Terminal
2. Features and Transactions Summary
Terminal
Transactions
Summary
Key
No.
Key Name
1
SALE
Obtains credit card sale authorization and
Ticket
2
RETURN
Authorizes a return/credit
3
AUTH ONLY
Authorizes a transaction without ticket
capture
4
VOID
Voids any host-captured transaction
5
TKT ONLY
Processes Offline Ticket transactions
6
INQUIRY
Checks previous business day’s deposits
8
9
Local or Terminal
Functions Summary
Explanation
Not used
CLOSE
Closes the terminal batch
Key Sequence
Explanation
BLUE KEY + 1
Item Review of captured tickets
BLUE KEY + 2
Terminal Totals
BLUE KEY + 3
Demo Mode
BLUE KEY + 4 + (code)
Setup functions:
Code 1 = Host Setup
Code 2 = Account Range Setup
Code 3 = Security Setup
Code 4 = Change Password
Code 5 = Terminal Options Setup
Code 6 = Sale Type Description
Code 7 = Printer/PINpad Device Type
Code 8 = Change Idle Prompt
Code 9 = Clear Batch
Code 0 = Card Type Label
BLUE KEY + 5
Print (item, totals and reprint)
BLUE KEY + 6
Display Current Time
TRANZ 460 Terminal
2-3
FDC Retail/Debit Purchasing Card Reference Manual
2-4
TRANZ 460 Terminal
3. TRANZ 460 Terminal
The TRANZ 460 terminal is an authorization and electronic transaction
terminal that performs Point-Of-Sale (POS) credit and debit authorizations. It
features the convenience of an integral roll printer for printing transaction
receipts and reports.
Figure 3-1. TRANZ 460 Terminal
Unpacking
Carefully inspect the shipping carton and its contents for shipping damage. If
the TRANZ 460 is damaged, file a claim immediately with the shipping
company or carrier and notify VeriFone. Do not use a damaged terminal.
1. Remove all of the items from the carton. You should have:
•
TRANZ 460 terminal
•
Power pack
•
Telephone line cord
•
Roll of carbon paper (for ribbonless operation), or
printer ribbon cassette and paper roll
•
TRANZ 460 Installation Guide
2. Remove any protective plastic wrapping from the terminal and place all the
components on a table or counter top.
3. Remove the plastic strip from the display panel. This strip protects the
plastic panel during shipment.
4. Save the carton and packing material for repacking or moving the terminal
in the future.
TRANZ 460 Terminal
3-1
FDC Retail/Debit Purchasing Card Reference Manual
Figure 3-2. TRANZ 460 Components
Note: If your TRANZ 460 terminal operates ribbonless, disregard the
following steps.
Loading/Unloading a Ribbon Cassette in the Printer
If a ribbon cassette is not already loaded in the printer, or if a new cassette
is required, perform the following steps:
1. Press in on the two finger grooves
on either side of the print
mechanism cover, lift up and
remove the cover (see Figure 3-3).
2. Press in on the two finger grooves
on either side of the paper roll
cover and pull back to remove.
3. Push down on the right side of the
ribbon cassette (labeled PUSH) and
remove the cassette
(see Figure 3-4, Step 1).
Figure 3-3. Removing the Printer
Cover
4. Insert the new ribbon cassette (Figure
3-4, Step 2) and gently push the
cassette down without locking the rotation of the ribbon feed roller.
5. Turn the cassette "knob" (marked by an arrow; Figure 3-4, Step 3)
clockwise to stretch the ribbon .
Figure 3-4. Loading and Unloading the Ribbon Cassette
3-2
TRANZ 460 Terminal
3. TRANZ 460 Terminal
Installation
This application can operate in either of two configurations, both using a
single telephone line. One configuration consists of a TRANZ 460 terminal
and a standard telephone sharing the same telephone line. The other
configuration supports up to five terminals per phone line, using a multi-lane
traffic controller.
Single Terminal
Configuration
In a single terminal configuration, there are two RS-232 devices: a
Data-Over-Voice Multiplexer (DVM) and a printer. The TRANZ 460 terminal
can connect to a TRANZport 232 device, which enables it to communicate
with the DVM and printer, or both terminal and printer can connect directly to
the DVM, provided the printer port on that device is compatible with VeriFone
equipment.
Follow these steps to connect your TRANZ 460 terminal to the printer and to
the DVM device. Refer also to Appendix F, TRANZport 232, for more
complete details of the various serial interface and power cables available to
install your DDOV TRANZ 460 terminal. Figures 3-5 through 3-7 illustrate
connections to a TRANZport 232 device.
Note: In the following configuration the TRANZ 460 receives its power from
the TRANZport 232. The power pack that came with your TRANZ 460
should be used with the TRANZport 232.
Data Connections
1. Using one of the supplied serial interface cables (PN 00446-04), plug the
DIN-8 end into the TRANZ 460 serial port. Plug the DB-9 end of this
cable into the connector labeled TERMINAL on the TRANZport 232.
(See Figure 3-5.)
2. Plug the DIN-8 end of the second supplied serial interface cable into the
connector labeled B on the TRANZport 232. The DB-9 end of this cable
should be plugged into the DVM (Figure 3-6).
TRANZport 232
(back view)
TRANZ 460
Serial Interface Cable
Figure 3-5. Serial Interface Cable Connection
Note: If connection is via DVM only, the terminal’s RS-232 cable plugs into
the DVM’s RS-232 connector. The DVM also features a 25-pin connector for
the serial port connection.
TRANZ 460 Terminal
3-3
FDC Retail/Debit Purchasing Card Reference Manual
DTR switch up
Connect to
serial port on
DVM
TRANZport 232
(front view)
B Port
Serial Interface Cable
Figure 3-6. TRANZport 232 Data Connections
DTR/RTS Switch and
Power Connections
1. Set the DTR/RTS switch on the TRANZport 232 to the UP position.
2. Plug one end of the power pass-thru cable into the Power In connector
on the TRANZ 460. Plug the other end of this cable into the connector
labeled POWER OUT on the TRANZport 232. Plug the TRANZ 460 power
pack into the connector labeled POWER IN on the TRANZport 232.
3. Plug the power pack into an indoor, 120 volt AC outlet.
TRANZ 460 Power Pack
(or optional TRANZport 232 power pack)
POWER IN
POWER IN POWER OUT
Figure 3-7. TRANZ 460/TRANZport 232 Power Connections
4. Remove the paper roll cover as shown in Figure 3-8 to expose the on/off
switch on the inside back panel. Turn the battery on by sliding the
switch to the right "on" position.
5. Once the battery is turned "on" and the terminal is connected to the power
pack, notice that the POWER indicator at the top, left-hand corner of the
terminal comes on, either "blinking" on and off (indicating that the battery
is recharging) or "steady" (indicating that the battery is already fully
charged).
6. Upon receiving power the terminal displays "FRET462" to identify the
software application. Note: The application is loaded only if it came from
your bank or Independent Service Organization (ISO). If you received a
terminal directly from VeriFone, contact your bank or ISO for application
download information.
3-4
TRANZ 460 Terminal
3. TRANZ 460 Terminal
On/Feed Switch
On/Off Switch
Figure 3-8. TRANZ 460 Battery Switch
Note: Because the power on/off switch is the only way the terminal can be
completely powered down, set it to "off" and then "on" again any time you
wish to reset the terminal (for example, during the software development
stage).
Telephone Connection
1. Connect one end of the telephone line
cord to the modular jack on the rear of
the terminal (see Figure 3-9).
2. Connect the other end of the line cord to
a modular telephone wall jack. If you
do not have a modular wall jack, obtain
Telco
an adapter from your local telephone
company.
Figure 3-9. Telephone Connection
Multi-Lane
Configuration
In a multi-lane configuration, a Multi-lane Traffic Controller (MTC) device
supports up to five POS terminals and connects to an RJ11 dialup port.
Terminals that support printers use a smart "Y" cable to connect to the MTC.
The MTC device connects to the DVM (single entry multiplexer), which then
sends data to the host over a single telephone line via a PAD (packet
assembler-disassembler) at the telephone company using T3POS protocol
for rapid host response. Figure 3-10 is a block diagram showing a multi-lane
environment connection layout.
POS
Printer
Smart
Cable
Additional
POS Device
Ports
M
T
C
Smart
Cable
POS
D
V
M
T
3 P
P A
O D
S
H
o
s
t
Printer
Figure 3-10. Multi-Lane Configuration Block Diagram
TRANZ 460 Terminal
3-5
FDC Retail/Debit Purchasing Card Reference Manual
Note: In a single terminal configuration, the printer and terminal connect
separately to the DVM, each using its own cable. In a multi-lane
configuration, the printer and terminal connect to the MTC via one "Smart" Y
cable.
Loading the Printer with Paper
Caution: Because impact, friction, temperature, humidity, light, and oil affect
the coloring and storage characteristics of no-carbon-required paper, handle
this type of paper carefully. Never load a roll of paper that has any folds,
wrinkles, tears, or holes at edges or in the printing area.
1. Remove both printer mechanism cover and paper roll cover.
2. Unroll several inches of paper. With the cut edges of the paper pointing
up, insert the paper spindle through the paper roll and place the roll into
the slots on the inside of the terminal.
3. Slide the edges of the paper over the second paper spindle and insert
them into the slot at back of printer, making sure that the left edge of the
paper is at the left edge of the slot and that the roll is aligned properly
(upper and lower paper edges match).
4. Press the On/Feed key located at the top of the terminal to feed the paper
through the printer (see top right, Figure 3-11).
5. Replace the paper roll cover.
6. Replace the printer mechanism cover on the terminal, making sure the
paper is free to feed through the opening on the top of the cover.
On/Feed Key
Figure 3-11. Loading the Printer with Paper
3-6
TRANZ 460 Terminal
3. TRANZ 460 Terminal
Hardware Features
Display Panel
The 16-character alphanumeric display panel provides the visual prompts
and information needed to operate the TRANZ 460. This bright blue,
vacuum fluorescent display is easy to read, even under poor lighting
conditions. It displays fully-formed numerals, letters and punctuation symbols.
Figure 3-12. TRANZ 460 Display Panel
Cardreader
The TRANZ 460 features an ISO Track 2 or optional Track 1 cardreader (slot
on the right-hand side) for reading the magnetic stripe data on most major
credit, private and debit cards.
Customer identification information
can be entered simply by sliding the
credit or debit card through the slot.
Place the card at the back of the
cardreader slot with the magnetic
stripe down and to the right, as
illustrated in Figure 3-13. Slide the
Figure 3-13. Cardreader
card towards you without stopping.
The cardreader reads the card data for validation by the terminal’s
application.
Keypad
The keypad has 16 keys for entering alphabetical and numeric data. The
functions of the keys are as shown on the following page.
H
O
S
T
K
E
Y
S
QZ.
ABC
DEF
1
2
3
GHI
JKL
MNO
4
5
6
PRS
TUV
WXY
7
8
9
,’"
- SP
*
0
TRANZ 460 Terminal
#
CLEAR
BACK
SPACE
ALPHA
FUNC
ENTER
3-7
FDC Retail/Debit Purchasing Card Reference Manual
I R
T E
E V
M
QZ.
1
T
O
T
A
L
S
SALE
S
E
T
U
P
GHI
4
VOID
ABC
2
D
E
M
O
JKL
5
TKT ONLY
3
T
I
M
E
MNO
BACK
6
SPACE
INQUIRY
EDIT
PRS
TUV
WXY
7
8
9
,’"
- SP
*
0
SCROLL
CLEAR
AUTH ONLY
RETURN
P
R
I
N
T
DEF
ALPHA
CLOSE
PRINT
#
FUNC
ENTER
BLUE
KEY
SCROLL
FDC TRANZ 460
Overlay
The keypad overlay for the FDC ETC PLUS Retail Debit application is
VeriFone Part Number 10730-37. Please contact your VeriFone
representative for ordering information.
Maintenance
Cleaning
Periodically clean your TRANZ 460 terminal using a cloth dampened with
water and a mild soap or cleaner. Do not use harsh chemicals.
Warning: Because your terminal can be damaged by liquids, do not spray
liquid cleaners directly on the terminal. Always apply the cleaner to the cloth
before cleaning the terminal.
Returning the
TRANZ 460 Terminal
for Service
3-8
For replacement or repair of your TRANZ 460 terminal, call the toll free
number given below. Be sure to mention the serial number found on the
bottom of your terminal.
•
If you are located in the United States, call 800-834-9133.
•
If you are located outside the United States, call 714-979-1870.
TRANZ 460 Terminal
3. TRANZ 460 Terminal
•
Unless otherwise instructed in this reference manual, do not, under
any circumstances, attempt any service, adjustments, or repairs on
this unit.
•
If your equipment failure cannot be resolved, call the toll free (800834-9133) VeriFone Customer Support Hot Line and ask for an MRA
(Merchandise Return Authorization) approval number. You must
have an MRA approval number before returning your equipment for
repair.
Troubleshooting
These troubleshooting guidelines identify various problems and the
appropriate corrective action. If you have problems operating your TRANZ
460 terminal, read these troubleshooting examples. If your problem persists,
or if it is not listed here, call the VeriFone Customer Support Hot Line listed
above.
Error Messages
Display Panel Does
Not Display Correct
Information
Appendix D of this manual lists the different prompts and error messages
that may appear on the display panel. If you see any of these messages,
refer to this appendix for an explanation of the message.
If the TRANZ 460 displays incorrect information, such as an unreadable
message or nothing at all, you may have a power problem or a defective
terminal. Follow these steps to determine the cause of the problem:
1. Your application may not have been properly loaded; repeat the
downloading procedure again.
2. Run the Display Test, as described in Section 4, Diagnostics, of the
TRANZ 460 Reference Manual, to ensure the display components are
working.
3. If the problem persists, call the toll free VeriFone Customer Support Hot
Line to have your terminal repaired or replaced.
Telephone Does Not
Work Properly
1. Check your telephone line and telephone connections.
2. Check the phone lines using another standard telephone. If the other
telephone works, have your telephone repaired or replaced.
Printer Does Not
Work
1. Verify that there is a ribbon cassette properly loaded in the printer, (or
disregard this step if your terminal operates ribbonless).
2. Verify that the printer paper is properly loaded in the printer. The printer will
not operate without a paper roll correctly installed.
3. Check the terminal for signs of power failure.
TRANZ 460 Terminal
3-9
FDC Retail/Debit Purchasing Card Reference Manual
4. Press the CLEAR key and try the operation again; an improper command
may have been used.
Terminal
Transactions Do
Not Work
1. Perform your transactions using several credit cards to ensure the problem
is not a defective card. When sliding the cards through the cardreader,
be sure the magnetic stripe faces down and to the right of the terminal.
2. Your application may not be properly loaded.
3. Perform a manual transaction using the keypad instead of the cardreader.
If the transaction works, call the toll free VeriFone Customer Support Hot
Line to have your terminal repaired or replaced.
Keypad Does Not
Respond
1. Check your display panel. If it displays the wrong characters or nothing at
all, refer to the first item in this troubleshooting section, "Display Panel
Does Not Display Correct Information."
2. Press several keys. If Memory Location 0009 contains a "0," you should
hear a short beep each time you press a key. If key beep works, make
sure you are entering the correct data.
3. Run the Keypad Test described in Section 4 of the TRANZ 460 Reference
Manual to ensure the keypad components are working properly.
4. If Memory Location 0009 contains a "0" or is <empty> and you do not hear
a beep, or if the keys do not operate as the applicaton says they should,
contact the MRA desk.
3 - 10
TRANZ 460 Terminal
3. TRANZ 460 Terminal
Terminal Specifications
Microprocessor: Z80A CPU operating at 3.579 MHz
Memory: 32 Kbyte EPROM and 32 Kbyte RAM
Cardreader: ISO 7811 Track 2 or Track 1 compatible
Display: 16-character fluorescent, alphanumeric, 14-segment with decimal
point and comma
Communication: Automatic dialing
Auto answer: Terminal dials whether touch tone or pulse (rotary mode) and
accepts 32-digit telephone numbers
Automatically dials host computer and call center numbers
Modem: Internal modem with modular jack
Model 103, 300 baud (Bell 103 type) modem
Model 212A Standard Bell 212A high-speed dial-up modem,
1200/300 baud
Operating
Environment
0o to 40oC, 32o to 104oF
Humidity: 20% to 80%; no condensation
Voltage: 95 to 130 VAC, 60 Hz (USA Model)
194 to 260 VAC, 50 Hz (International Model)
Dimensions
and Weight
Height: 4.57 in. (116 mm)
Width: 5.83 in. (148 mm)
Depth: 11.85 in. (301 mm)
Shipping Weight: Approximately 4 lb
Accessories
Part Number
Description
Direct Download Cable
00764-XX
00765-XX
10600-XX
10602-XX
TRANZ 460 to IBM PC or compatible personal computer
TRANZ 460 to IBM AT or compatible personal computer
TRANZ 460 to TRANZ 460
Adapter, mini 8 DIN (used with pn 10600-XX)
Peripheral Devices
00302-03
10601-XX
Bar Code Wand
Adapter, mini 6 DIN
P003-106-02
01582-00
10601-XX
P003-120-05
01582-00
PINpad 101 Device
Cable, TRANZ 460 to PINpad 101 device
Adapter, mini 6 DIN
PINpad 201 Device
Cable, TRANZ 460 to PINpad 201 device
TRANZ 460 Terminal
3 - 11
FDC Retail/Debit Purchasing Card Reference Manual
Programming
Languages
Reference Manuals
3 - 12
P006-205-00
00368-01
10016
TCL Programming Package
TCL Programmer’s Manual (manual only)
TCLOAD Manual and diskette
10768-01
10664
12412
ZONTALK 2000 Reference Manual
TRANZ 420 Programmer’s Manual
TRANZ 460 Reference Manual
TRANZ 460 Terminal
4. General Programming
The TRANZ 460 terminal allows you to:
•
Review a field
•
Move to another field
•
Change it if necessary
•
Display your new programmed data
Entering the General Programming Mode
To enter the general programming mode, press BLUE + 7. The terminal
displays:
RECALL WHAT?
Review a Field
To review the contents of a specific field, enter the memory location you wish
to review, then press [ENTER]. For example, if you entered 0100, you would
see a message similar to the following:
0100 = 18002289074
To review the contents of another specific field, enter the memory location
number, then press [ENTER].
To quickly move to adjacent fields, press [ENTER] to go to the next field (or
keep pressing the key to move through several fields) or press [ALPHA] to
go back to the previous field.
Change a Field
To program or change a field, press BLUE + 7.
Display
Response
RECALL WHAT?
0100
0100=18002289074
Press [BACKSPACE]
ENTER PASSWORD*
Key in "1[ALPHA] [ALPHA] 66831", press
[ENTER]*.
0100=
Key in new data, press [ENTER].
* Once you enter the password, the terminal will remain unlocked and not
require a password entry until you press both the [CLEAR] and a function
key or you remove the power cord from the terminal.
TRANZ 460 Terminal
4-1
FDC Retail/Debit Purchasing Card Reference Manual
Note: FDC TRANZ software has been designed with ten unique Setup
codes: BLUE + 4 + Codes 0 through 9. You should always use the Setup
functions to enter data in the various fields. Use this alternate programming
procedure only for entering data in other unique fields such as Fraud Control.
Setting the Calendar/Clock
You can set the calendar/clock after unpacking your new TRANZ 460
terminal. The calendar/clock will not copy when you perform a
terminal-to-terminal application copy.
To set the clock, simultaneously press the [*] and [3] keys. Release both
keys. The display shows:
Display
Response
DIAGNOSTICS
Press the [ALPHA] key.
RTC CHIP TEST
Respond to each prompt that follows.
YEAR 1980-2079 =
Enter a 2-digit number (94, 95, etc.), then
press [ENTER].
MONTH =
Enter a number (1–12) representing the
month, then press [ENTER].
January = 1
February = 2
March = 3, etc.
DAY =
Enter the day of the month, then press
[ENTER]. You can enter "2" or "02" for
February 2nd.
HOUR 0-23 =
Enter a number, 0 through 23, to identify the
hour of the day in 24-hour format, then press
[ENTER]. Enter "10" for 10 A.M. or "16" for 4
P.M.
MINUTES =
Enter the number of minutes, from 0 to 59,
currently past the hour, then press [ENTER].
For example, enter "14" if the time is 10:14.
SECONDS =
Enter the number of seconds, from 0 to 59,
currently past the minute, then press
[ENTER]. For example, enter "23" if the time
is 10:14 and 23 seconds.
(day of week, date and
time)
The terminal displays the new date and time.
Note: If you press the [CLEAR] key at any time before you complete this
function, the terminal does not accept any of the data you entered and will
default to a "zero out" date and time.
4-2
TRANZ 460 Terminal
4. General Programming
"Emptying" a Field
You can easily delete data previously entered in a memory location in the
TRANZ terminal.
1. Press [CLEAR], [BLUE] and [7].
2. Key in the field you wish to delete. The terminal displays the contents
already stored in that field.
3. Press [BACKSPACE].
4. Key in "1 [ALPHA] [ALPHA] 66831" and press [ENTER].
5. Press [ENTER] again.
6. The terminal displays that field again as <EMPTY>.
Entering Alphanumeric Characters
Twelve of the terminal’s sixteen keys can be used to enter alphanumeric
characters. These characters are the letters A through Z, the numerals 0
through 9, and the following special characters: * , ’ " - . # : : @ and [space].
Press the key containing the desired character, then press [ALPHA] as many
times as required to display the correct character.
Note: The terminal must be in a mode that allows data entry, such as the
STORE or RECALL modes, before information can be entered from the
keypad. Transaction codes which require entry of alpha characters are an
exception to this rule.
The following examples demonstrate how the characters 2, A, B, and C are
entered using the [2] key and the [ALPHA] key.
Desired
Character
Keys to Press
2
Press the [2] key
A
Press the [2] key
Press the [ALPHA] key once
B
Press the [2] key
Press the [ALPHA] key twice.
C
Press the [2] key.
Press the [ALPHA] key three times.
TRANZ 460 Terminal
4-3
FDC Retail/Debit Purchasing Card Reference Manual
Copying or Downloading Data to Another Terminal
Downloading is the process of copying data from one computer or terminal to
another. VeriFone supports direct downloading which lets you quickly copy
an application from one terminal to another, using the proper download
cable.
Note: The TRANZ download cable, P/N 00490-00, will copy both TRANZ
and XL terminals.
Follow these steps to perform a terminal-to-terminal download.
1. Plug both terminals into a 120 VAC power outlet.
2. Connect the download cable to the round 8-pin connector on the backs of
both terminals. This is the same connector used for the printer.
3. Press [BLUE] + [*] on the sending terminal (the one which contains the
application to be transferred to the other terminal). The terminal displays:
UNIT SEND
4. Press [BLUE] + [#] on the receiving terminal. The terminal displays:
UNIT RECEIVE
Note: Steps 3 and 4 can be done in either order.
5. If the transfer is OK, the terminals display "UNIT SENDING" and "UNIT
RECEIVING."
Note: If the displays do not change to UNIT SENDING and UNIT
RECEIVING, you may be using an XL only download cable.
6. Wait approximately 23 seconds and DO NOT TOUCH ANY KEY.
7. When copying is completed, both displays read "SUCCESSFUL."
Fraud Control Programming
You can help control credit card fraud at the merchant location several ways
using a TRANZ 460 terminal.
4-4
•
Require the clerk to key in the last four digits of the embossed card number after sliding the card through the cardreader. The terminal compares
data read off the card’s magnetic stripe with data entered on the keypad.
•
Check the contents of the card’s magnetic stripe on the terminal display
after sliding it through the card reader.
•
Program your terminal for both features.
TRANZ 460 Terminal
4. General Programming
Program Field 0X06 (X = key number) for each card you want to have these
features enabled.
Field
Entry
0X06 (X = key number)
Enter 0, 1, 2, or 3, then press [ENTER].
0 = None
1 = Enter last 4 digits
2 = Display Mag Stripe
3 = Options 1 and 2
Note: For this application, Fraud Control has been eliminated on debit
transactions (keys 1 and 2). Locations 0106 and 0206 must be empty for
fraud control to NOT occur during a debit transaction. The operating system
will attempt to perform Fraud Control if a value is present in 0X06 and a
debit transaction is initiated. As a result, 0X06 is cleared when Debit is
selected and remains empty until a host key which has the potential for using
Fraud Control is pressed. At that time, 0X06 is updated from a value stored
during the copyright display after initial download (the value of 0106 is stored
in 0635 and the value of 0206 is stored in 0636).
Eliminating "PROGRAMING ERROR"
If your terminal displays a "PROGRAMING ERROR" message, you have two
options to attempt recovery:
1. Press the [3] and [5] keys simultaneously. The TRANZ 460 recalculates
the check sum digit that may be the cause of the "PROGRAMMING
ERROR." A new download of the application is not necessary.
2. Simultaneously press the [1] and BLUE keys until the calendar/clock
reappears on the display. A new download of the application is required.
Follow the procedures for downloading from one terminal to another on
page 4-3 or call the VeriFone Customer Support Help Desk for a
telephone download.
Password Protection
The FDC TRANZ 460 application allows you to password-protect most of the
transactions and functions. This can be accomplished via a ZONTALK
download, the Setup function, or by entering the appropriate string of 12
characters in Memory Location 0859.
The character positions in the string and corresponding transactions are as
follows:
TRANZ 460 Terminal
4-5
FDC Retail/Debit Purchasing Card Reference Manual
Character
Position
Transaction
1
2
3
4
5
6
7
8
9
10
11
12
Sale
Return
Auth Only
Void
Ticket
Deposit Inquiry
Close Batch
Item Review
Totals Review
Setup
Print
Demo
To set the password option for a particular transaction, enter a "1" in the
corresponding position. If you do not wish to password-protect a particular
transaction, enter a "0" in the corresponding position.
For example, to turn on password protection for Sale and Void transactions,
enter the string in Memory Location 0859 like this:
0859=100100000000
4-6
TRANZ 460 Terminal
5. Programming the Terminal for Use
Check Memory Location 0019 to ensure your terminal is loaded with the
correct software version before you begin programming. Press BLUE + 7,
then enter 0019. The terminal should display " 0019 = FRET462." If
Memory Location 0019 contains data other than this, please contact your
VeriFone representative.
To prepare your terminal for use, you must enter the Setup function key
sequence (BLUE + 4) and Codes 1 through 0 for the selected Setup.
1 = Host Setup
2 = Account Range Tables
3 = Security Setup
4 = Password Setup
5 = Terminal Options
6 = Sale Type Description
7 = Printer Type/PINpad Device Setup
8 = Change Idle Prompt
9 = Clear Batch
0 = Card Type Label
Host Information
Use this function to store the FDC host telephone numbers and merchant
IDs. The merchant ID should be programmed without a prefix. This application displays current data for verification or change. To enter Host Setup:
1.
2.
3.
4.
Press BLUE + 4.
Key in the manager password.
Press the BLUE enter key.
Press Code 1.
Note: You may press the [ENTER] key to bypass any field and not disturb
what has already been programmed. If something is already programmed
and you wish to make a change, you must first press [BACKSPACE], then
key in the new data.
Display
Response
HOST INFO
FDR PRIMARY #?
FDR SECOND #?
FDR CLOSE PHONE?
FDR MERCH ID?
FDC Host primary and secondary phone
numbers and merchant ID number. If you
need to dial "9" first, then pause, enter
"9-XXXXXXX". Each "-" causes a 2-second
delay in dialing.
If this is an FDC "public port" number, add
"LØ" or "XØ" at the end of the telephone
number. For example, if the local "public
port" number is 123-4567, you must key in
"1234567LØ" or "1234567XØ."
TRANZ 460 Terminal
5-1
FDC Retail/Debit Purchasing Card Reference Manual
Display
Response
AMEX
AMEX
AMEX
AMEX
AMEX
Enter "Y" to enable split dial for the AMEX
host, and continue with remaining prompts.
Enter "N" to disable split dial and go to the
Discover prompts.
SPLIT Y/N
PRIMARY #?
SECOND #?
MERCH ID?
CARD TYPE?
Note: MERCH ID and CARD TYPE prompts
will not appear if there is an open batch.
DISC
DISC
DISC
DISC
DISC
SPLIT Y/N
PRIMARY #?
SECOND #?
MERCH ID?
CARD TYPE?
Enter "Y" to enable split dial for the Discover
host, and continue with remaining prompts.
Enter "N" to disable split dial and go to the
"ENABLE VPL" prompt.
Note: MERCH ID and CARD TYPE prompts
will not appear if there is an open batch.
ENABLE VPL? Y/N
<current value>
Enter "Y" to enable Virtual Private Line
(VPL) communications, or "N" for standard
dialup communications.
DOV=1 ISDN=2
Enter "1" for the DOV address, or "2" for the
ISDN address.
BANKCARD ADDRESS
9999999999999999999
Press [ENTER] to accept the current
address, or key in the host address up to 20
numeric characters, then press [ENTER].
Account Range Tables
Use this function to program the card types your terminal will accept. To
enter the Account Range Setup:
1.
2.
3.
4.
Press BLUE + 4.
Key in the manager password.
Press the BLUE enter key.
Press Code 2.
Note: You may scroll past fields you wish to leave unchanged unless the
terminal prevents you, in which case you must enter a value. You can
change/modify one item in a card account range provided you scroll past all
remaining prompts in the card range.
5-2
Display
Response
CARD RANGE INFO
ACCT RANGE ITEM?
Enter a digit 1–20.
The number you enter here determines the
field between 0043 and 0062 in which the
card range will be stored. If you enter "1",
the entire account range will be stored in
field 0043.
TRANZ 460 Terminal
5. Programming the Terminal for Use
Display
Response
nn-LOW?
Enter the first six digits of the low range of
the credit card account number, then press
[ENTER]. For example, the low account
number range for VISA is 400000.
nn-HIGH?
Enter the first six digits of the high range of
the credit card account number, then press
[ENTER]. For example, the high account
number range for VISA is 499999.
nn-CARD TYPE ?
Enter the card type, 1–6, then press
[ENTER]. For example:
1 = VISA or MasterCard
2 = American Express or Diner’s Club
3 = Discover, etc.
Note: The application uses this information
to generate reports by card type.
Normal Entries for
All Card Types
nn-CARD ABBREV?
Enter the card abbreviation, press [ENTER].
(VIS = VISA, MC = MasterCard, etc.)
nn-TERMS? Y/N
Press [9] for Y to enable Retail Terms
prompting, or [6] for N to disable.
nn-DESC CODE 0/2/4
Select "0" for no Descriptor Code prompting,
or "2" or "4" to allow 2- or 4-digit Descriptor
Codes.
nn-AVS? Y/N
Press [9] for Y to enable AVS prompts, or [6]
for N to turn them off.
nn-CUST CODE? Y/N
Press [9] for Y to enable the prompt for a
customer code, or [6] for N to turn it off.
Low
Card
Abbrev.
High
999999 999999 9
9 X X X 9 9 9 9
Card Type
Retail Terms
Descriptor Code
AVS Flag
Customer Code
Acct Range #1 (0043)=405501.405502.01VPC0001
Acct Range #2 (0044)=415928.415928.01VPC0001
Acct Range #3 (0045)=424604.424605.01VPC0001
TRANZ 460 Terminal
5-3
FDC Retail/Debit Purchasing Card Reference Manual
Acct Range #4 (0046)=427533.427533.01VPC0001
Acct Range #5 (0047)=428800.428800.01VPC0001
Acct Range #6 (0048)=443085.443085.01VPC0001
Acct Range #7 (0049)=471500.471699.01VPC0001
Acct Range #8 (0050)=400000.499999.01VIS0000
Acct Range #9 (0051)=540500.540599.02MPC0001
Acct Range #10 (0052)=500000.599999.02MC 0000
Acct Range #11 (0053)=340000.349999.03AMX0000
Acct Range #12 (0054)=370000.379999.03AMX0000
Acct Range #13 (0055)=300000.389999.04DC 0000
Acct Range #14 (0056)=601100.601199.05DIS0000
Acct Range #15 (0057)=000000.099999.06FDR0000
Acct Range #16–#20 (0058–0062)=<empty>
Note: The "." after the low and high fields is required to make the account
ranging work properly.
Security Setup
Use this function to set password protection for each individual terminal
transaction or function. To enter the Security Setup:
1.
2.
3.
4.
5-4
Press BLUE + 4.
Key in the manager password.
Press the BLUE enter key.
Press Code 3.
Display
Response
SECURITY
SET SALE? Y/N
SET RETURN? Y/N
SET AUTH? Y/N
SET VOID? Y/N
SET TICKET? Y/N
SET DEP INQ? Y/N
SET CLOSE? Y/N
SET ITM REV? Y/N
SET TOT REV? Y/N
SET SETUP? Y/N
SET PRINT? Y/N
SET DEMO? Y/N
Enter [Y] to set password protection for a
transaction, or [N] if you do not wish to
password protect the transaction. Press
keys [9] and [6] for "Y" and "N" responses.
To access protected functions, the operator
must enter the manager password.
TRANZ 460 Terminal
5. Programming the Terminal for Use
Update Password
Use this function to update the manager password. To enter the "Update
Password" Setup:
1.
2.
3.
4.
Press BLUE + 4.
Key in the manager password.
Press the BLUE enter key.
Press Code 4.
Display
Response
UPDATE PASSWD
ENTER NEW PASSWD
VERIFY NEW PASSW
Enter the new manager password. Enter the
password a second time to verify.
If both entries match, the terminal displays
"PASSWORD UPDATED."
Options Setup
Use this function to set terminal options. To enter the Options Setup:
1.
2.
3.
4.
Press BLUE + 4.
Key in the manager password.
Press the BLUE enter key.
Press Code 5.
Display
Response
OPTIONS
DEVICE ID?
Press [BACKSPACE], enter a 4-character
operator ID if there is one, then press
[ENTER]. Press [ENTER] to bypass this
prompt or press [BACKSPACE] then
[ENTER] to leave this field blank.
INVOICE #? Y/N
Select "Y" if you wish to be prompted for
entry of the invoice number, or "N" for no
prompting.
OPERATOR ID? Y/N
Select "Y" if you wish the terminal to prompt
for entry of an operator ID, or "N" for no
prompting.
PHONE ORDER? Y/N
Select "Y" if you wish to be prompted for
Phone Orders, or "N" for no prompt.
RECEIPT? Y/N
Select "Y" if you wish the printer to
automatically print receipts for all
transactions, or "N" for no receipt printing.
TRANZ 460 Terminal
5-5
FDC Retail/Debit Purchasing Card Reference Manual
Display
Response
PREPRINT? Y/N
Select "Y" if you wish the receipt header to
print before the terminal dials, or "N" for no
preprinting.
AUTO REPORT? Y/N
Select "Y" if you wish the printer to
automatically print Detail and Terminal
Totals reports at Batch Close, or "N" for no
report printing.
AUTO INSERT? Y/N
Select "Y" if you wish the terminal to
automatically insert batch totals at Batch
Close, or "N" for no totals insertion.
PREDIAL? Y/N
Select "Y" for the terminal to begin dialing
the host prior to transaction completion, or
"N" for no pre-dialing.
MAN ENTRY? Y/N
Select "Y" to enable manual as well as card
swipe account data entry, or "N" for card
swipe entry only.
TAX PROMPT? Y/N
Select "Y" to enable a tax prompt.
Note: In this application, you MUST turn on
the tax feature if using Purchasing Card functionality.
5-6
TAX CALC? Y/N
Select "Y" for the terminal to automatically
calculate the tax on the amount, or "N" to
disable this option.
TAX RATE 99.99
If you select "Y" for TAX CALC, key in the
tax rate, then press [ENTER].
OPTION FIELD Y/N
Select "Y" to enable extended prompt fields,
or "N" for no extended prompts.
PROMPT FIELD #1
Key in the first extended prompt, up to 16
characters, then press [ENTER].
PROMPT FIELD #2
Key in the second extended prompt, up to
16 characters, then press [ENTER]
AUTO CLOSE Y/N
CLOSE TIME HH:MM
Select "Y" and key in the close time in
24-hour format for Auto Close, or "N" for no
Auto close.
TRANZ 460 Terminal
5. Programming the Terminal for Use
Sale Type Description
Use this function to select the transaction type. To enter the Sale Type
Setup:
1. Press BLUE + 4.
2. Key in the manager password.
3. Press the BLUE enter key.
4. Press Code 6.
Display
Response
SALE TYPE DESC
<current value>
Press [ENTER] to leave unchanged, or key
in up to 7 alphanumeric characters and
press [ENTER] to change the name of the
transaction type for all Sale transactions.
Printer/PINpad Device Type
Use this function to enable/disable the printer and identify the type of PINpad
device you will be using. To enter the Printer/PINpad device setup:
1.
2.
3.
4.
Press BLUE + 4.
Key in the manager password.
Press the BLUE enter key.
Press Code 7.
Display
Response
PRINTER / PINPAD
PRINTER? Y/N
This prompt appears if there is anything
stored in Memory Location 0950. Press [6]
for "N" to remove the printer and return to
the "ENTER SETUP CODE" prompt or press
[9] for "Y" to continue.
MERCHANT LOGO
LINE 1?
|
LINE 6?
Enter the merchant name and address using
up to 24 characters per line and up to 6
lines of information. If data is already
present, press [BACKSPACE], enter the
information, and press [ENTER], or
[BACKSPACE] and [ENTER] to leave the
field empty. If no data is present, key in data
and press [ENTER].
FLEX AGREEMENT
LINE 1?
|
LINE 6?
Enter up to 6 flexible agreement lines using
up to 24 characters per line. If data is
already present, press [BACKSPACE], enter
the agreement information, then press
[ENTER].
TRANZ 460 Terminal
5-7
FDC Retail/Debit Purchasing Card Reference Manual
Display
Response
FLEX AGREEMENT
(cont’d.)
Press [BACKSPACE] and [ENTER] to leave
this field empty. If no data is present, key in
data and press [ENTER].
FLEX MESSAGE
LINE 1?
LINE 2?
LINE 3?
Enter up to 3 flexible message lines, using
up to 24 characters per line. If data is
already present, press [BACKSPACE], enter
the message line, then press [ENTER], or
press [BACKSPACE] and [ENTER] to leave
this field empty. If no data is present, key in
data and press [ENTER].
DEBIT? Y/N
Select "Y" to enable Debit functionality, or
"N" to disable.
1=PP101, 2=PP201
Select "1" for PINpad 101 device, or "2" for
PINpad 201 device support for Debit
transactions.
Change Idle Prompt
Use this function to program your terminal to display a custom prompt. To
enter the Change Idle Prompt Setup:
1.
2.
3.
4.
5-8
Press BLUE + 4.
Key in the manager password.
Press the BLUE enter key.
Press Code 8.
Display
Response
IDLE PROMPT
Press [BACKSPACE] and enter up to 16
alphanumeric characters, then press
[ENTER], or press [BACKSPACE], then
[ENTER] to use the default idle prompt
"READY **nnn**."
TRANZ 460 Terminal
5. Programming the Terminal for Use
Clear Batch
Use this function to clear all transactions from an open batch. To enter the
Clear Batch Setup:
1.
2.
3.
4.
Press BLUE + 4.
Key in the manager password.
Press the BLUE enter key.
Press Code 9.
Display
Response
CLEAR BATCH
CLEAR? Y/N
Enter [9] for "Y" to continue, or [6] for "N" to
return to the ENTER SETUP CODE prompt.
ENTER TO CONFIRM
Press the [ENTER] key. The terminal clears
the batch and returns to the setup code
prompt.
Card Type
Use this function to enter the card type labels. To enter the Card Type Setup:
1.
2.
3.
4.
Press BLUE + 4.
Key in the manager password.
Press the BLUE enter key.
Press Code 0.
Display
Response
CARD NAME
ENTER CARD TYPE
<card name>
Memory Map of
Important Locations
Enter a number, 1–10, to select the Card
Type to name.
The terminal displays the current value of
the card type. Enter a different card type, up
to eight characters, then press [ENTER].
You can review your programming of the TRANZ 460 terminal by pressing
BLUE + 7, then keying in the desired field. See Section 4, General
Programming, for procedures to follow if you wish to review or change
selected fields. Refer to Appendix E, ZONTALK 2000 Download Parameters,
for specific download information pertaining to this application.
TRANZ 460 Terminal
5-9
FDC Retail/Debit Purchasing Card Reference Manual
5 - 10
TRANZ 460 Terminal
6. Standard Key Operations
Retail transactions are common, unprotected transactions that all personnel
can perform. These transactions include Sale, Return, Debit Sale and Return, Void, Ticket Only, Inquiry, and Close Batch.
The TRANZ 460 idle prompt, "nnn" indicates spaces left for storage of transactions. For example, READY **3** indicates there is space to store three
more transactions in the current batch. When the file is full, the idle prompt
displays "BATCH FULL" and no further transaction can be stored until you
close the batch and clear the file from the terminal.
Note: Displays that appear during terminal communications with the host
may differ depending upon the selected protocol and logon.
Credit Sale
Follow these procedures to capture a credit sale transaction that requires
host authorization.
Display
Response
1. READY **nnn**
SALE
Press the [1] key labeled SALE.
2. ENTER PASSWORD
Enter the manager password if required,
then press [ENTER]. The display echoes
each keypress with an asterisk.
******
3. CREDIT=0 DEBIT=1
Press "0" for a credit transaction.
4. itm ENTER ACCT #
Enter the account number via the keypad or
slide the card through the cardreader, then
press [ENTER]. If entry is made via the
cardreader, continue with Step 6.
Note: "itm" is the item number for this transaction.
5. EXPIRY DATE MMYY
Enter the 4-digit expiration date using 2
digits each for month and year, then press
[ENTER].
PROCESSING ...
TRANZ 460 Terminal
6-1
FDC Retail/Debit Purchasing Card Reference Manual
Note: Prompts in Step 6 and Steps 8 through 17 may or may not appear, depending upon options selected in Setup.
Display
6-2
Response
6. OPERATOR ID
Enter the 4-digit operator ID, then press
[ENTER], or press [ENTER] to bypass this
prompt.
7. AMOUNT OF SALE ?
Enter the amount of the sale without the decimal, then press [ENTER].
8. TAX AMOUNT
Enter the tax amount without the decimal,
then press [ENTER]. If TAX CALC is enabled, the terminal automatically calculates
the tax based on the tax rate. If both are enabled, the TAX AMOUNT overrides tax
calculation.
9. RETAIL TERMS
Enter the retail terms, up to 4 digits, then
press [ENTER].
10. PHONE ORDER? Y/N
Enter [9] for "Y" if this is a phone order, or
[6] for "N" if it is not, then press [ENTER].
Press [ENTER] to bypass if no Phone Order.
11. DESC CODE
Enter the descriptor codes, up to 4 sets,
then press [ENTER].
12. ENTER INVOICE #
Enter the invoice # up to 8 digits, then press
[ENTER].
13. CUSTOMER CODE
Enter the customer code, if required, then
press [ENTER].
14. AVS ADDRESS
Enter the cardholder’s street number, then
press [ENTER].
15. AVS ZIP CODE
Enter the cardholder’s ZIP code, 5–9 numeric digits, then press [ENTER].
16. <option prompt #1>
Enter appropriate data, up to 8 alphanumeric
characters, then press [ENTER].
17. <option prompt #2>
Enter appropriate data, up to eight alphanumeric characters, then press [ENTER].
18. PROCESSING
or
<communication prompts>
The terminal is communicating with the host
via VPL lines. If these lines fail, dialup lines
are used and the terminal displays the standard communication prompts.
19. <host message>
The terminal displays the host response. Record the approval number. If the transaction
is disapproved, take necessary action. Press
[CLEAR] to return to the idle prompt.
TRANZ 460 Terminal
6. Standard Key Operations
Display
Response
PRINTING...
If the transaction is approved and the
printer is enabled, the printer prints a
receipt of the transaction.
20. READY **nnn**
The terminal returns to the idle prompt
indicating it is ready for the next transaction.
Debit Sale
Follow these procedures to capture a debit sale transaction.
PINpad
Device
Display
Response
1. READY **nnn**
SALE
Press the [1] key labeled SALE.
2. ENTER PASSWORD
Enter the manager password if required, then press [ENTER]. The display echoes each keypress with an asterisk.
******
3. CREDIT=0 DEBIT=1
OUT OF PAPER
Press "1" for a debit transaction.
Press [CLEAR] to return to the idle
prompt.
4. AMOUNT OF SALE ?
Enter the amount of the sale without
the decimal, then press [ENTER].
5. TAX AMOUNT
Enter the tax amount without a decimal, then press [ENTER]. If TAX
CALC is enabled, the terminal automatically calculates the tax based on
the tax rate. If both are enabled, the
TAX AMOUNT overrides tax calculation.
6. SWIPE CARD
If you are using a PINpad 101 device,
swipe the customer’s debit card
through the terminal’s cardreader.
7. PROCESSING
SWIPE CARD
8. WAITING ON PIN
TOT. $99999.99
ENTER PIN
9. WAITING ON PIN
PUSH "ENTER"
10. OPERATOR ID
PROCESSING
TRANZ 460 Terminal
If you are using a PINpad 201 device,
swipe the debit card through the PINpad unit cardreader.
The PINpad device displays the transaction amount.
The customer enters his/her PIN on
the PINpad device and presses
[ENTER].
Enter the 4-digit operator ID, then
press [ENTER], or press [ENTER] to
bypass this prompt.
6-3
FDC Retail/Debit Purchasing Card Reference Manual
PINpad
Device
Display
Response
11. ENTER INVOICE #
Enter the invoice number up to 8
digits, then press [ENTER].
12. <option prompt #1>
Enter appropriate data, up to 8 alphanumeric characters, then press
[ENTER].
13. <option prompt #2>
Enter appropriate data, up to eight
alphanumeric characters, then press
[ENTER].
14. PROCESSING
or
<communication prompts>
PROCESSING
The terminal is communicating with
the host via VPL lines. If these lines
fail, dialup lines are used and the terminal displays the standard communication prompts.
THANK YOU
The terminal displays the host response. Record the approval number.
15. <host message>
If the transaction is disapproved, you
should take necessary action. Press
[CLEAR] to return to the idle prompt.
If the transaction is approved and the
printer is enabled, the printer prints a
receipt of the transaction.
16. READY **nnn**
The terminal returns to the idle prompt
indicating it is ready for the next
transaction.
Credit Return
Follow these procedures to authorize a credit card return. This transaction is
always performed offline.
Display
Response
1. READY **nnn**
RETURN
Press the [2] key. The terminal pauses and
displays the type of transaction.
2. ENTER PASSWORD
Enter the manager password if required,
then press [ENTER]. The display echoes
each keypress with an asterisk.
******
6-4
3. CREDIT=0 DEBIT=1
Press "0" for a credit return.
4. itm ENTER ACCT #
Enter the account number via the keypad or
slide the card through the cardreader, then
press [ENTER]. If entry is made via the cardreader, continue with Step 5.
TRANZ 460 Terminal
6. Standard Key Operations
Display
Response
5. EXPIRY DATE MMYY
Enter the 4-digit expiration date using 2 digits each for month and year, then press
[ENTER].
PROCESSING ...
Note: Prompts in Step 6 and Steps 8 through 15 may or may not appear, depending on options selected in Setup.
6. OPERATOR ID
Enter the 4-digit operator ID, then press
[ENTER], or press [ENTER} to bypass this
prompt.
7. AMOUNT OF SALE ?
Enter the amount of the sale without the decimal, then press [ENTER].
8. TAX AMOUNT
Enter the tax amount without a decimal, then
press [ENTER]. If TAX CALC is enabled, the
terminal automatically calculates the tax
based on the tax rate. If both are enabled,
the TAX AMOUNT overrides tax calculation.
9. RETAIL TERMS
Enter the 4-digit retail terms, then press
[ENTER].
10. PHONE ORDER? Y/N
Enter [9] for "Y" if this is a phone order, or
[6] for "N" if it is not, then press [ENTER].
Press [ENTER] only if no Phone Order.
11. DESC CODE
Enter the descriptor codes, up to 4 sets,
then press [ENTER].
12. ENTER INVOICE #
Enter the invoice number up to 8 digits, then
press [ENTER].
13. CUSTOMER CODE
Enter the customer code, then press
[ENTER].
14. <option prompt #1>
Enter appropriate data, up to 8 alphanumeric
characters, then press [ENTER].
15. <option prompt #2>
Enter appropriate data, up to 8 alphanumeric
characters, then press [ENTER].
PROCESSING ...
16. ACCEPTED itm
Record the approval number. Press
[CLEAR] to return to the idle prompt.
(itm=trans. item #)
17. READY **nnn**
The terminal returns to the idle prompt indicating it is ready for the next transaction.
TRANZ 460 Terminal
6-5
FDC Retail/Debit Purchasing Card Reference Manual
Debit Return
Follow these procedures to capture a debit return transaction. This transaction will always be performed online.
PINpad
Device
Display
1. READY **nnn**
SALE
Press the [2] key labeled RETURN.
2. ENTER PASSWORD
Enter the manager password if required, then press [ENTER]. The display echoes each keypress with an
asterisk.
******
3. CREDIT=0 DEBIT=1
OUT OF PAPER
Press "1" for a debit transaction.
Press [CLEAR] to return to the idle
prompt.
4. AMOUNT OF SALE ?
Enter the amount of the sale without
the decimal, then press [ENTER].
5. TAX AMOUNT
Enter the tax amount without a decimal, then press [ENTER]. If TAX
CALC is enabled, the terminal automatically calculates the tax based on
the tax rate. If both are enabled, the
TAX AMOUNT overrides tax
calculation.
6. SWIPE CARD
If you are using a PINpad 101 device,
swipe the customer’s debit card
through the terminal’s cardreader.
SWIPE CARD
7. PROCESSING
8. WAITING ON PIN
TOT. $99999.99
ENTER PIN
9. WAITING ON PIN
PUSH "ENTER"
10. OPERATOR ID
PROCESSING
11. ENTER INVOICE #
6-6
Response
TRANZ 460 Terminal
If you are using a PINpad 201 device,
swipe the debit card through the PINpad unit cardreader.
The PINpad device displays the transaction amount.
The customer enters his/her PIN on
the PINpad device and presses
[ENTER].
Enter the 4-digit operator ID, then
press [ENTER], or press [ENTER] to
bypass this prompt.
Enter the invoice number up to 8
digits, then press [ENTER].
6. Standard Key Operations
PINpad
Device
Display
Response
12. <option prompt #1>
Enter appropriate data, up to 8
alphanumeric characters, then press
[ENTER].
13. <option prompt #2>
Enter appropriate data, up to eight
alphanumeric characters, then press
[ENTER].
14. PROCESSING
or
<communication prompts>
The terminal is communicating with
the host via VPL lines. If these lines
fail, dialup lines are used and the terminal displays the standard communication prompts.
PROCESSING
15. <host message>
THANK YOU
The terminal displays the host response. Record the approval number.
If the transaction is disapproved, you
should take necessary action. Press
[CLEAR] to return to the idle prompt.
If the transaction is approved and the
printer is enabled, the printer prints a
receipt of the transaction.
16. READY **nnn**
The terminal returns to the idle prompt
indicating it is ready for the next
transaction.
Auth Only
This transaction is used to authorize a transaction without ticket data capture.
Display
Response
1. READY **nnn**
AUTH ONLY
Press the [3] key labeled AUTH ONLY. The
terminal displays the type of transaction.
2. ENTER PASSWORD
Enter the manager password if required,
then press [ENTER]. The display echoes
each keypress with an asterisk.
******
3. ENTER ACCOUNT #
Enter the account number via the keypad or
slide the card through the cardreader. If entry is made via the cardreader, go to Step 5.
4. EXPIRY DATE MMYY
Enter the card’s expiration date, using two
digits each for month and year, then press
[ENTER].
TRANZ 460 Terminal
6-7
FDC Retail/Debit Purchasing Card Reference Manual
Display
Response
PROCESSING ...
5. AMOUNT OF SALE ?
Enter the amount of the sale without the decimal, then press [ENTER].
6. PHONE ORDER? Y/N
Enter [9] for "Y" if this is a phone order, or
[6] for "N" if it is not, then press [ENTER].
Press [ENTER] to bypass for no Phone Order.
Note: This prompt may or may not appear,
depending on options selected in Setup.
6-8
7. AVS ADDRESS
Enter the cardholder’s street number, then
press [ENTER].
8. AVS ZIP CODE
Enter the cardholder’s ZIP code, 5–9
numeric digits, then press [ENTER].
9. PROCESSING
or
<communication prompts>
The terminal is communicating with the host
via VPL lines. If these lines fail, dialup lines
are used and the terminal displays the standard communication prompts.
10. <host message>
The terminal displays the host response.
Record the approval number. If the transaction is disapproved, you should take necessary action. Press [CLEAR] to return to the
idle prompt.
PRINTING...
If the transaction is approved and the printer
is enabled, the printer prints a receipt of the
transaction.
11. READY **nnn**
The terminal returns to the idle prompt indicating it is ready for the next transaction.
TRANZ 460 Terminal
6. Standard Key Operations
Void
Follow these procedures to void a transaction completed earlier in the batch.
Void transactions are always approved offline.
Display
Response
1. READY **nnn**
VOID
Press the [4] key labeled VOID.
2. ENTER PASSWORD
Enter the manager password if required,
then press [ENTER]. The display echoes
each keypress with an asterisk.
******
3. ENTER ITEM #
NOT FOUND
4. itm AA
$99999.99
9999999999999999
999
$99999.99
a
$999.99
OPER
IIIIIIII
RET TERMS 9999
8888888888888888
AAAAAAAAAAXXXXXX
aaaaaaaaaaaaaaaa
sssss zzzzz-zzzz
<opt #1>
<opt #2>
Press [ENTER] to display the last transaction or enter the item number of the transaction you wish to void, then press [ENTER].
The terminal cannot find the entered item
number. Press [CLEAR] to return to the idle
prompt.
Press [*] or [#] to scroll the display, where:
itm = item number
AA = transaction type
99999.99 = total amount
999....999 = account number
a = AVS response code, $999.99 = misc. amt
OPER = operator ID
IIIIIIII = Invoice number
RET TERMS 9999 = Retail terms
8888...8888 = Descriptor codes
AAA...AAA = Host response
aaa...aaa = Transaction Identifier
Press [ENTER] to continue or [CLEAR] to
end the transaction.
5. VOID-PRESS ENTER
Press [ENTER] to continue or [CLEAR] to
return to the idle prompt.
6. ENTER TO CONFIRM
Press [ENTER] to confirm the void, or
[CLEAR] to end the transaction.
PROCESSING ...
7. ACCEPTED itm
(itm=trans. item #)
The transaction was approved offline. If enabled, the printer prints a receipt of the transaction.
PRINTING...
Press [CLEAR] to return to the idle prompt.
8. READY **nnn**
The terminal returns to the idle prompt indicating it is ready for the next transaction.
TRANZ 460 Terminal
6-9
FDC Retail/Debit Purchasing Card Reference Manual
Ticket Only
Follow these steps to process Ticket Only transactions.
Note: This transaction is always processed offline.
Display
Response
1. READY **nnn**
TKT ONLY
Press the [5] key, labeled TKT ONLY.
2. ENTER PASSWORD
Enter the manager password if required,
then press [ENTER]. The display echoes
each keypress with an asterisk.
******
3. itm ENTER ACCT #
Slide the card through the cardreader or enter the account number on the keyboard,
then press [ENTER]. If entry is made via the
cardreader, go to Step 5.
4. EXPIRY DATE MMYY
Enter the 4-digit card expiration date using 2
digits each for the month and year, then
press [ENTER].
PROCESSING ...
Note: Prompts in Step 5 and Steps 7 through 15 may or may not appear, depending upon options selected in Setup.
6 - 10
5. OPERATOR ID
Enter the 4-digit operator ID number, then
press [ENTER].
6. AMOUNT OF SALE ?
Enter the amount of the sale without the decimal, then press [ENTER].
7. TAX AMOUNT
Enter the tax amount without a decimal, then
press [ENTER]. If TAX CALC is enabled, the
terminal automatically calculates the tax
based on the tax rate. If both are enabled,
the TAX AMOUNT overrides tax calculation.
8. RETAIL TERMS
Enter the 4-digit retail terms, then press
[ENTER].
9. PHONE ORDER? Y/N
Enter [9] for "Y" if this is a phone order, or
[6] for "N" if it is not, then press [ENTER].
Press [ENTER] only for no Phone Order.
10. ENTER AUTH CODE
Enter the authorization code, up to 6 alphanumeric characters, then press [ENTER].
11. DESC CODE
Enter the descriptor code, up to 4 sets, then
press [ENTER].
12. ENTER INVOICE #
Enter the invoice number up to 8 digits, then
press [ENTER].
TRANZ 460 Terminal
6. Standard Key Operations
Display
Response
13. CUSTOMER CODE
Enter the customer code, then press
[ENTER].
14. <option prompt #1>
Enter appropriate data, up to 8 alphanumeric
characters, then press [ENTER].
15. <option prompt #2>
Enter appropriate data, up to 8 alphanumeric
characters, then press [ENTER].
PROCESSING ...
16. ACCEPTED itm
The terminal displays this response if the
transaction was approved. Record the approval number. Press [CLEAR] to return to
the idle prompt.
PRINTING...
If the transaction is approved and the printer
is enabled, the printer prints a receipt of the
transaction.
17. READY **nnn**
The terminal returns to the idle prompt indicating it is ready for the next transaction.
Deposit Inquiry
Follow these procedures to check the dollar amount of the previous business
day’s deposits.
Display
Response
1. READY **nnn**
INQUIRY
Press the [6] key labeled INQUIRY.
2. ENTER PASSWORD
Enter the manager password if required,
then press [ENTER]. The display echoes
each keypress with an asterisk.
******
3. PROCESSING
or
<communication prompts>
The terminal is communicating with the host
via VPL lines. If these lines fail, dialup lines
are used and the terminal displays the standard communication prompts.
4. <host response>
A dollar amount will be displayed on the terminal. Press [*] or [#] to scroll the display.
Press [CLEAR] to return to the idle prompt.
5. READY **nnn**
The terminal returns to the idle prompt indicating it is ready to proceed with the next
transaction.
TRANZ 460 Terminal
6 - 11
FDC Retail/Debit Purchasing Card Reference Manual
Close Batch
Follow this procedure to close a batch of transactions with the host. This will
clear the batch from the terminal’s memory and enable it to store future transactions.
Display
Response
1. READY **nnn**
Press the [9] key labeled CLOSE.
CLOSE BATCH
2. ENTER PASSWORD
Enter the manager password if required,
then press [ENTER]. The display echoes
each keypress with an asterisk.
******
NO TRANSACTIONS
3. ENTER AMOUNT
PRINTING...
6 - 12
There is no batch.
This prompt only appears if the auto-insert
totals option is set to OFF. Enter the terminal total amount without the decimal, then
press [ENTER].
If the Auto Report option is ON, the printer
prints the Detail and Terminal Totals reports.
4. REPORTING? Y/N
Enter [9] for "Y" print the transactions in the
batch, or [6] for "N" to continue with the
Close.
5. CLOSING
CLOSING
The terminal is formally closing the batch
with the host computer. The display alternates messages indicating it is transmitting
and receiving.
>>>>
>>>>
6. <host response>
Press [CLEAR] to return to the idle prompt.
7. READY **nnn**
The terminal returns to the idle prompt indicating it is ready to proceed with the next
transaction.
TRANZ 460 Terminal
7. Terminal Functions
Terminal functions include operations that do not require communication with
a host. To use the terminal in the function mode, press the [FUNC/ENTER]
blue key followed by the desired function key.
Note: The **nnn** indicates the number of spaces left for storage of data
capture transactions. For example, READY **3** indicates that there is space
for storage of three more transactions.
Item Review
Use this function to review items stored in the terminal capture file. You may
also void a record using the [4] key, print an item and edit an amount field,
however, you may not edit a voided record.
Display
Response
1. READY **nnn**
Press [FUNC] and the [1] key labeled ITEM
REV.
2. ENTER PASSWORD
Enter the manager password if required,
then press [ENTER]. The terminal echoes
each keypress with an asterisk.
******
3. ENTER CARD TYPE
Enter [1], [2] ... [10] for card type, then press
[ENTER], or press [ENTER] to review the
beginning of the batch.
Note: If only one card type was set up for
all cards, this prompt does not appear.
4. ENTER ITEM #
NOT FOUND
Enter the item number of the transaction to
review or press [ENTER] to review the first
item in the batch.
The terminal cannot find the item number.
Press [CLEAR] to return to the idle prompt.
Note: This prompt is a warning and may not
be displayed. When it is displayed, follow
the recommended response.
TRANZ 460 Terminal
7-1
FDC Retail/Debit Purchasing Card Reference Manual
Display
Response
5. itm AA $99999.99
9999999999999999
999
$9999.99
a
$999.99
OPER A
IIIIIIII
RET TERMS 9999
88888............8888
AAAAAAAAAAXXXXXX
aaaaaaaaaaaaaaaa
sssss zzzzz-zzzz
<option data #1>
<option data #2>
Press [*] or [#] to scroll the display fields.
The terminal displays transaction data in
multiple screens which contain some or all of
the following data, depending on setup
options:
itm = Item number
AA = Transaction type
$99999.99 = Total amount
9999999999999999 = Account number
999 $9999.99 = Base sale amount
a $99.99 = AVS resp. code, tax amount
OPER = Operator ID, if enabled
A = Authorization Character Indicator
IIIIIIII = Invoice number
RET TERMS 9999 = Retail terms
888888....88888 = Descriptor codes
AAAAAAAAXXXXXX = Host response
aaaa....aaaa = Transaction identifier
sssss zzzzz-zzzz = AVS street address/ZIP
Press [ALPHA] to print this record and
remain on this step. Press [4] to Void the
record and continue with Step 6. If you are
viewing an amount field and wish to change
the amount, press [BACKSPACE] key in the
new amount, press [ENTER] and remain at
this step. Press [CLEAR] to end the record
review, or press [ENTER] to view the next
item.
6. VOID-PRESS ENTER
Press [ENTER] to void this record, or press
[CLEAR] to quit.
7. ENTER TO CONFIRM
Press [ENTER] again to confirm the void, or
press any other key to return to Step 5.
Press [CLEAR] to return to the idle prompt.
END OF BATCH
8. READY **nnn**
7-2
The terminal displays "END OF BATCH"
after review of the last item in the batch.
Press [CLEAR] to return to the idle prompt.
The terminal returns to the idle prompt
indicating it is ready to proceed with the next
function.
TRANZ 460 Terminal
7. Terminal Functions
Totals Review
Follow this procedure to review terminal totals by card type, all card types, or
by operator ID.
Display
Response
1. READY **nnn**
Press [FUNC] and the [2] key labeled
TOTALS.
2. ENTER PASSWORD
Enter the manager password if required,
then press [ENTER]. The terminal echoes
each keypress with an asterisk.
******
3. CARD=1 OP=2
Enter "1" for credit card transaction totals
and continue with Step 4, or enter "2" for
operator totals and continue with Step 7.
4. ENTER CARD TYPE
Enter [1], [2] . . . [10], for card type, and
press [ENTER], or press [ENTER] to go to
Step 6 for the terminal grand total. The card
type displays for one second.
AAAAAAAA
5. 99T
99S
99R
99VS
99VR
999
999
999
999
999
99999.99
99999.99
99999.99
99999.99
99999.99
The terminal displays specified totals for the
card type. Press [*] or [#] to scroll the
display. Press [ENTER] to return to Step 4
or [CLEAR] to end.
99 = card type 01–10
T = Totals, no. items and amount
S = Sale totals, no. items and amount
R = Return totals, no. items and amount
VS = Void Sale totals, no. items, amount
VR = Void Return totals, no. items, amount
6. TT 999 999999.99
CDT 999 999999.99
DBT 999 999999.99
The terminal displays grand totals. Press
[ENTER] to return to Step 4 and enter
another card type to review or press
[CLEAR] to return to the idle prompt.
7. OPERATOR ID
Enter the operator ID for individual totals,
then press [ENTER] and continue with Step
9, or press [ENTER] for all totals and
continue with Step 8.
8. OT
999999.99
The terminal displays totals for all operator
IDs (OT= Operator Totals). Press [ENTER]
to return to Step 7 and enter another
operator ID.
9. O nnnn
999999.99
The terminal displays totals for the selected
operator ID. Press [ENTER] to return to
Step 7 or [CLEAR] to return to the idle
prompt.
TRANZ 460 Terminal
7-3
FDC Retail/Debit Purchasing Card Reference Manual
Display
Response
10. READY **nnn**
The terminal returns to the idle prompt
indicating it is ready to proceed with the next
function.
Demo Mode
Follow this procedure to place the terminal in or out of Demo Mode.
7-4
Display
Response
1. READY **nnn**
Press [FUNC] and the [3] key labeled DEMO.
2. DEMO Y/N
<current value>
Press "Y" for Demo mode, or "N" for Live
mode. Press [ENTER] for no change.
3. MUST CLEAR BATCH
There is an open batch. Press [CLEAR] to
return to the idle prompt and close the open
batch.
4. DEMO **nnn**
The terminal displays the Demo mode idle
prompt.
TRANZ 460 Terminal
7. Terminal Functions
Print Options
Follow these procedures to print batch details, operator totals, terminal totals
or to reprint the last receipt.
Display
Response
1. READY **nnn**
Press [FUNC] and the [5] key labeled PRINT.
2. ENTER PASSWORD
Enter the manager password if required,
then press [ENTER]. The terminal echoes
each keypress with an asterisk.
******
3. PRINT OPTION ?
Enter the number that corresponds to the
item you wish to print, then press [ENTER].
1 - detail items
2 - terminal totals
3 - reprint last receipt
If you select "1", continue with Step 4. If
you select "2", continue with Step 7. If you
select "3", continue with Step 8.
4. DETAIL
ENTER CARD TYPE
Enter the card type, then press [ENTER] or
press [ENTER] for all card types.
5. SORT BY ID? Y/N
Select "Y" to print a detail report by operator
number and in item number order, and
continue with Step 9. Select "N" for a detail
report in item number order only and
continue with Step 6.
6. ENTER ITEM #
Enter the item number and press [ENTER],
or press [ENTER] for a printed list of all
items and continue with Step 9.
7. TOTALS
CARD=1 OP=2
RE-PRINT
8. ENTER ITEM #
Enter "1" for a printed report of credit card
transaction totals, then press [ENTER], or
enter "2" for a printed report of operator
totals. Continue with Step 9.
The terminal displays this message for 1
second, then proceeds to reprint the last
receipt.
Enter the item number of the record you
wish to reprint, or press [ENTER] to reprint
the last transaction, provided no new
transaction has been initiated.
TRANZ 460 Terminal
7-5
FDC Retail/Debit Purchasing Card Reference Manual
Display
Response
9. PRINTING....
10. READY **nnn**
7-6
The printer prints the selected option.
The terminal returns to the idle prompt and
is ready to proceed with the next function.
TRANZ 460 Terminal
8. TRANZ 460 Accessories
VeriFone provides an assortment of accessories to enhance your TRANZ
460 terminals.
Telephone Cord
PINpad 201 Device
•
An extended 3-year warranty on all TRANZ 460 terminals
•
Silk-screened custom overlays that display your company’s logo and
other special key functions
•
An assortment of AC power packs for your "spares" inventory
•
Telephone cords
•
Duplex telephone adapters for connecting multiple telephone devices to
a single jack
•
PINpad devices for entering customer personal identification numbers
•
Bar code wands for scanning bar codes
•
Consumables such as paper and ribbons you can order by phone
(800-233-0522) or FAX (714-434-2498)
PINpad 101 Device
Bar Code Wand
Telephone Adapter
TRANZ 460 Terminal
8-1
FDC Retail/Debit Purchasing Card Reference Manual
8-2
TRANZ 460 Terminal
Appendix A. TRANZ 460 Integral
Printer
The TRANZ 460 terminal features an integral Epson Model 180 24-character
roll printer. Besides the default USA 96-character set, it is capable of supporting a number of special printing enhancements such as TALL, WIDE and
INVERSE, eleven different country character sets and a number of useful
graphics. Refer to Appendix E of the TRANZ 460 Reference Manual, Part
Number 12412, for a list and examples of the different character sets as well
as printer commands used to control the TRANZ 460 printer.
Paper Detect
There is a paper detection device that prevents printing a transaction without
producing a printed receipt. When the paper sensor detects the lack of paper, the printer completes the line it is currently printing, then stops any additional printing.
Refer to Section 3 of this manual for instructions on loading a paper roll and
ribbon cassette in the printer.
Specifications
Model: Epson Model M-180 mechanical micro-dot
Printing Method: Impact dot matrix (6 print solenoids)
Print Format: Total dots- 144 max/1 dot line
Total columns - 24 Max
Copy Capacity: 1 original plus 1 copy
Ribbon Cassette: CRM0012-01, Black
CRM0012-02, Purple
Paper: CRM0013, woodfree, pressure sensitive
Reliability: MCBF (mean character between failure) 1 million lines
Dimensions: 91 mm wide, 46.9 mm deep, 15.8 mm high
Following is a sample printed receipt for the FDC Sale transaction, and
samples of other printed reports.
TRANZ 460 Terminal
A-1
FDC Retail/Debit Purchasing Card Reference Manual
HEADER LINE
HEADER LINE
HEADER LINE
HEADER LINE
HEADER LINE
HEADER LINE
1
2
3
4
5
6
XXXXXXXXXXXXXXXXX XXXX
DATE MM/DD/YY
TIME HH:MM ?M
** RE-PRINT **
Six programmable merchant
message lines
Merchant ID, Terminal ID
Terminal Date and Time
Reprinted receipts only
ITEM:
ITM CCC AAAAAA
OP:
XXXX
ACCT:
XXXXXXXXXXXXXXXX
EXP:
XXXX
RESP:
AAAAAAAA XXXXXX
INV:
XXXXXXXX
AUTH:
XXXXXX
<opt. prompt #1>:
<opt. prompt #2>:
Item number, card, trantype
Operator ID
Account number
Expiration date
Host response
Invoice Number
Authorization code (optional)
Option prompt #1
Option prompt #2
PHONE ORDER
Phone Order marker
AMT:
TAX:
$99999.99
$999.99
Total amount
Tax amount (optional)
I AGREE TO PAY ABOVE
TOTAL AMOUNT ACCORDING
TO CARD ISSUER AGREEMENT
(MERCHANT AGREEMENT IF
CREDIT VOUCHER)
Cardholder agreement
(flexible lines)
X
Cardholder signature
SIGNATURE
TOP COPY - MERCHANT
BOTTOM COPY - CUSTOMER
FLEX MESSAGE 2
Message to cardholder
(Two flexible lines)
Figure A-1. Sample Sale Receipt
A-2
TRANZ 460 Terminal
Appendix A. TRANZ 460 Integral Printer
DETAIL REPORT
HEADER LINE
HEADER LINE
HEADER LINE
HEADER LINE
HEADER LINE
HEADER LINE
1
2
3
4
5
6
XXXXXXXXXXXXXXXXX XXXX
DATE MM/DD/YY
TIME HH:MM ?M
ITEM:
ITM CCC AAAAAA
OP:
XXXX
ACCT:
XXXXXXXXXXXXXXXX
EXP:
XXXX
CUST:
XXXXXXXXXXXXXXXXXX
RESP:
AAAAAAAA XXXXXX
INV:
XXXXXXXX
DESC:
8888888888888888888888
TERM:
9999
TID:
aaaaaaaaaaaa
PHONE ORDER
<opt. prompt #1>: XXXXXXXX
<opt. prompt #2>: XXXXXXXX
AMOUNT
TAX
$999999.99
$999.99
TOTAL: $99999.99
Six programmable merchant
message lines
Merchant ID, Terminal ID
Terminal Date and Time
Detail item number, card, trantype
Operator ID
Account number
Expiration date
Customer code
Host response
Invoice Number (optional)
Descriptor Codes
Retail Terms
Transaction ID
Phone Order marker
Option prompt #1
Option prompt #2
Amount w/o tax, Tax amount
Total amount
ITEM:
ITM CCC AAAAAA
OP:
XXXX
ACCT:
XXXXXXXXXXXXXXXX
EXP:
XXXX
CUST:
XXXXXXXXXXXXXXXXXX
RESP:
AAAAAAAA XXXXXX
INV:
XXXXXXXX
DESC:
8888888888888888888888
TERM:
9999
TID:
aaaaaaaaaaaa
PHONE ORDER
<opt. prompt #1>: XXXXXXXX
<opt. prompt #2>: XXXXXXXX
AMOUNT
TAX
$999999.99
$999.99
TOTAL: $99999.99
END OF BATCH
Figure A-2. Sample Detail Report
TRANZ 460 Terminal
A-3
FDC Retail/Debit Purchasing Card Reference Manual
TOTALS REPORT
HEADER LINE 1
HEADER LINE 2
HEADER LINE 3
HEADER LINE 4
HEADER LINE 5
HEADER LINE 6
Six programmable merchant
message lines
XXXXXXXXXXXXXXXXX XXXX
DATE MM/DD/YY
TIME HH:MM ?M
# TRAN
1
1
1
1
COUNT
AMOUNT
TT
ITM
xxxxxx.xx
Terminal Total
S
R
VS
VR
nnn
nnn
nnn
nnn
xxxxxx.xx
xxxxxx.xx
xxxxxx.xx
xxxxxx.xx
Card
Card
Card
Card
nnn
xxxxxx.xx
Card type 2, Sale total
2 S
.
.
.
.
.
.
.
.
.
10
10
10
10
Merchant ID, Terminal ID
Terminal Date and Time
S
R
VS
VR
DEBITS
T
nnn
nnn
nnn
nnn
xxxxxx.xx
xxxxxx.xx
xxxxxx.xx
xxxxxx.xx
nnn
xxxxxx.xx
type
type
type
type
Card
Card
Card
Card
TRANZ 460 Terminal
type
type
type
type
Sale total
Return total
Void Sale total
Void Return total
10,
10,
10,
10,
Sale total
Return total
Void Sale total
Void Return total
Debit count and amount
Figure A-3. Sample Totals Report
A-4
1,
1,
1,
1,
Appendix A. TRANZ 460 Integral Printer
OPERATOR TOTALS REPORT
XXXXXXXXXXXXXXXXX XXXX
DATE MM/DD/YY
TIME HH:MM ?M
AAAA CARD TOTAL
$999999.99
AAAA CARD TOTAL
$999999.99
AAAA CARD TOTAL
$999999.99
AAAA CARD TOTAL
$999999.99
AAAA CARD TOTAL
$999999.99
Merchant ID, Terminal ID
Terminal Date and Time
Operator ID, Total
END OF OPERATORS
Figure A-4. Sample Operator Totals Report
TRANZ 460 Terminal
A-5
FDC Retail/Debit Purchasing Card Reference Manual
BATCH CLOSED
XXXXXXXXXXXXXXXXX XXXX
DATE MM/DD/YY
TIME HH:MM ?M
# TRANS: NNN
AMOUNT: $xxxxxxxxxx.xx
RESP: xxxxxxxx
Merchant ID, Terminal ID
Terminal Date and Time
Total number transactions in batch
Total dollar amount
Host response
Figure A-5. Sample Batch Closed Header
Note: The batch number "xxxxxxxx" appears in the form the user entered. It
appears as blanks if the user pressed [ENTER] to bypass this field during
the transaction. If the batch number option is set to OFF, a blank line
appears instead of the batch number line.
A-6
TRANZ 460 Terminal
Appendix B. PINpad 101 Device
Introduction
The PINpad 101 data entry device accepts spersonal identification numbers
(PINs) for Debit card transactions. The PINpad 101 device uses a master
key and a working key to encrypt the PIN input. Typically, a PIN is a 4- to
12-digit code known only by the customer and the bank. A PIN is used
during retail transactions to verify that the customer is authorized to use the
credit card offered; the PIN also serves as the cardholder identification for
the credit or debit transaction.
The PINpad unit connects to a TRANZ 460 terminal that controls PIN entry
operations and does the actual communication with the host computer.
Figure B-1. PINpad 101
PINpad Device Components
The PINpad device components include:
Display
•
8-character display
•
12-key telephone-style keypad
The 8-character display shows up to 16 characters through automatic
scrolling. The PINpad 101 device displays fully-formed numerals, letters and
special characters * and #. Information displayed includes characters entered
from the keypad, instructions, prompts and error messages.
TRANZ 460 Terminal
B-1
FDC Retail/Debit Purchasing Card Reference Manual
Keypad
The keypad’s 12 keys are used for PIN and data entry and manual
diagnostics. Please see the PINpad 101 Reference Manual, Part Number
10420, for further details on diagnostic procedures and programming.
QZ
ABC
DEF
1
2
3
GHI
JKL
MNO
4
5
6
PRS
TUV
WXY
7
8
9
OPER
*
CLEAR
0
#
ENTER
Figure B-2. PINpad 101 Device Keypad
Selecting a Location for the PINpad Device
Select a location for the PINpad device that is convenient for the customer
and offers adequate ventilation and protection for the unit.
In general, avoid areas with:
B-2
•
Excessive heat
•
Oil or moisture
•
Excessive dust
•
Excessive electrical noise (caused by air conditioners, motors, fans or
power tools)
•
Direct sunlight
•
Artificial light that could reflect glare off the display
TRANZ 460 Terminal
Appendix B. PINpad 101 Device
Unpacking
Carefully inspect the shipping carton and its content for shipping damage. If
the PINpad device was damaged during shipment, immediately file a claim
with the shipping company and notify VeriFone, Inc.
Warning: Do not use the PINpad unit if it has been damaged.
1. Remove the PINpad unit from the shipping carton.
2. Remove any protective plastic wrap and place the unit on a table or
counter top.
3. Remove the protective plastic wrap from the display panel on the top of
the PINpad.
4. Replace all the packing materials, close the lid and save the carton for
repacking or moving the PINpad device in the future.
Connecting the PINpad Device to the Terminal
Unplug the terminal power pack before connecting the PINpad 101 device.
The PINpad 101 device rear panel has a modular, 4-wire interface port for
power and communication connection to the terminal.
Warning: Turn off or unplug the terminal whenever you connect or disconnect
the PINpad. Be sure the terminal is not processing data when you cut power.
Memory corruption and data loss can result.
Figure B-3 illustrates the PINpad
101 unit connection to a TRANZ
460 terminal.
Plug the cable into the PINpad
device connector on the rear of the
terminal. Use the rubber grommet
(cable cover) to protect the cord.
See the lower illustrations for more
detail.
1. Connect the modular plug on the
PINpad cable to the modular jack
on the rear of the PINpad unit.
2. Connect the other end of the cable
to the PINpad unit port on the
side of the terminal.
3. Spread the grommet open and put Figure B-3. PINpad 101 Device Cable
it on the cord with the narrow
Connections
end facing the PINpad device.
TRANZ 460 Terminal
B-3
FDC Retail/Debit Purchasing Card Reference Manual
4. Slide the grommet up the cord and push its narrow end into the modular
jack. When properly installed, the grommet should fit flat against the rear
of the PINpad device.
Cable Part Numbers
Part No.
10441-01
10441-02
01582-00
01582-01
01582-02
Description
0.6 M, coiled (stretches
to 7 ft.)
1.1 M, coiled (stretches to 15 ft.)
1 M, straight
3.6 M, straight
7.6 M, straight
PINpad 101 Device Mounting
The optional PINpad mount holds
your PINpad unit securely to a
counter top or a wall. The PINpad
device can be lifted from the
mount anytime for hand-held
operation.
First select a location for the
mount on a smooth wall or
countertop. Be sure the cable can
easily reach the terminal from this
position without stretching.
Wall Mounting
Figure B-4. PINpad Unit Mount
Components (Exploded View)
1. Screw the flat wall plate securely to the wall as shown in Figure B-4. Use
screw anchors if you are fastening the mount to a cement or brick wall. If
you are fastening the plate to drywall, the screws must go into the studs
behind the wall. Screw anchors alone will not safely hold the PINpad
mount to drywall.
2. Fasten the angled metal bracket to the wall mount using the TORX
machine screws provided. The two slots on the bracket allow a TORX
screwdriver to reach these screws.
3. Insert the two large slotted screws into the top of the angled bracket but do
not tighten them yet.
4. Position the keyholes on the molded cradle over the slotted screws on the
angled bracket. Slide the mount to the right until both screws are in the
narrow ends of the keyholes. If necessary, loosen the screws slightly
until the cradle slides easily.
5. Tighten the slotted screws to secure the cradle to the angled bracket.
Insert the small molded covers to conceal the keyholes.
6. Place the PINpad device firmly into cradle.
B-4
TRANZ 460 Terminal
Appendix B. PINpad 101 Device
Countertop Mounting
1. To secure the cradle, screw the wood screws into the counter top through
the narrow ends of the keyholes. If you do not want to make any holes,
use the double-faced tape provided with the wall mount.
2. Place the PINpad device firmly into the cradle.
PINpad Device Startup
If the PINpad master keys are loaded, the unit automatically starts up when
connected to the terminal. Upon startup, the PINpad device briefly displays
the version and date followed by the idle prompt.
The Idle Prompt
The PINpad device displays rows of characters that resemble a marching
arrow ( <- - - - - -). This is the idle prompt and indicates the device is ready
for use. This application sets the idle prompt via a ZONTALK download.
Using the Keypad
The PINpad unit has 12 keys—much like a standard telephone—and
includes letters A through Z, numerals 0 through 9 and special characters *
and #.
QZ
ABC
DEF
1
2
3
GHI
JKL
MNO
4
5
6
PRS
TUV
WXY
7
8
9
CLEAR
*
OPER
0
ENTER
#
Figure B-5. PINpad Keypad
TRANZ 460 Terminal
B-5
FDC Retail/Debit Purchasing Card Reference Manual
To complete a transaction, the PINpad device displays a prompt requesting
PIN entry. Enter your PIN number and press [ENTER]. The device rotates a
processing display when it successfully receives the PIN entry.
Note: To clear the PINpad unit display to reenter a PIN, press [CLEAR].
Refer to the appropriate PINpad Reference and Programmer’s Manual, for
more complete details, including diagnostic procedures and programming
considerations. See list of part numbers on page B-7.
Maintenance
VeriFone follows stringent quality control standards in manufacturing all
PINpad devices . Each unit receives numerous tests before leaving the
factory to ensure quality and reliability. However, should you encounter a
problem in operation, read this section for possible causes and solutions.
Cleaning
Periodically clean the PINpad device with a clean cloth dampened with water
and a mild soap or cleaner. Do not use harsh chemicals.
Warning: Because your PINpad device can be damaged by liquids, do not
spray liquid cleaners directly on the unit. Always apply the cleaner to the
cloth before cleaning the PINpad device.
Returning
the PINpad Device
If you need to return your PINpad unit for service or replacement, call the toll
free number given below and ask for the VeriFone MRA (Merchant Return
Authorization) desk. Be sure to mention the serial number found on the
bottom of your unit.
If phoning from the United States, call 800-834-9133.
If phoning from outside the United States, call 714-979-1870.
Warning: Do not try to service, repair or adjust the PINpad device in any
other way. Return the unit to VeriFone if it does not operate properly.
Send the malfunctioning PINpad device with approved MRA number to
VeriFone, Inc. 3080 Airway Ave., Costa Mesa, CA 92626 for repair or
replacement.
Troubleshooting
These troubleshooting guidelines identify various problems and the
appropriate corrective action. If you have a problem with your PINpad device,
read these troubleshooting examples. If your problem persists or is not listed
here, call the toll free number (800-834-9133) and ask for the VeriFone MRA
(Merchant Return Authorization) desk. You must have an MRA desk approval
before returning your equipment for repair.
Warning: Turn off or unplug the terminal whenever connecting or
disconnecting it from the PINpad device. Do not turn off or unplug the
controller while it is processing; memory corruption and data loss can result.
B-6
TRANZ 460 Terminal
Appendix B. PINpad 101 Device
Problem
Solution
Display Panel does not work
1. Check all your cable connections.
2. Check your terminal’s AC outlet to be sure
it’s supplying sufficient power; substitute
the terminal’s power pack with another
power pack.
3. Your application program might not be
loaded correctly; download the application
program and try again.
4. Run display reliability test as described
in the PINpad 101 Reference and Programmer’s Manual, Part Number 10420.
If the problem persists, phone the VeriFone
MRA desk.
Keypad does not respond
1. Check your display panel. If the wrong
characters are displayed or nothing at all,
refer to the solutions for previous problem.
2. Run manual keypad diagnostic as
described in the PINpad 101 Reference
and Programmer’s Manual.
If the problem persists, phone the VeriFone
MRA desk.
Documentation
PINpad 101 Reference and Programmer’s Manual, Part Number 10420,
Revision C.
Part Numbers
Unit
Part Number
PINpad 101 Device
P003-106-02
TRANZ 460 Terminal
B-7
FDC Retail/Debit Purchasing Card Reference Manual
B-8
TRANZ 460 Terminal
Appendix C. PINpad 201 Device
Introduction
The PINpad 201 data entry device, VeriFone
Part Number P003-120-05, accepts
Personal Identification Numbers (PINs)
during debit card transactions. The PINpad
201 device uses a master key and a working
key to encrypt PIN input. The PIN verifies
that the customer is authorized to use the
debit card offered and serves as an
electronic signature for the transaction.
Display
Cardreader
Keypad
Figure C-1. PINpad 201
PINpad 201 Device Components
The PINpad device components include:
•
16-character display
•
Magnetic cardreader
•
Push button telephone-like keypad
Selecting a Location for the PINpad Device
Select a location for the PINpad device that is convenient for the customer
and offers adequate ventilation and protection for the unit.
In general, avoid areas with:
•
Excessive heat
•
Oil or moisture
•
Excessive dust
•
Excessive electrical noise (caused by air conditioners, motors, fans or
power tools)
•
Direct sunlight
•
Artificial light that could reflect glare off the display
TRANZ 460 Terminal
C-1
FDC Retail/Debit Purchasing Card Reference Manual
Unpacking
Carefully inspect the shipping carton and its contents for shipping damage. If
the PINpad 201 unit was damaged during shipment, immediately file a claim
with the shipping company and notify VeriFone, Inc.
Warning: Do not use the PINpad unit if it has been damaged.
1. Remove the PINpad device from the shipping carton.
2. Remove any protective plastic wrap and place the unit on a table or
countertop.
3. Remove the protective plastic wrap from the display panel.
4. Replace all the packing materials, close the lid and save the carton for
repacking or moving the PINpad device in the future.
Connecting the PINpad Device to the Terminal
The PINpad 201 device rear panel has a modular, 4-position interface port
for power and communication connection to the TRANZ 460. (The rear panel
also has a power pin connector, which is not used for this system
implementation.) Figure C-2 illustrates how to connect the PINpad unit to the
TRANZ 460. For other terminal connections, refer to Section 3 of this manual.
Warning: Turn off or unplug the terminal whenever you connect or disconnect
the PINpad device. Be sure the terminal is not processing data when you cut
power. Memory corruption and data loss can result.
1. Turn off or unplug the power to the terminal.
2. Connect one end of the cord to the terminal.
3. Connect the other end of the cord to the PINpad device.
4. Turn on or plug in the power to the terminal.
PINpad Device
TRANZ 460
Figure C-2. PINpad Device to TRANZ 460 Connection
C-2
TRANZ 460 Terminal
Appendix C. PINpad 201 Device
Cable Part Numbers
Cable
Routing Channels
Part No.
Description
10441-01
10441-02
01582-00
01582-01
01582-02
02597-01
02598-01
10776-01
10776-02
.6 M, coiled (stretches to 7 ft)
1.1 M, coiled (stretches to 15 ft)
1 M, straight
3.6 M, straight
7.6 M, straight
Adapter, gender change
Adapter, gender change
Interface to PC
Interface to AT
The cable routing channels, located under the unit, allow you to route the
modular cord to the front of the PINpad device instead of the rear. Front
routing is especially convenient for wall mounting.
1. Turn the PINpad unit upside down and locate the cable channel.
2. Insert a section of the cable into the channel closest to the cable plug.
3. Be sure the cable is straight and nested securely in the channel.
4. Turn the PINpad unit right side up and position it with the cords neatly out
of the way.
PINpad 201 Device Mounting
VeriFone offers optional wedge and flat mounts for use with the PINpad
device. A wedge mount inclines or lifts the unit when mounting on counter
tops or walls. A flat mount allows you to attach the PINpad device to a flat
surface.
PINpad Device Startup
If the master keys are loaded, the PINpad unit automatically starts up when
connected to the terminal. Upon startup, the PINpad device briefly displays
the version and date followed by the idle prompt.
The Idle Prompt
The PINpad device, by default, displays rows of characters that resemble a
marching arrow ( <--------------). This represents the idle prompt and indicates
the unit is ready for use.
TRANZ 460 Terminal
C-3
FDC Retail/Debit Purchasing Card Reference Manual
The display of the PINpad device idle prompt can be downloadable. For
example, the idle prompt display may be customized to display a
"WELCOME" message.
Using the Cardreader
The cardreader reads data quickly and
accurately and is generally the preferred
method since the card swipe lessens the
chance for human error. However, manual
keypad entry is useful if a card is damaged or
when an order is being taken by phone or mail.
1. Check the display for the idle prompt. If not
displayed, press [CLEAR] twice to cancel
any current operation and display
the idle prompt.
Figure C-3. PINpad Device
Cardreader
2. Hold the card so the magnetic stripe is down
and facing left (toward the keypad or the center of the PINpad).
3. Insert the card in the rear of the slot and briskly slide it through the
cardreader toward the front of the PINpad.
If the PINpad device cannot read the card number, it displays PLEASE TRY
AGAIN. Check how you are holding the card and slide it through the slot
again. If the number still cannot be read, enter the number on the keypad
followed by [#/ENTER].
Using the Keypad
The PINpad 201 unit has 12 keys—much like
a standard telephone—and includes letters A
through Z, the numerals 0 through 9 and
special characters * and #.
To enter your personal identification number to
complete a transaction, the PINpad displays a
prompt requesting PIN entry. Enter your
number and press [#]. The PINpad device
rotates a processing display when it
successfully receives the PIN entry.
QZ
ABC
DEF
1
2
3
GHI
JKL
MNO
4
5
6
PRS
TUV
WXY
7
8
9
Note: You can clear the PINpad unit display to
CLEAR
ENTER
reenter a PIN by pressing [CLEAR]. Refer to
OPER
the PINpad 201 Reference and Programmer’s
0
#
*
Manual, P/N 10297 for more complete details
including diagnostic procedures and
Figure C-4. PINpad 201 Keypad
programming considerations.
C-4
TRANZ 460 Terminal
Appendix C. PINpad 201 Device
"THANK YOU" appears for 3 seconds at the end of the transaction. The
PINpad device then returns to the idle prompt.
Maintenance and Keypad Diagnostics
VeriFone follows stringent quality control standards in manufacturing all
PINpad devices. Each unit receives numerous tests before leaving the
factory to ensure quality and reliability. However, should you encounter a
problem in operation, read this section for possible causes and solutions.
Cleaning
Periodically clean the PINpad device with a clean cloth dampened with water
and a mild soap or cleaner. Do not use harsh chemicals.
Warning: Because your PINpad unit can be damaged by liquids, do not
spray liquid cleaners directly on the device. Always apply the cleaner to the
cloth before cleaning the PINpad device.
Returning
the PINpad Device
If you need to return your PINpad unit for service or replacement, call the toll
free number given below and ask for the VeriFone MRA (Merchant Return
Authorization) desk. Be sure to mention the serial number found on the
bottom of your unit.
If phoning from the United States, call 800-834-9133.
If phoning from outside the United States, call 714-979-1870.
Warning: Do not try to service, repair or adjust the PINpad device in any
other way. Return the unit to VeriFone if it does not operate properly.
Send the malfunctioning PINpad device with approved MRA number to
VeriFone, Inc. 3080 Airway Ave., Costa Mesa, CA 92626 for repair or
replacement.
Troubleshooting
These troubleshooting guidelines identify various problems and the
appropriate corrective action. If you have a problem with your PINpad unit,
read these troubleshooting examples. If your problem persists or is not listed
here, call the toll free number (800-834-9133) and ask for the VeriFone MRA
(Merchant Return Authorization) desk. You must have MRA desk approval
before returning your equipment for repair.
Warning: Turn off or unplug the terminal whenever connecting or disconnecting it from the PINpad device. Do not turn off or unplug the terminal
while it is processing; memory corruption and data loss can result.
Problem
Display Panel does not work
Solution
1. Check all your cable connections.
2. Check your terminal’s AC outlet to be sure
it’s supplying sufficient power; substitute
the terminal’s power pack with another
power pack.
TRANZ 460 Terminal
C-5
FDC Retail/Debit Purchasing Card Reference Manual
Problem
Solution
3. Your terminal’s application might not be
loaded correctly; download application
and try again.
4. Run display reliability test as described in
the PINpad 201 Reference and
Programmer’s Manual, Part Number
10297.
If the problem persists, phone the VeriFone
MRA desk.
Keypad does not respond
1. Check your display panel. If the wrong
characters are displayed or nothing at
all, refer to the solutions for previous
problem.
2. Run the manual keypad diagnostic as
described in the PINpad 201 Reference
and Programmer’s manual.
If the problem persists, phone VeriFone
MRA desk.
Cardreader does not work
1. Perform your transaction using several
debit cards to ensure problem is not a
defective card. When sliding cards
through the cardreader, be sure the
magnetic stripe is down and facing left.
2. Verify that Message Q3, Ignore Card
Swipe, has not been used.
3. Verify that Message Q4, Turn Cardreader
On/Off is turned on.
4. Your terminal application may not be
properly loaded. Download your
application and try again.
5. Perform Cardreader Diagnostic, described
in the PINpad 201 Reference and
Programmer’s Manual, Part Number
10297.
6. Enter the information manually from the
keypad. If the transaction works, phone
the VeriFone MRA desk.
C-6
TRANZ 460 Terminal
Appendix D. Prompts and Error
Messages
The following list includes the prompts and error messages that may appear
on your terminal’s display. The list consists of two columns:
ACCEPTED itm
ACCT RANGE ITEM?
ALREADY VOIDED
AMEX
AMEX
AMEX
AMEX
AMEX
SPLIT Y/N
PRIMARY #?
SECOND #?
MERCH ID?
CARD TYPE?
•
The left column is the message or prompt
•
The right column contains an explanation of the message and any appropriate required response.
Approval response if the transaction was performed offline. Press [CLEAR]
to return to the idle prompt.
Enter the account range item number 1–9, then continue to answer all
prompts.
Display indicating that the transaction selected to be voided has already
been voided. Press [CLEAR] to return to the idle prompt.
Host setup prompts. If you select "Y" for AMEX host split dial, continue with
the remaining prompts. Select "N" to disable split dial and go to the
Discover host prompts.
AMOUNT OF SALE ?
Enter the total amount of the sale without the decimal, then press [ENTER].
APPROVED: nnnnnn
Approval number on AUTHORIZATION ONLY transactions sent from the host.
AUTH ONLY
AUTO CLOSE Y/N
CLOSE TIME HH:MM
Display when key [3] is pressed when initiating procedures to authorize a
sale. Wait for the next prompt.
Select "Y" for the terminal to automatically close, then enter the close time in
24-hour format and press [ENTER]. Select "N" for no auto close.
TRANZ 460 Terminal
D-1
FDC Retail/Debit Purchasing Card Reference Manual
AVS ADDRESS
AVS ZIP
BANKCARD ADDRESS
9999999999999999999999
BATCH IS FULL
Enter the cardholder’s ZIP code, then press [ENTER].
Prompt that appears if you select "Y" at the ENABLE DDOV? prompt. Press
[ENTER] to accept the current address, or key in a new host address, up to
20 alphanumeric characters, then press [ENTER].
Indicates that data capture memory is full and no more transactions can be
stored in memory until data capture file is cleared.
CALL CENTER
Operator should call the credit authorization center voice line.
CARD=1 OP=2
In a Totals Review function, press "1" to review totals by card type or "2" to
review operator totals. This prompt also appears in the Print Totals Report
function.
CARD RANGE INFO
ACCT RANGE ITEM?
nn-LOW?
nn-HIGH?
nn-CARD TYPE?
nn-CARD ABBREV?
nn-TERMS? Y/N
nn-DES CODE 0/2/4
nn-AVS ? Y/N
nn-CUST CODE? Y/N
CLEAR BATCH
CLEAR? Y/N
CLOSE BATCH
D-2
Enter the cardholder’s street address, then press [ENTER].
Setup Code 2 was entered allowing the operator to enter card range
information.
Note: You must answer ALL prompts. Press [9] or [6] for "Y" and "N"
responses. At the Customer Code, prompt, enter 1 to 25 numeric digits.
Display when Code 9 of the Setup function is selected. Wait for the next
prompt.
Setup function Code 9 allowing the operator to clear the terminal buffer and
return to the setup mode. Press "Y" to continue or "N" to exit the function.
The Close Batch transaction, Key [9], was selected.
CLOSING > > > >
Close Batch display when the terminal is closing with the host.
COMMUNICATING
Display when the terminal is sending or receiving data from the download
host.
TRANZ 460 Terminal
Appendix D. Prompts and Error Messages
CONNECTED
CREDIT=0 DEBIT=1
CURRENTLY YES
CURRENTLY NO
CUSTOMER CODE
CUSTOMER CODE? Y/N
DEBIT? Y/N
Select "1" for debit transactions, or "0" for credit transactions. Wait for the
next prompt.
Display that appears following the ENABLE DDOV? Y/N prompt, showing the
current communications DDOV setting (YES or NO). Press [ENTER] to
accept the current setting. Press [9] for YES, or [6] for NO to change the
setting.
Enter the customer code, up to 25 alphanumeric characters, then press
[ENTER].
Account Range setup option. Select "Y" for the terminal to prompt for entry
of the customer code during specific transactions, or "N" for no prompt.
Press "Y" to enable debit transactions, or "N" to disable.
DECLINED
The host computer has declined authorization of a transaction.
DEMO Y/N
Display when you press [FUNC] [3] to place the terminal in Demo mode.
Select "Y" or "N" as desired, then wait for the next prompt.
DESC CODE
DETAIL
DIALING
DISC
DISC
DISC
DISC
DISC
The terminal has connected with the host computer and is ready to begin
communicating.
SPLIT Y/N
PRIMARY #?
SECOND #?
MERCH ID?
CARD TYPE?
DOES NOT BALANCE
Enter the descriptor codes, up to four sets, then press [ENTER].
Display indicating print Option 1, audit detail, was selected.
The terminal is dialing the host computer.
Host setup prompts. If you select "Y" for Discover host split dial, continue
with the remaining prompts. Select "N"to disable split dial.
Display indicating the amount keyed in at the time of the Close is not in
agreement with the terminal balance.
TRANZ 460 Terminal
D-3
FDC Retail/Debit Purchasing Card Reference Manual
DOWNLOAD DONE
Display after completion of successful download.
ENABLE VPL? Y/N
Host setup prompt. Press [9] for "Y" to enable VPL communications, or [6]
for "N" to disable.
END OF BATCH
Display in an Item Review function indicating the last item in the batch was
reviewed. Press [CLEAR] to return to the idle prompt.
itm ENTER ACCT #
ENTER AMOUNT
Enter the terminal total dollar amount of the batch you wish to close, then
press [ENTER].
ENTER AUTH CODE
Enter the authorization code up to six alphanumeric characters, then press
[ENTER].
ENTER CARD TYPE
When reviewing terminal totals and detail transactions, press [1], [2].....[6] for
the card type you wish to review.
ENTER ID NUMBER
Enter the ID number on the keyboard, then press [ENTER].
ENTER INVOICE #
ENTER ITEM #
ENTER NEW PASSWD
ENTER PASSWORD
ENTER PIN
PUSH "ENTER"
D-4
Enter the account number on the keyboard or slide the card through the
cardreader. "itm" is the transaction item number, for example 001, 002, 010,
etc.
Enter the invoice number for the transaction, then press [ENTER].
Enter the item number of the transaction to review, or press [ENTER] to
review the first item in the batch.
Enter the new manager password, then press [ENTER].
Enter the manager password, then press [ENTER].
PINpad device prompt after it displays the debit transaction amount. The
customer should enter his/her PIN on the PINpad device, then press the
[ENTER] key.
TRANZ 460 Terminal
Appendix D. Prompts and Error Messages
ENTER SETUP CODE
Enter the code that corresponds to the selected option during a terminal
setup function.
ENTER TO CONFIRM
Void transaction prompt. Press [ENTER] to confirm voiding the selected
transaction record.
ENTER TRAN CODE
EXPIRY DATE MMYY
FUNCTION?
HOST INFO
FDR PRIMARY #?
FDR SECOND #?
FDR CLOSE PHONE?
FDR MERCH ID?
IDLE PROMPT
INQUIRY
NO ENQ FROM HOST
Enter the numeric transaction code, then press [ENTER] when requesting
check authorization.
Enter the 4-digit expiration date using two digits each for the month and year,
then press [ENTER].
Prompt when the [FUNC/ENTER] key is pressed asking which function the
operator wishes to initiate.
Setup Code 1 was selected. Enter the required interactive host information.
Code 8 of the Setup function was selected. Press [ENTER] to leave the idle
prompt unchanged. Press [BACKSPACE] and enter up to 16 alphanumeric
characters to change the idle prompt, or [BACKSPACE] and [ENTER] to
keep the default idle prompt READY **nnn**.
Display indicating Key [6] was pressed. Wait for the next prompt.
The terminal did not see the ENQ character from the host. Repeat the
transaction, and if you receive the same message, call your authorization
center for help.
NO MERCHANT ID
Display when a transaction is initiated and the merchant ID number was not
entered in its memory location. Press [CLEAR] to return to the idle prompt,
and follow procedures to enter the merchant ID number in the correct
location.
NO TEL NUM
Display when a transaction is initiated and the host telephone number was
not entered in its memory location. Press [CLEAR] to return to the idle
prompt, and follow procedures to enter the telephone number in the correct
location.
TRANZ 460 Terminal
D-5
FDC Retail/Debit Purchasing Card Reference Manual
NO TRANSACTIONS
NOT FOUND
OPERATOR ID
OPTION FIELD Y/N
OPTIONS
DEVICE ID?
INVOICE #? Y/N?
OPERATOR ID? Y/N
PHONE ORDER? Y/N
RECEIPT? Y/N
PREPRINT? Y/N
AUTO REPORT? Y/N
AUTO INSERT? Y/N
PREDIAL? Y/N
MAN ENTRY? Y/N
OUT OF PAPER
PASSWORD?
PASSWORD UPDATED
The terminal cannot find the item number of transaction to review that has
been entered by user. Press [CLEAR] to return to the idle prompt.
Enter the 4-digit operator ID number, then press [ENTER].
Options setup prompt. Press [9] for "Y" to enable the extended prompt
fields, or [6] to disable.
Setup Code 5 was entered enabling the operator to enter the terminal
identifier and application options.
Note: Answer all prompts. Press [9] and [6] for "Y" and "N" responses.
Message indicating the integral printer is out of paper when you attempt to
initiate a Debit transaction. The terminal returns to the idle prompt.
Enter the system password, then press [ENTER], to unlock the terminal’s
memory. The display echoes each entry with an asterisk (*).
Display that indicates new manager password was updated correctly. Press
[CLEAR] to return to the idle prompt.
PHONE ORDER? Y/N
Select "Y" if the transaction is a phone order, or "N" if it is not, then press
[ENTER].
PLEASE TRY AGAIN
The cardreader was unable to read the card swipe. Slide the card again.
PRINT OPTION?
D-6
Display when the operator attempts to close, review or print a batch and
there are no transactions stored in the terminal’s memory. Press [CLEAR] to
return to the idle prompt.
Enter [1] to print detail items, [2] to print terminal totals,or [3] to reprint the
last receipt.
TRANZ 460 Terminal
Appendix D. Prompts and Error Messages
PRINTER / PIN PAD
PRINTER? Y/N
Setup Code 7 was entered in the Setup function. Enter "Y" or "N" or press
[ENTER] to keep the printer already installed. Enter "1" for the PINpad 101
device, or "2" for the PINpad 201 device.
PROGRAMING ERR Ø
If your terminal displays this message, you can attempt recovery by pressing
the [3] and [5] keys simultaneously, causing the terminal to recalculate the
checksum digit that may be the cause of the error message. An alternate
method is to hold down the [1] key and press the [ENTER] key until the
calendar/clock reappears on the display, then reload the program.
PROMPT FIELD <#n>
Enter an extended prompt, up to 16 characters, to be used in Sale, Ticket, or
Return transactions (N= 1 or 2).
READY *nnn*
The terminal displays "READY" when it is available to process transactions,
where nnn = the number of transactions left to be stored in the terminal. For
example, READY **3** indicates that there is space for storage of three
more transactions.
RECALL WHAT?
RECEIVING
REPORTING? Y/N
Enter the memory location you wish to review.
The terminal is receiving a response from the host computer.
Enter "Y" to print the records in the Close Batch transaction, or "N" to
continue with the closing.
RE-PRINT
Display indicating a reprint function was selected.
RETAIL TERMS
Enter the 4-digit retail terms, then press [ENTER].
RETURN
SALE
SALE TYPE DESC
<current value>
Display when initiating procedures to authorize a return/credit.
Display when the [1] key is pressed to process a standard credit card sale
transaction. Wait for the next prompt.
Setup prompt. Enter the name of the tran type for all Sale transactions, up
to seven alphanumeric characters, then press [ENTER], or press [ENTER] to
leave unchanged.
TRANZ 460 Terminal
D-7
FDC Retail/Debit Purchasing Card Reference Manual
SECURITY
SET SALE? Y/N
SET RETURN? Y/N
SET AUTH? Y/N
SET VOID? Y/N
SET TICKET? Y/N
SET DEP INQ? Y/N
SET CLOSE?Y/N
SET ITM REV? Y/N
SET TOT REV? Y/N
SET SETUP? Y/N
SET PRINT? Y/N
SET DEMO? Y/N
SERIAL # NOT FND
SETUP
Response from the download host when the terminal serial number stored in
Location 0001 does not match valid serial numbers for a download. Perform
the Recall function [FUNC] [7] and check the serial number. Correct it if
necessary.
[FUNC] [4] was pressed for terminal set up.
SORT BY ID? Y/N
Enter "Y" to print a detail report by operator number and item number order,
or "N" to print a detail report in item number order only.
STORE WHAT?
Enter the desired memory location (numbers 0000 through 0999) for storing
data in the terminal.
SUCCESSFUL DL
D-8
Setup Code 3 was entered enabling the operator to set security flags. Press
[9] or [6] for "Y" or "N" responses. A "Y" response will require entry of the
manager password to perform the selected transaction/function.
The terminal has successfully completed the download. Press [CLEAR] to
return to the idle prompt.
SWIPE CARD
When a PINpad 101 device is connected to the terminal and you are
performing a debit transaction, the terminal displays this prompt to swipe the
customer’s debit card through the terminal cardreader. If you are using a
PINpad 201 device, this prompt appears on the PINpad unit display.
TAX CALC? Y/N
Options setup prompt. Press [9] for "Y" to enable automatic tax calculation,
or press [6] for "N" to disable.
TAX PROMPT? Y/N
Options setup prompt. Press [9] for "Y" to enable a tax prompt, if you prefer
to enter a tax manually, or [6] for "N" to disable.
TRANZ 460 Terminal
Appendix D. Prompts and Error Messages
TAX RATE 9.99
Key in the tax rate for the terminal to use when calculating the tax on the
transaction amount. This prompt only appears if you select "Y" at the TAX
CALC prompt.
THANK YOU
PINpad device display at the conclusion of a successful debit transaction.
TKT ONLY
TRANSMITTING
UNDEFINED CARD
UNREADABLE CARD
UNSUCCESSFUL DL
UPDATE PASSWD
ENTER NEW PASSWD
VERIFY NEW PASSW
VOID
WAITING FOR LINE
The [5] key was pressed to dial for an ETC item. Wait for the next prompt.
The terminal is communicating with the host computer.
This prompt appears when a card that is not defined in the Account Range
table is swiped through the cardreader.
The terminal cannot read the card. Press [CLEAR] to return to the idle
prompt.
The terminal was unable to complete the download. Press the [CLEAR] key
and reinitiate the download.
Setup Code 4 was entered enabling the operator to update the manager
password.
Display when the [VOID] key is pressed for voiding a transaction that was
captured at the host. Wait for the next prompt.
The terminal is waiting for the line to become available.
1=PP101 2=PP201
Setup prompt. Press "1" for a PINpad 101 device, or "2" for a PINpad 201
device.
DOV=1 ISDN=2
Host setup if you select "Y" to enable VPL communications. Select "1" for
the DOV address, or "2" for the ISDN address.
TRANZ 460 Terminal
D-9
FDC Retail/Debit Purchasing Card Reference Manual
D - 10
TRANZ 460 Terminal
Appendix E. ZONTALK 2000
Download Parameters
ZONTALK 2000 is the VeriFone download program that simplifies the process of updating or completely reprogramming your VeriFone terminal. Designed to run on an IBM PC, XT, AT or compatible, ZONTALK 2000 performs modem downloads to your terminals in the field or direct downloads to
terminals physically connected via RS-232 cable to the computer’s serial port.
To obtain a ZONTALK 2000 download of the FDC Retail Debit Purchasing
Card application, you must program the following memory locations with specific information. Refer to Section 4 of this reference manual for an explanation of how to program the contents of a field location.
Location
Information to Enter
0000
0001
0019
Enter the phone number of a computer running ZONTALK 2000
Enter the serial number of the terminal.
Enter the application ID (FRET462). Call your customer service
representative for the most current application ID.
Enter the download speed. A "2" enables the terminal to
download at 1200 baud. A "1" enables the terminal to
download at 300 baud.
0960
When you receive a download from ZONTALK 2000, certain memory locations (parameters) will already have a default setting. These settings may be
changed later through the terminal setup function or through manual
programming of the terminal. The following list contains the ZONTALK 2000
parameters for the FDC Purchasing Card application. The list is organized in
four columns containing a description of the contents, the memory location,
the data type code, and the field length.
Data Type Codes
Codes
Description
Legal Character Set
A
N
X
P
Q
B
I
Alphabet
Numbers
Alphanumeric
Phone
Question
Binary
IBM
[A..Z, a..z, #, -, ., space]
[0..9]
[space...~]
[0..9, -, *, #,A,L,P,T,space]
[Y,N]
[0,1]
[full IBM ASCII set]
TRANZ 460 Terminal
E-1
FDC Retail/Debit Purchasing Card Reference Manual
Memory Locations
Type/
Location No. Chars
Description
E-2
Download Phone Number
Printer Type Flag
0000
0950
P(20)
N(1)
Roll Printer Line Feeds
Download Speed
Debit Flag
Beep On/Off
Dial Type
Telephone Line Test
Working key/M-key ptr
RECALL Password
Terminal Identifier
Security Bit Map
Manager Password
Application Options Map
Split Dial Options Map
Login String #0
Login String #1
Header Line #1
Header Line #2
Header Line #3
Header Line #4
Header Line #5
Header Line #6
Cardholder Flex Line
0951
0960
0970
0009
0010
0014
0016
0017
0858
0859
0860
0861
0862
0020
0021
0465
0466
0467
0468
0469
0470
0392
N(5)
N(5)
N(1)
B(1)
B(1)
N(1)
X(20)
B(1)
X(4)
B(12)
N(6)
B(10)
B(2)
X(60)
X(60)
X(26)
X(26)
X(26)
X(26)
X(26)
X(26)
X(40)
Cardholder Flex Line
0393
X(40)
Cardholder Flex Line
0394
X(40)
Cardholder Flex Line
Message Line
0395
0396
X(40)
X(40)
Message Line
1st Account Range
|
20th Account Range
Track Selection
Max. Trans. Allowed
Card Names
0397
0043
|
0062
0081
0235
0363
X(40)
X(23)
|
X(23)
B(20)
N(3)
X(100)
TRANZ 460 Terminal
Contents/
Comments
2 <empty>=None
2=Roll
5
2 (1=300, 2=1200)
1=PP 101 2=PP201
0
0 (T=0 P=1)
0000000000000000-1
000000000100 (See Note 2)
123123
0001000110000 (See Note 3)
00
3-81636
I AGREE TO PAY ABOVE
TOTAL AMOUNT
ACCORDING TO CARD
ISSUER AGREEMENT
(MERCHANT AGREEMENT
IF CREDIT VOUCHER)
TOP COPY-MERCHANT
BOTTOM COPY-CUSTOMER
See Note 1 for details
1=Trk 1 2=Trk 2
400
Separate 10 names with "/"
Appendix E. ZONTALK 2000 Download Parameters
Description
Type/
Location No. Chars
AMEX Card Type Split Dial 0093
Disc. Card Type Split Dial 0094
Fraud Control Flag
0106
Fraud Control Flag
0206
Fraud Control Flag
0306
Fraud Control Flag
0506
Primary Phone No.
0700
Secondary Phone No.
0701
Call Center Phone No.
0702
Pick-Up Card Phone No.
0703
Merchant ID
0704
Message Format Flag
0705
Fraud Control Flag
0706
Transaction Ctl String
0707
Transaction Prompt
0708
Floor Limit
0709
Resp. Analysis Ctl Str
0710
Auxiliary Ctl String
0711
DDOV Address
0844
ISDN Address
0847
Primary Phone No.
0852
Secondary Phone No.
0853
Merchant ID
0854
Close Phone No.
0855
Close Redial Phone No.
0856
Cardswipe Default key (1-9) 0985
TRANZ 460 Terminal
N(1)
N(1)
N(3)
N(3)
N(3)
N(3)
X(32)
X(32)
X(32)
X(32)
X(46)
N(3)
N(3)
X(120)
X(16)
N(4)
X(120)
X(120)
X(28)
X(28)
P(30)
P(30)
X(32)
P(30)
P(30)
N(1)
Contents/
Comments
4
1
E-3
FDC Retail/Debit Purchasing Card Reference Manual
Note 1
Locations 0043 through 0062 contain the account range tables. Normal entries for all card types are as follows:
High
Low
Card Abbrev.
999999 999999.9 9 X X X 9 9 9
9
Card type
Retail Terms
Descriptor Code
(0=no codes, 2=length 2, 4=length 4)
AVS Flag
Customer Code Flag
Account Ranges
Note 2
Acct
Acct
Acct
Acct
Acct
Acct
Acct
Acct
Acct
Acct
Acct
Acct
Acct
Acct
Acct
Acct
Range #1 (0043)=405501.405502.01VPC0001
Range #2 (0044)=415928.415928.01VPC0001
Range #3 (0045)=424604.424605.01VPC0001
Range #4 (0046)=427533.427533.01VPC0001
Range #5 (0047)=428800.428800.01VPC0001
Range #6 (0048)=443085.443085.01VPC0001
Range #7 (0049)=471500.471699.01VPC0001
Range #8 (0050)=400000.499999.01VIS0000
Range #9 (0051)=540500.540599.02MPC0001
Range #10 (0052)=500000.599999.02MC 0000
Range #11 (0053)=340000.349999.03AMX0000
Range #12 (0054)=370000.379999.03AMX0000
Range #13 (0055)=300000.389999.04DC 0000
Range #14 (0056)=601100.601199.05DIS0000
Range #15 (0057)=000000.099999.06FDR0000
Range #16–#20 (0058–0062)=<empty>
Note: The "." after the low and high fields is required to make the account
ranging work properly.
Location 0859, Security Bit Map, contains the string for password protection
on transactions and functions. A "1" indicates that the corresponding transaction is password protected. The following lists transactions and functions by
position in the string, with an example setting:
Position
1
2
3
4
5
6
Transaction
Sale
Return
Auth
Void
Ticket
Dep Inquiry
Position
7
8
9
10
11
12
Transaction
Close
Item Review
Totals Review
Setup
Print
Demo
For example, a string "100000100000" in Location 0859 indicates that Sale
and Close Batch functions are password protected.
E-4
TRANZ 460 Terminal
Appendix E. ZONTALK 2000 Download Parameters
Note 3
Location 0861, Application Options Map, contains the string for terminal options settings where 0 = Off and 1 = On.
Position
Option
1
2
3
4
5
6
7
8
9
10
11
12
13
Invoice number
Operator ID
Phone order
Receipt printing
Pre-printing
Auto report
Auto-insert
Pre-dial
Manual entry
Tax prompt
Tax calc
Optional prompts
VPL
If you have any questions regarding these parameter settings, contact your
VeriFone representative.
TRANZ 460 Terminal
E-5
FDC Retail/Debit Purchasing Card Reference Manual
E-6
TRANZ 460 Terminal
Appendix F. TRANZport 232
Introduction
The TRANZport 232 provides the VeriFone OMNI and TRANZ families of
terminals (including the PNCTM 330) the ability to communicate with two
RS-232 serial devices instead of one. For example, suppose in addition to
using a printer and a PINpad device, you wish to connect your TRANZ 460
to an external modem requiring an RS-232 compatible connection. Without
the TRANZport 232, you would not be able to do so because of the RS-232
port limitation. However, using the two connectors on the TRANZport allows
both the external modem and the printer to be connected at the same time.
Selecting between the two peripheral devices is controlled by the application
running in the terminal. Using the above example during a typical
transaction, the TRANZ 460 could select the external modem, make
connection with the host, get the transaction authorization, and then instruct
the printer to print out a receipt.
The TRANZport 232 is extremely compact and fits snugly behind your
transaction terminal to save counter space. It also comes with its own power
supply and necessary cables.
Unpacking
Carefully inspect the shipping carton and its contents for any damage that
may have occurred during shipment. If the TRANZport 232 is damaged,
immediately file a claim with the shipping company or carrier and notify
VeriFone, Inc. Do not use damaged equipment.
1. Remove all items from the carton. In a standard configuration you should
have:
•
1 TRANZport 232
•
1 power pass-thru cable (PN 20074-03)
•
2 serial interface cables (PN 00446-04)
NOTE: An optional power pack is available in other configurations.
2. Remove any protective plastic wrapping from the TRANZport and place all
the components on a table or countertop.
3. Reuse this carton and packing material whenever it is necessary to ship or
store the TRANZport 232.
TRANZ 460 Terminal
F-1
FDC Retail/Debit Purchasing Card Reference Manual
A-Port
Connector
(DIN-8)
B-Port
Connector
(DIN-8)
DIP Switch
(RTS/DTR
Selector Switch)
POWER IN
Connector
POWER OUT
Connector
TERMINAL Connector
(DB-9 Interface Cable
Connector)
Figure F-1. TRANZport 232 (Front and Rear Views)
Typical Installation
Use the steps below as a guide to connect a TRANZport 232 in a typical
TRANZ 460 configuration.
Note: In the following configuration the TRANZ 460 receives its power from
the TRANZport 232. The power pack that came with your TRANZ 460
should be used with the TRANZport 232. For all other terminal
configurations, you should obtain a TRANZ 460 power pack certified for use
in your country. If you have purchased a TRANZport 232 configuration
containing an optional power pack, use the provided power pack.
1. Unplug all power cords connected in the present configuration.
2. Disconnect printer from the TRANZ 460 serial port.
3. Plug the disconnected end of the printer serial cable into the connector
labeled A on the TRANZport 232.
4. Using one of the supplied serial interface cables (PN 00446-04), plug the
DIN-8 end into the TRANZ 460 serial port. Plug the DB-9 end of this
cable into the connector labeled TERMINAL on the TRANZport 232.
5. Plug the DIN-8 end of the second supplied serial interface cable into the
connector labeled B on the TRANZport 232. The DB-9 end of this cable
should be plugged into the DVM (Data Over Voice Multiplexer).
6. Plug one end of the power pass-thru cable into the Power In connector on
the TRANZ 460. Plug the other end of this cable into the connector
labeled POWER OUT on the TRANZport 232. Plug the TRANZ 460
power pack into the connector labeled POWER IN on the TRANZport
232.
7. Plug the power pack into an indoor, 120 volt AC outlet.
8. Plug in all other power cords (Printer 150/250, DVM, etc.).
F-2
TRANZ 460 Terminal
Appendix F. TRANZport 232
DTR switch up
Connect to
serial port on
DVM
TRANZport 232
(front view)
B Port
Serial Interface Cable
Figure F-2. TRANZport 232 and Data Connections
TRANZ 460 Power Pack
(or optional TRANZport 232 power pack)
POWER IN
POWER IN POWER OUT
Figure F-3. TRANZport 232 and TRANZ 460 Power Connections
DIP Switch Setting
The 2-position DIP switch determines which RS-232 control signal,
generated by the terminal, is used to select the A or B port. When the
switch is in the up position, DTR is used; when in the down position, RTS is
used.
DTR (switch up)
Printer cable in A port
Serial connection to B port
In this application, DTR is used with the switch in the UP position.
TRANZ 460 Terminal
F-3
FDC Retail/Debit Purchasing Card Reference Manual
Testing the TRANZ
460/TRANZport 232
Connection
After connecting the TRANZport as previously outlined, the following TCL
code can be used to test the system.
Using the standard recall and edit capabilities of the TRANZ 460, load
memory locations 31 and 32 with the following TCL command strings:
031=B1.1GR’B PORT TEST’R13R10*R5+R1*I
032=B1.1GR’A PORT TEST’R13R10*R5+R0*I
To test the TRANZport 232 B port, press the [FUNC/ENTER] key then the
[1] key on the TRANZ 460 terminal. This sends ’B PORT TEST’ to the
device connected to the B port at 9600 baud.
To test the A port, press the [FUNC/ENTER] key and then the [2] key on the
TRANZ 460. This sends ’A PORT TEST’ to the device connected to the A
port at 9600 baud.
When the TRANZ 460 is in the Idle Mode, the TRANZport 232 is connected
to the B port.
Specifications
Physical
Environmental
Power
Height: 1.5 in. (38.1 mm)
Width: 3.5 in .(88.9 mm)
Depth: 4.0 in. (101.6 mm)
Shipping Weight: 1.75 lb (0.8 kg), including cables and power supply
Operating Temperature: 0o to 40oC (32o to 104oF)
Operating Humidity: 20% to 90%, no condensation
Voltage: 120 VAC, 60 Hz
240 VAC, 50 Hz; 220 VAC, 50 Hz
200 VAC, 50 Hz
Port Configurations
Terminal Input Port (9-pin D-sub male connector)
pin
pin
pin
pin
pin
pin
pin
pin
pin
F-4
1
2
3
4
5
6
7
8
9
RTS
TxD (from terminal)
RxD (to terminal)
CTS
Signal Gnd
RTS (duplicate)
DCD
RTS (duplicate)
DTR
TRANZ 460 Terminal
Appendix F. TRANZport 232
B Output Port (8-pin DIN connector)
pin
pin
pin
pin
pin
pin
pin
1
2
3
4
5
6
7
Signal Gnd
DCD
RTS
CTS
RxD (from external device)
TxD (to external device)
TxD Idle Level
This input sets the state of the TxD output
in the the idle state. When open, the idle
state of TxD is a mark (-V). When
grounded, the idle state of TxD is a
space (+V).
Aux TxD
This output is a TTL version of the RS-232
TxD output, pin 6.
pin 8
A Output Port (8-pin DIN connector)
1
2
3
4
5
6
7
8
TRANZport 232 Kit
Service
Signal Gnd
DCD
RTS
CTS
RxD (from external device)
TxD (to external device)
DTR
+8.5 VDC (used to power PIN pad devices)
Part No.
Description
P044-01-002
TRANZport 232
P044-01-001
TRANZport 232, USA Power Pack
01536-01
Power Pack, USA
20074-03
Power Pass-Thru Cable
00446-04
Serial Interface Cable
(2 included)
Unless otherwise instructed in this reference manual, do not, under any
circumstances, attempt any service, adjustments or repairs on this unit.
Before returning a unit to VeriFone, call the VeriFone toll free number,
800-834-9133, and ask the service/repair department for an MRA
(Merchandise Return Authorization) number. You must have an MRA
number prior to returning your requirement for repair.
TRANZ 460 Terminal
F-5
FDC Retail/Debit Purchasing Card Reference Manual
F-6
TRANZ 460 Terminal
Glossary
AC
Alternating Current—used as a primary source of power by power packs and
power supplies.
Account Number
(1) A unique series or group of digits used to numerically identify each
cardholder. (2) The unique identification number assigned to the account of a
specific party, within a given institution.
Alpha Mode
Alphanumeric
Application
A means of allowing you to use the keypad to enter alphabetic characters.
Capable of utilizing both alphabetic and numeric characters such as a
display panel or keypad or a computer keyboard.
A software program designed with special codes stored in memory for a
specific purpose or customer.
Application ID Number
The number identifying which application program is to be downloaded by
the ZONTALK software from an IBM PC compatible computer.
ASCII
An abbreviation for American Standard Code for Information Interchange.
This standard code is used for transmitting data and is composed of 128
characters in 7-bit binary format.
Asynchronous
Method of transmitting data in which the interval between characters may be
of unequal length.
Bar Code
A printed code consisting of vertical lines of varying spacing and thicknesses
used for identification purposes. These lines are read by drawing the tip of a
bar code wand across them.
Bar Code Wand
Batch File
Batch Header
A pencil or wand shaped optical scanner for reading bar codes.
A file containing a series of transaction details to be processed as a single
unit.
A unique heading or title that identifies a batch.
TRANZ 460 Terminal
Glossary - 1
FDC Retail/Debit Purchasing Card Reference Manual
Baud
Buffer
Byte
Calendar/Clock Chip
Cardreader
Card Security or Fraud
Control
Carrier
A temporary storage area.
A group of consecutive bits that make up a character or a logical unit of
information. A byte usually consists of eight bits.
A terminal electronic component that keeps track of the date and time.
The slot on the terminal that automatically reads the magnetic stripe or bar
code on the back of a specially encoded card.
Measures taken to prevent unauthorized use of encoded identification cards.
A frequency signal or tone sent over the telephone or communication line
and modulated by the modem to transmit/receive data.
CCITT
Committee Consultative International Telegraph and Telephone. International
committee that sets standards for international data communications.
Character
A standard bit representation of a letter, number, punctuation, figure or other
symbol used in a message or in a control function.
Code
Program text representing letters, digits and other data symbols with binary
numbers, such as ASCII.
Control String
A series of terminal control language commands linked together to control
the execution of a terminal operation.
Copy
To produce a replica of information, usually done to guard against loss or
corruption of important records.
CPU
Custom Application
Custom Prompt
Glossary - 2
The signaling speed equal to the number of signal events per second.
Central Processing Unit. The brain of the computer or terminal that controls
either directly or indirectly every function and device associated with the
computer/terminal.
An application created to meet the specialized needs of an individual
company or institution.
A prompt, programmed by a user and stored in one of the terminal’s general
record memory locations.
TRANZ 460 Terminal
Glossary
Data
Data Entry
Data Packets
Default
Delete
Information prepared in a particular format for use by the terminal or host
computer for a specific transaction or operation.
The process of using a keyboard or other device to input data directly into a
system.
A packet of information transmitted from one device to another.
A value automatically assigned by the program when another value has not
been specified.
To remove a record or item of data.
Diagnostics
The procedure for detecting and isolating a problem with the terminal or
peripheral.
Dial-Up Line
A regular public telephone line. The switching equipment on a dial-up line
requires that a party dial the other party before a connection can be made.
Display
The small screen on your terminal that displays prompts and messages to
guide you through different operations and to alert you when errors or
problems occur.
Download
EPROM
File
Firmware
Fraud Control
Handshaking
The process of transferring data from one device to another.
Erasable Programmable Read-Only Memory. A type of memory chip
permanently stored in the terminal. Contains the standard application,
operating system and fixed prompts.
A collection of logically related records.
The basic instructions built into the terminal, stored in ROM and executed
automatically.
Measures taken to prevent unauthorized use of a credit or debit card.
The process of exchanging codes, or contol characters, between two
devices. The codes are predetermined and establish a connection between
both terminals.
TRANZ 460 Terminal
Glossary - 3
FDC Retail/Debit Purchasing Card Reference Manual
Header
Hookswitch
Host Computer
Input
Idle Prompt
Keypad
Leased-Line
Line Cord
Login
Login String
Luhn Check-Digit
Information and codes added to the beginning of user data, such as a
transmission block or packet, which contains the destination, address, source
address and message number.
The switch on a telephone instrument that operates when the handset is
removed from its cradle.
A central computer used to process transactions; also called a host.
To enter data into a processing system or peripheral device, or the data that
is entered.
The information shown on the display panel when the device is not
performing any operations or transactions. Normally the date and time.
The key panel used for entering data and performing operations.
A private telephone line connected directly to another party.
A telephone type cord with modular plugs for connecting a device to another
device or outlet.
Password information for a particular organization that allows access to a
system such as a public switched network (e.g., Telenet, Tymnet). The login
also opens an accounting file for the session.
A code consisting of a network code, user name and password used to login
to a network.
A fraud control measure used in transactions.
Manual Transaction
Transaction using account information entered from the keypad rather than
automatic reading devices such as the cardreader.
Memory
The storage of codes and data in the circuitry of a terminal or computer or
other media such as magnetic disk or tape.
Memory Dialing
A method of automatically dialing telephone numbers stored in a device’s
memory rather than dialing by hand.
Memory Location
An exact storage location in the terminal’s memory, identified by a 3-digit
location number.
Glossary - 4
TRANZ 460 Terminal
Glossary
Messages
Words and symbols appearing on the display panel which tell you the kind of
information required, the result of a process or if an error has occurred.
Modem
Short for modulator/demodulator; a device that converts digital data to analog
signals (for transmission over telephone wires) and analog signals back to
digital data.
Network
An interconnected group of systems, terminals or data facilities that route
numerous transactions and data to the proper terminals and host computers.
Nonvolatile Memory
Packet
Parameters
Password
PC
Peripheral
PIN
PINpad Device
Port
POS Terminal
Memory that retains its contents when power is turned off or lost.
A group of bits transmitted as a complete package on a packet-switched
network. Often called a message.
Information stored in memory that sets up the device for use with
transactions and other operations.
A confidential code used to gain access to terminal memory or a host
computer.
IBM PC or compatible personal computer used to download applications and
data to the terminal. A PC can also be used as a local or remote host
computer.
An attached device (e.g. a printer or PIN Pad), not the central processing
device or computer; typically used for I/O.
Personal Identification Number. A 4- to 16-digit confidential code or electronic
signature used by card holders to identify themselves as the proper users of
a credit or debit card to the host computer.
A Personal Identification Number input device used for entering a private
identification code to validate a transaction.
An interface device capable of attaching to a peripheral, computer, network
or other electronic device.
A terminal used at the Point-Of-Sale (POS) that can process transactions
and communicate transaction information with a larger remote computer
directly or through a network.
TRANZ 460 Terminal
Glossary - 5
FDC Retail/Debit Purchasing Card Reference Manual
Post Dialing
A feature that dials the host computer after all of the account and transaction
information is entered into the terminal.
Power Pack
A device that converts a voltage to a different level so it can be used by a
particular device.
Printer
A device used for imprinting records of a transaction on paper.
Prompt
A message appearing on the display panel telling you what action is required
or what type of information to specify.
Pulse Dialing
Queue
A group of jobs or messages waiting for service. All insertions are made at
one end of the queue and all removals and accesses at the other.
RAM
Random Access Memory used to store custom applications and temporary
data entered during a transaction.
RECALL
Procedure used to display data in a memory location. RECALL can also be
used to add or change data.
Record
A collection of data handled together in transfers.
Refund
Refund transaction credits a customer’s account with a refunded amount; the
terms "refund" and "return" are used interchangeably.
Remote Host Computer
Remote Host Network
Request Data Packet
A host computer requiring connection to the transaction system via a dial-up
or leased telephone line.
A network that connects the terminal to a remote host computer.
A request for information from a terminal to the host computer.
Return
A refund transaction which credits a customer’s account with the refunded
amount.
Ringer
A bell or alarm on a telephone that announces incoming calls.
ROM
Glossary - 6
A method of telephone dialing that specifies a phone number by the number
of electrical pulses sent.
Read Only Memory permanently stored in the device. Contains the standard
application program and operating system.
TRANZ 460 Terminal
Glossary
Scroll
To move text across a display screen.
Select
To initiate an action or enable a data path.
Serial Port
Start Up
STORE
String Constant
Swipe
System Password
An RS-232 connector for communicating with download computers, other
terminals, and printers.
The sequence that occurs when the terminal is turned on (powered up).
This sequence includes turning on power and automatic downloading of
configuration data for an application.
Procedure used to store data in a memory location.
A sequence of alphanumeric characters enclosed in single quotation marks;
for example, ‘SLIDE CARD’ or ‘1997.’
The action of sliding a card through a terminal cardreader.
The password (1[ALPHA][ALPHA]66831)supplied with each TRANZ 460
terminal.
Telephone Jack
Modular type sockets for connecting telephone line cords.
Telephone Line
The standard telephone wiring connecting you to your local or private
telephone company.
Terminal
A device used to initiate transactions. The transactions are processed by the
terminal itself or by a host computer. These devices have a display panel,
keypad, and cardreader, and are used to enter transaction information.
Terminal ID
An identification number used by the download computer to determine what
data and application programs to send to an individual terminal or controller.
Terminal Parameters
Timeout
Tone Dialing
Parameter data related to a specific terminal.
A specified period of time in which the terminal stops processing or
undertakes a predetermined alternate action.
Also called touch-tone dialing. A method of telephone dialing that uses
different pitched tones to specify a phone number.
TRANZ 460 Terminal
Glossary - 7
FDC Retail/Debit Purchasing Card Reference Manual
Track 1 Data
Information stored on Track 1 of the magnetic stripe that can be read by the
cardreader.
Track 2 Data
Information stored on Track 2 of the magnetic stripe that can be read by the
cardreader.
Trunk Cable
A cable to which all the components are connected.
User
ZONTALK 2000
Glossary - 8
The person who is using the terminal.
A communications program for IBM PC compatible computers used to
download applications from the computer to a terminal.
TRANZ 460 Terminal
Index
A
Accessories ............................... 3-11
Account range
setup ..................................... 5-2
range tables .......................... 5-3
Alphabetic characters.................. 4-3
Auth Only transaction.................. 6-7
DIP switches
TRANZport 232 .................... F-3
Display ........................................ B-1
Display panel .............................. 3-7
troubleshooting ............. B-7, C-5
DTR/RTS Switch settings ........... 3-4
F
Batch
"FULL" indicator .................... 6-1
clear ...................................... 5-9
close.................................... 6-12
Beep .......................................... 3-10
Field
change.................................. 4-1
emptying ............................... 4-3
review ................................... 4-1
Fraud control............................... 4-4
Functions summary..................... 2-3
C
G
B
Cables, PINPad device
front routing.......................... C-3
Cables, TRANZport 232.............. 3-3
Calendar/clock............................. 4-2
cardreader
features ................................. 3-7
troubleshooting..................... C-6
Close Batch ............................... 6-12
Connection, PINpad 201 to
TRANZ 380 .......................... C-2
Controller, PINpad 101 device
connection............................ B-3
Grommet ..................................... B-3
D
Keypad.................................3-7, B-2
clearing entry........................ B-5
entry advantages..................C-4
manual entry......................... B-5
troubleshooting ............. B-7, C-6
Data connections......................... 3-3
Deposit Inquiry .......................... 6-11
H
Host Setup .................................. 5-1
I
Idle prompt...........................5-8, B-5
Integral printer
loading paper........................ 3-6
loading/unloading ribbon ...... 3-2
Item Review ................................ 7-1
K
Index - 1
Index
M
Manual diagnostics
menu .................................... C-6
Memory locations ........................ 5-9
Mounting
countertop ............................ B-5
wall ....................................... B-4
MRA (Merchant Return
Authorization) desk ...... B-6, C-5
O
On/Feed key................................ 3-6
Options setup .............................. 5-5
P
Password protection.................... 4-5
Password update......................... 5-5
PIN (Personal Identification
Number) entry ...................... B-5
PINpad 101 device
cleaning................................ B-6
components.......................... B-1
display characteristics.......... B-1
keypad...........................B-2, B-5
mounting ...................... B-4, C-3
selecting location ................. B-2
service/return ....................... B-6
startup .................................. B-5
troubleshooting..................... B-6
unpacking..................... B-3, C-2
PIN Pad 201 device
cable routing channels......... C-3
cardreader operation............ C-4
Index - 2
cleaning ................................C-5
components ..........................C-1
countertop mounting.............C-3
idle prompt............................C-3
keypad entry.........................C-4
selecting location..................C-1
service/return........................C-5
terminal connection ..............C-2
troubleshooting .....................C-5
wall mounting .......................C-3
PLEASE TRY AGAIN .................C-4
Print
batch details ......................... 7-5
last receipt ............................ 7-5
operator totals ...................... 7-5
options .................................. 7-5
terminal totals ....................... 7-5
Printer.......................................... 1-2
integral roll............................ A-1
paper detect ......................... A-1
specifications ........................ A-1
Processing display.............. B-6, C-4
PROGRAMING ERROR,
eliminating ............................ 4-5
Programming, general ................ 4-1
Public port................................... 5-1
R
Return/credit................................ 6-4
Review
item....................................... 7-1
programming ........................ 5-9
totals .............................7-3 - 7-4
Index
S
U
Sale .............................. 6-1, 6-3, 6-6
Sale Type description.................. 5-7
Security setup.............................. 5-4
Setup codes ................................ 5-1
Software version.......................... 3-4
Specifications ...................... 3-8, F-4
Startup ................................ B-5, C-3
Unpacking terminal ..................... 3-1
Unpacking unit .................... B-3, C-2
Update Password ....................... 5-5
V
Void transaction .......................... 6-9
Z
T
Terminal
cleaning................................. 3-8
copying.................................. 4-4
functions................................ 7-1
programming ......................... 5-1
servicing ................................ 3-8
Testing connection ......................F-4
Ticket Only ................................ 6-10
Transaction storage..................... 6-1
Transaction summary.................. 2-3
TRANZport 232 ........................... 3-3
data connections...................F-3
kit part numbers ....................F-5
port configurations ................F-4
unpacking..............................F-1
TRANZport 232 installation .........F-2
Troubleshooting........................... 3-9
display panel ......................... 3-9
keypad................................. 3-10
printer .................................... 3-9
telephone connection............ 3-9
terminal transactions........... 3-10
ZONTALK Download
Parameters ........................... E-1
Index - 3
Index - 4