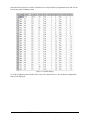
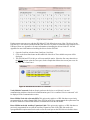
1
DP-1000S
USER MANUAL
For programming these devices:
GPS-201/GPS-202
GPS-205
GPS-206
GPS-208
PT-101
CES WIRELESS TECHNOLOGIES, CORP.
925-122 South Semoran Boulevard
Winter Park, Florida 32792
DP1000S v4p1.doc
Revision 4.1
November 1, 2011
© Copyright CES WIRELESS TECHNOLOGIES CORP. (2011)
The information contained in this document is subject to change without notice and should not be construed as a commitment by CES
WIRELESS TECHNOLOGIES CORP. unless such commitment is expressly given in a covering document.
TABLE OF CONTENTS
TABLE OF CONTENTS.............................................................................................................................2
FIGURES....................................................................................................................................................3
TABLES......................................................................................................................................................4
WARRANTY..............................................................................................................................................5
COPYRIGHT .............................................................................................................................................5
1.0 Introduction...........................................................................................................................................6
2.0 DP-1000S Programming Software.........................................................................................................6
2.1 DP-1000S Main Window..................................................................................................................7
2.2 System Setup.....................................................................................................................................8
2.3 GPS Reporting Options...................................................................................................................10
2.4GPS201 and GPS-202 Options.........................................................................................................13
2.5GPS-205 Options..............................................................................................................................13
2.5.1 GPS-205 I/O Options...............................................................................................................13
2.5.2 GPS-205 GeoStatus Configuration...........................................................................................15
2.5.3 GPS-205 SMS Options.............................................................................................................17
2.6 GPS-206 Options.............................................................................................................................18
2.6.1 GPS-206 I/O Options...............................................................................................................18
2.6.1.1 Input 1 ............................................................................................................................19
2.6.1.2 Input 2.............................................................................................................................22
2.6.1.3 Advanced I/O Options....................................................................................................22
2.6.1.4 Other GPS-206 I/O and Events.......................................................................................22
2.6.2 GPS-206 GeoStatus Options....................................................................................................23
2.6.3 GPS-206 SMS Options.............................................................................................................24
2.6.4 Garmin FMI Options................................................................................................................24
2.7 GPS-208 Options.............................................................................................................................25
2.7.1 Inputs.......................................................................................................................................25
2.7.2 Outputs.....................................................................................................................................26
2.8 PT-101 Options...............................................................................................................................26
2.8.1 PT-101 Events..........................................................................................................................26
2.8.2 PT-101 GeoStatus Options.......................................................................................................28
2.8.3 PT-101 SMS Options...............................................................................................................28
2.8.4 PT-101 User Defined Button....................................................................................................29
2.9 Send Configuration Button..............................................................................................................30
2.10 DP-1000S Main Menu...................................................................................................................30
2.11 File Menu......................................................................................................................................30
2.12 Configure Menu............................................................................................................................31
2.13 Program Menu...............................................................................................................................33
2.14 Help...............................................................................................................................................35
2.15 Troubleshooting.............................................................................................................................35
GPRS Connection Commands..........................................................................................................36
Firmware Commands........................................................................................................................39
3.0 Support................................................................................................................................................40
Appendix A: Installing the Device Drivers for the PT101.........................................................................41
Appendix B: Installing the Device Drivers for the GPS-208.....................................................................44
Revision History........................................................................................................................................50
© CES Wireless Technologies Corp – 2011 Page 2 of 50
FIGURES
Figure 1: Device Selection...........................................................................................................................7
Figure 2: DP-1000S Main Window.............................................................................................................7
Figure 3: System Information......................................................................................................................8
Figure 4: GPS Reporting Options. The Garmin FMI section ONLY applies to the GPS-206 when it is set
to use the TCP protocol (see previous section). If using the UDP protocol or a device other than the GPS206 the Garmin FMI options will not be available.....................................................................................10
Figure 5: Maximum Speed Reporting Options..........................................................................................11
Figure 6: Other GPS Options.....................................................................................................................12
Figure 7: Garmin FMI Options..................................................................................................................12
Figure 8: GPS201 and GPS202 Input Configuration.................................................................................13
Figure 9: GPS-205 I/O...............................................................................................................................14
Figure 10: Input 1 Reporting Options........................................................................................................14
Figure 11: Ignition Input Options..............................................................................................................14
Figure 12: GPS Status Reporting Options..................................................................................................15
Figure 13: Idle Vehicle Reporting Options................................................................................................15
Figure 14: GeoStatus Debounce Options...................................................................................................15
Figure 15: GeoStatus Display....................................................................................................................16
Figure 16: GeoStatus Configuration Details..............................................................................................17
Figure 17: SMS Options............................................................................................................................18
Figure 18: GPS-206 I/O Options (both Inputs 1 and 2 are enabled)...........................................................19
Figure 19: Input 1 Options.........................................................................................................................19
Figure 20: Advanced Input Configuration for Input 1...............................................................................20
Figure 21: Advanced Input Configuration - Enabled.................................................................................21
Figure 22: Call Configuration for Input 1..................................................................................................21
Figure 23: Advanced I/O Options..............................................................................................................22
Figure 24: GPS Status Reporting Options..................................................................................................22
Figure 25: Idle Vehicle Reporting Options................................................................................................23
Figure 26: Ignition Input Options..............................................................................................................23
Figure 27: Garmin FMI Options................................................................................................................24
Figure 28: Inputs for the GPS-208.............................................................................................................25
Figure 29: PT-101 GPS Status Reporting Options.....................................................................................27
Figure 30: PT-101 Idle Vehicle Reporting Options...................................................................................27
Figure 31: PT-101 Stay Awake While Moving Options............................................................................27
Figure 32: PT-101 Phone Number Options................................................................................................27
Figure 33: PT-101 Set GeoStatus with Button Press Options....................................................................28
Figure 34: PT-101 Call Configuration Options..........................................................................................28
Figure 35: PT-101 SMS Options...............................................................................................................29
Figure 36: PT-101 User Defined Button Options.......................................................................................30
Figure 37: Main Menu...............................................................................................................................30
Figure 38: File Menu.................................................................................................................................31
Figure 39: Configure Menu.......................................................................................................................31
Figure 40: Select Com Port........................................................................................................................32
Figure 41: Results from Scan Ports for a GPS-208....................................................................................32
Figure 42: Program Menu..........................................................................................................................33
Figure 43: Sequential programming prompt..............................................................................................34
Figure 44: Sequential programming – Send Config button dialog.............................................................34
Figure 45: Programming complete – sequential programming..................................................................34
Figure 46: Begin programming from a file prompt....................................................................................35
Figure 47: Unit ID file has been read.........................................................................................................35
Figure 48: Test Commands tab..................................................................................................................36
Figure 49: Verify GSM Status response....................................................................................................38
© CES Wireless Technologies Corp – 2011 Page 3 of 50
Figure 50: Verify GPRS Status response...................................................................................................38
Figure 51: Verify GPRS Activation response displaying successful GPRS activation..............................38
Figure 52: Response to Read Firmware Version........................................................................................39
Figure 53: Response to Read Package Version..........................................................................................39
Figure 54: Found New Hardware Wizard Screen 1...................................................................................41
Figure 55: Found New Hardware Wizard Screen 2...................................................................................41
Figure 56: Found New Hardware Wizard Screen 3...................................................................................42
Figure 57: Found New Hardware Wizard Screen 4...................................................................................42
Figure 58: Windows logo verification.......................................................................................................43
Figure 59: Found New Hardware Wizard Screen 5...................................................................................43
Figure 60: Found New Hardware Wizard Screen 1...................................................................................44
Figure 61: Found New Hardware Wizard Screen 2...................................................................................44
Figure 62: Found New Hardware Wizard Screen 3...................................................................................45
Figure 63: Windows logo verification.......................................................................................................45
Figure 64: Found New Hardware Wizard Screen 5...................................................................................49
TABLES
Table 1: Sample Network APN, User Name, Password and Gateway Number Information.......................8
Table 2: Time-Distance Reporting Configuration......................................................................................11
Table 3: GPS-206 Call Functionality Truth Table.....................................................................................21
© CES Wireless Technologies Corp – 2011 Page 4 of 50
WARRANTY
Complete Warranty details can be found at the CES Wireless web site: www.ceswireless.com
CES Wireless Technologies Corp., (CES Wireless), warrants this product to be free from defects in material
and workmanship for 12 months from date of shipment. If such malfunction occurs, it will be repaired or
replaced (at our option) without charge for materials or labor if returned to the factory. This warranty does
not apply to parts damaged due to improper use- including accident, neglect, unreasonable use, and
improper installation - or to unauthorized alterations or modifications of the equipment. It does not extend
to damage incurred by natural causes such as lightning, fire, floods, or other such catastrophes, or to
damage caused by environmental extremes, such as power surges and or transients. It does not extend to
microprocessors if is determined that the failure of a micro is due to static damage, application of improper
voltages to the unit, or other problems not related to circuit design. In such case or in the case of a desire to
update the micro to a different version of software, such request must be specified in writing, and there will
be a charge agreed upon by both parties.
Software products provided by CES Wireless are only compatible with currently supported Microsoft®
operating systems.
This product is warranted to meet published specifications and to operation as specified only properly
programmed and installed. CES Wireless is not responsible for any operational problems caused by system
design, cellular coverage, outside interference, or improper installation. A qualified two-way radio
technician or engineer must complete installation and programming of this CES Wireless product.
Equipment for repair must be returned to the factory, freight prepaid, only with prior authorization. Please
call 407-679-9440 for an RMA number. A brief letter describing the nature of the defect should be included
with the merchandise. Repair by other than CES Wireless will void this warranty. In-warranty merchandise
must be shipped, freight prepaid, to CES. CES Wireless will return the repaired or replaced equipment
prepaid to purchaser, within the United States. Outside the US the customer must pay freight.
This warranty applies to the original purchaser of the equipment only. CES Wireless is not liable under this
warranty, or any implied warranty, for loss of use or for other consequential loss or damage experienced by
the purchaser. Some states do not permit the exclusion or limitation of implied warranties or consequential
damages. This warranty provides special legal rights, and the purchaser may have other rights that vary
from state to state. Complete current Warranty details can be found at the CES Wireless web site:
www.ceswireless.com
COPYRIGHT
The information in this manual and any software in this product remain the property of CES Wireless
Technologies Corp. Duplication or disclosure is not permitted without the prior written consent of CES
Wireless. CES Wireless reserves the right to change products, specifications, and installation data at any
time, without notice. All information contained in this document is carefully prepared and offered in good
faith as a guide in the installation, operation, use and servicing of our products. Installers must insure that
the final installation operates satisfactory, within relevant regulatory requirements. We accept no
responsibility for incorrect installations.
Windows XP and 2000 are registered trademarks of Microsoft. IBM is a trademark of International
Business Machines. Enfora is a registered trademark of Enfora, Inc. All other trademarks are the property
their respective owners.
A CES Wireless publication. © Copyright CES Wireless 1997-2011
© CES Wireless Technologies Corp – 2011 Page 5 of 50
1.0
Introduction
This manual contains instructions on how to configure the GPS-201, GPS-202 GPS-205, GPS-206, GPS208 and the PT-101 using DP-1000S version 7.5.
NOTE: DP-1000S Version 7.4.0.1 and up require the use of FleetControl Version 4.5 and
up. If you are using DP-1000S Version 7.4.0.1 and do not have FleetControl Version 4.5 or
greater contact CES Wireless Technologies before programming any devices.
2.0
DP-1000S Programming Software
The GPS-201, GPS-202, GPS-205, GPS-206, GPS-208 and PT-101 are programmed with the DP-1000S
programming software (DP-1000S).
GPS-205 Only: To program the GPS-205 you must use the power/serial interface cable (PRG-02). PRG02 is configured with a DB-9 serial connector, a heavy duty GPS-205 interface connector and leads for
power and ground. The power and ground leads should be connected to a power supply that supplies
power per the specifications in section 2.7. The DB-9 connector should be connected to an available serial
port on the computer. The GPS-205 interface connector connects to the GPS-205.
GPS-201, GPS-202, GPS-206: To program the GPS-201, GPS-202 or GPS-206 you must use the
power/serial interface cable (PRG-03). PRG-03 is configured with a DB-9 serial connector, a GPS201/GPS-202/GPS-206 interface connector and leads for power and ground. The power and ground leads
should be connected to a power supply that supplies power per the specifications in section 2.7. The DB-9
connector should be connected to an available serial port on the computer. The GPS-201/GPS-202/GPS206 interface connector connects to the GPS-201/GPS-202/GPS-206.
GPS-208 Only: To program the GPS-208 you must use the power/USB cable (PRG-05). The standard
size USB connector should be connected to an available USB port on the computer. You must also install
the device driver for the GPS-208. The device driver enables a virtual com port that will be used to
program the device. NOTE: If the device driver is not installed or if the GPS-208 is not connected to the
computer when you run the DP-1000S application an error will occur. Power should be applied to the
device using a standard 12V power supply.
PT-101 Only: To program the PT-101 you must use the power/USB interface cable (CABLE63). The
standard size USB connector should be connected to an available USB port on the computer. The mini
USB connector connects to the PT-101. You must also install the device driver for the PT-101. The
device driver enables a virtual com port that will be used to program the device. NOTE: If the device
driver is not installed or if the PT-101 is not connected to the computer when you run the DP-1000S
application an error will occur.
Note: To program the PT-101 the driver for it must be installed first. This driver creates a
virtual com port which is used to communicate with the PT-101. The driver can be obtained
from CES. Please contact Support for additional information.
All Devices: Once the DP-1000S software is installed and running, the select device form is displayed.
Select the desired device and click OK. The main DP-1000S window is now displayed. Please note that
you can switch devices while the application is running.
© CES Wireless Technologies Corp – 2011 Page 6 of 50
Figure 1: Device Selection
If the configuration values entered were saved when the application was closed (optional) those values
will be read and the application will display that saved configuration. The System and GPS values saved
are common between the GPS-201, GPS-202, GPS-205, GPS-206, GPS-208 and the PT-101.The other
values are different for each product and are saved individually.
2.1
DP-1000S Main Window
Figure 2: DP-1000S Main Window
The initial view of the main window is comprised of: Device Selection section, Send Configuration
button and System Information section.
© CES Wireless Technologies Corp – 2011 Page 7 of 50
2.2
System Setup
The System Information section contains the fields necessary to program the GPS-201, GPS-202, GPS205, GPS-206, GPS-208 or the PT-101 to connect to and send data on the GPRS network. It also includes
the Unit ID field, which must be unique for each unit in the fleet (regardless of the device type), the Wake
Up Packet Interval field, the Automatic Reset Interval field and the GSM Registration Reset options.
NOTE: If the device is to be used on FleetLinc or with the CES DataGate CES must
assign the Unit ID. Requests can be made by sending an e-mail to [email protected].
Figure 3: System Information
APN: The APN for the GPRS network is entered in the field labeled “Enter the APN for the Network”.
Sample values for the APN are as follows. The APN to use should be provided by the GPRS provider.
Network
AT&T Wireless
Cingular Wireless
CES DataGate (USA)
CES DataGate (Canada)
Wyless
APN
PROXY
ISP.CINGULAR
c1.korem2m.com
apn.zerogravitywireless.com
teleargo.t-mobile.com
User Name, Password
Gateway Number
+121
User: CES9a97
Password: 3B9B4261
Table 1: Sample Network APN, User Name, Password and Gateway Number Information
To make the setting of the APN, User Name and Password easier you can click on the button
and
select the carrier from the list of carriers (as shown above in Table 1). This list contains the carriers whose
configuration values are known to CES.
User Name: The user name for the GPRS network is entered in this field. Not all carriers require a user
name and password (i.e. AT&T Wireless). If one is required the user name should be entered here.
Sample user name and passwords are noted in Table 4 above.
Password: The password for the GPRS network is entered in this field. Not all carriers require a user
name and password (i.e. AT&T Wireless). If one is required the user name should be entered here.
Sample user name and passwords are noted in Table 4 above.
© CES Wireless Technologies Corp – 2011 Page 8 of 50
Unit ID: A unique Unit ID is entered in this field. This value must be unique for each unit on the system.
If the device is to be used on FleetLinc or the DataGate you must contact CES Wireless
Technologies to obtain a unique Unit ID.
Server IP Address: In order for the device to send data to the proper location it must be programmed
with the IP Address of the Server where the Fleet-Control application is running. For example, to have the
device send data to the FleetLinc servers the IP Address to enter is “216.139.231.204”. Another method
of entering the IP Address for FleetLinc is by clicking on the left
FleetLinc server will be filled in automatically. Clicking on the right
of the DataGate server.
button. The IP Address of the
button will insert the IP Address
If using a different IP Address please note that it should be a static IP Address. If it is dynamic then the
devices will no longer be able to communicate with it if it changes, which it will.
Port Number: The port number used by the device to communicate to the server is entered here. It is
recommended to leave the value unchanged (2400). If using the device with FleetLinc or the DataGate the
port must be set to 2400. If changed for other uses the port must also be changed in FleetControl.
Note: If the device will be reporting to your server you must configure the firewall or
router to route data received on the programmed port to the IP Address of the server. If
there is a firewall on the server it must be configured to allow FleetControl to have full access. The Port
set here should also be configured so that data can be sent and received. Please contact your local
Information Technology expert for assistance in configuring the firewall and/or router. CES support
personnel can only assist with the device and software configurations.
Protocol: Select the protocol the device should use (UDP or TCP). If the device is to be used with
FleetLinc the protocol should be UDP.
UDP is a connectionless protocol for sending and receiving packets across a network. UDP does not
provide a guarantee that the receiver will receive packets in the right order; in fact, there is no guarantee
that the packets will arrive at all.
TCP is a connection-based protocol which guarantees that the receiver will receive exactly what the
sender sent - there will be no errors and it will be in the correct order.
UDP is much faster than TCP because there is no extra overhead for error-checking above the packet
level. This extra overhead also uses more data.
If a Garmin device is being interfaced to a GPS206 then the TCP protocol must be selected.
Wake Up Packet Interval: Program the report period for the Wake Up packet to be sent. The wake up
packet is useful on systems where other packets are sent infrequently (i.e. every hour as opposed to every
5 minutes). In most configurations the Wake Up Packet Interval can be set to 0 (off). Note – the
Wake Up Packet does use data and it will effect the data usage.
Automatic Reset Interval: Program the interval at which the device should do an automatic reset. It is
recommended that the unit be configured to perform an automatic reset every 4 hours. The minimum
value is 4. To turn this off (not recommended) a value of 0 can be entered.
© CES Wireless Technologies Corp – 2011 Page 9 of 50
GSM Registration Reset Options: This option provides the capability of having the device perform a
soft reset when it cannot connect to the GSM network within the specified period of time. This is useful if
the device will travel to areas where the GSM coverage is poor.
2.3
GPS Reporting Options
The GPS Reporting Options contains selections for how/when the device is to report its position. There
are 3 sections in the GPS Reporting Options. They are Time-Distance Reporting Configuration, Max
Speed Exceeded Reporting and Other GPS Options.
Note: These values should be selected with care as they will greatly effect the amount of
data used by the device. Be sure to configure the device to operate within your data plan.
Figure 4: GPS Reporting Options. The Garmin FMI section ONLY applies to the GPS-206 when it is set to use the
TCP protocol (see previous section). If using the UDP protocol or a device other than the GPS-206 the Garmin FMI
options will not be available.
Time-Distance Reporting Configuration: The values set here instruct the device to send its position at a
specified interval of time or if the unit has traveled a specified distance. There are 3 values: Min Time,
Max Time and Distance. These values work together to determine when a position packet is sent. As the
values are changed a description of the configuration will be displayed below the values.
Common values are provided in the dropdown lists. These can be overridden by entering the desired
value manually.
Note: Distance is programmed in meters. Values in feet may be entered and they will be converted to
meters when the device is programmed.
© CES Wireless Technologies Corp – 2011 Page 10 of 50
Minimum
Time
(seconds)
Maximum
Time
(seconds)
Distance
(meters)
Description
0
0
0
0
0
0
300
300
0
1000
0
1000
300
300
*
0
0
1000
300
3600
1000
Time/Distance Reporting is disabled.
Position is sent every 1000 meters.
Position is sent every 300 seconds (5 minutes).
Position is sent every 300 seconds if the vehicle has not moved
1000 meters. Position will be sent every 1000 meters if the
vehicle is moving and traveling the distance of 1000 meters in
less than 300 seconds. In short, message is sent upon
expiration of time or moving of distance – whichever occurs
first.
Position is sent every 300 seconds (* = don’t care).
Position is sent when the vehicle has moved 1000 meters and
300 seconds have elapsed.
Position is sent every 3600 seconds (1 hour) if the vehicle is
idle and not moving or moving slowly. If the vehicle is
moving, then GPS message will be sent when 300 seconds
have expired and 1000 meters have been moved.
Table 2: Time-Distance Reporting Configuration
Maximum Speed Exceeded: To program the device to send its position when a specific speed is
exceeded select the Maximum Speed Exceeded feature. Set the Max Speed to 0 to disable this feature.
Figure 5: Maximum Speed Reporting Options
Enter the speed that, if exceeded, a position packet is to be generated. Select the unit of measure for the
speed value where mph is miles per hour (the default) or kph is kilometers per hour. Note – the device is
programmed in knots so some rounding of the value entered will occur.
Advanced Options for Maximum Speed Exceeded provide the capability to report the over-speed
condition only if the vehicle is continuously over the specified speed value for the specified period of
time. This is useful in removing temporary over-speed events that may occur when passing another
vehicle, for example.
To enable this feature check Enable Advanced Options and enter the time value in seconds. The minimum
value is 5 seconds and the maximum is 60 seconds.
© CES Wireless Technologies Corp – 2011 Page 11 of 50
Figure 6: Other GPS Options
Enable GPRS Queue: Enabling the GPRS Queue instructs the device to store its packets if GPRS is
unavailable. This is important to select if you want the device to store position packets when it is out of its
cellular coverage area. These packets will then be downloaded when the device returns to an area where it
has cellular coverage.
Include GPS Mileage: By checking this the device will send its GPS mileage value with all packets.
Reset GPS Mileage: By checking this the mileage value stored in the device will be reset to 0. It is
recommended that any new device have the mileage reset if the mileage value is to be included in the
packets.
Send last known valid position if current position is invalid: If this is checked the device will send its
last valid position if its current GPS solution is inadequate to obtain a fix. This typically will occur if the
vehicle/device is in a parking garage, for example. Checking this option should also eliminate errant
position reporting due to an inadequate GPS solution (odd position and speed values are the most
common indications of an inadequate GPS solution). Note that if checked the device will send its last
valid position including the date and time of that position.
Figure 7: Garmin FMI Options
Garmin FMI: A Garmin personal navigation device (PND) can be interfaced to the GPS-206 (contact
CES for compatible Garmin PNDs and pricing on enabling the interface). This section, only visible for
the GPS-206 when the TCP protocol is selected, is used to enable the interface in the GPS-206.
Note: this option is not compatible with the option to Send GPS to Serial Port and the
Auxiliary Expansion Cable.
Send GPS to Serial Port: This option provides the capability for the GPS-206 to send its position
information out of its serial port in addition to sending it over the air. The parameters for the serial port
interface are: 115200 baud, no parity, 8 bits, 1 stop bit, no flow control.
Note: this option is not compatible with the Garmin FMI option and the Auxiliary
Expansion Cable.
© CES Wireless Technologies Corp – 2011 Page 12 of 50
2.4
GPS201 and GPS-202 Options
The GPS-201 and GPS-202 support one input and an ignition input. The configuration of these are
discussed in this section.
Figure 8: GPS201 and GPS202 Input Configuration
Input 1: If a position packet is to be generated when the state of Input 1 changes, check Enable in the
Input 1 section.
Note that there are two options for Input 1 reporting and that both are selected by default. If an input 1
state change with position packet is to be sent when input 1 goes from a high state to a low state then
select “Send on High to Low”. If an input 1 state change with position packet is to be sent when input 1
goes from a low state to a high state then select “Send on Low to High”.
Ignition Input Options: The GPS-205 can be instructed to send the ignition state when it changes. This
event is sent as Input 6. An Input 6 high to low state change packet, with position, is sent when the GPS205 detects the ignition is turned off. When the ignition is turned on an Input 6 low to high state change
packet, with position, is sent. Note that this packet is sent after the GPS-205 has a valid GPS fix. Also, the
GPS-205 performs a reset when the ignition goes active.
This option requires correct configuration of the Ignition and Power connections. Refer to
the GPS-205 manual for more information.
When the GPS-205 detects ignition on any events that are sent to occur on power up will
fire (i.e. Sending Input 3 on Power Up is enabled). This is because the ignition on event
causes the GPS-205 to perform a reset.
2.5
GPS-205 Options
The I/O, GeoStatus and SMS options for the GPS-205 are discussed in this section.
Note: These values should be selected with care as they will greatly effect the amount of
data used by the device. Be sure to configure the device to operate within your data plan.
2.5.1 GPS-205 I/O Options
The input and output options contains the configuration of the inputs of the GPS-205. The output on the
GPS-205 is always enabled.
NOTE: By default the output is in the high state.
© CES Wireless Technologies Corp – 2011 Page 13 of 50
Figure 9: GPS-205 I/O
Input 1: If a position packet is to be generated when the state of Input 1 changes, check Enable in the
Input 1 section.
Figure 10: Input 1 Reporting Options
Note that there are two options for Input 1 reporting and that both are selected by default. If an input 1
state change with position packet is to be sent when input 1 goes from a high state to a low state then
select “Send on High to Low”. If an input 1 state change with position packet is to be sent when input 1
goes from a low state to a high state then select “Send on Low to High”.
Input 2: If a position packet is to be generated when the state of Input 2, check Enable in the Input 2
section. The options are the same as those for Input 1.
Ignition Input Options: The GPS-205 can be instructed to send the ignition state when it changes. This
event is sent as Input 6. An Input 6 high to low state change packet, with position, is sent when the GPS205 detects the ignition is turned off. When the ignition is turned on an Input 6 low to high state change
packet, with position, is sent. Note that this packet is sent after the GPS-205 has a valid GPS fix. Also, the
GPS-205 performs a reset when the ignition goes active.
Figure 11: Ignition Input Options
This option requires correct configuration of the Ignition and Power connections. Refer to
the GPS-205 manual for more information.
When the GPS-205 detects ignition on any events that are sent to occur on power up will
fire (i.e. Sending Input 3 on Power Up is enabled). This is because the ignition on event
causes the GPS-205 to perform a reset.
© CES Wireless Technologies Corp – 2011 Page 14 of 50
GPS Status Reporting Options: The status of the GPS signal can sent, if desired. It can be sent when the
signal is valid and when the signal is invalid for a programmable number of seconds.
Figure 12: GPS Status Reporting Options
The GPS-205 uses Input 4 to report the state of the GPS signal. If programmed to send a packet when
GPS is valid, the GPS-205 will send an Input 4 low to high state change packet (with position). If
programmed to send a packet when GPS is invalid for a specified number of seconds, the GPS-205 will
send an Input 4 high to low state change packet (without position since position is known to be invalid).
Idle Vehicle Reporting Options: The GPS-205 can be programmed to send a packet when it is idle
and/or started moving.
Figure 13: Idle Vehicle Reporting Options
To program the GPS-205 to send an Idle On packet (Input 5 state change low to high) enter a time (in
seconds) for which the GPS-205 must be idle before being considered idle. A value of 0 (zero) disables
this.
To program the GPS-205 to send an Idle Off (moving) packet (Input 5 state change high to low) check the
box. It should be noted that this could generate extra “moving” packets if the vehicle is idle for periods of
time that are less than the value programmed.
Geo Status Options: If using GeoStatuses as described in the following section the GPS-205 can be
programmed to the desired level of sensitivity for the entry or exit event that triggers the GeoStatus. This
is called GeoStatus Debounce. It is set by entering the number of consecutive GeoStatus positions
required to trigger an GeoStatus Entry or GeoStatus Exit event. It prevents a false reading when the
device is on the threshold of the GeoStatus.
Figure 14: GeoStatus Debounce Options
2.5.2 GPS-205 GeoStatus Configuration
The GPS-205 can be programmed to send a status key with key data and position packet when it enters
and/or leaves a circular area. The area is defined as a radius (in meters) around a specified point. If an
area is defined that is simply a smaller area within another, larger, defined area it should have a higher
GeoStatus number. This is because the GeoStatuses are examined from high to low. If the GPS-205
© CES Wireless Technologies Corp – 2011 Page 15 of 50
detects that it has entered or exited a GeoStatus area it will perform the programmed action and will not
look for any other GeoStatus actions.
Figure 15: GeoStatus Display
To set the GeoStatus options double click on any cell in the desired row. The GeoStatus configuration
form will be displayed.
© CES Wireless Technologies Corp – 2011 Page 16 of 50
Figure 16: GeoStatus Configuration Details
Enter the information for the GeoStatus on this form. The coordinates are entered in decimal degrees. The
value to enter can be obtained via FleetLinc or Power-trak3. The key data is limited to a maximum of 5
numeric characters. An entry of at least one character is required.
Coordinate Information: In FleetLinc or PowerTrak3 go to the map view and zoom into the area where
the GeoStatus should be. Position the cursor on the point where the center of the GeoStatus should be. In
FleetLinc the coordinates of this point will be displayed in the lower right corner. In PowerTrak3 the
coordinates of the point will be displayed in the status bar at the bottom of the map view.
2.5.3 GPS-205 SMS Options
The GPS-205 can be configured to send an SMS when specific events occur. There is the capability to
configure the GPS-205 to send an SMS for 6 different events. The events that the GPS-205 can send an
SMS for are: Max Speed Exceeded, Input 1 High to Low, Input 1 Low to High, Input 2 High to Low,
Input 2 Low to High, Power On, Ignition On, Ignition Off, GPS Valid, GPS Invalid, Idle, Moving,
GeoStatus #1 Entry, GeoStatus #1 Exit, GeoStatus #2 Entry, GeoStatus #2 Exit, GeoStatus #3 Entry,
GeoStatus #3 Exit, GeoStatus #4 Entry, GeoStatus #4 Exit, GeoStatus #5 Entry, GeoStatus #5 Exit,
GeoStatus #6 Entry and GeoStatus #6 Exit.
Note: The capability to send SMS is cellular carrier dependent. Please contact your cellular
service provider to see if they offer this capability.
Note: The use of SMS often requires the entry of a Gateway Number. Please contact your
cellular service provider to see if this is required and, if so, to get the value to be used.
© CES Wireless Technologies Corp – 2011 Page 17 of 50
Figure 17: SMS Options
Destination: To configure the GPS-205 to send an SMS check Enable and then select the destination.
The destination can be an e-mail address of a mobile telephone number capable of receiving SMS. Select
the destination type and then enter the destination.
Individual SMS Options: For each SMS event to be configured select the Event from the drop down list
of events. Upon doing this a default message will be placed in the Message to Send text box. This
message can be accepted or edited as needed. Last, select if the Unit ID of the unit should be included in
the message. The Unit ID can be included in front of the text or after it. It is recommended that the Unit
ID be included in the SMS so that it is easy to determine what unit sent the message.
2.6
GPS-206 Options
The I/O, GeoStatus and SMS options for the GPS-206 are discussed in this section.
Note: These values should be selected with care as they will greatly effect the amount of
data used by the device. Be sure to configure the device to operate within your data plan.
2.6.1 GPS-206 I/O Options
The input and output options contains the configuration of the inputs of the GPS-206. The output on the
GPS-206 is always enabled.
© CES Wireless Technologies Corp – 2011 Page 18 of 50
NOTE: By default the output is in the high state.
Figure 18: GPS-206 I/O Options (both Inputs 1 and 2 are enabled)
2.6.1.1
Input 1
Input 1 can be disabled, set to send only on a high to low transition, set to only send on a low to high
transition, to send on both changes of state, to enable the advanced configuration of the input or to place a
call.
Figure 19: Input 1 Options
Each of these options are explained below.
2.6.1.1.1
Disabled
When the input is disabled no activity will occur when it’s state changes.
2.6.1.1.2
Send on High to Low State Change
When the input is enabled to send on high to low state change it will send a packet indicating this state
change. It will not send a packet when the state goes from low to high.
2.6.1.1.3
Send on Low to High State Change
© CES Wireless Technologies Corp – 2011 Page 19 of 50
When the input is enabled to send on low to high state change it will send a packet indicating this state
change. It will not send a packet when the state goes from high to low.
2.6.1.1.4
Send on Both
When the input is enabled to send on both it will send a packet indicating either state change.
2.6.1.1.5
Advanced Configuration
In addition to standard input state change reporting the GPS-206 can be programmed for additional
actions in the event of a state change. These actions are configured by selecting Advanced Configuration.
Note that the advanced configuration options are only available if GPS Position reporting is based upon a
minimum time or specific distance intervals (not both).
Figure 20: Advanced Input Configuration for Input 1
The GPS position reporting interval can be changed based upon the state of the input. By default this is
not enabled. To Enable it select the “Change GPS Report Interval on Input 1 Change”. The other fields
will then be enabled.
Select if the GPS position reporting interval should change when the input goes from low to high or from
high to low. Next, select the new time or distance reporting value. If using distance the selection can be
made in feet or meters.
© CES Wireless Technologies Corp – 2011 Page 20 of 50
Figure 21: Advanced Input Configuration - Enabled
2.6.1.1.3
Call
Input 1 on the GPS206 can be used to place a call to one pre-programmed number, to answer an incoming
call or to disconnect an active call. This functionality requires the use of a momentary switch on the input.
A device is available for this from CES (CES P/N zzzzzzzzz).
Call Functionality only works for Input 1.
When the input is configured for a call the Call Configuration area will be displayed for the call enabled
input.
Figure 22: Call Configuration for Input 1
Enter the phone number to call when the state of the input changes.
Call Operation Explained: The calling functionality works as follows when the momentary switch is
pressed. The GPS-206 must have an established GPRS connection for this functionality to work.
1. If the momentary switch on the input is pressed and no call is in progress it will dial the
programmed number.
2. If the momentary switch on the input is pressed and a call is in progress the GPS-206 will
disconnect (hang up) the call.
3. If the momentary switch on the input is pressed, no call is in progress and the GPS-206 is being
called the GPS-206 will answer the call.
The following “truth table” explains this in another manner.
No call in
progress
True
False
True
Call in progress
Incoming call
Action taken
False
True
False
False
False
True
Initiate call to preprogrammed number
Disconnect active call
Answer incoming call
Table 3: GPS-206 Call Functionality Truth Table
© CES Wireless Technologies Corp – 2011 Page 21 of 50
2.6.1.2
Input 2
The options for Input 2 are the same as those for Input 1 with the exception that only Input 1 can be used
to place or answer calls.
2.6.1.3
Advanced I/O Options
The Advanced I/O Options require the use of the Auxiliary Expansion Cable (CES P/N: HRNS-060).
This cable provides the capability to add 6 more digital inputs and 2 more digital outputs to the GPS206
bringing the total to 8 inputs, ignition input and 3 outputs.
Figure 23: Advanced I/O Options
The additional inputs can be disabled, programmed to send only on a state change of high to low or low to
high, or to send on both changes of state.
Note: When using the Auxiliary Expansion Cable the number of GeoStatuses is reduced to
16. Also, the Auxiliary Expansion Cable is not compatible with the Garmin FMI and
sending GPS data out of the serial port.
2.6.1.4
Other GPS-206 I/O and Events
Auto Answer: The GPS-206 can be programmed to automatically answer a call after a specific number
of rings. To enable this feature enter a non-zero value.
Input 4, GPS Validity: This option is to send an input change indicating that the device has lost or has
obtained a fix on the required number of GPS satellites.
Figure 24: GPS Status Reporting Options
Note: If the device will be used in an area where acquiring an adequate fix on the GPS
satellites may be difficult (forested areas, urban canyons, etc.) it is highly recommended
that this option is NOT USED. If used it may generate a large number of packets and could cause the
device to use more data than is allowed on its data plan.
© CES Wireless Technologies Corp – 2011 Page 22 of 50
Input 5, Idle State: The final option is for the unit to send its idle state. The GPS-206 can be configured
to not send its state, to send a moving state or to send an idle state.
Figure 25: Idle Vehicle Reporting Options
Note: If the device will be used in a vehicle that will have a large number of starts and stops
it is highly recommended that this option is NOT USED. If used it may generate a large
number of packets and could cause the device to use more data than is allowed on its data plan.
Ignition Input Options: The GPS-206 can be instructed to send the ignition state when it changes. This
event is sent as Input 6. An Input 6 high to low state change packet is sent when the GPS-206 detects the
ignition is turned off. When the ignition is turned on an Input 6 low to high state change packet is sent.
Also, the GPS-206 performs a reset when the ignition goes active. The ignition state can be sent with or
without position.
It is recommended that the packet be sent without position information. This is because the device will
likely not have a GPS fix when the ignition goes from off to on due to the device resetting during this
activity.
Figure 26: Ignition Input Options
This option requires correct configuration of the Ignition and Power connections. Refer to
the GPS-206 manual for more information.
2.6.2 GPS-206 GeoStatus Options
The GPS-206 can be programmed to send a status key with key data and position packet when it enters
and/or leaves a circular area. The area is defined as a radius (in meters) around a specified point. If an
area is defined that is simply a smaller area within another, larger, defined area it should have a higher
GeoStatus number. This is because the GeoStatuses are examined from high to low. If the GPS-206
detects that it has entered or exited a GeoStatus area it will perform the programmed action and will not
look for any other GeoStatus actions.
To set the GeoStatus options double click on any cell in the desired row. The GeoStatus configuration
form will be displayed (see Figure 16: GeoStatus Configuration Details).
Enter the information for the GeoStatus on this form. The coordinates are entered in decimal degrees. The
value to enter can be obtained via FleetLinc or Power-trak3. The key data is limited to a maximum of 5
numeric characters. An entry of at least one character is required.
Coordinate Information: In FleetLinc or PowerTrak3 go to the map view and zoom into the area where
the GeoStatus should be. Position the cursor on the point where the center of the GeoStatus should be. In
© CES Wireless Technologies Corp – 2011 Page 23 of 50
FleetLinc the coordinates of this point will be displayed in the lower right corner. In PowerTrak3 the
coordinates of the point will be displayed in the status bar at the bottom of the map view.
2.6.3 GPS-206 SMS Options
The GPS-206 can be configured to send an SMS when specific events occur. There is the capability to
configure the GPS-206 to send an SMS for 6 different events. The events that the GPS-206 can send an
SMS for are: Max Speed Exceeded, Input 1 High to Low, Input 1 Low to High, Input 2 High to Low,
Input 2 Low to High, Power On, Ignition On, Ignition Off, GPS Valid, GPS Invalid, Idle, Moving,
GeoStatus #1 Entry, GeoStatus #1 Exit, GeoStatus #2 Entry, GeoStatus #2 Exit, GeoStatus #3 Entry,
GeoStatus #3 Exit, GeoStatus #4 Entry, GeoStatus #4 Exit, GeoStatus #5 Entry, GeoStatus #5 Exit,
GeoStatus #6 Entry and GeoStatus #6 Exit.
Note: The capability to send SMS is cellular carrier dependent. Please contact your cellular
service provider to see if they offer this capability.
Note: The use of SMS often requires the entry of a Gateway Number. Please contact your
cellular service provider to see if this is required and, if so, to get the value to be used.
See Figure 17: SMS Options.
Destination: To configure the GPS-206 to send an SMS check Enable and then select the destination.
The destination can be an e-mail address of a mobile telephone number capable of receiving SMS. Select
the destination type and then enter the destination.
Individual SMS Options: For each SMS event to be configured select the Event from the drop down list
of events. Upon doing this a default message will be placed in the Message to Send text box. This
message can be accepted or edited as needed. Last, select if the Unit ID of the unit should be included in
the message. The Unit ID can be included in front of the text or after it. It is recommended that the Unit
ID be included in the SMS so that it is easy to determine what unit sent the message.
2.6.4 Garmin FMI Options
The GPS-206 can be used in conjunction with compatible Garmin Nüvi Personal Navigation Devices
(PND). For more information on the Garmin Nüvi product line and compatible devices please visit the
Garmin website (www.garmin.com).
Figure 27: Garmin FMI Options
Do not attempt to enter route information or adjust the Garmin PND while driving. Failure
to pay full attention to the operation of your vehicle could result in death, serious injury or
property damage. You assume total responsibility and risk for using this device.
This interface requires the Garmin FMI v2. Not all GARMIN PNDs with FMI v2 support all
FMI v2 commands available. Please verify the Protocol Support Data of the Garmin PND
being used.
© CES Wireless Technologies Corp – 2011 Page 24 of 50
If interfacing the GPS-206 to a Garmin Nüvi PND the interface needs to be enabled in the GPS-206. This
is done by checking the Enable Garmin FMI checkbox as shown in Figure 25. The garmin FMI section is
located on the GPS tab.
If the Garmin FMI needs to be unlocked the Garmin FMI Password will also be required. Once the FMI
is unlocked the password does not need to be sent again even if the programming of the GPS-206
changes.
The Garmin FMI interface in the GPS-206 must be licensed. A password is required to unlock this
functionality. Please contact CES for a password. The IMEI of each GPS-206 to enable the FMI on is
required as the password is unique for each device.
There are no additional configuration parameters for the GPS-206 and the Garmin FMI.
2.7
GPS-208 Options
The Events options for the GPS-208 are discussed in this section. Currently GeoStatuses and SMS is not
supported. If this functionality is required please contact your CES Wireless sales representative or send
an e-mail to [email protected] with your contact information and details of the installation.
Figure 28: Inputs for the GPS-208
2.7.1 Inputs
There are four inputs on the GPS-208. They are Inputs 1, 2, 3 and Ignition.
Input 1: Input 1 can send a packet when its state goes low, when it goes high, or for both state changes.
This input has an internal pull-up resistor, meaning that it is normally high, and only a Low (Ground)
needs to be applied or removed to obtain both ON or OFF states.
NOTE: Inputs 2 & 3 are different than input 1, in that they are normally Low, and must be pulled
High to obtain a change of state. A signal of 12 to 16 volts is considered a High. Removing this signal
constitutes a Low.
Input 2: Input 2 can send a packet when its state goes low, when it goes high, or for both state changes.
See note above.
NOTE: Depending upon programming, it is possible for the GPS-208 to send an Input 2 Low state
change event if a device reset occurs.
© CES Wireless Technologies Corp – 2011 Page 25 of 50
Input 3: Input 3 can send a packet when its state goes low, when it goes high, or for both state changes.
See note above.
NOTE: Depending upon programming, it is possible for the GPS-208 to send an Input 3 High state
change event if a device reset occurs.
Ignition Input: The state of the ignition can be sent when on, off or both. When voltage is detected on
the Ignition Input it transitions to the high (on) state. When voltage is not detected it transitions to the low
(off) state. Note – because the voltage on a vehicles ignition line can fluctuate while the vehicle is started
multiple ignition events may fire.
NOTE: When the Ignition goes to the on state the GPS-208 will do a reset.
2.7.2 Outputs
The GPS-208 also supports two outputs. These outputs are always active, meaning that they do not need
to be enabled via the programming software. However, it should be noted that they have different output
characteristics. The output states are written into memory, so as to return to their last known state if
power is cycled.
Output 1: Output 1, when not set to Low, will be at logic level 1 (3 volts), and can source 10 ma. of
current. When set to Low, it can sink 1.1 amps. This output works in the expected fashion. When a
command is sent to the output to go low, it goes to the Low state.
Output 2: Output 2 is open collector. Meaning that when it is not set to low, it is open circuit. When set
to Low, it can sink 1.1 Amp. This output is controlled the opposite of output 1. A command to go high
must be sent for the output to go low.
POWER-trak3 Note: If the GPS-208 is used with POWER-trak3 the output can be made to
appear as if it works in the same manner as Output 1. This can be done by setting its Active State
to low as the I/O Profile is defined.
NOTE: Output 2 will float (go open circuit) during a device reset.
2.8
PT-101 Options
The Events, GeoStatuses, SMS and User Defined Button options for the PT-101 are discussed in this
section.
Note: To program the PT-101 the driver for it must be installed first. This driver creates a
virtual com port which is used to communicate with the PT-101. The driver can be obtained
from CES. Please contact Support for additional information.
Note: These values should be selected with care as they will greatly effect the amount of
data used by the device. Be sure to configure the device to operate within your data plan
2.8.1 PT-101 Events
The Events options contains the configuration of the events of the PT-101.
GPS Status Reporting Options: The status of the GPS signal can sent, if desired. It can be sent when the
signal is valid and when the signal is invalid for a programmable number of seconds.
© CES Wireless Technologies Corp – 2011 Page 26 of 50
Figure 29: PT-101 GPS Status Reporting Options
The PT-101 uses Input 4 to report the state of the GPS signal. If programmed to send a packet when GPS
is valid, the PT-101 will send an Input 4 low to high state change packet (with position). If programmed
to send a packet when GPS is invalid for a specified number of seconds, the PT-101 will send an Input 4
high to low state change packet (without position since position is known to be invalid).
Idle Vehicle Reporting Options: The PT-101 can be programmed to send a packet when it is idle and/or
started moving.
Figure 30: PT-101 Idle Vehicle Reporting Options
To configure the PT-101 to send an Idle state packet check “Send Input 5 on Idle/Moving Change”. This
will cause the PT-101 to send an Input 5 High packet when the unit is idle and am Input 5 Low packet
when the unit is moving.
Stay Awake While Moving Options: The PT-101 can be configured to go into sleep mode when it has
been idle for a specified amount of time.
Figure 31: PT-101 Stay Awake While Moving Options
To enable this feature, and greatly extend the charge of the battery, enter the time (in seconds) at which
the unit should go to sleep after having been idle.
Phone Numbers: The PT-101 can be configured to dial a preprogrammed phone number. To enable this
feature enter a phone number into the Phone Number text box.
Figure 32: PT-101 Phone Number Options
The PT-101 can also be configured to call an emergency number. Note: It is important to use this only
for emergency numbers as its functionality is enabled even if the device does not have a SIM card
installed.
Geo Status Options: If using GeoStatuses as described in the following section the PT-101 can be
programmed to the desired level of sensitivity for the entry or exit event that triggers the GeoStatus. This
is called GeoStatus Debounce. It is set by entering the number of consecutive GeoStatus positions
© CES Wireless Technologies Corp – 2011 Page 27 of 50
required to trigger an GeoStatus Entry or GeoStatus Exit event. It prevents a false reading when the
device is on the threshold of the GeoStatus.
Set GeoStatus with Button Press: The PT-101 can set the region for GeoStatus #25 by pressing the
GeoStatus button. To configure the radius that will be used enter it here.
Figure 33: PT-101 Set GeoStatus with Button Press Options
It is important to enable GeoStatus #25 in the GeoStatus section for proper operation of this functionality.
Call Configuration: When the PT-101 receives a call it can be configured to ring, vibrate, or do nothing.
Make the desired selection here.
Figure 34: PT-101 Call Configuration Options
2.8.2 PT-101 GeoStatus Options
The PT-101 can be programmed to send a status key with key data and position packet when it enters
and/or leaves a circular area. The area is defined as a radius (in meters) around a specified point. If an
area is defined that is simply a smaller area within another, larger, defined area it should have a higher
GeoStatus number. This is because the GeoStatuses are examined from high to low. If the PT-101 detects
that it has entered or exited a GeoStatus area it will perform the programmed action and will not look for
any other GeoStatus actions.
See Figure 15: GeoStatus Display. To set the GeoStatus options double click on any cell in the desired
row. The GeoStatus configuration form will be displayed (see Figure 16: GeoStatus Configuration
Details).
Enter the information for the GeoStatus on this form. The coordinates are entered in decimal degrees. The
value to enter can be obtained via FleetLinc or Power-trak3. The key data is limited to a maximum of 5
numeric characters. An entry of at least one character is required.
Coordinate Information: In FleetLinc or PowerTrak3 go to the map view and zoom into the area where
the GeoStatus should be. Position the cursor on the point where the center of the GeoStatus should be. In
FleetLinc the coordinates of this point will be displayed in the lower right corner. In PowerTrak3 the
coordinates of the point will be displayed in the status bar at the bottom of the map view.
2.8.3 PT-101 SMS Options
The PT-101 can be configured to send an SMS when specific events occur. There is the capability to
configure the PT-101 to send an SMS for 5 different events. The events that the PT-101 can send an SMS
for are: Max Speed Exceeded, GPS Valid, GPS Invalid, Idle, Moving, Battery Level, User Defined
Button, Geo Status #1 Entry, Geo Status #1 Exit, Geo Status #2 Entry, Geo Status #2 Exit, Geo Status #3
Entry, Geo Status #3 Exit, Geo Status #4 Entry, Geo Status #4 Exit, Geo Status #5 Entry, Geo Status #5
Exit, Geo Status #6 Entry and Geo Status #6 Exit.
Note: The capability to send SMS is cellular carrier dependent. Please contact your cellular
service provider to see if they offer this capability.
© CES Wireless Technologies Corp – 2011 Page 28 of 50
Note: The use of SMS often requires the entry of a Gateway Number. Please contact your
cellular service provider to see if this is required and, if so, to get the value to be used.
Figure 35: PT-101 SMS Options
Destination: To configure the PT-101 to send an SMS check Enable and then select the destination. The
destination can be an e-mail address of a mobile telephone number capable of receiving SMS. Select the
destination type and then enter the destination.
Individual SMS Options: For each SMS event to be configured select the Event from the drop down list
of events. Upon doing this a default message will be placed in the Message to Send text box. This
message can be accepted or edited as needed. Last, select if the Unit ID of the unit should be included in
the message. The Unit ID can be included in front of the text or after it. It is recommended that the Unit
ID be included in the SMS so that it is easy to determine what unit sent the message.
2.8.4 PT-101 User Defined Button
The User Defined Button on the PT-101 can be configured to these packets: Input 7 High, Status with
Key Data, Current Position and to set the region for GeoStatus #23.
© CES Wireless Technologies Corp – 2011 Page 29 of 50
Figure 36: PT-101 User Defined Button Options
To enable the User Defined Button check Enable. Now select the desired action. If selecting a Status Key
the status number and key data needs to be configured. If selecting a GeoStatus the radius of the
GeoStatus must be entered. If selecting input or position there is no additional configuration. An Input 1
High packet will be sent when the button is pressed.
2.9
Send Configuration Button
The Send Configuration button begins the automatic programming of the selected device. The unit will be
programmed with the data in the System Information section and with the Features that were selected.
It should be noted that the selected device is programmed all at once. If you wish to add a feature a later
date then it must be totally reprogrammed (include existing features as well as any new feature(s)). The
progress bar above the communications window displays the state of the programming as it s processed.
The Send Configuration is not enabled until at least one Feature is selected. The button is also disabled as
the programming is taking place.
2.10 DP-1000S Main Menu
The main menu of the DP-1000S has four upper level selections: File, Configure, Program and Help.
Figure 37: Main Menu
2.11 File Menu
There are 5 selections on the File menu: Open, Save, Save As, Print and Exit.
© CES Wireless Technologies Corp – 2011 Page 30 of 50
Figure 38: File Menu
Open: This selection allows an existing device configuration file to be opened. The default location for
the configuration files is in the Fleet-Control application data folder. ON a Windows XP system the path
to this folder is C:\Docments and Settings\All Users\Application Data\CES Wireless Technologies\FleetControl.
Save: This selection will save the current configuration of the DP-1000S in the configuration file format.
It uses the existing file name (if Open or Save As were previously selected) or to a new file name (if Open
or Save As were not previously selected).
Save As: Provides the capability to save the configuration to a new file name.
Print: Prints the configuration.
Exit: Exits the DP-1000S application.
2.12 Configure Menu
There are four selections on the Configure menu: Com Port, Verify Mobile Connected, Reset GPS206
Used with a Garmin PND and Reset GPS206 used with Auxiliary Expansion Cable.
Figure 39: Configure Menu
Com Port: Provides the capability to select the serial communications port to use in communicating with
the selected device. There is a selection for the Com Port to use with the GPS-201/202, GPS-205 and
GPS-206, a section select the Com Port to use with the PT-101 and a section to select the com port to use
with the GPS-208.
© CES Wireless Technologies Corp – 2011 Page 31 of 50
Figure 40: Select Com Port
For the correct com port to use with the GPS-208 or PT-101 follow these steps. Note: The driver for the
GPS-208 or PT-101 must be installed and the GPS-208 or PT101 must be connected to the computer via a
USB port. Please see Appendix A for more information on installing the drivers for the PT-101 and
Appendix for more information on installing the drivers for the GPS-208.
1. Open the Com Port selection form (Configure, Com Port).
2. Click on the Scan Ports button at the bottom left of the form. The available com ports will be
displayed.
3. The GPS-208 and PT-101 drivers will create multiple entries. Select the first entry that refers to
the Modem (do not select the Trace port). In the example that follows the correct port to use for
the GPS-208 is Com Port 4.
Figure 41: Results from Scan Ports for a GPS-208
Verify Mobile Connected: Sends an Inquiry packet to the device to verify that it is on and
communicating with the selected serial communications port. If it is connected “Device connected” will
be displayed in the Communication section.
Reset GPS206 Used with a Garmin PND: This option only applies to a GPS-206 that was previously
programmed for use with a Garmin PND. If the GPS-206 needs to be reprogrammed this option must first
be used to disable the Garmin FMI and allow communication with the DP-1000S.
Reset GPS206 used with Auxiliary Expansion Cable: This option only applies to a GPS-206 that was
previously programmed for use with the Auxiliary Expansion Cable. If the GPS-206 needs to be
reprogrammed this option must first be used to reset the serial port on the GPS-206 to its default values.
© CES Wireless Technologies Corp – 2011 Page 32 of 50
2.13 Program Menu
The selections on the Program are: Set to Factory Defaults, Read System Information, Compare System
Information and either Mode-Manual or Mode-Program.
Figure 42: Program Menu
Set to Factory Defaults: Sends the reset to factory defaults command to the device. Note: this command
is also the first command sent when the Send Configuration button is clicked.
Read System Information: Reads the System Information from the device and displays it in the System
Information section. Note: if a Server IP Address of 1.1.1.1 is sent to the device it will display as
001.001.001.001 when read.
NOTE: Only the System Information can be read from the unit. All other parameters (GPS,
I/O, GeoStatuses) cannot be read.
Compare System Information: Reads the System Information in the device and compares it to the
system information that is displayed in the DP-1000S. Any differences will be noted. Note: if a Server IP
Address of 1.1.1.1 is sent to the device it will be read as 001.001.001.001. These values will not be
considered as equal during a Compare.
NOTE: Only the System Information is compared. The other parameters (GPS, I/O,
GeoStatuses) cannot be read from the unit so they cannot be compared.
Mode-Advanced: This selection provides the capability to send individual commands to the device. The
default mode is explained in this manual. Advanced mode is intended for use by CES Wireless
Technologies technicians or by technicians that have been trained and licensed by CES Wireless
Technologies. This document does not cover the functionality of Advanced Mode. CES Support does
provide information regarding Advanced- mode.
Begin Sequential Programming: This selection is to be used when a number of devices need to be
programmed and the Unit IDs are sequential (i.e. 24, 25, 26, 27, …). The first unit ID should be entered
as usual. Then select this option. This prompt will be displayed
© CES Wireless Technologies Corp – 2011 Page 33 of 50
Figure 43: Sequential programming prompt.
Note that the Unit ID entered will be the first one programmed. To start the sequential programming click
OK. Otherwise, click Cancel. If OK was selected this prompt will be displayed
Figure 44: Sequential programming – Send Config button dialog.
The first Unit ID will be programmed when the Send Config button is clicked. Upon completion of the
programming of the unit there will be another prompt.
Figure 45: Programming complete – sequential programming
This prompt informs you that the unit was successfully programmed. The Unit ID programmed is noted
as well as the next Unit ID to be programmed. To continue programming disconnect the current unit and
make a note on the unit as to its Unit ID (we suggest placing a label on it with the Unit ID). Connect the
next unit and click on the Send Config button. If programming is complete no further action is required.
Begin Programming from Text File: This selection provides the capability to read Unit IDs from a
normal text file and use these Unit IDs to program a number of units. The text file should have one Unit
ID on each line with no other characters (letters, tabs, etc.).
After this option is selected the following prompt is displayed
© CES Wireless Technologies Corp – 2011 Page 34 of 50
Figure 46: Begin programming from a file prompt.
To begin the programming from a file process click the Yes button. A file dialog will now be displayed.
Use this to locate the text file containing the Unit IDs. Select the file and click Open. This prompt will
now be displayed
Figure 47: Unit ID file has been read.
The first Unit ID will be programmed when the Send Config button is clicked. Upon completion of the
programming of the unit there will be another prompt (see Figure 45: Programming complete – sequential
programming).
This prompt informs you that the unit was successfully programmed. The Unit ID programmed is noted
as well as the next Unit ID to be programmed. To continue programming disconnect the current unit and
make a note on the unit as to its Unit ID (we suggest placing a label on it with the Unit ID). Connect the
next unit and click on the Send Config button. If programming is complete no further action is required.
CES Internal Functionality: This selection is for use only by CES Engineering staff and is not
explained in this manual.
2.14 Help
There is a single selection on the Help menu: About. If selected it will display the version of the DP1000S, copyright and other information related to the application.
2.15 Troubleshooting
To troubleshoot the cellular connectivity and to determine what firmware is in the attached device the
Test Commands tab has been added. This tab is common for all devices that can be programmed with the
DP-1000S. This tab is useful in determining if there are cellular connectivity issues and to determine what
version of firmware is loaded in the device.
There are two sections on the Text Commands tab: GPRS Connection Commands and Firmware
Commands.
© CES Wireless Technologies Corp – 2011 Page 35 of 50
Figure 48: Test Commands tab
GPRS Connection Commands
This section provides the functionality to determine if the attached device is able to successfully access
and connect to the cellular network and, if not, what the cause for failure may be related to.
Verify GSM Status: This button sends a command to the attached device to verify if it is registered on
the GSM network. The possible responses to the command are:
•
•
•
•
•
•
not registered, ME is not currently searching a new operator to register to
registered, home network
not registered, but ME is currently searching a new operator to register to
registration denied
unknown
registered, roaming
The “registered, home network” and “registered, roaming” responses indicate that the device has
successfully connected to a cellular network.
© CES Wireless Technologies Corp – 2011 Page 36 of 50
© CES Wireless Technologies Corp – 2011 Page 37 of 50
Figure 49: Verify GSM Status response
Verify GPRS Status: This button sends a command to the attached device to verify if it is registered on
the GPRS network. The possible responses to the command are the same as that for verifying the GSM
status. GPRS connectivity is required for data transmission.
Figure 50: Verify GPRS Status response
Verify GPRS Activation: This button sends a command to the attached device requesting its network
assigned IP Address. If the device returns “000.000.000.000” then GPRS activation has failed.
Figure 51: Verify GPRS Activation response displaying successful GPRS
activation
Get PDP Rejection Cause: This button sends a command to the attached device to determine the cause
for PDP (Packet Data Protocol) rejection. If the attached device has reported connectivity failure as a
result of the previous button(s) the response to this command can help to determine the issue. The
possible responses to this command are:
•
•
•
•
•
•
•
no PDP reject cause
insufficient resources
missing or unknown APN
unknown PDP address or PDP type
user authentication failed
activation rejected by GGSN
activation rejected, unspecified
© CES Wireless Technologies Corp – 2011 Page 38 of 50
•
•
•
•
•
service option not supported
requested service option not subscribed
service option temporarily out of order
NSAPI already used
protocol errors
The preferred response is “no PDP reject cause”. The other responses will provide insight to the cellular
carrier representative in regards to troubleshooting the connection.
Firmware Commands
The buttons in this section provide the capability to determine the Firmware and Package Versions in the
attached device.
Read Firmware Version: This button sends a command to the attached device to determine its firmware
Version.
Figure 52: Response to Read
Firmware Version
Read Package Version: This button sends a command to the attached device to determine its Package
Version.
Figure 53: Response to Read
Package Version
© CES Wireless Technologies Corp – 2011 Page 39 of 50
3.0
Support
If you need help, we are easily accessible ….
Telephone:
Call 407-679-9440, and ask for product support.
Fax:
407-679-8110
Email:
[email protected]
Skype: Please email [email protected] to obtain your currently assigned support engineer’s
Skype address.
Product support may ask you to E-MAIL a copy of the programmed parameters to us for analysis. To do
this, go to FILE on the DP-1000S main menu, and click on SAVE AS. Note the path to the saved file in
the save file dialog. Attach this file to an e-mail and send it to you product support representative or to the
e-mail address noted above.
Product support may ask you to PRINT a copy of the programmed parameters, and fax to us for analysis.
To do this, go to FILE on the DP-1000S main menu, and click on PRINT.
Support Resources: www.ceswireless.com
FTP Site: Please go to www.ceswireless.com and register for an FTP site User Name and Password
© CES Wireless Technologies Corp – 2011 Page 40 of 50
Appendix A: Installing the Device Drivers for the PT101
In order for the computer to recognize the PT101 device the device drivers for the PT101 must be
installed. The device drivers are located on CD-Soft1 as well as on the CES FTP server. On CD-Soft1 the
drivers are located in the PT101 USB Device Drivers folder. The file name is PT101_Drivers.zip. Open
the compressed file and extract its contents to your computer. The suggested path for the drivers is
C:\PT101 USB Device Driver. If a different path is used make a note of it because this information will
be required later.
Connect the PT101 to a USB port on the computer. The Windows Found New Hardware Wizard will be
displayed.
Figure 54: Found New Hardware Wizard Screen 1
Select the No, not this time option as shown in the image above and click Next.
Figure 55: Found New Hardware Wizard Screen 2
© CES Wireless Technologies Corp – 2011 Page 41 of 50
Choose the Install from a list or specific location (Advanced) selection and click Next.
Figure 56: Found New Hardware Wizard Screen 3
Select the options as shown in the image above. If the file from CD-Soft1 was extracted to a folder other
than the recommended folder click on the Browse button to locate the folder. Click Next when done.
Figure 57: Found New Hardware Wizard Screen 4
The following form may appear.
© CES Wireless Technologies Corp – 2011 Page 42 of 50
Figure 58: Windows logo verification
If it does click on the Continue Anyway button.
Figure 59: Found New Hardware Wizard Screen 5
Click on Finish. The Windows Found New Hardware Wizard will be displayed one more time. Follow
the steps above for the Mini-MT USB device. When done the computer will have been prepared to
communicate with the PT101.
© CES Wireless Technologies Corp – 2011 Page 43 of 50
Appendix B: Installing the Device Drivers for the GPS-208
In order for the computer to recognize the GPS-208 device the device drivers for the GPS-208 must be
installed. The device drivers are located on CD-Soft1 as well as on the CES FTP server. On CD-Soft1 the
drivers are located in the GPS-208 USB Device Drivers folder. The file GPS208_32bit.zip has the drivers
for 32 bit systems and GPS208_64bit.zip has the drivers for 64 bit systems. Open the appropriate
compressed file for your system and extract its contents to your computer. The suggested path for the
drivers is C:\GPS-208 Device Drivers. If a different path is used make a note of it because this
information will be required later.
Connect the GPS-208 to a USB port on the computer. The Windows Found New Hardware Wizard will
be displayed.
Figure 60: Found New Hardware Wizard Screen 1
Select the No, not this time option as shown in the image above and click Next.
Figure 61: Found New Hardware Wizard Screen 2
© CES Wireless Technologies Corp – 2011 Page 44 of 50
Choose the Install from a list or specific location (Advanced) selection and click Next.
Figure 62: Found New Hardware Wizard Screen 3
Select the options as shown in the image above. If the file from CD-Soft1 was extracted to a folder other
than the recommended folder click on the Browse button to locate the folder. Click Next when done.
The following form may appear.
Figure 63: Windows logo verification
If it does click on the Continue Anyway button.
The following form will be displayed as the driver is installed.
© CES Wireless Technologies Corp – 2011 Page 45 of 50
© CES Wireless Technologies Corp – 2011 Page 46 of 50
© CES Wireless Technologies Corp – 2011 Page 47 of 50
© CES Wireless Technologies Corp – 2011 Page 48 of 50
Figure 64: Found New Hardware Wizard Screen 5
Once the drivers have been installed this final form will be displayed.
Click on Finish. The Windows Found New Hardware Wizard will be displayed two more times. Follow
the steps above for the Enfora MT 2500 Modem. When done the computer will have been prepared to
communicate with the GPS-208.
© CES Wireless Technologies Corp – 2011 Page 49 of 50
Revision History
Revision
1.0
1.1
1.2
2.0
2.1
2.2
3.0
3.1
4.0
4.1
Description
Initial Release for GPS-206
Added Advanced Input Configuration for the GPS-206.
Added sequential programming and programming from
file instructions.
Added Phone Call Configuration for the GPS-206.
Added Garmin FMI support.
Updated images.
Added configuration information in support of the
GPS-201 and GPS-202 devices.
Added Appendix A. This has details on the installation
of the drivers for the PT101.
Added instructions for the Auxiliary Expansion Cable,
Advanced Speed option, GPS sent out of the serial port.
Added updates related to DP-1000S Version 7.4.0.1.
Added information related to programming the GPS208. Also added information related to other changes
made in the DP-1000S.
Clarified the information regarding the inputs and
outputs for the GPS-208.
Revised By
D. Hamilton
Date
04-21-2009
D. Hamilton
04-28-2009
D. Hamilton
05-07-2009
D. Hamilton
05-05-2010
D. Hamilton
08-04-2010
D. Hamilton
02-02-2011
D. Hamilton
05-04-2011
D. Hamilton
D. Hamilton
06-09-2011
09/23/11
D. Hamilton
11/01/11
© CES Wireless Technologies Corp – 2011 Page 50 of 50