1
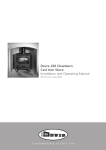
Installation & Servicing Instructions
Bioflo
Pellet Central Heating System Boiler
These instructions should be read in conjunction with the
Supplementary Instructions
Please keep these instructions in a safe place.
If you move house, please hand them over to the next occupier.
© Baxi Heating UK Ltd 2010
Baxi Bioflo 12 kW Granite
Baxi Bioflo 12 kW Pearl
© Baxi Heating UK Ltd 2010 All rights reserved. No part of this publication may
be reproduced or transmitted in any form or by any means, or stored in any
retrieval system of any nature (including in any database), in each case whether
electronic, mechanical, recording or otherwise, without the prior written
permission of the copyright owner, except for permitted fair dealing under
Copyrights, Designs and Patents Act 1988.
Applications for the copyright owner’s permission to reproduce or make other
use of any part of this publication should be made, giving details of the proposed
use, to the following address:
The Company Secretary, Baxi Heating UK Ltd,
Brooks House, Coventry Road, Warwick. CV34 4LL
Full acknowledgement of author and source must be given.
WARNING: Any person who does any unauthorised act in relation to a
copyright work may be liable to criminal prosecution and civil claims for damages.
Table of contents:
Page
Important initial information for the Technician . . . . . . . . . . . . . . . . . . . . . . . . . . . . .4
1.1
Safety . . . . . . . . . . . . . . . . . . . . . . . . . . . . . . . . . . . . . . . . . . . . . . . . . . . . . . . . . . . . . . . . . . . . . . . . . . . . .4
1.2
Please note! . . . . . . . . . . . . . . . . . . . . . . . . . . . . . . . . . . . . . . . . . . . . . . . . . . . . . . . . . . . . . . . . . . . . . . . .4
1.3
Fuel . . . . . . . . . . . . . . . . . . . . . . . . . . . . . . . . . . . . . . . . . . . . . . . . . . . . . . . . . . . . . . . . . . . . . . . . . . . . . . .4
1.4
Fuel storage - Manuell pellet supply . . . . . . . . . . . . . . . . . . . . . . . . . . . . . . . . . . . . . . . . . . . . . . . . . . . . .5
1.5
Application options . . . . . . . . . . . . . . . . . . . . . . . . . . . . . . . . . . . . . . . . . . . . . . . . . . . . . . . . . . . . . . . . . .5
1.6
Flue . . . . . . . . . . . . . . . . . . . . . . . . . . . . . . . . . . . . . . . . . . . . . . . . . . . . . . . . . . . . . . . . . . . . . . . . . . . . . . .5
For the Installer . . . . . . . . . . . . . . . . . . . . . . . . . . . . . . . . . . . . . . . . . . . . . . . . . . . . . . .6
2.1
Delivery, packaging . . . . . . . . . . . . . . . . . . . . . . . . . . . . . . . . . . . . . . . . . . . . . . . . . . . . . . . . . . . . . . . . . .7
2.2
Installation . . . . . . . . . . . . . . . . . . . . . . . . . . . . . . . . . . . . . . . . . . . . . . . . . . . . . . . . . . . . . . . . . . . . . . . . .7
2.3
2.3.1 Installation room . . . . . . . . . . . . . . . . . . . . . . . . . . . . . . . . . . . . . . . . . . . . . . . . . . . . . . . . . . . . . .7
2.3.2 Heat radiation . . . . . . . . . . . . . . . . . . . . . . . . . . . . . . . . . . . . . . . . . . . . . . . . . . . . . . . . . . . . . . . .7
2.3.3 Installation siting . . . . . . . . . . . . . . . . . . . . . . . . . . . . . . . . . . . . . . . . . . . . . . . . . . . . . . . . . . . . . .8
2.3.4 Combustion air . . . . . . . . . . . . . . . . . . . . . . . . . . . . . . . . . . . . . . . . . . . . . . . . . . . . . . . . . . . . . . .9
Dimensional sketches . . . . . . . . . . . . . . . . . . . . . . . . . . . . . . . . . . . . . . . . . . . . . . . . . . . . . . . . . . . . . . .10
2.4
Minimum service clearances for fire protection, cleaning and maintenance . . . . . . . . . . . . . . . . . .12
2.4.1
2.4.2
2.4.3
Masonry feed-throughs for the exhaust pipe . . . . . . . . . . . . . . . . . . . . . . . . . . . . . . . . . . . . .12
Minimum service clearances with flue gas tube connection straight back . . . . . . . . . . . . .13
Minimum service clearances with flue gas tube connection to the left or right side . . . . .14
2.5
System . . . . . . . . . . . . . . . . . . . . . . . . . . . . . . . . . . . . . . . . . . . . . . . . . . . . . . . . . . . . . . . . . . . . . . . . . . .15
2.6
2.5.1 Heating fittings . . . . . . . . . . . . . . . . . . . . . . . . . . . . . . . . . . . . . . . . . . . . . . . . . . . . . . . . . . . . . .15
2.5.2 Heating circuits . . . . . . . . . . . . . . . . . . . . . . . . . . . . . . . . . . . . . . . . . . . . . . . . . . . . . . . . . . . . . .15
2.5.3 Domestic water (hot water tank) . . . . . . . . . . . . . . . . . . . . . . . . . . . . . . . . . . . . . . . . . . . . . . . .15
2.5.4 Return temperature . . . . . . . . . . . . . . . . . . . . . . . . . . . . . . . . . . . . . . . . . . . . . . . . . . . . . . . . . .16
2.5.5 Accumulator tank . . . . . . . . . . . . . . . . . . . . . . . . . . . . . . . . . . . . . . . . . . . . . . . . . . . . . . . . . . . .16
2.5.6 Heating water . . . . . . . . . . . . . . . . . . . . . . . . . . . . . . . . . . . . . . . . . . . . . . . . . . . . . . . . . . . . . . .17
2.5.7 Water-side resistance (pressure loss) . . . . . . . . . . . . . . . . . . . . . . . . . . . . . . . . . . . . . . . . . . .17
Installing the cladding . . . . . . . . . . . . . . . . . . . . . . . . . . . . . . . . . . . . . . . . . . . . . . . . . . . . . . . . . . . . . .18
For the Electrician . . . . . . . . . . . . . . . . . . . . . . . . . . . . . . . . . . . . . . . . . . . . . . . . . . . .21
3.1
Electrical connections . . . . . . . . . . . . . . . . . . . . . . . . . . . . . . . . . . . . . . . . . . . . . . . . . . . . . . . . . . . . . .21
For the Service Technician . . . . . . . . . . . . . . . . . . . . . . . . . . . . . . . . . . . . . . . . . . . . . .23
4.1
Initial start-up and operating instructions . . . . . . . . . . . . . . . . . . . . . . . . . . . . . . . . . . . . . . . . . . . . . .23
4.2
Service and repair work . . . . . . . . . . . . . . . . . . . . . . . . . . . . . . . . . . . . . . . . . . . . . . . . . . . . . . . . . . . . .23
4.3
Technical data for calculating the flue gas system acc. to EN 13384-1 . . . . . . . . . . . . . . . . . . . . . . .24
4.4
Technical data – General . . . . . . . . . . . . . . . . . . . . . . . . . . . . . . . . . . . . . . . . . . . . . . . . . . . . . . . . . . . . .24
4.5
Service level . . . . . . . . . . . . . . . . . . . . . . . . . . . . . . . . . . . . . . . . . . . . . . . . . . . . . . . . . . . . . . . . . . . . . . .25
4.5.1
4.5.2
4.5.3
4.6
Parameters . . . . . . . . . . . . . . . . . . . . . . . . . . . . . . . . . . . . . . . . . . . . . . . . . . . . . . . . . . . . . . . . .27
Start-up . . . . . . . . . . . . . . . . . . . . . . . . . . . . . . . . . . . . . . . . . . . . . . . . . . . . . . . . . . . . . . . . . . . .30
Actuator test . . . . . . . . . . . . . . . . . . . . . . . . . . . . . . . . . . . . . . . . . . . . . . . . . . . . . . . . . . . . . . . .30
BAXI Bioflo basic circuitry . . . . . . . . . . . . . . . . . . . . . . . . . . . . . . . . . . . . . . . . . . . . . . . . . . . . . . . . . . .31
“Please read the supplementary assembly instruction document also supplied for
clear UK requirements”
3
Important initial information for the Technician
1.1
Safety
The boiler and related accessories reflect the state of the art and meet all applicable safety regulations.
1.2
Please note!
Your boiler and all accessories operate using 230 VAC electrical current. Improper installation or repair can pose
the danger of life-threatening electrical shock. (Building reg Part P.)
Caution symbols
Please take careful note of the following symbols in these Installation instructions.
Ignoring the identified warnings can lead to personal injury.
Ignoring the identified warnings can lead to malfunction of, or damage to the boiler or heating system.
The specified safety requirements are to be followed in accordance with nationally applicable regulations, standards and guidelines.
1.3
Fuel
The boilers are designed to burn the following fuels:
Pellets according to ÖNORM M7135 or DINplus.
Significant criteria based on the standards are as follows:
Diameter 6 mm
Smooth surface
Residual moisture content max. 10%
Ash content max. 0.5%
Length 80% between 15 – 30 mm
Density at least 1.1 kg/dm3
Energy content min. 18 MJ/kg = 5 kWh/kg
(in water-free condition)
Abraded particles max. 2.3%
Chemical/synthetic binding agents are strictly prohibited No impurities from varnish or paint residues, etc.
4
Important initial information for the Technician
1.4
Fuel storage - Manual pellet supply
Pellets in bags must be stored in a dry place.
Please observe the local regulations on storing fuel.
The pellets must be transported carefully into and out of the storage room so as to maintain good
pellet quality.
1.5 Application options
BAXI Bioflo is designed for installation in the living area and is configured as a fully featured central heating system. This means no second heat generator is required. If desired, however, BAXI Bioflo can be combined with
alternative heat generators (e.g. solar or solid fuel boiler). Refer to the hydraulic systems for details about this.
The necessary hydraulic components for a heating circuit as well as hot water preparation are integrated in
BAXI Bioflo (see hydraulic equipment). This means there is no longer any need for a boiler room or equipment
room and that BAXI Bioflo is ideally suited for use as a central heating system in houses without a basement
or when central heating is being installed in a building for the first time as part of a renovation project.
1.6
Flue
A properly dimensioned flue is required for optimal functioning of the combustion system. Measurement of the
dimensions must follow EN 13384-1. See the Technical data section for values required for this calculation.
Please note that in the lower performance range, flue gases may be below 90 °C. Therefore, thermally-insulated flues meeting thermal transmittance coefficient Group I requirements according to DIN 18160 T1 or other
appropriate, officially approved moisture-resistant exhaust systems may be connected to the hearths.
Frequently, these requirements on the flue are not satisfied during the renovation of existing systems. We therefore suggest an evaluation by the local building inspector before installing the boiler system. In this way appropriate modifications can be made to the flue before system installation. (See the technical data for flue calculation values.)
Energy-saving intake regulators or explosion flaps are not allowed to be installed in the living area.
Comply with the statutory regulations and directives.
5
For the Installer
2.1
Delivery, packaging
Hydraulic equipment
type/order no.
with circulation pump, expansion tank 12 l, safety valve and pressure
gauge
BAXI
2.1.1 BAXI Bioflo
The boiler is supplied on a wooden pallet covered with a plastic sack. The cladding parts are in a separate cardboard box. Cleaning tools are packed in the combustion chamber and the ash pan.
BAXI Bioflo is delivered without cladding (door, cover, side panels) on a pallet, without wood partitions. The
cladding parts are in a separate cardboard box. The taking-in weight is less than 200 kg, the taking-in width is
55 cm.
2.1.2 Supplied accessories
– Heat shield
patented cover for the front window to reduce heat radiation during summer operation
– Adapter for external combustion air supply
already integrated in the boiler if ordered; connection for plastic pipes Ø 75 mm.
– Flue conection adapter
6
For the Installer
2.2 Installation
2.2.1 Installation room
Basically, any room with normal air humidity and living space temperature in the living area is suitable for installation, providing it has a flue connection with an adequate draught (see technical data for flue requirements)
and satisfies the statutory regulations and directives.
Note: Due to the operating and flame noises, we do not recommend installing the device in bedrooms or quiet
rooms.
BAXI Bioflo is not allowed to be installed in rooms that are very dusty or humid (e.g. bathrooms, sanitary rooms,
etc.). The combustion air must be free from halogens and hydrocarbons (detergents, e.g. chlorine, ammonia,
fluorine, etc.) otherwise malfunctions may occur.
The installation room should not be too small otherwise the room could be overheated by the heat radiation.
The recommended rule of thumb is: The installation room should account for at least 15% of the area to be
heated.
The boiler must be installed in dry, frost-free premises!
Limits (maximum):
Air humidity: 85% at 25° room temperature (noncondensing)
Room temperature +2 to 40°C
2.2.2 Heat radiation
The viewing panel of the BAXI Bioflo means it is inevitable that heat will be radiated into the installation room.
The distribution of heat between air and water heating is approx. 15 : 85 % without the heat shield and approx.
9 : 91 % with the heat shield (.
The following should be noted:
– Heating domestic water in summer:
Heat radiation always heats up the installation room when domestic water is being heated. Although the
amount of radiated heat can be significantly reduced by using the supplied atented heat shield, it can never
be totally prevented.
This means it may not be possible to rule out overheating the installation room on hot days and, above all,
during the summer months.
To remedy this, we recommend heating domestic water using an alternative system such as solar or immersion heater supplementation with indirect cylinder..
– Heating surfaces/radiators in the installation room:
The heat radiation from BAXI Bioflo has been reduced to the minimum necessary, therefore a corresponding
heating surface or radiator should also be installed in the installation room. Heating surfaces in the installation room are essential when the system is combined with alternative heat generators (solar, accumulator tank
or solid fuel boiler) – Fig. 2.
We recommend using thermostat heads in the installation room.
– Minimum room size:
BAXI Bioflo very rapidly provides the necessary amount of heat at very low building heat demands or in
autumn/spring. Despite the fact that the boiler quickly reduces its output to the minimum level or actually
switches itself off entirely, there will nevertheless be a corresponding amount of heat radiation into the installation room.
This means it may not be possible to rule out overheating the installation room on hot days and, above all,
during the autumn/spring.
As a remedy, we recommend having an installation room with a minimum size of approx. 15 % of the entire
area to be heated) – Fig. 2.
7
For the Installer
Fig. 2
BAXI Bioflo in an installation room (more than approx. 15 % of the entire area to be heated)
2.2.3 Installation siting
– The minimum service clearances from flammable materials and for connections, cleaning and maintenance must
be complied with building regualtions part J for full guidance
–– BAXI Bioflo must be placed directly on hearth contstruction - compliant with Part J.
The configuration of the entire system must comply with technical fire protection requirements in accordance with the applicable regulations, standards and guidelines
Wall hinges - fireguard minimum requirments of part J for fire protection safety.
8
For the Installer
2.2.4 Combustion air
An adequate supply of combustion air is absolutely essential. The following combustion air flow is required for
operation at max. heat output:
BAXI Bioflo 120 (12 kW):
approx. 26 m3/h
There are various possible ways of supplying the combustion air:
a) Operating with room air
(Combustion air supply from the installation room or adjacent room)
b) Operating independently of the room air
(Combustion air supply from ventilation draught in the chimney)
Note: There may be an induction noise from the air supply induction point (air opening in the device), depending on
the modulation. The noise can be transferred outside or into an adjacent room by relocating the air supply induction
point.
Negative pressures in the installation/induction room with point a) Operating with room air are not permitted.
The function and safety of BAXI Bioflo is affected when combining with room ventilation systems and combustion air supply from the installation room or adjacent room. Room ventilation systems must switch off automatically when the negative pressure in the device is more than 4 Pa below the external pressure. Special ventilation systems are available for controlled living area ventilation in combination with solid fuel systems – refer
to information provided by the manufacturers of ventilation systems.
If ventilation systems (e.g. extractor hoods or pneumatic pumping systems, etc.), we recommend routing the
combustion air according to point b) Operating independently of the room air. This means it is possible to decouple the combustion air from the air conditions in the installation room to a large extent.
In addition, the device is equipped as standard with a pressure monitoring device in the fire box in order to
guarantee safe operation of the device.
a) Operating with room air:
(Combustion air supply from the installation room or adjacent room)
Always ensure there is a sufficient combustion air supply (no windows and doors that provide a complete
air seal).
Combustion air supply from a well ventilated adjacent room via an air intake pipe.
The combustion air is carried along an air intake pipe from a well ventilated adjacent room (e.g. stairwell) to
the BAXI Bioflo. This avoids the induction noise in the installation room during operation. The air supply is
carried in commercially available plastic pipes 1) Ø 75 mm. The maximum induction length is 9 m, each 90°
bend1) reduces the length by 1 m.
Combustion air supply directly from the installation room:
The combustion air is drawn directly by the device from the installation room, therefore the installation room
has to be adequately ventilated.
Malfunctions or complaints occasioned by inadequate combustion air will not be covered by the
guarantee!
b) Operating independently of the room air:
(Combustion air supply from ventilation draught in the chimney)
This variant is to be preferred over operating with room air, because it ensures that there will always be sufficient combustion air and that the induction noise during operation will be transferred to the outside.
The air supply is carried in commercially available plastic pipes of diameter 75 mm. The maximum induction
length is 9 m, each 90° bend reduces the length by 1 m.
9
For the Installer
2.3 Dimensional sketches
2.3.1 BAXI Bioflo flue gas and air supply connection
All dimensions in mm:
Side view
Front view
A.........Flue gases
Z .........Air intake
Fig. 5
BAXI Bioflo flue gas and air supply connection
Standard:
Accessories – for exhaust pipe connection in the middle:
1 . . . . .Double exhaust pipe bend rigid
2 . . . . .Pipe clamp
Fig. 6
BAXI Bioflo flue gas connection – standard
Fig. 7
10
BAXI Bioflo flue gas connection
with accessories
For the Installer
2.3.2 BAXI Bioflo
with circulation pump, expansion tank 12 l, safety valve and pressure gauge
Front view
Side view
All dimensions in mm:
HV
HV
HR
HV.......Heating feed (3/4” pipe)
HR.......Heating return (3/4” pipe)
Fig. 8
BAXI Bioflo with hydraulic fittings fittings
11
For the Installer
2.4
Minimum service clearances for fire protection, cleaning
and maintenance
The following minimum service clearances from flammable materials and for connections, cleaning and maintenance
must be complied with.
The configuration of the entire system must comply with technical fire protection requirements in accordance with the applicable regulations, standards and guidelines.
2.4.1 Masonry feed-throughs for the exhaust pipe
Examples of masonry feed-throughs tested by the IBS – Institut für Brandschutztechnik und Sicherheitsforschung
(Institute for Fire Protection Technology and Safety Research)
Multi-layer flammable wall
Fig. 9
Multi-layer flammable wall
Tested masonry feed-throughs for exhaust pipe
Multi-layer flammable wall
There must be a gap of 200 mm from flammable components all round the exhaust pipe.
12
Non-flammable wall
For the Installer
2.4.2 Minimum service clearances with flue gas tube connection
straight back
Dimension
Clearance
Description
a
800 mm
Minimum clearance in radiation area (front window) from flammable materials
b
500 mm
Minimum lateral clearance from non-movable objects (e.g. wall)
c
50 mm
Minimum lateral clearance from movable objects (e.g. furniture)
400 mm
Minimum clearance from flammable walls with non-insulated exhaust pipe
Minimum clearance from flammable walls with insulated exhaust pipe (20 mm)
f
200 mm
1)
Minimum clearance from flammable walls with tested double-walled insulated
exhaust pipe, acc. to accreditation of connecting piece 2)
1)
Note: The intake air line must be non-flammable (e.g. flexible aluminium tube) if the exhaust pipe is uninsulated.
If the walls are non-flammable, there are no fire protection reasons for a minimum service clearance
from the exhaust pipe and no need to insulate the exhaust pipe.
Fig. 9
BAXI Bioflo – view from above
1)
Technical data for exhaust pipe insulation: Mineral wall insulation; melting point: >1000 °C; thermal conductivity: < 0.04 W/mK
2)
The minimum service clearance is determined by the design specifications (Ø of the double pipe) of the flue gas system used
or the minimum service clearances demanded in the accreditation.
13
For the Installer
2.4.3 Minimum service clearances with flue gas tube connection to the
left or right side
Dimension
Clearance
a
800 mm
Minimum clearance in radiation area (front window) from flammable materials
b
500 mm
Minimum lateral clearance from non-movable objects (e.g. wall)
c
50 mm
Minimum lateral clearance from movable objects (e.g. furniture)
d1)
f
Description
>500 mm
Minimum clearance from flammable walls with non-insulated exhaust pipe
>305 mm
Minimum clearance from flammable walls with insulated exhaust pipe (20 mm)
>210 mm
2)
>250 mm
2)
1)
Minimum service clearance from flammable walls, flue connection to left or right
and tested double-walled insulated exhaust pipe 2)
>140 mm
Minimum service clearance from non-flammable walls, flue connection to left or right
400 mm
Minimum clearance from flammable walls with non-insulated exhaust pipe
200 mm
Minimum clearance from flammable walls with insulated exhaust pipe (20 mm)
>50–70 mm
3)
1)
Minimum clearance from flammable walls with tested double-walled insulated
exhaust pipe, acc. to accreditation of connecting piece 2)
1)
Note: The intake air line must be non-flammable (e.g. flexible aluminium tube) if the exhaust pipe is uninsulated.
If the walls are non-flammable, there are no fire protection reasons for a minimum service clearance
from the exhaust pipe and no need to insulate the exhaust pipe.
Fig. 10
BAXI Bioflo – view from above
1)
Technical data for exhaust pipe insulation: Mineral wall insulation; melting point: >1000 °C; thermal conductivity: < 0.04 W/mK
2)
The minimum service clearance is determined by the design specifications (Ø of the double pipe) of the flue gas system used
or the minimum service clearances demanded in the accreditation.
14
For the Installer
2.5
System
The boilers are designed and approved as heat generators for hot water heating systems with a permissible
flow temperatures of up to 90°C. The maximum flow temperature is factory-set at 75°C. They may be installed
only in sealed systems.
2.5.1 Heating fittings
Safety valve 2.5 bar (in BAXI Bioflo under the front cover as standard):
The safety valve is type-tested (code letter “H”). Only safety valves of this kind are allowed to be used. The drainage
line from the safety valve must be provided by the client. The line can be routed backwards on the left side
between the pellet reservoir container and the left side panel – Fig. .11
Break out the cut-out on the rear wall.Please note:
- Have the function checked by an expert on start-up and at least once a year.
Break out the cut-out in the rear wall
Drain line from safety valve
Fig. 11
Drain line from safety valve
Expansion tank:
An expansion tank must be installed in water heating systems in accordance with the technical regulations. The size
of the expansion tank depends of the parameters of the heating system and must be calculated on a case-by-case
basis. The flat pressure expansion tank installed in BAXI Bioflo versions is designed for a feed pressure of 1.0 bar
and a content of 12 l.
An additional expansion tank must be provided by the client if this volume is not sufficient.
Pressure gauge (in BAXI Bioflo at the front behind the cladding door as standard):
The system pressure should be at least 1 bar. Check the system pressure, more frequently at first and then twice
a year later on.
Bleeder valve:
Installed as standard in all boilers under the front cover. Also have a manual ventilation function behind the
left side panel at the feed above the circulation pump.
Low-water cut-off:
A low-water cut-off is not required for systems providing up to 300 kW nominal thermal output, if it can be
assured that excess heating will not result from a lack of water in the system.
The boilers are equipped with an electronic temperature regulator and a type-tested safety temperature limiter.
If the boiler is above the radiators, then a low-water cut-off must be installed.
15
For the Installer
Circulation pump (installed as standard in BAXI Bioflo):
The circulation pump shaft is lubricated by water, therefore the pump is never allowed to run without water.
Model: HUP 15–4.0 U
Installation dimension: 130 mm
Diagram 1
Pump characteristic curve
2.5.3 Domestic water (hot water tank)
If BAXI Bioflo is used for loading a hot water tank, a gravity brake must be installed in the heating return. This
is provided as standard with BAXI Bioflo.
2.5.4 Return temperature
The return flow temperature increase installed as standard means that BAXI Bioflo can be operated with a return
temperature down to min. 20 °C. No external return flow temperature increase is required.
2.5.5 Accumulator tank
In principle a pellet boiler system does not need a buffer tank. A guaranteed minimum heat consumption is
required, e.g. fit a consumer circuit that cannot be blocked off or do not fit thermostat valves on all radiators.
Exceptions:
If the total heating requirements of the building according to the EN 12831 calculation are less than 50 % of the
boiler’s nominal output, we would recommend integrating a buffer tank in the system. This means that the BAXI
Bioflo loads the buffer tank with a return hold-up group.
Boiler installation criteria:
– controlled residential area ventilation is an advantage if the boiler is being installed in a small space or if
building heat loads are low
– the room temperature in the installation room is too high
– BAXI Bioflo operating times are set by the system control
16
For the Installer
2.5.6 Heating water
a) The chemical composition of the heating water must meet the specifications of ÖNORM H 5195 Part 1 or VDI
2035 P1. According to ÖNORM M 5195 Part 1, the condition of the heating water must be checked every 2 years
by a heating technician in order to avoid corrosion and sediment accumulation in the heating system.
The check must be performed once every year in heating systems with more than 1500 litres of heating water.
b) The pipe lines and heating appliances should be thoroughly rinsed before the boiler is connected.
c) To protect the boiler from contamination from the heating system, installation of a dirt trap is required in old
or existing systems (mesh size 0.5 mm) with maintenance cocks installed in the return line.
d) If oxygen diffusion or sludge build-up cannot be prevented, the system must be segregated by means of a
heat exchanger.
e) If antifreeze is used, a minimum volume of 20 % antifreeze is required, otherwise corrosion prevention is
not guaranteed.
2.5.7 Water-side resistance (pressure loss)
Flow rate (m3/h)
BAXI Bioflo
Pressure loss (mbar)
Diagram 2 water-side resistance - BAXI Bioflo
17
For the Installer
2.6
Installing the cladding
The cladding comprises the following parts:
1
2
3
4
5
6
7
8
5
4
1
Rear left side panel
Left side panel
Front cover plate
Front cover
Rear cover
Right side panel
Rear right side panel
Cladding door
7
2
8
3
6
Fig. 12
Cladding parts
Installation sequence:
– Fit „rear cover“ (part 5) at the rear, use 4 nuts to secure to reserve supply container – Fig. 13.
– Connect 4-pin plug of Info panel cable (5-pin plug remains free), secure earth cables for screw to reserve
supply container – Fig. 14.
Info panel plug
Secure earth
cable
Fig. 13
Fit rear cover at 4 points
Fig. 14
18
Connect 4-pin InfoWIN plug, fit earth cable to
reserve supply container
For the Installer
– Screw on the gas springs for BAXI Bioflo with manual filling (Fig. 15)
– Take pressure gauge provided out of ash pan and screw into shut-off valve at front – Fig. 16.
BAXI Bioflo with manual filling
Gas spring
Fig. 15
Fig. 16
Screwing on gas springs
Screwing pressure gauge into shut-off valve
– Secure the “left side panel” (part 2) to the boiler at the rear using 3 screws – Fig. 17 and front using 2 screws
– Fig. 18.
Fig. 17
Screwing the side panel on at
the rear at 3 points
Fig. 18
Screwing the side panel on at
the front at 2 points
– Secure the “front cover plate” (part 3) onto the side panel using 2 screws – Fig. 19
– Secure the “right side panel” (part 6) to the boiler at the rear using 3 screws, at the front using 2 screws and
screw onto the “front cover plate” (part 3) – Fig. 20.
Fig. 19
Screwing the front cover plate on at
the front at 2 points
Fig. 20
19
Mounting the right side panel in the
same way as the left side panel
For the Installer
– Hook in the “rear side panels” (parts 1 and 7) – Fig. 21.
– Secure the “rear left side panel” using a screw at the rear – Fig. 22.
Fig. 21
Hooking in side panels at the rear
Fig. 22
Securing the left side panel using a
screw at the rear
– Screw both hinges of the “cladding door” (part 8) onto the left side panel using – Fig. 23.
– Check the setting of the door safety switch; close the door, the door safety switch must be operated about 2 – 3 mm
before the door magnet closes (audible clicking of the switch); adjust the actuation play with the screw if necessary
– Fig. 24.
Screw
door safety switch
Fig. 23
Inserting the hinges in the side panel
Fig. 24
Checking the setting of the door safety switch
– Place the “front cover” (part 4) onto the side wall with its pins in the holes provided on the side panel – Fig. 25.
– Press the button (Fig. 26), it must be easy to open the glass cover, align the front cover if necessary.
Fig. 25
Putting on the front cover
Fig. 26
20
Checking the button moves easily
For the Electrician
3.1
Electrical connections
The pellet flue-connected boiler and related accessories are designed to be installed only in dry areas (protection type IP 10).
Installation of electrical components may only be performed by a qualified technician. The regulations and specifications of ÖVE, VDI, SEV and local ordinances must be followed.
– The mains connection must be protected against short circuit with a 13 A delayed-action fuse.
– On site, the technician must install an all-pole disconnection with at least 3 mm contact gap at the mains access
point. Current-operated r.c.d. protection switches are considered all-pole disconnections (ÖVE regulation)???.
The boiler is pre-wired and internally fused with a T 6.3 A fine-wire fuse to protect against short circuit.
The electrical power consumed depends on whether a fully automated pellet feed (suction turbine) is connected, and on the number of actuators supplied (pumps, mixing valves, etc.).
In areas with increased power surge risk (e.g., lightning strikes in regions prone to storms), we recommend
installation of an appropriate surge protector.
21
For the Electrician
Electrical power supply 230 VAC (mains plug) and electrical connections:
Electrical power supply 230 VAC (mains power plug) and the control panel with all electrical connections are
located behind the right side panel cladding. The mains plug, safety thermostats and fuse are located on the
outside of the control panel. The control panel includes the main board and the connection terminals (screwless spring-type terminal) – Fig. 27.
Mains power plug
(230 VAC)
Cover of safety thermostat
Fuse T 6.3 A
Cover of safety thermostat
auger tube
Control panel
Fig. 27
Control panel
Electrical cables must not touch heating and exhaust pipes, nor must they come in contact with noninsulated boiler components. They are to be sufficiently braced and provided with a protective tube.
To access the control panel:
– The rear right side panel must be unhooked and removed upwards.
– Disconnect the mains power plug and remove the screw behind it – Fig. 28.
Mains power plug
(230 VAC)
Fig. 28
Disconnecting the mains power
plug and removing the screw.
Fig. 29
22
Cable feed-throughs – rear view
For the Service Technician
4.1
Initial start-up and operating instructions
Windhager Customer Service or the customer service partner will start up the boiler first of all, and will familiarize the customer with the system operation and cleaning of the boiler, with reference to the Operating Manual.
The following preconditions must be met before you order the initial start-up:
1.) Boiler installed correctly.
2.) System fully wired up electrically.
3.) System rinsed, filled and vented – heat consumption must be possible.
4.) Boiler connected to domestic water and filled.
5.) Sufficient quantity of fuel available (pellets, split logs, oil or gas).
6.) The customer must be present during start-up.
The initial start-up cannot be carried out if any of these points is neglected. The customer will be charged for
any unnecessary costs arising as a result.
Start-up and maintenance are part of the guarantee requirements of the enclosed “guarantee limitations”.
Note: During the first few weeks after start-up, condensation can occur in the combustion chamber, ash pan
and on the heating surfaces. This has no effect on the function and service life of the boiler.
4.2
Service and repair work
Service and repair may be performed only by appropriately qualified technicians.
Always disconnect the mains power plug for service or repair purposes.
After being switch off, the boiler and accessories are not completely without power! When replacing system
components (pumps, mixing valves, etc.) prevent all power input by removing the mains power plug.
Remove the right side panel: Unhook the rear side panel, disconnect the mains power plug, remove the securing screw under the mains power plug (Fig. 30) and swivel open the control panel.
Remove the left side panel: Remove the securing screw at the rear on the left side panel (Fig. 31) and unhook
the side panel.
Mains power plug
(230 VAC)
Fig. 30
Fig. 31
Disconnecting the mains power
plug and removing the screw.
23
Removing the securing screw
For the Service Technician
4.3
Technical data for calculating the flue
gas system acc. to EN 13384-1
BAXI Bioflo pellet flue-connected boiler
Formula symbols
Unit
Set nominal thermal output
QN
kW
12.0
Nominal heat load
QB
kW
12.7
(firing thermal output)
σ (CO2)
.
m
%
12.3
kg/s
0.0076
Flue gas temperature
TW
°C
125
Necessary feed pressure
PW
Pa
5 (0)1)
mm
100
Volume concentration of CO2
Flue gas mass flow rate
Flue gas connection diameter
1)
Feed pressure 0 can be used in the calculation for marginal cases.
4.4
Technical data – General
BAXI Bioflo pellet flue-connected boiler
Unit
Boiler class according to EN 303-5
3
Set total thermal output
kW
12
Set water thermal output range
kW
3.8 – 10.4
kW
0.6 – 1.6
0.3 – 1.1
°C
125/80
mbar
3.7
13.6
Boiler temperature control range
°C
60 – 75
Max. operating pressure
bar
3
Test pressure
bar
4.5
l
30
Pellet reservoir
l
kg
60
approx. 37
Weight (net)
kg
218
mm
530 x 691 x 1230
A
5.8
W
860
W
650
W
50
33
W
8
Room thermal output range without heat shield (bottom)
with heat shield (top)
Firing efficiency
Flue gas temperature
Rated load
Rated load/part load
Water-side resistance
∆T = 20 °K
∆T = 10 °K
Boiler water volume
Dimensions W x D x H
Electrical power consumption of pellet boiler:
maximum current consumption
maximum for igniting
(ignition, motor, blower,)
medium power for igniting
(with purging, without flame stabilisation)
Heating operation
Rated load
Part load
Idle operation
24
For the Service Technician
4.5
Service level
System parameters, start-up or actuator test can be displayed, modified and/or performed on the service level.
Only trained service personnel may perform system modifications on the service level.
Structure on the service level:
Menu
Operator level
Service level
Settings on the operator level
see VarioWIN Operating Manual.
Reserved for trained service
personnel only.
Parameters
Start-up
Auger conveyor
Number of
burner starts
Hysteresis
Burner ON
Fuel quantity
Auger conveyor
Induced draught fan
Feed unit
Type of pellet
feed system
Maximum value of
set temperature
Delivery time
ignition phase
Auger conveyor
Correction of
cleaning interval
Operating time of
suction turbine
Set temperature ext.
heating requirement
Ash removal
Actuator test
Profile
ash removal
Ash compression
Ignition element
Air intake/
exhaust flap
Probe switching
Suction turbine
25
Limits for
blower speed
Boiler pump
Install
display module
Language
For the Service Technician
Service level
Boiler temperature
Pressing the Menu button changes the display to the “Operator
level” and “Service level” – Fig. 32.
42
°C
5s
(Operating phases)
Info
Menu
RESET
Fig. 32
Use the arrow buttons to select the “Service level” sub-menu
(Fig. 54) and confirm with the Choose button – Fig. 33.
Operator level
Service level
5s
Choose
Back
RESET
Fig. 33
Operator level
Service level
5s
Choose
Back
RESET
Fig. 34
Press the 5 s button for longer than 5 seconds – Fig. 35 and select
the required sub-menu of Parameters, Start-up or Actuator test
using the Choose button – Fig. 36.
Service level only
for trained
service personnel
5s
5 s
RESET
Fig. 35
Press for 5
seconds
Parameters
Start-up
Actuator test
5s
Choose
The menu item or sub-menu item is exited by pressing the Back
button or after a delay of 45 seconds.
Fig. 36
26
Back
RESET
For the Service Technician
4.5.1 Parameters
The following parameters can be selected with the arrow buttons, then confirmed using the Choose button.
–
–
–
–
–
–
–
–
–
–
–
–
–
Number of burner starts
Fuel quantity auger conveyor
Delivery time ignition phase
Hysteresis Burner ON
Maximum value of set temperature
Set temperature ext. heating requirement
Profile ash removal
Correction of cleaning interval
Air intake/exhaust flap
Limits for blower speed
Install display module
Language
Installation
Number of burner starts
Number of
burner starts
1.350
The number of burner starts of the BAXI Bioflo is displayed – Fig. 37.
Fig. 37
Fuel quantity auger conveyor
Back
Fuel quantity
Auger conveyor
Actual value
6.0 kg
Range
6.0 kg
Correction
0
The calculated fuel quantity (actual value) and the range is displayed in kg/h,
and can be adjusted – Fig. 38.
Choose
Fig. 38
BAXI Bioflo
Actual
value
Factory setting:
Setting range:
6.0 kg/h
±2 kg of range
Range
Factory setting:
Setting range:
6.0 kg/h
6.0 – 8.0 kg/h
Correction
Factory setting:
Setting range:
0
±5
Delivery time ignition phase
Delivery time
ignition phase
120
Fuel quantity in the ignition phase – Fig. 39.
BAXI Bioflo
Fig. 39
Factory setting:
Back
–
Save
Yes
No
+
120 s
Setting range:
100 – 150 s
Hysteresis Burner ON
Hysteresis
Burner ON
Switching hysteresis for burner control – Fig. 40
Factory setting:
Setting range:
s
5K
0 – 20 K
Fig. 40
27
–
Save
Yes
No
5
K
+
For the Service Technician
Maximum value of set temperature
Maximum value of
set temperature
75
°C
This is the maximum setpoint achievable in normal heating operation – Fig. 41.
Factory setting:
Setting range:
75 °C
60 – 75 °C
Fig. 41
Set temperature ext. heating requirement
–
+
Set temperature ext.
heating requirement
70
°C
This is the set temperature for external heating requirement – Fig. 42.
Factory setting:
Setting range:
Save
Yes
No
70 °C
35 – 75 °C
Fig. 42
Profile ash removal
This adjuster can be used to adjust the ash removal from the burner pot for
different levels of pellet quality – Fig. 43.
Level 0: very low proportion of ash – no ash removal in modulation mode.
to
Level 3: very high proportion of ash (possibly formation of slag) – frequent ash
removal in modulation mode
Factory setting: Level 1
–
Save
Yes
No
Fig. 43
Ash removal
Level 0
Level 1
Level 2
Level 3
Save
Yes
No
Fig. 44
Correction of
cleaning interval
Actual value
0
min.
-50
max.
+50
Save
–
Yes
No
+
Restore factory setting for next delivery of pellets.
Correction of cleaning interval
The cleaning interval is basically dependent on the proportion of ash in the
pellets and the ash removal profile. This adjuster can be used to extend or shorten the cleaning interval by ±50 %.
The standard setting is a cleaning interval determined by testing. – Fig. 44.
Factory setting:
Setting range:
0%
±50 %
If too long a cleaning interval is selected, the ash container may overfill.
28
%
%
%
+
For the Service Technician
Air intake/exhaust flap
Factory setting:
Air intake/exh. flap
Control
OFF
Operating time in s 300
Control
OFF
Operating time in s 300
Setting range:
30 – 600 s
Fig. 45
Choose
Back
The set operating time should be twice as long as the actual operating time of the air intake/exhaust flap.
Limits for blower speed
Limits for
blower speed
minimum
maximum
minimum
maximum
1250
2050
Factory setting:
rpm
Setting range:
rpm
1150–1450 1950–2250
Step width:
rpm
50
Fig. 46
Display module installation
Choose
1250
2050
Back
Install
display module
Start installation
procedure
This is not required for the BAXI Bioflo.
Fig. 47
Language
Selection of „Language“ for the display texts on InfoWIN.
Fig. 48
29
Choose
Back
Language
Deutsch
English
Français
Italiano
Castellano
Choose Back
For the Service Technician
4.5.2 Start-up
The auger conveyor and the feed can be selected on the Start-up level with the arrow buttons and the selection confirmed with the Choose button. A self-test is started at the end of the start-up.
Auger conveyor
Start-up
Auger conveyor
Feed
The auger conveyor can be switched on for 6 minutes.
Fig. 49
Feed
Choose
Back
Depending on the set feed system, the feed and each probe including purging can be started up.
4.5.3 Actuator test
The following actuators can be selected with the arrow buttons, then confirmed and started using the Choose
button. The actuators are switched off again after 1 minute. A self-test is started at the end of an actuator test.
–
–
–
–
–
–
Induced draught fan
Auger conveyor
Ash removal
Ignition element
Ash compression
Boiler pump
Fig. 50
Induces draught fan
Auger conveyor
Ash removal
Ignition element
Ash compression
Suction turbine
Choose Back
Probe switching
Boiler pump
Choose
Fig. 51
30
Back
4.6
BAXI Bioflo basic circuitry
092464/01
For the Service Technician
31
4.7
BAXI Bioflo connecting diagram
For the Service Technician
32
Connecting diagram for air intake/exhaust flap
Internal
External
33
Motor
Extra-low voltage
Automatic firing device
Low-voltage
Limit switch
Air intake/exhaust flap with limit switch
Internal
External
Extra-low voltage
Automatic firing device
Low-voltage
Motor
Air intake/exhaust flap without limit switch
091719/01
The air intake/exhaust flap is directly connected to the automatic firing device (see basic circuit diagram 4.6) at plug X4 (motor) and X14 (limit switch).
See section 4.5.1 Parameters; Air intake/exhaust flap for the setting of the parameters for the air intake/exhaust flap.
4.8
For the Service Technician
Notes
Guarantee & Warranty Limitations
The guarantee and warranty limitations require that the boiler
and related accessories be properly installed, commissioned and
started up by either i) heateam service engineer or ii) a HETAS
approved engineer and the HETAS approved number must be
logged on the supplied warranty card; otherwise the
manufacturer’s guarantee will not be honoured.
Malfunctions resulting from improper operation or adjustment
as well as use of poor or not recommended fuel types are not
covered by the guarantee and warranty. Further, the warranty
shall be void if equipment other than those provided by
heateam are installed. The special warranty restrictions for your
system are available in the “Warranty Conditions” folder
supplied with your boiler.
Start-up and regular maintenance following the terms of the
“Warranty Conditions” will assure safe, environmentally
friendly and economical operation of your system. We
recommend that you obtain a maintenance service contract.
The Baxi Bioflo wood pellet sealed central heating system
boiler includes a one year parts and labour guarantee.
The labour guarantee is subject to a set up and test being
completed by a Baxi Engineer or Baxi approved installer
(HETAS Qualified).
Baxi offer a free set up and test with this product. Please
contact Baxi on 0844 871 1568 to arrange this service.
Open Monday - Friday, 8am - 6pm
Saturdays, 8.30am - 2pm
We are closed on Christmas Day & New Year’s Day
Alternatively your HETAS qualified installer must complete the
enclosed set up and test checklist and warranty registration
card and return to the address below
Warranty Registrations
Baxi Heating UK Ltd
Brooks House
Coventry Road
Warwick
CV34 4LL
All descriptions and illustrations provided in this leaflet have been carefully
prepared but we reserve the right to make changes and improvements in
our products which may affect the accuracy of the information contained in
this leaflet. All goods are sold subject to our standard Conditions of Sale
which are available on request.
BA X I
A Tr a din g D i v i s i on of B a x i Heat i ng U K Lt d ( 3879156)
Brooks House, Coventry Road, Warwick. CV34 4LL
After Sales Service & Technical Enquiries 0844 871 1568
Website www.baxi.co.uk
e&oe
© Baxi Heating UK Ltd 2010
Issue 720574501 (9/10)