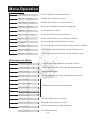
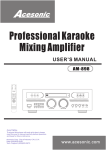
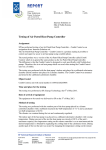
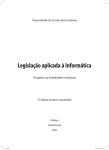
1
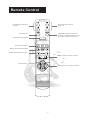
Professional DSP Karaoke Mixer USER’S MANUAL v2 KM-360 CAUTION: To assure this player will work at its best, please read this user’s manual carefully before operation and keep for future reference. Acesonic Corp. City of Industry CA,U.S.A Sale:(626)820-0645 Tech. Support:(626)820-0670 www.acesonic.com Warnings, Cautions and Others Mises en garde, precautions et indications diverses FCC INFORMATION (U.S.A.) 1.This equipment has been tested and found to comply with the limits for a Class B digital device, pursuant to part 15 of the FCC Rules. These limits are designed to provide reasonable protection against harmful interference in a residential installation. This equipment generates, uses and can radiate radio frequency energy and, if not installed and used in accordance with the instructions, may cause harmful interference to radio communications. However, there is no guarantee that interference will not occur in a particular installation. If this equipment does cause harmful interference to radio or television reception, which can be determined by turning the equipment off and on, the user is encouraged to try to correct the interference by one or more of the following measures: Connect the equipment into an outlet on a circuit different from that to which the receiver is connected. Consult the dealer or an experienced radio/TV technician for help. 2.IMPORTANT: When connecting this product to accessories and/or another product use only high quality shielded cables. Cable(s) supplied with this product MUST be used. Follow all installation instructions. Failure to follow instructions could void your FCC authorization to use product in the U. S. A. For Canada/Pour le Canada CAUTION: TO PREVENT ELECTRIC SHOCK, MATCH WIDE BLADE OF PLUG TO WIDE SLOT,AND FULLY INSERT. ATTENTION: POUR EVITER LES CHOCS ELECTRIQUES, INTRODUIRE LA LAME LA PLUS LARGE DE LA FICHE DANS LA BORNE CORRESPONDANTE DE LA PRISE ET POUSSER JUSQUAU FOND. For Canada/Pour le Canada THIS DIGITAL APPARATUS DOES NOT EXCEED THE CLASS B LIMITS FOR RADIO NOISE EMISSIONS FORM DIGITAL APPARATUS AS" SET " OUT IN THE INTERFERENCE-CAUSING EQUIPMENT STANDARD "ENTITLED DIGITAL " APPARATUS, ICES-003 OF THE DEPARTMENT OF COMMUNICATIONS. CET APPAREIL NUMERIQUE RESPECTE LES LIMITES DE BRUITS RADIO ELECTRIQUES APPLICABLES AUX APPAREILS NUMERIQUES DE CLASSE B PRESCRITES DANS LA NORMESUR LE MATERIEL BROUILLEUR: APPAREILS NUMERIQUES , NMB-003 EDICTEE PAR LE MINISTRE DES COMMUNICATIONS. Caution Disconnect the electrical plug to shut off power completely. The POWER on the unit is not off from the electrical plug when the POWER button on the front panel is not pressed in. The lightning flash with arrowhead symbol, within an equilateral triangle is intended to alert the user to the presence of uninsulated dangerous voltage within the product's enclosure that may be of sufficient magnitude to constitute a risk of electric shock to persons. CAUTION RISK OF ELECTRIC SHOCK DO NOT OPEN The exclamation point within an equilateral triangle is intended to alert the user to the presence of important operating and maintenance (servicing) instructions in the literature accompanying the appliance. CAUTION: TO REDUCE THE RISK OF ELECTRIC SHOCK. DO NOT REMOVE COVER (OR BACK). CAUTION To reduce the risk of electrical shocks, fire, etc: 1.Do not remove screws, covers or cabinet. 2.Do not expose this appliance to rain or moisture. A1 ` Important Safety instructions 1. Read These Instructions. 2. Keep These Instructions. 3. Heed All Warnings. 4. Follow All Instructions. 5. Do not use this product near water. 18. Overloading Do not overload wall outlets, extension cords, or integral convenience receptacles as this can result in a risk of fire or electric shock. 19. Object and Liquid Entry Never push objects of any kind into this product through openings as they may touch dangerous voltage points or short-out parts that could result in a fire or electric shock. Never spill liquid of any kind on the product. 6. Clean only with dry cloth. 7. Do not block any ventilation openings. 8. Do not install near any heat sources such as radiators, heat register, stoves, or other apparatus (including amplifiers) that produce heat. 9. Do not defeat the safety purpose of the polarized or grounding-type plug. A polarized plug has two blades with one wider than the other. A grounding type plug has two blades and third grounding prong. The wide blade or the third prong are provided for your safety. If the provided plug does not fit into your outlet, consult an electrician for replacement of the obsolete outlet. 10. Protect the power cord from being walked on or pinched particularly at plugs, convenience receptacles, and the point where they exit from the apparatus. 11. Only use attachments and accessories specified by the manufacturer. 12. Use only with the cart, stand, tripod, bracket, or table specified by the manufacturer, or sold with the apparatus. When a cart is used, use caution when moving the cart. 13. Unplug this apparatus during lightning storms or unused for long period of time. Apparatus combination to avoid injury from tip-cover. 14. Refer all servicing to qualified service personnel. Servicing is required when the apparatus has been damaged in any way, such as power-supply cord or plug is damaged, liquid has been spilled or objects have fallen into the apparatus, the apparatus has been exposed to rain or moisture, does not operate normally, or has been dropped. 20. Replacement Parts When replacement parts are required, be sure the service technician has used replacement parts specified by the manufacturer or have the same characteristics as the original part. Unauthorized substitutions may result in fire, electric shock, or other hazards. 21. Safety Check Upon completion of any service or repairs to this product, ask the service technician to perform safety checks to determine that the product is in proper operating condition. 22.Wall or Ceiling Mounting The product should be mounted to a wall or ceiling only as recommended by the manufacturer. Any mounting of the product should follow the manufacturer instructions, and should use a mounting accessory recommended by the manufacturer. 23. Wet location marking Apparatus shall not be exposed to dripping or splashing and no objects filled with liquids, such as vases, shall be placed on the apparatus. 24. Servicing If your product is not operating correctly or exhibits a marked change in performance and you are unable to restore normal operation by following the detailed procedure in its operating instructions, do not attempt to service it yourself as operating instructions, do not attempt to service it yourself as opening or removing covers may expose you to dangerous voltage or other hazards. Refer all servicing to qualified service personal. 15. This product should be operated only from the type of power source indicated on the marking label. If you are not sure of the type of power supply to your home, consult your product dealer or local power company. For products intended to operate from battery power, or other sources, refer to the operating instructions. 16. Protective Attachment Plug The product is equipped with an attachment plug having overload protection. This is a safety feature. See Instruction Manual for replacement or resetting of protective device. If replacement of the plug is required, be sure the service technician has used a replacement plug specified by the manufacturer that has the same overload protection as the original plug. 17. Power Lines An outside antenna system should not be located in the vicinity of overhead power lines or other electric light or power circuits, or where it can fall into such power lines or circuits. When installing an outside antenna system, extreme care should be taken to keep from touching such power lines or circuits as contact with them might be fatal. A2 Inedex Table of Contents 1.Features --------------------------------------------------------------------Page 2~3 2.Remote Control ------------------------------------------------------------Page 4~5 3.Front Panel View -------------------------------------------------------------Page 6 4.Rear Panel View --------------------------------------------------------------Page 7 5.System Setup---------------------------------------------------------------- Page 8 6.Basic Operation---------------------------------------------------------------Page 9 7.Music Menu Operation Music EQ Setting---------------------------------------------------------Page 10 Key Control----------------------------------------------------------------Page 10 Subwoofer Reducer------------------------------------------------------Page 11 Subwoofer LPF------------------------------------------------------------Page 11 Music Balance-------------------------------------------------------------Page 11 Music Auto Leveling------------------------------------------------------Page 12 Music Vocal Canceling---------------------------------------------------Page 12 Center channel Setup----------------------------------------------------Page 13 Surrounding Channel Setup--------------------------------------------Page 13 Center Volume Setup ----------------------------------------------------Page 13 8.Microphone Menu Operation Microphone Preset Max Volume----------------------------------------Page 14 Microphone Effect Volume-----------------------------------------------Page 14 Feedback Eliminator------------------------------------------------------Page 14 Reverb Time ---------------------------------------------------------------Page 15 Reverb Level --------------------------------------------------------------Page 15 Reverb Repeat ------------------------------------------------------------Page 15 Echo Delay -----------------------------------------------------------------Page 16 Microphone EQ------------------------------------------------------------Page 16 Microphone Noise Gate--------------------------------------------------Page 16 9.Other Operation Preset Memory-------------------------------------------------------------Page 17 Control Panel Lock/Unlock-----------------------------------------------Page 17 10.Menu Operation Music Control Menu-------------------------------------------------------Page 18 Microphone Control Menu------------------------------------------------Page 18 11. Troubleshooting ----------------------------------------------------------Page 19 12.Specification---- ----------------------------------------------------------Page 19 Package Includes: 1. Acesonic KM-360 Professional DSP Karaoke Mixer 2. User ' s Manual 3. Power Cable 4. Remote Control 1 FEATURES Feedback Eliminator - KM-360's real-time feedback eliminator processor was designed to provide state-of-the-art feedback elimination processing, while maintaining a simple control interface. You just select one of the 3 room sizes and it will automatically filter out howling feedback noise from the speakers. This is a necessary function for any venue that is looking for a professional sound environment or any KJ who are looking to prolong your speakers' life. Vocal Eliminator - KM-360 has a powerful vocal eliminator processor that can take out up to 90% of vocals from any regular audio CD. The KM-360's DSP utilizes one of the most powerful vocal elimination algorithm which removes more vocal with less impact on the background instruments. You can easily turn any regular CD into a karaoke track and begin your karaoke performance. Music Volume Auto Leveling - When you play audio tracks, some songs are louder than others even though the volume of your system remains the same. When you turn on the "Music Volume Auto Leveling" function, the KM-360 Mixer will automatically adjust your music to one of the six preset volume level. If your music level is too low, the KM-360 will boost the audio signal, and if the music is too loud, it will decrease the music volume back to your pre-set volume level. This function will eliminate lots unnecessary adjustment for KJs. Digital Effect Processor - The KM-360 has a powerful built-in Reverb and Echo Effects that can dramatically increase the quality of your performance. A "reverb" is created when a sound is produced in an enclosed space causing a large number of echoes to build up and then slowly decay. Reverb is most noticeable when the sound source stops but the reflections continue, decreasing in amplitude, until they can no longer be heard. The KM360 enables you to adjust the reverb time, reverb level, echo repeat and echo delay to optimize your sound effects. 5-Band Music and Microphone Equalizer (EQ) - The KM-360 has two independent 5 band equalizers for the music and microphone volume. Using a powerful EQ, it can compensate for your music or singer's shortcomings or when you would like to add more treble or bass to your performance. For music, the 5 band frequencies are at 100Hz, 330Hz, 1000Hz, 3.3 kHz and 10 kHz. For the microphone, the frequency bands are at 100Hz, 300Hz, 900Hz, 2.7 kHz and 8kHz. You can fine tune each frequency to your desired level. Multiple-Channel Surround Sound Configuration - The KM-360 has additional audio signal outputs for center speaker (C), sub-woofer (S), and 2 rear speakers (SR). You can configure the mixer using one of the many types of settings from 2.0 (L+R), 3.0 (L+C+R), 2.1 (L+R+S), 3.1 (L+C+R+S) and 5.1 (L+C+R+SR+SL+S). Using one of the many surround sound configurations will help you create the enveloping effect inside of a concert hall. Microphone Noise Gate - This powerful auto-mute function enables your mixer to automatically turn off the microphone when it is not in-use. The powerful noise gate function allows a microphone signal to pass through only when it is above the preset threshold value from 1 to 40. The mixer utilizes an advanced fading technique to cut in and out of sound so you will not hear your microphone abruptly cut off once it has fallen below the threshold or hear a loud click when the noise gate re-opens from mute. 5 Microphone Inputs with 2 XLR Input Connectors - The KM-360 includes 3 microphone inputs in the front and 2 balanced audio connectors (XLR) for high quality microphone signal inputs from the rear. This XLR connector allows for the use of long cables while reducing susceptibility to external noise. You can ensure to transmit the upmost vocal signal to your KM-360 Mixer using the XLR inputs. The rear inputs also enable you to connect to most wireless microphone units while reducing the messy cables going from the front. FEATURES S/PDIF Digital Input - KM-360 has a coaxial input to carry digital audio signals from your player to the mixer. Using the S/PDIF connector, you can send the purest audio signal to the mixer without any RF interference noise. RS-232 Serial Port PC Interface - KM-360 has a serial port for PC connections. You can control all functions of the KM-360 mixer using either 1) pre-bundled Windows™ software or 2) serial commands. This powerful feature makes the KM-360 a perfect PC karaoke companion. User Lock-Down Mode - The mixer has built-in 'user lock' feature that can prevent most users from changing any KM-360's setting. You can also define the maximum allowed volume for the music or microphone to prevent users from blowing out speakers. The KM360 is designed to be used in public places including bars or karaoke rooms. This useful function will help you preserve the best sound quality in all occasions. Center Speaker and Rear Speakers Signal Control - When you enable the center speaker and surround speakers, not only can you independently control its volume, but you can also independently control the balance between the music and vocal. Using the turning knob, you can fine tune if you want to hear only the music, only the vocal, or a mix of music+vocal from the center speaker or from the rear speakers. Subwoofer Signal Control - KM-360 has 3 powerful subwoofer setting to fine tune your subwoofer's performance. You can adjust 1) Subwoofer Volume 2) Subwoofer LPF: the Low-Pass-Filter range from 40 to 150Hz enable you to decide how much of the low frequency signal should be coming from the subwoofer 3) Subwoofer Volume Reducer: this function help you reduce subwoofer volume when you are singing. This dynamic feature comes handy when a singer has low vocal range. KM-360 will automatically reduce the subwoofer volume to let the singer's voice comes out loud enough to be heard. Music and Microphone Balance - this powerful feature is designed for you to compensate for your irregular room configuration or when your speakers are not placed symmetrically from the audiences. Using this function, you can easily adjust both the music level and echo delay for each speaker to compensate for speakers that are further away from audiences. Auto-Source Detection - The KM-360 has a built-in auto-source selection function that enables the mixer to automatically play music and video from one of the 3 available inputs. When the music stopps, it will automatically play the background A/V source (BGM) until the next song begins. This useful function will keep your entertainment alive even when the performance ended and DJ is changing the disc for the next singer. 4 Preset Memory Recall Buttons - You can save all of your optimal setting to one of the 4 preset memory buttons. Audio effects such as echo, reverb, music volume, and microphone volume can be recalled by either pressing the button on the remote control or on the front panel. Once you have tuned and saved the your favorite settings, you will never need to adjust the mixer again. XLR Line Outputs - all of the KM-360's line outputs including Left, Right, Center and Subwoofer audio signal are using XLR Balanced Audio Connectors to preserve the cleanest signal to your professional amplifier. 3 Before Opertation Batteries installation of Remote Control Remote Control usage: Remote control will send out an IR signal as a command to control KM360. Please always face the front panel of KM-360 when using remote: INPUT FB-EX 30 30 4 Remote Control Preset Memory Button #1 & #3 Preset Memory Button #2 & #4 Mute Button Feedback Eliminating Button. There are 3 different effect level and OFF to turn the effect off. Input Selecting Button Key Control Button Effect Level Control Button Master Microphone Volume Master Music Volume Control Menu Button Arrow Keys to navigate in Menu 5 Front Panel View 1 2 3 4 5 6 7 8 INPUT 15 16 9 10 11 12 13 14 FB-EX 17 18 [1]Microphone Volume Control- for #1 & #A(rear) [2]Microphone Volume Control- for #2 & #B(rear) [3]Memory- Use these buttons to recall preset effect settings, to save preferred effect settings, or to reset to default settings. [4]Music Menu- To select amount music relative selections, see also P 10~13 & P18 [5]Microphone Menu- To select amount microphone relative selection, see also P14~16 & P18 [6]Parameter- To change the setting in music menu(#4) or microphone menu(#5) [7] LED display- The screen to show the setting & information [8] Remote sensor - To receive the IR signal from remote control [9] Power indicator - will turn on when t3he machine connect to power [10]Subwoofer Volume Control - To adjust the volume of subwoofer [11]Center Volume Control - To adjust the volume of the center speaker. There are 3 selections for the center speaker output: music only, microphone only or music plus microphone audio output. [12]Microphone Effect Volume Control- To control the effect volume of microphone. [13]Master Microphone Volume - To control the master volume of microphone inputs. [14]Master Music Volume- To control the master volume of the music. [15]Microphone inputs #1,#2 and #3 [16]Input Selector- To manul select input sources amount BGM,VCR,DVD,AUX, and Digital Input or Auto Detection. [17]Key Control- To change the tone of the music [18]FeebBack Eliminator- 3 different feedback eliminating level, or select off to turn this function off. 6 Rear Panel View 1 2 3 4 5 6 7 8 9 10 11 12 13 14 15 16 17 18 [1] Main Power Switch [2] Power plug (AC 110V/50Hz) [3] Rs232 Port - To connect to computer, and use software(sale separately) to control KM-360. [4] Extra Remote Sensor port - To plug an external IR signal receiver(sale separately). [5] S/PDIF Digital Input (PCM 44.1KHz,48KHz) [6] Four Video Inputs - BGM,VCR,DVD and AUX [7] Two Video Outputs - Video out #1 and #2 [8] Four Audio Inputs - BGM,VCR,DVD and AUX [9] PRE out - Audio Output ( same signal with L/R) [10]Surrounding Audio Output - 3 audio output types: Music only, microphone only, or music plus microphone audio output. [11]Left Channel Audio Output [12]Right Channel Audio Output [13]Center Channel Audio Output- When in music only mode, use music volume control to adjust the music level; when in microphone mode, use microphone volume control to adjust the microphone level. [14]Subwoofer Balance Output - Volume control by subwoofer volume control (#10 at previous page). [15]Surrounding Microphone Volume Control - To adjust the level of microphone volume from the surrounding audio output. [16]Center Microphone Volume Control - To adjust the level of microphone volume from the center audio output. [17] Balanced Microphone #B Input [18] Balanced Microphone #A Input 7 System Setup Surrounding Speakers Front Left/Right Speakers Microphones Computer Power Cable Professional Amplifier S/PDIF Digital Input External IR Senser AUDIO L R VIDEO OUT AUDIO AUDIO OUT Power Subwoofer or Amplifier + subwoofer DVD/VOD Television Professional Amplifier 8 Operation Power on KM-360 Plug the power cable, and press the power switch in Pic#1; Power indicator at front panel will turn on, the LED screen shows KARAOKE(Pic#2). Then machine will do an auto detecting from all the inputs(Pic#3). When machine ready to work, Display will show like Pic#4, Mic means microphone volume, E stands for Echo volume, Music means music volume. Auto Detecting KARAOKE INPUT FB-EX FB-EX #2 #1 Mic: 28 INPUT E: 28 Musi c: 28 INPUT #3 FB-EX #4 Input Selection: Km360 allows 4 individual input sources, one S/PDIF digital input. You can manual switch them or use the auto detecting function: The input order will be BGM > DVD > VCR >DIG and Auto Detecting. When using S/PDIF input, select DIG Input mode, then press the music menu button to select Digital Frequency 44.1k/48k to PCM mode. INPUT FB-EX INPUT Input selections from the front panel Input selection from the remote Music Volume Selection & Preset Max Volume: KM-360 supports the preset max music volume. Press the music menu button on the front panel and select the Max Music Volume, then use parameter buttons to preset the max volume ( 0~63). If you set 50, means the max music volume can only be adjusted from 0~50. Adjust music volume from the remote Music Adjust music volume from KM-360 Vo l u m e +50 Max music volume setting on the LED screen 9 Music Menu Operation Music EQ Setting: KM-360 allows to customize the EQ setting in following frequencies: 10KHz/3300Hz/1000Hz/330Hz/100Hz/60Hz Remote Use Up/Down buttons to find the EQ frequency Use Left/Right buttons to adjust the value FL SCART SL SR Key Control: To change music tone for karaoke purpose: Use & buttons to change music keys INPUT FB-EX Down Up To reset the key control, press INPUT / button. Down Reset Up FB-EX LED display message: If key changes while song playing. 2 seconds after music finished, the key will reset automatically. Music Music 10 Pitch Pitch +05 00 Music Menu Operation Subwoofer Reducer: This function helps you reduce subwoofer volume when you are singing. This dynamic comes handy when a singer has low vocal range. Select “Subwoofer Reducer” from Music menu. Use parameter buttons to adjust the level(1~20). Use Up/Down buttons to find “Subwoofer Reducer” Use Left/Right to adjust the setting LED screen display: Subwoof Reducer 10 Subwoofer LPF: The low-pass-filter range from 40 to 150Hz enable you to decide how much the low frequency signal should be coming from the subwoofer, the frequency above the setting will be filtered out. SW Vole can be adjust gain from -10dB to+10 dB. the sub woofer volume also controlled by master music volume knob. Select “Subwoof LPF” from Music menu. Use parameter buttons to adjust setting. Use SW vol to change the gain(-10~+10dB) Use Up/Down buttons to find “Subwoof LPF” Use Left/Right buttons to adjust setting LED screen display: Subwoof LPF 100Hz Music Balance: This function can adjust the music volume from left & right channel. It is handy for not rectangle space or special listening requests. Use Up/Down buttons to find “Music Balance” selection Use Left/Right buttons to adjust value Select “Music Balance” LED screen disply Music 11 Balance +5 Music Menu Operation Music Auto Level Setup: When playing audio tracks, some songs are louder than others even though the volume of your system remains the same. When you turn on the "Music Volume Auto Leveling" function KM-360 will automatically adjust music to one of the six preset volume level. It boosts the audio signal for audio too low, and if the music is too loud, it will decrease the music volume back to your pre-set volume level. This function will eliminate lots unnecessary adjustment for KJs. Use Up/Down buttons to select “Music Auto Level” Use Left/Right buttons to change volume Select “Music Auto Level” LED screen display Music Auto Level 4 Music Vocal(canceling) Setup: KM-360 has a powerful vocal eliminator processor that can take out up to 90%(might be very) of vocals from any regular stereo audio CD. There are four different settings in this function: L/R mode: normal stereo audio output L/L mode: both left & right channel will send out the first(left) song track. L-R mode: both left & right channel will send out vocal canceling(L-R) music. R/R mode: both left & right channel will send out the second(right) song track. Use Up/Down buttons to select “Music Vocal” Use “Music Menu” to select “Music Vical” option and use Parameter buttons to switch the settings. Use Left/Right buttons to change setting LED screen display Music 12 Vocal L/R Music Menu Operation Center Channel Setup: There are three center channel modes: Microphone/ Music/ Mic.+Muisc 1. Microphone mode: only microphone signal will be the audio output 2. Music mode: only music signal be the audio output 3. Mic.+Music mode: audio output will be the mixed from both mic. & Music. Surrounding Volume setup: You can use this function to change the audio signal(-10dB~+10dB) of the surrounding audio outputs. Use Up/Down buttons to select “S Volume” Use Left/Right buttons to change the volume select “S Volume” LCD screen display S Volume +10 Surrounding Channel Setup: Two audio output mode for “surround sel”: 1. L/R: regular stereo output 2. L-R:vocal cancel (multiplex karaoke song track only) This function is also controlled by “Music Vocal” function. When selecting L/R in “surround sel”, audio output will be the same with the setting in “music vocal”. see next page fore more “music vocal” detail. Up/Down buttons to select “Surround Sel” Use Left/Right buttons to adjust volume Select “Surround Sel” LED screen display Surround Sel L/R Center Volume Setup: To adjust the gain (-10dB~+10dB) for center volume audio output. Up/Down buttons to select “C Volume” Left/Right buttons to adjust volume LED screen display C 13 Volume +10 Microphone Menu Operation Microphone Preset Max Volume: Presetting a max microphone volume to prevent uncomfortable microphone noise while unappropriated using. Remote Select “Max Mic volume” from MIC MENU buttons, then use parameter buttons to change the preset microphone max volume. Select “microphone setup” from menu, go into Max mic volume to change setting. LED screen display Mic Volume +40 Microphone Effect Volume: Use to adjust microphone effect volume. Use Effect buttons on the front panel to change the master microphone effect level Remote LED screen display Eff Volume +20 Feedback Eliminator: KM-360's real-time feedback eliminator processor provide 3 room sizes of feedback eliminating effects. It will automatically filter out howling feedback noise from the speakers. Use FB-EX button to select 1 of 3 feedback eliminating effects. INPUT Remote FB-EX FB-EX Note: Use mode #1 if room size over 30 square meters. Use mode #2 if room size between 20~30 square meters. Use mode #3 if room size below 20 square meters. 14 LED screen display Feedback Mode 2 Microphone Menu Operation Reverb Time Setting: A reverb is created when a sound is produced in an enclosed space causing a large number of echoes to build up and then slowly decay. Reverb is most noticeable when the sound source stops but the reflections continue, decreasing in amplitude, until they can no longer be heard. Reverb time means the length of the reverb effect. Adjustale range is from 0~40ms Remote Up/Down buttons to select “Reverb Time” Left/Right buttons to adjust the volume Select “Reverb Time” LED screen display Reverb Time 40 Reverb Level Setting: Reverb level is to adjust the level of reverb effect(0~40). Remote Up/Down buttons to select “Reverb Level” Left/Right buttons to adjust the volume Select “Reverb Level” LED screen display Reverb Level 40 Reverb Repeat Setting: Reverb level is to adjust the repeat frequency of reverb effect(0~40). Remote Up/Down buttons to select “Reverb Repeat” Left/Right buttons to adjust the volume Select “Reverb Repeat” LED screen display Reverb 15 Repeat 40 Microphone Menu Operation Echo Delay Setting: Echo delay function is used to adjust the echo delay timing, range from 0~250ms. You can adjust Echo Delay L and Echo Delay R separately to enhance the stereo sound effect. Remote Up/Down buttons to select “Echo Delay R” or “Echo Delay L” Left/Right buttons to adjust volume. Select “Echo Delay L” or “Echo Delay R” LCD screen display Echo Delay 180 Microphone EQ Setting: 5 bands equalizers settings:100Hz/300Hz/911Hz/2.7KHz/8Khz. Adjustable range is from -10dB to +10dB Remote Up/Down buttons to select “Echo Delay R” or “Echo Delay L” Left/Right buttons to adjust volume. Select “Echo Delay L” or “Echo Delay R” LCD screen display Echo Delay 180 Microphone Noise Gate Setting: Microphone noise gate is setting a threshold to auto mute the microphone to filter unwanted environment noise. Adjustable range is from 1-40. Remote Up/Down buttons to select “Noise Gate” Left/Right buttons to adjust volume. Select “Noise Gate” LCD screen display Noise Gate 16 180 Other Operation Preset Memory Recall: 4 preset effect settings allow you to store your favorite effect settings. 4 preset memory store factory default effect setting. INPUT FB-EX INPUT To store/renew your own setting. To press “Down” button of parameter for about 2 seconds, the LCD screen will shows “SAVE to ?”, then press any of M1~M4 buttons on the remote to assign the memory number to store the settings. FB-EX INPUT FB-EX To reset the settings to default settings. Press “UP” button of the parameter for 2 seconds. the LCD screen will shows “RESET...”, then press any of M1~M4 buttons. This memory will be reset. Control Panel Lock/unlock: To lock the machine control panel, press and hold the “ ” button on the front panel until the LED screen shows “Locked”. LED screen display: When control panel locked, only master Microphone & Music volume knobs work, and also adjustable. Other INPUT FB -EX buttons/functions will be disable. To unlock the machine control panel, press and hold the “ front panel again until the LED screen shows “Unlocked” “ button on the LED screen display: 17 Menu Operation Music Menu Center channel volume control C Volume Subwoof Max Volume Music Volume Subwoofer volume control Preset max music volume control Subwoof Reducer Reduce low frequence while singing Subwoof LPF Low frequence filter Music Auto Level Music Vocal Voice cancellation of multiplex tracks Surrounding sound volume control S Volume Surround Music Digital Auto level the music loudness Sel Surrounding out selection(vocal,music or both) Left/Right channel music volume balancing Balance Freq PCM frequence selection of the digital input Microphone Menu Max Mic Volume Preset max microphone volume control Echo Delay Left/right speaker echo delay adjustment L/R Echo Level Echo effect level Noise Noise threshold of the microphone pickup Gate Mic EQ 8KHz Mic EQ 2.7KHz Mic EQ 900Hz 5 bands microphone equalizers Mic EQ 300Hz Mic EQ 100Hz Reverb Level Revers effect level control Reverb Time Reverb timing level control Echo Repeat Echo Level Echo repeat timing adjustment Echo effect level 18 Trouble shooting If you are having problems operating the KM-360, or suspect something is wrong with the unit, please check the troubleshoot list below to see if the issue is a result of incorrect operation rather than equipment malfunction. If you are still unable to resolve the problem, please contact our Acesonic tech. service center at 626-820-0670 Problem No power No music output No microphone output Possible Reason Solusion Power core loose Reinstall the power plug Preset max music output volume is 0, it will limit the music output level to 0. Set the preset music volume higher Select the wrong audio input Switch to correct audio input Audio input plug loose Reinstall the audio input cable Microphone cable broke Fix or replace the cable Microphone plug loose Reinstall the microphone plug Master microphone volume knob sets to 0 Adjust the volume to appropriate level Mic. Max volume(in Mic. Menu) sets to 0 Adjust the volume to appropriate level No video output Video input loose; Wrong video input switch; Video device setup error Reinstall video input; switch to correct video input ; Change another device. No mixing effect Max effect level(in Mic. Menu) sets to 0 Adjust the volume to appropriate level Audio input loose Reinstall the audio input Speaker cable loose Reconnect the cable to speaker Out of batteries Change the batteries and try again One channel no sound Remote doesn’t work Specification Test under max music volume, 1KHz analog frequency signal with 1V(RMS), 10K ohms resistance. Music: Music frequency --------------------------------------20 Hz~22KHz(+-0.5) Input sensitivity ---------------------------------------------------- 210mV Max music signal voltage ---------------------------------7V(THD <=0.5%) Music/Noise ratio----------------------------------------------------0.19mV Microphone: Microphone frequency--------------------------------20 Hz~22KHz(+-0.5) Mic. sensitivity ------------------------------------------------------- 15mV Max mic. signal voltage-----------------------------------7V(THD <=0.5%) Microphone/Noise ratio---------------------------------------------0.36mV Machine: Power input--------------------------------------------------AC 110V / 50Hz Max power usage-------------------------------------------------------10 W Machine size---------------------------------------------480x 125 x 44(cm) Machine weight--------------------------------------------------------2 Kg 19