1
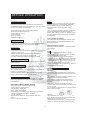
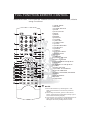
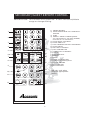
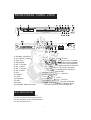
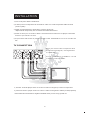
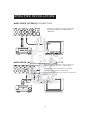
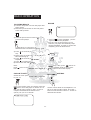
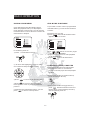
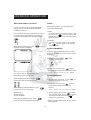
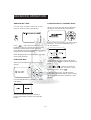
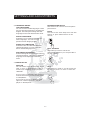
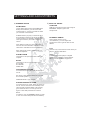
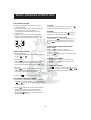
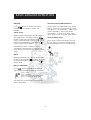
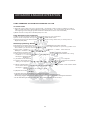
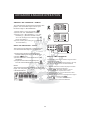
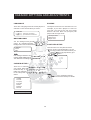
Karaoke on Demand Jukebox
With Disc Capturing
KOD-800
www.acesonic.com
1)WARNINGS, CAUTIONS
AND OTHERS..............................1
2)BEFORE OPERATION...................3
INCLUDED ACCESSORIES
3)FEATURES.................................4
4)FULL FUNCTION
REMOTE CONTROL......................5
5)GUEST REMOTE CONTROL............6
6)FRONT/REAR PANEL VIEW..........7
7)INSTALLATION.........................8
TV HOOKUP
AMPLIFIER SETUP
STEREO AMPLIFIER SETUP
AC3/DTS DECODER AMPLIFIER SETUP
8)BASIC OPERATION...................11
PLAYING DISCS
SETUP TV COLOR SYSTEM
PAUSE
DISPLAY
VOLUME CONTROL
USING A DVD MENU
SVCD & VCD PBC PLAYBACK
9)ADVANCED OPERATION.............13
SETTING AUDIO OUTPUT
MUTE
FAST FORWARD
FAST REVERSE
SLOW SCAN
USING REPEAT PLAY
SELECTING A SUBTITLE
SELECTING AN ANGLE
USING TIME SEARCH
PLAYING Mp3
PLAYING JPG, MPG AND OTHERS
8) MACHINE SETTING
AND ADJUSTMENTS..................16
SYSTEM SETUP
LANGUAGE SETUP
AUDIO SETUP
SPEAKER SETUP
DIGITAL SETUP
9) BASIC KARAOKE OPERATION.....19
GETTING STARTED
SELECTING A SONG
SETTING A PRIORITY SONG
CLEAN
RENEW
DISPLAYING PLAYLIST
CANCELING A SONG FORM THE PLAYLIST
SKIPPING A SONG
STOPPING A SONG
PAUSE
AUTO PLAY
MUTE
MULTI-CHANNEL
SETTING MICROPHONE ECHO
ADJUSTING PITCH
10) ADVANCED KARAOKE
OPERATION...........................21
RECORDING SONGS ONE BY ONE
QUICK SELF - RECORDED
DELETING SONGS / FILMS FROM H . D . D
SONG UPDATING DISK
TRANSFER FILES FROM COMPUTER TO
KOD
KOD-800 HARD DRIVE STRUCTURE
ADDING " MY FAVORITE " SONGS
EDIT " MY FAVORITE " TITLE
DELETE “MY FAVORITE” SONG
11)KARAOKE SETTINGS
AND ADJUSTMENTS.................25
12)TROUBLESHOOTING................27
13)SPECIFICATION &
CONTACT INFORMATION..........28
Warnings, Cautions and Others
Mises en garde, precautions et indications diverses
For Canada/Pour le Canada
CAUTION: TO PREVENT ELECTRIC SHOCK,
MATCH WIDE BLADE OF PLUG TO WIDE
SLOT,AND FULLY INSERT.
ATTENTION: POUR EVITER LES CHOCS
ELECTRIQUES, INTRODUIRE LA LAME LA PLUS
LARGE DE LA FICHE DANS LA BORNE
CORRESPONDANTE DE LA PRISE ET POUSSER
JUSQUAU FOND.
CAUTION
RISK OF ELECTRIC SHOCK
DO NOT OPEN
CAUTION: TO REDUCE THE RISK OF ELECTRIC
SHOCK.
DO NOT REMOVE COVER (OR BACK).
The lightning flash with arrowhead symbol, within an
equilateral triangle is intended to alert the user to the
presence of uninsulated dangerous voltage within the
product's enclosure that may be of sufficient magnitude to
constitute a risk of electric shock to persons.
The exclamation point within an equilateral triangle is
intended to alert the user to the presence of important
operating and maintenance (servicing) instructions in the
literature accompanying the appliance.
For Canada/Pour le Canada
THIS DIGITAL APPARATUS DOES NOT EXCEED
THE CLASS B LIMITS FOR RADIO NOISE
EMISSIONS FORM DIGITAL APPARATUS
AS" SET
"
OUT IN THE INTERFERENCE-CAUSING
EQUIPMENT STANDARD "ENTITLED DIGITAL
"
APPARATUS, ICES-003 OF THE DEPARTMENT OF
COMMUNICATIONS. CET APPAREIL NUMERIQUE
RESPECTE LES LIMITES DE BRUITS RADIO
ELECTRIQUES APPLICABLES AUX APPAREILS
NUMERIQUES DE CLASSE B PRESCRITES DANS
LA NORMESUR LE MATERIEL BROUILLEUR:
APPAREILS NUMERIQUES , NMB-003 EDICTEE
PAR LE MINISTRE DES COMMUNICATIONS.
CAUTION
To reduce the risk of electrical shocks, fire, etc:
1.Do not remove screws, screws, covers or cabinet.
2.Do not expose this appliance to rain or moisture.
FCC INFORMATION (U.S.A.)
1.This equipment has been tested and found to
comply with the limits for a Class B digital device,
pursuant to part 15 of the FCC Rules. These limits
are designed to provide reasonable protection
against harmful interference in a residential
installation.
This equipment generates, uses and can radiate
radio frequency energy and, if not installed and
used in accordance with the instructions, may
cause harmful interference to radio
communications. However, there is no guarantee
that interference will not occur in a particular
installation. If this equipment does cause harmful
interference to radio or television reception, which
can be determined by turning the equipment off
and on, the user is encouraged to try to correct the
interference by one or more of the following
measures:
Reorient or relocate the receiving antenna.
Increase the separation between the equipment
and receiver.
Connect the equipment into an outlet on a circuit
different from that to which the receiver is
connected. Consult the dealer or an experienced
radio/TV technician for help.
Caution
Disconnect the electrical plug to shut off power
completely. The POWER on the unit is not off from the
electrical plug when the POWER button on the front
panel is not pressed in.
IMPORTANT FOR LASER PODUCTS
1. CLASS1 LASER PRODUCT
2. DANGER: Visible laser radiation when open and
interlock failed or defeated. Avoid direct exposure to
beam.
3. CATION: Do not open the top cover. There are no
user service able parts inside the unit. Leave all
servicing to qualified service personnel.
4. REPRODUCTION OF LABEL: CAUTION LABEL,
PLACED INSIDE THE UNIT.
2. IMPORTANT: When connecting this product to
accessories and/or another product use only high
quality shielded cables. Cable(s) supplied with
this product MUST be used. Follow all installation
instructions. Failure to follow instructions could
void your FCC authorization to use product in the
U. S. A.
1
18. Overloading
Do not overload wall outlets, extension cords, or integral
convenience receptacles as this can result in a risk of fire or
electric shock.
Important Safety instructions
1. Read These Instructions.
2. Keep These Instructions.
3. Heed All Warnings.
19. Object and Liquid Entry
Never push objects of any kind into this product through
openings as they may touch dangerous voltage points or
short-out parts that could result in a fire or electric shock.
Never spill liquid of any kind on the product.
4. Follow All Instructions.
5. Do not use this product near water.
6. Clean only with dry cloth.
7. Do not block any ventilation openings.
20. Replacement Parts
When replacement parts are required, be sure the service
technician has used replacement parts specified by the
manufacturer or have the same characteristics as the
original part. Unauthorized substitutions may result in fire,
electric shock, or other hazards.
8. Do not install near any heat sources such as radiators, heat
register, stoves, or other apparatus (including amplifiers) that
produce heat.
9. Do not defeat the safety purpose of the polarized or
grounding-type plug. A polarized plug has two blades with one
wider than the other. A grounding type plug has two blades and
third grounding prong. The wide blade or the third prong are
provided for your safety. If the provided plug does not fit into
your outlet, consult an electrician for replacement of the
obsolete outlet.
21. Safety Check
Upon completion of any service or repairs to this product,
ask the service technician to perform safety checks to
determine that the product is in proper operating condition.
22. Wall or Ceiling Mounting
The product should be mounted to a wall or ceiling only as
recommended by the manufacturer. Any mounting of the
product should follow the manufacturer instructions, and
should use a mounting accessory recommended by the
manufacturer.
10. Protect the power cord from being walked on or pinched
particularly at plugs, convenience receptacles, and the point
where they exit from the apparatus.
11. Only use attachments and accessories specified by the
manufacturer.
23. Wet location marking
Apparatus shall not be exposed to dripping or splashing and
no objects filled with liquids, such as vases, shall be placed
on the apparatus.
12. Use only with the cart, stand, tripod, bracket,
or table specified by the manufacturer, or sold
with the apparatus. When a cart is used, use
caution when moving the cart. Apparatus
combination to avoid injury from tip-cover.
24. Outdoor Antenna Grounding
If an outside antenna or cable system is connected to the
product, be sure the antenna or cable system is grounded so
as to provide some protection against voltage surges and
built-up static charges. Article 810 of the National Electrical
Code, ANSI/NFPA 70, provides information with regard to
proper grounding of the mast and supporting structure,
grounding of the lead-in wire to an antenna discharge unit,
size of grounding conductors, location of antenna discharge
unit, connection to grounding electrodes, and requirements
for the grounding electrode. See figure below.
13. Unplug this apparatus during lightning storms or unused for
long period of time.
14. Refer all servicing to qualified service personnel. Servicing
is required when the apparatus has been damaged in any
way, such as power-supply cord or plug is damaged, liquid
has been spilled or objects have fallen into the apparatus,
the apparatus has been exposed to rain or moisture, does
not operate normally, or has been dropped.
15. This product should be operated only from the type of power
source indicated on the marking label. If you are not sure of
the type of power supply to your home, consult your product
dealer or local power company. For products intended to
operate from battery power, or other sources, refer to the
operating instructions.
16. Protective Attachment Plug
The product is equipped with an attachment plug having
overload protection. This is a safety feature. See Instruction
Manual for replacement or resetting of protective device. If
replacement of the plug is required, be sure the service
technician has used a replacement plug specified by the
manufacturer that has the same overload protection as the
original plug.
17. Power Lines
An outside antenna system should not be located in the
vicinity of overhead power lines or other electric light or
power circuits, or where it can fall into such power lines or
circuits. When installing an outside antenna system, extreme
care should be taken to keep from touching such power lines
or circuits as contact with them might be fatal.
2
BEFORE OPERATION
Note
Included Accessories
Please check to see that you have all of the following
accessories supply to you. If anything is missing, please
contact your dealer immediately.
*RCA Audio/Video Cable (Yellow/Red/White)
*Full Function Remote Control
*Guest Remote Control
*User’s Manual
*Rack-mount kit
*Warranty Card
- Any disc that is not listed, will cause the player
to display NO DISC in the DISPLAY WINDOW.
Future media and disc formats maybe be
supported with firmware upgrade, when
available.
-Dirty, scratched, warped or defective discs may
cause a considerable time delay during the
loading and reading of te disc. In extreme cases,
this may render the disc completely unreadable
by the player.
Video Signal Formats
This player also accommodates NTSC and PAL
color systems, with automatic detection and
override settings.
About this manual
The display window information and On Screen Display
(OSD) menu items are all in upper case letters.
Digital Audio Formats
This player accommodates 5.1 Channels while
playing DVD.
Precautions
Notes on Power Cord
*Unplug the unit from the wall outlet if you are gone for
a long period of time.
*When you are removing the player from the wall
outlet, always pull the plug, not the cord.
*Do NOT unplug the power cord with a wet hand.
Note
-Depending on the AUDIO SETUP> SPDIF
settings digital audio signals may not be output
as they are recorded on the disc.
-On some DVD’s, the player starts playback
automatically after inserting the disc, regardless
whether or not PLAY BACK CONTROL is on or off.
-The images that are poor, noisy or grainy are
due to actual defects on the disc itself.
-Some functions may not be possible on all discs
as described in this manual.
Avoid High Temperatures
*Do not expose the player to direct sunlight or near any
heating device.
Notes on Installation
*Select a place where the unit will be level, dry and not
too cold or too hot.
*Do not use the unit on it’s side or where vibrations are
present. (e.g. Subwoofer)
*Leave sufficient distance between the TV and unit.
*Do not leave heavy objects on top of unit.
Handling and Cleaning of Discs
Handling
-At anytime, when handling discs, always hold
them from their edges and/or by the circle in the
center.
-NEVER write on the any surface of the disc for it
maybe render the disc unreadable.
-Store discs in a clean and dry environment.
Storing CD’s vertically will also help prevent
warping.
-After use, insert CD into jacket or case to
minimize wear and tear. DO NOT stack CDs on top
of one another.
-Do not bend or press the disc. Do not expose the
disc to direct sunlight.
Prevent Malfunction of Unit
*This unit is not user-serviceable. If the unit no longer
functions, unplug from it wall outlet and contact the
manufacture.
Playable & Recordable Media
This unit supports the following formats:
-DVD, Video CD, Video CD 2.0
-CD+Graphics, Audio CD
-Mp3, WMA, JPEG, MPEG
Above media is playable on the following type of discs:
-DVD±R, DVD±RW, DVD±R DL , DVD± DL
- CD - R , CD - RW
The following media can be recorded to the discs
above:
CD+G, Video CD, CD-Audio.
Cleaning
-Wipe the discs from time to time using a soft
cloth. Always wipe from the center towards the
edges. NOT in circular motions.
-DO NOT clean with any other cleaning solution,
unless it is specifically made for disc cleaning.
3
FEATURE
ALL IN ONE KARAOKE PLAYER
-Karaoke on demand jukebox
-DVD/VCD player with digital outputs
-Karaoke pitch adjustment
-Audio mixing function
MULTI-FUNCTION
-Integration of DVD and karaoke functions in a single unit
-Compatible with MPEGI, MPGII, CD+G
-Compatible with DVD, CD+G, VCD, CD, MP3, JPEG pictures, CD R/RW, DVD R/RW disc
-Record CD+G, VCD and Audio CD into built-in hard drive
EASY TO USE KARAOKE FUNCTIONS
-Efficient song ordering through on screen display even without songbooks
-Up to 80 songs could be added to the song list
-Searching songs by song name or artist
-Easy to add or delete songs using remote control
EFFICIENT PLAYBACK FUNCTIONS
-Random play of all songs stored in the hard disc
-Play reserved songs repeatedly by pushing one button
-Quick access to favorite songs with “my favorite” feature
OUTSTANDING AUDIO/VIDEO PERFORMANCE
-Built-in 5.1 Channel decoder and optical/coaxial digital output allows the high quality
sound effects.
-High quality MPEGII audio and video coding technology produce more than 500 lines
horizontal resolution.
-Built-in microphone mixer and echo control transmits desired sound effects
VARIOUS STANDBY MODES
Useful commercial use of standby modes such as advertising, screen saver and random
play. Also support commercial jukebox with billy feature. Sold separately.
MULTILINGUAL
Support (Chinese/English) on menu navigation and (Chinese/English/Japanese) lyrics
FULLY FUNCTIONAL REMOTE
Full-function, large-keys, glow-in-dark karaoke remote control
HIGH COMPATIBILITY HARD DISK
Unlimited storage and upgrade by optional plug & plays high capacity hard disk
MULTI-VOLTAGE POWER SUPPLY
This unit can operate on 100-240 voltages.
ELECTRICITY SAVING
On-screen protection along with hard disk electricity saving feature to extend service
life.
4
FULL FUNCTION REMOTE CONTROL
DESCRIPTION : Full function remote control has record / edit / delete
song functions.
1 ) VOCAL GUIDE
2 ) KEYPAD
3 ) CLEAN /DELETE
4)STOP
5)PLAY/PAUSE
6)BACK
7)MENU
8)ENTER
9)DISPLAY
10)CLEAR
11)RETURN
12)TENS DIGIT
13)TITLE
14)SLOW MOTION
15)SUBTITLE
16)ANGLE
17)GOTO
18)LETTER INPUT
19)TV SYSTEM
20)SETUP
21)ON/OFF
22)MUSIC VOLUME
23)KEY CHANGER
24)ADD TO BOTTOM QUEUE
25)MUTE
26)INSERT TO TOP QUEUE
27)NEXT
28)MIC VOLUME
29)STORE TO FAVORITE
30)ECHO CONTROL
31)FAST FORWARD/ REVERSE
32)EDIT
33)A-B/REPEAT
34)CAPS
35)RECORD
FAVORITE
CAPS
LG-75
NOTE:
1 ) Insert AA batteries by matching the + and ends on the batteries to the correct position in
the slot.
2) When using the remote, point it at the remote
sensor within effective transmission range. (Up to
seven meters and sixty degree)
3) If the remote is not used for an extended period of
time, remove the batteries to avoid possible
damage from battery leakage and corrosion.
5
SECONDARY/GUEST
REMOTECONTROL
CONTROL
FULL
FUNCTION REMOTE
DESCRIPTION: This remote is for guest use. It can’t not record/delete
songs or change setting.
1
2
STORE
1
2
3
4
4
6
1) POWER ON/OFF
2) SAVE SONGS INTO “MY FAVORITES”
FOLDER
3) STOP
4) INSERT SONG TO SONG QUEUE.
13
3
4
INSERT
7
8
9
CLEAR
0
ENTER
MENU
PG.UP
14
5
6
7
15
16
VOCAL
8
PG.DN
LIST
17
9
MALE
10
KEY
11
FEMALE
MIC
MUSIC
18
19
ECHO
12
SETUP
20
6
YOU CAN INSERT BY THE SONG NUMBER,
CATALOG OR “ MY FAVORITES”
5) CLEAR WHAT YOU INPUT
6) PAUSE AND PLAY
7) FAST FORWARD OR FAST BACKWARD
8) GUIDE VOCAL
9) MALE KEY CHANGER*
10) KEY CONTROLLER
11) FEMALE KEY CHANGER*
12) SETUP
13) NUMBER KEYS
14) ENTER
15) MENU
16) PAGE UP/DOWN KEY
17) DISPLAYS SONG QUEUE
18) MUSIC VOLUME
19) MIC. VOLUME
20) ECHO EFFECT
*Will only work when
song has appropriates
setting.
FRONT/REAR PANEL VIEW
1) STANDBY INDICATOR
2) LED DISPLAY WINDOW
3) DISC TRAY
4) OPEN/CLOSE
5) MIC. 1 VOLUME
6) MIC. 1 INPUT
7) MIC. 2 VOLUME
8) MIC. 2 INPUT
9) PLAY
10) ON/OFF
11) STOP
12) PREVIOUS
13) NEXT
14) PAUSE
15) PORTABLE HARD DISK TRAY
16 ) MIC . 3
17 ) 5 . 1 CHANNEL AUDIO OUTPUT
LEFT : CONNECT TO FRONT LEFT SPEAKER
RIGHT - CONNECT TO FRONT RIGHT SPEAKER
SL-CONNECT TO SURROUND LEFT SPEAKER
SR-CONNECT TO SURROUND RIGHT SPEAKER
CENTER-CONNECT TO CENTER SPEAKER
SW-CONNECT TO SUBWOOFER SPEAKER
18)VIDEO OUT - COMPONENT
19)DIGITAL AUDIO OUT - COAXIAL
20)VIDEO OUT - RCA
21)VIDEO OUT - S-VIDEO
22)DIGITAL AUDIO OUT - OPTICAL
23)RS-232 PORT- ONLY SUPPORT ACESONIC
COMMERCIAL KARAOKE JUKEBOX WITH
BILLING FEATURE. SOLD SEPARATELY.
LED INDICATOR
Disc format: SVCD DVD PBC MP3
Current TV system settings NTSC/PAL
System playback mode- DVD/KARAOKE
Current playback time
7
INSTALLATION
1 ) Turn of all power before installation.
2) S-Video, RCA or Component can be used for video out. Used Component cables for best
picture quality.
3) SPDIF (coaxial/optical) or RCA can be used for audio out.
*Optical audio output may not work with some karaoke features.
4) Check to see if your TV is PAL or NTSC. Use main function remote to set player to the same
format or you can set it to auto.
5) If you have a wide screen TV, set the TV type to 16:9. Traditional TV are set to 4:3 LB or 4:3
PN.
TV CONNECTION
- When you connect the component with
the following Diagram, set Digital Out
to “ANALOG”
- You can select either S-VIDEO or Y Cr Cb
or Video connector codes.
1 ) Connect from the player video out to the TV video in using RCA, S-Vide or Component.
2) Connect from the player audio out to the TV audio in using RCA or SPDIF (coaxial/opitcial)
*Some karaoke sound feature might be disabled when you are using optical out.
8
AMPLIFIER INSTALLATION
AMPLIFIER (STEREO) CONNECTION
When you connect the player with the
following Diagram set “Digital Out” to
“ANALOG”.
AMPLIFIER (AC3/DTS DECODER) CONNECTION
- When you connect the player with the following
diagram , set " Digital Out " to " SPDIF / RAW”.
- If your amplifier does not have built-in AC3/DTS
decoder, set “Digital Out” to “SPDIF/PCM”.
-You can select either Optical or Coaxial to connect the
player .
9
AMPLIFIER INSTALLATION
AMPLIFIER ( 5 . 1 CHANNEL) CONNECTION
When you connect the player with the following
diagram, set " Digital Out” to “Analog”.
LEFT: AUDIO OUT FRONT LEFT CONNECTOR
RIGHT : AUDIO OUT FRONT RIGHT CONNECTOR
SL: AUDIO OUT SURROUND LEFT CONNECTOR
SR: AUDIO OUT SURROUND RIGHT CONNECTOR
CENTER: AUDIO OUT CENTER CONNECTOR
SW: SUBWOOFER
10
BASIC OPERATION
PAUSE
PLAYING DISCS
1) Connect the power cord into the player and
power outlet.
2) Switch the power button on the rear panel
to the “ON” position.
3) Press the power button on the front panel
to turn on the player.
1 ) Press
to pause playback ; press it
again to resume the playback.
2)If a CD is set on pause mode over 20
minutes, the player automatically stops
the disc playback. In order to resume the
Playback, press the PLAY button.
It takes about 1-2 minutes to load the song
database before the machine is ready to use
4) Press
on the front panel to open the disc
tray.
5) Place a disc on the disc tray with the disc’s l
label side facing up.
6) Press
on the front panel to start
Playback.
7) Press
to end the playback.
8) Remove the disc and turn off the power.
DISPLAY
Note:
Press
twice to stop playback while playing a
DVD disc.
When playing a disc, press
button to
show the playback mode on the screen.
Press it again to cancel the display.
COLOR TV SETUP
VOLUME CONTROL
Switch the color system (NTSC/PAL) according
to your TV.
If the color system of the TV is NTSC, press the
button to set the player to “NTSC”. If it is
PAL, set the color system to “PAL”. If your TV
complies with both NTSC and PAL color
system, set your TV to “AUTO”.
11
Use the volume knob on the amplifier or on
the TV to adjust audio volume. Press the +
button to increase the volume or - button to
decrease the volume.
BASIC OPERATION
USING A DVD MENU
CDG & PBC PLAYBACK
Some DVD discs have title/chapter menu.
When the playback starts, a Title/Chapter
menu appears on the screen. You can use the
numeric buttons or arrow buttons to select the
desired title or chapter.
If your CDG or VCD 2.0 disc is programmed
with PBC feature, you can access the menu
to select.
Ex:Playing VCD 2.0 disc
1)Press
and wait till the main menu
appears on the TV screen.
Ex. Selecting Track 13
1) Press +10 and then 3 buttons.
2)Use
button to turn the pages
if a sub-menu is available.
3)Press numeric buttons to start playback
of the desired song.
4)Press
to go to the main menu.
2) Or move the highlight to Track 13 using
arrow buttons and press
to select.
PLAYING A TITLE/CHAPTER
1)You can select a desired Title/Chapter
from the disc menu or use numeric
buttons to directly input the title/chapter
number.
2)If the entry number is smaller than 10,
press the number directly.
3)Press
to return to the previous menu.
4)Press
to return to the main menu,
Press again to return to previous playback
position.
3)If the entry number is bigger than 10,
press
and then numeric button for
the last digit. In the example, the entry
will start playing track 13.
5)If the disc has a multilayer menu, you can
press
to return to the top menu.
12
ADVANCED OPERATION
SETTING AUDIO OUTPUT
MUTE
You can set various audio languages when
playing a DVD or SVCD with programmed
multilingual feature.
When playing discs, you can silence the
sound with this feature.
1)Mute
In order to silence the audio output of the
player, press
. The word “Mute” will
appear the on the screen indicating that it
has been mute
You can select left/right channel audio output
or stereo audio output when playing VCD or
CD with programmed multi-channel feature.
When playing DVD discs, press
then the screen will display:
button
2)Resume
In order to turn the audio back on,press
the
Button again or the volume
control buttons.
FAST FORWARD*
You can locate a particular point on a disc
quicky by using fast forward or fast reverse
feature.
1)During playback, press
forward the pictures.
to fast-
2)Each time you press the
button;
the playback speed will change as follows:
FF x 02 → FF x 04 → FF x 08 → FF x 20 → NORMAL
The player outputs an audio language
depending on the type of discs.
FAST REVERSE*
When playing SVCD discs, press
button then the screen will display:
1)During the playback, press
fast reverse the pictures.
to
2)Each time you press the
button,
the playback speed will change as
follows:
When playing VCD and CD discs, press
button the screen will display:
FR x 02 → FR x 04 → FR x 08 → FR x 20 → NORMAL
3 ) When playing CD’s, press
fast forward mode, press
fast reverse mode and press
return to normal mode.
AUDIO: LEFT
AUDIO: RIGHT
AUDIO: STEREO
When playing bilingual films, press
button to select the desired language.
to enter
to enter
to
*Fast forward & Fast Reverse do not support
CDG playback.
13
ADVANCED OPERATION
SETTING SUBTITLE
SLOW SCAN
1 ) During playback , press
to slow scan
the pictures .
2 ) Each time you press the
button, the
playback speed will change as follows:
to set various
languages for the on-screen display when
playing DVD or SVCD discs.
This function will work only with the discs
that are programmed with language
selections. Some discs don’t have this
feature or the language selections.
SLOW 1/2 → SLOW 1/3 → SLOW 1/4 → SLOW 1/5
→ SLOW 1/6 → SLOW 1/7 → NORMAL(normal speed)
3)Press
Y ou can press
to return back to normal mode.
SETTING ANGLES
REPEAT PLAY
When playing DVD/VCD discs, you can use this
feature to play a specific track/title/chapter/all
repeatedly. You can also set specific points to
start the repeat play.
With DVD on which various angles for a
scene are recorded, you can select the
desired angle. The TV screen will display
the
icon, then you can press
to
change to another angle.
1)During playback, each time you press
The TV screen will display:
REPEAT: OFF
REPEAT: CHAPTER
REPEAT: TITLE
In order to change to other angles,
press again to select “2/3” or “3/3”.
2)Press
button twice till the screen
displays “ REPEAT: OFF ”.
3)When playing SVCD and VCD discs, press the
button to switch between “ REPEAT:
ONE ” and “ REPEAT: ALL ” mode.
“REPEAT: ONE” repeat a single track while
“REPEAT: ALL” repeat the whole CD.
4)To play a specific portion repeatedly, press
the
button to set the starting point.
When you reach the ending point, press the
button again to set the ending point.
A-B Repeat can be started at anytime during
playback. The disc will play the specified
portion repeatedly.
14
ADVANCED OPERATION
SEARCH BY TIME
PLAYING MULTI FORMAT DISC
You can enter a specific time and set the
player to start from the selected time .
When you load a disc with JPG or MPG files,
the player will read the disc and display:
Press
, then use the arrow buttons to
highlight. Press the numeric buttons to enter
the desire chapter/title number and time.
Press ENTER to input the information and start
playback from the selected time.
Below is what you see when you select “Play
CD Photo”. You can press ENTER to go to
the file directory.
When playing SVCD, VCD and CD, you can only
select track and time.
PLAYING Mp3
Use the arrow buttons to select the desire
file and press ENTER to enlarge the selected
picture.
When you load a Mp3 disc, the TV screen will
display:
Press
buttons to open the
previous or the next file. In order to return
to the main menu, press
.
If the files in your disc are MPG format,
select PLAY CD AUDIO/VIDEO. After loading
the disc, follow the above examples to play
the disc.
Press the ENTER button, then the TV screen
will display:
Use the arrow buttons on the remote to
browse each folder and title of the Mp3 file
folders.
15
SETTINGS AND ADJUSTMENTS
In DVD playback mode , you can set the
following functions to obtain the best
performance .
VIDEO
This player has built-in S-video and
component connection. Choose either one to
connect the component. If your TV only has an
S-video connector, set it to “S-VIDEO”
connections. If your TV has a component
connector, select “COMPONENT”.
TV TYPE
4:3 PAN SCAN
1 )SYSTEM SETUP
When displaying a wide picture, the screen
displays in 4:3 ratio and cuts off the portions
that do not fit.
The menu is displayed as follows:
4:3 LETTER BOX
If your TV is not wide-screen. The screen
displays with black bands on the upper and
lower portions when displaying a wide picture.
16:9 WIDE SCREEN
Select this when you connect a wide-screen TV
to the player.
PASSWORD*
You can set a password to the player. If the
player has registered a password, you have to
enter your password in order to change the
rating level.. You will not be able to
record/delete/edit songs if the password
protection is set.
TV SETUP
RATING
If the TV color system is NTSC, set the player
to “NTSC”. If it is PAL, change the color system
to “PAL60” or “PAL”.
The feature is a rating limit system, like movie
ratings. You can set three ratings for the discs
encoded with rating information- “NO ADULT”
“KID SAFE” and “VIEW ALL”.
If your TV complies with both NTSC and PAL
color system, set your TV to “AUTO”.
DEFAULTS
SCREEN SAVER
Use the default feature to restore all options
to the factory defaults, but password and
rating settings are not effected.
The screen will enter sleeping mode when the
player is not in use for a period of time.
*Please remember your password. We will not
able to retrieve if afterward.
16
SETTINGS AND ADJUSTMENTS
MICROPHONE SETUP
This feature can control the microphone
performance.
2) LANGUAGE SETUP
OSD LANGUAGE
You can set various OSD languages. There
are two language selections; the default is
English. This setup will change the OSD
language both in DVD and karaoke mode.
ECHO
You can set the echo delay time with this
feature or press ECHO button on the
remote .
AUDIO LANGUAGE
Some discs are recorded with different
audio languages. You can set your
preferred audio language here.
SUBTITLE LANGUAGE
Some discs are recorded with different
subtitle languages. You can select the
desire subtitle language here.
DVD MENU LANGUAGE
Some multilingual discs have disc menus in
several languages. This setting can select
language to be displayed on the DVD
menu.
MIC. VOLUME
This feature is used to control the
microphone volume or you can press MIC.±
On the remote .
3) AUDIO SETUP .
ANALOG
You can select from three options. If you
want to use 5.1- channel audio output to
connect your amplifier, set the player to
“ANALOG”.
KEY
This feature is used to set the music key
or you can press ± to raise or lower the
key .
If you use 5.1 CH amplifiers with optical or
coaxial connectors, you can set the player
to “SPDI/RAW”.
If you want to use stereo amplifies with
optical or coaxial connectors, set the
player to “SPDIF/PCM”.
17
SETTINGS AND ADJUSTMENTS
5) DIGITAL SETUP
4) SPEAKER SETUP
OP MODE
DOWN MIX:
LINE OUT: Compresses the output signal.
RF REMOD: Output signal is not
compressed.
LT/RT: When playing discs with PROLOGIC
Dolby stereo effects, you can select this
output mode to enjoy live sounds of which
you can hear in the theater.
STEREO: When you play 5.1 channel discs,
the left/rigth connectors projects the audio
output of the front channels. When playing
other general discs, the audio output is
stereo.
DYNAMIC RANGE
If the output mode is set to
“Line OUTPUT”, you can adjust the
compression rate to get the best sound
effects.
VSS: When you play 5.1 discs, this setting
will mix the surround audio outputs to front
channels to simulate the surround effects.
L+R
OFF: Select this mode in order to use 5.1channel amplifier.
This will only work with mix mode when you
play 5.1 channel DVD discs.
SUBWOOFER
NOTE
You can only set the player to Digital
Output when playing 5.1 channel DVD
discs. Karaoke mode not supported.
This feature can open/close the subwoofer
outputs.
BASS
This feature can set your speaker type:
ALL LG SPK
ALL SM SPK
MIXED SPK
CENTER DELAY TIME
You can set from 0~5 ms. Each ms equals to
34 cm.
DF refers to the distance between you and
the central speaker.
CENTRAL DELAY = (DF-DC)/34
SURROUND DELAY TIME
You can set from 0~15ms. Each ms equals to
34 cm. The formula of Surround Delay is the
same to that of Central Delay. This setting
gives each unit 3ms. You can get a close
figure to the delay calculation outcome.
NOTE
You have to turn off DOWNMIX mode in order
to turn on Center Delay and Surround Delay.
18
BASIC KARAOKE OPERATION
GETTING STARTED
1) Make sure the disc tray is empty. If not,
remove the disc.
2) Connect microphones to the into jacks on
the front panel. You can use two
microphones with this player to enjoy
karaoke fun.
3) If this is your first time using this player,
please use the volume control buttons to
Adust to an adequate volume level.
CLEAN
If you input a wrong number entry, press
button to delete the last digit entered.
RENEW
During playback, you can press
button to
replay the current song from the beginning.
DISPLAYING PLAY LIST
You can press
to show the play list. If
the number of reserved songs exceed five,
press
to display the next or previous
page.
CANCELING A SONG FROM THE
PLAY LIST
1) Press
to show the play list.
2) Use the arrow buttons to highlight the
undesired song.
3) Press
to delete the song from the play
list.
SELECTING A SONG
1) By Song Number
Press the song number from songbook and
Press
or
.
SKIPPING A SONG
2)By Song Title
Press
once to show the index and use
the numeral buttons or arrow buttons to
select the desired item, then press
or
.
If you don’t like the current song, you can
press
to skip to the next song on the
play list.
3)By Artist
Press
twice to show the index and use
the numeral buttons or arrow buttons to
select the desired item, then press
or
.
Press
to stop karaoke playback. You can
play discs hereafter. You can press
or
button or restart playback of the reserved
songs
STOPPING A SONG
4) press
to start playing song.
SETTING A PRIORITY SONG
1) Follow the song selection steps to select a
desired song, then press
instead of
or
button to set this song on the top
of the play list.
2) Press
and all the songs on the play list
will show on the screen. Use the arrow
buttons to select the desired song, then
press the
button to set this song to be
displayed next in or er.
19
BASIC KARAOKE OPERATION
PAUSE
SETTING MICROPHONE ECHO
Press
button to pause the current
playback , press again to resume the
playback .
Sound effects are adjustable using ECHO
button . Adjust the microphone echo level
according to your preference . Eight levels
can be selected to adjust microphone
echo effects . Level 0 for no echo effect
and level 8 for the strongest echo effects .
AUTO PLAY
When no disc is in the player and the player is
at it’s main menu, you can press the
button to start auto-play. All the songs in the
H.D.D. will be played in a random order. If you
want to end random play mode, press
button or input song numbers.
ADJUSTING PITCH
If the song is pitched too high or too low
for your voice, you can press key button to
set the playback to a lower or higher pitch.
*Random play mode is useful for singing
competition, demonstration or background
music display. You can turn off random play in
setup.
MUTE
When playing discs, you can shut off the audio
output by pressing the
button. In order
to resume the audio output, press the
button again.
MULTI-CHANNEL
Press
button to switch from different
audio output channels to meet your demands.
AUDIO :
AUDIO :
AUDIO :
AUDIO:
VOCAL
KARAOKE
MIDI ( NOTE : Min . Melody VOL.)
MELODY(NOTE: Melody VOL.)
This function only works when your disc has
multi sound tracks.
20
ADVANCED KARAOKE OPERATION
Edit song files that were executed Quick
self-record
RECORDING SONGS ONE BY ONE
The steps below showed how you can record songs
one by one from a VCD or CDG to the hard drive.
1) Place the disc with your desired songs into the
disc tray.
2) Play the song you want to record and press
anytime during playback. Press
to record
the current song.
3) Follow the on screen instructions using numeral
buttons to assign a new song number for the
recording song.(example. # 1001 for the song
JADED)
4) When the system requests for a path of storage,
use the numeral or arrow buttons to catalog the
recording songs by language and alphabet order
of the song title.(Example. \English\JKL for the
Song JADED)
5) When the system requests for a song title input,
CAPS
press
button to select a desired input method
and then use the symbol table on the remote to
input the song title. Press
when you
done inputting the title of the song.
6) Use numeral buttons to catalog the recording
songs by singer’s gender or choose Choir to leave
the song as is. When the recording is completed,
the screen display will return to the playback.
7) Remove the disc from the tray. When the screen
shows “NO DISC”, then you start the song
selection.
1) Please make sure there was no disc in
the player and no songs in the queue.
Then input the song numbers (80009999 which you just recorded on the
Previous step) and press the
key.
2) Follow instructions on screen then you
can edit the song numbers, song
directory and song title to your wanted
menu.
3) After editing, press
key to save.
4) Repeat step 1-3 until all the songs are
named.
Note :
After changing song numbers , the original
number will be empty numbers. If you execute
Quick self-record and numbers exceed 9999, the
player will search empty numbers from 8000 as
new song numbers.
DELETING SONGS/FILMS FROM H.D.D
1) Make sure the play list is empty.
2) Input the song number of undesired
songs, and then press
.
3) Refer to on-screen displays and confirm
the deletion. By doing this can delete
the song from H.D.D.
NOTE:
It is suggested to assign no.1001~7999 for new
songs during the recording but the song number can
be a 1 to 6 digit number. If you want to cancel or
correct the previous input, press
button to
clear the input.
QUICK SELF-RECORD FOR WHOLE
CDG/VCD
1) While the player is playing, press
.
2) Select option 2 to record the whole CD.
3) This player will automatically save the
whole disc to hard disc.
4) This player will automatically distribute
song numbers that start from 8000 to 9999,
These numbers will be temporal song
names.(Please memorize the song numbers
because you are going to edit them on the
next step.
5)Please do not switch power while recording.
If you want to stop recording, you can push
button.
SONG UPDATING DISK*
The song library can be upgraded with
auto-loading feature. Please contact
dealer to purchase new song discs if
available.
1) Open the disc tray and load the new
song disc. The system will add each new
song into the hard disc accordingly.
2) When the system detects repeated
songs from the new song disc and the
originals song library, the players will
display a system message on the screen.
Please follow the instruction to select your
desired replacement option.
P.S. Please do not shut off the power in the
process to avoid any damages to the contents in
the hard disc.
*Sold Seperately
21
ADVANCED KARAOKE OPERATION
SONG TRANSFER FILES FROM COMPUTER TO KOD
Transfer Files
1)Rip and convert the song into .mpg format. (Customer need s to have a CD drive that is
able to read CDG along with ripping/coverting programs. You can find the CD drive model
and ripping/converting programs online but most Plexor drive can read CDG.)
2)Make sure the computer and KOD player are off.
Plug Hard Drive To Computer
3)Take out the hard drive from the player and plug it in your computer.
4)Turn on the computer and go into the newly install hard drive.
5)Insert the song into desire folder. Example ( for the song name Hero, I would put it in
English\GHI path)
Manually Updating Database
6)Go back to the main directory and open the file SONGLIST.TXT with notepad.
7)Scroll down to the bottom of the file and choose a 6 digit number for your song.(make sure
the number you choose isn't already used)
8)Type in the “number” + “=” + “song path” + “song name” + “.MPG”. save and exit
Example. “502031=\English\GHI\Hero.MPG”
9)Go back to the main directory and open the file MAINMENU.TXT with notepad.
10)Scroll down the file to the directory path where you put your song and add in the “song
number” + “=”. save and exit.
Example “\English\GHI
502031=”
11)Go back to the main directory path and open the file MENU(1).TXT with notepad.
12)Type in the Artist name under the correct path. For example, for the song Hero by Mariah
Carey, I would put it under Artist Female\M,N,O. “\Artist Female\M,N,O
Mariah Carey”
13)After inputting the artist name, type in the song path and song number under all the Artist
name. Save and exit.
Example. “\Artist Female\M,N,O\Mariah Carey
502031=”
14)Repeat for multiple songs.
*Customer takes full responsibility for modifying hard drive.
Modifying the hard drive incorrectly can lead to the KOD not working properly.
We strongly suggest the customer makes a copy of the original data before editing the hard drive.
**If the hard drive get mess up in any way, we will charge for hard drive recovery.
22
ADVANCED KARAOKE OPERATION
KOD-800 Hard drive structure (FAT32 Single partition)
Hid den
Files
X
X
X
Root
Sub folder
Function/Purpose
Advertisements ,up to 99 MPG
files
ADV
Fonts files
FONTS
Interlude files
TAIL
Quick self -recording files
TMP
TMP1
Booting up picture
Front page picture
Song Number and Path
Ordering song by title
Ordering song by Singer
POWER_ON.MPG
KARALOGO.MPG
SONGLIST.TXT
MAINMENU.TXT
MENU(1).TXT
● Up to 9 indexes(main folder) can be created under the ROOT ( the
10th index is reserved for the “My Favorite” folder ) . The main folder
name can use up to 12 English characters.
●Each sub folder can support up to 10 more sub folders. The name of
the sub folder can use up to 12 English characters. Each sub folder
can save up to 2000 songs files.
23
ADVANCED KARAOKE OPERATION
ADDING “MY FAVORITE” SONGS
Ten “My Favorite” directories are preset in the
player. You can follow steps to store your
favorite songs to “MY FAVORITE”.
1)Slect desire song and push
2)Slect the “MY FAVORITE” folder.
3)Slect from “MY FAVOR(1)” to “MY
FAVOR(0)” (Default folder name.
You can change the name of the My
Favorite folder).
4)Press enter.(the song is now added
To that folder)
CAPS
EDIT “MY FAVORITE” TITLE
There are ten “My Favorite” sub-directories.
You can follow the steps to rename them.
1) Perform this feature when the player
finishes playing all songs on the playlist.
2) Press
button.
3) Press numeral or arrow buttons to select
the menu.
4) Input the title name and then press
.
You can cancel changes by pressing
.
DELETE “MY FAVORITE”
You can follow the steps to delete songs stored in
“My Favorite” folder.
*Song has not been deleted from the H.D.D. Only
the index in “My Favorite” has been deleted.
NOTE:
There are several input methods for song title
CAPS
input. You can press the
button to select
a desired method.
【
】
24
1) Perform this feature when the player finishes
playing all songs on the playlist.
2) Press
and then numeric or arrow
buttons to enter “My Favorite” menu.
3) Press the numeric or arrow buttons to enter
the selected sub-menu.
4) Use the arrow buttons to highlight the songs to
be deleted and then press
.
5) Press
to confirm the deletion or
other buttons to cancel the deletion.
KARAOKE SETTINGS AND ADJUSTMENTS
SETTINGS AND ADJUSTMENTS
PASSWORD
With karaoke playback mode, you can set the
following functions to obtain the best
performance.When you press the
button, the
menu displays as below.
Press numerical key to select:
You can set password to lock the karaoke functions.
After you registered a password, you have enter the
password inorder to enter karaoke mode. Press
numerical key to select:
1
2
3
4
5
6
7
8
9
0
1.Administer Password
2.HDD Password
Song Password
ADVANCE SETUP
FONT SELECTION
PASSWORD
STANDBY MODE
PLAY INTERLUDE
LANGUAGE
BACK GROUND
COINER SETUP
EXPIRE
FAST KEY SETUP
ADVANCE SETUP
Press numerical key to select:
1) Repeat Mode: Press
button to turn on/off
repeat mode.
2) Volume Control: Press
button to turn on/off
the volume button of remote control.
3) Sublyric: Press
button to setup if there are
Chinese and Romanization lyric both on screen.
(There function doesn’t apply for Japanese song).
4) Song Forecase: Press
button to turn on/off
song forecase.
5) MIDI Priority: There is no this function on this
model.
6) MIDI EQ Adjust: There is no this function on this
model.
7) MIDI Key Shift: There is no this function on this
model.
8) Power Mode: There are ON/STAND BY mode.
9) Remote Con: There is no this function on this
model.
0) Room No.: Press
button to setup the room
Number in this player.
FONT SELECTION
Press numerical key to select:
1 Menu Font
2 Lyric Font
Several Chinese fonts are built in this player
for selection. There are 8 Chinese fonts in
menu font. 3 Chinese fonts in lyric display.
If you want to set Administer/HDD/Song password
the detail as below:
1) First, make sure the player is not under playback
mode.
2) Input your password using a 1~6 digits number
and then press
.
3) To confirm the new password, you will be
prompted to re-enter the new password. If you
don't, the password become inactive when you
turn the power off.
1)FOR PROTECT YOUR IF YOU FORGET YOUR
PASSWORD. THE ONLY SOLUTION IS TO
CHANGE YOUR KARAOKE IC CHIP. PLEASE BE
CAREFUL TO USE PASSWORD FUNCTION.
2)If you set HDD/Song password then you can not record
and delete any song.
STANDBY MODE
If the karaoke machine wait over 45 second will into
standby mode. You just can chose one of them as
below. Press numerical key to select:
1 ) Off : that will show the main screen or queue list.
2)Screen Saver
3)Random Play- from all the song collections
Advertise Video -from the “ADV” folder
1) If you are in Off/Screen Saver mode, you need
input the song number and press PLAY to start
the song. But, if you are in Random
Play/Advertise Video mode, you don’t need to
press play after inputting the number.
2) If you are Random Play/Advertise Video mode,
the word “Input song number” be display on the
top of screen to remind you that you are in
standby mode.
PLAY INTERLUDE
1) Interlude [ON]/[OFF]: For turning interlude animation
ON/OFF when you switch to the next song.
Interlude Timer: This is to set the time between a
song played and next queue. The time can be 0~90
seconds and forever(STOP). When you select
forever(STOP) you have to press
to start the
next song.
NOTE:
1) You can not change menu font during playback.
2) The built-in fonts may vary from model.
25
KARAOKE SETTINGS AND ADJUSTMENTS
LANGUAGE
EXPIRE
There are 3 language are built in this player for
selection. Press numerical key to select:
The Expire functions is for business use. For
example, if you rent a player to a store for
one year. You can set an one year expire
date for the user. After one year pass, the
player will no longer work.
1.ENGLISH
2. (Simple Chinese)
3. (Traditional Chinese)
1.Set Expire Date
2.Adjust Date
3.Adjust Time
BACKGROUND
You can change back ground of MP3 format
songs by Default/User/No. “No” is black
background. Press numerical key to select:
1.Default
2.User
3.No
FAST KEY SETUP
This function is for “keyboard remote
control ” that is sold separately. You can
input a song number into each function (F1
-F9) and have that song play directly just
pushing that function.
User background files need to be stored on the
catalog \BKG\USER\and format shall be
720*480 M2V including GOP.
COINER SETUP*
There are 7 functions of coiner. If you want
your coiner have these functions please press
numerical key to switch it on/off. When you
make any chances to these setting, you need
to turn the power off and back on for it to take
effect.
1.Model
2.Pause
3.Q-jump
4.Restart
5.Menu
6.Deduct
Remote
*Coiner sold sepertely
26
F1=
F2=
F3=
F4=
F5=
F6=
F7=
F8=
F9=
If you want to buy a “keyboard remote
control”, please contract with your dealer.
TROUBLE SHOOTING
Please refer to the following methods to
detect the problem if any functions fail to
perform properly.
NO POWER
sure both ends of the AC power cord
are securely plugged into the DVD player
and into the wall outlet.
ÄEnsure that the power switch on the back
panel is turned on.
ÄMake
NO SOUND
ÄEnsure that the equipment is connected
properly.
ÄEnsure that the input settings and the volume
adjustment for the TV are correct.
ÄEnsure that the input settings and the volume
adjustment for the receiver are correct.
ÄEnsure that the input setting for the TV is
correct.
ÄEnsure machine music volume is up.
DISC WON’T PLAY
a disc with label side facing up.
ÄIf the laser reader is dirty, use a lense
clean disc.
ÄPlease check if the disc surface is dirty.
Wipe the disc with a cleaning cloth.
ÄInsert
NO MICROPHONE SOUND
that microphone is connected
properly.
ÄEnsure that the microphone power is
turned on.
ÄTurn the volume control knob on the front
panel clockwise.
ÄAdjust the microphone volume with the
remote control.
ÄEnsure
NO PICTURE
ÄEnsure that the equipment is connected
properly.
ÄEnsure the TV is properly set on a correct
mode.
ÄEnsure that the input setting for the TV is
correct.
DISTORTED SOUND
ÄEnsure that the equipment is connected
properly.
ÄEnsure that the input settings and the
volume adjustment for the TV and
receiver are correct.
DISTORTED PICTURE
ÄEnsure that the equipment is connected
properly.
ÄEnsure that the connection to the YUV jack is
set properly.
ÄEnsure that the output setting is correct.
Select only one output connection, either SVideo or YUV.
ÄEnsure that the connection cord is in good
condition.
SELECTED SONG WON’T PLAY
ÄEnsure that the disc tray is empty.
ÄEnsure that the selected song is recorded in
the H.D.D.
ÄPlease check if you have deleted this song.
27
REMOTE WON’T WORK
any obstacles between the
remote and the DVD player.
ÄOperate the remote control close to the
DVD player and point directly to the
sensor.
ÄPlease check if the batteries in the remote
need replacement.
ÄRemove
BLUE SCREEN WITH DVD LOGO
AFTER MACHINE BOOT UP
ÄH.D.D might be damage or song data base
has been messed up due to
unappropriated operating. Please contact
manufacture.
SPECIFICATION & CONTACT INFO.
Power supply
16.9 in X 11.4 in X 22.in
7.7lbs (3.5kg)
Acesonic Corp. City of Industry CA,U.S
Sale:(626)820-0645
Technicals:(626)820-0605
www.acesonic.com
28
Acesonic Corp.
161 S. 8th Ave
City of Industry CA, 91746