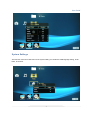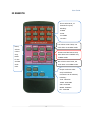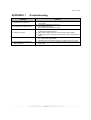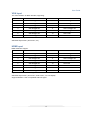
1
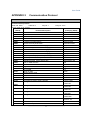
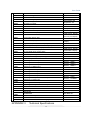
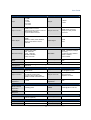
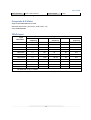
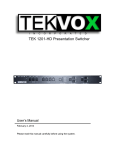
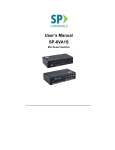
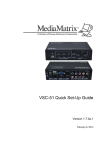
USERS GUIDE
ASP-S123V
Presentation Scaler Switcher
i
Manual Number: 130301
User Guide
SAFETY INSTRUCTIONS
Please review the following safety precautions. If this is the first time using this model, then read this
manual before installing or using the product. If the product is not functioning properly, please contact
your local dealer or Aurora for further instructions.
The lightning symbol in the triangle is used to alert you to the presence of dangerous voltage
inside the product that may be sufficient to constitute a risk of electric shock to anyone opening
the case. It is also used to indicate improper installation or handling of the product that could
damage the electrical system in the product or in other equipment attached to the product.
The exclamation point in the triangle is used to alert you to important operating and maintenance
instructions. Failure to follow these instructions could result in injury to you or damage to the
product.
Be careful with electricity:
Power outlet: To prevent electric shock, be sure the electrical plug used on the product power cord
matches the electrical outlet used to supply power to the Aurora product. Use only the power adapter
and power connection cables designed for this unit.
Power cord: Be sure the power cord is routed so that it will not be stepped on or pinched by heavy
items.
Lightning: For protection from lightning or when the product is left unattended for a long period,
disconnect it from the power source.
.
Also follow these precautions:
Ventilation: Do not block the ventilation slots if applicable on the product or place any heavy object
on top of it.
Blocking the air flow could cause damage. Arrange components so that air can flow freely. Ensure
that there is adequate ventilation if the product is placed in a stand or cabinet. Put the product in a
properly ventilated area, away from direct sunlight or any source of heat.
Overheating: Avoid stacking the Aurora product on top of a hot component such as a power
amplifier.
Risk of Fire: Do not place unit on top of any easily combustible material, such as carpet or fabric.
Proper Connections: Be sure all cables and equipment are connected to the unit as described in
this manual.
Object Entry: To avoid electric shock, never stick anything in the slots on the case or remove the
cover.
Water Exposure: To reduce the risk of fire or electric shock, do not expose to rain or moisture.
Cleaning: Do not use liquid or aerosol cleaners to clean this unit. Always unplug the power to the
device before cleaning.
ESD: Handle this unit with proper ESD care. Failure to do so can result in failure.
FCC
This device complies with Part 15 of the FCC Rules. Operation is subject to the following two conditions:
(1) This device may not cause harmful interference.
(2) This device must accept any interferences received, including interference that may cause undesired
operation.
Trademarks
All trademarks in this document are the properties of their respective owners.
i
User Guide
TABLE OF CONTENTS
PACKAGE CONTENTS .............................................................................................................1
INTRODUCTION........................................................................................................................2
About............................................................................................................................................... 2
Features .......................................................................................................................................... 2
Front Panel ...................................................................................................................................... 3
Rear Panel ...................................................................................................................................... 4
HDBaseT CAT Receiver .................................................................................................................. 4
QUICK START ...........................................................................................................................5
Hardware......................................................................................................................................... 5
OSD OPERATION .....................................................................................................................6
Picture Settings ............................................................................................................................... 6
Audio Settings ................................................................................................................................. 6
System Settings............................................................................................................................... 7
IR REMOTE ...............................................................................................................................8
FIRMWARE UPDATING ............................................................................................................9
APPENDIX 1
Troubleshooting ...........................................................................................10
APPENDIX 2
Communication Protocol ............................................................................ 11
Composite & S-Video .................................................................................................................... 14
YPbPr Input ................................................................................................................................... 14
VGA Input ...................................................................................................................................... 15
HDMI Input .................................................................................................................................... 15
APPENDIX 4
Warranty .......................................................................................................16
ii
User Guide
PACKAGE CONTENTS
Please make sure the following items are included within your package. Contact your dealer if any items
are missing or damaged.
ASP-S123V Presentation Scaler x 1
Power Cord x 1
DXE-CAT-RX1 HDBaseT CAT Receiver x 1 (Not included in –NC model)
Note: Go to www.auroramultimedia.com for latest manual and firmware
1
User Guide
INTRODUCTION
About
The ASP-S123V is a presentation scaler switcher designed for multi-signal processing of Composite
Video, S-Video, Component Video (YPbPr), VGA (Computer Graphics), and HDMI inputs which can be
scaled to 1080p in VGA/HDMI format. In addition, the built in HDMI CAT extension, microphone input,
and 20 Watt amplifier makes the ASP-S123V a complete cost effective solution for education,
commercial, and digital signage.
Features
4 HDMI Inputs
4 VGA Inputs with 3.5mm TRS Audio
1 YPbPr Input
1 Composite / S-Video Input with L/R Stereo Audio
1 Microphone Input
1 HDMI Output
1 VGA Output with L/R Stereo Audio
1 HDMI CAT Extender Port (Not included in –NC Model)
Scales input up to 1080p
2 x 10 Watt Amplifier
Volume Control
Front Panel Button Control with IR receiver
RS-232 Control
10/100 LAN (Optional)
USB for Firmware Updating
Note: Must use shielded CAT 5e/6/7 cable for extender port. CAT Extender port transmits
HDMI only.
2
User Guide
Front Panel
. Power indicating LED. It is illuminated red when the unit is on.
. IR sensor window for remote
. Input selection LEDs.
. Input source selection buttons. Select video/audio source type HDMI, VGA, and Video.
. Signal channel selection buttons. Selects the input specific to the selected Input source.
. Resolution selection buttons. Rotates through 1024×768, 1280x720p, 1280×800, 1360×768,
1920×1080p.
. MIC volume control buttons. “MUTE” for mute MIC volume, “△”for MIC volume up, and “▽”for
MIC volume down.
. Line volume control buttons. “MUTE” for mute line volume, “△”for line volume up, and “▽”for line
volume down.
3
User Guide
Rear Panel
. Two RCA connectors for stereo audio output, one VGA output, one HDMI output with embedded
audio, one HDBaseT for HDMI extending (Not available on –NC model).
. Four VGA connectors for VGA inputs.
. Four HDMI connectors for HDMI inputs.
. Four 3.5mm audio connectors for VGA audio inputs.
. One Component video input: Y/Pb/Pr, two composite video inputs, one S-Video input, and two
pairs L/R for analog audio input.
. One RS232 port for serial control (2=Rx, 3=Tx, 5=Gnd), one USB port for firmware update.
. Two MIC connectors: MIC with pre-amplification, LINE for audio direct input. One TCP/IP port for
network controlling.
. Amplifier with 2x10W@8Ω output.
. Connector for POWER.
. Grounding lug.
HDBaseT CAT Receiver
Note: The DXE-CAT-RX1 CAT Receiver unit is not included in –NC model. Also, only the HDMI output is
active when in use with the ASP-S123V. The RS-232 and IR are not active. Total distance from ASP-S123V
is 230ft (70m) using CAT 5e/6 shielded cable.
4
User Guide
QUICK START
Hardware
•
Unpack the ASP-S123V from its carton making certain everything is included.
•
If rack mounted find suitable space and mount using standard rack screws.
•
Connect all audio and video inputs and outputs accordingly.
•
Connect power cord.
•
System is ready to use.
5
User Guide
OSD OPERATION
Picture Settings
The first icon from left of OSD menu is to set the picture parameter. It includes the picture mode preset,
color temperature, contrast, brightness, hue, saturation, sharpness, scale, VGA setting and Advance
picture adjust.
Some parameters are available specific to the input type. For example: VGA setting can be set only with
VGA input.
The Advance Picture Adjust can set the Digital Noise Reduction (DNR), dynamic color, skin tone and
Adaptive Luma adjustment function on or off. DNR is suggested to be on as it can make the output image
clear and smooth.
Audio Settings
The second icon from left of the OSD menu is to set the audio/sound parameter. It includes the sound
effect presets, bass, treble, balance, scene mode, surround and smart volume setting. Some parameters
are available depending on the selected input.
6
User Guide
System Settings
The third icon from left of OSD menu is the system setting. It includes the OSD language setting, audio
listen, and freeze.
7
User Guide
IR REMOTE
Source select area, 12
channels for inputs,
including:
4 HDMI
4 VGA
2 C-VIDEO
1 S-Video
Line volume control area, can
Menu/
work when not in MENU mode.
Volume
control
Direction and OK buttons area,
area,
these buttons are available only
MUTE
in MENU mode.
for line
and MIC
MIC volume control area, can
audio
work when not in MENU mode.
mute.
Output resolution select
area, five different
resolutions can be selected,
including:
720P: 1280x720
1080P: 1920x1080
XGA: 1024x768
WXGA: 1280x800
HD: 1360x768
8
User Guide
FIRMWARE UPDATING
The ASP-S123V supports firmware field-updating, by USB flash disk. The Operation is as follows:
1. Copy the file to a USB flash disk.
2. Plug the USB flash disk to the USB port on ASP-S123V.
3. Pressing the button “HDMI” on the front panel for 6 seconds or send the RS232 command 0698% for
update mode, then press the button “OK” on the remote or send RS232 command 0609% to confirm
update. The ASP-S123V will load the new firmware from USB flash disk.
4. After updating finish, reboot and send the command “0617%” to reset to factory settings.
5. After reset, reboot again.
9
User Guide
APPENDIX 1
Troubleshooting
Problem
1. Front Panel does not work.
2. RS-232 does not have control
3. VGA has no output
4. Remote control does not operate.
5. CAT Extender is Intermittent or
does not operate
Solution
a. Check that the power plug is properly inserted into a functioning
power outlet.
a. Check baud rate settings for the port
b. Try swapping RX and TX.
c. Make certain protocol used is correct.
a. If HDMI is selected and HDMI is HDCP protected the VGA will turn off
by design for licensing reasons.
b. Make certain output resolution is set correctly to match display.
c. If OSD is present on screen then check to see if source selected has a
signal.
a. Make sure batteries are inserted correctly. Or if the batteries are worn
out, replace with new batteries.
b. Use the remote control within a distance of about 20 feet line of site.
a. Make certain you are using shielded CAT cable and/or the distance is
under 230ft.
10
User Guide
APPENDIX 2
Communication Protocol
RS-232 Control
Communication protocol:
Baud rate: 9600
Data bit: 8
Stop bit: 1
Pinout: 2=Rx, 3=Tx, 5=Gnd
Command
(ASCII)
Function Description
Parity bit: none
0600%
MUTE Line
Feedback
(example) (ASCII)
LINE Mute On
0601%
UnMute Line
LINE Mute Off
0602%
Audio turn up
LINE Volume: XX
0603%
Audio turn down
LINE Volume: XX
0604%
Lock the front panel button
Panel Locked
0605%
01XX%
Unlock the front panel button
Preset the volume. The XX is ranging from 00 to 99
Panel UnLocked
Volume: XX
02XX%
Preset the brightness. The XX is ranging from 00 to 99
Brightness: XX
03XX%
Preset the contrast. The XX is ranging from 00 to 99
Contrast: XX
04XX%
Preset the saturation. The XX is ranging from 00 to 99
Saturation: XX
05XX%
0606%
0607%
Preset the sharpness. The XX is ranging from 00 to 07
Auto-adjust the input parameter(VGA only)
Auto-adjust the color temperature
Sharpness: XX
Adjustment
Color Temp: XX
0608%
ZOOM the image, set the aspect ratio
Aspect Ratio: XX
0609%
OK, for OSD selection
OK
0610%
Left of OSD
Left
0611%
Right of OSD
Right
0612%
Up of OSD
Up
0613%
0614%
Down of OSD
set the picture mode
Down
Picture Mode : XX
0615%
SM Mode
Sound Mode:
0616%
MENU of OSD
MENU
0617%
0618%
Command to reset to factory defaults
Change the resolution to 1360X768 HD
0626%
Change the resolution to 1024X768 XGA
0627%
Change the resolution to 1280X720 720P
0628%
Change the resolution to 1280X800 WXGA
0629%
Change the resolution to 1920X1080 1080P
0630%
Check the volume level
Factory reset
Resolution: HD
1360X768
Resolution: XGA
1024X768
Resolution: 720P
1280X720
Resolution: WXGA
1280X800
Resolution: 1080P
1920X1080
LINE Volume: XX/MIC
Volume: XX
0631%
Check the input source
Source:
0632%
Check the output resolution
Resolution:
11
XX
XXXXXX
User Guide
XXXXXXXX
0633%
Check the image mode
Picture Mode : XX
0634%
Check the audio mode
Sound Mode:
0635%
Check the image aspect ratio
Aspect Ratio: XX
0636%
Check the brightness
Brightness: XX
0637%
Check the contrast
Contrast: XX
0638%
Check the saturation
Saturation: XX
0639%
Check the sharpness
Sharpness: XX
0640%
Check the color temperature
Color Temp: XX
0644%
OSD CHANNEL display able
0645%
Shield OSD CHANNEL
OSD Source: Display
OSD Channel
(Source): No Display
0646%
Volume Bar display able
0647%
Volume Bar display unable
Volume Bar: Display
Volume Bar: No
Display
0648%
Digital audio (HDMI and SPDIF) output enable
HDMI Audio: Enable
0649%
Shield digital audio (HDMI and SPDIF) output
HDMI Audio: Disable
0650%
Check OSD CHANNEL display status
OSD Source: Display
0651%
Check Volume Bar display status
Volume Bar: Display
0652%
Check Digital audio output status
HDMI Audio: Enable
0655%
Freeze output image
Freeze: Enable
0656%
Cancel the freezing of output image
Freeze: Disable
0698%
Firmware update
0701%
Switching to HDMI1 input
Source:
HDMI 1
0702%
Switching to HDMI2 input
Source:
HDMI 2
0703%
Switching to HDMI3 input
Source:
HDMI 3
0704%
Switching to HDMI4 input
Source:
HDMI 4
0705%
Switching to VGA1 input
Source:
VGA1
0706%
Switching to VGA2 input
Source:
VGA2
0707%
Switching to VGA3 input
Source:
VGA3
0708%
Switching to VGA4 input
Source:
VGA4
0709%
Switching to composite video AV1 input
Source:
CVIDEO1
0710%
Switching to YPbPr input
Source:
YPbPr
0711%
Switching to S-Video input
Source:
SVIDEO
0712%
Switching to composite video AV2 input
0720%
Mute Line and MIC
Source: CVIDEO2
LINE/MIC Mute On
0721%
UnMute Line and MIC
LINE/MIC Mute Off
0722%
MUTE MIC
MIC Mute On
0723%
UnMute MIC
MIC Mute Off
0724%
MIC volume turn up
MIC Volume: XX
0725%
MIC volume turn down
Preset MIC volume. The XX is ranging from 00 to 99
MIC Volume: XX
08XX%
APPENDIX 3
Technical Specifications
12
XX
MIC Volume: XX
User Guide
Video Input
Video Output
Input
4 HDMI
4 VGA
1 YPbPr
2 C-Video
1 S-Video
Output
1 HDMI
1 VGA
Input Connector
HDMI female connector
VGA(15 pin HD), female connector
RCA female connector
4 pin mini DIN connector
Output Connector
HDMI female connector
VGA(15 pin HD), female
connector
Video Signal
HDMI
RGBHV, RGBs, RGsB, RsBsGs,
NTSC 3.58, NTSC 4.42,PAL,
SECAM
Video Signal
HDMI
VGA
1080P,1920*1080 ;
HD, 1360*768
720P, 1280*720;
WXGA,1280*800 ;
XGA, 1024*768.
Bandwidth
HDMI: 4.95Gbps(1.65Gbps
per color)
C-Video/S-Video: 150MHz
YPbPr: 170MHz
VGA: 375MHz
145MHz
Video
Video General
Resolution Range
Maximum Pixel
Clock
Gain
HDCP
management
Audio Input
Input
Impedance
75Ω
Input / Output Level
0dB
0.5V~2.0Vp-p
Compliant with High-bandwidth Digital Content Protection(HDCP) with DVI & HDMI
standards
Audio Output
6 Stereo Audio for line audio
Stereo audio for line audio
Output
2 MIC audio
2x10W@8Ω amplifier
Input Connector
4 RCA female connector for YPbPr,
C-Video & S-Video audio
4 3.5mm jack for VGA audio
HDMI for HDMI embedded audio
Output Connector
RCA connector
Amplifier connector
Audio Input
Impedance
>10kΩ
Audio Output
Impedance
50Ω
>80dB @1KHz
CMRR
>90dB @20Hz to 20K Hz
Pin Configurations
2 = TX, 3 = RX, 5 = GND
Audio General
Stereo Channel
Separation
Frequency
Response
Control Ports
20Hz~20K Hz
IR remote, Buttons & RS-232,
TCP/IP (Optional)
Power, Mechanical, Environmental
Control/Remote
Temperature
-20 ~ +70℃
Humidity
10% ~ 90%
Power Supply
100VAC ~ 240VAC, 50/60Hz
Power Consumption
65W
13
User Guide
Case Dimension
W483 x H44x D235mm
Product Weight
3.2Kg
Specifications subject to change without notice.
Composite & S-Video
Supports PAL/SECAM/NTSC formats.
Selectable aspect ratio. (Full-screen, wide screen, 4:3)
Color RGB adjustable
YPbPr Input
Input
Resolution
Display Parameter
Frame
frequency
Frame
frequency
Frame
frequency
720x480I
2:1
525
15.75
60
4:3
720x480P
1:1
525
31.5
60
4:3
720x576I
2:1
625
15.625
50
4:3
720x576P
1:1
625
31.25
50
4:3
1280x720P
1;1
750
45
60
16:9
1280x720P
1:1
750
37.50
50
16:9
1920x1080I
2:1
1125
28.125
50
16:9
1920x1080I
2:1
1125
33.75
60
16:9
1920x1080I
2:1
1250
31.25
50
16:9
1920x1080P
1:1
1250
62.5
50
16:9
1920x1080P
1:1
1250
67.5
50
16:9
The bandwidth is up to 170MHz.
Selectable aspect ratio. (Full-screen, wide screen, 4:3, auto-adjust)
14
User Guide
VGA Input
The VGA resolution is VESA standard, supporting:
No.
Resolution
No.
Resolution
1
720×400@70 Hz
8
1024×768@70 Hz
2
640×480@60 Hz
9
1024×768@75 Hz
3
640×480@72 Hz
10
1280×768
4
800×600@60 Hz
11
1280×1024@75 Hz
5
800×600@72 Hz
12
1360×768@60Hz
6
800×600@75 Hz
13
1920×1080
7
1024×768@60 Hz
The bandwidth is up to 375MHz.
Selectable aspect ratio. (Full-screen, 4:3)
HDMI Input
HDMI resolution support:
No.
Resolution
No.
Resolution
1
640×480@60 Hz
9
1024×768@70 Hz
2
640×480@72 Hz
10
1024×768@75 Hz
3
640×480@75 Hz
11
1280×1024@75 Hz
4
800×600@56 Hz
12
1280×720P
5
800×600@60 Hz
13
1360×768
6
800×600@72 Hz
14
1920×540
7
800×600@75 Hz
15
1920×1080I
8
1024×768@60 Hz
16
1920×1080P
Digital embedded audio decoding.
Selectable aspect ratio. (Full-screen, wide screen, 4:3, auto-adjust)
Supports HDCP1.3 and is compatible with DVI signal.
15
User Guide
APPENDIX 4
Warranty
Limited 3 Year Warranty
Aurora Multimedia Corp. (“Manufacturer”) warrants that this product is free of defects in both materials and
workmanship for a period of 3 years as defined herein for parts and labor from date of purchase. This Limited
Warranty covers products purchased in the year of 2009 and after. Motorized mechanical parts (Hard Drives, DVD,
etc), mechanical parts (buttons, doors, etc), remotes and cables are covered for a period of 1 year. Touch screen
displays are covered for 1 year; touch screen overlay components are covered for 90 days. Supplied batteries are not
covered by this warranty. During the warranty period, and upon proof of purchase, the product will be repaired or
replaced (with same or similar model) at our option without charge for parts or labor for the specified product
lifetime warranty period.
This warranty shall not apply if any of the following:
A. The product has been damaged by negligence, accident, lightning, water, act-of-God or mishandling; or,
B. The product has not been operated in accordance with procedures specified in operating instructions: or,
C. The product has been repaired and or altered by other than manufacturer or authorized service center; or,
D. The product's original serial number has been modified or removed: or,
E. External equipment other than supplied by manufacturer, in determination of manufacturer, shall have
affected the performance, safety or reliability of the product.
F. Part(s) are no longer available for product.
In the event that the product needs repair or replacement during the specified warranty period, product should be
shipped back to Manufacturer at Purchaser's expense. Repaired or replaced product shall be returned to Purchaser
by standard shipping methods at Manufacturer's discretion. Express shipping will be at the expense of the
Purchaser. If Purchaser resides outside the contiguous US, return shipping shall be at Purchaser's expense.
No other warranty, express or implied other than Manufacturer's shall apply.
Manufacturer does not assume any responsibility for consequential damages, expenses or loss of revenue or
property, inconvenience or interruption in operation experienced by the customer due to a malfunction of the
purchased equipment. No warranty service performed on any product shall extend the applicable warranty period.
This warranty does not cover damage to the equipment during shipping and Manufacturer assumes no responsibility
for such damage.
This product warranty extends to the original purchaser only and will be null and void upon any assignment or transfer.
16
User Guide
This page is intentionally left blank.
17
www.auroramultimedia.com
User Guide
Th
Aurora Multimedia Corp.
205 Commercial Court
Morganville, NJ 07751
Phone: 732-591-5800
18
Fax: 732-591-6801