1
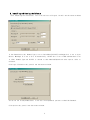
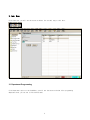
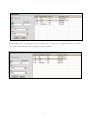
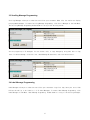
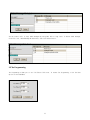
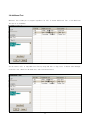
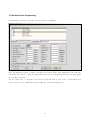
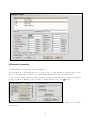
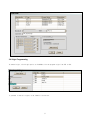
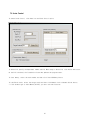
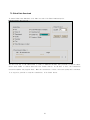
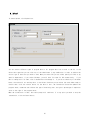
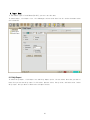
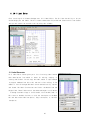
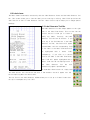
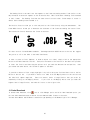
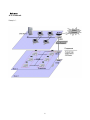
LP-II
VER 2.00
SOFTWARE PACKAGE
1
Attention:
Copyright© 2001, by CAS Corporation.
All rights reserved.
No part of this publication may
be reproduced, transmitted, transcribed, stored in a retrieval system, or translated into any
language or computer language, in any form or by any means, electronic, mechanical, magnetic,
optical, chemical, manual or otherwise, without the prior expressed written permission of
this company.
Disclaimer:
This company makes no representations or warranties, either expressed or implied, with
respect to the contents hereof and specifically disclaims any warranties of merchantability
or fitness for any particular purpose.
licensed “as is”.
Any software describes in this manual is sold or
Should the programs prove defective following their purchase, the buyer
(and not this company, its distributors, or its dealers) assumes the entire cost of all
necessary servicing, repair, and any incidental or consequential damages resulting from any
defect in the software.
Further, this company reserves the right to revise this publication
and to make changes from time to time in the contents hereof without obligation to notify any
person of such revision or changes.
2
Table of Contents
1. Introduction ..................................................................................... 5
1.1 Version and Specifications.................................................................... 5
2. Installing and Running the Software ............................................................... 6
2.1 Tool Bar ..................................................................................... 7
3. Code
Menu ....................................................................................... 9
3.1 Department Programming........................................................................ 9
3.2 Operator Assignments......................................................................... 10
3.3 Scrolling Message Programming................................................................ 12
3.4 Label Message Programming.................................................................... 12
3.5 Tax Programming.............................................................................. 13
3.6 Additional Text.............................................................................. 14
3.7 Nutritional Facts Programming................................................................ 15
3.8 Barcode Programming.......................................................................... 16
3.9 Origin Programming........................................................................... 17
3.10 Speed Key Set............................................................................... 19
4. Data Menu ....................................................................................... 20
4.1 Store ID .................................................................................... 20
4.2 Scale Assignments............................................................................ 21
4.3 Scrolling Message Assignment................................................................. 22
5.PLU Creation ( Excel File, LP-1 File Import ) ...................................................... 23
5.1 PLU Add, Copy, Delete........................................................................ 24
6. Configuration Menu............................................................................... 27
7. Download Menu ................................................................................... 29
7.1 PLU Download................................................................................. 30
7.2 Scale Control ................................................................................ 32
7.3 Global Data Download....................................................................... 33
7.4 Global Label Setting.......................................................................... 34
8. Upload .......................................................................................... 35
9. Report Menu ..................................................................................... 36
9.1 Daily Report................................................................................. 36
9.2 Weekly Report................................................................................ 39
9.3 Monthly Report............................................................................... 40
10. LP-II Messenger Program ......................................................................... 41
10.1 Sales Report................................................................................ 42
10.2 IP Address.................................................................................. 43
10.3 Configuration............................................................................... 45
3
11. LP-II Label Editor.............................................................................. 46
11.1 Label Generator............................................................................. 46
11.2 Label viewer................................................................................ 47
11.3 Label Generator Tool Bar.................................................................... 47
11.4 Field Specifications........................................................................ 48
11.5 Label Download.............................................................................. 49
Reference .......................................................................................... 51
A. LP-2 Network ................................................................................. 51
B. Cable ........................................................................................ 54
4
1. Introduction
Thank you for purchasing the CAS LP-II Software Package. We have designed this product with many
advanced features and user-friendly menu-driven programming.
We are confident that you will find that
the CAS LP-II Software Package will meet all of your most demanding needs.
Sales data are easily acquired through many of the available sorting and consolidating reports
which are quickly accessible through on-screen menus.
Also available: password protection, full access
to ALL scale programming features, and advanced WYSIWYG (What You See Is What You Get) label formatting
for creating the most intricate of label formats.
This Software Package also can serve as a great back-up-and-restore medium not just for PLU data
but for ALL scale programming data.
You can keep track of any system from a stand-alone set-up (just 1
LP-II) to an entire store with network!
What’s more, you can even keep track of several stores each
with a 32-scale network!
Remember, for proper installation and maintenance please have your Authorized CAS Dealer do the
primary installation, programming, and demonstration.
Your CAS Authorized Dealer also has a wide
variety of supplies, accessories, and expansion options for whatever your new and increasing demands may
require.
1.1 Version and Specifications
1) Version:
2) Model:
VER.
2.00
LP-II Software Package
3) System Requirements:
PC with a Pentium 333MHz or higher
Microsoft Windows® 98/2000 compatible
32 MB of RAM (64 MB recommended)
Language Support : Korea, English
Free RS-232 port
Hard-disk space required:
Supported Network Protocol : TCP/IP
Data Space : 10 MB, Application Space : 5MB
Mouse or other pointing device
VGA or higher-resolution monitor
CD-ROM Drive
4) Cable pin configurations and interface
See Reference B on page 52.
5
15 MB free space
2. Installing and Running the Software
After completing the installation, turn off PC and turn on PC again. You will see the screen as below.
In the Communication tab, Network Type is set to Scale Master(RS-232C) and Weight Unit is set to kg as
default. Messenger IP is set to IP of PC automatically. RS-232C Port is set to COM1 and Baud Rate is set
to 19200. Network Type and RS-232C is related to data Download/Upload and sales reports. Refer to
reference.
Click Login Information tab, you will see the screen as below.
You can set the ID and password here. To use this ID and password, you have to check Use Password.
Click Options tab, you will see the screen as below.
6
You can set Weight Unit, Country, Price decimal point, and Maximum price digit here. Country
Selection is available to all versions except USA version. Weight unit is available to USA version only.
After completing to set up, clik the OK button. You will see this message “You must restart the
program”. And then the program is closed automatically.
Setup is completed. Operate the LP-II Manager program, you will see the screen as below.
The Initial Options window gives three options to immediately choose from: Create new file, Open other
file and Open last accessed file. Once you select one of these options, the initial Options window will
close.
* Create new file : This button allows you start a new Store Data Base for a store network.
* Open other file : This option allows you select from any existing Store Date Bases stored on your hard
drive.
* Open last accessed file : This button allows you open to the last Store Data Base you used.
2.1 Tool Bar
The Tool Bar has 11 different icons, some you are familiar with from use in Windows® 98/2000 others
are unique to the LP-2 software package. See the Tool Bare below.
7
The New, Save, Print icons work the same as with Windows® 98 applications. The Add, Copy, and Edit icons
are used to ADD, COPY, or EDIT entire records such as Department, PLUs, etc. Some buttons are available
only when there is an open file.
8
3. Code Menu
Click Code icon, you will see the screen as below. You can add, copy or edit data.
3.1 Department Programming
Click Department option on the Code Menu, you will see the screen as below. After programming
department data, you can use it PLU and Data menu.
9
Department programming allows you to create, edit, or delete departments by using Add, Copy, and Edit
icons.
You may have up to 32 departments and each department name can be up to 20 characters long. The
Department programming window shows a listing of existing departments from which to choose from, a field
for you to enter the department number, and a field for you to type in a new department or to change on
existing one.
3.2 Operator Assignments
Operator Assignment allows you to determine what employees have access to what scale on your network and
what level of security they may have. To access Operator assignments, click Operator option on the Code
Menu. The Operator Assignment window shows a listing of the existing operators. It also has a field for
you to enter the operator name, password, departmental access, and operator level. The Operator Name can
be 20 characters long; the Password can be 5 characters long: the Operator level can be Operator(1),
Store manager(2), or Department manager(3); and the departmental acess can be one specific department or
all departments. See the Scale Owner’s Manual for details.
10
You can create, edit, or copy operator by using Add, Edit or Copy icons. To delete operator, click Edit
icon, check ID No check box, and click Delete button as below.
11
3.3 Scrolling Message Programming.
Scrolling Messages allow you to advertise and inform your customers. When idle, the scales can display
pre-progrmmed messages. To access Scrolling Message Programming, click Scroll Message on the Code Menu.
The Scrolling Message Programming window shows a listing of the existing scales.
You can program up to 32 messages. You can create, edit, or copy message by using Add, Edit or Copy
icons. To delete message, click Edit icon, check Message No check box, and click Delete button.
3.4 Label Message Programming
Label Messages allow you to advertise and inform your coustomers long after they leave your store. Each
PLU has the ability to be linked to 1 of 32 Label Messages. To access Label Message Programming, click
Label Message on Code Menu. Label Message Programming
12
window shows a listing of the existing messages.
You can create, edit, or copy label messages by using Add, Edit or Copy icons. To delete label message,
click Edit icon, check Message No check box, and click Delete button.
3.5 Tax Programming
Tax Programming allows you to set 3 different TAX rates. To access Tax Programming, click Tax Rate
option on the Code Menu.
13
3.6 Additional Text
Additonal Text allows you to program ingredient for PLU. To access Additional Text, click Additional
Text option on Code Menu.
You can create, edit, or copy Additional Text by using Add, Edit or Copy icons. To delete label message,
click Edit icon, check Text No check box, and click Delete button.
14
3.7 Nutritional Facts Programming
To access Nutrition Facts, click Nutrition Facts option on Code Menu.
Enter the appropriate values in each of the Nutritional Facts fields. Then, depending on the item that
this PLU will be used for, select the appropriate panel size in from the Panel Size Box. You can program
up to 32 Nutrition Facts.
You can create, edit, or copy Nutrition Facts by using Add, Edit or Copy icons. To delete Nutrition
Facts, click Edit icon, check Nutri-Facts No check box, and click Delete button.
15
3.8 Barcode Programming
To access Barcode, click Barcode option on Code Menu.
You can program up to 32 barcode here. You can create, edit, or copy Barcode by using Add, Edit or Copy
icons. To delete Barcode, click Edit icon, check Barcode No check box, and click Delete button.
If you click Edit Format button on Format String Box, you can edit Barcode string. To enter N (Item#), P
(Price), D (Dept#), W (Weight), V (Price Check) on Format Selection Box, click
buttons.
You can see the result on Format String Box. To enter numerical data, click numeric key on Format
Selection Box.
16
3.9 Origin Programming
To access Origin, click Origin option on Code Menu. You can program origin from 256 to 400.
If you want to see all origins, click View All list button.
17
If you click View Editable list, you can program origin again.
You can create, edit, or copy Origin by using Add, Edit or Copy icons. To delete Origin, click Edit icon,
check Origin No check box, and click Delete button.
18
3.10 Speed Key Set
To access Speed Key, click Speed Key option on Code Menu. To edit or create Speed Key, click Edit icon.
To delete Speed key, check Speed Key No check box and click Delete button.
You can create or edit Speed Key Map to assign this Speed Key to each Department as above. For example,
Speed Key Map #2 is assigned to Department #4. To create or edit Speed Key Map, click Edit S-Key button.
You will see the Speed Key Map screen as below.
You can program a Speed Key : Enter a Speed key number or click SHIFT button and enter a Speed key.
Click OK button to save it.
19
4. Data Menu
Tool Bar
The Add, Copy, and Edit icons are used to ADD, COPY, or EDIT data such as Store ID, Advertisement, etc.
4.1 Store ID
The Store ID is what the LP-II will print as a name and address on your labels. To access Store ID,
click Data icon. The Store ID window shows 3 lines of text containing the existing Store ID. Each line
has 20 characters. You can use any numbers, letters, or symbols. Click on any line to begin entering the
text for that line and click OK button to accept the data that you typed in.
20
4.2 Scale Assignments
Scale Assignment allows you to determine which scale on your network belongs to what department. This
allows you to keep track of sales and PLUs by department number. To access Scale Assignment, click Scale
option on Data menu.
The Scale Assignment window shows a listing of the existing scales on the network from which to choose
from, a field for you to enter the scale number, a field for you to type in a department number and a
field for you to type in Speed Key which that scale will be assigned to. Click OK button to finalize the
store the data.
You can create, edit, or copy Scale Assignment by using Add, Edit or Copy icons. To delete Scale
Assignment, click Edit icon, check Scale No check box, and click Delete button.
21
4.3 Scrolling Message Assignment
To access Scrolling Message Assignment, click Advertisement on Data menu.
Scrolling Message Assignment determine what messages get displayed on which scale and how they get
displayed. Each scale can sequence up to 4 different messages with 4 different effects. Click OK button
to store the data.
You can create, edit, or copy Scrolling Message Assignment by using Add, Edit or Copy icons.
22
5.PLU Creation ( Excel File, LP-1 File Import )
Click PLU icon on the Tool Bar and then click File on the menu. Click PLU Import then you will see two
options. You can import Excel file or LP1 file to PLU.
Click Excel file, you will see the screen as below.
Click DB Format Set button, you will see the screen as below. Note: It does not need to be fixed
whenever opening the file, but you just can fix it in the first place. In case there is the change in
the format of Excel File hereafter, you can set it up again. .
23
You have to select Excel File Field number and if you do not use field, select No Data. Make sure that
you select same field number as Excel File. Click OK button to save DB Format Setting.
Click Open button then you can open Excel file.
5.1 PLU Add, Copy, Delete
(1) PLU Add
To create a PLU, click Add button then you will see the screen as below.
Select the department number then click OK button.
A PLU is created as below.
You have to enter all required data for the PLU such as PLU No, Type, Item code and so on.
Type: PLUs can be By-Weight(W), By-Count(C), or Non-Food(N).
If you select W for PLU Type, Count is assigned to X as default because you do not need to enter count
for this PLU. Enter all fields for PLU.
(2) PLU Copy
24
You have to check the A check box that you wish to copy as above and then click Copy button, you will
see screen the as below.
Enter number to copy and click OK button.
PLU is copied as below.
(3) PLU Delete
25
To delete a PLU, check each check box that you wish to erase and then click Delete button.
If you want to delete all PLUs, click A and then click Delete button. You will see the “Delete all?”
Message as above. Click Y to erase. To cancel it, click Cancel button.
26
6. Configuration Menu
Click Config icon, you will see the screen as below.
You can select Network Type. If you select Scale Master Type for Network Type, you have to set up RS232C. If you select PC Master Type for Network Type, you have to set Messenger IP Address and Port No.
If you click Check Scale button, you can see scale IP address.
To access Manager Options, click Config icon and click Manager Options button.
27
You can select weight unit. Once you selected weight unit, all PLUs are set to this weight unit as
default. Country option is available to all contries except to USA. At the Price option, setup price
decimal point and maximum price digit. Click the OK button and SAVE button. From now, you can use as
you’ve set up.
28
7. Download Menu
You can download PLU data, Global data and so on.
29
7.1 PLU Download
To access PLU Download, click Down icon and PLU Download option.
When you select PLU you can either specify All PLUs or by specific departments. Click Find button you
will see the PLUs.
30
If you click A, all PLUs are selected. You have to select scale or department to transmit data. If you
select Scale in Download To box, you can download data to specific scale. If you select Department in
Download To box, you can download data to all scales of each department. If scale 1, 2, 3 belong to
Department 1 and scale 4,5,6 belong to Department 2, data of department 1 is transmitted to scale 1,2,3
and data of department 2 is transmitted to scale 4,5,6 simultaneously. When ready to transmit data,
click Transmit button. As the data is sent, the Transmission Status Box updates the progress meter. When
the transmission is done, the status prompt will read Done. If at any point you wish to stop the
transmission, click Cancel button.
31
7.2 Scale Control
To access Scale Control, click Down icon and Scale Control option.
To delete PLU, specify the department number and PLU. When ready to delete PLU, click Delete PLU button.
As the PLU is deleted, the Transmission Status Box updates the progress meter.
To clear memory, select the scale number and then click Clear NV Memory button.
To Lock/Unlock scale, select the tareget scale and then click Network Lock or Network Unlock button.
* If the network type is Scale Master(RS-232), you can’t use some functions.
32
7.3 Global Data Download
To access Global Data Download, click Down icon and click Global Download option.
You can click any of the check boxes in order to download the data that you wish to send as above.
Select scale number to receive data and click Transmit button. As the data is sent, the Transmission
Status Box updates the progress meter. When the transmission is done, the status prompt will read Done.
If at any point you wish to stop the transmission, click Cancel button.
33
7.4 Global Label Setting
If the network type is Scale Master(RS-232), You can’t use this menu.
To access Global Label Setting, click Down icon and click Global Download option.
You can setup Global Barcode, Global Label Format, Printer Font, and Misc. PLU Label Format. The Global
label Format allows you select a label format that will override each PLU’s label format.
34
8. Upload
To access Upload, click Upload icon.
You can receive different types of program data or all program data from a scale to the PC. In the
Select data types box you can click any of the check boxes in any combination in order to achieve the
correct type of data that you wish to send. When you select PLU you can either specify ALL PLUs or by
specific departments. If you select PLU-Dept, you will have file name for PLU automatically.
If you
want to change this file name, click Filename button and change it. If you do not check any of the check
boxes, the scale will not send any data. In the Select Scale box you can select the scale. When ready to
receive data, click the receive button. As the data is sent, the Trasmission Status Box updates the
progress meter, enumerate and indicate the type of data being sent, and give a percentage of completion
value to the right of the progress meter.
When the transmission is done, the status prompt will read Done. If at any point you wish to stop the
transmission, click the Cancel button.
35
9. Report Menu
If the network type is Scale Master(RS-232), you can’t use this menu.
To access Report, click Report icon. LP-II Messenger recives sales data from all scales the moment sales
are transacted.
9.1 Daily Report
To access Daily Report, click Report icon and Daily Report option. You can select date that you wish to
know. Also you can see daily report for PLU sales, Operator sales, Hourly sales, and Scale sales. Select
daily report that you wish to check and click Report button.
36
Also you can delete record that you wish to delete.To delete record, Click Delete Record button. You
will see the box as below. Enter the Search Options and click OK button. Record that you’ve selected is
deleted.
Notice) “Delete record” button of Weekly Report and Monthly Report is used to do same functions.
37
If you want to print out this sales report, click File -> Print on the menu bar. If you want to preview
sales report as below, click File -> Print Preview on the menu bar.
38
9.2 Weekly Report
To access Weekly Report, click Report icon and Weekly Report option. You can select date that you wish
to know. You can see Weekly reports for PLU sales, Operator sales, Hourly sales, and Scale sales.
If you want to print out this sales report, click File -> Print on the menu bar. If you want to preview
sales report as below, click File -> Print Preview on the menu bar.
39
9.3 Monthly Report
To access Monthly Report, click Report icon and Monthly Report option. You can select date that you wish
to know. You can see Weekly reports for PLU sales, Operator sales, Hourly sales, and Scale sales.
If you want to print out this sales report, click File -> Print on the menu bar. If you want to preview
sales report as below, click File -> Print Preview on the menu bar.
40
10. LP-II Messenger Program
If the network type is Scale Master(RS-232), you can’t use this Messenger Program.
After installing LP-II Software Package and then turn OFF and ON the PC, LP-II Messenger will start
itself. If you click
button, LP-II Messenger will search scales and get information of them
such as scale ID, IP address, sales report and so on. Even though you finish Messenger program and start
again, this program stores all information.
Scale number,IP Address
Scale status and maximum
and Port
transation number
Used to search scales.
Maximum transaction number,
current transaction number
and error.
Transaction
number and price
If you install LP-II Software Package, you will have Tray icon of Messenger.
41
10.1 Sales Report
If the clerk sells items, you can see transaction data on the Messenger program and this sales report is
stored in Database. If you want to clear this sales report in the Messenger program, click
button. If you want to clear this sales report in database, click
button.
If you want to check specific customer’s sales, type customer number and click
key.
No-Clerk Mode- Customer number:0
Floating Clerk/ Standard Clerk Mode- Type Clerk
number
You can see detail information of sales.
42
If you want to check scale sales, double click scale number on the main screen.
You can see detail information of sales.
10.2 IP Address
If you click
button, you will see IP Address window as above. You can check scale ID
Number and IP Address. You can set IP address of each scale that is not connected, in advance, and the
information of scale will be shown on the program automatically when connected.
and IP address is 10.10.0.188, you have type 7 and 10.10.0.188 and then click
43
If the Scale ID is 7
button.
You will see new IP address on the list as above then click
button. You can also delete IP
address of each scale.
You can check status of scale. If the scale is connected, you will see red line and if the scale is
disconnected you will see blue line as below.
Status
of
scale:
Connect,
Disconnect, or Unstable.
44
10.3 Configuration
To access Configuration, click
key. You will see Configuration window as below. You can check
IP Address, Port and so on.
Scale Port
Port(Transaction from Scale) : 2000
This port is used to receive sales data.
CMD Port (Request to Scale): 2001
This port is used to send data to scale.
Port(Receive from Manager) : 2004
This port is used to receive data from Manager.
PC manager
Port(Send to Manager) :
2005
This port is used to send data to Manager.
IP Address :
10.10.0.151
IP Address of Manager.
You can see IP Address of current system automatically.
Gateway :
10.10.0.1
Number of Scale : 32
The number of scale that you wish to connect. (1~ 32)
Log Size : 300 (5~ 500)
The number of transaction report that you can check on the Messenger
Monitor Time : 300
(50~ 500, Unit: msec)
Decimal Point : 2
You have to set up a decimal point same as that of scale. (0 ~ 5)
45
11. LP-II Label Editor
After installing LP-II Software Package start LP-II Label Editor. The LP-II has the ability to let you
custom design your own labels. The LP-II comes standard with 90 pre-defined formats and 10 free-formats
that you can create from scratch or edit by using this software.
11.1 Label Generator
LP-II Label Editor Screen gives you a list of existing label formats
with descriptions from which to chose for editing, copying, or
creating new formats. You can copy the label, which is input example
in program, numbered from 100 to 166, and use it after editing. To the
number of from 167 through 999 label can be used arbitrarily, copied,
and formed. The Label Size Box has two fields: the Width Field and
Height Field. These fields control the width and height in millimeters.
To change from Add to Copy or to Edit modes, click the ADD, COPY, or
Edit Icons on the Main Tool Bar or click the Item Option on the Menu
Bar and then select Add item Option, Copy Item Option, or the Edit
Item Option.
46
11.2 Label viewer
The Label Viewer Screen works concurrently with the Label Generator Screen and the Label Generator Tool
Bar. This screen allows you to view the label you are creating or editing. Label Field option has the
same function as that of Label Generator Tool Bar. Label Controls option helps you to change special
headings.
11.3 Label Generator Tool Bar
The Label Generator Tool Bar always appears on the right
side of the Label View Screen. This tool bar has the
buttons that will allow you to create or
modify any
labels. Currently, the
Label
Generator Tool Bar has 44 buttons. If you
click any of the Field Buttons in the Label
Generator Tool Bar, that button will appear
“pressed-down” and the corresponding field
on the label in the Label View Screen will
be
highlighted
with
a
darker
frame.
Consequently, if you click on a certain
field on the label in the Label View Screen,
that field will appear highlighted with a
darker frame and the correspoing button in
the
Label
Generator
Tool
Bar
will
automatically appear “pressed-down.”
To know what these buttons do, simply hold
the mouse pointer over the button and after a few seconds a box will appear over the
button explaining what that button does.
The Link Field in the Label Generator window allows you to link up to 5 label formats that
will print consequentively from 1 PLU.
47
11.4 Field Specifications
All fields also have different properties. To access these properties left click on the field in the
Label View Screen. Once that field is highlighted right-click that same field and the Field
Specifications screen will appear. Most fields and Label Generator Tool Bar Buttons have the same Field
Specifications Screen. The Field Specifications Screen for all fields except Barcode Fields and
StaticText Fields have the following functions: Position controls, Orientation controls, Justification
controls, Special Effects controls, Font Size controls, Frame Width controls, and a Headings control.
All templates and Static Text Fields have the same controls as above except there is no Headings control.
Barcode Fields and all the draw buttons have a different Field Specifications Screen with only: Position
controls, Orientation controls, and Frame Width controls.
Field Specification Screen (For all fields except Box, Line, Graphics and Barcodes.)
Field Specification Screen (For Box, Line and Barcodes)
48
The Heading Field is the small text that appears on the frame surrounding another field similar to the
way the words “Orientation” appears on the Orientation Box.
to their frames.
Most fields have a Heading field attached
The Heading field has the same controls as most other fields except of course it
doesn’t have a Heading Field attached to it.
The Position Controls allow you to size and position the field directly using mm measurements.
The
Frame Width Control allows you to determine the thickness of the frame surrounding the current field.
The Orientation Controls determine the field’s orientation:
All other controls follow Windows standards.
The Background Grid ON/OFF Button on the tool bar toggles
the grid on or off on the label in the Label View Screen.
In order to place a Field, Template, or Draw an object on a label, simply click on the appropriate
button on the Label Generator Tool Bar. Then point the mouse to the location on the label that you wish
to insert the field in and then drag the pointer until you reach the desired size and position.
Once
you release the mouse button, the field will appear on the label.
If you wish to delete a field, simply highlight it by left-clicking the field and then click on the Cut
Button on the tool bar.
If you wish to zoom-in on a label click the Magnify Button on the tool bar and
the label will appear magnified.
There are several levels of magnification that you attain by
repeatedly clicking on the Magnify Button.
If you click on the Magnify Button once you reach the
highest level of magnification, the label will return to the original size.
11.5 Label Download
To access Label Download, click
icon or click Manager option and click Label Download option, you
will see Lable Download screen as below. You can download label formats to the scale.
You have Scale Master and PC Master transmission type dpending on the Network Type of LP-II Manager.
49
To transmit label, check Label No check box that you wish to send as below. (To check all check boxes,
click Label No.) Then select target scale to receive data. If the network is PC master type, click
button, Target Scale list is updated.
When ready to send data, click
click
button. If at any point you wish to stop the transmission,
button.
50
Reference
A. LP-2 Network
Example 1.
51
Example 2.
52
Example 3.
Example 4.
53
B. Cable
Ethernet wire – straight cable and crossover cable
Straight connection
Crossover connection
Scale
HUB
HUB
HUB
1 2 3 4 5 6 7 8
1 2 3 4 5 6 7 8
1 2 3 4 5 6 7 8
1 2 3 4 5 6 7 8
TX+
RX-
TX-
RX+
RX+
RJ-45
Plug
1
2
3
4
5
6
7
8
TX-
RX-
RX+
TX+
1
2
3
4
5
6
7
8
TX-
RX-
RJ-45
Plug
TX+
RJ-45
Plug
`
`
NOTE: Twisted pair Category-5 (UTP) cable with RJ45 Plug
RS232C wire
To Scale
To PC
9pin
D-SUB
(male)
NOTE:
1
2
3
4
5
6
7
8
9
1
2
3
4
5
6
7
8
9
9pin
D-SUB
(female)
Do not use 1,4,6,7,8,9 pin.
54
1
2
3
4
5
6
7
8
RX+
TX-
RX-
TX+
1
2
3
4
5
6
7
8
RJ-45
Plug