1
G95 DVD Surround Receiver System
User Guide
ii
Preface
Important safety instructions
•Read the instructions.
•Keep these instructions.
•Follow all instructions.
•Do not use this apparatus near water.
•Clean only with a dry cloth.
•Install only in accordance with the manufacturer’s instructions.
•Refer all servicing to approved service personnel.
To avoid overheating
•Leave at least 10cm around the equipment to ensure sufficient
ventilation.
Do not position the product:
•In direct sunlight.
•Near heat sources, such as a radiator.
WARNING: TO REDUCE THE RISK OF FIRE OR ELECTRIC SHOCK,
DO NOT EXPOSE THIS APPARATUS TO RAIN OR MOISTURE.
•Stacked with any other audio products, as the heat it generates
may damage the other products.
•On a soft surface, such as a carpet, which would obstruct the
This apparatus has been designed with Class 1 construction and
ventilation holes in the base.
must be connected to a mains socket outlet with a protective
earthing connection (the third grounding pin).
The sides, base, and top of the G95 DVD Surround Receiver System
case contain venting holes for the internal heatsinks which should
This apparatus uses a single-pole power switch. As a result it is
not be obstructed. Ensure that air can flow around them. The
not isolated from AC mains power when switched off at the rear
product normally runs warm to the touch when not in standby.
panel. The apparatus may be isolated from mains power either by
unplugging the power connector from the rear of the unit, or by
Radio interference
unplugging the connector at the opposing end of the power cord
FCC Warning: This equipment generates and can radiate radio
or cable from its supply outlet. As a result, either or both of these
connectors should remain accessible
Safety warnings
frequency energy and if not installed and used correctly in
accordance with our instructions may cause interference to radio
communications or radio and television reception. It has been typetested and complies with the limits set out in Subpart J, Part 15 of
•Do not expose the product to dripping or splashing.
FCC rules for a Class B computing device. These limits are intended
•Do not place any object filled with liquid, such as a vase, on the
to provide reasonable protection against such interference in home
product.
installations.
•Do not place naked flame sources, such as lighted candles, on the
product.
EEC: This product has been designed and type-tested to comply
with the limits set out in EN55013 and EN55020.
To avoid interference
Do not position the product:
•Near strong magnetic radiation, such as near a power amplifier.
•Near to a television, or where connecting cables may be subject
to or cause interference.
iii
Contents
Introduction
Contents
1
Provides information about the G95 DVD Sound Receiver
Installing the DVD system
31
Describes how to install the DVD system and connect it to the
System and technical specifications.
other equipment in your system.
The G95 DVD Surround Receiver System
1
Unpacking
31
Specifications
5
Audio connections
32
Communications connections
39
Using the DVD system
7
Gives information about operating the G95 DVD Surround
Resetting the DVD system
Receiver System using the front panel or MSR+ remote control.
Explains how to reset the DVD system using the front-panel
Operating your G95 DVD Surround Receiver System
43
8
controls.
Using the MSR+
9
Resetting the product
Selecting sources
10
Changing the DSP preset
11
Configuring the DVD system
DSP presets
12
Explains how to configure the DVD system using the on-screen
DSP displays
13
setup menus.
Playing CDs
14
Configuration
45
Playing CDs – Repeat and fast scan
15
Configuring the video 47
Playing CDs – Programming a selection
16
Configuring the audio
52
CD displays 17
Configuring the sources 56
Using the radio
18
Configuring settings
58
Using the radio – DAB band
19
Using the radio – AM/FM band
20
Configuring playback options
Radio displays 21
Explains how to use the options on the Setup menu to
Playing DVDs
22
configure the playback options of the DVD system.
Playing DVDs – Fast and slow-motion playback
23
Setting playback options
59
Playing DVDs – Displaying and exiting from menus
24
Region codes
62
Playing DVDs – Selecting options from a menu
25
Playing DVDs – Selecting the audio soundtrack and
repeat playback
26
Playing DVDs – Changing the camera angle and
Troubleshooting
43
45
59
63
Provides suggested solutions to problems while installing,
configuring, or operating the product.
subtitles
27
Maintenance
67
Playing DVDs – Changing the video controls
28
Service and guarantee
68
DVD displays 29
Index
69
iv
Preface
Copyright and acknowledgements
Sales and service in the UK
Sales and service in the USA
Meridian Audio Ltd
Meridian America Inc
Latham Road
8055 Troon Circle
Huntingdon
Suite C
Cambridgeshire
Austell
PE29 6YE
GA30168-7849
England
USA
Tel +44 (0)1480 445678
Tel +1 (404) 344 7111
Fax +44 (0)1480 445686
Fax +1 (404) 346 7111
World Wide Web – http://www.meridian-audio.com/
This guide was produced by Human-Computer Interface Ltd,
http://www.interface.co.uk/
Copyright © 2003-2007 Meridian Audio Ltd
Manufactured under license from Dolby Laboratories Licensing
Designed and manufactured in the UK by Meridian Audio Ltd.
Corporation (Canadian patent 1,037,877), Lucasfilm Ltd. (US
Meridian Audio reserves the right to make changes and
patents 5,043,970; 5,189,703; 5,222,059. European patent
improvements to any of the products described in this document
0323830), Trifield Productions Ltd, and Nimbus Records Ltd.
without prior notice.
Macrovision: This product incorporates copyright protection
Dolby, Dolby Digital, Pro Logic, AC-3, PLII, and the double-D symbol
technology that is protected by US patents and other intellectual
are trademarks of Dolby Laboratories Licensing Corporation. DTS
property rights. Use of this copyright protection technology must
is a registered trademark of Digital Theatre Systems Inc. MPEG
be authorized by Macrovision, and is intended for home and
is a registered trademark of the MPEG organisation. Trifield is a
other limited viewing uses only unless otherwise authorized by
trademark of Trifield Productions Ltd. HDMI, the HDMI logo, and
Macrovision. Reverse engineering or disassembly is prohibited.
High-Definition Multimedia Interface are trademarks or registered
trademarks of HDMI Licensing LLC.
Boothroyd|Stuart Meridian, Meridian, and Meridian Digital Theatre
are registered trademarks of Meridian Audio Ltd.
Part no: G95/1 (P86016)
Introduction
Introduction
This guide is designed to enable you to obtain the best possible results from your G95 DVD
Surround Receiver System.
If you have just purchased the DVD system you should first turn to the chapter Installing the
DVD system, page 31, for information about unpacking the DVD system, connecting it to the
other equipment in your system, and configuring it using the front panel.
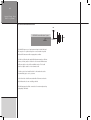
The G95 DVD Surround
Receiver System
high-quality FM/AM tuner with RDS/RDBS (G95 model), or a DAB/
FM tuner (G95-DAB) is also included.
The G95 is a full 5.1 DVD Surround Receiver with both stereo
Audio outputs
and surround modes, a robust slot-loading DVD drive and five
Power amplifiers
built-in digital power amplifiers to drive your choice of passive
The G95 includes five channels of powerful, compact and
loudspeakers, plus an active subwoofer output. It plays audio CDs,
innovative new Class D digital power amplifiers, which offer
MP3 CDs, Video CDs and DVD-Video discs including the DVD side
exceptional power output – 100W per channel into 8Ω – while
of DualDisc hybrids. It can decode Dolby Digital, DTS, MPEG, and
remaining cool even at full output. The G95 is the first Meridian
MP3 data streams to PCM for stereo and multichannel playback
product to include digital power amplifiers, and the design was
and also includes Trifield high-resolution stereo processing. Stereo
chosen following extensive research to ensure that the quality
and multichannel digital audio outputs are also available via HDMI
and performance matched that typically delivered by Meridian’s
at up to 192kHz.
conventional audio amplifier designs. The power amplifier has been
specially optimised for cool running and maximum audio quality,
The G95 also includes comprehensive preamplifier functionality
including the use of audiophile capacitors and other components.
with multiple analogue and digital inputs including two coax digital
inputs, two optical digital inputs, and three analogue input pairs.
The amplifiers are powered by a linear power supply including an
Digital signal processing is included to upsample stereo decoded
overspecified true toroidal transformer to provide the high levels of
streams, or decode surround bitstreams from external sources. A
clean power required for powerful multichannel performance.
Introduction
Line-level outputs
The digital electronics as a whole are driven by a new design of
In addition to five pairs of heavy-duty gold-plated power output
high-stability clocking system which further reduces jitter and
terminals, a complete set of six analogue line-level outputs is
ensures that the highest level of detail is recovered from a disc. All
included to drive external power amplifiers and speakers and an
digital data are accurately re-clocked, and multiple power supplies
active subwoofer such as the Meridian SW1600 or SW5500. Thus
ensure that digital and analogue circuitry are kept separate.
the G95 is truly a complete stereo or surround system in a box:
just add the conventional passive loudspeakers (and optionally
Radio tuner
amplifiers) of your choice!
Two tuner options are available: AM/FM and DAB/FM. The former
provides AM (LF/MF) and FM (VHF stereo Band II) reception with
Built-in sources
DVD-ROM drive
At the heart of the player side of the G95 is a robust, high-speed,
slot-loading DVD-ROM drive – the best type of drive to use to
ensure accurate data recovery from all types of disc. The drive
normally operates at standard speed; however, it is capable of
recovering data a great deal faster when required, enabling it to
RDS/RDBS, and is fitted with its own 96kHz, 24-bit A/D stage.
Digital signal processing provides a sophisticated FM stereo blend/
width control which allows you to minimise noise on a received
signal. There is also a DSP-based low-pass filter and a whistle filter
for improved AM reception. Alternatively, a version is available with
DAB Digital Radio (UHF L-Band and/or VHF Band III) and FM.
make more attempts to recover accurate data from a problem
User interface
disc. Because of this, the drive can perfectly recover the data from
The G95 features a comprehensive front-panel user interface which
almost any compatible disc. In addition, the drive has a special
allows access to all the features of the unit. The player can be set
on-board anti-vibration buffer and is especially robust for durability
to a standard Type which configures all the required settings as
and reliability in constant service.
required for a particular application, stereo or surround. In addition,
an on-screen display (OSD) allows you to configure specific settings
Unlike other players that use a mechanical approach to attempt to
individually.
lower jitter by minimising drive vibration, the G95 employs a triple
buffering system to minimise jitter, maximizing HF transparency,
The player employs Flash ROM memory for the operating system,
sound stage precision and stability. The result of this sophisticated
so software updates can be downloaded from the Internet and
approach is that the player delivers ultra-low jitter, with sound and
installed via a PC connected to the serial port on the rear panel.
picture quality second only to that of Meridian’s 800 Reference
This port also allows full remote control and configuration of the
DVD/CD Player.
unit.
Introduction
The output level of the system can be controlled remotely or via
a full surround image from 2-channel soundtracks on audio CDs
the front-panel knob which controls a proprietary hybrid digital/
or DVD‑Vs, or from the external two-channel digital or analogue
analogue volume control – a design similar to that used in the 800
inputs, by extracting latent surround information in the recording.
Series and DSP 8000.
The acclaimed Trifield system – which decodes conventional
Digital Signal Processing
Upsampling
The G95 includes upsampling in stereo mode, which allows digital
filters to be placed far beyond the range of human hearing, as
well as offering other audible benefits right across the audio band,
including improved transient response. All processing is at 48-bit
precision. This results in a more open, transparent sound, tighter
bass, and a generally more ‘musical’ sound overall.
To drive the power amplifier modules and the six-channel
analogue line-level outputs, signals are upsampled to 24-bit,
176.4/192kHz for digital to analogue conversion – DACs can offer
better performance at higher sampling rates; up to 88.2/96kHz
multichannel or 192kHz in stereo is delivered as the digital audio
component of the HDMI output, at 24-bit word length.
stereo to the 3-speaker front stage (LCR) of a surround layout
for impressive added soundstage stability and imaging – is also
included.
Several DSP presets are provided to allow you to choose the type
of surround processing used for different sources. For 5.1 audio
formats a Discrete or Cinema DSP preset is selected automatically,
depending on whether the source is music or a movie. For twochannel audio formats the DSP preset can usually be switched
between Trifield (recommended for music), Stereo (uses just the
main left and right speakers and subwoofer), or PLII (recommended
for movies), using the DSP key on the front panel or the supplied
MSR+ infrared learning remote.
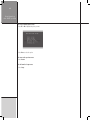
Video
On the video side, advanced video circuit designs, matched-phase
Digital surround decoding
video filters, and a broadcast-quality video encoder are employed
Advanced digital processing features are handled by a powerful
to deliver low-noise images of outstanding colour depth up to full-
DSP engine delivering an impressive 150MIPS (million instructions
specification High Definition 1080p resolution. Separate ultra-low
per second). In addition, the G95 incorporates digital surround
jitter master video and audio oscillators allow picture and sound to
decoding to allow full 5.1 surround performance. The built-in
be independently optimized, ensuring that the G95 DVD Surround
surround processing system decodes 5.1 Dolby Digital or DTS
Receiver System delivers breathtakingly clear pictures.
soundtracks from DVD discs, and Dolby Digital or DTS data
streams fed into the external digital inputs. It will also synthesise
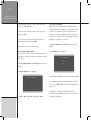
Introduction
Video processor/scaler
resolution as the best current HD sources. Analogue component out
The G95 includes a unique broadcast-quality, high-resolution video
is available at 480p and 576p (plus 1080i pass-through).
processor/scaler which combines both Meridian and Faroudja
DCDi® technology, delivering the most advanced, high-quality
The HDMI output can be connected to a DVI input if the device
video available today. The processor can simultaneously provide
supports HDCP copy protection, using a suitable adaptor cable.
composite and S-video outputs, plus progressive component video
and up to 1080p full-spec High Definition on an HDMI output. The
To avoid potential degradation of High Definition signals caused by
processor can receive two composite, three S-video, and interlaced
switching video signals inside the unit, the G95 includes a single
component video inputs, and convert between the formats, or
HDMI video/audio output with HDCP.
to the HDMI (high-definition multimedia interface) standard, to
provide a single video output for all the video sources in your
To support environments where it is required to switch multiple
system.
HDMI-based sources (such as a High Definition PVR) to a single
display, the G95 directly supports the Meridian HDMax 421 four-
Picture adjustment controls
into-one HDMI switch box, which permits source selection on the
The video processor includes picture adjustment controls, available
G95 to switch HDMI inputs seamlessly via the 421.
via the MSR+ and front-panel display. These include Contrast, Black
Level (Brightness) and Saturation. The black level, contrast, colour,
and hue (NTSC) are adjustable on the video inputs.
A bypass function allows progressive or high definition component
video to be routed directly to the component output only.
HDMI port
The HDMI port also delivers high-resolution digital audio, up to six
channels of PCM at up to 24-bit, 96kHz; two channels at 24/192;
or a 5.1 bitstream.
The HDMI port supports a wide range of high quality digital video
options including 480p, 576p, 720p, 1080i and 1080p, the highest
video resolution available in the consumer industry – the same
Introduction
Specifications
Audio inputs
Analogue: three stereo inputs, unbalanced 0.5–2.5Vrms on phono. Digital S/PDIF: two stereo coax inputs and
two stereo Toslink optical inputs.
Loudspeaker
5 x digital amplifier outputs (Left Front, Centre Front, Right Front, Left Surround, Right Surround) each delivering
outputs
100W per channel into 8Ω, with sturdy gold-plated binding posts (in Europe, terminals booted to CE spec)..
Line level outputs
Line-level analogue outputs (LF, CF, RF, LS, RS, Sub) on phono connectors.
Digital output
HDMI 2/6-ch/bitstream output (with video)
Tuner
AM (Long/Medium Wave, 150–285/525–1605 kHz). AM lowpass filter and whistle filter.
FM (VHF Band II, 87.5–108 MHz), sensitivity 2μv. DSP processing for FM stereo/mono blend and width.
DAB: Band III and L Band.
Video features
Automatic PAL or NTSC encoding on Composite and S-video. NTSC black-level setup adjustable as 0 or 7.5IRE.
16:9 and 4:3 displays supported. Contrast, Black Level, Saturation controls on output; Contrast, Black Level,
Colour and Hue (NTSC) on inputs.
Video inputs and
Two composite video inputs, one component input, three S-video inputs. Composite, S-video, component and
outputs
HDMI outputs (HDCP-compatible, also carries 2/6-ch/bitstream audio), outputs all simultaneously active; selected
video input is converted to all formats at valid resolutions (except non-interlaced component input which
bypasses processor).
Video processor
Faroudja DCDi® scaling and de-interlacing technology. HDMI port supports 480p, 576p, 720p, 1080i and 1080p.
Analogue component out at 480p and 576p (plus 1080i component pass-through).
Trigger output
12v trigger output allows control of power amplifiers, etc.
Comms
Full RS232 control and status enables custom integration or automation. Meridian Comms (2 x DIN plus BNC).
Formats
DVD-Video, DVD-R; Video CD (VCD), CVCD, MP3; CD Audio (CD-DA), CD-R and hybrids such as SACD (CD layer
only) and DualDisc (DVD layer only).
Power
100–240v specified on ordering, 50–60Hz, 700W max.
Dimensions
Width: 440mm (17.32in); Depth: 350mm (13.78in) plus connectors; Height: 90mm (3.54in).
Weight
13.5 kg (30 lbs).
Rack mounting
Kit available from Meridian authorized dealers.
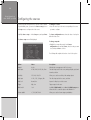
Controls
Front-panel soft key functions include Play, Stop, Pause, Previous, Next, plus Home and More keys. Off, Display
and Eject buttons. Off gently illuminated when off; keys back-illuminated when on.
On-screen display
Switchable custom On-Screen Display allows instant review of disc status. Screen saver with user timeout options.
Logo screen with PLUGE bars enables set-up of display device.
Front-panel display
Multi-character dot-matrix graphic Vacuum Fluorescent Display (VFD).
Introduction
Using the DVD
system
Using the DVD system
This chapter gives full information about operating the G95 DVD Surround Receiver System
using the front panel or MSR+ remote control.
For information about connecting up and configuring the DVD system, refer to Installing the
DVD system, page 31.
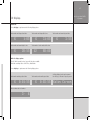
Basic use
Playing CDs
For information about switching your G95 on and off, using the
For information about playing and controlling CDs see Playing CDs,
soft keys, changing the display format, and using the MSR+, see
page 14.
Operating your G95 DVD Surround Receiver System, page 8
Using the preamplifier features
For information about selecting sources see Selecting sources,
Using the radio tuner
For information about using the DAB and FM/AM radio tuner see
Using the radio, page 18.
page 10.
Digital Surround Processing
For information about using the Digital Surround Processing
features of the G95, and the DSP modes, see Changing the DSP
preset, page 11.
Playing DVDs
For information about playing and controlling DVD-Video discs see
Playing DVDs, page 22.
Using the DVD
system
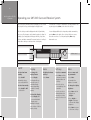
Operating your G95 DVD Surround Receiver System
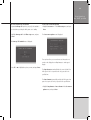
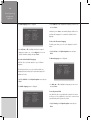
This section gives information about switching your G95 on and
This initial set of soft keys is called Home. You can get back to it at
off, using the soft keys, and changing the display format.
any time by pressing Home, to the left of the soft keys.
The five soft keys under the display make the G95 particularly
You can display additional, less frequently needed commands by
easy to use. They change to reflect what the product is doing. For
pressing More to the right of the soft keys. With some sources
example, if you are playing a CD they provide Play, Stop, Pause,
there are several sets of soft keys and pressing More steps
Previous, and Next commands. The current function of each key is
between the sets.
shown above the key on the bottom line of the display.
Eject
Slot-loading DVD drive
Eject
Display
Display
Home
G95 DVD Surround Receiver System
More
Volume control
On Off
More
On/Off
Home
Soft keys
On/Off
Display
Home
Soft keys
More
To switch on from
To change the
To display the Home
To select a command
To access more soft
standby
display format
soft keys
key commands
•Press On/Off.
•Press Display.
•Press Home.
Alternatively select a
source using the MSR+.
The display will step
through a series of
alternative display
formats, depending
on what is currently
playing.
•Press More until the
command you want is
displayed above the
soft keys.
To switch to standby
•Press On/Off or OFF
on the MSR+.
To blank the display
•Press Display until
you reach the blank
display option.
Blanking the display
also switches off all the
display circuitry.
•Press the soft key
corresponding to the
command.
If you do not select a
command after a few
seconds, the soft keys
revert to the Home soft
keys.
•Press More.
An example is the
brightness command.
To change the display
brightness
•Press More until the
display shows
–Bright+.
•Press –Bright or
Bright+ to decrease
or increase the display
brightness.
•Press Home to return
to the Home soft keys.
Using the DVD
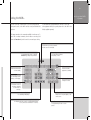
Using the MSR+
system
You can control all of the functions of your G95 using either the
For information about programming the remote to control the
front-panel controls, or the MSR+ remote control provided with the
other equipment within your system please refer to the MSR+ User
products.
Guide, supplied separately.
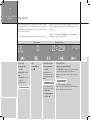
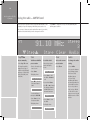
This page summarises the commands available from the remote. To
access the secondary commands, shown in blue on some keys, hold
down the Function key in the lower left corner and press the key.
Indicator
Flashes when you send a command.
Includes sensor for backlight
Transport keys
For controlling a CD player,
DVD player, or tuner
Menu keys
For navigating DVD menus or, with the
Function key, editing DSP parameters
CD
Source keys
Select a source to turn
on from standby
Number keys
For controlling a tuner,
CD player, or DVD player
RADIO
DVD
AUX
DISC
TAPE
TV
CABLE
SAT
VCR1
VCR2
GAME
OFF
Power
1
2
3
Page
4
5
6
7
8
9
Function
0
Top Menu
Page
Audio
Enter
Slow
Open
Function
Hold down to select a
secondary command,
shown in blue on
some keys
#
OFF
Switches Meridian
equipment to standby
Return
Record
Band
Top Menu
For controlling a DVD player
Record/Band/Angle/OSD
For changing the video controls, controlling DVD and other
sources, and colour commands for TV services
Menu
Repeat
Setup
A-B
Angle
OSD
Subtitle
DSP
Store
Clear
Phase
Display
Mute
Volume keys/Mute
Change the volume
Display
Changes the front-panel display of the
current source
Store/Clear
For programming CD tracks or tuner
presets
10
Using the DVD
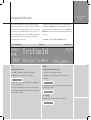
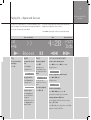
Selecting sources
system
The G95 DVD Surround Receiver System provides up to 12 sources
•Press Home to display the soft keys for selecting a source.
initially labelled: CD, RADIO, DVD, AUX, DISC, TAPE, TV,
CABLE, SAT, VCR1, VCR2, and GAME.
Source
$!"
$6$
Volume
2ADIO
2ADIO 46 6#2 !UX
Sources
Volume
To select a source
To change the
To mute the sound
Either:
volume
•Press the appropriate
source key on the
MSR+.
•Turn the volume
control.
•Press the volume
control.
Or:
•Press the soft key
corresponding to the
source.
You may need to press
More until the source
you want is displayed.
You can adjust the
volume between 1dB
and 99dB in precise
steps of 1dB, where 9dB
is equivalent to doubling
the loudness.
As you adjust the
volume the display may
change to show the
currently selected source
and current volume:
$6$
The display will show:
-UTE
To restore the sound
•Press the volume
control again, or
adjust the volume.
11
Using the DVD
Changing the DSP preset
system
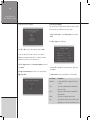
The G95 DVD Surround Receiver System uses advanced digital
For example, if you have selected the CD source and are playing
signal processing techniques to give you superb space-filling sound
an audio CD, the Trifield DSP preset will initially be selected. You
that makes the most of whatever type of source you are listening
may then wish to choose a different DSP preset, such as Stereo or
to. It achieves this by identifying whether the source is music or a
PLII Movie. You can also change the default DSP preset assigned
movie soundtrack, and whether it is two-channel or multichannel.
to the source.
It then automatically selects a processing mode, called a DSP
•Press More to display the DSP and Assign soft keys.
preset, appropriate to that source.
DSP preset
Source/Sampling rate
Audio format
$6$6
0#K
$30 !SSIGN 6IDEO "RIGHT
4RIFIELD
DSP
Assign
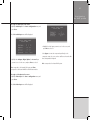
To change the DSP preset
To assign a DSP preset to a source
•Press DSP to step between the different DSP presets.
•Listen to the source you want to change.
The display shows the current preset; for example:
•Press DSP to show the DSP preset assigned to that source.
#INEMA
You will be able to choose any of the DSP presets appropriate to
the source you are playing.
For more information about the DSP presets see the next page.
The G95 mutes the sound while changing source or DSP preset, to
avoid clicks in the speakers.
For example:
4RIFIELD
•Press DSP until the display shows the new DSP preset you want
to assign. For example:
0,))-OV
•Press Assign.
The display shows the new assignment; for example:
$6$0,))-OV
12
Using the DVD
system
DSP presets
Multichannel movie sound tracks on DVD
Multichannel music recordings
The Cinema preset is designed for use with multichannel movie
The Discrete preset is recommended for music recordings
soundtracks encoded using Dolby Digital or DTS.
containing more than two channels:
It decodes the soundtrack to render the original six channels to
It renders the source channels to your speaker layout with the
your speaker layout – five full-range channels (three front and two
ultimate precision and transparency.
rear) and one LFE (bass effects) channel.
Music on CD or radio
Two-channel movie soundtracks on DVD, video, and TV
Many movie soundtracks are Dolby Surround Encoded onto a twochannel stereo soundtrack.
The Trifield DSP preset adds a surround dimension to stereo
recordings, such as on audio CDs or FM radio.
It generates a centre-front signal that is completely integrated with
PLII Movie re-creates the surround components from this type
the front stereo image, for a more stable, accurate, and focused
of material. It is Dolby’s recommended choice for Dolby Surround
stereo image. The image width is also adjustable.
Encoded material.
Special presets for two-channel materials
Stereo uses only the left and right speakers, and a subwoofer if
it is present. Compare this with the effect of surround processing
using the other modes.
13
Using the DVD
DSP displays
system
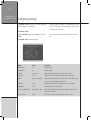
•Press Display to step between the following display options:
Source and volume.
DSP preset and volume.
$6$
0,))-OV
Other diagnostic displays may appear depending on the configuration of the G95.
Blank.
14
Using the DVD
system
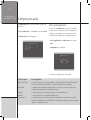
Playing CDs
The G95 will play audio CDs, recordable CDs, and MP3 CD-ROMs.
with the selection of tracks you have programmed. For information
You can play an entire CD, or start playing from any track. While a
about programming see Playing CDs – Programming a selection,
disc is playing you can go back to the start of the track or skip to
page 16.
the start of the next track.
•With a CD inserted select the DVD source and press Home to
If you have programmed a selection, these functions also work
Track number
#$
K
display the soft keys for playing CDs.
Elapsed disc time
0#-
`ab def dgf hij `ac
Play/Skip
Stop
Pause/Resume
Previous/Next
To play the disc
To stop playback
To pause playback
To play from a particular track
•Press >.
•Press *.
•Press =.
•Press [ or ] to step through the track numbers,
or enter the track number using the MSR+.
To skip to the next
track
•Press > while the disc
is playing.
The display shows:
0LAY
Depending on the
current display format
the display shows PS or
Pause:
03
You can change tracks
while the disc is paused
using [ or ].
To resume playback
•Press = or >.
The display shows which track you are selecting; for
example:
4RACK
•Press > to start play immediately.
Alternatively, after a short delay the disc will start to
play from the track you have selected.
15
Using the DVD
Playing CDs – Repeat and fast scan
system
You can choose to play a track, disc, or selection repeatedly, so that
You can also scan through a disc at faster than normal speed to
when it has played, it will start again from the beginning; with MP3
rapidly locate a particular position on the disc.
discs you can also repeat the current album.
•Press More to display the soft keys for repeat and fast play.
#$
K
Fast scan indicator
Time
Repeat indicator
0#$
`ab 2EPEATdgf klm nop
Play
Repeat
Pause
Fast scan reverse/forward
To revert to normal
To repeat the current
To pause playback
To scan at twice normal speed
speed play
track
•Press =.
•Press ¯ for reverse or ˘ for forward.
•Press >.
•Press Repeat.
Depending on the
current display format
the display shows PS or
Pause:
The display shows:
The display shows:
2EPEATTRACK
To repeat the disc
•Press Repeat again.
The display shows:
2EPEATDISC
To cancel repeat
•Press Repeat until
the repeat indicator
disappears.
With MP3 discs you can
press Repeat again to
repeat the album.
03
To scan at eight times normal speed
•Press ¯ or ˘ again.
You can fast scan
forward or reverse from
pause.
The display shows:
To resume playback
To revert to normal play
•Press = or >.
•Press ¯ or ˘ again, or press >.
Play resumes from the point you scanned to.
To change album on MP3 discs
If you are playing an MP3 disc the fast scan keys
change to V and A.
•Press V or A to go to the previous or next album.
An album is a folder of MP3 files.
16
Using the DVD
Playing CDs – Programming a selection
system
The G95 allows you to programme a selection of tracks, and then
hear, you can play the tracks in any order and repeat tracks in the
play only those tracks you have programmed.
sequence.
You can programme a selection either by storing the tracks you
You can programme a selection while the disc is playing, in which
want to play, or by clearing the tracks you do not want to play.
case the selection will be played after the current track finishes.
If you programme a selection by storing the tracks you want to
•Press More to display the soft keys for programming selections.
Store indicates track will play. Clear indicates track will not play.
#$
K
Track number
3TORE
0#-
`ab 3TORE #LEAR hij `ac
Play
Store
Clear
Previous/Next
To play a selection of
To make a selection
To make a selection
To add or remove a track from a selection
tracks
by adding tracks
by omitting tracks
•Select the track using [ or ].
•Programme the tracks
you want to play,
using Store and
Clear.
•Press [ or ] to
select the first track
you want to play, and
press Store.
•Press [ or ] to
select the first track
you want to omit, and
press Clear.
Alternatively you can enter the track number using
the MSR+.
•Press >.
The display will change
from Track to Store,
and all the other tracks
will be marked Clear.
The display will change
from Track to Clear,
and all the other tracks
will be marked Store.
You should store the
first track for a selection
within two seconds, or it
will begin to play.
You should clear the
first track for a selection
within two seconds, or it
will begin to play.
To clear the
programmed
selection of tracks
•Press Home to display
the * key.
•Press * twice.
The display shows:
#LEAR0ROG
•Press Store to add the track, or Clear to remove
the track.
17
Using the DVD
CD displays
system
Audio CDs
•Press Display to step between the following display options:
Track number and elapsed track time.
Track number and remaining disc time.
Track number and elapsed disc time.
Track number and remaining track time.
Total number of tracks and total disc time.
MP3 disc display options
The G95 DVD Surround Receiver System will also play recordable
CD-ROMs containing folders of MP3 files, called albums.
•Press Display to step between the following display options:
Scrolling display of artist and song name
Track number and elapsed track time.
Album number and track number.
Track number and remaining track time.
from ID3 tag, or filename if tag not present.
+ELIS#IRCUS
18
Using the DVD
system
Using the radio
This section gives information about using the DAB/FM or
•Press Home when the Radio source is selected to display the
AM/FM radio tuner. It explains how to select stations, change the
soft keys for selecting stations.
waveband, and step between preset stations.
Band and Frequency (AM/FM) or bit rate (DAB) Station name (if available)
$!"
KB
Stereo and preset station
3TEREO
#LASSIC
wxy
"AND z{|
hij `ac
Radio
Select station
Band
Step Previous/Next
To select the radio
To select the next
To change the band
To step between preset stations
tuner
station
•Press Band.
•Press [ or ].
•Press Home to
display the source
options.
•Press V or A.
You can switch between
DAB band
the following bands:
Alternatively enter the preset station number using
the remote.
The tuner will select the
previous or next service,
in alphabetical order.
DAB/FM tuner
•Press Radio to select
the radio tuner.
FM/AM band
The tuner will scan
down or up in frequency
until it finds the next
station.
On FM, if the station
supports RDS the
display will show the
station name:
""#2
FM (VHF)
DAB
AM/FM tuner
FM (VHF)
MW (Medium Wave)
LW (Long Wave)
AM/FM tuner (USA)
FM (VHF)
AM
The display shows the frequency and preset station
number:
-(Z
�
or, if a name has been stored for the preset station,
the preset station name:
#LASSIC
For information about defining preset stations, see
To define a DAB preset station, page 19, or To
define an AM/FM preset station, page 20.
19
Using the DVD
Using the radio – DAB band
system
This section gives information about using the DAB band to define
stations) that are available.
preset stations and scan for services.
•Press More to display the soft keys for defining preset stations
You should scan for services when using the tuner for the first
and scanning.
time, and then periodically to find any new ensembles (groups of
$!"
KB
tuv3TEPyz
#LASSIC
Step V/A
Store
To select the next
To define a DAB
service on the current
preset station
ensemble
•Tune to the station you
want to store.
•Press Step V or A.
For example, if you are
currently listening to
a BBC station this will
step through all the BBC
stations.
•Press Store.
The display shows:
0ICK3TATION
•Press ] to show the
first unused preset
label:
To select a different
preset press [ or ].
•Press Store to store
the preset station.
The display shows:
3TORED
3TEREO
3TORE #LEAR 3CAN
Clear
Scan
To edit the label
To clear the current
To scan for services
After storing a preset
station the display
shows:
preset station
•Press Scan to display
the DAB Scan menu.
3TORE,ABEL
•Press Store to edit
the label or Return to
exit.
If you selected Store:
•Use V or A to change
the flashing character,
and < or > to move
between characters:
""#2?
•Press Store to store
the label.
The display shows:
3TORED
•Press Clear.
•Press Auto to start.
The display shows
Scanning together
with the name of each
ensemble (eg 12A) and
the number of services
found (eg Found 34).
Note that this takes
several minutes.
•Press Return to
return to the previous
display.
20
Using the DVD
system
Using the radio – AM/FM band
This section gives information about using the AM/FM band to tune
manually to a specific frequency, and define preset stations. You
•Press More to display the soft keys for tuning manually and
defining preset stations.
can store up to 30 preset stations each with a name of your choice,
and then select them directly from the front panel or MSR+.
&-
-(Z
tuv3TEPyz
Step V/A
Store
To tune manually
To define an AM/FM
•Press Step V or A.
preset station
This steps through the
frequencies in steps of
0.1MHz on the FM band,
and steps of 10kHz (AM,
USA), 9kHz (MW), and
1kHz (LW).
•Tune to the station you
want to store.
•Press Store.
The display shows:
0ICK3TATION
•Press ] to show the
first unused preset
label:
To select a different
preset press [ or ].
•Press Store to store
the preset station.
The display shows:
3TORED
3TEREO
3TORE #LEAR !UDIO
Clear
Audio
To edit the label
To clear the current
To change the audio
After storing a preset
station the display
shows:
preset station
setting
•Press Clear.
•Press Audio.
3TORE,ABEL
•Press Store to edit
the label or Return to
exit.
If you selected Store:
•Use V or A to change
the flashing character,
and < or > to move
between characters:
""#2?
•Press Store to store
the label.
The display shows:
3TORED
You can select between
the following settings:
FM: Stereo, Wide,
Medium, Narrow,
or Mono. Wide,
Medium, and Narrow
progressively reduce the
stereo width to reduce
hiss on noisy stations.
AM: Low Pass, Whistle,
or Filter Off. Low Pass
removes excess hiss, and
Whistle removes 4.5kHz
whistle.
21
Using the DVD
Radio displays
system
FM band
•Press Display to step between the following display options:
Preset name.
2ADIO
Radio data.
Genre.
""#3YMPHONY #LASSICS
Time.
Note: The information displayed depends on the RDS features supported by the selected radio station, and may take several seconds to
appear.
DAB band
•Press Display to step between the following display options:
Station name.
2ADIO
Program type.
0OP-USIC
Ensemble name.
Radio text (scrolling).
""#.ATIONAL 7ELCOMETOT
22
Using the DVD
system
Playing DVDs
Most DVDs start playing automatically when you insert the disc.
Some DVDs are double-sided, and need to be turned over during
•After loading a DVD-Video disc select the DVD source, then press
Home to display the soft keys for playing DVDs.
play.
DVD format and sampling rate
$6$6
K
Title number Chapter number
Audio format
`ab def dgf hij `ac
Play
Stop
Pause
Previous/Next
To play the disc
To stop playback
To pause playback
To move to the previous or next chapter or
• Press >.
• Press *.
• Press =.
track
The on-screen display
shows
and the
front-panel display
shows the chapter
number and title time.
For example:
The on-screen display
shows:
The on-screen display
shows:
• Press [ or ].
To resume after
To step forward
stopping
frame by frame
Alternatively you can enter a chapter number using
the remote, followed by Enter.
• Press >.
You can step forward,
frame by frame, while
a DVD-Video disc is
paused:
The disc will resume
playing from the
position where you
stopped playback, and
the on-screen display
shows:
To return to the start
of the disc
• Press * while the disc
is stopped.
The on-screen display
shows
and the disc
is reset to the start.
• Press =.
The on-screen display
shows:
To continue after
pausing
• Press >.
The on-screen display
shows:
The on-screen display shows
or
.
Note: These functions are normally disabled while
the disc’s copyright notice is being displayed.
23
Using the DVD
Playing DVDs – Fast and slow-motion playback
You can play back DVD-Video discs faster than normal, at twice or
eight times normal speed, or in slow motion, at from one-half to
system
•Press More while a disc is playing to display the soft keys for
fast and slow-motion playback.
one-sixteenth of normal speed.
Note: The sound is muted when playing back DVD-Video discs
faster or slower than normal.
����
���
������������
����
���� 3LOW
�
�
�
����� �
�����
dgf �
Play
Slow
Pause
Fast reverse/Fast forward
To resume normal
To play DVD-Video
To pause while
To play DVDs faster than normal
speed
discs in slow motion
playing at faster or
• Press ¯ or ˘ during playback.
• Press >.
• Press Slow during
playback.
slower than normal
Each time you press
Slow the speed
switches between
one-half, one-quarter,
one-eighth, and onesixteenth normal speed,
as shown by the onscreen display:
• Press =.
speed
Each time you press ¯ or ˘ the speed switches
between twice and eight times normal speed, as
shown by the on-screen display:
24
Using the DVD
system
Playing DVDs – Displaying and exiting from menus
DVDs generally provide a Top Menu, which provides access to the
This section explains how to display these menus.
contents of the disc.
• Press More while a DVD is playing to display the soft keys for
Many DVD-Video discs also provide a disc menu, which allows you
displaying and exiting from menus.
to select additional sections or special options.
����
���
������������
����
2ETURN
4OP
���� �����
Return
Top
Menu
Enter
To return from a
To display the Top
To display the disc
To select a
menu
Menu
menu
highlighted option
• Press Return.
• Press Top.
• Press Menu.
• Press Enter.
This will exit from the
menu without selecting
an option.
If you selected a title
on a DVD-Video disc
playback will start from
chapter 1 of that title.
25
Using the DVD
Playing DVDs – Selecting options from a menu
• Press More while a DVD is playing to display the soft keys for
selecting options from a menu.
system
These keys may automatically appear if the DVD is currently
displaying a menu screen, for example when a disc is first loaded.
����
���
������������
���
uv ����� ����
����
�����
Menu </>
Menu V/A
Enter
To move left or right on a menu
To move down or up on a menu
To select a highlighted
• Press < or >.
• Press V or A.
option
• Press Enter.
If you selected a title on a
DVD-Video disc, playback
will start from chapter 1 of
that title.
26
Using the DVD
system
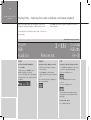
Playing DVDs – Selecting the audio soundtrack and repeat playback
DVDs often include multiple audio soundtracks, such as movie
soundtracks in different languages, or different audio formats.
• Press More while a DVD is playing to display the soft keys for
audio and repeat.
You can play back a specified title, chapter, track, or selection of a
disc repeatedly.
����
���
Audio format and repeat mode
������������
����
AB∂∑
A�dio
�R�p�a�
Audio
Repeat
A-B
To select the audio soundtrack
To repeat a title, chapter, or track
To repeat a specific section of a disc
• Press Audio.
• Select the title, chapter, or track you
want to repeat.
• Press A-B at the beginning of the section
you want to play back repeatedly.
• Press Repeat to switch between
chapter repeat, title repeat, and repeat
off.
The on-screen display shows:
Each time you press Audio the next
available soundtrack is selected.
The on-screen display shows the language
and audio format of the currently selected
soundtrack:
The current repeat mode is displayed on
the on-screen display:
����A-B
• Press A-B again at the end of the
section.
The on-screen display shows:
The DVD player automatically returns to
the start of the section and plays it back
repeatedly.
To cancel the repeat
• Press A-B a third time.
27
Using the DVD
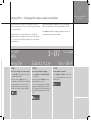
Playing DVDs – Changing the camera angle and subtitles
system
Some DVD-Video discs include scenes recorded from up to nine
A question-mark symbol is displayed on the on-screen display if
different camera angles, and you can select the camera angle while
you select a function that is not currently available on this disc.
you are playing the disc.
• Press More while a DVD is playing to display the soft keys for
Many DVD-Video discs include subtitles in up to 32 different
changing the camera angle and subtitles.
languages. While you are playing a disc you can turn the subtitles
on or off, and select the subtitle language from those provided on
the DVD-Video disc.
����
���
������������
����
A�gl�
S�b�i�l�
�O�/Off
Angle
Subtitle
On/Off
To select or change the camera angle
To select the subtitle language
To turn subtitles on or off
• Press Angle while viewing a scene with
multiple camera angles.
• Press Subtitle or Function Subtitle
on the MSR+.
• Press On/Off or Subtitle on the MSR+.
Each time you press Angle the next
camera angle is selected after a short delay.
Each time you press Subtitle the next
subtitle language is selected.
The camera angle icon on the on-screen
display shows the current camera angle
and the total number of angles available:
The on-screen display shows the subtitle
language (for example, ENG, SPA, FRE, or
OFF), followed by the subtitle number and
total number of languages (for example
2/3):
The on-screen displays shows the current
subtitle setting:
28
Using the DVD
system
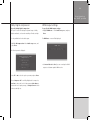
Playing DVDs – Changing the video controls
The G95 DVD Surround Receiver System includes several video
Alternatively press the red • key on the MSR+.
controls to allow you to adjust the video image. The video controls
are available for video inputs, and the picture position controls are
If you have reprogrammed the MSR+ you may need to press
also available for the internal DVD.
Function DVD first.
•Press More to display the Video soft key, then press Video.
&ILMON
6IDEO st
uv wxy z{|
Video
Left/Right
Aspect Ratio
To select the video control
To adjust the current control
To change the image aspect ratio
•Press Video or the red • key on the
MSR+ to select the required video
control.
• Press < or > to change the current
control; eg output black level.
With correctly authored DVDs the DVD
player automatically selects the correct
scaling. For external inputs or incorrectly
authored DVDs you can press the green
• key on the MSR+ to cycle through the
following options:
The following video controls are available:
Film on/off: Film mode detection setting†.
I.Black: Input black level*.
I.Cont.: Input picture contrast*.
I.Col.: Input picture colour*.
I.Hue: Input picture hue (NTSC only)*.
O.Black: Output black level.
O.Cont.: Output picture contrast.
O.Col.: Output picture colour.
O.Hue: Output picture hue (NTSC only).
* Only for external video sources.
† Normally turned on. Should only be
turned off if advised by technical support.
30fps setting may be useful for some older
NTSC film material.
Each control can be varied between 0%
and 100%, where 50% is the default
value.
4x3: Typical VHS and broadcast TV.
14x9LB: 4x3 picture with black bars
top and bottom enclosing a 14x9 image.
Typically BBC broadcasts in the UK.
16x9LB: 4x3 picture with black bars
top and bottom enclosing a 16x9 image.
Typically for films on Laserdisc.
16x9: 16x9 picture filling the image. Often
called anamorphic. Typically for external
DVD inputs.
Native: Aspect ratio conversion disabled.
Image fills display as is.
29
Using the DVD
DVD displays
system
•Press Display to step between the following display options:
Title number and elapsed title time.
Title number and remaining chapter time.
Title number and elapsed chapter time.
Title number and chapter number.
Title number and remaining title time.
Total number of titles and total disc time.
30
Using the DVD
system
31
Installing the
DVD system
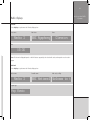
Installing the DVD system
This chapter explains how to install the G95 DVD Surround Receiver System. It describes what
you should find when you unpack the product, and how you should connect it to the other
equipment in the system.
You should not make any connections to the product or to any other component in the system
while the AC power supply is connected and switched on.
Unpacking
Models fitted with an AM/FM tuner also include the following:
The G95 DVD Surround Receiver System is supplied with the
•AM antenna.
following accessories:
•FM antenna.
•2 FM antenna adaptors.
•MSR+ remote control with batteries, manual, and spare key caps.
•Meridian Comms lead.
If any of these items are missing please contact your dealer.
•Ferrite bead*.
•Power cord.
Note: You should retain the packaging in case you need to
•This manual.
transport the unit.
*If a trigger cable is used this should be clamped around the cable
near the DVD system.
Models fitted with a DAB/FM tuner also include the following:
•Telescopic DAB antenna.
32
DVD system
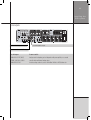
Audio connections
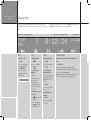
The G95 DVD Surround Receiver System includes five power
It also provides six line-level analogue outputs, for the five main
amplifiers, allowing you to connect five passive loudspeakers in a
channels and an active subwoofer.
surround system.
Loudspeaker outputs
S-VIDEO
ANTENNA
S1 DISC
S2 AUX
COMPOSITE
V1 VCR1
COMPONENT OUT
Y1
V2 TV
Pb
S3
GAME
HDMI OUT
MAINTENANCE
RS232
SAT
Pr
TRIGGER
+12V
100mA
IR IN
MERIDIAN COMMS
ON
Pb
OUT
OUT
Y
Pr
DAB FM
L
L
D1
LEFT
CENTRE
SURR L
RIGHT
SUB
SURR R
O2 GAME
+
+
+
+
+
MAIN RIGHT
REAR RIGHT
CENTRE
REAR LEFT
MAIN LEFT
O1 SAT
AUX
R
D2
A3 TAPE
OFF
Y
A2 TV
ANALOGUE IN
A1 VCR1
ANALOGUE OUT
DISC
DIG IN
OPTICAL IN
Main right loudspeaker
CAUTION REPLACE WITH SAME TYPE FUSE
T1.6AL 250V for 100 - 240V
POWER INPUT ~50-60Hz 40VA MAX
Installing the
Main left loudspeaker
Rear right loudspeaker
Rear left loudspeaker
Centre loudspeaker
Use this output
To connect to this
MAIN RIGHT, MAIN LEFT
The left and right loudspeakers in a stereo system, or main loudspeakers in a surround system..
REAR RIGHT, REAR LEFT
The rear left and right loudspeakers in a surround system..
CENTRE
The centre loudspeaker in a surround system..
The loudspeakers should not have an impedance of less than 4Ω.
•Ensure that none of the bare wires extend beyond the terminals
where they might touch.
•Connect the positive (red) cable to the terminal marked + and
the negative (black) cable to the terminal marked -.
•Loosen the terminal, insert a bare wire into the hole in the
terminal post, and tighten the terminal to secure the wire.
On models sold outside Europe, cables terminated in banana plugs
can also be used.
33
Installing the
DVD system
Line outputs
S-VIDEO
S1 DISC
COMPOSITE
S2 AUX
V1 VCR1
COMPONENT OUT
Y1
V2 TV
Pb
S3
GAME
HDMI OUT
SAT
Pr
MAINTENANCE
RS232
TRIGGER
+12V
100mA
IR IN
MERIDIAN COMMS
ON
Pb
OUT
OUT
Y
Pr
DAB FM
L
L
D1
LEFT
CENTRE
SURR L
RIGHT
SUB
SURR R
O2 GAME
+
+
+
+
+
MAIN RIGHT
REAR RIGHT
CENTRE
REAR LEFT
MAIN LEFT
O1 SAT
AUX
R
D2
A3 TAPE
OFF
Y
A2 TV
A1 VCR1
ANALOGUE IN
Main left/right line outputs
ANALOGUE OUT
DISC
DIG IN
OPTICAL IN
CAUTION REPLACE WITH SAME TYPE FUSE
T1.6AL 250V for 100 - 240V
POWER INPUT ~50-60Hz 40VA MAX
ANTENNA
Surround left/right line outputs
Centre and sub line outputs
Use this output
To connect to this
ANALOGUE OUT LEFT, RIGHT,
Analogue active loudspeakers, passive loudspeakers with power amplifiers, or a surround
CENTRE, SUB, SURR-L, SURR-R
controller with a multichannel analogue input.
ANALOGUE OUT SUB
An active analogue subwoofer, such as the Meridian SW1600 or SW5500 subwoofer.
34
Installing the
DVD system
Preamplifier and tuner connections
The G95 includes an integrated preamplifier, allowing you to
connect up to seven external sources in addition to the DVD player
and internal tuner.
S-VIDEO
S1 DISC
S2 AUX
COMPOSITE
V1 VCR1
COMPONENT OUT
Y1
V2 TV
Pb
S3
GAME
HDMI OUT
Pr
TRIGGER
+12V
100mA
MAINTENANCE
RS232
SAT
IR IN
MERIDIAN COMMS
ON
Pb
OUT
OUT
Y
+
+
+
+
+
MAIN RIGHT
REAR RIGHT
CENTRE
REAR LEFT
MAIN LEFT
Pr
DAB FM
L
L
D1
LEFT
CENTRE
SURR L
RIGHT
SUB
SURR R
O2 GAME
O1 SAT
AUX
R
D2
A3 TAPE
OFF
Y
A2 TV
A1 VCR1
ANALOGUE IN
ANALOGUE OUT
Antenna
Analogue inputs
DISC
DIG IN
OPTICAL IN
CAUTION REPLACE WITH SAME TYPE FUSE
T1.6AL 250V for 100 - 240V
POWER INPUT ~50-60Hz 40VA MAX
ANTENNA
Digital optical inputs
Digital coax inputs
Use this connector
To connect to this
ANALOGUE IN A1 (VCR1), A2 (TV), A3 (TAPE)
The analogue outputs of a source such as a TV or tape deck.
DIG IN D1 (AUX), D2 (DISC)
The digital output of a source such as a LaserDisc player.
DOPTICAL INPUT O1 (SAT), O2 (GAME)
The optical output of a source such as a satellite receiver.
ANTENNAE FM, AM or DAB/FM
FM and AM or DAB/FM antennae.
The default assignment of the sources to each input are shown in brackets after the input name in the above table. DVD and RADIO
correspond to the internal DVD player and tuner.
35
Installing the
Applications
DVD system
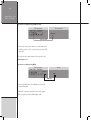
To create a surround system (Type 7)
G95 DVD System
COMMS
ANALOGUE
OUT
Main right
Subwoofer
Rear right
Centre
The G95 provides five loudspeaker connections and six line
Rear left
Main left
•Connect the SURR L and SURR R loudspeaker outputs to the rear
analogue outputs, and includes surround decoding to allow you
to create a 5.1 surround system directly connected to five passive
loudspeakers and an active subwoofer.
loudspeakers.
•Connect the CENTRE loudspeaker output to the centre
loudspeaker.
•Connect the LEFT and RIGHT loudspeaker outputs to the main
front loudspeakers.
•Connect the SUB analogue output to an active analogue
subwoofer.
To connect to a multichannel analogue surround controller (Type 1 or 2)
G95 DVD System
G68 Digital Surround Controller
COMMS
ANALOGUE
OUT
S-VIDEO
OUT IN
MULTI AN IN
6 x PHONO LEADS
The G95 provides six multichannel analogue outputs which can
advantage of the Meridian Room Correction provided by these
be configured as fixed-level outputs, to allow you to connect
products.
to a surround controller with multichannel analogue inputs. For
example, you can connect to the Meridian G68 or 861, to take
•Connect the analogue outputs to the analogue inputs of the
surround controller, using phono leads.
36
Installing the
DVD system
Video connections
Composite inputs
Component output
HDMI output
S-video inputs
S-VIDEO
S1 DISC
S2 AUX
COMPOSITE
V1 VCR1
COMPONENT OUT
Y1
V2 TV
Pb
S3
GAME
HDMI OUT
SAT
Pr
MAINTENANCE
RS232
TRIGGER
+12V
100mA
IR IN
MERIDIAN COMMS
ON
Y
Pb
OUT
OUT
Y
Pr
DAB FM
L
L
D1
LEFT
CENTRE
SURR L
RIGHT
SUB
SURR R
O2 GAME
+
+
+
+
+
MAIN RIGHT
REAR RIGHT
CENTRE
REAR LEFT
MAIN LEFT
O1 SAT
AUX
R
D2
A3 TAPE
OFF
A2 TV
A1 VCR1
ANALOGUE IN
S-video output
ANALOGUE OUT
DISC
DIG IN
OPTICAL IN
CAUTION REPLACE WITH SAME TYPE FUSE
T1.6AL 250V for 100 - 240V
POWER INPUT ~50-60Hz 40VA MAX
ANTENNA
Component input
Composite output
Video outputs
Use this output
To connect to this
HDMI OUT
The HDMI input of a monitor or high-definition television.
COMPONENT OUT
The component or progressive component video inputs on a monitor or projection television.
S-VIDEO OUT
The S-video input on a monitor or television.
COMPOSITE OUT
The composite video input on a monitor or television.
Video inputs
Use this input
To connect to this
S-VIDEO SI (DISC), S2 (AUX), S3 (GAME)
The S-video output of a source such as a LaserDisc player or video game.
COMPOSITE V1 (VCR1), V2 (TV)
The composite output of a source such as a television tuner or VCR.
COMPONENT Y1 (SAT)
The component output of a source such as a satellite receiver.
37
Installing the
DVD system
To connect to a display using component video
Television/monitor
G95 DVD system
S-VIDEO COMP
COMPONENT
COMPONENT
IN
VIDEO LEADS
If your television, monitor, or projection system includes component
video inputs, but no HDMI or DVI-HDCP, these will give the highest
•Connect the appropriate component outputs from the DVD player
to the component video inputs, using suitable video cables.
possible quality from DVD-Videos.
To connect to a display using S-video
Television/monitor
G95 DVD system
S-VIDEO COMP
COMPONENT
S-VIDEO
IN
S-VIDEO LEAD
•Connect the S-video output to a corresponding input on a
television, monitor, or video control unit, using a suitable S-video
cable.
The S-video output is recommended if your other equipment
provides a choice of both S-video and composite inputs.
The S-video output is always active, irrespective of the Video
output setting.
38
Installing the
DVD system
To connect to a display using composite video
������������������
G95 DVD �y����
�-V���� ����
���������
���������
��
��������������
•Connect the composite video output to a corresponding input on
a television, monitor, or video control unit using a screened 75Ω
video cable.
The composite video output is always active, irrespective of the
Video output setting.
To connect to a display using HDMI
G95 DVD system
S-VIDEO COMP
Monitor
COMPONENT
HDMI
HDMI
HDMI LEAD
•Connect the HDMI output to the HDMI input on the monitor
using an HDMI cable.
HDMI can be connected to a DVI input if the monitor supports
HDCP copy protection, using a suitable adaptor cable.
39
Installing the
Communications connections
DVD system
Infra-red repeater input
DIN Comms
Trigger output
BNC Comms
RS232 connection
S-VIDEO
S1 DISC
S2 AUX
COMPOSITE
V1 VCR1
COMPONENT OUT
Y1
V2 TV
Pb
S3
GAME
HDMI OUT
MAINTENANCE
RS232
SAT
Pr
TRIGGER
+12V
100mA
IR IN
MERIDIAN COMMS
ON
OFF
Y
Pb
OUT
OUT
Y
+
+
+
+
+
MAIN RIGHT
REAR RIGHT
CENTRE
REAR LEFT
MAIN LEFT
Pr
DAB FM
L
L
D1
LEFT
CENTRE
SURR L
RIGHT
SUB
SURR R
O2 GAME
O1 SAT
AUX
R
D2
A3 TAPE
A2 TV
ANALOGUE IN
A1 VCR1
ANALOGUE OUT
DISC
DIG IN
OPTICAL IN
CAUTION REPLACE WITH SAME TYPE FUSE
T1.6AL 250V for 100 - 240V
POWER INPUT ~50-60Hz 40VA MAX
ANTENNA
Power and fuse
Use this connection
To connect to this
DIN COMMS
Other Meridian G Series, 500 Series, or 800 Series equipment, or Meridian DSP loudspeakers.
BNC COMMS
Meridian components with BNC Comms.
RS232 connection
A computer, for configuring the DVD player.
IR IN
A G12 IR Receiver, or approved alternative infra-red repeater. Contact your dealer for details.
TRIGGER OUTPUT
Other equipment, via a mono 3.5mm jack output (centre pin hot) that provides 12VDC. It is always low in
standby. By default it is high for all sources, so can be used to bring a G56 or G57 Two-channel Power
Amplifier out of standby. Alternatively you can program it to be high for specific sources; eg to control a
projection screen.
40
Installing the
DVD system
To connect to other Meridian G Series, 500 Series, or 800 Series equipment
G95 DVD system
G Series, 500 Series, or 800 Series unit
COMMS
COMMS
COMMS LEAD
COMMS LEAD
In a system of Meridian products the products should be linked
All the other units will be configured as non-controllers, and
together in a chain, via the COMMS sockets, using the Comms
display:
leads supplied with each product. The sequence in which you
connect the units is not important.
���Not�Con.
One of the products acts as the controller for the system, receiving
infra-red commands from the MSR+, and then, if appropriate,
relaying them to the other products via the Comms link. The
following procedure should be used to set up the Comms correctly
between several products:
•Switch all the units to standby.
•Press Clear (MSR+).
The system is now ready for use.
If the automatic setup does not work, first make sure you are
operating the MSR+ from a position where all the units can receive
the infra-red, and try again. Then:
•Check that none of the units have been configured to be
IR Controller; see Resetting the DVD player, page 43, and
Each unit will display:
!UTO
Configuring settings, page 58. Either all products should be set
to Auto, or one should be configured as Controller and the others
as Not Controller.
Note: Do not, under any circumstances, connect any equipment
One unit will then be designated as the controller, and display:
���Con.
other than Meridian G Series, 500 Series, or 800 Series to the
socket marked COMMS on the back of the product.
41
Installing the
DVD system
To connect FM and AM antennae (products fitted with AM/FM tuner)
G95 DVD Surround Receiver System
AM
FM
•Connect an FM antenna or split-flex dipole to the FM Coax
For best AM results use an external AM antenna.
connector, if necessary using the adaptor provided.
Note: For AM you must fit a good ground as well as an antenna.
In the UK use a female Belling-Lee (VCR) connector.
The tuner can be used with most proprietary indoor AM, FM, or
Although the FM tuner is very sensitive, for best performance and
combi (AM/FM) antennae. It is possible in some cases to use a
lowest noise use a good antenna placed as high as possible and
trigger output (+12V) from the G95 to power such devices. For
oriented towards the transmitter.
more details, see the Library: Application Notes section of the
Meridian Web site at http://www.meridian-audio.com/lib_apps.htm.
Note: For all outdoor antennae we strongly recommend you use a
qualified installer who will comply with local safety regulations.
•Connect an AM antenna to the AM connector by pressing
the tabs and inserting a bare wire into each hole. The ground
connection should be connected to the socket marked GND.
The product is supplied with an indoor loop antenna. This is
directional, and for best results you will need to orient it, and this
may be station dependent.
•Place the antenna as far away from other electrical equipment
and as high as possible.
42
Installing the
DVD system
To connect DAB and FM antennae
FM
G95 DVD Surround Receiver System
DAB
DAB/FM
The DAB/FM tuner uses a single antenna input for both DAB and
FM reception. For optimum reception we recommend using both
DAB and FM antennae with an appropriate combiner.
For DAB-only listening the supplied DAB antenna may be sufficient.
However, in many areas an external or loft mounted DAB antenna
will be needed to receive all the available stations. This should
either be a dipole aerial or a four-element aerial.
Consult a professional aerial installer for information about the
recommended type to use in your area.
In the UK aerials should be mounted with all elements vertical as
the DAB transmissions are vertically polarised.
The DAB antenna should be connected to the antenna input using
high-quality 50Ω cable.
Combiner
43
Resetting the
DVD system
Resetting the DVD system
This chapter explains how to reset the DVD system using the front-panel controls.
Resetting the product
•Press Reset.
The DVD system provides several alternative standard settings,
The display shows:
called Types, which configure all aspects of the product into the
most commonly needed configurations.
2ESET0LAYER
Choosing one of the Types overrides any other configuration you
%XIT
9ES
may have performed, and so can be used to reset the configuration
of the unit.
•Press Yes to reset the DVD system settings.
To reset the configuration
The display shows the current Type:
•If necessary press On/Off to put the DVD system into standby.
•Press More.
4YPE
3ELECT
wxy z{|
The display shows:
•Press A or V to step through the available Types.
t6ERSION
)2
2ESET
44
Resetting the
DVD system
As you select each Type the DVD system is reset to that Type.
•Press IR to toggle between IR Auto (auto setup), IR Con
(controller), and IR N.Con (not controller).
When you have selected the Type you want:
•Press Exit or On/Off to return to standby.
•Press Exit or On/Off to return to standby.
Types
To toggle the IR mode
•If necessary press On/Off to put the DVD system into standby.
•Press More.
The Types configure the DVD system in the appropriate way
according to the other equipment you are connecting it to, and
whether it is performing video switching, as shown in the following
table:
The display shows:
6ERSION
)2
2ESET
Type
To connect to this
Volume control in G95
Video switching in G95
Type 0
2-channel analogue amplifier via line outputs.
Yes.
Yes.
Type 1
Multichannel analogue surround processor via line outputs.
No.
Yes.
Type 2
Multichannel analogue surround processor via line outputs.
No.
In surround processor.
Type 3
2-channel audio via HDMI output.
No.
Yes.
Type 4
Multichannel surround processor via HDMI output.
No.
Yes.
Type 5
Directly to a surround system consisting of large main
Yes.
No.
Yes.
Yes.
Yes.
Yes.
loudspeakers, small centre and rear speakers, and a subwoofer.
Type 6
Directly to a surround system consisting of large main
loudspeakers, small centre and rear speakers, and a subwoofer.
Type 7
Directly to a surround system consisting of large main, centre,
and rear speakers, and a subwoofer.
45
Configuring
the DVD system
Configuring the DVD system
This chapter explains how to configure the DVD system using the on-screen Setup menus.
Alternatively, for complete control over all aspects of the product’s configuration you can set
up the unit from a computer using the Meridian Configuration Program. For full information
refer to the Meridian Configuration Program Guide available separately.
Configuration
•Press Setup.
The Setup menus allow you to configure the video, audio, sources,
The displays then shows:
settings, or playback options of the DVD system.
To use the on-screen Setup menus you need to have a suitable
display connected to an appropriate output on the DVD system; see
Video connections, page 36.
/3$3ETUP
%XIT 2ETURN wxy z{| %NTER
The main Setup menu will be displayed on the On-Screen Display:
To display the Setup menus
•If a disc is playing press *.
•Press More until the display shows:
.ODISC
3ETUP
46
Configuring
the DVD system
To select an option from a menu
•Press V or A to highlight the option you want:
•Press Enter to select the option.
To return to the previous menu
•Press Return.
To exit from the Setup menus
•Press Setup.
47
Configuring
Configuring the video
The Video setup menu lets you change the video settings of the
the DVD system
The Display aspect ratio menu is displayed:
DVD system.
•Highlight Video setup… in the Setup menu, and press Enter.
The Video setup menu will be displayed:
•Press V or A to specify the format of your TV, and press Enter.
Note: The pan-scan feature is not available on some discs, in
which case letterbox format will be used.
To specify your display format
To select the black level for NTSC
You should set the Display aspect option to the format that your
•Highlight Black level in the Video setup menu, and press
display can accommodate.
Select 16x9 if you have a widescreen display, an external processor
Enter.
The Black level menu is displayed:
for picture formats, or you are using the HDMI or progressive
outputs.
If you have a standard 4x3 television you also have the choice
of displaying widescreen pictures cropped to fill your television
screen (pan-scan), or with black bars above and below the picture
(letterbox).
•Highlight Display aspect in the Video setup menu, and press
Enter.
•Press V or A to highlight the appropriate option, and press
Enter.
48
Configuring
the DVD system
If you are using the composite or S-video outputs of the DVD
To select the TV standard
system select the 7.5 IRE option.
DVD-Video discs are produced in both PAL and NTSC television
formats. The DVD system is capable of converting between formats,
If you are using the component outputs select the option that
to allow you to view DVD movies in either format even if your
matches your display.
television is not capable of displaying that format. However the
conversion process introduces some picture degradation, and may
If you are using the DVD system to play both NTSC and PAL
disable disc menu operation on some discs.
material the recommended setting is 0 IRE.
•Highlight TV standard in the Video setup menu, and press
This setting has no effect on the HDMI output.
To select closed caption subtitles
Enter.
The TV standard menu is displayed:
Some DVD-Videos include closed caption subtitles, which provide
a description of sound effects for the hard of hearing; for example
“door creaks”.
•Highlight Closed caption in the Video setup menu, and press
Enter.
The Closed captions menu is displayed:
•Press V or A to highlight the option you want, and press Enter.
Choose Auto if your television can display both PAL and NTSC
video, or choose NTSC or PAL to match the format supported by
your television.
If your television is capable of displaying both formats the
recommended setting is Auto, which supplies the unconverted
•Press V or A to highlight On or Off, and press Enter.
video signal to the television.
49
Configuring
the DVD system
To select the power up TV standard
To select the screensaver options
A separate Powerup std option lets you specify the standard to
•Highlight Screensaver… in the Video setup menu, and press
be selected when you bring the DVD system out of standby:
•Highlight Powerup std in the Video setup menu, and press
Enter.
The Screensaver options menu is displayed:
Enter.
The Power up TV Standard menu is displayed:
These options allow you to ensure that a static image does not
remain on the display, thus avoiding damage to certain types of
display.
•Press V or A to highlight the option you want, and press Enter.
The Stop timeout automatically fades the screen to black if the
DVD system is left in stop mode and no key is pressed for the
specified time.
The Pause timeout automatically switches the DVD system from
pause into stop mode if no key is pressed for the specified time.
•Highlight Stop timeout or Pause timeout in the Screensaver
options menu, and press Enter.
50
Configuring
the DVD system
The appropriate menu is displayed:
To set the scaler options
These specify how the interlaced video signal from the DVD should
be upconverted to the HDMI and component outputs.
•Highlight Scaler setup… in the Video setup menu, and press
Enter.
The Scaler setup menu is displayed:
•Press V or A to select the timeout delay, and press Enter.
You can also adjust the intensity of the logo screen, which is
displayed as a background image when no video disc is playing
and the DVD system is not in screensaver mode.
•Highlight Logo screen in the Screensaver options menu, and
press Enter.
•Press A or V to highlight the setting you want to change, and
press Enter.
The Logo screen intensity menu allows you to select between
High, Low or Off:
The Scaler mode options are explained in the following table:
Scaler mode
Description
Deinterlace
Converts 480i (NTSC) to 480p and 576i (PAL)
to 576p.
720p
Upconverts to High Definition standard 720p
progressive video.
1080i
Upconverts to High Definition standard 1080i
interlaced video.
1080p
Upconverts to 1080p progressive video.
Auto
Automatically selects the best resolution for the
display device connected to the HDMI connector.
51
Configuring
the DVD system
The Gamma correction affects the grey scale, and can be set
To set the HDMI options
to 1.0, 0.8, 0.9, or 1.1. If the picture has poor detail in the dark
•Highlight HDMI options… in the Video setup menu, and
areas choose a Gamma correction below 1.0. If the picture
press Enter.
has poor detail in the light areas choose a Gamma correction
greater than 1.0.
The HDMI setup menu is displayed:
The Sharpness can be set to Off, Low, Medium, or High. It
adds edge detail, but can cause picture artefacts.
Gamma correction and Sharpness only affect the analogue
outputs.
Display aspect allows you to perform aspect ratio conversion on
the scaled outputs; ie progressive analogue or HDMI. Set Display
aspect to the shape of your screen, or Native to disable aspect
ratio conversion.
Component output allows you to choose what is available on
the component output socket. Standard Definition gives an SD
interlaced component signal. Scaled gives a deinterlaced signal;
for this option the Scaler mode should be set to Deinterlace.
•Press A or V to highlight the setting you want to change, and
press Enter.
•Set HDMI switch to On if using an HDMAX 421 switcher on
the HDMI output, or Off otherwise.
The Colour space can be set to RGB or YCrCb (recommended).
Information… provides information about the capabilities (the
EDID) of the connected HDMI display device.
52
Configuring
the DVD system
Configuring the audio
The Audio setup menu lets you select the audio settings of the
DVD system.
DVD system application
The options on the Application menu allow you to configure
•Highlight Audio setup… in the Setup menu, and press Enter.
The Audio setup menu will be displayed:
the audio outputs for optimum performance, depending on the
capabilities of the equipment you are connecting to. For more
information about the applications see Applications, page 35.
•Highlight Application in the Audio setup menu, and press
Enter.
The Application menu is displayed::
These options are explained in the following table:
Select this option
For this application
Analogue 2Ch (Type 0)
To use the DVD system as a 2-channel preamplifier, connected via the main LEFT and RIGHT ANALOGUE
OUT sockets to analogue active loudspeakers, or passive loudspeakers with power amplifiers.
Analogue MCh
To provide a fixed level multichannel analogue output for connection to a surround controller with a
multichannel analogue input. The power amplifiers are muted.
HDMI 2Ch
To use the DVD system as a preamplifier, connected to a 2-channel HDMI receiver.
HDMI MCh
To connect the DVD system to a multichannel HDMI receiver.
Surround (Type 7)
To use the DVD system as a surround controller, connected directly to a surround system consisting of
analogue active loudspeakers on the ANALOGUE OUT sockets, passive loudspeakers on the power amplifier
outputs, or a combination of the two.
53
Configuring
the DVD system
Dolby Digital compression
HDMI output settings
To specify Dolby Digital compression
To specify the HDMI output settings
This option is useful for reducing the dynamic range of Dolby
•Highlight HDMI out… in the Audio setup menu, and press
Digital soundtracks, such as when watching a film late at night.
It is only available on the decoded output.
Enter.
The HDMI out… menu will be displayed:
•Highlight DD compression in the Audio setup menu, and
press Enter.
The following menu is displayed:
•Set Internal decode to No if you are connecting the HDMI
output to a bitstream-capable HDMI receiver.
•Press V or A to select the option you want, and press Enter.
Choose Compress off for no Dolby Digital audio compression,
Loud cut to reduce the level of loud passages, Quiet boost to
increase the level of quiet passages, or Compress max for both
low boost and high cut.
54
Configuring
the DVD system
Speakers
The Speakers menu will be displayed:
To configure speakers
If you are using the G95 in a surround application, directly
connected to up to six loudspeakers, the Speakers menu allows
you to configure the speaker layout and enter calibration settings.
•Highlight Speakers… in the Audio setup menu, and press
Enter.
The options are summarised in the following table:
Option
Values
Description
Left/Right
Large, Small
Whether the main left and right loudspeakers should handle the bass (Large),
or the bass should be directed to a subwoofer (Small).
Centre
Large, Small, Off
Whether there is a centre loudspeaker, and its bass handling.
Subwoofer
On, Off
Whether there is a subwoofer.
Surround
Large, Small, Off
Whether there are rear surround speakers, and their bass handling.
Calibration…
See opposite.
55
Configuring
the DVD system
To calibrate the speaker layout
•Highlight Calibration… in the Speakers menu, and press
Enter.
The Calibration menu will be displayed:
•Highlight Distance units and press Enter to change the
distance units between cm and inches.
Then for each speaker adjust the Gain and Distance as follows:
•Press V to highlight the Gain figure and press Enter to edit it.
You will hear a noise test signal from the corresponding channel.
•Press V or A to decrease or increase the gain in 0.5dB steps,
and press Enter to confirm it.
Adjust the Gain values so all the speakers sound equally loud at
the listening position.
•Press V to highlight the Distance figure and press Enter to
edit it.
•Measure the distance from the listening position to the speaker
and enter the value using the V or A keys, or the MSR+ number
keys, and press Enter to confirm it.
•Press Return when you have entered the values for all the
speakers.
56
Configuring
the DVD system
Configuring the sources
If you are using the DVD system as the controller or video switcher
To configure a source
in your Meridian system, you can use the Source setup option on
•Press the source key on the remote corresponding to the source
the Setup menu to configure each of the sources.
•Highlight Source setup… in the Setup menu, and press Enter.
you want to configure.
The Source configuration menu shows the values of each option
defined for that source.
The Source setup menu will be displayed:
To change an option
•Highlight the corresponding option in the Source
configuration menu and press Enter, select the value you want
to use, and press Enter to select it.
The following table explains the function of each of the options:
Option
Values
Description
Enabled
Yes, No
Whether the source appears on the list of sources.
Audio input
A1-A3, D1-D2, O1-O2, Disc, Tuner
The audio input used for the source; analogue, digital, optical, and
Sensitivity
2.5V, 2.0V, 1.0V, 0.7V
Allows you to set the sensitivity of the analogue inputs.
Video input
V1-V2, S1-S3, Y1, Bypass, Disc
The video input used for the source; see below.
Video lock
Normal, Poor
Improves locking for poor video sources
Trigger
High, Low
Trigger output for the source.
HDMI switch
1 to 4
Available if HDMI switch is set to On in the HDMI setup menu.
internal; see below.
Allows the G95 to control the input on the HDMAX 421.
Comms cat/add
-C, 1C-9C, NC/1A-8A
Allows you to set the Comms category and address.
57
Configuring
the DVD system
To assign an audio input to the source
•Highlight Audio input in the Source configuration menu, and
press Enter.
The Select audio input menu will be displayed:
•Highlight the video input you want to use for the source, and
press Enter to select it.
Select Bypass to route the component input directly to the
component output, for sources such as satellite receivers and cable
•Highlight the Analogue, Digital, Optical, or Internal input
you want to use for the source, and press Enter to select it.
Disc corresponds to the internal DVD system and Tuner
corresponds to the internal DAB/FM or AM/FM tuner module.
To assign a video input to the source
•Highlight Video input in the Source configuration menu, and
press Enter.
The Select video input menu will be displayed:
boxes that generate HD signals.
Disc corresponds to the internal DVD system.
58
Configuring
the DVD system
Configuring settings
The Meridian setup menu allows you to configure settings that
The product settings are generally set to an appropriate value when
affect the operation of the DVD system.
you reset the DVD system to the standard settings, and you should
not normally need to alter them.
To configure settings
•Highlight Meridian setup… in the Setup menu, and press
Enter.
The options are summarised in the following table for advanced
use:
The Meridian setup menu will be displayed:
Option
Values
Description
System address
1-8
Advanced setting.
Product address
1-8
Advanced setting.
Controller
Yes, No, Auto
Whether the product is the infra-red controller for the system.
Start source
Source
Specifies which source is selected when switching on from standby.
Volume
Main, Secondary, None
Specifies whether the DVD system controls the main volume, volume in a tworoom system, or has independent volume control.
Vol display
No, Yes
Specifies whether the DVD system displays the volume for the system.
Advanced OSD
Off, On
Shows playback statistics in the OSD bar.
Tuner Region (AM/FM only)
Europe, America, Japan
Band selection (MW/LW or AM) and the tuner deemphasis standard. Set to
Europe for other countries.
Timeout To Home
Off, On
Sets a 30s timeout for the front-panel display to return to Home.
59
Configuring
playback
options
Configuring playback options
DVD-Video discs are capable of providing a wide range of options and special features.
This chapter explains how to use the options on the Setup menu to configure the playback
options of the DVD system.
Setting playback options
To select the default soundtrack language
To display the playback options
English is usually the default soundtrack language, but you can use
•Highlight Playback options… in the Setup menu, and press
the Audio language menu to set a different default language if
Enter.
The Playback options menu lets you change the default
language for the audio soundtrack, subtitles, and on-screen menus,
and the parental rating:
Most DVD-Video discs include a selection of soundtrack languages.
you prefer.
•Highlight Audio in the Playback options menu, and press
Enter.
60
Configuring
playback
options
The Audio language menu is displayed:
•Press <, >, A, or V to highlight the language you want to use,
and press Enter.
Alternatively, select Auto to automatically display subtitles in the
specified audio language if no soundtrack is available for that
language.
To select the disc menu language
The DVD system allows you to choose the language for the disc
menus.
•Press <, >, A, or V to highlight the default soundtrack
language you want to use, or select Original to choose the
original soundtrack language, and press Enter.
To set the default subtitle language
•Highlight Menu in the Playback options menu and press
Enter.
The Menu language menu is displayed:
DVD-Video discs can include subtitles in up to 32 different
languages.
The DVD system allows you to select whether subtitles are
displayed by default, and specify the preferred language if it is
available on the disc.
•Highlight Subtitles in the Playback options menu, and press
Enter.
•Use <, >, A, or V to highlight the language you want to use,
The Subtitle language menu is displayed:
and press Enter.
To set the parental lock
Some DVD-Video discs are provided with a parental lock function
to allow you to lock out playback of scenes whose content exceeds
a specified rating until a password is entered.
•Highlight Rating in the Playback options menu and press
Enter.
61
Configuring
playback
options
The Enter password screen is displayed:
The rating level you have set will be displayed in the Playback
options menu.
To change the password
•Highlight Change password on the Set rating level screen
and press Enter to select it.
The following screen allows you to specify the new password:
•Enter your four-digit password and press Enter.
Initially the password is set to 7890, but you can change it to any
password you choose as described in To change the password on
this page.
The following screen then allows you to set the rating level:
•Enter the four-digit password you want to use and press Enter
to select it. The password cannot start with a zero.
Take care not to forget your password, or you will need to contact
your Meridian dealer to reset it for you.
•Press A or V to highlight the rating level you want to set, or
highlight Off to turn the parental lock off, and press Enter to
select it.
Level 1 corresponds to general viewing, level 3 is equivalent to the
USA movie rating PG, and level 8 corresponds to adult viewing.
62
Configuring
playback
options
Region codes
For commercial reasons many DVDs are encoded with one or more
The different parts of the world are divided into regions 1 to 6 as
region codes to identify the countries in which they can be used.
shown in the following diagram:
Every DVD player is assigned a region code to determine which
discs it can play.
1 – USA, Canada
5
2 – Europe, Near East, South Africa, Japan
1
3 – South East Asia
2
6
2
4 – Australia, Central & South America
5 – Africa, Asia, Eastern Europe
6 – People’s Republic of China
3
5
4
2
4
If you try to play a disc which is assigned to the incorrect region
The Information screen shows the region code, and other
code then either a special screen or the warning WRONG
information which depends on the product version:
REGION CODE will be displayed.
To change your DVD system’s region code please contact your
dealer.
To check your DVD system region code
•Highlight Information… in the Setup menu, and press Enter
to select it.
63
Tr o u b l e s h o o t i n g
Troubleshooting
We expect you to achieve superb results with the DVD system. If, however, you encounter
any problems, either when installing and configuring it, or during operation, please check the
following pages for suggested solutions.
If these suggestions fail to cure the problem, please contact your Meridian dealer for further
assistance.
General operating problems
The DVD system will not play a particular disc
Although we have made every effort to ensure complete
compatibility with all supported disc types, it is impossible to check
the correct operation of every function of the G95 with every
available disc; furthermore, some discs currently on sale do not
conform to the agreed format specifications. We cannot therefore
accept any responsibility for discs that will not play correctly, even if
they play correctly on other brands of player.
•The disc may be scratched or faulty. Examine it for damage, and
try playing it on another product.
•There are several Web sites that give details of discs with known
playback problems. Please check these to see if your disc is listed.
No lights are displayed when switching on
•Check that the AC power supply is connected correctly.
•Check that the ON OFF switch on the back panel is in the ON
position.
•Press Display to check that the display is not blank.
A question-mark symbol is displayed on the on-screen
display
This indicates that the function you have selected is not currently
available on the disc you are playing.
The on-screen display shows PLEASE CHECK DISC when
attempting to play a disc
•Check that the disc is positioned correctly in the tray.
•If it is a single-sided disc check that the label is uppermost.
•Check that the disc is clean and free of debris.
•Try playing another disc. If this disc works, check the problem disc
for signs of dirt or damage.
64
Tr o u b l e s h o o t i n g
The on-screen display shows WRONG REGION CODE
This indicates that you are attempting to play a DVD-Video disc
encoded for a region that is not supported by your DVD system.
The DVD system unexpectedly switches from pause to
stop, or fades the screen to black
This is caused by the pause or stop timeouts.
Audio problems
There is no sound when playing a disc
•Check that your preamplifier is switched on, and the volume is at
an appropriate level.
•Check that the DVD system is connected correctly to the other
components of your system; see Installing the DVD system, page
31.
The pause timeout automatically switches the DVD system from
pause into stop mode if no key has been pressed for the specified
time.
The stop timeout automatically fades the screen to black if the DVD
system is left in stop mode and no key has been pressed for the
specified time.
There is interference on the radio and/or television when
the DVD system is switched on
Before following the steps below, ensure all units are switched off.
If this equipment does cause or suffer from interference to/from
radio or television reception then the following measures should
be tried:
•Reorient the receiving aerial (or antenna) or route the antenna
cable of the receiver as far as possible from the DVD system and
its cabling.
•Ensure that the receiver uses well-screened antenna cable.
•Relocate the receiver with respect to the DVD system.
•Connect the receiver and this product to different AC outlets.
•Check that the correct source has been selected on your
preamplifier.
•Try playing another disc. If this disc works, check the problem disc
for signs of dirt or damage.
•Check that the correct option has been selected in the
Application menu; see DVD system application, page 52.
There is no sound from the loudspeakers and the display
shows HOT
The G95 includes a thermal shutdown, which mutes the output sif
the amplifier becomes too hot.
•Leave the G95 for a few minutes to cool down; the Standby LED
will turn blue.
65
Tr o u b l e s h o o t i n g
Video problems
There is no picture
The G95 includes video switching, so each source can be
associated with a video input or the internal DVD.
•Select the DVD source.
To associate the internal DVD with another source see Configuring
the sources, page 56.
Problems with high definition television sets
The screen is blank and the display shows HDCP ERROR
This means that HDCP encryption has failed. This can happen if:
•The G95 is connected to a display using HDMI (or HDMI to DVI)
and the display does not support HDCP encryption
•The cable is too long and is causing dropouts.
There are sparkles on the display
This can be caused by using HDMI with a cable which is too long.
An HD121 or HD421 can improve or fix this.
Not all high definition television sets are fully compatible with this
FM tuner problems
product and may cause artefacts to be displayed in the picture. In
FM tuner reception is poor
case of problems switch to the standard definition output.
To obtain high-quality stereo reception on FM a good aerial is
essential. Try positioning the aerial at different points in a room;
The video picture is monochrome
generally performance is best high up and near a window.
Check your video cabling.
In some areas an external fixed aerial will be necessary. This can be
Problems with fixed-matrix displays or DLP projectors
placed in a loft or mounted externally.
If you have a fixed-matrix display like a DLP projector, an LCD
display or a plasma, use 720p for best results.
RDS station names are not being received
Not all stations transmit the station name in all areas, and RDS will
Picture whites appear green or picture is bright pink
only be received if the signal strength is good.
Ensure that the HDMI colour space setting agrees with the display’s
HDMI colour space setting.
If the station name is not available you can define a preset station
with a name; see To define an AM/FM preset station, page 20.
I get the logo screen but I cannot watch discs on my DVI
display
Your display device must support the HDCP encryption standard in
order to display copy-protected DVD content.
66
Tr o u b l e s h o o t i n g
AM tuner problems
AM tuner reception is poor
Position the antenna to maximise the strength of the station you
want to receive and to reduce interference from other stations on
The display shows “No Services”
This indicates that a list of available services has not been built.
•Perform a scan to build a list of available services.
nearby frequencies.
Creating MP3 discs
Position the antenna away from items that generate electrical
MP3 discs can be created from a computer using appropriate MP3
interference, such as fluorescent tubes or televisions.
encoding software and a CD-ROM writer.
DAB tuner problems
Generate the MP3 files with a data rate of at least 128kbits per
The display shows “No signal”
This indicates that the tuner cannot locate a signal for the selected
service.
•Check that the antenna is connected correctly and reselect a
service.
You may need to use a better aerial.
This may also indicate that a stored ensemble is no longer
available, either because the tuner has been moved to a different
area of the country, or because the transmission has ended.
•Perform a scan to rebuild the list of services.
The display shows “Weak signal”
This indicates that the reception is poor.
•Try moving the aerial to improve reception, or fit a better aerial.
second. Group the tracks into folders to create separate albums on
the disc. Do not create folders within the folders.
Tracks and albums are played in the order in which they are
recorded onto the CD-ROM. Usually this will be in alphabetical
order of filename. To determine the playing order prefix the track
and album names with 01, 02, 03 etc, and sort the list into
alphabetical order before making the CD-ROM.
If artist and album names are stored in each file’s ID3 tags, these
can be displayed on the DVD system’s front-panel display.
67
Maintenance
Cleaning
To clean the case, display panel, and keypad
•Disconnect the power cord before cleaning the unit.
The exterior surfaces of Meridian G Series products are made from
solid anodised aluminium, powder coated steel, thermoplastic
rubber, and glass.
They are designed to be easily wiped clean with a dry, lint free
cloth. Greasy marks should be removed by light rubbing with a
slightly damp cloth and a trace of proprietary glass cleaner. Do
not use any other solvent or abrasive based cleaners. Dust can be
removed from the disc drive tray with a small dry brush when the
drawer is open.
Ensure that no liquid enters the casework and that the product is
completely dry before re-connection.
To clean the audio and video connections
The audio and video sockets on the back of the product are gold
plated and do not need to be cleaned if gold-plated phono plugs
are used. Otherwise, it is recommended that you unplug and
reconnect the plugs at least once a year. A proprietary contact
cleaner can be used to some advantage.
The electrical digital output should be treated in a similar way.
Tr o u b l e s h o o t i n g
To change the mains fuse
•Remove the mains connector, and pull out the drawer above the
power input to access the fuse.
Before replacing a blown fuse, it is best to ascertain the cause of
the failure.
The fuse drawer includes a spare fuse. This should be replaced by a
fuse of the same rating.
68
Tr o u b l e s h o o t i n g
Service and guarantee
Service
Guarantee
The Meridian G Series of hi-fi components has been carefully
The product is guaranteed against defects in material and
designed to give years of untroubled service. There are no user-
workmanship for two years from the date of purchase.
serviceable parts inside the case, nor do the units require any form
of maintenance.
The guarantee is void if the product has been subject to misuse,
accident, or negligence, or has been tampered with or modified
In the unlikely event that your product fails to function correctly,
in any way without the written authorisation of Meridian Audio
it should be returned, in its original packaging, to your Meridian
Limited. Note: Connecting anything other than the correct network
dealer.
lead to the COMMS sockets may cause damage to the product
which will not be covered by this guarantee. Attempted servicing
In case of difficulty within the UK or USA please contact the
by unauthorised people may also invalidate this guarantee. Labour
appropriate sales and service address shown on page iv.
and carriage charges are not covered unless by local agreement.
In case of difficulty outside the UK or USA, contact the importing
Outside the UK, local warranty liability is restricted to equipment
agent for the territory. A list of Meridian agents outside the UK is
purchased within the territory. Our agents outside the UK are only
available from Meridian Audio.
under contractual obligation to service under-guarantee equipment
sold through them. They are entitled to make a non-refundable
No responsibility can be accepted for the product whilst in transit
charge for any service carried out on other equipment.
to the factory or an agent, and customers are therefore advised to
insure the unit. When seeking service under guarantee, proof of the
This guarantee does not limit your statutory rights within the
date of purchase will be required.
country of purchase.
69
Index
A
accessories 31
AM antenna 31, 41
AM reception 41, 66
antennae, connecting 41, 42
Application menu 52
aspect ratio, changing 28
Index
connections
cleaning 67
communications 39
preamplifier 34
tuner 34
contrast, changing 28
controller, setting 40
Audio input, assigning 57
Audio setup menu 52
automatic setup 40
D
DAB antenna 31, 42
DAB reception 42, 66
B
default soundtrack language, selecting 59
black level (NTSC), selecting 47
black level, changing 28
blanking the display 8
brightness, display 8
default subtitle language, setting 60
digital surround processing
assigning a DSP preset 11
changing a DSP preset 11
DSP presets 12
selecting a source 11
C
CD player 14
CDs
pausing 14
stop 14
cleaning 67
closed caption subtitles, selecting 48
colour, changing 28
COMMS, connecting 40
Communications connections 39
component video, connecting 37
composite video, connecting 38
disc menu language, selecting 60
display
blanking 8
brightness 8
changing 8
display format, specifying 47
Display key 8
Dolby Digital compression, specifying 53
DSP presets 12
assigning to a source 11
changing 11
70
Index
DVD-Video discs
Home key 8
A-B repeat 26
Home soft keys 8
changing the camera angle 27
hue, changing 28
fast forward/reverse 23
pausing 22
selecting a chapter 22
selecting a track 22
slow-motion 23
stopping play 22
M
mains fuse, changing 67
menu navigation 46
Meridian setup menu 58
More key 8
MP3 discs 15, 66
E
MSR+, using 9
Eject key 8
mute 10
F
O
FM antenna 31, 41, 42
On/Off key 8
FM reception 42, 65
functions, selecting 8
G
guarantee 68
P
parental lock, setting 60
password, changing 61
Playback options menu 59
preamplifier
H
HDMI
connecting to a monitor 38
options 51
output settings 53
HDMI receiver, connecting to 52
HDMI switch 51
changing the volume 10
muting the sound 10
preamplifier connections 34
product, resetting 43
71
Index
R
speaker layout, calibrating 55
radio
avoiding hiss 20
scanning 18
stepping between preset stations 18
speakers, configuring 54
specifications 5
standby 8
surround system
calibrating 55
region codes 62
configuring 54
resetting the configuration 43
T
S
S-video, connecting 37
safety warnings ii
scaler options 50
troubleshooting 63
tuner connections 34
TV standard
power up 49
screensaver options 49
Setup menu 59
displaying 45
selecting 48
Types 43, 44
soft keys 8
sources
audio inputs, assigning 57
configuring 56
video inputs, assigning 57
sources, selecting 10
Source setup menu 56
V
video controls 28
Video setup menu 47
volume, changing 10
volume setting 58
72
Index