1
Technical Manual
Motorola T720 Handset
Developer Guide
Version 1.0
Table of Contents
INTRODUCTION ............................................................................................................................4
DOCUMENT HISTORY .....................................................................................................................4
OVERVIEW ....................................................................................................................................5
GLOSSARY ....................................................................................................................................5
REFERENCES ................................................................................................................................6
HARDWARE ENVIRONMENT .......................................................................................................7
HARDWARE OVERVIEW ..................................................................................................................7
SUPPORTED NETWORKS ................................................................................................................7
CONNECTIVITY ..............................................................................................................................8
DISPLAY INFO................................................................................................................................8
BATTERY LIFE ...............................................................................................................................9
SOFTWARE ENVIRONMENT......................................................................................................10
JAVA™ SUPPORT ........................................................................................................................10
BREW SUPPORT ........................................................................................................................11
WAP SUPPORT...........................................................................................................................11
DISPLAY LANGUAGE SUPPORT .....................................................................................................11
FONT SUPPORT ...........................................................................................................................13
MEDIA SUPPORT .........................................................................................................................13
DEVELOPMENT TOOLS .............................................................................................................14
DEVELOPMENT TOOLS .................................................................................................................14
DEVELOPER TRAINING .................................................................................................................16
DEVELOPING FOR THE MOTOROLA T720 HANDSET ............................................................17
DEVELOPING PROGRAMS .............................................................................................................17
Resources Available ..............................................................................................................17
Key Mapping Information.......................................................................................................18
CREATING PROGRAMS .................................................................................................................21
Using MIDlet Stationery to Create a Project ..........................................................................21
Using the MIDlet Wizard to Create a Project .........................................................................24
Preverifying a MIDlet .............................................................................................................29
Selecting a VM and Simulator ...............................................................................................30
Running a MIDlet ...................................................................................................................31
DEBUGGING PROGRAMS ..............................................................................................................31
MIDlet Debugging Setup........................................................................................................32
Debugging a MIDlet ...............................................................................................................32
DOWNLOADING PROGRAMS ..........................................................................................................33
INSTALLING PROGRAMS ...............................................................................................................34
PACKAGING PROGRAMS...............................................................................................................36
TROUBLESHOOTING .....................................................................................................................37
2
Table of Contents
CODING EXAMPLE .....................................................................................................................40
BUTTON OVERVIEW .....................................................................................................................40
CHARACTERISTICS OF LWT BUTTONS ..........................................................................................40
ROUNDBUTTON CLASS CODE TOUR .............................................................................................44
MODIFY A BUTTON’S CHARACTERISTICS........................................................................................50
MODIFY A BUTTON’S LOCATION ....................................................................................................52
INDEX...........................................................................................................................................55
3
Introduction
Welcome to the Motorola T720 Handset Developer’s Guide. This manual contains all the
information you need to get started developing software that operates on the Motorola
T720 handset.
The Motorola T720 handset information covers the following areas:
•
Hardware specifications like displays, processors, memory, and more
•
Software specifications like languages, fonts, audio, and more
•
Development tools information
•
Software development references, guidelines, and instructions
This document assumes that the developer is familiar with the basic principles of
programming, the wireless infrastructure, and wireless specifications.
Document History
4
Version
Date
Author
Comments
Draft (1.0)
9 Dec, 2002
MW MDP
First draft
Draft (1.0)
29 Jan, 2003
MW MDP
Second draft
Final (1.0)
10 Feb, 2003
MW MDP
FC-1
Final (1.0)
27 Feb, 2003
MW MDP
Final release
Introduction
Overview
The chapters in this manual cover all aspects of developing programs that operate on the
Motorola T720 handset. These include:
•
Hardware Environment–learn the hardware that is available and the capabilities of the
processor, memory, networks, and more
•
Software Environment–learn the software environment in which your programs will
operate on the device
•
Development Tools–learn which development tools are available to make your
program happen
•
Developing for the Motorola T720 Handset –provides the information you need in
order to create, debug, download, and package programs
•
Coding Example–learn how to customize the LWT Button class on the Motorola T720
in this extended code example.
Glossary
Here are definitions of common terms used in this manual:
Term
Definition
AMR
Adaptive Multi Rate
API
Application Programming Interface
BREW
Binary Runtime Environment for Wireless
CDMA
Code Division Multiple Access
EMS
Enhanced Messaging Service
GPRS
General Packet Radio Services
GSM
Global System for Mobile Communications
MMS
Multimedia Messaging Service
SMIL
Synchronized Multimedia Integration Language
WAP
Wireless Application Protocol
5
References
The following references provide information related to developing software for wireless
devices in general.
6
Organization
URL
3GPP
www.3gpp.org
Brew Development
www.qualcomm.com/brew
Infrared Data Association
www.irda.org
JPEG Organization
www.jpeg.org
Motorola Developer Program
www.motocoder.com
Open Mobile Alliance
www.openmobilealliance.org
Qualcomm
www.qualcomm.com
Sun Microsystems
wireless.java.sun.com
WAP Forum
www.wapforum.org
World Wide Web Consortium
www.w3.org
Hardware Environment
Hardware Environment
This chapter describes the hardware characteristics of the Motorola T720 handset. Use it
to understand the hardware environment in which your software will operate.
Hardware Overview
The Motorola T720 mobile phone represents the latest generation of 2.5G capable mobile
phones from Motorola. For domestic USA and European markets, the Motorola T720 uses
GSM/GPRS wireless communications. The Motorola T720’s built-in J2ME™ environment
executes the Java™ applications that you write and customers download to the phone.
For Asian and South American markets, a version using CDMA is available that uses
BREW to write and support applications.
Supported Networks
The Motorola T720 handset supports these networks:
•
GSM 900/1800 (EMEA)
•
GSM 850/1900 (Americas)
•
GPRS (General Packet Radio Service) packet data
•
CDMA 800/1900 and 800 AMPS TriMode (Asia, S. America)
•
CDMA 1XRTT
GSM Networks
The Motorola T720 uses GPRS wireless technology (in the US and European Union
versions) to manage voice calls and transfer data. Four channels are allocated for
downstream data, and one channel is dedicated to upstream data. This gives the
Motorola T720 a theoretical download rate of 54 Kbps and a theoretical upload rate of
13.4 Kbps. These rates will vary according to the network operator's channel allocation
and the signal quality.
7
CDMA Networks
The Motorola T720 uses CDMA wireless technology (in the Asian and S. American
versions) to manage voice calls and transfer data. Two channels are allocated for
downstream data, and one channel is dedicated to upstream data. This gives the
Motorola T720 a theoretical download rate of 153 Kbps. This rate will vary according to
the network operator's channel allocation and the signal quality.
Connectivity
The Motorola T720 handset contains the following connectors:
•
USB 1.0
•
RS232 serial connection (P2K connector)
The consumer can use these ports to perform synchronization of the phone's contact lists
and other personal information to a database on a desktop PC.
Display Info
The physical display characteristics of this Motorola T720 handset are:
Item
External
Internal
Screen resolution
96 x 32 pixels
120 x 160 pixels
Screen dimensions
28 mm x 38 mm
Pixel pitch
0.237 mm
Color depth
Black and White
12-bit pixels
Maximum Colors
2
4096
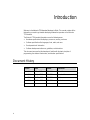
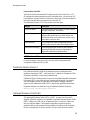
The resolution of the interior color screen on the Motorola T720 is 120 by 160 pixels. The
interior color screen displays nine lines of text, plus one line of color icons. A “zoom
mode” has the screen present 7 lines of enlarged text for easy reading. The Motorola
T720 has a second, 96- by 32-pixel black-and-white screen on the outer case. This
external screen displays a line of text and status icons, as shown in Figure 1. It allows the
user to check on call information without opening the phone.
8
Hardware Environment
Figure 1.
The Motorola T720 internal display.
The Motorola T720’s display hardware supports a 12-bit pixel depth, with a screen
capable of producing up to 4096 colors. With the larger color range, images on the
Motorola T720 appear at a much higher quality than on devices whose display hardware
limits the palette to 256 colors.
The Motorola T720 generates a 12-bit color by taking a 24-bit RGB color value and
truncating the four least significant bits in the byte that represents each color component.
That is, if a 24-bit RGB color has a value of 0xFEE3CE (red: 0xFE, green; 0xE3, blue:
0xCE), the conversion process zeros the bits in each component so that the value
becomes 0xF0E0C0 (red: 0xF0, green; 0xE0, blue: 0xC0).
Battery Life
The battery characteristics of the Motorola T720 handset include:
Item
Description
Type
Li Ion battery
Size (slim battery)
80cc, 106g
Slim battery
Type: 550 mAhr
Talk Time: up to 156-270 minutes
Standby Time: up to 90-170 hours
Standard battery
Type: 750 mAhr
Talk Time: up to 210-390 minutes
Standby Time: up to 120-230 hours
Extended battery
Type: 1100 mAhr
Talk Time: up to 318-540 minutes
Standby Time: up to 180-340 hours
9
Software Environment
This chapter describes the environment of the Motorola T720 handset. Use it to
understand the operating system and software environment in which your software will
operate.
Java™ Support
This device supports the following Java™ technologies and their respective APIs:
•
Java 2 Standard, Micro Edition
•
MIDP™ 1.0
•
CLDC™ 1.0
Devices that support J2ME development are available for the GSM and GPRS networks.
Java™ 2 Standard, Micro Edition
The Java™ 2 Standard, Micro Edition (J2ME™) is a highly optimized runtime environment
targeting a wide range of consumer products, including pagers, cellular phones,
screenphones, digital set-top boxes and car navigation systems.
For information and documentation, visit: wireless.java.sun.com/j2me/
CLDC 1.0
The J2ME Connected Limited Device Configuration (CLDC) specification consists of the K
virtual machine and a core set of class libraries appropriate for use within an industrydefined profile. This configuration is intended for small wireless devices with simplified
user interfaces, minimum memory budgets starting at about 128 kilobytes, and
intermittent network connections with lower bandwidth.
For information and documentation, visit: wireless.java.sun.com/
configurations/
10
Software Environment
MIDP 1.0
The J2ME™ Mobile Information Device Profile (MIDP) lets you write downloadable
applications and services for network-connectable, battery-operated mobile handheld
devices.
For information and documentation, visit: wireless.java.sun.com/midp/
BREW Support
The Binary Runtime Environment for Wireless (BREW) is an open-source on-line
application development platform for wireless CDMA devices. BREW is designed to allow
developers to write in whatever language they choose. Most native BREW applications
are written using C or C++, but BREW supports other programming languages too, such
as Java. Using BREW, developers can create portable applications that will work on
CDMA devices.
For information and documentation, visit: www.qualcomm.com/brew/
WAP Support
The Wireless Application Protocol (WAP) is an open industry standard technology that
allows mobile users to access and to interact with information and services easily. WAP
makes it possible to link wireless devices (such as mobile phones) to the Internet by
translating Internet information so it can be displayed on the display screen of a mobile
telephone or other portable device.
The Motorola T720 handset supports:
•
WAP specification–WAP 1.2.1
•
WML 1.3, xHTML, WTLS Class 2
For information on WAP, visit: www.wapforum.org
Display Language Support
The following languages bundles are supported by the Motorola T720 handset:
Bundle ID
Language Bundle
0001
US English
0002
UK English
0003
US English, French Canadian, Spanish Col. Port. Brazil
0004
UK English, French, German, Italian
11
Bundle ID
12
Language Bundle
0005
UK English, French, German, Dutch
0006
n/a
0007
n/a
0008
n/a
000A
UK English, Spanish, Portuguese, Greek
000B
UK English, Norwegian, Danish, Swedish
000C
UK English, Swedish, Finnish, Estonian
000D
UK English, Lithuanian, Latvian, Russian
000E
UK English, Polish, Czech, Slovak
000F
UK English, Hungarian, Turkish, Bulgarian
0010
UK English, Serbian, Slovenian, Croatian
0011
UK English, Russian, Ukranian, Romanian
0012
UK English, Arabic, Hebrew, Russian
0014
UK English, Complex Chinese (lite)
0015
US English, Simplified Chinese
0016
US English, Complex Chinese (lite)
0017
US English, French Canadian
0018
US English, Spanish Columbian
0019
US English, Portuguese Brazil
001A
US English, Spanish Columbian, Portuguese Brazil
001B
US English, French Canadian, Spanish Columbian
0020
UK English, French, Arabic, Turkish
0021
UK English, Thai, Vietnamese
0022
n/a
0023
n/a
0024
UK English, Simplified Chinese
Software Environment
Application Language Checking
The Motorola T720 supports the ISO-639A language standard. When writing programs
that use a specific language, use these guidelines.
Upon startup, a MIDlet that supports multiple languages should query the handset to
determine which display language is supported by that model. If the language is
supported, the MIDlet can then use the language; otherwise, it should use the default
language (normally English).
NOTE: Due to the ISO language assignments, a query for Traditional Chinese will only
return Chinese as a supported language, not the subgroups of Traditional or Simplified
Chinese. The program itself must then determine which version of Chinese to use.
Media Support
See the Creating Media for the Motorola T720 Handset manual for information on
supported media types, which include:
•
Messaging support (SMS, EMS 5.0, POP)
•
Graphic support (JPEG, GIF, WBMP)
•
Ring Tone support (iMelody, MIDI)
If you are creating programs that use any of these media, download the Creating Media
for the Motorola T720 Handset manual from: www.motorola.com/
developers/wireless.
13
Development Tools
This chapter describes the development tools and associated software development kits,
and application program interfaces required to create programs that operate on the
Motorola T720 handset.
NOTE: There are two different development paths for the Motorola T720 depending upon
which network the phone is deployed on. For GSM and GPRS networks, the path to use
is J2ME. For CDMA networks, the required path is BREW. This manualonly covers the
creation of J2ME applications and the development tools available on the MOTOCODER
web site.
Development Tools
Use these development tools and software development kits to write programs for the
Motorola T720 handset used on GSM or GPRS networks:
•
Motorola SDK for J2ME™
•
Metrowerks’ CodeWarrior™ Wireless Studio, 7.0
•
Lightweight Windowing Toolkit
•
Sun One Studio, Mobile Edition
•
Java™ 2 Standard, Micro Edition Wireless Toolkit
For more information on all of these tools, visit: www.motorola.com/
developers/wireless
Motorola SDK for J2ME™
The Motorola Software Development Kit (SDK) for the J2ME platform is the tool used for
developing and testing programs written in the Java programming language. The SDK
includes applications that make it easy to launch MIDlets (J2ME programs) using the
Motorola J2ME device emulator. Together these tools allow you to develop and debug
your J2ME programs in emulation before downloading them to a target device. The
Motorola SDK can be integrated into Metrowerks’ CodeWarrior Wireless Studio 7.0 as
well as other development environments
14
Development Tools
Licensee Open Class APIs
The Motorola Software Development Kit includes several Licensee Open Class (LOC)
API packages that make programming specific functionality easier. Just because an LOC
is included does not mean it will work on all devices. Always refer to the documentation to
find out which mobile devices are supported by a particular LOC.
The table below lists each LOC API and provides a brief description.
Package
Description
com.mot.tcc.media
The Media package provides classes to control a phone’s
backlight, media player, and vibration.
com.motorola.game
The Gaming package provides classes essential for
writing exciting games that run on mobile devices and
includes classes for working with screens, sprites, music,
sound effects, and much more.
com.motorola.lwt
LWT provides basic interface components that make
writing smaller and more powerful user interface easier.
com.motorola.messaging
The Messaging package provides the base interfaces
containing functionality common to all messages for
implementing derived messaging interfaces.
NOTE: The Motorola T720 only supports the com.motorola.lwt API package.
For more information on the various LOCs; see the JavaDoc documentation that
accompanies the Motorola SDK for J2ME.
CodeWarrior Wireless Studio 7.0
Use CodeWarrior Wireless Studio as the development tool for creating world-class
applications targeting the J2ME™ and Personal Java™ platforms for smartphones, PDAs,
set-top boxes and other Java technology enabled devices.
CodeWarrior Wireless Studio provides an open and customizable Integrated Development
Environment (IDE), a state-of-the art project manager and build system, class browser
and code navigation system, text editor with code completion, debugger, emulators,
support for team collaboration and WYSIWYG -drag and drop application development.
Registered developers can download a copy of CodeWarrior Wireless Studio from
www.motorola.com/developers/wireless/.
Lightweight Windowing Toolkit (LWT)
The Lightweight Windowing Toolkit (LWT) is a J2ME™ Licensee Open Class (LOC)
designed by Motorola to enhance the capabilities of the Mobile Information Device Profile
(MIDP). It defines new J2ME classes to implement Buttons, Checkboxes, Sliders, and
other user interface widgets. These widgets let application programmers produce
applications that are more powerful and more intuitive user interfaces while still keeping
the size of the application as small as possible. They also reduce the amount of time
15
needed to write these applications by providing a powerful set of extensible classes ready
for use.
Registered developers can download a copy of LWT from www.motorola.com/
developers/wireless/.
Java™ 2 Standard, Micro Edition Wireless Toolkit
The Java™2 Platform Micro Edition, (J2ME™) Wireless Toolkit is a set of tools that
provides application developers with the emulation environment, documentation and
examples needed to develop Java technology applications targeted at CLDC/MIDP
compliant mobile phones and entry level PDAs.
The J2ME Wireless Toolkit is normally bundled with development toolsets like
CodeWarrior Wirelss Studio and Sun One Mobile, but if not, you can download it from:
java.sun.com/products/j2mewtoolkit/.
Sun One Studio, Mobile Edition
Sun One Studio, Mobile Edition is Sun’s integrated development environment (IDE),
which provides support for developing mobile applications and comes bundled with the
J2ME Wireless Toolkit.
For more info on Sun One Studio, Mobile Edition, visit: java.sun.com/products
/j2mewtoolkit/.
Developer Training
Online, instructor led courses are available at the Motorola Developer Learning Center for
members of the Motorola Developer Program. These courses provide a faster and easier
way for you to get up to speed in developing applications that operate on Motorola Java
technology enabled devices.
Some of the courses currently available cover the CodeWarrior Wireless Studio
development tools as well as Programming the Motorola T720. These courses are
available at www.motocoder.com.
16
Developing for the
Motorola T720 Handset
Developing for the
Motorola T720 Handset
This chapter provides the information you need in order to create, debug, download, and
packaging of programs written for the Motorola T720 handset.
Developing Programs
This section provides the basic resources available and key mapping information needed
to develop applications for the Motorola T720 handset.
Resources Available
This section provides information on the availability of resources for the Motorola T720
handset.
Internal Display
Resolution
160 x 120
Color Depth
12 bit color (up to 4096 colors)
External Display
Resolution
96 x 32
Color Depth
Black & white (2 colors)
Networking
Max HTTP Socket connections*
3
UDP Max Socket connections*
10
UDP Max Buffer Size
1500 bytes
UDP Packet Size
1300 bytes
TCP Max Socket connections*
10
File & RMS
17
~500
Max number of Files/RMS*
Java VM
512 KB
Heap Space
Program Space
Data Space*
Recommended JAR Size
Maximum JAR Size
Motorola T720
Motorola T720i
640K
512K
Motorola T720
Motorola T720i
384K
512K
50-100 KB
200 KB
* These resources are shared with the rest of the phone and there could be less available
to Java at any given time.
Zoom In and Zoom Out Modes
The Motorola T720 supports zoom in and zoom out modes on the display. When zoom in
mode is selected, the display area is enlarged, reducing the number of visible pixels on
the display. The zoom mode is controlled by a user selectable option but is often preset
by region distributors. For example, in Asia, zoom in mode is the default setting, whereas
in the US, zoom out is the default setting.
Developers should note which region they are writing the program for and adjust the
program’s UI accordingly to fit. Just as important, you should test the program under both
zoom conditions to ensure no clipping of the visible portions of the program occur.
If your program requires the use of one zoom mode over another, it should read and store
the current zoom setting, change it as required during execution, and always restore the
original zoom zetting upon exit.
Softkey Character Limits
The softkey area at the bottom of the display is divided into three equal sections of
approximately 40 pixels each. Any text that appears as a softkey selection must fit within
that 40-pixel limit. This limits the number of characters you can use in a softkey to a
maximum of six characters per softkey. Failure to follow this guideline can result in clipped
softkey text displays.
18
Developing for the
Motorola T720 Handset
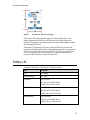
Key Mapping Information
The key map information for the Motorola T720 handset is as follows:
Key Number (KN)
Key Code (KC)
Game Action (GA)
# (pound)
35
0
* (asterisk)
42
0
0
48
0
1
49
GAME_A
2
50
0
3
51
GAME_B
4
52
0
5
53
0
6
54
0
7
55
GAME_C
8
56
0
9
57
GAME_D
Down Arrow
-11
DOWN
Left Arrow
-12
LEFT
Left Soft Key
-20
0
Right Arrow
-13
RIGHT
Right Soft Key
-21
7
Send (Enter)
-14
FIRE
Up Arrow
-10
UP
- (minus)
-22
0
NOTE: Game Action column shows J2ME-defined constants for game actions.
19
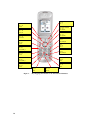
KN: RIGHT SOFT KEY
KC: -21
GA: 7
KN: LEFT SOFT KEY
KC: -20
GA: 0
KN: RIGHT ARROW
KC: -13
GA: RIGHT
KN: UP ARROW
KC: -10
GA: UP
KN: DOWN ARROW
KC: -11
GA: DOWN
KN: LEFT ARROW
KC: -12
GA: LEFT
KN: 3
KC: 51
GA: GAME_B
KN: 2
KC: 50
GA: 0
KN: 6
KC: 54
GA: 0
KN: 1
KC: 49
GA: GAME_A
KN: 9
KC: 57
GA: GAME_D
KN: 4
KC: 52
GA: 0
KN: 7
KC: 55
GA: GAME_C
KN: 8
KC: 56
GA: 0
KN: *
KC: 42
GA: 0
KN: #
KC: 35
GA: 0
KN: 5
KC: 53
GA: 0
Figure 2.
20
KN: 0
KC: 48
GA: 0
Key Mapping information for the Motorola T720 handset.
Developing for the
Motorola T720 Handset
Creating Programs
This section explains how to use the CodeWarrior™ IDE to create MIDlets. A MIDlet is a
Java™ application that conforms to two specifications defined by Sun® Microsystems:
•
the Connected, Limited Device Configuration (CLDC) and
•
the Mobile Information Device Profile (MIDP)
These specifications define requirements that Java applications must adhere to in order to
run on a mobile device. Mobile devices that can run MIDlets have several common
attributes:
•
some level of network connectivity
•
limited screen size
•
relatively low memory
•
relatively low processing power
Cellular phones and pagers are good examples of devices that have these characteristics.
The CLDC and MIDP specifications address the limitations of these devices.
CodeWarrior Wireless Studio provides two ways to create a MIDlet project. You can
create a MIDlet project based on stationery, or you can create a project by using a
CodeWarrior wizard. Both of these methods create a project that is configured to use the
CLDC and the MIDP.
For more information, see the CodeWarrior IDE User Guide.
Using MIDlet Stationery to Create a Project
The CodeWarrior IDE includes Java J2ME stationery that contains the base files and
default settings required to build a MIDlet project. You can create a new project based on
this stationery and then modify project settings and files to suit your needs.
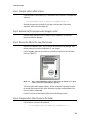
To create a new MIDlet project from stationery:
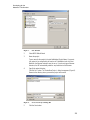
1
Select File > New from the main menu bar.
The CodeWarrior IDE displays the New window (Figure 3).
21
Figure 3.
New window
2
Select Java J2ME Stationery.
3
Name the project.
Type a name for the project in the text field labeled Project Name. If you want
your project to be recognized by all versions of CodeWarrior tools on all host
platforms, the filename extension must be .mcp. If you do not type a filename
extension, the IDE automatically adds the .mcp extension to the filename.
4
Specify the project directory
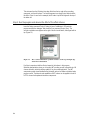
Click the Set... button. The Create New Project... window appears (Figure 4).
Browse to the directory where you want the project to be saved.
Figure 4.
5
22
Create New Project... window
Create a new folder.
Developing for the
Motorola T720 Handset
Check the Create Folder check box to indicate that you want to create a new
folder that will contain all of the project files. The new folder has the same name
as the project file without the file extension.
6
Click the Save button to create the new project directory, and return to the New
dialog box.
7
Click the OK button.
The IDE displays the New Project window.
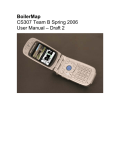
8
Click on the tree control (+) to expand the list of Generic stationery.
The New Project window (0) lists the available J2ME stationery. The list varies,
depending on which SDKs are installed on your computer and whether you have
created your own stationery.
Figure 5.
9
New Project Window Displaying Available J2ME Stationery
Select J2ME MIDlet.
You can select from three different J2ME stationeries. The J2ME MIDlet
stationery contains an example of a Hello World MIDlet. The J2ME MIDletResource Support stationery contains an example of a MIDlet that uses resource
files. The J2ME MIDlet Suite stationery contains an example of a MIDlet suite
that contains multiple MIDlets.
If you want to create a MIDlet that uses graphical user interface (GUI)
components, you should create the MIDlet by using the CodeWarrior MIDlet
Wizard. For more information about the CodeWarrior MIDlet Wizard, see “Using
the MIDlet Wizard to Create a Project”.
10
Click the OK button.
The CodeWarrior IDE creates project files and a project folder based on the
stationery that you selected. The CodeWarrior IDE displays a new Project
window (Figure 6).
23
Figure 6.
Project Window displaying project created from J2ME Stationery
The CodeWarrior project manager also creates a directory named ProjectName Data,
where ProjectName is the name of your project. The CodeWarrior IDE uses this directory
to store internal data. Do not modify or move any files in this directory.
A project that is created from stationery contains example source files, and other files that
provide you with a starting point for your project. You can modify these files and save
them with a new name, or replace them with your own files.
Using the MIDlet Wizard to Create a Project
The following procedure shows you how to use the MIDlet Wizard to create a new MIDlet
project. The MIDlet Wizard creates a project that is configured for a MIDlet that uses
graphical user interface (GUI) components. The project takes advantage of the
CodeWarrior RAD tools, which help you create GUI components.
This procedure consists of the following sections:
•
The New Window
•
MIDlet Wizard - Page 1 of 3
•
MIDlet Wizard - Page 2 of 3
•
MIDlet Wizard - Page 3 of 3
•
MIDlet Wizard - Summary
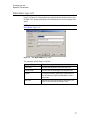
The New Window
The New window (Figure 7) is where you specify the name and location of the new
CodeWarrior project. You also specify the wizard to use to create the new project.
To start the MIDlet Wizard:
1
Open the New window.
Select File > New from the main menu bar. The IDE displays the New window
(Figure 7).
24
Developing for the
Motorola T720 Handset
Figure 7.
New Window
2
Select MIDP Midlet Wizard.
3
Name the project.
Type a name for the project in the text field labeled Project Name. If you want
your project to be recognized by all versions of CodeWarrior tools on all host
platforms, the filename extension must be .mcp. If you do not type a filename
extension, the IDE automatically adds the .mcp extension to the filename.
4
Specify the project directory.
Click the Set... button. The Create New Project... dialog box appears (Figure 8).
Browse to the directory where you want the project to be saved.
Figure 8.
5
Create New Project Dialog Box
Click the Save button.
25
The IDE saves the location and returns to the New window.
6
Click the OK button.
The IDE displays the New MIDP MIDlet: Page 1 of 3 window (Figure 9).
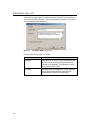
MIDlet Wizard - Page 1 of 3
The first page of the wizard (Figure 9) lets you define basic properties of the MIDlet, such
as the class and package name. Fill in the appropriate fields and click Next button to show
the next page of the wizard.
Figure 9.
New MIDP MIDlet: Page 1 of 3 Window
The components found in Page 1 of 3 include:
Component
Description
Class name
Type the name of the main class for the new MIDlet.
Package name
Type the name of the package for the new MIDlet.
Location
Type in a new location or click the … button to the right of
the text field to choose a new location.
Create an initial form
Check this box to have the wizard create a form for the
application. The form inherits from the following class:
javax.microedition.lcdui.form
NOTE: If you did not check the Create an initial form check box, the IDE does not show
you the Wizard’s Frame Class configuration page. In this case, skip to “MIDlet Wizard Page 3 of 3” on page 84 for the next step of this procedure.
26
Developing for the
Motorola T720 Handset
MIDlet Wizard - Page 2 of 3
Page 2 of 3 (Figure 10) of the wizard lets you specify information about the form class for
the MIDlet. Fill in the appropriate fields and click Next button to show the next page of the
wizard.
NOTE: Skip this section if you did not check the Create an initial form check box in the
MIDlet Wizard - Page 1 of 3.
Figure 10.
New MIDP MIDlet: Page 2 of 3
The components found in Page 2 of 3 include:
Component
Description
Class name
Type the name you want to use for the form class.
Package name
Type the name of the package for the new form class.
Location
To change this location, either type in a new location or
click the button to the right of the text field to choose a
new location.
Base Class
The base class for the form class can only be the Form
class. You do not need to set the Base Class.
27
MIDlet Wizard - Page 3 of 3
This page of the wizard (Figure 11) contains information that the IDE can insert into each
of the source code files it generates. Fill in the appropriate fields and click Finish button to
show the Summary page of the wizard.
Figure 11.
New MIDlet MIDlet: Page 3 of 3
The components found in Page 3 of 3 include:
28
Component
Description
Application
Type the title for the MIDlet. The IDE inserts this text into
the Title comment at the start of the generated source
code files for the application. The target device uses this
title as the name of your MIDlet.
Description
Type a description of the application. The IDE inserts this
text into the Description comment at the start of the
generated source code files for the application.
Developing for the
Motorola T720 Handset
MIDlet Wizard - Summary
To complete the wizard and generate the project just review the attributes that you have
specified, then click the Generate button. The CodeWarrior IDE creates the project files
and a project folder for a new MIDlet project. The CodeWarrior IDE displays a new Project
window (Figure 4.11).
Figure 12.
Project Window for MIDlet Project Created by the MIDP MIDlet
Wizard
The IDE also opens three other windows: the Component Palette window, the Object
Inspector window, and the RAD canvas window. For more information about using these
windows, see “Java MIDP Components” on page 145 and the IDE User Guide.
Preverifying a MIDlet
Due to memory and processing power available on a device, the verification process of
classes are split into two processes. The first process is the preverification which is offdevice and done using the preverify tool. The second process is verification, which is
done on-device.
The byte code preverifier tool rearranges byte codes in the classes to simplify the final
stage of byte code verification on the CLDC virtual machine. The preverifier tool also
checks for the use of virtual machine features that are not supported by the CLDC.
To preverify a MIDlet:
1
Open the Target Settings window.
Select Edit > TargetName Settings from the main menu bar (where TargetName
is the name of the current build target). The IDE displays the Target Settings
window.
29
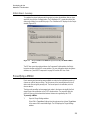
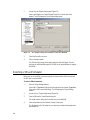
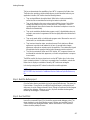
2
Access the Java Output settings panel (Figure 13).
Select Java Output in the Target Settings Panels list on the left side of the
window. The IDE displays the Java Output settings panel.
Figure 13.
Java Output Settings Panel with Preverification Enabled
3
Check the Preverify check box.
4
Click on the Apply button.
The IDE saves the change to the target settings for this build target. The next
time that you build the build target, the IDE will run the preverification tool against
the MIDlet.
Selecting a VM and Simulator
Before you can run a MIDlet, you need to specify the virtual machine (VM) and simulator
the IDE uses to run the MIDlet.
To select a VM and simulator:
1
Open the Target Settings window.
Select Edit > TargetName Settings from the main menu bar (where TargetName
is the name of the current build target). The IDE displays the Target Settings
window.
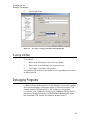
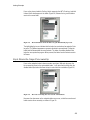
2
Access the Java Target settings panel (Figure 14).
3
Select a VM from the Virtual Machine drop list.
The virtual machine listing lets you select from any installed VM.
4
Select a simulator from the Simulator Config. File drop list.
The Simulator Config. File listing lets you select any simulator that operates with
the selected VM.
30
Developing for the
Motorola T720 Handset
5
Click the Apply button.
Figure 14.
Java Target settings panel with Virtual Machine list
Running a MIDlet
To run a MIDlet:
1
Make sure the MIDlet project is open in the Project window.
2
Make sure the current build target is the one you want to run.
3
Select Project > Run from the main menu bar.
The CodeWarrior IDE starts the VM you specified in Java Target settings panel, and runs
the MIDlet in that VM.
Debugging Programs
CodeWarrior Wireless Studio supports the low-level debugging of Java projects, however,
direct on-device debugging is not supported. Instead, you must use the Motorola T720
Simulator available in the Motorola SDK for J2ME to debug your Java programs.
For information on the CodeWarrior Debugger, see the CodeWarrior IDE User Guide. For
information on debugging Java projects, see the CodeWarrior Wireless Studio manual.
Both are available in PDF format on the CodeWarrior Wireless Studio CD.
31
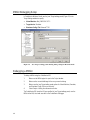
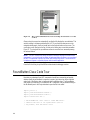
MIDlet Debugging Setup
In CodeWarrior Wireless Studio, use the Java Target settings panel (Figure 15) in the
Target Settings window to specify:
•
Virtual Machine: Mot J2ME SDK 3 E7.5
•
Target device: Simulator
•
Simulator Config. File: Motorola T720
Figure 15.
Java Target settings panel showing debug setting for Motorola T720
Debugging a MIDlet
To debug a MIDlet using the CodeWarrior IDE:
1
Make sure the MIDlet project is open in the Project window.
2
Make sure the current build target is the one you want to debug.
3
Makes sure the Java Target setting panel options for Virtual Machine, Simulator,
and Simulator Config. File are set correctly.
4
Select Project > Debug from the main menu bar.
The CodeWarrior IDE starts the VM you specified in Java Target settings panel, runs the
MIDlet in that VM, then halts execution in the CodeWarrior Debugger.
32
Developing for the
Motorola T720 Handset
Downloading Programs
This section explains how to download a MIDlet program to the Motorola T720 handset.
Serial Downloading
By default, the serial downloading of programs is disabled on Motorola T720 handsets. It
is recommended that you use OTA instead to load programs on the device for testing.
Over the Air (OTA) Downloading
You can download Java™ MIDlets from any web server as long as that server
understands the Java Archive (JAR™) and Java Descriptor (JAD™) file MIME types. The
MIME type descriptors to use are:
•
JAD files: text/vnd.sun.j2me.app
•
JAR files: application/java-archive
For more information, check your web server documentation.
CodeWarrior Wireless Studio produces both the JAR and JAD output files when compiling
a Java project. The JAD file contains a MIDlet-Jar-URL line, which automatically
points to the program’s location while under development. This is the wrong location once
you move the JAR file (e.g. by loading it onto a server for download).
For example, if the program mytest.jar is uploaded to the test directory of
www.testserv.com, then the JAD file’s MIDlet-Jar-URL line needs
modification. Where it once said:
MIDlet-Jar-URL: C:\Program Files\MyTest\mytest.jar
You modify it to read:
MIDlet-Jar-URL: http://www.testserv.com/test/mytest.jar
Once the JAD is correctly modified, both files can be uploaded to the web server. After
that, the MIDlet is available for downloading from the web server just as any other file
stored there. At this point, you can just key in the URL to the JAD file on the handset to
download it.
Continuing with the above example, you would type this URL into your WAP browser to
access the MIDlet:
http://www.testserv.com/test/mytest.jad
NOTE: JAR files cannot be downloaded directly onto phones. The only way to properly
install MIDlets is to download the JAD files, which then download the JAR for you. If you
set up an index page to allow MIDlet downloading, be sure your links point to the JAD files
and not the JAR files.
33
For more information on downloading files using a WAP Browser, see the WAP SDK
Browser User Guide.
Installing Programs
This section provides a program checklist, and information on the running and exiting
programs on the Motorola T720 handset.
Installation Checklist
Here is a checklist of items to review before attempting to download a program to the
Motorola T720 handset for testing. Following this checklist will ensure that you don’t waste
testing time.
Application checklist:
•
JAD file was created
•
JAD file’s MIDlet-Jar-URL attribute correctly modified (See Over the Air (OTA)
Downloading for a description of this process.)
•
JAR file contains META-INF/MANIFEST.MF
•
Verify MIDlet-Name, MIDlet-Version, and MIDlet-Vendor
attributes are duplicated in both MANIFEST.MF and the JAD file
•
Both JAD and JAR files have identical names (except for extensions)
•
Names for JAD and JAR files are less than 32 characters (including extension)
•
Less than 20 MIDlet suites are currently installed
•
Maximum length of class path name inside JAR file is less than 64 characters
•
Maximum length of URL path is less than 256 characters
•
No more than ~500 files are used by the installed MIDlet suites
•
JAR size listed in JAD matches actual JAR file size
•
MIDlet suite version must be higher than an already installed version
Installation Troubleshooting
You may encounter one or more of the following errors while attempting to install an
application:
34
•
Insufficient Memory–There is not enough data space (file system space) to store
the JAR file. Try removing other applications to free up data space so you can upload
the new JAR file.
•
Memory Full–There is not enough heap space to uncompress and run the JAR file.
The JAR size should be predefined as a portion of heap space, typically no more
than 100K. If larger than 100K, the MIDlet normally cannot be installed and run.
Developing for the
Motorola T720 Handset
Note, there are exceptions to this size limitation, typically related to the number of
class files versus resource files in the JAR file.
•
Memory Full–There is not enough data space to both install the JAR file and store
MIDlet resources. There must be enough room to both uncompress the JAR file in
heap space and store the resources associated with it in data space. Once
uncompressed into a MIDlet, the JAR file is deleted. Note that the total size of the
uncompressed resources may differ from the data space required by the MIDlet once
it is installed.
•
Not enough Program Space– There is not enough program space to store the
MIDlet. A MIDlet requires more storage space than a JAR file because it is stored on
the device in uncompressed form, normally as a DAV Object. DAV reserved
additional space for the MIDlet equal to the largest DAV Object. This reserved space
cannot be used to store other MIDlets. Instead, it provides power loss protection
during a DAV reclaim of flash memory.
Starting Applications
Many times a MIDlet suite contains one MIDlet. If so, the MIDlet can be launched from the
Games & Apps menu by highlighting the MIDlet suite and pressing the SELECT soft key.
If there are multiple MIDlets in the suite, then a suite content menu is displayed. Choose
one of the individual MIDlets, and then press the RUN soft key to launch the selected
MIDlet.
Exiting Applications
During the development process, chances are a MIDlet may not exit properly. If a
program becomes unstable or fails to respond during the development process, you can
end the program by pressing the END soft key.
Removing Applications
Use the standard menu commands on the Motorola T720 to remove a program once you
are finished using it.
35
Packaging Programs
When developing applications, there are two situations to be aware of when packaging
your applications for loading on the device.
36
•
Accessing external libraries or resources–in this situation, make sure that all the
necessary libraries and resources are placed in the JAR file so that the application
has access to them on the device.
•
Duplicate external class libraries–when packaging your application, be sure that
any external class libraries already available on the device’s KVM are not duplicated
in the JAR file. This prevents your application from using scarce program space to
duplicate already available functionality.
Developing for the
Motorola T720 Handset
Troubleshooting
This section describes some common troubleshooting issues and their solutions.
Title
Applications consume more space on the Motorola T720 than other
devices.
Problem
The application consumes much more size when downloaded to
Motorola T720 devices or use Motorola T720 emulator. The Motorola
i95cl (actual device as well as emulator) uses approx 340KB of heap.
Motorola's Motorola T720 emulator, the exact same MIDlet uses over
900KB of heap!
Solution
Image files take up twice as much space in the emulator as they
should. Image files will be substantially larger under the emulator since
they are stored as 24-bit true color images instead of the 12-bit images
that would be stored on the phone. We recommend increasing the
heap size of the emulator as a workaround. The heap size can be
changed in the Motorola T720.props file in the 7.5 emulator installation.
Although image files take up the correct amount on space on the “real”
phone, you will encounter other problems there. On the real Motorola
T720 phone an installed MIDlet requests twice as much memory as it
needs so you might run into more problems.
Title
An application installed on the device takes permanent space for
existing on the device.
Problem
When an application is installed to a device, it consumes the device's
space. Does this application take that program space permanently in
order to exist on the handset, or just temporally in order to install on the
handset?
Solution
After the application has been installed on the phone, it exists there.
Normally, the installation of an application to the phone takes 3 steps:
1. Decompression if your JAR file is compressed;
2. Verificaton: the class files are verified to ensure that the class files
come from a trusted source;
3. Transformation: After the application has been verified, it is
transformed from the application class files into a device specific
internal representation. This allows the application to be launched and
executed faster than loading the raw class files. The transformed file
(and associated resources) is stored in the FLASH file system on the
device.
37
Title
OTA installation failed on Motorola T720.
Problem
While downloading an application to the Motorola T720, an OTA failed
message comes up:"File corrupt". Does this mean the JAD/manifest
files are incorrect, class files are not correctly preverified…etc.?
Solution
In the event you experience problems, check the following:
1. Make sure ALL the fields in JAD file are EXACTLY IDENTICAL to
the fields in the manifest inside the JAR. And I mean *EXACTLY*. If
you have a white space after the Vendor name, for example, it wouldn't
work...
2. Make sure the size is ok
If it still doesn't work, try to upgrade the firmware. For firmware V8,
sometimes it has problem to download some MIDlets but these MIDlets
are installed fine on V11.
Title
Phone issues a “file corrupt” error when installing program.
Problem
MIDlet operates fine in simulator but the phone issues a “file corrupt”
error when attempting to install the program
Solution
The PNG files in the MIDlet may contain meta-data, which the VM on
the phone cannot handle. This meta-data is attached to the PNG by
some graphic programs and is most often seen with images from digital
cameras. The image meta-data can include data like F-stop settings,
flash setting, resolution, and a host of other information.
To determine if image meta-data is the problem, try removing the PNG
images from the MIDlet and re-installing on the phone. If the error does
not appear, the PNG images will need replacing with versions that do
not contain meta-data.
38
Developing for the
Motorola T720 Handset
Title
Determining the font size used in the Motorola T720 in various regions.
Problem
Different regions use different font sizes in the device. A program
needs to consider the font size when it comes to drawing to the screen
to avoid display errors.
Solution
You can use the Java method Font.getHeight() to determine
the size of the visible font for all regions. The method returns the
standard height of a line of text in the current font. The returned value
represents the sum of two different values: font height plus leading.
Font height is the actual height of the characters in the font and leading
is the separation, or distance between two different lines of text as
intended by the font designer and the device. The leading always
occurs below the text.
The returned font height value also takes into account the "zoom in" or
"zoom out" mode setting of the device. The zoom mode is set by the
user and independent of the Java environment. For example, a font
that is returned as 14-points in "zoom out" mode may be returned as
18-points in "zoom in" mode.
39
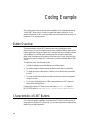
Coding Example
This chapter explores how you can extend the capabilities of the Lightweight Windowing
Toolkit’s (LWT) Button class to enhance a program with unique components. It is not
meant to be a tutorial on LWT or using the Button class, but to demonstrate how easy it is
to expand LWT for special purposes.
Button Overview
The program displays several LWT Buttons and two custom RoundButtons on the
device's screen. You use the navigation keys to select the different Buttons. Note how the
button's appearance changes as it gains focus. Press the Enter key to actuate the Buttons
or RoundButtons. You will see how to customize this class to make a unique button
design, while inheriting many of the features of the Button class. Finally, you will see that
there are many ways to arrange LWT components on a mobile information device’s (MID)
screen.
The objectives for this code example include:
•
To build an example program that displays several Button objects
•
To examine example code that extends the Button class to make a round button
•
To change the various characteristics of buttons, such as whether they are enabled
or visible
•
To change the offset fields of particular buttons and observe how their arrangement
changes on-screen
•
To see how to implement both an LCDUI command listener and LWT component
listener in the same application
Download the complete LWT Button source code (called button.zip) from the
MOTOCODER web site: www.motorola.com/wireless/developers.
Characteristics of LWT Buttons
One of the most valuable capabilities of the Motorola LWT is that it provides a toolbox of
ready-made user interface (UI) components. You use these components to implement the
interface to your mobile application.
40
Coding Example
This lesson demonstrates the capabilities of one LWT UI component, the Button class.
The Button class provides a simple and effective way to add interactive buttons to your
application’s interface. LWT buttons have the following features:
•
They can have different, descriptive labels. Within limits, a button automatically
resizes itself to accommodate the text string that makes up the label.
•
They can be placed on the screen using a variety of offset schemes. Such offsets
schemes are relative to the screen, or from other LWT components. If the UI is
carefully designed, these offset schemes allow the buttons to adapt to a screen of a
different size automatically.
•
They can be enabled or disabled under program control. A disabled button does not
respond to user events. Its appearance will also be slightly different to indicate that it
is disabled.
•
They can be made visible or invisible under program control. Because the user can’t
interact with it, an invisible button is disabled.
•
They have two interactive states: normal and pressed. Each state has a different
appearance to provide visual feedback to the user. A pressed button changes
appearance and sends an actuate event to the application. The actuate event signals
the application that the operation that the button represents must be carried out.
•
They can be customized. Unlike most LCDUI objects, LWT component classes can
be extended to customize their appearance, or to add a unique behavior in response
to user events.
The MIDlet used for this lesson shows how to use the LWT Button class. It also shows
how to customize a button. For this lesson an example class, RoundButton, extends the
Button class to display a round button. Normally, LWT buttons are rectangular.
Let’s start by seeing how LWT buttons function within a mobile application.
NOTE: If you haven’t already done so, download the Button sample program from the
MOTOCODER site, then launch CodeWarrior Wireless Studio and open the Button.mcp
file.
Step 1: Build the Button project
Go to the Button directory and double-click on the project file Button.mcp. This opens the
Project window. Ensure that the Java MIDlet Debug build target is selected in the pulldown menu. Issue the Debug command (Project | Debug) to compile and link the program
and launch the debugger. If there are no errors, the phone simulator window appears,
followed by the debugger’s Thread window.
Step 2: Run the MIDlet
Issue a Run command (Project | Run) to start the program under debugger control. The
phone simulator’s screen should display an array of buttons, and resemble Figure 16.
There should be three rectangular buttons, and two round buttons. One of the round
buttons should be partially off-screen.
41
Figure 16.
The simulator displaying LWT buttons.
You’ll notice that where LWT objects can’t fit entirely on the screen, the LWT displays a
scrollbar at the right of the screen. You can’t interact with the scrollbar; it’s used to
indicate that some of the application’s UI is off-screen. You use the navigation button to
see these hidden UI elements.
Step 3: Observe the button’s behavior
Click on the Motorola T720’s navigation button or use the keyboard’s arrow keys to
navigate down the screen. The first click on the navigation button’s down arrow causes
the small button at the top of the screen to display a small border (Figure 17). This border
indicates that the button has focus, or focus ownership.
Figure 17.
The first button has focus ownership, as indicated by the border.
Focus defines where an LWT component receives key events from the device. In the case
of a button, there’s not much in the way of key events to process, but it’s important for,
say, an LWT TextArea component where the user must rely on the phone’s keypad to
enter text.
NOTE: An LWT component receives focus only if it is visible, enabled, and its
acceptKeyFocus field is set to true. You might set this field to false to use the button as an
ornament in a screen design, rather than as a functional control.
42
Coding Example
Press on the phone simulator’s End key (which represents the LWT’s Enter key) and hold
it down. Watch what happens to the button (Figure 18). Release the key, and the button
reverts to its normal state.
Figure 18.
The LWT button when the Enter key (the End button) is pressed.
The highlighting that occurs indicates that the button has received and accepted an Enter
key press. This different appearance represents the button’s pressed state. Clicking the
button itself will demonstrate the same behavior. The button is providing feedback that
helps the user operate the program. When pressed, the button sends an actuate event to
its listener.
Step 4: Observe the change of focus ownership
Press on the navigation button’s down arrow two more times. With each key press, the
focus ownership moves to the next enabled button. You’ll notice that the focus skips the
disabled button (the button third from the top) to select the first round button (Figure 19).
Figure 19.
The focus ownership has moved to the round button.
Now press the down arrow on the navigation button once more, so that the second round
button receives focus ownership, as shown in Figure 20.
43
Figure 20.
The second round button has focus ownership. Note that the screen has
scrolled.
Observe how the screen has automatically scrolled to fully display the second button. This
vertical scrolling is a feature provided by the LWT. If you press the down arrow on the
navigation button again, the focus jumps back to the topmost button on the screen. The
screen also scrolls back up to the top, so that you’re looking at a screen that resembles
Figure 17. Try using both the up and down arrows to move the focus ownership among
the various buttons.
NOTE: The LWT reserves the vertical scrollbar to maneuver through the visible screen
components. You use horizontal scrollbars to implement sliders. However, you can extend
the LWT’s components to process up, down, left, and right key events. You would do this
to implement a game or a special-purpose vertical market application.
Press the Exit soft key to quit the MIDlet and terminate the debugger session.
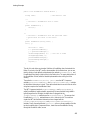
RoundButton Class Code Tour
Now that you understand how LWT components handle focus ownership and provide
desktop-quality visual feedback in response to events, let’s take a tour of the code that
makes use of the Button class to implement the RoundButton class. The RoundButton
code shows you how easy it is to extend an LWT component. Start by double-clicking on
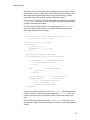
the file Buttons.java in the Project window to open the file in the editor.
import
import
import
import
java.io.*;
javax.microedition.midlet.*;
javax.microedition.lcdui.*;
com.motorola.lwt.*;
// The RoundButton class. Draws a round LWT button.
// Inherits the rest of its capabilities (such as
// key events) from the Button class.
44
Coding Example
public class RoundButton extends Button {
String label;
// The Button's text
/**
* Constructs a RoundButton with no label.
*/
public RoundButton() {
this("");
}
/**
* Constructs a RoundButton with the specified label.
* @param label the label of the button
*/
public RoundButton(String label) {
int x, y;
this.label = label;
x = getPreferredWidth();
y = getPreferredHeight();
setBottomEdge(HEIGHT, x);
setRightEdge(WIDTH, x);
preferredWidthChanged();
preferredHeightChanged();
repaint();
// note use of width
}
Thus far, this code looks very standard. It defines a RoundButton class that extends the
Button. If you look at the LWT JavaDoc documentation for the Button class, you can see
that this section of code defines and implements the methods RoundButton() and
RoundButton(String label), similar to those in the Button class. The empty label version of
the RoundButton is trivial, while the labeled implementation does nothing out of the
ordinary.
The method RoundButton(String label) uses the LWT Component
methods getPreferredWidth() and getPreferredHeight() to obtain
the this button’s dimensions in pixels. These two methods take into account the size of the
string that comprises the RoundButton’s label.
The LWT Component methods setBottomEdge() and setRightEdge()
adjust RoundButton’s height and width, respectively. Because the label string’s width is
typically larger than the its height, the width value x is plugged into the
setBottomEdge() method as well as setRightEdge(). This ensures that
RoundButton’s paint() methods draws a circle—and not an oval. The code then
signals the LWT that the button’s dimensions have changed with the
preferredWidthChanged() and preferredHeightChanged()
methods. Finally, the method invokes repaint() to force a screen update so that the
top-level container object, ComponentScreen, draws the new RoundButton. Moving
through the file with the editor, we see:
45
/**
* gets the label
* @see setLabel
*/
public String getLabel() {
return label;
}
/**
* sets the label
* @see getLabel
*/
public void setLabel(String label) {
this.label = label;
repaint();
}
These methods, getLabel() and setLabel(), fetch the string that represents
the RoundButton’s label or sets it, respectively.
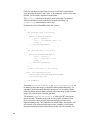
The next method, paint(), contains the code that draws a round button:
/**
* paints the RoundButton
*/
public void paint(Graphics g) {
// Ensure that the button doesn't draw into
// the clipping area
int s = Math.max(getWidth() - 5, getHeight() - 5);
if (hasFocus()) {
g.drawArc(0,0, s+4,s+4,0,360);
} //end if
// Set the color, depending upon if button is depressed
if (isPressed()){
// black, pressed state
g.setColor(0, 0, 0);
} // end if
else {
// gray, normal state
g.setColor(220, 220, 220);
} // end else
The first section of code derives a value s that becomes the size of a rectangle within
which the LWT draws the round button. It takes the values that getWidth() and
getHeight() obtain for this component’s dimensions, and uses the largest value.
46
Coding Example
One thing to note is that we reduce the drawing rectangle’s size by five pixels. This is so
that the button and its focus border (which must be slightly larger than the button) can be
drawn safely within the rectangle that comprises the actual component. If you draw
outside of the component’s rectangle, a portion of the image is clipped.
The next section of code tests to see if the round button component has focus ownership
(isPressed() returns true). If so, the focus border circle i drawn using the drawing
rectangle’s dimensions plus four pixels.
The code next tests to see if the button is in its pressed state. If so (isPressed()
returns true), then the button’s fill color is set to black. Otherwise, the button is in its
normal state, and the fill color is set to gray.
// Paint the interior of the button with the chosen color
g.fillArc(2, 2, s, s, 0, 360);
// Draw the perimeter of the button
if (isEnabled()){
g.setColor(0, 0, 0);
g.drawArc(2, 2, s, s, 0, 360);
} // end if
// Draw the label centered in the button
// Set color depending upon if button is depressed
if (isPressed()){
// white label (pressed)
g.setColor(255, 255, 255);
} // end if
else {
// black label (normal)
g.setColor(0, 0, 0);
} // end else
Font f = getFont();
// Get typeface info
g.drawString(label,
// Draw the text
(s/2 - f.stringWidth(label)/2)+2,
(s/2 - f.getHeight()/2)+2,
Graphics.TOP|Graphics.LEFT);
} // end paint
This section of code draws the button’s body. The fillArc() method paints an area
using the current color. Because the drawing rectangle that fillArc() works with is
actually a square in this case, which results in painting a circular area with the current
color.
The code tests to see if the button is enabled (isEnabled() returns true). If it is, a
black perimeter is drawn. Otherwise, the perimeter isn’t drawn, so that the button appears
disabled.
47
Finally, the code draws the button’s label. It first sets the color that’s used to draw the
string, based upon the buttons’s state. That is, for the normal state, the text is set to black,
otherwise, it is set to white to represent the pressed state.
The getFont() method fetches the string’s typeface information. The typeface’s
dimension information is used to center the text string within the button. The
drawString() method draws the button’s label
Scrolling to the end of the RoundButton class code, you see:
/**
* The preferred width of the button.
*/
public int getPreferredWidth() {
Font f = getFont();
int x = f.stringWidth(label) + 10;
return x;
} // end getPreferredWidth
/**
* The preferred height of the button.
*/
public int getPreferredHeight() {
Font f = getFont();
int y = f.getHeight() + 10;
return y;
} // end getPreferredHeight
/**
* Send an action event to the listener.
*/
public void componentActuated() {
dispatchComponentEvent(BUTTON_ACTION_EVENT);
} // end componentActuated
} // end RoundButton
The methods getPreferredWidth() and getPreferredHeight() use
the dimensions of the label string to set the button’s width and height dimensions. The
code adds 10 pixels to the values returned for two reasons. First, it provides a 10-pixel
buffer zone between the round button’s perimeter and the label string. Second, if the label
string is null, a button10 pixels in diameter gets drawn.
The last method, componentActuated(), is called by the LWT when the user
presses the button. This method simply sends an action event to the button’s listener.
As you can see, this code is very basic, other than employing one or two tricks to
implement drawing a circle. The RoundButton class inherits Button’s other features, such
as its response to key events and positioning on screen. In addition, you don’t have to
worry about managing the button’s states (normal, pressed, and focus ownership). The
48
Coding Example
LWT manages this for you, and as the RoundButton code shows, you merely query these
state values as you paint the component. The LWT will issue a repaint request every time
a component’s state changes.
Because of how getPreferredWidth() and getPreferredHeight()
are implemented, the button automatically sizes itself to accommodate the label’s width.
Feel free to try this by editing the label in the statements that make the round buttons.
These statements can be found in the ButtonScreen‘s constructor.
LWT components use Component listeners to manage UI events, while LCDUI classes
use Command listeners. Can both be used in the same MIDlet? Yes, they can. The
sample MIDlet you just ran demonstrates this by using a CommandListener interface
(implemented in the DemoScreen class) to handle the Exit soft key. Meanwhile, the
ButtonScreen class implements a ComponentListerner interface, which manages the
interaction of the LWT buttons. If you look in the ButtonScreen’s code, you’ll see:
public void processComponentEvent(Object source, int eventType) {
// Button #1 pressed
if (source == b1)
statusLabel= "Button #1 pressed";
// Button #2 pressed
else if (source == b2)
statusLabel= "Button #2 pressed";
// Button #3 pressed
else if (source == b3)
statusLabel= "Button #3 pressed";
// Button #4 pressed
else if (source == b4)
statusLabel= "Button #4 clicked";
// Button #5 pressed
else if (source == b5)
statusLabel= "Button #5 clicked";
} // end processComponenEvent
This is the listener for LWT component events. This method is simple in that it only
examines the source object of the event, and not the event’s type. More complex LWT
classes might require you to examine the event’s type. The statements that set the string
statusLabel are just code stubs that can be populated with code that actually
accomplishes something.
Now, let’s see what we can do with LWT components in regards to their being visible, and
the effects of their offset schemes.
49
Modify a Button’s Characteristics
Let’s examine ButtonDemo’s constructor in more detail to see how LWT buttons are
made, and how their visibility and screen location can be changed. Scroll through the
Buttons.java file with the editor to find:
// The constructor for our screen
public ButtonScreen() {
// First button
b1 = new Button("Button");
add(b1);
// Second button, set to fill the screen
b2 = new Button("Large Button");
b2.setRightEdge(Component.SCREEN_RIGHT, 0);
b2.setBottomEdge(Component.HEIGHT,
b2.getPreferredHeight() * 2);
//
b2.setVisible(false);
add(b2);
// Third button, disabled
b3 = new Button("Disabled Button");
b3.setEnabled(false);
add(b3);
// Fourth button, using the custom RoundButton class
b4 = new RoundButton("Round");
//
b4.setEnabled(false);
//
b4.setVisible(false);
add(b4);
// Fifth button, RoundButton class, located to right and
// level with the top of the previous button
b5 = new RoundButton("Round");
//
b5.setLeftEdge(Component.PREVIOUS_COMPONENT_RIGHT,
0);
//
b5.setTopEdge(Component.PREVIOUS_COMPONENT_TOP, 0);
//
b5.setVisible(false);
add(b5);
// Assign each button a listener
b1.setComponentListener(this);
b2.setComponentListener(this);
b3.setComponentListener(this);
b4.setComponentListener(this);
b5.setComponentListener(this);
50
Coding Example
} // end constructor
As the code shows, using an LWT button is straightforward. You use the new constructor
and then the add() method to add the button to a LWT ComponentScreen. (The
instance of a ComponentScreen is made in the class DemoScreen.) Making a
RoundButton is no different: you use its new constructor and add it to the
ComponentScreen. Finally, you assign each button a listener, even if it is disabled.
For the second button, note how the button’s right edge field can be set to reach to the
right edge of the screen. (Component.SCREEN_RIGHT).
For the third button, observe that by using the method setEnabled() with an
argument of false, it disables the button.
Now, let’s change things and see what happens.
Step 1: Modify a button’s visibility.
For the second button, b2, uncomment the statement:
//
b2.setVisible(false);
This makes the second button invisible.
Step 2: Disable a button.
For the fourth button, b4, uncomment the statement
//
b4.setEnabled(false);
This disables the fourth button.
Step 3: Run the program and observe the results.
Build the project (Project | Make) and run it under debugger control (Project | Debug).
Start the debugger, (Project | Run) and notice that changes. The phone simulator’s screen
should resemble Figure 21.
51
Figure 21.
The screen after the second button was made invisible and the fourth
button is disabled.
Step 4: Watch the change of focus ownership.
Use the navigation button to traverse the focus among the enabled buttons. You’ll see
that only two of the buttons receive focus ownership: the first button b1, and the second
round button, b5.
There are several other statements in the ButtonDemo constructor that you can
uncomment to disable other buttons or make them invisible. Feel free to experiment with
those and see what happens.
Now let’s see what effect an LWT component’s offset scheme can have on the MIDlet’s UI
layout.
Modify a Button’s Location
You can specify the screen location of an LWT component using one of several schemes.
You can position the component using offsets from a screen location (top, left, right, or
center). For example, the second button’s right edge was set to coincide with the right of
the screen by supplying the setRightEdge() method with arguments of a
SCREEN_RIGHT constant and an offset of zero.
Alternatively, components can be located offset relative to other components. The LWT
provides an extensive suite of relative offset schemes, where a component can be offset
from another component’s right edge, left edge, horizontal center, top edge, bottom edge,
or vertical center. Consult the Lightweight Window Toolkit Programmer’s Guide for further
information on these offset schemes.
By default, the LWT aligns a component adjacent to the left edge of the screen and under
the previous component. This is what the MIDlet’s current layout shows. Let’s change an
offset scheme or two and see what happens.
52
Coding Example
Step 1: Change a button’s offset scheme
Locate the code for the fifth button, b5, in the ButtonScreen’s constructor. Uncomment the
statement:
// b5.setLeftEdge(Component.PREVIOUS_COMPONENT_RIGHT, 0);
What this statement does is offsets b5’s left edge to the right edge of the previous
component, which is the round button b4.
Step 2: Build and start the program under debugger control
Issue the Debug command (Project | Debug) to have CodeWarrior’s IDE make the
program and start the debugger.
Step 3: Observe the effect of the new offset scheme
Issue a Run command (Project | Run) to have the MIDlet execute in the debugger. Note
that the location of the second round button, b5, has changed
Use the navigation button to move the focus ownership so that the second round button
has focus (Figure 22).
Figure 22.
The second round button, using an offset where the button’s left edge is
relative to the first round button’s right edge.
The second round button appears relative to the first round button’s right edge. However,
the vertical offset scheme is still in effect: this button’s top edge is located relative to the
first round button’s bottom edge.
Use the Exit soft key to terminate the MIDlet and end the debugger session.
Step 4: Change another offset scheme for this button
Use the editor to uncomment the statement:
//
b5.setTopEdge(Component.PREVIOUS_COMPONENT_TOP, 0);
53
This statement has the b5 button’s top edge offset from the top edge of the preceding
component, not from its bottom. The second argument can supply a pixel value to add to
this offset. Since it’s zero for this example, the b5 button’s top will be aligned to the top of
the button b4.
Step 5: Run the program and observe the effect of the offset scheme
Issue the Debug command (Project | Debug) to have CodeWarrior’s IDE make the
program and start the debugger. Now issue the Run command (Project | Run). The
second round button now appears to the right of the first round button, and aligned with its
top (Figure 23).
Figure 23.
The second round button, positioned relative to the top and right edge
of the first round button.
Feel free to experiment with the offset schemes for the buttons in this program.
What this demonstration shows you is how the LWT provides you with a powerful set of UI
classes with which to build a desktop-quality UI for your mobile application. The LWT
components provide visual feedback when actuated, and can be hidden or disabled under
program control. The behavior and capabilities of LWT buttons can be applied to the all of
LWT UI classes that implement interactive components.
54
Index
Index
3GPP, 6
AMR, 5
battery info, 9
Binary Runtime Environment for Wireless, 11
BREW, 11
CDMA, 8, 11
CDMA 1XRTT, 7
CDMA 800/1900, 7
CLDC, see Connected Limited Device
Configuration, 10
CodeWarrior Wireless Studio, 15
com.mot.tcc.media, 15
com.motorola.game, 15
com.motorola.lwt, 15
com.motorola.messaging, 15
Connected Limited Device Configuration, 10
Creating Media for the Motorola T720 Handset,
13
data space, 18
memory full error, 35
not insufficient memory error, 34
debugger settings, 32
debugging a MIDlet, 32
development tools, 14, 16
CodeWarrior Wireless Studio, 15
Lightweight Windowing Toolkit, 15
Motorola SDK for J2ME™ 3.1, 14
display
external, 17
internal, 17
display info, 8
EMS, 5
game actions, 19
glossary, 5
GPRS, 7
GSM 850/1900, 7
GSM 900/1800, 7
heap space, 18
memory full error, 34
Infrared Data Association, 6
J2ME, see Java™ 2 Standard, Micro Edition, 10
JAD files
MIDlet-Jar-URL, 33
MIME type, 33
modifying, 33
JAR files
MIME type, 33
Java VM resources, 18
Java™ 2 Standard, Micro Edition, 10, 16
key codes, 19
key map
figure, 20
key mapping table, 19
key numbers, 19
language support, 11
Licensee Open Class, 15
Lightweight Windowing Toolkit (LWT), 15
media support, 13
MIDlets
create using stationery, 21
create using wizard, 24
debugging, 31, 32
installing, 34
preverifying, 29
running, 31
selecting simulator, 30
selecting VM, 30
MIDP, see Mobile Information Device Profile,
11
MMS, 5
Mobile Information Device Profile, 11
Motorola Developer Program, 6
Motorola SDK for J2ME™ 3.1, 14
networking resources, 17
OTA downloading, 33
preverifying MIDlets, 29
program space, 18
not enough program space error, 35
programs
creating, 21
stationery projects, 21
wizard projects, 24
references, 6
RS232 connector, 8
serial, 33
Simulator, selecting, 30
SMIL, 5
Sun One Studio, Mobile Edition, 16
troubleshooting installations, 34
USB connector, 8
55
VM, selecting, 30
W3C, 6
WAP, 5
56
WAP Forum, 6
WAP support, 11
MOTOROLA and the Stylized M Logo are registered in the U.S. Patent & Trademark Office. All other product or
service names are the property of their respective owners. Java and all other Java-based marks are trademarks or
registered trademarks of Sun Microsystems, Inc. in the U.S. and other countries.
© Motorola, Inc. 2003.