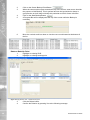
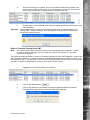
1
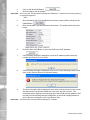
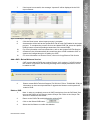
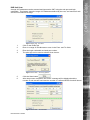
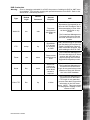
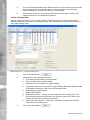
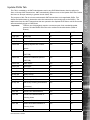
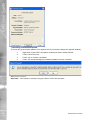
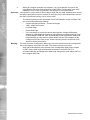
Centralized
Management
Tool (CMT)
User Guide
CMT User Guide
Contents
Introduction........................................................3
Installation..........................................................6
Options Tab........................................................6
Tab Display........................................................8
Groups Tab.........................................................19
Users Tab...........................................................24
Firmware Tab.....................................................41
Audit Tab............................................................47
Help Tab.............................................................51
Trouble Shooting Procedures............................ 52
Trouble Shooting Table...................................... 55
Appendix A LOGIN/PASSWORD ...................... 58
Appendix B – CMT CSV FILE CREATION......... 59
Index..................................................................61
Whilst every attempt is made to ensure these manuals are accurate and current, Dedicated Micros reserve the right to alter
or modify the specification of the machine described herein without prejudice.
CMT Installation Guide - Version 2.7
Dedicated Micros ©2008
Dedicated Micros’ Centralized Management Tool (CMT) is designed to reduce the burden of
management and maintenance for administrators of large video surveillance systems. The CMT
automates many tasks which are otherwise very repetitive and time consuming.
Features and Functions
1.
2.
3.
4.
5.
6.
7.
8.
9.
10.
11.
12.
13.
Control multiple DVRs from a single management tool.
Grant and revoke individual viewing permissions across many DVRs.
Upgrade firmware on multiple DVRs simultaneously.
Configure DVRs.
Time sync DVRs to a NTP Server’s time.
Back up, restore, and copy DVR configurations.
Share a common set of viewing permissions by grouping DVRs and then
associating users to the DVR Group.
Each DVR can be in more than one Group.
In addition to inheriting the viewing permissions of their assigned groups, certain
users (DVR Administrators) will also be assigned configuration and maintenance
rights for the DVRs in their Groups.
All system configuration data is backed up to the CMT database.
All configuration changes and alert messages are captured in the CMT database
and accessible via the Audit Log Tab.
Upon login to CMT, system “alerts” are displayed to Administrators.
CMT allows for the creation of three types of users:
• CMT Administrators have all permissions for all DVRs
• DVR Administrators have a subset of permissions for a subset of DVRs
• Viewing Users have video viewing permissions (live and/or recorded) for
a subset of DVRs and a subset of cameras via NetVu Observer and other
Viewers.
Dedicated Micros ©2008
CMT User Guide
Introduction
CMT User Guide
CMT Architecture
CMT is a “3-tier” application:
1.
2.
3.
CMT Server, which runs 24x7 as a server and actually communicates with the
DVRs in response to administrator commands.
CMT Client, the CMT GUI which runs on administrator’s PCs and is used to log into
the CMT Server and execute changes
SQL Server Database, which is used by the CMT Server to store all DVR
configurations
CMT has three types of Users:
1.
2.
3.
CMT System Administrator – Access to all Users and DVRs in CMT.
CMT DVR Administrator – Access to a Group of DVRs and a sub-section of Users.
Viewing Users – Able to view video, but do not have access to CMT.
Dedicated Micros ©2008
•
•
•
•
•
NetVu DVRs provide reliable storage
NetVu ObserVer provides a full-featured viewer with centralized alarm monitoring
The CMT provides efficient management and maintenance of large DVR systems
The Health Monitor provides continuous monitoring and reporting of DVRs’ health
Integrations with leading access control, loss prevention and other security partners
contribute towards a complete, integrated security solution.
System Requirements
The CMT Server minimum requirements are:
•
2.2 GHz Pentium 4
•
1 GB RAM
•
1 GB of available hard drive space
•
USB port (preferably internal) for license dongle
•
Windows XP Professional SP2 or Windows 2003 Server operating system
•
Microsoft SQL Server Express database, with 20 MB of storage required per DVR
Note: Microsoft SQL Server 2000 or 2005 database can also be used, but is not included in the
Server Installation Package and therefore must be installed separately
CMT User Guide
CMT’s Place in a NetVu-Connected System
CMT Client requirements are:
•
2.0 GHz Pentium 4
•
512 MB RAM
•
100 MB of available hard drive space
•
Windows XP Service Pack 2
•
Screen Resolution recommendation is 1280X1024
Additional CMT requirements are:
•
•
•
•
•
CMT is compatible with NetVu DS2, NetVu BX2, ChipWrights DV-IP, and DV-IP
ATM.
All DVRs must have Firmware V4.3 or higher prior to being added to CMT.
Only one administrator can be logged into CMT at a time.
The “User Accounts” Config Web Page cannot be used for DVRs that are
controlled by CMT
The CMT can be purchased with licenses to manage 25, 50, 100 or 500 DVRs. A
USB “dongle” and license file are used to enforce the limit. Without a license CMT
runs in demo mode and can manage only five DVRs.
Dedicated Micros ©2008
CMT User Guide
Installation
Refer to the ‘Centralized Management Tool (CMT) Installation Guide’ for the complete install
procedures.
Options Tab
This Tab provides three functions:
1.
Define the CMT Server Machine Name to the CMT Client. The user must define
the CMT Server Machine Name to the CMT Client before logging into the CMT
Client. Navigate to the Options tab, enter in the CMT Server Machine Name in
the New Server field, and press the Set CMT Server button. The CMT Client
application must be restarted for the changes to take effect.
2.
Define the NTP Server Machine Name for time syncing DVRs (only available to
CMT admins). Please refer to the ‘Batch Time Sync’ section for further information
regarding this option.
3.
Maintain the License Dongle.
Note: Please refer to the Centralized Managment Tool (CMT) Installation Guide for further
detailed information regarding the Options tab.
Login Tab
1.
Warning: The default login for CMT is:
Username = admin
Password = admin
This login (admin/admin) has the highest level of authority permissible in CMT and therefore should be changed shortly after CMT is installed. For information on changing this default login, refer to the User Tab section. Note: if you forget your password, please contact DM’s Technical Support for assistance (#703-904-7738 or #877-367-8778).
2. Three invalid attempts to login to CMT will result in the Login button becoming unavailable for 5 minutes. After the 5 minute lock out period has expired, this Administrator will once again be able to log into CMT.
Usernames and Passwords may contain upper and lower case alpha numeric characters and must be entered exactly as they are in the CMT Database. For information on adding logins to CMT, refer to the User Tab section as well as Addendum A.
Login to CMT
1.
2.
Enter Username: admin
Enter Password: admin
3.
Click on the Login Button (or press Enter)
Dedicated Micros ©2008
After clicking on the Login Button, CMT will check for a license dongle. If the dongle is not found an
Alert Message will be displayed:
Figure 1 Login Tab with Alert Message
CMT User Guide
License Dongle Check / Alert Messages
If a dongle is found, no alert message will be displayed.
Note: For additional information about License Dongles, refer to the installation section of this
guide or the ‘Centralized Management Tool (CMT) Installation Guide.’
The purpose of Alert Messages is to ensure that the Administrators are made aware of a possible
issue. Alerts are displayed directly on the Login Tab. CMT Administrators will have access to all
Alerts generated via CMT and DVR Administrators will have access to Alerts generated during their
CMT session.
Clicking on the Clear Alerts Button, will remove all existing Alerts from the Login Tab.
CMT displays the expiration date of the maintenance agreement above the Alert area. The text
display is highlighted in red bold text when the remaining time gets to 90 days.
Note: For additional information regarding the tracking of events in CMT, refer to the Audit Tab
Section.
Dedicated Micros ©2008
CMT User Guide
Tab Display
The Tabs displayed will be tied to the level of permissions that are assigned to this Administrator. In
the case above, this CMT Administrator has all permissions and therefore has access to all available
Tabs in CMT.
DVRs Tab
This Tab is only available to CMT Administrators. DVR Administrators cannot access the DVRs Tab.
The DVRs Tab allows DVRs to be added, deleted, or edited in CMT.
Important: In order to complete the process of adding a DVR or changing the system ids/
passwords, the CMT Administrator will be required to route to the Update DVRs Tab
and send the pending transaction to the DVR.
In order to perform an action on a DVR, it must first be added to CMT. Once a DVR is added to CMT,
it will appear on all applicable Tabs and can be accessed by all permissible Administrators. All DVRs
are added to CMT via the DVRs Tab.
CMT is compatible with the following Dedicated Micros’ DVRs:
1.
NetVu DS2
2.
NetVu BX2
3.
ChipWrights DV-IP
4.
DV-IP ATM
Important: All DVRs must have embedded Firmware V4.3 or higher in order to be added to CMT.
Figure 2 DVRs Tab Introduction
Dedicated Micros ©2008
A DVR can be identified by either the IP Address or the Fully Qualified Domain Name (FQDN) in
CMT. Each DVR is independently defined consequently a DS2 for example could be identified by its
IP and another DS2 could be identified by its FQDN.
In order to ensure that CMT will recognize the DVR, it is always a good practice to attempt a ‘ping’
prior to defining the DVR. Using a DOS prompt, enter the ping command followed by either the IP
or FQDN. If a reply is returned than the ping was successful. Contact your IT Department for further
information.
CMT User Guide
Add a DVR
Figure 3 PING Command
A DVR can be added one of two ways:
1.
2.
Add a DVR individually by using the New DVR button
Add a batch of DVRs by using CSV Import
Figure 4 DVRs Tab – Add a DVR
1.
Click on the DVRs Tab
Dedicated Micros ©2008
CMT User Guide
2.
Click on the New DVR Button
3.
Enter the Name and IP Address
Important: Do not use the Tab Key when entering the IP Address - instead use the full point key (.)
to seperate segments.
--OR-4.
Enter the Name and Fully Qualified Domain Name of the DVR by clicking on the
FQDN Button
Enter the System Login and Password information. The default values are listed
below:
5.
Figure 5 DVRs Tab - System Credentials
6.
Press the Save DVR Button to save this DVR to the CMT database.
7.
If the following message is displayed, check the IP address and the web port
number and verify the unit is online.
8.
If the following message is displayed, refer to the Trouble Shooting section at the
back of this manual (Remove Credentials button).
9.
The Unit Information will be displayed on the lower left hand section of the screen,
the Name and IP will also be added to the list at the top of the screen. Two
messages will be displayed: one advising that a New DVR is being added to CMT
and the second indicating that the configuration of this DVR is being backed-up
(this C/R point will appear on the Copy Restore Tab).
Important: This DVR will be locked until the backup is complete.
10
Dedicated Micros ©2008
10.
11.
12.
13.
Figure 6 DVRs Tab Tab - Unit Information
A transaction will be held at the Update DVR Tab. To complete the process click
on the Update DVR Tab, press the Update DVR(s) Button to send all pending
transactions to the actual DVRs.
For more information on these transactions, refer to the Update DVR Tab Section.
A Restore Point will automatically be created any time a DVR is added to CMT to
capture the Configuration prior to adding it to CMT.
For more information on Restore Points, refer to the Copy/Restore Tab Section.
CMT User Guide
Figure 7 Update DVR Tab - Add New DVR
Add a DVR – Batch Import
DVRs can be added simultaneously to CMT by creating a CSV file and importing it into CMT by
using the CSV Import button on the DVRs Tab. For more information on CSV files, refer to the
Creating a Batch DVR Import CSV File Section in Addendum B.
1.
2.
Click on the DVRs Tab.
Click on the CSV Import button.
3.
Navigate to the CSV file and click on the Open button.
Dedicated Micros ©2008
11
CMT User Guide
Figure 8 DVRs Tab – CSV Import
4.
The display of the credentials and web port settings can be overridden in the Import
Units window by entering in the credentials or web port number in the appropriate
place and selecting the Override All button to add credentials simultaneously
or clicking on the plus button beside each field to add each setting individually.
However, this feature cannot be used to change the credentials or web port on the
unit. It only changes the display of the settings in the Import Units window. The
settings have to match the settings on the unit before CMT will allow the unit to be
added to the CMT database.
Figure 9 CSV Import – Override Credentials
5.
6.
12
Select DVRs to import or press the Check All button .
Click on the Import Checked button to begin importing the DVRs.
Dedicated Micros ©2008
If the import is successful, the message “Imported!” will be displayed in the CSV
Import window.
CMT User Guide
7.
Figure 10 CSV Import – Messages
8.
9.
10.
11.
12.
Click the Done button when import process is complete
A transaction will be held at the Update DVR Tab for each DVR added in the import
process. To complete the process click on the Update DVR Tab, press the Update
DVR(s) button to send all pending transactions to the actual DVRs.
For more information on these transactions, refer to the Update DVR Tab Section.
A Restore Point will automatically be created any time a DVR is added to CMT to
capture the Configuration prior to adding it to CMT.
For more information on Restore Points, refer to the Copy/Restore Tab Section.
Add a DVR - Below Minimum Version
1.
2.
Delete a DVR
1.
CMT requires that all DVRs are running Firmwre V4.3 or above. If a DVR is below
this version of Firmware, the following message will be displayed and this will not
be added to CMT.
Please contact DM’s Technical Support (Tel:703-904-7738 or Tel:800-864-7539) for information on the manual procedures to upgrade the firmware on this particular model of DVR.
2.
Note: In order to completely remove all CMT permissions from the DVR itself, first
remove this DVR from all Group(s) via the Groups Tab. Refer to the Groups Tab
Section for additional information.
Return to the DVRs Tab and highlight the existing DVR.
3.
4.
Click on the Delete DVR button.
Select the Yes Button to confirm this deletion.
Dedicated Micros ©2008
13
CMT User Guide
5.
Click OK to close the notification message.
6.
Deleting a DVR removes the DVR from the CMT database but does not change
anything on the unit itself consequently a transaction will not be queued in the
Update DVR Tab.
Batch Time Sync
The DVRs in the CMT database can be time synced to a Network Time Protocol (NTP) Server’s
clock. NTP is a protocol designed to synchronize the clocks of computers over a network. However,
the time zones will not be changed; hence if a DVR unit is set to use CST and the NTP Server is set
to EST the DVR unit will be synchronized to the NTP Server but the time zone offset will be kept.
Note: The NTP Server can only be set after a CMT admin logs into CMT; hence it will not display
on the Options tab until a CMT admin logs in.
1.
2.
14
Click on the Options Tab.
Enter the NTP Server Machine Name in the New Server text field in the NTP
Server section.
Figure 11 Options Tab - Set NTP Server
3.
Click on the DVRs Tab.
4.
5.
Click on the Batch Time Sync button.
After the progress bar completes, the DVRs in the CMT database should all be
synced to the NTP Server clock
Dedicated Micros ©2008
A range of IP addresses can be scanned and imported to CMT using the web port and login
credentials. This feature scans the range of IP Addresses defined by the user, and returns all web
servers found within that range.
1.
2.
3.
4.
5.
6.
CMT User Guide
DVR Unit Scan
Figure 12 VRs Tab - Unit Scan
Click on the DVRs Tab.
Enter in a range of IP Addresses to scan in the From: and To: fields.
Enter the login credentials and web port number.
The plus sign can be used to edit the Scan timeout.
Figure 13 Unit Scan – Scanning Options
Click the Scan button
.
After the process completes, the “Done!” message will be displayed and the
number of web servers found and the number of confirmed DVRs found will shown.
Dedicated Micros ©2008
Figure 14 Unit Scan – Scan Results
15
CMT User Guide
16
7.
8.
If there are any web servers found during the Scan and the user wishes to import
them to CMT, press the Proceed to Import button; otherwise press the Cancel
button.
Pressing the Proceed to Import button brings up the Import Units dialog. This is
the same dialog that pops up when the user selects the CSV Import button in the
DVRs tab; therefore, the same steps can be followed for both processes. Refer to
the Add a DVR – Batch Import section
Modify DVR Names
1.
2.
Highlight an existing DVR
Type directly over the existing Login and/or Password
3.
Click on the Save DVR Button
Dedicated Micros ©2008
Warning: Prior to changing credentials for a DVR, the process of adding the DVR to CMT must be complete. This includes sending the queued transaction to the DVR. Refer to the Add a DVR – Individually Section.
Type
Default
Login
Web/CGI
FTP
dm
dmftp
Telnet
Serial
Video FTP
Dedicated Micros ©2008
dm
Dm
Dm
Default
Password
web
General
Purpose
To access
configuration
web pages on
DVR
CMT
All CMT Admins will use this
id/password if prompted for an
id on the CMT Configure Tab or
when attempting to view video
via NetVu ObserVer or any
Viewer.
The Centralized Management
Tool uses this login to access
the DVR and issue CGI Commands.
CMT uses this login to ‘put’ and
‘get’ files during a Firmware Upgrade, Configuration Restore,
CMT Permission changes, and
while adding the DVR to CMT.
ftp
Read/Write
FTP access
for all drives
on DVR
telnet
Telnet access
to all drives on
DVR
serial
Serial Connection access to DVR
when direct
access is
required.
The Centralized Management
Tool does not use the Serial
Login for any particular process
othethan to store this information in the CMT database.
c:\video
The Centralized Management
Tool does not use the Video
FTP Login for any particular
process other than to store this
information in the CMT database. NOTE: This login cannot
be displayed or altered via this
release of CMT.
ftp
CMT User Guide
DVR Credentials
The Centralized Management
Tool uses this login for a Telnet
session with the DVR that is
required during the Firmware
Upgrade/Downgrade process.
17
CMT User Guide
Change Credentials
1.
2.
Highlight an existing DVR.
Type directly over the existing Login and/or Password.
3.
4.
Click on the Save DVR button
.
The following message will be displayed, once the save to the CMT database is
complete .
.
5.
In order to send the new System Login/Password to the DVR, route to the Update
DVR Tab and click on the Update DVR(s) Tab.
Important: The DVR is automatically reset by CMT during this change. Refer to the Update DVRs Tab Section for further details
Change Web Ports
NOTE: Changing a DVR’s web port only changes how CMT communicates with the DVR, it does
not actually change the web port settings on the DVR. To enable a secondary web port on
the unit itself, the user must change this setting under the unit’s Network – Network Settings
configuration web page via the “Configure DVR” tab.
1.
2.
Highlight an existing DVR.
Type directly over the existing Web Port.
3.
4.
Click on the Save DVR button
.
The following message will be displayed, once the save to the CMT database is
complete
.
Unlocking a DVR
If the CMT server unexpectedly restarts while performing an operation on a DVR or a set of DVRs,
some of the DVRs could be left in a locked position and be unusable throughout CMT until it is
unlocked. In order to unlock a DVR, the user must “Poll” the unit via the DVR tab. This can be done
by navigating to the DVR tab, highlighting the DVR unit in the DVR list box and clicking the Poll DVR
18
Dedicated Micros ©2008
Poll DVR Button
The purpose of the Poll DVR button is to poll the unit to ensure that it is online or to poll the unit
to unlock it in CMT if the proceeding/pending process has been completed. To refresh the unit’s
information to ensure that the most current information for this DVR is being displayed in CMT, rightclick on the unit in the DVR list and click the Refresh menu item. The Unit Information, Software
Information, and System Logins/Passwords are all updated.
1.
Highlight an existing DVR.
2.
Click on the Poll DVR button
or right-click on an
existing DVR unit to bring up a context menu and click on the Poll menu option or
the Refresh menu option.
The progress bar will be displayed while CMT is updating this Tab.
3.
CMT User Guide
button. If the unit is still being worked, the user will be notified of the proceeding/pending process
and the unit will remain locked. The unit will also remain locked if the unit is unreachable; however,
if CMT can poll the unit and the unit is not being worked, then CMT will unlock the DVR. The user
will then regain access to that DVR in CMT.
Groups Tab
This Tab is available to all CMT Administrators and to any DVR Administrator that has been given
this level of authority.
The Groups Tab provides the ability to gather DVRs together primarily for three purposes:
1.
Organize DVRs so they can be distributed amongst the DVR Administrators for
management.
2.
Control viewing permissions by DVR and by Camera for Viewing Type Users.
3.
Remote Set/Unset/Override modes of operation, i.e. Day, Night, or Weekend
Modes.
A DVR can be in multiple Groups. A DVR Administrator is initially associated with a single DVR
Group that will contain all the DVRs they will manage. The DVR Administrator then has the ability to
create multiple sub-groups in order to create different combinations of viewing permissions for their
View Only Users.
Important: In order for the DVR Administrator to have ownership of their Sub-Groups, the DVR Administrator must create them. Only the original Group is created and assigned to the DVR Administrator by the CMT Administrator. If the DVR Administrator moves DVRs from his main group into his subgroup, the DVR administrator will lose access to the DVRs from his main group. The DVR administrator will still be able to access the DVRs from his subgroup as long as the DVRs remain in his subgroup; however, when the DVRs are removed from the subgroup the DVR administrator loses total access to those DVRs. Only a CMT System Administrator can move the DVRs back into the DVR administrator’s main group; thus giving the DVR administrator access to those DVRs again.
Any Group created on this Tab will also appear on the Users Tab. Refer to the Users Tab Section for
further details.
Below is an example of a small Group Structure. It is important to note that the CMT Administrator is
the only role that is not associated with a Group in CMT. The CMT Administrator has access to: all
Groups, all Viewing Users, and all DVR Administrators in CMT.
Dedicated Micros ©2008
19
CMT User Guide
CMT Administrator’s View of the Groups Tab
Below is a CMT Administrator’s vision of the Groups Tab. Consequently all the Groups (listed in
alphabetical order) and all the DVRs are displayed.
Figure 15 CMT Administrator’s View of Groups Tab
DVR Administrator’s View of the Groups Tab (DVR Admin East)
Below is the display of the Groups Tab for the DVR Administrator East. Consequently only their
original Group and the Sub-Groups that this DVR Administrator created are displayed. The original
group is always listed at the top of the list followed by all sub-groups.
Note: All DVRs in the Assigned DVR(s) box are contained in this Group ‘DVR Admin East.’ The
DVR that is highlighted in the DVR Camera Settings Section has all Cameras turned ‘ON’
for both Live and Recorded Video. Consequently any userid that is associated with the DVR
Admin East Group will be able to use NetVu ObserVer to view video for all cameras on DVR
Dorms East (192.168.4.25). Refer to the Users Tab Section for userid association.
20
Dedicated Micros ©2008
CMT User Guide
Figure 16 DVR Administrator’s View of Groups Tab
Create a Group
1.
Click on the New Button
2.
Type in a Group Name
3.
Click on the Save Button
4.
Move DVRs from the Available DVR(s) Box to the Assigned DVR(s) Box via one of
the following methods:
a. Highlight one or more DVR(s) in the Available DVR(s) Box and click on the
Single Arrow Right to move all highlighted DVR(s) into the Group.
b. Click on the Double Arrow Key Right to move all DVRs into the Group
5.
Assign Camera Permissions for each DVR in this Group.
a. Highlight each DVR in the DVR Camera Settings Box to view the current
Camera Settings. Note: The default is for all cameras to be ‘ON’ for both Live
and Recorded Video. This would allow viewing of both pre-recorded and live
video for any user associated with this Group.
b. To turn OFF all Camera Settings for this DVR, press the None Button for Live
Cams and/or Replay Cams.
c. To turn ON all Camera Settings for this DVR, press the All Button for Live
and/or Replay Cams.
Dedicated Micros ©2008
21
CMT User Guide
d. To turn ON or OFF a single Camera, simply click on the check box with the
appropriate Camera Number.
Note: The number of Camera Check Boxes that are available in CMT are dependent upon the
number of cameras that the DVR can accommodate.
e. When all camera settings are complete, press the Save Settings Button to
save the camera settings for this DVR.
Repeat steps 5a through 5e for each DVR in this Group until all Camera
Settings are complete.
g. The Cancel Changes Button will ensure that the camera changes made for a
f.
particular DVR are not saved.
Note: A transaction will be queued to the Update DVR Tab when a new group is added in CMT.
Since users will need to be associated to the new group, it is best to wait until all changes
are finished prior to updating the DVR. Refer to the Users Tab and Update DVR Tab
Sections.
Delete a Group
1.
2.
Select the Group Name via the Drop Down List.
All the information associated with this Group will appear on the screen.
3.
4.
Click on the Delete Button.
When the warning message is displayed, click on YES.
5.
There may be pending transactions queued in the Update DVR Tab, if DVRs were
included in this Group.
In order to complete the process, route to the Update DVR Tab and press the
Update DVR(s) Button. Refer to the Update DVRs Tab Section for further details.
6.
Change an existing Group
1.
2.
22
Edit Group Name:
a. Select an existing Group from the dropdown list
b. The screen will be populated with all the information for this Group
c. Change the name by typing directly over the existing Group Name combo box,
and click on the Save button.
d. There is no transaction queued for this type of change to the Update DVR Tab.
Edit Group DVRs:
a. Select an existing Group from the dropdown list,
b. Move DVRs from Available to Assigned via the Arrow Keys.
Dedicated Micros ©2008
3.
d. Click on the Save Settings Button.
e. A transaction will be queued to the Update DVRs Tab and therefore sending
this transaction to the DVR to complete the process is required. Refer to the
Update DVR Tab for additional information.
CMT User Guide
c. This type of change is automatically saved and does not require an actual
save by the Administrator.
d. A transaction will be queued to the Update DVRs Tab and therefore sending
this transaction to the DVR to complete the process is required. Refer to the
Update DVR Tab for additional information.
Edit a Group’s Viewing Permissions:
a. Select an existing Group from the dropdown list
b. Highlight a DVR in the DVR Camera Settings Section
c. Check/uncheck Cameras to allow or disallow Viewing Permissions
Remote Set/Unset/Override
The remote set/unset/override webpage of the DVR unit is implemented in CMT such that Groups of
DVRs can be remotely forced to change their record and alarm settings to operate in Day, Night, or
Weekend Modes for a defined period of time.
Important: This is not a supported feature for the SD series therefore this will not force any SD DVRs in the group to a particular schedule override.
1.
2.
Select an existing Group from the dropdown list.
Select an override duration time in minutes (the time that the unit will operate at the
forced operating mode).
3.
Press the Force DAY Mode button to force the DVRs in the selected group to
change the record and alarm settings to operate in DAY mode for the override
duration period.
-OR
Press the Force NIGHT Mode button to force the DVRs in the selected group to
change the record and alarm settings to operate in NIGHT mode for the override
duration period.
-OR
Press the Force WEEKEND Mode button to force the DVRs in the selected group
to change the record and alarm settings to operate in WEEKEND mode for the
override duration period.
4.
When the process completes the “Group Updated” message is displayed.
Figure 17 Group Tab - emote Set/Unset/Override
Dedicated Micros ©2008
23
CMT User Guide
Users Tab
This Tab is available to all CMT Administrators and to any DVR Administrator that have been given
this level of authority.
The purpose of this Tab is to create, edit, or delete the three types of users (CMT Administrators,
DVR Administrators, and Viewing Users).
Users can be added to CMT two ways:
1.
2.
Individual Users can be created in CMT
Multiple Users can be imported into CMT from a CSV file
Create a CMT Administrator
Only CMT Administrators have the authority to create new CMT Administrators. CMT Administrators
have access to all Tabs, Users, DVRs, and Groups in CMT. Please note that CMT Administrators
can view video on all DVRs.
Important The CMT Administrator (super user) account cannot be deleted nor can it be assigned to a specific Group. CMT Administrators created can be deleted and/or have their Administrator permissions revoked. All CMT System Administrators will have the Group
assignment option disabled since they have access to all Groups.
1.
Click on the New Button
2.
Complete all of the following information:
a. First Name and Last Name (required fields)
b. Phone and Extension (optional fields)
c. Alternate Phone and Extension (optional fields)
d. Login and Password to access CMT (required fields). Reference Addendum #A
for allowable characters in the Login and Password fields
e. Email Address (optional field)
f. Notes (optional field)
g. DVR Group Section – Disregard this field as CMT Administrators do not have
Group assignments and therefore None will always be the default for this type
of user.
h. CMT Permissions Section– Check only the System Administrator Check Box
and all other CMT Permissions will automatically be checked.
3.
4.
Click on the Save Button
The new CMT Administrator will be added to the list of users at the section towards
the top of this screen. This display can be sorted by clicking on the following
column headings: Last Name, First Name or Group Name.
A transaction will be sent to the Update DVR queue for this action to add this
CMT Administrator to all DVRs. Refer to the Update DVR Section for additional
information.
5.
24
Dedicated Micros ©2008
DVR Administrators have access to the Tabs, Users, DVRs, and Groups that are granted to them
by the CMT Administrator. DVR Administrators cannot create an Administrator with a higher level of
authority than their own.
CMT User Guide
Create a DVR Administrator
Figure 18 Users Tab - Create CMT Administrator
1.
2.
Click on the New Button
Complete all of the following information:
a. First Name and Last Name (required fields)
b. Phone and Extension (optional fields)
c. Alternate Phone and Extension (optional fields)
d. Login and Password to access CMT (required fields). Reference Addendum #A
for allowable characters in the Login and Password fields
e. Email Address (optional field)
f. Notes (optional field)
g. DVR Group Section – A Group must be selected for the DVR Administrator.
This Group should contain all the DVRs that this Administrator will manage.
It is up to the DVR Administrator to create Sub-Groups from this original
Group for their Viewing Users. Refer to the Groups Tab Section for additional
information.
h. CMT Permissions Section – Check only the CMT Permissions that this DVR
Administrator should be allowed to access. Each Check Box represents a Tab
in CMT consequently if the check box is selected this DVR Administrator will be
able to access the corresponding CMT Tab.
Note: Access to the Update DVR Tab is automatically granted to all DVR Administrators that have
permissions to the Users or Groups Tabs. The DVRs Tab CMT Permission is only allowable
to CMT Administrators.
3.
Click on the Save Button
Dedicated Micros ©2008
25
CMT User Guide
4.
5.
The new DVR Administrator will be added to the list of users at the section towards
the top of this screen. This display can be sorted by clicking on the following
column headings: Last Name, First Name or Group Name.
A transaction will be sent to the Update DVR queue for this action. Refer to the
Update DVR Section for additional information.
Create a Viewing User
Viewing Users do not have access to CMT. Viewing Users have access to Video via the NetVu
Observer Application and other Viewing Applications. CMT Administrators and DVR Administrators
can create Viewing Users.
Figure 19 Users Tab – Create DVR Administrator
26
1.
2.
Click on the New Button
Complete all of the following information:
a. First Name and Last Name (required fields)
b. Phone and Extension (optional fields)
c. Alternate Phone and Extension (optional fields)
d. Login and Password to access CMT (required fields). Reference Addendum #A
for allowable characters in the Login and Password fields
e. Email Address (optional field)
f. Notes (optional field)
g. DVR Group Section – A Group must be selected for the Viewing User. This
Group should contain the DVRs this user will use to video view. Refer to the
Groups Tab Section for additional information.
h. CMT Permissions Section – This section should be unchecked for all CMT
Permissions for Viewing Users.
3.
Click on the Save Button
Dedicated Micros ©2008
5.
6.
The new Viewing User will be added to the list of users at the section towards the
top of this screen. This display can be sorted by clicking on the following column
headings: Last Name, First Name or Group Name.
A transaction will be sent to the Update DVR queue for this action. Refer to the
Update DVR Section for additional information.
Viewing Users do not have access to CMT.
Deleting Administrators or Users from CMT
CMT User Guide
4.
Figure 20 Users Tab - Create a Viewing User
1.
Highlight the record at the top of the screen to be deleted
2.
3.
Click on the Delete Button
Click on YES, in the displayed message, to confirm the deletion
4.
The record will be deleted from the CMT database, removed from the list at the top
of the screen, and queued to the Update DVR Tab to remove this record from the
DVR. Refer to the Update DVR Tab for additional information.
Dedicated Micros ©2008
27
CMT User Guide
Editing Records on the Users Tab
1.
2.
3.
4.
Highlight the record at the top of the screen to be edited.
All the information that pertains to this Administrator or Viewing User will be
displayed.
Type directly over the existing data to make a change to the Name, Phone, Login,
Password, Email or Notes.
Select a new Group in the drop down list to change Group Assignment. When
removing a user from a DVR Administrator’s group, the following prompt will be
displayed notifying the user of the change and waits for confirmation.
5.
Check or Uncheck the CMT Permissions to add or remove Tab access
6.
7.
Click on the ‘Save’ button
to save these changes to the database.
Group Assignment and Login or Password changes will queue a transaction to
the Update DVR Tab to be submitted to the DVR(s) refer to the Update DVR Tab
Section for additional information.
Batch Import Users
Users can be added simultaneously to CMT by creating a CSV file and importing it into CMT by
using the Import Users button on the Users Tab. For more information on CSV files, refer to the
Creating a Batch User Import CSV File Section in Addendum B.
1.
2.
28
Press the Import Users button.
Navigate to the .CSV file to import and press the Open button.
Dedicated Micros ©2008
CMT User Guide
Figure 21 Users Tab – Import Users
3.
Change user information by highlighting an existing user in the Import Users dialog
and typing over the current information. Press the Save button
save the changes.
to
.
4.
Select users to import or press the Check All button
5.
6.
.
Click the Import Checked button
If the import is successful, the “Imported!” is displayed. If a user has a user name
as an existing user in the CMT database or another user in the CSV file, the
message “Username is already taken” is displayed.
Dedicated Micros ©2008
29
CMT User Guide
Figure 22 Users Tab – Import Users Messages
7.
8.
30
Click the Done button
to exit the Import Users screen.
Each User that was just imported will need to be associated with a Group. The
importation process does not take care of group association.
Dedicated Micros ©2008
This Tab is available to all CMT Administrators and to any DVR Administrator that has either the
User or Groups CMT Permissions. CMT automatically allows access to the Update DVR Tab if either
the Users or Groups authority is granted via the Users Tab.
The purpose of this Tab is to house and transmit CMT transactions to the applicable DVRs. This
allows the Administrator to determine when the transactions are actually sent to the DVR(s). The
table below lists the CMT Transactions that are queued to the Update DVR Tab as well as those that
will automatically trigger a DVR Reset.
Important: TransVu (non Chipwrights) requires a restart as part of the credential update process. All other DVRs follow the rules outlined in the table below (Table of Events).
Tab
Event
Update DVR Transaction
DVR Reset
Login Tab
All Events
No
No
DVRs Tab
Add DVR
Yes
Yes
DVRs Tab
Delete DVR
No
No
DVRs Tab
Change System Ids or Pass-
Yes
Yes
No
Yes
Yes
Yes
CMT User Guide
Update DVRs Tab
words
DVRs Tab
Remove Credentials (DVR not in
CMT DB)
DVRs Tab
Remove Credentials (DVR in
CMT DB)
DVRs Tab
CSV Import
Yes
Yes
DVRs Tab
Unit Scan*
No
No
DVRs Tab
Batch Time Sync
No
No
Group Tab
Add Group
Yes
No
Group Tab
Delete Group
Yes
No
Group Tab
Edit Group’s Name
No
No
Group Tab
Edit Group’s DVRs
Yes
No
Group Tab
Edit Group Viewing Permissions
Yes
No
(Cameras)
Group Tab
Remote Set/Unset/Override
No
No
User Tab
Create CMT Adminstration
Yes
No
User Tab
Create DVR Administrator or
Yes
Mo
Viewing Users
User Tab
Delete CMT Administrator
Yes
No
User Tab
Delete DVR Administrators or
Yes
No
Yes
No
Viewing Users
User Tabs
Import Users
Dedicated Micros ©2008
31
CMT User Guide
User Tab
Editing Records for Group
Yes
No
Copy
No
Yes
Restore
No
Yes
All Events
No
Depends On
Firmware Tab
All Events
No
Yes
Audit Tab
All Events
No
No
Options Tab
Set CMT Server
No
No
Options Tab
Set NTP Server
No
No
Association or Login Password
Copy/Restore
Tab
Copy/Restore
Tab
Configuration
Tab
*
Request
The Unit Scan itself does not produce an Update transaction or a DVR Reset. However,
the Unit Scan has the ability to import DVRs which does produce an update transaction and
a DVR Reset.
Update DVRs Screen
For all transactions where a Yes appears in the Update DVR Transaction Column in the previous
table, it will be necessary to ensure that the transactions are sent to the DVR(s) by clicking on the
Update DVR(s) Button
.
Important: Credential Updates are required before any changes take effect.
Scheduling an Update Window
Credential updates can also be scheduled to run during a specified update window by clicking on the
Schedule Update button.
If the DVR is unavailable or off-line during the
update window it will remain in the process queue until the next scheduled windowed opportunity.
Important: When scheduling credential updates it is important to remember that the update time window is based on the CMT Server’s time zone, not the CMT client or DVR’s time zone.
32
Dedicated Micros ©2008
CMT User Guide
Figure 23 Update DVRs Tab
Important: DVR Administrators will only see transactions that pertain to their DVRs on this Tab while CMT Administrators will be able to view and update all transactions.
Viewing Update Status and additional information
DVRs that are pending, processing, or have already completed credential updates will remain in the
status window until the CMT Administrator or DVR Administrator clears the list by selecting the Clear
Completed Updates button.
Right clicking on the DVR in the list and selecting Update Details will open the Credential Update
window. This will display useful update information including the scheduled update window, which
user scheduled or queued the update to process, and any additional information pertaining to the
credential update.
Dedicated Micros ©2008
33
CMT User Guide
Cancelling a Scheduled Update
To cancel any unprocessed updates (You might do this if you need to change the upgrade window):
1.
2.
3.
4.
Right click on the DVR in the status window and chose ‘Update Details’.
Press ‘Cancel Process’.
Press ‘Yes’ to confirm cancelation.
Press ‘Ok’ to acknowledge the credential update has been cancelled.
Figure 23 Cancel Progress
Important: If the update is already in progress then it cannot be cancelled.
34
Dedicated Micros ©2008
This Tab is available to all CMT Administrators and to any DVR Administrator that has been given
this level of authority, Refer to ‘Users Tab’ for more information on granting permissions.
CMT User Guide
Configure DVR Tab
Figure 24 Configure DVR Tab
Only the DVRs that are within a DVR Administrators original DVR Group will be displayed on this
Tab. CMT Administrators will have access to all DVRs via the Configure DVR Tab.
The purpose of this Tab is to allow access to the Configuration Web Pages for each DVR in order
to make any necessary changes to the Video Standard, Time Zone, Camera Settings, VMD, Alarms
Zones, Network Settings, etc.
Important: SD DVRs will have alternate web pages where the configuration notes below may not apply. Please refer to the specific DVR’s user guide for web page configuration details.
1.
Any changes made via this Tab should be saved by clicking on this button
before leaving the page (does not apply to SD).
2.
Any changes that necessitate a DVR Reset will require that this button
pressed prior to leaving the Configure Web Pages for this DVR
3.
For Help detailed to a particular Configuration Feature, click on the following button
is
(does not apply to SD).
Dedicated Micros ©2008
35
CMT User Guide
4.
When all Configure changes are complete, it is a good practice to route to the
Copy/Restore Tab and create a Back-Up of the DVR’s Configuration in the CMT
Database. Refer to the Copy/Restore Tab Section for more information.
Important: If prompted for a login while in the Configure DVR Tab, the CMT Administrators will use
the Web Login/Password that is located on the DVRs Tab. DVR Administrators will use
the CMT Login/Password they use to access CMT.
•
The following areas are not accessible in this CMT Release via the Configure Tab
due to the ActiveX Browser Settings:
• Camera and Record Setup – Thumbnail Images
• VMD – Walk Test Feature
• Live Web Page
• Demo Web Page
• If it is necessary to access the above listed options, change the Browser
Settings to JAVA Applet and press the Save Button on the Main Set-Up Page
of the Configure DVR Tab. CMT automatically resets the Browser Settings to
Plugin/ActiveX for each session which allows Camera Title changes on the
Configure DVR Tab. Refer to the Trouble Shooting Section at the end of the
Guide for further information.
Warning: The User Accounts Configuration Web Page has been blocked from the Configuration
Tab as this feature will conflict with CMT. This feature should not be used.
•
36
Only CMT Administrators have access to the Configuration Web Pages outside
of CMT, via the Web Login and Password located on the DVRs Tab. It is
recommended that all Configuration Web Page changes be made within CMT via
the Configure DVR Tab.
Dedicated Micros ©2008
This Tab is available to all CMT Administrators and to any DVR Administrator that has been given
this level of authority. CMT Administrators are able to access all DVRs on this Tab and DVR
Administrators are able to access the DVRs that are contained within their original group.
The purpose of this Tab is to Back-up the Configuration of DVRs; to Restore the Configuration of a
DVR, and to Copy the Configuration of a DVR to one or more DVRs.
Automatic Copy Restore Point
The two scenarios in which CMT will automatically generate a copy of a DVRs Configuration are:
1.
2.
When a DVR is added to CMT a Restore Point will automatically be created. This
Pre-CMT Backup of the DVR’s Configuration will be labeled accordingly in the
Notes Column of the Copy/Restore Tab.
When a Firmware upgrade or downgrade is requested, CMT will automatically
create a Back-Up Point prior to beginning the Firmware process. That Automatic
Copy/Restore Point will be held on the Copy/Restore Tab and labeled accordingly
in the Notes Column so it can be easily identified. Refer to the Firmware Tab for
additional information.
CMT User Guide
Copy/Restore Tab
Manual Back-UP of Current Configuration
A manual Copy, Restore, or Back-up can also be requested by an Administrator at any time and
is identified by the Comments entered by the Administrator. All Comments are visible in the Notes
Column.
Figure 25 Copy/Restore Tab
Create a Back-Up Point
The purpose of creating a Back-Up Point is to capture and preserve the Configuration on a particular
DVR. The Configuration includes: Video Standard, Date Format, Browser Settings, Language, Time
Zone, Camera Settings, Alarms/VMD, Time Zones, and System Settings.
Note: The DVR is not RESET but will be locked during this process.
1.
Select a DVR by highlighting it on the left side of the screen
Dedicated Micros ©2008
37
CMT User Guide
2.
3.
4.
5.
6.
Click on the Create Backup Point Button
When the comment box opens towards the top of the screen, enter text to describe
the purpose of this Backup. This is optional and can be ignored but is always a
good practice as it will help to identify this particular record for future reference.
Click on the Start Backup Button
A Progress Bar will be displayed at the top of the screen while the Backup is
underway.
Move the vertical scroll bar down to view the new record located at the bottom of
the list
Delete a Back-Up Point
1.
2.
Highlight an existing DVR.
Highlight an existing backup point.
Figure 26 Copy/Restore Tab – Delete backup point
3.
4.
38
Click the Delete button.
Confirm the Deletion by pressing Yes to the following message.
Dedicated Micros ©2008
The purpose of Restoring is to overlay the current Configuration of a DVR. The Configuration
includes: Video Standard, Date Format, Browser Settings, Language, Time Zone, Camera Settings,
Alarms/VMD, and System Settings.
Important: The DVR is always automatically RESET during the Restore process consequently
a Lock is placed on the DVR during the Restore process. The Lock will prevent any
changes, on this unit, that might interfere with the Restore.
CMT User Guide
Restore to DVR
Note: The Web Port Setting may be overwritten when restoring configurations to DVRs.
1.
2.
Select a DVR by highlighting it on the left side of the screen
Click on the Configuration that will be used (any automatic or manually created
Restore Point).
3.
Click on the Restore to DVR Button
4.
5.
Click on the Commit Button
A Progress Bar will appear at the bottom of the screen.
6.
The following message will be displayed. Click the OK Button to continue.
Dedicated Micros ©2008
39
CMT User Guide
7.
8.
The DVR will be locked (indicated by the red icon
) until this process is
complete. The Lock icon will be visible on all Tabs where this DVR is displayed.
When the Lock is lifted from the DVR, the Restore Process is complete and this
DVR will have the new Configuration.
Copy to Other DVR(s)
This option allows a single Configuration to be propagated to one or many DVRs.
Important: In the current CMT release, Configurations can only be copied to ‘like’ model DVRs with
identical Firmware Versions. Consequently a Configuration cannot be copied from a
BX2 to a New DS2 nor can the Configuration of a New DS2 V4.3 (005) be copied to a
New DS2 V4.3 (001).
40
1.
2.
Select a DVR by highlighting it on the left side of the screen
Click on the Configuration that will be used (any automatic or manually created
Restore Point).
3.
4.
Click on the Copy to Other DVR(s) Button
Click on each individual check box or the Select All Button to identify the DVRs that
will receive this Configuration
5.
Click on the Push Configuration Button to begin the process
6.
Click on the Commit Button
7.
8.
A Progress Bar will appear at the bottom of the screen.
All DVRs selected in the Push Configuration Section above will be locked in CMT
until the process is complete.
Dedicated Micros ©2008
CMT User Guide
9.
When the Lock is lifted from the DVR(s), the Copy Process is complete and the
selected DVR(s) will have the new Configuration.
Dedicated Micros ©2008
41
CMT User Guide
Firmware Tab
This Tab is available to all CMT Administrators and to any DVR Administrator that has been given
this level of authority. CMT Administrators are able to access all DVRs on this Tab and DVR
Administrators are able to access the DVRs that are contained within their original group.
The purpose of this Tab is to upgrade or downgrade the embedded Firmware on one or many DVRs.
Important: In order to complete the Firmware Upgrade/Downgrade process, CMT will automatically
RESET the DVR(s).
CMT will also lock the DVR(s) until the Firmware process is concluded. Therefore each DVR that is
involved will be represented with a red icon throughout CMT and no changes will be accepted until
CMT has lifted the Lock.
In this version of CMT, each model of DVR uses a unique Firmware Package. Consequently a
NetVu BX2 Firmware Package, for example, can only be used to upgrade/downgrade NetVu BX2
models.
Obtain the Firmware Packages from Dedicated Micros
When a new Firmware Package is available from Dedicated Micros, it will be accessible via the DM
CMT Portal. As a member of the CMT Portal, you will be notified when new updates are available.
For more information, contact Dedicated Micros support at 877-367-8778 or ussupport@dmicros.
com.
Important: Only CMT Ready Firmware Packages can be imported into CMT. Consequently the
Firmware Packages distributed for general use will not be compatible with CMT.
Add a Firmware Package to CMT
This option allows a new Firmware Package to be imported into CMT. Once this step is completed
this particular version of Firmware will be available to use to upgrade/downgrade DVR(s) via CMT.
42
1.
2.
Click on the Browse Button
Route to the location of the Firmware Packages. Highlight the package and click on
the Open Button.
3.
Click on the Send Button to begin to import this package into the CMT database.
The following message will be displayed while the Firmware is being downloaded.
Dedicated Micros ©2008
Once the download is complete, the new Firmware Package will be listed in the
section in the middle of the screen. It may be necessary to use the vertical scroll
bar in order to locate the new package at the bottom of the list.
5.
This package is now available to be down/up loaded to DVRs and will remain in the
CMT Database.
Important: If an attempt is made to import a Firmware Package with an identical name as an
existing CMT Firmware Package, the following error message will be displayed to
prevent the duplicate import.
CMT User Guide
4.
Delete a Firmware Package from CMT
Note: The ‘Delete’ button will be disabled if there are any pending/queued upgrades. In order
to delete a firmware package you must allow the upgrade to complete or cancel ALL
unprocessed upgrades.
This option provides the ability to remove a Firmware Package from the CMT database. In the event
that a Firmware Version is no longer needed or if a defective package was imported into CMT, it can
be erased from CMT. This allows for a new Firmware Package, with the same name, to be imported
into CMT or allows an Administrator to remove the clutter from the screen.
1.
Highlight the Firmware Package to be deleted.
2.
3.
Click on the Delete Button
Click on Yes when the confirmation message is displayed and the Firmware
Package will be removed from the list and the CMT database.
Dedicated Micros ©2008
43
CMT User Guide
Upgrade/Downgrade Firmware
CMT offers the ability to change the embedded firmware version on one or more DVRs via the
Firmware Tab. Only the DVRs that are accessible to this DVR Administrator (i.e., the DVRs in
the original group assigned to this Administrator) will be displayed on this Tab. As always, CMT
Administrators have access to all DVRs in CMT via the Firmware Tab.
CMT has two options for upgrading the DVR firmware:
1.
On demand (Upgrade Now)
2.
Scheduling an Upgrade Window (Schedule Upgrade)
Important: In this version of CMT, each model DVR uses a unique Firmware Package.
Figure 27 Firmware Tab
1.
2.
3.
Highlight the Firmware Package in the section titled ‘Please Choose a Firmware
Package’
Only the DVRs that are applicable will be displayed in the lower section (i.e., like
model units).
Select the DVRs to be upgraded by one of the following methods:
a. Highlight a single DVR by clicking on it.
b. Highlight more than one DVR by holding down the Ctrl Key and clicking on the
DVR Name
c. Highlight all DVRs listed by clicking on the Select All Button
4.
5.
44
Click on the Update DVR(s) Button to begin the process
In Figure 28, the warning message is displayed that notifies the Administrator
about the deletion of the Zip Files from the DVR and requests confirmation prior
to beginning the process. Click on the OK Button to continue or Cancel to stop the
Firmware Process from starting.
6.
In Figure 28, the Firmware Process has begun. The Upgrade Status and the Step
Progress and Overall Progress Bars will continue to track the process and indicate
when the Firmware process is complete.
Important: The DVR will be locked until the Firmware Process is complete. The Lock will be
represented by a red icon next to the unit throughout CMT. This prevents any action
from being conducted on this unit that may interfere with the Firmware Process.
Dedicated Micros ©2008
High DVR record rates may prolong the upgrade process. The firmware upgrades/
downgrades can be processed faster if the user sets the “USEBOOTLOADER” flag
equal to “1” inside the C:\Program Files\Dedicated Micros\CMT\Server\serv.ini file on
the CMT Server Machine before starting the CMT Server. Doing so will cause CMT
to restart each DVR in engineering Bootloader mode after uploading the upgrade files
to the unit. When the DVR is in Bootloader mode, it will not record video and the web
server will not be available.
The SD series will be excluded from using the Engineering Bootloader option.
CMT User Guide
Note: Figure 28 Update Firmware Warning Message
Figure 29 Firmware Process is underway
Dedicated Micros ©2008
45
CMT User Guide
Scheduled Upgrades
Similar to scheduling a credential update; DVR firmware upgrades can be scheduled to run during a
specified timeframe by clicking on the Schedule Upgrade button.
If the DVR
is offline during the upgrade window opportunity it will remain in the upgrade queue until the unit is
available again until the scheduled timeframe opens again.
Scheduling a Timeframe
Important: When scheduling firmware upgrades it is important to remember that the upgrade time window is based on the CMT Server’s time zone, not the CMT client or DVR’s time zone.
Because firmware upgrade times can range from as little as 10 minutes or up to 45 minutes it is
important to allow a long enough upgrade window needed to complete the upgrades required. DVRs
scheduled for a firmware upgrade will be queued and then upgraded consecutively.
Units that were unable to begin their upgrade during the requested timeframe will remain in the
queue until the scheduled window opens again.
Important: Upgrade times may vary depending on the DVR model and the upgrade options (with or without the pc application files - PCApps). Refer to the CMT User Notes document for additional details.
It is recommended to allow 1 hour increments per DVR scheduled to upgrade, however your DVR
upgrade times will vary:
Example:
Number of DVRs Scheduled
46
Estimated Time Needed to Complete
ALL Upgrades
1
45 Minutes
5
5 hours
10+
10+ hours
Dedicated Micros ©2008
DVRs that are pending, processing, or have already completed firmware upgrades will remain in
the Unit Upgrading / Waiting to Upgrade window until the CMT Administrator or DVR Administrator
select the Clear Completed button.
Right clicking on the DVR in the list and selecting Upgrade Details will open the Firmware Upgrade
window. This will display useful update information including the scheduled upgrade window, which
user made the request, and additional information pertaining to the firmware upgrade.
CMT User Guide
Viewing Upgrade Status or additional information
Cancelling a Scheduled Upgrade
To cancel any unprocessed upgrades (You might do this if you need to modify the upgrade window,
or decided to upgrade to a different version of the firmware):
1.
2.
3.
4.
Right click on the DVR in the status window and chose ‘Upgrade Details’.
Press ‘Cancel Process’.
Press ‘Yes’ to confirm cancelation.
Press ‘OK’ to acknowledge the firmware upgrade has been cancelled
Dedicated Micros ©2008
47
CMT User Guide
Audit Tab
This Tab is only available to CMT Administrators.
The purpose of this Tab is to allow CMT Administrators to review all CMT transactions including
both successful and failed events. The Audit Log can be reviewed on-line and exported to a comma
separated file (CSV). The CSV file can be opened using Notepad and will display the date/time
in a 12-hour clock format. Or the CSV file can be opened in Microsoft Excel and will display the
date/time in a 24-hour clock format.
Figure 30 Audit Tab – Last 2 Days Search
Last 2 Days Search/Export
This search will display all Audit Records for the current date and yesterday’s date.
1.
2.
3.
4.
48
Click on the Last 2 Days Button. (Note: When the Audit Tab is first displayed it will
default to a Last 2 Days Search automatically. Since the Custom Search and Last
2 Days Buttons are mutually exclusive, clicking on the Custom Search Button will
make the Last 2 Days Button available.)
No criterion is required for this type of search and all search fields will be ignored if
populated.
All records equal to the current date as well as the current date minus one will be
displayed.
Use the vertical and horizontal scroll bars to view all the information.
Dedicated Micros ©2008
CMT User Guide
Figure 31 Audit Tab - Custom Listing Search
Custom Listing Search/Export
This search will allow the CMT Administrator to narrow the search results in order to only access a
specific grouping of events. The search fields available can be used in combination or individually as
necessary.
1.
2.
Click on the Custom Listing Button.
Enter a Start Date by clicking on the down arrow to open the calendar and
selecting a date. Type in the start time using the following format HH:MM:SS.
3.
Enter an End Date by clicking on the down arrow to open the calendar and
selecting a date. Type in the end time using the following format HH:MM:SS.
4.
Click on the Search User Check Box and enter either the Login or the First/Last
Name of the CMT Administrator who generated the Event
a.
Refer to Figure 31 above: In the CMT Database being used for this example
‘mmarshall’ is the login for this DVR Administrator with a full name of ‘Misty
Marshall’ therefore entering either ‘mmarshall’ or ‘Misty Marshall’ in the Search
User Text Field will result in the same records being displayed.
.
Dedicated Micros ©2008
49
CMT User Guide
5.
Click on the Search Description Check Box to search on the Event Description.
This type of search allows one of the following methods to be selected:
a.
b.
Match Search Term Exactly – must be exact but is not case sensitive.
Search Term Starts Description – must begin with these letter(s) or word(s) and is
not case sensitive.
Search Term Can Be Anywhere – letters or words can be in beginning, middle, or
end and is not case sensitive.
i. Refer to Figure 21 above: The word ‘user’ can be found anywhere in the Event
Column.
Click on the Search Button begin the search and display the results. Use the
vertical and horizontal scroll bars to view all the information.
c.
6.
Search Results
1.
2.
3.
4.
Date-Time Column – Contains the Date and Time of the actual event
(12 hour clock)
User Name Column – First and Last Name of the Administrator that performed the
action
Event Column – The Event column contains the description of the action.
Sort – Click on the column headings to sort in either ascending or descending
order.
Export the Search Results
50
1.
These records can be exported by clicking on the Export Button.
2.
Select a location to save this file and enter a name for this file.
3.
Click on the Save Button
Dedicated Micros ©2008
Click the Yes Button to continue the save.
5.
Route to the location of the saved file and open the search results.
CMT User Guide
4.
Figure 32 Export Search Results
Dedicated Micros ©2008
51
CMT User Guide
Help Tab
The Help Tab provides an on-line tutorial of all CMT functions per Tab and is accessible to all
Administrators.
Use the vertical scroll bar to maneuver to the bottom of the text or click on a link in the Table of
Contents to route directly to a particular topic.
Note: The Serviced Components versions should be identical between the server and client to
prevent application errors. However, the overall Client and Server versions can be different
from each other but still operate without issue.
Figure 33 Help Tab
52
Dedicated Micros ©2008
Remove Credentials Feature.
The Remove Credentials button clears all permissions from a DVR. It can be used for two
scenarios:
1.
To clear all pre-existing permissions prior to actually adding a DVR to CMT.
2.
To remove all CMT permissions from a DVR that already exists in CMT.
Warning: After running the Remove Credentials feature, all permissions will be removed from the unit and therefore the unit is unprotected. It is imperative that the permissions be placed back on the unit by following all steps listed below.
What exactly does the Remove Credentials Button do?
a.
b.
c.
d.
e.
f.
CMT User Guide
Trouble Shooting Procedures
Locks the DVR.
Removes Webuser.ini and Users.ini files. (For some models, CMT replaces the
webuser.ini file with a default version of the file.*)
Removes the User.db file.
Resets the DVR. (When the DVR restarts it rebuilds the missing User.db file.)
Unlocks the DVR. (For Units already in CMT).
Places the DVR in the Update DVR Tab queue so that CMT will re-apply access
credentials to the unit. (For Units already in CMT).
* If FTP credentials are invalid, then CMT will be unable to upload the default webuser.ini file,
this may require you to update the DVR twice after removing the credentials.
Note: This process utilizes the Telnet Username/Password to complete successfully. If the
Telnet permissions are not correctly listed on the DVRs Tab, the following message will be
displayed. Re-enter the Telnet permissions and press the Remove Credentials button.
Remove Credentials – before adding a DVR to CMT.
1.
2.
Press the Remove Credentials button
located on
the DVRs Tab to clear all permissions on this unit.
The following message will be displayed to notify the Administrator of the process
and the fact that the DVR will be restarted. Press the Yes button to continue.
Dedicated Micros ©2008
53
CMT User Guide
3.
Once the Remove Credentials process is complete, the following message will be
displayed:
4.
Select ‘Yes’ to have CMT monitor the DVR to alert you when it has restarted. If you
click ‘Yes’ you’ll see a window like this:
Remove Credentials – Existing CMT DVR
If at any time it is necessary to removed all permissions defined to a DVR that is currently in CMT,
follow the procedures below:
1.
Press the Removed Credentials button
2,
Once the process is complete, it is necessary to restore the existing CMT permissions to this unit.
3,
Go to the Update DVR Tab and Update the DVR. This will restore the system passwords.To restore viewing user permissions you will need to Update again (see step 4).
4.
Click on the Groups Tab and remove the DVR from a group then add it back to that group.
This will queue a transaction to the Update DVR Tab containing all viewing permissions for this DVR. (You could also add it to a group that it was not a member of and then remove it, this also queues a transaction on the Update DVR Tab. Send this transaction to the unit at any time by clicking on the Update DVR(s) button to finish restoring your viewing permisions
the DVR.
.
Restore a Reformatted DVR
If a DVR were to require the hard drive to be reformatted for any reason, the following steps should
be followed in order to Restore the Configuration and ensure the Unit is once again recognized by
CMT.
Warning: These steps are only to be used in the scenario listed above and require a CMT Administrator level of authority.
54
1.
Consult the DVR Guide for procedures on reformatting the hard drive. After the unit is reformatted, follow the steps below:
2.
Once the Unit is back on-line, sign into CMT, click on the Firmware Tab, and upgrade the firmware on this DVR to the correct version.
Dedicated Micros ©2008
Once the Unit is back-on line, click on the Copy/Restore Tab. Highlight the Unit and the Restore Point that contains the correct Configuration and press the Restore to DVR button
4.
At this point both the firmware and the configuration have been restored to this DVR.
5.
To restore all permissions click on the DVRs Tab and make a change to any system id or password (i.e., Web, FTP, etc.) and click on the Save DVR button, reverse the change and once again press save. This will queue a transaction to the Update DVR Tab containing all permissions for this DVR. Since the change was made and reversed, no permissions will be altered in CMT. Send this transaction to the unit at any time by clicking on the Update DVR(s) button.
Dedicated Micros ©2008
CMT User Guide
3.
55
CMT User Guide
Trouble Shooting Table
Issue
Reason
Solution
CMT Client is locking up or
freezing at times
Microsoft .Net 1.1 Service
Pack 1 may not have been
installed.
This Service Pack is included
in both the Server Installation
Packages as well as the Client
Installation Packages. Be sure
to install this Service Pack and
try again.
DVR Administrator logs into
CMT and does not see any
User IDs, Groups, or DVRs on
ant tabs.
This DVR Administrator was
created without a Group association
Contact the CMT Administrator
and request a Group Assignment
Alert Message ‘Dongle: Missing or invalid server dongle,
error: 205”.
CMT did not detect a Dongle
when the Server and Client
started.
If this installation does not require a Dongle, then disregard
(five DVR demo version)
Alert Message “Dongle: Missing or invalid server dongle,
error: 603”
CMT detected an expired
Dongle when the Server and
Client were started
Upgrade the license dongle.
Dongle is not recognized.
Verify that the light is illuminated at the end of the Dongle.
To illuminated the Dongle
Light, reboot the CMT Server.
Options Tab: The CMT Server
was unable to create an
update request code.
A USB Dongle is not inserted
into the USB port of the CMT
Server Machine.
Insert the USB Dongle prior
to requesting the upgrade
request file.
Stop/Start the CMT Server
Service in the case where
the USB Dongle is not being
recognized.
56
Dedicated Micros ©2008
CMT Server is not up and
running or the Server has not
correctly been defined to the
Client.
Close the CMT Client, go to
the Server Machine and ensure the CMT Server Service
is running.
or:
Verify that the correct Server
Name is displayed on the Options tab. Check that thisname
can be pinged from the Client
machine.
DVR is locked
A CMT process is underway
that must complete prior to
unlocking the unit.
CMT User Guide
“Server Denied Connection:
The Server is not accepting
connections. Please ensure
the server application is running.”
Wait for the process to complete, and the CMT will automatically unlock the DVR when
all processes are finished.
or:
Route to the Update DVR
tab and highlight this specific
DVR. Click on the Refesh DVR
button.
Importing DVR Units Message “Address already in
CMT” is displayed
The entered IP Address is
already in CMT.
Select a different IP Address to
import to CMT.
“This DVR does not meet the
minimum version for CMT
compatibility. Please upgrade
this to Major Release version
4.3 or higher.”
The DVR is currently running
an embedded firmware
version that is not compatible
with CMT.
Notify the CMT Administrator
to upgrade this DVR outside
of CMT to a Firmware V4.3
or higher. Once complete,
this DVR can be added to
CMT and all future Firmware
upgrades can be handled
within CMT.
FQDN or IP not recognized
by CMT.
This FQDN or IP may not be
reachable from the Client or
Server Machine.
Ping the FQDN or IP from
both the CMT Client and CMT
Server Machines and ensure
that the Ping does not time
out. Contact the IT Department
for further assistance.
Dedicated Micros ©2008
57
CMT User Guide
58
Configure Tab - Viewing
Video via:
•Camera and Record Setup
– Thumbnail Images
•VMD – Walk Test Feature
•Live Web Page
•Demo Web Page
Plugin/ActiveX is set as the
Browser Settings in the Main
Set-Up Web Page under the
CMT Configure DVR table.
Change the Browser settings
to Java Applet and press the
Save buton.
Note: This is the default of
CMT and CMT will reset this
setting back to Plugin/ActiveX.
Configure Tab - Unable to
change Camera Titles
Java Applet is defined as the
Browser Settings in the Main
Set-Up Web Page under the
CMT Configure DVR Tab.
Change the Browser Settings
to Plugin/ActiveX and press
the Save button.
Configure Tab - Prompted for
User name and password to
view images.
Video Protection is invoked
when an attempt is made to
review video
The CMT Administrator will
enter the id and password
defined for this DVR on the
DVRs Tab (Web). The DVR
Administrator will enter the
id and password they use to
access CMT.
Configure Tab - Prompted for
User name and password, IDs
are then not accepted.
Plugin/ActiveX is set as the
Browser settings.
Go to the Main Set-Up Web
page on the CMT Configure
tab. Then change the Browser
settings to Java Applet and
press the Save button.
Dedicated Micros ©2008
The software will only recognise certain characters for use in usernames and passwords.
Character
Users Tab
Hash
#
Login
Password
Not allowed Allowed
Double quotes
“
Not allowed
Allowed
N/A
Allowed
Comma
,
Not allowed
Allowed
N/A
Allowed
Space
Not allowed
Allowed
N/A
Allowed
Ampersand
&
Not allowed
Allowed
N/A
Allowed
Numbers
0-9
Allowed
Allowed
Allowed
Allowed
At sign
@
Allowed
Allowed
Allowed
Allowed
Dash
-
Allowed
Allowed
Allowed
Allowed
Underscore
_
Allowed
Allowed
Allowed
Allowed
Period
.
Allowed
Allowed
Allowed
Allowed
Dedicated Micros ©2008
Login Tab
Username
N/A
Password
Allowed
CMT User Guide
Appendix A LOGIN/PASSWORD
CHARACTERS
59
CMT User Guide
Appendix B – CMT CSV FILE CREATION
Creating a Batch DVR Import CSV File
Accepted CSV Column Headers:
The following column headers are recognized by the CSV Import function on the DVRs tab. They
must be named the following way to be correctly interpreted by the importer, but they are case
insensitive and can be in any order:
•
•
•
•
•
•
•
•
•
•
•
“DVR NAME” – The name by which the DVR will be called inside CMT.
“DVR ADDRESS” – The IP Address or Fully Qualified Domain Name of the DVR.
“WEB PORT” – The port number for Http communication (default is port 80).
“CGI USERNAME” – A username for accessing cgi variables/video
“CGI PASSWORD” – The password that goes with the “CGI USERNAME”
“TELNET USERNAME” – The username for establishing a telnet connection with
the unit. The unit cannot be added without a valid Telnet username.
“TELNET PASSWORD” – The Telnet Username’s corresponding password.
“FTP USERNAME” – The username for establishing an FTP connection with the
unit. This user must be an admin level FTP user with access to at least the Web
and Video drives.
“FTP PASSWORD” – The FTP Username’s corresponding password
“SERIAL USERNAME” – Serial username, not required for adding the unit, but this
will override any Serial connection credentials, which protect the unit from Serial
cable interaction, leave blank for no protection.
“SERIAL PASSWORD” – Password for the serial user.
Below is an example:
For more information on creating a CSV DVR unit file, see the example file that came with CMT.
Creating a Batch User Import CSV File
Accepted CSV Column Headers:
60
Dedicated Micros ©2008
•
•
•
•
•
•
•
•
•
•
•
•
•
•
•
•
“USERNAME” – The login that the user will use to log into CMT.
“PASSWORD” – The password that the user will use to log into CMT.
“LAST NAME” – The user’s last name that will be used in CMT.
“FIRST NAME” – The user’s first name that will be used in CMT.
“EMAIL” – The user’s email address
“PHONE” – The user’s phone number
“PHONE-EXT “ – The user’s phone extension
“ALT “ – An alternate phone number for the user
“ALT-EXT “ – The extension for the user’s alternate phone number
“NOTES” – Notes about that user that will be added to CMT
“ADMINISTRATOR” – Place an x in this column to give user CMT Administrator privileges. This will give the user access to all CMT Tabs.
“USERS TAB” – Place an x in this column to allow the user access to the Users Tab
in CMT.
“GROUPS TAB” – Place an x in this column to allow the user access to the Groups
Tab in CMT.
“CONFIG TAB” – Place an x in this column to allow the user access to the
Configure DVR Tab in CMT.
“FIRMWARE TAB” – Place an x in this column to allow the user access to the
Firmware Tab in CMT.
“COPY/RESTORE TAB” – Place an x in this column to allow the user access to the
Copy Restore Tab in CMT.
CMT User Guide
The following column headers are recognized by the CMT User Import function on the Users tab.
They must be named in the following way to be correctly interpreted by the importer, but they are
case insensitive and can be in any order:
Below is an example:
For more information on creating a CSV User file, see the example file that came with CMT.
Dedicated Micros ©2008
61
CMT User Guide
62
Index
Appendix A LOGIN/PASSWORD CHARACTERS..............................................................................................58
Appendix B – CMT CSV FILE CREATION.........................................................................................................59
Change Web Ports..............................................................................................................................................18
CMT’s Place in a NetVu-Connected System........................................................................................................5
CMT Architecture..................................................................................................................................................4
Configure DVR Tab.............................................................................................................................................35
Contents................................................................................................................................................................2
Copy/Restore Tab...............................................................................................................................................37
DVRs Tab..............................................................................................................................................................8
Features and Functions........................................................................................................................................3
Index...................................................................................................................................................................61
Installation.............................................................................................................................................................6
Introduction...........................................................................................................................................................3
Login Tab..............................................................................................................................................................6
System Requirements...........................................................................................................................................5
Tab Display...........................................................................................................................................................8
Trouble Shooting Procedures.............................................................................................................................52
Update DVRs Tab...............................................................................................................................................31
Dedicated Micros ©2008
Dedicated Micros USA.
14434 Albemarle Point Place, Suite 100,
Chantilly, Virginia 20151 USA
Dedicated Micros Ltd.
1200 Daresbury Park, Daresbury,
Cheshire, WA4 4HS, UK
Dedicated Micros, Australia PTY.
5/3 Packard Avenue, Castle Hill,
NSW 2154, Australia
Dedicated Micros France
9-13 rue du Moulinet
75013 Paris, France
Dedicated Micros, Asia PTY
16 New Industrial Road,
#03-03 Hudson Techno Centre,
Singapore 536204
Dedicated Micros Slovenia
Delavska cesta 26,
4208 Sencure, Slovenia
Dedicated Micros Middle East
Building 12, Suite 302, P.O. Box 500291, Dubai Internet City,
Dubai, United Arab Emirates
Dedicated Micros Benelux
Joseph Chantraineplantsoen 1,
3070 Kortenberg, Belgium
Dedicated Micros (Malta) Ltd.
BLB017, Bulebel Industrial Estate,
Zejtun, ZTN3000, Malta
Centralised Managment Tool CMT User Guide Ver 2.7.