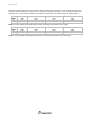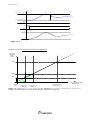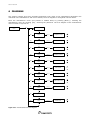
1
W3000 TECHNICAL MANUAL C0240111-06-07-GB For software versions CA15 Replaces C0240111-01-07-GB GB CLIMAVENETA S.p.A Via Sarson, 57C 36061 Bassano del Grappa(VI)-ITALY Tel. (+39) 0424 509 500 Fax. (+39) 0424 509 509 http://www.climaveneta.it/ mailto:[email protected] H H The information contained in this document may be modified without prior notice. No part of this document may be reproduced and/or disclosed to third parties or competitors. June 2006 C0240111-06-07-GB Contents 1 USER INTERFACE................................................................................................................ 3 1.1 Menu structure .............................................................................................................. 4 1.2 Switching the unit on and off........................................................................................... 6 1.3 Setting the operating mode............................................................................................. 8 1.4 Setting adjustment methods ......................................................................................... 10 1.4.1 Proportional step adjustment on inlet probe ................................................................ 11 1.4.2 Proportional step adjustment on inlet probe + integral on inlet probe ............................. 13 1.4.3 Quick mind adjustment ............................................................................................. 14 1.4.4 Modulating adjustment of screw compressors .............................................................. 16 1.4.5 Adjustment method for centrifuge compressors ........................................................... 17 2 ALARMS............................................................................................................................ 21 3 TABLE OF MASKS .............................................................................................................. 26 4 TABLE OF MASKS W3000 BASE......................................................................................... 49 5 PARAMETERS TABLE ......................................................................................................... 53 5.1 Table of parameter limits (depending on unit configuration) .............................................. 60 6 DIAGRAMS ..............................................................ERRORE. IL SEGNALIBRO NON È DEFINITO. 6.1 Freecooling ................................................................................................................. 64 6.2 Condensation .............................................................................................................. 66 7 HARDWARE ...................................................................................................................... 67 8 INPUT/OUTPUT CONFIGURATION TABLE ......................................................................... 69 8.1 HARDWARE “L” ............................................................................................................ 69 8.1.1 Units with hermetic compressors................................................................................ 69 8.1.2 Units with centrifuge compressors .............................................................................. 72 8.2 HARDWARE “XL” .......................................................................................................... 73 8.3 HARDWARE “B” ........................................................................................................... 76 8.4 EXPANSIONS............................................................................................................... 78 8.4.1 Units with hermetic compressors................................................................................ 78 8.4.2 Units with alternative and screw compressors .............................................................. 83 8.4.3 Units with centrifuge compressors .............................................................................. 90 9 CONNECTING SEVERAL BOARDS....................................................................................... 91 9.1 “BASE-EXPANSION” Connection ..................................................................................... 91 9.2 “MASTER-SLAVE” connection ......................................................................................... 93 9.3 “Mixed” connection ...................................................................................................... 94 10 TERMINAL CONFIGURATION ............................................................................................ 96 10.1 Setting the keypad address........................................................................................... 96 10.2 Setting the board address ............................................................................................. 97 10.3 Plan network configuration ............................................................................................ 98 10.3.1 Plan network connection (local).............................................................................. 98 10.3.2 Configuring the plan network (global) ..................................................................... 99 10.4 Connecting the remote keypad .................................................................................... 100 10.4.1 “T” shunt ........................................................................................................... 100 10.4.2 Remote keyboard up to 200 metres ...................................................................... 101 10.4.3 Remote keyboard from 200 metres up to 500 metres ............................................. 102 10.4.4 Remote keypad for more than one unit ................................................................. 103 Notice: The W3000 controller software is protected by a digital signature. This means that it can only work on boards supplied by Climaveneta and not on boards purchased from other dealers. 2 C0240111-06-07-GB 1 USER INTERFACE There are three types of user interface: W3000 W3000 compact W3000 base Depending on the type of user interface installed, there are more or less keys available for controlling the unit and for accessing system information. Key W3000, W3000 base Description W3000 compact [MENU key]: accesses the main menu. [UP key]: moves around the masks and sets control parameter values [DOWN key]: moves around the masks and sets control parameter values [ENTER key]: confirms entered data. [ESC key]: goes back one level in the mask tree if you are in the header masks, or returns to the unit controller. ----- [ALARM key]: displays the alarms and resets normal operating conditions. [SETPOINT key]: directly accesses the setpoint menu. [ON/OFF key]: switches the machine on and off. For each compressor, the following LED's are also located on the W3000 user interface: Symbol Colour Green Description If the LED shines steady the compressor is on, if it flashes the compressor is demanded The compressor is blocked by a compressor or circuit alarm The compressor is in the “chiller” mode Green The circuit is in the “freecooling” mode Green The compressor is in the “heat pump” mode Green Red Green Green If the LED shines steady the circuit is in the “recovery mode”, if it flashes there is a “recovery alarm” If the LED shines steady the circuit is in the “defrost mode”, if it flashes it is in the “drip mode” 3 C0240111-06-07-GB 1.1 Menu structure The tree structures for moving around the various menus are shown below. Setpoint Tasto Setpoint key Tasto Menu Menù key Power On Thermoregulator Termoregolatore ↑ / ↓ Esc / ↵ Tasto Alarm Alarm key Display Thermoregulat or Visual. Termoreg. Menù Alarm Alarm menu ↑/↓ Esc / ↵ Visual. Alarm Display alarm Esc / ↵ Menùmenu unità Unit ↑/↓ Esc / ↵ Visual. unità Display unit Esc / ↵ Menù setpoint Setpoint menu ↑/↓ Esc / ↵ Display Visual. setpoint Esc / ↵ Menù I/O I/O menu ↑/↓ Esc / ↵ Display I/O Visual. I/O Esc / ↵ Clock Menù orologio menu ↑/↓ Esc / ↵ Visual. orologio Display clock Esc / ↵ Log menu Menù storico ↑/↓ Esc / ↵ Viewstorico log Visual. Esc ↑/↓ Esc Selezione Unit menu Menù unità selection Esc Selezione Setpoint menu Menù setpoint selection ↑/↓ setpoint ↑/↓ Esc I/O menu Selezione Menù I/O selection Esc Clock menu Selezione Menù orologio selection Esc Selezione Select log Menù storico menu ↑/↓ ↑/↓ ↑/↓ Esc Select service Selezione menu Menù utente Esc Manufacturer Selezione Menù costruttore menu selection Esc / ↵ Service Password password utente Esc / ↵ Password Factory costruttore Password ↑/↓ ↵ Menù utente Service menu ↑/↓ Esc / ↵ Visual. utente View service ↵ Manufacturer Menù costruttore ↑/↓ Esc / ↵ Visual. costruttore Esc ↑/↓ menu Display manufacturer Esc Figure 1.1: menu tree for W3000-W3000 compact Termoregolatore Thermoregulator ↑/↓ Esc / ↵ Alarm Tasto key Alarm Setpoint Tasto Setpoint key Tasto Menu Menù key Power On Display Visual. Termoreg. Thermoregulator Alarm menu Menù Alarm ↑/↓ Esc / ↵ DisplayAlarm alarm Visual. Esc / ↵ Menù unità Unit menu ↑/↓ Esc / ↵ Visual. Displayunità unit Esc / ↵ Menù setpoint Setpoint menu ↑/↓ Esc / ↵ Display setpoint Visual. setpoint Esc / ↵ Menù I/O I/O menu ↑/↓ Esc / ↵ Display I/O Visual. I/O Esc / ↵ Menù Clockorologio menu ↑/↓ Esc / ↵ Display clock Visual. orologio ↵ User utente menu Menù ↑/↓ Esc / ↵ Displayutente user Visual. ↵ Service menu Menù costruttore ↑/↓ Esc / ↵ Viewcostruttore service Visual. Esc ↑/↓ Esc Selezione Unit menu Menù unità selection Esc Selezione Setpoint menu Menù setpoint selection ↑/↓ ↑/↓ Esc Selezione I/O menu Menù I/O selection ↑/↓ Esc Selezione Clock menu Menù orologio selection Esc Selezione User menu Menù utente selection Esc Select service Selezione Menùmenu costruttore ↑/↓ Esc / ↵ Password User utente Password Esc / ↵ Password Service costruttore password ↑/↓ Esc ↑/↓ Esc Figure 1.2: menu tree for W3000 base 4 C0240111-06-07-GB The menus are briefly described below: • The “Unit Menu” displays information such as temperature, pressure and circuit states. • The “Setpoint menu” is used to set the setpoints for the various available functions. Different setpoints can be set depending on the available operating modes (chiller, heat pump and recovery). Dual setpoint values can also be set for chiller and heat pump operation (only if the digital input is fitted and the “dual setpoint” function is enabled in the “user menu”). • The “I/O menu” shows the status of the digital inputs and values read from the analogue inputs. It also shows the status of the digital outputs and the voltage supplied to the analogue outputs. If expansions are necessary (depending on the configuration parameters), the inputs and outputs of the latter are also shown. • Parameters relative to user programming of the unit can be displayed and set in the “User menu”. • Unit configuration parameters can be displayed and set in the “manufacturer menu”. • Service engineers can view and set parameters in the “Assistance menu”. • The list of alarm events recorded by the unit can be displayed in the “Log menu” (only accessible if the clock card is installed). • The “Clock menu”, if the clock board is present, is used to set and display the date and time and configure the time bands (except for W3000 base). After enabling time bands from the “enable time bands” parameter in the “user menu”, time bands can be set and specific operating modes and different setpoints can be set according to requirements. Several time bands (up to 10) of different types (A, B, C and D) can be set during the day. Figure 1.3 shows an example: the beginning of the first time band is set at 00:00 and the end of the tenth time band is set at 23:59; the end of one time band determines the beginning of the following one. To use a smaller number of bands, set the time a band ends to the same time it begins, and that band will be ignored. Summer and winter setpoints and unit On/Off switching can be set for each time band. If the unit is switched Off, it will remain in the “Off from time bands” mode. Adjustment Unit off Figure 1.3: example of setting time bands 5 C0240111-06-07-GB 1.2 Switching the unit on and off Caution: connect the unit to the power supply at least 8 hours before starting it; if this is not done, the guarantee will become null and void. There are different procedures for starting or stopping the unit: using the user interface keys or selecting from the display. The following procedures have a priority. In the event of conflicts between different settings, the following priorities apply: - highest priority: - lowest priority: on/off on/off on/off on/off from from from from keypad - on/off from parameter digital input time bands protocol using the [ON/OFF] key: For W3000 and W3000 base Proceed as follows: • SWITCHING ON: press the [ON-OFF] key. • SWITCHING OFF: press the [ON-OFF] key. In the W3000, the message Com. : ON appears on the display In the W3000 base, the message “On” appears on the display with the LED on, or “OFF” with the LED off. using the On/Off parameter: For W3000 and W3000 compact The “Com: On/Off” parameter can be displayed on the user interface. “Off” means that the unit is switched off while “On” means that the unit is switched on. Proceed as follows: • SWITCHING ON: Move to the “On/Off” parameter by pressing [Enter] and then press [Up] or [Down] until “On” appears. Press [Enter] again to confirm. If “On” continues to be displayed it means that the unit has been switched on. • SWITCHING OFF: Move to the “On/Off” parameter and change to “Off” using the same procedure used to switch the unit on. Press [Enter] again to confirm. If “Off” continues to be displayed it means that the unit has been switched on. using the digital input: Only if the digital input is fitted. Open the “user menu” and check that the “On/Off enable from digital input” parameter is set to “Yes”. When the contact is open the unit is “Off”, when the contact is closed the unit is “On”. Proceed as follows: • SWITCHING ON: Close the remote On/Off contact. The “On from digital input” message appears in the main mask to show that the unit has been switched on. • SWITCHING OFF: Open the remote On/Off contact. The “Off from digital input” message appears in the main mask to show that the unit has been switched off. 6 C0240111-06-07-GB In the W3000 base the following procedure is used: press [MENU] / select the “User” menu using the [UP] or [DOWN] keys / press [ENTER] to access the menu / press enter to type in the password / press [UP] or [DOWN] to choose the password and [ENTER] to confirm / use the [UP] or [DOWN] keys to choose the “dI 0” (Enable from digital input) mask / press [ENTER] to view the current setting of the parameter (“Y” or “N”) / press [ENTER] to modify the parameter (the display flashes) / press [UP] or [DOWN] to select one of the two alternatives. Press the “digital input” button on the panel to switch the unit on and off. using time bands: For W3000 and W3000 compact (if the clock board is fitted) Make sure that the “Clock board not installed” is not displayed in the “clock menu”. Check that the “Time bands enabled” parameter in the “user menu” is set to “Yes”. • SWITCHING ON: set the required switching on time in the “clock menu”. The unit switches on when the set time is reached. The “On from time bands” message appears in the main mask to show that the unit has been switched on. N.B.: The unit does not switch on if it is set to “Off from keypad” or “Off from digital input”. SWITCHING OFF: set the required switching off time in the “clock menu”. The unit switches off when the set time is reached. The “Off from time bands” message appears in the main mask to show that the unit has been switched off. • using the supervision protocol: Only if the serial board is fitted. Check that the “Supervisor enable” and “On/Off enable from supervisor” parameters in the “user menu” are set to “Yes”. Proceed as follows: • SWITCHING ON: Send the switching on command from the protocol. The “On from supervisor” message appears in the main mask to show that the unit has been switched on. N.B.: The unit does not switch on if it is set to “Off from keypad” or “Off from digital input”. • SWITCHING OFF: Send the switching off command from the protocol. The “Off from supervisor” message appears in the main mask to show that the unit has been switched off. In the W3000 base the following procedure is used: press [MENU] / select the User menu using the [UP] or [DOWN] keys / press [ENTER] to access the menu / press enter to type in the password / press [UP] or [DOWN] to choose the password and [ENTER] to confirm / use the [UP] or [DOWN] keys to choose the “SPr” (Enable from supervisor) mask / press [ENTER] to view the current setting / press [ENTER] to see the display flashing / press [UP] or [DOWN] to modify the setting and press [ENTER] to confirm. 7 C0240111-06-07-GB 1.3 Setting the operating mode Caution: Do not switch from chiller to heat pump unless the inlet temperature is above 15°C. Do not switch from heat pump to chiller unless the inlet water temperature is below 30°C. There are various ways of setting the operating mode of the unit. The set operating mode may be any one of the following, as long as they are compatible with the unit: Operating mode chiller chiller+rec heatpump summer ch summer ch+rec summer rec recovery summer auto winter hp winter rec winter auto auto Description W3000 base ch hp Chiller Chiller plus recovery Heat pump Chiller in summer mode Chiller plus recovery in summer mode Recovery in summer mode Recovery only Automatic in summer mode Heat pump in winter mode Recovery in winter mode Automatic in winter mode Automatic The following procedures have a priority: in the event of conflicts between opposing settings the following priorities apply: - highest priority: - lowest priority: change through parameter chiller/heat pump from digital input ch/ch+rec from digital input change through protocol Using the parameter: Make sure the unit is “Off”. Access the “setpoint menu” and display the “Operating mode” parameter. Move to the “Operating mode” parameter by pressing [Enter] and modify the parameter by pressing [Up] or [Down]. Press [Enter] again to confirm. If the set message continues to be displayed it means that operating mode has been changed. In the W3000 base the key sequence is: switch off the unit using the [ON/OFF] key / press the [setpoint] key / select MODE with the [UP] or [DOWN] keys / press [Enter] / press [Enter]. At this point the cursor flashes. Press the [UP] or [DOWN] keys to select either “ch”= chiller or “hp”= heat pump. Press [Enter] to confirm. Using the digital input: Only for heat pump units and only if the digital input is present. Check that the “Chiller/Hp enable from digital input” parameter in the “user menu” is set to “Yes”. When the contact is open the unit is in the “heat pump” mode, when the contact is closed the unit is in the “chiller” mode. Switching the digital input switches the unit off, changes the operating mode and switches the unit on again. In the W3000 base access the “user menu” / select “DI S” by pressing the [UP or DOWN] key/ press [Enter] to view the current setting / press [Enter] to see the current setting flashing and change it using the [UP or DOWN] key / press [Enter] to confirm the new setting. 8 C0240111-06-07-GB Using the recovery from digital input command: Only for “chiller plus recovery” units and only if the digital input is present. This mode is not present in the W3000 base. Proceed as follows: check that the “Recovery control enable from digital input” parameter in the “Recovery menu” is set to “Yes”. When the contact is open the unit is in the “chiller+rec” mode, when the contact is closed the unit is in the “chiller” mode. Switching the digital input switches the unit off, changes the operating mode and switches the unit on again. Using the supervision protocol: Only applicable if the serial board is fitted. Check that the “Supervisor enable” and “Enable operating mode from supervisor” parameters in the “user menu” are set to “Yes”. Make sure the unit is “Off”. Send the change operating mode command from the protocol. The operating mode only changes if the unit is switched off. In the W3000 base press [ON/OFF] to switch the unit off. Access the “user menu” / press [UP] or [DOWN] to select “SV M”/ press [Enter] to view the set mode / press [Enter] to see the setting flashing / press [UP] or [DOWN] to modify the setting / press [Enter] to confirm the new setting. Send the change operating mode command from the protocol. The operating mode only changes if the unit is switched off. 9 C0240111-06-07-GB 1.4 Setting adjustment methods Depending on the type of compressor used, various adjustment methods may be selected. Compressor Hermetic Alternative Screw Centrifuge Unit Water/water heat pump Water/water chiller Evaporating units Water/air heat pump Water/air chiller Chiller with heat recovery Chiller with free-cooling Energy Raiser Heat pump with heat recovery Chiller with free-cooling Energy Raiser Heat pump with recovery Chiller with heat recovery Water/water heat pump Water/water chiller Evaporating units Water/air heat pump Water/air chiller Water/water heat pump Water/water chiller Evaporating units Water/air heat pump Water/air chiller Chiller with heat recovery Chiller with freecooling Energy Raiser Heat pump with recovery Water/water chiller Water/air chiller Adjustment method • • • • • • • • • • • • Quick Mind on outlet probe Quick Mind on inlet probe Proportional step on inlet probe Proportional step on inlet probe + integral on inlet probe Proportional step on inlet probe Proportional step on inlet probe + integral on inlet probe Proportional step on inlet probe Proportional step on inlet probe + integral on inlet probe Modulating on outlet probe Proportional step on inlet probe Proportional step on inlet probe + integral on inlet probe • Proportional step on inlet probe Proportional step on inlet probe + integral on inlet probe • Proportional on inlet probe + integral on outlet probe Table 1.1: adjustment methods available by compressor type The various adjustment methods are described below. 10 C0240111-06-07-GB 1.4.1 Proportional step adjustment on inlet probe Some examples of proportional “step” adjustment on the inlet temperature probe: Chiller (n° steps =2) P out Tin proportional band Figure 1.4: Tin is the inlet variable, Pout is the percentage of delivered power (chiller). ▄ = Set + proportional band/2 Heat pump (n° steps =2) Pout Tin proportional band Figure 1.5: Tin is the inlet variable, Pout is the percentage of delivered power (heat pump). ▄ = Set + proportional band/2 11 C0240111-06-07-GB The following tables show some typical values for the parameters in question. The theoretical maximum and minimum outlet temperature values refer to operation at nominal flow rates ( with a thermal head at the evaporator of 5 °C and sufficient water in the system to ensure a litre / KW ratio equal to or greater than 7). N° steps 2 4 Setpoint (°C) 9.5 7 Proportional band (°C) 2.5 5 Theoric min. outlet T (°C) 5.7 5.7 Theoric max. outlet T (°C) 10.8 8.3 Table 1.2: normal setpoint and proportional band values according to the number of steps (chiller). N° steps 2 4 Setpoint (°C) 42.5 45 Proportional band (°C) 2.5 5 Theoric min. outlet T (°C) 41.2 43.7 Theoric max. outlet T (°C) 46.3 46.3 Table 1.3: normal setpoint and proportional band values according to the number of steps (heat pump). 12 C0240111-06-07-GB 1.4.2 Proportional step adjustment on inlet probe + integral on inlet probe This adjustment method is based on the sum of two components: proportional and integral. The proportional component generates the percentage demand for activating/deactivating the steps, as illustrated in the previous paragraph “Proportional step adjustment on inlet probe”. The integral component adds the integral error to the proportional component at regular intervals (integral time: parameter 55.02). The integral error is calculated according to the following formula: Inlet temperature – Setpoint Proportional band Integral error = x 100 [%] However, the integral component is limited (integral limit: parameter 55.03) to prevent the adjustment from becoming unstable. If the inlet temperature varies by 5% or more in one second, a rapid change, therefore, the integral component is not calculated. Tin Set point + P. band 100 % 50 % Set point 0% + limit Integral - limit Integral time Integral time Integral time Integral time Integral time 100 % Prop. + Integral 50 % 0% 2 1 Compr. On Fig 1.6 Example of a 2 step adjustment in the chiller mode 13 Example 2-step unit Band: 5°C Integral limit: 15% C0240111-06-07-GB 1.4.3 Quick mind adjustment Users only need set the required setpoint as the other parameters are adapted to the system by the Quick Mind algorithm. The values normally used are: SETPOINT SETPOINT SETPOINT SETPOINT Chiller on inlet Chiller on outlet Heat pump on inlet Heat pump on outlet 11.0 °C 7.0 °C 42.5 °C 45.0 °C QUICK MIND is a self-adapting algorithm for adjusting the temperature of the water treated by an all-inone unit. The following figure shows how this adjustment is made: SUMMER ESTATE Compressors activated Attivazione compressori Compressors deactivated Disattivazione compressori ZONA NEUTRA DEAD AREA Tin/Tout Setpoint WINTER INVERNO Compressors deactivated Disattivazione compressori Compressors activated Attivazione compressori ZONA DEADNEUTRA AREA Tin/Tout Setpoint Figure 1.7: QUICK MIND adjustment model (chiller and heat pump) The setpoint remains within a dead area. If the temperature also remains within this area, no change is made to the number of active compressors. When the temperature leaves the dead area following a change in system load, the compressors are either activated or deactivated in order to return the temperature to the dead area. The amplitude of the neutral zone depends on the dynamic characteristics of the system and, in particular, on the amount of water it contains and the load. The self-adapting algorithm is able to “measure” system dynamics and calculate the minimum dead area in order to respect compressor activation times and the maximum number of start-ups per hour. Both return and delivery temperatures can be adjusted. Special functions are also present which reduce the number of compressor start-ups in the event of very low loads or start-ups of units with significantly higher or lower temperatures than the setpoint. 14 C0240111-06-07-GB 2 compressors Litres/kW 10.5 ∆ Τout 3.2 2 compressors Litres/kW 10.5 ∆ Τout 3.0 4 compressors Litres/kW 10.5 ∆ Τout 1.8 4 compressors Litres/kW 10.5 ∆ Τout 1.8 with maximum permitted number 9.5 8.5 7.5 3.2 3.4 3.4 with maximum permitted number 9.5 8.5 7.5 3.0 3.0 3.2 with maximum permitted number 9.5 8.5 7.5 1.8 1.8 1.8 with maximum permitted number 9.5 8.5 7.5 1.8 1.8 1.8 of start-ups per 6.5 5.5 3.6 3.8 of start-ups per 6.5 5.5 3.2 3.4 of start-ups per 6.5 5.5 1.8 1.9 of start-ups per 6.5 5.5 1.8 1.9 hour 8 4.5 4.0 hour 12 4.5 3.6 hour 8 4.5 2.0 hour 12 4.5 2.0 3.5 4.4 2.5 5.2 3.5 3.8 2.5 4.3 3.5 2.3 2.5 2.7 3.5 2.3 2.5 2.7 Table 1.4: maximum theoretical delivery temperature range at constant part load (depending on the quantity of water contained in the system) An example of real data acquired during operation with the Quick Mind adjuster on the delivery side is shown below. Reference is made to the following figure: Fase di avviamento controllato Adattamento zona neutra Temperatura uscita evaporatore Temperatura ingresso evaporatore 1 compressore attivo 2 compressori attivi = = = = = = Controlled starting phase Adaptation to dead area Outlet temperature of evaporator Inlet temperature of evaporator 1 compressor active 2 compressors active Figure 1.8: example of real data with quick-mind outlet adjustment (x-axis: time in [s]; y-axis: Tout in [°C] ). This is an example of start-up with a very high initial temperature compared with the setpoint (7°C). About 10 seconds after data acquisition began, one compressor switches on. The second compressor does not switch on immediately as the algorithm which handles start-up checks if one compressor is enough to return delivery temperature to the setpoint and avoid unnecessary start-ups. As the delivery temperature is still at 12 °C after about 200 seconds, the second compressor is also switched on, otherwise it would take too long to reach setpoint. Following the controlled starting phase, the delivery temperature falls until it “enters” the dead area. The algorithm (at t= 350 s) begins to adapt the amplitude of the dead area in order to respect compressor safety times. As can be seen, the dead area is later reduced (t= 780 s, 950 s) to the absolute minimum amplitude which allows safety times to be respected. It can also be seen that the compressors are activated and deactivated when the outlet temperature reaches the upper or lower limits of the dead area. The example shows that outlet temperature varies by about 3.5 °C during regular operation. 15 C0240111-06-07-GB 1.4.4 Modulating adjustment of screw compressors With screw compressors, modulating adjustment is performed on the outlet probe. Modulating adjustment is only available on “Bitzer” screw compressors. Tout [°C] B (increase) set point ZN t [min] C (decrease) Figure 1.9: modulating adjustment for screw compressors Reference is made to the figure to the left: The setpoint remains within a dead area. If the temperature also remains within this zone, no change is made to the number of active compressors or their load percentages (position of modulating chamber). When the temperature rises above zone B following a change in the system load, the compressors are activated in order to return the temperature to the dead area. Inside zone B, if the outlet temperature derivative is positive, compressor power is increased in order to return the temperature to the dead area (ZN). The further away the temperature is from the setpoint, the greater the increase is. When the temperature falls below zone C following a change in the system load, the compressors are either deactivated in order to return the temperature to the dead area. Inside zone C, if the outlet temperature derivative is negative, compressor power is decreased in order to return the temperature to the dead area (ZN). The further away the temperature is from the setpoint, the greater the decrease is. The amplitude of the neutral zone depends on the dynamic characteristics of the system and, in particular, on the amount of water it contains and the load. The self-adapting algorithm is able to “measure” system dynamics and calculate the minimum dead area in order to respect compressor activation times and the maximum number of start-ups per hour. When a second or subsequent compressor is switched on, the ones that are already running are forced to a minimum, and the subsequent power increases/decreases are applied to all the compressors. 16 C0240111-06-07-GB 1.4.5 Adjustment method for centrifuge compressors Adjustment is combined on the inlet temperature and integral on the outlet temperature. Some diagrams outlining how this works are shown below. Suppose we have a single compressor unit. A b s o rb e d powe r [K w ] Max M in T h e rm o re g u la to r power re q u e s t [% ] s e t p o in t (0 % P 0 9 .4 2 ) S e t p o in t + P ro p o rtio n a l % c o m p re s s o r s w itc h -o n (P 0 9 .4 3 ) b a n d (1 0 0 % ) Figure 1.10: Adjustment for a single-compressor unit. Min=theoretical minimum electrical power absorbed by a compressor, Max=theoretical maximum electrical power absorbed by a compressor Let us take a close look at how the compressor is activated. When the system return temperature lies in zone A (figure 1.11a) or less than the setpoint, the compressor is off. The amplitude of zone A normally coincides with the temperature difference at the evaporator with the compressor running at minimum power. When the return temperature exceeds zone A (figure 1.11b), the compressor is switched on and then switches off if the temperature falls below the setpoint. If the return temperature lies in zone B (figure 1.11c), the power of the compressor is modulated according to system requirements. set point + proportional band Tin [°C] set point + proportional band Tin [°C] start compressor 1 start compressor 1 A set point A t [min] set point t [min] ON ON OFF OFF Figure 1.11 a) Figure 1.11 b) 17 C0240111-06-07-GB s e t p o in t + p r o p o r t io n a l b a n d T in [ ° C ] B s ta rt c o m p re s s o r 1 s e t p o in t t [m in ] O N O FF P a s s [K w ] m ax m in Figure 1.11 c) Suppose we have a unit with more than one compressor. Potenza Absorbed assorbita power [Kw] [Kw] Max 2x Min Min set point (0%) % % % accensione % accensione compressor 1 compressor 2 compressore 1°switch-on compressore 2° switch-on Set point point ++ Banda prop. band (100(100 %) %) proporzionale Potenza power Thermoregulator richiesta del Request [%] termoregolatore [%] Figure 1.12: Adjustment for a twin-compressor unit. Min=theoretical minimum electrical power absorbed by a compressor, Max=theoretical maximum electrical power absorbed by a compressor. 18 C0240111-06-07-GB Let us take a close look at how the compressor is activated. The amplitude of zone A coincides with the temperature difference at the evaporator, with all the compressors running at minimum power. Zone A is the sum of the zones of each single compressor (A1+A2+…). When the temperature lies in one of the An zones, the power of the active compressors is modulated according to system requirements. When moving from an An zone to the one just above it, the active compressors are taken to minimum power while waiting for the next one to be switched on. After that, they continue to be modulated in the new zone. When moving from an An zone to the one just below it, one of the compressors is switched off while the others are kept at a minimum. sSee tt ppo oi ni tn t ++ b a np rdoap opr tr ioo n p aol r bz ai on dn a l e T in [°C ] B r e ps sr oe r s 2s °o r e s t as tr at r 2t °c ocmopm A 2 r e ps sr oe r s 1s °o r e s t as tr at r 1t °c ocmo pm A A 1 s e t p o in t t [m in ] m a x P a s s [K w ] C o m p r.1 m in m a x P a s s [K w ] C o m p r.2 m in Figure 1.13: adjustment for a twin-compressor unit 19 C0240111-06-07-GB The following figure, instead, gives an example of the integral contribution of the adjustment method. Tin Set point + P. band 100 % Start compressor (P09.43) Set point 0% Pass [KW] Max Min Tout Set point + P. band Set point + limit (P39.07) Integral - limit (P39.07) Integral time Integral time Integral time Integral time Figure 1.14: Adjustment for a single-compressor unit: integral contribution 20 Integral time Example 1-compressor unit Band: 6°C Integral limit: 20% Integral time: 90 s C0240111-06-07-GB 2 ALARMS Press the [ALARM] key once to enter the “alarms menu” and view the alarm message along with its code. If there is more than one alarm, scroll the menu using the [UP] and [DOWN] keys. In the W3000 base, “NO A” is displayed if there is no alarm, otherwise the alarm code appears. Press any other key to exit from this menu. To reset the alarm press the [ALARM] key again and hold it down until the message “No Alarm Active” (for W3000 or W3000 compact) or “No A” (for W3000 base) appears. If the message does not appear it means that one or more alarm conditions are still active. Alarms table ALARM 002 DESCRIPTION Phase sequence / Voltage out of range 003 Evaporator flow switch 005 Low inlet temperature 006 High inlet temperature 010 Evaporator antifreeze 014 Insufficient system pressure 017 Low external air temperature 021 Low water charge 022 Low water flow 045 046 Condenser flow switch Recuperator flow switch 051 Pump 1 maintenance 052 Pump 2 maintenance 061 062 063 064 Subcooling driver 1 offline Subcooling driver 2 offline Subcooling driver 3 offline Subcooling driver 4 offline 075 076 Condenser antifreeze Recuperator antifreeze 081 Pump 1 thermal switch details Faulty phase connection. Totally shuts down the unit (only displayed if the input that detects it is fitted) No flow to evaporator. The alarms automatically resets 3 times in the same hour if flow is restored within the maximum operating time of the pumps with a small amount of water (P23.34), otherwise, it must be reset manually Enabled only in the “heat pump” mode. Low water temperature at evaporator inlet. Enabled only in the “chiller” mode. High water temperature at evaporator inlet. Low water temperature at evaporator outlet. Also specifies (except for W3000 base) which evaporator (if more than one) is involved in the alarm condition. Only displayed if the relative input is present (see I/O menu). Unit stops due to an external pressure switch. Indicates that the external air temperature has fallen below the set point. The evaporator inlet temperature changes too quickly and creates a low water level in the system. The temperature difference between the evaporator inlet and outlet is too high and creates a low water flow from the pump Similarly to “Evaporator flow switch” (only for water/water units with freon reversal). No water flow to the recuperator. Maintenance hours limit exceeded (in units with just 1 pump, pump 1 is the evaporator pump) Pump 2 maintenance hours limit exceeded (in units with more than one pump). The circuit 1 subcooling management driver is disconnected (only for units with centrifuge compressors) “as above, for circuit 2” “as above, for circuit 3” “as above, for circuit 4” Low water temperature at condenser outlet. Except for W3000 base, it also specifies which condenser (if more than one) is involved in the alarm condition (only for water/water units with freon reversal). Low water temperature at recuperator outlet. Pump 1 overheated (in units with just 1 pump, pump 1 = evaporator pump) 21 RESET A A/M S-A S-A M M S S M A/M A S S A A A A M A M C0240111-06-07-GB ALARM DESCRIPTION 082 Pump 2 thermal switch 085 086 Condenser pump thermal switch Recuperator pump thermal protection 087 Glycol pump thermal switch 090 Slave no-link 091 092 093 094 095 101 102 103 104 105 Expansion 1 no-link Expansion 2 no-link Expansion 3 no-link Expansion 4 no-link Expansion 5 no-link Expansion 1 slave no-link Expansion 2 slave no-link Expansion 3 slave no-link Expansion 4 slave no-link Expansion 5 slave no-link 111 112 113 114 Compressor 1 oil Compressor 2 oil Compressor 3 oil Compressor 4 oil 121 122 123 124 High outlet temperature compressor 1 High outlet temperature compressor 2 High outlet temperature compressor 3 High outlet temperature compressor 4 131 132 133 134 Compressor 1 fault Compressor 2 fault Compressor 3 fault Compressor 4 fault 141 142 143 144 Compressor 1 offline Compressor 2 offline Compressor 3 offline Compressor 4 offline 151 152 153 154 Compressor 1 maintenance Compressor 2 maintenance Compressor 3 maintenance Compressor 4 maintenance 171 172 173 174 Compressor 1 start-up timeout Compressor 2 start-up timeout Compressor 3 start-up timeout Compressor 4 start-up timeout 181 182 183 184 211 212 213 214 Compressor 1 start-up limit Compressor 2 start-up limit Compressor 3 start-up limit Compressor 4 start-up limit Circuit 1 high pressure Circuit 2 high pressure Circuit 3 high pressure Circuit 4 high pressure 221 222 Circuit 1 fan thermal protection Circuit 2 fan thermal protection details Pump 2 overheated (in units with more than one pump). Condenser pump overheated (only for water/water units with freon reversal) Recuperator pump overheated Glycol pump overheated (in units with freecooling). The slave card is disconnected (only for units with 3 or 4 circuits) Master expansion 1 unlinked. Apart from W3000 base, the word master appears in units with 3 or 4 circuits. “as above, for expansion 2” “as above, for expansion 3” “as above, for expansion 4” “as above, for expansion 5” Slave expansion 1 unlinked. “as above, for expansion 2” “as above, for expansion 3” “as above, for expansion 4” “as above, for expansion 5” No oil on compressor 1 due to low compressor oil level or pressure “as above, for compressor 2” “as above, for compressor 3” “as above, for compressor 4” Compressor 1 delivery temperature is higher than the set limit. “as above, for compressor 2” “as above, for compressor 3” “as above, for compressor 4” Compressor 1 motor overheated or any another fault “as above, for compressor 2” “as above, for compressor 3” “as above, for compressor 4” No communication with compressor n°1 (only for units with centrifuge compressors) “as above, for compressor 2” “as above, for compressor 3” “as above, for compressor 4” Maintenance hours limit exceeded on compressor 1 “as above, for compressor 2” “as above, for compressor 3” “as above, for compressor 4” Compressor 1 did not start within the set timeout (only for units with centrifuge compressors) “as above, for compressor 2” “as above, for compressor 3” “as above, for compressor 4” The maximum number of start-ups per hour permitted for compressor 1 has been exceeded (only for quick mind adjustment and modulating adjustment of screw compressors) “as above, for compressor 2” “as above, for compressor 3” “as above, for compressor 4” High pressure on cooling circuit 1 “as above, for circuit 2” “as above, for circuit 3” “as above, for circuit 4” One of the condensation fans in circuit 1 overheated and stopped. “as above, for circuit 2” 22 RESET M M M S/A A A A A A A A A A A A M M M M M M M M M - A/M M - A/M M - A/M M - A/M A A A A S S S S A/M A/M A/M A/M S S S S M M M M M M C0240111-06-07-GB 223 224 ALARM DESCRIPTION Circuit 3 fan thermal protection Circuit 4 fan thermal protection 231 232 233 234 Circuit 1 low pressure Circuit 2 low pressure Circuit 3 low pressure Circuit 4 low pressure 241 242 243 244 Transducer 1 high pressure Transducer 2 high pressure Transducer 3 high pressure Transducer 4 high pressure 251 252 253 254 Circuit 1 start-up timeout Circuit 2 start-up timeout Circuit 3 start-up timeout Circuit 4 start-up timeout 261 262 263 264 271 272 273 274 No freon in circuit 1 No freon in circuit 2 No freon in circuit 3 No freon in circuit 4 Finned coil in circuit 1 Finned coil in circuit 2 Finned coil in circuit 3 Finned coil in circuit 4 281 282 283 284 301 302 303 304 Insufficient evaporation pressure circuit 1 Insufficient evaporation pressure circuit 2 Insufficient evaporation pressure circuit 3 Insufficient evaporation pressure circuit 4 Compressor 1 inverter temperature Compressor 2 inverter temperature Compressor 3 inverter temperature Compressor 4 inverter temperature 311 312 313 314 Compressor 1 discharge temperature Compressor 2 discharge temperature Compressor 3 discharge temperature Compressor 4 discharge temperature 321 322 323 324 Compressor 1 low pressure Compressor 2 low pressure Compressor 3 low pressure Compressor 4 low pressure 331 332 333 334 Compressor 1 high pressure Compressor 2 high pressure Compressor 3 high pressure Compressor 4 high pressure 341 342 343 344 Compressor 1 input current Compressor 2 input current Compressor 3 input current Compressor 4 input current 351 352 353 354 Compressor 1 rotor temperature Compressor 2 rotor temperature Compressor 3 rotor temperature Compressor 4 rotor temperature 361 362 Compressor 1 compression ratio Compressor 2 compression ratio details RESET “as above, for circuit 3” M “as above, for circuit 4” M Low pressure detected by the A/M transducer/pressure switch on circuit 1 “as above, for circuit 2” A/M “as above, for circuit 3” A/M “as above, for circuit 4” A/M High pressure detected by the M transducer/pressure switch on cooling circuit 1 “as above, for circuit 2” M “as above, for circuit 3” M “as above, for circuit 4” M Possible start-up attempt with no Freon in circuit A 1. “as above, for circuit 2” A “as above, for circuit 3” A “as above, for circuit 4” A Possible Freon leakage in circuit 1 as the “Startup timeout” alarm has continued for at least 8 A hours. “as above, for circuit 2” A “as above, for circuit 3” A “as above, for circuit 4” A Circuit 1 condensation coil obstructed A/M “as above, for circuit 2” A/M “as above, for circuit 3” A/M “as above, for circuit 4” A/M There may not be any freon in circuit 1 as the evaporation pressure has fallen below the set M point “as above, for circuit 2” M “as above, for circuit 3” M “as above, for circuit 4” M Compressor 1 inverter overheated A/M “as above, for compressor 2” A/M “as above, for compressor 3” A/M “as above, for compressor 4” A/M Compressor 1 discharge overtemperature (only A/M for units with centrifuge compressors) “as above, for compressor 2” A/M “as above, for compressor 3” A/M “as above, for compressor 4” A/M Compressor 1 suction pressure under min. (only A/M for units with centrifuge compressors) “as above, for compressor 2” A/M “as above, for compressor 3” A/M “as above, for compressor 4” A/M Compressor 1 compression pressure over max. B (only for units with centrifuge compressors) “as above, for compressor 2” B “as above, for compressor 3” B “as above, for compressor 4” B Compressor 1 current input over max. (only for B units with centrifuge compressors) “as above, for compressor 2” B “as above, for compressor 3” B “as above, for compressor 4” B Compressor 1 rotor temperature over max. (only A/M for units with centrifuge compressors) “as above, for compressor 2” A/M “as above, for compressor 3” A/M “as above, for compressor 4” A/M Compressor 1 compression ratio over max. (only A/M for units with centrifuge compressors) “as above, for compressor 2” A/M 23 C0240111-06-07-GB 363 364 ALARM DESCRIPTION Compressor 3 compression ratio Compressor 4 compression ratio 371 372 373 374 Compressor 1 bearings Compressor 2 bearings Compressor 3 bearings Compressor 4 bearings 381 382 383 384 Compressor 1 SCR temperature Compressor 2 SCR temperature Compressor 3 SCR temperature Compressor 4 SCR temperature 391 392 393 394 Compressor 1 rotor block Compressor 2 rotor block Compressor 3 rotor block Compressor 4 rotor block 400 401 402 403 404 405 406 407 408 409 411 412 413 414 421 422 423 424 425 426 427 428 431 432 433 434 451 452 453 454 Probe 10 error Probe 1 error Probe 2 error Probe 3 error Probe 4 error Probe 5 error Probe 6 error Probe 7 error Probe 8 error Probe 9 error Exp 1 Probe 1 error Exp 1 Probe 2 error Exp 1 Probe 3 error Exp 1 Probe 4 error Exp 2 Probe 1 error Exp 2 Probe 2 error Exp 2 Probe 3 error Exp 2 Probe 4 error Exp 2 Probe 5 error Exp 2 Probe 6 error Exp 2 Probe 7 error Exp 2 Probe 8 error Exp 3 Probe 1 error Exp 3 Probe 2 error Exp 3 Probe 3 error Exp 3 Probe 4 error Exp 5 Probe 1 error Exp 5 Probe 2 error Exp 5 Probe 3 error Exp 5 Probe 4 error 500 501 502 503 504 505 506 507 508 509 511 512 513 514 521 Probe 10 error slave Probe 1 error slave Probe 2 error slave Probe 3 error slave Probe 4 error slave Probe 5 error slave Probe 6 error slave Probe 7 error slave Probe 8 error slave Probe 9 error slave Exp 1 Probe 1 error slave Exp 1 Probe 2 error slave Exp 1 Probe 3 error slave Exp 1 Probe 4 error slave Exp 2 Probe 1 error slave details “as above, for compressor 3” “as above, for compressor 4” Compressor 1 bearings faulty (only for units with centrifuge compressors) “as above, for compressor 2” “as above, for compressor 3” “as above, for compressor 4” Compressor 1 SCR temperature over max. (only for units with centrifuge compressors) “as above, for compressor 2” “as above, for compressor 3” “as above, for compressor 4” Compressor 1 blocked (only for units with centrifuge compressors) “as above, for compressor 2” “as above, for compressor 3” “as above, for compressor 4” Probe 10 error. Values read by probe 10 out of range. “analogue, as above” “analogue, as above” “analogue, as above” “analogue, as above” “analogue, as above” “analogue, as above” “analogue, as above” “analogue, as above” “analogue, as above” Probe 1, expansion 1 fault “analogue, as above” “analogue, as above” “analogue, as above” “analogue, as above” “analogue, as above” “analogue, as above” “analogue, as above” “analogue, as above” “analogue, as above” “analogue, as above” “analogue, as above” “analogue, as above” “analogue, as above” “analogue, as above” “analogue, as above” “analogue, as above” “analogue, as above” “analogue, as above” “analogue, as above” Slave probe 10 faulty - only in units with more than 2 circuits “analogue, as above” “analogue, as above” “analogue, as above” “analogue, as above” “analogue, as above” “analogue, as above” “analogue, as above” “analogue, as above” “analogue, as above” Probe 1, expansion 1, connected to slave faulty “analogue, as above” “analogue, as above” “analogue, as above” “analogue, as above” 24 RESET A/M A/M A/M A/M A/M A/M A/M A/M A/M A/M A/M A/M A/M A/M A A A A A A A A A A A A A A A A A A A A A A A A A A A A A A A A A A A A A A A A A A A A A C0240111-06-07-GB 522 523 524 525 526 527 528 531 532 533 534 551 552 553 554 ALARM DESCRIPTION Exp 2 Probe 2 error slave Exp 2 Probe 3 error slave Exp 2 Probe 4 error slave Exp 2 Probe 5 error slave Exp 2 Probe 6 error slave Exp 2 Probe 7 error slave Exp 2 Probe 8 error slave Exp 3 Probe 1 error slave Exp 3 Probe 2 error slave Exp 3 Probe 3 error slave Exp 3 Probe 4 error slave Exp 5 Probe 1 error slave Exp 5 Probe 2 error slave Exp 5 Probe 3 error slave Exp 5 Probe 4 error slave 611 612 613 614 Antifreeze pre-alarm evaporator 1 Antifreeze pre-alarm evaporator 2 Antifreeze pre-alarm evaporator 3 Antifreeze pre-alarm evaporator 4 631 632 633 634 Low pressure in circuit 1 pre-alarm Low pressure in circuit 2 pre-alarm Low pressure in circuit 3 pre-alarm Low pressure in circuit 4 pre-alarm 641 642 643 644 High pressure in circuit 1 pre-alarm High pressure in circuit 2 pre-alarm High pressure in circuit 3 pre-alarm High pressure in circuit 4 pre-alarm details “analogue, as above” “analogue, as above” “analogue, as above” “analogue, as above” “analogue, as above” “analogue, as above” “analogue, as above” “analogue, as above” “analogue, as above” “analogue, as above” “analogue, as above” “analogue, as above” “analogue, as above” “analogue, as above” “analogue, as above” Low water temperature at evaporator outlet prealarm. Also specifies which evaporator (if more than one) is involved in the alarm condition “as above, for circuit 2” “as above, for circuit 3” “as above, for circuit 4” Low pressure acquired from circuit 1 transducer pre-alarm “as above, for circuit 2” “as above, for circuit 3” “as above, for circuit 4” High pressure acquired from circuit 1 transducer pre-alarm “as above, for circuit 2” “as above, for circuit 3” “as above, for circuit 4” RESET A A A A A A A A A A A A A A A S S S S S S S S S S S S Key to “RESET” column: M = Manual reset alarm (if the condition that generated the alarm is eliminated, the alarm must be reset from the keypad); sets “cumulative alarms” A = Automatic reset alarm (if the condition that generated the alarm is eliminated, the alarm is reset automatically); sets “cumulative alarms” A/M = Automatic reset alarm for the first “n” cut-ins, after which manual; sets “cumulative alarms” S = Signal on display (does not set “cumulative alarms”) S-A = Automatic reset signal (that does not stop the machine) or alarm. The mode is selected from a parameter M - A/M = Manual reset alarm (in hermetic, alternative and screw compressors), automatic for the first “n” cut-ins, after which manual (in centrifuge compressors) B =Block that cannot be reset from the display; sets “cumulative alarms”. To eliminate the alarm, switch the relative compressor off and then back on again. 25 C0240111-06-07-GB 3 TABLE OF MASKS Press [UP] or [DOWN] to move from one mask to another inside the same menu. Press [ENTER] to access the parameter, press [UP] or [DOWN] to change the value of the parameter. Mask Com. : ON ALXXX Mode : chiller State: ON keypad LIMIT ID:011 U:01 Term. Req. Act. Cool. 042 050 % Rec. 040 050 % Pump time 010s Temp. In. Out. Evap. 12.5 07.0°C Rec. 35.6 40.5°C Cond. 38.0 42.5°C Temp. In. Out. Evap. 12.5 07.0°C Evap1 07.2°C Evap2 06.9°C Temp. In. Out. Cond. 24.3 22.4°C Cond.1 22.3°C Cond.2 22.4°C Temp. Freecooling 12.3°C External air 15.4°C Optional 19.6°C Description Main display mask. Shows operating mode and status. The unit can be switched on and off with the On/Off command: press "Enter" to move to "Com. :", select the command using the "Up" or "Down" keys and press "Enter" again to confirm. Also displays the following messages: “ALxxx”: alarm active, “Sxxx”: signal active, "U:xx" : unit configuration address, "ID:xxx" : unit supervisor address, Symbols describing unit status also appear (see table at the end of this manual). Shows the request of the controller and the operating percentage of the thermoregulator (cool/heat) and recovery (if possible). Also shows the pump time remaining during switching on and off. Para n° Shows the inlet and outlet water temperature. (evaporator, recuperator and condenser are only displayed if they are fitted). (if 2 evaporators are fitted) Displays inlet and outlet temperatures of the evaporator or condenser (depending on whether the unit is in the chiller or heat pump mode) and the outlet temperature of the two evaporators. (if 2 condensers are fitted) Displays inlet and outlet temperatures of the evaporator or condenser (depending on whether the unit is in the chiller or heat pump mode) and the outlet temperature of the two condensers. (for water-air units) Displays freecooling temperature (in chiller+freecooling units), external air temperature and optional temperature (if the probes are enabled). Access mask to manufacturer menu. Enter the manufacturer password for access. This menu may only be accessed by authorised staff. Manuf. Password:0000000000 Access mask to user configuration submenu. Press "Up" or "Down" to scroll the other masks and "Esc" to return to the submenu. Config. ← Unit: Type : chiller Compressors : Type : hermetic Circuits: ↓ Mask for setting the type of unit and compressors. 01.01 01.02 Sets the number of circuits in the unit 01.03 N° compressors per circuit : 1 N° sep. stages per compressor : 0 Condensation: Type : water N° : 2 Reversal : water Fan: Type : axial Sets the number of compressors per circuit and the number of separation stages per compressor. 01.04 01.05 Sets the type of condensation (for evaporating units set none). For water-cooled units with Freon-side reversal, select the number of condensers in the unit. For water-cooled heat pumps set the type of circuit reversal (water-side or freon-side reversal). 01.06 01.07 01.08 Selects the type of ventilation used, only for air-cooled units. 01.09 Evaporation: Type : water N° : 1 Selects the type of evaporation and the number of evaporators in the unit. (For evaporating units set the number of evaporators to 0) 01.10 01.11 Evaporating banks: N° : 1 Sets the number of evaporating banks, only for evaporating units. 01.12 N° : 2 26 C0240111-06-07-GB Mask Refrigerant: Type : R407c Sets the type of refrigerant used. Description Recovery: Enabled: N Enables recovery. Recovery is enabled automatically in the polyvalent units. 01.14 Freecooling: Enabled: N Enables freecooling control. 01.15 Enable probes: Probe enable mask for enabling the external air temperature probe or optional temperature probe (only visible in water-air units) 01.17 01.24 Probe enable mask for enabling the condenser inlet probe or the condenser outlet probe (only visible in water-water chiller and heat pump units with just one condenser; two condenser outlet probes are enabled in the units with two condensers) 01.16 01.25 External temp. Optional temp. Enable probes: N N Cond. in. temp. Cond. out. temp. Enable probes: N N Pressure N Low Pressure N High pressure transducers Start Scale 00.0bar End Scale 30.0bar High pressure transducers Start Scale 00.0bar End Scale 30.0bar Maschera di abilizzazione sonde per l'abilitazione dei trasduttori di alta pressione e di bassa 01.18 pressione. 01.19 Mask for configuring the high pressure transducers. 01.20 01.21 Mask for configuring the low pressure transducers. 01.22 01.23 Access mask to user global parameters submenu. Press "Up" or "Down" to scroll the other masks and "Esc" to return to the submenu. Global. ← ↓ Enter another manufacturer password 0000000000 Display passwords service 0000 user 0000 W 3000 Code CA 15.00 GB Man. C0240011-06-07 Functions ← Setpoint Limitation Sets a new password. ATTENTION: THE PASSWORD ENTERED IN THIS FIELD IS THE ONLY ONE THAT ALLOWS ACCESS TO THE MANUFACTURER MENU!! Displays the passwords governing access to the service and user menus This mask contains the reference information of the software [Code] and of the reference technical manual [Man.]. The closed padlock symbol shows that the board is provided with its propriety software; two padlocks appear on units with 3 or 4 circuits Access mask to functions submenu. Press "Up" or "Down" to scroll the other masks and "Esc" to return to the submenu. ↓ Winter N Ext. air winter set point limit. -05.0°C Delta 05.0°C Max var. set 05.0°C Max setpoint limit winter 45.0°C Coil fractioning N Upper set Upper diff. Lower set Lower diff. Subcooling modulating adjustment Enable Para n° 01.13 10.0 05.0 12.0 00.5 bar bar bar bar Enables setpoint limitation in summer and winter modes. 05.02 (only with winter setpoint limitation) Enables setting of the external air temperature setpoint below which setpoint limitation begins in the heat pump or recovery only modes and defining the temperature delta at which the maximum setpoint (lowering) variation (negative) takes place. (only with winter setpoint limitation) maximum winter setpoint limit 05.07 05.08 05.09 Enables coil fractioning. 05.11 05.10 (only with coil fractioning) Sets the upper setpoint and differential and the lower setpoint and 05.12 differential for controlling coil fractioning. 05.13 05.14 05.15 Enables subcooling modulating adjustment (only for units with centrifuge compressors) 05.30 N 27 C0240111-06-07-GB Mask Subcooling Enabled N Description Enables subcooling. This function is only enabled in chillers with recovery mode. Para n° 05.16 Subcooling Adjustment start delay 010 s Relay delay 005 s Subcooling Sets the delay before subcooling adjustment commences and the delay in the subcooling relay. 05.17 05.18 Sets the upper and lower sub cooling setpoint. 05.19 05.20 Enables setting of the pressure switch control of high temperatures by separating active circuit power 05.21 Enables the setpoint and differential for the pressure switch control of high temperatures 05.22 05.23 Upper set 06.0 °C Lower set 04.0 °C High temp. pressure switch control Enabled: N High temp. pressure switch control Setpoint: 23.5 bar Diff: 02.0 bar Pumpdown Disabled Pumpdown Setpoint 02.5bar Max. time 03s Cyclical pumpdown Cycle time 030min Pumpdown Chiller S Heatpump N Ch+Rec N Win rec N Sum rec N => 01 All-in-one unit valve override Enables or disables pumpdown. Selects the type of pumpdown to perform, pumpdown during 05.24 shutdown or cyclical pumpdown or both. Sets end pumpdown setpoint and pumpdown timeout. The pumpdown procedure is interrupted … - when low pressure falls below the setpoint (if there are transducers on the low pressure section) - when the low pressure switch trips (if there are no transducers) - after the timeout (if the procedure is not interrupted by pressure) 05.25 05.26 Sets the cyclical pumpdown time. A pumpdown is performed each time the set time elapses. 05.27 The time is reset every time a mode change occurs. Sets the modes in which pumpdown is performed (both cyclical and shutdown). Depending on the type of unit, a smaller or larger number of available modes appear. 05.28 Pumpdown can be selected in the chiller mode and not in the chiller plus recovery mode, for example. Sets valve override for all-in-one units. 05.29 Enabled: Y Compressor ← Access mask to compressor submenu. Press "Up" or "Down" to scroll the other masks and "Esc" to return to the submenu. ↓ Min compressor stop time 0120 s Min. del. btw starts diff. compr. 0010 s Min. del. btw starts same compr. 0360 s Max. compr. starts per hour 10 Min. compr. start time 150 s Force at low ext.t. Enable N Setpoint -05.0 °C Diff. 01.0 °C Oil control type Direct Max time : 1200s Override T: 120s Width of dead area: 015 % Power incr. impulse: Period: 010 s Min. dur.: 00.3 s Max. dur.: 02.0 s Power decr. impulse: Period: 010 s Min. dur.: 00.5 s Max. dur.: 03.0 s Minimum time a compressor must stay off after being switched off. (Only visible in the proportional step adjustment mode) 09.02 “Antipeak” time to prevent overcurrents at start-up due to simultaneous demand from more than one compressor. Delay which limits the number of compressor start-ups per hour. (Only visible in the proportional step adjustment mode) Maximum permitted number of compressor starts per hour. Minimum switch-on time of a compressor. (Only visible in the quick mind and modulating adjustment modes of screw compressors) 09.03 09.04 Only for screw compressors. Enables 100% screw compressor forcing of in the winter mode with low external temperatures. 09.07 09.08 09.09 Selects the screw compressor oil level control mode: None, Direct, Indirect and Direct + Indirect. 09.58 09.11 09.12 Sets the percentage with respect to the dead area and around the setpoint in which the compressor is not modulated. (only for modulating screw compressors) 09.59 Sets the period and duration of the power increase impulse. (Only for modulating adjustment of screw compressors) 09.14 09.15 09.16 Sets the period and duration of the power decrease impulse. (Only for modulating adjustment of screw compressors) 09.17 09.18 09.19 28 09.05 09.06 C0240111-06-07-GB Mask Compressor start time: 30 s Min. time sep. stages active: Description Para n° Sets the start-up time of the compressor, that, is, the time the compressor remains in the no- 09.20 load start mode before it starts adjusting. (Only for modulating adjustment of screw compressors) Sets the minimum time the separation stages remain active. 09.21 Time compressor oil valve active 10 s Sets the time the compressor oil valve remains active. 09.22 Model: Bitzer Sets the compressor model. 09.23 Economiser: Enables the economiser and sets the start delay. 09.24 09.25 Sets the setpoint and differential for disabling the economiser. 09.26 09.27 Enables compressor discharge temperature control for liquid injection. 09.28 Sets the setpoint and differential for liquid injection. 09.29 09.30 Mask only visible in screw compressors that allow the type of discharge temperature probe used to be selected. 09.60 Sets minimum and maximum values for centrifugal compressor modulation. 09.31 09.32 Sets the number of revs for calculating opening of the liquid line solenoid valve. Sets minimum revs timeout during start-up. (Only for centrifuge compressors) 09.33 09.34 Sets the number of bypass valves (N.B.: controlled by the board and not by external timers) (Only for centrifuge compressors) 09.35 Sets the compression ratio for calculating opening of the liquid line solenoid valve. Sets the bypass solenoid valve closing delay. (Only for centrifuge compressors) 09.36 09.37 Sets the integral time and minimum variation for increasing the power request. (Only for centrifuge compressors) 09.38 09.39 Sets the integral time and minimum variation for decreasing the power request. (Only for centrifuge compressors) 09.40 09.41 Sets the enable and disable percentage with respect to the proportional band for each centrifuge compressor. 09.42 09.43 09.44 09.45 09.46 09.47 09.48 09.49 10 s Enable N Start delay 120 s Economiser disable: Setpoint 15.0 bar Diff. 2.0 bar Compressor discharge temperature control Enabled: N Compressor discharge temperature control Setpoint 110.0 °C Diff. 10.0 °C Config. discharge temperature probes for compressors: NTC 0-150°C Compressor modulation Minimum: 010 % Maximum: 090 % Start revs: 03300 rpm Compressor start time: 020 s Number of bypass valves 1 Start compression 2.2 Start bypass delay 020 s Power request increase Integral T. 005 sec Minimum Var. 001 % Power request decrease Integral T. 005 sec Minimum Var. 001 % Centrifuge Comp. off: on: Comp. 1 000% 040% Comp. 2 000% 040% Centrifuge Comp. off: on: Comp. 3 000% 040% Comp. 4 000% 040% Valves ← ↓ Status configuration S0 => off Valves: CCCCCCCCCC => 00 Sets the enable and disable percentage with respect to the proportional band for each centrifuge compressor. Access mask to valves submenu. Press "Up" or "Down" to scroll the other masks and "Esc" to return to the submenu. Status editor mask. Configures the valves (A=valve open, C=valve closed) in each status (S0,S1,… S12). Valve configuration is automatically converted. It is also possible to directly set the coded information, the state of the valves is automatically decoded and memorised. 29 C0240111-06-07-GB Mask Valve release time: V1: 000 s V2: 000 s V3: 000 s V4: 000 s V5: 000 s Description Status Code Description S0 off Off, circuit off S1 chiller on Chiller on S2 ch+rec on Chiller plus recovery on S3 chiller pd Chiller in pumpdown S4 chiller off Chiller off S5 rec on Recovery on S6 defrost Defrost S7 rec pd Recovery in pumpdown S8 rec off Recovery off S9 heatpump on Heat pump on S10 ch+rec pd Chiller plus recovery in pumpdown S11 heatpump pd Heat pump in pumpdown S12 heatpump off Heat pump off Sets the valve release time. Valve release time : V6: 000 s V7: 000 s V8: 000 s V9: 000 s V10:000 s Sets the valve release time. C1: off valve:CCCCCCCCCC C2: off valve:CCCCCCCCCC C3: off valve:CCCCCCCCCC C4: off valve:CCCCCCCCCC Displays the status of the circuits and circuit valves. Defrost ← ↓ Defrost config. Timer + Auto Tuning Defrost parameters: Start 03.0 bar Stop 14.0 bar Defrost parameters: Delay 01800 s Max. time 00300 s Drip time 120 s Timer tuning defrost Ref. time 120 s Ref. T. -10°C 180 s Ref. T. +10°C 060 s Timer tuning maximum delay variation perc. 20 % Maximum defrosts per hour 3 Ext t.-Evap. t. calc. interval 300 s t.ext-t.evap. var. speed threshold 3.0°C Ext t.-evap. t. difference threshold for changing defrost delay 15.0°C Threshold offset Start var. 2.0°C Variation factor 1 % Para n° 13.01 13.02 13.03 13.04 13.05 13.06 13.07 13.08 13.09 13.10 13.11 13.12 13.13 13.14 13.15 13.16 13.17 13.18 13.19 13.20 13.21 13.22 13.23 Displays the status of the circuits and circuit valves. Access mask to defrost submenu. Press "Up" or "Down" to scroll the other masks and "Esc" to return to the submenu. Sets 3 defrost types: Traditional, defrosting at fixed intervals, Timer Tuning, defrosting at dynamic intervals, Timer Tuning + Auto Tuning, defrosting at dynamic intervals, also analysing evaporation pressure values. Defines the pressure setpoints for start and stop defrost. 21.01 Sets defrost time parameters. Delay: cumulative time measured before the defrost procedure starts. Max. time: maximum duration of defrost procedure. Drip time: duration of coil dripping Sets certain timer tuning defrost parameters. Nominal defrost reference time (display only). Reference time at -10°C used to calculate the nominal reference time. Reference time at +10°C used to calculate the nominal reference time. Sets the maximum current defrost delay variation percentage. 21.04 21.05 21.06 Sets the maximum number of defrosts in an hour. If this value is exceeded, the finned coil alarm appears. 21.10 21.02 21.03 21.08 21.07 21.09 (only for auto tuning) 21.11 Maximum rate of change in the difference between external temperature and evaporation 21.12 temperature. If exceeded, it force activates the defrost procedure after the bypass time. The calculation is updated every "calculation interval" (only for auto tuning) 21.13 Initial threshold for the difference between external temperature and evaporation temperature for changing the defrost start delay. (only for auto tuning) Offset used to calculate the threshold for changing the defrost start delay. Defrost start delay change factor provided by Auto Tuning Defrost. 30 21.14 21.15 C0240111-06-07-GB Mask Circuit start bypass 120 s Start variation delay 600 s Minimum derived evaporation pressure -00.1 bar/m Forced defrosting with low pressure Enabled Y Threshold 1.7 bar Step override in heatpump separate 1.7 bar restore 2.1 bar Enable Free Defrost Y Minimum external temperature 04.0°C Drip phase with compressors on N Minimum permitted evaporation pressure in heatpump. If the pressure falls below this value, 21.19 defrosting is forced. 21.20 Evaporation pressure values at which the circuit with more than one hermetic compressor per 21.21 circuit is "separated" to return the operating point within limits. 21.22 Evaporation pressure value at which compressor "separation" terminates. Enables the Free-Defrost algorithm and sets the minimum external temperature for operation. 21.23 21.24 Enables the drip phase with the compressors on after defrosting. 21.25 Access mask to recovery submenu. Press "Up" or "Down" to scroll the other masks and "Esc" to return to the submenu. Recovery ← ↓ Chiller override fm recovery pressure Setpoint 23.5 bar Diff. 5.0 bar Cyclical override to chiller from ch+rec Enable N Cycle time 060min Override time in chiller before passing to ch+rec 120 Description Para n° (only for auto tuning) 21.16 Bypass delay between the start of the circuits and the moment the defrost procedure is force 21.17 changed if the maximum speed of change in the difference between the external temperature and the evaporation temperature is exceeded. If the difference between the external temperature and the evaporation temperature is greater than the calculated threshold, when the "Variation start delay" elapses, the defrost start delay specified in the "Change factor" parameter commences. (only for auto tuning) 21.18 Maximum permitted change in evaporation pressure before changing the defrost start delay. Defines the pressure setpoint and differential at which the recovery mode is forced to chiller. 15.03 15.04 Enables override to the chiller mode from the chiller plus recovery mode (only for units with 15.05 recovery). Sets the cycle time of this function, that is, the maximum time in the chiller plus 15.06 recovery mode. The time is reset every time a mode change occurs. (NB.: pumpdown is also considered a mode change and therefore the cyclical pumpdown function in the Ch+rec mode is inconsistent with cyclical override, the function will be performed with the lowest cycle time.) Changing mode to Chiller+Rec. On, requires the Chiller On mode. This mask sets the Chiller 15.07 On mode timeout before passing to the Chiller+Rec On mode. s Condens. ← ↓ Condensation control Enable : Y Type : Step Cont. N° steps : 3 Condensation control Type: Separate Mod.: PWM Condensation control Access mask to condensation submenu. Press "Up" or "Down" to scroll the other masks and "Esc" to return to the submenu. Enables condensation control, the type and number of steps. 17.01 17.02 17.03 Selects between individual and contemporary condensation. Also sets linear fan operation (0:Standard - 1:0-10V - 2:PWM - 3:FAE - 4:0-10V C5110973) 17.04 17.05 Selects the type of valve for condensation in water-cooled chillers. 17.06 Enables 100% forced condensation in the chiller mode and establishes the setpoint. 17.10 17.11 17.12 Logic: direct Enable max. override Chiller cond. NO Setpoint 23.0 bar Diff. 3.0 bar Enable max. override Heat pump evap. NO Setpoint 01.0 bar Diff. 0.5 bar Cont. cond. control Chiller Setpoint 14.0 bar Diff. 05.0 bar Cont. cond. control HeatPump Setpoint 06.0 bar Diff. 01.0 bar Used to enable 100% forced evaporation in the heat pump mode and establish the setpoint. 17.13 17.14 17.15 Sets the setpoint and differential for continuous condensation adjustment in the chiller mode. 17.32 17.33 Sets the setpoint and differential for continuous condensation adjustment in the heat pump mode. 31 17.34 17.35 C0240111-06-07-GB Mask Cont. condensation control Max. lim. 100 % Min. lim. 030 % Cont. condensation control Min. lim. Adjustment off: Y Diff. 01.0bar Modulating valve management N Opening time 100% 070 s Description Para n° Sets maximum and minimum condensation with continuous adjustment. This is fan speed or 17.36 condensation valve opening. 17.37 Enables the fans or the condensation valve when the minimum condensation limit is reached with continuous adjustment. The set condensation minimum may remain enabled or adjustment can be turned off when pressure falls below the condensation setpoint of the differential value. Enables management of the 2- or 3-way molulating valve connected to the heat exchanger with well/tower water and sets opening time from 0% to 100%. 17.38 17.39 17.40 17.41 Access mask to alarms submenu. Press "Up" or "Down" to scroll the other masks and "Esc" to return to the submenu. Alarms ← ↓ High pressure from transducers alarm: Setpoint 28.0 bar Diff. 07.0 bar Low press. alarm N° resets 3 Start bypass 120 s Low pressure alarm from transducers: Setpoint 01.6 bar Diff. 00.9 bar Low pressure alarm low air temp. Enabled N Start timeout 120 s Low pressure alarm low air temp. Setpoint 0.1 bar Diff. 0.5 bar Compressor alarms N° resets 3 Sets the setpoint and differential for activating the high pressure from transducers alarm. 23.01 23.02 Sets the parameters for activating the low pressure alarm. Number of times the alarm has triggered in the previous hour and been reset automatically within the set period, the next time the alarm triggers it must be reset manually. Low pressure alarm by-pass delay. Sets the setpoint and differential for activating and resetting the low pressure alarms (only if the low pressure transducers are configured) 23.03 23.04 23.05 23.06 Enables external air temperature control for activating the low pressure alarm and sets the start timeout. 23.07 23.08 Sets the setpoint and differential for activating and resetting the low pressure alarms with control on external air temperature 23.09 23.10 Sets the maximum number of automatic reset compressor fault alarms in the arc of an hour, 23.11 after which the compressor fault alarm must be reset manually. (only for centrifugal compressors) Compressor thermal protection alarm: Bypass time 0010 s The compressor is switched off for a set time when the unit is powered. Must be set to 360 secs only for BRISTOL compressors 23.12 Compressor discharge temperature alarm Setpoint 125.0°C Diff. 10.0°C Compressor oil alarm: Start delay 090 s Running delay 090 s Flow switch alarm N° resets 3 Sets the setpoint and differential for activating the high compressor discharge temperature alarm. 23.13 23.14 Sets the compressor oil alarm delay 23.15 23.16 Max. pump op. and flow auto reset time in al. mode 015 s Evaporator flow switch alarm: Start delay 010 Running delay 001 Recuperator flow switch alarm: Start delay 010 Running delay 001 Condenser flow switch alarm: Start delay 010 Running delay 001 s s s s s s Sets the maximum number of automatic reset flow switch fault alarms in the arc of an hour, 23.25 after which the flow switch fault alarm must be reset manually. The flow switch alarm is always automatically reset until the maximum pump alarm operation delay has elapsed. The pump then turns off and the flow switch alarm must be manually reset. Maximum pump operation time in flow alarm mode Following alarms requiring the pump to 23.34 start (antifreeze alarm, low flow rate alarm, evaporator flow switch alarm) the pump is kept running in order to reset normal conditions. In any case, the time indicated is the time in which the flow switch alarm is automatically reset. After this delay, the flow switch alarm must be manually reset. Configuration parameters for evaporator flow switch alarm. 23.26 Start delay: minimum time during which the flow must remain constant before the 23.27 compressors start running. Running delay: minimum time before the flow switch triggers with the compressors running. Configuration parameters for recuperator flow switch alarm. 23.28 Start delay: minimum time during which the flow must remain constant before the 23.29 compressors start running. Running delay: minimum time before the flow switch triggers with the compressors running. Configuration parameters for condenser flow switch alarm. 23.30 Start delay: minimum time during which the flow must remain constant before the 23.31 compressors start running. Running delay: minimum time before the flow switch triggers with the compressors running. (only for water/water units with freon reversal) 32 C0240111-06-07-GB Mask Low ext. air temp. Enabled N Setpoint -25.0 °C Diff. 02.0 °C Default ← Reset chiller to default values ↓ N N Loads parameters from file. The unit is configured with factory settings. NB: Run default before Load configuration. Deletes the contents of the alarms log on the display N Access mask to service menu. Enter the service password for access. This menu may only be accessed by authorised staff. Service Password: Access mask to initialisation menu. Press "Up" or "Down" to scroll the other mask and "Esc" to return to the submenu. The mask is not displayed when the chiller is ON. This restores the default values. Deletes the memory and installs "logical" values. The chiller must then be programmed with the parameter set during factory testing. Load configuration Alarmi log on display Delete Description Para n° Enables external air temperature control for activating the low external air temperature alarm. 35.50 Sets the alarm cut-in setpoint and differential This function automatically enables the external 35.51 air temperature probe. 35.52 0000 Adjust. ← ↓ Inlet adjustment: Type PROPORTION. Integration time: 0090 s Integration correction limit: 020 % Chiller setpoint limits: Low 11.0 °C High 20.0 °C Chiller setpoint limits: Low 06.0 °C High 18.0 °C Heat pump setpoint limits: Low 30.0 °C High 44.0 °C Heat pump setpoint limits: Low 30.0 °C High 48.0 °C Recovery setpoint limits: Low 30.0 °C High 45.0 °C Forced shutdown Access screen to adjustment menu. Press "Up" or "Down" to scroll the other mask and "Esc" to return to the submenu. Defines the type of adjustment. (only visible in the step inlet adjustment mode) 55.01 Sets integration time and correction limit (displayed in the proportional step inlet adjustment mode with proportional + integral adjustment type) 55.02 55.03 Maximum and minimum setpoint values that can be set with inlet adjustment N.B.: For low temperature units, the minimum value that can be set for the low limit is equal to the antifreeze setpoint +2°C (also check the value set for forced shut-down in the Quick Mind adjustment mode and modulating adjustment mode with screw compressors). Maximum and minimum setpoint values that can be set with outlet adjustment N.B.: For low temperature units, the minimum value that can be set for the low limit is equal to the antifreeze setpoint +2°C (also check the value set for forced shut-down in the Quick Mind adjustment mode and modulating adjustment mode with screw compressors). Maximum and minimum setpoint values that can be set with inlet adjustment (only visible if the heat pump configuration is set) 55.04 55.05 55.06 55.09 55.10 Maximum and minimum setpoint values that can be set with outlet adjustment (only visible if 55.11 the heat pump configuration is set) 55.12 Maximum and minimum recovery setpoints. (only visible if recovery is configured) (Only in the Quick Mind and modulating adjustment modes of screw compressors). Forces compressor shut-down if: Chiller 04.5 °C Tout Chiller < chiller minimum Heat pump 51.0 °C or Tout Heat Pump > heat pump maximum Temperature adjustment Sets the temperature and recovery adjustment band. band 02.5 °C Recovery adjustment band 02.5 °C Dual setpoint Enables selection of a second setpoint via an external contact (only displayed on compatible Enable N units). Setpoint variation Enabled 4-20 mA Min. 00.0 °C Max. 06.0 °C 55.07 55.08 55.13 55.14 55.15 55.16 55.17 55.18 55.19 Enables setpoint variation through an external input which can be configured at 4-20mA or 0- 55.20 5V. Maximum and minimum variation limits can also be set. If time bands have been enabled 55.21 the external setpoint cannot be enabled (only displayed on compatible units). 55.22 For units with alternative or screw compressors only a 4-20 mA variation can be selected. 55.23 33 C0240111-06-07-GB Mask Rec. setpoint var. Enabled 4-20 mA Min. 00.0 °C Max. 06.0 °C Pump config. Type of use: automatic Minimum start delay between pump and compressors 060 s Pump shutdown delay 060 s Demand limit Enable N Demand limit Chiller 050 % Heat pump 050 % Recovery 050 % Enable from dig. in.: On/Off: Y Chiller/HP: N Defines the delay between pump start-up and compressor start-up after the unit has been switched on. 55.29 Defines pump shutdown delay after the unit has been switched off. 55.30 Enables limitation of the power delivered by the unit. 55.31 Sets the maximum percentage of power delivered by the unit in the chiller, heat pump (in heat pump units) and recovery (in compatible units where possible) modes. 55.32 55.33 55.34 Allows the on/off status of the unit to be selected from external enables. Also performs chiller/heat pump switching in heat pump units. 55.35 55.36 Access mask to pumps submenu. Press "Up" or "Down" to scroll the other masks and "Esc" to return to the submenu. Pumps ← Evaporator pumps configuration: N° Pumps Description Para n° Enables recovery setpoint variation through an external input which can be configured at 4- 55.24 20mA or 0-5V. Maximum and minimum variation limits can also be set. If time bands have 55.25 been enabled the external setpoint cannot be enabled (only displayed on compatible units). 55.26 For units with alternative or screw compressors only a 4-20 mA variation can be selected. 55.27 (Only displayed if more than one pump is set) Selects whether to use both pumps through 55.28 hourly rotation (FIFO if they have the same number of operating hours) or override pump 1 or pump 2. ↓ Sets the n° of pumps in the unit. 07.01 Enable recuperator pumps: N Enables the pump on the recuperator. 07.03 Enable condenser pump: N Enables the condenser pump overheated (only for water/water units with freon reversal) 07.04 Pump changeover after long activity: Threshold 0007 days Max diff. 0060 days Long inactivity: Test pumps Y Threshold 0030 days Impulse 10 s Defines, in the automatic mode, the number of days of continuous operation after which a 07.08 pump is stopped and the other one started. Max. diff. defines the maximum difference in 07.09 hours between the two pumps over which the threshold value for the pump with less hours is doubled in order to balance pump hours more rapidly. Only appears for units with two pumps. When enabled, this function activates the pumps for the set impulse time after a period of 07.10 activity reaches the threshold value. This appears with at least one pump enabled. 07.11 07.12 1 Freecool. ← ↓ Freecooling Delta 01.0 °C Offset -04.0 °C Diff. 01.0 °C Direct valve Fans hysteresis 0.3 °C delay 020 s Service ← ↓ Hour counter Pump: Threshold 012x1000 Reset N° 000000 Hour counter Pump 2: Threshold 012x1000 Reset N° 000000 Access mask to freecooling submenu. Press "Up" or "Down" to scroll the other masks and "Esc" to return to the submenu. Sets the freecooling adjustment parameters. The delta, the offset and the differential for freecooling adjustment are set here. 19.01 19.02 19.03 Selects the type of control for the freecooling valve, direct or reverse. Also sets the hysteresis 19.04 of each fan and the start/stop delay for each fan. 19.05 19.06 Access mask to assistance submenu. Press "Up" or "Down" to scroll the other masks and "Esc" to return to the submenu. Sets the threshold for programmed maintenance on the evaporator pump. 35.01 Sets the threshold for programmed maintenance on pump 2. (this may be pump 2 of the evaporator or the pump on the secondary circuit in the water/water units or the recuperator pump, depending on unit configuration) 34 35.02 C0240111-06-07-GB Mask Hour counter Compressor 1: Threshold 010x1000 Reset N° 000000 Hour counter Compressor 2: Threshold 010x1000 Reset N° 000000 Hour counter Compressor 3: Threshold 010x1000 Reset N° 000000 Hour counter Compressor 4: Threshold 010x1000 Reset N° 000000 Priority in winter: N Description Sets the threshold for programmed maintenance. Para n° 35.03 35.11 35.12 Sets the threshold for programmed maintenance. 35.04 35.13 35.14 Sets the threshold for programmed maintenance. 35.05 35.15 35.16 Sets the threshold for programmed maintenance. 35.06 35.17 35.18 Sets winter priority for recovery (only for heat pump units with recovery). 35.27 Enable remove control of recovery: Enables recovery control from a remote contact (requires expansion tank). 35.28 Enables evaporation pressure control for activating the insufficient evaporation pressure alarm . Sets the alarm cut-in delay 35.53 35.54 35.55 Sets the setpoint and differential for activating the insufficient evaporation pressure alarm. 35.56 35.57 Sets the setpoint and differential for activating the evaporator anti-freeze alarm. 35.29 35.30 Sets the setpoint and differential for activating the evaporator anti-freeze heating element. 35.31 35.32 Sets the setpoint and differential for activating the condenser antifreeze alarm (only for water/water unit with freon reversal). 35.33 35.34 Sets the setpoint and differential for activating the recuperator anti-freeze heater. 35.35 35.36 Sets the setpoint and delay for triggering the low water flow alarm. 35.37 35.38 N Insuff. evap. press: Enable N Start delay 300 s Full p. del. 030 s Insuff. evap. press: Setpoint 03.4 bar Diff. 00.1 bar Evaporator antifreeze alarm: Setpoint 04.0 °C Diff. 04.0 °C Evaporator antifreeze heating element: Setpoint 04.0 °C Diff. 04.0 °C Condensor anti-freeze alarm: Setpoint 04.0 °C Diff. 04.0 °C Recuperator antifreeze heater: Setpoint 04.0 °C Diff. 04.0 °C Low water flow alarm: max. delta 08.0 °C delay 030 s High/Low inlet temp. to unit Type: signal Delay: 030 s High inlet temp. to unit signal: setpoint 30.0 °C Low inlet temp. to unit signal: setpoint 15.0 °C Pre-alarms Enable: Antifreeze pre-alarm Offset Diff. Chooses whether, with high/low inlet water temperature, the unit must continue to work 35.39 (giving a signal) or stop the compressors to prevent them from suffering damage (automatic 35.40 reset alarm). Sets the delay before activating the high inlet water temperature (summer mode) / low temperature inlet water (winter mode) alarm/signal. Sets the setpoint for activating the high inlet water temperature alarm/signal. (When operating in the chiller mode) 35.41 Sets the setpoint for activating the low inlet water temperature alarm/signal. (When operating in the chiller mode) 35.42 Pre-alarm enable mask. 35.43 Mask for setting the offset (with respect to the antifreeze alarm) and differential of the antifreeze pre-alarm on the evaporator (only visible if pre-alarm management is enabled). The anti-freeze alarm setpoint and offset define signal activation, the differential defines deactivation. Mask for setting the offset (with respect to the low pressure alarm from transducer) and differential of the low pressure pre-alarm (only visible if pre-alarm management and low pressure transducers are enabled or, for heat pumps, the pressure transducers are enabled). The low pressure alarm setpoint and offset define signal activation, the differential defines deactivation. 35.44 35.45 N 00.5 °C 03.0 °C Low pressure pre-alarm Offset 00.5 bar Diff. 00.5 bar 35 35.46 35.47 C0240111-06-07-GB Mask High pressure pre-alarm Offset -03.5 bar Diff. 05.0 bar W 3000 Cod. CA 15.00 GB Man. C0240011-06-07 Enter new service password 0000 Ventil. ← ↓ Condensation contr. Enable precond. Y Precond. time 10 s Precond. perc. 066 % Condensation contr. Chiller step1 Setpoint 15.0 bar Diff. 3.0 bar Condensation contr. Chiller step2 Setpoint 16.5 bar Diff. 3.0 bar Condensation contr. Chiller step3 Setpoint 18.0 bar Diff. 3.0 bar Condensation contr. Chiller step4 Setpoint 19.0 bar Diff. 2.0 bar Evaporation contr. HeatPump step1 Setpoint 08.0 bar Diff. 1.0 bar Evaporation contr. HeatPump step2 Setpoint 05.0 bar Diff. 1.4 bar Evaporation contr. HeatPump step3 Setpoint 02.2 bar Diff. 0.8 bar Evaporation contr. HeatPump step4 Setpoint 01.0 bar Diff. 0.5 bar Circuits on with fan overheating N Description Mask for setting the offset (with respect to the high pressure alarm from transducer) and differential of the high pressure pre-alarm (only visible if pre-alarm management and high pressure transducers are enabled). The anti-freeze alarm setpoint and offset define signal activation (negative offset), the differential defines deactivation (downwards with positive value). This mask contains the reference information of the software [Code] and of the reference technical manual [Man.]. The closed padlock symbol shows that the board is provided with its propriety software; two padlocks appear on units with 3 or 4 circuits. Sets a new password. ATTENTION: THE PASSWORD ENTERED IN THIS FIELD IS THE ONLY ONE THAT ALLOWS ACCESS TO THE SERVICE MENU!! Para n° 35.48 35.49 Access mask to fan submenu. Press "Up" or "Down" to scroll the other masks and "Esc" to return to the submenu. Enables pre-condensation (pre-ventilation), sets the duration and defines a value at which the 51.01 fans (or condensation valve) run during this phase. 51.02 51.03 Sets step 1 in the chiller mode (only displayed if step condensation is set). 51.04 51.05 Sets step 2 in the chiller mode (only displayed if step condensation is set). 51.06 51.07 Sets step 3 in the chiller mode (only displayed if step condensation is set). 51.08 51.09 Sets step 4 in the chiller mode (only displayed if step condensation is set). 51.10 51.11 Sets step 1 in the heat pump mode (only displayed if step condensation is set). 51.12 51.13 Sets step 2 in the heat pump mode (only displayed if step condensation is set). 51.14 51.15 Sets step 3 in the heat pump mode (only displayed if step condensation is set). 51.16 51.17 Sets step 4 in the heat pump mode (only displayed if step condensation is set). 51.18 51.19 Enables the circuits even if the fan overheating alarm has tripped. 51.20 Access mask to calibration submenu. Press "Up" or "Down" to scroll the other masks and "Esc" to return to the submenu. Calibration ← ↓ Master calibration offset Value B1: 0.0bar 07.3bar B2: 0.0°C 12.3°C Master calibration offset Value B3: 0.0°C 12.3°C B4: 0.0°C 12.3°C Master calibration offset Value B5: 0.0°C 12.3°C B6: 0.0°C 07.3bar Master calibration offset Value B7: 0.0°C 05.3°C B8: - Modifies the probe offsets. (Only present if required by the type of machine configured). The word "master" only appears on units with more than 2 circuits. 27.01 27.02 Modifies the probe offsets. (Only present if required by the type of machine configured) The word "master" only appears on units with more than 2 circuits. 27.03 27.04 Modifies the probe offsets. (Only present if required by the type of machine configured) The word "master" only appears on units with more than 2 circuits. 27.05 27.06 Modifies the probe offsets. (Only present if required by the type of machine configured) The word "master" only appears on units with more than 2 circuits. 27.07 27.08 36 C0240111-06-07-GB Mask Master calibration offset Value B9: 0.0°C 00.0°C B10: Master calibr. exp1 offset Value B1: 0.0°C 35.6°C B2: 0.0°C 40.5°C Master calibr. exp1 offset Value B3: 0.0°C 37.2°C B4: 0.0°C 37.2°C Master calibr. exp2 offset Value B1: 0.0bar 04.2bar B2: 0.0bar 03.9bar Master calibr. exp2 offset Value B3: 0.0°C 35.6°C B4: 0.0°C 40.5°C Master calibr. exp2 offset Value B5: 0.0°C 22.3°C B6: 0.0°C 24.2°C Master calibr. exp2 offset Value B7: 0.0°C 22.4°C B8: Master calibr. exp3 offset Value B1: 0.0°C 05.3°C B2: 0.0°C 00.0°C Master calibr. exp3 offset Value B3: 0.0°C 00.0°C B4: 0.0°C 00.0°C Master calibr. exp5 offset Value B1: 0.0°C 00.0°C B2: 0.0°C 00.0°C Master calibr. exp5 offset Value B3: 0.0°C 00.0°C B4: 0.0°C 00.0°C Slave calibration offset Value B1: 0.0bar 07.3bar B2: 0.0°C 12.3°C Slave calibration offset Value B3: 0.0°C 12.3°C B4: 0.0°C 12.3°C Slave calibration offset Value B5: 0.0°C 12.3°C B6: 0.0°C 07.3bar Slave calibration offset Value B7: 0.0°C 05.3°C B8: Slave calibration offset Value B9: 0.0°C 00.0°C B10: Slave calibr. exp1 offset Value B1: 0.0°C 35.6°C B2: 0.0°C 40.5°C Slave calibr. exp1 offset Value B3: 0.0°C 37.2°C B4: 0.0°C 37.2°C Slave calibr. exp2 offset Value B1: 0.0bar 04.2bar B2: 0.0bar 03.9bar Slave calibr. exp2 offset Value B3: 0.0°C 35.6°C B4: 0.0°C 40.5°C Description Modifies the probe offsets. (Only present if required by the type of machine configured) The word "master" only appears on units with more than 2 circuits. Para n° 27.09 27.10 Modifies the probe offsets of expansion 1. (Only present if required by the type of machine configured) The word "master" only appears on units with more than 2 circuits. 27.11 27.12 Modifies the probe offsets of expansion 1. (Only present if required by the type of machine configured) The word "master" only appears on units with more than 2 circuits. 27.13 27.14 Modifies the probe offsets of expansion 2. (Only present if required by the type of machine configured) The word "master" only appears on units with more than 2 circuits. 27.21 27.22 Modifies the probe offsets of expansion 2. (Only present if required by the type of machine configured) The word "master" only appears on units with more than 2 circuits. 27.23 27.24 Modifies the probe offsets of expansion 2. (Only present if required by the type of machine configured) The word "master" only appears on units with more than 2 circuits. 27.25 27.26 Modifies the probe offsets of expansion 2. (Only present if required by the type of machine configured) The word "master" only appears on units with more than 2 circuits. 27.27 27.28 Modifies the probe offsets of expansion 3. (Only present if required by the type of machine configured) The word "master" only appears on units with more than 2 circuits. 27.31 27.32 Modifies the probe offsets of expansion 3. (Only present if required by the type of machine configured) The word "master" only appears on units with more than 2 circuits. 27.33 27.34 Modifies the probe offsets of expansion 5. (Only present if required by the type of machine configured) The word "master" only appears on units with more than 2 circuits. 27.51 27.52 Modifies the probe offsets of expansion 5. (Only present if required by the type of machine configured) The word "master" only appears on units with more than 2 circuits. 27.53 27.54 Modifies the probe offsets. (Only present if required by the type of machine configured). 31.01 31.02 Modifies the probe offsets. (Only present if required by the type of machine configured) 31.03 31.04 Modifies the probe offsets. (Only present if required by the type of machine configured) 31.05 31.06 Modifies the probe offsets. (Only present if required by the type of machine configured) 31.07 31.08 Modifies the probe offsets. (Only present if required by the type of machine configured) 31.09 31.10 Modifies the probe offsets of expansion 1. (Only present if required by the type of machine configured) 31.11 31.12 Modifies the probe offsets of expansion 1. (Only present if required by the type of machine configured) 31.13 31.14 Modifies the probe offsets of expansion 2. (Only present if required by the type of machine configured) 31.21 31.22 Modifies the probe offsets of expansion 2. (Only present if required by the type of machine configured) 31.23 31.24 37 C0240111-06-07-GB Mask Slave calibr. exp2 offset Value B5: 0.0°C 22.3°C B6: 0.0°C 24.2°C Slave calibr. exp2 offset Value B7: 0.0°C 22.4°C B8: Slave calibr. exp3 offset Value B1: 0.0°C 05.3°C B2: 0.0°C 00.0°C Slave calibr. exp3 offset Value B3: 0.0°C 00.0°C B4: 0.0°C 00.0°C Slave calibr. exp5 offset Value B1: 0.0°C 00.0°C B2: 0.0°C 00.0°C Slave calibr. exp5 offset Value B3: 0.0°C 00.0°C B4: 0.0°C 00.0°C Description Modifies the probe offsets of expansion 2. (Only present if required by the type of machine configured) Para n° 31.25 31.26 Modifies the probe offsets of expansion 2. (Only present if required by the type of machine configured) 31.27 31.28 Modifies the probe offsets of expansion 3. (Only present if required by the type of machine configured) 31.31 31.32 Modifies the probe offsets of expansion 3. (Only present if required by the type of machine configured) 31.33 31.34 Modifies the probe offsets of expansion 5. (Only present if required by the type of machine configured) 31.51 31.52 Modifies the probe offsets of expansion 5. (Only present if required by the type of machine configured) 31.53 31.54 Access mask to user menu. Enter the user password for access. User Password: 0000 Access mask to user menu. Press "Up" or "Down" to scroll the other masks and "Esc" to return to the submenu. User ← Step adjustment type ↓ Chooses between proportional step adjustment, Quick Mind adjustment and modulating adjustment for screw compressors. Also defines on which temperature probe the adjustment is made. If the unit has more than one evaporator or step adjustment is set, adjustment can only be made on the inlet probe. Activates/deactivates time bands. The time bands cannot be activated if the external setpoint is enabled. 39.01 39.01 39.02 Serial line configuration: Disabled Allows the devices connected to the serial interface board to be enabled and selected ( "0"=disabled, "1"= supervision, "2"= sequencer, "3"=Manager 3000). N.B.: the Service software does not need to be enabled. 39.42 En. from superv.: On/Off: N Operating mode: N Allows the on/off status of the unit to be selected from a supervision system. Also performs operating mode switching (to modify the latter, the unit must be switched off). 39.43 39.44 Superv. setting Modbus protocol Speed 9600 baud ID 011 Select language: English Defines the connection parameters with the supervisor: protocol type, communication speed 39.45 and unit identification number. 39.46 39.47 IN INLET Time bands enable: Disabled Select language W 3000 Code CA 15.00 GB Man. C0240001-06-07 Enter another user password 0000 In. 12.5 35.6 38.0 In. 12.5 Selects the required language; “Select language” flashes on the last line in all the available 39.48 languages. Once a language has been selected, the programme automatically switches to the first mask of the display menu. N.B.: Up to three languages are present on the board: Italian, English and another language. This mask contains the reference information of the software [Code] and of the reference technical manual [Man.]. The closed padlock symbol shows that the board is provided with its propriety software; two padlocks appear on units with 3 or 4 circuits Personalises the password by defining one that will replace the default password. Access mask to unit menu. Press "Up" or "Down" to scroll the other masks and "Esc" to return to the submenu. Unit ← Temp. Evap. Rec. Cond. Temp. Evap. Evap1 Evap2 ↓ Out. 07.0°C 40.5°C 42.5°C Out. 07.0°C 07.2°C 06.9°C 39.41 Displays inlet and outlet temperatures of the evaporator, recuperator and condenser (where fitted). (if 2 evaporators are fitted) Displays inlet and outlet temperatures of the evaporator or condenser (depending on whether the unit is in the chiller or heat pump mode) and the outlet temperature of the two evaporators. 38 C0240111-06-07-GB Mask Temp. In. Out. Cond. 24.3 22.4°C Cond.1 22.3°C Cond.2 22.4°C Temp. Freecooling 12.3°C External air 15.4°C Optional 19.6°C Circ1 Circ2 hp 07.3 07.3bar lp 04.2 03.9bar st Off Off Circ3 Circ4 hp 07.3 07.3bar lp 04.2 03.9bar st Off Off Circ1 Circ2 tc 07.3 07.3 °C tl 00.0 00.0 °C sub 00.0 00.0 °C Circ3 Circ4 tc 07.3 07.3 °C tl 00.0 00.0 °C sub 00.0 00.0 °C Timer tuning defrost Range 1200 - 03600 s Free Defrost 0370 s Circ1 Circ2 Time 02700 02700 s Timer tuning defrost Circ3 Circ4 Time 02700 02700 s Timer tuning defrost Circ1 Circ2 Time 0188 0125 s Max 0290 0270 s Free Defrost Circ3 Circ4 Time 0188 0125 s Max 0290 0270 s Free Defrost Circ1 Circ2 defr N N T.del 0904 0000 s T.dur 0000 0028 s Circ3 Circ4 defr N N T.del 0904 0000 s T.dur 0000 0028 s Discharge temp. Comp.1 105.3°C Comp.2 098.4°C Description Para n° (if 2 condensers are fitted) Displays inlet and outlet temperatures of the evaporator or condenser (depending on whether the unit is in the chiller or heat pump mode) and the outlet temperature of the two condensers. (for water-air units) Displays freecooling temperature (in chiller+freecooling units), external air temperature and optional temperature (if the probes are enabled). Displays high and low pressure values (if transducers are fitted) and codifies the operating mode of circuits 1 and 2. (see table at end of manual) Displays high and low pressure values (if transducers are fitted) and codifies the operating mode of circuits 3 and 4. (see table at end of manual) (in chiller units with recovery) Displays pressure converted into temperature values, temperature of the liquid and calculated subcooling values of circuits 1 and 2. (in chiller units with recovery) Displays pressure converted into temperature values, temperature of the liquid and calculated subcooling values of circuits 3 and 4. Displays, for timer tuning defrost, the variation range in the defrost delay calculated according to external temperature. Also displays the maximum duration of the free defrost calculated according to external temperature. Displays the defrost delay calculated by the timer tuning defrost algorithm. Displays the defrost delay calculated by the timer tuning defrost algorithm. Displays the free defrost enable time and the maximum time calculated according to the length of the delay. Displays the free defrost enable time and the maximum time calculated according to the length of the delay. Displays the defrosting status of circuits 1 and 2, the delay before defrosting starts and the time taken to defrost. Displays the defrosting status of circuits 3 and 4, the delay before defrosting starts and the time taken to defrost. Displays the discharge temperature (if probes are present) of compressors 1 and 2. Discharge temp. Comp.3 105.3°C Comp.4 098.4°C Displays the discharge temperature (if probes are present) of compressors 3 and 4. Analogue outputs: Cond. 1 adj.:000 % Cond. 2 adj.:000 % Displays analogue outputs 1 and 2. Shows the percentage of demand of the devices connected to it (for non-linear devices correspondence with supplied voltage V does not apply). Compares Cond.1-2 adj. with single or dual ventilation adjustment. Analogue outputs: Cond. 3 adj.:000 % Cond. 4 adj.:000 % Displays analogue outputs 3 and 4. Analogue outputs: --- % --- % Displays analogue outputs 5 and 6. Analogue outputs: 3 Freecooling :000 % --- % Displays analogue outputs 1 and 2 of expansion 3. 39 C0240111-06-07-GB Mask Analogue outputs: Cond. 3 adj.:000 % Cond. 4 adj.:000 % Description Displays analogue outputs 1 and 2 of the slave board. Shows the percentage of demand of the devices connected to it (for non-linear devices correspondence with supplied voltage V does not apply). Compares Cond. 3-4 adj. with single or dual ventilation adjustment. Analogue outputs: --- % --- % Displays analogue outputs 3 and 4 of the slave. Analogue outputs: --- % --- % Displays analogue outputs 5 and 6 of the slave. Analogue outputs: 3 Freecooling :000 % Displays analogue outputs 1 and 2 of slave expansion 3. Hour counter Displays the operating hours of the circulation pump (pump 2 appears only if two pumps are enabled). Pump 1 000000 Pump 2 000000 Compr. hour counter Av. hrs 000000 C1 000000 C2 000000 C3 000000 C4 000000 Comp.1 Work Req 078 << 082 Act 082% 32450rpm CR 02.82 outlet temp lp 78.5°C 03.9bar Comp.2 Work Req 075 << 080 Act 080% 29500rpm CR 02.84 outlet temp lp 78.5°C 03.9bar Comp.3 Work Req 076 << 082 Act 082% 33600rpm CR 02.86 outlet temp lp 78.5°C 03.9bar Comp.4 Work Req 078 << 081 Act 081% 30250rpm CR 02.83 outlet temp lp 78.5°C 03.9bar subc 03.8 03.6 st Off Off step 0000 0000 Enable circuits Circ1: Y Circ2: Y Circ3: N Circ4: N Enable compressors C1:Y C2:Y C3:Y C4:Y W 3000 Code CA 15.00 GB Displays average compressor hours. Displays the operating hours of compressors 1, 2, 3 and 4. Displays the operating status of the centrifuge compressors, the request and effective activation, the rpm and the percentage delivered. Displays other data relative to the centrifuge compressors, such as outlet temperature and inlet pressure Displays the operating status of the centrifuge compressors, the request and effective activation, the rpm and the percentage delivered. Displays other data relative to the centrifuge compressors, such as outlet temperature and inlet pressure Displays the operating status of the centrifuge compressors, the request and effective activation, the rpm and the percentage delivered. Displays other data relative to the centrifuge compressors, such as outlet temperature and inlet pressure Displays the operating status of the centrifuge compressors, the request and effective activation, the rpm and the percentage delivered. Displays other data relative to the centrifuge compressors, such as outlet temperature and inlet pressure Displays the subcooling value of circuits, the status of the electronic thermostat valve drivers and the number of valve aperture steps Selects/deselects circuits. 47.01 47.02 47.03 47.04 47.05 47.06 47.07 47.08 Selects/deselects compressors. This mask contains the reference information of the software [Code]. The closed padlock symbol shows that the board is provided with its propriety software; two padlocks appear on units with 3 or 4 circuits Access mask to setpoint menu. Press "Up" or "Down" to scroll the other masks and "Esc" to return to the submenu. Setpoint ← Para n° ↓ 40 C0240111-06-07-GB Mask Unit type: chiller Operating mode: chiller Setpoint active: Principal 07.0 °C Recovery 42.5 °C Chiller setpoint 07.0 °C Heatpump setpoint 42.5 °C Chiller setpoint 11.0 °C Heatpump setpoint 45.0 °C Dual setpoint chiller 07.0 °C Dual setpoint heatpump 45.0 °C Recovery Setpoint 42.5 °C In/Out ← ↓ Dig.In. master 12345 67890 12345 CCCCC CCCCC CCCCC CCC Dig.Out. master 12345 67890 12345 AAAAA AAAAA AAAAA AAAAA AAAAA AAAA An. In. master N° Value 1 07.3 bar 2 12.3 °C An. In. master N° Value 3 12.3 °C 4 12.3 °C An. In. master N° Value 5 12.3 °C 6 07.3 bar An. In. master N° Value 7 05.3 °C 8 00.0 An. In. master N° Value 9 00.0 °C 10 A An. Out. master N° Value 1 00.0 V 2 00.0 V An. Out. master N° Value 3 00.0 V 4 00.0 V An. Out. master N° Value 5 00.0 V 6 00.0 V Masters required Exp.1: Y Exp.2: N Exp.3: Y Exp.4: N Exp.5: N Description Mask for displaying the unit type and setting the operating mode. Para n° 43.01 Displays the current setpoint. If the letter R appears in the top right-hand corner, the active setpoint is the secondary one. Sets the chiller and heat pump setpoint for inlet adjustment. 43.02 43.03 43.04 Sets the chiller and heat pump setpoint for outlet adjustment. 43.05 43.06 Mask for setting the second setpoint (only visible if the dual setpoint function is enabled P39.23). 43.07 43.08 Sets the recovery setpoint (only displayed if recovery is enabled). 43.09 Access mask to In/Out menu. Press "Up" or "Down" to scroll the other masks and "Esc" to return to the submenu. Displays the state of the digital inputs and specifies their state. C: Contact closed A: Contact open The number of inputs displayed depends on the type of unit. (the figures on the second row are for reference purposes) Master is only specified on units with 3 or 4 circuits. Displays the state of the digital outputs and specifies their state. C: Contact closed A: Contact open The number of outputs displayed depends on the type of unit. (the figures on the second row are for reference purposes) Master is only specified on units with 3 or 4 circuits. Display of analogue inputs 1 and 2. Master is only specified on units with 3 or 4 circuits. Display of analogue inputs 3 and 4. Master is only specified on units with 3 or 4 circuits. Display of analogue inputs 5 and 6. Master is only specified on units with 3 or 4 circuits. Display of analogue inputs 7 and 8. Master is only specified on units with 3 or 4 circuits. Display of analogue inputs 9 and 10. Master is only specified on units with 3 or 4 circuits. Voltage applied to analogue outputs 1 and 2. Master is only specified on units with 3 or 4 circuits. Voltage applied to analogue outputs 3 and 4. Master is only specified on units with 3 or 4 circuits. Voltage applied to analogue outputs 5 and 6. Master is only specified on units with 3 or 4 circuits. Mask indicating the address for the expansion boards. This changes depending on the parameter settings. Master is only specified on units with 3 or 4 circuits. 41 C0240111-06-07-GB Mask Masters on-line Exp.1: Y Exp.2: N Exp.3: Y Exp.4: N Exp.5: N Dig.In. master exp1 12345 67890 12345 CCCCC CCCCC CCCCC CCC Dig.Out. master exp1 12345 67890 12345 AAAAA AAAAA AAAAA AAAAA AAAAA AAAA An. In. master exp1 N° Value 1 35.6 °C 2 40.5 °C An. In. master exp1 N° Value 3 37.2 °C 4 37.2 °C Dig.In. master exp2 12345 67890 12345 CCCCC CCCCC CCCCC CCC Dig.Out. master exp2 12345 67890 12345 AAAAA AAAAA AAAAA AAAAA AAAAA AAAA An. In. master exp2 N° Value 1 04.2 bar 2 03.9 bar An. In. master exp2 N° Value 3 35.6 °C 4 40.5 °C An. In. master exp2 N° Value 5 22.3 °C 6 24.2 °C An. In. master exp2 N° Value 7 22.4 °C 8 - °C Dig.In. master exp3 12345 67890 12345 CCCCC CCCCC CCCCC CCC Dig.Out. master exp3 12345 67890 12345 AAAAA AAAAA AAAAA AAAAA AAAAA AAAA An. In. master exp3 N° Value 1 06.0 °C 2 00.0 °C An. In. master exp3 N° Value 3 00.0 °C 4 00.0 °C An. Out. master exp3 N° Value 1 00.0 V Dig.In. master exp4 12345 67890 12345 CCCCC CCCCC CCCCC CCC Dig.Out. master exp4 12345 67890 12345 AAAAA AAAAA AAAAA AAAAA AAAAA AAAA An. In. master exp4 N° Value 1 A 2 A Description Mask for checking connection with the expansion boards. N means that there is no link with the expansion indicated in the address. Master is only specified on units with 3 or 4 circuits. Displays the state of the digital inputs of expansion 1 (if present) and specifies their state. C: Contact closed A: Contact open Master is only specified on units with 3 or 4 circuits. Displays the state of the digital outputs of expansion 1 (if present) and specifies their state. C: Contact closed A: Contact open Master is only specified on units with 3 or 4 circuits. Displays analogue inputs 1 and 2 of expansion 1 (if present). Master is only specified on units with 3 or 4 circuits. Displays analogue inputs 3 and 4 of expansion 1 (if present). Master is only specified on units with 3 or 4 circuits. Displays the state of the digital inputs of expansion 2 (if present) and specifies their state. C: Contact closed A: Contact open Master is only specified on units with 3 or 4 circuits. Displays the state of the digital outputs of expansion 2 (if present) and specifies their state. C: Contact closed A: Contact open Master is only specified on units with 3 or 4 circuits. Displays analogue inputs 1 and 2 of expansion 2 (if present). Master is only specified on units with 3 or 4 circuits. Displays analogue inputs 3 and 4 of expansion 2 (if present). Master is only specified on units with 3 or 4 circuits. Displays analogue inputs 5 and 6 of expansion 2 (if present). Master is only specified on units with 3 or 4 circuits. Displays analogue inputs 7 and 8 of expansion 2 (if present). Master is only specified on units with 3 or 4 circuits. Displays the state of the digital inputs of expansion 3 (if present) and specifies their state. C: Contact closed A: Contact open Master is only specified on units with 3 or 4 circuits. Displays the state of the digital outputs of expansion 3 (if present) and specifies their state. C: Contact closed A: Contact open Master is only specified on units with 3 or 4 circuits. Displays analogue inputs 1 and 2 of expansion 3 (if present). Master is only specified on units with 3 or 4 circuits. Displays analogue inputs 3 and 4 of expansion 3 (if present). Master is only specified on units with 3 or 4 circuits. Voltage applied to analogue output 1 of expansion 3 (if present). Master is only specified on units with 3 or 4 circuits. Displays the state of the digital inputs of expansion 4 (if present) and specifies their state. C: Contact closed A: Contact open Master is only specified on units with 3 or 4 circuits. Displays the state of the digital outputs of expansion 4 (if present) and specifies their state. C: Contact closed A: Contact open Master is only specified on units with 3 or 4 circuits. Displays analogue inputs 1 and 2 of expansion 4 (if present). Master is only specified on units with 3 or 4 circuits. 42 Para n° C0240111-06-07-GB Mask An. In. master exp4 N° Value 3 A 4 A Dig.In. master exp5 12345 67890 12345 CCCCC CCCCC CCCCC CCC Dig.Out. master exp5 12345 67890 12345 AAAAA AAAAA AAAAA AAAAA AAAAA AAAA An. In. master exp5 N° Value 1 00.0 °C 2 00.0 °C An. In. master exp5 N° Value 3 00.0 °C 4 00.0 °C Dig.In. slave 12345 67890 12345 CCCCC CCCCC CCCCC CCC Dig.Out. slave 12345 67890 12345 AAAAA AAAAA AAAAA AAAAA AAAAA AAAA An. In. slave N° Value 1 07.3 bar 2 12.3 °C An. In. slave N° Value 3 12.3 °C 4 12.3 °C An. In. slave N° Value 5 12.3 °C 6 07.3 bar An. In. slave N° Value 7 05.3 °C 8 00.0 An. In. slave N° Value 9 00.0 °C 10 A An. Out. slave N° Value 1 00.0 V 2 00.0 V An. Out. slave N° Value 3 00.0 V 4 00.0 V An. Out. slave N° Value 5 00.0 V 6 00.0 V Slaves required Exp.1: Y Exp.2: N Exp.3: Y Exp.4: N Exp.5: N Slaves on-line Exp.1: Y Exp.2: N Exp.3: Y Exp.4: N Exp.5: N Dig.In. slave exp1 12345 67890 12345 CCCCC CCCCC CCCCC CCC Dig.Out. slave exp1 12345 67890 12345 AAAAA AAAAA AAAAA AAAAA AAAAA AAAA Description Displays analogue inputs 3 and 4 of expansion 4 (if present). Master is only specified on units with 3 or 4 circuits. Displays the state of the digital inputs of expansion 5 (if present) and specifies their state. C: Contact closed A: Contact open Master is only specified on units with 3 or 4 circuits. Displays the state of the digital outputs of expansion 5 (if present) and specifies their state. C: Contact closed A: Contact open Master is only specified on units with 3 or 4 circuits. Displays analogue inputs 1 and 2 of expansion 5 (if present). Master is only specified on units with 3 or 4 circuits. Displays analogue inputs 3 and 4 of expansion 5 (if present). Master is only specified on units with 3 or 4 circuits. Displays the state of the digital inputs and specifies their state. C: Contact closed A: Contact open The number of inputs displayed depends on the type of unit. (the figures on the second row are for reference purposes) Displays the state of the digital outputs and specifies their state. C: Contact closed A: Contact open The number of outputs displayed depends on the type of unit. (the figures on the second row are for reference purposes) Display of analogue inputs 1 and 2. Display of analogue inputs 3 and 4. Display of analogue inputs 5 and 6. Display of analogue inputs 7 and 8. Display of analogue inputs 9 and 10. Voltage applied to analogue outputs 1 and 2. Voltage applied to analogue outputs 3 and 4. Voltage applied to analogue outputs 5 and 6. Mask indicating the address for the slave expansion boards. This changes depending on the parameter settings. Master is only specified on units with 3 or 4 circuits. Mask for checking connection with the slave expansion boards. N means that there is no link with the expansion indicated in the address. Master is only specified on units with 3 or 4 circuits. Displays the state of the digital inputs of expansion 1 (if present) and specifies their state. C: Contact closed A: Contact open Displays the state of the digital outputs of expansion 1 (if present) and specifies their state. C: Contact closed A: Contact open 43 Para n° C0240111-06-07-GB Mask An. In. slave exp1 N° Value 1 35.6 °C 2 40.5 °C An. In. slave exp1 N° Value 3 37.2 °C 4 37.2 °C Dig.In. slave exp2 12345 67890 12345 CCCCC CCCCC CCCCC CCC Dig.Out. slave exp2 12345 67890 12345 AAAAA AAAAA AAAAA AAAAA AAAAA AAAA An. In. slave exp2 N° Value 1 04.2 bar 2 03.9 bar An. In. slave exp2 N° Value 3 35.6 °C 4 40.5 °C An. In. slave exp2 N° Value 5 22.3 °C 6 24.2 °C An. In. slave exp2 N° Value 7 22.4 °C 8 - °C Dig.In. slave exp3 12345 67890 12345 CCCCC CCCCC CCCCC CCC Dig.Out. slave exp3 12345 67890 12345 AAAAA AAAAA AAAAA AAAAA AAAAA AAAA An. In. slave exp3 N° Value 1 06.0 °C 2 00.0 °C An. In. slave exp3 N° Value 3 00.0 °C 4 00.0 °C An. Out. slave exp3 N° Value 1 00.0 V Description Displays analogue inputs 1 and 2 of expansion 1 (if present). Dig.In. slave exp4 12345 67890 12345 CCCCC CCCCC CCCCC CCC Dig.Out. slave exp4 12345 67890 12345 AAAAA AAAAA AAAAA AAAAA AAAAA AAAA An. In. slave exp4 N° Value 1 A 2 A An. In. slave exp4 N° Value 3 A 4 A Dig.In. slave exp5 12345 67890 12345 CCCCC CCCCC CCCCC CCC Dig.Out. slave exp5 12345 67890 12345 AAAAA AAAAA AAAAA AAAAA AAAAA AAAA An. In. slave exp5 N° Value 1 00.0 °C 2 00.0 °C Displays the state of the digital inputs of expansion 4 (if present) and specifies their state. C: Contact closed A: Contact open Displays analogue inputs 3 and 4 of expansion 1 (if present). Displays the state of the digital inputs of expansion 2 (if present) and specifies their state. C: Contact closed A: Contact open Displays the state of the digital outputs of expansion 2 (if present) and specifies their state. C: Contact closed A: Contact open Displays analogue inputs 1 and 2 of expansion 2 (if present). Displays analogue inputs 3 and 4 of expansion 2 (if present). Displays analogue inputs 5 and 6 of expansion 2 (if present). Displays analogue inputs 7 and 8 of expansion 2 (if present). Displays the state of the digital inputs of expansion 3 (if present) and specifies their state. C: Contact closed A: Contact open Displays the state of the digital outputs of expansion 3 (if present) and specifies their state. C: Contact closed A: Contact open Displays analogue inputs 1 and 2 of expansion 3 (if present). Displays analogue inputs 3 and 4 of expansion 3 (if present). Voltage applied to analogue output 1 of expansion 3 (if present). Displays the state of the digital outputs of expansion 4 (if present) and specifies their state. C: Contact closed A: Contact open Displays analogue inputs 1 and 2 of expansion 4 (if present). Displays analogue inputs 3 and 4 of expansion 4 (if present). Displays the state of the digital inputs of expansion 5 (if present) and specifies their state. C: Contact closed A: Contact open Displays the state of the digital outputs of expansion 5 (if present) and specifies their state. C: Contact closed A: Contact open Displays analogue inputs 1 and 2 of expansion 5 (if present). 44 Para n° C0240111-06-07-GB An. In. N° 3 4 Mask slave exp5 Value 00.0 °C 00.0 °C Para n° Access mask to clock menu. Press "Up" or "Down" to scroll the other masks and "Esc" to return to the submenu. Clock ← Description Displays analogue inputs 3 and 4 of expansion 5 (if present). ↓ Mask showing that the clock board is missing or damaged. Clock card not installed Clock configuration: Date Time 01/01/04 08:00 Time bands not enabled. See user menu Daily time band programming: advanced Current date and time settings. Indicates that the time bands are set correctly but not enabled. To enable them, consult the user menu. Advanced time band programming manages four different daily time bands, type A and type 900.01 B; each type can be personalised and each is independent from the other. Only the A-type time band is used in the standard programming mode. Weekly timetable Monday type A Tuesday type A Wednesday type A Weekly timetable Thursday type A Friday type A Saturday disabled Weekly timetable Sunday disabled Weekly timetable setting. 900.02 900.03 900.04 Weekly timetable setting. 900.05 900.06 900.07 Weekly timetable setting. 900.08 Time Time Sp S Sp R band 1A Off 00:00 / 07:00 08.0°C W 40.0°C 40.0°C Setting band A, first daily time band. Time Time Sp S Sp R band 2A Adj. 07:00 / 12:00 07.0°C W 45.0°C 45.0°C Setting band A, second daily time band. Time Time Sp S Sp R band 3A Off 12:00 / 13:30 08.0°C W 40.0°C 40.0°C Setting band A, third daily time band. Time Time Sp S Sp R band 4A Adj. 13:30 / 19:30 07.0°C W 45.0°C 45.0°C Setting band A, fourth daily time band. Time Time Sp S Sp R band 5A Off 19:30 / 19:30 08.0°C W 40.0°C 40.0°C Setting band A, fifth daily time band. Time Time Sp S Sp R band 6A Off 19:30 / 19:30 08.0°C W 40.0°C 40.0°C Setting band A, sixth daily time band. 901.01 901.02 901.03 901.04 901.05 901.06 901.07 901.08 901.09 901.10 901.11 901.12 901.13 901.14 901.15 901.16 901.17 901.18 901.19 901.20 901.21 901.22 901.23 901.24 901.25 901.26 901.27 901.28 901.29 901.30 901.31 901.32 901.33 901.34 901.35 901.36 45 C0240111-06-07-GB Time Time Sp S Sp R Mask band 7A Off 19:30 / 19:30 08.0°C W 40.0°C 40.0°C Description Time Time Sp S Sp R band 8A Off 19:30 / 19:30 08.0°C W 40.0°C 40.0°C Setting band A, eighth daily time band. Time Time Sp S Sp R band 9A Off 19:30 / 19:30 08.0°C W 40.0°C 40.0°C Setting band A, ninth daily time band. Time Time Sp S Sp R Time Time Sp S Sp R band 10A Off 19:30 / 19:30 08.0°C W 40.0°C 40.0°C band 1B Off 00:00 / 06:30 09.0°C W 40.0°C 40.0°C Setting band A, tenth daily time band. Time Time Sp S Sp R band 2B Off 00:00 / 06:30 09.0°C W 40.0°C 40.0°C Setting band B, second daily time band. Time Time Sp S Sp R band 3B Adj. 06:30 / 19:30 07.0°C W 45.0°C 45.0°C Setting band B, third daily time band. Time Time Sp S Sp R band 4B Off 19:30 / 19:30 09.0°C W 40.0°C 40.0°C Setting band B, fourth daily time band. Time Time Sp S Sp R band 5B Off 19:30 / 19:30 09.0°C W 40.0°C 40.0°C Setting band B, fifth daily time band. Time Time Sp S Sp R band 6B Off 19:30 / 19:30 09.0°C W 40.0°C 40.0°C Setting band B, sixth daily time band. Time Time Sp S Sp R band 7B Off 19:30 / 19:30 09.0°C W 40.0°C 40.0°C Setting band B, seventh daily time band. Time Time Sp S Sp R band 8B Off 19:30 / 19:30 09.0°C W 40.0°C 40.0°C Setting band B, eighth daily time band. Setting band A, seventh daily time band. Setting band B, first daily time band. 46 Para n° 901.37 901.38 901.39 901.40 901.41 901.42 901.43 901.44 901.45 901.46 901.47 901.48 901.49 901.50 901.51 901.52 901.53 901.54 901.55 901.56 901.57 901.58 902.01 902.02 902.03 902.04 902.05 902.06 902.07 902.08 902.09 902.10 902.11 902.12 902.13 902.14 902.15 902.16 902.17 902.18 902.19 902.20 902.21 902.22 902.23 902.24 902.25 902.26 902.27 902.28 902.29 902.30 902.31 902.32 902.33 902.34 902.35 902.36 902.37 902.38 902.39 902.40 902.41 902.42 902.43 902.44 902.45 902.46 902.47 902.48 C0240111-06-07-GB Time Time Sp S Sp R Mask band 9B Off 19:30 / 19:30 09.0°C W 40.0°C 40.0°C Description Time Time Sp S Sp R Time Time Sp S Sp R band 10B Off 19:30 / 19:30 09.0°C W 40.0°C 40.0°C band 1C Off 00:00 / 06:30 09.0°C W 40.0°C 40.0°C Setting band B, tenth daily time band. Time Time Sp S Sp R band 2C Off 00:00 / 06:30 09.0°C W 40.0°C 40.0°C Setting band C, second daily time band. Time Time Sp S Sp R band 3C Adj. 06:30 / 19:30 07.0°C W 45.0°C 45.0°C Setting band C, third daily time band. Time Time Sp S Sp R band 4C Off 19:30 / 19:30 09.0°C W 40.0°C 40.0°C Setting band C, fourth daily time band. Time Time Sp S Sp R band 5C Off 19:30 / 19:30 09.0°C W 40.0°C 40.0°C Setting band C, fifth daily time band. Time Time Sp S Sp R band 6C Off 19:30 / 19:30 09.0°C W 40.0°C 40.0°C Setting band C, sixth daily time band. Time Time Sp S Sp R band 7C Off 19:30 / 19:30 09.0°C W 40.0°C 40.0°C Setting band C, seventh daily time band. Time Time Sp S Sp R band 8C Off 19:30 / 19:30 09.0°C W 40.0°C 40.0°C Setting band C, eighth daily time band. Time Time Sp S Sp R band 9C Off 19:30 / 19:30 09.0°C W 40.0°C 40.0°C Setting band C, ninth daily time band. Time Time Sp S Sp R Time Time Sp S Sp R band 10C Off 19:30 / 19:30 09.0°C W 40.0°C 40.0°C band 1D Off 00:00 / 06:30 09.0°C W 40.0°C 40.0°C Setting band C, tenth daily time band. Setting band B, ninth daily time band. Setting band C, first daily time band. Setting band D, first daily time band. 47 Para n° 902.49 902.50 902.51 902.52 902.53 902.54 902.55 902.56 902.57 902.58 903.01 903.02 903.03 903.04 903.05 903.06 903.07 903.08 903.09 903.10 903.11 903.12 903.13 903.14 903.15 903.16 903.17 903.18 903.19 903.20 903.21 903.22 903.23 903.24 903.25 903.26 903.27 903.28 903.29 903.30 903.31 903.32 903.33 903.34 903.35 903.36 903.37 903.38 903.39 903.40 903.41 903.42 903.43 903.44 903.45 903.46 903.47 903.48 903.49 903.50 903.51 903.52 903.53 903.54 903.55 903.56 903.57 903.58 904.01 904.02 904.03 904.04 904.05 904.06 C0240111-06-07-GB Time Time Sp S Sp R Mask band 2D Off 00:00 / 06:30 09.0°C W 40.0°C 40.0°C Time Time Sp S Sp R band 3D Adj. 06:30 / 19:30 07.0°C W 45.0°C 45.0°C Setting band D, third daily time band. Time Time Sp S Sp R band 4D Off 19:30 / 19:30 09.0°C W 40.0°C 40.0°C Setting band D, fourth daily time band. Time Time Sp S Sp R band 5D Off 19:30 / 19:30 09.0°C W 40.0°C 40.0°C Setting band D, fifth daily time band. Time Time Sp S Sp R band 6D Off 19:30 / 19:30 09.0°C W 40.0°C 40.0°C Setting band D, sixth daily time band. Time Time Sp S Sp R band 7D Off 19:30 / 19:30 09.0°C W 40.0°C 40.0°C Setting band D, seventh daily time band. Time Time Sp S Sp R band 8D Off 19:30 / 19:30 09.0°C W 40.0°C 40.0°C Setting band D, eighth daily time band. Time Time Sp S Sp R band 9D Off 19:30 / 19:30 09.0°C W 40.0°C 40.0°C Setting band D, ninth daily time band. Time Time Sp S Sp R band 10D Off 19:30 / 19:30 09.0°C W 40.0°C 40.0°C Setting band D, tenth daily time band. Log ← ↓ 10:36:04 20/12/06 Event N°001 A002 Y Phase sequence Description Setting band D, second daily time band. Access mask to Alarms Log menu. Press "Up" or "Down" to scroll the other masks and "Esc" to return to the submenu. Access mask to alarms log (only visible if the clock card is installed). Each alarm registered contains the following details: date and time, alarm or report code, activation or deactivation event (S = set, R = reset), event number, alarm description. 48 Para n° 904.07 904.08 904.09 904.10 904.11 904.12 904.13 904.14 904.15 904.16 904.17 904.18 904.19 904.20 904.21 904.22 904.23 904.24 904.25 904.26 904.27 904.28 904.29 904.30 904.31 904.32 904.33 904.34 904.35 904.36 904.37 904.38 904.39 904.40 904.41 904.42 904.43 904.44 904.45 904.46 904.47 904.48 904.49 904.50 904.51 904.52 904.53 904.54 904.55 904.56 904.57 904.58 C0240111-06-07-GB 4 TABLE OF MASKS W3000 base Mask Description Para n° level1 | level2 | level3 OFF >MODE > > CH >ST > > ON H >REQ > 50 > >ACT > > 50 >PUMP > > 60 >EVIN > > >EVO1 > > >EVO2 > > >CDIN 12.5 07.2 06.9 > > 24.3 >CDO1 >CDO2 > > 22.4 >EHt > > 15.6 >OPT > > 18.8 MNT >PROP > > P >LL S > > 0 >HL S > > >LL S > > >HL S > > >LL U > > >HL U > > >LL U > > >HL U > > >OFFS 0 0 0 0 0 0 0 > > 4.5 >OFFU >OFFU > > 51.0 >BAND Main display mask. Indicates the state of the unit ("ON", "OFF"). The submask displays the operating mode of the unit "CH"=Chiller, "HP"= Heat Pump The submask displays the operating status of the unit "ON K"= on from keypad, "ON D"= on from digital input, "ON B"= on from time bands, "ON S"= on from supervisor, "OFFA"= off from alarm, "OFFS"= off from supervisor, "OFFB"= off from time bands, "OFFD"= off from digital input, "OFFK"= off from keypad, "OFF"= off The submask displays the percentage of power requested by the thermoregulator value ranging from 0 to 100 The submask displays the percentage of power delivered by the thermoregulator value ranging from 0 to 100 The submask displays the time remaining before the pump is switched on/off. If the time decreases the unit is in the switching on/off phase. The time is expressed in seconds. The submask displays the inlet temperature of the evaporator temperature expressed in degrees centigrade The submask displays the outlet temperature of evaporator 1 temperature expressed in degrees centigrade (If 2 evaporators are present). The submask displays the outlet temperature of evaporator 2 temperature expressed in degrees centigrade The submask displays the inlet temperature of the condenser (only for water/water units if the condenser inlet probe is enabled) temperature expressed in degrees centigrade The submask displays the outlet temperature of condenser n° 1 (only for water/water units if the condenser outlet probe is enabled) (If 2 condensers are present). The submask displays the outlet temperature of condenser n° 2 (only for water/water units if the condenser outlet probe is enabled) temperature expressed in degrees centigrade (In water/air units, if the external air temperature probe is enabled). Displays external temperature temperature expressed in degrees centigrade (In water-air units, if the operational temperature probe is enabled). Displays optional temperature temperature expressed in degrees centigrade Service menu (Enable the "step adjustment" parameter first). The submask is used to set step adjustment. "P"=proportional adjustment, "P+I"=proportional + integral adjustment 55.01 The submask is used to set the lower limit of the chiller setpoint with inlet adjustment 55.04 expressed in degrees centigrade 55.05 The submask is used to set the upper limit of the chiller setpoint with inlet adjustment expressed in degrees centigrade 55.06 The submask is used to set the lower limit of the chiller setpoint with outlet adjustment expressed in degrees centigrade 55.07 The submask is used to set the upper limit of the chiller setpoint with outlet adjustment expressed in degrees centigrade 55.08 The submask is used to set the lower limit of the heat pump setpoint with inlet adjustment expressed in degrees centigrade 55.09 The submask is used to set the upper limit of the heat pump setpoint with inlet adjustment expressed in degrees centigrade 55.10 The submask is used to set the lower limit of the heat pump setpoint with outlet adjustment expressed in degrees centigrade 55.11 The submask is used to set the upper limit of the heat pump setpoint with outlet adjustment expressed in degrees centigrade 55.12 (Only in the quick mind adjustment mode). The submask is used to set the forced shutdown temperature in the chiller mode expressed in degrees centigrade 55.15 (Only in the quick mind adjustment mode). The submask is used to set the forced shutdown temperature in the heat pump mode expressed in degrees centigrade 55.16 (Only visible in the step adjustment mode). The submask is used to set the temperature adjustment band 49 C0240111-06-07-GB Mask > > >SETV > > >SETT > > >SETL > > >SETH > > >P PR 0 N 4 20 0 6.0 > > AUTO >P ON > > 60 >P OF > > >PUr >PUrL UrL > > > > > > >PUrU >PUrU > >DI > >DI 60 N 22.3 50 > 0 O > N S > > >SALI > > >DALI > > >SR I > > >DR I > > >PASS > > USER >REG > > >FLOU > > >BAND > > >SER > > >PROT > > >BAUD N 04.0 04.0 04.0 04.0 0 STEP IN N N MODB > > 1200 >ID > >SV > >SV > 0 O > N M > > N >PASS > > 0 CLH Description Para n° expressed in degrees centigrade 55.17 The submask is used to enable setpoint variation "N"= disabled, "Y"= enabled 55.20 The submask is used to set the setpoint variation signal type. "4-20"= 4-20 mA 55.21 The submask is used to set the minimum variation, corresponding to the minimum signal expressed in degrees centigrade 55.22 The submask is used to set the maximum variation, corresponding to the maximum signal expressed in degrees centigrade 55.23 (if 2 pumps are present on the evaporator). The submask is used to set the pump control type. "AUTO"= automatic, "PMP1"= pump 1 only, "PMP2"= pump 2 only 55.28 The submask is used to set the minimum pump operation time when the unit is switched on time expressed in seconds 55.29 The submask is used to set the minimum pump switch-off time when the unit is switched off time expressed in seconds 55.30 The submask is used to enable demand limit "N"=disabled, "Y"=enabled 55.31 temperature expressed in degrees centigrade value expressed in percent 55.32 (If the "demand limit" parameter is enabled"). The submask is used to set the power limitation percentage in the heat pump mode value expressed in percent 55.33 The submask is used to set the digital input for switching on/off the unit "N"= disabled, "Y"= enabled 55.35 (Only if the "operating mode" parameter is set on the heat pump). The submask is used to enable the digital input for the chiller/heat pump modes "N"= disabled, "Y"= enabled 55.36 Evaporator antifreeze alarm setpoint temperature expressed in degrees centigrade 35.29 Evaporator antifreeze alarm differential temperature expressed in degrees centigrade 35.30 Evaporator antifreeze heating element setpoint temperature expressed in degrees centigrade 35.31 Evaporator antifreeze heating element differential temperature expressed in degrees centigrade 35.32 The submask is used to set the Service Password from 0 to 9999 User menu The submask is used to set the adjustment type. (Switch off the unit before changing this setting!!!). "STEP"= steps, "QM"= quick mind 39.01 The submask is used to set the adjustment flow type. "IN"= inlet flow, "OUT"= outlet type 39.02 The submask can be used to enable time bands "N"= disabled, "Y"= enabled 39.41 The submask is used to enable the supervisor “N”= disabled, “SPV”= Supervision, “SQ”= Sequencer, “EDI”= Manager 3000 39.42 (If the "supervisor" is enabled). The submask is used to set the communication protocol. "MODB"= modbus, "LON"= lonWorks, "STD"=standard Carel 39.45 (If the "supervisor" is enabled). The submask is used to set the speed of communication expressed in bauds Possible values: "1200"-"2400"-"9600"-"19,2"=19200 39.46 (If the "supervisor" is enabled). The submask is used to set the identification n° for communicating in the supervisor network address 39.47 (If the "supervisor" is enabled). The submask is used to set on/off from the supervisor "N"= disabled, "Y"= enabled 39.43 (If the "supervisor" is enabled). The submask is used to enable the operating mode as supervisor "N"= disabled, "Y"= enabled 39.44 The submask is used to set the user Password from 0 to 9999 Clock menu, not available on this keypad >NONE I/O >DI A > > CCCC >DI B Input/output menu Displays digital input 1:4 C=closed,A=open. XXXX=[input1][input2][input3][input4] Displays digital input 5:8 50 C0240111-06-07-GB Mask > > CCCC >DI C > > CCCC >DI D > > CCC >DO A > > CAAA >DO B > > CAAA >DO C > > AAAA >AI 1 > > >AI 2 > > >AI 3 > > >AI 4 > > >AI 5 > > >AI 6 > > >AI 7 > > >AI 8 > > >AO 3 > > >AO 4 > > SETP >MODE 18.1 17.9 17.9 25.3 30.2 24.5 24.5 0 0 70 80 > > CH >ACT > > 50 >SUM > > 11.0 >SUM > > 9.5 >U I n > > 0 >U I n > > 0 UNIT >EVIN >EVO1 >EVO2 >CDIN >CDO1 >CDO2 >EHt >EHt >OPT >HP1 Description Para n° C=closed,A=open. XXXX=[input5][input6][input7][input8] Displays digital input 09:12:00 C=closed,A=open. XXXX=[input9][input10][input11][input12] Displays digital input 13:15 C=closed,A=open. XXX-=[input13][input14][input15] Displays digital output 1:4 C=closed,A=open. XXXX=[output1][output2][output3][output4] Displays digital output 5:8 C=closed,A=open. XXXX=[output5][output6][output7][output8] Displays digital output 9:12 C=closed,A=open. XXXX=[output9][output10][output11][output12] Displays analogue input 1 value Displays analogue input 2 value Displays analogue input 3 value Displays analogue input 4 value Displays analogue input 5 value Displays analogue input 6 value Displays analogue input 7 value Displays analogue input 8 value Displays analogue output 3 value expressed in Volts Displays analogue output 4 value expressed in Volts Setpoint menu The submask is used to set the operating mode (this depends on the machine type set in the manufacturer menu using the W3000-compact keypad) "CH"= Chiller, "HP"= heat pump 43.01 The submask displays the percentage of active power of the thermoregulator value ranging from 0 to 100 (If the FLOW parameter in the user menu is set to inlet). The submask is used to set the chiller setpoint with inlet adjustment 43.02 expressed in degrees centigrade 43.03 (If the FLOW parameter in the user menu is set to outlet). The submask is used to set the chiller setpoint with outlet adjustment expressed in degrees centigrade 43.05 (If the FLOW parameter in the user menu is set to inlet). The submask is used to set the heat pump setpoint with inlet adjustment expressed in degrees centigrade 43.04 (If the FLOW parameter in the user menu is set to outlet). The submask is used to set the heat pump setpoint with outlet adjustment expressed in degrees centigrade 43.06 Unit menu Displays evaporator inlet temperature Displays evaporator 1 outlet temperature (If evaporator 2 is present). Displays evaporator 2 outlet temperature (In water-water units, if the condenser inlet probe is enabled). Displays condenser inlet temperature (In water-water units, if the condenser outlet probe is enabled). Displays condenser outlet temperature (In water-water units with two condensers, if the condenser 2 outlet probe is enabled). Displays condenser 2 outlet temperature (In water/air units, if the external air temperature probe is enabled). Displays external temperature (In water-air units, if the operational temperature probe is enabled). Displays optional temperature Displays circuit 1 high pressure 51 C0240111-06-07-GB Mask > > >HP2 >HP2 > > >AO 3 > > >AO 4 > > >HH 1 > > >LH 1 > > >HH 2 > > >LH 2 > > >SEL1 > > >SEL2 > > >CA13 > > NO A 0 0 0 0 1 50 1 50 Y Y r.00 Description high pressure value Displays circuit 2 high pressure high pressure value Displays value of analogue output 3 value expressed in percent Displays value of analogue output 4 value expressed in percent Displays compressor 1 operating hours expressed in thousands e.g.: "1"=1000 hours Displays compressor 1 operating hours expressed in units e.g.: "50"=50 hours Displays compressor 2 operating hours expressed in thousands e.g.: "1"=1000 hours Displays compressor 2 operating hours expressed in units e.g.: "50"=50 hours Enables compressor 1 "N"=deselected, "Y"= selected Enables compressor 2 "N"=deselected, "Y"= selected Software release Software revision No alarm active 52 Para n° 47.05 47.06 C0240111-06-07-GB 5 PARAMETERS TABLE Para n° 01.01 01.02 01.03 01.04 01.05 01.06 01.07 01.08 01.09 01.10 01.11 01.12 01.13 01.14 01.15 01.16 01.17 01.18 01.19 01.20 01.21 01.22 01.23 01.24 01.25 05.02 05.07 05.08 05.09 05.10 05.11 05.12 05.13 05.14 05.15 05.16 05.17 05.18 05.19 05.20 05.21 05.22 05.23 05.24 05.25 05.26 05.27 05.28 05.29 05.30 07.01 07.03 07.04 07.08 07.09 07.10 07.11 07.12 09.02 09.03 09.04 Description of parameter Type of unit (0:chiller - 1:heat pump - 2:multi-use) Type of compressors (0:centrifuge - 1:hermetic - 2:semi-hermetic - 3:screw) N° circuits N° compressors per circuit N° separation stages per compressor Condensation type (0:none - 1:air - 2:water) N° condensers Reversal side for chiller-heat pump (0:water - 1:freon ) Fan type (0:axial - 1:centrifuge) Evaporation type (0:none - 1:water) N° evaporators N° evaporating coils Freon type (0: R22 - 1: R134a - 2: R404a 3: R407c - 4: R410a 5: R507c - 6: R290 - 7: R600 - 8: R600a - 9: R717 - 10: R744) Recovery enable (0:disabled - 1:enabled) Freecooling enable (0:disabled- 1:enabled) Condenser inlet temperature probe enable (0:disabled - 1:enabled) External air temperature probe enable (0:disabled - 1:enabled) Pressure transducers enable (0:disabled - 1: enabled) Low pressure transducers enable (0:disabled - 1: enabled) Start scale value of high pressure transducers End scale value of high pressure transducers Start scale value of low pressure transducers End scale value of low pressure transducers Optional temperature probe enable (0:disabled - 1:enabled) Condenser outlet temperature probe enable (0:disabled - 1:enabled) Winter setpoint limitation enable (0:disabled - 1:enabled) Winter setpoint limitation setpoint Winter setpoint limitation differential Maximum variation for winter setpoint limitation Minimum limit for winter setpoint limitation Coil fractioning enable (0:disabled - 1:enabled) Upper setpoint Upper differential Lower setpoint Lower differential Subcooling enable (0:disabled - 1:enabled) Start delay for subcooling adjustment Activation delay for subcooling relay Upper setpoint for opening/closing subcooling valves Lower setpoint for opening/closing subcooling valves Enable high temperature pressure switch control (0:disabled - 1:enabled) Pressure switch high temperature control setpoint Pressure switch high temperature control differential Pumpdown type (0:enabled - 1:during shutdown - 2:cyclical - 3:during shutdown and cyclical) End pumpdown setpoint Maximum pumpdown time Timeout for performing cyclical pumpdown Configure pumpdown start modes Enable valve override on all-in-one unit (0:disabled - 1:enabled) Modulating subcooling control enable for TECS (0:disabled - 1:enabled) Number of pumps on the evaporator Recuperator pump enable (0:disabled - 1: enabled) Condenser pump enable (0:disabled - 1: enabled) Maximum acceptable continuous operating time of a pump before rotation is forced Maximum difference in days between the two pumps before the 'Threshold' value of the pump is doubled Pump override enable during a long period of inactivity (0:No - 1:Yes) Threshold time for long period of inactivity Duration of pump override for long period of inactivity Minimum compressor shut-down time (with step adjustment) Minimum time between start-ups of different compressors (with step adjustment) Minimum time between start-ups of the same compressor (with step adjustment) 53 Default 0 1 2 1 0 1 1 0 0 1 1 1 U.M. - Min. 0 P 99.25 1 1 0 0 1 Max. P 99.01 P 99.02 P 99.03 P 99.04 P 99.05 2 2 0 1 0 1 1 P 99.31 P 99.06 P 01.03 3 - 0 10 0 0 0 0 0 0 0.0 30.0 0.0 30.0 0 0 0 -5.0 5.0 5.0 45.0 0 10.0 5.0 12.0 0.5 0 10 5 6.0 4.0 0 23.5 2.0 bar bar bar bar °C °C °C °C bar bar bar bar s s °C °C bar bar 0.0 P 01.20 0.0 P 01.22 P 01.21 45.0 P 01.23 45.0 -30.0 0.0 0.0 26.0 0.0 20.0 20.0 70.0 0.0 0.0 0.0 0.0 P 01.21 10.0 P 01.21 10.0 0 0 0.0 0.0 120 120 20.0 20.0 P 01.20 0.0 P 01.21 5.0 0 - 0 3 2.5 3 30 0 1 0 1 0 0 bar s min - 0.1 3 1 0 7.0 60 999 31 0 P 99.24 7 gg 1 1500 60 gg 1 9999 1 30 10 120 gg s s 1 1 1 1500 999 500 10 s 1 500 360 s 1 900 C0240111-06-07-GB Para n° 09.05 09.06 09.07 09.08 09.09 09.11 09.12 09.14 09.15 09.16 09.17 09.18 09.19 09.20 09.21 09.22 09.23 09.24 09.25 09.26 09.27 09.28 09.29 09.30 09.31 09.32 09.33 09.34 09.35 09.36 09.37 09.38 09.39 09.40 09.41 09.42 09.43 09.44 09.45 09.46 09.47 09.48 09.49 09.58 09.59 09.60 13.01 13.02 13.03 13.04 13.05 13.06 13.07 13.08 13.09 13.10 13.11 Description of parameter Maximum number of compressor start-ups (with Quick Mind or modulating adjustment of screw compressors) Maximum compressor start-up time (with Quick Mind or modulating adjustment of screw compressors) Enables 100% screw compressor forcing (0:disabled - 1:enabled) Minimum separation mode temperature setpoint Separation re-activation differential Maximum separation time before 100% screw compressor forcing 100% forcing time following maximum separation time control Period for power increase impulse (only modulating adjustment of screw compressors) Minimum duration of charge impulse (only modulating adjustment of screw compressors) Maximum duration of charge impulse (only modulating adjustment of screw compressors) Period for power decrease impulse (only modulating adjustment of screw compressors) Minimum duration of discharge impulse (only modulating adjustment of screw compressors) Maximum duration of discharge impulse (only modulating adjustment of screw compressors) Compressor start-up time (no-load) Minimum time the separation stages remain active Time the compressor oil valve remains active Screw compressor model (0:Bitzer - 1:Hitachi - 2:Fu-Sheng) Economiser enable (0:disabled - 1:enabled) Economiser start delay after compressor starts Setpoint for disabling the economiser Differential for disabling the economiser Enable compressor discharge temperature control, liquid injection (0:disabled - 1:enabled) Setpoint for enabling discharge temperature control Differential for disabling discharge temperature control Minimum percentage for modulating centrifuge compressors Maximum percentage for modulating centrifuge compressors Number of revs for compressor start (for units with shall and tube evaporator and centrifuge compressors) Start-up time for centrifuge compressors Number of bypass valves for centrifugal compressors Compression ration required to open the liquid line solenoid (centrifuge compressors only) Bypass valve closing timeout upon compressor start-up (centrifuge compressors only) Integral time for power increase (centrifuge compressors only) Minimum variation for power increase (centrifuge compressors only) Integral time for power decrease (centrifuge compressors only) Minimum variation for power decrease (centrifuge compressors only) Off percentage for centrifugal compressor 1 On percentage for centrifugal compressor 1 Off percentage for centrifugal compressor 2 On percentage for centrifugal compressor 2 Off percentage for centrifugal compressor 3 On percentage for centrifugal compressor 3 Off percentage for centrifugal compressor 4 On percentage for centrifugal compressor 4 Screw compressor oil control type (0:none, 1:direct, 2:indirect, 3:direct+indirect) Width of maintenance dead area (percentage inside the dead area in which the compressor is not modulated ) Type of compressor discharge temperature probe (0:NTC 0-150°C, 1:PT1000 ) Valve configuration in status 0 - off Valve configuration in status 1 - chiller on Valve configuration in status 2 - ch+rec on Valve configuration in status 3 - chiller pd Valve configuration in status 4 - chiller off Valve configuration in status 5 - rec on Valve configuration in status 6 - defrost Valve configuration in status 7 - rec pd Valve configuration in status 8 - rec off Valve configuration in status 9 - heatpump on Valve configuration in status 10 - ch+rec pd - 54 Default U.M. Min. Max. 10 - 1 12 150 s 1 500 0 -5.0 1.0 1200 120 °C °C s s -30.0 0.5 1 1 0.0 10.0 7200 300 10 s 0 999 0.3 s 0.0 P 09.16 2.0 s P 09.15 99.9 10 s 1 999 0.5 s 0.0 P 09.19 3.0 s P 09.18 99.9 30 10 10 0 0 120 15.0 2.0 s s s s bar bar 1 1 1 0 60 60 60 2 1 10.0 0.1 500 P 01.21 9.9 0 - 110.0 10.0 10 90 °C °C % % 70.0 0.1 0 P 09.31 P 23.13 25.0 P 09.32 100 3200 rpmx10 100 6000 20 1 s - 0 0 300 1 2.0 - 1.0 4.0 20 s 15 120 5 1 5 1 0 40 0 40 0 40 0 40 s % s % % % % % % % % % 1 0 1 0 0 P 09.42 0 P 09.44 0 P 09.46 0 P 09.48 120 100 120 100 P 09.43 100 P 09.45 100 P 09.47 100 P 09.49 100 1 - 0 P 99.32 15 % 0 100 0 0 0 0 0 0 0 0 0 0 0 0 - 0 0 0 0 0 0 0 0 0 0 0 99 99 99 99 99 99 99 99 99 99 99 C0240111-06-07-GB Para n° 13.12 13.13 13.14 13.15 13.16 13.17 13.18 13.19 13.20 13.21 13.22 13.23 15.03 15.04 15.05 15.06 15.07 17.01 17.02 17.03 17.04 17.05 17.06 17.10 17.11 17.12 17.13 17.14 17.15 17.32 17.33 17.34 17.35 17.36 17.37 17.38 17.39 17.40 17.41 19.01 19.02 19.03 19.04 19.05 19.06 21.01 21.02 21.03 21.04 21.05 21.06 21.07 21.08 21.09 21.10 21.11 21.12 21.13 21.14 21.15 21.16 21.17 21.18 Description of parameter Valve configuration in status 11 - heatpump pd Valve configuration in status 12 - heatpump off Valve 1 release time Valve 2 release time Valve 3 release time Valve 4 release time Valve 5 release time Valve 6 release time Valve 7 release time Valve 8 release time Valve 9 release time Valve 10 release time Pressure setpoint for forcing chiller status from recovery Pressure differential for forcing chiller status from recovery Enables cyclical forcing from chiller plus heat recovery mode to chiller mode Maximum time in chiller plus heat recovery mode before forcing to chiller mode Minimum time in chiller mode before forcing to chiller plus heat recovery mode Enable condensation control (0:No - 1:Yes) Type of condensation adjustment (0:Step. Cont - 1:Step - 2:Continuous) N° condensation steps Type of condensation control (0:Separate - 1:Individual - 2:Dual) Linear operation model (0:Standard - 1:0-10V - 2:PWM - 3:FAE - 4:0-10V C5110973) Condensation valve logic (0:direct - 1:reverse) Enable maximum condensation override in the chiller mode (0:No - 1:Yes) Maximum condensation override setpoint in the chiller mode Maximum condensation override differential in the chiller mode Enable minimum evaporation override in the heat pump mode (0:No 1:Yes) Minimum evaporation override setpoint in the heat pump mode Minimum evaporation override differential in the heat pump mode Continuous adjustment setpoint in the chiller mode Continuous adjustment differential in the chiller mode Continuous adjustment setpoint in the heat pump mode Continuous adjustment differential in the heat pump mode Maximum condensation limit in continuous adjustment Minimum condensation limit in continuous adjustment Adjustment under the minimum condensation limit (0:adjustment always1:adjustment Off) Condensation adjustment off differential Water modulating valve control (0:disabled - 1:enabled) Opening time 0-100% water modulating valve Temperature difference for activating freecooling Temperature offset for deactivating freecooling Temperature delta for deactivating freecooling Type of freecooling valve control (0:direct - 1:reverse) Hysteresis temperature of individual fans Start/stop delay for each fan Defrost type (0:standard - 1:Timer Tuning - 2:Timer Tuning + Auto Tuning) Start defrost setpoint Stop defrost setpoint Defrost delay Maximum defrost time Drip time Reference time at +10°C for calculating reference time. Reference time at -10°C for calculating reference time. Defrost start delay variation percentage Maximum number of defrosts per hour Calculation interval of the rate of change in the difference between external temperature and evaporation temperature Maximum rate of change in the difference between external temperature and evaporation temperature. Initial threshold of difference between external temperature and evaporation temperature for changing the defrost delay. Offset for calculating the threshold for changing the defrost delay. Defrost delay variation factor Circuit start-up bypass delay for override in the defrost mode Delay in the defrost delay change with temperature difference higher than the calculated threshold Maximum derived evaporation pressure 55 Default 0 0 0 0 0 0 0 0 0 0 0 0 23.5 5.0 0 U.M. s s s s s s s s s s bar bar - Min. 0 0 0 0 0 0 0 0 0 0 0 0 10.0 0.1 Max. 99 99 999 999 999 999 999 999 999 999 999 999 P 01.21 9.9 60 min 1 999 120 s 40 500 1 2 3 0 - 0 1 0 2 P 99.23 P 99.26 2 - 0 4 0 0 23.0 3.0 bar bar 10.0 0.1 P 01.21 5.0 0.5 0.1 5.0 0.1 0.5 0.1 P 17.37 0 15.0 5.0 P 01.21 15.0 15.0 15.0 100 P 17.36 0.0 5.0 0 - 1.0 0.5 14.0 5.0 6.0 1.0 100 30 bar bar bar bar bar bar % % 1 - 1.0 0 70 1.0 -4.0 1.0 0 0.3 20 2 3.0 14.0 1800 300 120 60 180 20 3 bar s °C °C °C °C s bar bar s s s s s s - 0 1.0 -10.0 0.1 999 5.0 P 99.21 3.0 0.0 1 0 0.0 P 21.02 60 10 0 30 P 21.07 0 1 1.0 500 2 P 21.03 P 25.07 3600 500 500 P 21.08 P 99.28 100 9 300 s 10 600 3.0 °C 0.1 9.9 15.0 °C 2.0 20.0 2.0 1 120 °C % s 0.5 0 0 9.9 99 999 600 s 0 999 -0.1 bar/m -10.0 10.0 C0240111-06-07-GB Para n° 21.19 21.20 21.21 21.22 21.23 21.24 21.25 23.01 23.02 23.03 23.04 23.05 23.06 23.07 23.08 23.09 23.10 23.11 23.12 23.13 23.14 23.15 23.16 23.25 23.26 23.27 23.28 23.29 23.30 23.31 23.34 27.01 27.02 27.03 27.04 27.05 27.06 27.07 27.08 27.09 27.10 27.11 27.12 27.13 27.14 27.21 27.22 27.23 27.24 27.25 27.26 27.27 27.28 27.31 27.32 27.33 27.34 27.51 27.52 27.53 27.54 31.01 31.02 31.03 31.04 31.05 31.06 31.07 31.08 Description of parameter Forced defrosting with low pressure (0:disabled - 1:enabled) Forced defrosting pressure threshold Circuit separation pressure with hermetic compressors Restore pressure for separating the circuits with hermetic compressors Free defrost enable (0:disabled - 1:enabled) Minimum external temperature for free defrost operation Drip mode enable with compressors on (0:disabled - 1:enabled) High pressure from transducers alarm High pressure from transducers alarm differential N° of low pressure alarm automatic resets Duration of low pressure alarm Low pressure alarm setpoint Low pressure alarm differential Enable low pressure control with low external air temperature (0:No - 1:Yes) Start-up time for low pressure control with low external air temperature Low pressure setpoint with low external air temperature Low pressure differential with low external air temperature N° of centrifugal compressor alarm automatic resets Bypass time of compressor thermal protection alarm Setpoint for activating the high compressor discharge temperature alarm Differential for deactivating the high compressor discharge temperature alarm Compressor oil alarm delay after starting Compressor oil alarm delay during running N° of flow switch alarm automatic resets Evaporator flow switch start-up delay Evaporator flow switch running delay Recuperator flow switch start-up delay Recuperator flow meter running delay Condenser flow meter start-up delay Condenser flow meter running delay Maximum delay for automatic reset of flow switch alarms and pump operation in alarm conditions Probe 1 calibration Probe 2 calibration Probe 3 calibration Probe 4 calibration Probe 5 calibration Probe 6 calibration Probe 7 calibration Probe 8 calibration Probe 9 calibration Probe 10 calibration Expansion 1 Probe 1 calibration Expansion 1 Probe 2 calibration Expansion 1 Probe 3 calibration Expansion 1 Probe 4 calibration Expansion 2 Probe 1 calibration Expansion 2 Probe 2 calibration Expansion 2 Probe 3 calibration Expansion 2 Probe 4 calibration Expansion 2 Probe 5 calibration Expansion 2 Probe 6 calibration Expansion 2 Probe 7 calibration Expansion 2 Probe 8 calibration Expansion 3 Probe 1 calibration Expansion 3 Probe 2 calibration Expansion 3 Probe 3 calibration Expansion 3 Probe 4 calibration Expansion 5 Probe 1 calibration Expansion 5 Probe 2 calibration Expansion 5 Probe 3 calibration Expansion 5 Probe 4 calibration Slave Probe 1 calibration Slave Probe 2 calibration Slave Probe 3 calibration Slave Probe 4 calibration Slave Probe 5 calibration Slave Probe 6 calibration Slave Probe 7 calibration Slave Probe 8 calibration 56 Default 1 1.7 1.7 2.1 1 4.0 0 28.0 7.0 3 120 1.6 0.9 0 120 0.1 0.5 3 10 125.0 U.M. bar bar bar °C bar bar s bar bar s bar bar s °C Min. Max. P 23.05 P 23.05 P 21.21 9.9 9.9 9.9 -10.0 10.0 0.0 0.0 0 0 0.1 0.1 P 25.07 30.0 5 500 9.9 4.0 10 0.1 0.1 0 0 70.0 P 23.04 P 23.05 4.0 5 360 125.0 10.0 °C 2.0 25.0 90 90 3 10 1 10 1 10 1 s s s s s s s s 1 1 0 1 1 1 1 1 1 120 120 9 120 20 120 20 120 20 15 s 15 999 0.0 0.0 0.0 0.0 0.0 0.0 0.0 0.0 0.0 0.0 0.0 0.0 0.0 0.0 0.0 0.0 0.0 0.0 0.0 0.0 0.0 0.0 0.0 0.0 0.0 0.0 0.0 0.0 0.0 0.0 0.0 0.0 0.0 0.0 0.0 0.0 0.0 0.0 °C/bar °C/bar °C/bar °C/bar °C/bar °C/bar °C/bar °C/bar °C/bar °C/bar °C/bar °C/bar °C/bar °C/bar °C/bar °C/bar °C/bar °C/bar °C/bar °C/bar °C/bar °C/bar °C/bar °C/bar °C/bar °C/bar °C/bar °C/bar °C/bar °C/bar °C/bar °C/bar °C/bar °C/bar °C/bar °C/bar °C/bar °C/bar -9.9 -9.9 -9.9 -9.9 -9.9 -9.9 -9.9 -9.9 -9.9 -9.9 -9.9 -9.9 -9.9 -9.9 -9.9 -9.9 -9.9 -9.9 -9.9 -9.9 -9.9 -9.9 -9.9 -9.9 -9.9 -9.9 -9.9 -9.9 -9.9 -9.9 -9.9 -9.9 -9.9 -9.9 -9.9 -9.9 -9.9 -9.9 9.9 9.9 9.9 9.9 9.9 9.9 9.9 9.9 9.9 9.9 9.9 9.9 9.9 9.9 9.9 9.9 9.9 9.9 9.9 9.9 9.9 9.9 9.9 9.9 9.9 9.9 9.9 9.9 9.9 9.9 9.9 9.9 9.9 9.9 9.9 9.9 9.9 9.9 C0240111-06-07-GB Para n° 31.09 31.10 31.11 31.12 31.13 31.14 31.21 31.22 31.23 31.24 31.25 31.26 31.27 31.28 31.31 31.32 31.33 31.34 31.51 31.52 31.53 31.54 35.01 35.02 35.03 35.04 35.05 35.06 35.11 35.12 35.13 35.14 35.15 35.16 35.17 35.18 35.27 35.28 35.29 35.30 35.31 35.32 35.33 35.34 35.35 35.36 35.37 35.38 35.39 35.40 35.41 35.42 35.43 35.44 35.45 35.46 35.47 35.48 35.49 35.50 35.51 35.52 35.53 35.54 35.55 35.56 35.57 39.01 Description of parameter Slave Probe 9 calibration Slave Probe 10 calibration Expansion 1 Slave Probe 1 calibration Expansion 1 Slave Probe 2 calibration Expansion 1 Slave Probe 3 calibration Expansion 1 Slave Probe 4 calibration Expansion 2 Slave Probe 1 calibration Expansion 2 Slave Probe 2 calibration Expansion 2 Slave Probe 3 calibration Expansion 2 Slave Probe 4 calibration Expansion 2 Slave Probe 5 calibration Expansion 2 Slave Probe 6 calibration Expansion 2 Slave Probe 7 calibration Expansion 2 Slave Probe 8 calibration Expansion 3 Slave Probe 1 calibration Expansion 3 Slave Probe 2 calibration Expansion 3 Slave Probe 3 calibration Expansion 3 Slave Probe 4 calibration Expansion 5 Slave Probe 1 calibration Expansion 5 Slave Probe 2 calibration Expansion 5 Slave Probe 3 calibration Expansion 5 Slave Probe 4 calibration Evaporator pump hour counter threshold Pump 2 hour counter threshold Compressor 1 hour counter threshold Compressor 2 hour counter threshold Compressor 3 hour counter threshold Compressor 4 hour counter threshold Compressor 1 hours (thousands) Compressor 1 hours (units) Compressor 2 hours (thousands) Compressor 2 hours (units) Compressor 3 hours (thousands) Compressor 3 hours (units) Compressor 4 hours (thousands) Compressor 4 hours (units) Recovery priority in winter (0:disabled - 1:enabled) Remote recovery control enable (0:disabled - 1:enabled) Evaporator antifreeze alarm setpoint Evaporator antifreeze alarm differential Evaporator antifreeze heating element setpoint Evaporator antifreeze heating element differential Condenser antifreeze alarm setpoint Condenser antifreeze alarm differential Recuperator antifreeze heating element setpoint Recuperator antifreeze heating element differential Low water flow alarm setpoint Low water flow alarm delay High/low inlet temperature (0:signal - 1:alarm) High/low inlet temperature alarm delay High inlet water temperature alarm setpoint Low inlet water temperature alarm setpoint Pre-alarms enable (0:disabled - 1: enabled) Evaporator antifreeze pre-alarm offset with respect to evaporator antifreeze alarm (P23.17) Evaporator antifreeze pre-alarm differential Low pressure pre-alarm offset with respect to low pressure alarm from transducer (P23.05) Low pressure pre-alarm differential High pressure pre-alarm offset with respect to high pressure alarm from transducer (P23.01) High pressure pre-alarm differential Low external air temperature alarm enable (0:disabled - 1:enabled) Low external air temperature alarm activation set point Differential for low external air temperature alarm deactivation Insufficient evaporation pressure alarm enable (0:disabled - 1:enabled) Insufficient evaporation pressure alarm delay Insufficient evaporation pressure alarm run delay Insufficient evaporation pressure alarm setpoint Insufficient evaporation pressure alarm differential Adjustment type (0:step - 1:Quick Mind or Modulating) 57 Default 0.0 0.0 0.0 0.0 0.0 0.0 0.0 0.0 0.0 0.0 0.0 0.0 0.0 0.0 0.0 0.0 0.0 0.0 0.0 0.0 0.0 0.0 12 12 10 10 10 10 0 0 0 0 0 0 0 0 0 0 4.0 4.0 4.0 4.0 4.0 4.0 4.0 4.0 8.0 30 0 30 30.0 15.0 0 U.M. °C/bar °C/bar °C/bar °C/bar °C/bar °C/bar °C/bar °C/bar °C/bar °C/bar °C/bar °C/bar °C/bar °C/bar °C/bar °C/bar °C/bar °C/bar °C/bar °C/bar °C/bar °C/bar hx1000 hx1000 hx1000 hx1000 hx1000 hx1000 hx1000 h hx1000 h hx1000 h hx1000 h °C °C °C °C °C °C °C °C °C s s °C °C - Min. -9.9 -9.9 -9.9 -9.9 -9.9 -9.9 -9.9 -9.9 -9.9 -9.9 -9.9 -9.9 -9.9 -9.9 -9.9 -9.9 -9.9 -9.9 -9.9 -9.9 -9.9 -9.9 0 0 0 0 0 0 0 0 0 0 0 0 0 0 Max. 9.9 9.9 9.9 9.9 9.9 9.9 9.9 9.9 9.9 9.9 9.9 9.9 9.9 9.9 9.9 9.9 9.9 9.9 9.9 9.9 9.9 9.9 999 999 999 999 999 999 999 999 999 999 999 999 999 999 -30.0 1.0 P 35.29 1.0 -30.0 1.0 -30.0 1.0 3.0 P 23.26 5.0 10.0 5.0 10.0 5.0 10.0 5.0 10.0 15.0 30 1 P 99.12 15.0 999 40.0 P 99.13 0.5 1.0 °C °C -9.9 0.1 9.9 9.9 0.5 0.5 bar bar 0.1 0.1 9.9 9.9 -3.5 4.0 0 -25.0 2.0 0 300 30 3.4 0.1 1 bar bar °C °C s s bar bar - -9.9 0.1 9.9 9.9 -60.0 0.0 0.0 50.0 P 23.04 1 P 23.05 0.0 600 300 10.0 1.0 C0240111-06-07-GB Para n° Description of parameter 39.02 Adjustment control type (0:inlet - 1:outlet) 39.41 Time bands enable (0:disabled - 1:enabled) Serial line configuration (0:Disabled - 1:Supervision - 2:Sequencer 39.42 3:Manager 3000) 39.43 On/off enable from supervisor (0:No - 1:Yes) 39.44 Enable operating mode modification from supervisor (0:No - 1:Yes) #Set communication protocol with supervisor (1:Standard - 2:ModBus 39.45 3:LonWorks - 4:Trend - 5:Bacnet) #Speed of communication with supervisor setting (0:1200 baud - 1:2400 39.46 baud - 2:4800 baud - 3:9600 baud - 4:19200 baud) 39.47 #Set unit identification number with supervisor 39.48 Language (0:Italian - 1:English - 2:Extra language) Operatine mode for unit: -ch(3:ch) -ch+fc(7:ch - 8:ch+fc) -ch+rec(2:ch+rec 3:ch) -hp(3:ch - 4:hp) -Q(0:aut - 1:rec - 2:ch+rec - 3:ch) -NR(10:sum.aut 11:sum.rec - 12:sum.ch+rec - 13:sum.ch - 14:win.hp - 15:win.rec 43.01 16:win.aut) 43.02 Chiller setpoint with Quick Mind adjustment on inlet probe 43.03 Chiller setpoint with step adjustment on inlet probe 43.04 Heat pump setpoint with adjustment on inlet probe 43.05 Chiller setpoint with adjustment on outlet probe 43.06 Heat pump setpoint with adjustment on outlet probe 43.07 Chiller dual setpoint 43.08 Heat pump dual setpoint 43.09 Recovery setpoint 47.01 Circuit 1 enable (0:disabled - 1:enabled) 47.02 Circuit 2 enable (0:disabled - 1:enabled) 47.03 Circuit 3 enable (0:disabled - 1:enabled) 47.04 Circuit 4 enable (0:disabled - 1:enabled) 47.05 Compressor 1 enable (0:disabled - 1:enabled) 47.06 Compressor 2 enable (0:disabled - 1:enabled) 47.07 Compressor 3 enable (0:disabled - 1:enabled) 47.08 Compressor 4 enable (0:disabled - 1:enabled) 51.01 Enable pre-condensation (0:No - 1:Yes) 51.02 Pre-condensation time 51.03 Pre-condensation percentage 51.04 Step 1 setpoint in chiller mode 51.05 Step 1 differential in chiller mode 51.06 Step 2 setpoint in chiller mode 51.07 Step 2 differential in chiller mode 51.08 Step 3 setpoint in chiller mode 51.09 Step 3 differential in chiller mode 51.10 Step 4 setpoint in chiller mode 51.11 Step 4 differential in chiller mode 51.12 Step 1 setpoint in heat pump mode 51.13 Step 1 differential in heat pump mode 51.14 Step 2 setpoint in heat pump mode 51.15 Step 2 differential in heat pump mode 51.16 Step 3 setpoint in heat pump mode 51.17 Step 3 differential in heat pump mode 51.18 Step 4 setpoint in heat pump mode 51.19 Step 4 differential in heat pump mode 51.20 Force circuits with fan overheating alarm (0:disabled - 1:enabled) 55.01 Step adjustment type (0: proportional - 1: proportional+integral) 55.02 Integral time 55.03 Integral offset limit 55.04 Minimum chiller setpoint (in the Quick Mind inlet adjustment mode) 55.05 Minimum chiller setpoint (in the step inlet adjustment mode) 55.06 Maximum chiller setpoint (with inlet adjustment) 55.07 Minimum chiller setpoint (with outlet adjustment) 55.08 Maximum chiller setpoint (with outlet adjustment) 55.09 Minimum heat pump setpoint (with inlet adjustment) 55.10 Maximum heat pump setpoint (with inlet adjustment) 55.11 Minimum heat pump setpoint (with outlet adjustment) 55.12 Maximum heat pump setpoint (with outlet adjustment) 55.13 Minimum recovery setpoint 55.14 Maximum recovery setpoint 55.15 Forced summer shutdown 55.16 Forced winter shutdown 55.17 Temperature adjustment band (with step adjustment) 55.18 Recovery adjustment band 55.19 Enable dual setpoint (0:No - 1:Yes) 58 Default 1 0 U.M. - Min. Max. 0 - 0 3 0 0 - 2 - 1 5 3 - 0 4 11 0 - 1 0 200 2 3 11.0 9.5 42.5 7.0 45.0 7.0 45.0 42.5 1 1 1 1 1 1 1 1 1 10 66 15.0 3.0 16.5 3.0 18.0 3.0 19.0 2.0 8.0 1.0 5.0 1.4 2.2 0.8 1.0 0.5 0 0 90 20 11.0 6.0 20.0 6.0 15.0 30.0 44.0 30.0 48.0 30.0 50.0 4.5 51.0 2.5 2.5 0 °C °C °C °C °C °C °C °C s % bar bar bar bar bar bar bar bar bar bar bar bar bar bar bar bar s % °C °C °C °C °C °C °C °C °C °C °C °C °C °C °C - P 99.07 P 55.04 P 55.05 P 55.09 P 55.07 P 55.11 P 99.11 P 99.13 P 55.13 P 99.08 P 55.06 P 55.06 P 55.10 P 55.08 P 55.12 P 99.12 P 99.14 P 55.14 0 50 0.5 0.1 0.5 0.1 0.5 0.1 0.5 0.1 0.5 0.1 0.5 0.1 0.5 0.1 0.5 0.1 30 100 P 01.21 9.9 P 01.21 9.9 P 01.21 9.9 P 01.21 9.9 15.0 5.0 15.0 5.0 15.0 5.0 15.0 5.0 0 1 P 99.09 P 99.09 P 99.10 P 99.09 P 43.05 22.0 P 43.04 26.0 P 43.06 26.0 P 55.13 P 35.29 P 99.14 1.0 1.0 600 100 P 43.02 P 43.03 P 99.29 P 43.05 P 99.30 P 43.04 70.0 P 43.06 70.0 P 55.14 70.0 P 99.11 75.0 10.0 10.0 C0240111-06-07-GB Para n° 55.20 55.21 55.22 55.23 55.24 55.25 55.26 55.27 55.28 55.29 55.30 55.31 55.32 55.33 55.34 55.35 55.36 Description of parameter Enable setpoint variation from external signal (0:No - 1:Yes) External signal type for setpoint variation (0:4-20 mA - 1:0-5 V) Minimum for setpoint varied from external signal Maximum for setpoint varied from external signal Enable recovery setpoint variation from external signal (0:No - 1:Yes) External signal type for recovery setpoint variation (0:4-20 mA - 1:0-5 V) Minimum for recovery setpoint varied from external signal Maximum for recovery setpoint varied from external signal Evaporator pump operating mode (0:automatic - 1:pump 1 only - 2:pump 2 only) Minimum delay between pump start-up and compressor start-up Pump shutdown delay Enable limit demand (0:No - 1:Yes) Power limitation in chiller mode (%) Power limitation in heat pump mode (%) Power limitation in recovery mode (%) On/off enable from digital input (0:No - 1:Yes) Chiller/heat pump enable from digital input (0:No - 1:Yes) 59 Default 0 0 0.0 6.0 0 0 0.0 6.0 U.M. °C °C °C °C Min. Max. 0.0 0.0 10.0 20.0 0.0 0.0 10.0 10.0 0 60 60 0 50 50 50 1 0 s s % % % - 0 1 10 2 500 500 0 0 0 100 100 100 C0240111-06-07-GB 5.1 Table of parameter limits (depending on unit configuration) Para n° Description of parameter 99.01 Maximum settable limit for configuring the machine type (depends on the type of hardware and the type of compressor): - with hardware L and centrifuge compressors (0:chiller) - with hardware B (1:chiller and heat pump) - other cases (2:chiller, heat pump, all-in-one) 99.02 Maximum settable limit for choosing the type of compressor (depends on the type of board installed): - with hardware B (1:hermetic) - with hardware L (1:centrifuge or hermetic) - with hardware XL (3:alternative or screw) 99.03 Maximum number of circuits (depends on the type of hardware): - with hardware B (2: maximum 2 circuits) - other cases (4: maximum 4 circuits, slave board required) 99.04 Maximum number of compressors per circuit (depends on the type of hardware and the configured type of compressors): - screw compressors (1:maximum one comp. per circuit) - alternative compressors (2:maximum two comp. per circuit) - hardware B with 1 circ. (2:maximum two comp. on the same circuit) - hardware B with 2 circ. (1:maximum one comp. per circuit) - centrifuge comp. with 1 circ. (4:maximum four comp. per circ.) - centrifuge comp. with 2 circ. (2:maximum two comp. per circ.) - centrifuge comp. with 4 circ. (1:maximum one comp. per circ.) 99.05 Maximum number of separation stages per compressor (depends on the set type of compressor): - with hermetic compressors (0:no separation stages) - other cases (2:maximum two separation stages per compressor) 99.06 Maximum number of evaporators (depends on the type of hardware and the number of configured cooling circuits): - with hardware B (1: maximum one evaporator) - with 2 cooling circuits (2:maximum two evaporators) - with 4 cooling circuits (4:maximum four evaporators) 99.07 Maximum value settable for the operating mode (depends on the configured type of machine): - Chiller (3:chiller) - Chiller + freecooling (7:chiller or chiller+fc) - Chiller + recovery (2:chiller+rec or chiller) - Heat pump (3:chiller or heatpump) - All-in-one unit (0:auto, recovery, chiller+rec or chiller) - Heat pump with recovery (10:summer auto, summer rec, summer ch+rec, summer ch., winter hp., winter rec or winter auto) 99.08 Maximum settable value for the operating mode (depends on the configured type of machine): - Chiller (3:chiller) - Chiller + freecooling (8:chiller or chiller+fc) - Chiller + recovery (3:chiller+rec or chiller) - Heat pump (4:chiller or heatpump) - All-in-one unit (3:auto, recovery, chiller+rec or chiller) - Heat pump with recovery (16:summer auto, summer rec, summer ch+rec, summer ch., winter hp., winter rec or winter auto) 99.09 Minimum settable value for the minimum chiller setpoint equal to anti-freeze setpoint + 2°C (P35.29+2°C) 99.10 Maximum settable value for the minimum chiller setpoint, depends on the set type of adjustment: - with step adjustment on inlet (P43.03) - with quick mind adjustment on inlet (P43.02) 99.11 Minimum chiller setpoint limit (depends on the type of adjustment): - with step adjustment on inlet (P55.05) - with quick mind adjustment on inlet (P55.04) - with adjustment on outlet (P55.07) 99.12 Maximum chiller setpoint limit (depends on the type of adjustment): - with adjustment on inlet (P55.06) - with adjustment on outlet (P55.08) 99.13 Minimum heat pump setpoint limit (depends on the type of adjustment): - with adjustment on inlet (P55.09) - with adjustment on outlet (P55.11) 99.14 Maximum heat pump setpoint limit (depends on the type of adjustment): - with adjustment on inlet (P55.10) - with adjustment on outlet (P55.12) 99.18 Advanced time band enable limit, depends on the advanced time band enable (P900.01): - with standard time band prog.: 1 (A bands), - with advanced time band prog.: 4 (bands A, B, C and D) 99.19 Minimum settable value for controlling time bands (depends on parameter settings) (1:off) 99.20 Maximum settable value for controlling time bands (depends on parameter settings) (2:adjustment) 99.21 Negated value of parameter: (P19.03+3°C) 60 C0240111-06-07-GB Para n° Description of parameter 99.23 Maximum number of available ventilation steps (depends on the type of board used and the configured type of compressors): - hardware XL (4:maximum four ventilation steps) - unit with centrifuge compressors (4:maximum four steps) - other cases (3:maximum three ventilation steps) 99.24 Maximum number of pumps available from board (2: maximum two pumps) 99.25 Minimum settable limit for choosing the compressor type (depends on the type of board installed): - with hardware B (1:hermetic) - with hardware L (0:centrifuge or hermetic) - with hardware XL (2:alternative or screw) 99.26 Possible ventilation type, depends on the number of cooling circuits: - unit with 4 circuits (2: separate, single or dual ventilation) - unit with 3 circuits (0: separate ventilation) - unit with 1 or 2 circuits (1: separate or single ventilation) 99.28 Maximum upper Timer-Tuning-Defrost band limit. This is the result of (maximum defrost time)-(reference time calculated by the system according to weather conditions and the unit operating mode) (P21.05 - P21.07 o P21.05 - P21.08) 99.29 Maximum settable chiller setpoint limit with inlet adjustment of: High inlet temperature alarm setpoint-7°C (P35.41 - 7°C) 99.30 Maximum settable chiller setpoint limit with outlet adjustment of: High inlet temperature alarm setpoint-12°C (P35.41 - 12°C) 99.31 maximum limit for the configurable type of evaporators (1:no evaporation or water evaporation) 99.32 maximum limit for setting the screw compressor oil management algorithms (depends on the set type of adjustment): - with modulating adjustment (1: none or direct) - with step adjustment (3: none, direct, indirect or direct+indirect) 61 C0240111-06-07-GB 6 DIAGRAMS This section explains how some operating algorithms work. Most of the configuration parameters are contained in the manufacturer and service menus; the tree diagram for navigation is shown below. Enter the manufacturer menu (not present in W3000 base) by pressing [Menu] / selecting the manufacturer menu by pressing [UP] / entering the password. The tree diagram of the manufacturer menu is shown in figure 6.0a. Select manufacturer menu Esc ↑/↓ Manufacturer menu ↑/↓ Esc Select configuration menu Esc / ↵ Configuration menu ↑/↓ Esc / ↵ Global menu ↑/↓ Esc / ↵ Functions menu ↑/↓ Esc / ↵ Compressors menu ↑/↓ Esc / ↵ Valves menu ↑/↓ Esc / ↵ Defrost menu ↑/↓ Esc / ↵ Recovery menu ↑/↓ Esc / ↵ Condensation menu ↑/↓ Esc / ↵ Alarms menu ↑/↓ Esc / ↵ Default menu ↑/↓ ↑/↓ Esc Select global menu ↑/↓ Esc Select functions menu ↑/↓ Esc Select compressors menu ↑/↓ Esc Select valves menu ↑/↓ Esc Select defrost menu ↑/↓ Esc Select recovery menu ↑/↓ Esc Select condensation menu ↑/↓ Esc Select alarms menu ↑/↓ Esc Super User ↑/↓ Esc Select default menu ↑/↓ Figure 6.0a : manufacturer menu tree diagram 62 C0240111-06-07-GB Enter the service menu (only partly present in W3000 base) by pressing [Menu] / selecting the service menu by pressing [UP] / entering the password. The tree diagram of the service menu is shown in figure 6.0b. Select assistance menu Esc ↑/↓ Assistance menu ↑/↓ Esc Select assistance menu Esc / ↵ Assistance menu ↑/↓ Esc / ↵ Adjustment menu ↑/↓ Esc / ↵ Pumps menu ↑/↓ Esc / ↵ Freecooling menu ↑/↓ Esc / ↵ Service menu ↑/↓ Esc / ↵ Fan menu ↑/↓ Esc / ↵ Calibration menu ↑/↓ ↑/↓ Esc Select adjustment menu ↑/↓ Esc Select pumps menu ↑/↓ Esc Select freecooling menu ↑/↓ Esc Select service menu ↑/↓ Esc Select fan menu ↑/↓ Esc Select calibration menu ↑/↓ Figure 6.0b : service menu tree diagram 63 C0240111-06-07-GB 6.1 Freecooling The “freecooling” function is applied to the efficient production of cold water by using external air. The operating principle is illustrated in the following figure External air Text Tfcool Tin FREECOOLING COIL Tout EVAPORATOR "3-way" valve Outlet water Inlet water Figure 6.1: block diagram of the freecooling activation circuit If the external water is cold, the valve closes and the water passes through the coil which cool the water by the water-air heat exchange achieved thanks to the internal fans. If, instead, the air is hot, there is no point in it passing through the coil and all the water is cooled with the evaporator compressors. Further details of the valve and fan adjustment system are shown in figures 6.2. % a pValve e rtu ra v a lv o la aperture - On/Off V a l v o valve la O n / O f f - Modulatine V a l v o l a mvalve o d u la n t e 100% T e x t. D e lta ( P 1 9 .0 1 ) T f c o o l. Figure 6.2a: operation of the valve (On/Off or modulating) depending on the difference between the unit inlet temperature (Tfcool) and that of the external air (Text) - V a lvo lavalve O n /O ff On/Off - V Modulatine a lvo la m ovalve d u la n te % a p eValve rtu ra vaperture a lvo la 100% T . in D iff. (P 1 9 .0 3 ) S e tp o in t Chiller C setpoint h ille r O ffs e t (P 1 9 .0 2 ) Figure 6.2b: control in low freecooling temperature: to prevent the risk of the coil freezing, the valve is closed below a suitable offset 64 C0240111-06-07-GB n. step RStep egolazione a step speed velocità adjustment % richiesta demand T. in Setpoint Dynamic Dinam ico setpoint Setpoint Chiller Csetpoint hiller Banda dinamfreecooling ica di freecooling Dynamic band Figure 6.2c: fan adjustment in the step mode (example with 8 fans) 100% Regolazione velocità continua Continual speed adjustment % richiesta demand T. in Setpoint Dynamic setpoint Dinamico Banda dinamica di freecooling Dynamic freecooling band Figure 6.2d: fan adjustment in the continuous mode 65 Setpoint Chiller setpoint Chiller C0240111-06-07-GB 6.2 Condensation Condensation adjustment depends on how the fans are turned on. Various condensation adjustment types in the “chiller” operating mode are shown below. The fans may be turned on using the on/off system ( “step”) in which the fans are turned on progressively one after the other (figure 6.3a) or mutually excluded (figure 6.3b). Fans switched on in parallel but that increase fan speed (depending on pressure) are illustrated in figure 6.3c). Continual step speed adjustment Active steps Step4 on Step3 on 3 Set Point differential Set Point Step2 on 2 Set Point differential Set Point Step1 on 1 Set Point differential Set Point differential Set Point Set Point Pressure Figure 6.3a: “continuous step” condensation adjustment Active steps step speed adjustment Step1 on Step2 on Step3 on Step4 on 1 Set Point differential Set Point Set Point differential Set Point Set Point differential Set Point Set Point differential Set Point Pressure Figure 6.3b: “step” condensation adjustment Condensation Continual adjustment 100% max sp. % Condensation without Adjustment off min sp. % Condensation with Adjustment off Set Point diff. Off - Set point + differential Set Point Figure 6.3c: “step” condensation adjustment 66 Pressure C0240111-06-07-GB 7 HARDWARE “B” “M” “L” “XL” 67 C0240111-06-07-GB EXPANSION “E” W3000 68 C0240111-06-07-GB 8 INPUT/OUTPUT CONFIGURATION TABLE 8.1 HARDWARE “L” 8.1.1 Units with hermetic compressors WATER-AIR UNIT with “L” axial fans ID1 ID2 ID3 ID4 ID5 ID6 ID7 ID8 ID9 ID10 ID11 ID12 ID13 ID14 ID15 ID16 ID17 ID18 B1 B2 B3 B4 B5 B6 B7 B8 B9 B10 NO1 NO2 NO3 NO4 NO5 NO6 NO7 NO8 NO9 NO10 NO11 NO12 NO13 NO14 NO15 NO16 NO17 NO18 Y1 Y2 Y3 Y4 Y5 Y6 WATER-AIR UNIT with “L” centrifuge fans Digital inputs Circuit 1 low pressure switch Compressor 1 thermal protection Compressor 2 thermal protection Circuit 2 low pressure switch Compressor 3 thermal protection Compressor 4 thermal protection Circuit 1 fan thermal protection Circuit 2 fan thermal protection Evaporator flow switch Remote on/off Pump 1 thermal switch Pump 2 thermal switch Circuit 1 high pressure switch Circuit 2 high pressure switch Phase sequence System pressure control Demand limit Chiller/Heat pump from external contact ID1 ID2 ID3 ID4 ID5 ID6 ID7 ID8 ID9 ID10 ID11 ID12 ID13 ID14 ID15 ID16 ID17 ID18 Analogue inputs Circuit 1 high pressure transducer Evap. outlet water temperature (blend) Evaporator inlet water temperature Evap. outlet water temperature 1 Evap. outlet water temperature 2 Circuit 2 high pressure transducer External air temperature Setpoint var. from ext. signal (4-20mA.0-10V) Optional temperature Dual setpoint from external contact B1 B2 B3 B4 B5 B6 B7 B8 B9 B10 Digital outputs Circuit 1 cycle reversal valve Circuit 2 cycle reversal valve Solenoid valve 1 Solenoid valve 2 Pump 1 Pump 2 Compressor 1 Compressor 2 Ventilation step 1 circuit 1 Ventilation step 2 circuit 1 Ventilation step 3 circuit 1 Evaporator antifreeze heating element General alarms cumulative Compressor 3 Compressor 4 Ventilation step 1 circuit 2 Ventilation step 2 circuit 2 Ventilation step 3 circuit 2 Circuit Circuit Circuit Circuit NO1 NO2 NO3 NO4 NO5 NO6 NO7 NO8 NO9 NO10 NO11 NO12 NO13 NO14 NO15 NO16 NO17 NO18 Analogue outputs 1 speed adjustment 2 speed adjustment Defrost 1 Defrost 2 Digital inputs Circuit 1 low pressure switch Compressor 1 thermal protection Compressor 2 thermal protection Circuit 2 low pressure switch Compressor 3 thermal protection Compressor 4 thermal protection Fans thermal relay Evaporator flow switch Remote on/off Pump 1 thermal switch Pump 2 thermal switch Circuit 1 high pressure switch Circuit 2 high pressure switch Phase sequence General enable Demand limit Chiller/Heat pump from external contact Analogue inputs Circuit 1 high pressure transducer Evap. outlet water temperature (blend) Evaporator inlet water temperature Evap. outlet water temperature 1 Evap. outlet water temperature 2 Circuit 2 high pressure transducer External air temperature Setpoint var. from ext. signal (4-20mA.0-10V) Optional temperature Dual setpoint from external contact Digital outputs Circuit 1 cycle reversal valve Circuit 2 cycle reversal valve Solenoid valve 1 Solenoid valve 2 Pump 1 Pump 2 Compressor 1 Compressor 2 Main ventilation step Evaporator antifreeze heating element General alarms cumulative Compressor 3 Compressor 4 Ventilation step 1 Ventilation step 2 Ventilation step 3 Analogue outputs Y1 Speed adjustment Y2 Y3 Circuit Defrost 1 Y4 Circuit Defrost 2 Y5 Y6 69 C0240111-06-07-GB “L” WATER-WATER UNIT “L” Digital inputs Circuit 1 low pressure switch Compressor 1 thermal protection Compressor 2 thermal protection Circuit 2 low pressure switch Compressor 3 thermal protection Compressor 4 thermal protection Condenser flow switch (units with freon-side ID7 reversal only) ID8 ID9 Evaporator flow switch ID10 Remote on/off ID11 Pump 1 thermal switch ID12 Pump 2 thermal switch ID13 Circuit 1 high pressure switch ID14 Circuit 2 high pressure switch ID15 Phase sequence ID16 System pressure control ID17 Demand limit ID18 Chiller/Heat pump from external contact ID1 ID2 ID3 ID4 ID5 ID6 B1 B2 B3 B4 B5 B6 B7 B8 B9 B10 NO1 NO2 NO3 NO4 NO5 NO6 NO7 NO8 NO9 NO10 NO11 NO12 NO13 NO14 NO15 NO16 NO17 NO18 Analogue inputs Circuit 1 high pressure transducer Evap. outlet water temperature (blend) Evaporator inlet water temperature Evap. outlet water temperature 1 Evap. outlet water temperature 2 Circuit 2 high pressure transducer Outlet 2 water temp. / cond. inlet Setpoint var. from ext. signal (4-20mA.0-10V) Condenser outlet water temperature Dual setpoint from external contact Digital outputs Unit operating mode: Chiller - Heat pump / Circuit 1 cycle reversal valve (units with freonside reversal only) Circuit 2 cycle reversal valve (units with freonside reversal only) Solenoid valve 1 Solenoid valve 2 Pump 1 Pump 2 Compressor 1 Compressor 2 Evaporator antifreeze heating element General alarms cumulative Compressor 3 Compressor 4 Analogue outputs Y1 Condensation adjustment Y2 Y3 Y4 Y5 Y6 70 C0240111-06-07-GB “L” CONDENSING UNIT ID1 ID2 ID3 ID4 ID5 ID6 ID7 ID8 ID9 ID10 ID11 ID12 ID13 ID14 ID15 ID16 ID17 ID18 B1 B2 B3 B4 B5 B6 B7 B8 B9 B10 “L” EVAPORATING UNIT Digital inputs Circuit 1 low pressure switch Compressor 1 thermal protection Compressor 2 thermal protection Circuit 2 low pressure switch Compressor 3 thermal protection Compressor 4 thermal protection Circuit 1 fan thermal protection Circuit 2 fan thermal protection ID1 ID2 ID3 ID4 ID5 ID6 ID7 ID8 ID9 ID10 ID11 ID12 ID13 ID14 ID15 ID16 ID17 ID18 Remote on/off Circuit 1 high pressure switch Circuit 2 high pressure switch Phase sequence Analogue inputs Circuit 1 high pressure transducer Analogue inputs B1 B2 B3 B4 B5 B6 B7 B8 B9 B10 Step 1 Step 2 Circuit 2 high pressure transducer Step 3 Step 4 Digital outputs NO1 NO2 NO3 NO4 NO5 NO6 NO7 NO8 NO9 NO10 NO11 NO12 NO13 NO14 NO15 NO16 NO17 NO18 Digital inputs Circuit 1 low pressure switch Compressor 1 thermal protection Compressor 2 thermal protection Circuit 2 low pressure switch Compressor 3 thermal protection Compressor 4 thermal protection Circuit 1 fan thermal protection Circuit 2 fan thermal protection Evaporator flow switch Remote on/off Pump 1 thermal switch Pump 2 thermal switch Circuit 1 high pressure switch Circuit 2 high pressure switch Phase sequence System pressure control Demand limit Evap. outlet water temperature (blend) Evaporator inlet water temperature Evap. outlet water temperature 1 Evap. outlet water temperature 2 Setpoint var. from ext. signal (4-20mA.0-10V) Dual setpoint from external contact Digital outputs General alarms cumulative Compressor 3 Compressor 4 Ventilation step 1 circuit 2 Ventilation step 2 circuit 2 Ventilation step 3 circuit 2 NO1 NO2 NO3 NO4 NO5 NO6 NO7 NO8 NO9 NO10 NO11 NO12 NO13 NO14 NO15 NO16 NO17 NO18 Analogue outputs Y1 Circuit 1 speed adjustment Y2 Circuit 2 speed adjustment Y3 Y4 Y5 Y6 Y1 Y2 Y3 Y4 Y5 Y6 Solenoid valve 1 Solenoid valve 2 Compressor 1 Compressor 2 Ventilation step 1 circuit 1 Ventilation step 2 circuit 1 Ventilation step 3 circuit 1 Solenoid valve 1 Solenoid valve 2 Pump 1 Pump 2 Compressor 1 Compressor 2 Evaporator antifreeze heating element General alarms cumulative Compressor 3 Compressor 4 Analogue outputs 71 C0240111-06-07-GB 8.1.2 Units with centrifuge compressors WATER-WATER UNIT with “L” axial fans “L” WATER-WATER UNIT “L” Digital inputs ID1 ID2 ID3 ID4 ID5 ID6 ID7 ID8 ID9 ID10 ID11 ID12 ID13 ID14 ID15 ID16 ID17 ID18 B1 B2 B3 B4 B5 B6 B7 B8 B9 B10 NO1 NO2 NO3 NO4 NO5 NO6 NO7 NO8 NO9 NO10 NO11 NO12 NO13 NO14 NO15 NO16 NO17 NO18 Digital inputs ID1 ID2 ID3 ID4 ID5 ID6 ID7 ID8 ID9 ID10 ID11 ID12 ID13 ID14 ID15 ID16 ID17 ID18 Circuit 1 fan thermal protection Circuit 2 fan thermal protection Evaporator flow switch Remote on/off Pump 1 thermal switch Pump 2 thermal switch Circuit 1 high pressure switch Circuit 2 high pressure switch Demand limit Analogue inputs Circuit 1 high pressure transducer Evap. outlet water temperature (blend) Evaporator inlet water temperature Evap. outlet water temperature 1 Evap. outlet water temperature 2 Circuit 2 high pressure transducer External air temperature Setpoint var. from ext. signal (4-20mA.0-10V) Optional temperature Dual setpoint from external contact B1 B2 B3 B4 B5 B6 B7 B8 B9 B10 Digital outputs Ventilation step 4 circuit 1 Ventilation step 4 circuit 2 Solenoid valve 1 Solenoid valve 2 Pump 1 Pump 2 Compressor 1 Compressor 2 Ventilation step 1 circuit 1 Ventilation step 2 circuit 1 Ventilation step 3 circuit 1 Evaporator antifreeze heating element General alarms cumulative Compressor 3 Compressor 4 Ventilation step 1 circuit 2 Ventilation step 2 circuit 2 Ventilation step 3 circuit 2 NO1 NO2 NO3 NO4 NO5 NO6 NO7 NO8 NO9 NO10 NO11 NO12 NO13 NO14 NO15 NO16 NO17 NO18 Evaporator flow switch Remote on/off Pump 1 thermal switch Pump 2 thermal switch Circuit 1 high pressure switch Circuit 2 high pressure switch Demand limit Analogue inputs Circuit 1 high pressure transducer Evap. outlet water temperature (blend) Evaporator inlet water temperature Evap. outlet water temperature 1 Evap. outlet water temperature 2 Circuit 2 high pressure transducer Outlet temperature 2 cond / condenser inlet Setpoint var. from ext. signal (4-20mA.0-10V) Condenser outlet temperature Dual setpoint from external contact Digital outputs Ventilation step 4 circuit 1 Ventilation step 4 circuit 2 Solenoid valve 1 Solenoid valve 2 Pump 1 Pump 2 Compressor 1 Compressor 2 Evaporator antifreeze heating element General alarms cumulative Compressor 3 Compressor 4 Analogue outputs Analogue outputs Y1 Circuit 1 speed adjustment Y2 Circuit 2 speed adjustment Y3 Y4 Y5 Y6 Y1 Y2 Y3 Y4 Y5 Y6 72 C0240111-06-07-GB 8.2 HARDWARE “XL” WATER-WATER UNIT with “XL” axial fans ID1 ID2 ID3 ID4 ID5 ID6 ID7 ID8 ID9 ID10 ID11 ID12 ID13 ID14 B1 B2 B3 B4 B5 B6 B7 B8 NO1 NO2 NO3 NO4 NO5 NO6 NO7 NO8 NO9 NO10 NO11 NO12 NO13 NO14 NO15 NO16 NO17 NO18 NO19 NO20 NO21 NO22 NO23 NO24 NO25 NO26 NO27 NO28 NO29 Y1 Y2 Y3 Y4 WATER-WATER UNIT with “XL” centrifuge fans Digital inputs Circuit 1 low pressure switch Compressor 1 thermal protection Compressor 2 thermal protection Circuit 2 low pressure switch Compressor 1 oil Compressor 2 oil Circuit 1 fan thermal protection Circuit 2 fan thermal protection Evaporator flow switch Remote on/off Phase sequence Demand limit Circuit 1 high pressure switch Circuit 2 high pressure switch ID1 ID2 ID3 ID4 ID5 ID6 ID7 ID8 ID9 ID10 ID11 ID12 ID13 ID14 Analogue inputs Circuit 1 high pressure transducer Evap. outlet water temperature (blend) Evaporator inlet water temperature Compressor 1 discharge temperature Compressor 2 discharge temperature Circuit 2 high pressure transducer Circuit 1 low pressure transducer Circuit 2 low pressure transducer B1 B2 B3 B4 B5 B6 B7 B8 Digital outputs Compressor 1 start 1 Compressor 1 start 2 Separation stage 1 compressor 1 Compressor 2 start 1 Compressor 2 start 2 Separation stage 1 compressor 2 Oil valve comp. 1/ Compressor 3 start 1 Oil valve comp. 2/ Compressor 3 start 2 Liquid injection 1 / Compressor 4 start 1 Liquid injection 2 / Compressor 4 start 2 Economiser compressor 1 Evaporator antifreeze heating element General alarms cumulative Solenoid valve 1 Solenoid valve 2 Economiser compressor 2 Ventilation step 1 circuit 1 Ventilation step 2 circuit 1 Ventilation step 3 circuit 1 Ventilation step 4 circuit 1 Ventilation step 1 circuit 2 Ventilation step 2 circuit 2 Ventilation step 3 circuit 2 Ventilation step 4 circuit 2 Compressor 1 no-load starting Compressor 2 no-load starting Separation stage 2 compressor 1 Separation stage 2 compressor 2 Drip tray resistor Circuit Circuit Circuit Circuit NO1 NO2 NO3 NO4 NO5 NO6 NO7 NO8 NO9 NO10 NO11 NO12 NO13 NO14 NO15 NO16 NO17 NO18 NO19 NO20 NO21 NO22 NO23 NO24 NO25 NO26 NO27 NO28 NO29 Analogue outputs 1 speed adjustment 2 speed adjustment Defrost 1 Defrost 2 Digital inputs Circuit 1 low pressure switch Compressor 1 thermal protection Compressor 2 thermal protection Circuit 2 low pressure switch Compressor 1 oil Compressor 2 oil Fans thermal relay Evaporator flow switch Remote on/off Phase sequence Demand limit Circuit 1 high pressure switch Circuit 2 high pressure switch Analogue inputs Circuit 1 high pressure transducer Evap. outlet water temperature (blend) Evaporator inlet water temperature Compressor 1 discharge temperature Compressor 2 discharge temperature Circuit 2 high pressure transducer Circuit 1 low pressure transducer Circuit 2 low pressure transducer Digital outputs Compressor 1 start 1 Compressor 1 start 2 Separation stage 1 compressor 1 Compressor 2 start 1 Compressor 2 start 2 Separation stage 1 compressor 2 Oil valve comp. 1/ Compressor 3 start 1 Oil valve comp. 2/ Compressor 3 start 2 Liquid injection 1 / Compressor 4 start 1 Liquid injection 2 / Compressor 4 start 2 Economiser compressor 1 Evaporator antifreeze heating element General alarms cumulative Solenoid valve 1 Solenoid valve 2 Economiser compressor 2 Main ventilation step Ventilation step 1 circuit 2 Ventilation step 2 circuit 2 Ventilation step 3 circuit 2 Ventilation step 4 circuit 2 Compressor 1 no-load starting Compressor 2 no-load starting Separation stage 2 compressor 1 Separation stage 2 compressor 2 Drip tray resistor Analogue outputs Y1 Speed adjustment Y2 Y3 Circuit Defrost 1 Y4 Circuit Defrost 2 73 C0240111-06-07-GB “XL” WATER-WATER UNIT “XL” CONDENSING UNIT Digital inputs Circuit 1 low pressure switch Compressor 1 thermal protection Compressor 2 thermal protection Circuit 2 low pressure switch Compressor 1 oil Compressor 2 oil Condenser flow switch (units with freon-side ID7 reversal only) ID8 ID9 Evaporator flow switch ID10 Remote on/off ID11 Phase sequence ID12 Demand limit ID13 Circuit 1 high pressure switch ID14 Circuit 2 high pressure switch ID1 ID2 ID3 ID4 ID5 ID6 B1 B2 B3 B4 B5 B6 B7 B8 NO1 NO2 NO3 NO4 NO5 NO6 NO7 NO8 NO9 NO10 NO11 NO12 NO13 NO14 NO15 NO16 NO17 NO18 NO19 NO20 NO21 NO22 NO23 NO24 NO25 NO26 NO27 NO28 NO29 ID1 ID2 ID3 ID4 ID5 ID6 ID7 ID8 ID9 ID10 ID11 ID12 ID13 ID14 Analogue inputs Circuit 1 high pressure transducer Evap. outlet water temperature (blend) Evaporator inlet water temperature Compressor 1 discharge temperature Compressor 2 discharge temperature Circuit 2 high pressure transducer Circuit 1 low pressure transducer Circuit 2 low pressure transducer B1 B2 B3 B4 B5 B6 B7 B8 Digital outputs Compressor 1 start 1 Compressor 1 start 2 Separation stage 1 compressor 1 Compressor 2 start 1 Compressor 2 start 2 Separation stage 1 compressor 2 Oil valve comp. 1/ Compressor 3 start 1 Oil valve comp. 2/ Compressor 3 start 2 Liquid injection 1 / Compressor 4 start 1 Liquid injection 2 / Compressor 4 start 2 Economiser compressor 1 Evaporator antifreeze heating element General alarms cumulative Solenoid valve 1 Solenoid valve 2 Economiser compressor 2 NO1 NO2 NO3 NO4 NO5 NO6 NO7 NO8 NO9 NO10 NO11 NO12 NO13 NO14 NO15 NO16 NO17 NO18 NO19 NO20 NO21 NO22 NO23 NO24 NO25 NO26 NO27 NO28 NO29 Compressor 1 no-load starting Compressor 2 no-load starting Separation stage 2 compressor 1 Separation stage 2 compressor 2 Digital inputs Circuit 1 low pressure switch Compressor 1 thermal protection Compressor 2 thermal protection Circuit 2 low pressure switch Compressor 1 oil Compressor 2 oil Circuit 1 fan thermal protection Circuit 2 fan thermal protection Remote on/off Phase sequence Demand limit Circuit 1 high pressure switch Circuit 2 high pressure switch Analogue inputs Circuit 1 high pressure transducer Compressor 1 discharge temperature Compressor 2 discharge temperature Circuit 2 high pressure transducer Circuit 1 low pressure transducer Circuit 2 low pressure transducer Digital outputs Compressor 1 start 1 Compressor 1 start 2 Separation stage 1 compressor 1 Compressor 2 start 1 Compressor 2 start 2 Separation stage 1 compressor 2 Oil valve comp. 1/ Compressor 3 start 1 Oil valve comp. 2/ Compressor 3 start 2 Liquid injection 1 / Compressor 4 start 1 Liquid injection 2 / Compressor 4 start 2 Economiser compressor 1 General alarms cumulative Solenoid valve 1 Solenoid valve 2 Economiser compressor 2 Ventilation step 1 circuit 1 Ventilation step 2 circuit 1 Ventilation step 3 circuit 1 Ventilation step 4 circuit 1 Ventilation step 1 circuit 2 Ventilation step 2 circuit 2 Ventilation step 3 circuit 2 Ventilation step 4 circuit 2 Compressor 1 no-load starting Compressor 2 no-load starting Separation stage 2 compressor 1 Separation stage 2 compressor 2 Analogue outputs Y1 Circuit 1 speed adjustment Y2 Circuit 2 speed adjustment Y3 Y4 Analogue outputs Y1 Condensation adjustment Y2 Y3 Y4 74 C0240111-06-07-GB “XL” EVAPORATING UNIT ID1 ID2 ID3 ID4 ID5 ID6 ID7 ID8 ID9 ID10 ID11 ID12 ID13 ID14 Digital inputs Circuit 1 low pressure switch Compressor 1 thermal protection Compressor 2 thermal protection Circuit 2 low pressure switch Compressor 1 oil Compressor 2 oil Circuit 1 fan thermal protection Circuit 2 fan thermal protection Evaporator flow switch Remote on/off Phase sequence Demand limit Circuit 1 high pressure switch Circuit 2 high pressure switch Analogue inputs B1 B2 B3 B4 B5 B6 B7 B8 NO1 NO2 NO3 NO4 NO5 NO6 NO7 NO8 NO9 NO10 NO11 NO12 NO13 NO14 NO15 NO16 NO17 NO18 NO19 NO20 NO21 NO22 NO23 NO24 NO25 NO26 NO27 NO28 NO29 Evap. outlet water temperature (blend) Evaporator inlet water temperature Compressor 1 discharge temperature Compressor 2 discharge temperature Digital outputs Compressor 1 start 1 Compressor 1 start 2 Separation stage 1 compressor 1 Compressor 2 start 1 Compressor 2 start 2 Separation stage 1 compressor 2 Oil valve comp. 1/ Compressor 3 start 1 Oil valve comp. 2/ Compressor 3 start 2 Liquid injection 1 / Compressor 4 start 1 Liquid injection 2 / Compressor 4 start 2 Economiser compressor 1 Evaporator antifreeze heating element General alarms cumulative Solenoid valve 1 Solenoid valve 2 Economiser compressor 2 Compressor 1 no-load starting Compressor 2 no-load starting Separation stage 2 compressor 1 Separation stage 2 compressor 2 Analogue outputs Y1 Y2 Y3 Y4 75 C0240111-06-07-GB 8.3 HARDWARE “B” Water/air chiller with “B” axial fans ID1 ID2 ID3 ID4 ID5 ID6 ID7 ID8 ID9 ID10 ID11 ID12 ID13 ID14 ID15 B1 B2 B3 B4 B5 B6 B7 B8 NO1 NO2 NO3 NO4 NO5 NO6 NO7 NO8 NO9 NO10 NO11 NO12 Water/air chiller with “B” centrifuge fans Digital inputs Circuit 1 high pressure switch Circuit 2 high pressure switch Remote on/off Chiller/Heat pump from external contact Evaporator flow switch Circuit 1 low pressure switch Circuit 2 low pressure switch Compressor 1 thermal protection Compressor 2 thermal protection Pump 1 thermal protection Fans thermal relay Phase sequence System pressure control Pump 2 thermal protection Demand limit ID1 ID2 ID3 ID4 ID5 ID6 ID7 ID8 ID9 ID10 ID11 ID12 ID13 ID14 ID15 Analogue inputs Circuit 1 high pressure transducer Circuit 2 high pressure transducer Evaporator inlet water temperature Evaporator outlet 1 water temperature Evaporator outlet 2 water temperature Optional temperature External temperature Setpoint var. from ext. signal output 4-20 mA B1 B2 B3 B4 B5 B6 B7 B8 Digital outputs Evaporator antifreeze heating element Circuit 1 cycle reversal valve Circuit 2 cycle reversal valve NO1 NO2 NO3 NO4 NO5 NO6 NO7 NO8 NO9 NO10 NO11 NO12 Pump 1 Compressor 1 Compressor 2 General alarms cumulative Pump 2 Ventilation step 1 Ventilation step 2 Ventilation step 3 Analogue outputs Y1 Circuit 1 speed adjustment (PWM) Y2 Circuit 2 speed adjustment (PWM) Digital inputs Circuit 1 high pressure switch Circuit 2 high pressure switch Remote on/off Chiller/Heat pump from external contact Evaporator flow switch Circuit 1 low pressure switch Circuit 2 low pressure switch Compressor 1 thermal protection Compressor 2 thermal protection Pump 1 thermal protection Fans thermal relay Phase sequence System pressure control Pump 2 thermal protection Demand limit Analogue inputs Circuit 1 high pressure transducer Circuit 2 high pressure transducer Evaporator inlet water temperature Evaporator outlet 1 water temperature Evaporator outlet 2 water temperature Optional temperature External temperature Setpoint var. from ext. signal output 4-20 mA Digital outputs Evaporator antifreeze heating element Circuit 1 cycle reversal valve Circuit 2 cycle reversal valve Main fan step Pump 1 Compressor 1 Compressor 2 General alarms cumulative Pump 2 Ventilation step 1 Ventilation step 2 Ventilation step 3 Analogue outputs Y1 Speed adjustment (PWM) Y2 76 C0240111-06-07-GB WATER-WATER UNIT “B” ID1 ID2 ID3 ID4 ID5 ID6 ID7 ID8 ID9 ID10 ID11 ID12 ID13 ID14 ID15 B1 B2 B3 B4 B5 B6 B7 B8 Digital inputs Circuit 1 high pressure switch Circuit 2 high pressure switch Remote on/off Chiller/Heat pump from external contact Evaporator flow switch Circuit 1 low pressure switch Circuit 2 low pressure switch Compressor 1 thermal protection Compressor 2 thermal protection Pump 1 thermal protection Condenser flow switch (units with freon-side reversal only) Phase sequence System pressure control Pump 2 thermal switch Demand limit Analogue inputs Circuit 1 high pressure transducer Circuit 2 high pressure transducer Evaporator inlet water temperature Evaporator outlet 1 water temperature Evaporator outlet 2 water temperature Condenser outlet water temperature Outlet 2 water temp. / cond. inlet Setpoint var. from ext. signal output 4-20 mA Digital outputs NO1 Evaporator antifreeze heating element Unit operating mode: Chiller - Heat pump / NO2 Circuit 1 cycle reversal valve (units with freonside reversal only) Circuit 2 cycle reversal valve (units with freonNO3 side reversal only) NO4 NO5 Pump 1 NO6 Compressor 1 NO7 Compressor 2 NO8 General alarms cumulative Pump 2 / Condenser pump (units with freon-side NO9 reversal only) NO10 NO11 NO12 Analogue outputs Y1 Condensation adjustment (PWM) Y2 77 C0240111-06-07-GB 8.4 EXPANSIONS 8.4.1 Units with hermetic compressors “E” expansion for chiller with recovery. Expansion "E" - address 1 Digital inputs Recovery flow switch Recovery remote enable Digital inputs ID1 ID2 ID3 ID4 ID5 ID6 ID7 ID8 ID9 ID10 ID11 ID12 ID13 ID14 ID15 ID16 ID17 ID18 ID1 ID2 ID3 ID4 Analogue inputs Circuit 1 liquid temperature Circuit 2 liquid temperature Recovery inlet temperature Recovery outlet temperature B1 B2 B3 B4 Digital outputs Subcooling circuit 1-1 Subcooling circuit 1-2 Subcooling circuit 2-1 Subcooling circuit 2-2 NO1 NO2 NO3 NO4 Analogue outputs Y1 Analogue inputs B1 B2 B3 B4 B5 B6 B7 B8 B9 B10 NO1 NO2 NO3 NO4 NO5 NO6 NO7 NO8 NO9 NO10 NO11 NO12 NO13 NO14 NO15 NO16 NO17 NO18 Digital outputs Recovery valve circuit 1 Recovery valve circuit 2 Analogue outputs Y1 Y2 Y3 Y4 Y5 Y6 78 C0240111-06-07-GB “E” Expansion Heat pumps for low external air temperatures Expansion “E” - address 1 Digital inputs Digital inputs ID1 ID2 ID3 ID4 ID5 ID6 ID7 ID8 ID9 ID10 ID11 ID12 ID13 ID14 ID15 ID16 ID17 ID18 ID1 ID2 ID3 ID4 Analogue inputs Compressor 1 outlet temperature Compressor 2 outlet temperature Compressor 3 outlet temperature Compressor 4 outlet temperature Digital outputs Circuit 1 relay Circuit 2 relay B1 B2 B3 B4 NO1 NO2 NO3 NO4 Analogue outputs Y1 Analogue inputs B1 B2 B3 B4 B5 B6 B7 B8 B9 B10 Digital outputs NO1 NO2 NO3 NO4 NO5 NO6 NO7 NO8 NO9 NO10 NO11 NO12 NO13 NO14 NO15 NO16 NO17 NO18 Analogue outputs Y1 Y2 Y3 Y4 Y5 Y6 79 C0240111-06-07-GB “M” expansion for hermetic compressors. Air-cooled polyvalent units and heat pumps with total recovery. Expansion "M" - address 2 Digital inputs Recovery flow switch Digital inputs ID1 ID2 ID3 ID4 ID5 ID6 ID7 ID8 ID9 ID10 ID11 ID12 ID13 ID14 ID15 ID16 ID17 ID18 Analogue inputs Circuit 1 low pressure transducer Circuit 2 low pressure transducer Recovery inlet temperature Recovery outlet temperature Not used Analogue inputs B1 B2 B3 B4 B5 B6 B7 B8 B9 B10 NO1 NO2 NO3 NO4 NO5 NO6 NO7 NO8 NO9 NO10 NO11 NO12 NO13 NO14 NO15 NO16 NO17 NO18 ID1 ID2 ID3 ID4 ID5 ID6 ID7 ID8 ID9 ID10 ID11 ID12 ID13 ID14 B1 B2 B3 B4 B5 B6 B7 B8 Digital outputs Digital outputs Not used Not used V V V V V 1-1 1-2 1-3 1-4 1-5 V V V V V 2-1 2-2 2-3 2-4 2-5 NO1 NO2 NO3 NO4 NO5 NO6 NO7 NO8 NO9 NO10 NO11 NO12 NO13 Analogue outputs Y1 Y2 Y3 Y4 Analogue outputs Y1 Y2 Y3 Y4 Y5 Y6 80 C0240111-06-07-GB “M” expansion for hermetic compressors. Water-cooled polyvalent units and heat pumps with total recovery. Expansion "M" - address 2 Digital inputs Recovery flow switch Condenser flow switch Condenser pump thermal switch Digital inputs ID1 ID2 ID3 ID4 ID5 ID6 ID7 ID8 ID9 ID10 ID11 ID12 ID13 ID14 ID15 ID16 ID17 ID18 Analogue inputs Circuit 1 low pressure transducer Circuit 2 low pressure transducer Recovery inlet temperature Recovery outlet temperature Condenser inlet temperature (if 2 cond.) Analogue inputs B1 B2 B3 B4 B5 B6 B7 B8 B9 B10 NO1 NO2 NO3 NO4 NO5 NO6 NO7 NO8 NO9 NO10 NO11 NO12 NO13 NO14 NO15 NO16 NO17 NO18 ID1 ID2 ID3 ID4 ID5 ID6 ID7 ID8 ID9 ID10 ID11 ID12 ID13 ID14 B1 B2 B3 B4 B5 B6 B7 B8 Digital outputs V V V V V Digital outputs Not used Not used 1-1 1-2 1-3 1-4 1-5 Condenser pump V 2-1 V 2-2 V 2-3 V 2-4 V 2-5 NO1 NO2 NO3 NO4 NO5 NO6 NO7 NO8 NO9 NO10 NO11 NO12 NO13 Analogue outputs Y1 Y2 Y3 Y4 Analogue outputs Y1 Y2 Y3 Y4 Y5 Y6 81 C0240111-06-07-GB “E” expansion for hermetic compressors. Chiller with freecooling. Expansion "E" - address 3 Digital inputs Glycol pump thermal switch Digital inputs ID1 ID2 ID3 ID4 ID5 ID6 ID7 ID8 ID9 ID10 ID11 ID12 ID13 ID14 ID15 ID16 ID17 ID18 Analogue inputs Circuit 1 low pressure transducer Circuit 2 low pressure transducer Freecooling inlet temperature Coil Coil Coil Coil Analogue outputs Freecooling modulating valve Analogue inputs B1 B2 B3 B4 B5 B6 B7 B8 B9 B10 NO1 NO2 NO3 NO4 NO5 NO6 NO7 NO8 NO9 NO10 NO11 NO12 NO13 NO14 NO15 NO16 NO17 NO18 Digital outputs charge valve circuit 1 discharge valve circuit 1 charge valve circuit 2 discharge valve circuit 2 Digital outputs Freecooling valve Off Freecooling valve On Analogue outputs Y1 Y2 Y3 Y4 Y5 Y6 82 ID1 ID2 ID3 ID4 B1 B2 B3 B4 NO1 NO2 NO3 NO4 Y1 C0240111-06-07-GB 8.4.2 Units with alternative and screw compressors “E” expansions for chillers with heat pumps or two pumps. Expansion "E" - address 5 Digital inputs Chiller/Heat pump from external contact Digital inputs ID1 ID2 ID3 ID4 ID5 ID6 ID7 ID8 ID9 ID10 ID11 ID12 ID13 ID14 Analogue inputs B1 B2 B3 B4 B5 B6 B7 B8 Pump 1 thermal switch Pump 2 thermal switch ID1 ID2 ID3 ID4 Analogue inputs Evap. outlet water temperature 1 Evap. outlet water temperature 2 External temp. / Cond. 2 outlet water temp. Optional temp. / Cond. outlet water temp. B1 B2 B3 B4 Digital outputs Rev. cycle valve 1/recovery 1/freecooling OFF Rev. cycle valve 2/recovery 2/freecooling ON Pump 1 Pump 2 NO1 NO2 NO3 NO4 Analogue outputs Y1 Digital outputs NO1 NO2 NO3 NO4 NO5 NO6 NO7 NO8 NO9 NO10 NO11 NO12 NO13 NO14 NO15 NO16 NO17 NO18 NO19 NO20 NO21 NO22 NO23 NO24 NO25 NO26 NO27 NO28 NO29 Analogue outputs Y1 Y2 Y3 Y4 83 C0240111-06-07-GB “E” expansions for chillers with external signal setpoint variation or dual setpoint. Expansion "E" - address 3 Digital inputs Glycol pump thermal switch Dual setpoint Digital inputs ID1 ID2 ID3 ID4 ID5 ID6 ID7 ID8 ID9 ID10 ID11 ID12 ID13 ID14 ID1 ID2 ID3 ID4 Analogue inputs Setpoint var. from ext. signal (4-20mA) B1 Recovery setpoint var. from ext. signal (4-20mA) B2 Freecooling inlet temperature B3 B4 Coil Coil Coil Coil Analogue inputs B1 B2 B3 B4 B5 B6 B7 B8 Digital outputs charge valve circuit 1 discharge valve circuit 1 charge valve circuit 2 discharge valve circuit 2 Analogue outputs Freecooling modulating valve Digital outputs NO1 NO2 NO3 NO4 NO5 NO6 NO7 NO8 NO9 NO10 NO11 NO12 NO13 NO14 NO15 NO16 NO17 NO18 NO19 NO20 NO21 NO22 NO23 NO24 NO25 NO26 NO27 NO28 NO29 Analogue outputs Y1 Y2 Y3 Y4 84 NO1 NO2 NO3 NO4 Y1 C0240111-06-07-GB “E” expansions for chillers with recovery. Expansion "E" - address 1 Digital inputs Recovery flow switch Recovery remote enable Digital inputs ID1 ID2 ID3 ID4 ID5 ID6 ID7 ID8 ID9 ID10 ID11 ID12 ID13 ID14 Analogue inputs B1 B2 B3 B4 B5 B6 B7 B8 ID1 ID2 ID3 ID4 Analogue inputs Circuit 1 liquid temperature Circuit 2 liquid temperature Recovery inlet temperature Recovery outlet temperature B1 B2 B3 B4 Digital outputs Subcooling circuit 1-1 Subcooling circuit 1-2 Subcooling circuit 2-1 Subcooling circuit 2-2 NO1 NO2 NO3 NO4 Analogue outputs Y1 Digital outputs NO1 NO2 NO3 NO4 NO5 NO6 NO7 NO8 NO9 NO10 NO11 NO12 NO13 NO14 NO15 NO16 NO17 NO18 NO19 NO20 NO21 NO22 NO23 NO24 NO25 NO26 NO27 NO28 NO29 Expansion "E" - address 5 Digital inputs Chiller/Heat pump from external contact Analogue outputs Y1 Y2 Y3 Y4 Pump 1 thermal switch Pump 2 thermal switch ID1 ID2 ID3 ID4 Analogue inputs Evap. outlet water temperature 1 Evap. outlet water temperature 2 External temp. / Cond. 2 outlet water temp. Optional temp. / Cond. outlet water temp. B1 B2 B3 B4 Digital outputs Rev. cycle valve 1/recovery 1/freecooling OFF Rev. cycle valve 2/recovery 2/freecooling ON Pump 1 Pump 2 NO1 NO2 NO3 NO4 Analogue outputs Y1 85 C0240111-06-07-GB “M” expansion for alternative and screw compressors. Air-cooled polyvalent units and heat pumps with total recovery. Expansion "M" - address 2 Digital inputs Recovery flow switch Digital inputs ID1 ID2 ID3 ID4 ID5 ID6 ID7 ID8 ID9 ID10 ID11 ID12 ID13 ID14 Analogue inputs Analogue inputs Evap. 1 outlet water temperature Evap. 2 outlet water temperature Recovery inlet temperature Recovery outlet temperature B1 B2 B3 B4 B5 B6 B7 B8 Digital outputs ID1 ID2 ID3 ID4 ID5 ID6 ID7 ID8 ID9 ID10 ID11 ID12 ID13 ID14 B1 B2 B3 B4 B5 B6 B7 B8 Digital outputs NO1 NO2 NO3 NO4 NO5 NO6 NO7 NO8 NO9 NO10 NO11 NO12 NO13 NO14 NO15 NO16 NO17 NO18 NO19 NO20 NO21 NO22 NO23 NO24 NO25 NO26 NO27 NO28 NO29 V V V V V 1-1 1-2 1-3 1-4 1-5 V V V V V 2-1 2-2 2-3 2-4 2-5 NO1 NO2 NO3 NO4 NO5 NO6 NO7 NO8 NO9 NO10 NO11 NO12 NO13 Analogue outputs Y1 Y2 Y3 Y4 Analogue outputs Y1 Y2 Y3 Y4 86 C0240111-06-07-GB “M” expansion for alternative and screw compressors. Water-cooled polyvalent units and heat pumps with total recovery. Expansion "M" - address 2 Digital inputs Recovery flow switch Condenser flow switch Condenser pump thermal switch Digital inputs ID1 ID2 ID3 ID4 ID5 ID6 ID7 ID8 ID9 ID10 ID11 ID12 ID13 ID14 Not used Analogue inputs Analogue inputs Evap. 1 outlet water temperature Evap. 2 outlet water temperature Recovery inlet temperature Recovery outlet temperature Condenser inlet temperature (if 2 cond.) Condenser outlet water temp. Condenser 2 outlet water temp. B1 B2 B3 B4 B5 B6 B7 B8 Digital outputs ID1 ID2 ID3 ID4 ID5 ID6 ID7 ID8 ID9 ID10 ID11 ID12 ID13 ID14 B1 B2 B3 B4 B5 B6 B7 B8 Digital outputs NO1 NO2 NO3 NO4 NO5 NO6 NO7 NO8 NO9 NO10 NO11 NO12 NO13 NO14 NO15 NO16 NO17 NO18 NO19 NO20 NO21 NO22 NO23 NO24 NO25 NO26 NO27 NO28 NO29 V V V V V 1-1 1-2 1-3 1-4 1-5 Condenser pump V 2-1 V 2-2 V 2-3 V 2-4 V 2-5 NO1 NO2 NO3 NO4 NO5 NO6 NO7 NO8 NO9 NO10 NO11 NO12 NO13 Analogue outputs Y1 Y2 Y3 Y4 Analogue outputs Y1 Y2 Y3 Y4 87 C0240111-06-07-GB “E” expansion for alternative and screw compressors. Chiller with freecooling. Expansion "E" - address 3 Digital inputs Glycol pump thermal switch Dual setpoint from external contact Digital inputs ID1 ID2 ID3 ID4 ID5 ID6 ID7 ID8 ID9 ID10 ID11 ID12 ID13 ID14 Analogue inputs Setpoint var. from ext. signal (4-20mA) Recovery setpoint var. from ext. signal (4-20mA) Freecooling inlet temperature Coil Coil Coil Coil Analogue inputs B1 B2 B3 B4 B5 B6 B7 B8 Digital outputs charge valve circuit 1 discharge valve circuit 1 charge valve circuit 2 discharge valve circuit 2 Analogue outputs Freecooling modulating valve ID1 ID2 ID3 ID4 B1 B2 B3 B4 NO1 NO2 NO3 NO4 Y1 Digital outputs NO1 NO2 NO3 NO4 NO5 NO6 NO7 NO8 NO9 NO10 NO11 NO12 NO13 NO14 NO15 NO16 NO17 NO18 NO19 NO20 NO21 NO22 NO23 NO24 NO25 NO26 NO27 NO28 NO29 Expansion "E" - address 5 Digital inputs Chiller/Heat pump from external contact Analogue outputs Y1 Y2 Y3 Y4 Pump 1 thermal switch Pump 2 thermal switch ID1 ID2 ID3 ID4 Analogue inputs Evap. outlet water temperature 1 Evap. outlet water temperature 2 External temp. / Cond. 2 outlet water temp. Optional temp. / Cond. outlet water temp. B1 B2 B3 B4 Digital outputs Rev. cycle valve 1/recovery 1/freecooling OFF Rev. cycle valve 2/recovery 2/freecooling ON Pump 1 Pump 2 NO1 NO2 NO3 NO4 Analogue outputs Y1 88 C0240111-06-07-GB “E” expansions for semi-hermetic compressors. Condensing unit or for alternative compressors. Unit with four compressors on two circuits. Expansion "E" - address 4 Digital inputs Compressor 3 thermal protection Compressor 4 thermal protection Compressor 3 oil Compressor 4 oil Digital inputs ID1 ID2 ID3 ID4 ID5 ID6 ID7 ID8 ID9 ID10 ID11 ID12 ID13 ID14 ID1 ID2 ID3 ID4 Analogue inputs Step Step Step Step 1 2 3 4 B1 B2 B3 B4 Digital outputs Separation stage 1 compressor Separation stage 2 compressor Separation stage 1 compressor Separation stage 2 compressor Analogue inputs B1 B2 B3 B4 B5 B6 B7 B8 3 3 4 4 NO1 NO2 NO3 NO4 Analogue outputs Y1 Digital outputs NO1 NO2 NO3 NO4 NO5 NO6 NO7 NO8 NO9 NO10 NO11 NO12 NO13 NO14 NO15 NO16 NO17 NO18 NO19 NO20 NO21 NO22 NO23 NO24 NO25 NO26 NO27 NO28 NO29 Analogue outputs Y1 Y2 Y3 Y4 89 C0240111-06-07-GB 8.4.3 Units with centrifuge compressors Expansion “E” Chiller with bypass valves. Expansion "E" - address 1 Digital inputs Digital inputs ID1 ID2 ID3 ID4 ID5 ID6 ID7 ID8 ID9 ID10 ID11 ID12 ID13 ID14 ID15 ID16 ID17 ID18 ID1 ID2 ID3 ID4 Analogue inputs B1 B2 B3 B4 Digital outputs Injection 1 Injection 2 Injection 3 Injection 4 NO1 NO2 NO3 NO4 Analogue outputs Y1 Analogue inputs B1 B2 B3 B4 B5 B6 B7 B8 B9 B10 Digital outputs NO1 NO2 NO3 NO4 NO5 NO6 NO7 NO8 NO9 NO10 NO11 NO12 NO13 NO14 NO15 NO16 NO17 NO18 Analogue outputs Y1 Y2 Y3 Y4 Y5 Y6 90 C0240111-06-07-GB 9 CONNECTING SEVERAL BOARDS Caution: , perform the following operations before touching the boards in order to prevent electrostatic discharge: • wear the bracelet (connected to the earth circuit) and the heel strap • the board should be closed inside an antistatic bag protecting it from electrostatic discharge: remove it from the bag and place it on the light-blue mat with the yellow edge or on the dark-blue mat. • You can now work on the board. Several boards can be connected together. There are two connection types: “base-expansion” on the expansion serial line and “master-slave” on the “plan” serial line. The “mixed” connection is a combination of the other two. 9.1 “BASE-EXPANSION” Connection In the “base-expansion” connection, the entire intelligence of the unit resides in the base. The connected expansions are exclusively used as additional I/O. The boards must be connected together with a threewire shielded cable connected from terminal J23 of the base to terminal J3 of expansion “E” or to terminal J11 of expansion “M” (see figure below). “W3000 exp” software must be installed in expansion ”M” while no software application is required for expansion “E”. Base Expansion E Base Expansion M Expansion E Expansion E Expansion E Figure 9.1: “base-expansion” connection A certain number of expansions are present depending on the type of boards and the enabled functions. A specific address must be given for each expansion. 91 C0240111-06-07-GB EXPANSIONS FOR HERMETIC COMPRESSORS Additional function Function, chiller type Recovery enable Low external air temperature kit Chiller with heat recovery Heat pump for low external air temperatures Multi-purpose Heat pump with total heat recovery Freecooling chiller Unit with fractioned coil Low temperature chiller Any unit with hermetic compressors where low pressure is required to be monitored (except for All-in one units and Heat pumps with total recovery) Recovery enable Freecooling enable Coil fractioning enable Low temperature control enable Low pressure transducer enable Expansion address 1 Expansion type E 1 E 2 M 3 E Expansion address 1 Expansion type E 2 M 3 E 4 E 5 E Expansion address Expansion type 1 E EXPANSIONS FOR ALTERNATIVE AND SCREW COMPRESSORS Additional function Function, chiller type Recovery enable Recovery enable Chiller with heat recovery Multi-purpose Heat pump with total heat recovery Freecooling enable Freecooling chiller Coil fractioning enable Unit with fractioned coil Setpoint variation enable from external Unit with setpoint variation or dual signal setpoint Recovery setpoint variation enable from external signal Dual setpoint enable from external contact Number of evaporators 0 Condensing units Number of compressors per circuit 2 Unit with 2 alternative compressors per circuit At least one pump enable Chiller with pumps on board Heat pump Heat pump chiller External temperature probe enable Unit with external temp. probe Optional temperature probe enable Unit with optional temp. probe Recovery enable Chiller with heat recovery Freecooling enable Freecooling chiller Coil fractioning enable Unit with fractioned coil Low temperature control enable Low temperature chiller Chiller with more than one 2 evaporators evaporator EXPANSIONS FOR CENTRIFUGAL COMPRESSORS Additional function Function, chiller type Bypass valve enable Bypass valve compressors 92 for starting C0240111-06-07-GB 9.2 “MASTER-SLAVE” connection Intelligence is distributed instead in the “master-slave” connections. Suppose we have a unit with 4 cooling circuits: the master board manages circuits 1 and 2 while the slave board manages circuits 3 and 4. In this case, the additional board is not simply an input/output expansion, but is fully involved managing part of the unit. The board software is the same and identifies its functions depending on the board address: the one with address 1 will be the master and will communicate with the board with address 11 (master address plus 10). Pay special attention to board addresses for this reason. Connect the boards together with a 3-wire shielded cable connected between terminals J11 of the boards, as shown in the figure below. Figure 9.2: “master-slave” connection 93 C0240111-06-07-GB 9.3 “Mixed” connection The “mixed” connection is used in units with 3/4 cooling circuits where an increase in inputs/outputs is required. The master board manages circuits 1 and 2 while the slave board manages circuits 3 and 4. Additionally, depending on the required functions or the type of machine, boards used as expansions can be connected. Connect the expansions for the I/O of circuits 1 and 2, and for the unit I/O to the master. Connect the expansions for the I/O of circuits 3 and 4 to the slave The following figure shows the connections between the boards and the expansions: a 3-wire shielded cable connects terminals J11 of the master and slave boards (marked in orange), and a 3-wire shielded cable connects terminals J23 of the master and/or slave boards with terminal J3 or J11 of expansions “E” or “M” (marked in blue). Master Expansion E Expansion E Expansion E Slave Expansion E Expansion E Expansion E Figure 9.3a: “mixed” connection 94 C0240111-06-07-GB Master Expansion M Slave Expansion M Figure 9.3b: “mixed” connection 95 Expansion E C0240111-06-07-GB 10 Terminal configuration The first thing to do when connecting the boards of several units in a network in order to have a remote keypad or replace a board, is to configure the terminals. This cannot be achieved with the basic W3000 keypad. In this case, configure the terminals using the W3000 or W3000 compact keypad and afterwards reconnect the W3000 basic display. Before starting, it is advisable to check that each board and each terminal has been identified with the correct address established when the network was designed. It is important to remember that as the set address is only read by the boards during start-up, it is best to perform a global reset of all the devices if a mistake is made when configuring the addresses (more than one board with the same address). Reset the network by disconnecting all the devices from the power supply . The configuration procedure can be activated from any terminal (keyboard), which may also be connected temporarily only to perform configuration operations and removed upon completion. The operations to perform are described in the following paragraphs. 10.1 Setting the keypad address After connecting the keypad to the device, perform the following procedure: 1) 2) Press [UP], [DOWN] and [ENTER] together and hold down until the Display address Setting..........:00 mask shown to the side appears. I/O Board address: Press [ENTER] to move the cursor to “Display address setting”. Press Display address Setting..........:21 [UP] and [DOWN] to set the required keypad address (e.g.: 21). I/O Board address:-- 3) This mask means that the address of the keyboard has been set. 4) If an empty mask or a mask showing “NO LINK” appears after pressing [ESC], it means that the keypad is not communicating with any board. Either the board must be addressed or the plan network must be configured. Display address changed NO LINK N.B.: This is a timed procedure; if the parameters are not set within a few seconds, the display turns off. In this case, the operation must be repeated. 96 C0240111-06-07-GB 10.2 Setting the board address The board address is set by the software using the keypad. Proceed as follows: 1 2 3 4 5 6 Make sure the keypad address is set to 0 (see keypad address Display address Setting..........:00 settings para) I/O Board address: Disconnect the board from the power supply (turn off the general switch). 0 Power the board by pressing [ALARM] and [UP] together; hold the pLan address: UP: increase keys down until the mask shown to the side appears. DOWN: decrease ENTER: save & exit pLan address: 1 Set the required address (e.g.: 1 ) UP: increase To do this, press [UP] or [DOWN]; press [ENTER] to confirm. DOWN: decrease ENTER: save & exit An “empty” mask appears because the address of the keyboard is 0 and that of the board is (as shown in the example) 1; the two devices cannot communicate. In any case, board address 1 has been set. Now perform “PLAN NETWORK CONFIGURATION” to allow the board to communicate with its keypad 97 C0240111-06-07-GB 10.3 Plan network configuration 10.3.1 Plan network connection (local) For each unit with an on-board keyboard, perform the following procedure to create a “local” plan network: 0 1 2 1 Make sure the board has been addressed (as described in the pLan address: UP: increase previous paragraph). DOWN: decrease ENTER: save & exit Press [UP], [DOWN] and [ENTER] together and hold down until the Display address Setting..........:00 mask shown to the side appears. Set the required address for the keyboard (e.g.: 21 ) I/O Board address: Display address Setting..........:21 I/O Board address:-- 3 Press [ENTER] to display the address of the boards in pLan (in this Display address Setting..........:21 case 1 ). N.B.: If there is more than one board, press [UP] or [DOWN] to I/O Board address:01 choose which board to configure. 4 Press [ENTER] to configure the terminals of the selected board; press [ENTER] to confirm 5 In this mask, the [ENTER] key moves the cursor from one field to another and the [UP] or [DOWN] keys change the values. P:01 means that the board with address 1 is being configured. Adr Priv/Shared None -None -None -- Ok?No Adr Priv/Shared 21 Pr None -None -- Ok?No Adr Priv/Shared 21 Pr 32 Sh None -- Ok?No Adr Priv/Shared 21 Pr 32 Sh None -- Ok?Yes The following mask may appear. If no expansions are connected, simply press [ESC] to show the main display menu. #################### ...expansion link... #################### 6 7 8 9 Terminal config Press ENTER To continue P:01 Trm1 Trm2 Trm3 Configure keyboard 21 (previously set) as Pr=private (usually the one P:01 Trm1 on the unit). (Sp=printer, or Sh=shared) Trm2 Trm3 P:01 The remote keyboard must also be configured. Simply define the Trm1 keyboard addressed with 32 (even if not present) as Sh. Trm2 Trm3 P:01 To save the settings and exit the configuration procedure, move the cursor to “No”, change it to “Yes” and press [ENTER]. To exit without Trm1 Trm2 saving the settings, wait 30 seconds without touching the keyboard. Trm3 To connect several units together and remote control them, thereby forming a plan network (global), a remote keypad controlling all the units is required. The remote keypad cannot be a W3000 base keypad. If a W3000 basic keypad is installed on the machine, replace it with a 3000 compact. 98 C0240111-06-07-GB 10.3.2 Configuring the plan network (global) It is easy to install a PLAN network (global). Just a few but essential operations are required. If just one of these is not performed correctly, the entire system will not work. The remote keyboard will work problem-free if the following operations are performed one after the other. Set the on-board machine board and keyboard Configure the addresses of each board and keypad (with a univocal address in the network), leaving addresses (see configuring the local plan the network cable disconnected (connector J11) network) Check the chillers work correctly without being connected to the network. 1 2 3 Disconnect the power supply from the chillers 4 Connect all the chillers to the network except Connect connectors J11 together. Do not connect for the remote keyboard. the remote keyboard. This creates a plan network comprising more than one chiller. Power the chillers. 5 6 Check that all the networked devices (boards If any faults occur, check the configuration of the and keypads) work correctly terminals to make sure that no two devices have the same address. Connect the remote keypad to one of the units Disconnect the machine keyboard and connect the remote keypad to the J10 connector. 7 8 Make sure the remote keyboard address is set Follow the procedure for addressing the keyboard. to 32. 9 Make sure that the devices outside the chillers If the power unit for the remote keypad is fitted are correctly configured. (see below: remote keypad from 200 up to 500 metres), make sure the remote keypad is powered. Connect the remote keyboard. Disconnect connector J10 from the last board and connect it to connector “A” of the “T” shunt. Connect connector J10 on the last board to connector “B” of the “T” shunt. 11 10 Wait a few seconds until communication has stabilised. • • 7 8 network In a global network comprising just W3000 chillers, the W3000-compact can be used as a remote keyboard. After configuring the various units (each with a different address in order not to generate conflicts in the global network), connect the remote keyboard and repeat the procedure. In this network type, the various machines of the network are switched by pressing [ESC] and [UP] together. If the plan network does not comprise just W3000 chillers, a 16-key keyboard must be used. Press [UNIT] to switch between one board and another. The terminals, however, must be given a special configuration as the 16-key keyboard is only recognised on “terminal 3”. Then configure the local plan network. Follow the same procedure up to point 6 and then modify the subsequent points as follows: The remote keyboard can be configured even if the plan network doe P:01 Adr Priv/Shared Pr not comprise just W3000 chillers. Simply define the keyboard Trm1 21 Trm2 None -addressed with 32 (N.B.: on terminal 3) as Sh, i.e.: shared. Trm3 32 Sh Ok?No To save the settings and exit the configuration procedure, move the P:01 Adr Priv/Shared Pr cursor to “No”, change it to “Yes” and press [ENTER]. To exit without Trm1 21 Trm2 None -saving the settings, wait 30 seconds without touching the keyboard. Trm3 32 Sh Ok?Yes 99 C0240111-06-07-GB 10.4 Connecting the remote keypad Usually, just the keyboard on the chiller is used. This is connected directly to connector J10. It is possible to connect a remote keyboard to the chillers and choose between various configurations. Unit 10.4.1 “T” shunt This is a shunt with phone connectors that is used in both the local and global plan network. The two jumpers J14 and J15 must short circuit pins 1 and 2. There is also a terminal board. The meanings of the various terminals are explained below. 1. Imagine of a T shunt. 2. Wiring diagram of a T shunt. 3. Screw terminal 0 1 2 3 4 5 6 Meaning of the terminal board 100 Function Earth (shielded cable sheath) +VRL=30V GND Rx-/TxRx+/Tx+ GND +VRL=30V C0240111-06-07-GB 10.4.2 Remote keyboard up to 200 metres To connect a remote keyboard two “T” shunt boards must be used, one near the controller and one near the remote keyboard. If a remote keyboard monitors just one unit, the correct configuration is: Shielded and twisted Unit The wiring diagram is shown below. 101 C0240111-06-07-GB 10.4.3 Remote keyboard from 200 metres up to 500 metres If the remote keyboard must be installed over 200m away from the plan network, a power unit must be installed near the remote keyboard. The remote keyboard cannot be installed more than 500 m away. The only difference between this and a remote keyboard up to 200 metres is that the power unit must be to terminals 1 and 2 of the T shunt (the one near the remote keyboard) If just one chiller is connected, the connection diagram is: Shielded and twisted Unit The wiring diagram is shown below. 102 C0240111-06-07-GB 10.4.4 Remote keypad for more than one unit To connect more than one chiller to the same remote keyboard, connect the two boards together by jumpering connectors J11. A configuration similar to the two shown above should only be used on the last board in the network (the one nearest the remote keyboard). CONFIGURING THE REMOTE To link units (up to 10), simply connect the controllers together with a 3x1 cable on connector J11. Each unit will have its own keypad on connector J10. The configuration up to 200m, or from 200m to 500m, will only be used on the last board, the one nearest the remote keypad. 103 C0240111-06-07-GB SYMBOLS The following symbols are used in the W3000 and W3000 compact masks. Flashing items on main mask Bands Fcool Limit Freeze Description Time bands active Unit in free-cooling mode Power limit active (demand limit) Outlet temperature approaching anti-freeze setpoint Unit symbol Off Ch nr Ch Ch+R Hp nr Hp R nr R Pd Defr Drip menu Description Unit/circuit off Chiller circuit not demanded by thermoregulator Chiller circuit demanded by thermoregulator Chiller circuit plus recovery demanded by thermoregulator Heat pump circuit not demanded by thermoregulator Heat pump circuit demanded by thermoregulator Recovery only circuit not demanded by thermoregulator Recovery only circuit demanded by thermoregulator Circuit in pump-down mode Circuit in defrost mode Circuit in drip mode Chiller symbol chiller Description Chiller Chiller+freecooling symbol chiller chiller+fc Description Chiller Chiller plus freecooling Chiller+recovery symbol chiller chiller+rec Description Chiller Chiller plus recovery Heat pump symbol chiller heat pump Description Chiller Heat pump All-in-one symbol auto recovery chiller+rec chiller Description Automatic Recovery Chiller plus recovery Chiller Heat pump with symbol summer auto summer rec summer ch+rec summer ch winter hp winter rec winter auto recovery Description Summer automatic Summer recovery Summer chiller plus recovery Summer chiller Winter heat pump Winter recovery Winter automatic 104