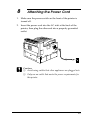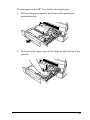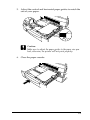
1
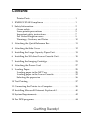
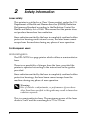
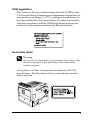
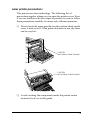
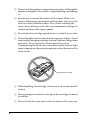
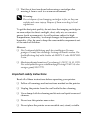
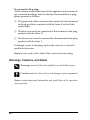
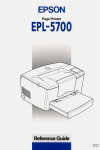
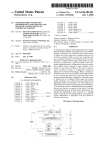
[Read This First]
Page Printer
Getting Ready!
4010651
XXX-00
Printer Parts
control panel
face-down tray
power switch
MP tray
lower cassette
cover B
ethernet interface serial interface
connector
connector
optional interface
slot cover
lock
lever
parallel interface
connector
cover A
AC inlet
cover C1
duplex unit
connector
5-bin multi-purpose
unit connector
10-bin multi-purpose
unit connector
2
Contents
Printer Parts. . . . . . . . . . . . . . . . . . . . . . . . . . . . . . . . . . . . . . . . . 1
1 ENERGY STAR Compliance . . . . . . . . . . . . . . . . . . . . . . . . . . . . 1
2 Safety Information . . . . . . . . . . . . . . . . . . . . . . . . . . . . . . . . . . . . . 2
Ozone safety . . . . . . . . . . . . . . . . . . . . . . . . . . . . . . . . . . . . . . . . 4
Laser printer precautions . . . . . . . . . . . . . . . . . . . . . . . . . . . . . 5
Important safety instructions . . . . . . . . . . . . . . . . . . . . . . . . . . 7
For United Kingdom users . . . . . . . . . . . . . . . . . . . . . . . . . . . . 9
Warnings, Cautions, and Notes . . . . . . . . . . . . . . . . . . . . . . . . 10
3 Attaching the Quick Reference Box. . . . . . . . . . . . . . . . . . . . . . . 11
4 Attaching the Side Cover . . . . . . . . . . . . . . . . . . . . . . . . . . . . . . . 12
5 Installing the Large Capacity Paper Unit . . . . . . . . . . . . . . . . . . 13
6 Installing the 500-sheet Lower Cassette Unit. . . . . . . . . . . . . . . 18
7 Installing the Imaging Cartridge . . . . . . . . . . . . . . . . . . . . . . . . . 23
8 Attaching the Power Cord . . . . . . . . . . . . . . . . . . . . . . . . . . . . . . 27
9 Loading Paper. . . . . . . . . . . . . . . . . . . . . . . . . . . . . . . . . . . . . . . . . 28
Loading paper in the MP Tray . . . . . . . . . . . . . . . . . . . . . . . . . 28
Loading paper in the Lower Cassette . . . . . . . . . . . . . . . . . . . 32
Selecting the paper size . . . . . . . . . . . . . . . . . . . . . . . . . . . . . . . 36
10 Test Printing . . . . . . . . . . . . . . . . . . . . . . . . . . . . . . . . . . . . . . . . . . 37
11 Connecting the Printer to a Computer . . . . . . . . . . . . . . . . . . . . 38
12 Installing Microsoft® Internet Explorer 4.0 . . . . . . . . . . . . . . . . 40
13 System Requirements . . . . . . . . . . . . . . . . . . . . . . . . . . . . . . . . . . 42
14 For DOS programs . . . . . . . . . . . . . . . . . . . . . . . . . . . . . . . . . . . . . 44
Getting Ready!
Where to Find Information
Getting Ready!
This is a manual which explains setting up the printer and installing the
optional Large Capacity Paper Unit and optional 500-sheet Lower Cassette
Unit. It explains the preparations which are necessary before the printer can
be used, before the installation of the optional Large Capacity Paper Unit and
optional 500-sheet Lower Cassette Unit, and before the installation of the
Internet Explorer browser software used to view the online manual.
Administrator's Guide
This is an online manual which explains information needed by the
Administrator, including network settings and installation of printer
software. You will find this manual in the CD-ROM entitled "Online Guide
for the EPL-N2700". For information about how to access and read online
manuals, refer to the booklet accompanying the CD-ROM. Use the Internet
Explorer browser to view the online manual.
Reference Guide
This is an online manual which provides detailed information necessary for
using the printer, including explanations on the installation of the various
options and the different printer functions. You will find this manual in the
CD-ROM entitled "Online Guide for the EPL-N2700". For information about
how to access and read online manuals, refer to the booklet accompanying
the CD-ROM. Use the Internet Explorer browser to view the online manual.
Quick Reference Guide
This explains the printer messages, how to clear paper jams and how to
replace imaging cartridges. Place it in the small box on the front of the printer
for safekeeping and easy access.
Online Help (Microsoft® Windows® 3.1x, 95, 98, and NT® only)
Provides you with detailed information and instructions on the Windowsbased printer software that controls your printer. (Online help is
automatically installed when you install the printer software.) See the online
Reference Guide for information on accessing online help.
EPSON is a registered trademark of SEIKO EPSON CORPORATION.
General Notice: Other product names used herein are for identification purposes only and may be
trademarks of their respective owners. EPSON disclaims any and all rights in those marks.
Copyright © 1999 by SEIKO EPSON CORPORATION, Nagano, Japan
iv
1
ENERGY STAR Compliance
As an ENERGY STAR Partner, EPSON has
determined that this product meets the ENERGY
STAR guidelines for energy efficiency.
The International ENERGY STAR Office Equipment Program is
a voluntary partnership with the computer and office equipment
industry to promote the introduction of energy-efficient personal
computers, monitors, printers, fax machines, copiers, and
scanners, in an effort to reduce air pollution caused by power
generation.
1
2
Safety Information
Laser safety
This printer is certified as a Class 1 laser product under the U.S.
Department of Health and Human Services (DHHS) Radiation
Performance Standard according to the Radiation Control for
Health and Safety Act of 1968. This means that the printer does
not produce hazardous laser radiation.
Since radiation emitted by the laser is completely confined within
protective housings and external covers, the laser beam cannot
escape from the machine during any phase of user operation.
For European users
United Kingdom
The EPL-N2700 is a page printer which utilizes a semiconductor
laser.
There is no possibility of danger from the laser, provided the
printer is operated according to the instructions in the guides
provided.
Since radiation emitted by the laser is completely confined within
protective housings, the laser beam cannot escape from the
machine during any phase of user operation.
w
Warning:
Use of controls or adjustments, or performance of procedures
other than those specified in this guide may result in hazardous
radiation exposure.
This is a semiconductor laser. The maximum power of the laser
diode is 5 mW and the wavelength is 775 to 795 nm.
2
CDRH regulations
The Center for Devices and Radiological Health (CDRH) of the
U.S. Food and Drug Administration implemented regulations for
laser products on August 2, 1976. Compliance is mandatory for
products marketed in the United States. The label shown below
indicates compliance with the CDRH regulations and must be
attached to laser products marketed in the United States.
Laser safety labels
w
Warning:
Use of controls, adjustments, or performance of procedures other
than those specified in this guide may result in hazardous
radiation exposure.
Your printer is a Class 1 laser product as defined in IEC 825
specifications. The label shown below is attached in countries
where required.
3
Ozone safety
Ozone emission
Ozone gas is generated by laser printers as a by-product of the
printing process. Ozone is produced only when the printer is
printing.
Ozone exposure limit
The recommended exposure limit for ozone is 0.02 parts per
million (ppm) expressed as an average time-weighted
concentration over an eight-hour period.
The EPL-N2700 laser printer generates less than 0.01 ppm for
eight hours of continuous printing in a closed room of
approximately 1000 cubic feet (8' × 10' × 12').
Minimize exposure risk
To minimize the risk of exposure to ozone:
❏ Do not use more than one laser printer in a confined area.
❏ Do not use your printer in conditions of extremely low
humidity.
❏ Do not use your printer in a room with poor ventilation.
❏ Avoid long, continuous printing in any of the conditions
mentioned above.
Printer location
The printer should be located so that the exhaust gases and
generated heat are:
❏ Not blown directly into the user's face.
❏ Vented directly out of the building whenever possible.
4
Laser printer precautions
This printer uses laser technology. The following list of
precautions applies whenever you open the printer cover. Even
if you are familiar with other types of printers, be sure to follow
these precautions carefully to ensure safe, efficient operation.
❏ Do not touch the areas specified on the caution labels inside
cover A and cover B. If the printer has been in use, the fuser
can be very hot.
CAUTION
Hot Surface Avoid Contact
CAUTION
Hot Surface Avoid Contact
❏ Avoid touching the components inside the printer unless
instructed to do so in this guide.
5
❏ Never force the printer's components into place. Although the
printer is designed to be sturdy, rough handling can damage
it.
❏ Be sure not to scratch the surface of the drum. When you
remove the imaging cartridge from the printer, always set the
unit on a clean, smooth surface. Also, avoid touching the
drum, since oils from your skin can permanently damage its
surface and may affect print quality.
❏ Do not turn the cartridge upside down or stand it on its sides.
❏ Protect the light-sensitive drum from exposure to light. Avoid
exposing the imaging cartridge to room light any longer than
necessary. Do not open the drum's protective cover.
Overexposing the drum may cause abnormally dark or light
areas to appear on the printed page and reduce the service life
of the drum.
protective cover
❏ When handling the cartridge, always set it on a clean, smooth
surface.
❏ Do not attempt to modify or take apart the cartridge. It cannot
be refilled.
❏ Do not touch the toner and avoid all contact with your eyes.
6
❏ Wait for at least one hour before using a cartridge after
moving it from a cool to a warm environment.
w
Warning:
Do not dispose of used imaging cartridges in fire, as they can
explode and cause injury. Dispose of them according to local
regulations.
To get the best print quality, do not store the imaging cartridge in
an area subject to direct sunlight, dust, salty air, or corrosive
gasses (such as ammonia). Avoid locations subject to high
temperatures, humidity, or abrupt changes in temperature or
humidity. Also, be sure to keep the consumable components out
of the reach of children.
Hinweis:
❏ Die Geräteanschlußleitung muß den einshlägigen Normen
genügen. Es muß eine dreiadrige Leitung verwendet werden. Die
Anshlußleitung darf nicht leichter als H05VV-F order H05VVH2F sein.
❏ Maschinenlärminformations-Verordnung-3. GSGV, 18. 01. 1991:
Der arbeitsplatzbezogene schalldruckpegel beträgt 70 dB (A) oder
weniger gemäß ISO 7779.
Important safety instructions
Read all of these instructions before operating your printer.
❏ Follow all warnings and instructions marked on the printer.
❏ Unplug the printer from the wall outlet before cleaning.
❏ Use a damp cloth for cleaning and do not use liquid or aerosol
cleaners.
❏ Do not use this printer near water.
❏ Do not place the printer on an unstable cart, stand, or table.
7
❏ Slots and openings in the cabinet and at the back and bottom
of the printer are provided for ventilation. Do not block or
cover them and do not put the printer on beds, sofas, rugs, or
other soft surfaces that may block ventilation. Do not place
the printer in an enclosure unless proper ventilation is
provided.
❏ Use the type of power source indicated on the label. If you are
not sure of the type of power available, consult your dealer or
local power company.
❏ If you are unable to insert the plug into the outlet, contact your
electrician to have your outlet repaired or replaced.
❏ Do not put your printer where the cord might be stepped on.
❏ Avoid using outlets that other appliances are plugged into.
❏ Only use an outlet that meets the power requirements for this
printer.
❏ Never push objects of any kind through cabinet slots as they
may touch dangerous voltage points or short out parts which
could result in fire or electric shock. Never spill liquid of any
kind on the printer.
❏ Except as specifically explained in this guide, do not attempt
to service this product yourself. Opening or removing covers
that are marked “Do Not Remove” exposes you to dangerous
voltage. Refer all servicing in those compartments to service
personnel.
❏ Unplug the printer from the wall outlet and refer servicing to
qualified service personnel under the following conditions:
A) If liquid has been spilled into it.
B) If it has been exposed to rain or water.
8
C) If it does not operate normally when the operating
instructions are followed. Adjust only those controls that are
covered by the operating instructions since improper
adjustment of other controls may result in damage and will
often require extensive work by a qualified technician to
restore the product to normal operation.
D) If it has been dropped or the cabinet has been damaged.
E) If it exhibits a distinct change in performance and a
message indicating a need for service appears on the LCD
panel.
F) When the power cord or plug is damaged or frayed.
For United Kingdom users
Use of options
EPSON (UK) Limited shall not be liable against any damages or
problems arising from the use of any options or consumable
products other than those designated as Original EPSON
Products or EPSON Approved Products by EPSON (UK) Limited.
Safety information
w
Warning:
This appliance must be earthed. Refer to rating plate for voltage
and check that the appliance voltage corresponds to the supply
voltage.
Important:
The wires in the mains lead fitted to this appliance are coloured
in accordance with the following code:
Green and yellow—Earth
Blue—Neutral
Brown—Live
9
If you need to fit a plug:
As the colours of the mains lead of this appliance may not match
any coloured markings used to identify the terminals in a plug,
please proceed as follows:
❏ The green and yellow wire must be connected to the terminal
in the plug which is marked with the letter E or the Earth
symbol (G).
❏ The blue wire must be connected to the terminal in the plug
marked with the letter N.
❏ The brown wire must be connected to the terminal in the plug
marked with the letter L.
If damage occurs to the plug, replace the cord set or consult a
qualified electrician.
Replace fuses only with a fuse of the correct size and rating.
Warnings, Cautions, and Notes
w
c
Warnings must be followed carefully to avoid bodily injury.
Cautions must be observed to avoid damage to your equipment.
Notes contain important information and useful tips on the operation
of your printer.
10
3
Attaching the Quick Reference
Box
Use the quick reference box for storing the Quick Reference Guide
if the guide is included with your printer. Insert the knob on the
bottom of the quick reference box into the slot on the left of the
printer. Then attach the quick reference box by inserting the knobs
into the slots on each side.
If you installed the 10-Bin Multi-Purpose Unit, attach the quick
reference box to the back of the printer as shown below.
11
4
Attaching the Side Cover
Attach the printer's side cover unless the optional Large Capacity
Paper Unit is installed.
Note:
If the optional 500-sheet Lower Cassette Unit is installed, attach the side
cover to the lowermost 500-sheet Lower Cassette Unit.
1. Remove the side cover from the box and confirm the direction
in which it is to be attached.
2. Fit the side cover to the bottom of the printer.
After fitting the side cover into the slot to the rear of the
printer, fit the other end in the slot to the front.
12
5
Installing the Large Capacity
Paper Unit
It is best to install the Large Capacity Paper Unit when first setting
up the printer. Please note that you will need the assistance of at
least two other people to lift up the printer when installing this
option.
Follow these instructions to install the Large Capacity Paper Unit.
1. Open the shipping carton.
2. Remove the inserts and all other protective materials inside
the box. Make sure the contents of the package match the
items on the included documentation. Remove the packaging
materials and any other items from the unit and store them
for future use.
3. With the assistance of two or more people, lift the Large
Capacity Paper Unit out of the box and place it near the
printer.
13
4. You will find three casters at the bottom of the Large Capacity
Paper Unit. Lock the casters by pushing their levers down.
5. If you are also installing a 500-Sheet Lower Cassette Unit,
stack it on top of the Large Capacity Paper Unit. For
instructions on how to prepare the Lower Cassette Unit for
installation, see “Installing the 500-sheet Lower Cassette
Unit” on page 18.
6. Remove the side cover from the bottom of the printer.
14
7. With the assistance of two or more people, grasp the printer
at the positions indicated below and lift it carefully.
Front
c
Rear
Caution:
The printer weighs about 30 kg (66.1 lb); always lift it with
two or more people.
8. Align each of the printer’s corners with those of the unit, then
lower the printer until it rests securely on the unit.
15
9. Make sure all corners of the printer fit firmly onto the unit.
Then pull out the cassette and fasten the unit using the fittings
and screws provided.
10. On the back of the printer, fasten the unit using the fittings
and screws provided.
16
11. Pull the cassette out of the unit and remove the protective
materials.
12. Peel the appropriate cover and cassette numbering labels
from the label sheet included with the Large Capacity Paper
Unit and attach it to the unit.
13. Pull out the cassette and attach the printer supports and
printer support covers to the front of the printer as shown
below. Then attach the printer supports to the back of the
printer.
17
6
Installing the 500-sheet Lower
Cassette Unit
It is best to install the Lower Cassette Unit when first setting up
the printer. You can install up to two Lower Cassettes, or one
Lower Cassette plus the optional Large Capacity Paper Unit.
Please note that you will need the assistance of at least two other
people to lift up the printer when installing this option.
Follow these instructions to install the Lower Cassette Unit.
1. Open the shipping carton.
2. Remove the inserts and all other protective materials inside
the box. Make sure the contents of the package match the
items on the included documentation. Remove the packaging
materials and any other items from the Lower Cassette Unit
and store them for future use.
3. Lift the Lower Cassette out of the box and place it near the
printer.
If you plan to use more than one Lower Cassette, stack the
cassettes with the front of each cassette facing the same
direction.
18
If you plan to install the Large Capacity Paper Unit at the same
time, follow the instructions in “Installing the Large Capacity
Paper Unit” on page 13 to complete the installation of both
units.
4. Remove the side cover from the bottom of the printer.
5. With the assistance of two or more people, grasp the printer
at the positions indicated below and lift it carefully.
Front
c
Rear
Caution:
The printer weighs about 30 kg (66.1 lb); always lift it with
two or more people.
19
6. Align each of the printer’s corners with those of the cassette
unit, then lower the printer until it rests securely on the unit.
7. Make sure all corners of the printer fit firmly onto the unit.
8. Pull out the cassette and fasten the Lower Cassette Unit using
the fittings and screws provided.
20
9. On the back of the printer, fasten the unit using the fittings
and screws provided.
10. Pull the cassette out and remove the protective materials.
11. Attach the side cover to the bottom of the cassette unit as
shown below.
21
12. Peel the appropriate cover and cassette numbering labels
from the label sheet included with cassette unit, and attach
them to the unit as shown below.
22
7
Installing the Imaging Cartridge
1. While holding the imaging cartridge horizontally, gently
rock it back and forth a few times to distribute the toner
evenly.
c
Caution:
❏ Do not turn the imaging cartridge upside down.
❏ Do not open the drum's protective cover and avoid exposing
the imaging cartridge to room light any longer than
necessary. Overexposing the cartridge may cause
abnormally dark or light areas to appear on the printed page
and reduce the life of the cartridge.
protective cover
23
2. While holding down the carrying handle so that it doesn't fly
out, peel off the tape that is affixed to the handle. Release the
handle by removing your hand from it gently and the handle
will automatically eject.
c
Caution:
When you peel the tape off, the handle will quickly eject so
that it could injure your fingers. To avoid this, hold the
handle in position firmly while peeling off the tape.
3. Open cover A gently by pulling the latch.
24
w
Warning
Do not touch the hot areas indicated on the caution labels inside
cover A.
CAUTION
Hot Surface Avoid Contact
4. Holding the Left and Right handles on the imaging cartridge,
insert it into the printer until it is firmly seated.
25
5. Close cover A by pushing it up and into the printer.
c
26
Caution:
Never transport the printer with the imaging cartridge installed.
8
Attaching the Power Cord
1. Make sure the power switch on the front of the printer is
turned off.
2. Insert the power cord into the AC inlet at the back of the
printer, then plug the other end into a properly grounded
outlet.
c
Caution:
❏ Avoid using outlets that other appliances are plugged into.
❏ Only use an outlet that meets the power requirements for
this printer.
27
9
Loading Paper
This section includes instructions for loading paper in the MP
Tray and the Lower Cassette.
Note:
The printer also supports an optional 500-sheet Lower Cassette Unit,
which uses the same loading method as the standard Lower Cassette.
Loading paper in the MP Tray
The MP Tray can accommodate various types and sizes of paper
and envelopes. It handles 250 sheets, allowing you to load a total
of 750 sheets when used in combination with the Lower Cassette.
You can load the following paper sizes. The loading orientation
differs depending on the paper size, as explained below:
Loading Orientation
Paper Size
Vertical
A4, A5, Executive, Letter, B5, G-Letter, HTL
Horizontal
A3, Ledger, Legal, B4, F4, G-Legal
To confirm paper sizes, see “Paper Specifications” in Appendix A of the
Reference Guide.
Note:
When you load Excutive, G-Letter, HTL, Ledger, B4, G-Legal, and other
custom paper sizes, select the paper size in the printer driver, then set
the paper size for MP Tray using the SelecType Tray menu. For
instructions, see "SelecType settings" in the Reference Guide.
28
To load paper in the MP Tray, follow the steps below.
1. Pull out the paper cassette, and remove the protective
materials inside.
2. Push down the inner tray until it clicks on the bottom of the
cassette.
29
3. While pulling up the vertical and horizontal paper guide,
slide it to match the size of your paper.
4. Fan a stack of paper and tap it on a flat surface to even the
edges. Insert the paper face up into the cassette, aligning the
corners of the paper with the arrow mark inside the cassette.
Printable side up
Note:
❏ Be sure not to load paper higher than the arrow mark.
❏ If your printouts are curled or do not stack properly when using
plain paper, try turning the stack over and reloading it.
30
5. Adjust the vertical and horizontal paper guides to match the
size of your paper.
c
Caution:
Make sure to adjust the paper guides to the paper size you
load; otherwise, the printer will not print properly.
6. Close the paper cassette.
31
7. Peel the appropriate paper size label from the label sheet
included with your printer and attach it to the cassette.
Loading paper in the Lower Cassette
The Lower Cassette can accommodate a variety of paper sizes. It
handles 500 sheets, allowing you to load a total of 750 sheets when
used in combination with the MP Tray.
You can load the following paper sizes. The loading orientation
differs depending on the paper size, as explained below:
Loading Orientation
Paper Size
Vertical
A4, Letter, Government Letter
Horizontal
A3, Ledger, Legal, B4
To confirm paper sizes, see “Paper Specifications” in Appendix A of the
Reference Guide.
32
To load paper in the Lower Cassette, or in an optional 500-sheet
Lower Cassette Unit, follow the steps below.
1. Pull out the cassette all the way out, and remove the protective
materials inside.
2. Push down the inner tray until it clicks on the bottom of the
cassette.
33
3. While pulling up the vertical paper guide, slide it to match
the paper size.
4. Insert the horizontal paper guide into the slot for the paper
size you want to load.
34
5. Fan a stack of paper and tap it on a flat surface to even the
edges. Insert the paper face up into the cassette, aligning the
corners of the paper with the arrow mark inside the cassette.
Printable side up
Note:
❏ Be sure not to load paper higher than the arrow mark.
❏ If your printouts are curled or do not stack properly when using
plain paper, try turning the stack over and reloading it.
c
Caution:
Make sure to adjust the paper guides to the paper size you
load; otherwise, the printer will not print properly.
6. Set the paper size with the paper-size dial.
35
7. Close the paper cassette.
8. Peel the appropriate paper size label from the label sheet
included with your printer and attach it to the cassette.
Selecting the paper size
By default, the printer driver is set for A4 size paper. If you load
paper of a different size, change the paper size setting on the
printer driver’s Basic Settings menu. For more information on
using the printer driver, see the driver’s online help.
You can also change this setting from the printer’s control panel
using OneTouch mode 1. For details, see “Using the OneTouch
Modes” in the Reference Guide.
36
10
Test Printing
1. Make sure the imaging cartridge is installed. Turn on the
printer. Several messages will appear on the display as the
printer performs internal tests. After about 10 seconds, the
Ready message will appear.
2. Make sure the On Line light is on. This indicates that the
printer is ready to accept and print data. If it isn't on, press the
On Line button.
3. Press Enter two times. The printer will print the status sheet,
showing the current printer settings.
When printing is completed, the On Line light will blink.
Enter button
37
11
Connecting the Printer to a
Computer
Though this printer is intended to be used on a network, you can use
the parallel interface to connect the printer directly to a computer.
Note:
Your printer also has room for an optional interface. See Chapter 4,
“Handling Options,” in your Reference Guide for more information.
To connect the parallel interface, follow the steps below.
1. Make sure both the printer and the computer are off.
2. Connect the parallel cable to the parallel interface connector.
Note:
Use only a shielded, twisted-pair parallel cable.
parallel interface
connector
38
3. Secure the connector by pushing the two wire clips together
until they lock in place on both sides of the connector.
4. Connect the other end of the cable to your computer, and
fasten it as required.
5. Turn on the printer, then turn on your computer.
39
12
Installing Microsoft® Internet
Explorer 4.0
A Web browser is required to use these guides. If you do not have
a Web browser, install Microsoft Internet Explorer 4.0 from the
online guide CD.
For Windows
Note for Windows 98 users:
Windows 98 comes with Internet Explorer 4.0 already installed; please
skip this section.
Note for Windows NT 4.0 users:
Before installing Microsoft Internet Explorer 4.0, you need to install the
Windows NT Service Pack 3. For installation instructions, see the read
me file located in the online guide CD at
Browser\Win95nt\NT4sp3\Readme.txt. Read also License.txt
in the same directory.
1. Insert the online guide CD in your CD-ROM drive. If a dialog
box appears with options to view or install the guides, click
Quit.
2. Double-click the My Computer icon, then double-click the
CD-ROM icon. For Windows 3.1, click the CD-ROM drive in
File Manager.
3. Double-click the Browser folder.
4. For Windows 95 or NT 4.0: double-click Win95nt then
double-click Ie40.
For Windows 3.1: double-click Win31.
5. Double-click ie4setup.exe (for Windows 95 or NT 4.0) or
Setup.exe (for Windows 3.1) and follow the on-screen
instructions.
40
For Macintosh
1. Insert the online guide CD in your CD-ROM drive.
2. Double-click the Browser folder.
3. Double-click ppc or 68k depending on your Macintosh CPU.
4. Double-click ie4setup and follow the instructions on the
screen.
41
13
System Requirements
For Windows
System:
Microsoft Windows® 3.1, 95, 98, or NT 4.0
CPU:
i486/25 MHz (for Windows 95/ NT 4.0)
i486/66 MHz (for Windows 98)
i386/25 MHz (for Windows 3.1)
(Pentium or higher recommended)
Memory:
16 MB (32 MB or more recommended)
Hard disk space: 4 MB to install the Reference Guide
15 MB to install Microsoft Internet
Explorer 4.0
CD-ROM drive: Double-speed
(Quad-speed or faster recommended)
42
Display:
640 x 480 pixel or 800 x 600 pixel
resolution, with High Color (16 bit)
or True Color (32 bit) setting
Browser:
Web browser
(Microsoft Internet Explorer 4.0 or
later recommended)
For Macintosh
System:
System 7.5.1 (System 7.6 or later
recommended)
Memory:
16 MB (32 MB or more recommended)
Hard disk space: 4 MB to install the Reference Guide
15 MB to install Microsoft Internet
Explorer
CD-ROM drive: Double-speed
(Quad-speed or faster recommended)
Display:
Color monitor with 640 x 480 pixel
resolution or greater
(Thousands of colors recommended)
Browser:
Web browser
(Microsoft Internet Explorer 4.0 or later
recommended)
43
14
For DOS programs
Since DOS application programs differ in their driver selection
procedures, there is no standard way to select the printer driver.
See your software manual for information on how to select the
printer.
When asked to select a printer, pick the first printer available in
the list below.
EPL-N4000
EPL-5500/5500+
EPL-N1200
EPL-N2000
EPL-5600
EPL-3000
EPL-5200/5200+
HP LaserJet III/IIIP/IIID
HP LaserJet III Si
HP LaserJer 4L
EPL-9000
HP LaserJer 4
HP LaserJer 4V
If you choose a printer other than the EPL-N2700, you may not be
able to use some printer features.
44
Page Printer
Getting Ready!
Printed in Japan 99.XX-XX