1
DIGIDIM 503AV / 505
RS232
AV INTERFACE
PACKAGE
User Guide
Digidim 503AV / 505 RS232 AV Interface User Guide
Helvar Ltd.
Contents
1.
Overview.............................................................................................................................1
1.1. DIGIDIM and DALI .....................................................................................................1
1.2. DALI Safety Note .......................................................................................................1
1.3. Isolation .....................................................................................................................1
1.4. Byte Format ...............................................................................................................1
1.5. References ................................................................................................................1
2.
Interface Power ...................................................................................................................2
2.1. 505 Interface Power ...................................................................................................2
Old type (black case) .................................................................................................2
New type (transparent case) ......................................................................................2
Both types..................................................................................................................2
2.2. 503AV Interface Power ..............................................................................................2
3.
Connection..........................................................................................................................3
3.1. Connection Details .....................................................................................................4
3.2. 505 Interface RS232 Connector .................................................................................5
Old Interface (Black Case) .........................................................................................5
New Interface (Transparent Case)..............................................................................5
4.
Operating Modes.................................................................................................................6
4.1. 505 Operational Default .............................................................................................6
4.2. 503AV Operational Default.........................................................................................6
5.
Installation...........................................................................................................................6
5.1. 505 Installation...........................................................................................................6
5.2. 503AV Installation ......................................................................................................6
5.3. System Installation Example ......................................................................................7
6.
Programming a DIGIDIM system .........................................................................................8
7.
Messages ...........................................................................................................................8
7.1. Message Handling .....................................................................................................8
Synchronisation .........................................................................................................8
Data Transfer .............................................................................................................8
7.2. Message Structure .....................................................................................................8
Transmission to Interface ...........................................................................................8
Return from Interface .................................................................................................8
DALI System Traffic ...................................................................................................9
DALI Component Addressing .....................................................................................9
7.3. Message List............................................................................................................ 10
8.
Appendices ....................................................................................................................... 13
8.1. Return message format............................................................................................ 13
Reply type................................................................................................................ 13
Data formats ............................................................................................................ 13
8.2. Touch Screen .......................................................................................................... 14
Doc. No. 7860076
Page i
Issue 8
Digidim 503AV / 505 RS232 AV Interface User Guide
Helvar Ltd.
1. Overview
The DIGIDIM RS232 interface provides the means of interconnection between a Digidim
Lighting Control System and an RS232 port. Communication is bi-directional. The interface
itself is functionally passive and serves only to link the communications between the
computer (or equivalent) and DIGIDIM. The 505 interface uses the industry standard 9-pin
D-connector, allowing direct connection to such as a PC compatible serial port. The 503AV
interface is a DIN-rail mounted module, more suited to fixed installation applications.
The interface module’s power requirements are derived from the connecting systems.
Opto-coupling is used for the internal link of the two systems to provide double-insulation
between them.
Note:
You must install Digidim ‘Toolbox‘ Software to utilise the functions of the AV
interface with a Digidim Lighting Control System.
1.1. DIGIDIM and DALI
DIGIDIM is Helvar’s implementation of the application of DALI to controls and load
interfaces. It is possible that a DIGIDIM system may contain a mixture of devices, including
third party DALI-compliant ballasts or dimmers. For this reason, the User Guide often refers
to aspects of the DALI standard.
1.2. DALI Safety Note
By definition, when connected to a lamp interface, DALI is recognised as having basic
insulation from the mains supply only, and is therefore deemed a live connection. In
consequence, the module is constructed to offer a double-insulation rated barrier to the
RS232 serial interface and the user, when correctly installed.
Connection to DALI should be by use of mains-rated cable to a double-insulation
specification and using a shrouded connector. The low voltage power supply to the DALI
components should always be isolated prior to connection to – or work with – the DALI
components. Where appropriate, the use of the Helvar DIGIDIM 180 Programming Point
panel and proprietary connecting lead offers a means of a double-insulation connection,
without powering down the DALI system.
1.3. Isolation
Isolation is 3kV between the RS232 and DALI.
1.4. Byte Format
The byte format is 19,200 baud by default; 8 data bits, no parity and 1 stop bit.
No control or handshaking is used.
1.5. References
‘RS232 to DALI Command List’ (Doc. No. 7860077)
‘RS232 to 900 Lighting Router Command List’ (Doc. No. D004102)
‘RS232 to 900 Digidim Router User Guide’ (Doc. No. ???)
‘RS232 to 910 Digidim Router User Guide’ (Doc. No. ???)
Doc. No. 7860076
Page 1
Issue 8
Digidim 503AV / 505 RS232 AV Interface User Guide
Helvar Ltd.
2. Interface Power
2.1. 505 Interface Power
The Digidim 505 interface takes power from the serial port for operation of the RS232 link.
This differs between the old type (black case) and new type (transparent case).
Old type (black case)
Either or both the RTS and DTR lines must be set to HIGH for operation. Internally the
lines are diode ‘or’d’.
Note:
Some low-power RS232 ports do not provide enough power if only one of these
lines is HIGH. Setting both to HIGH always provides enough power.
New type (transparent case)
This requires the RTS line to be set to HIGH, and the DTR line to be set to LOW. Both
these lines must be connected for the interface to function. No ground connection is
required.
Note:
Internally, the DTR line is connected to DCD, but connection to DCD is not
required for operation.
Where the control interface does not allow setting of the RTS and DTR lines as required
then an external DC supply must be used. The exact specification of the DC supply is not
critical but must be of double-insulation rating with a floating output. The voltage must be
between +/- 4 and +/- 12 volts and remain stable with no load. The supply negative is
connected to pin 4 of the interface, the supply positive to pin 7 of the interface, and the
supply 0 volt reference to the Host GND connection.
Both types
The main operating power and DALI communications are taken from the DALI connection.
In the absence of a DALI supply connection the interface will not function.
Note:
Interface’s nominal power consumption is 3mA from the RS232 port and 10mA
from DALI.
2.2. 503AV Interface Power
The interface is powered entirely from the Digidim connection. The RS232 connection is
RX, TX and GND. All connections are via terminals, with the Digidim connection using the
standard Helvar 6-way terminal connector.
Doc. No. 7860076
Page 2
Issue 8
Digidim 503AV / 505 RS232 AV Interface User Guide
Helvar Ltd.
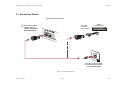
3. Interface Connection
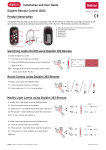
This section describes the connection of the RS232 AV interface.
See Figure 1: Connection Instructions (overleaf) for details on how to connect the AV
interface to the AV system.
Doc. No. 7860076
Page 3
Issue 8
Digidim 503AV / 505 RS232 AV Interface User Guide
Helvar Ltd.
3.1. Connection Details
1Shut down the AV-system
2
9 D- male
Connector
with fly-leads
Connect the network
adapter to the AVsystems serial port or
Connection block
RS232
Connector block
, connect the cable
3 Finally
to the programming point
on the DIGIDIM system.
Figure 1: Connection Instructions
Doc. No. 7860076
Page 4
Issue 8
Digidim 503AV / 505 RS232 AV Interface User Guide
Helvar Ltd.
3.2. 505 Interface RS232 Connector
The 505 interface uses the industry standard 9-way D-type socket connector. All
connections conform to the conventional pin designations. The interface uses the transmit
(TX), receive (RX), request to send (RTS) and data terminal ready (DTR) connections. The
new interface does not use the ground connection.
Note:
All unspecified pins have no connection.
Old Interface (Black Case)
Interface
RS232
power
RX
TX
RTS
DTR
GND
Host
3
2
7
4
5
TX
RX
RTS
DTR
GND
Set Both
to High
9-way D-type
socket
New Interface (Transparent Case)
Interface
DCD
RS232
RX
power
TX
+
RTS
DTR
not used GND
1
3
2
7
4
5
Host
TX
RX
RTS Set to High
DTR Set to Low
GND
9-way D-type
Socket
Doc. No. 7860076
Page 5
Issue 8
Digidim 503AV / 505 RS232 AV Interface User Guide
Helvar Ltd.
4. Operating Modes
4.1. 505 Operational Default
The interface can operate in several modes. From power up (of the DALI supply), the 505
interface’s operational default is for Helvar DIGIDIM ‘Toolbox’ Software. The mode
command is required to activate the interface for AV use. (Note that the reply message to
the mode command contains the interface firmware revision).
4.2. 503AV Operational Default
The default for the 503AV interface is AV mode.
5. Installation
5.1. 505 Installation
If the DIGIDIM system that you want to configure does not include a 180 programming
point, one must be installed before the RS232 connection can be used.
Important Notes:
Before installation, isolate the circuit.
All DIGIDIM cabling must be 230v mains-rated.
For safety reasons, do not connect the interface other than with a correctly installed
programming point (see document ‘180 Programming Point (I438M1)’, included on the
CD within the 503 package).
Connect the adapter directly to the serial port (9-way D-type). If you are not sure which
connector is the serial port, refer to your system documentation.
5.2. 503AV Installation
The DIN-rail mounted 503AV interface is intended for installation in a protected enclosure
or area. Always follow safe practice when working in a protected area. Digidim and RS232
connections are made directly at the module. Mains-rated cable must be used for Digidim
and preferably segregated from the RS232.
Doc. No. 7860076
Page 6
Issue 8
Digidim 503AV / 505 RS232 AV Interface User Guide
Helvar Ltd
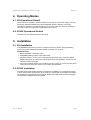
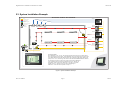
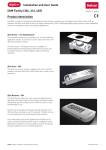
5.3. System Installation Example
INSTALLATION EXAMPLE
Key
GROUP 3
DALI
ADDRESS 6
Relay Outputs
ADDRESS 7
AV data
Programming point
ADDRESS 8
Modular control panel
1
2
3
4
494 RELAY UNIT
ADDRESS 5
Dimmed Outputs
O
505 interface
505
PC Ser i al
I nte rf ace
Tungsten
GROUP 1
GROUP 2
DATA
OVERHEAD DISPLAY
SCREEN
PROJECTOR
CRT PROJECTOR CONTROL
RELAY
Fluorescent
455
THYRISTOR
DIMMER 500W
ADDRESS 1
GROUP 1
ADDRESS 2
1
2
3
O
Screen
4
470
CONVERTER
1-10V
GROUP 1
455
THYRISTOR
DIMMER 500W
GROUP 1
GROUP 2
455
THYRISTOR
DIMMER 500W
ADDRESS 3
ADDRESS 4
AV CONTROLLER
V
V
505
P CSer ial
Inte rf ac e
TOUCH SCREEN
SCENES
WALL
WASH
TABLE
POWER
LIGHTS
ON
OHP
ON
OHP
OFF
PRES
1
DISP
ON
DISP
OFF
PROJ
ON
PROJ
OFF
S/O
ON
S/O
OFF
PRES
2
PRES
3
LIGHTS
OFF
Short addresses, from 1 to 63, are assigned uniquely at random to every DALI device
when programming is first begun. These addresses are not assigned by the programmer.
Once all the devices have been discovered the the programmer will assign devices into
groups, from 1 to 16, according to the needs of the area with DIGIDIM Toolbox software.
For example, the power circuits on the relay unit have short addresses
5,6,7 and 8 but they have all been included in Group 3. Similary all
the lighting circuits, which have addresses 1,2,3 and 4, have been
placed in Group 1. Finally, the two circuits of wall lighting at
addresses 1 and 4 have been placed in Group 2.
TOUCH SCREEN
Figure 2: System Installation Example
Doc. No. 7860076
Page 7
Issue 8
Digidim 503AV / 505 RS232 AV Interface User Guide
Helvar Ltd.
6. Programming a DIGIDIM system
Before commands can be sent to the DIGIDIM system it has to be programmed.
Programming usually covers assigning device addresses, allocation of groups and setting
scene levels. This is done with DIGIDIM Toolbox Software or, in case of a small system,
with the DIGIDIM IR remote controller 303.
Note:
Ensure that you fully understand the operation of the ‘Toolbox’ Software before
programming. For full instructions on the use of the application see the DIGIDIM
Toolbox online help manual.
7. Messages
Refer to documents ‘RS232 to DALI Command List’ (7860077) and ‘RS232 to 900 Lighting
Router Command List’ (D004102,) for more information on messaging formats.
7.1. Message Handling
Synchronisation
Data transfer to the interface is auto-synchronising. An incomplete or damaged string of
message bytes will be discarded after approximately 3 byte periods. Subsequent bytes will
be considered a new message string.
Data Transfer
Messages are handled singularly. Passing a message to the interface will generate a reply,
either as a message acknowledgement or the returned data to a query request. A
subsequent message can not be passed to the interface until after the reply; an attempt to
do so will result in its loss.
Each transmitted message will result in a single return message.
7.2. Message Structure
Transmission to Interface
This is the message to be transmitted to the DALI system or to configure the interface.
The normal message type is 3 bytes; 4 or 5 bytes for special types.
Length byte:
this defines the number of bytes to FOLLOW.
Message type:
refer to following description.
DALI data byte(s):
2 bytes to the DALI protocol: 1 byte is address and 2
command or data.
st
nd
is
Return from Interface
This is the message from the DALI system, or acknowledgement from the interface.
The message can be 2, 3 or 4 bytes in size.
Length byte:
this defines the number of bytes to follow.
Message type:
defines reply status and if there is data to follow (refer to table in
section 8.3 Message List).
Doc. No. 7860076
Page 8
Issue 8
Digidim 503AV / 505 RS232 AV Interface User Guide
Helvar Ltd.
Data byte(s):
message echo or returned data to DALI protocol.
Pack byte(s):
contents not defined; ignore.
DALI System Traffic
All messages present on the DALI system which are not generated by the interface, are
automatically returned from the interface. This allows complete monitoring of all activity of
the DALI system components. Other than the byte count, all messages are returned as
seen by the interface.
DALI Component Addressing
A DALI system, or sub-net, can consist of up to 63 individual components, each with its
own ‘short address’. These short addresses are assigned at the time of configuration and
programming of the DALI system. In addition, any number of the individual components
can be put into a group with consequential group control. There are a total of 16 groups in
the DALI protocol and each component can belong to none, one or any number of the
groups. To allow communication to all components at the same time, a ‘broadcast’ address
is used.
This allows three methods of addressing: broadcast, group and individual short address (or
a total of 1 + 16 + 63 addresses, which is 80).
Other than the interface control commands, all messages can have one of 80 address
possibilities. Multiple addresses can only be sent by multiple messages; no combinations
within a single message are permitted.
Doc. No. 7860076
Page 9
Issue 8
Digidim 503AV / 505 RS232 AV Interface User Guide
Helvar Ltd
7.3. Message List
Note:
Refer to document 7860077, ‘RS232 to DALI Command List’ for a full list of DALI commands.
Command
Transmit
Return
Set Interface AV mode – this command must be sent at
power up.
03, 82, 02, 00
03, 82, xx, yy
where the decimal value
of xx.yy is the Interface revision
General form
No. of bytes to follow, type, DALI address, DALI command or
data
No. of bytes to follow, reply type (see notes),
returned data or message echo
Go to level ‘dd’
03, 51, a0, dd where a0 = {bxxxxxxx0}DALI level address and
dd = DALI level of 00 through FE
03, 64, a0, dd
OFF
03, 51, a1, 00 where a1 = {bxxxxxxx1}DALI command
address
03, 64, a1, 00
UP
03, 51, a1, 01 where a1 = {bxxxxxxx1}DALI command
address
03, 64, a1, 01
DOWN
03, 51, a1, 02 where a1 = {bxxxxxxx1}DALI command
address
03, 64, a1, 02
STEP UP
03, 51, a1, 03 where a1 = {bxxxxxxx1}DALI command
address
03, 64, a1, 03
STEP DOWN
03, 51, a1, 04 where a1 = {bxxxxxxx1}DALI command
address
03, 64, a1, 04
Recall MAX level
03, 51, a1, 05 where a1 = {bxxxxxxx1}DALI command
address
03, 64, a1, 05
Recall MIN level
03, 51, a1, 06 where a1 = {bxxxxxxx1}DALI command
address
03, 64, a1, 06
STEP DOWN and OFF
03, 51, a1, 07 where a1 = {bxxxxxxx1}DALI command
address
03, 64, a1, 07
ON and STEP UP
03, 51, a1, 08 where a1 = {bxxxxxxx1}DALI command
address
03, 64, a1, 08
Doc. No. 7860076
Page 10
Issue 8
Digidim 503AV / 505 RS232 AV Interface User Guide
Helvar Ltd.
Command
Transmit
Return
Go to Scene ‘s’
03, 51, a1, 1s where a1 = {bxxxxxxx1}DALI command address
and s = DALI Scene of 1 through 16 (Hex values 0 to F, for
Scenes 1 to 16)
03, 64, a1, 1s
Query Lamp Interface Status – short Address ‘sc’ where sc =
1 to 63 (offset 1 and LSB set to 1)
- example for address’1’
03, 55, sc, 90 where sc = {b0xxxxxx1}
giving range of sc = 01 to 7D
03, 55, 01, 90
03, 66, sb, sb where sb = {bxxxxxxxx} status
bit information, where:
bit 0 status; ‘0’=OK
bit 1 lamp failure; ‘0’=OK
bit 2 lamp power; ‘0’=OFF
bit 3 limit error; ‘0’=last requested level
between
MIN and MAX Level or OFF
bit 4 fade; ‘0’=fade ready, ‘1’=fade running
bit 5 Reset state; ‘0’=NO
bit 6 missing short address; ‘0’=NO
bit 7 Power failure;’0’=NO
02, 6B, 90 no lamp interface at that address
Query Actual Level – short Address ‘sc’ where sc = 1 to 63
(offset 1 and LSB set to 1)
- & for ‘1’
03, 55, sc, A0 where sc = {b0xxxxxx1}
giving range of sc = 01 to 7D
03, 55, 01, A0
03, 66, xx, xx where xx = 0 through FF
02, 6B, A0 no lamp interface at that address
DALI Addressing
Broadcast address for go to level
03, 51, FE, dd where dd = DALI level
Broadcast address for DALI command
03, 51, FF, cc where cc = DALI command
Group addressing, 1 to 16 for DALI level
Group ‘gl’, go to level dd; where gl = 1 to 16 (offset 1 with
MSB set to 1, bits 6&5 set to 0 and LSB set to 0)
03, 51, gl, dd where gl = {b100xxxx0}
giving range of gl = 80 to 9E
03, 64, gl, dd
Group addressing, 1 to 16 for DALI command
Group ‘gc’, action command cc; where gc = 1 to 16 (offset 1
with MSB set to 1, bits 6&5 set to 0 and LSB set to 1)
03, 51, gc, cc where gc = {b100xxxx1}
giving range of gc = 81 to 9F
03, 64, gc, cc
Short addressing, 1 to 63 for DALI level
Address ‘sl’, go to level dd; where sl = 1 to 64 (offset 1 with
MSB set to 0 and LSB set to 0)
03, 51, sl, dd where sl = {b0xxxxxx0}
giving range of sl = 00 to 7C
03, 64, sl, dd
Short addressing, 1 to 63 for DALI command
03, 51, sc, cc
03, 64, sc, cc
Doc. No. 7860076
where sc = {b0xxxxxx1}
Page 11
Issue 8
Digidim 503AV / 505 RS232 AV Interface User Guide
Helvar Ltd.
Command
Transmit
Return
Address ‘sc’, action command cc; where sc = 1 to 64 (offset 1
with MSB set to 0 and LSB set to 1)
giving range of sc = 01 to 7D
Error return messages
For query commands
02, 6C, xx Multiple replies. This will be
returned for example if a query is sent with
the broadcast address. Here xx = pack byte,
ignore.
03, 70, xx, xx Failure in transmitting a DALI
message. Where xx = pack byte for all types.
03, 71, xx, xx Illegal DALI frame received,
may or may not be as a result of requested
transmission.
03, 73, xx, xx Unknown command (from
computer)
03, 74, xx, xx Error. Already transmitting and
can not accept further data
03, 75, xx, xx Fault. DALI line held low for
too long – external problem.
All types
Doc. No. 7860076
Page 12
Issue 8
Digidim 503AV / 505 RS232 AV Interface User Guide
Helvar Ltd.
8. Appendices
8.1. Return message format
Reply type
The ‘reply type’ is dependent upon the transmitted message type and source of
transmission. The return for a self-generated AV type 51 will be 64, as shown. However,
messages originating from other sources will differ. For example, those originating from a
DIGIDIM push-button panel will typically show a type return of 61. These variations are for
internal use by DIGIDIM components and are of no consequence to AV control. If return
messages are to be processed, it is recommended that the exact content of the reply type
byte is ignored.
Data formats
Some third party AV interface equipment display received data in different formats to
hexadecimal, and may even display received bytes in different formats, dependent upon
the data value. In such cases, the displayed data may appear to be a mixture of
hexadecimal and other formats, such as ASCII. This is entirely a function of the third party
equipment and the user should ascertain the details from the third party vendor.
As an example:
Transmit 03 51 01 10
Return 03 64 01 10
Displayed Return 03 d
01 10
(d = ASCII for hex 64)
In general, data bytes only within the range of 20h to 7Fh will be converted to the ASCII
character. The standard conversion will be as per the table below, but confirmation should
be gained from the third party vendor.
HEX
-0
-1
-2
-3
-4
-5
-6
-7
-8
-9
-A
-B
-C
-D
-E
-F
2-
SP
!
‘
#
$
%
&
’
(
)
*
+
,
-
.
/
3-
0
1
2
3
4
5
6
7
8
9
:
;
<
=
>
?
4-
@
A
B
C
D
E
F
G
H
I
J
K
L
M
N
O
5-
P
Q
R
S
T
U
V
W
X
Y
Z
[
\
]
^
_
6-
‘
a
b
c
d
e
f
g
h
i
j
k
l
m
n
o
7-
p
q
r
s
t
u
v
w
x
y
z
{
|
}
~
del
Note:
Doc. No. 7860076
For more detailed listing of commands, refer to document ‘RS232 to DALI
Command List’ (7860077).
Page 13
Issue 8
Digidim 503AV / 505 RS232 AV Interface User Guide
Helvar Ltd
8.2. Touch Screen Commands
The touch screen panel has been given the controls shown. The commands associated with these are shown below.
Destination of action
LIGHTS
LIGHTS
ON
ON
Select Scene 1 in Group 1
Interface instruction
Group Address
Command Data
03 51
100 0000 1
= 81 hex
0001 0000
= 10 hex
0001 0001
= 11 hex
PRES
1
Select Scene 2 in Group 1
03 51
100 0000 1
= 81 hex
PRES
2
Select Scene 3 in Group 1
03 51
100 0000 1
= 81 hex
0001 0010
= 12 hex
0001 0011
= 13 hex
0000 0000
= 00 hex
PRES
3
Select Scene 4 in Group 1
03 51
100 0000 1
= 81 hex
LIGHTS
LIGHTS
OFF
OFF
Select OFF in Group 1
03 51
100 0000 1
= 81 hex
Destination of action
Interface instruction
Group Address
03 51
100 0001 1
= 83 hex
0000 0001
= 01 hex
Group 2 lights DOWN
03 51
100 0001 1
= 83 hex
0000 0010
= 02 hex
Bargraph to adjust
address 4 to a
direct level
Interface instruction
03 51
Short Address
0 000011 0
= 06 hex
WALL
WASH
TABLE
POWER
LIGHTS
ON
OHP
ON
OHP
OFF
PRES
1
DISP
ON
DISP
OFF
PRES
2
PROJ
ON
PROJ
OFF
S/O
ON
S/O
OFF
Command Data
Group 2 lights UP
Destination of action
SCENES
PRES
3
LIGHTS
OFF
Command Data
LLLL LLLL
=00 to FE hex
Example code is in attached files
Destination of action
OHP
ON
Turn address 5 ON
(Recall MAX level)
OHP
OFF
Interface instruction
Short Address
Command Data
03 51
0 000100 1
= 09 hex
0000 0101
= 05 hex
Turn address 5 OFF
03 51
0 000100 1
= 09 hex
0000 0000
= 00 hex
DISP
ON
Turn address 6 ON
(Recall MAX level)
03 51
0 000101 1
= 0B hex
0000 0101
= 05 hex
DISP
OFF
Turn address 6 OFF
03 51
0 000101 1
= 0B hex
0000 0101
= 00 hex
PROJ
ON
Turn address 7 ON
(Recall MAX level)
03 51
0 000110 1
= 0D hex
0000 0101
= 05 hex
PROJ
OFF
Turn address 7 OFF
03 51
0 000110 1
= 0D hex
0000 0000
= 00 hex
SCR
ON
Turn addresss 8 ON
(Recall MAX level)
03 51
0 000111 1
= 0F hex
0000 0101
= 05 hex
SCR
OFF
Turn address 8 OFF
03 51
0 000111 1
= 0F hex
Destination of action
Turn everything OFF
Interface instruction
03 51
Broadcast Address
1111111 1
= FF hex
TOUCH SCREEN
Full list of common DALI messages are contained in document:
“RS232 to DALI command list 7860077.pdf”
Example files for AMX and Crestron based on the solution above
are available from the 503 CD; File’s AMX DALI demo and Crestron DALI demo.
0000 0101
= 00 hex
Command Data
0000 0000
= 00 hex
TOUCH SCREEN
Figure 3: Touch Screen Controls
Doc. No. 7860076
Page 14
Issue 8